

Page 1

Operation Manual
lawn trimmer
61495, 61496
Read and follow the operating instructions and safety information before using for the first time.
Technical changes reserved!
Due to further developments, illustrations, functioning steps and technical data can differ
insignificantly.
Updating the documentation
If you have suggestions for improvement or have found any irregularities please contact us.
© by WilTec Wildanger Technik GmbH Seite 20
http://www.WilTec.de
http://www.aoyue.eu
http://www.teichtip.de
Page 2

The information contained in this document is subject to change without prior notice. No part of this
document can be copied or duplicated in another form without the prior written consent of WilTec
Wildanger Technik GmbH. The WilTec Wildanger Technik GmbH assumes no liability for any errors in
this user manual or the connection diagram.
Although WilTec Wildanger Technik GmbH has made every effort to make sure that this user manual
is complete, accurate and updated, errors cannot always be avoided. In the event of problems with
this user manual please complete and send this form back to us.
FAX-notification (+++49 2403 55592-15),
from: ________________________________________
Name: ________________
Firm:_____________________
Tel/Fax:__________________
I would like to report the following mistakes:
_______________________________ ____________________________________
Customer Service WilTec Wildanger Technik GmbH
e-mail: [email protected]
Tel:++ +49 2403 55592-0
Introduction
Thank you for purchasing this quality product. To minimize the risk of injury by means of fire or
electric shock we urge that our clients take some basic safety precautions when using this
device. Please read the operation instructions carefully and make sure you have understood its
content.
Always use a grounded power connection with the appropriate mains voltage. You can find the
corresponding mains voltage on the type plate. If you have any doubts about the connection being
grounded, have it checked by a qualified professional. Never use a faulty electric cable.
Do not inspect the electrical part of the pressure pond filter in a wet or damp environment or when you
are wet yourself and protect it from direct sunlight. Install this device in a safe location so that nobody
can step on the cable, fall over or damage it. Disconnect the power plug before cleaning it and use
only a damp cloth for cleaning. Avoid using cleaning agents and make sure that no liquid enters the
electrical part of the pump.
The electric part of the device contains no parts that can be inspected or serviced by the user. Leave
the maintenance, adjustment and repair to qualified technical personnel. In case of unauthorised
intervention the 2-year warranty is no longer valid! Keep these operation instructions safe.
© by WilTec Wildanger Technik GmbH Seite 21
http://www.WilTec.de
http://www.aoyue.eu
http://www.teichtip.de
Page 3

Notes on types of warnings in the manual
This mark indicates instructions which must be followed in order to prevent accidens
which could lead to serious bodily injury or death.
This mark indicates instructions which must be followed, or it leads to mechanical failure, breakdown, or damage.
This mark indicates hints or directions useful in the use of the product.
Contents
1. Warning Labels on the machine
2. Parts location
3. Symbols on the machine
4. Safety precautions
5. Set Up
6. Fuel
7. Operation
8. Maintenance
9. Specification
1. Warning label on the machine
(1) Read owner‘s manual before operating this machine
(2) Wear head, eye and ear protection
(3) Warning/Attention
(4) Keep all persons 15 meters away from the brush cutter
© by WilTec Wildanger Technik GmbH Seite 22
http://www.WilTec.de
http://www.aoyue.eu
http://www.teichtip.de
Page 4
If warning seals peel off or become soiled and impossible to read, you should contact
the dealer from which you purchased the product to order new seals and affix the
new seal in the required location.
Never remodel your brush cutter. We won‘t warrant the machine, if you use the remodeled brush cutter or you don‘t observe the proper usage written in the manual.
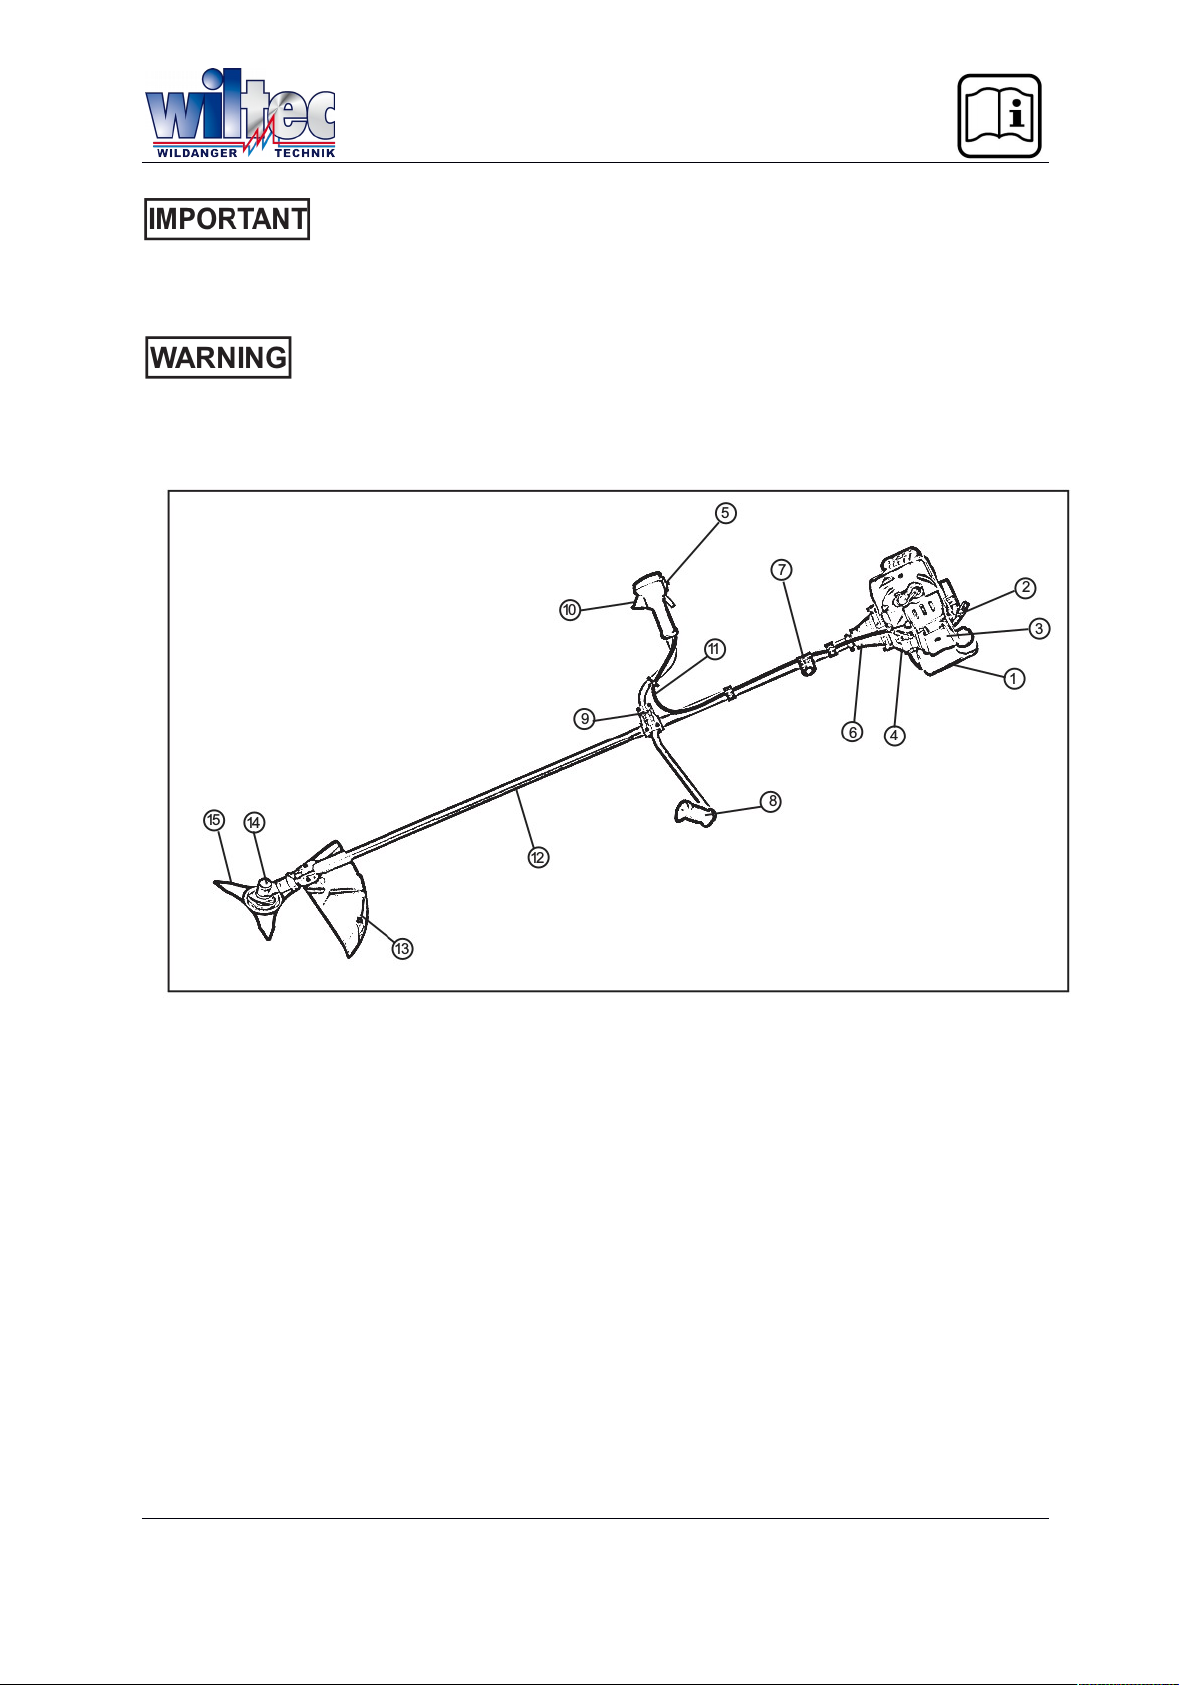
2. Parts Location
1. Fuel tank
2. Starter
3. Air cleaner
4. Stand
5. Engine switch button
6. Housing
7. Hanger
8. Handle
9. Hale bracket
10. Throttle lever
11. Throttle cable
12. Outer pipe
13. Safety guard
14. Gear case
15. Blade
© by WilTec Wildanger Technik GmbH Seite 23
http://www.WilTec.de
http://www.aoyue.eu
http://www.teichtip.de
Page 5
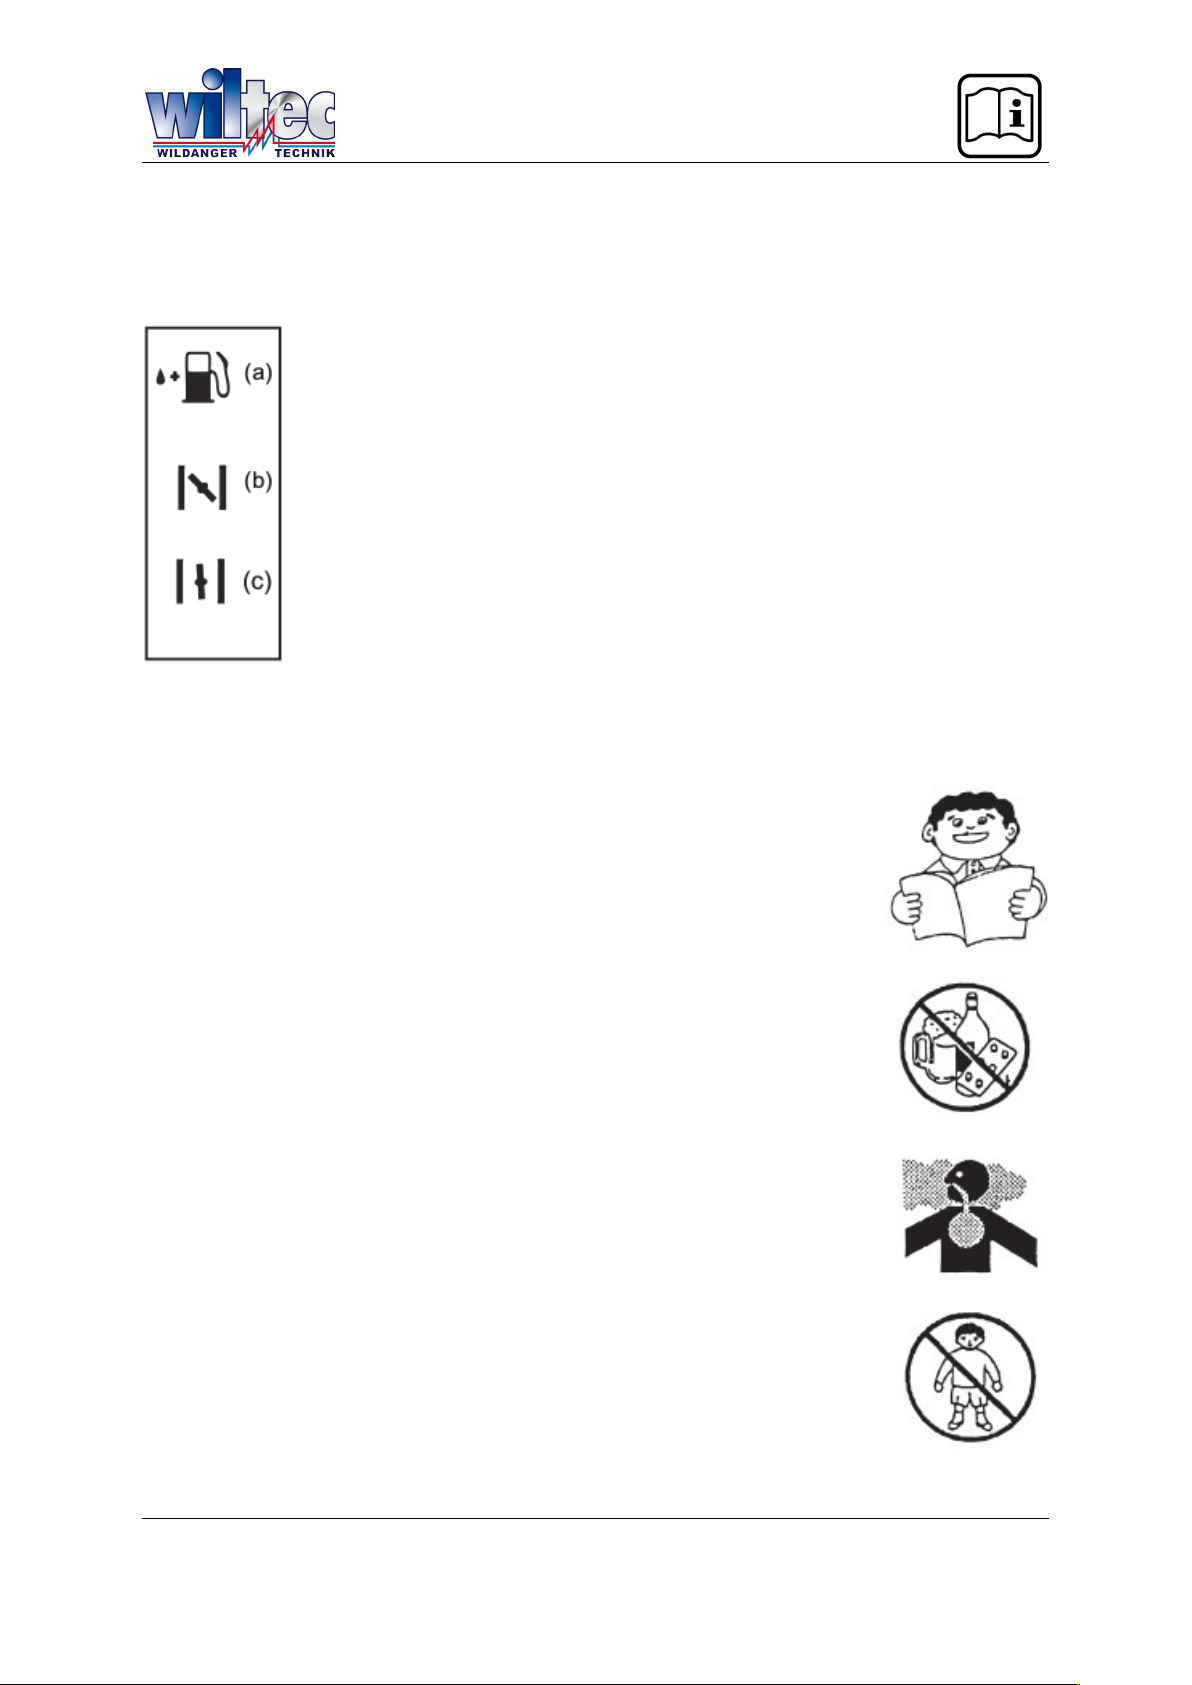
3. Symbols on the machine
For safe operation and maintenances, symbols are carved in relief on the machine.
According to these indications, please be careful not to make a mistake.
( a) The port to refuel the „MIX GASOLINE“
Position: fuel tank cap
( b) The direction to close the choke
Position: AIR CLEANER COVER
( c) The direction to open the choke
Position: AIR CLEANER COVER
4. Safety Precautions
Before using the device
a. Read this owner‘s manual carefully to understand how to operate
this unit properly
b. This product has been designed for use in cutting grass, ad it
should never be used for any other purpose.
c. You should never use the product when under the influence of alcohol, when suffering from exhaustion or lack of sleep.
d. Avoid running the engine indoors. The exhaust gases contain
harmful carbon monoxide
e. Never use the product under circumstances like those described
below:
1. When the ground is slippery or when other conditions exist which
might make it not possible to maintain a steady posture
2. At night, at times of heavy fog, or at any other times when your
field of vision might be limited and it would be difficult to gain a clear
view of the area.
3. During rain storms, during lightning storms, at times of strong or
gale- force winds, or at any other times when weather conditions
might make it unsafe to use this product.
f. When using this product for the first time, learn to handle it from
skilled worker.
g. Lack of sleep, tiredness, or physical exhaustion results in lower attention spans, and this in turn leads to accidents and injury. Limit the
amount of time of using the machine continuously to somewhere
around 10 minutes per session and take 10~20 minutes of rest between work-sessions.
© by WilTec Wildanger Technik GmbH Seite 24
http://www.WilTec.de
http://www.aoyue.eu
http://www.teichtip.de
Page 6
Also try to keep the total amount of work performed in a single day under 2 hours or
less.
1. Be sure to keep this manual handy so that you may refer to it later whenever any
questions arise.
2. Never allow children or anyone unable to fully understand the directions given in
this manual to use this brush cutter.
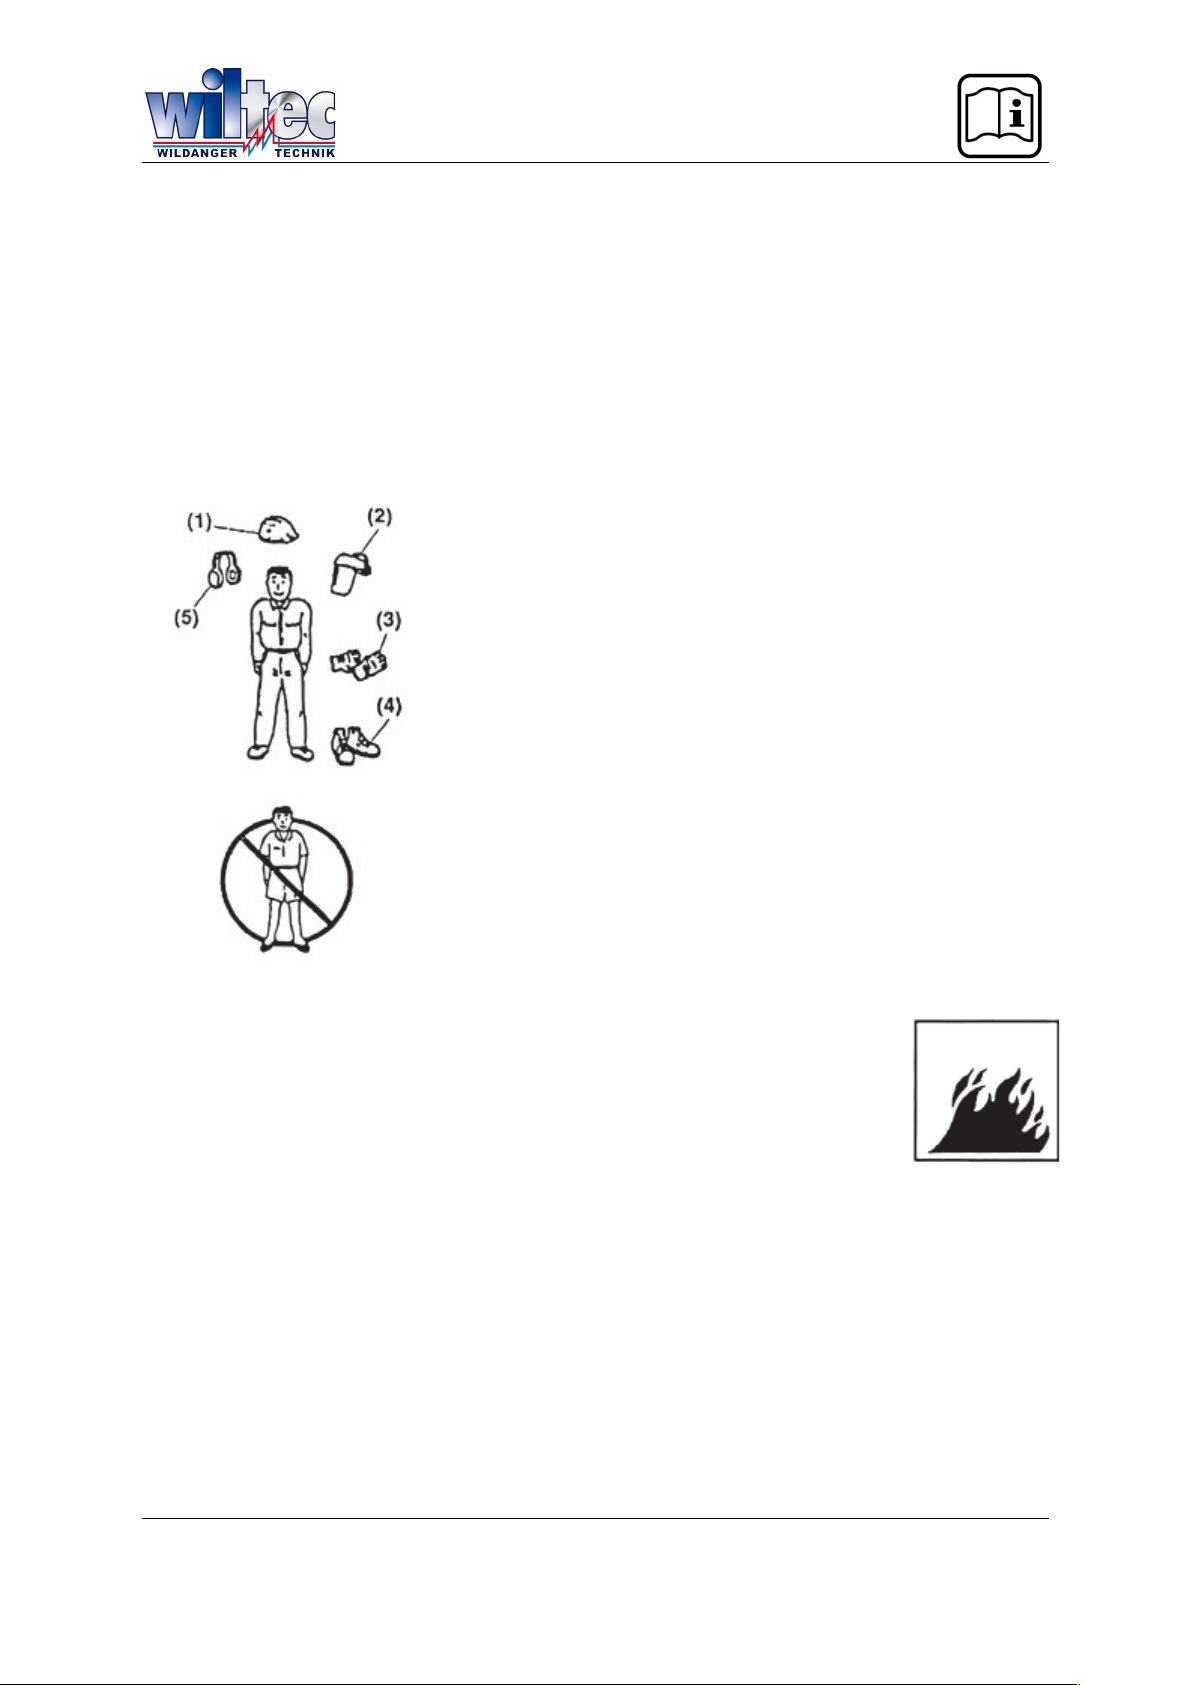
Working gear and clothing
a. When using the product, you should wear proper clothing
and protective equipments as follows.
( 1) Helmet
( 2) Protection goggles or face protector
( 3) Thick work gloves
( 4) Non-slip-sole work boots
( 5) Ear protectors
b. And you should carry with you
1. Description
2. Properly locked fuel tank
3. Spare blade
4. Things to notify your working area (shutter band,
warning signs)
c. Never use the product when wearing pants with loose
cuffs, when wearing sandals, or when barefoot.
Working considering handling of fuel
a. The engine of this product is designed to run on a mixed fuel which
contains highly flammable gasoline. Never store cans of fuel or refill
the fuel tank in any place where there is a boiler stove, wood fire, electrical sparks, welding sparks, or any other source of heat or fire which
might ignite the fuel.
b. Smoking while operating the product or refilling its fuel tank is extremely dangerous. Always be sure to keep lit cigarettes away from the product at all times.
c. When refilling the tank always turn off the engine first and take a careful look
around to make sure that there are no sparks or open flames anywhere nearby before refueling.
d. If any fuel spillage occurs during refueling, use a dry rag to wipe up spills before
turning the engine back on again.
e. after refueling, screw the fuel cap back tightly onto the fuel tank and then carry the
product to a spot 3 m or more away from where it was refueled before turning on the
engine.
© by WilTec Wildanger Technik GmbH Seite 25
http://www.WilTec.de
http://www.aoyue.eu
http://www.teichtip.de
Page 7

Things to check before using your brushcutter
a. Before beginning work, look around carefully to get a feel for the shape of the land
or grass to be trimmed and whether or not there are any obstacle which might get in
the way white working, and remove any obstacles,
which can be cleared away.
b. The area within a perimeter of 15m of the person using the brush cutter should be considered a hazardous
area into which no one should enter while the brush
cutter is in use, and when necessary yellow warning
rope, warning signs should be placed around the work
area. When work is to be performed simultaneously by
two or more persons always check the presence and
locations of others so as to maintain a distance each
person.
c. Make sure that there are no loose screws or bolts.
fuel leaks, ruptures, dents, or
any other problems, which might interfere with safe operation. Be especially careful to check that there is
nothing wrong with the blades or with the joints by
which the blades are attached to the brush cutter.
d. Never use blades that are bent, warped, cracked,
broken or damaged in any way.
e. Keep the blade always sharp.
f. Filling the cutting edges, keep the end corner sharp
and round the root of the edge.
g. Check the boll to fasten the blade and be sure the
blade turns smoothly without abnormal noise.
Notes on starting the engine
1. Take a careful look around to make sure that no obstacles exist within a perimeter
of 15m or less around brush cutter.
2. Place the body of the brush cutter onto the ground in a flat clear area and hold it
firmly in place so as to ensure that neither the blades nor the throttle come into contact with any obstacles when the engine starts up.
3. Place the throttle into the idling position when starting the engine.
4. After starting up the engine, if the blades continue to rotate even after the throttle
has been moved fully back, turn off the engine and check the throttle wire and other
parts.
Kickback safety precautions
A dangerous reaction may occur when the spinning blade contacts a solid object in
the critical area. It is called kickback. as a result, the operator can lose control of the
unit, which can cause serious or fatal injury. Avoid kickback, observe the safely precautions below strictly:
© by WilTec Wildanger Technik GmbH Seite 26
http://www.WilTec.de
http://www.aoyue.eu
http://www.teichtip.de
Page 8

1. Before beginning work, clear your working area.
2. When using your brush cutter do not grip other parts except the handles.
3. When using your brush cutter never take your eyes off, if you need to place
the throttle into the idling position.
4. When using your brush cutter do not let the unit get close to your feet nor
raise the unit above your waist
Transportation
1. Make sure the appropriate blade cover is in place.
2. When transporting by car fix the unit firmly using a rope, do not transport by bicycle or motorcycle because it is dangerous.
3. Never transport the brush cutter over rough roads over long distances without first
removing all fuel from the fuel tank, as doing so might cause fuel to leak from the
tank.
Operation safety precautions
1. Grip the handles of the brush cutter firmly with both hands. If you suspend the
work, place the throttle into the idling position.
2. Always be sure to maintain a steady even posture while working.
3. Maintain the speed of the engine at the level required to perform
cutting work and never raise the speed of the engine above the
level necessary.
4. If the grass gets caught in the blade during operation or if you
need to check the unit or refuel the tank always be sure to turn off
the engine.
5. If the blade touches a hard object like a stone immediately stop
the engine and check if something is wrong with the blade. If so replace the blade by new one.
6. If someone calls out while working always be sure to turn off the
engine before turning around.
7. Never touch the spark plug or plug cord while the engine is in
operation. It may result in being subjected to an electrical shock.
8. Never touch the muffler spark plug or other metallic parts of the
engine while the engine is in operation or immediately after shutting down the engine. Doing so may result in serious burns.
9. When you finish cutting in one location and wish to continue
work in another spot turn off the engine and turn the unit as the
blade faces away from your body.
Maintenance safety precaution
1. Perform the maintenance and checking operations described in this manual at reg-
ular intervals. If any parts must be replaced or any maintenance or repair work not
described in this manual must be performed please contact a representative from the
store nearest authorized servicing dealer for assistance.
© by WilTec Wildanger Technik GmbH Seite 27
http://www.WilTec.de
http://www.aoyue.eu
http://www.teichtip.de
Page 9
2. Under no circumstances should you ever take apart the brush cutter or alter it in
any way. Doing so might result in the brush cutter becoming damaged during operation or the brush cutter becoming unable to operate properly.
3. Always be sure to turn off the engine before performing any maintenance or
checking procedures.
4. When sharpening removing the blade with proper tools and equipment to prevent
injury.
5. When replacing blade or any other parts or when replacing the oil or any lubricants
always be sure to use only products which have been certified by for use with the
brush cutter.
5. Set up
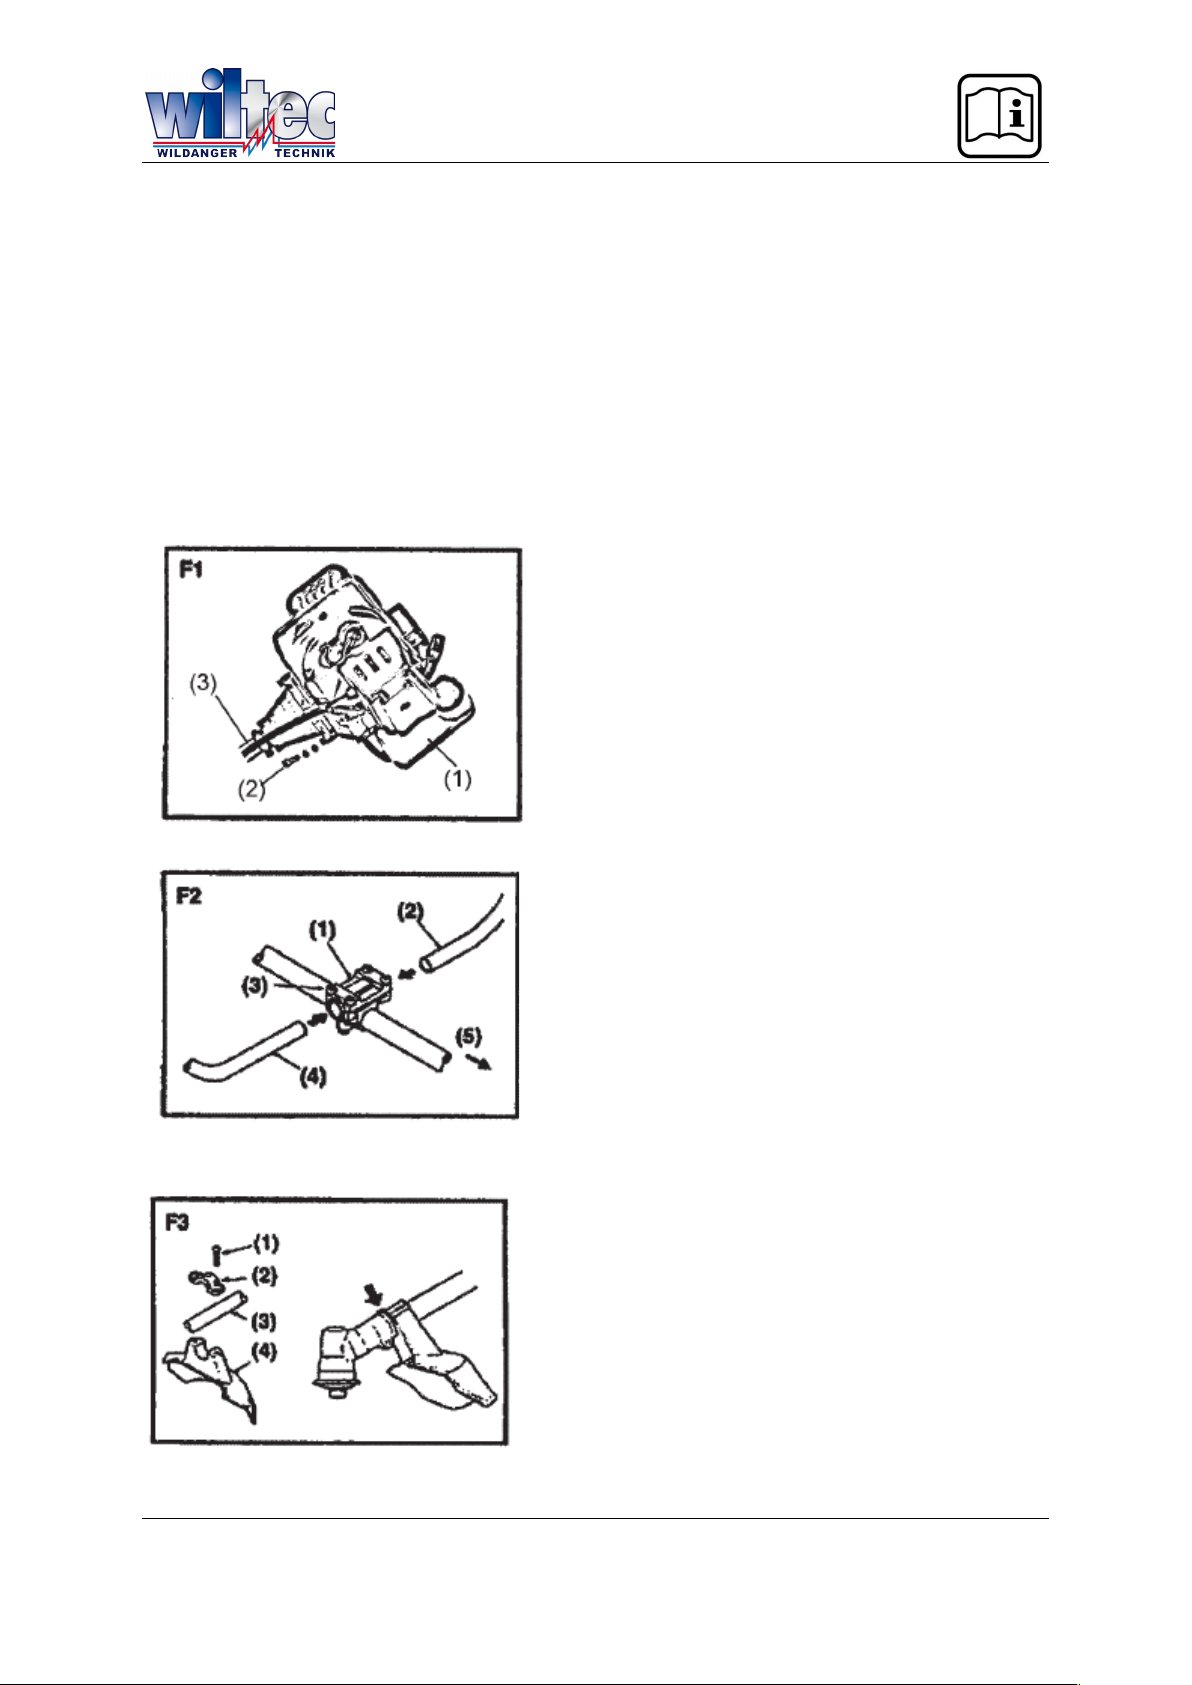
Engine and main pipe
Align the hanger and the fuel tank using attached 4 socket screws secure the connection firmly with equal force.(F1)
(1) Fuel tank
(2) Molt
(3) Main pipe
Handle
1.Loosen the 4 bolts on the handle bracket.(F2)
2.Insert the right handle (throttle lever is at-
tached) and the left handle assembly into the
bracket and retighten the bolts
securely.(F2)
(1) Handle bracket
(2) Right handle
(3) Bolt
(4) Left handle
(5) Engine side
Safety guard
Attach the safety guard to the gear case and fix it
with the clamp and 2 bolts (M5*25) securely.(F3)
(1) Bolt
(2) Clamp
(3) Main pipe
(4) Safety guard
© by WilTec Wildanger Technik GmbH Seite 28
http://www.WilTec.de
http://www.aoyue.eu
http://www.teichtip.de
Page 10
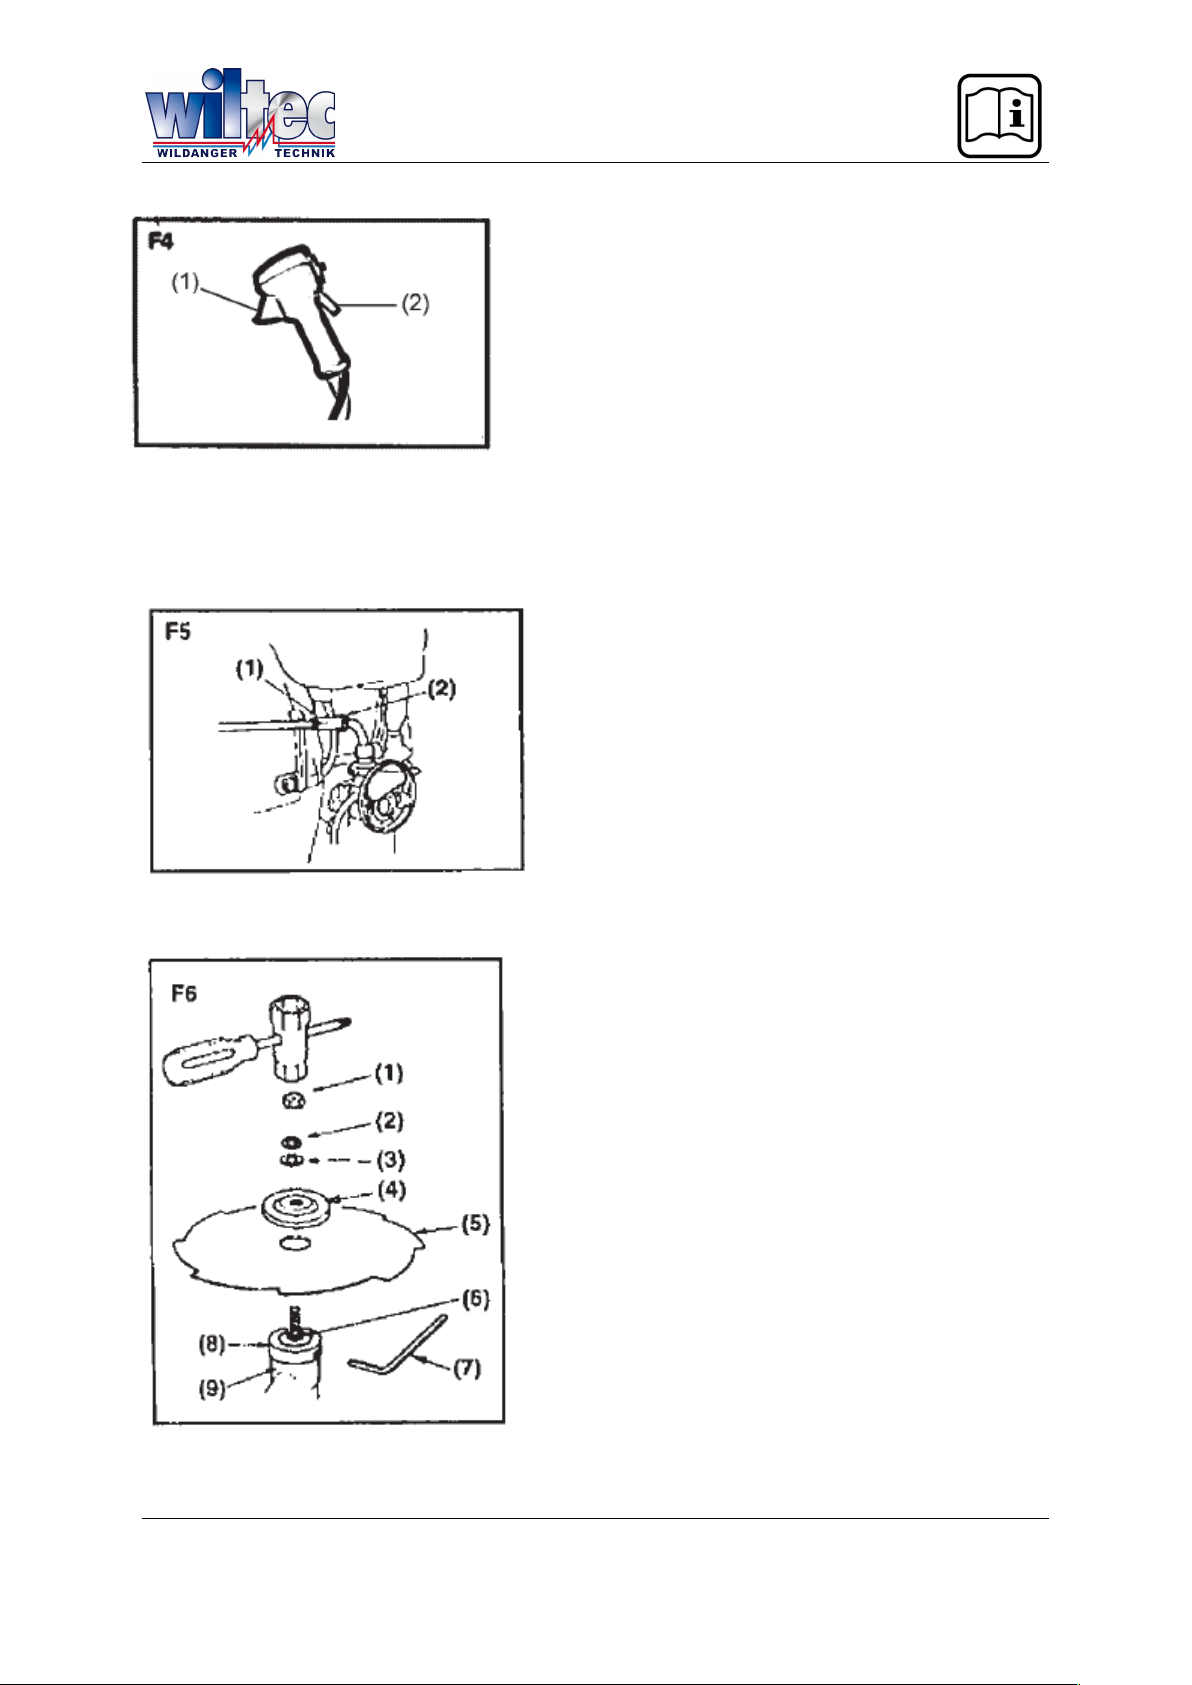
Throttle wire
After fitting up the wire make sure that the throttle
cable is put in the throttle lever. If not it is very dangerous because the engines rotate after releasing
the throttle.
1. Hook the cable end into the hole of the throttle
lever. And set the cable in the lever as shown in the
picture.(F4)
2. Wrap the band so as the throttle wire is fixed with
the handle.
(1) Hole
(2) Throttle cable
Adjusting the throttle cable
1. after releasing the throttle lever pull the throttle wire. The normal play is 1 or 2 mm when
measured at the carburetor side end.
2. If the play is short or long take off the air
cleaner cover loosen the lock nut and adjust the
play.(F5)
(1) Adjust nut
(2) Lock nut
Installing the metal blade (F6)
1. Set the inner holder to the gear shaft and fix
with the attached L-shaped bar.
2. Put the blade on the inner holder with letters to
the gear case and match correctly the hole of the
blade
to the projection of the inner holder.
3. Set the outer holder to the gear shaft with the
hollowed face to the blade.
4. Put the attached bolt cover on the outer holder
and secure it with the bolt (left screw) together
with the spring washer and the washer.
(1) Nut
(2) Spring Washer
(3) washer
(4) Outer holder
(5) Blade
(6) Gear shaft
(7) Bar
(8) Inner holder
(9) Gear case
© by WilTec Wildanger Technik GmbH Seite 29
http://www.WilTec.de
http://www.aoyue.eu
http://www.teichtip.de
Page 11
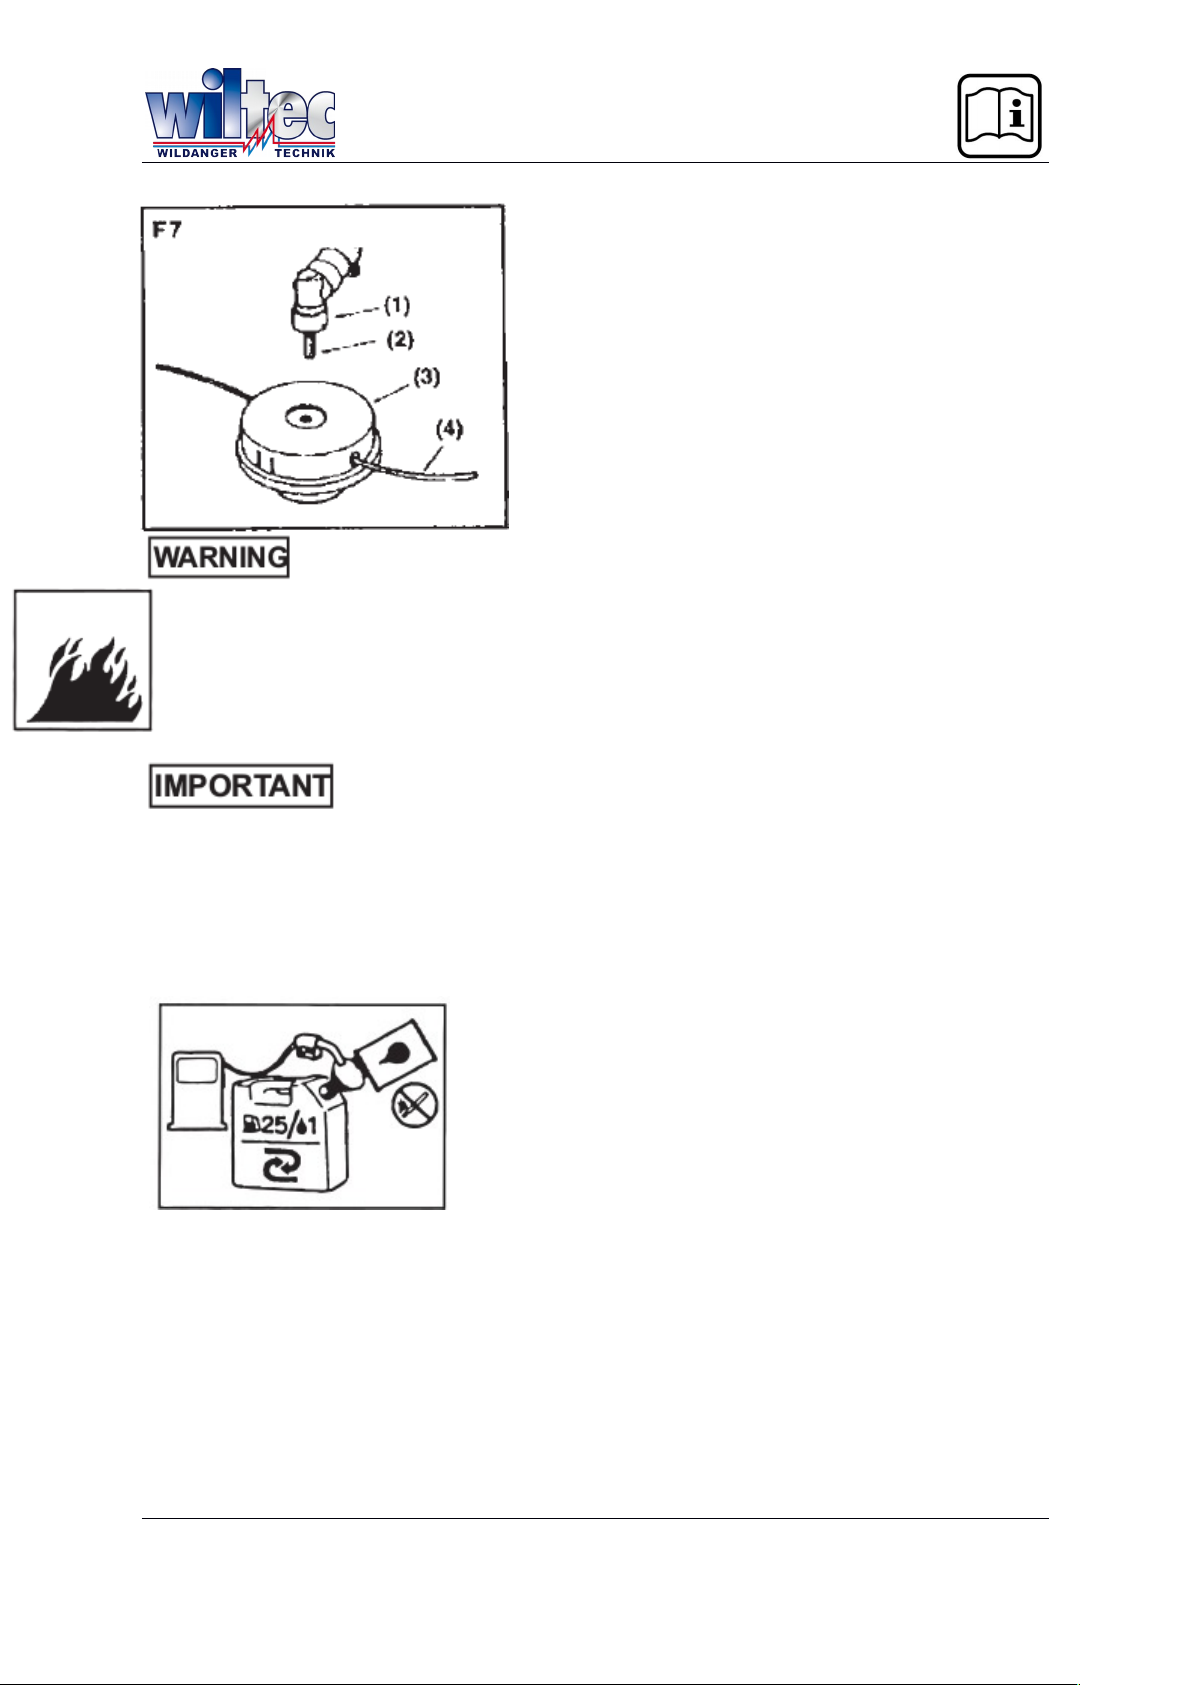
Installing the nylon cutter (Option) (F7)
1. Set correctly the inner and the outer holder to the gear shaft.
2. Screws the attached bold (M8 Left) into the gear shaft and secure it with the spanner.
3. Screw the nylon cutter into the bolt by fixing the inner holder with the L-shaped bar
and tighten it manually. Keep bolts and washers to install the blade carefully.
(1) Gear Case
(2) Bolt
(3) Nylon cutter
(4) Nylon cord
6. Fuel
- Gasoline is very flammable. Avoid smoking or bringing any flame or
- Wipe up all spills before starting the engine.
- Make sure to stop the engine and allow it cool before refueling the unit.
- Keep open flames away from the area where fuel is handled or stored.
- Never use oil for 4-cycle engine use or water cooled 2-cycle engine. It can
cause spark plug fouling exhaust port blocking or piston ring sticking.
- Mixed fuels which have been left unused for a period of one month or more
may clog the carburetor result in the engine failing to operate properly. Put remained fuel into an airtight container and keep it in the dark and cool room.
Mix a regular grade gasoline (leaded or unleaded) and a
quality-proven motor oil for air-cooled 2 cycle engines.
RECOMMENDED MIXING RATIO
GASOLINE 25 :OIL 1
© by WilTec Wildanger Technik GmbH Seite 30
http://www.WilTec.de
http://www.aoyue.eu
http://www.teichtip.de
Page 12
7. Operation
Starting the engine
- Before starting the engine inspect the entire unit for loose fittings or fuel leaks and
the
cutting attachment is properly installed and securely fastened.
- Place the unit on a flat firm place. Keep the cutting head clear of everything around it.
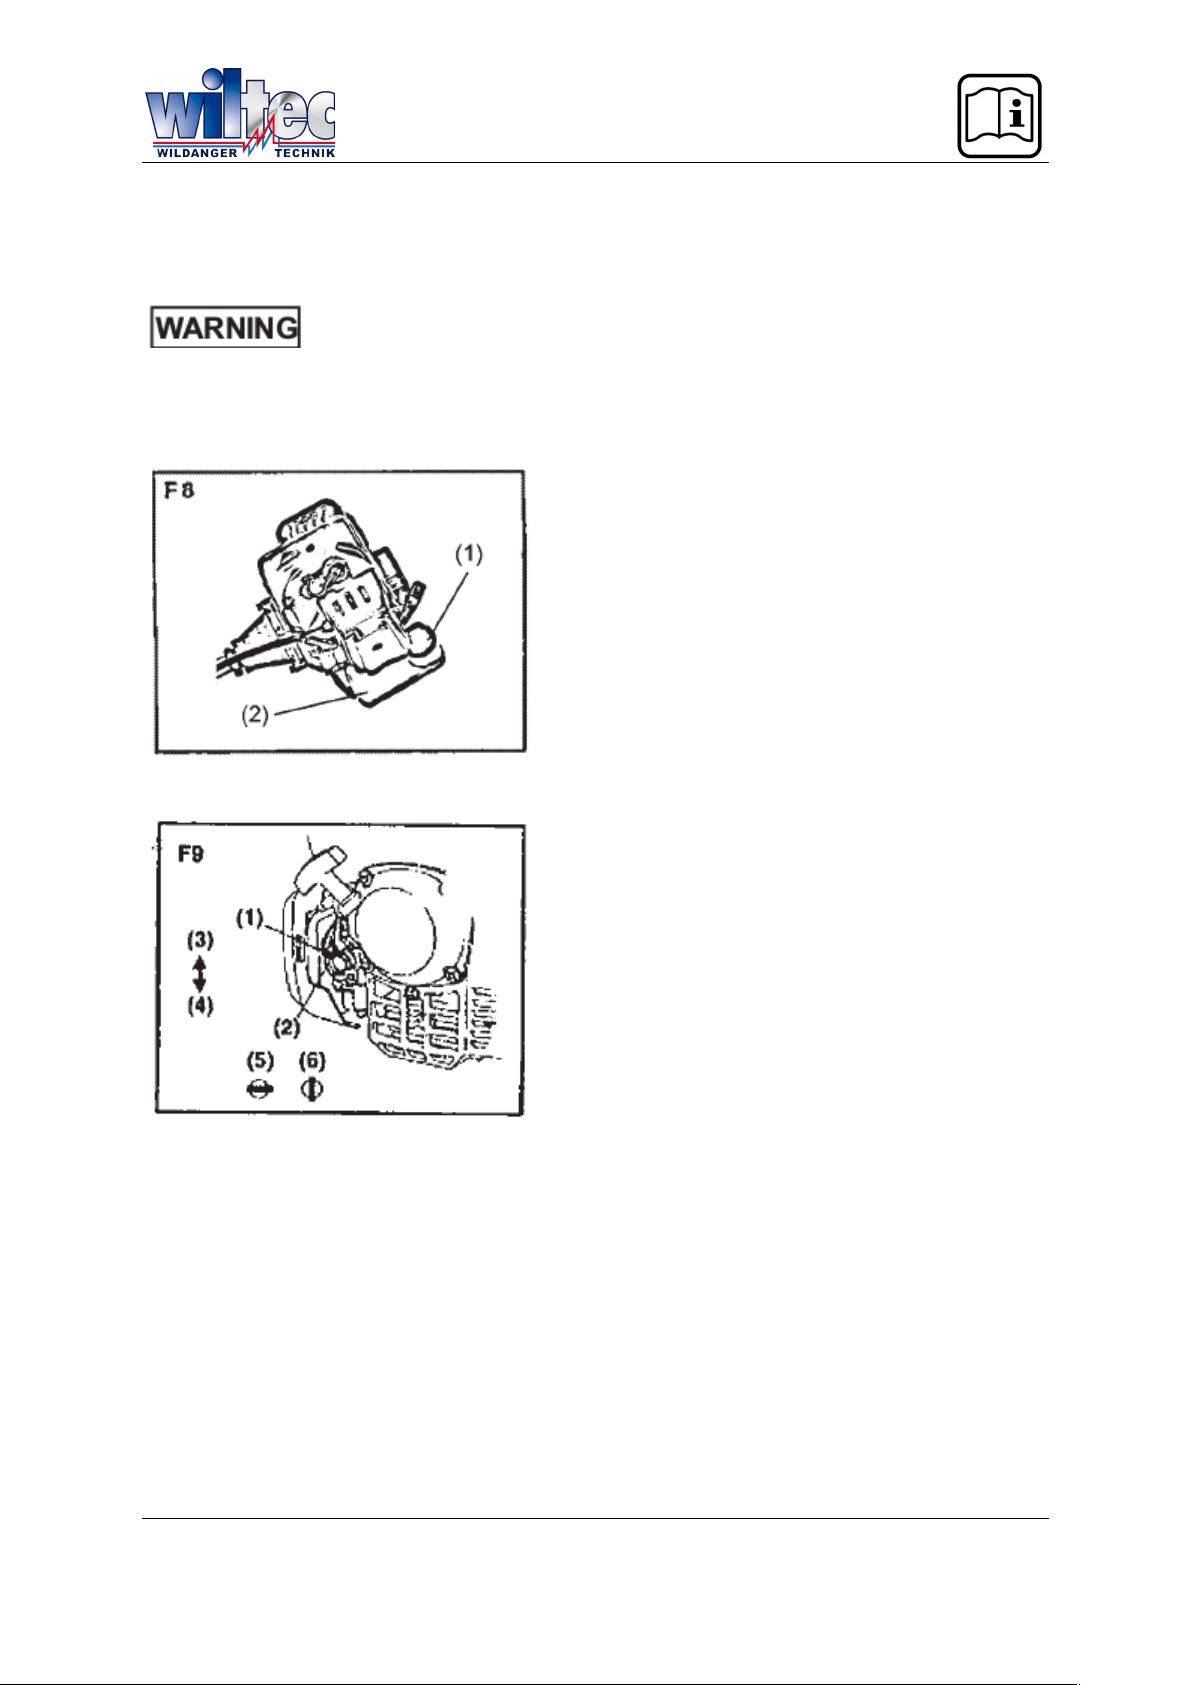
1. Turn the cap to the fuel tank to make sure that
it is fixed on tightly (F8)
(1) Cap
(2) Fuel tank
2. Open the fuel tank cock.(F9)
3. Move the choke lever to the closed position.
(F9)
(1) Choke lever
(2) Fuel cock
(3) Close
(4) Open
(5) Close
(6) Open
© by WilTec Wildanger Technik GmbH Seite 31
http://www.WilTec.de
http://www.aoyue.eu
http://www.teichtip.de
Page 13
When restarting immediately after stopping the engine move the choke lever to the
open position.
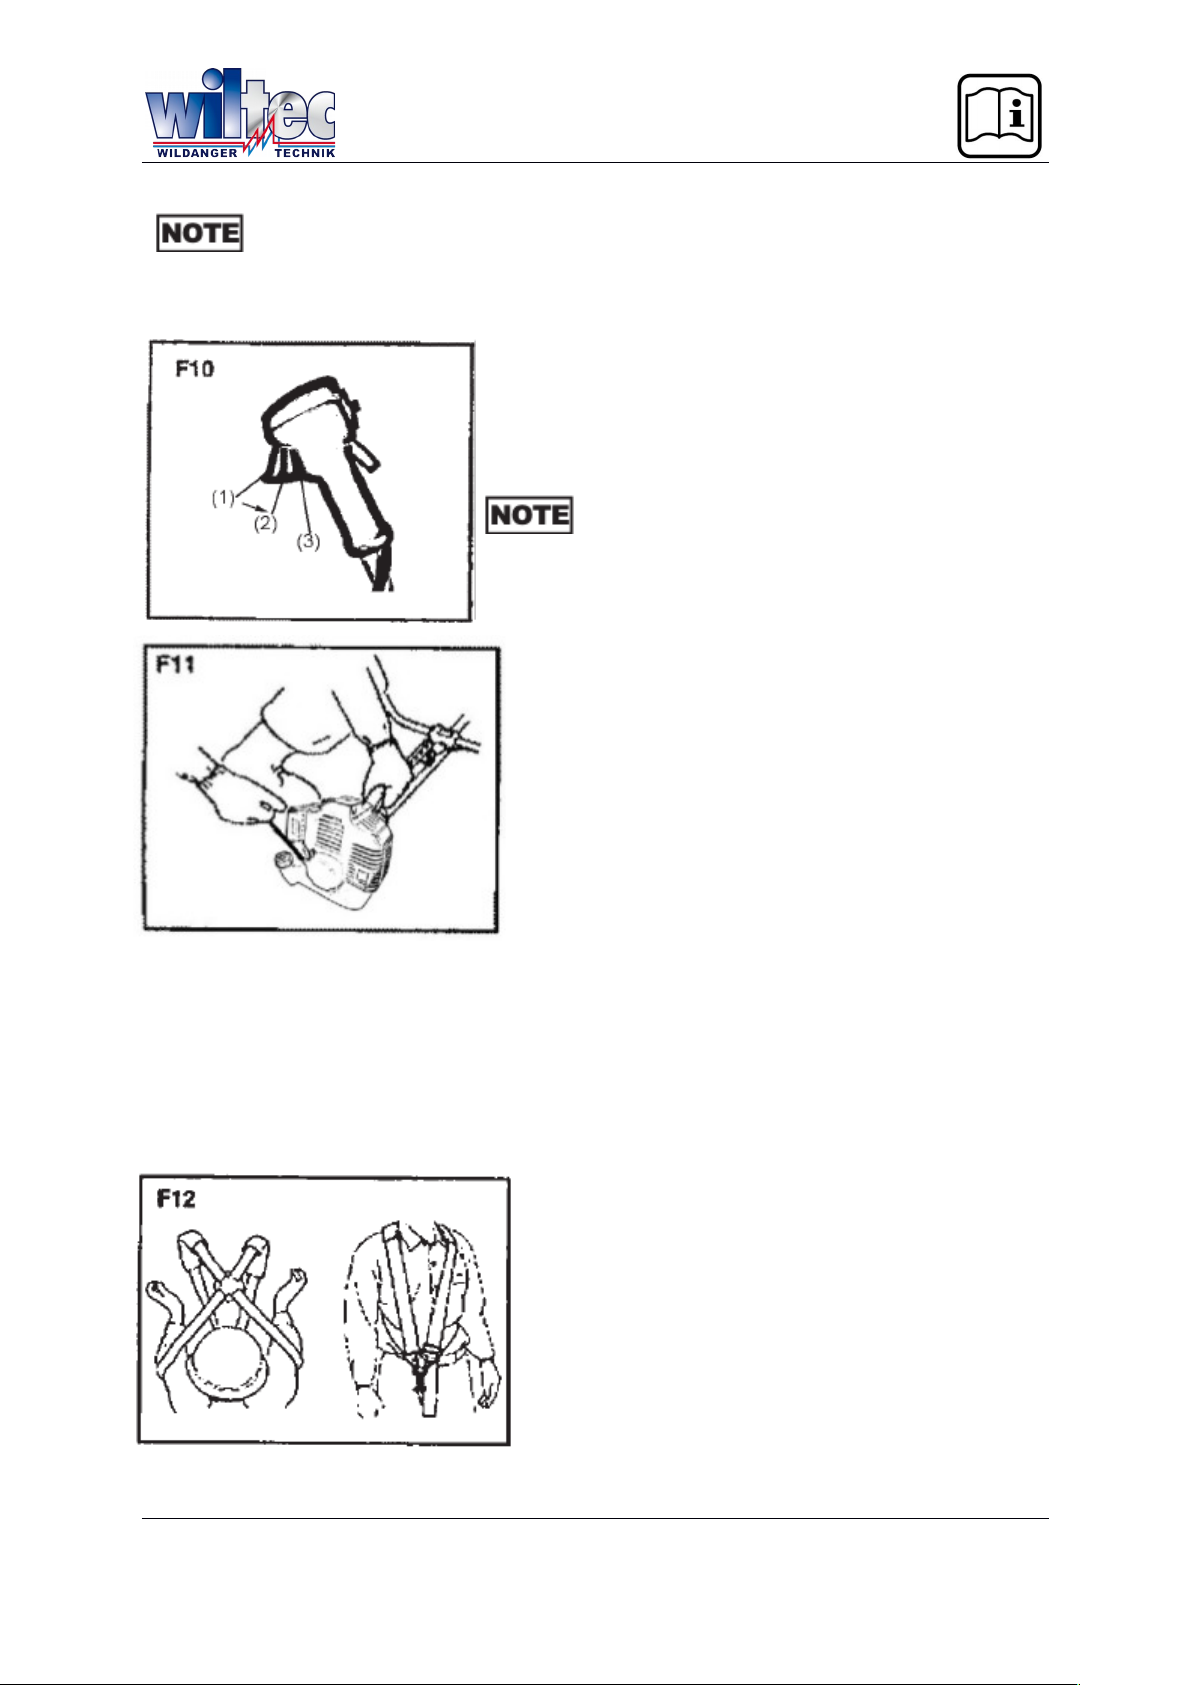
4. Set the throttle lever to the starting position.(F10)
(1) Idling
(2) Starting (1/3-1/2 open)
(3) Full throttle
When restarting immediately after stopping the engine move the throttle lever to the idling position.
5. While holding the unit firmly pull out the starter
rope quickly.(F11)
6. After the engine has started open the choke
gradually.
7. Allow the engine to run for 2 to 3 minutes to
warm up.
Stopping the engine
1. Return the throttle lever to the idling position.
2. Push the engine switch button.
Equipping the shawl band (F12)
1. Equip the attached shawl band.(F12)
2. Turn on the engine return the throttle lever to
the lowest speed position and put the shawl band
hook to the hanging part of the machine.
3. Adjust the length of the shawl band so that the
blade may be parallel to the ground in the working position. In order to prevent stack during operation turn up the extra part of the band from the
buckle.
© by WilTec Wildanger Technik GmbH Seite 32
http://www.WilTec.de
http://www.aoyue.eu
http://www.teichtip.de
Page 14
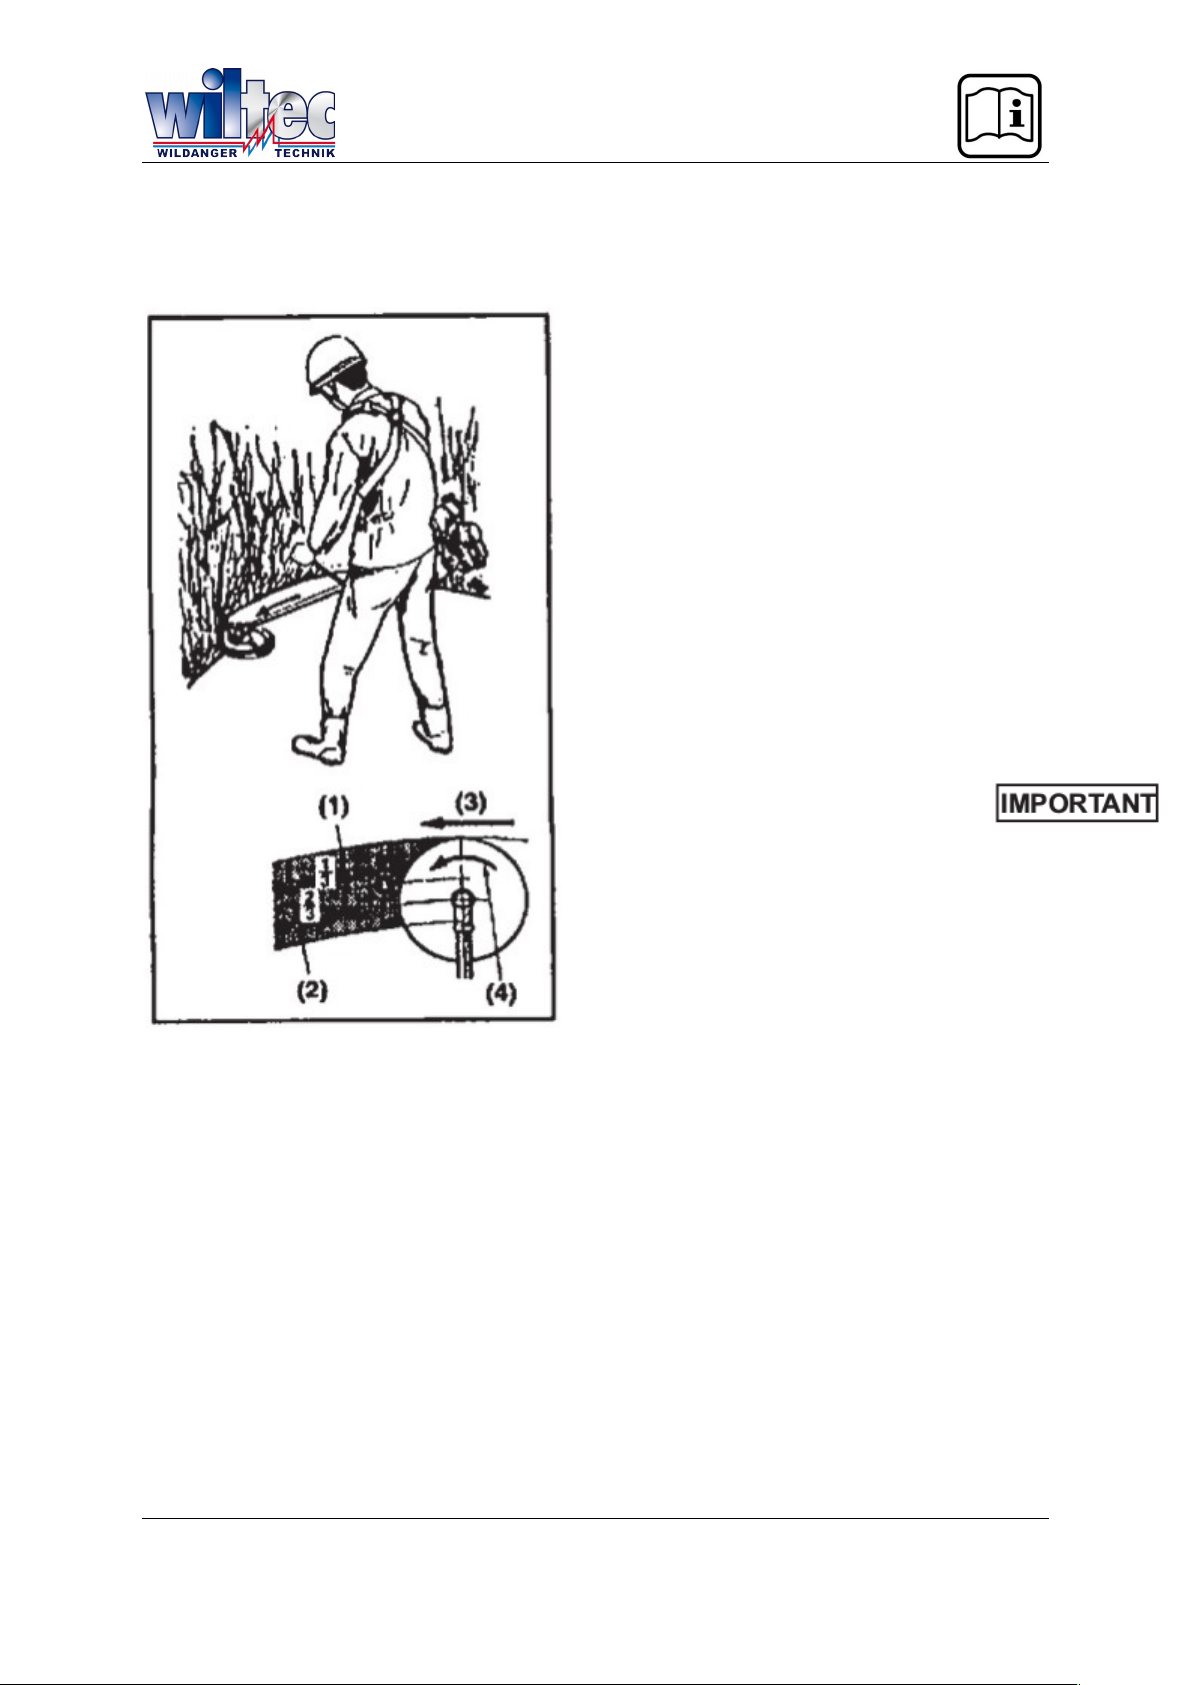
Cutting operation
Metal blade usage
- Always cut by guiding the head from your
right to left.
- A metal blade cut best up to the point 1/3
from the edge. Use that area for cutting
shrubs tough and thick weeds. For cutting
young grass you can use up to 2/3 from the
tip of blade.
- Adjust the engine speed according to the
cutting objects. Cutthe young grass
at middle speed and cut shrubs or tough and
thick weeds at high speed.
(1) For boughs and trees
(2) For grass and weeds
(3) Direction of cutting
(4) Direction of rotation
Operating at low speed make it easier for
grass weeds or twigs to caught up in the
blades and also it mokes the shaft and clutch
wear down more quickly.
Nylon cutter usage
- Nylon cord consumes large power. Please note that the engine rotation
should be in operation
- Nylon cutter cut grass with the power of cord rotation. If you try to cut grass
for the length of cord at one 50% as large as when using metal blade. time
rotation speed becomes lower due to resistance and you cannot cut well. In
case of large resistance get the nylon cutter away from grass once make the rotation speed higher and cut a small amount of grass at one time.
- If you try to cut grass by swinging the brush cutter in the reverse way (from
left to right) scraps fly in the direction away from the body, so you can avoid getting
your clothes dirty.
© by WilTec Wildanger Technik GmbH Seite 33
http://www.WilTec.de
http://www.aoyue.eu
http://www.teichtip.de
Page 15
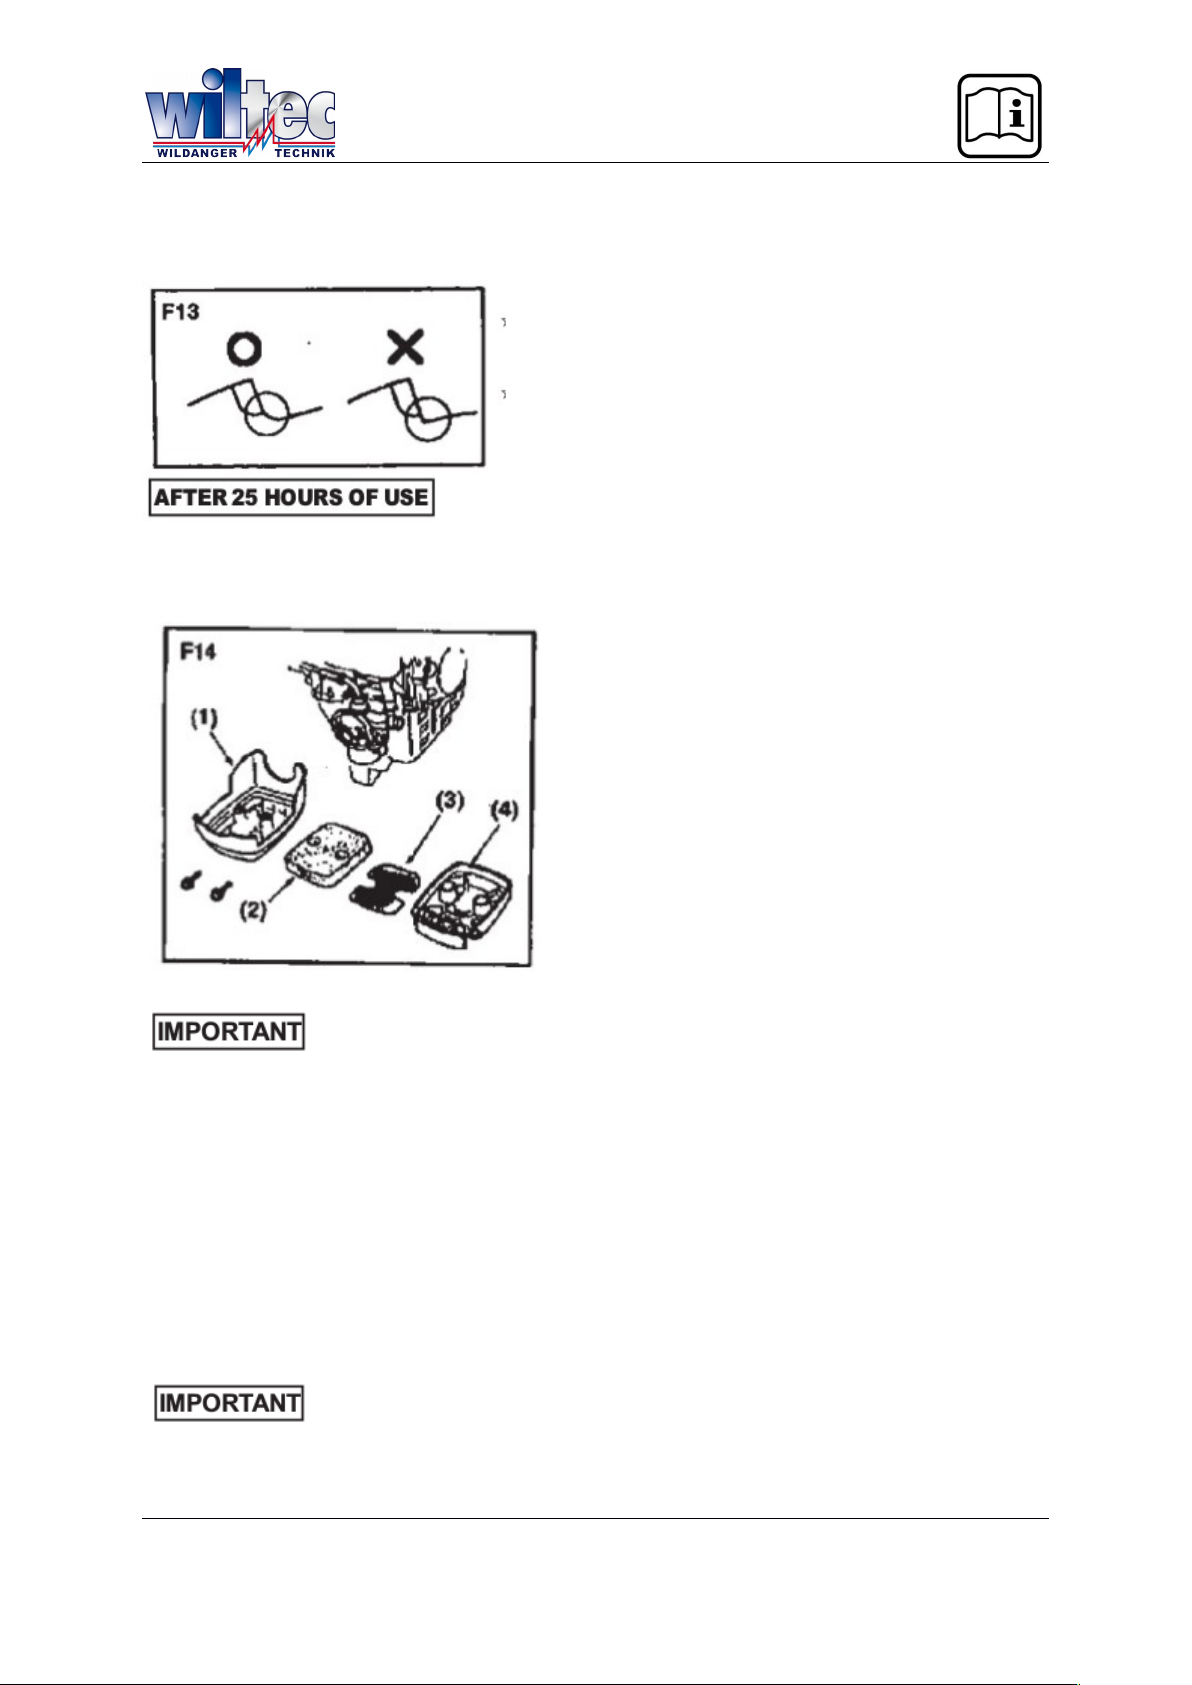
8. Maintenance
Blade
- Sharpen each cutting edge and make sure the bottom corner is
rounded.(F13)
- Do not cool the blade with water in case of using grinder. If may cause
cracks on blade.
Air cleaner
Check and clean the filter element in warm
soapy water if
required. Dry completely before installing. If the
element is broken or shrunk replace with a new
one. (F14)
(1) cover
(2) Element
(3) screen
(4) Body
A clogged air filter may increase fuel consumption while cutting down the engine
power.
If you operate the brush cutter without the air filter or with a deformed filter element
will quickly ruin the engine.
Fuel Filter
Take the filter out of the fueling port using a small wire hook. Disconnect the filter assembly from the fuel pipe and unhook the retainer to disassemble it. Clean the components with gasoline.
A clogged fuel fitter may cause poor acceleration of the engine.
© by WilTec Wildanger Technik GmbH Seite 34
http://www.WilTec.de
http://www.aoyue.eu
http://www.teichtip.de
Page 16
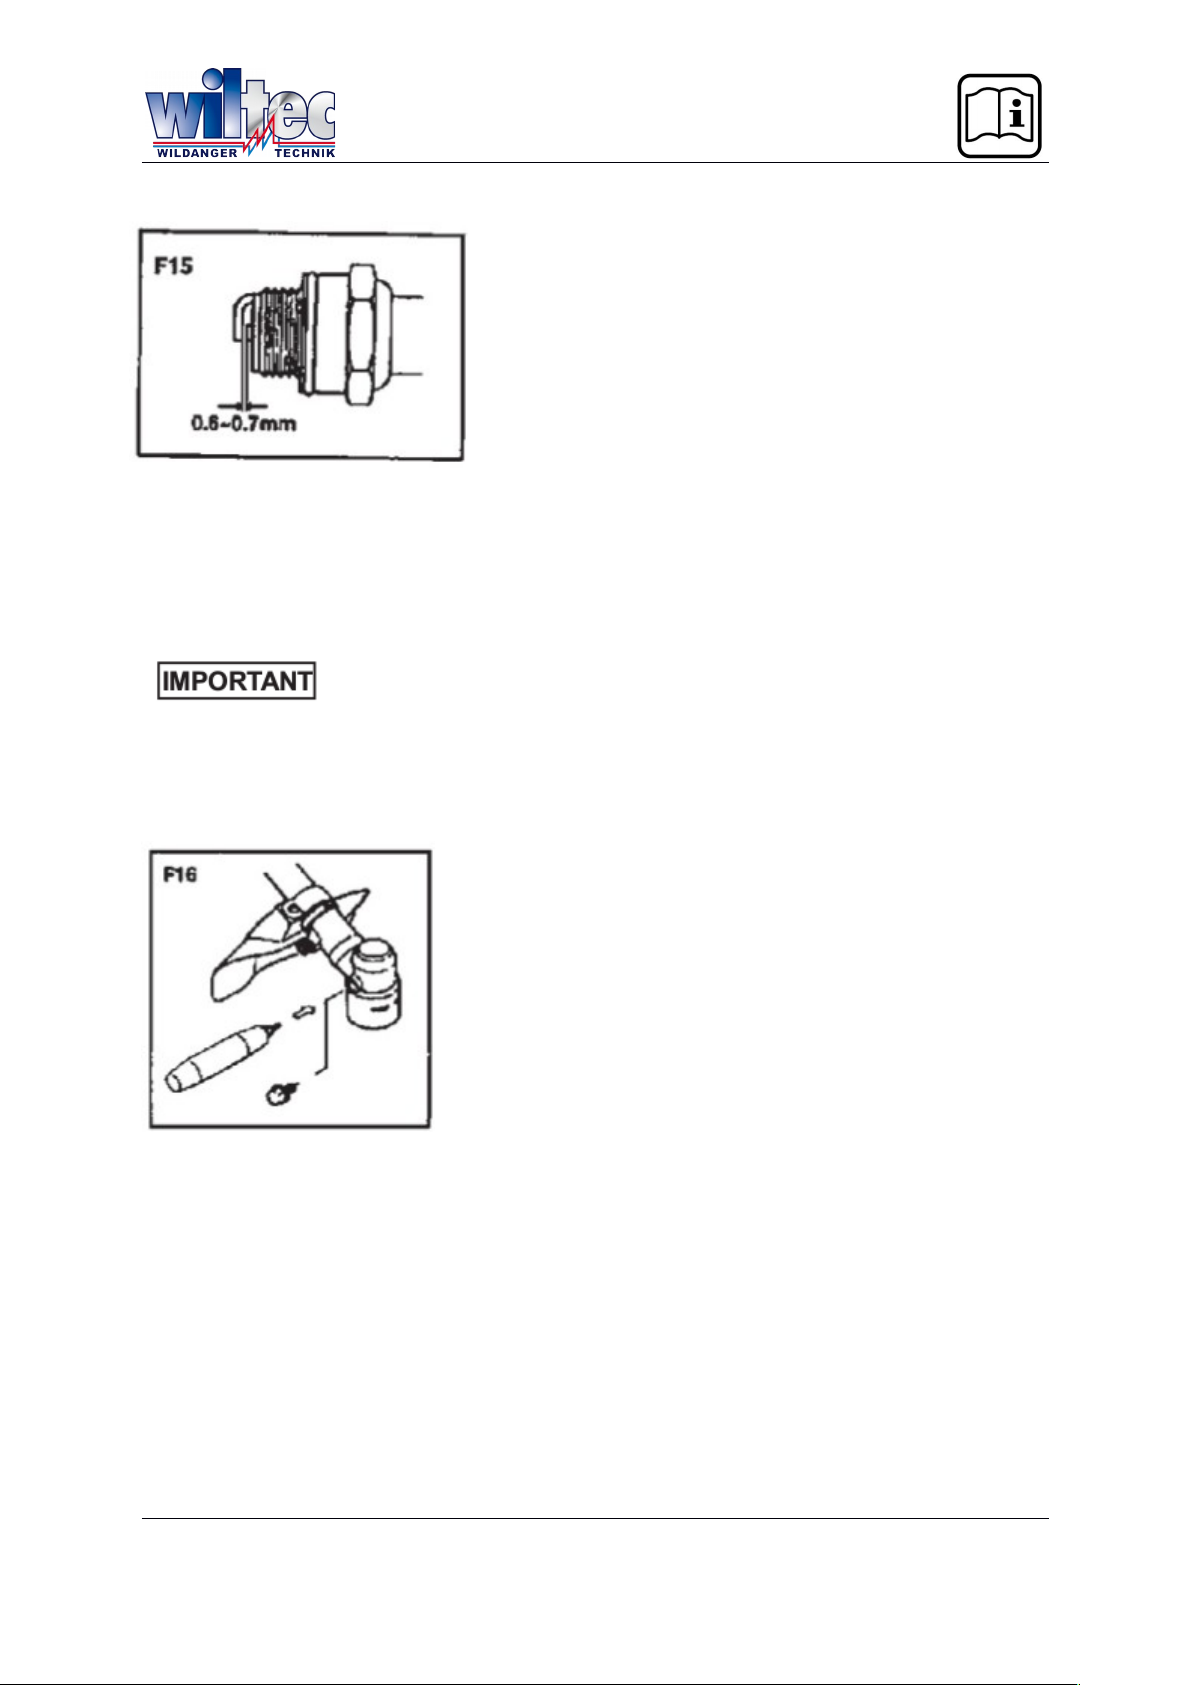
Spark plug
Remove and inspect the spark plug and clean the
electrodes if necessary with brush.
The spark gap should be adjusted to 0.6 - 0.7 mm. (F
15)
Intake air cooling vent
- Check the intake air-cooling vent and the area around the cylinder cooling
fins and remove any waste which has attached itself to the brush cutter.
- Note that failing to do so could cause the muffler to become overheated and
that this in turn could cause the brush cutter to catch on fire.
Gear Case
Supply multi-purpose grease at every 25 hours of use.
Remove the cutter holders to arrange for old grease.
(F16)
Muffler
1. Remove the muffler insert a screwdriver into the vent and wipe away any
carbon buildup. Wipe also away any carbon buildup on the muffler exhaust
vent.
2. Tighten all screws bolts and fittings.
3. check to see it any oil or grease has worked its way in between the clutch,
lining and drum and if it has, wipe it away. Using oil-free lead-free gasoline.
4. Remove the float cabin of the carburetor and clean the inside.
© by WilTec Wildanger Technik GmbH Seite 35
http://www.WilTec.de
http://www.aoyue.eu
http://www.teichtip.de
Page 17
Adjusting carburetor
A wrong adjustment may cause damage to your unit. If the engine does not
run well after adjusting the carburetor, please contact the shop where you purchased the pro duct.
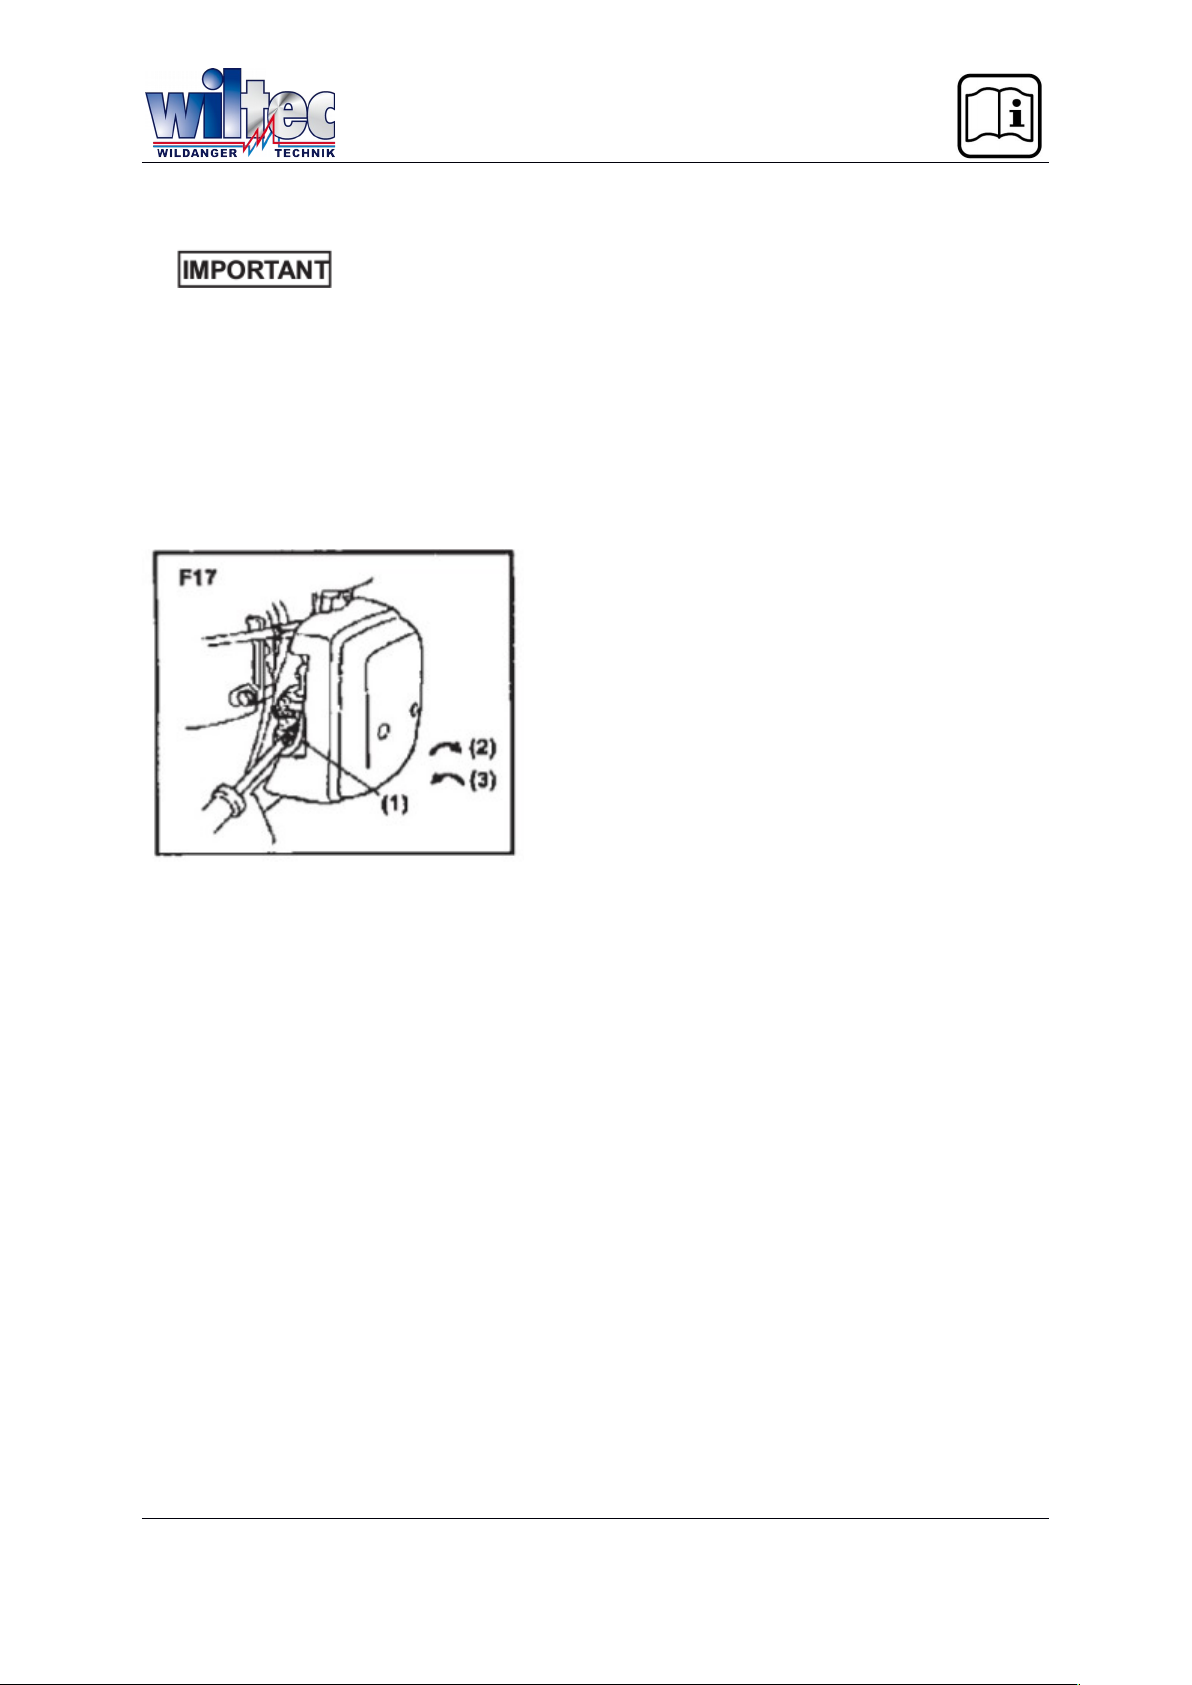
Idle adjustment screw (F17)
This is the screw to adjust the engine rotation when the throttle lever is set to
the
lowest speed position. If you turn right (clockwise) the rotation increases and left (counterclockwise)
decreases. In case the blade continues to rotate
or engine stops when you return the throttle lever
completely to the original position, make a
readjustment.
(1) Idle adjustment screw
(2) High
(3) Low
Maintenance before storing
1. Brushing off dirt form the machine check damage or stack of each part if you find
out abnormalities, repair them for the next use.
2. Extract fuel from the tank and loose the drain screw of the float cabin to extract
fuel, turn on the engine and leave it running until it stops naturally.
3. Remove the spark plug and put in 1-2cc of 2-cycle oil in the engine. Draw the
starter rope 2-3 times, set the plug back and stop it at the contraction position.
4. Apply anti-rust oil to the metal parts such as the throttle wire put the security
cover on the blade and keep the machine indoor avoiding dampness.
© by WilTec Wildanger Technik GmbH Seite 36
http://www.WilTec.de
http://www.aoyue.eu
http://www.teichtip.de
 Loading...