

Page 1
Manual
Incubator
Artikel 50035
Vor Inbetriebnahme Bedienungsanleitung und Sicherheitshinweise lesen und beachten
Read and follow the operating instructions and safety information before using for the first time.
Avant la mise en service, lisez le mode d’emploi et les consignes de sécurité et respectez-les.
Technische Änderungen vorbehalten!
Durch stetige Weiterentwicklungen können Abbildungen, Funktionsschritte und technische Daten ge ringfügig abweichen.
Aktualisierung der Dokumentation
Haben Sie Vorschläge zur Verbesserung oder haben Sie Unregelmäßigkeiten festgestellt, nehmen Sie
bitte Kontakt mit uns auf.
© by WilTec Wildanger Technik GmbH Seite 10
http://www.WilTec.de
http://www.aoyue.eu
http://www.teichtip.de
Page 2

The information contained in this document is subject to change without prior notice. No part of this
document can be copied or duplicated in another form without the prior written consent of Wiltec
Wildanger Technik GmbH. The Wiltec Wildanger Technik GmbH assumes no liability for any errors in
this user manual or the connection diagram.
Although Wiltec Wildanger Technik GmbH has made every effort to make sure that this user manual is
complete, accurate and updated, errors cannot always be avoided. In the event of problems with this
user manual please complete and send this form back to us.
FAX-notification (+++49 2403 55592-15),
from: ________________________________________
Name: ________________
Firm:_____________________
Tel/Fax:__________________
I would like to report the following mistakes:
_______________________________ ____________________________________
Customer Service Wiltec Wildanger Technik GmbH
e-mail: [email protected]
Tel:++ +49 2403 55592-0
Introduction
Thank you for purchasing this quality product. To minimize the risk of injury by means of fire or
electric shock we urge that our clients take some basic safety precautions when using this
device. Please read the operation instructions carefully and make sure you have understood its
content.
Always use a grounded power connection with the appropriate mains voltage. You can
nd the corresponding mains voltage on the type plate. If you have any doubts about the
connection being grounded, have it checked by a qualied professional. Never use a
faulty electric cable.
Do not inspect the electrical part of the pressure pond lter in a wet or damp
environment or when you are wet yourself and protect it from direct sunlight. Install this
device in a safe location so that nobody can step on the cable, fall over or damage it.
Disconnect the power plug before cleaning it and use only a damp cloth for cleaning.
Avoid using cleaning agents and make sure that no liquid enters the electrical part of the pump.
The electric part of the device contains no parts that can be inspected or serviced by the user. Leave
the maintenance, adjustment and repair to qualified technical personnel. In case of unauthorised
intervention the 2-year warranty is no longer valid! Keep these operation instructions safe.
© by WilTec Wildanger Technik GmbH Seite 11
http://www.WilTec.de
http://www.aoyue.eu
http://www.teichtip.de
Page 3

Security
Attention:
The device is not intended for use by persons (including children) with impaired or limited physical,
sensory and mental abilities or lack of experience and/or real knowledge, unless they are supervised
by a person responsible for their safety or you follow the instructions made by this person how to use
the device correctly.
Children should be supervised to make sure that they do not play with the device.
ATTENTION:
Run a visual inspection of the device before every use. Do not use the device if the safety
appliances are damaged or worn out. Never override safety regulations.
Use the device exclusively according to the intended purpose stated in the instructions for
use.
You are responsible for the safety of the working environment.
If the cable or the plug is damaged due to external influences the cable must not be repaired!
It has to be replaced with a new one. This work can be carried out only by an electrician.
The voltage indicated on the type plate of the device of 230 Volt alternating voltage has to
correspond to the existent mains voltage.
Never lift, carry or fixate the device by using the power cable.
Avoid exposing the appliance to a direct water jet or rain.
The user is responsible for the compliance with location specific safety and installing
regulations. (Ask an electrician).
In case of malfunction the repair work can be carried out only by a qualified electricial or the
WilTec-service.
Please do not try to adjust the temperature parameters in the machine when hatching eggs.
The parameters are set by the factory. Chicken could be hatch successfully
© by WilTec Wildanger Technik GmbH Seite 12
http://www.WilTec.de
http://www.aoyue.eu
http://www.teichtip.de
Page 4
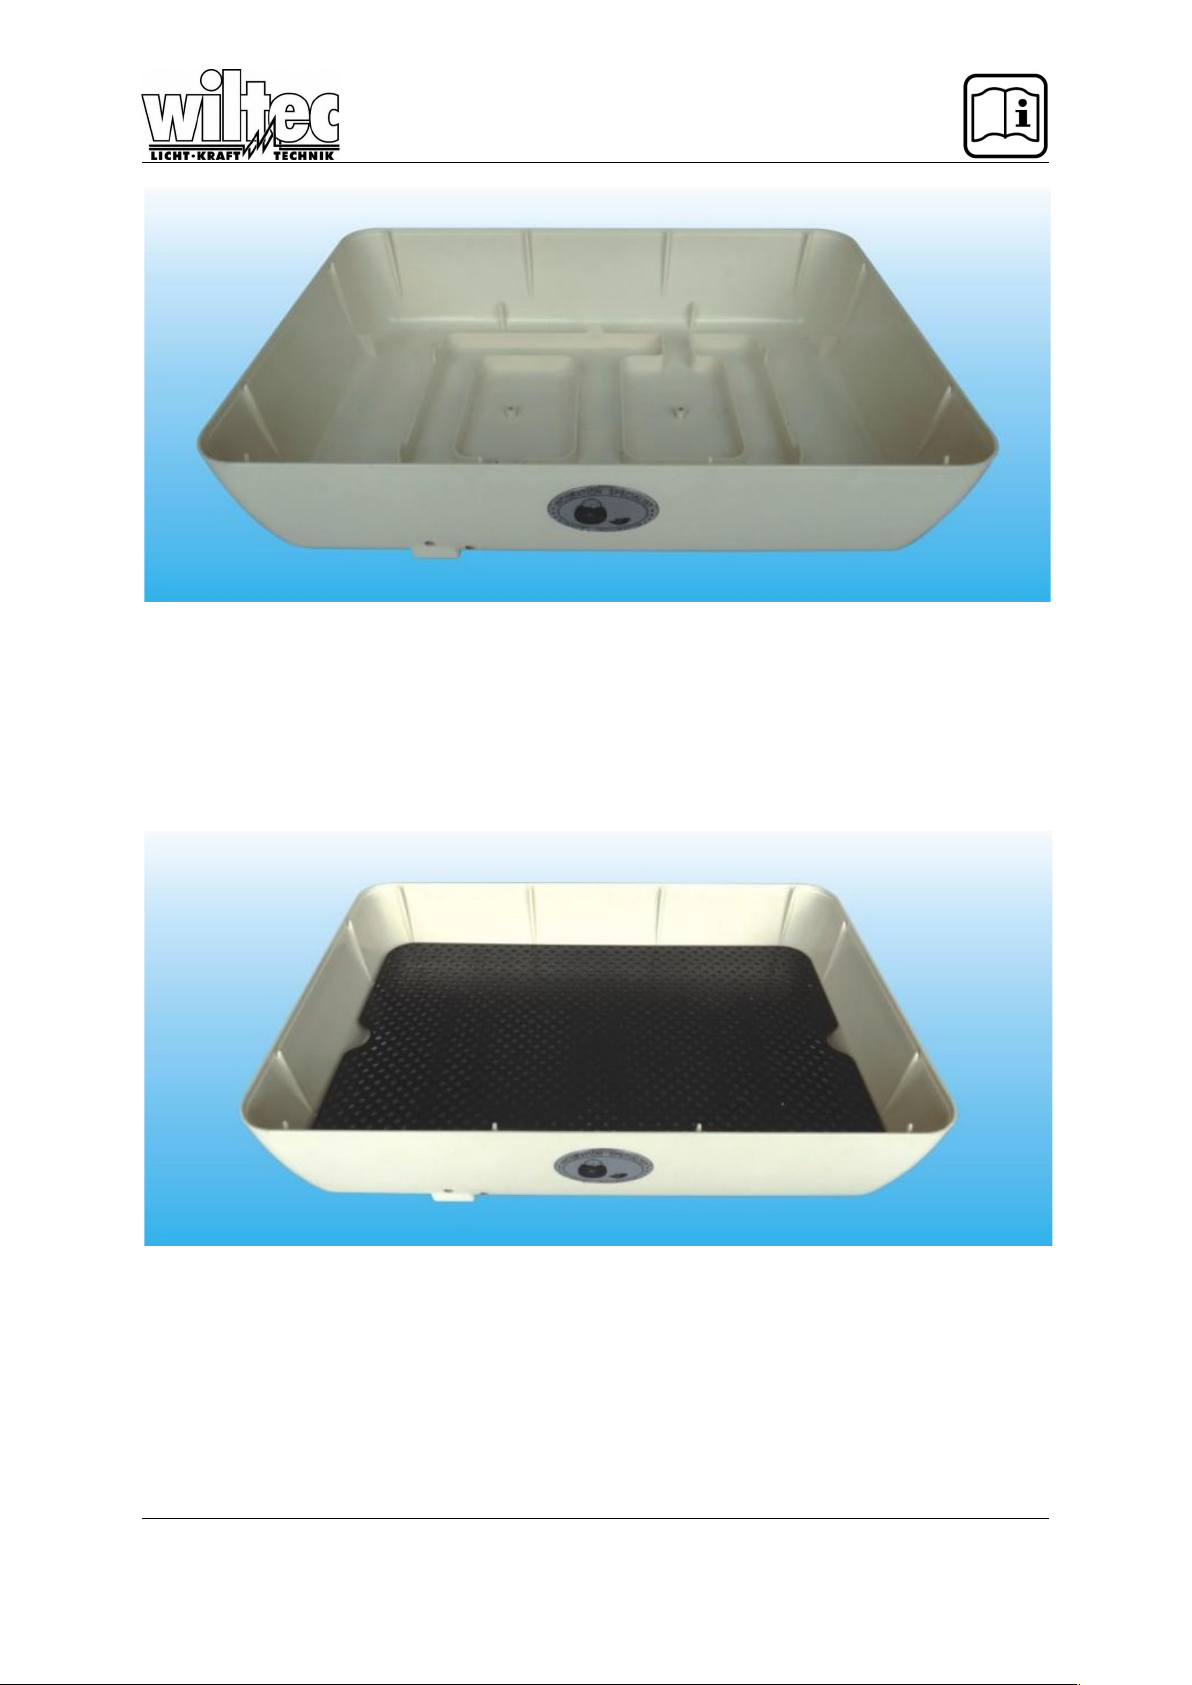
Fig. 1: Base, with two water tanks inside and 2 holes on the sides. For example, when first day using
Please fill 300-350ml water to water tank No. 1, 100-1 150ml water shall be filled on the following every day so as to ensure that there‘s always water in the tank. 18 days later , water tank No. 2 shall
also be filled with water, 200-250ml for the first time. The two water tanks shall always have water
from day18th-22nd (as it requires higher humidity within the hatching days), We recommend users put
the device on a 60-80cm height table.
Fig. 2: mesh plate, with the smooth surface as the upside, so that it's good for turning of egg.
© by WilTec Wildanger Technik GmbH Seite 13
http://www.WilTec.de
http://www.aoyue.eu
http://www.teichtip.de
Page 5
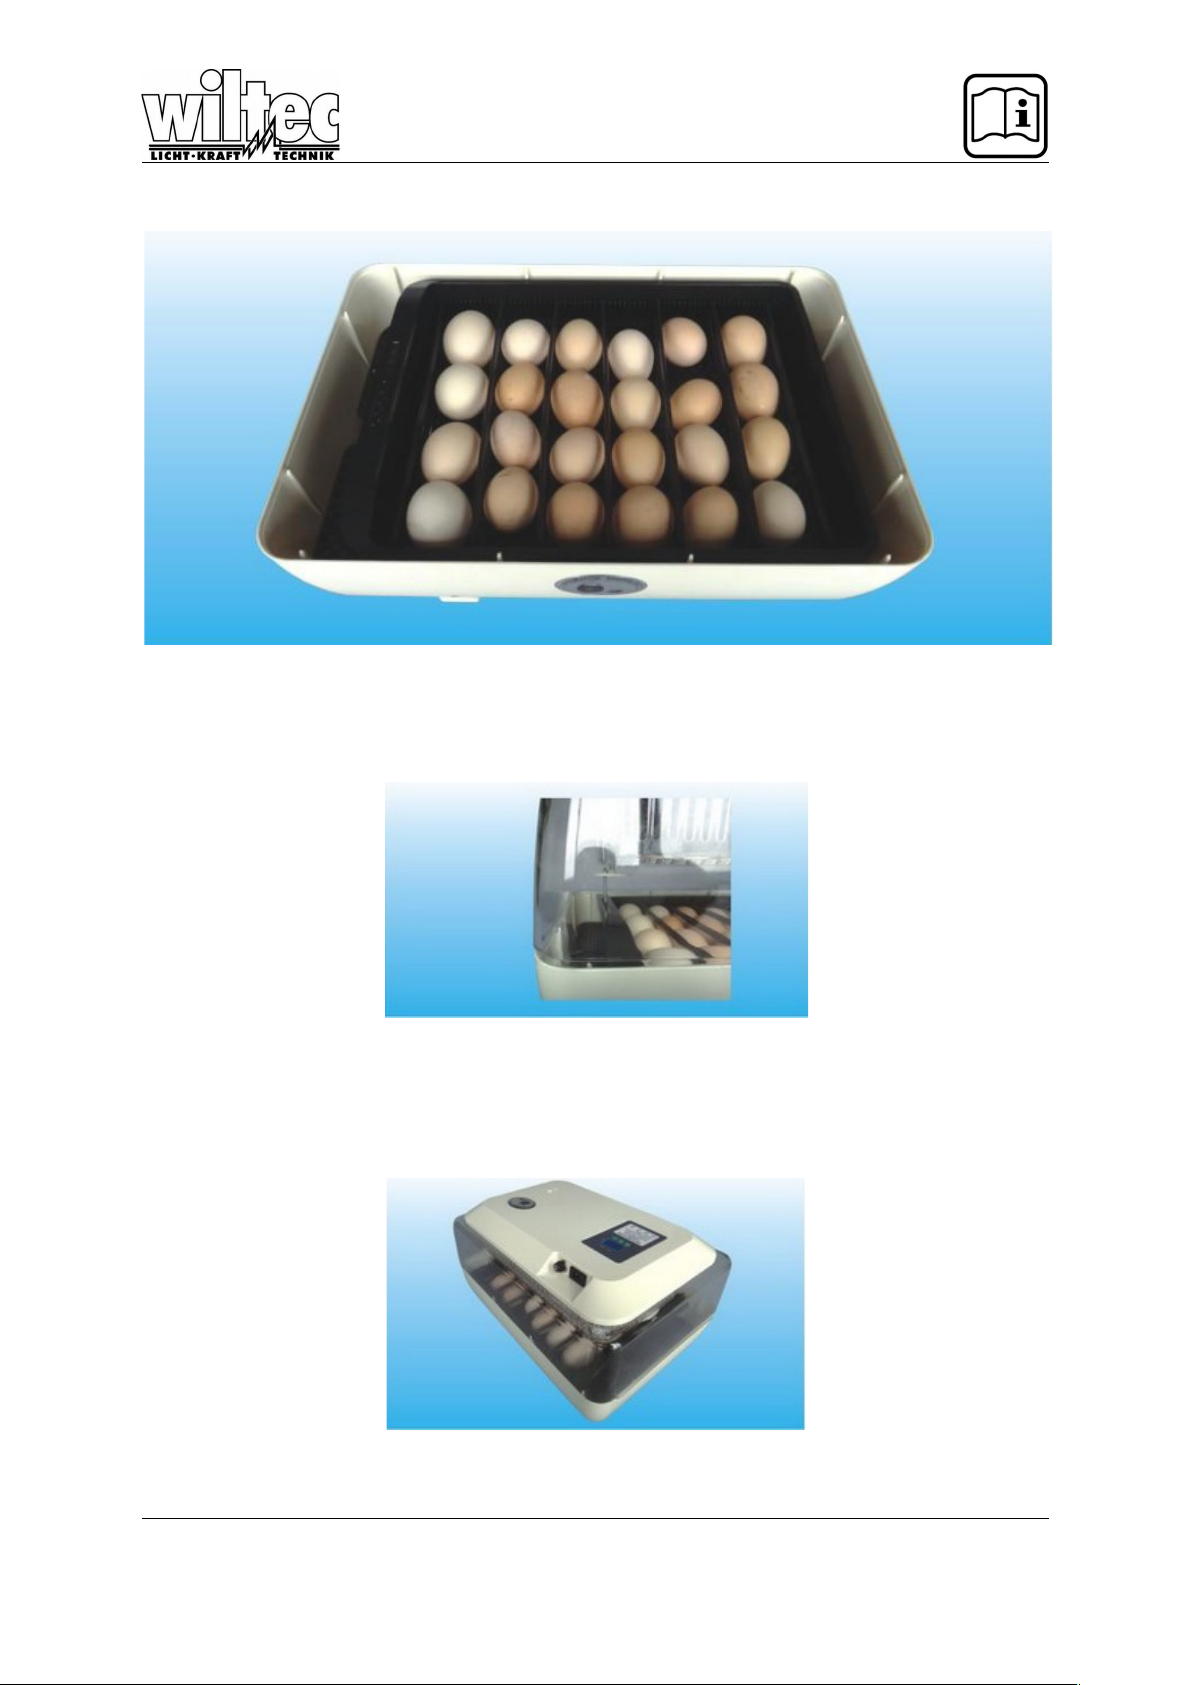
Fig. 3: Put the egg tray on the mesh plate, and put the egg tray grille according to size of egg for incubation, the width of each space shall be 5-10mm bigger than the diameter of egg, so that it's good for
turning of egg.
Fig. 4: pay attention that there's an egg turning rod in the transparent case at the upper part of device.
The rod must insert into the channel of egg tray for the egg turning. The egg turning motor runs as
long as the device is powered on. lt runs one cycle every four hours so that it's very slow. The egg is
turned once about every 4 hours.
© by WilTec Wildanger Technik GmbH Seite 14
http://www.WilTec.de
http://www.aoyue.eu
http://www.teichtip.de
Page 6
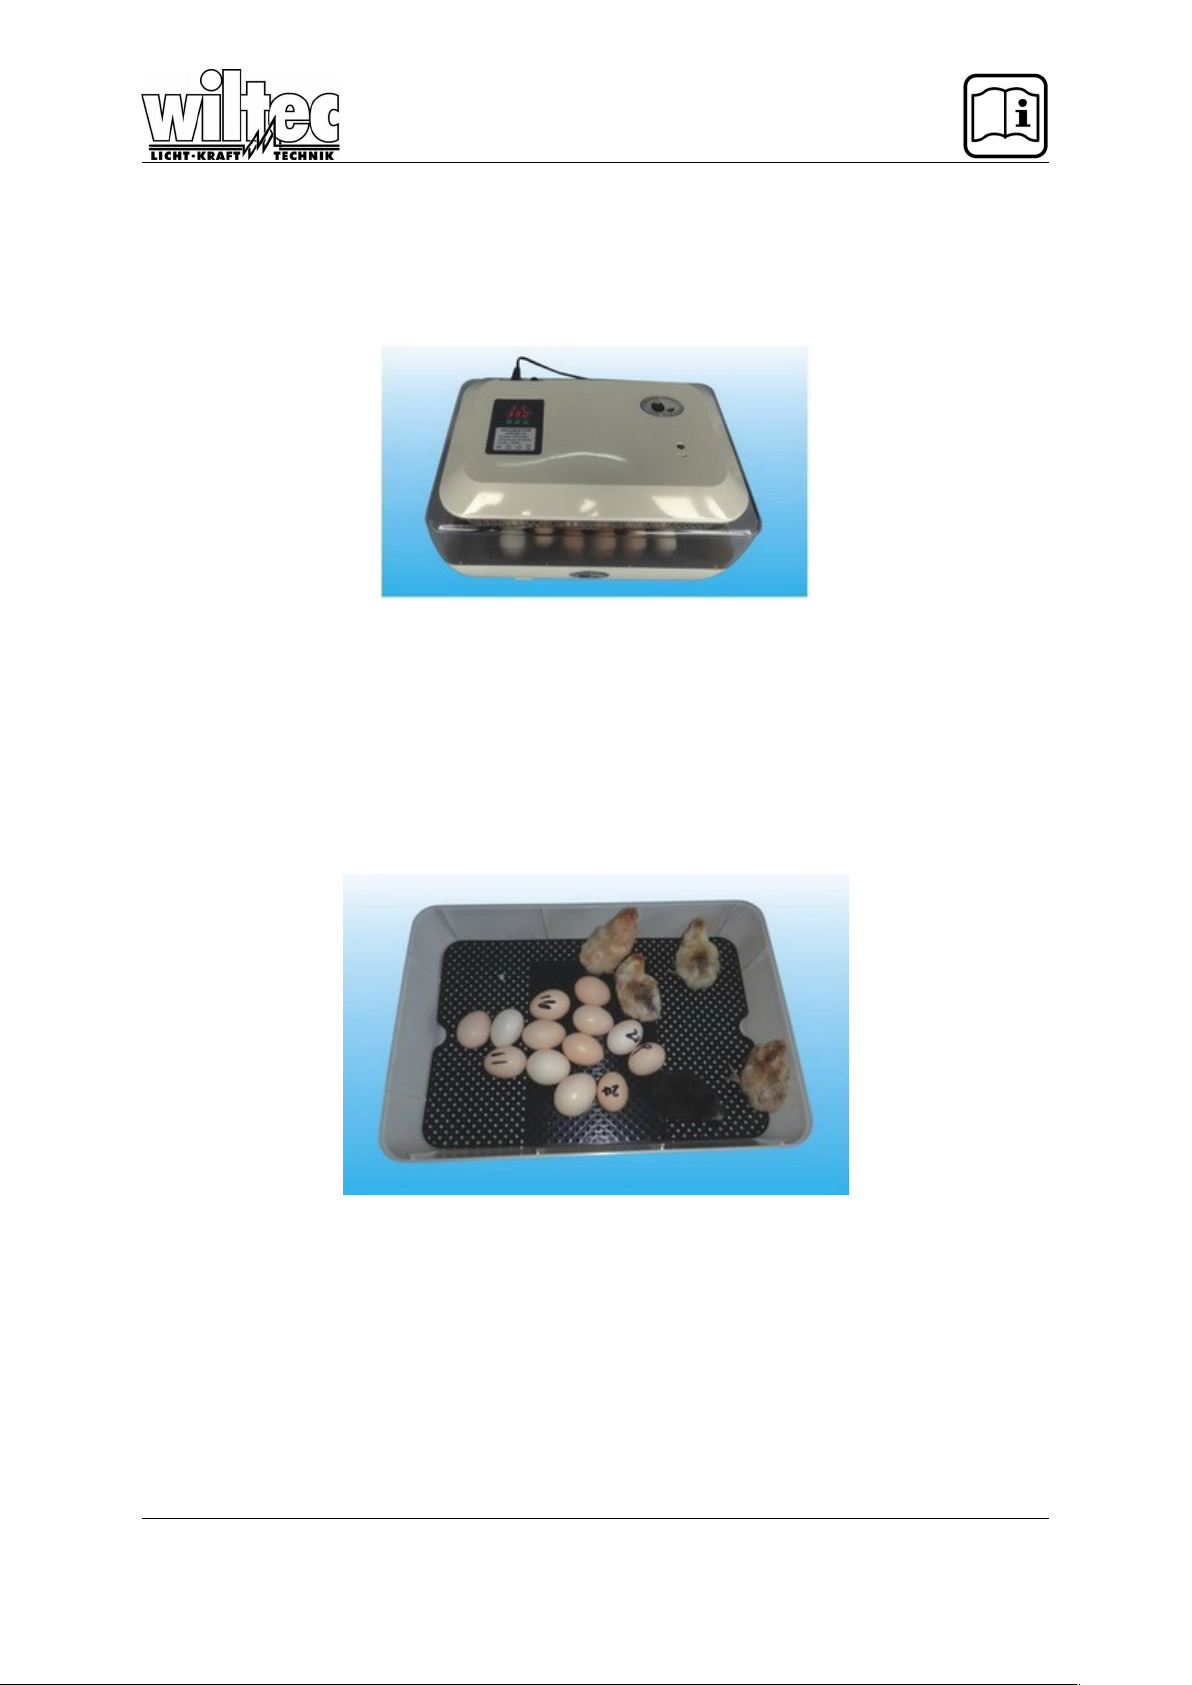
Fig. 5: the upper cover is put together with the base, please make sure the cover is completely closed.
The egg turning rod shall insert into the channel of movable egg tray. The device can begin to work after powered on.
Fig. 6: Please don't worry about the fuse link besides the power socket, and don't move it as in normal
use. The fuse link may be damaged if the device doesn't work after powered on, the fan doesn't'! run
and there's no temperature display. The device begins to work after powered -on, the temperature
may display " L" at the beginning, at the moment, you should only need to push one ofthe three buttons on the device to display the temperature. Please don'! adjust the parameter if you are not quite
familiar with the control parameter description. lt will be fine if you hatch egg as factory preset, and it
still has high hatchability. Turn the cross-ventilation hole on the upper right side to the maximum 18
days later
Fig. 7: when the egg is about to hatch poult (that is days lll or 19), take the movable egg tray out from
the device the egg tray once one or two hatching eggs are seen hatched. Don't turn the egg to ensure
humidity of device, and clean the egg shell on time after hatching, and the poult can be taken out for
feeding or vaccination after the furon body get dry. The subsequent cultivation technology is omitted
here.
l. Cautions:
l. Unpack the box and check the incubator, check whether all of the accessories inside ofthe packing
hos are well-equipped, including one power line, one base, one mesh plate, one movable egg tray, 6
egg (ray grilles, one cover.
© by WilTec Wildanger Technik GmbH Seite 15
http://www.WilTec.de
http://www.aoyue.eu
http://www.teichtip.de
Page 7

2. Note: when ambient temperature is less than 25'C`, measure shall be taken for heat preservation,
it's good for temperature uniformity when the device is enclosed with clothes or other wa rms, and it
also helps energy-saving and reduces heat dissipation. Use thermometer to correct temperature display before use, CA parameter can be adjusted.
3. The incubator can be placed into service after 2-hour trial run. lt's best to clean the base, egg tray
and mesh plate before test.
ll. Operating Steps:
l. Put the movable egg tray on the mesh plate.
3. Put the egg tray grille into movable egg tray according to size of egg for incubation.
-·l. Put the hatching egg into movable egg tray for incubation, pay attention that after each egg is put
into the grille, there should be 5-l0mm clearance at least for convenient turning ofhatching egg, inject
300ml water into the base after the hatching egg is put, check once for every day so that the incubator
is not short of water. Every water injection shall not be more than 100- l50ml, take down the date ofplacing hatching egg so as to well control the hatching time. It's best to place the incubator on 6080CM table for conve nient observation.
5. When closing the cover, the rod must insert the shifting slot of movable egg tray, so that the egg
tray can shift normally.
6. Switch on the power supply after closing the cover, and set the temperature according to Push-Button Instruction and Incubation Technology. If the user has no time to care about the temperature, the
temperature can be set at 38°Cfrom the first day of incubation to first day of hatching, and it can be set
as 37.5 -37.8°C since the following day of hatching.
7. It moves to hatching tray 3 days earlier than incubation period for all poultries.
8. It usually takes 3--I days less than the number of incubation days for egg tray replacement, replace
the egg tray once one or two hatching eggs are seen hatched, and then take the movable egg tray and
grille out.
9. After closing the cover and switching on the power supply, the hatching situation can be observed.
III. Important for Safety
1.0nly the power supply marked on the incubator can be used,
2. Don't put any goods on the wire, the power line ofincubator shall be placed where it won't be
stepped on or make people trip and fall;
3. Make sure that the socket and extension line in use have no overload, otherwise, it may cause fire
or electric shock;
-I. If the incubator is smoking, or sending abnormal smell or unusual noise, please cut off the power
supply and pull down the power line to stop the fault, after that, contact the agency or maintenance
center;
5. Please don't touch the power line with wet hand, or it may cause electric shock;
6. This incubator can't be exposed to rain and sunshine;
7. Make sure that the power supply is switched off before cleaning the incubator;
8. The incubator shall be placed in room where is ventilated without vibratory equipment, it can't be
placed in room with fast air movement or room with harmful and noxious chemicals and other pollutants.
IV. Push-button Instruction:
1. SET:
A: Push SET once to enter temperature control set, push <+> or <-> to adjust parameter,
push<+>or<-> for 3s to enter fast adjustment mode, push SET again to exit from setting state.
B: Push SET for 3s to enter system menu set, push <+> or <-> to select menu in need of adjustment,
then push SET again to enter relative parameter setting state, push <+> or <-> to adjust parameter in
need of modification, push RST to exit after adjustment, or the system will exits after 5s delay.
2.<+>: Up button
3.<->: Down button
Operation Instruction:
Indicating lamp state instruction:
© by WilTec Wildanger Technik GmbH Seite 16
http://www.WilTec.de
http://www.aoyue.eu
http://www.teichtip.de
Page 8

WORK lamp on the left side of display screen is made as work indicating lamp, LED normally on
means it's in heating state. SET lamp on the left side of display screen is used for indicating lamp set,
LED normally on means it's in setting state.
Function instruction:
{HU,HD:
Parameter HU and HD is set by factory, the user unless the professional is not allowed to adjust it.
{Temperature correction set:
When measuring temperature deviates from reference temperature, temperature correction <CA>
function shall be used to make the measuring value in accordance with reference temperature, temperature after correction shall be the sum oftemperature before correction and correction value (correction value can be positive number, negative number or zero).
{Temperature correction set:
Push "SET" for3s to enter menu display, push <+> or <-> until code "CA" appears on screen, then
push " SET" to display temperature correction setting value, push <+> or <-> again to adjust parameter.
{Upper and lower limit function:
HS and LS set limits setting range oftemperature control, e.g., ifHS is set as 39.5 and LS is set as 30,
then the temperature can only be set from 30 to 39.5, so the display value still keeps as 30 after pushing U-U ifit displays 30; the display value still keeps as 39.5 after pushing Q+Kl ifit displays 39.5. If setting value is beyond the setting range, then HS and LS must be changed at first.
Q Upper and lower limit set:
Push "SET " 3s to enter menu display, push <+> or <-> until code "HS" or "LS” appears on screen,
push "SET ” to display upper or lower limit setting value, then push <+> or <-> to adjust the parameter.
HS means upper limit and LS means lower limit.
Code Description Setting range Factory set Unit
HU Heating power
parameter
1-90 35 -
HD Heat preservation
power parameter
1-80 40 -
LS Lower limit set -9.9~HS 30 °C
HS Upper limit set LS~99.9 39.5 °C
CA Temperature cor-
rection
-5~+5 XX °C
AH Factory set, not
adjustable
0-15 -- °C
AL Factory set, not
adjustable
0-15 -- °C
V Incubation Technology
1. Incubation temperature control
Different poultry requires different temperatures: incubation period of chicken is 21 days, it's 38.2°C
from 1st~6th day, 38°C from 7th~l-lth day, 37.8°C on 15th day, and 37.2~37.5°C from l6th~2lst day.
2. Humidity control: It requires different relative humidity in different period of incubation. The relative
humidity shall keep within 55%~60% at the earlier stage of incubation to ensure even heating for embryo, which is good for formation of allantoic fluid and amniotic fluid, the relative humidity shall keep
within 30%~55% at the middle stage of incubation, which is good for evaporation ofwater, the relative
humidity at the last stage ofincubation shall be increased to 65%~75%, as high relative humidity is
good for poult to hatch, when above 20% of poult hatches, the relative humidity shall keep at 75
%~85%.
3. Cleaning and sterilization before incubation: wash and clean the incubator, then suffumigate it with
potassium permanganate and formalin.
4. Incubation equipment inspection before incubation: check all of the parts completely and observe
whether the fan rotation device works normally and whether all of the components are in good condition, then adjust the temperature and feed water to the tank. Make a 12-2-l hours' trial again when
© by WilTec Wildanger Technik GmbH Seite 17
http://www.WilTec.de
http://www.aoyue.eu
http://www.teichtip.de
Page 9
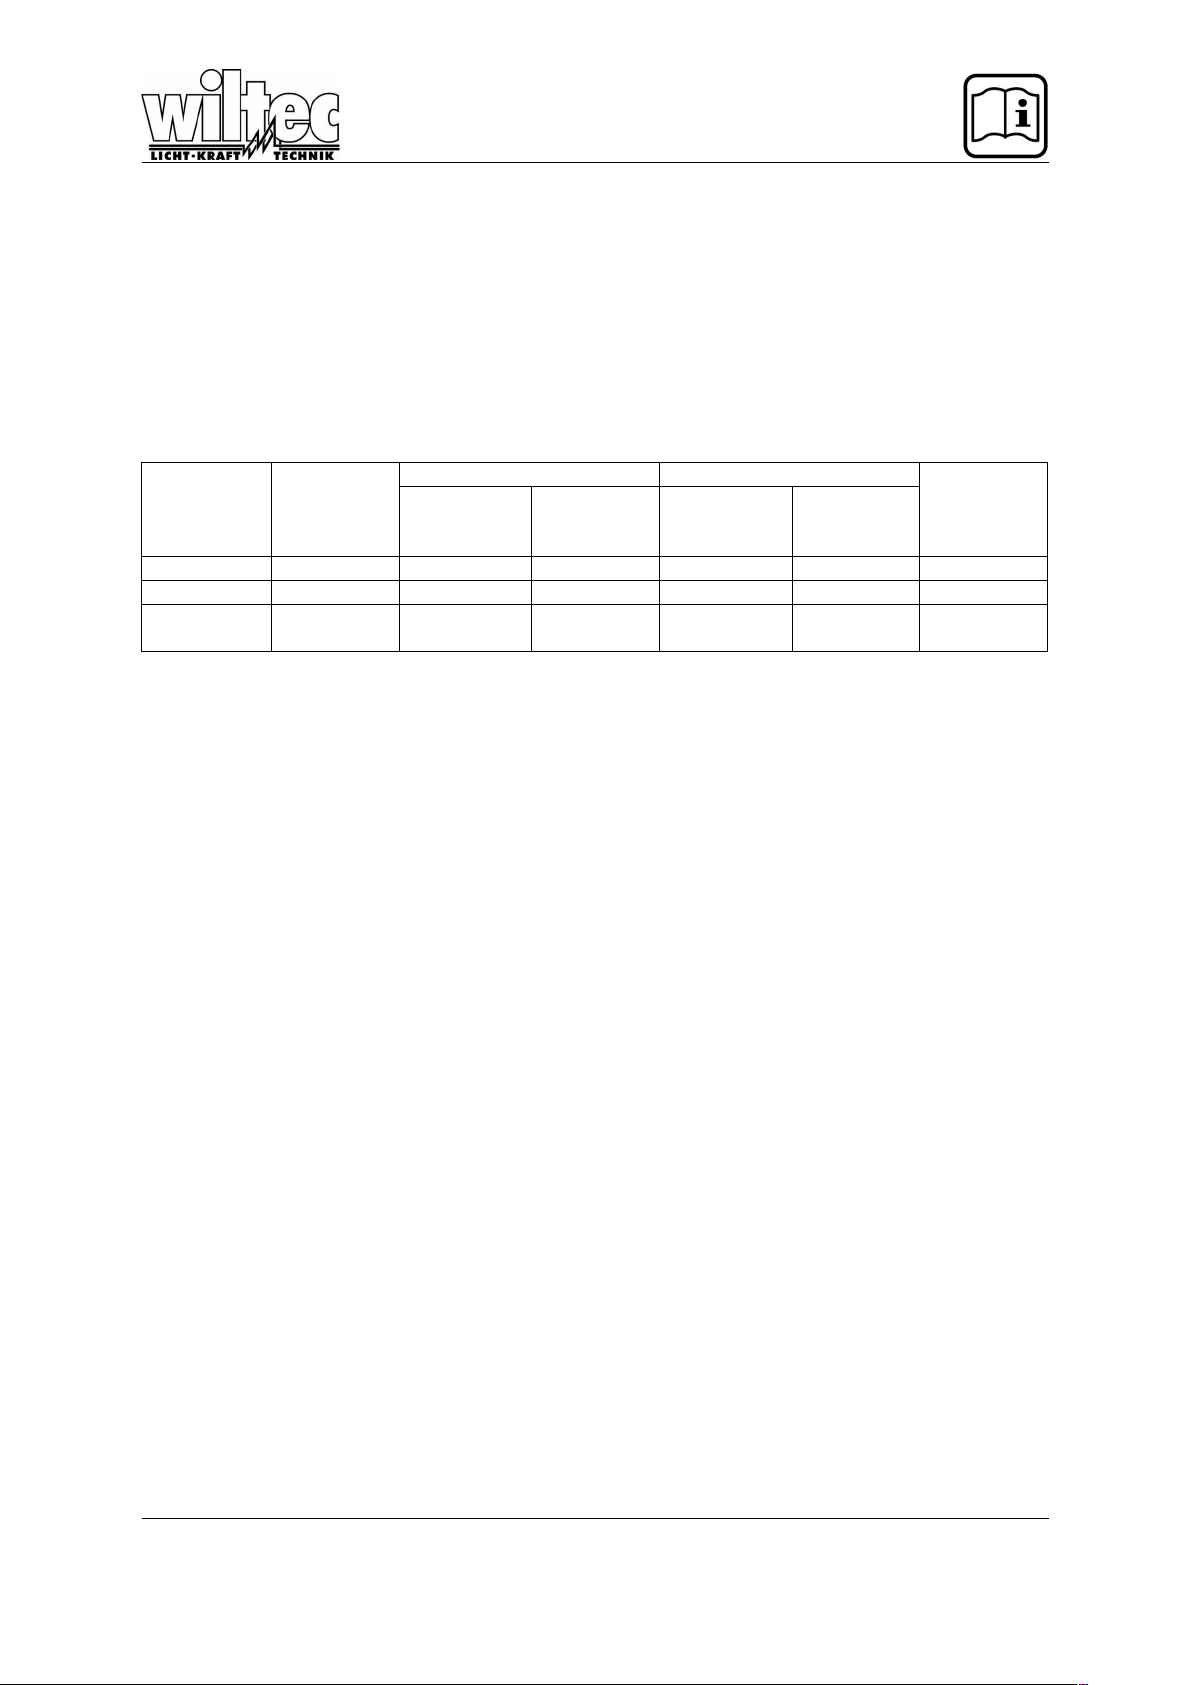
the incubator reaches temperature and humidity requirement, if the incubator works normally, it can be
put into running.
5. Choose and store fresh egg within 5 days (7 days at most) as hatching egg, as for the egg stored
for more than 5 days, 4% less the incubation rate and 30 minutes prolonged incubation period for one
more day storage. The proper temperature for hatching egg storage is l2°C ~l6“C.The smaller side
shall be put upside during hatching egg storage.
6. Notes for off-tray period: The process to remove from egg tray to hatching tray is called off-tray, the
chick embryo usually removes off the tray at an age of 18-19 days. It shall be placed gently during offtray, it's best to lay to single layer. It also removes to hatching tray 3 days earlier than incubation period for other poultry. Poultry Incubation Parameter
Incubation Period Hatching period
Poultry Number of
Days
Tempera-
ture °C
±0,5
Humidity
%
Tempera-
ture °C
±0,5
Humidity
%
Hatching
egg weight
G
Chicken 21 38 55-75 37.5 65-85 100-120
Dove 18 38.5 55-75 37.8 65-85 30-40
Local
chicken
21 37.9 55-75 37.5 65-85 45-55
© by WilTec Wildanger Technik GmbH Seite 18
http://www.WilTec.de
http://www.aoyue.eu
http://www.teichtip.de
Page 10

Disposal regulations
EU guidelines regarding the disposal of scrap electric appliances (WEEE, 2012/19/EU) were
implemented in the law related to electrical and electronic equipment and appliances.
All WilTec electric devices that fall under the WEEE regulations are labelled with the crossed-out
wheeled waste bin logo. This logo indicates that this electric equipment must not be disposed with the
domestic waste.
The company WilTec Technik GmbH has been registrated in the German registry EAR under the
WEEE-registration number DE45283704.
Disposal of used electrical and electronic appliances
(intended for use in the countries of the European
Union and other European countries with a separate
collection system for these appliances).
The logo on the article or on its packaging points out
that this article must not be treated as normal
household waste but must be disposed to a recycling
collection point for electronic and electrical waste
equipment. By contributing to the correct disposal of
this article you protect the environment and the health
of your fellow men. Environment and health are
threatened by inappropriate disposal.
Materials’ recycling helps reduce the consumption of raw materials.
Additional information on recycling this article can be provided by your local community, municipal
waste disposal facilities or the store where you purchased the article.
Address:
WilTec Wildanger Technik GmbH
Königsbenden 12 / 28
D-52249 Eschweiler
Important notice:
The reprint or reproduction, even of excerpts, and any commercial use, even in part of this instructions
manual require the written permission of WilTec Wildanger Technik GmbH.
© by WilTec Wildanger Technik GmbH Seite 19
http://www.WilTec.de
http://www.aoyue.eu
http://www.teichtip.de
 Loading...