

Wilo Helix V 22, Helix V 52, Helix V First 22, Helix V First 36, Helix V First 52 Installation And Operating Instructions Manual
...Page 1
Wilo-Helix V 22-36-52
Wilo-Helix V FIRST 22-36-52
Pioneering for You
de Einbau- und Betriebsanleitung
en Installation and operating instructions
fr Notice de montage et de mise en service
nl Inbouw- en bedieningsvoorschriften
ru Инструкция по монтажу и эксплуатации
es Istruzioni di montaggio, uso e manutenzione
it Istruzioni di montaggio, uso e manutenzione
4 120 943-Ed.09 / 2016-03-Wilo
pt
Manual de Instalação e funcionamento
tr
Návodkmontážiaobsluze
el
Инструкцияпомонтажуиэксплуатации
sv
Iнструкціязмонтажутаексплуатації
no
Paigaldus- ja kasutusjuhend
fi Uzstādīšanasunekspluatācijasinstrukcija
da
Montavimo ir naudojimo instrukcija
hu Beépítési és üzemeltetési utasítás
pl Instrukcja montażu i obsługi
cs
Návod k montáži a obsluze
et
Paigaldus- ja kasutusjuhend
lv
Uzstādīšanas un ekspluatācijas instrukcija
lt
lt Montavimo ir naudojimo instrukcija
sk
Návod na montáž a obsluhu
sl
Navodila za vgradnjo in obratovanje
hr
Upute za ugradnju i uporabu
sr Uputstvo za ugradnju i upotrebuU
Uputstv
ro Instrucţiuni de montaj şi exploatare
bg
Инструкция за монтаж и експлоатация
Page 2
Fig. 1
FIRST
Page 3
Fig. 2
Page 4
Fig. 3
Fig. 6
Fig. 7
Fig. 5
HIGH
VOLTAGE
LOW
VOLTAGE
<ܾ
L1 L2 L3
W1
V2U2W2
U1 V1
L1 L2 L3
L1 L2 L3
<
Page 5

A
A
A
D
E
C
AK
AK
AK
AG
AG
AJ
AJ
AJ
AG
AH
AH
AH
B
C
B
C
B
D
E
D
E
F
F
F
Fig. 4
Type
(mm)
A B C D E F G H J K
Helix V 22
PN16/PN25/
PN30
130 296 215 250 300 90 DN50 125 4 x M16
16 x
Ø14
Helix V 36
PN16
170
or
220
296
240
or
220
250 320 105 DN65 145
4 x M16
PN25/PN30 8 x M16
Helix V 52
PN16/PN25/
PN30
190
or
220
296
266
or
220
250 365 140 DN80 160 8 x M16
Type
(mm)
A B C D E F G H J K
Helix FIRST
V22
PN16/PN25/
PN30
130 260 215 226 300 90 DN50 125 4 x M16
4 x Ø14
Helix FIRST
V36
PN16
170 294 240 226 320 105 DN65 145
4 x M16
PN25PN30 8 x M16
Helix FIRST
V52
PN16/PN25/
PN30
190
or
170
295
266
or
240
226 365 140 DN80 160 8 x M16
Type
(mm)
A B C D E F G H J K
Helix V 22
PN16/PN25 130 255 215 226 300 90 DN50 125 4 x M16
4 x Ø14
Helix V 36
PN16
170 284 240 230 320 105 DN65 145
4 x M16
PN25 8 x M16
Helix V 52
PN16/PN25
190
or
170
310
266
or
240
234 365 140 DN80 160 8 x M16
Material code -2 -3
Material code -4 -5
Material code -1
Page 6
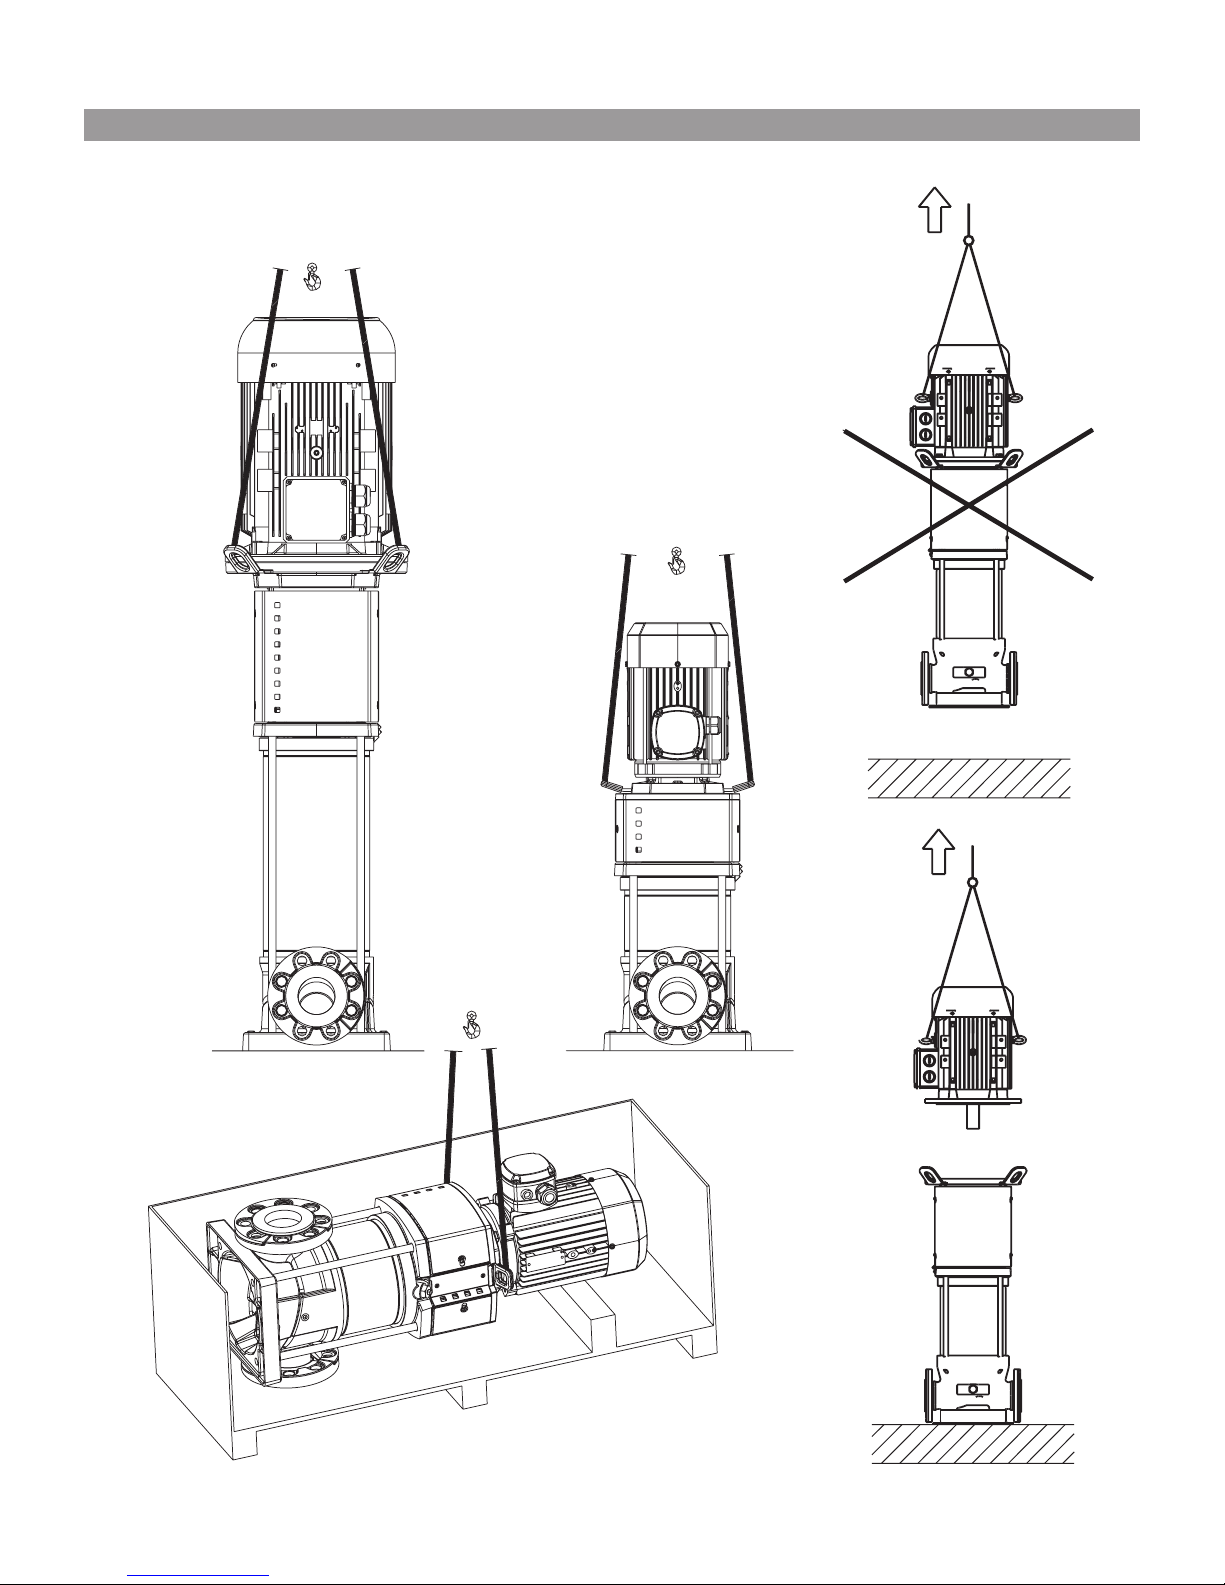
Fig. 8
;
;
;
Page 7

15
English
WILO SE 03/2016
1. General
1.1 About this document
The language of the original operating instructions is English. All other languages of these instructions are translations of the original operating
instructions.
These installation and operating instructions are
an integral part of the product. They must be kept
readily available at the place where the product is
installed. Strict adherence to these instructions
is a precondition for the proper use and correct
operation of the product.
These installation and operating instructions correspond to the relevant version of the product
and the underlying safety standards valid at the
time of going to print.
EC declaration of conformity:
A copy of the EC declaration of conformity is a
component of these operating instructions.
If a technical modification is made on the designs
named there without our agreement, this declaration loses its validity.
2. Safety
These instructions contain important information
which must be followed when installing and operating the pump. It is therefore imperative that
they be read by both the installer and the operator before the circulator is installed or started up.
Both the general safety instructions in the ‘Safety
precautions’ section and those in subsequent
sections indicated by danger symbols should be
carefully observed.
2.1 Symbols and signal words used in these
operating instructions
Symbols
General safety symbol.
Hazards from electrical causes.
NOTE: ....
Signal words:
DANGER! Imminently hazardous situation. Will
result in death or serious injury if not avoided.
WARNING! Risk of (serious) injury. ‘Warning’
implies that failure to comply with the safety
instructions is likely to result in (severe) personal injury.
CAUTION! Risk of damage to the pump/installation. ‘Caution’ alerts to user to potential product damage due to non-compliance with the
safety instructions.
NOTE: Useful information on the handling of the
product.
It alerts the user to potential difficulties.
2.2 Personnel qualification
The personnel installing the pump must have the
appropriate qualification for this work.
2.3 Risks incurred by failure to comply with the
safety instructions
Failure to comply with the safety precautions
could result in personal injury or damage to the
pump or installation. Failure to comply with the
safety precautions could also invalidate any claim
for damages.
In particular, failure to comply with these safety
instructions could give rise, for example, to the
following risks:
• the failure of important parts of the pump or installation,
• personal injury due to electrical and mechanical
causes,
• material damage.
2.4 Safety instructions for the operator
Existing regulations for the prevention of accidents must be observed.
National Electrical Codes, local codes and regulations must be followed.
2.5 Safety instructions for inspection and assembly
This appliance is not intended for use by persons
(including children) with reduced physical, sensory or mental capabilities, or lack of experience
and knowledge, unless they have been given
supervision or instruction concerning use of the
appliance by a person responsible for their safety.
Children should be supervised to ensure that they
do not play with the appliance.
• If hot or cold components on the product/the
unit lead to hazards, local measures must be
taken to guard them against touching.
• Guards protecting against touching moving
components (such as the coupling) must not be
removed whilst the product is in operation.
• Leakages (e.g. from the shaft seals) of hazardous
fluids (which are explosive, toxic or hot) must be
led away so that no danger to persons or to the
environment arises. National statutory provisions
are to be complied with.
• Highly flammable materials are always to be kept
at a safe distance from the product.
• Danger from electrical current must be eliminated. Local directives or general directives [e.g.
IEC, VDE etc.] and local power supply companies
must be adhered to.
2.6 Unauthorised modification and manufacture of
spare parts
Alterations to the pump or installation may only
be carried out with the manufacturer’s consent.
The use of original spare parts and accessories
authorized by the manufacturer will ensure safety. The use of any other parts may invalidate
claims invoking the liability of the manufacturer
for any consequences.
Page 8

2.7 Improper use
The operational safety of the pump or installation
supplied can only be guaranteed if it is used in
accordance with paragraph 4 of the operating
instructions. The limits given in the catalogue
or data sheet must under no circumstances be
exceeded.
2.8 Improper use
The operating safety of the supplied product is
only guaranteed for conventional use in accordance with Section 4 of the operating instructions. The limit values must on no account fall
under or exceed those specified in the catalogue/
data sheet.
3. Transport and interim storage
When receiving the material, check that there has
been no damage during the transport. If shipping
damage has occurred, take all necessary steps
with the carrier within the allowed time.
CAUTION! Outside influences may cause damages. If the delivered material is to be installed
later on, store it in a dry place and protect it from
impacts and any outside influences (humidity,
frost etc.).
The product should be cleaned thoroughly before
it is put into temporary storage. The product can
be stored for at least one year.
Handle the pump carefully so as not to damage the
unit prior to installation.
4. Application
This pump’s basic function is to pump hot or cold
water, water with glycol or other low viscosity
fluids that contain no mineral oil, solid or abrasive
substances, or materials having long fibres. The
manufacturer’s approval is required for use to
pump corrosive chemicals.
CAUTION! Risk of explosion!
Do not use this pump to handle flammable or
explosive liquids.
4.1 Applications areas
- water distribution and boosting installations,
- industrial circulation systems,
- process fluids,
- cooling water circuits,
- fire-fighting and washing stations,
- watering installations, etc.
16
English
WILO SE 03/2016
5. Technical data
5.1 Type key
Example: Helix V2205/2-1/16/E/KS/400-50xxxx
Helix V
Helix FIRST V
Vertical high-pressure multistage
centrifugal pump in in-line design
22 Nominalowinm3/h
05 Number of impellers
2
Number of trimmed impellers (if
any)
1
Pump material code
1 = Pump housing Stainless steel
1.4308 (AISI 304)
+ Hydraulics 1.4307 (AISI 304)
2 = Modular pump housing Stain-
less steel 1.4409 (AISI 316L)
+ Hydraulics 1.4404
(AISI 316L)
3 = Modular pump housing Cast
Iron EN-GJL-250 (ACS and
WRAS approved coating)
+ Hydraulics 1.4307 (AISI 304)
4 = Monobloc Pump housing cast
iron EN-GJL-250 (ACS and
WRAS approved coating)
+ Hydraulics 1.4307
(AISI 304)
5 = Monobloc Pump housing cast
iron EN-GJL-250
(standard coating)
+ Hydraulics 1.4307
(AISI 304)
16
Pipe connection
16 = PN16
25 = PN25
30 = PN40
E
Seal type code
E = EPDM
V = FKM Viton
KS
K = Cartridge seal, versions without “K” are equipped with simple
mechanical seal
S = Lantern orientation align with
suction pipe
X = X-Care version
400
460
Motor electrical
voltage ( V )
50
60
Motor frequency ( Hz)
xxxx Options code (if any)
Page 9

17
English
WILO SE 03/2016
5.2 Technical data
Outline and pipe dimensions (Fig. 4).
5.3 Scope of Supply
• Multistage pump.
• Installation and operating instructions.
Maximum operating pressure
Pump casing 16, 25 ou 30 bars depend on the model
Maximum suction pressure
10 bars
Note:realinletpressure(Pinlet)+pressureat0owdeliveredbythe
pump must be below the maximum operating pressure of the pump. In
case of exceeding maximum operating pressure, the ball bearing and the
mechanical seal could be damaged or lifetime could decrease.
PInlet+Pat0ow≤Pmaxpump
See pump nameplate to know the maximum operating pressure: Pmax
Temperature range
Liquid temperatures
-20°C to +120 °C
-30°C to +120° C (if full stainless steel)
-15°C to + 90°C (Viton version for O’ring and mechanical seal )
Ambient temperature
-15° to +40 °C
Other temperature on request
Electrical data
Motor efciency Motor according to IEC 60034-30
Motor Protection index IP 55
Insulation class 155 (F)
Frequency See motor plating
Electrical voltage See motor plating
Other data
Humidity < 90% sans condensation
Altitude
< 1000 m
(> 1000m on request)
Maximum suction head according to NPSH of the pump
Sound pressure level dB(A)
0/+3 dB(A)
Power (kW)
0.37 0.55 0.75 1.1 1.5 2.2 3 4 5.5 7.5 11 15 18.5 22 30 37 45
50Hz 56 57 58 62 64 68 69 71 74
76
60Hz 60 61 63 67 71 72 74 78 81
84
Page 10

18
English
5.4 Accessories
Original accessories are available for HELIX range:
The use of new accessories is recommended.
6. Description and function
6.1 Product description
FIG. 1
1 - Motor connection bolt
2 - Coupling guard
3 - Mechanical seal
4- Hydraulic stage casing
5 - Impeller
6 - Pump shaft
7 - Motor
8 - Coupling
9 - Lantern
10 - Tube liner
11 - Flange
12 - Pump housing
13 - Base plate
FIG. 2, 3
1 - Strainer
2 - Pump suction valve
3 - Pump discharge valve
4 - Check valve
5 - Drain + priming plug
6 - Air bleed screw + Filling plug
7 - Tank
8 - Foundation block
9 - In option : pressure plugs (a-suction,
b-discharge)
10 - Lifting hook
6.2 Design of product
• HELIX pumps are vertical high pressure non-self
priming pumps with inline connection based on
multistage design.
• HELIX pumps combine use of both high efficiency hydraulics and motors (if any).
• All metallic parts in contact with water are made
of stainless steel or grey cast iron.
• For aggressive fluid, special versions exist with
stainless steel only for all wetted components.
• Helix pumps are equipped with a simple mechanical seal or with a cartridge seal to facilitate
maintenance.
• In addition, for heaviest motor, a specific coupling allows to change this seal without removing the motor.
• HELIX lantern design integrates an additional ball
bearing that withstand hydraulic axial forces: this
allows the pump to use a fully standard motor.
• Special handling devices are integrated in order
to facilitate pump installation (Fig. 8).
7. Installation and electrical connection
Installation and electrical work in compliance
with any local codes and by qualified personnel
only.
WARNING! Bodily injury!
Existing regulations for the prevention of accidents must be observed.
WARNING! Electrical shock hazard!
Dangers caused by electrical energy must be
excluded.
7.1 Commissioning
Unpack the pump and dispose of the packaging
in an environmentally-responsible manner.
7.2 Installation
The pump must be installed in a dry, well-ventilated and frost-free place.
CAUTION! Possible damage of the pump!
Dirt and solder drops in to the pump body can
effect the pump operation.
• It is recommended that any welding and soldering work be done before installing the pump.
• Thoroughly flush the system out before
installing the pump.
- The pump must be installed in an easily accessible position to facilitate inspection or replacement.
- For heavy pumps, install a lifting hook (Fig. 2,
item 10) above the pump in order to ease its
disassembly.
WARNING! Risk of accident by hot surfaces!
The pump must be positioned so that someone
cannot come into contact with the hot pump
surfaces while operation.
- The pump must be installed in an easily accessible position to facilitate inspection or replacement.
WARNING! Risk of fall!
The pump must be screwed to the ground.
Designation
Article no.
2
Round counterflanges, stainless steel,
1.4404 (PN16 – DN50) 4038587
2
Round counterflanges, stainless steel,
1.4404 (PN25 – DN50) 4038589
2 Round counterflanges, steel,
(PN16 – DN50) 4038585
2 Round counterflanges, steel,
(PN25 – DN50) 4038588
2
Round counterflanges, stainless steel,
1.4404 (PN16 – DN65) 4038592
2
Round counterflanges, stainless steel,
1.4404 (PN25 – DN65) 4038594
2 Round counterflanges, steel,
(PN16 – DN65) 4038591
2 Round counterflanges, steel,
(PN25 – DN65) 4038593
2
Round counterflanges, stainless steel,
1.4404 (PN16 – DN80) 4073797
2
Round counterflanges, stainless steel,
1.4404 (PN25 – DN80) 4073799
2 Round counterflanges, steel,
(PN16 – DN80) 4072534
2 Round counterflanges, steel,
(PN25 – DN80) 4072536
Bypass kit 25 bar
4124994
Bypass kit (with pressure gauge 25 bar)
4124995
Baseplate with dampers for pumps up to 5.5kW
4157154
WILO SE 03/2016
Page 11

19
English
- Place the pump where it will be easy to reach, to
facilitate inspection and removal work. The pump
must always be installed perfectly upright on a
sufficiently heavy concrete base.
CAUTION! Risk of parts inside the pump!
Take care to remove closure members of the
pump housing before installation.
NOTE: Each pumps could be tested regarding
hydraulic features in factory, some water may
remain in them. It is recommended for hygienic
purposes, to carry out a rinsing of the pump
before any using with potable water supply.
- The installation and connection dimensions are
given § 5.2.
- Lift the pump carefully by using the integrated
hooks rings, if necessary with a hoist and suitable
slings according to the current hoist guidelines.
WARNING! Risk of fall!
Take care to pump fixations especially for the
highest pumps whose centre of gravity may lead
to risk during pump handling.
WARNING! Risk of fall!
Use integrated rings only if they are not damaged
(no corrosion ...). Replace them if needed.
WARNING! Risk of fall!
The pump must be never carried by using motor
hooks: these are only designed to lift the motor
alone.
7.3 Pipe connection
- Connect the pump to the pipes by using appropriate counterflanges, bolts, nuts and gaskets.
CAUTION!
Tightening of bolts must not exceed 80 Nm
Use of impact wrench is prohibited.
- The circulation sense of the fluid is indicated on
the identification label of the pump.
- Pump must be installed in such a way that it is
not stressed by the pipework. The pipes must be
attached so that the pump does not bear their
weight.
- It is recommended that isolation valves be installed on the suction and discharge side of the
pump.
- Use of expansion joints may mitigate noise and
vibration of the pump.
- As regards the nominal cross-section of the suction pipe, we recommend a cross-section at least
as large as that of the pump connection.
- A check valve could be placed on the discharge
pipe in order to protect the pump against hammer shock.
- For direct connection to a public drinking water
system, the suction pipe must also have a check
valve and a guard valve.
- For indirect connection via a tank, the suction
pipe must have a strainer to keep any impurities
out of the pump and a check valve.
- In case of half flanges pump design, it is recommended to connect the hydraulic network and
then keep out the plastic fixation links to prevent any leakage risk.
7.4 Motor connection for bare-shaft pump
(without motor)
- Remove coupling guards.
NOTE: Helix pumps are equipped with captive
screws as required in the Machinery Directive.
- Install the motor on the pump by using screws
(FT lantern size – see product designation) or
bolts, nuts and handling devices (FF lantern
size – see product designation) provided with
the pump : check motor power and dimension in
WILO catalogue.
NOTE: Depending on fluid characteristics,
motor power could be modified. Contact WILO
Customer Services if needed.
- Close the coupling guards by screwing all screws
provided with the pump.
7.5 Electrical connection
WARNING! Electrical shock hazard!
Dangers caused by electrical energy must be
excluded.
• Electrical work by a qualified electrician only!
• All electrical connections must be performed
after the electrical supply has been switched off
and secured against unauthorized switching.
• For safe installation and operation a proper
grounding of the pump to the power supply’s
grounding terminals is required.
- Check that operating current, voltage and frequency used comply with motor plating data.
- The pump must be connected to the power supply by a solid cable equipped with a grounded
plug-connection or a main power switch.
- Three-Phase motors must be connected to an
approved motor starter. The set nominal current
must correspond to the electrical data on the
pump motor name plate
- The supply cable must be laid so that it never touches
the pipework and/or the pump and motor casing.
- The pump/installation should be grounded in
compliance with local regulations. A ground fault
interrupter can be used as extra protection.
- The connection to the network must be in
accordance with the connection plan (Fig. 5).
7.6 Operation with frequency converter
- Motors used can be connected to a frequency
converter in order to adapt pump performance to
duty point.
- The converter must not generate voltage peaks
at motor terminals higher than 850V and dU/dt
slope higher than 2500 V/µs.
- In case of higher value, an appropriate filter must
be used : contact converter manufacturer for this
filter definition and selection.
- Strictly follow instructions provided by the
converter manufacturer data sheet for installation.
- Minimum variable speed should not be set below
40% of pump nominal speed.
WILO SE 03/2016
Page 12

WARNING!
When the pumped liquid is hot and the pressure
high, the stream escaping at the air bleed screw
may cause burns or other injuries.
- Open the guard valve on the discharge side completely (3).
- Close the drain-priming plug (5a).
8.2 Starting up
CAUTION!
The pump must not operate at zero flow (closed
discharge valve).
WARNING! Risk of injury!
When the pump runs, coupling guards must be in
place, tightened with all appropriate screws.
WARNING! Important noise!
Noise emitted by most powerful pumps could be
very high : protection must be used in case of long
stay close to the pump.
WARNING!
Installation must be designed in order that no one
could be hurt in case of fluid leakage (mechanical
seal failure …).
9. Maintenance - Service
All servicing should be performed by an authorized service representative!
WARNING! Electrical shock hazard!
Dangers caused by electrical energy must be
excluded.
All electrical work must be performed after the
electrical supply has been switched off and
secured against unauthorized switching.
WARNING! Risk of scalding!
At high water temperatures and system pressure
close isolating valves before and after the pump.
First, allow pump to cool down.
- These pumps are maintenance free. Nevertheless
a regular check is recommended every 15 000
hours.
- Optionally, the mechanical seal for certain
models can be replaced easily thanks to its cartridge design.
- In case of pump with half flanges design and installation again after maintenance operation, it is
suggested to add plastic link to maintain in easy
way the half flanges together.
- For pumps equipped with one grease feeder (Fig.
7, pos. 1), respect lubrication frequences mentioned on sticker glued on lantern part (2).
- Insert its adjusting wedge in its housing (Fig. 6)
once mechanical seal position is set.
- Always keep the pump perfectly clean.
- Pumps which are not being used during periods
of frost should be drained to avoid damage:
Close the guard valves, open completely the
drain-priming plug and the air bleed screw.
- Service life : 10 years depending on the operating
conditions and whether all requirements described
in the operation manual have been met.
20
English
8. Start up
8.1 System filling - Venting
CAUTION! Possible damage of the pump!
Never operate the pump dry.
The system must be filled before starting the
pump.
8.1.1 Air evacuation process – Pump with sufficient
supply pressure (Fig. 3)
- Close the two guard valves (2, 3).
- Unscrew the air bleed screw from filling plug
(6a).
- Slowly open the guard valve on the suction side
(2).
- Retighten the air-bleed screw when air escapes
at the air bleed screw and the pumped liquid
flows (6a).
WARNING!
When the pumped liquid is hot and the pressure
high, the stream escaping at the air bleed screw
may cause burns or other injuries.
- Open the guard valve on the suction side completely (2).
- Start the pump and check if direction of rotation
matches the one printed on pump plating. If this
is not the case, interchange 2 phases in the terminal box.
CAUTION!
A wrong direction of rotation will cause bad
pump performances and possibly coupling
damage.
- Open the guard valve on the discharge side (3).
8.1.2 Air evacuation process – Pump in suction
(Fig. 2)
- Close the guard valve on the discharge side (3).
Open the guard valve on the suction side (2).
- Remove the filling plug with air bleed screw (6b).
- Open the drain-priming plug not completely
(5b).
- Fill the pump and the suction pipe with water.
- Make sure that there is no air in the pump and in
the suction pipe : refilling until complete removal
of air is required.
- Close the filling plug with air bleed screw (6b).
- Start the pump and check if direction of rotation
matches the one printed on pump plating. If this
is not the case, interchange two phases in the
terminal box.
CAUTION!
A wrong direction of rotation will cause bad
pump performances and possibly coupling
damage.
- Open the guard valve on the discharge side a
little (3).
- Unscrew the air bleed screw from filling plug for
air venting (6a).
- Retighten the air-bleed screw when air escapes
at the air bleed screw and the pumped liquid
flows.
WILO SE 03/2016
Page 13

21
English
WILO SE 03/2016
10. Defects - causes - remedies
WARNING! Electrical shock hazard!
Dangers caused by electrical energy must be excluded.
All electrical work must be performed after the
electrical supply has been switched off and
secured against unauthorized switching.
WARNING! Risk of scalding!
At high water temperatures and system pressure
close isolating valves before and after the pump.
First, allow pump to cool down.
If the fault cannot be solved, please
contact WILO customer services.
11. Spare parts
All spare parts must be ordered through WILO
Customer Services.
In order to avoid any mistakes, please specify the
name plate data for orders.
Spare parts catalogue is available at www.wilo.
com.
12. Safe disposal
Proper disposal and recycling of this product
prevents damage to the environment and risks to
personal health.
Disposal in accordance with the regulations
requires the product to be drained and cleaned.
Lubricants must be collected. The pump components are to be separated according to material
(metal, plastic, electronics).
1. Use public or private disposal organizations
when disposing of all or part of the product.
2. For more information on proper disposal, please
contact your local
council or waste disposal office or the supplier
from whom you obtained the product.
NOTE: The pump must not be disposed of along with
household waste. Further information on recycling
can be found at www.wilo-recycling.com.
Subject to technical alterations!
Defects Causes Remedies
Pump fails to operate No current Check the fuses, the wiring, and the
connectors
The thermistor tripping device has tripped out, cutting off power
Eliminate any cause of overloading of the
motor
Pump runs but delivers too little Wrong direction of rotation Check the direction of rotation of the
motor and correct it if necessary
Parts of the pump are obstructed by foreign bodies
Check and clean the pipe
Air in suction pipe Make the suction pipe airtight
Suction pipe too narrow Install a larger suction pipe
The valve is not open far enough Open the valve properly
Pump delivers unevenly Air in pump Evacuate the air in the pump; check that
the suction pipe is airtight. If required,
start the pump 20-30s – open the air
bleed screw in order to move air away
– close the air bleed screw and repeat it
several times until no more air is going
out of the pump
Pump vibrates or is noisy Foreign bodies in pump Remove the foreign bodies
Pump not properly attached to ground Retighten the screws
Bearing damaged Call WILO Customer Service
Motor overheats. Its protection trips out A phase is open-circuit Check the fuses, the wiring, and the
connectors
Ambient temperature too high Provide cooling
Mechanical seal is leaking Mechanical seal is damaged Replace the mechanical seal
Page 14

Wilo – International (Subsidiaries)
Argentina
WILO SALMSON
ArgentinaS.A.
C1295ABI Ciudad
Autónoma de Buenos Aires
T+ 54 11 4361 5929
info@salmson.com.ar
Australia
WILO Australia Pty Limited
Murrarrie, Queensland,
4172
T +61 7 3907 6900
chris.dayton@wilo.com.au
Austria
WILO Pumpen
ÖsterreichGmbH
2351 Wiener Neudorf
T +43 507 507-0
office@wilo.at
Azerbaijan
WILO Caspian LLC
1014 Baku
T +994 12 5962372
info@wilo.az
Belarus
WILO Bel OOO
220035 Minsk
T +375 17 2535363
wilo@wilo.by
Belgium
WILO SA/NV
1083Ganshoren
T +32 2 4823333
info@wilo.be
Bulgaria
WILOBulgariaLtd.
1125 Sofia
T +359 2 9701970
info@wilo.bg
Brazil
WILO Brasil Ltda
Jundiaí – São Paulo – Brasil
ZIPCode:13.213-105
T +55 11 2923 (WILO)
9456
wilo@wilo-brasil.com.br
Canada
WILOCanadaInc.
Calgary, Alberta T2A 5L4
T +1 403 2769456
bill.lowe@wilo-na.com
China
WILOChinaLtd.
101300 Beijing
T +86 10 58041888
wilobj@wilo.com.cn
Croatia
WiloHrvatskad.o.o.
10430 Samobor
T +38 51 3430914
wilo-hrvatska@wilo.hr
Czech Republic
WILOCS,s.r.o.
25101Cestlice
T +420 234 098711
info@wilo.cz
Denmark
WILO Danmark A/S
2690 Karlslunde
T +45 70 253312
wilo@wilo.dk
Estonia
WILO Eesti OÜ
12618 Tallinn
T +372 6 509780
info@wilo.ee
Finland
WILO Finland OY
02330 Espoo
T +358 207401540
wilo@wilo.fi
France
WILOS.A.S.
78390Boisd‘Arcy
T +33 1 30050930
info@wilo.fr
Great Britain
WILO(U.K.)Ltd.
Burton Upon Trent
DE14 2WJ
T +44 1283 523000
sales@wilo.co.uk
Greece
WILOHellasAG
14569 Anixi (Attika)
T +302 10 6248300
wilo.info@wilo.gr
Hungary
WILOMagyarországKft
2045Törökbálint
(Budapest)
T +36 23 889500
wilo@wilo.hu
India
WILOIndiaMatherand
PlattPumpsLtd.
Pune 411019
T +91 20 27442100
services@matherplatt.com
Indonesia
WILO Pumps Indonesia
Jakarta Selatan 12140
T +62 21 7247676
citrawilo@cbn.net.id
Ireland
WILO Ireland
Limerick
T +353 61 227566
sales@wilo.ie
Italy
WILOItalias.r.l.
20068Peschiera
Borromeo (Milano)
T +39 25538351
wilo.italia@wilo.it
Kazakhstan
WILO Central Asia
050002 Almaty
T +7 727 2785961
info@wilo.kz
Korea
WILOPumpsLtd.
618-220Gangseo,Busan
T +82 51 950 8000
wilo@wilo.co.kr
Latvia
WILOBalticSIA
1019 Riga
T +371 6714-5229
info@wilo.lv
Lebanon
WILO LEBANON SARL
Jdeideh12022030
Lebanon
T +961 1 888910
info@wilo.com.lb
Lithuania
WILOLietuvaUAB
03202 Vilnius
T +370 5 2136495
mail@wilo.lt
Morocco
WILO MAROC SARL
20600 CASABLANCA
T + 212 (0) 5 22 66 09
24/28
contact@wilo.ma
The Netherlands
WILONederlandb.v.
1551NAWestzaan
T +31 88 9456 000
info@wilo.nl
Norway
WILO Norge AS
0975 Oslo
T +47 22 804570
wilo@wilo.no
Poland
WILOPolskaSp.z.o.o.
05-506Lesznowola
T +48 22 7026161
wilo@wilo.pl
Portugal
Bombas Wilo-Salmson
PortugalLda.
4050-040 Porto
T +351 22 2080350
bombas@wilo.pt
Romania
WILORomanias.r.l.
077040Com.Chiajna
Jud.Ilfov
T +40 21 3170164
wilo@wilo.ro
Russia
WILO Rus ooo
123592Moscow
T +7 495 7810690
wilo@wilo.ru
Saudi Arabia
WILOME-Riyadh
Riyadh11465
T +966 1 4624430
wshoula@wataniaind.com
Serbia and Montenegro
WILOBeogradd.o.o.
11000 Beograd
T +381 11 2851278
office@wilo.rs
Slovakia
WILOCSs.r.o.,org.Zložka
83106Bratislava
T +421 2 33014511
info@wilo.sk
Slovenia
WILOAdriaticd.o.o.
1000 Ljubljana
T +386 1 5838130
wilo.adriatic@wilo.si
South Africa
SalmsonSouthAfrica
1610Edenvale
T +27 11 6082780
errol.cornelius@
salmson.co.za
Spain
WILOIbéricaS.A.
28806AlcaládeHenares
(Madrid)
T +34 91 8797100
wilo.iberica@wilo.es
Sweden
WILOSverigeAB
35246 Växjö
T +46 470 727600
wilo@wilo.se
Switzerland
EMBPumpenAG
4310Rheinfelden
T +41 61 83680-20
info@emb-pumpen.ch
Taiwan
WILOTaiwanCompanyLtd.
SanchongDist.,NewTaipei
City 24159
T +886 2 2999 8676
nelson.wu@wilo.com.tw
Turkey
WILO Pompa Sistemleri
San.veTic.A.S¸.
34956İstanbul
T +90 216 2509400
wilo@wilo.com.tr
Ukraina
WILOUkrainat.o.w.
01033Kiew
T +38 044 2011870
wilo@wilo.ua
United Arab Emirates
WILO Middle East FZE
JebelAliFreeZone–South
PO Box 262720 Dubai
T +971 4 880 91 77
info@wilo.ae
USA
WILO USA LLC
Rosemont, IL 60018
T +1 866 945 6872
info@wilo-usa.com
Vietnam
WILOVietnamCoLtd.
HoChiMinhCity,Vietnam
T +84 8 38109975
nkminh@wilo.vn
May 2013Furthersubsidiaries,representationandsalesofficesonwww.wilo.com
Page 15

Pioneering for You
WILO SE
Nortkirchenstraße 100
D-44263 Dortmund
Germany
T +49(0)231 4102-0
F +49(0)231 4102-7363
wilo@wilo.com
www.wilo.com
 Loading...