

Page 1
(READ AND FALLOW ALL SAFETY INSTRUCTIONS)
Quick Reference Guide
Page 2
How to operate the
App?
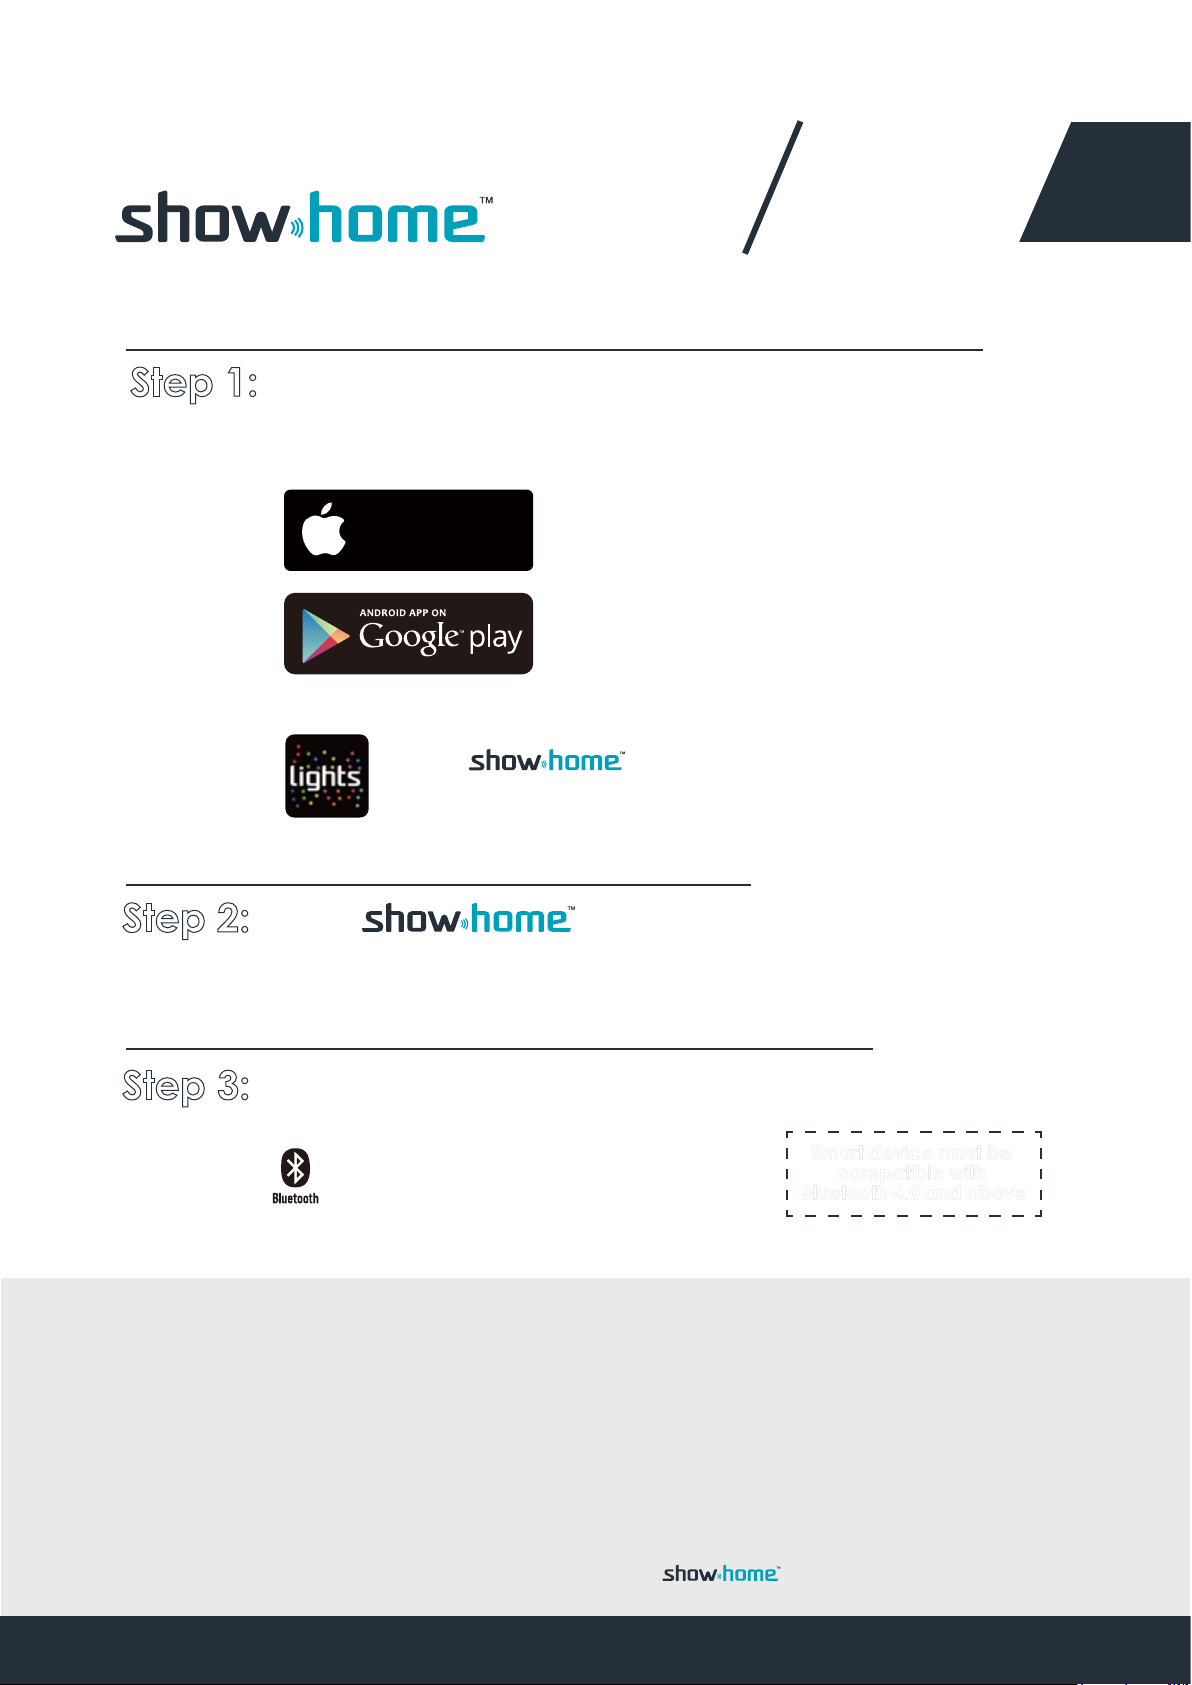
Step 1: Download your Free Showhome App
for your smartphone at:
Available on the
App Store
2
Type in the
search option of either store and look for this icon.
Step 2: Plug item.
into an electrical socket.
Step 3: Turn ON Bluetooth function.
Make sure your Bluetooth on
your smartphone is turned on.
Smart device must be
compatible with
Bluetooth 4.0 and above
Smartphone compatibility
· Android 4.3 or higher version,Supporting 4.0 Bluetooth.
· iOS 7.0 orhigher version,iPhone:4S,5,5S,6,6+,6S,6S+,SE,7,7+,8,8+,X.
· iPad:iPad3,ipadmini(1,2,3,4 series),iPad Air(1,2 series),iPad Pro.
· iPod touch
Depending on what phone you use,there could be a delay of 10
seconds before your phone fully synce with your .
Page 3
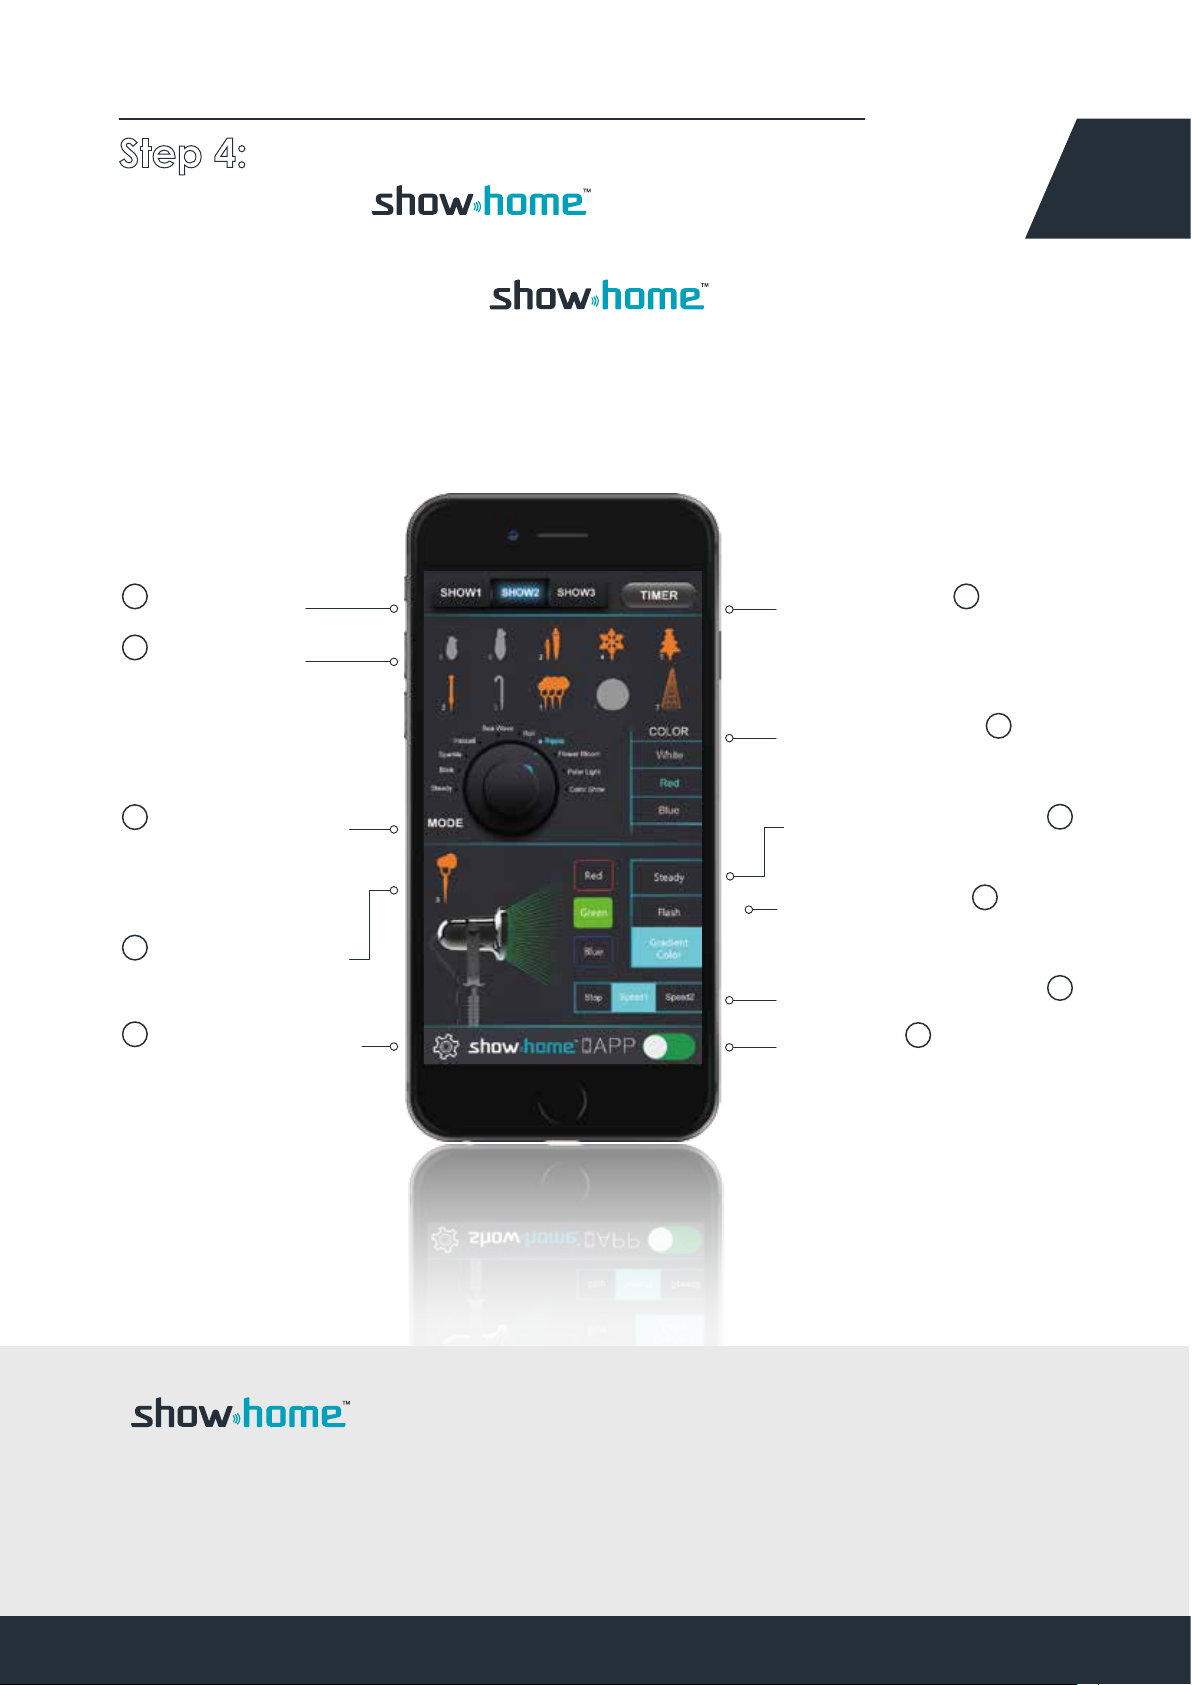
Step 4: You're now ready to control
your App product.
This is the MAIN MENU and
function of App.
3
2
Light Shows
4
ShowHome
Products
Sync all ShowHome
Products
5
Product Mode
Customise Specific
light elements of
your show.
7
Laser projector
Control
11
Function settings
Timer Settings
Color Reference
Laser projector Mode
Color mode of
laser projector
Laser projector Motor
ON / OFF
3
6
8
1
9
10
App+
ShowHome App is the most advanced way to control all your lights.
Easily switch between colors and lighting effects. Combine colors with
lighting effects and find the setting that works best for you.
Page 4
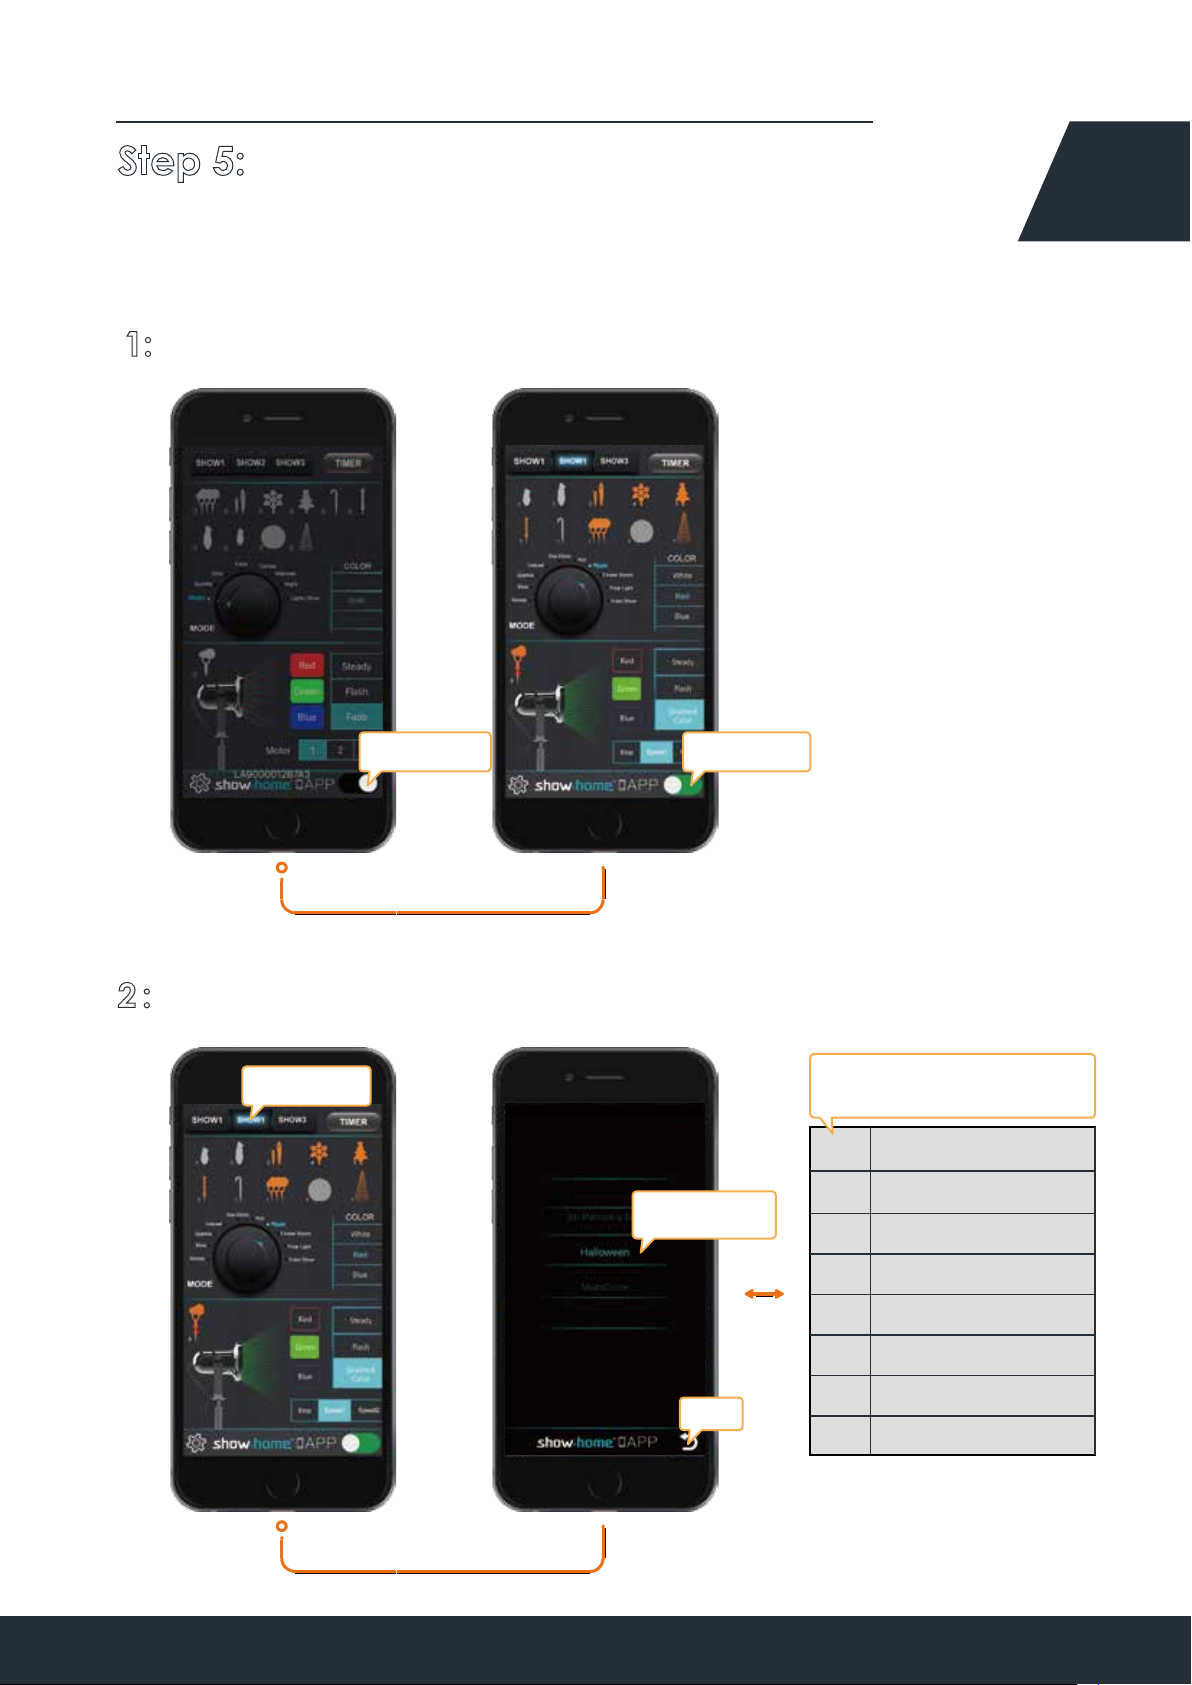
Step 5: Control your products with the
below 11 main functions on your App.
1: ON / OFF (Tap to turn On or Off)
4
Tap to Turn On
Tap to Turn Off
2 : Light Shows (Customizing your show mode)
Tap to Select
Swipe Up or Down
Sliding Selection
There are 7 kinds of show
modes to choose from
Light Shows
No.
1
Christmas Day
2
Valentines' Day
3
Independence Day
4
Thanksgiving Day
Return
5
St. Patrick's day
6
Halloween
7
MultiColor
Page 5
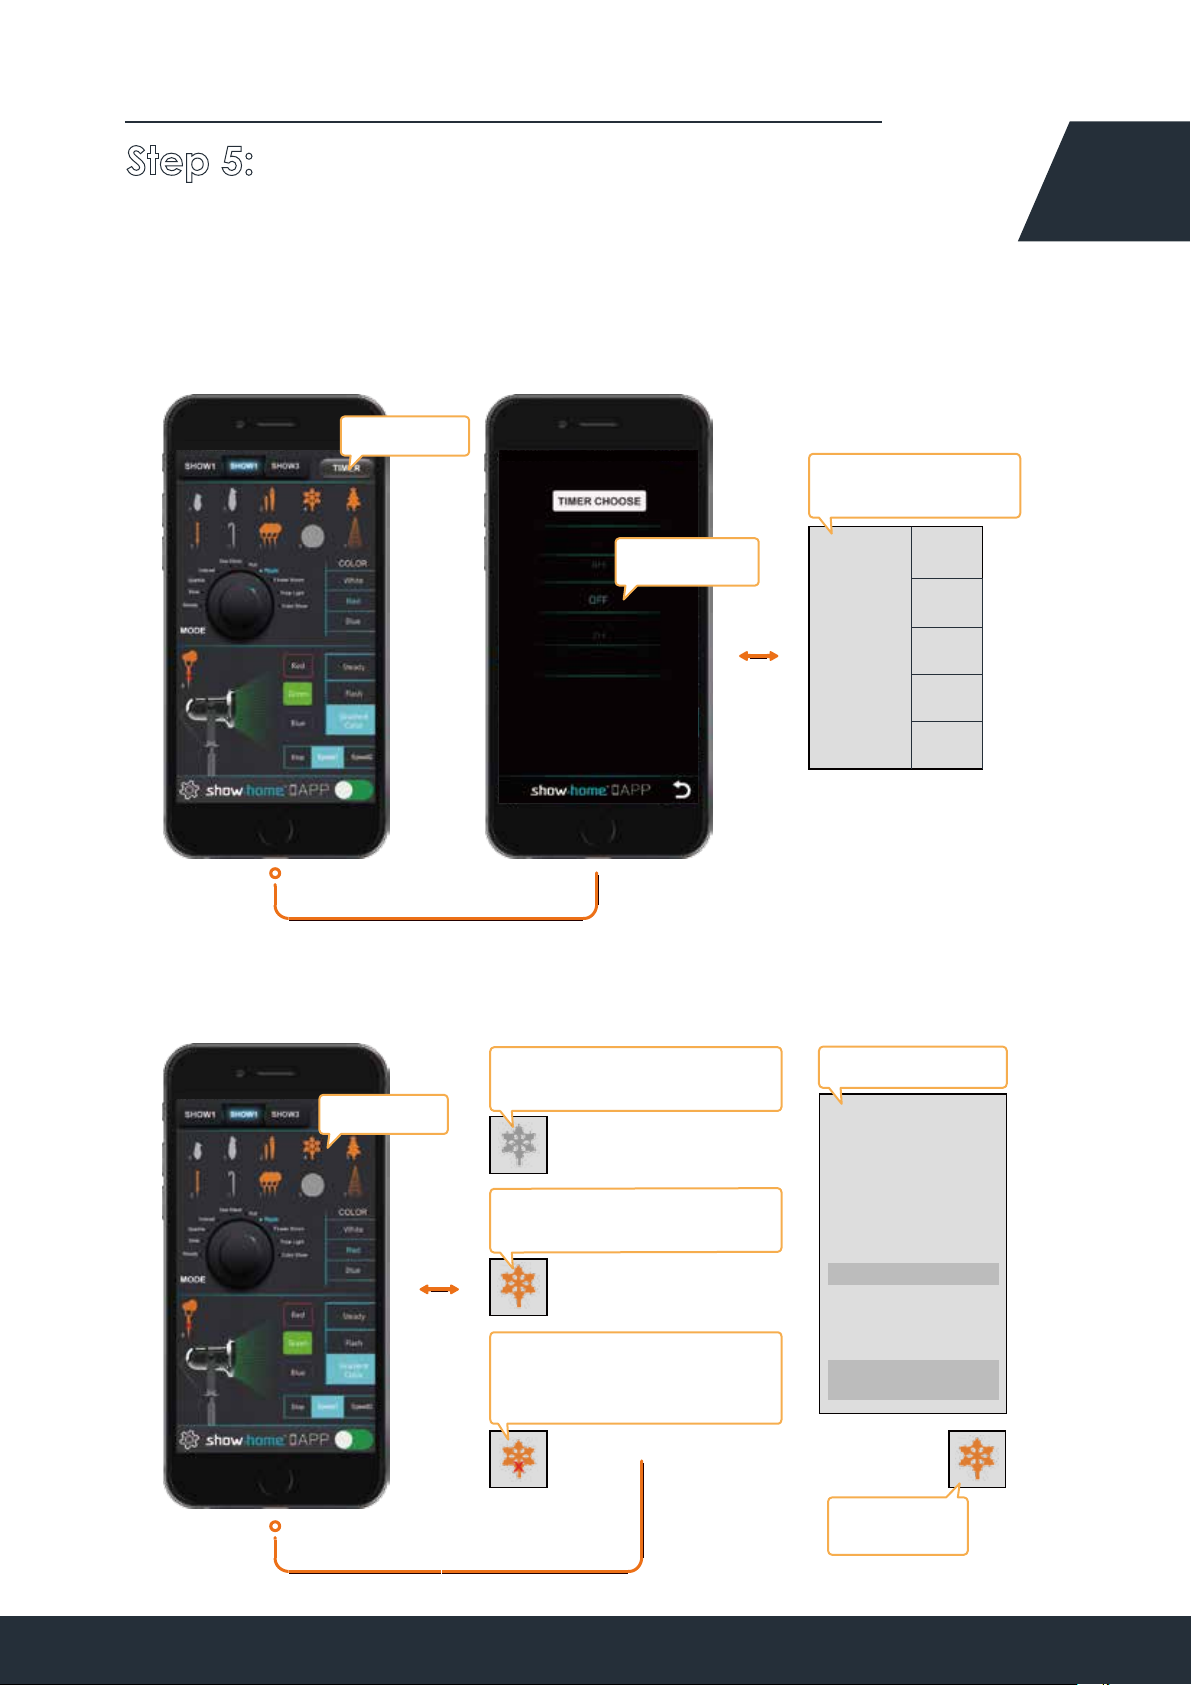
Step 5: Control your products with the
below 11 main functions on your App.
3: Timer Settings (Set and cancel the time you want)
Tap to Select
Timer Options or
Turn Timer off
5
Swipe Up or Down
Sliding Selection
TIMER
OFF
2H
4H
6H
8H
4: ShowHome Products (Sync all ShowHome products)
Gray icon:
Devices are not connected
Tap to Switch
0
Orange icon:
Devices are connected
4
Orange icon with X :
Stays in current function,
and cannot changed.
Troubleshooting
After the product is
plugged into the
power supply and the
APP does not display
a connection. It may
be because of:
1,The product has not
started normally.
(Resolve: Repower)
2,The product has
been set up a
password.
(Resolve:
Reelectric 3 times)
4
Number of
connections
4
Page 6
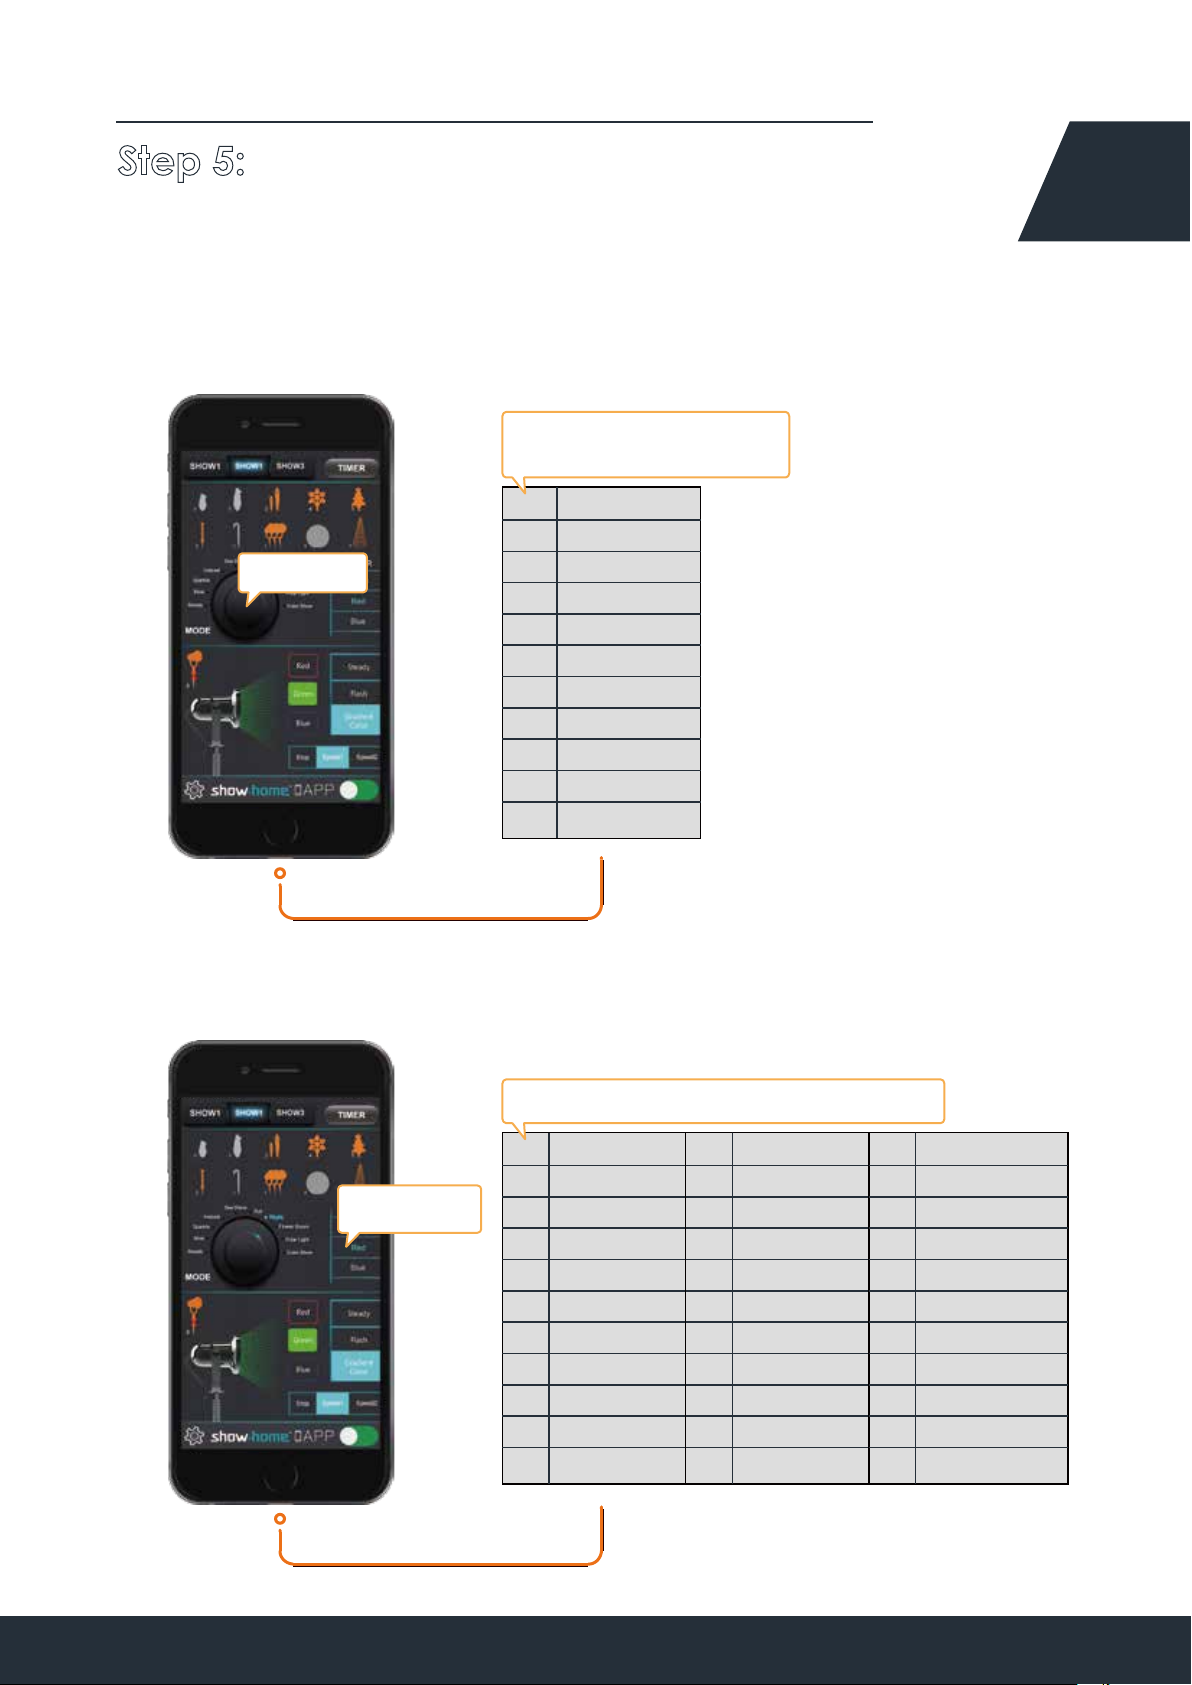
Step 5: Control your products with the
below 11 main functions on your App.
5: Product Mode (Customize your show mode)
There are 10 kinds of show
modes to choose from
No.
Mode Name
Steady
1
Blink
Tap to Select
2
Sparkle
3
Instead
4
Fade
5
Roll
6
Ripple
7
Fireworks
8
Polar Light
9
Color Show
10
6
6: Color Reference (Customize your show color)
There are 28 color patterns to choose from
Up or Down
Sliding Selection
Color NameNo.
Red
1
Green
2
Gule
3
Orange
4
Pink
5
Aque
6
Gold
7
Fuchsia
8
Lawn green
9
Magenta
10
Color NameNo.
Cyan
11
Yellow
12
purple
13
Pure white
14
Cold white
15
Spring
16
Summer
17
Autumn
18
Winter
19
Christmas day
20
Color NameNo.
Valentines' day
21
Independence day
22
Thanksgiving Day
23
St. Patrick's day
24
Halloween
25
Sun
26
Earth
27
Multi Color
28
Page 7
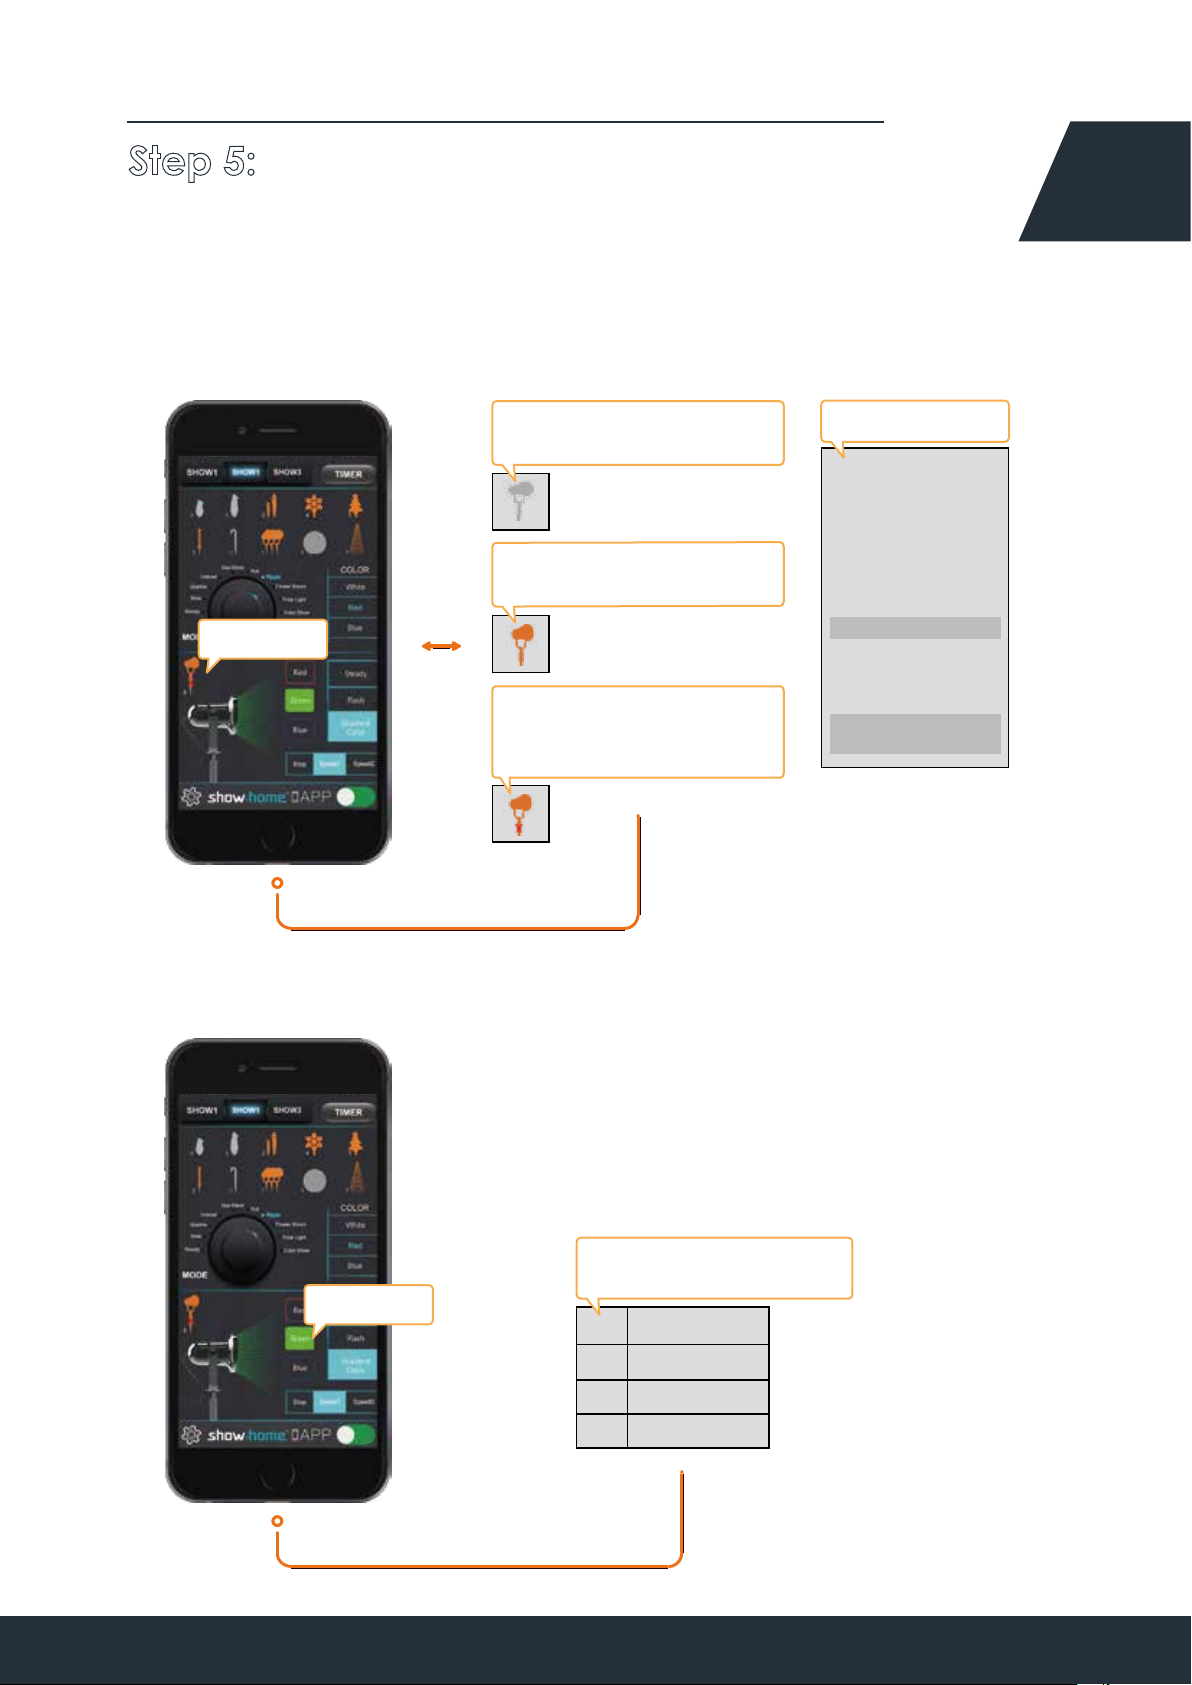
Step 5: Control your products with the
below 11 main functions on your App.
7: Laser Projector Control (Tap to Control )
7
Gray icon:
Devices are not connected
0
Orange icon:
Devices are connected
Tap to Switch
3
Orange icon with X :
Stay in current function,and
cannot by any click.
3
Troubleshooting
After the product is
plugged into the
power supply, APP
does not display the
connection. It may
be:
1,The product has no
normal start.
(Resolvent: REpower)
2,The product has
been set up a
password.
(Resolvent:
Reelectric 3 times)
8: Laser Projector Color Reference (Multiple choices )
Tap to Select
There are 3 color patterns
to choose from
No.
Color Name
Red1
Green
2
Bule
3
Page 8
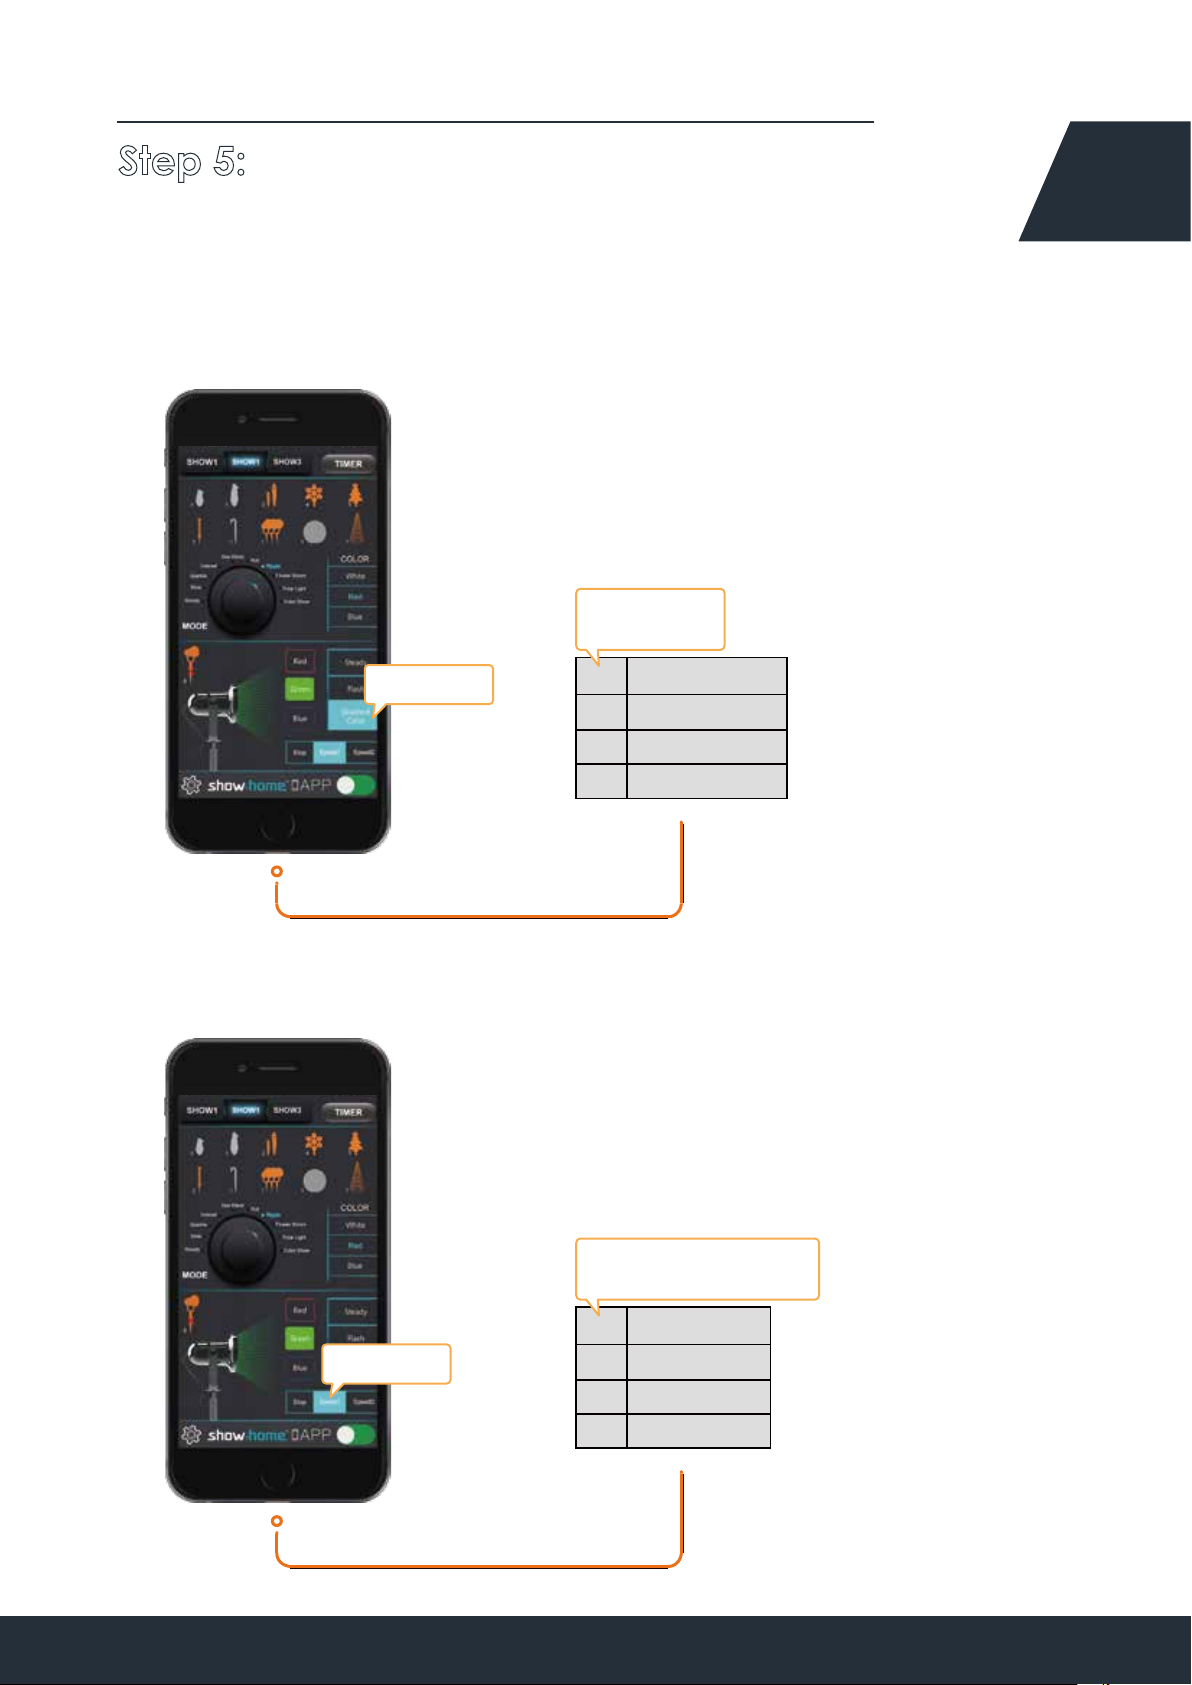
Step 5: Control your products with the
below 11 main functions on your App.
9: Laser Projector Mode (Customize mode)
3 models to
choose from
No.
Tap to Select
Mode Name
Steady
1
Flash
2
8
3
Gradient color
10: Laser Projector Motor(Customize motor)
3 options for the motor
to be controlled
No.
Motor Name
Stop
Tap to Select
1
2
Speed1
3
Speed2
Page 9
Step 5: Control your products with the
below 11 main functions on your App.
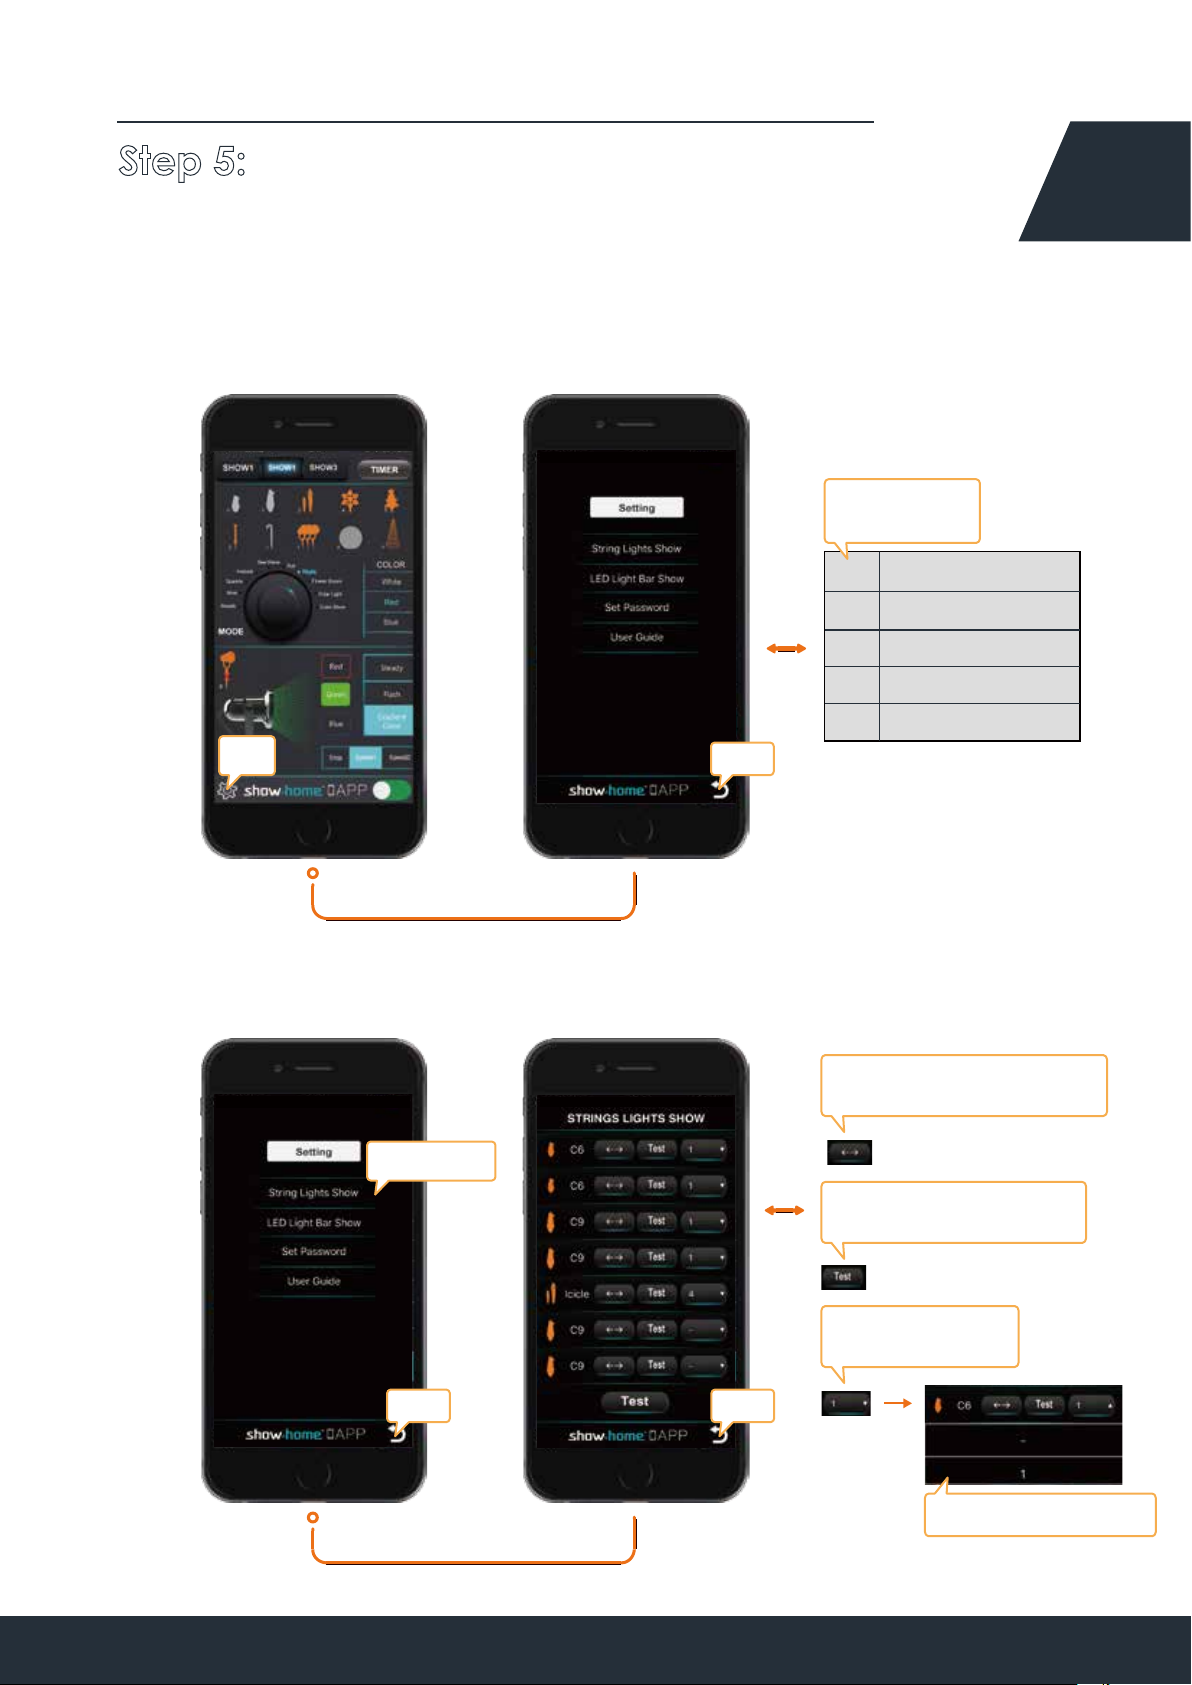
11: Function Setting (Main page )
Other settings
4 options
Setting name
No.
1
String lights show
2
LED light bar show
Set password
3
4 User guided
9
Tap
a. String Lights Show
Tap to Select
Return
Control the direction of the
lights flicker: left or right
Flashing light, prompting
its location
Set the sequence
of light flicker
ReturnReturn
Selection of numbers
Page 10
Step 5: Control your products with the
below 11 main functions on your App.
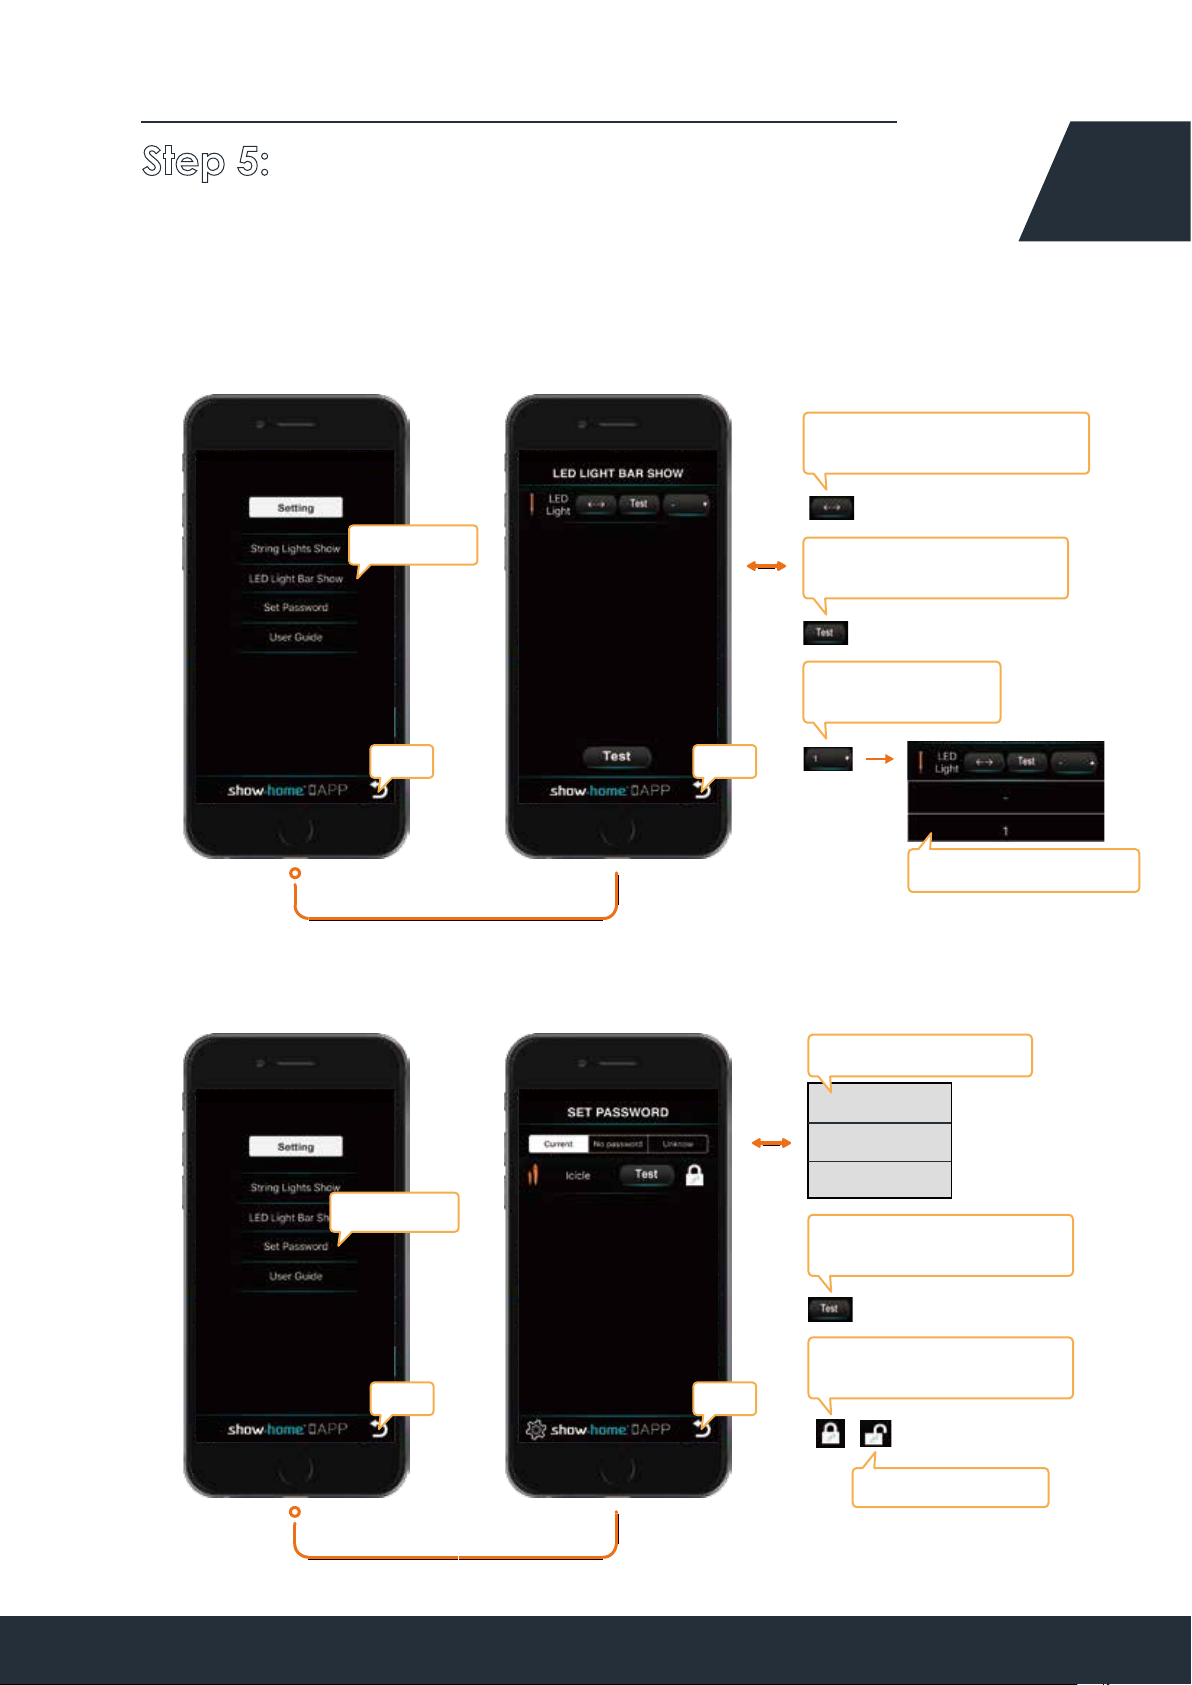
b. LED Light Bar Show
Control the direction of the
lights flicker: left or right
10
Tap to Selection
c. Set Password
Flashing light, prompting
its location
Set the sequence
of light flicker
ReturnReturn
Selection of numbers
3 states of the cipher
Current
Tap to Select
No Password
Unknow
Flashing light, prompting
its location
Lock the state, determine
the modification
ReturnReturn
Unencrypted state
Page 11
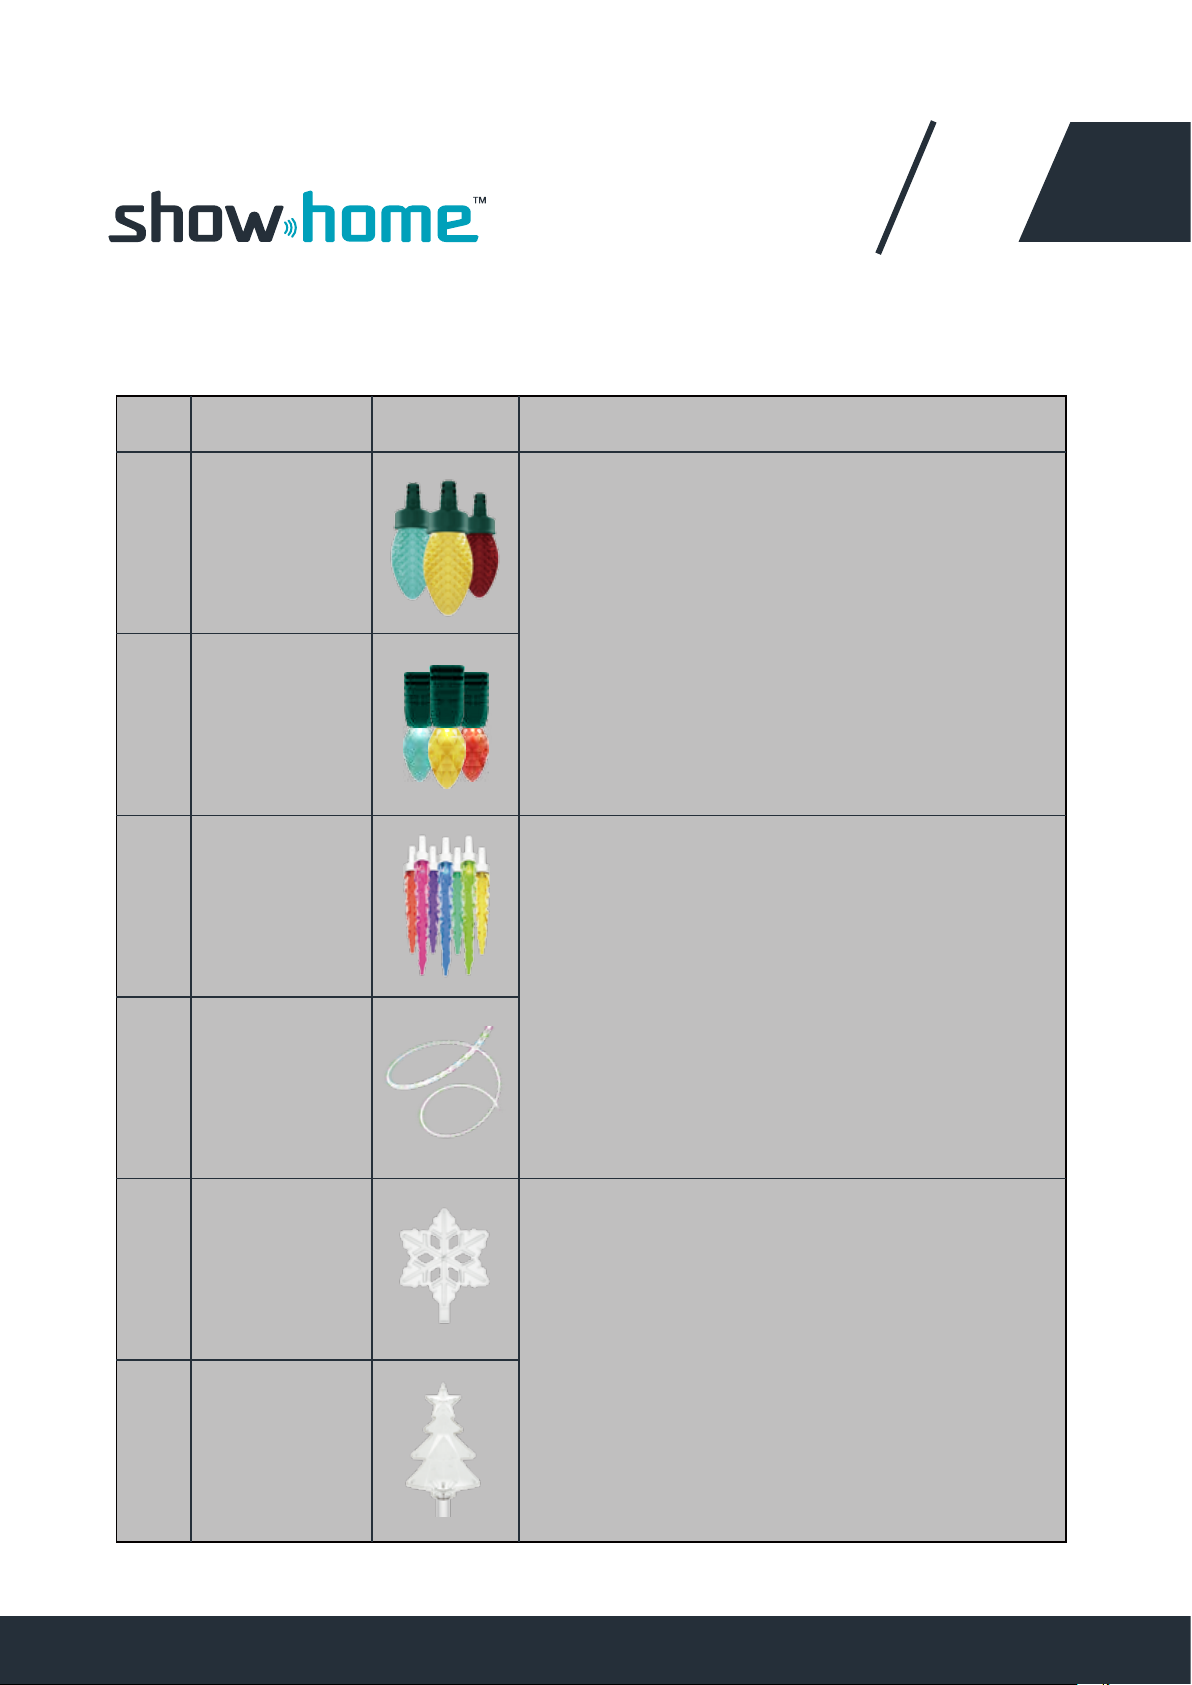
More information about
products
11 product parameters:
11
Product Name No. Picture
Function:
1. RGB Lights
C9 Lights 1
2
3
4
C6 Lights
Icicles
LED Light Strip
2. Timer
3. Function: 26 kinds of theme colors
Standard: 10 kinds of patterns
3 kinds of theme shows selected
4. with APP+Bluetooth Smart controled control
distance: >50m
5. with auto setting string lights illuminate sequentially
6. Multiple color+Super brightness
7. Control over 100 sets synchronized
Standard / Approval:
FCC / UL / Bluetooth Certified
Function:
1. RGB Lights
2. Timer
3. Function: 26 kinds of theme colors
Standard: 10 kinds of patterns
3 kinds of theme shows selected
4. with APP+Bluetooth Smart controled control
distance: >50m
5. with auto setting string lights illuminate sequentially
6. Multiple color+Super brightness
7. Control over 100 sets synchronized
Standard / Approval:
FCC / UL / Bluetooth Certified
Describe
Function:
1. RGB Lights
5
6
Snow Flake
Christmas Tree
2. Timer
3. Function: 26 kinds of theme colors
Standard: 10 kinds of patterns3 kinds of theme
shows selected
4. with APP+Bluetooth Smart controledcontrol
distance: >50m
5. Multiple color+Super brightness
6. Control over 100 sets synchronized
Standard / Approval:
FCC / UL / Bluetooth Certified
Page 12
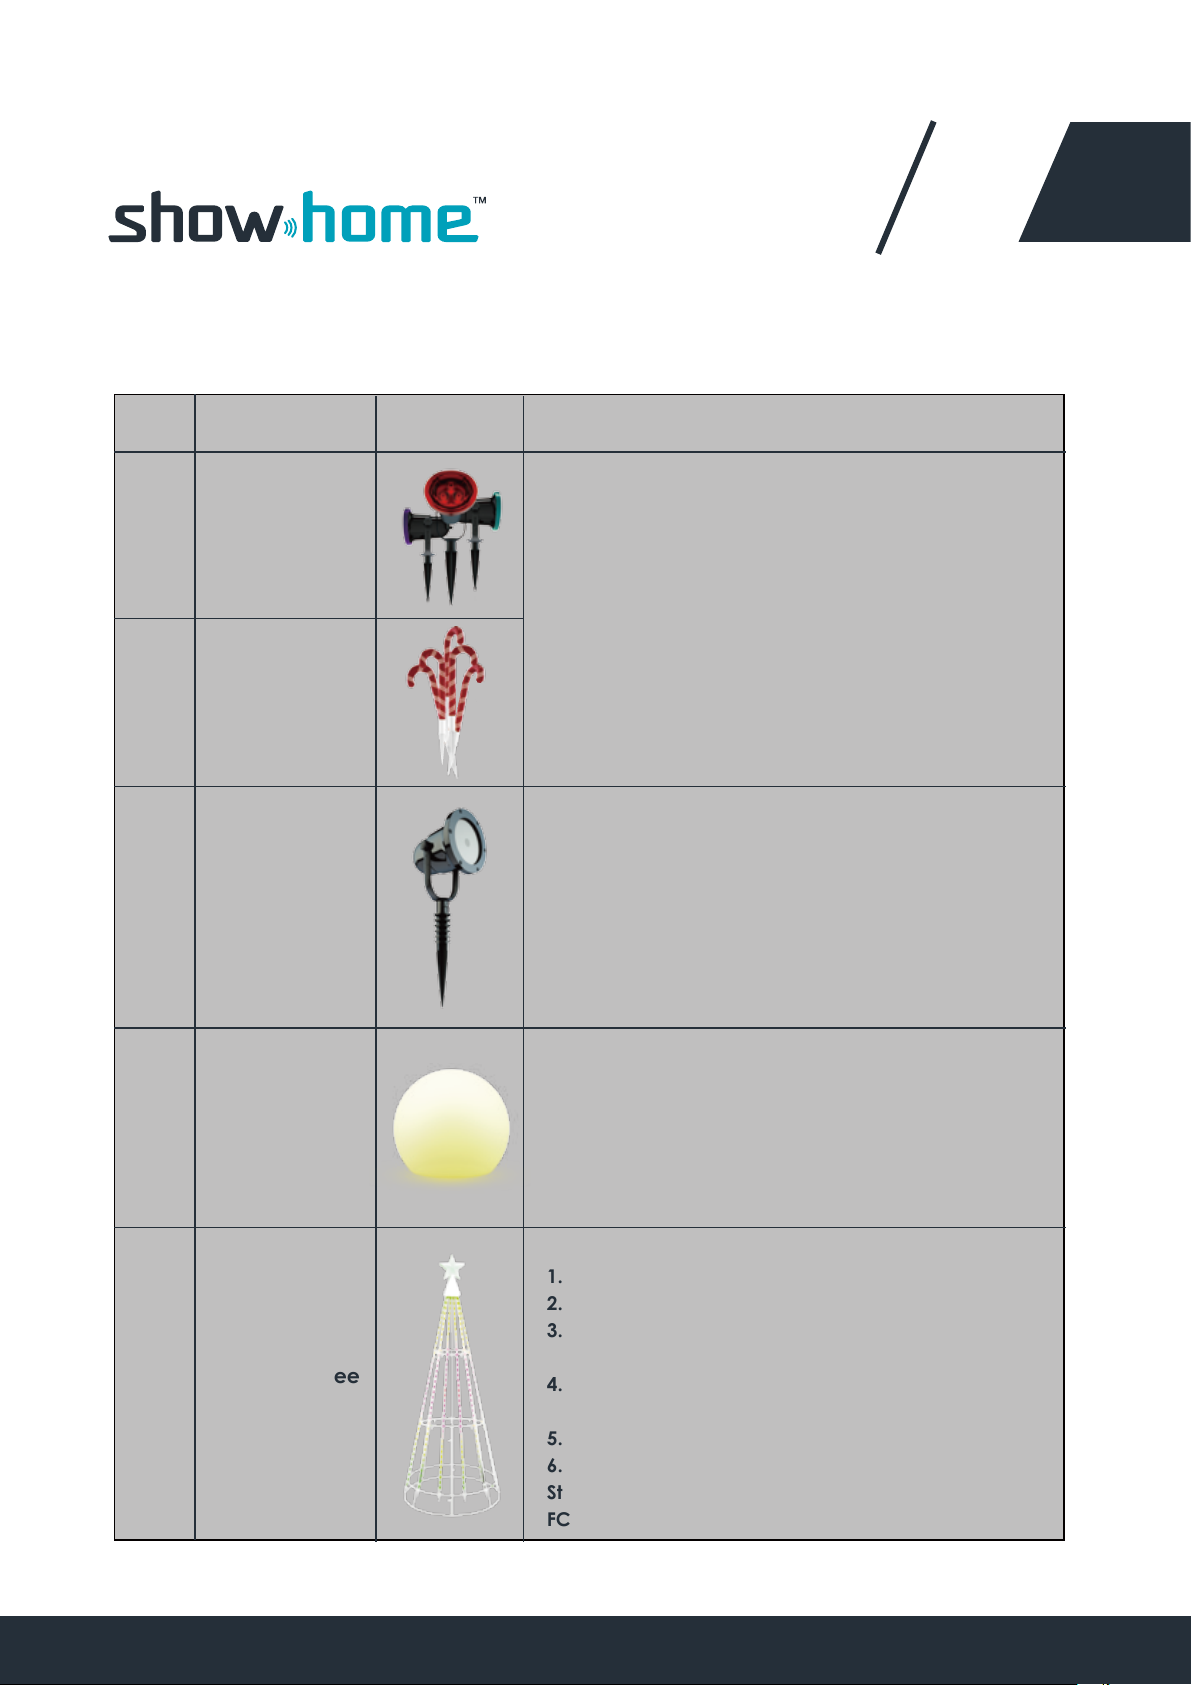
More information about
products
11 product parameters:
12
Product Name No. Picture
Function:
1. RGB Lights
7
8
9
LED Spotlights
Candy Canes
Laser RGB 3D
Hologram
Projector
2. Timer
3 . Function: 26 kinds of theme colors
Standard: 10 kinds of patterns 3 kinds of theme
shows selected
4. with APP+Bluetooth Smart controled control
distance: >50m
5. Multiple color+Super brightness
6. Control over 100 sets synchronized
Standard / Approval:
FCC / UL / Bluetooth Certified
Function:
1. RGB Lights
2. Timer
3. With APP+Bluetooth Smart controled
control distance: >50m
4. Control over 100 sets synchronized
5. Unique patterns show
6. Project distance: >10m
Standard / Approval:
FCC / UL / FDA / Bluetooth Certified
Describe
10
11
light Ball
RGB Show Tree
Function:
1. RGB & White Ligths
2. Timer
3. with APP+Bluetooth Smart controled control distance:>50m
4. Control over 100 sets synchronized
5. Unique patterns show
6. Battery supply Used for floating on water
Standard / Approval:
FCC / UL / Bluetooth Certified
Function:
1. RGB Lights
2. Timer
3. Function: 26 kinds of theme colors Standard:
10 kinds of patterns 3 kinds of theme shows selected
4. with APP+Bluetooth Smart controled control
distance: >50m
5. Multiple color+Super brightness
6. Control over 100 sets synchronized
Standard / Approval:
FCC / UL / Bluetooth Certified
Page 13
Frequently Asked Questions
My App can't connect with my products / devices
Q:
Connectivity issues mainly occur because of a week bluetooth signal.
A:
Try these steps and see if they help the connection.
1.Shorten the distance between your phone and the product.
2.Turn off bluetooth functionality on your phone, and turn back on it again, Try
recconnect the App with device again.
3.If the Above to options fail, then try cutting the power supply, take the plug out
of the socket. Once clear for a few second place the plug back in to the socket
and turn the power back on. Try recconnect the App with device again.
13
Q:
A:
Q:
A:
Q:
App can connect with devices, but there are no product
numbers displaying on the App, or product numbers are
visible, but App cannot connect and control the products.
1. This could be because of a bad connection to the power supply. Cut the power suppl,
unplug. Re insert the plug into the socket and turn the power on again.
2.If the present password is different between the products and App, then reset the products ( to do this, cut the power supply and plug into a socket, repeat this for 3 times quickly)
3.If the above options fail, then exit the App close it down completely then turn the App
back on again.
If the product numbers visible are more than the actual
actual products.
1.The App may likely be connecting with nearby products,
try setting a password for the products.
If products change their mode without being controlled.
A:
This could be because of a nearby neighbor using the App, you need to set a
password for the products.
Page 14

Important Safety Instructions
When using electrical products, basic precautions should always be
followed including the following:
a) Read and following all safety instrucions.
b) Do not use seasonal products outdoors unless marked suitable for indoor and outdoor use.
When products are used in outdoor applications, connect the product to a Ground Fault
Circuit Interrupting (GFCI) outlet. If one is not provided, contact a qualified electrician for
proper installation
c) This seasonal use product is not intended for permanent installation or use.
d) Do not mount or place near gas or electric heaters, fireplace, candles or other similar sources
of heat.
e) Do not secure the wiring of the product with staples or nails, or place on sharp hooks or nails.
f) Do not let lamps rest on the supply cord or on any wire.
14
g) Unplug the product when leaving the house, when retiring for the night, or if left unattended.
h) This is an electric product-not a toy! To avoid risk of fire, burns, personal injury and electric
shock it should not be played with or placed where small children can reach it.
i) Do not use this product for other than its intended use.
j) Do not hang ornaments or other objects from cord, wire, or light string.
k) Do not close doors or windows on the product or extension cords as this may damage the
wire insulation.
l) Do not cover the product with cloth, paper or any material not part of the product when in
use.
m) This product employs overload protection (fuse). A blown fuse indicates and overload or
short-circuit situation. If the fuse blows, unplug the product from the outlet. Also unplug any
additional strings or products that may be attached to the product. Replace the fuse as per
the user servicing instructions (follow product marking for proper fuse rating) and check the
product. If the replacement fuse blows, a short-circuit may be present and the product
should be discarded.
n) Read and follow all instructions that are on the product or provided with the product.
Save these instructions.
o)
Page 15
Important Safety Instructions
Use and Care Instructions:
a) When the product is placed on a live tree, the tree should be well maintained and fresh. Do
not place on live trees in which the needles are brown or break off easily. Keep the tree
holder filled with water.
b) If the product is placed on a tree, the tree should be well secured and stable.
c) Before using or reusing, inspect product carefully. Discard any products that have cut,
damaged, or frayed wire insulation or cords, cracks in the lampholders or enclosures, loose
connectors connections, and wires.
d) When storing the product, carefully remove the product from wherever it is placed, including
tree, branches, or bushes, to avoid any undue strain or stress on the product conductors,
connections, and wires
e) When not the use, store neatly in a cool, dry location protected from sunlight.
15
User Servicing Instructions:
Replace the fuse.
a) Grasp plug and remove from the receptacle or other outlet
device. Do not unplug by pulling o
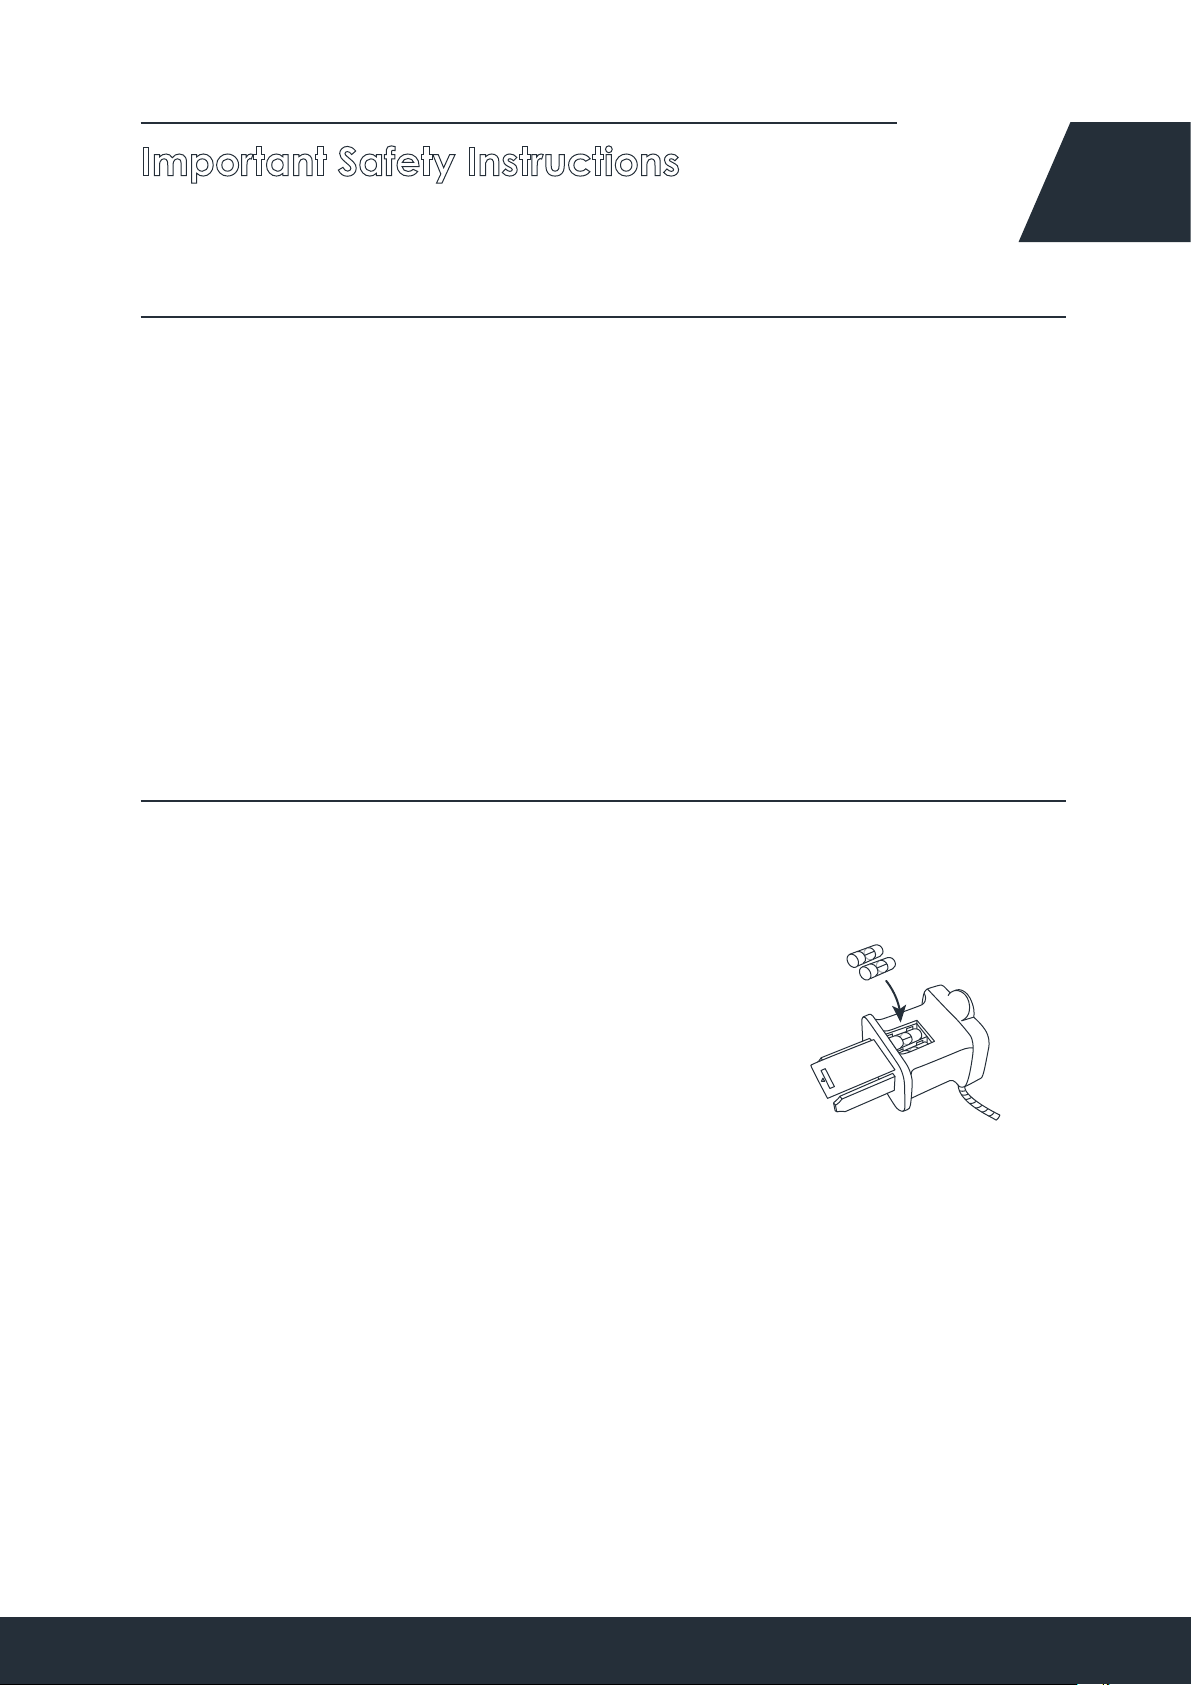
b) Open fuse cover. Slide open fuse access cover on top of
attachment plug towards blades.
c) Remove fuse carefully.
d) Risk of fire. Replace fuse only with 3 Amp, 125 Volt fuse
(provided with product)
e) Close fuse cover. Slide closed the fuse access cover on top of attachment plug.
f) Risk of fire. Do not replace attachment plug. Contains a safety device (fuse) that should
not be
removed. Discard product of the attachment plug is damaged.
If connecting to a lighting string that does not have a Wattage (W) rating{found on the tag
within 6 inches of the plug}calculate the wattage as follows: Multiply the current ( A) which
is on the flag-type tag by 120.
For Example: Lighting string is rated 120V, 60Hz, 0.2 Amps. 0.2*120=24 Watts
Add the wattage of each light string together for a total of 216 Watts or less. (Do not exceed
216 Watts)
Page 16

Important Safety Instructions
CAUTION
1. To reduce the risk of fire or electric shock, do not attempt to replace lamps or modify string.
2. To reduce the risk of fire and electric shock: a) Do not install on trees having needles leaves or
branch coverings of metal or materials which look like metal, and b) Do not mount or support
strings in a manner that can cut or damage wire insulation.
16
Page 17
FEDERAL COMMUNICATIONS COMMUISSION
(FCC) STATEMENT
FCC Caution: Changes or modifications not expressly approved by the party responsible for
compliance could void the user’s authority to operate the equipment.
Note: This equipment has been tested and found to comply with the limits for a Class B digital
device, pursuant to part 15 of the FCC Rules. This device complies with Part 15 of the FCC Rules.
Operation is subject to the following two conditions:
(1) This device may not cause harmful interference, and
(2) This device must accept any interference received, including interference that may cause
undesired operation.
These limits are designed to provide reasonable protection against harmful interference in a
residential installation. This equipment generates, uses and can radiate radio frequency energy
and, if not installed and used in accordance with the instructions, may cause harmful interference to radio communications. However, there is no guarantee that interference will not occur
in a particular installation. If this equipment does cause harmful interference to radio or television
reception, which can be determined by turning the equipment off and on, the user is encouraged to try to correct the interference by one or more of the following measures:-Reorient or
relocate the receiving antenna.-Increase the separation between the equipment and receiver.-Connect the equipment into an outlet on a circuit different from that to which the receiver is
connected.-Consult the dealer or an experienced radio/TV technician for help.
17
*RF warning for Mobile device:
This equipment complies with FCC radiation exposure limits set forth for an uncontrolled environment. This equipment should be installed and operated with minimum distance 20cm between
the radiator & your body.
(SAVE THESE INSTRUCTIONS)
 Loading...