

© 2017 WilliamsWarn NZ Ltd
SAFETY INSTRUCTIONS 01
FERMENTING & DISPENSING 02
TYPICAL SINGLE TAP INSTALLATION
FOR BREWKEGS
TM
AND CORNELIUS KEGS 04
D-SANKE KEGS 06
INSTALLATION INSTRUCTIONS
SETTING UP YOUR KEGERATOR 07
MINIMUM CLEARANCES 10
WATCH OUR HELPFUL
INSTRUCTION VIDEOS
For instructional videos on installing and
using your WilliamsWarn Kegerators check
out www.williamswarn.com/how-to-videos/
Kegerator
User Manual
1
SAFETY WARNINGS
SAFETY FIRST
CO2 gas can be dangerous. Make sure to always use
CO2 in a well-ventilated place.
Never exceed 40psi on your keg system.
Flush out chemicals from your beer line completely
before tapping keg.
Always thoroughly check for gas leaks once you
have set up your system.
WARNING
If fridge has just been moved do not turn on unless
the fridge has been standing upright for 24hrs.
Failure to do so will void warranty. Stand fridge in
the upright position for 24hrs before plugging into
mains power socket.
!
!
VERSION 5
3
KEGERATOR
2
USER MANUAL
FERMENTING &
DISPENSING
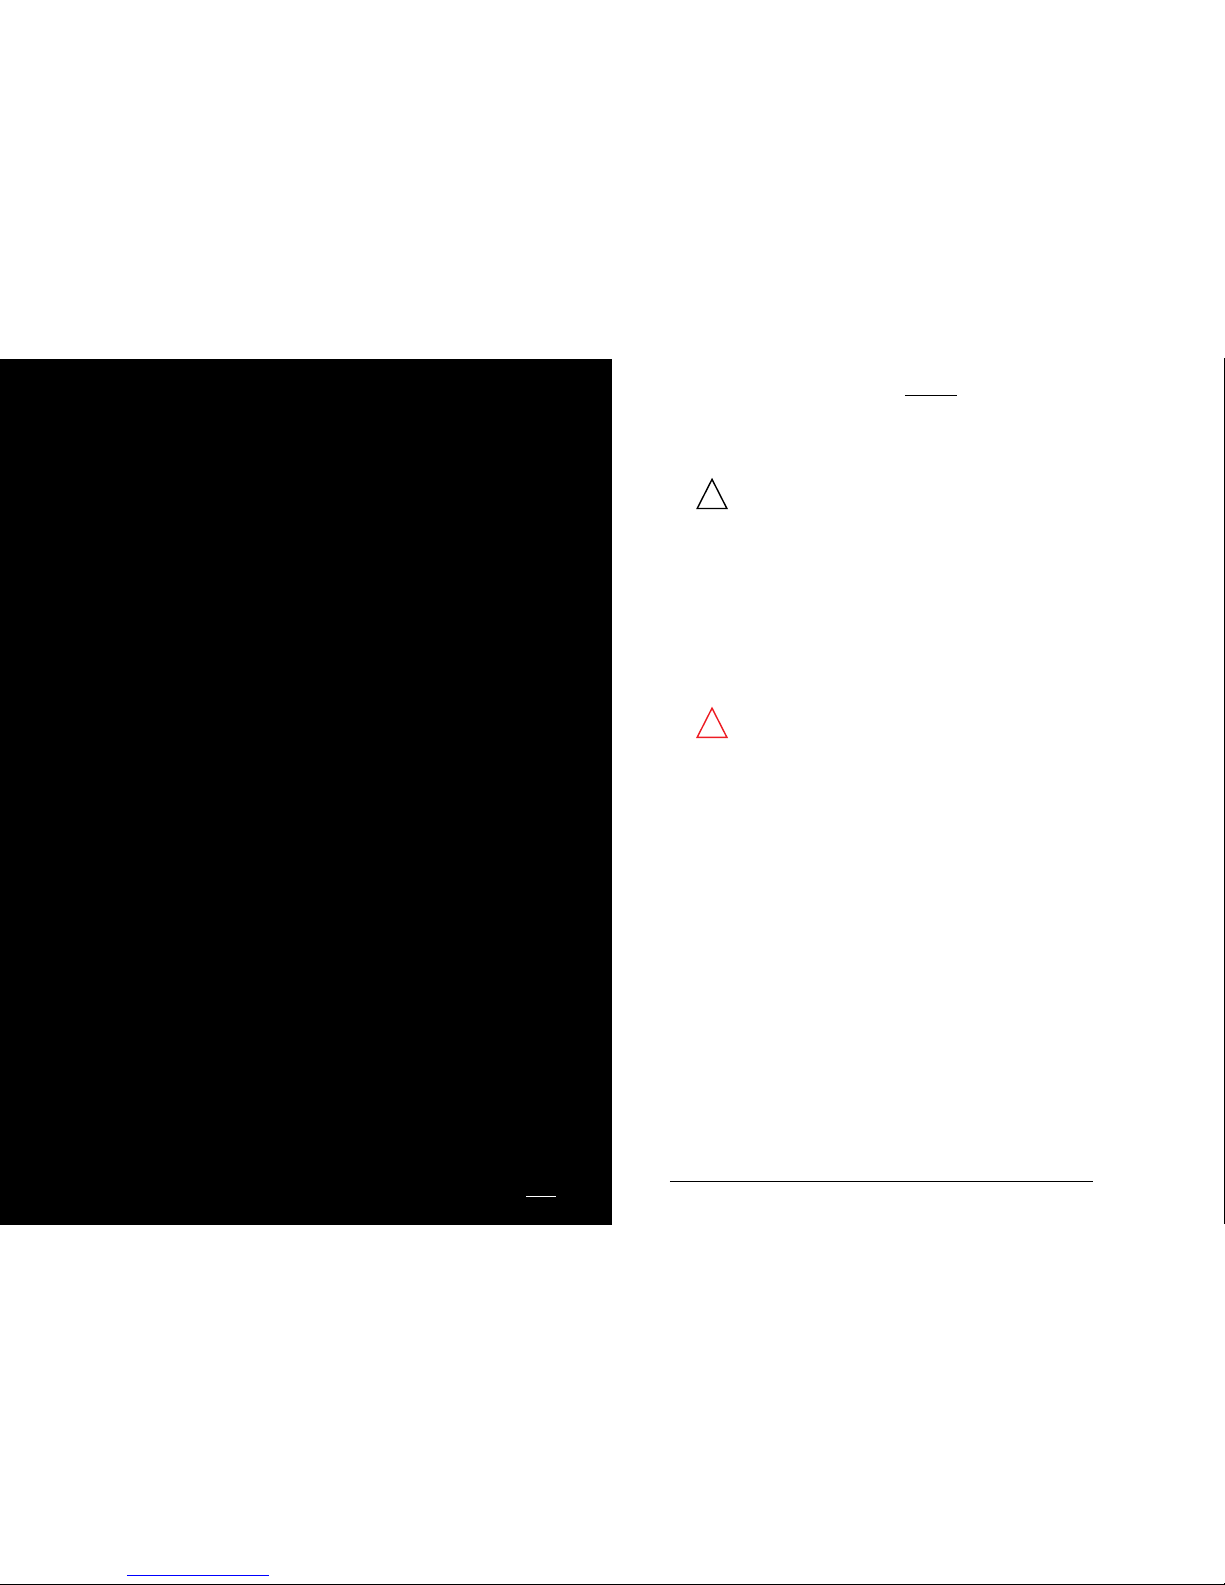
The WilliamsWarn Kegerator can be
used to both ferment and dispense
fresh beer using WilliamsWarn
brewing technology.
FERMENTING
The WilliamsWarn Kegerator has the
ability to ferment and dispense up to two
BrewKeg10s™ at one time. The Kegerator
works in conjunction with the heating
belt and temperature controller and the
brewer can set the desired fermentation
temperature. Once fermentation is complete
the brewer can then set the fridge at 1°C
and perform the clarification steps. Once
clarified the brewer can then connect the
BrewKeg10™ to the tap using the fittings
provided and dispense directly from the
BrewKeg10™. See Figure 1.
DISPENSING
The WilliamsWarn Kegerator can dispense
a variety of dispensing keg once the
brewing process is complete. There are
two styles of kegs that are used, the most
common for personal use is a Cornelius
Keg which is available in 9.5 and 19L
(as shown in Figure 3). The other style of
keg which is commonly used in bars is a
D- Sanke keg which is available in 20L,
30L and 50L kegs. The D-Sanke kegs
will require a Coupler and a Liquid
and Gas Adapter, which connects onto
the Gas and Liquid ports (available on
http://www.williamswarn.com/Shop/
Dispensing-Accessories ). See Figures 4 and
5. Additionally a BrewKeg25™ can fit into
the WilliamsWarn Kegerator once it has
finished the brewing process and the
sediment bottle and stand has been
removed. A BrewKeg25™ has the same
connections as a Cornelius Keg.
See Figure 2.
Figure 1: Two BrewKeg10™
Figure 4: One 20L and One 30L D-Sanke Keg
Figure 5: One 50L D-Sanke Keg
Figure 3: Three 19L Cornelius Kegs
Figure 2: One BrewKeg25™

Beer Font
Beer Line
Ball Lock
Disconnect
Gas Line
Cornelius Kegs
CO
2
Regulator
CO
2
Gas Cylinder
Ball Lock Disconnect
54
USER MANUAL
KEGERATOR
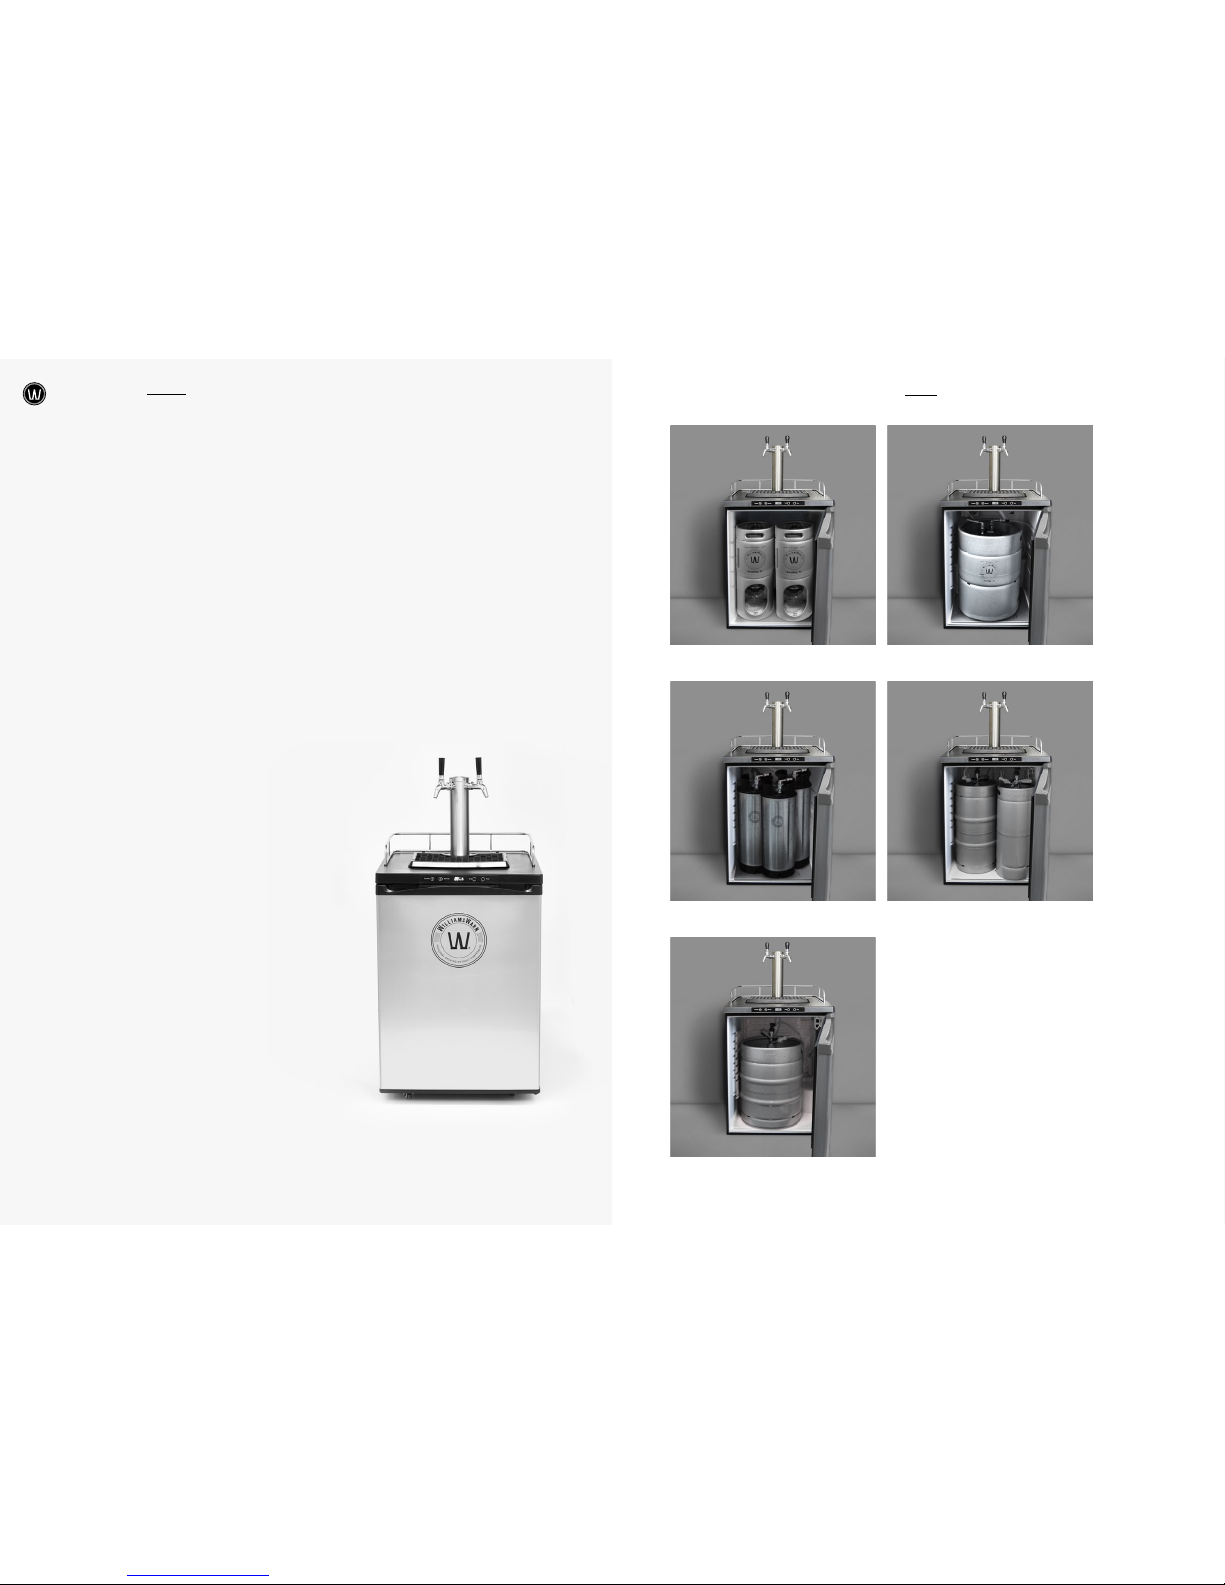
TYPICAL SINGLE TAP
INSTALLATIONS
The following diagrams illustrate a
single typical single tap installation.
FOR BREWKEG™ AND CORNELIUS KEGS
CORNELIUS KEGS
The beer line that is attached to the beer font
connects to the ‘Out’ port on your Cornelius
Kegs. It will not be able to be attached to the
in port. You have the ability to connect up to
two Cornelius Kegs at one time. The Gas Line
connects to the “In” port on your Cornelius
kegs and you can connect up to two Cornelius
kegs at one time. Show close up photo of the
difference between the two fittings so they
know which is the in port and out port.
BREWKEGS™
The beer line that is attached to the beer
font connects to the beverage out port on
your BrewKegs™. It will not be able to
be attached to the in port. You have the
ability to connect up to two BrewKeg10™
or one BrewKeg25™ at one time. The
Gas Line connects to the gas in port on
your BrewKegs™ and you can connect
up to two BrewKeg10™ or one BrewKeg25™
at one time. See diagrams below.
BREWKEG10
TM
BREWKEG25
TM
/ BREWKEG50
TM
BEVERAGE-OUT PORT
(WITHOUT NOTCHES ON ITS BASE HEX,
WITH TUBE EXTENDING INTO THE VESSEL)
BK10 LID
VARIABLE PRESSURE
RELIEF VALVE VPRV
GAS-IN PORT
(WITH NOTCHES ON ITS BASE HEX)
LIDGAS-IN PORT PRESSURE GAUGE
BEVERAGE-OUT PORT
VIEWING PORTS
VARIABLE PRESSURE RELIEF VALVE (VPRV)
Beer Font
Beer Line
Commercial Keg
Keg Coupler
Gas Line
CO
2
Regulator
CO
2
Gas Cylinder
Image 2
Image 3
76
USER MANUAL
KEGERATOR
D-Sanke Kegs
To use Sanke Kegs you will need to purchase
a D-type Coupler, Liquid D-type adapter and
a Gas D-type adapter. The Gas line connects
onto the side port of the coupler (reads
Gas In) and the beer tube connects to the
top port on the coupler. If you are putting
multiple D-Sanke kegs in the Kegerator
e.g. a 20L and 30L you will need 2 x D-type
Couplers, 2 x Liquid D-type adapters and
2 x Gas D-type adapters
For D-Sanke Kegs
INSTALLATION
INSTRUCTIONS
Setting up Your Kegerator
Watch the kegerator installation video on
www.williamswarn.com/how-to-videos
You will require 1 x Philips screwdriver
A. Carefully remove all products from packaging.
B. If not required remove shelf and glass rack
from the inside of the WilliamsWarn Kegerator.
C. If you are wanting to fit the wheels now is the
best time to install them:
1. Turn the Kegerator on its side (you may
want to put some cardboard down if
assembling on a hard surface.
2. Screw on the wheels using the screws
provided. Two of the wheels have a brake,
these should be installed at the front of
the Kegerator (See image 1).
3. Position Kegerator upright (do not turn on
Kegerator for
24 hours after being on its side.).
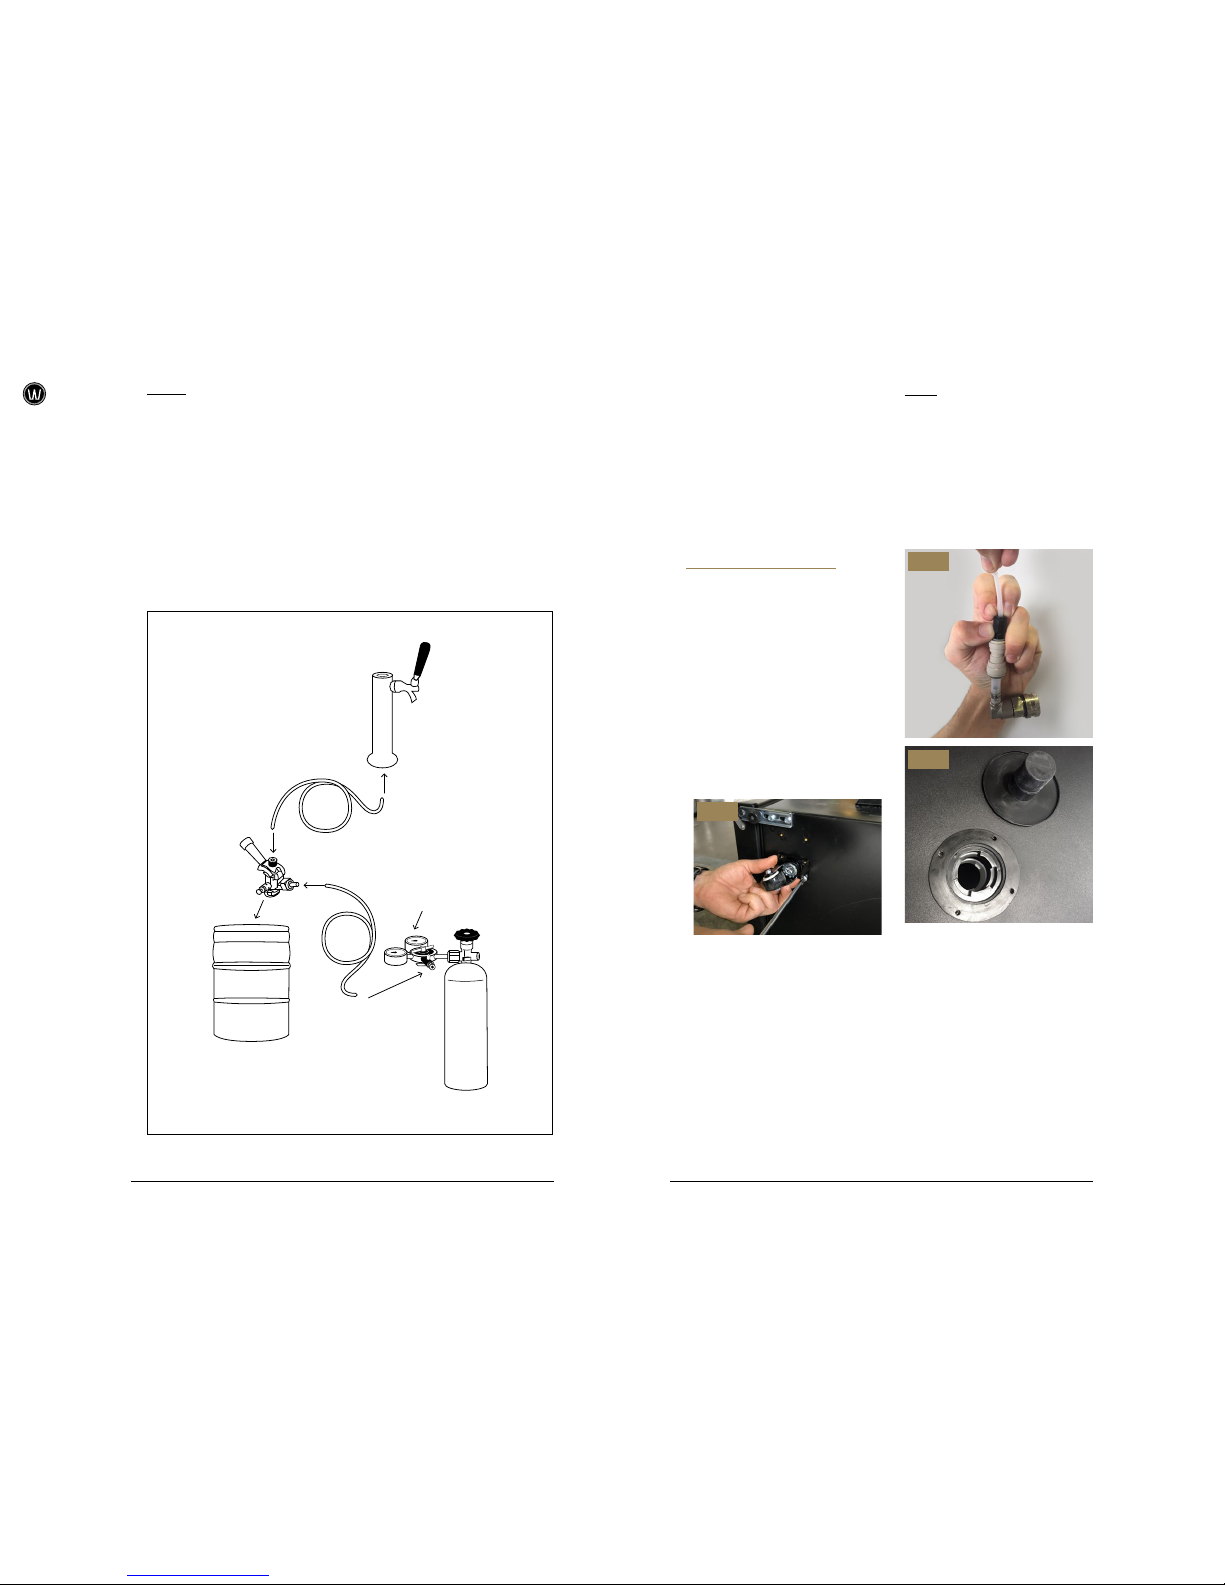
D. Remove the fittings from the end of the Beer
font tubing. These are John Guest connections
and can be removed by pushing in the end of
the fitting and pulling the tubing out at the
same time. (See image 2).
E. Remove the black cover and place gasket over
the hole and line it up with the 4 holes (See
image 3).
F. Feed the tubes through the top of the Kegerator.
Using a Phillips screw driver and the 4 screws
provided screw the font in place (See image 4).
with the taps facing towards you (if you are
standing facing the door of the Kegerator). Refit
the fittings on to the end of the beer lines –
ensure they are tight by gently pulling the tubing
away from the fittings and you should be unable
to pull the tube out (Photo of installation).
G. If you wish to mount the CO
2
cylinder on
the back of the kegerator there is a bracket
supplied that locates on the rear of the unit
(See Image 4a & 4b).
H. Take the CO
2
cylinder and attach the gas
regulator to it. Use the spanner provided to
tighten it.
Image 1

Image 4A
Image 4B
Image 4
Image 5
Image 8
Image 6
Image 7
98
USER MANUAL
KEGERATOR
I. Place the CO
2
cylinder onto the bracket at
the back of the kegerator. Thread the velcro
belt supplied through the holes at each end ensure it is tightly in place.
J. Unscrew the black cap on the back of the
Kegerator and remove the small bung (see
image 5). *Note if you are using the The
Kegerator as a fridge only do not remove the
black bung.
K. Feed the black gas line through the white hole
from the inside of the Kegerator and screw
the black cap back on (see image 6). Connect
the gas line to the regulator provided to the
regulator fitting as shown in image 7. Push
the line in well and pull on it to make sure it
is secure in the fitting.
L. Turn on the CO
2
bottle and ensure there are
no leaks. Set the regulator at the pressure
you require. An average pressure would be
about 1.1 bar (
110 kPA) or 16 psi, but this
does depend on the beverage type and the
temperature you are serving at. If you are
using a D-Style keg (Sanke keg) bought
from a brewery in your kegerator, follow their
guidelines for pressure and temperature. If
you have brewed a beverage in a WilliamsWarn
BrewKeg
25
TM
or a BrewKeg10TM and are
serving it from the kegerator, or if you have
brewed in a BrewMaster and have transferred
the beverage into a Cornelius keg for
dispense, we’d recommend a temperature
between 1-4°C and a pressure range of about
1.1 bar (
110 kPA or 16 psi). The higher
the pressure the higher the carbonation,
and the colder the beverage the higher the
carbonation, so if you find your beverage is
too carbonated, you can brew and dispense on
the lower side of the range, to suit your taste.
Conversely, if you find not enough bubbles are
in your beverage, increase your brewing and
dispensing pressures to the higher end of the
range. The BrewKeg
10
TM
is a small vessel so
you may find that a brewing and dispensing
pressure nearer the 1 bar level (
100kPA, 14.5
psi) is preferable to avoid over-carbonating
the beverage. An over-carbonated beverage
will foam more when poured and taste more
effervescent. Please note that when a beer
cools, the CO
2
dissolves better, and the
pressure drops a little bit, so a WilliamsWarn
vessel’s brewing pressure is usually set about
0.
25 bar (250 kPA) higher than the dispense
pressure, to account for the drop once it’s
cooled after fermentation.
M. Plug in and set temperature to the desired
dispense temperature. The table below shows
typical serving temperatures for various
beverages. In general, ales are traditionally
served warmer than lagers, but you can of
course choose whatever temperature you
prefer to drink a beverage at. A temperature
set around 1-4°C is a good range to start at
for a first time user.
The Kegerator also comes with a fan and
tubing that can be inserted up into the font in
order to cool the font down. Just push the fan
button on the control panel to activate the fan.
N. The Stainless steel connections connect to the
Keg fittings by pulling back on the collar (See
image 8) and pushing onto the fitting onto the
BrewKeg™ or Cornelius Kegs.
O. Then place the font guard rail on top of the
kegerator and place the drip tray in front of
the font.
BEVERAGE
TYPICAL SERVING
TEMPERATURE
Lagers 1 - 7°C / 34 - 45°F
Ales in New World Countries 1 - 8°C / 34 - 46°F
Wheat Beers 6 - 10°C / 43 - 50°F
British and Belgian Ales 7 - 13°C / 45 -55°F
Cider and Mead 5 - 16°C / 41 - 61°F
Strong Dark Ales and
Barley Wines
10 - 15°C / 41 - 61°F

1
1
1
0
USER MANUAL
KEGERATOR
Minimum Clearances
Around the Kegerator
The Series 4 Kegerator has radiators in the
left and right hand wall of the Kegerator in
the outside skin. These radiators need to be
well ventilated so heat can escape from the
Kegerators. A minimum of 100mm (4inches)
clearance should be given to the Kegerator
on the left and right hand wall. This allows
the Kegerator to breathe and for the heat
to escape. If the Kegerator is incorrectly
installed it may void the warranty, cause high
electrical consumption and the Kegerator may
fail prematurely.
For instance it is not a good idea to push the
Kegerator right up into the corner of a room
against two walls as this will prevent adequate
ventilation of one of the sides of the Kegerator
limiting its ability to operate efficiently.
See diagram to the below. This is an incorrect
Kegerator installation. Little or no ventilation
is given to the Kegerator on the left and right
hand wall.
For any questions contact
service@williamswarn.com
NOTES
100mm clearance required on
left and right hand side. This
installation will void warranty
and cause poor performance.

 Loading...