

TM
BrewKeg10
User Manual
OVERVIEW 01
PROCESS SUMMARY 02
SETTING UP YOUR
BREWKEG10
SET UP 03
EQUIPMENT 03
TM
SPECIAL NOTE ON
PRESSURE AND CARBONATION 12
CO2 LEVELS FROM
PRESSURE VS CARBONATION 12
ADJUSTING CARBONATION 13
CARBONATION FOR WARMER BEVERAGES 13
BREWING INSTRUCTIONS
STEP 1: CLEAN 04
STEP 2: MIX 06
STEP 3: ADJUST 07
STEP 4: DISPENSE 10
DOWNLOAD OUR 3
MOST POPULAR RECIPES.
Simply register your brewery at
brew.williamswarn.com/register-now.html
Help us to support you by registering your new
brewing equipment. Registration is easy and is
helpful for warranty and support queries!
© 2017 WilliamsWarn NZ Ltd

VERSION 8
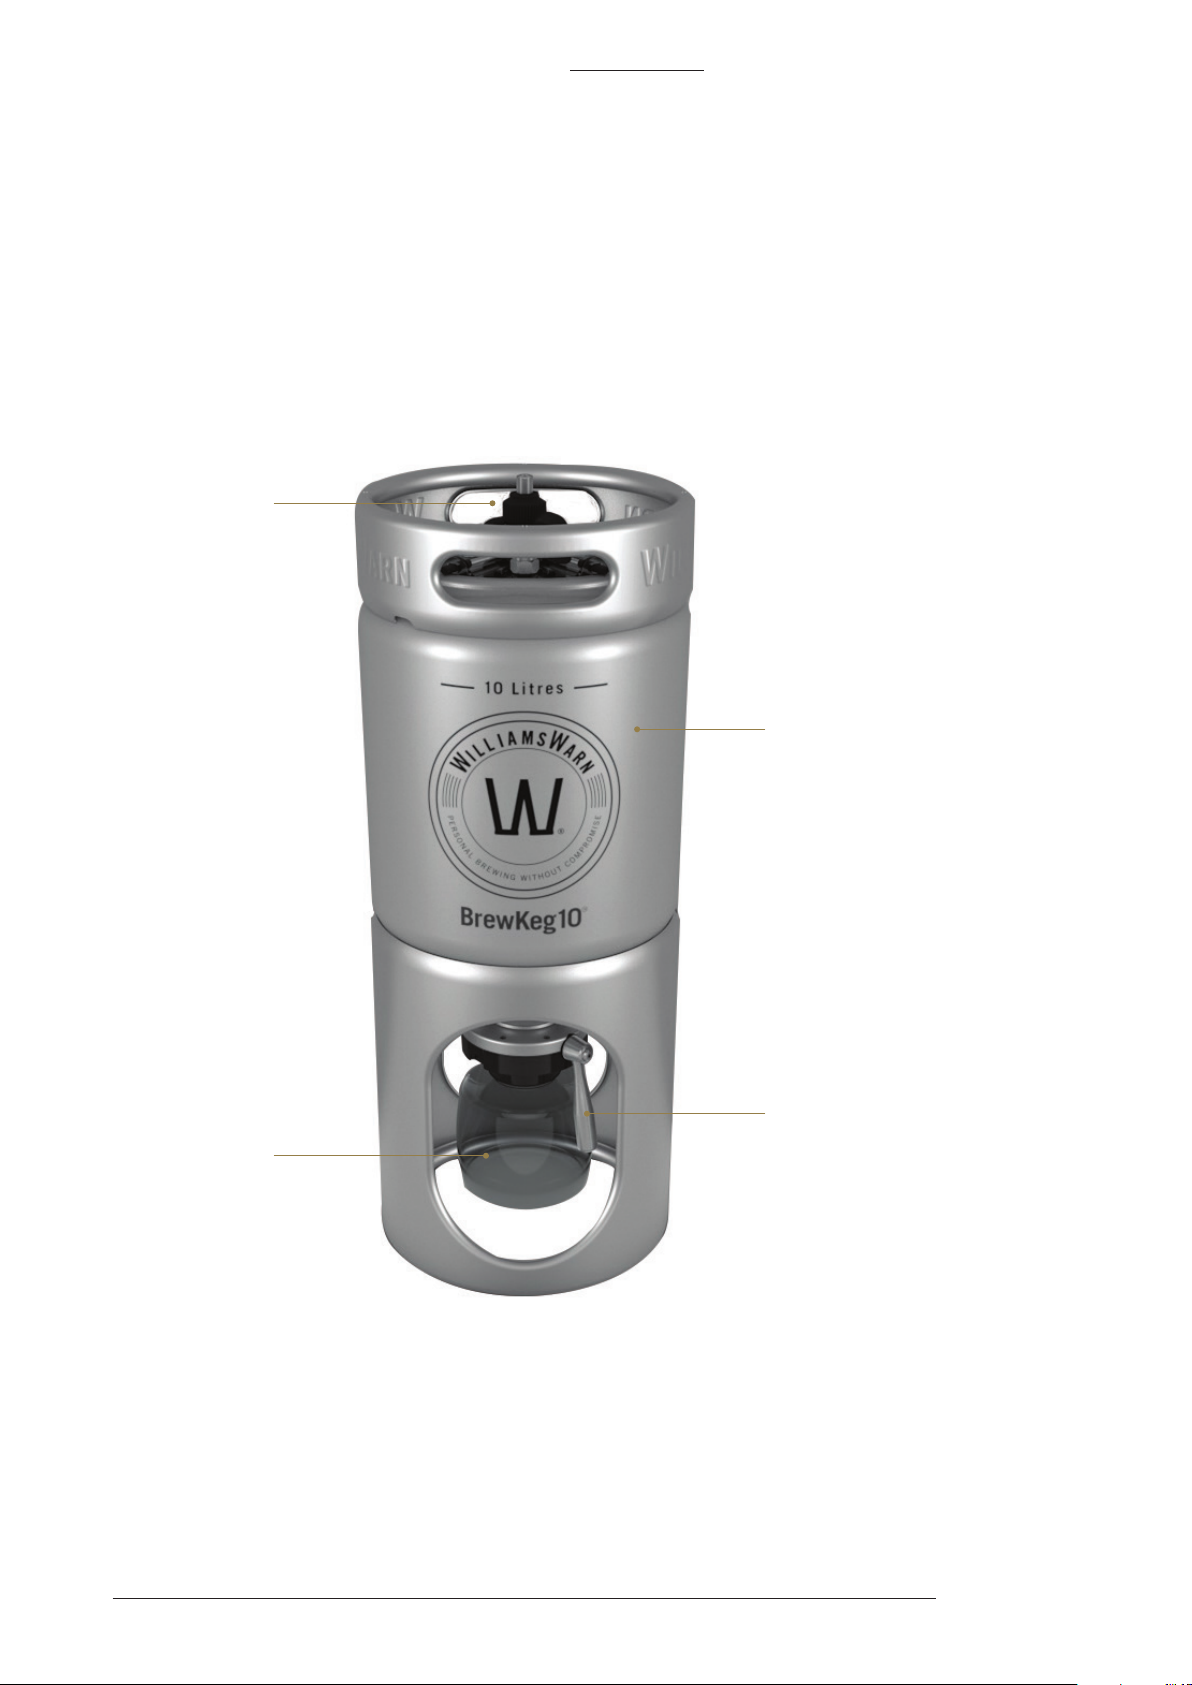
OVERVIEW
BrewKeg10TM Structure
VESSEL LID
BREWING INSTRUCTIONS
SEDIMENT BOTTLE
STAINLESS STEEL VESSEL
1
VESSEL BUTTERFLY VALVE
USER MANUAL
PROCESS
SUMMARY
CLEAN
01. Rinse off the internal yeast ring – ensure the
internal surface is visibly clean.
02. Add hot water and detergent – shake with lid
on – take some liquid out the beer line.
03. Open the vessel butterfly valve and add
remaining detergent to the sediment bottle.
04. Rinse the detergent from the BrewKeg10™,
its lid, sediment bottle and beer line.
MIX
01. Add the extracts to the vessel with hot water
and stir to dissolve.
02. Add any extra ingredients (e.g. hop tea).
03. Top up with water. Target 25ºC (77ºF)
when full. Stir.
04. Rehydrate yeast in sediment bottle in
25ºC (77ºF) water and add to vessel.
05. Attach sediment bottle and open vessel valve.
06. Top up again, attach lid, set VPRV to approx.
2.5 turns and set temperature to ideally
2
25ºC (77ºF) or within the range of 18-28ºC
(
64-82ºF) in your fridge or room.
ADJUST
01. Maintain temperature for 4 days.
02. Check and adjust the pressure as required
after
24 hours. Target 1.5 bar (22 psi).
03. Chill to 1-4ºC (34-39ºF) when fermentation
is finished.
04. Clarify beer - 2 step process. Cider does not
require clarification.
DISPENSE
01. Close the vessel butterfly valve and remove
the sediment bottle.
02. Ensure CO
the lid.
03. Connect draft tap to the beverage-out port on
the lid and pour a beverage.
Transfer the beverage to bottles or kegs if
required.
is connected to the gas-in port on
2
Instructional Videos available at
williamswarn.com/TheWilliamsWarn/BrewKeg10
SETTING UP
YOUR BREWKEG
BREWING INSTRUCTIONS
Please watch the brewing videos on our
website www.williamswarn.com/TheWilliamsWarn/BrewKeg10 before you make
your first brew. This will make the instructions
below easier to understand and assist you in
making a great brew first time and every time.
You can also use the videos as the instruction
manual rather than this printed manual, by
using the play and pause buttons on the video
to help you perform each step. The printed
words below are in fact generally the narration
to the videos.
SETTING UP YOUR BREWKEG10™
Unpack the BrewKeg10™ from its packaging.
It consists of three parts being the main
vessel, the lid and the sediment bottle. See
the image on the Process Summary page. The
BrewKeg10 is ready to use once unpacked.
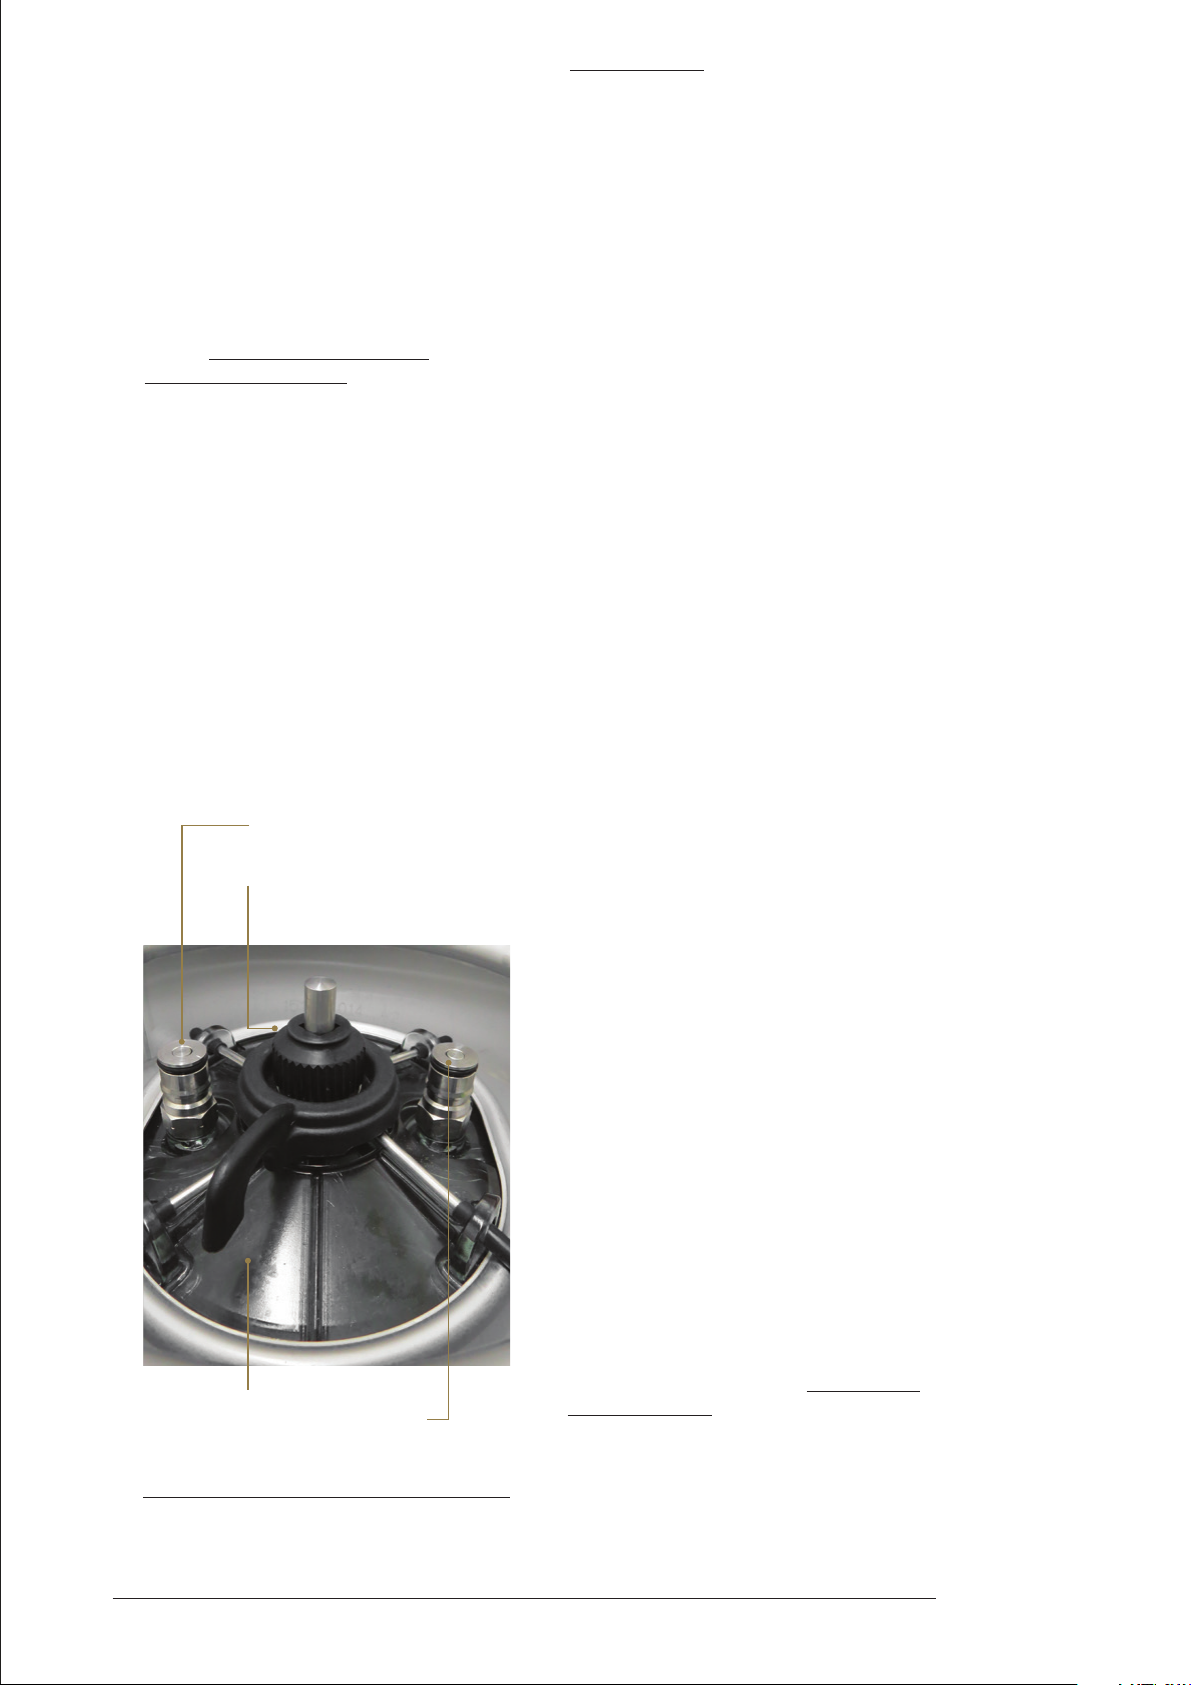
GAS-IN PORT
(WITH NOTCHES ON ITS BASE HEX)
VARIABLE PRESSURE
RELIEF VALVE VPRV
EQUIPMENT YOU NEED
•
A BrewKeg10™.
•
The Sundry Accessories set, (spatula,
clarification agent, brewery detergent,
non-scratch sponge).
•
The Dosing Device.
•
The BrewKeg10™ pressure gauge.
•
Means to receive CO2 e.g. either a CO2 cylinder
or soda stream bottle with a gas regulator and
gas line with grey quick-disconnect fitting.
•
Means to dispense e.g. a draft beer line and
tap (and a fridge) or alternatively a kegerator
with a draft beer tap.
•
A set of ingredients for the BrewKeg10™.
•
A means to maintain temperature between
18-28ºC (64-82ºF) e.g. a heat-belt and a
temperature controller (sold by WilliamsWarn)
can be used to control the temperature inside
a kegerator or fridge during fermentation.
A room or cupboard with a thermostatically
controlled portable heater can also be used.
•
A standard 1.5L (51 fl. oz.) kitchen kettle,
scissors, a thermometer.
3
BK10 LID
BEVERAGE-OUT PORT
(WITHOUT NOTCHES ON ITS BASE HEX,
WITH TUBE EXTENDING INTO THE VESSEL)
Figure 1: BrewKeg10™ Lid
NOTES REGARDING THE GAS-IN
AND BEVERAGE-OUT PORTS.
It is a good idea to regularly check the state
of the O-rings on the gas-in and beverageout ports (these are also called posts).
The O-rings are very inexpensive parts and
should be regularly checked to ensure that
they aren’t worn or frayed or split. If they
don’t form a good seal gas or beverage can
leak out around the ports. A gas leak can
contribute to emptying of your CO
and a liquid leak will make a mess on your
floor. These parts are consumable parts and
can be purchased through our website.
It is also a good practice to wet the O-rings
with a little water when you put on and
take off the quick-disconnect fittings, as
shown at the beginning of the Step 1: Clean
instructional video. This will allow the rings
to last longer before they need replacing.
cylinder
2
USER MANUAL
BREWING
INSTRUCTIONS
Step 1 – Clean
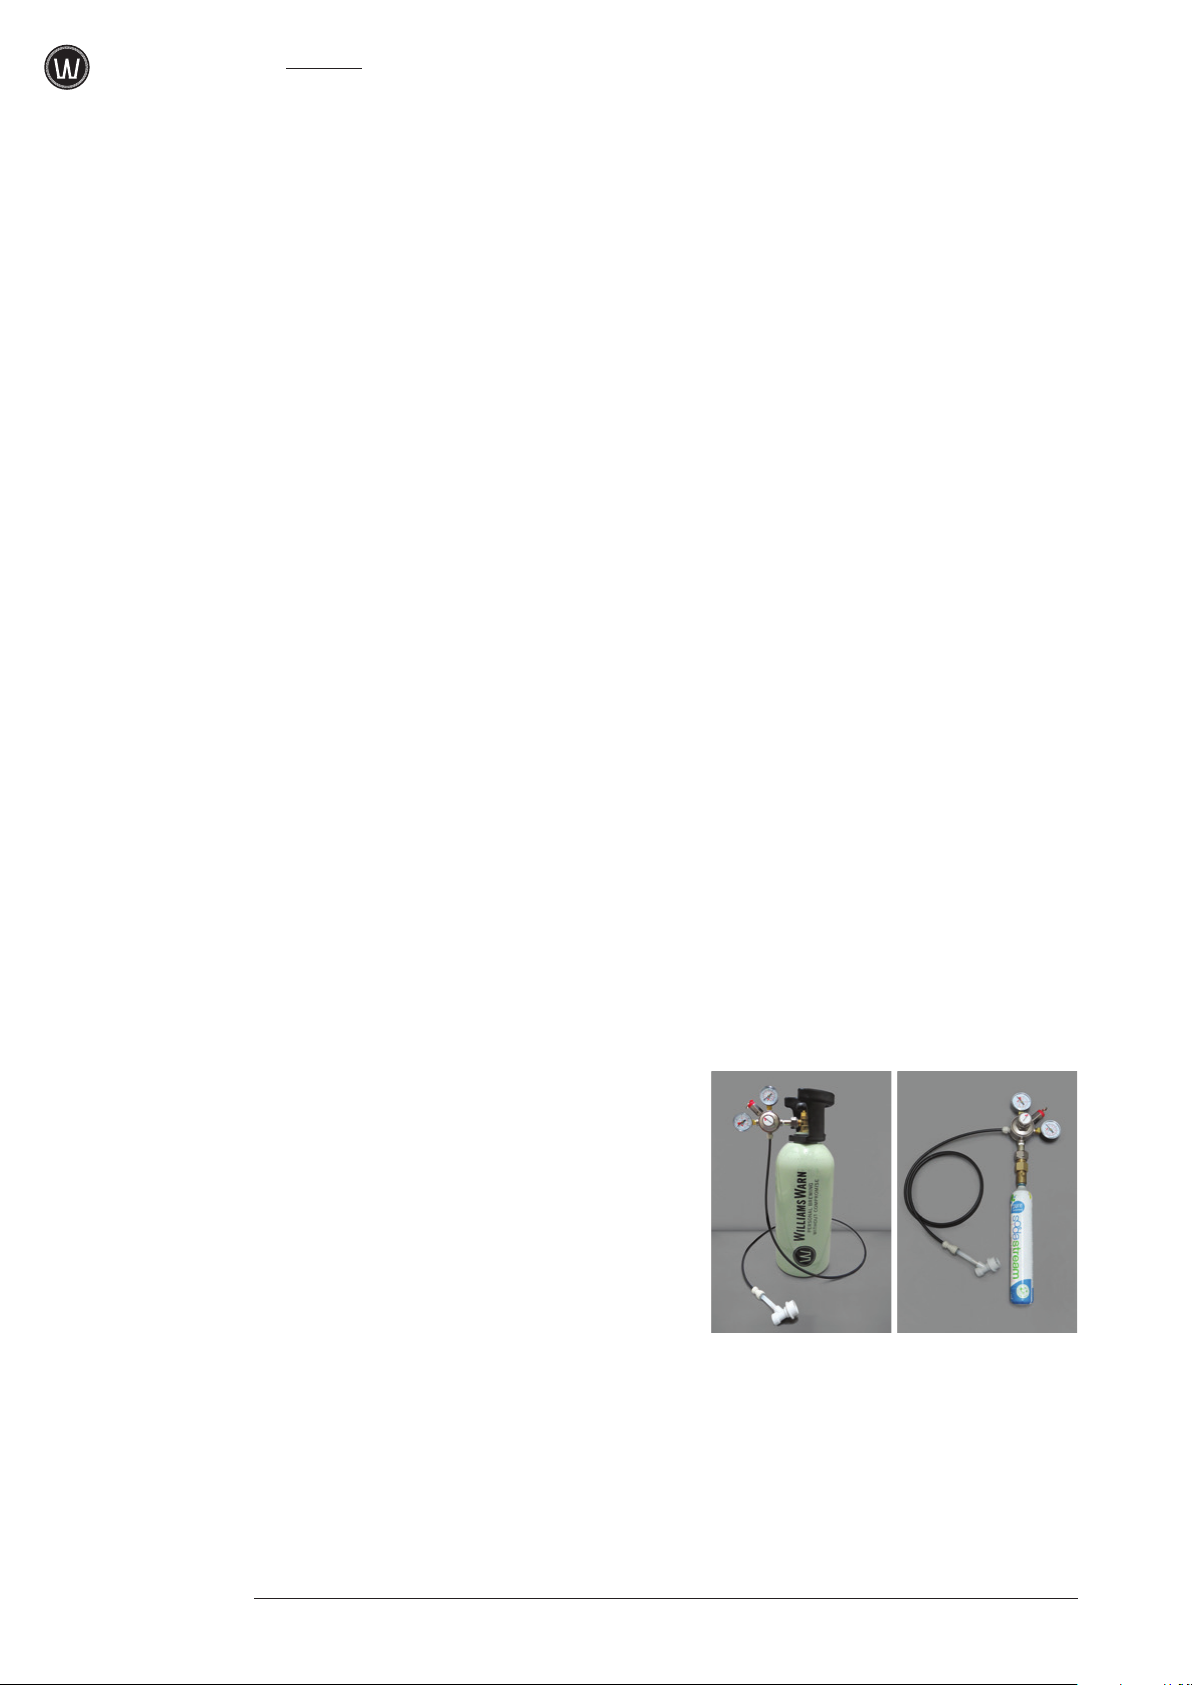
A. Firstly, set up your CO
Figure 2. Ensure the gas line with the grey
quick-disconnect fitting is inserted all the way
into the push-lock fitting under the adjusting
knob on the gas regulator as shown. If you are
using a large CO
regulator to the cylinder securely and open
the cylinder top valve. If you are using a soda
stream bottle, first screw the special adaptor
onto the regulator well and then screw the
complete regulator set-up onto the soda stream
bottle securely. Please see the video on our
website or on vimeo (vimeo.com/
for a clear explanation on how to set up a soda
stream bottle to a regulator. Then set the pressure
on the low pressure gauge (the one sitting
above the adjusting knob) to 1.1 bar (
by turning the adjusting knob clockwise.
Please note that it is always most accurate to
set the pressure by winding the adjusting knob
4
anti-clockwise first to release pressure and be
under the set-point and then wind it clockwise
to increase the pressure to its set-point. Once you
have set the pressure, your CO
ready to provide pressure to the BrewKeg
each time the grey quick-disconnect fitting is
connected to the gas-in port on the BrewKeg
lid. The gas-in port is the port with the notches
on the hex of the fitting (see Figure 1). Note: if
you need to remove the gas line from the regulator,
push in the end of the fitting and pull the tubing
out at the same time.
Caution: When connecting the Gas dispense
line to the BrewKeg™ or any other Keg, DO
NOT connect to the liquid post. If this is done
and the regulator is not on or not set to your
desired dispense pressure, beer can flow back
into the regulator and cause damage. If you are
concerned about this you can buy a non-return
valve from our website and insert it into the line
to prevent this happening.
B. Start to boil 1L (34 fl. oz.) of water in the
kitchen kettle.
C. Remove any pressure in the vessel by pressing
the button on the VPRV (indicated in Figure
supply as shown in
2
cylinder, then connect the
2
196807721)
16 psi)
system is then
2
10™
10™
1) until all pressure is released. Remove the
lid by turning its locking knob anti-clockwise
and slipping the lid out from under the rim.
Ensure the vessel butterfly valve is closed and
then remove the sediment bottle (it screws off
clockwise looking down on it).
D. Place the BrewKeg10™ over a sink or drain
and open the butterfly valve. Use a water source
to rinse off any beverage residue or yeast ring
from a previous brew. The water source can be
for example, a tap or a water hose or a rinse
bottle full of water. Drain all the liquid out of
the vessel and close the vessel butterfly valve.
Fill the vessel cone with the tap water and dip
the non-scratch sponge into the water in the
cone and scrub the entire internal surface of
the vessel with the cold water. It is important
to especially scrub off any yeast ring from a
previous brew. Open the vessel butterfly valve
again, dump this water and then rinse the
internal surface of the vessel with water again.
Then close the vessel butterfly valve. The idea
here is to scrub off most of the visible solids
and beverage residue from a previous brew.
Wash the lid with cold water until visibly clean.
Next, remove the VPRV and pour boiling water
into the VPRV socket and over the seal end of
the fitting. After this, re-fit the VPRV.
Fig 2: CO2 cylinder and soda stream attached to
regulator and gas side connection
E. Ensure the vessel butterfly valve is closed.
Add
15g (1 heaped tablespoon/1 cap full) of
WilliamsWarn Brewery Detergent to the vessel.
Then add the 1L (
34 fl. oz.) of boiling water

BREWING INSTRUCTIONS
from the kettle into the vessel. Ensure the
lid seal is still in its proper position and then
put the lid on the BrewKeg
10™ by slipping
it under the vessel rim and turning its locking
knob clockwise to seal it. Circulate the keg in
an upright position for
10 seconds to dissolve
the detergent in the cone into the hot water.
Then tip the keg upside down and circulate
it again for
10 seconds so that the hot liquid
soaks and cleans the underside of the lid and
the vessels internal top area. Then hold the
keg horizontally and shake it up and down for
10 seconds so that the hot liquid loops around
the walls of the keg. The hot detergent will
dissolve all organic residues that you didn’t
scrub off in the previous water rinse step.
In addition to that, the internal keg walls
should all now be hot to the touch and have
risen in temperature to at least
80˚C (176˚F)
for 2 seconds, which is enough to pasteurise
them and kill any unwanted micro-organisms
that might be on the internal surfaces and
that could potentially cause an infection. The
pressure will build up as you shake and we will
use that pressure in the next step. So this step
is a combined cleaning and pasteurising step
and it eliminates the chance of contamination
of the brew by spoiling bacteria.
F. We need to take some hot detergent out the
beer tube in the keg and your draft beer line to
clean and pasteurise them too. So as soon as you
have finished shaking the keg and while there
is still pressure in the keg (it reduces as the keg
cools), place the keg upright and attach your
draft beer line. In the case of a kegerator, this
will be the black quick-disconnect fitting and line
inside the kegerator that goes to the draft beer tap
on the font. In the case of a normal fridge being
used in your setup up, this may be a plastic beer
tap or stainless tap and line with a black quickdisconnect fitting (as sold by WilliamsWarn).
In any case, attach the black quick-disconnect
fitting of your draft tap line to the beverage-out
port on the lid and open your draft tap and pour
the hot detergent out the tap into a cup for just
1 second. We don’t want to take out more than
100ml (3.4 fl. oz.) of hot liquid out the beer
line because we need the remaining
900ml of
liquid in the vessel for the sediment bottle clean
in a following step, so the idea is to just ensure
some comes out the tap and then close the tap.
Then remove the black quick-disconnect from
the beverage-out port on the lid. The beverage
out tube in the keg and draft beer line will both
remain full of hot detergent and soak to clean and
pasteurise them as we perform the next steps.
G. NOTE: If no liquid flows (the pressure reduces
slowly as the detergent cools down in the keg),
you’ll need to add some pressure manually
by connecting your low pressure CO
to take
2
out a sample. You can do this by connecting
the grey quick-disconnect fitting of your CO
2
supply to the gas-in port on the keg lid, as
shown in Figure 3, and adding some pressure
for 3 seconds. You should hear the gas go into
the vessel. Then remove the grey fitting. Then
open the tap and pour the hot fluid out for no
more than 1 second before closing the tap.
Then remove the black quick-disconnect from
the beverage-out port on the lid.
Fig 3: Grey quick-disconnect fitting attached to
gas-in port from the CO2 cylinder. The gas-in port
has notches on its base hex.
H. Next, remove pressure in the vessel by pressing
the button on the VPRV, then screw the
sediment bottle back onto the vessel butterfly
valve and open the vessel butterfly valve and
allow the remaining hot liquid to flood the
sediment bottle. Let it stand for
20 seconds
minimum. Note: by this time the temperature
of the liquid is about
natural cooling down and the
72˚C (158˚F) due to
20 seconds is
enough to pasteurise the bottle. Do not add
water above
85°C (185°F) to the sediment
bottle at any time as that will melt it. If you
feel at some stage that you need to give the
sediment bottle an extra clean, do it by hand
with detergent and water below
I. Next, close the vessel butterfly valve and
85°C (185°F).
remove the sediment bottle. Dump its contents
and rinse the sediment bottle several times with
cold water to remove the detergent residue.
Remove the BrewKeg
10™ lid and rinse the
internal surface of the lid and the outside of
the beverage-out tube both well with water,
to remove all detergent residue and place it
upside down on a table.
5

USER MANUAL
J. You now need to rinse the detergent off
the keg’s internal surface, so place the
BrewKeg
10™ over your drain again and open
important to scoop into the area above the valve
to dissolve any settled extract there. Then add
500ml (17 fl. oz.) of cold water and stir that in.
the vessel butterfly valve. Use water to rinse all
the detergent off the internal surfaces of the
keg including the underneath of the rim at the
top of the keg. Drain all the liquid and then
close the butterfly valve.
C. Then use the scissors to open the 645g bag
of dry malt extract (DME) and add this to the
BrewKeg
10™. Stir the DME into the liquid
with the spatula. You may find that there are
a few lumps that don’t dissolve but this is
K. You now need to rinse the detergent from the
beer line and draft beer tap. So fill the cone of
acceptable as they will dissolve by themselves
over the next few hours.
the keg half full of water and screw the lid back
on well and add some pressure manually by
connecting the grey quick-disconnect fitting of
your CO
supply to the gas-in port on the keg lid,
2
as shown in Figure 3. Add some pressure for
3 seconds then remove the grey fitting. Connect
your draft beer tap’s black quick-disconnect
D. For cider brews, just open the cider pouch
with the scissors and add to the BrewKeg
Then add the
500ml (17 fl. oz.) of boiled water
from the kitchen kettle. (This is performed
to get the final temperature correct when the
vessel is full).
10™.
fitting to the beverage-out port on the lid again
and open the tap and allow the water in the cone
to flow out into a cup and flush the lines of the
detergent. Wait until all the liquid is out and gas
comes out the tap for a few seconds and then
disconnect the black fitting from the beverageout port.
L. Push the button on the VPRV to release
all remaining pressure and remove the
BrewKeg
6
a table. Then place the BrewKeg
10™ lid and place it upside down on
10™ ready for
the addition of the ingredients.
M. Note: Every 5th brew or so its good practice to
clean the vessel lid seal and its groove on top
of the vessel rim manually with some detergent
and then rinse and put it back in its groove.
Step 2: Mix
(Add ingredients)
A. Boil 500ml (17 fl. oz.) of water in the kitchen
kettle.
E. At this point you can add extra ingredients. For
example, for beer brews a hop tea made with
e.g.
25g (0.9 oz.) of pellet hops in a French
Press coffee plunger is a great way to boost
the flavour of any beer. In the same way, fruit
flavourings can be added to the cider. For
more examples for these sorts of methods,
visit the WilliamsWarn® website and download
our Recipes pdf. www.williamswarn.com/The-
WilliamsWarn/Recipes
F. You can now top up to the 10L (2.64 US
gallons) full mark with water. The target
temperature when full is near
or within the range
18-28°C (64-82°F). If your
25°C (77°F)
water source is cold e.g. in winter and between
12-16°C (54-61°F), add another 500ml
(
17 fl. oz.) of boiled water from the kitchen
kettle during your top up to the
If it is colder than that and between 8-
(
46-52°F) out of the tap, then include 1L
(
34 fl. oz.) total of extra boiled water from the
kitchen kettle during your top up to the
10L mark.
11°C
10L
mark. Otherwise just top up with ambient tap
water. This target temperature range is very
important as it helps to ensure a quick onset of
B. For beer malt extract brews, firstly open the
800g can of liquid malt extract (LME) and add
the extract directly to the BrewKeg
10™ cone.
Keep the can and its remaining residue. Fill
the can halfway with the boiled water from
the kettle and dissolve the extract residue
by stirring with the spatula. Hold the can
at the top area where it is less hot and add
the content to the BrewKeg
10™. Add the
remaining boiled water in the kitchen kettle
to the extract in the cone and stir it all with
fermentation.
G. The fill level is marked on the outside of the
BrewKeg
Internally the fill level is 6cm (2.
10™ and is 10L (2.6 US gallons).
36”) from the
bottom of the vessel rim. Fill up close to this
level (we are more exact in the next step) and
stir the contents to even out the temperature
and dissolve all the extract evenly into the
water, ahead of adding the yeast in the next
step.
the spatula and dissolve it completely. It is

BREWING INSTRUCTIONS
H. Next add about a cup of water (approx.
200ml/6 fl. oz.) at 25°C (77°F) to the sediment
bottle. Open the yeast sachet with the scissors
and add the yeast to this water. If the water
temperature is more than
40ºC (104°F) you
will kill the yeast. Swirl the sediment bottle
for
30 seconds to rehydrate the yeast. After a
minimum of
30 seconds, add the rehydrated
yeast directly to the top of the wort in the
keg. Then screw the sediment bottle onto the
vessel butterfly valve under the BrewKeg
10™
and open the butterfly valve fully so that the
liquid wort fills the sediment bottle fully.
Leave the valve open. Then top up to the
(2.6 US gallons) fill mark accurately. You have
now made
10.85L (2.9 US gallons) of wort,
but during the process the sediment bottle
fills up with yeast and haze and gets dumped,
so the final volume to consume will be
10L
(2.6 US gallons).
I. Ensure the lid seal is in its place and then
put the lid back on well.
J. If you’d like to check the lid is on correctly,
you can pressurise the BK
as a check. Connect your CO
gas-in port and pressurise to 1.1 bar (
10 temporarily
source to the
2
16psi)
or whatever you have on the low pressure.
Disconnect the gas-in fitting and attach
the pressure gauge and wait a few moments.
If you are satisfied there is no leak, push
the button on the VPRV and release all
the pressure. It’s best to let the yeast start
fermentation without any pressure and let
them build up the pressure themselves
naturally as fermentation kicks in. Then set
the Variable Pressure Relief Valve (VPRV) to
2½ full turns open from fully closed, which
will allow the pressure during fermentation
to build up to about 1.5 bar (
22 psi). Always
ensure the VPRV set pressure is higher than
the regulator set pressure. Each VPRV will
be slightly different depending on their
natural spring tension and after several brews
you will know how many turns of the VPRV
you should set to achieve the pressure level.
The higher the pressure achieved, the more
carbonation there is in the beverage, so if
you prefer a less carbonated beverage, you
can set the VPRV at less turns to achieve a
lower pressure during fermentation.
10L
K. Put the BrewKeg10™ pressure gauge onto the
gas-in port on the lid, as shown in Figure 4. If
you brew with multiple BrewKeg
10™ vessels
and only have one pressure gauge, just use
the gauge as required in the subsequent steps
below. It can be put on and then removed
whenever you need it to check the pressure.
Fig 4: Pressure gauge on lid
The BrewKeg
10™ is now at its fermentation
stage.
Step 3: Adjust
FERMENTATION
If you ferment WilliamsWarn brew kits in the
range of 18-28°C (64-82°F), the process will
be as follows:
Day 0 to
Day 4
Day 4 Chill to 1-4°C (34-39°F)
Day 4.5 First clarification for beer, and
Day 5.0 Second clarification for beer.
Day 5.5-6.0 Dispense stage for beer.
If you have temperature control we
suggest you target 25°C (77°F). You can
of course optionally ferment lagers at a
lower temperature which is more traditional
but do start near the warmer 25°C (77°F)
temperature at yeast pitching (the MIX
step above) and then adjust your ambient
Monitor temperature and pressure
during fermentation and determine
when fermentation is finished.
Dispense stage cider.
7

USER MANUAL
temperature down in this step. This method
allows fermentation to start quicker. If you
have temperature control and want to ferment
the lagers a bit colder, our recommendation
is to ferment our lagers and pilsners at 15°C
(59°F) for 3 days and then 18°C (64°F) for 3
days, so a total of 6 days. However great lagers
can also be made at the warmer temperatures
associated with ale fermentations (as the yeast
actually prefer it warmer and ferment quicker),
so it’s not wrong to ferment a lager at an ale
temperature range (18-28°C/65-82°F), if you
prefer the lagers to be brewed a bit quicker
than they are at the colder temperatures.
and tightened but it isn’t necessary and not
preferred as the heat belt can get quite hot
and add too much heat to a localised area on
the vessel. It is better to use the heat belt to
warm the ambient air inside the kegerator/
fridge so that heat is distributed evenly around
the vessel. Plus, if you have more than one
keg fermenting inside the kegerator/fridge,
with this method you still only need one heat
belt not two or more. The best position for
the controller’s temperature probe would be
hanging down into the middle of the kegerator/
fridge, but just having it taped to a wall is
most practical so it is not in the way when you
moved kegs in and out. It will ensure a good
A. The ideal set up for fermentation is to place
the BrewKeg
10™ inside a kegerator or a
fridge with a heat-belt and temperature
controller to control the temperature at your
temperature control within a degree or so of
the set point, which is totally acceptable and
will ensure a steady fermentation and a good
beverage produced.
set point during fermentation, as shown in
Figure 5. However, as long as you maintain
the temperature range, during fermentation,
any set up will work and ensure fermentation
proceeds and finishes before the chilling step.
For example, it could be placed in a small
cupboard with a small portable heater which
B. Monitor the temperature during fermentation.
If you don’t have accurate temperature
control, try and maintain a range between
18-28°C (64-82°F). This will ensure a strong
fermentation for all beer styles. Fermentation
can take longer at colder temperatures.
has a standard adjustable thermostat, so that
the cupboard’s ambient air can be kept in the
8
temperature range required for the period of
fermentation. For brewers using a kegerator or
a fridge, before you set up your temperature
controller, plug your kegerator or fridge into
the wall socket and make sure it is set to cold.
In the case of a kegerator set the temperature
to 1
ºC (34ºF). Next unplug your kegerator or
fridge from the wall socket. Then plug the
C. After about 12 hours following the pitching
of the yeast, if you shine a torch on the
sediment bottle, you should see the signs of
the beginning of fermentation. After
there should be a lot of CO
being produced by
2
24 hours
the yeast and hundreds of tiny bubbles rising
constantly. Please see the Adjust video for
images of how the brewing should look with
respect to CO
bubbles.
2
temperature controller into a wall socket next
to the kegerator/fridge and take the controller
temperature probe and place it or tape it to
a wall inside the kegerator/fridge. Then plug
the fridge into the temperature controller’s
cooling socket and plug the heat belt into the
temperature controller’s heating socket. Then
place the heat belt around a BrewKeg as a loop
on the kegerator/fridge floor and then close
the door. In this set up you will be closing
the kegerator/fridge door on the heat belt and
probe chords, but the seals on the doors will
close around them well and keep the inside
insulated from the outside temperatures. Turn
the temperature controller on and set the
temperature to your target e.g.
25°C (77°F).
The temperature controller will now control
the temperature inside the kegerator/fridge
and turn the heat-belt or fridge on as required.
The heat belt can be place around the keg

BREWING INSTRUCTIONS
some settled yeast in the sediment bottle and
only the odd bubble rising once and a while
from the sediment. Fermentation is officially
over when the Specific Gravity (SG) no longer
reduces and is constant. If you need to take
a sample to check the SG, attach your draft
beer tap to the beverage-out port on the lid,
take a sample, degas it and measure the SG
as shown in the Adjust video online. The
alcohol level can be calculated by the (OGSG) x
131.25. The OG is the original specific
gravity reading in the wort measure before
fermentation and the SG is the specific gravity
measured in the final beverage, both at
(
68°F). e.g. (1.045-1.010) x 131.25 = 4.59%
20°C
alcohol by volume. If you think fermentation
isn’t finished, wait another day before cooling.
1
Temperature Controller
2
Temperature Probe
3
Heat Belt
Fig 5: Temperature control set up during fermentation
in a kegerator and a fridge.
D. After 24 hours the pressure will have built up
and the beverage is carbonated. It is important
to monitor the pressure during fermentation,
so aim for fermenting at 1.5 bar (
adjust the VPRV to achieve this after
22 psi) and
24 hours,
once pressure has built up. If you prefer lower
carbonation, brew at a lower pressure to suit
your tastes. If the pressure is higher than your
target, turn the VPRV anti-clockwise as this
will release some pressure. Conversely, if you
can hear or smell CO
emitting out the VPRV
2
and you aren’t at your target pressure, then
turn the VPRV clockwise a little, to establish a
new set point then come back in a few hours
and check. You do not need to be over-precise
here because when you hook up your CO
2
cylinder to the BrewKeg during Clarification
and Dispense, an equilibrium will establish
itself, so the idea is to get close to the final
pressure you will set when consuming the
beverage.
E. At the temperature range of 18-28°C
(
64-82°F), after 4 days, fermentation should
be completed (for WilliamsWarn extracts)
and you should able to cool the beverage.
Lagers brewed at the colder temperature
range of
15°C (59°F) to 18°C (65°F) will
take 6 days. But first check fermentation is
finished. Fermentation is over when there is
F. To cool, wind the VPRV right down to its closed
position (to avoid losing all the CO
CO
bottle once it gets connected) and ensure
2
the BrewKeg
10™ is in a kegerator or fridge or
out of your
2
chiller of some kind and that it is set to cold.
If you were fermenting in a kegerator/fridge
with a heat-belt and temperature controller,
change the set point to 1-4°C (
34-39°F),
unplug the heat belt from the controller and
remove it from the kegerator/fridge, ready for
the next brew. The fridge will then come on
and cool the beverage down. Or conversely
you can turn the temperature controller off,
remove its temperature probe, remove the
heatbelt, and plug the kegerator/fridge back into
the wall socket and use its own temperature
controller to refrigerate the beverage. If you were
fermenting at room temperature or on a warm
area such as a cupboard with a small portable
thermostatically controlled heater in it, you now
need to move the keg into a fridge or chiller and
ensure it is set to cold. Wait
12 hours so that
the entire vessel contents cools down, before
moving to the next step. The pressure will
naturally reduce a little bit during this period as
the natural CO
becomes more dissolved in the
2
beverage as it cools.
CLARIFICATION
A. A WilliamsWarn cider kit does not need
clarification because once it is cold, the yeast
should all settle out and the cider look clear.
So once the cider is cold, just follow the steps
in the Dispense instructions below and in
the Dispense video. Beer on the other hand
requires clarification.
B. Beer Clarification 1: Remove the cold
BrewKeg
10™ from its kegerator/fridge to
9

USER MANUAL
give yourself some space to work on it and
close the BrewKeg
10™ butterfly valve above
the sediment bottle. Ensure you have your
CO
cylinder regulator connected to the gas
2
line with the grey quick-disconnect fitting as
in Figure 2, ready to be used, with the low
pressure set at 1.1 bar (
16 psi) pressure.
D. Next remove the grey quick-disconnect fitting
from the clarification pot lid, remove the
clarification pot lid and add
30ml of rinse
water to the pot. Then put the pot lid back on,
reconnect the grey fitting to the pot lid port
and blow that water through the lines for a just
a few seconds. If the water doesn’t flow out of
the pot because the gas supply and the vessel
are in equilibrium, just press the button on
the VPRV to release some pressure out of the
vessel and look for the water to exit the pot. It
just needs to rinse the line, not mix into the
beer like the clarification agent needed to.
Then remove the grey fitting from the pot lid
again. Then remove the black quick-disconnect
fitting from the BrewKeg
10™ lid beverage-
out port and remove the pressure gauge from
the gas-in port. Then disconnect the pressure
gauge and then connect the grey fitting of
your CO
BrewKeg
bottle to the gas gas-in port of the
2
10™ lid. The pressure from the CO
bottle is now connected onto the vessel and
the beverage inside and maintains the natural
carbonation. Ensure the CO
set at 1.1 bar (
16 psi) or another level you are
bottle regulator is
2
targeting.
2
E. The clarification agent will have reacted with
haze proteins and yeast and a new sediment
1
0
Fig 6 Dosing Device set up
C. Measure 15ml (0.5 fl. oz.) of clarification
agent into dosing device (it has graduations
on it to indicate the volume) and put
its lid back on. Then connect the grey
quick-disconnect fitting to the port on the
layer will settle down. So now open the vessel
butterfly valve to allow this sediment to fall
into the sediment bottle over the next
12 hours
and form a new layer on the already naturally
sedimented yeast. Then put the BrewKeg
and the CO
bottle (still connected to the
2
10™
vessel lid) inside the kegerator/fridge to
maintain the cold temperature and pressure.
dosing device lid. Press the VPRV button
and release CO
until the gauge reads 0.6 bar (9 psi). The
principle is that the vessel needs to be 0.5 bar
(7 psi) lower in pressure than the CO
low pressure to be able to dose clarification
agent in. Then connect the black quickdisconnect fitting to the beverage-out port on
the BrewKeg
in Figure 6 (previous page). As soon as you
out of the BrewKeg10™
2
supply
2
10™ lid. This set up is shown
F. Beer Clarification 2: After 12 hours, there will
be a new layer of sediment settled, with beer
seen above that in the sediment bottle. Remove
the grey fitting on the gas-in port and put the
pressure gauge back on that port. Then repeat
the above steps from B to E, but this time with
10ml (0.34 fl. oz.) of clarification agent at step
C. A third yeast and haze layer will fall into the
sediment bottle over the next
12 hours.
connect the black fitting, the higher pressure
in the clarification pot will force the agent
down the line and into the keg. Bubble the
Step 4: Dispense
agent into the beer for a few seconds or until
the vessel pressure equalises with the pressure
you have set on your regulator, e.g. 1.1 bar
(
16 psi). You must hear the bubbling
to confirm it is working. Note that the
BrewKeg
10™ pressure will increase during
bubbling as seen on its pressure gauge.
A. After another 12–24 hours the beer will be
ready for dispense. For WilliamsWarn cider
this stage will coincide with the 6-
12 hour
mark after cooling (Day 4.5), as that beverage
doesn’t need the clarification step. In both
cases the sediment bottle will be part full

of sediment, and you should see a clear
line between the sediment and the beverage
above it.
B. Disconnect the grey fitting from the lid gas-in
port and close the vessel butterfly valve. Take
the BrewKeg
10™ out of the kegerator/fridge
and take it to the sink or drain. Then remove
the sediment bottle as shown at the beginning
of the Dispense video. It screws off clockwise
looking down on it. Dump the sediment, rinse
the sediment bottle well with water and rinse
the butterfly valve with some water too. Then
put the sediment bottle back onto the butterfly
valve as a safety mechanism, in case someone
opens the valve accidentally during the
Dispense period.
C. Put the keg back in the kegerator/fridge and
connect the CO
supply grey fitting back
2
onto the gas-in port on the lid. Then connect
the black fitting of your draft beer tap to the
beverage-out port on the lid. See Figure 7 for
this set up.
BREWING INSTRUCTIONS
D. The beverage is ready for dispense so open the
draft beer tap to allow flow of the final product
into a glass and enjoy your brew.
Pull the tap towards you to open the tap. A
Williamswarn kegerator has taps with a flow
control lever on the side. The closed positions
are both fully up and fully down, so open the
lever part way down to get the flow you desire.
Horizontal is fully open.
You can also transfer beverage brewed in a
BrewKeg
10™ into bottles or Cornelius kegs
and get on with another brew in the BrewKeg.
See the WilliamsWarn website for videos and
manuals of those transfers.
Special note for Kegerator users: Most
kegerators have a hole at the back of the
kegerator for the CO
this instance the CO
line to go through. In
2
bottle sits outside the
2
kegerator. Use this set up if you prefer it to
placing the CO
bottle inside the kegerator with
2
the keg/kegs. It is particularly useful when you
have 2 kegs inside a kegerator, in which case
you will need a splitter to split the CO
line
2
coming off the regulator into several gas lines
with grey quick-disconnect fittings on their
ends, to supply CO
pressure on the gas-in ports
2
on several kegs at the same time. See figure 8.
Fig 7: Dispense from a kegerator (above) and a
fridge (below) with CO2 bottle inside.
1
1
Fig 8: Kegerator with CO2 bottle going through the
back.

USER MANUAL
Special Note on Pressure and Carbonation
Beverage Typical Grams
per Litre (g/L) CO
British Ales 3.0 - 4.0
Porter, Stout 3.5 - 4.5
Belgian Ales 4.0 - 4.5
American Ales 4.5 - 5.5
European Lagers, Belgian Lambics 5.0 - 5.5
Some Lagers, New World Ales 5.5 - 6.0
Cider and Mead Still - 8.0
American Wheat 5.5 - 6.5
German Wheat Beers 6.5 - 8.0
2
Beverage Typical Serving
British Ales
Porter, Stout
Belgian Ales
American Ales
European Lagers, Belgian Lambics
Some Lagers, New World Ales
Temperature
1 – 7°C / 34 – 45°F
1 – 8°C / 34 – 46°F
6 – 10°C / 43 – 50°F
7 – 13°C / 45 – 55°F
5 – 16°C / 41 – 61°F
10 – 15°C / 41 – 59°F
The typical serving temperature for beers also has
a historical basis and ranges from 1ºC–15/16ºC
(34ºF–59/61ºF). The brewers in New Zealand,
Historically the amount of CO2 in a beer has
depended on its beer style and this ranges from
3g/L to 8g/L. We’ve found over the years that
Australia and the USA tend to like the colder
beers, so we’ve targeted 1ºC (34ºF) as the starting
point for these instructional manuals.
WilliamsWarn brewers like to target around about
6–6.4g/L CO
in their beers.
2
CO2 Levels From Pressure vs Temperature
Temp (ºC)
13
12
11
1
2
Tank Pressure (BAR)
10
9
8
7
6
5
4
3
2
1
CO2 Level g/L
WilliamsWarn brewers tend to like quite highly
carbonated beers so we’ve targeted 6.4g/L in a
BrewKeg10 at 1ºC. This means, as you can see on
this graph, we need a pressure of 1.1 bar during
dispense. So that’s why we set 1.1 bar pressure
on the low pressure gauge on our CO
supply
2
regulator.

Adjusting Carbonation
BREWING INSTRUCTIONS
Carbonation g/L CO2Pressure on CO2 Supply for
Clarification and dispense (1ºC/34ºF)
High 6.4 g/L 1.10 bar
High 6.2 g/L 1.03 bar
High 6.0 g/L 0.96 bar
Moderate 5.8 g/L 0.90 bar
Moderate 5.6 g/L 0.83 bar
Average 5.4 g/L 0.76 bar
Average 5.2 g/L 0.70 bar
Average 5.0 g/L 0.63 bar
Low 4.8 g/L 0.56 bar
Low 4.6 g/L 0.49 bar
Carbonation for Warmer Beverages
Carbonation g/L CO2Pressure on CO2 Supply for
Clarification and dispense (5ºC/41ºF)
High 6.4 g/L 1.41 bar
High 6.2 g/L 1.34 bar
High 6.0 g/L 1.26 bar
Moderate 5.8 g/L 1.19 bar
Moderate 5.6 g/L 1.11 bar
Average 5.4 g/L 1.03 bar
Average 5.2 g/L 0.96 bar
Average 5.0 g/L 0.88 bar
Low 4.8 g/L 0.81 bar
Low 4.6 g/L 0.73 bar
If you find this high carbonation level is a little
bit too high for your personal preference, or you
are getting a little too much foam out of the draft
beer tap, then for your next brews just target a
lower dispense pressure. For example 0.9 bar will
give you 5.8g/L carbon dioxide. So that is what
you would set on the low pressure gauge on your
CO
supply. During fermentation set your VPRV to
2
release at about 0.4 bar higher than the dispense
pressure you’ve chosen to allow for a pressure
drop during cooling and to have a little excess
carbonation in the beer before clarification. Also
when you press the button on the VPRV to reduce
the pressure in the vessel before you dose in the
clarification agent, lower the vessel pressure to
0.5 bar lower than the dispense pressure you
might be choosing from this table, to be able to
force the agent into the beer.
Please note, if you prefer a warmer beverage
temperature at dispense, for the same amount
of carbonation you need more pressure. So
choose the amount of carbonation you want
and use the graph on the left to set the dispense
pressure you need. If you find your beverage
is over carbonated to your personal taste or
maybe over foaming through your beverage
tap system, put the pressure gauge back on
and open the VPRV up to a lower pressure
and let it stand overnight. This will reduce
the carbonation level. If you’re short of time,
you could try shaking the keg a little bit to help
force the CO
out of the beverage.
2
1
3
A Simple Rule of Thumb
If you like the level of carbonation that 1.1 bar
(16 psi) gives you at 1ºC (34ºF), but would like
a warmer beer, a simple rule of thumb is to try
1.2 bar at 2ºC (35.6ºF), or 1.3 bar at 3ºC (37ºF),
or 1.4 bar at 4ºC (39ºF), or 1.5 bar at 5ºC (41ºF).
This works well for those who like a high
carbonation level and it will not result in foaming
of the beer out the tap when the beer is poured.

USER MANUAL
FINAL
WORDS
These instructions represent
a means for anyone to
make great beer or cider
the first time they use a
BrewKeg10™. As you
brew more, you may find
you come up with your
own tweaks to what is
written here or develop
radically different methods
that suit you better. As long
as you and your friends are
happy with the final beer
1
4
or cider, feel free to make
you own adjustments to the
process if you feel the need
or see an easier way to brew
using your set up.

NOTES
BREWING INSTRUCTIONS
1
5

 Loading...