

Page 1

®
MANUAL AND USER GUIDE
SoundPlus™TV Infrared System
Model WIR 237
Model WIR 238
Model WIR 239
Transmitter Model WIR TX238
Receiver Model WIR RX237 or
Receiver Model WIR RX238 or
Receiver Model WIR RX239
MAN 120C © 2007 Williams Sound Corp.
Page 2

2
CONTENTS PAGE
System Overview . . . . . . . . . . . . . . . . . . . . . . . . . . . 3
System Components . . . . . . . . . . . . . . . . . . . . . . . . 3
Safety Information . . . . . . . . . . . . . . . . . . . . . . . . . . 4
Recycling Instructions . . . . . . . . . . . . . . . . . . . . . . . 5
Operating Instructions . . . . . . . . . . . . . . . . . . . . . . . 6
WIR TX238 Transmitter . . . . . . . . . . . . . . . . 6
WIR RX237 Receiver . . . . . . . . . . . . . . . . . 10
WIR RX238 Receiver . . . . . . . . . . . . . . . . . 13
WIR RX239 Receiver . . . . . . . . . . . . . . . . . 15
In Case of Difficulty . . . . . . . . . . . . . . . . . . . . . . . 17
Warranty. . . . . . . . . . . . . . . . . . . . . . . . . . . . . . . . . 18
System Specifications . . . . . . . . . . . . . . . . . . . . . . 20
®
Page 3
S
YSTEMOVERVIEW
Thank you for purchasing the SoundPlus™TV Infrared System
from Williams Sound Corp. Anyone needing auditory assistance to overcome background noise, reverberation, or distance
from the sound source can benefit from the SoundPlus
™
TV
Infrared System.
You can use the SoundPlus™TV Infrared System for hearing
assistance in conference rooms, listening to the TV, or with
other audio equipment. The TX238 Transmitter features an
Automatic Level Control to adjust for different audio signal
levels and to maintain a comfortable listening level.
NOTE: The SoundPlus
™
TV Infrared System is not recom-
mended for use with a PLASMA TV MONITOR.
If you have problems at anytime with these systems, do not
hesitate to call us toll-free at 1-800-843-3544.
S
YSTEMCOMPONENTS
3
• WIR RX237 or
WIR RX238 or
WIR RX239 Receiver
• 1m Audio Cable with
dual RCA plugs (WCA 078)
• Two Rechargeable Batteries
(BAT AP97A)
• WIR TX238 Transmitter
• Power Supply
• TV Microphone (MIC 084)
Please read through this manual carefully
for proper setup and installation instructions.
®
Page 4

4
SAFETY INFORMATION
Hearing Safety:
CAUTION!
This product is designed to amplify sounds to a high volume
level which could potentially cause hearing damage if used
improperly.
To protect your hearing and the hearing of others:
1. Make sure the volume is turned down before putting on the
earphone or headphone before adjusting the volume to a
comfortable level.
2. Set the volume level at the minimum setting that you
need to hear.
3. If you experience feedback (a squealing or howling sound),
reduce the volume setting and move the microphone away
from the earphone or headphone.
4. Do not allow children or other unauthorized persons to
have access to this product.
®
Page 5
5
Pacemaker Safety:
CAUTION!
1. Before using this product with a pacemaker or other medical
device, consult your physician or the manufacturer of your
pacemaker or other medical device.
2. If you have a pacemaker or other medical device, make sure
that you are using this product in accordance with safety
guidelines established by your physician or the pacemaker
manufacturer.
RECYCLING INSTRUCTIONS
Help Williams Sound protect the environment! Please take the
time to dispose of your equipment properly.
Product Recycling for Customers in the European Union:
Please do NOT dispose of your Williams Sound equipment in
the household trash. Please take the equipment to an electronics recycling center; OR, return the product to the factory for
proper disposal.
Battery Recycling for Customers in the European Union:
Please do NOT dispose of used batteries in the household trash.
Please take the batteries to a retail or community collection
point for recycling.
04/04/07
®
Page 6

6
S
ETTING UP THE
TX238 T
RANSMITTER
NOTICE: T
HE RECHARGEABLE BATTERIES ARE SHIPPED IN A DIS
-
CHARGED STATE
. T
HE BATTERIES MUST BE CHARGED OVERNIGHT
BEFORE USING THE
S
OUNDPLUS
™
TV I
NFRAREDSYSTEM
.
The WIR TX238 Transmitter may be placed on top of a TV or
shelf. Place the TX238 Transmitter where it is clearly visible
from your listening position.
Infrared light behaves like visible light, so it is blocked by solid
objects. This confines the signal to the room where the transmitter is located. The transmitter cannot be placed inside or
behind anything except glass. The maximum operating distance
is approximately 30 feet (9 m).
Ideally, the TX238 Transmitter should be at ear-level height or
above. The infrared light pattern is much like a floodlight
“cone” as it leaves the transmitter, with the best reception
inside the cone.
Sunlight can cause infrared interference in the form of a buzz,
hiss, or static. Thus, the system cannot be used outdoors and
may not work properly inside if a lot of direct sunlight is present. Closing drapes or blinds will help if sunlight is a problem.
Any number of receivers may be used with the TX238
Transmitter, but use only one transmitter in a room at the same
time. Otherwise, interference will occur.
)
Receiver Charging Cradle
Battery
Charging
Port
Left
Battery
Charging
Indicator
Infrared
Transmitting
Diodes
Receiver
Charging
Indicator
(only for WIR
RX237, RX238,
RX239 Receiver
Infrared
Transmitting
Diodes
Right
Battery
Charging
Indicator
Battery
Charging
Port
®
Page 7
7
TV Microphone
If an RCA connection is unavailable, use the provided TV microphone to pickup the sound source
directly from the TV loud speaker as shown on right.
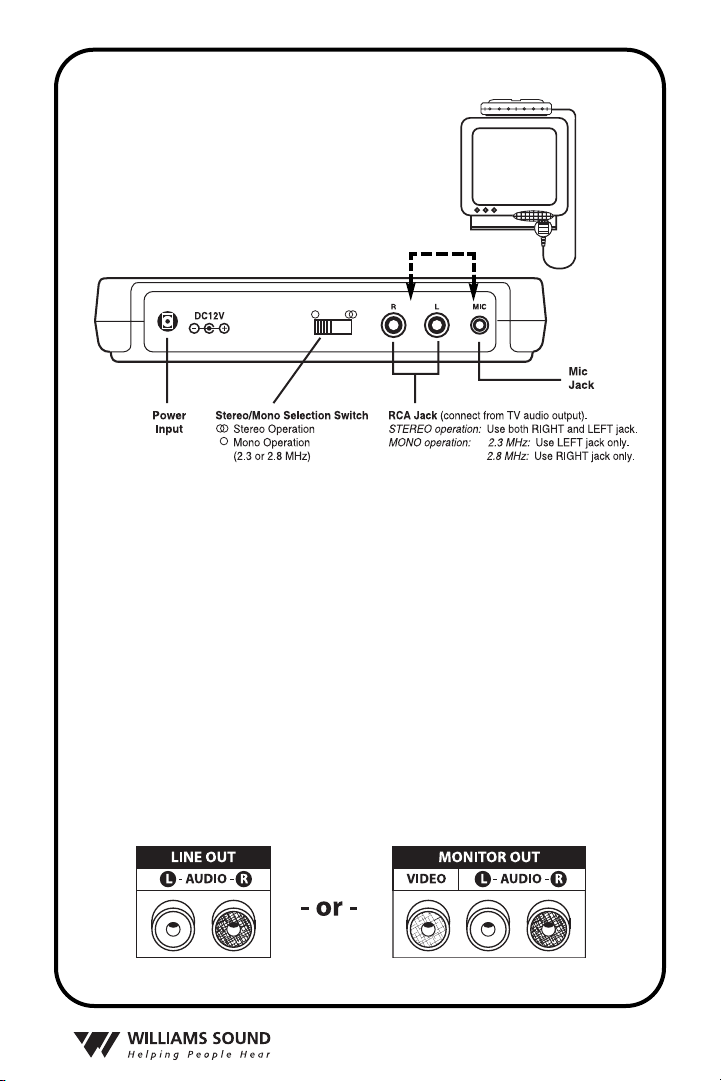
TX238 Transmitter (Rear View)
STEP 1: CONNECT THE TRANSMITTER POWER SUPPLY
Plug the Power Supply cord into the “DC 12V” jack 1 on the
back of the TX238. Then plug the Power Supply into an AC
outlet. When the receiver is placed into the charging cradle built
into the top of the transmitter, the center charging indicator on
the front of the TX238 will turn on. When the spare battery is
plugged into the left or right battery charging port on the transmitter, the corresponding charge indicator light will turn on.
S
TEP 2: CONNECT THE TRANSMITTER TO THE AUDIO SOURCE
Use the supplied red and white RCA audio cables to connect the
TX238 Transmitter directly to the TV, VCR, or stereo “AUDIO
OUT” jacks. If your television does not have “AUDIO OUT”
jacks, you will need use the supplied TV microphone. See page
9 for TV microphone instructions.
5
1
2
3
4
OR
TX238
®
Page 8

(HIGHEST AUDIO QUALITY)
Connect the RCA plugs from the TV or VCR
audio output into the LEFT
and RIGHT RCA
jacks on the TX238 Transmitter
3. Next, slide the
stereo/mono switch 2on the TX238 Transmitter
to the stereo “ ” position. Your transmitter is
now set for stereo operation.
8
STEP 3: SELECT STEREO OR MONO OPERATION
Compatible with:
RX237
-or-
RX238
STEREO OPERATION:
Note: Choose 1 of 3 transmitter setup options below and on
page 9. Verify receiver compatibility on left.
Important: If your system is packaged with the WIR RX239
(neckloop) Receiver, you must setup the WIR TX238
Transmitter to operate in 2.3 MHz
(mono) mode. See 2.3 MHz
(mono) instructions on page 9. The WIR RX239 (neckloop)
Receiver will NO
T work while the transmitter is in stereo or
2.8 MHz mode.
If your system is packaged with the WIR RX237 or WIR RX238
Receiver, you can choose to operate the WIR TX238 in stereo OR
mono (2.3 or 2.8 MHz) operation. For the highest quality, stereo is
the recommended
mode of operation.
S
TEP 2 (CONTINUED):
NOTE: Some televisions have FIXED output and others have
VARIABLE output. If available, FIXED output should be
selected. Consult your television manual for more information.
“Fixed” output means the volume on the television will not
change when the volume is increased, decreased, or muted.
“Variable” output means the volume on the television will
change when it is increased, decreased, or muted. If variable output is the only output available on your television, we recommend using the supplied TV microphone. See page 9 for TV
microphone instructions.
®
Page 9

9
STEP 3 (CONTINUED):
If an RCA connection is unavailable, use the provided
TV MICROPHONE 5 to pickup the desired sound source.
Plug in the microphone into the Mic Jack on the rear of the
TX238 Transmitter 4. Use the velcro strip supplied to attach
the microphone near the loudspeaker 4 of your TV or stereo.
The microphone will allow you to play the TV at lower volume
for other listeners and will pick up other important sounds like
the telephone or doorbell ringing.
Connect the LEFT
RCA plug from the TV or
VCR audio output into the LEFT RCA jack on the
TX238 Transmitter 3 (the right jack should be
left unplugged). Next, slide the stereo/mono
switch to the “ ” mono position 2. The transmitter is now set for 2.3 MHz operation.
Connect the LEFT RCA plug from the TV or VCR
speaker output into the RIGHT RCA jack on the
TX238 Transmitter 3 (the left jack should be left
unplugged). Next, slide the stereo/mono switch 2
to the “ ” mono position. The transmitter is now
set for 2.8 MHz operation.
Compatible with:
Compatible with:
RX239
RX237
-or-
RX238
-or-
RX237
-or-
RX238
2.3 MHz (MONO)
OPERATION:
2.8 MHz (MONO) OPERATION:
®
Page 10

10
SETTING UP THE RX237 RECEIVER
STEP 1: INSTALL THE RECEIVER BATTERIES
Insert the rechargeable battery into the bottom of the RX237 Receiver
(see page 12). Place the receiver into the charger cradle built into the
top of the TX238 Transmitter and let charge overnight. The spare battery can be plugged into the charging port located on either side of the
transmitter. By keeping the spare battery charged, you can easily swap
batteries when the one in use runs out and always have a fresh battery
ready. A fully charged battery will operate the receiver for approximately 6 hours depending on the volume setting. The battery should
be changed when you notice the sound getting weak and noisy. the
batteries may be left charging when not in use.
S
TEP 2: USING THE WIR RX237 RECEIVER
The RX237 will automatically configure itself for stereo or mono
(2.3 or 2.8 MHz) operation depending on the setup chosen for the
TX238 Transmitter.
Before you use the system, double check to make sure the WIR
TX238 Transmitter’s power supply is plugged in. Make sure the TV,
stereo, or audio source is turned ON. Make sure the receiver’s battery
is fully charged.
To Use the Receiver:
1. First, place the lanyard on the receiver around your neck.
IMPORTANT: a dual detector infrared “eye” is located in the
front of the receiver. Do not cover it up or you will lose reception.
Make sure the “SOUND PLUS” lettering is facing away from
you when you put the receiver on.
2. Next, plug in an earphone, headphone, or neckloop with 3.5mm
plug into the jack on the bottom of the RX237 receiver (see drawing
on page 12). Note: The RX237 turns ON automatically when you
plug in the earphone/headphone into the jack, and turns OFF when
you remove the earphone/headphone from the jack.
3. Rotate the volume control to a comfortable listening level. Note: If
you are using a neckloop with the RX237, turn the volume control to
“2,” or about half of full volume. Then, turn the switch on your hearing aid to the “T” position and adjust the volume to a comfortable
listening level. If the sound is weak, increase the volume on the
RX237 Receiver, then on your hearing aid.
®
Page 11

11
IMPORTANT: When you are done using the RX237, remember
to UNPLUG the earphone, headphone, or neckloop from
the receiver’s jack. The receiver will not turn off until the
earphone/headphone is removed from the unit.
Return the receiver to the charger when it is not in use!
A
DDITIONAL RECEIVER ADJUSTMENTS
Balance Control: Use a small screwdriver to adjust the loudness balance between the Left and Right Earphones. See page 12.
Tone Controls: Use a small screwdriver to adjust the tone for the left
and right earphones. See page 12.
®
Page 12

12
Lanyard
Volume
Control
Battery (BAT AP97A)
RX237 Receiver
(Front View)
Optional Earphone/Headphone/Neckloop
for 3.5mm Jack
RX237 Receiver (Rear View)
Tone Controls Balance Control
–
+
–
+
RX237 Receiver (Bottom View)
3.5mm Jack Battery (BAT AP97A)
-
L
L
-
BAL
R
-
R
®
Page 13

13
SETTING UP THE RX238 RECEIVER
STEP 1: INSTALL THE RECEIVER BATTERIES
Insert the rechargeable battery into the bottom of the RX238
Receiver (see page 14). Place the receiver into the charger cradle
built into the top of the TX238 Transmitter and let charge
overnight. The spare battery can be plugged into the charging
port located on either side of the transmitter. By keeping the
spare battery charged, you can easily swap batteries when the
one in use runs out and always have a fresh battery ready. A fully
charged battery will operate the receiver for approximately 6
hours, depending on the volume setting. The battery should be
changed when you notice the sound getting weak and noisy. The
batteries may be left charging when not in use.
S
TEP 2: USING THE WIR RX238 RECEIVER
The RX238 will automatically configure itself for stereo or
mono (2.3 or 2.8 MHz) operation depending on the setup chosen for the TX238 Transmitter.
To use the system, first check to make sure your TV or audio
source is turned ON. Make sure the receiver battery is fully
charged. The RX238 Receiver has an automatic on/off function.
When you put the receiver on, it turns on. When you take the
receiver off, it turns off. Rotate the volume control to adjust the
volume to a comfortable level.
IMPORTANT: A dual detector infrared “eye” is located in
the front of the receiver. Do not cover it up or you will lose
reception. Make sure the “SOUND PLUS” lettering is facing
away from you when you put the receiver on.
Return the receiver to the charger when it is not in use.
A
DDITIONAL RECEIVER ADJUSTMENTS
Balance Control: Use a small screwdriver to adjust the loudness
balance between the left and right earphones. See page 14.
Tone Controls: Use a small screwdriver to adjust the tone for
the left and right earphones. See page 14.
Ear Cushions: Replacement ear cushions are available from
your Williams Sound dealer, part number EAR 031.
®
Page 14

14
Volume
Control
RX238 Receiver
(Front View)
Battery (BAT AP97A)
RX238 Receiver (Rear View)
Tone Controls Balance Control
–
-
L
L
+
–
+
-
BAL
R
-
R
®
Page 15

15
SETTING UP THE RX239 (NECKLOOP) RECEIVER
STEP 1: INSTALL THE RECEIVER BATTERIES
Insert the Rechargeable battery into the bottom of the RX239
Receiver (see drawing on page 16). Place the receiver into the
charger cradle built into the top of the TX238 Transmitter and let
charge overnight. The spare battery can be plugged into the charging port located on either side of the transmitter. By keeping the
spare battery charged, you can easily swap batteries when the one
in use runs out and always have a fresh battery ready. A fully
charged battery will operate the receiver for approximately 6
hours, depending on the volume setting. The battery should be
changed when you notice the sound getting weak and noisy. The
batteries may be left charging when not in use.
S
TEP 2: USING THE WIR RX239 RECEIVER
The RX239 Receiver magnetically transfers the audio from the
TX238 Transmitter into a hearing aid equipped with a telephone
coil (T-coil).
Before you use the receiver, double check to make sure the
WIR TX238 Transmitter’s power supply is plugged in. Make sure
the audio connection on the transmitter is set up for 2.3 MHz
(mono) operation only. See pages 8-9. Make sure the TV, stereo,
or audio source is turned ON. Make sure the receiver’s battery is
fully charged.
To use the Receiver:
1) First, place the neckloop on the receiver around your neck.
Important: A dual detector infrared “eye” is located on the
front of the receiver. Do not cover it up or you will lose reception. Make sure that “SOUNDPLUS” lettering is facing away
from you when you put the receiver on.
2) Turn the receiver ON by turning the volume control to “2,” or
about half of full volume.
3) Turn the switch on your hearing aid to the “T” position and
adjust the volume for comfortable listening.
4) If the sound is weak, increase the volume on the Williams
Sound unit, then on your hearing aid.
®
Page 16

16
)
Volume
Control
RX239 Receiver
(Front View)
Battery (BAT AP97A
RX239 Receiver (Rear View)
Neckloop
®
Page 17

17
INC
ASE OFDIFFICULTY
If the system does not seem to be functioning:
1. Read through the manual and user guide carefully to verify proper
setup and installation of your system.
2. Make sure that your television or VCR is plugged in and
turned on.
3. Make sure that the TX238 Transmitter’s power adapter is plugged in.
4. If you’ve installed the TX238 Transmitter other than on top of the
TV, make sure that its front panel is facing the receiver.
5. Make sure that the receiver has a fully charged battery.
6. Make sure you are not covering the infrared “eye.” Remove any
objects obstructing the line between the TX238 Transmitter and
the receiver. The “SoundPlus” label should be facing towards the
TV while you listen.
7. If you are using the RX237 or RX238 Receiver and getting static
or hiss: Try operating the TX238 Transmitter in MONO (2.3 MHz
or 2.8 MHz) mode. See instructions on page 8.
8. If you are using the RX239 (neckloop) Receiver, and the sound is
weak or noisy: First, make sure that the TX238 Transmitter is
operating in 2.3 (Mono) mode
. Also, check that the T-coil switch
on your hearing aid is switched to the “On” position. Next, try
increasing the volume on the receiver unit, then increase the volume on your hearing aid until the volume is at a comfortable listening level.
9. If you are operating the TX238 Transmitter in MONO (2.3 MHz
or 2.8 MHz) mode and getting noise or hiss in the receiver: For
2.3 MHz operation, check to make sure you are only using the left
RCA jack on the TX238 Transmitter. For 2.8 MHz operation:
make sure you are only using the r
ight RCA jack on the TX238
Transmitter.
10. If you are using the TV microphone and not getting a signal, try
turning up the TV volume up slightly. Also, try positioning the
TV mic directly over the TV speaker.
11. If the system still does not function, call Williams Sound at:
1-800-843-3544.
®
Page 18

18
LIMITED WARRANTY
Williams Sound products are engineered, designed and manufactured
under carefully controlled conditions to provide you with many years
of reliable service. Williams Sound warrants the SoundPlus
™
TV
Infrared System against defects in materials and workmanship for
FIVE (5) years. During the first five years from the purchase date, we
will promptly repair or replace the SoundPlus
™
TV Infrared System.
Microphones, earphones, headphones, batteries, cables, carry cases,
and all other accessory products carry a 90-day warranty. Chargers
carry a one year warranty.
WILLIAMS SOUND HAS NO CONTROL OVER THE CONDITIONS UNDER WHICH THIS PRODUCT IS USED. WILLIAMS
SOUND, THEREFORE, DISCLAIMS ALL WARRANTIES NOT
SET FORTH ABOVE, BOTH EXPRESS AND IMPLIED, WITH
RESPECT TO THE SOUNDPLUS
™
TV INFRARED SYSTEM,
INCLUDING BUT NOT LIMITED TO, ANY IMPLIED WARRANTY OF MERCHANTABILITY OR FITNESS FOR A PARTICULAR
PURPOSE. WILLIAMS SOUND SHALL NOT BE LIABLE TO
ANY PERSON OR ENTITY FOR ANY MEDICAL EXPENSES OR
ANY DIRECT, INCIDENTAL OR CONSEQUENTIAL DAMAGES
CAUSED BY ANY USE, DEFECT, FAILURE OR MALFUNCTION
OF THE PRODUCT, WHETHER A CLAIM FOR SUCH DAMAGES
IS BASED UPON WARRANTY, CONTRACT, TORT OR OTHERWISE. THE SOLE REMEDY FOR ANY DEFECT, FAILURE OR
MALFUNCTION OF THE PRODUCT IS REPLACEMENT OF THE
PRODUCT. NO PERSON HAS ANY AUTHORITY TO BIND
WILLIAMS SOUND TO ANY REPRESENTATION OR WARRANTY WITH RESPECT TO THE SOUNDPLUS
™
TV INFRARED
SYSTEM. UNAUTHORIZED REPAIRS OR MODIFICATIONS
WILL VOID THE WARRANTY.
The exclusions and limitations set out above are not intended to, and
should not be construed so as to contravene mandatory provisions of
applicable law. If any part or term of this Disclaimer of Warranty is
held to be illegal, unenforceable or in conflict with applicable law by a
court of competent jurisdiction, the validity of the remaining portions
of this Disclaimer of Warranty shall not be affected, and all rights and
obligations shall be construed and enforced as if this Limited Warranty
did not contain the particular part or term held to be invalid.
®
Page 19

19
If you experience difficulty with your system, call Toll-Free for
Customer Assistance:
1-800-843-3544
If it is necessary to return the system for service, your Customer
Service Representative will give you a Return Authorization Number
(RA) and shipping instructions.
Pack the system carefully and send it to:
Williams Sound Corp.
Attn: Repair Dept.
10321 West 70th Street
Eden Prairie, MN 55344
®
Page 20

20
WIR 238, WIR 239
SYSTEM SPECIFICATIONS:
WIR TX238 Transmitter:
Size, Weight, Color: 6.25”L x 3.25”W x 1.25”H (15.9cm x
8.3cm x 3.2cm), 5.1oz. (140g), Gray
Power Input: 12 VDC (center is positive), 200 mA Class
II wall transformer
TFP 024 Power Supply: North America:
120VAC, 60Hz, UL/CSA
TFP 032 Power Supply, 2 pin Euro mains
plug, 230VAC, 50-60 Hz, CE
TFP 033 Power Supply, 3 pin UK mains
plug, 230VAC, 50-60 Hz, CE
Subcarrier Frequency: 2.3 MHz, 2.8 MHz, or stereo.
Range: 30ft. (9m) line-of-site
Auto Power On/Off: Transmitter shuts off infrared after 1.5 min-
utes when audio signal is removed. Battery
charging functions remain on full time.
Microphone Input: 3.5 mm jack for MIC 084 Electret TV
Microphone, 1.5 kΩ
Line Inputs: 2 RCA jacks for mono or stereo line-level
sources
200 mV min. to 10 V rms max. input level,
5.1 kΩ
Automatic Level Control: 35 dB compression range
Infrared LEDs, Pattern: 8 IR LEDs, 45 degree cone-shaped cover-
age pattern to 6dB intensity,
30ft. (9m) line of sight
Charging Ports: Charges one WIR RX238 Receiver plus
two additional BAT AP97A NiMH battery
packs
Approvals: RoHS, WEEE
Warranty: 5 years*
*90 days on cords, batteries, power supply and other accessories.
®
Page 21

21
WIR RX237 Receiver:
Weight: 1.7 oz (50 g) with battery
Material and Color: ABS plastic, Black
Battery Type, Life: BAT AP97A NiMH Battery Pack, 6 hours
Modulation Frequency: 2.3 and 2.8 MHz
Frequency Response: 200 Hz to 8 kHz, ± 5 dB
Signal-to-Noise Ratio: 60 dB at 9m
Controls: Volume control thumbwheel; screwdriver
adjust balance
and (L & R) tone controls
Acoustic Output: 115 dB MAX SSPL90 with EAR 013 (2cc
coupler)
Compatibility: Compatible with transmitters operating on
2.3 MHz/2.8 MHz
Power Switch: Built into jack
Approvals: RoHS, WEEE
Warranty: 5 years, parts and labor*
WIR RX238 Receiver:
Weight: 2.1 oz (60 g) with batteries
Material and Color: ABS plastic, Black and Grey
Battery Type, Life: BAT AP97A NiMH Battery Pack, 6 hours
Modulation Frequency: 2.3 MHz and/or 2.8 MHz
Frequency Response: 200 Hz to 8 kHz, ± 5 dB
Signal to Noise Ratio: 60 dB at 30 ft. (9m)
Controls: Volume control thumbwheel; screwdriver
adjust balance and (L & R) tone controls
Acoustic Output: 112 dB MAX SSPL90 with 2 cc coupler
Compatibility: Compatible with transmitters operating on 2.3
MHz, 2.8 MHz, or both (stereo)
Power Switch: Built into receiver “arms”
Ear pads: Uses EAR 031 foam cushions
Approvals: RoHS, WEEE
Warranty: 5 years*
*90 days on cords, batteries, power supply and other accessories.
®
Page 22

22
WIR RX239 Receiver:
Weight: 2.2 oz (64 g) with batteries
Material and Color: ABS plastic, Black
Battery Type, Life: BAT AP97A NiMH Battery Pack, 6 hours
Modulation Frequency: 2.3 MHz
Frequency Response: 200 Hz to 8 kHz, ± 5 dB
Signal to Noise Ratio: 60 dB at 30 ft. (9m)
Controls: Volume control thumbwheel
Compatibility: Compatible with most wide-band 2.3 MHz
Transmitters
Power Switch: Built into volume control
Loop Length: 32”
Approvals: RoHS, WEEE
Warranty: 5 years*
*90 days on cords, batteries, power supply and other accessories.
®
Page 23

Page 24

10321 West 70th St., Eden Prairie, MN 55344 U.S.A.
©2007 Williams Sound Corp. MAN 120C
800.843.3544 | 952.943.2252 | FAX: 952.943.2174
www.williamssound.com
®
 Loading...