

Page 1
FM +
Assistive Listening System FM T55
USER MANUAL
MAN 245B
Page 2

FM +
Table of Contents
Safety Warnings and Instructions �������������������������������������������������������������������������������������������������������������������������������������������� 3
Recycling Instructions ���������������������������������������������������������������������������������������������������������������������������������������������������������������� 3
System Overview ������������������������������������������������������������������������������������������������������������������������������������������������������������������������ 4
Quick Setup Instructions ����������������������������������������������������������������������������������������������������������������������������������������������������������� 5
Wi-Fi Network May Be Required ����������������������������������������������������������������������������������������������������������������������������������������������6
Router and Network Equipment Selection �����������������������������������������������������������������������������������������������������������������������������6
Wiring and Connections ������������������������������������������������������������������������������������������������������������������������������������������������������������ 6
Ethernet and Dante RJ-45 Connection ��������������������������������������������������������������������������������������������������������������������������������������������� 7
Audio Source Connections ������������������������������������������������������������������������������������������������������������������������������������������������������������������� 7
Multi-Channel Sources ��������������������������������������������������������������������������������������������������������������������������������������������������������������������������� 7
Connecting Additional Sound Systems ��������������������������������������������������������������������������������������������������������������������������������������������� 7
Avoiding Hum in the Audio (as a Result of a Ground Loop) ��������������������������������������������������������������������������������������������������������� 8
Selecting an Audio Source Appropriate for Hearing Impaired Listeners ��������������������������������������������������������������������������������� 8
Installing the ANT 025 Whip Antenna ����������������������������������������������������������������������������������������������������������������������������������������������� 8
Connecting to other Devices ���������������������������������������������������������������������������������������������������������������������������������������������������������������9
Controls and Features ������������������������������������������������������������������������������������������������������������������������������������������������������������� 10
System Settings ������������������������������������������������������������������������������������������������������������������������������������������������������������������������� 11
Audio Settings ������������������������������������������������������������������������������������������������������������������������������������������������������������������������������������������11
Audio Source ��������������������������������������������������������������������������������������������������������������������������������������������������������������������������������������������11
Audio Input Gain ��������������������������������������������������������������������������������������������������������������������������������������������������������������������������������������11
Audio Presets �������������������������������������������������������������������������������������������������������������������������������������������������������������������������������������������11
High-pass Filter �������������������������������������������������������������������������������������������������������������������������������������������������������������������������������������� 12
Low-pass Filter ��������������������������������������������������������������������������������������������������������������������������������������������������������������������������������������� 12
Compression ������������������������������������������������������������������������������������������������������������������������������������������������������������������������������������������ 12
Headphone Volume ������������������������������������������������������������������������������������������������������������������������������������������������������������������������������ 12
FM Output Power ���������������������������������������������������������������������������������������������������������������������������������������������������������������������������������� 12
Time-Out �������������������������������������������������������������������������������������������������������������������������������������������������������������������������������������������������� 12
Screen Lock �������������������������������������������������������������������������������������������������������������������������������������������������������������������������������������������� 12
User-Entered Transmitter Description ����������������������������������������������������������������������������������������������������������������������������������������������13
Channel �����������������������������������������������������������������������������������������������������������������������������������������������������������������������������������������������������13
Restore Defaults �������������������������������������������������������������������������������������������������������������������������������������������������������������������������������������13
Network Settings ������������������������������������������������������������������������������������������������������������������������������������������������������������������������������������13
Adjusting Network Settings �����������������������������������������������������������������������������������������������������������������������������������������������������������������13
Dante Settings �����������������������������������������������������������������������������������������������������������������������������������������������������������������������������������������14
Web Control Interface �������������������������������������������������������������������������������������������������������������������������������������������������������������� 14
WaveCAST App with FM + ������������������������������������������������������������������������������������������������������������������������������������������������������� 19
Connecting the App to the Channel ������������������������������������������������������������������������������������������������������������������������������������������������ 19
Listening via the App ���������������������������������������������������������������������������������������������������������������������������������������������������������������������������� 19
Note on Wi-Fi Assist/Smart Network Switching ���������������������������������������������������������������������������������������������������������������������������� 19
WaveCAST Receiver ����������������������������������������������������������������������������������������������������������������������������������������������������������������� 19
FM Receivers ����������������������������������������������������������������������������������������������������������������������������������������������������������������������������� 19
Troubleshooting ������������������������������������������������������������������������������������������������������������������������������������������������������������������������20
Website problems �������������������������������������������������������������������������������������������������������������������������������������������������������������������������������� 20
Audio problems ������������������������������������������������������������������������������������������������������������������������������������������������������������������������������������� 20
Wi-Fi reception diculties ������������������������������������������������������������������������������������������������������������������������������������������������������������������ 20
FM reception diculties ���������������������������������������������������������������������������������������������������������������������������������������������������������������������� 21
Remote Control is not working over the hardwired Ethernet network ����������������������������������������������������������������������������������� 21
Remote Control is not working over Wi-Fi ������������������������������������������������������������������������������������������������������������������������������������� 22
FM Plus Specifications �������������������������������������������������������������������������������������������������������������������������������������������������������������24
Regulatory Statements ������������������������������������������������������������������������������������������������������������������������������������������������������������26
FCC ���������������������������������������������������������������������������������������������������������������������������������������������������������������������������������������������������������� 26
IC ��������������������������������������������������������������������������������������������������������������������������������������������������������������������������������������������������������������� 26
2-Year Warranty ������������������������������������������������������������������������������������������������������������������������������������������������������������������������� 27
2
Page 3

Safety Warnings and Instructions
WARNING! TO REDUCE THE RISK OF FIRE OR ELECTRIC SHOCK, DO NOT EXPOSE THIS APPLIANCE TO RAIN OR MOISTURE.
CAUTION! TO REDUCE THE RISK OF ELECTRIC SHOCK, DO NOT REMOVE COVER. NO USER-SERVICEABLE PARTS INSIDE. REFER
SERVICING TO QUALIFIED SERVICE PERSONNEL.
Precautions:
1. Power – WARNING, BEFORE TURNING ON THE POWER FOR THE FIRST TIME, READ THE FOLLOWING SECTION CAREFULLY.
The unit is designed for use only with the line cord of the region in which it will be operated.
2. Voltage Label (Rear Panel) – A label located at the rear panel power connection indicates the DC power input for the unit. The
label will read 24VDC. Use the Williams AV TFP 062 power supply for this unit.
3. Do not plug in the input, output, Ethernet, or Dante connections while the power switch is switched to the on position.
4. Do not touch the FM + [D] with wet hands. Do not handle the FM + [D] or power cord when your hands are wet or damp. If water or
any other liquid enters the FM + [D] cabinet, take the FM + [D] to qualified service personnel for inspection.
5. Place the FM + [D] in a well ventilated location. Take special care to provide plenty of ventilation on all sides of the FM + [D]
especially when it is placed in an audio rack. If ventilation is blocked, the FM + [D] may over heat and malfunction.
6. Do not expose the FM + [D] to direct sun light or heating units as the FM + [D] internal components temperature may rise and
shorten the life of the components. Avoid damp and dusty places.
7. Care – From time to time you should wipe o the front and side panels and the cabinet with a soft cloth. Do not use rough
material, thinners, alcohol or other chemical solvents or cloths since this may damage the finish or remove the panel graphics.
FM +
Recycling Instructions
Help Williams AV protect the environment! Please take the time to dispose of your equipment properly.
Product Recycling:
Please do NOT dispose of your equipment in the household trash. Please take the equipment to a electronics
recycling center for proper disposal.
Battery Recycling:
Please do NOT dispose of used batteries in the household trash. Please take the batteries to a retail or community
collection point for recycling.
3
Page 4
FM +
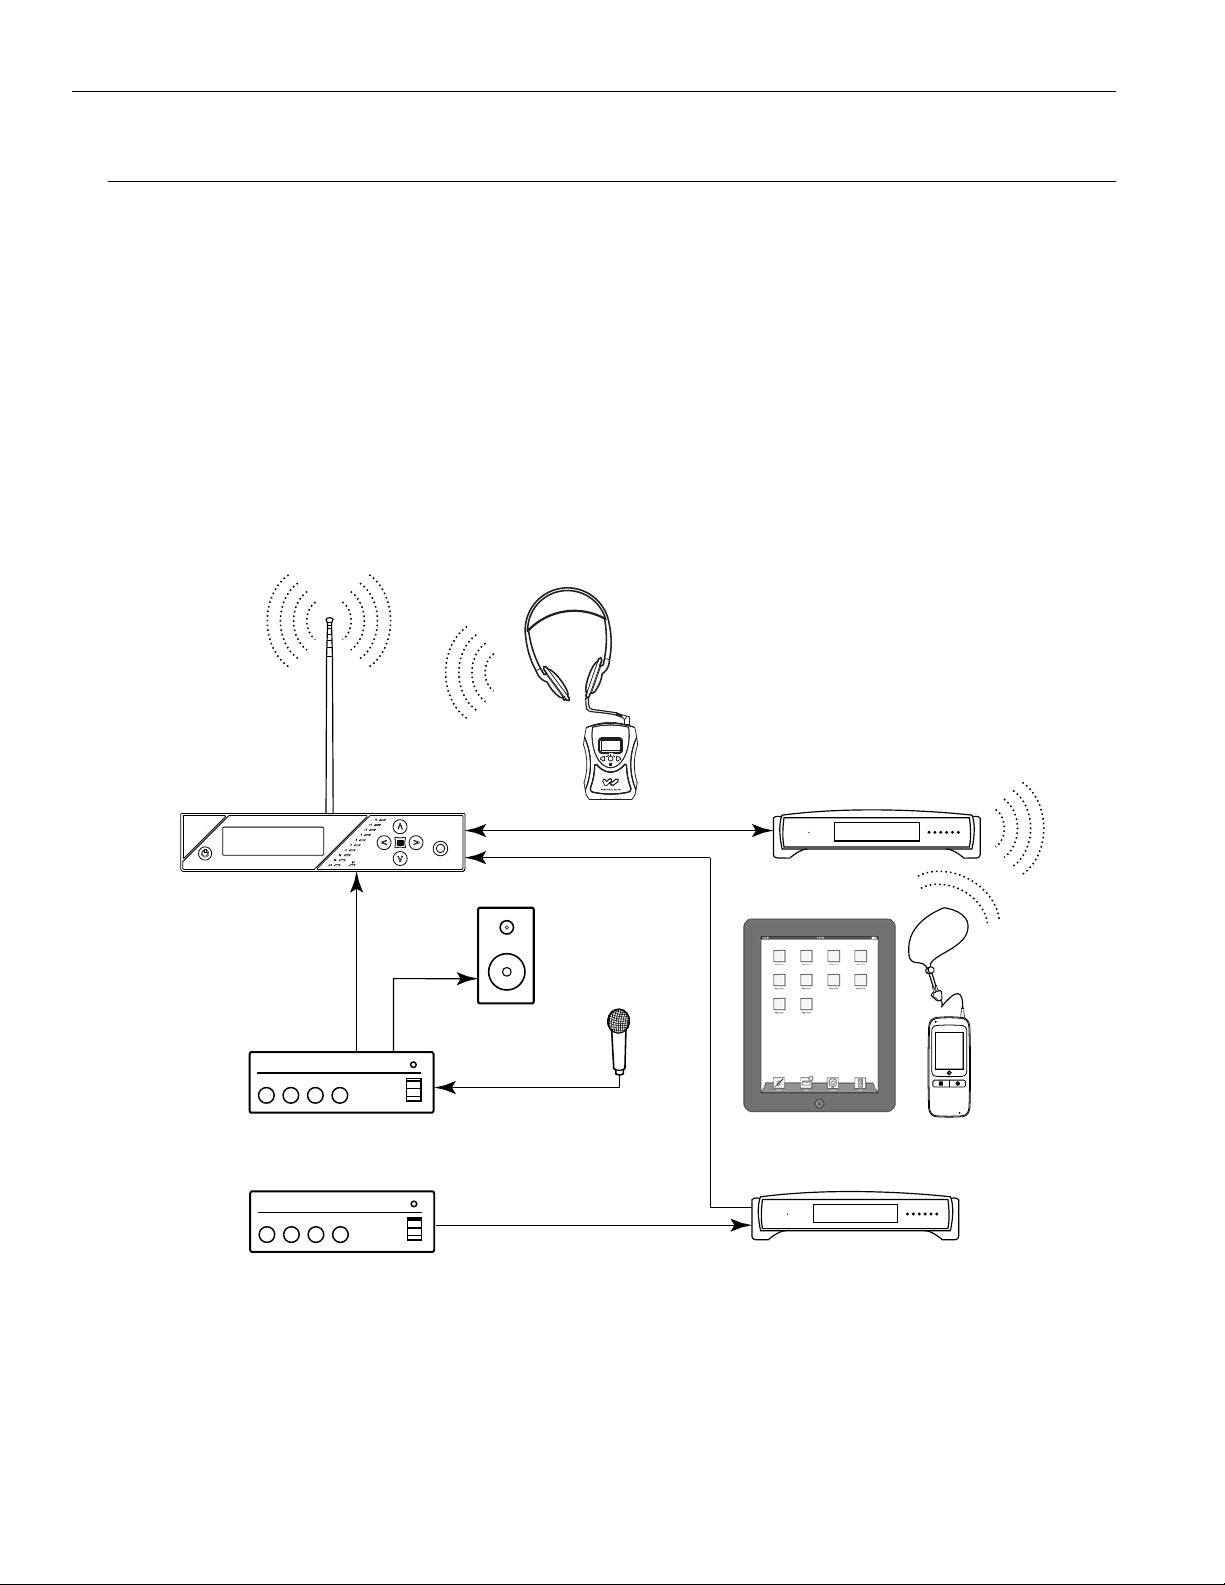
System Overview
The groundbreaking FM + provides the industry-first choice of using traditional FM receivers or using personal electronic
devices over Wi-Fi for hearing assistance. Along with this flexibility comes exceptional audio quality, as the FM + is built on a
professional digital audio (DSP) platform.
The new FM + is designed to support those who want to use their own smartphones and headphones for a more discreet
assistive listening experience. Simplicity is also available for those who want a more traditional assistive listening system with
a dedicated FM receiver and headset. Venues no longer need to choose between providing FM or Wi-Fi assistive listening
systems. FM + supports the iOS and Android WaveCAST Apps and the Wi-Fi Receiver-- in addition to all of the current and
legacy Williams Sound FM receivers operating on the 72-76 MHz bandwidth.
Developed for hearing assistance in public venues, the FM + includes a complete audio processor optimized for the needs of
hearing impaired people and are easily integrated with an existing sound system, or used with a microphone as a stand-alone
system.
FM
FM RECEIVERS
FM + TRANSMITTER
LINE-LEVEL
INPUT
LINE-LEVEL
OUTPUT
SOUND SYSTEM/
AMPLIFIER
DANTE™ AUDIO SOURCE,
MIXING BOARD,
etc.
LAN NETWORK ROUTER
ETHERNET
Dante™ Audio (FM+ D only)
LOUDSPEAKER
MICROPHONE
TABLET OR PHONE
WITH WI-FI
DANTE NETWORK*
Dante™ Audio
*If Dante™ Audio is to be physically isolated from the LAN, a separate NETWORK ROUTER and/or SWITCH
may be required. The LAN router may also be configured to keep Dante™ Audio separated from the LAN
with port management or other techniques, but as Dante trac increases, LAN performance may decrease.
Wi-Fi Receiver
WI-FI
4
Page 5

Quick Setup Instructions
1. Position the FM + transmitter near the sound system or mixer from which it will receive audio. We do not recommend wall or
ceiling mounting, or putting the device on a cart.
2. Connect the power supply to the Power Supply connector located on the back of the FM +. Press in the power button on the
front of the FM +. The power button should light up. If not, go back and check the power connections.
3. Choose and configure the audio source. The audio source must be configured in the menu before plugging the source into
the jack (except Dante Audio - skip to step 9). Push the Menu button and push the > button once to display AUDIO SOURCE on
the screen. Push the > button to access the audio sources. Using the ^ or v menu buttons, choose between ANALOG LINE IN,
MIC, PHANTOM MIC +12V, 400 Hz Test Tone, or DANTE. When the desired audio source is displayed, press the right arrow (>)
to apply the setting. Press the Menu button to exit the menu.
4. Push the power button to turn the unit o.
5. Connect the audio source to the audio input jack on the rear of the FM +.
6. Push the power button to turn the unit on.
7. With the audio source playing, adjust the Audio Level on the FM + so that the green 0 dB LED generally lights and the red +9
dB LED lights occasionally. To do this, use the Hot Buttons while on the main info screen. Press the ^ button to increase the
audio level in 1.0 dB steps, or press the v button to decrease the audio level in 1.0 dB steps.
8. Select an Audio Preset. The FM + has three pre-configured Audio Presets to choose from: Hearing Assist, Music, and Voice. A
Custom preset is also available. The performance of the FM + is optimized for each of the pre-configured Audio Presets. Using
the menu and control buttons on the front of the FM +, push the Menu button, the display will change to show Audio Settings.
Use the forward > button to display Audio Source in the selection box. Push the down v button to show Audio Presets. Now
press the right arrow > button to display the list of Presets. Use the ^ and v buttons to alternate between Hearing Assist, Music,
Voice and Custom selections. When the desired Audio Preset is displayed, press the right arrow (>) to apply the setting. If
Custom is desired, push the right arrow > button to enter the custom settings. Press the Menu button to exit the menu.
9. (FM + D only) Connect a CAT 5e Ethernet cable from the Dante network to the connector labelled Dante on the transmitter.
(Note: Dante IP Address and other settings are configured externally through Dante Controller; there are no settings in the
transmitter for Dante, other than choosing Dante as the input source).
10. If Dante audio is being used, the Dante source must be connected, must be playing audio, and the Dante Controller must be
used to route audio from the Dante source to the FM +.
11. Install an appropriate antenna for your system configuration. For a full list of antenna options, please go to our website www.
williamsav.com. See the 72 MHz Antenna Selection Guide on the Williams AV website for further installation advice.
12. Set the Transmitter Channel. The FM + is shipped from the factory with the channel/frequency set to Ch.1 (72.1 MHz). To change
the channel/frequency, while on the main info screen, use the buttons < and > to change channels.
13. To test Wi-Fi Audio, use a personal device with the WaveCAST App installed to listen to the audio and test that device is
working and sounds correct over Wi-Fi.
14. To test FM Audio, listen with an FM receiver. Walk around the listening area. The signal should be clear and quite loud when
the volume is turned up.
To adjust any settings via a web browser:
1. Connect a CAT 5e Ethernet cable from your local area network, or Wi-Fi router to the connector on the transmitter labelled
Ethernet. This network will be used to broadcast the audio.
2. Open a web browser on a computer or mobile device that is also connected to the same local network as the FM +.
3. In the address bar of the browser, type in the IP address that is shown on the front of the transmitter's main info screen, and
push the enter key on the keyboard. (Note: it is not necessary to type “http://” or “www.” preceding the IP address.)
4. The browser will open the transmitter's web page, displaying a Login button. Click the log-in button and enter the user name
“admin” and the default password “admin”.
5. The web browser will now show the transmitter's Home Page, which shows the current FM + status info. The tabs at the top
navigate to dierent pages that allow adjustment of the transmitter's settings.
FM +
5
Page 6
FM +
Wi-Fi Network May Be Required
If Wi-Fi audio is desired, the FM + connects to the installation location's Wi-Fi Network. It does not provide a network on its own.
The Wi-Fi network will need to be installed and established before the FM + can be used.
You may connect the device to a computer via a hardwired connection to help troubleshoot any networking problems.
A Wi-Fi network is not required for broadcasting audio over FM.
Router and Network Equipment Selection
The FM+ does not come with its own router or networking equipment. It is intended to be set up on an already existing Wi-Fi
network; however, upgrades to your network equipment may be necessary depending on the performance desired from the FM +.
For instance, a higher-end, more powerful router will allow more users to connect to your audio stream than using a cheaper, less
powerful router.
The Wi-Fi network will need to be accessible to the users who will be listening to the audio. A public or Guest Wi-Fi network will
usually be ideal for ease of accessibility. If the user's devices cannot connect to the network due to security settings, they will not
be able to hear the audio.
The FM + system will put a demand on the network. If the network cannot handle the demand, whether because it is being used
for other networking needs or because the networking hardware is not strong enough, the FM + will be unable to reach it's
maximum audience.
When streaming to a small or medium sized audience, a basic networking configuration may suce. When streaming music using
multiple channels (such as having several FM + units on your network), a powerful router and network configuration is more likely
to be required.
The WaveCAST Networking Guide is available on the Williams AV website for additional networking tips. The WaveCAST
networking guide applies to the FM + as well as the WaveCAST.
Wiring and Connections
+ 9
+ 6
+ 3
0 dB
– 3
– 6
– 9
– 12
– 15
– 18
Made in USA
bal
unbal
phantom
Power Supply Connection
Connect the TFP 062 power supply to the Power Supply Jack located on the rear of the FM + transmitter.
Analog
Audio
Line OutLine / Mic In
RoHS
Ethernet
Streaming Audio Out
RF75Ω Ant
FM
24VDC
0.75 A
+
6
Page 7
Ethernet and Dante RJ-45 Connection
If connecting to a network or directly to a PC, a CAT 5e cable must be used. In some cases, (like older PCs) a crossover cable may
need to be used.
Audio Source Connections
The FM + transmitter will accept the following audio sources:
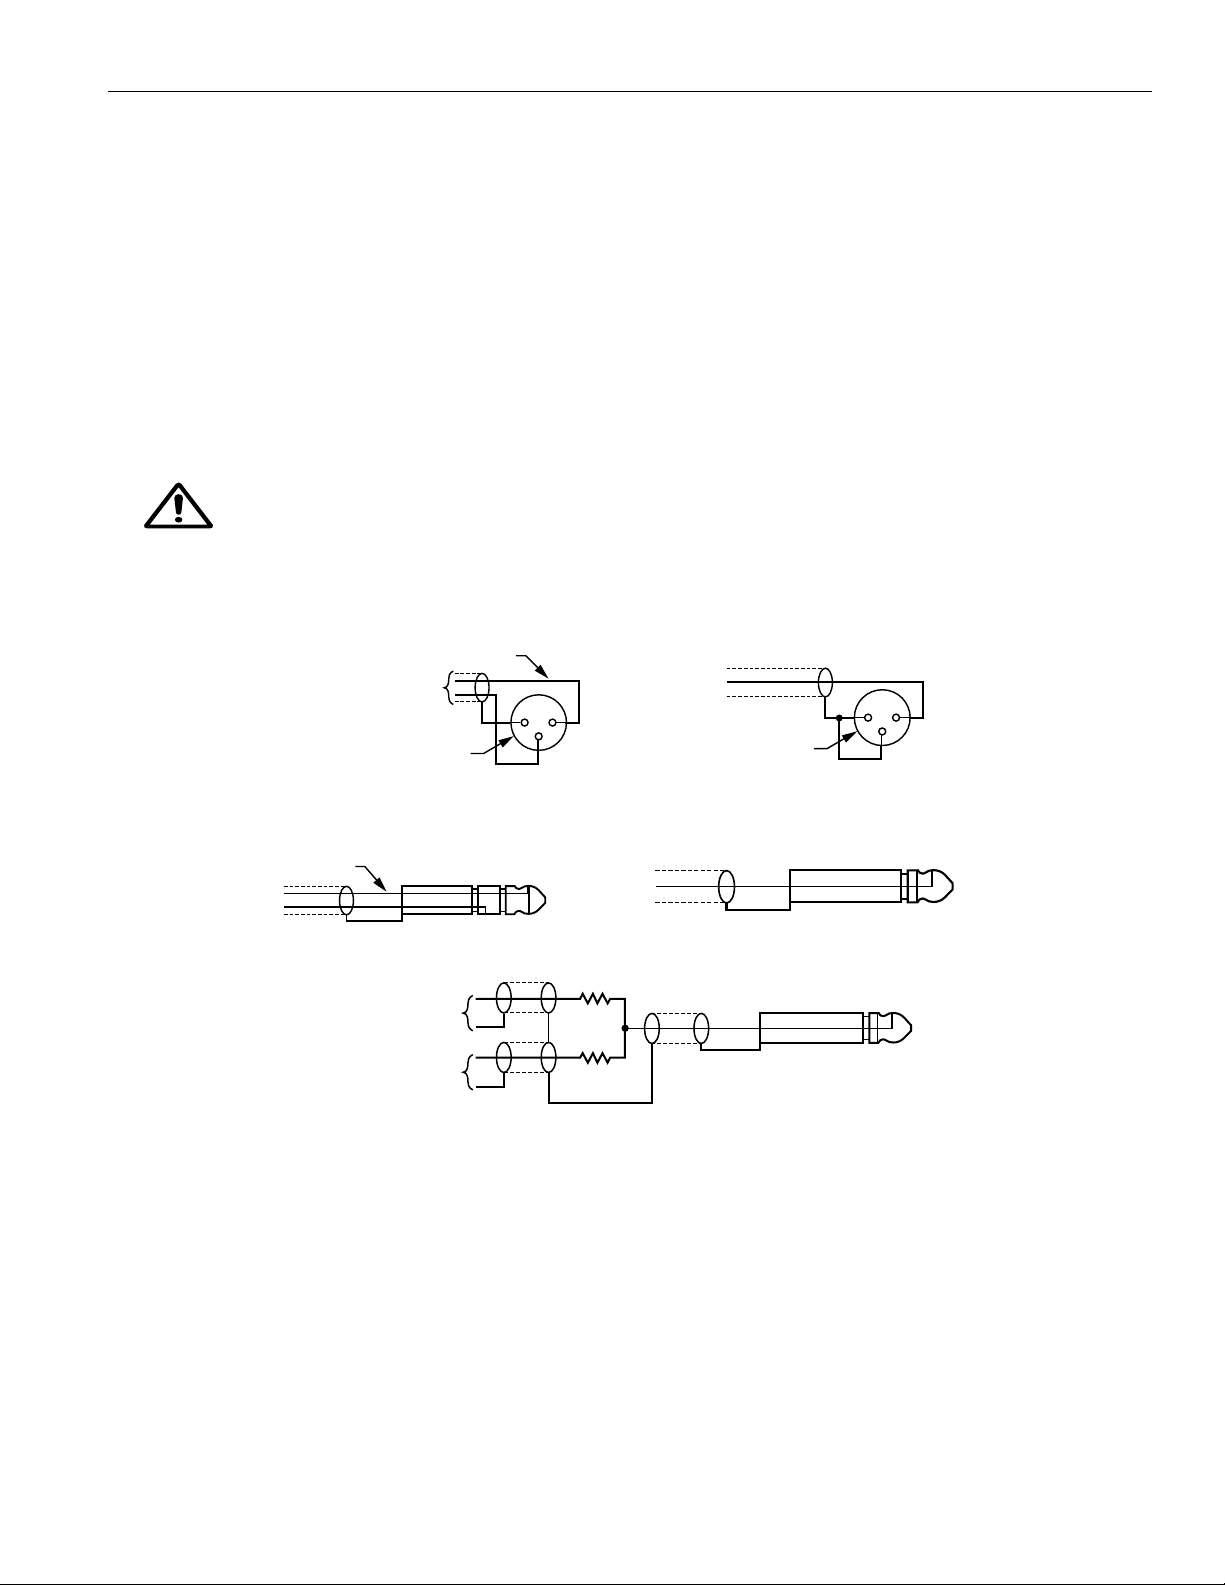
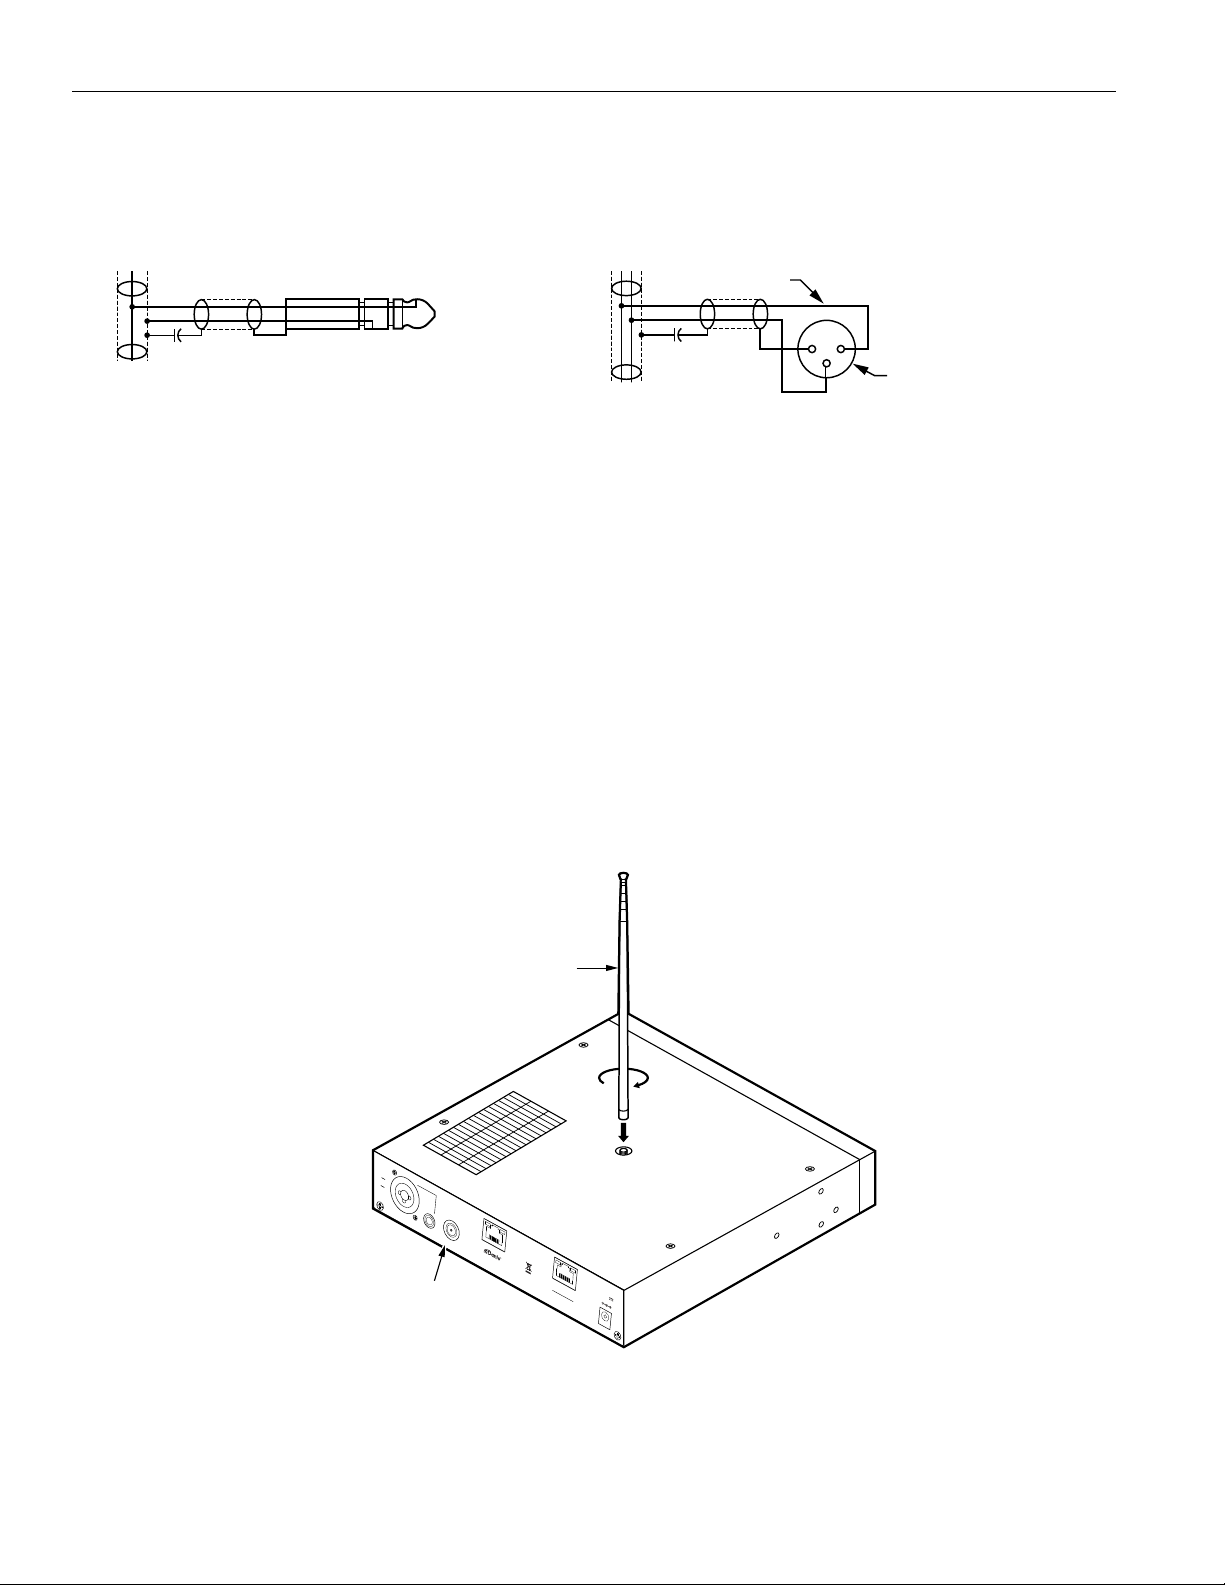
1. Balanced Microphone with or without 12 volt phantom power (DIN 45596) on a 3-pin (XLR) connector.
2. Balanced/Unbalanced microphone with or without phantom power on 1/4 inch (TRS) jack
3. Balanced/Unbalanced Line on a 3-pin (XLR) connector.
4. Balanced/Unbalanced Line on 1/4 inch (TRS) jack.
5. Dante on an RJ-45 jack (optional).
WARNING:
The FM + is not designed to accept 70 volt speaker signals! This may result in damage to your system� The sound source
should come directly from the system mixer or digital source as a low-level or unprocessed signal�
IMPORTANT: When a suitable audio source has been determined, you MUST configure the audio source in the menu of the
FM + before plugging that source in�
IN PHASE
FROM MICROPHONE
3 PIN CONNECTOR
1 2
3
3 PIN CONNECTOR
1 2
3
FM +
BALANCED LINE/LOW IMPEDANCE MICROPHONE
IN PHASE
BALANCED LINE USING 1/4" CONNECTOR
SOURCE A
SOURCE B
CONNECTING TO A MULTI-CHANNEL OR STEREO SOURCE
4.7 K
4.7 K
UNBALANCED LINE USING 3–PIN CONNECTOR
UNBALANCED LINE USING 1/4" CONNECTOR
Multi-Channel Sources
By constructing a simple resistive mixer, stereo (or 3 channel) sources can be connected to the FM +. Additional channels can be
accommodated by adding a resistor for each source.
Note: The Dante audio input will automatically mix the left and right channels.
Connecting Additional Sound Systems
The Analog Audio Line Output (RCA) jack can be used for monitoring, recording, or routing the FM +'s processed audio into
another sound system. For help connecting your sound system, contact Williams AV's TechBlue technical support team.
7
Page 8
FM +
0.75A
Streaming Audio Out
Ethernet
RoHS
Made in USA
Analog
Audio
Line OutLine / Mic In
phantom
bal
unbal
24VDC
RF75Ω Ant
REMOTE ANTENNA JACK
FOR 75 Ohm ANTENNAS
CHASSIS STUD
MOUNT
ANT 025 ANTENNA
(INCLUDED)
Avoiding Hum in the Audio (as a Result of a Ground Loop)
A hum created by a ground loop can often be eliminated by connecting a capacitor in series with the audio line shield to the
transmitter’s ground. This method also maintains good radio frequency (RF) shielding. Determining the eectiveness of this
method for your installation usually requires some experimentation.
IN PHASE
1 2
.01 uF CERAMIC DISC
CAPACITOR
.01 uF CERAMIC
DISC CAPACITOR
3
3-PIN
CONNECTOR
BREAKING A GROUND LOOP WHEN
CONNECTING TO A UNBALANCED LINE
BREAKING A GROUND LOOP WHEN
CONNECTING TO A BALANCED LINE
Selecting an Audio Source Appropriate for Hearing Impaired Listeners
The FM + transmits audio with excellent fidelity. Therefore, the audio source signal should be of the highest audio quality and not
subject to a compressor, limiter, reverberation, or other signal processing equipment. While compressed audio is available through
the FM +, excessive compression is not helpful to the hearing impaired and can contribute to excessive noise in the audio.
The FM + audio source signal is usually connected to a mixer’s line output signal which is behind the mixer’s parametric equalizers
but ahead of any equalization used for house loudspeakers.
If audio delay is available for use in large auditoriums, it’s usually best to use it. Because radio signals travel faster than sound,
delaying the transmitted audio so that an average listener (in the middle of the listening area) hears the transmitted audio a few
milliseconds after audio from the main sound reinforcement system speaker is helpful. This will also help audience members who
lip read.
Installing the ANT 025 Whip Antenna
Gently thread the ANT 025 onto the stud recessed in the hole on the top of the transmitter.
NOTE: If the FM + is going to be rack mounted, you will not be able to install the ANT 025 whip antenna. For rack mounting,
consider installing a remote antenna like the ANT 005 or ANT 024 - these antennas require using the Remote Antenna
Coaxial Jack (above) and a long length of terminated coaxial cable. Another option is to mount the antenna on the rack
itself - consider the ANT 029 which includes a 1RU bracket and a 3ft terminated coaxial cable.
8
Page 9
For a full list of antenna options, please go to our website www.williamsav.com. See the 72 MHz Antenna Selection Guide on the
Williams AV website for further installation advice.
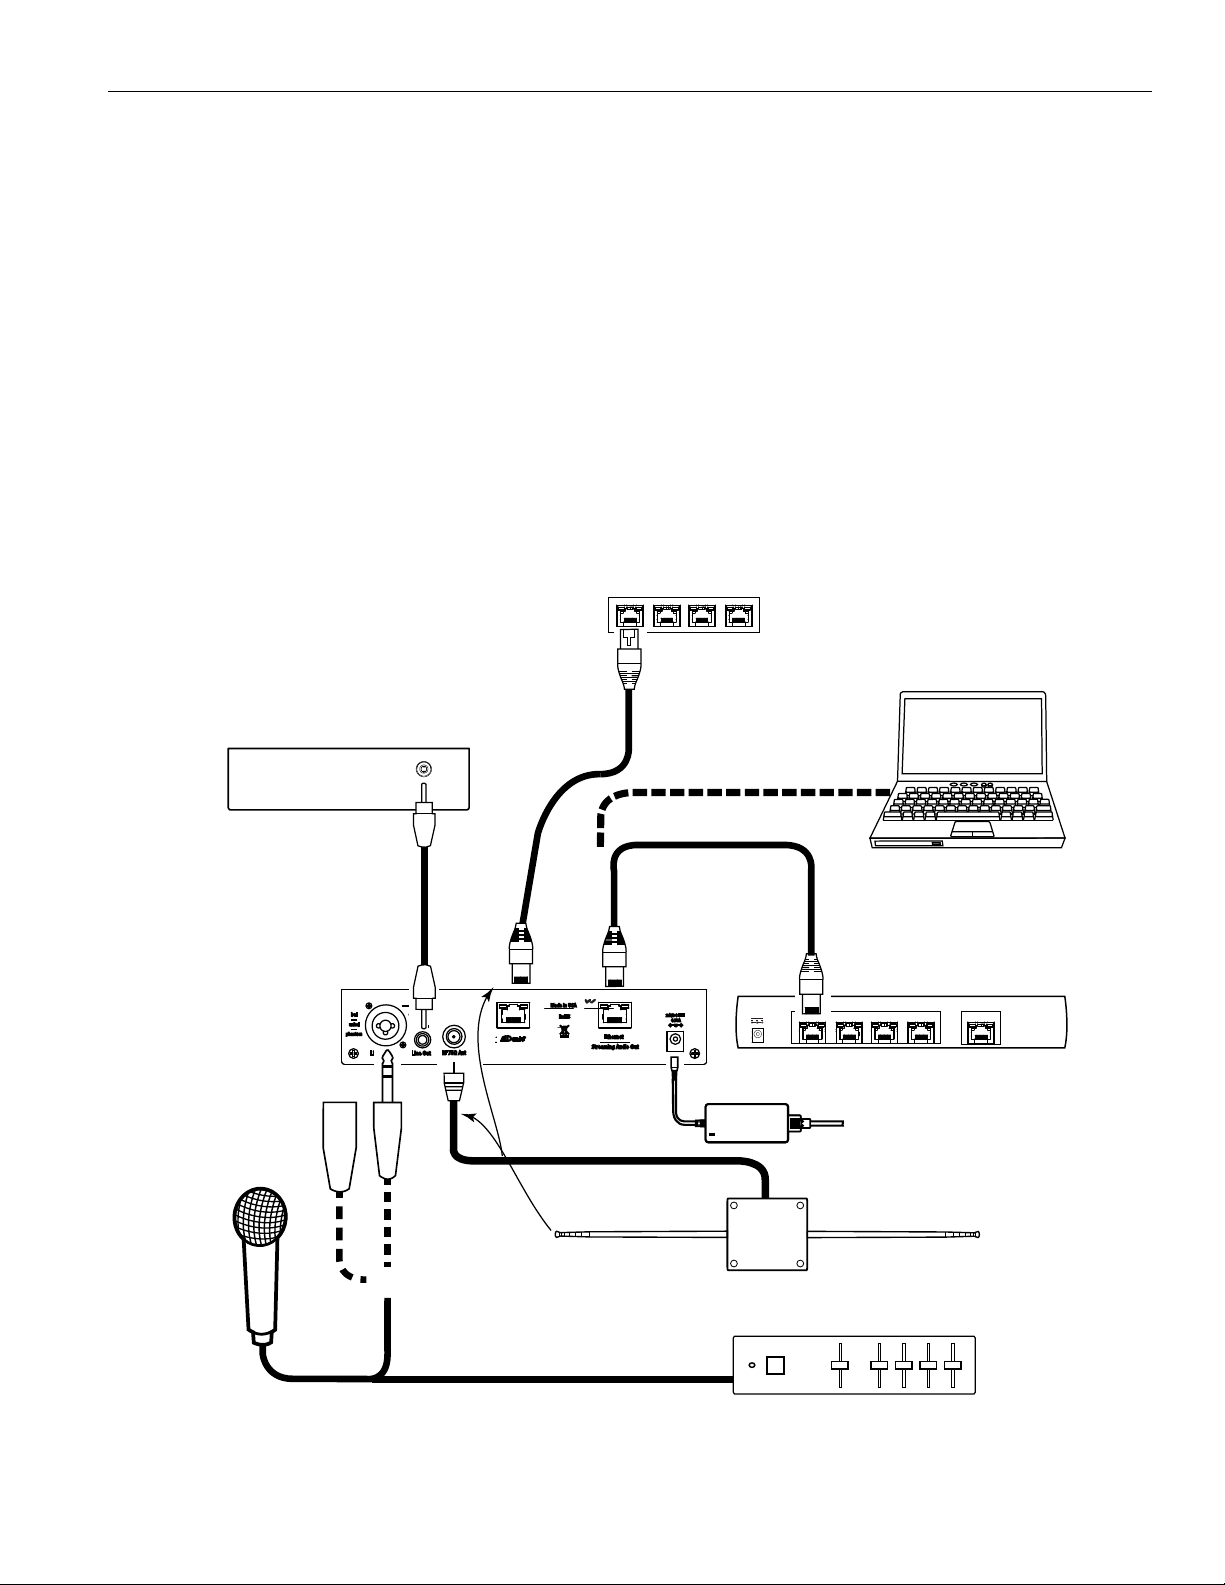
Connecting to other Devices
The Analog LINE/MIC Input (XLR / 1/4") jack can be used with standard pro audio electronics such as standard pro audio line level
condenser microphones up to 15v or an analog line output from a mixer. The combination jack accepts either XLR or 1/4” (TRS).
This source must be configured in the menu before plugging the source into the jack.
The Analog Audio Line Output (RCA) jack can be used for monitoring, recording, or routing processed audio to another sound
system.
The Remote Antenna Connection can be used to connect a remote antenna to the FM + when the whip antenna won’t be used
(as in the case of rack-mounting) or when a larger coverage area is needed. See the Williams AV Antenna Guide for a full range of
antenna and mounting options.
The Ethernet and Dante RJ-45 jacks can be used to connect the FM + to either a local network or directly to a single computer or
Dante device. An Ethernet connection will not allow the WI-Fi broadcast features to work, a Wi-Fi connection must be established.
DANTE NETWORK (SWITCH)
DANTE AUDIO AND NETWORK CONTROL CAN BE COMBINED
ON THE SAME NETWORK IF DESIRED (NOT SHOWN).
FM +
ANALOG MIXER OR AUDIO SYSTEM
AUDIO LINE IN (RCA)
ANALOG AUDIO
LINE OUT (RCA)
FM +
bal
LINE/MIC INPUT
(XLR OR 1/4”)
BALANCED,
UNBALANCED,
OR PHANTOM.
MICROPHONE
(CONDENSER
OR OTHER)
ANALOG
phantom
unbal
Line / Mic In
Analog
Analog
Audio
Audio
Line Out
DIGITAL
INPUT
(RCA)
RF75Ω Ant
LINE
Digital
Audio
CAT5e CABLE
CAT5e CABLE
CAT5e CABLE
Made in USA
RoHS
Ethernet
Streaming Audio Out
REMOTE
ANTENNA
CONNECTION
(F-CONN, COAXIAL)
REMOTE ANTENNA CONNECTION
OR CHASSIS MOUNT ANTENNA
CAN BE USED, BUT NOT BOTH AT THE SAME TIME
24VDC
0.75A
REMOTE
ANTENNA
LAPTOP (OR DESKTOP)
COMPUTER
ETHERNET NETWORK ROUTER
TO AC
POWER
SOURCE
ANALOG LINE
OUTPUT
(1/4” or XLR)
ANALOG MIXER
9
Page 10

FM +
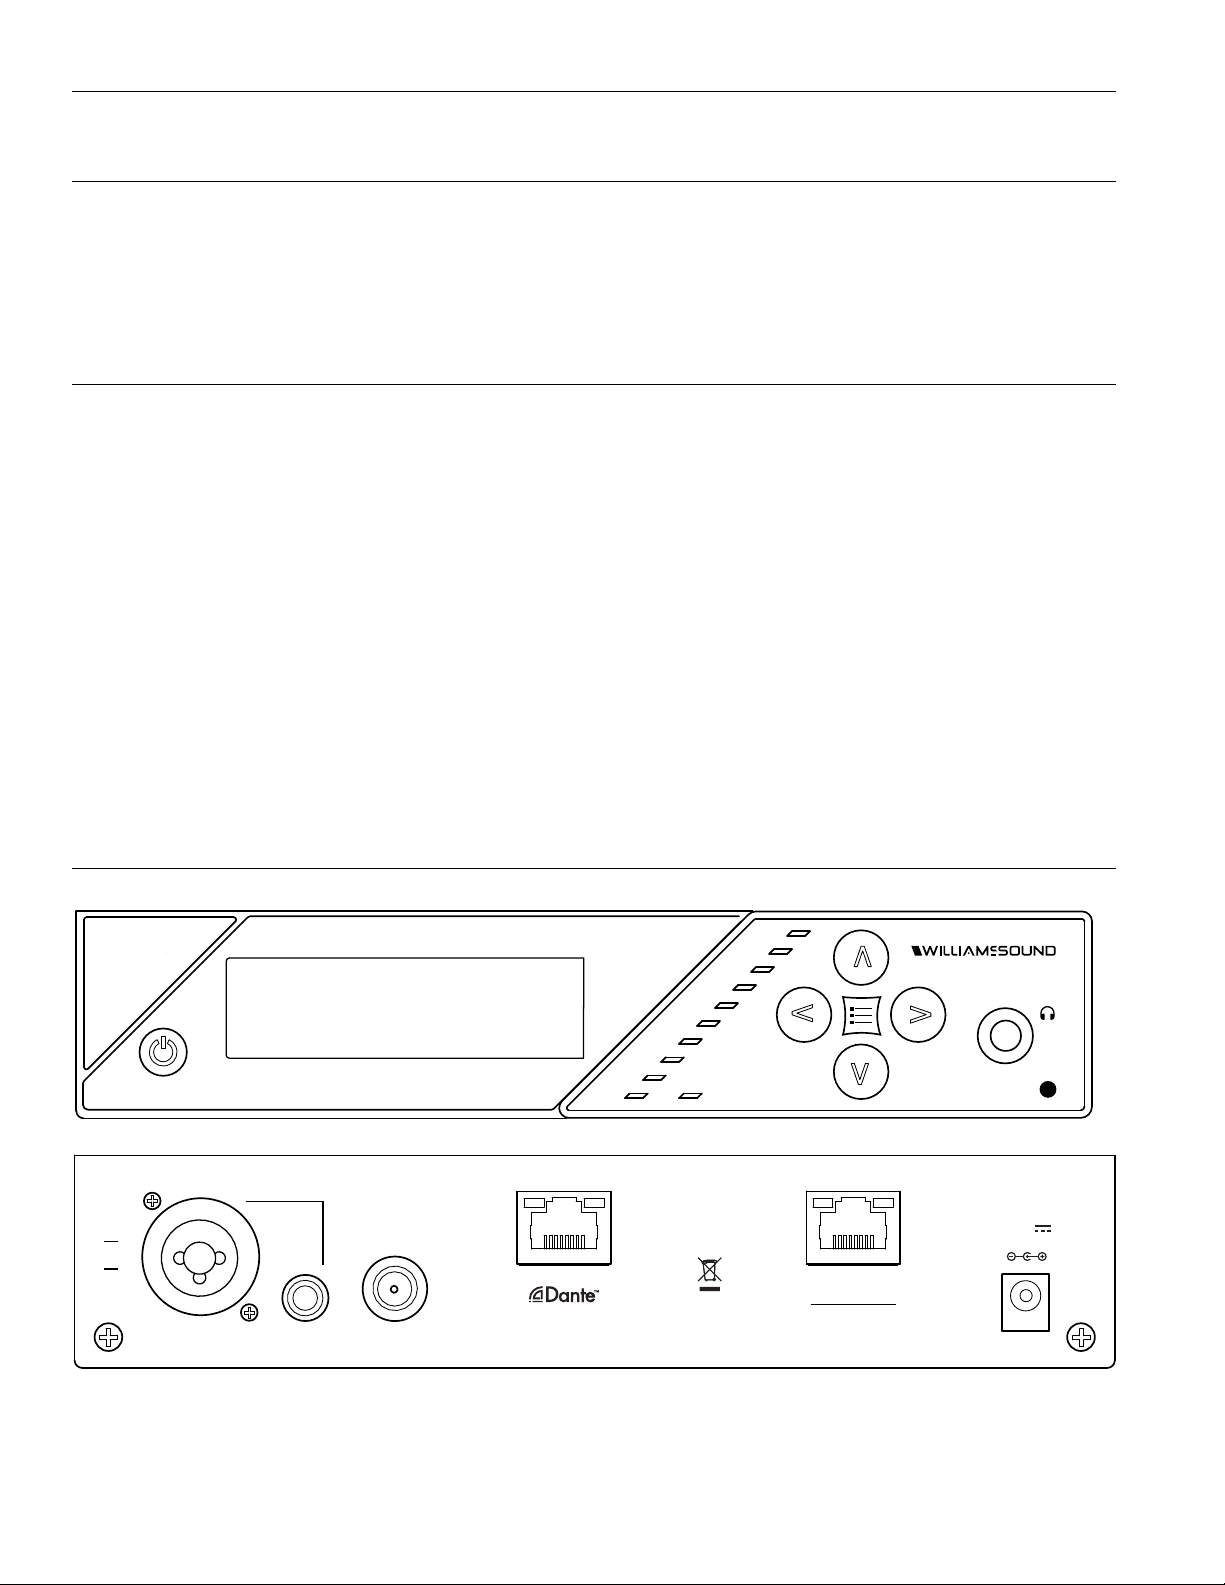
Controls and Features
Power Button
Latching push-button switch turns the transmitter on or o. The desktop power supply provides power to the unit at all times.
OLED Display
This shows current operation settings and is also used with the menu control buttons for configuring the FM +. Each time the
power of the unit is turned on, the OLED Display shows a Williams AV start-up screen. After seven seconds, the default Main Info
Screen screen will be displayed. The FM + is now fully operational.
NOTE: If the transmitter's internal tests fail, the transmitter will attempt to auto-recover by rebooting itself.
Audio Input Level Indicator
The bar graph indicator shows audio level in 3dB steps at the input of the audio level processing circuit. The indicator is peak
responding and is calibrated so that optimum level is reached when the 0dB LED lights up often and the +9dB only lights
occasionally. Use the up and down buttons from the front panel to set the audio levels.
Input Overload Indication
The OLED Display shows an overload warning screen each time the audio signal exceeds the capacity of the input circuit. Either the
source of the audio coming in to the FM + needs to be adjusted to correct this or the Audio Input Gain needs to be adjusted.
On Air Indicator LED
Indicates when radio frequency is transmitting over FM.
Menu Controls
• While the transmitter is displaying the main info screen, the Up ^ and Down v buttons adjust the Audio Input Gain; while the
Left < and Right > buttons change the channel.
• The Menu button is a enter/exit menu function only. It does not select anything within the menu. It allows the user to quickly
return to the main info screen from any place in the menu.
• While the transmitter is displaying the menu on the screen:
• The Up ^ button navigates upward in the menu, changes a setting, or acts as a page up on info screens.
• The Down v button navigates downward in the menu, changes a setting, or acts as a page down on info screens.
• The Left < button backs out of the menu one step at a time.
• The Right > button navigates forward in the menu or selects a setting.
Headphone Jack
A headset plugged into the headphone jack allows monitoring processed audio output. The headphone volume can be adjusted
via the front panel menu.
Main Info Screen and Screen Navigation
The Main Info Screen will show various setting information including FM Channel, IP Address (If connected to Ethernet network), and the
Server Name.
If the IP Address is grey, the network connection is not working and the FM + is oine.
If the FM Channel is gray, FM is not currently being broadcast.
Main Info Screen
While navigating through the menu, directional arrows (<, >, ^, v) will show up, indicating that parts of the menu exist o-screen to
the left, right, above or below. Use the corresponding buttons on the front panel to navigate the menu.
10
Page 11

System Settings
Settings can be selected using the arrows on the front of the FM + to navigate the OLED menu system or be set via the web
interface by using a computer. Not all settings are available in the front panel menu or through the web interface, and using both
may be necessary for your initial set up.
When the On Air indicator LED is lit, the FM + is broadcasting over FM. If audio is present, the audio input level LED’s will pulse
with the level of the audio.
Audio Settings
The Audio Settings provide the ability to change the audio characteristics for dierent listening applications, choose the input
source, adjust the input level, and adjust the headphone volume.
Audio Source
The Audio Source menu is used to configure the FM + for the audio source jack and type of source that will be used. The audio
source must be configured in the menu before plugging the source into the jack.
The Audio Source menu has five possible selections to choose from: Analog Line In, Mic, Phantom Mic +12V, 400 Hz Test Tone, or
Dante (optional).
Audio Input Gain
The Audio Input Gain adjusts the incoming audio level into the FM +. This adjustment only aects analog audio. Changes to the
input level will aect the level indicated by the front panel LED’s when audio is present. Audio Input Gain is adjustable from 0 dB
to -50 dB in 1 dB steps.
FM +
Audio Presets
The Audio Presets allow the user to quickly and easily configure the FM + for common applications. There is a Custom setting if
customization is desired, or three pre-configured settings.
There are three pre-configured to choose from: Hearing Assist, Music, and Voice� When one of these selections is made, the
performance of the FM + is immediately optimized for the needs of that application (an adjustment is automatically made to the
Low-pass Filter, High-pass Filter, and Compression). Refer to the chart below for a comparison of the Audio Preset configurations.
By default, the FM + is shipped in the Music mode.
Audio Preset Configuration Table
Preset High-pass Low-pass Compression
Voice 125 Hz 6.3 kHz
Music 31 Hz 16 kHz
Hearing Assist 500 Hz 8.0 kHz 2:1
IMPORTANT: Listen to the transmitted audio through the headphone jack, especially when
deciding on an appropriate high-pass filter� This is a good way to ensure the listening
audience will receive the highest audio quality�
For music, concerts, and other applications where the highest audio quality is desirable, Music is the recommended mode of
operation.
For hearing assistance applications or applications where the message is critical for listening, Hearing Assist is the recommended
mode of operation.
For speaking and other voice applications, Voice is the preferred mode of operation.
1:1
1:1
Custom Audio Preset
If the three preset configurations do not meet the needs of the venue, the Custom audio preset can be used. The custom preset
allows the user to adjust the High-Pass Filter cuto frequency, Low-Pass Filter cuto frequency, and choose the Compression
11
Page 12

FM +
Ratio. If the audio preset is changed from Custom to Music, Hearing Assist, or Voice, the Custom settings are still saved for use in
the future.
High-pass Filter
A High-pass Filter cuts o low frequencies and lets high frequencies pass through. The pole frequency chosen is the point where
the cuto takes eect. The high-pass filter will help to remove low frequency noise from the transmitted audio signal, such as room
noise, a line hum, or breath accents picked up from an improperly installed microphone. Available frequencies are: 31, 63, 80, 100,
125, 160, 200, 250, 315, 400, 500, and 630 Hz.
Low-pass Filter
A Low-pass Filter cuts o high frequencies and lets low frequencies pass through. The pole frequency chosen is the point where
the cuto takes eect. The low-pass filter will help to remove high frequency noise from the transmitted audio signal, such as
hiss in the audio line as a result of room noise, sharp speech sounds, or other uncomfortable high frequency sounds. Available
frequencies are: 3.5, 4.0, 5.0, 6.3, 8.0, 10.0, 12.5, and 16 kHz.
Compression
Compression reduces the volume of loud sounds and boosts the quiet sounds to louder listening levels. It also limits loud sounds
to a lower level, protecting sensitive hearing. Compression is typically used for voice and hearing assistance applications for a
listener who has diculty hearing the quiet sounds of an audio broadcast.
For listening to music programs, concerts, etc., lower compression ratios or no compression is generally used. The FM + has three
selectable modes of compression: 1:1 (compression o), 1.5:1 (low compression) or 2:1 (high compression).
For applications such as music and voice, where high audio quality is desirable, 1:1 is the recommended mode of operation. For
hearing assistance or applications where the transmitted message is critical for listening, 1.5:1 or 2:1 is recommended.
NOTE: The FM + is shipped from the factory at a 1:1 compression ratio (no compression).
NOTE: Some hearing impaired people cannot tolerate as loud of a sound as those with normal hearing. Using compression
can help protect those users. However, compression also can make audio sound flat. Only use compression when it is the
best choice for the listeners.
Headphone Volume
The headphone volume level can be increased or decreased by using the Headphone Volume setting in the menu.
FM Output Power
The selectable transmitter power levels are Full, Medium (-10dB), Low (-20 dB), and O. By default the FM + is set to full power
mode. For general listening applications, full power is the preferred mode of operation. Full power provides an operating range of
up to 1000 ft (dependent on the environment and antenna installation).
For special listening applications, it may be desirable to reduce the overall operating range if:
• The audio transmission is to be contained to a smaller listening area;
• The signal is too strong and it is overloading the receiver
• Multiple transmitters are used in adjacent classrooms where the FM signals overlap each other.
In these cases, the power level can be reduced to -10 dB or -20 dB. The output may be temporarily set to o to help troubleshoot
interfering or overlapping Radio Frequency signals.
Time-Out
The Time-Out setting determines how long the transmitter continues to transmit over FM with no audio present (30 minutes, 4
hours, or Always On). After the time-out period occurs (with no audio input and no front panel button presses), the FM + will go
into sleep mode to conserve power. During sleep mode the transmitter is completely shut o and the power switch light will fade
from bright to dark to indicate the unit is in sleep mode.
Note: Time-out delay and Screen Time-out delay are two independent events.
Screen Lock
The front panel screen of the device can be locked to prevent any changes from being made outside of the web interface. This
option can only be toggled from the website.
12
Page 13

User-Entered Transmitter Description
The Description field allows the user to easily identify the transmitter and can only be adjusted from the settings website. This
typically comes into play when multiple transmitters need to be distinguished from one from another. The description appears on
the front main info screen, the WaveCAST app, and also on the web page. In a rack, all the user has to do is activate the main info
screen with a touch of any button on the front, and the description is displayed as one of the fields on the main info screen.
On the web interface, the description appears on the main settings page, making it easy to identify which transmitter the web
page is controlling. It’s possible to enter all blanks in the description field, and then the description will be blank on the front
display.
Channel
The FM + transmitter supports 17-channel and 8-channel modes. 17-channel mode allows the user to select any of the 17 wide band
frequencies available in the 72.1-75.9 MHz range approved of for ADA compliance in most of North America. Check your countries laws
to see if using this range is legal for accessibility.
To avoid interference in multi-channel applications, select 8-channel mode. These channels have been carefully selected to prevent
interference.
Note: The FM + is shipped from the factory with the frequency pre-set to Channel 1.
Ch Freq (MHz) Ch Freq (MHz)
1 72�1 9 72�5
2 72�3 10 72�2
3 72�6 11 72�4
4 72�8 12 72�7
5 74�7 13 72�9
6 75�4 14 75�3
7 75�7 15 75�6
8 75�9 16 75�8
17 75�5
Channel/Frequency Selection Chart
8 groups can operate simultaneously without interfering with each other. The first 8 channels (in the first column) have been
designed for non-interference, and can be used for this purpose.
Although these 8 channels have been designed to not interfere with each other, outside sources of interference may limit how
many of these channels may be used.
FM +
Restore Defaults
The Restore Defaults action will restore the transmitter to its original factory settings. Restoring defaults from the front panel of
the FM + will reset all settings. Restoring defaults from the web page will reset all settings except Network and Dante connectivity
settings (IP Address, Subnet Mask, IP Address Mode, and Web Password). This maintains connectivity between the Web Page and
the FM +, as well as the optional Dante source, after the FM + reboots.
Network Settings
Network Settings can only be edited from the web interface. An IP address will be automatically assigned to the FM + once an
Ethernet cable has been connected to the device and network connection found. Additional configuration would need to be
made through the web interface.
Adjusting Network Settings
The Network Settings screen where the IP Address Mode (Static or DHCP), the IP Address, and Subnet Mask are set via the web
interface. See "Network Settings" on page 13 for details on how to use the web interface.
IP Address Mode Static or DHCP
IP Address If the IP Address Mode is set to Static, this is where the IP Address is manually entered
Subnet Mask If the IP Address Mode is set to Static, this is where the Subnet Mask is manually entered
13
Page 14

FM +
Gateway If the IP Address Mode is set to Static, this is where the gateway is manually entered
Multicast Address If needed, the multicast cast address can be enabled and either manually set or randomly generated. This
setting is under the Advanced options.
DHCP IP Addresses are automatically created, and are usually preferred to a manual static IP address.
To set up a static IP Address:
1. Determine an appropriate static IP address for the FM +.
a. If someone set up your network, they may be able to help you determine an appropriate IP address (i.e. network system
administrator).
b. There should be no other device having this same address on the network.
c. This will be an address on the same subnet as the router.
For example, if the router’s address is 192.168.1.100, the first three sets of numbers will be the same (i.e. 192.168.1), and the last
number will be the number you determine for the FM + (i.e. .You can choose another number instead of .100).
When you determine this address, remember or write it down. You will need it later.
2. Enter the information on the device website on the Network Settings page. Select 'Static' for the fields to show.
3. Click Submit when ready.
4. A prompt will ask to restart the device. Click Ye s to reboot the device.
Dante Settings
Some Dante settings can be viewed through the web interface, but must be configured through the Dante system, not the FM +.
See "Network Settings" on page 13 for details on how to use the web interface. See your Dante device manual for information
on setting up and working with your Dante network.
The Dante settings will only show up in the menu if the optional Dante feature is installed (FM T55 D). It will not be present for
other models.
The FM + cannot provide Dante information until a physical connection to the Dante network is established through the Dante port
on the back panel.
Web Control Interface
The FM + provides a web interface to manage the transmitter settings which can be accessed over either a hard-wired or wireless
network connection with most internet browsers.
Changes take eect when applied or saved. Some changes require a reboot. Any updates made through the front panel will show
up on the web interface once the current page has been navigated away from, either by refreshing the page or going to a new
page.
1. Open the web browser of your choice.
2. In the address bar of the browser, type in the IP address of the FM + and hit Enter.
3. You should see the Login Page of the FM +.
Login Page
The default User name is “admin” and the default password is “admin”. The user name and the password can (and should) be
changed on the website's Admin page.
14
Page 15

Error Alert
If the FM+ encounters an error, a message may appear at the top of the screen. Clicking the Clear Error button will hide the alert.
Not all errors require action, however, if an error continues occurring or aects system performance, contact Customer Service.
Main Settings Page
The Main Settings page displays all current audio settings, as well as corresponding FM + web-based controls. It is the first page
to appear when logging into the website.
The RF Settings section only aects FM broadcasts. All other settings apply to both Wi-Fi and FM broadcasts.
Note: Network speed can also aect the audio monitor updating and web page performance.
FM +
15
Page 16

FM +
Options Page
The Options page displays user preferences that can be tailored to each FM + system.
The description sets the name of the device, which may be used to uniquely identify the device without referring to the IP address.
Other features may be available in dierent models of the FM +, such as systems with Dante.
Upload Image Page
An image can be uploaded that will display for any users listening using the WaveCAST app, which works with the FM +. This
image can be used to easily distinguish the content of your audio broadcast. The image must be under 128kB and be in PNG or
JPG format.
16
Page 17

FM +
Network Settings Page
The Network Settings page displays network and Dante connectivity settings. Typically these are not needed after initial
installation.
Changing a static IP address or subnet will not instantly take place. The changed IP address or subnet will only take aect once
the device is rebooted. This can be done manually or from the Admin menu.
17
Page 18

FM +
Administration Page
The Admin page displays administrative controls that can be used to help with non-technical FM + users, or for remote site
troubleshooting purposes.
The login username and password for the website can be set from this screen. If the username or password is ever forgotten, it
can be restored to its default value by restoring defaults via the front panel menu.
Limited Restore Defaults on the web interface will reset the devices settings that will not aect the website connectivity. Using the
limited restore defaults from the web interface will not reset the username or password. For a full reset, the reset will need to be
performed via the front panel of the device.
Upgrades are performed from the Admin page. At the bottom of the page, upload the upgrade file (provided by Williams AV) and
hit the upgrade button. Your system will begin the upgrade process from there, which will include a reboot. Do not make any
changes on the device until the system has rebooted� There is no indicator for the progress of the update, but it should take
around two minutes.
Upgrading, restoring or rebooting the device and make the website temporarily unavailable as the system resets.
A full error log can be downloaded by clicking the Download Error Log link. This may be useful when working with Customer
Service.
Note: If the IP address or subnet of the device was changed and the device is being rebooted, the website may not be available at
the same URL location. Take note of the network information before rebooting the device. See "Network Settings" on page
13 for more information.
18
Page 19

WaveCAST App with FM +
The WaveCAST app, which is used for both FM + and WaveCAST systems, allows listeners to hear the audio on their personal,
Wi-Fi connected devices, such as a mobile phone. The WaveCAST App can be downloaded from Google Play for Android devices
or the Apple App Store for IOS devices.
The app will only detect audio sent over Wi-Fi, not any FM broadcasts.
Connecting the App to the Channel
When the app is opened for the first time, a list of channels will be available. Tap on the channel to hear its audio.
If a list of channels does not appear, check that the personal device has Wi-Fi enabled and is connected to the same Wi-Fi
network as the FM +. If the phone settings seem correct, troubleshoot the network connection of the FM + itself.
Listening via the App
Once connected to the channel, the audio should start playing automatically. The volume of the audio can be adjusted using the
slider in the middle of the screen, or the physical buttons on your device.
To mute the audio, tap the speaker icon. Tap it again to unmute the audio.
To switch channels, tap the menu icon on the bottom of the screen to display the list of channels again.
Note on Wi-Fi Assist/Smart Network Switching
The network connection the FM+ creates is not an internet connection. It creates a network connection to the audio stream only.
Some phones expect network connections to provide internet access. When the phone does cannot reach the internet, it may
automatically try to switch to a network connection with an internet connection. Sometimes, the phone determines that the best
internet connection is through a mobile data network.
This is not the desired behavior when using the FM+'s network. The phone will automatically take the user o of the FM+'s audio
streaming network, and onto a unrelated internet network connection. This will prevent the user from hearing the audio, and they
may not realize their phone switched networks on them.
Steps for disabling this feature will dier for every phone, but is typically found under the Wi-Fi or Mobile network settings. Look in
the manual for your phone for instructions on disabling this feature.
FM +
WaveCAST Receiver
The WaveCAST Receiver (WF R1) is available for customers who do not want to use their personal device for listening to Wi-Fi
Audio. The receiver is a dedicated listening device with the WaveCAST app available on it. The WaveCAST Receiver will work
with the Wi-Fi features of the FM +.
For more information on our Wi-Fi receiver, visit williamsav.com for product specifications, manuals and more.
NOTE: Wi-Fi receivers may be required to meet national and international requirements for device minimums when using Wi-Fi
audio for assistive listening. Personal devices typically cannot be counted in meeting device requirements; receivers must
be available on request. Please check your location's legal requirements to see if you need a Wi-Fi Receiver.
FM Receivers can be used to meet the requirements if FM audio is being broadcast.
FM Receivers
Williams Sound has a variety of receivers that will work with the FM features of the FM + System. Available receiver models
include:
• PPA R38
• PPA R37
• PPA R37-8
Contact our TechBlue project planning and technical support team for help determining which receiver is best for your use case.
For more information on our receivers in general, visit williamsav.com for product specifications, manuals and more.
19
Page 20

FM +
Troubleshooting
Website problems
The full website is unavailable�
• If you are only able to install a firmware update, the website stored on the WaveCAST has been corrupted, likely by a power
outage. Install the firmware for your current version (or newer) of the WaveCAST via the firmware update page to restore the
website.
• Check your network settings. The IP address is viewable on the front panel of the device.
Lost username or password
• Using the front panel menu, restore defaults. See "Restore Defaults" on page 12.
Website not behaving as expected
• The website will only work with a modern browser. Do not use the website with IE11 or earlier.
• Try switching browsers. Google Chrome is our recommended browser.
Audio problems
The On Air Indicator is not on
• Ensure the transformer (TFP 062) is plugged into the transmitter and any remote power switch is on.
• Ensure the power button on the front of the is pressed to the on position and the power LED is lit.
• Ensure the RF output is not set to o in the RF settings section. "FM Output Power" on page 12.
• Ensure there is audio present. The RF will time-out and shut o if audio is not present for a period of time.
No Audio heard through earphone jack
• Check that the VU meter is lit to see if there is a signal coming from your audio source. Check and correct your audio
source, if necessary.
• Check to see if the Headphone Volume Level has been turned all the way down. If so, increase it.
• Check to see if there is an incorrect or defective connection from your audio source.
• Check and correct your audio gain level, if necessary.
Noise or Distortion in the Audio
• Check to see if there is noise in the audio source. To find out, disconnect the audio cable. If the noise disappears your noise
problem is in the source. Correct or repair your audio source.
• Ensure the Audio Source configuration is set to match the audio source input device. See "Audio Source Connections" on
page 7 for how to properly configure the Audio Source.
• Check for ground loops or noise on the input signal. If you are still having trouble, call your Authorized Williams AV dealer or
representative.
Noise in audio grows when program is silent
• The Audio Gain Control may be set too high. You may be seeing the +6 level indicator lighting all the time on the front of the
device. See "Audio Input Gain" on page 11.
• Check the FM + Compression Ratio, which may be inappropriate for the type of program being transmitted. Try setting the
Compression Ratio to 1:1 (compression o). See "Audio Settings" on page 11.
Volume too quiet
• The audio gain control may be set incorrectly on the transmitter. Correct the Audio Gain control setting by adjusting it until
the sound level peaks between 0 and 6 dB.
• Check the batteries in the receiver. For non-rechargeable (alkaline) batteries, they may need replaced. If you are using
rechargeable batteries, ensure the batteries are fully charged prior to use.
• The audio input may not be configured for the audio source being used. If not, correct the setting of the Audio Source
control menu. See "Audio Settings" on page 11.
• Some users may not be helped by this system. Severe hearing loss may require using the system with a T-Coil and personal
hearing aid rather than headphones.
• If using Wi-Fi, some phones and tablets have the ability to broadcast to a T-coil; research the phone model to see if this is an
option.
Wi-Fi reception diculties
No Reception
• Ensure the listeners have the correct app open are listening on the same channel as the FM +.
20
Page 21

FM reception diculties
NOTE: Be sure to listen to the audio transmission on the FM + headphone jack prior to checking the receiver reception.
No Reception
• Ensure the listeners have the receiver on the same channel as the FM + is broadcasting on.
• Ensure the On Air Indicator is lit, and the RF power level setting is correct for your antenna and needed broadcast range.
• If using an FM Receiver, ensure the headphones are properly plugged in. The headphone cord acts as an antenna for the
receiver.
Insucient range, good reception near transmitter, poor at a distance
• Ensure the transmitting antenna was correctly installed (see "Installing the ANT 025 Whip Antenna" on page 8). If not,
correct or replace the antenna. If a remote antenna was installed, check the cables and connections. The signal should be
clearly audible up to at least a 100-foot distance with the ANT 025.
• Ensure the transmitting antenna is not in an unsuitable location. Perhaps the transmitting antenna was installed inside a
metal enclosure or is separated from the reception area by electrically conducting objects. (i.e., steel stud walls, heating
ducts, substantial structural steel, or 2x2 or 2x4 ceiling grid.) In either case, reinstall the antenna according to installation
instructions, locating it outside metal enclosures and away from electrically conducting objects.
• A strong interfering signal may exist. Ensure the transmitter and antenna are correctly installed. Set the transmitter to FULL
power output. If this does not solve the problem, try operating the transmitter on a dierent channel/frequency.
• Ensure the antenna selected is the best fit for your application. See the 72 MHz Antenna Selection Guide on the Williams
AV website for further advice.
Users complain of too much noise during soft audio� Dynamic range of music reduced too greatly�
• The transmitter could be set for High Compression (2:1) when Reduced Compression (1.5:1) or No Compression (1:1) would
be more suitable, given the program material. If so, set the Compression Ratio to 1.5:1 or 1:1 and see if this reduces the noise.
See "Audio Settings" on page 11.
FM +
Buzz in other equipment when transmitter is on or o
• This is likely caused by incorrect audio connections, a ground loop, or defective equipment. To remedy, use proper audio
wiring practice to make connections.
Buzz or other noise in equipment only when transmitter is on
• Make certain the transmitter chassis is connected to the equipment cabinet rails if installed in a rack. Buzz/hum in system
may be experienced when the FM + chassis is insuciently grounded. In this case, install a ground wire to the FM + chassis
and terminate to a verified ground source.
• Ensure antenna connections are secure.
• Select medium power output for the Power Output setting.
• Install transmitter at a distance from sensitive equipment.
• Use a remote antenna (ANT 005 or ANT 024).
• Make sensitive equipment more immune to RFI/EMI. The manufacturers of your audio equipment may oer application notes
for this purpose. Download Technical Bulletin: Buzz Or Hum Remedies from the Williams AV website for suggestions for
improving radio frequency (RF) immunity in existing audio equipment.
Remote Control is not working over the hardwired Ethernet network
Note: If you have a network system administrator, please contact them first before attempting to troubleshoot the network yourself.
The following steps are things you can try on a small, non-managed network.
Check the entire signal path between the control device (laptop or desktop computer) and the FM +. You can save some time by
pinging the router and FM +. Pinging allows you to verify the wiring path without physically having to trace the wires themselves.
1. Write down the IP address of the FM + and the router. You can find the IP address of the FM + on the front screen of the device.
2. Make sure the FM +, Router, and any other devices that may be needed (such as an Ethernet switch) are all connected and
powered on. You can save time tracing wiring/hardware paths with these next three steps:
• Open a CMD window on the computer. (For example, on Windows 10 computers, in the search box, type “CMD”. A black box
should come up and the cursor will be blinking.)
• Type “ping” followed by a space, followed by the IP address of the FM +, and hit Enter. If you see a “reply from...[IP address]”
this means the hard-wired Ethernet path is OK. If you see “request timed-out”, there is most-likely a break in the wiring path
between the computer and the FM +.
• Try pinging the IP address of the router. If you can get a “reply from...” the router, but not the FM +, the problem is either in
the wiring between the router and FM +, or the FM + itself could be malfunctioning.
3. Check all of the wiring between the computer and the FM +. Make sure every device in the signal path is plugged in,
connected, and powered on. Unplug and plug back in firmly all Ethernet cables in the path between the computer and the FM
21
Page 22

FM +
+. If you find one that was loose, plug it in and test the device connection again. If none are loose, try to replace the Ethernet
cables.
Note: When checking connections, make sure the FM + Ethernet cable is plugged into one of the LAN ports on the router, not the
WAN port.
4. If no loose cables were found, try re-booting in this order
• the router
• the computer
• the FM + (turn it o for 10 seconds then turn it back on)
Wait at least two full minutes for the FM + to re-establish itself on the network. Then try testing the connection again.
5. Once you have verified that you can ping the FM + from the computer, open an internet browser on the computer. Type the IP
address of the FM + into the address bar of the internet browser.
6. Verify the connection by logging into the FM + through the internet browser. If you can log into the web page, you are now
connected to the FM +.
7. If you can make changes to the FM + initially, but then get disconnected, you may have to look at deeper network issues such
as IP address conflicts, power issues, or even settings in the router.
8. Double check the FM +'s IP address. If the router has restarted, the IP address may have changed.
9. Restore the FM + to factory settings. This will clear out any changes and allow you to start clean.
10. Directly connecting the FM +’s Ethernet cable to a PC to verify that the FM + and Ethernet cable are operational.
11. If you have tried all of these steps and still can’t connect, call Williams AV for additional troubleshooting help. Note that Williams
AV cannot help in all cases, as there are many variables within networks.
Remote Control is not working over Wi-Fi
Note: If you have a network system administrator, please contact them first before attempting to troubleshoot the network yourself.
If you don’t have a system administrator, the following steps are things you can try on a small, non-managed network.
This situation is most often caused by the mobile device losing connection to the router when the Wi-Fi on the mobile device has
been turned o (or the Wi-Fi reception is unstable).
1. In order to perform these steps you will need the SSID of the router, the router Wi-Fi connection password, and the IP address of
the FM +.
2. Make sure the FM + and Router are both ON.
3. Make sure the Ethernet cable going to the FM + is plugged into one of the LAN ports on the router (not the WAN port).
4. Is the mobile device connected to the Wi-Fi network? On the mobile device, go into the Wi-Fi Settings, and make sure Wi-Fi
is turned on or enabled. More than one network may show up in the list of possible connections, depending upon how many
possible Wi-Fi networks are nearby. If you don’t see the network that is connected to the FM + in the list, make sure the router
is on and broadcasting it’s SSID.
5. If you see the desired router SSID in the list, connect to it by clicking on it. Usually there is a check mark or some other
indication of which router/SSID you are connected to. You may need to enter the Wi-Fi password/passkey to the router to
connect to it.
6. Once you have verified that you have connected the mobile device to the Wi-Fi network, exit the Wi-Fi settings on the mobile
device (without shutting o the Wi-Fi) and open an internet browser. Type the IP address of the FM + into the address bar of the
internet browser and hit the enter key. You should see the FM + login web page come up.
7. Verify the connection by changing a setting on the FM + through the internet browser. If you can change settings and get
feedback on the web page (or verify the change on the front display of the FM +), you are now connected to and controlling
the FM +.
8. Try re-booting in this order
• the router
• the computer
• the FM + (turn it o for 10 seconds then turn it back on).
Wait at least two full minutes for the FM + to re-establish itself on the network. Then try testing the connection again.
9. If you can make changes to the FM + initially, but then lose that ability (get disconnected), you may have to look at deeper
network issues such as IP address conflicts, power issues, or even settings in the router.
10. If there is interference, or low Wi-Fi signal on the mobile device, try moving the router to a better location.
11. Some mobile devices have known issues with certain routers. To fix this, you can investigate updating the operating system
on the mobile device. Or, try a dierent mobile device just to verify that ANY wireless device can connect. If you can get one
22
Page 23

FM +
device connected, but not another, chances are the device that cannot connect has issues. A dierent brand/model of router
may also fix the problem with certain devices not connecting.
12. You can try connecting a computer directly to the FM + with a standard Ethernet cable to verify that the Ethernet connection on
the FM + is working. Once this has been verified you can place the FM + back on the network and begin troubleshooting back
to the mobile Wi-Fi device.
13. Try connecting to the FM + using Wi-Fi on a laptop, rather than a mobile device, to verify that the mobile device is/is not the
problem. If you can connect with a laptop, check the Wi-Fi settings on the mobile device and make sure Wi-Fi is turned on.
14. You can try restoring the FM + to factory settings. This will clear out any changes and allow you to start clean.
15. If you have tried all of these steps and still can’t connect, call Williams AV for additional troubleshooting help. Note that
Williams AV cannot help in all cases, as there are many variables within networks.
23
Page 24

FM +
FM Plus Specifications
Dimensions
Weight
Color
Rack Mount
Power Supply
Power ON Indicator
Temperature Range
Ethernet
Dante
User Interface
RF Section
Operating Frequencies
Frequency Accuracy
Deviation
Pre-Emphasis
RF Field Strength
Compatible Antennas
Transmission Range
RF Outputs
RF Transmit Indicator
RF Power
RF Time Out (sleep mode)
Audio Section
Audio Processor Functions
Frequency Response
Signal-to-Noise Ratio
Total Harmonic Distortion
Common Mode Rejection
Audio Inputs
Audio Input Gain Adjust
Phantom Power
8.45” W x 8.25” D x 1.72”H (21.5 cm x 21 cm x 4.4 cm)
Transmitter: 3.2 lbs (1.45 kg)
Black/Silver with silver legends on the front, white legends on the back
Standard 19” Rack, one EIA rack space high, 1/2 space wide
1–2 units can be mounted in a single rack space with optional RPK 005 (single) or RPK 006 (double) Rack
Mount Kits
Desktop Style Transformer (TFP 062); Input: 100-240 VAC, 50/60 Hz. IEC Line Cord; Output: 24 VDC, 750
mA, 18W. 2.5mm ID center positive barrel connector
Push On/Push O latching power button, backlit green indicates power ON, backlight o indicates power
OFF, fading from bright to dark indicates Sleep Mode.
Operating: +32° F to +104° F (0° C to 40° C); Storage: -4° F to +158° F (-20° C to 70° C)
RJ-45 on back of unit supports CAT 5e cable lengths up to 328 feet (100 meters); 10/100 Base-T IEEE
802.3 compliant, unique MAC address
Only available on FM T55 D
3.12” High Resolution OLED display with selections via buttons. Hosted Web page. Remote control and
monitoring.
72.1-75.9 MHz , 17 wideband channels (selectable)
± 2 ppm stability, 0-50˚ C
± 75 kHz maximum
75 µsec
Does not exceed 80 mV/m at 3 m
ANT 005, ANT 021, ANT 024, or ANT 025
Up to 1000 ft (304 m) with ANT 005 coaxial antenna mounted on rear chassis connector
(1x) #10-32 stud connector in center of unit (pcb mounted)
(1x) F-connector on rear chassis
1 Green LED On Air Indicator
Full, Medium, Low or OFF indiacted by menu icon.
30 min. duration, 4 hr. duration, or Always On selected via menu. Starts when audio is below -18 dB level
with no button pressed for selected duration.
DSP based; Compression: 1:1, 1.5:1 or 2:1; High-pass and Low-pass Filter Frequency control,
Music, Voice and Hearing Assistance Audio Presets
31-16000 Hz, ±3 dB (re: 1 kHz, ±3 dB) (“Music” Audio Preset)
67 dB (typical) Transmited RF
Less than 0.25% @ 1 kHz (RF output)
>57 dB @ 1 kHz, Mic or Line
(1x) Combination 3-pin XLR, 1/4” (TRS) jack for balanced or unbalanced line level, or balanced or
unbalanced microphone with selectable phantom power
In menu, adjustable to 0 to -50 dB, in 1dB steps
14.4 VDC applied through 2.2 kΩ resistors to analog combo jack: Pin 2 and Pin 3 on XLR jack, or tip and
ring on 1/4” TRS jack
24
Page 25

FM +
Audio Level Indicators
Headphone Output
Line Output
Input Levels (Bal or Unbal)
(at Audio Input Gain = 0dB)
Microphone
Line
Approvals
Warranty
NOTE: SPECIFICATIONS SUBJECT TO CHANGE WITHOUT NOTICE
** Stresses above these ratings may cause permanent damage. Exposure for extended periods may degrade reliability.
This device complies with Industry Canada licence-exempt RSS standard(s) and FCC part 15.105[b] for the United States.
Operation is subject to the following two conditions: [1] this device may not cause interference, and [2] this device must accept any interference,
including interference that may cause undesired operation of the device.
10-LED array that reads -18 to +9 dB at 3 dB intervals. 7 Green, 2 Amber, and 1 red LED. Green LEDs
indicate normal operating audio level peaks, Amber LEDS indicate close to overload peaks, Red LED
indicates overload peaks
1/4” TRS stereo jack, mono signal, 14.85 mW at +9 dB, maximum in 33 Ω (level adjustable in menu 0 to -40
dB in 2 dB steps)
RCA jack (black), -10 dBV (.32 VRMS); Output impedance 100 Ω at +9 dB
Nominal (1st Amber LED)
-55 dBV (1.7 mV RMS) -22 dBV (80 mV RMS) +20 dBV (10.0 V RMS)
-25 dBV (55 mV RMS) +16 dBV (6.3 V RMS) +20 dBV (10.0 V RMS)
FCC, RoHS3, WEEE, Industry Canada
2-year parts and labor
Overload Warning
(Displayed On Screen)
Absolute Max. Rating*
25
Page 26

FM +
Regulatory Statements
FCC
FCC Compliance Statement
This equipment has been tested and found to comply with the limits for a Class B digital device, pursuant to Part 15 of the FCC
Rules.
These limits are designed to provide reasonable protection against harmful interference in a residential installation.
This equipment generates, uses and can radiate radio frequency energy and, if not installed and used in accordance with the
instructions, may cause harmful interference to radio communications. However, there is no guarantee that interference will not
occur in a particular installation. If this equipment does cause harmful interference to radio or television reception, which can be
determined by turning the equipment o and on, the user is encouraged to try to correct the interference by one of the following
measures:
• Reorient or relocate the receiving antenna.
• Increase the separation between the equipment and receiver.
• Connect the equipment into an outlet on a circuit dierent from that to which the receiver is connected.
• Consult the dealer or an experienced radio/TV technician for help.
This device complies with Part 15 of the FCC Rules. Operation is subject to the following two conditions:
1. This device may not cause harmful interference, and
2. This device must accept any interference received, including interference that may cause undesired operation.
Caution: Any changes or modifications to the equipment not expressly approved by the party responsible for compliance could
void your authority to operate the equipment.
SAR Requirement
This equipment complies with FCC radiation exposure limits set forth for an uncontrolled environment.
This product meets the applicable national or international RF exposure guidance (SAR guideline) when used normally against
your head or, when worn or carried, at a distance of 0.5 cm from the body. The SAR guideline includes a considerable safety
margin designed to assure the safety of all persons, regardless of age and health.
IC
Industry Canada Statement
This equipment complies with IC RSS-102 radiation exposure limits set forth for an uncontrolled environment.
Operation is subject to the following two conditions:
1. this device may not cause harmful interference, and
2. this device must accept any interference received, including interference that may cause undesired operation
Cet équipement est conforme aux limites d’exposition de rayonnement d’IC RSS-102 déterminées pour un environnement non
contrôlé. Cet
Son utilisation est soumise aux deux conditions suivantes:
1. Cet appareil ne doit pas causer d’interférences et
2. il doit accepter toutes interférences reçues, y compris celles susceptibles d’avoir des eets indésirables sur son
fonctionnement.
SAR Requirement
This product meets the applicable national or international RF exposure guidance (SAR guideline) when used normally against
your head or, when worn or carried, at a distance of 0.5 cm from the body. The SAR guideline includes a considerable safety
margin designed to assure the safety of all persons, regardless of age and health.
Ce produit est conforme aux directives nationales ou internationales sur l’exposition aux fréquences radioélectriques (directives
SAR) en vigueur lorsqu’il est utilisé normalement contre la tête ou, porté ou porté, à une distance de 0,5 cm du corps.
La directive SAR inclut une marge de sécurité considérable conçue pour assurer la sécurité de toutes les personnes,
indépendamment de leur âge et de leur santé.
26
Page 27

2-Year Warranty
Williams AV products are engineered, designed, and manufactured under carefully controlled conditions to provide you with many
years of reliable service.
Williams AV warrants the FM + transmitters against defects in materials and workmanship under normal use and conditions for the
2-years from the product from date of purchase.
This warranty is available to the original end purchaser of the product and CAN BE transferred to subsequent purchasers of the
product.
Microphones, earphones, headphones, batteries, chargers, cables, carry cases, and most other accessory products carry a 90day warranty.
Williams AV has no control over the conditions under which this product is used. Williams AV, therefore, disclaims all warranties
not set forth above, both express and implied, with respect to the FM +, including but not limited to, any implied warranty of
merchantability or fitness of use of such equipment including, without limitation, any warranty that the use of such equipment
for any purpose will comply with applicable laws and regulations. Williams AV shall not be liable to any person or entity for any
medical expenses or any direct, incidental or consequential damages caused by any use, defect, failure or malfunctioning of the
product, whether a claim for such damages is based upon warranty, contract, tort or otherwise, the sole remedy for any defect,
failure or malfunction of the products is replacement of the product. No person has any authority to bind Williams AV to any
representation or warranty with respect to the FM + System. Unauthorized repairs or modifications will void the warranty. This
warranty is void if damage occurred because of misuse, or if the product has been repaired or modified by anyone other than a
factory authorized service technician. Warranty does not cover normal wear and tear on the product or any other physical damage
unless the damage was the result of a manufacturing defect. Williams AV is not liable for consequential damages due to any
failure of equipment to perform as intended. Williams AV shall bear no responsibility or obligation with respect to the manner of
use of any equipment sold by it.
This warranty does not cover reimbursement for your costs of removing and transporting the product for warranty service
evaluation or installation of any replacement product provided under this warranty.
The exclusions and limitations set out above are not intended to, and should not be construed so as to contravene mandatory
provisions of applicable law. If any part or term of this Disclaimer of Warranty is held to be illegal, unenforceable, or in conflict with
applicable law by a court of competent jurisdiction, the validity of the remaining portions of this Disclaimer of Warranty shall not
be aected, and all rights and obligations shall be construed and enforced as if this warranty did not contain the particular part or
term held to be invalid. The terms of the warranty are governed by the laws of the State of Minnesota.
Prices and the specifications of the products are subject to change without notice. For Complete Warranty Statement go to: www.
williamsav.com/warranty-statement
NOTICE: Williams AV products are NOT designed for use in extreme temperature, humidity or chemical environments. The
introduction of chemicals such as chlorine, salt water or human sweat into the product will cause damage to the circuitry. Damage
due to these causes is NOT covered under the Product Warranty.
If you experience diculty with your system, call Toll-Free for Customer Assistance 1-800-843-3544 (U.S.A.) or +1 952 943 2252
(Outside the U.S.A.)
If it is necessary to return the system for service, your Customer Service Representative will give you a Return Authorization
Number (RA) and shipping instructions.
FM +
27
Page 28

info@williamsav�com / www�williamsav�com
800-843-3544 / INTL: +1-952-943-2252
©2019 Williams AV, LLC • All Rights Reserved
MAN 245B
 Loading...