

Page 1
VINYARD Ext. Dining Table
Date: 04-September-13 Page 1 of 4
Rev: 20-March-15
Page 2
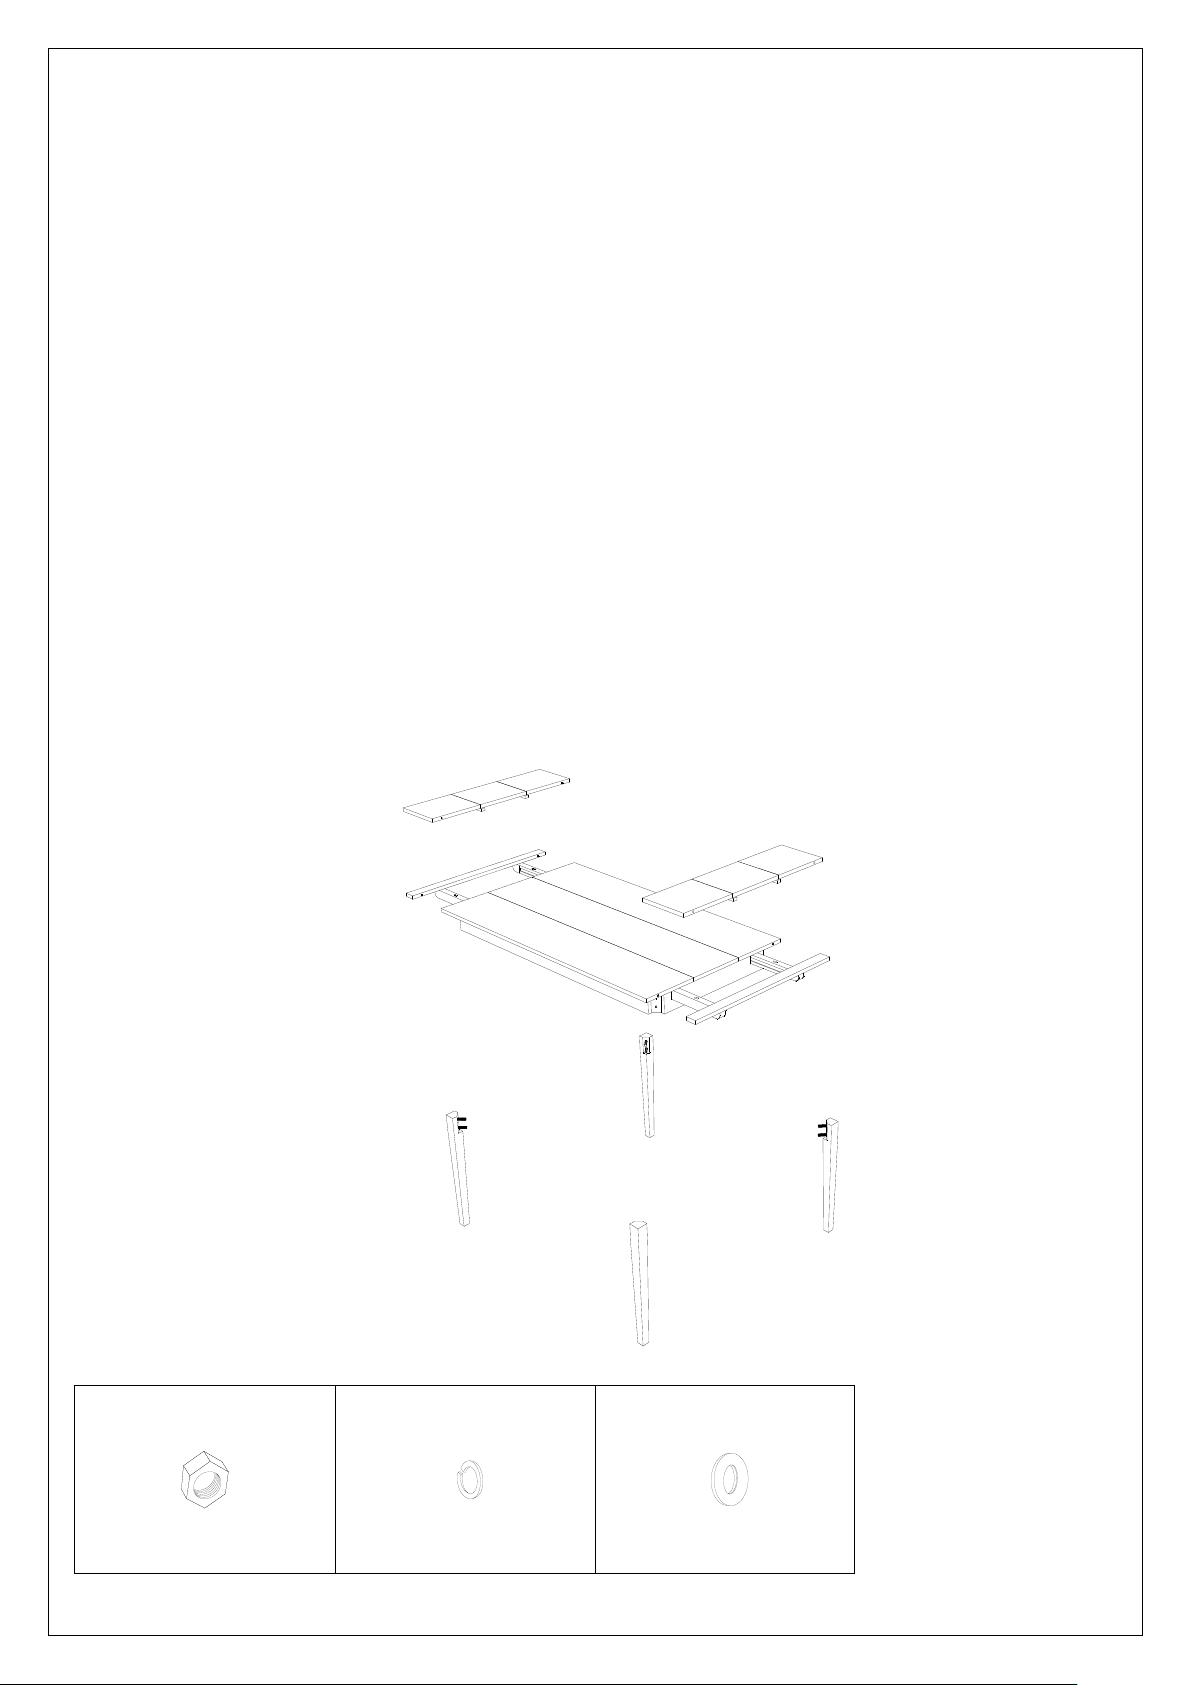
(A)
Table Top
1pc
(B)
Left Leaf
1pc
(C)
Right Leaf
1pc
(D)
Leg
4pcs
(E)
Nut
Ø 3/8”
8x
(F)
Spring washer
Ø 3/8”
8x
(G)
Flat washer
Ø 3/8”
8x
A B D
D D C
D
Important Safety Instructions:
Please read all instructions carefully before assembling.
For your safety, assembly by two or more adults is strongly recommended.
Keep instructions for future use.
Use only vendor supplied hardware to assemble. Using unauthorized hardware could jeopardize the structural
integrity of the item.
Pre-assembly:
Remove all parts and hardware from the box and lay out on a clear carpeted or scratch-free work surface, as
this will avoid damaging parts during assembly. The shipping box provides an ideal work surface.
Do not dispose of any packaging or contents of the shipping carton until assembly is completed to avoid
accidentally discarding small parts or hardware.
Use the parts and hardware lists below to identify and separate each of the pieces included.
The illustrations provided allow for easier assembly when used in conjunction with the assembly instructions.
The use of power tools to aid in assembly is not recommended. Power tools can damage hardware and split
wood.
Parts Included:
Hardware Included:
Date: 04-September-13 Page 2 of 4
Rev: 20-March-15
Page 3
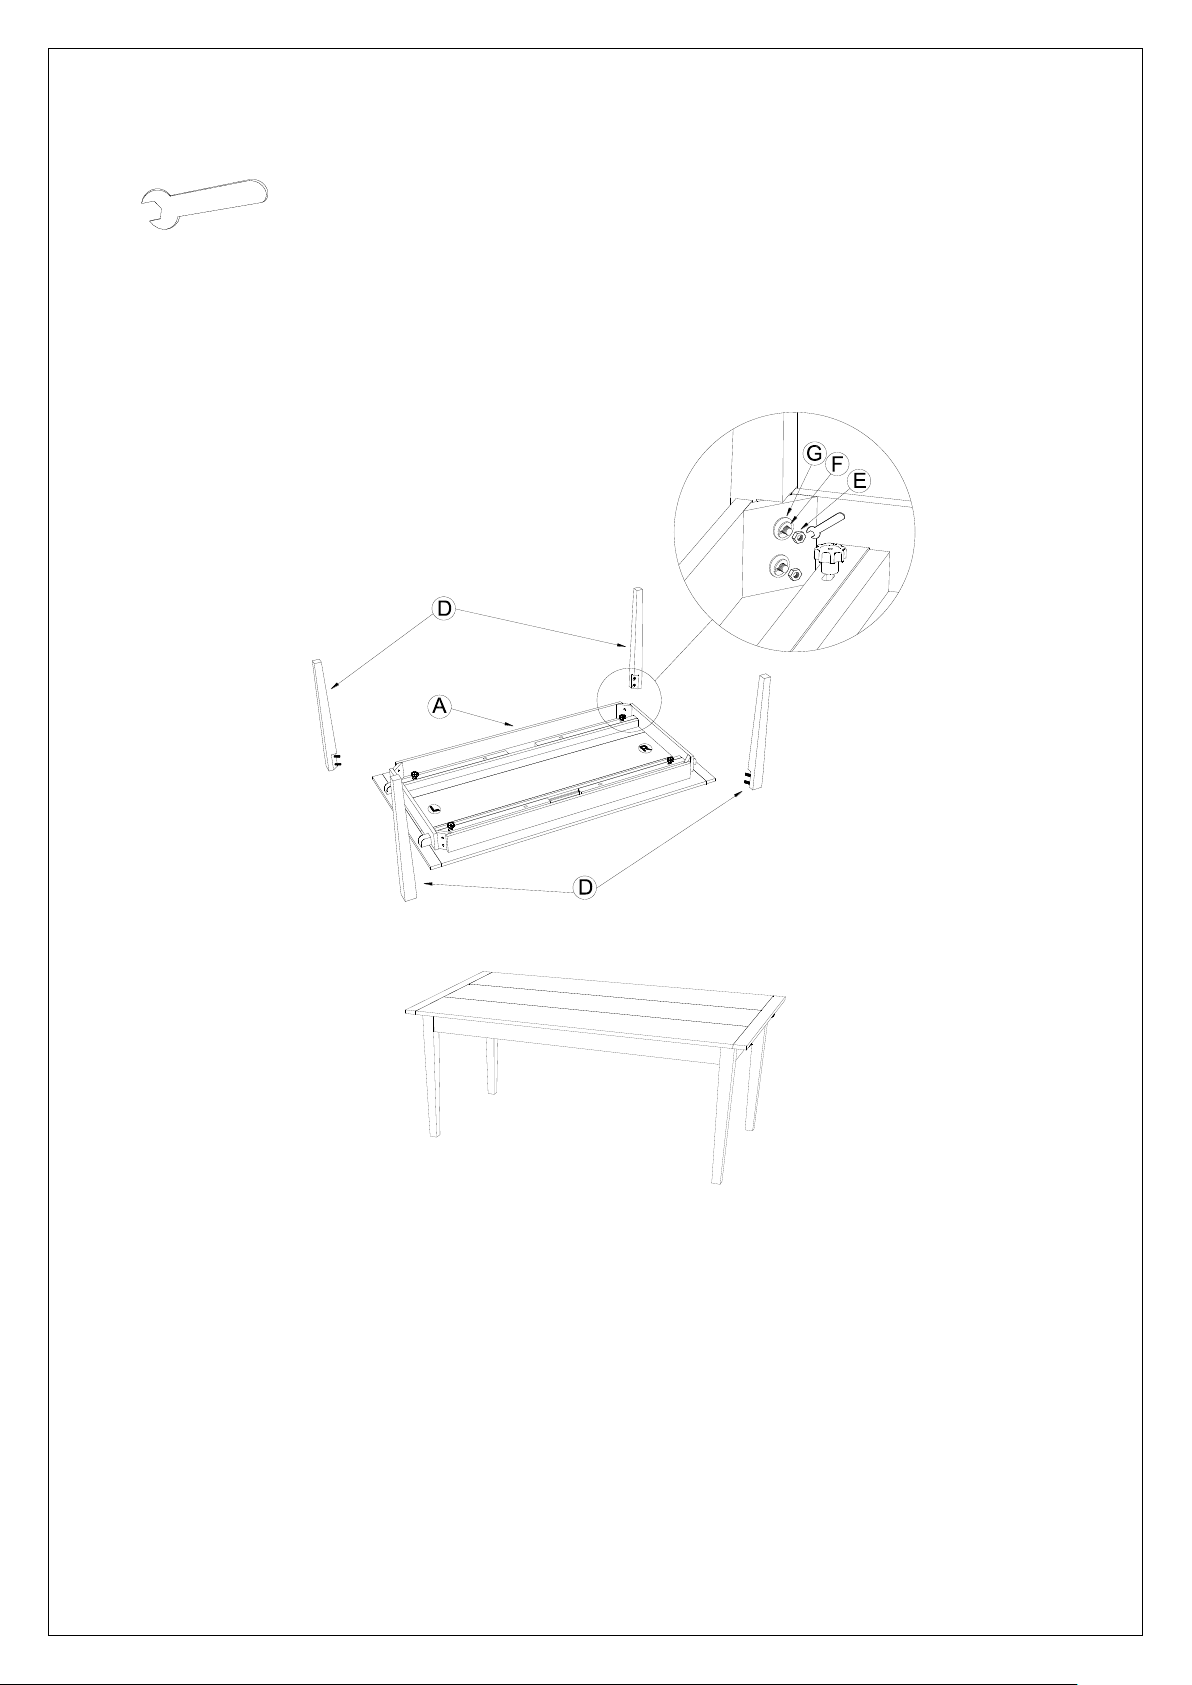
Fig.1
Fig.2
E x 8pcs
F x 8pcs
G x 8pcs
Tool Required (included):
(H)
Wrench
Assembly Instruction Steps:
1. Carefully put Top (A) upside down on a carpeted or scratch-free surface.
2. Attach Leg (D) to Top (A) using Flat washer (G), spring washer (F) and Nut (E), tighten with Wrench. Repeat to
attach remaining Legs (C) to Top (A). (See Fig.1)
3. Check to ensure all bolts are tightened. Grip the table top and carefully turn upright. (See Fig.2)
4. Assembly is complete.
To install or remove the extension leaves:
1. Un-assemble Thumb screw from bottom of slide rail, keep Thumb screw available for next step. (See Fig.3).
Fully open slide rails at the end of table to allow enough room to insert leaves. (See Fig.4). Insert
extension leaf (B&C), make sure leaf's pegs matches with the corresponding holes and board lines on table
match with the board lines on leaf, and then lift the bread and push it to close. (See Fig.5). Now tighten the
Thumb screw to ensure that the leaves are securely installed. (See Fig.6). NOTE: Thumb screw must be
tightened for leaves to align properly with main table top. .
2. Repeat for the other leaf.
3. When not in use, the Thumb screw can be stored underneath the table on bottom of slide rail.
Date: 04-September-13 Page 3 of 4
Rev: 20-March-15
Page 4
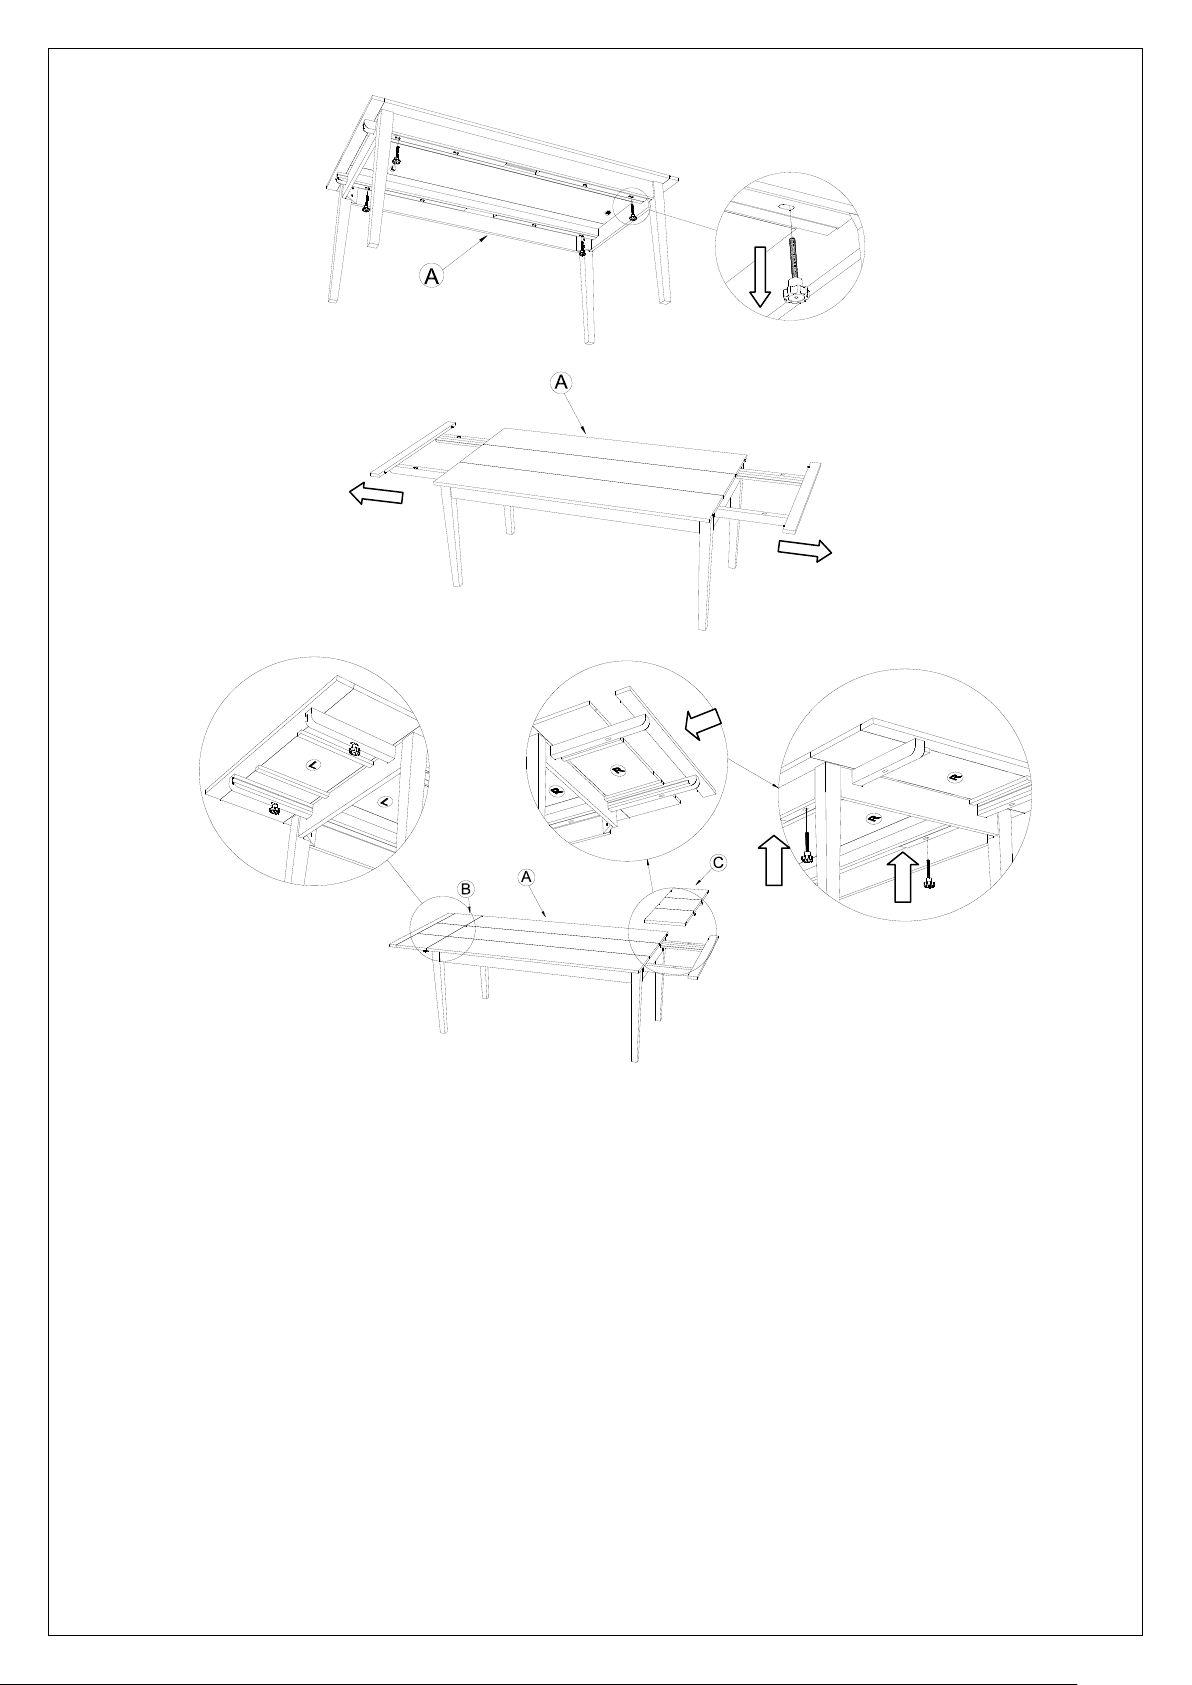
Fig.3
Fig.5
Fig.6
Fig.4
Make sure that Leaf B
with sticker-“L” installed
on left side. So board
lines match each other.
Make sure that Leaf C
with sticker-“R” installed
on right side. So board
lines match each other.
Leaf Storage:
When not in use, leaves should be stored in a flat position inside its bag. Avoid resting or leaning upright when
stored. This will prevent misalignment of the leaf apron
Care Instructions:
Dust with a clean, soft damp cloth and wipe dry immediately.
Avoid the use of chemicals and harsh cleaning agents
TAKE NOTE: THE BOLTS MAY SLIGHTLY LOOSEN OVER TIME. IF YOUR FURNITURE FEELS
"WOBBLY" OR LOOSE, PLEASE RE-TIGHTEN BOLTS.
Thank you for your purchase.
Date: 04-September-13 Page 4 of 4
Rev: 20-March-15
 Loading...