

Page 1

Square Framed Lantern
Assembly Instructions
IMPORTANT SAFETY INSTRUCTIONS
These instructions are provided for your safety. It is very important that they are read carefully and completely before
beginning the assembly and installation of this lighting fixture.
We strongly recommend that a professional electrician install all direct wire fixtures.
This fixture has been rated for up to two (2) 60-watt maximum TYPE A st andard incandescent light bulb (not includ ed)
or two (2) 13-watt compact fluorescent light bulb (not included). To avoid the risk of fire, do not exceed the
recommended wattage.
This lamp is meant for indoor use.
Save these instructions.
WARNING
To reduce the risk of fire, electrical shock, or personal injury, always turn off and unplug lamp and allow it to cool prior to
replacing light bulb.
Do not touch bulb when fixture is turned on. Do not look directly at lit bulb.
Keep flammable materials away from lit bulb.
All wires are connected at the factory. Please be careful when unpacking the lamp so that wires do not get damaged.
This lighting fixture contains lead, a chemical known to the State of California to cause cancer, birth defects and other
reproductive harm. Wash hands after installing, handling, cleaning or otherwise touching this light fixture.
PRE-ASSEMBLY
Remove all parts and hardware from box along with any plastic p rotective packaging.
Do not discard any contents until after assembly is complete to avoid accidentally disca rding small parts or hardware.
PARTS ENCLOSED
(A) Outlet box(1)
(B) Wire nut(3)
(C) Crossbar(1)
(D) Mounting screw(2)
(E) Ceiling loop (1)
(F) Canopy (1)
(G) Lock collar(1)
(H) Chain(1)
(I) Chain end link(2)
(J) Check ring (1)
(K) Fixture frame(1)
(L) Shade(1)
Page 2
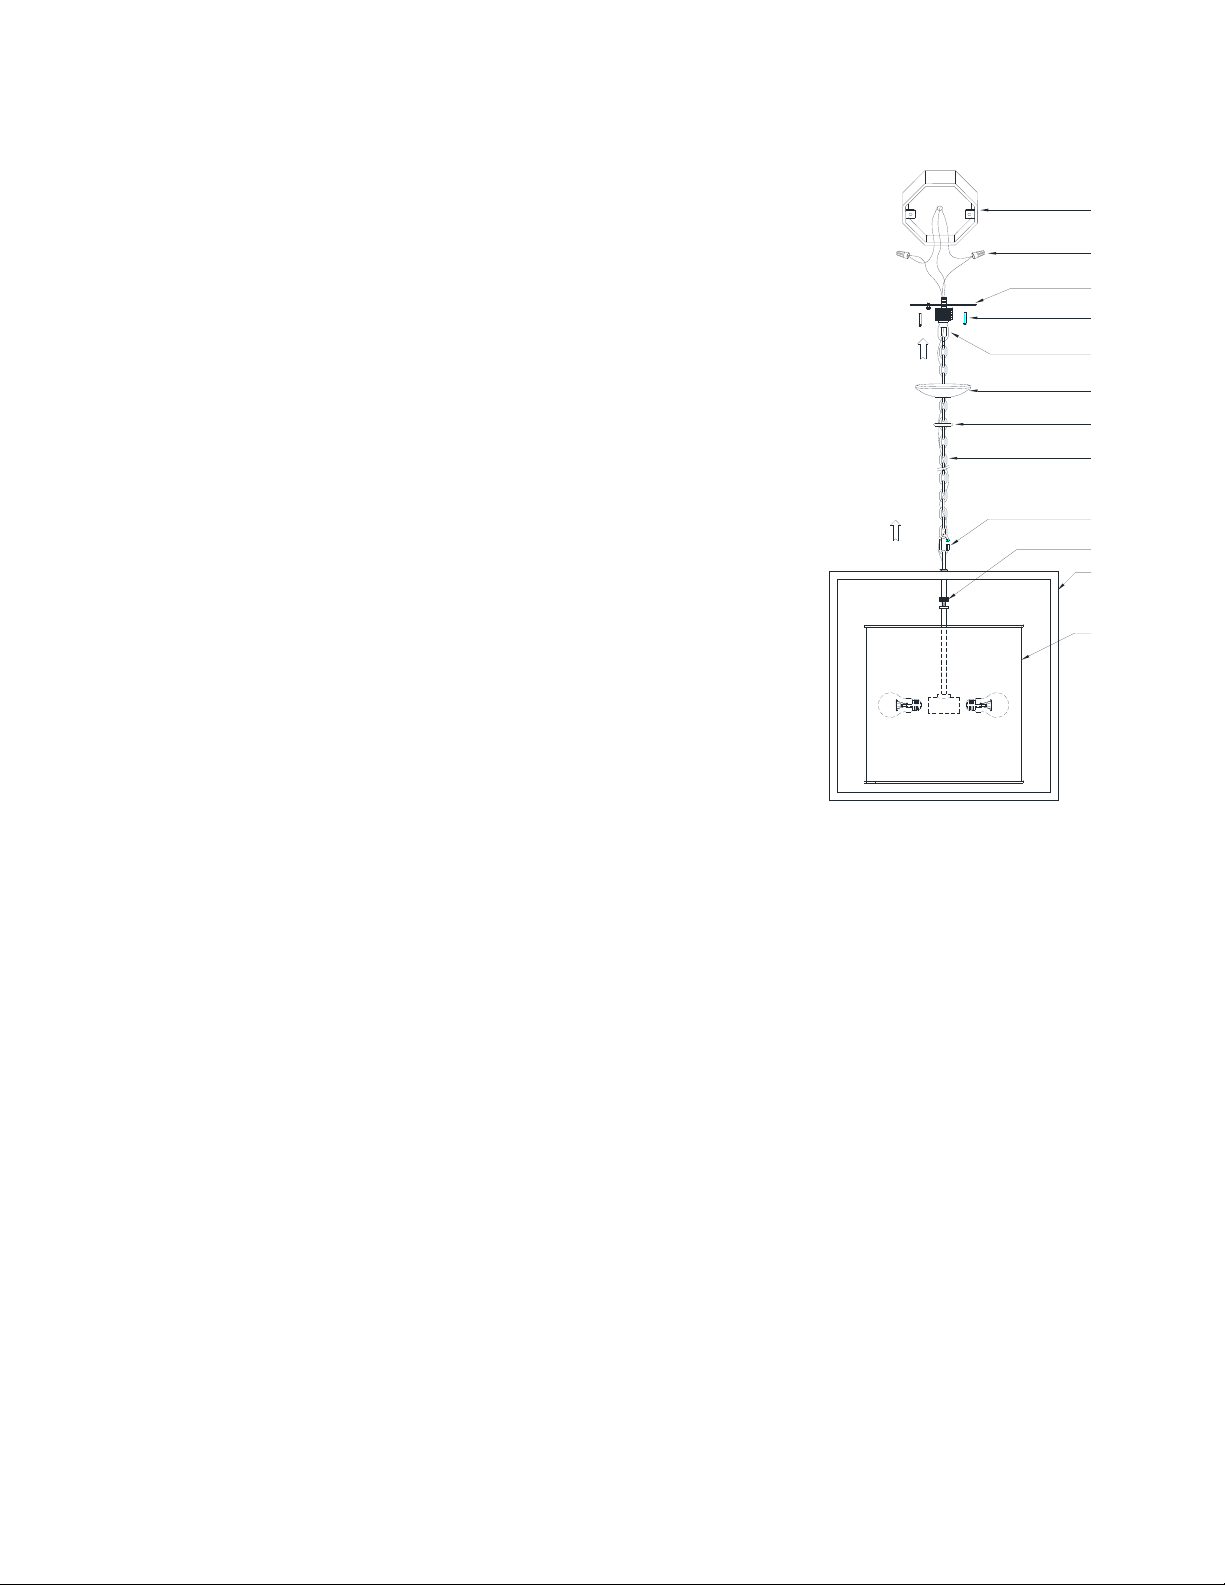
TO ASSEMBLE
SHUT OFF THE MAIN ELECTRICAL SUPPLY FROM THE MAIN FUSE BOX/CIRCUIT BREAKER!
1. Carefully remove all parts from the box.
2. Attach shade spider washer (L) to the thread nipple in the pipe of cluster,then
turn the check ring (J) clockwise to secure the shade.
3. Install the crossbar (C) with ceiling loop (E) to the outlet box (A) by mounting
screws (D) provided.
4. Unscrew the threaded collar on the chain end link (I) and attach it to the top
fixture body (K). Close the threaded collar to secure the fixture body.
5. Let canopy (F) and lock collar (G) go through the chain (H) as shown in the
diagram.
6. With the fixture dimension as a guide, shorten the chain (H) as needed using a
pair of chain pliers.
7. Unscrew the threaded collar on the other chain end link, raise the fixture then
attach chain end link to the ceiling loop (E). Cl ose the threaded coll ar to secure
the fixture body.
8. Unwrap the wiring from the top of the fixture body. Weave the power supply
cord and the ground wire through the chain (H).When you reach the
canopy (F) and ceiling loop (E), measure the wires then cut. Be cert ain to
leave enough wiring to connect inside of the outlet box (A).
9. Strip the insulation ba ck on the two power supply wires approximately 5/8".
10. Twist the power supply and ground wire together and push through the center
hole of the ceiling loop (E).
11. Connect the fixture ground (bare) wire with the ground (usually bare) wire
from the outlet box using wire nut (B). If your house does not have ground
wire, then attach this wire to the green grounding screw inside of the outlet box.
A
B
C
D
E
F
G
H
I
J
K
L
IT IS IMPERATIVE THAT THIS FIXTURE BE GROUNDED.
12. Connect the fixture Neutral wire (ribbed edge, no markings) with the neutral wire (usually white) from the outlet box using
wire nut (B).
13. Connect the fixture Hot (smooth edge,markings) wire with the hot wire (usually black) from the outlet box using wire nut
(B).
14. Tuck these wire connections neatly into the outlet box to secure.
15. Put canopy (F) to ceiling loop (E), and secure with lock collar (G).
16. Install the two (2) 60-watt maximum TYPE A standard incandescent light bulb (not included) or two (2) 13-watt
compact fluorescent light bulb (included for California customers only) (not includ ed) into sockets.
17. Your installation is complete, turn on power at fuse or circuit breaker.
Thank you for your purchase
Williams Sonoma, Inc. | Customer Service 1.877.812.6235 | www.williams-sonoma.com
 Loading...