

Page 1
ICE CREAM MAKER USER MANUAL
MANUEL D’UTILISATEUR POUR
LA SORBETIÈRE
GATHER. COOK. EAT. REPEAT.
RASSEMBLER. CUISINER. MANGER. RECOMMENCER.
WS OK Ice Cream Maker User Manual R3.indd 1 2015-12-22 9:34 AM
Page 2
IMPORTANT SAFEGUARDS
When using an electrical appliance, basic safety precautions should always be followed.
Read all instructions before using.
To protect against fire, electric shock and personal injury, do not immerse appliance, cords or plug in
water or any other liquid.
Close supervision is necessary when any appliance is used by or near children.
Unplug from outlet when not in use, before putting on or taking off parts, and before cleaning.
Avoid contact with moving parts. Keep hands, hair, clothing, as well as spatulas and other utensils, away
during operation to reduce the risk of injury to persons and/or damage to the appliance.
Do not operate any appliance with a damaged cord or plug, or after appliance is dropped or damaged in
any manner. Return the malfunctioning appliance for repairs or electrical and mechanical adjustments
(see warranty).
The use of attachments not recommended by the appliance manufacturer may result in fire, electric
shock or personal injury.
Do not use outdoors.
Do not let cord hang over edge of table or counter, or touch hot surfaces, including the stove.
Do not operate unit dry. Always have ice cream mixture in the bowl when you plug in the unit.
The freezer bowl should be thoroughly towel dried after washing.
Keep hands and utensils out of freezer bowl while in use to reduce the risk of injury to persons and/or
damage to the appliance.
DO NOT USE SHARP OBJECTS OR UTENSILS inside the freezer bowl to avoid damage to the inside of the
freezer bowl. A rubber spatula or wooden spoon may be used, when the appliance is in the OFF position.
Check that the voltage indicated on the name plate agrees with your voltage.
Never clean with scouring powders or hard implements.
Do not place or use the appliance on hot surfaces, such as stoves or hotplates, or near open gas flames.
Do not expose the freezer bowl to temperatures above 105°F (41°C). Do not clean freezer bowl
in dishwasher.
If the supply cord is damaged it must be replaced by the manufacturer or a qualified service agent in
order to avoid a hazard.
SAVE THESE INSTRUCTIONS.
USER MAINTENANCE INSTRUCTIONS
CAUTION: This appliance is for HOUSEHOLD USE ONLY.
This appliance requires little maintenance. It contains no user serviceable parts. Do not try to repair it by
yourself. Any servicing that requires disassembly other than cleaning must be performed by a qualified
appliance repair technician.
NOTE: The base does not contain any user-serviceable parts.
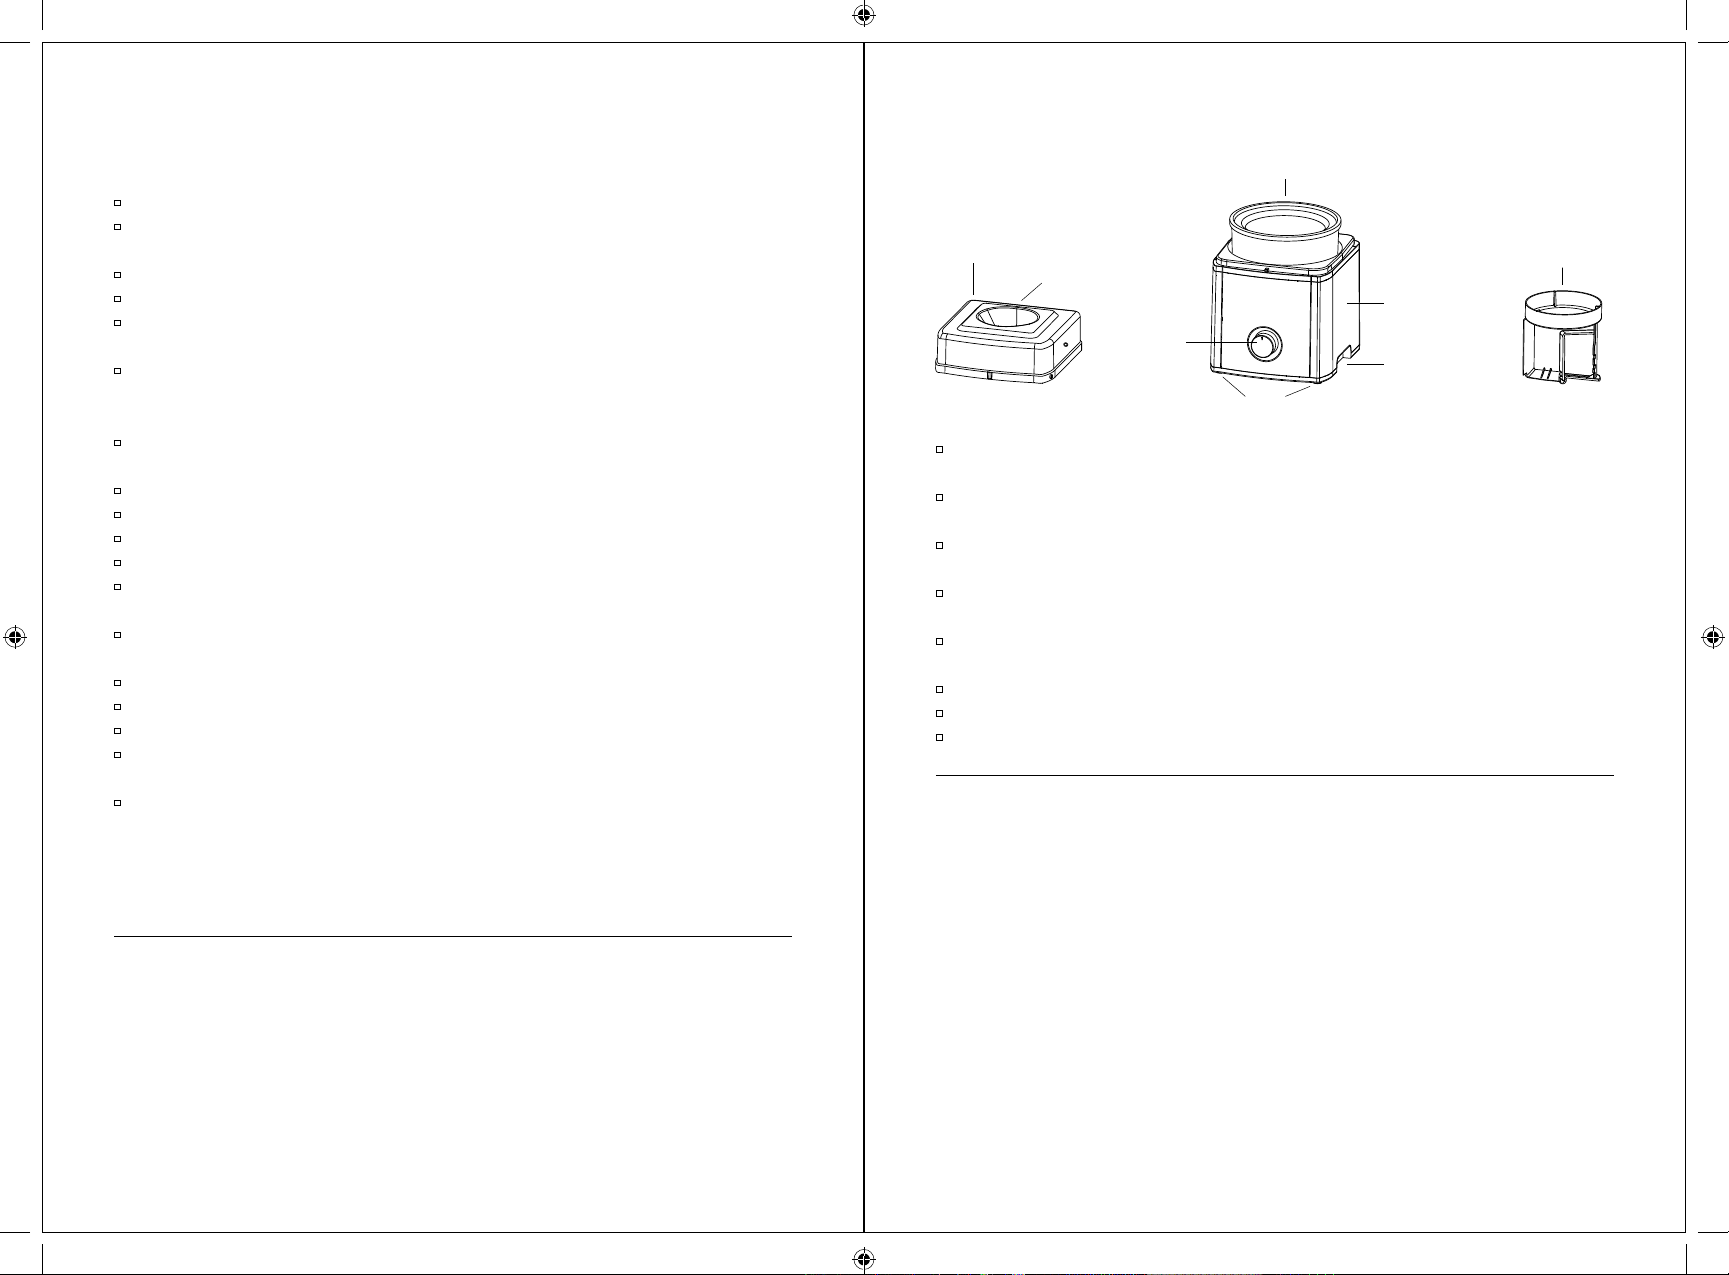
FEATURES & BENEFITS
FREEZER BOWL
EASY-LOCK LID
SPOUT
BASE
KNOB
CORD STORAGE
SILICON FEET
Ingredient Spout: Pour recipe ingredients through the spout. Also use the spout to add ingredients, such
as chips or nuts, without interrupting the freezing cycle.
Easy-lock Lid: The lid is designed to easily lock to the base and is transparent to let you check the
freezing process as it progresses.
Mixing Attachment: Mixes and aerates ingredients in freezer bowl to create frozen desserts
or drinks.
Freezer Bowl: Contains cooling liquid within a double-insulated wall to create fast and even freezing.
Double wall keeps the bowl cool and at an even temperature.
Base: Contains a heavy-duty motor that is strong enough to handle ice cream, frozen yogurt, sherbet,
sorbet and frozen drinks.
On/Off Knob.
Silicon Feet (not shown): Nonslip feet keep base stationary during use.
Cord Storage (not shown): Unused cord is easily pushed into the base to keep counters neat and safe.
MIXING ATTACHMENT
CORDS, PLUGS & PLASTICIZERS
The provided short power-supply cord should be used to reduce the risk of entanglement and tripping over a
longer cord. Do not use an extension cord with this product. This appliance has a polarized plug (one blade
is wider than the other). To reduce the risk of electric shock, this plug will fit in a polarized outlet only one
way. If the plug does not fit fully into the outlet, reverse the plug. If it still does not fit, contact a qualified
electrician. Do not modify the plug in any way.
Plasticizer Warning: To prevent Plasticizers from migrating to the finish of the counter top or table top or
other furniture, place NON-PLASTIC coasters or place mats between the appliance and the finish of the
counter top or table top. Failure to do so may cause the finish to darken; permanent blemishes may occur or
stains can appear.
Electric Power: If the electrical circuit is overloaded with other appliances, your appliance may not operate
properly. It should be operated on a separate electrical circuit from other appliances.
1
WS OK Ice Cream Maker User Manual R3.indd 2-1 2015-12-22 9:34 AM
Page 3

SAFETY FEATURE
The appliance is equipped with a safety feature that automatically stops the unit if the motor overheats.
Overheating may occur if the dessert is extremely thick in consistency, if the unit has been running for a
long period of time, or if the added ingredients are too large. To reset the unit, turn the ON/OFF switch to the
OFF position. Let the unit cool off. After a few minutes, you may turn the unit on again and continue making
your dessert or drink.
Frozen desserts or drinks will be done in 25 to 35 minutes depending on the recipe. When the mixture has
thickened to your liking, it is done. If you desire a firmer consistency, transfer the dessert or drink to an
airtight container and store in the freezer for two or more hours.
Do not operate the appliance longer than required. If after 40 minutes, the mixture is not yet solid, or has
thawed again, do not continue. Possible reasons for mixture not freezing:
•
freezer bowl was not cold enough
•
mixture was too warm
•
proportion of ingredients was incorrect
•
freezer not cold enough- reset to coldest setting
BEFORE USING FOR THE FIRST TIME
DO NOT immerse the motor base in water. Wipe it with a moist cloth. Wash the lid, freezer bowl and mixing
attachment in warm soapy water to remove any dust or residue from the manufacturing and shipping process.
DO NOT clean any parts with abrasive cleaners or hard implements.
FREEZING TIME AND BOWL PREPARATION
The freezer bowl must be completely frozen before you begin. The length of time needed to reach the frozen
state depends on how cold your freezer is. For convenient frozen desserts and drinks, leave your freezer
bowl in the freezer at all times on a flat surface in an upright position. You can take it out at any time for
immediate use. We recommend a minimum of 16 hours freezing time. To determine whether the bowl is
completely frozen, shake it. If you do not hear liquid moving, the cooling liquid is frozen. Before freezing,
wash and dry the bowl. Wrap it in a plastic bag to prevent freezer burn. We recommend placing the freezer
bowl in an upright position at the back of your freezer where it is coldest.
Reminder: Your freezer should be set to 0°F (-18°C) to ensure proper freezing of all foods.
FREEZER TEMEPRATURE APPROXIMATE MINIMUM FREEZING TIME
-9.4°F (-23°C) 16 hours
-0.4°F (-18°C) 20-22 hours
MAKING FROZEN DESSERTS OR DRINKS
Follow recipes that yields 2 quarts or less. The ingredients will increase in volume during the freezing
process. For best results, prepare ingredients in a container from which it is easy to pour.
Remove the freezer bowl from the freezer and place freezer bowl on the center of the base.
Note: Bowl will begin to defrost quickly once it has been removed from freezer. Use it immediately after
removing from freezer.
Place mixing attachment in freezer bowl. This attachment does not fit tightly. It rests in the center of the
bowl, with the circle side facing up.
Place lid on base.
Turn the On/Off switch to ON position. Freezer bowl will begin to turn.
Immediately pour ingredients through ingredient spout.
ADDING INGREDIENTS
Ingredients such as chips and nuts should be added about 5 minutes before the recipe is complete. Once
the dessert or drink has begun to thicken, add the ingredients through the ingredient spout. Nuts and other
ingredients should be no larger than a chocolate chip.
HELPFUL HINTS
Some recipes require the mixture to be pre-cooked. Make the recipe at least one day ahead. This will
allow the mixture to cool completely and increase in volume.
Uncooked recipes will yield best results when an electric mixer is used to mix the eggs and sugar. This
helps increase volume in the ice cream mixture.
Most ice cream recipes are a combination of cream, milk, eggs and sugar. You can use any type of cream
you like, but the type of cream you use will affect the flavor and texture. The higher the percentage of
fat, the richer the ice cream and the softer the texture. For example, heavy cream has at least 36% fat,
followed by whipping cream (30%), coffee or light cream (18%), and half-and-half (10%). Any
combination can be used, but make sure the liquid measurement remains the same.
Lighter ice creams can be made by using more milk than cream, but there will be a noticeable difference
in texture and taste.
The ice cream mixture will stay fresh in the refrigerator for several days. Be sure to shake well before
adding to the canister.
When pouring mixture into the canister, follow recipes that yield 2 quarts or less because the mixture will
increase in volume during the freezing process.
Alcohol inhibits the freezing process. To add alcohol to a recipe, add when the mixture is semi-stiff.
The flavor of a sorbet will depend greatly on the ripeness and sweetness of the fruit and/or juice. If fruit
is too tart, add sugar; if fruit is very ripe, decrease or omit the sugar. Freezing decreases sweetness, so
the recipe will not be quite as sweet when frozen.
Artificial sweeteners can be used as a substitute for sugar.
NOTE: Heat affects the sweetness of artificial sweeteners. Only add artificial sweeteners to mixtures that
are cold or have been completely cooled. When a recipe calls for heating liquid to dilute sugar, omit the
heating process and simply stir in the sweetener until it is well dissolved.
•
1 packet of sweetener = 2 teaspoons (10 ml) sugar
•
6 packets = ¼ cup (60 ml)
•
8 packets = ¹⁄³ cup (75 ml)
•
12 packets = ½ (125 ml)
2 3
WS OK Ice Cream Maker User Manual R3.indd 2-3 2015-12-22 9:34 AM
Page 4

The ice cream mixture should be liquid when preparation starts. Do not use stiff mixtures such as
whipped cream or frozen liquids.
When adapting your own recipes to the maximum amount of 1 quart, change all ingredients to the same
percentage as for 2-quart recipes.
CLEANING & STORAGE
Clean the freezer bowl, mixing arm and lid in warm soapy water.
DO NOT PUT FREEZER BOWL IN THE DISHWASHER.
DO NOT CLEAN WITH ABRASIVE CLEANSERS OR IMPLEMENTS.
Wipe motor base clean with damp cloth. Dry all parts thoroughly.
Do not store frozen desserts or drinks in the freezer bowl. They will stick to the side of the freezer bowl
and may damage the bowl.
Store frozen desserts and drinks in a plastic airtight container.
WASTE DISPOSAL
The liquid in the freezer bowl contains no toxic materials. Dispose as normal household waste.
WARRANTY
For one year from the date of purchase, the manufacturer
guarantees to repair or replace any item found defective in
material, construction or workmanship under normal use and
following care instructions. This excludes damage from misuse or
abuse. Minor imperfections and slight color variations are normal.
Should your appliance require repair or replacement, please
contact the Consumer Service Department by phone at
1-866-832-4843 or visit www.sensioinc.com for return procedures
and a return authorization number.
If the manufacturer confirms a defect and approves your claim, the
manufacturer will repair or replace (free of charge) or refund the
purchase price of the item.
IMPORTANTES CONSIGNES DE SÉCURITÉ
Toujours respecter les consignes de sécurité de base lors de l’utilisation d’appareils électriques.
Lire toutes les consignes avant l’utilisation.
Pour prévenir tout risque d’incendie, de décharge électrique et de blessure, ne pas immerger l’appareil, le
cordon ou la fiche dans de l’eau ou d’autres liquides.
Une supervision étroite est de rigueur quand l’appareil est utilisé par des enfants ou près d’eux.
Débrancher l’appareil de la prise murale lorsqu’il n’est pas utilisé, avant de poser ou d’enlever des
pièces et avant le nettoyage.
Éviter tout contact avec les pièces en mouvement. Maintenir les mains, les cheveux, les vêtements, ainsi
que les spatules et autres ustensiles éloignés de l’appareil pendant son fonctionnement afin de réduire
les risques de blessures ou de dommages à l’appareil.
Ne pas utiliser l’appareil lorsque le cordon ou la fiche électrique est endommagé, ou après une chute
ou une détérioration de l’appareil, de quelque façon que ce soit. Retourner l’appareil défectueux pour
réparation ou d’éventuels ajustements électriques et mécaniques (voir la garantie).
L’utilisation d’accessoires non recommandés par le fabricant de l’appareil peut causer un incendie, une
décharge électrique ou des blessures.
Ne pas utiliser à l’extérieur.
Ne pas laisser le cordon pendre d’une table ou d’un comptoir, ni toucher des surfaces chaudes, y compris
une cuisinière.
Ne pas utiliser l’appareil à sec. Toujours s’assurer que le bol contient un mélange de crème glacée au
moment de brancher l’appareil.
Sécher soigneusement avec une serviette le bol isotherme après l’avoir lavé.
Garder les mains et les ustensiles en dehors du bol isotherme pendant son utilisation afin de réduire le
risque de blessures ou de dommages à l’appareil.
NE PAS UTILISER D’OBJETS OU D’USTENSILES COUPANTS dans le bol isotherme afin de ne pas risquer
d’endommager les parois intérieures. Une spatule en caoutchouc ou une cuillère en bois peut être utilisée
lorsque l’appareil est en position OFF (ARRÊT).
Vérifier que la tension indiquée sur la plaque signalétique est conforme à la tension de la prise.
Ne jamais nettoyer l’appareil avec des poudres à récurer ou des outils durs.
Ne pas poser ou utiliser l’appareil sur des surfaces chaudes, telles qu’une cuisinière ou une plaque
chauffante, ou à proximité d’une flamme de gaz nue.
Ne pas exposer le bol isotherme à des températures supérieures à 41 °C (105 °F). Ne pas laver le bol
isotherme au lave-vaisselle.
Si le cordon d’alimentation est endommagé, il doit être remplacé par le fabricant ou un agent de service
qualifié pour éviter de courir un danger.
CONSERVER CES INSTRUCTIONS.
RÉPARATION
MISE EN GARDE : Cet appareil est prévu pour un USAGE DOMESTIQUE UNIQUEMENT.
L’appareil exige peu d’entretien. Il ne contient aucune pièce pouvant être réparée ou remplacée par
l’utilisateur. Il ne faut donc pas tenter de le réparer soi-même. Confier l’entretien à un technicien en
réparation d’appareils ménagers qualifié.
REMARQUE : Le socle ne contient aucune pièce réparable par l’utilisateur.
4 5
WS OK Ice Cream Maker User Manual R3.indd 4-5 2015-12-22 9:34 AM
Page 5

CARACTÉRISTIQUES ET AVANTAGES
BOL ISOTHERME
COUVERCLE À
VERROUILLAGE
FACILE
ORIFICE DE
REMPLISSAGE
BASE
MÉLANGEUR
FONCTION DE SÉCURITÉ
Cet appareil est équipé d’une fonction de sécurité conçue pour déclencher l’arrêt immédiat de l’appareil
en cas de surchauffe. Une surchauffe peut se produire en cas de consistance extrêmement épaisse de la
préparation, d’utilisation prolongée de l’appareil ou d’ajout d’ingrédients trop volumineux. Pour réinitialiser
l’appareil, mettre le bouton ON/OFF (MARCHE/ARRÊT) en position OFF (ARRÊT). Laisser l’appareil refroidir
complètement. Au bout de quelques minutes, l’appareil peut être rallumé et utilisé pour poursuivre la
confection du dessert ou de la boisson.
BOUTON
RANGE-CORDON
PIEDS EN SILICONE
Orifice de remplissage : Verser les ingrédients de la recette au moyen de l’orifice de remplissage. Utiliser aussi
l’orifice pour ajouter des ingrédients tels que : des copeaux ou des noix, sans interrompre le cycle de congélation.
Couvercle à verrouillage facile : Le couvercle est conçu de façon à se verrouiller facilement sur le socle.
Et comme il est transparent, il permet de contrôler le processus graduel de congélation.
Mélangeur : Mélange et aère les ingrédients placés dans le bol isotherme pour confectionner des desserts
ou des boissons glacés.
Bol isotherme : Contient un liquide de refroidissement enfermé dans une paroi à double isolation pour assurer
une congélation rapide et uniforme. La double paroi maintient le bol à une température froide et uniforme.
Base : Contient un moteur robuste suffisamment puissant pour permettre la préparation de crèmes
glacées, yogourts glacés, sorbets laitiers et classiques, et boissons glacées.
Bouton On/Off (Marche/Arrêt).
Pieds en silicone (non illustrés) : Les pieds antidérapants assurent la stabilité du socle pendant
l’utilisation de la sorbetière.
Range-cordon (non illustré) : Lorsqu’il n’est pas utilisé, le cordon peut être facilement poussé dans le
socle pour maintenir le comptoir désencombré et sécuritaire.
CORDON, FICHES ET PLASTIFIANTS
Le cordon d’alimentation court fourni doit être utilisé afin de prévenir tout risque d’enchevêtrement ou de
trébuchement sur un plus long cordon. Ne pas utiliser de rallonge avec ce produit. Cet appareil est doté d’une
fiche polarisée (une broche est plus large que l’autre). Pour réduire le risque de décharge électrique, la fiche
s’insère d’une seule manière dans une prise polarisée. Si la fiche ne s’insère pas complètement dans la prise,
la tourner pour l’insérer de l’autre côté. S’il est toujours impossible de l’insérer complètement dans la prise,
communiquer avec un électricien qualifié. Ne jamais modifier la fiche de quelque façon que ce soit.
Avertissement de migration de plastifiants : Pour éviter la migration de plastifiants du fini de comptoirs, de
tables ou de tout autre meuble, placer des sous-plats ou des napperons faits de matière NON PLASTIQUE
entre l’appareil et le dessus du comptoir ou de la table. Si cette consigne n’est pas respectée, le fini de la
surface pourrait noircir et des ternissures permanentes ou des taches indélébiles pourraient se former.
Alimentation électrique : Si le circuit électrique est surchargé parce qu’il doit également alimenter d’autres
appareils, cet appareil pourrait ne pas fonctionner correctement. Il doit être alimenté par un circuit
électrique distinct de tout autre appareil
AVANT LA PREMIÈRE UTILISATION
NE PAS plonger le socle-moteur dans l’eau. L’essuyer avec un chiffon humide. Laver le couvercle, le bol
isotherme et le mélangeur à l’eau chaude savonneuse pour éliminer la poussière ou les résidus accumulés
pendant le processus de fabrication et d’expédition.
NE nettoyer AUCUNE pièce avec un nettoyant abrasif ou un outil dur.
TEMPS DE CONGÉLATION ET PRÉPARATION DU BOL
Le bol isotherme doit être entièrement congelé avant de commencer. Le délai nécessaire pour atteindre le
point de congélation dépend de la température du congélateur. Pour disposer de desserts et boissons glacés
à tout moment, laisser le bol isotherme au congélateur en permanence, sur une surface plane et en position
verticale. Le bol contenant la préparation peut être sorti à tout moment en vue d’une utilisation immédiate.
Nous recommandons une durée de congélation d’au moins 16 heures. Secouer le bol pour déterminer si
celui-ci est complètement congelé. Si aucun mouvement liquide n’est audible, cela signifie que le liquide de
refroidissement est congelé. Avant de procéder à la congélation, laver et sécher le bol. L’envelopper dans un
sac de plastique pour éviter les brûlures de congélation. Nous recommandons de placer le bol isotherme à la
verticale au fond de votre congélateur, là où la température est plus froide.
Rappel : Le congélateur doit être réglé sur -18 °C (0 °F) pour garantir la bonne congélation de tous les aliments.
TEMPÉRATURE DU CONGÉLATEUR DURÉE DE CONGÉLATION APPROXIMATIVE
-23 °C (-9.4 °F) 16 heures
-18 °C (-0.4 °F) 20-22 heures
CONFECTION DE DESSERTS OU BOISSONS GLACÉS
Suivre les recettes permettant d’obtenir 2 pintes (1,89 l) de préparation ou moins, car les ingrédients
augmentent de volume pendant le processus de congélation. Pour des résultats optimaux, préparer les
ingrédients dans un récipient permettant de verser facilement la préparation.
Sortir le bol isotherme du congélateur et déposer le bol au milieu du socle.
Remarque : Une fois sorti du congélateur, le bol commencera à se décongeler rapidement. Le bol doit être
utilisé immédiatement dès sa sortie du congélateur.
Placer le mélangeur dans le bol isotherme. Cet accessoire n’est pas censé être serré. Il repose au centre
du bol, avec le côté circulaire orienté vers le haut.
Poser le couvercle sur le socle.
6 7
WS OK Ice Cream Maker User Manual R3.indd 6-7 2015-12-22 9:34 AM
Page 6

Mettre le bouton On/Off (Marche/Arrêt) en position ON (MARCHE). Le bol isotherme commencera à tourner.
Verser immédiatement les ingrédients au moyen de l’orifice.
Le temps de préparation de desserts ou de boissons glacés varie entre 25 et 35 minutes, selon la recette.
Le mélange est terminé une fois l’obtention de la consistance désirée. Pour une consistance plus ferme,
transférer le dessert ou la boisson dans un récipient hermétique et le laisser au congélateur pendant au
moins deux heures.
Ne pas faire fonctionner l’appareil pendant plus longtemps que nécessaire. Arrêter l’appareil au bout de
40 minutes si le mélange n’acquiert pas une consistance solide ou qu’il se décongèle. Causes possibles
de la non-congélation du mélange :
•
bol isotherme pas assez froid
•
mélange trop chaud
•
proportion d’ingrédients incorrecte
•
congélateur pas assez froid; baisser la température
AJOUT D’INGRÉDIENTS
Les ingrédients tels que les copeaux et les noix doivent être ajoutés environ 5 minutes avant la fin de la
recette. Dès que le dessert ou la boisson commence à s’épaissir, ajouter les ingrédients par le bec verseur.
Les noix et autres ingrédients ne doivent pas être plus gros qu’un copeau de chocolat.
de chauffer le liquide pour diluer le sucre, omettre cette étape et incorporer simplement l’édulcorant
jusqu’à sa dissolution complète.
•
1 paquet d’édulcorant = 2 cuillères à thé (10 ml) de sucre
•
8 paquets = 75 ml (0,33 tasse)
Le mélange de crème glacée doit être liquide au début de la préparation. Ne pas utiliser de mélanges à
consistance ferme comme de la crème fouettée ou un liquide congelé.
Si une recette est adaptée pour préparer au maximum 0,94 l (1 pinte), changer la quantité de tous les
ingrédients en respectant les mêmes proportions que pour la recette de 1,89 l (2 pintes).
•
6 paquets = 60 ml (0,25 tasse)
•
12 paquets = 125 ml (0,5 tasse)
NETTOYAGE ET CONSERVATION
Nettoyer le bol isotherme, le mélangeur et le couvercle à l’eau chaude savonneuse.
NE PAS LAVER LE BOL ISOTHERME AU LAVE-VAISSELLE.
NE PAS LAVER AVEC UN NETTOYANT ABRASIF OU UN OUTIL DUR.
Nettoyer le socle-moteur à l’aide d’un chiffon humide. Sécher soigneusement toutes les pièces.
Ne pas conserver de desserts ou boissons glacés dans le bol isotherme car ils adhéreront à la paroi du
bol et risqueraient de l’endommager.
Transférer et conserver les desserts ou boissons glacés dans un récipient en plastique hermétique.
CONSEILS UTILES
Certaines recettes nécessitent la cuisson préalable du mélange. Préparer la recette au moins un jour à
l’avance. Cela permet au mélange de refroidir entièrement et d’augmenter de volume.
Les recettes non cuites produisent les meilleurs résultats lorsqu’un batteur électrique est utilisé pour
mélanger les œufs et le sucre. Cela favorise l’augmentation de volume du mélange de crème glacée.
La plupart des recettes de crème glacée exigent un mélange de crème, de lait, d’œufs et de sucre. Même
si tout type de crème peut être utilisé, le goût et la texture varieront selon la crème utilisée. Plus la teneur
en gras est élevée, plus la crème glacée sera riche et la texture onctueuse. À titre de comparaison, la
crème épaisse contient au minimum 36 % de matières grasses, suivie de la crème à fouetter (30 %),
de la crème ou allégée (18 %) et de la crème demi-grasse « moitié-moitié » (10 %). N’importe quel
mélange peut être utilisé, mais en veillant à garder la même quantité de liquide.
Il est possible de confectionner des crèmes glacées plus légères en utilisant davantage de lait que de
crème, même si cela affecte notablement le goût et la texture.
Le mélange de crème glacée restera frais pendant plusieurs jours au réfrigérateur. Veiller à bien agiter le
mélange avant de le verser dans le récipient.
Lorsque le mélange est versé dans le récipient, suivre les recettes permettant d’obtenir 1,89 l (2 pintes)
de préparation ou moins, car le mélange augmente de volume pendant le processus de congélation.
L’alcool neutralise le processus de congélation. Pour ajouter de l’alcool à une recette, attendre que le
mélange atteigne une consistance semi-ferme.
Le goût des sorbets dépendra en grande partie du degré de maturité et de la teneur en sucre des fruits
ou jus utilisés. Si le fruit est trop acide, ajouter du sucre; s’il est très mûr, réduire ou éliminer le sucre.
Comme la saveur sucrée diminue sous l’effet du processus de congélation, le mélange ne sera pas aussi
sucré une fois congelé.
Le sucre peut être remplacé par des édulcorants artificiels.
REMARQUE : La saveur sucrée des édulcorants artificiels diminue sous l’effet de la chaleur. Ajouter des
édulcorants artificiels uniquement à un mélange froid ou entièrement refroidi. Lorsqu’une recette requiert
ÉLIMINATION DES DÉCHETS
Le liquide dans le bol isotherme ne contient aucune substance toxique. Il peut donc être éliminé dans les
ordures ménagères.
Garantie
Pendant une période d’un an à compter de la date d’achat, le fabricant
s’engage à réparer ou remplacer tout article défectueux en raison d’un
défaut de matériel, de fabrication ou de mécanique, dans le cadre
d’une utilisation normale conformément aux instructions d’entretien
suivantes. Les dommages causés par un entretien inapproprié ou une
mauvaise utilisation ne sont pas couverts. Les légères imperfections et
les petites variations de couleurs sont normales.
Si votre appareil doit être réparé ou remplacé, veuillez communiquer
avec le service à la clientèle par téléphone au 1 866 832-4843
ou visitez le www.sensioinc.com pour connaître les procédures de
retour et obtenir un numéro d’autorisation de retour.
Si le fabricant confirme la défectuosité et approuve votre
réclamation, le fabricant remplacera ou remplacera l’appareil (sans
frais) ou vous remboursera le prix d’achat.
8
WS OK Ice Cream Maker User Manual R3.indd 8-9 2015-12-22 9:34 AM
Page 7

Developed exclusively for WILLIAMS-SONOMA®.
Conçu en exclusivité pour WILLIAMS-SONOMA
MD
.
© 2015 Williams-Sonoma, Inc. San Francisco, Ca 94109 USA.
2 Grosvenor Street, Suite 201, Level 2, Bondi Junction, NSW 2022, AUS.
Made in China. Fabriqué en Chine.
WS OK Ice Cream Maker User Manual R3.indd 10 2015-12-22 9:34 AM
 Loading...