

Williams pianos Grand, Grand Piano User Manual
Sound. Style. Value.

CAUTION: TO REDUCE THE RISK OF ELECTRIC SHOCK, DO NOT
REMOVE COVER OR BACK. NO USER-SERVICEABLE PARTS INSIDE.
REFER SERVICING TO QUALIFIED SERVICE PERSONNEL
IMPORTANT SAFETY INSTRUCTIONS
Do not use near water.
Clean only with a soft dry cloth. Visit www.williamspianos.com for detailed cleaning instructions.
Do not block any ventilation openings.
Do not place near any heat sources such as radiators, heat registers, stoves, or any other apparatus
(including amplifiers) that produce heat.
Do not remove the polarized or grounding-type plug.
Protect the power cord from being walked on or pinched.
Only use the included attachments/accessories.
Unplug this apparatus during lightning storms or when unused for a long period of time.
Refer all servicing to qualified service personnel. Servicing is required when the apparatus has been damaged in
any way, such as power-supply cord or plug is damaged, liquid has been spilled or objects have fallen into the
apparatus, the apparatus has been exposed to rain or moisture, does not operate normally, or has been dropped.
FCC STATEMENTS
1) Caution: Changes or modifications to this unit not expressly approved by the party responsible for
compliance could void the user’s authority to operate the equipment.
2) Note: This equipment has been tested and found to comply with the limits for a Class B digital device,
pursuant to Part 15 of the FCC Rules. These limits are designed to provide reasonable protection against
harmful interference in a residential installation. This equipment generates, uses, and can radiate radio
frequency energy and, if not installed and used in accordance with the instructions, may cause harmful
interference to radio communications. However, there is no guarantee that interference will not occur in a
particular installation. If this equipment does cause harmful interference to radio or television reception,
which can be dete mined by turning the equipment off and on, the user is encouraged to try to correct the
interference by one or more of the following measures:
•Reorientorrelocatethereceivingantenna.
•Increasetheseparationbetweentheequipmentandreceiver.
•Connecttheequipmentintoanoutletonacircuitdifferentfromthattowhichthereceiverisconnected.
•Consultthedealeroranexperiencedradio/TVtechnicianforhelp.
3

We would like to express our appreciation, and congratulate you for purchasing this Williams Grand digital
piano. With proper care, this piano will provide you with years of musical enjoyment. Williams’ advanced
state of the art electronics are combined with an elegant cabinet that adds beauty and sophistication to any
home environment.
Some features include:
Authentic acoustic piano feel•
Williams’ acclaimed stereo imaging•
Acoustic instrument voices offering unmatched realism•
Metronome feature with variable tempo to facilitate practice•
Two track recorder that allows you to record and playback your performances•
Digital effects to further enhance the instrument voices•
29 demo songs
MIDI In/Out Connections•
Two Stereo line outputs and two headphone outputs•
Stereo line input•
Sustain, soft, and Sostenuto pedals•
In order to make the most of your piano, we suggest that you take a few minutes to read this user’s manual, then
save it for later reference.
4
TABLE OF CONTENTS
INTRODUCTION .........................................................6
Before You Get Started ...............................................6
Shipment ....................................................................... 6
Initial Operation ........................................................... 6
QUICK START ...............................................................6
Power On/Off .............................................................6
Fuse Holder/IEC Receptacle .........................................6
Adjusting the Volume.................................................7
Demo Playback ...........................................................7
Playing Back the Sound Demos ...................................7
Playing Back the Piano Music Demos ......................... 7
Selecting and Playing Sounds ....................................8
CONTROL ELEMENTS AND CONNECTIONS ..........8
Control Panel .............................................................8
Control Elements of the Piano ..................................... 8
Connectors ...............................................................10
Foot Pedals................................................................10
Power Supply ............................................................ 11
Headphone Connectors ...........................................11
BASIC OPERATION .................................................... 11
Using Two Sounds (Layer Mode) ............................11
Changing the Sound Character ...............................12
Brightness Equalizer ................................................... 12
Room Effects ............................................................... 12
Modulation Effects...................................................... 12
Using the Pedals .......................................................13
Using Headphones ................................................... 14
ADVANCED OPERATION ..........................................14
Using EDIT Mode ....................................................14
Transposition ............................................................15
Layer Mode Settings .................................................15
Quick Access to Layer Mode Functions ..................... 15
Volume Ratio............................................................... 16
Detune ......................................................................... 16
Transposition .............................................................. 16
Effect Intensity ............................................................16
Reset ............................................................................17
Using the Metronome .............................................. 17
Metronome Volume ....................................................17
Music Sequencer ......................................................18
Recording Pieces of Music .......................................... 18
Editing Pieces of Music ............................................... 19
Playing Back Pieces of Music ..................................... 20
Repeating Musical Passages for Practicing ................21
Setting the Volume of Muted Tracks .......................... 22
Editing the Music Sequencer Settings ........................ 22
Sync Start ..................................................................... 23
Start the Music Sequencer With Foot Pedal ..............23
System Settings .........................................................23
Key Velocity ................................................................. 23
Soft Pedal Intensity .....................................................24
Fine Tuning ................................................................. 24
Tunings ........................................................................25
Saving Parameter Settings ..........................................26
Restoring the Factory Default Settings ......................27
CONNECTION TO EXTERNAL EQUIPMENT ........28
Connecting External Sound Sources .......................28
Connection to Amplifiers and
Recording Equipment ........................................28
MIDI Functions .......................................................29
MIDI Connection to Other Sound Modules ............. 29
MIDI Connection to a Computer With
Sequencing Software ........................................ 30
MIDI Settings .............................................................. 30
TROUBLESHOOTING ...............................................34
SPECIFICATIONS .......................................................35
APPENDIX...................................................................36
Cables ........................................................................36
Unbalanced 1/4" Cable ............................................... 36
RCA Cables .................................................................. 36
1/4" to RCA Cable ....................................................... 37
MIDI Cables ................................................................37
Presets on the Piano .................................................38
MIDI Implementation Chart ..................................39
List of Demo Music Pieces Included .......................40
EDIT Parameters ......................................................41
WARRANTY .................................................................42
5
INTRODUCTION
Congratulations! With the Williams Grand,
you have purchased a state of the art digital piano
which is on a par with its acoustic counterpart in
terms of sound and feel. The keyboard features 88
weighted keys with hammer action, in combination
with a stereo sound generator that gives you an
unparalleled playing experience. High-quality
modulation and room effects as well as a 2 x 40Watt loudspeaker system produce a very natural
and spacious sound. The 2-track sequencer for
recording and practicing also includes a metronome
and adds the finishing touch to the overall concept.
Blown fuses must be replaced by fuses of the
same type and rating! Please refer to the
"SPECIFICATIONS" for details.
The mains connection of the piano is made by
using the enclosed mains cable and a standard IEC
receptacle. It meets all of the international safety
certification requirements.
Please make sure that all units have a proper ground
connection. For your own safety, never remove or
disable the ground conductor from the unit or of
the AC power cord.
This is an electronic piano. Unlike an acoustic
piano, this instrument does not need to be tuned.
Before You Get Started
Shipment
Your piano was carefully packed at the factory, and
the packaging was designed to protect the unit from
rough handling. Nevertheless, we recommend that
you carefully examine the packaging and its contents
for any signs of physical damage that may have
occurred during transit.
If the unit is damaged, please do NOT return •
it to Williams. Instead, notify your dealer
and the shipping company immediately.
Otherwise, claims for damage or replacement
may not be honored.
Always use the original packing carton to •
prevent damage during storage or transport.
Make sure that no children are left •
unsupervised with the piano or its packaging.
Please ensure proper disposal of all packing •
materials.
Initial Operation
Be sure that there is enough space around the unit
for cooling and please do not place the piano on
high temperature devices such as radiators etc. To
avoid overheating.
The sound quality may diminish within the
range of powerful broadcasting stations and
high-frequency sources. Increase the distance
between the transmitter and the device and use
shielded cables for all connections.
QUICK START
Power On/Off
Power is required to operate the piano. The following
section describes how to connect the unit to power.
The POWER switch to the left of the keyboard must
be in the "off " position when you connect the unit
to power.
Fuse Holder / IEC Receptacle
The piano is connected to the AC mains using a
standard IEC receptacle. A matching power cable is
included with the unit. Blown fuses must be replaced
with a fuse of the same type and rating.
Connect the power cable supplied with the unit to
the connector provided on the underside of the
instrument and to a wall socket.
Press the POWER switch to the left of the keyboard
to switch the instrument on or off. The LED on
the front panel lights up when the piano is ready
for operation.
6

highlight the various sounds and their features and
show you what can be done with your instrument.
Press the DEMO button.
After playing, switch off the unit with the POWER
switch. The POWER LED on the front panel will go
out. Please note: Merely switching the unit off does
not mean that it is fully disconnected from the mains.
If you do not plan to use your piano for a prolonged
period of time, please disconnect it from the mains by
unplugging the power cable from the wall outlet.
Adjusting the Volume
The volume of the built-in loudspeakers and
headphones can be adjusted as follows:
Set the MAIN VOLUME control to mid-travel
position, between MIN and MAX.
Adjust the volume as desired by moving the control
to the right (up) or left (down).
The piano is capable of producing extreme
volumes. Please bear in mind that high sound
pressures not only temporarily affect your sense of
hearing, but can also cause permanent damage.
Be careful to select a suitable volume at all times,
particularly when you are playing with headphones.
Demo Playback
Press one of the 14 buttons in the SOUND SELECT
section to play back an audio demo of the selected
sound color.
Press the DEMO button again to quit DEMO mode.
During demo playback the piano does not receive or
send MIDI data.
The music sequencer (see piano p.18) must not be set
to playback or record-ready mode when you switch to
DEMO mode.
Playing Back the Piano Music Demos
The following section describes how to play back the
15 piano music demos. These demos show you the
versatility of the piano's sounds.
Press the DEMO button.
Use the -/NO and +/YES buttons in the VALUE/
SONG section to select the music piece of your
choice.
The piano offers you 14 sound and 15 piano music
demos. These music pieces give you an impression of
the instrument’s versatility and range of sounds.
Playing Back the Sound Demos
This section describes how to play back the 14
sound demos. These demos are specially designed to
The display reads:
1 ... 15: Number of the selected music piece.
ALL: Playback of all music pieces. The pieces are
7
played in chronological order.
ShF: Playback of all music pieces. The pieces are
played in random order.
Press the START/STOP button in the SONG section
to start playback.
Press the START/STOP button again to stop playback.
The LED above the sound button lights up to
show that the corresponding sound has been
selected. The selected sound can be played over
the entire keyboard.
The volume of the sound depends on how heavily
you play the keys (not applicable to HARPSICHORD,
CEMBALO, JAZZ ORGAN, CHURCH ORGAN and
PIPE ORGAN).
TIP: You can also select two sounds at the same time.
Repeat steps 2 to 4 to play back other pieces.
Press the DEMO button again to quit DEMO mode.
A list of all the music pieces can be found on
page 37.
The music sequencer (see p.18) must not be set to
playback or record-ready mode when you switch to
DEMO mode.
You can adjust the playback tempo of the piano
music demos using the tempo/edit mode
buttons (|}).
Select any sound you like to accompany the
piano music demos; you can also add the room,
modulation and brilliance effects (see p.12).
Select and set the sound color before you enter
DEMO mode.
Selecting & Playing Sounds
The piano comes with 14 different sound colors
covering a wide spectrum of sounds. You can select
a sound in the SOUND SELECT section.
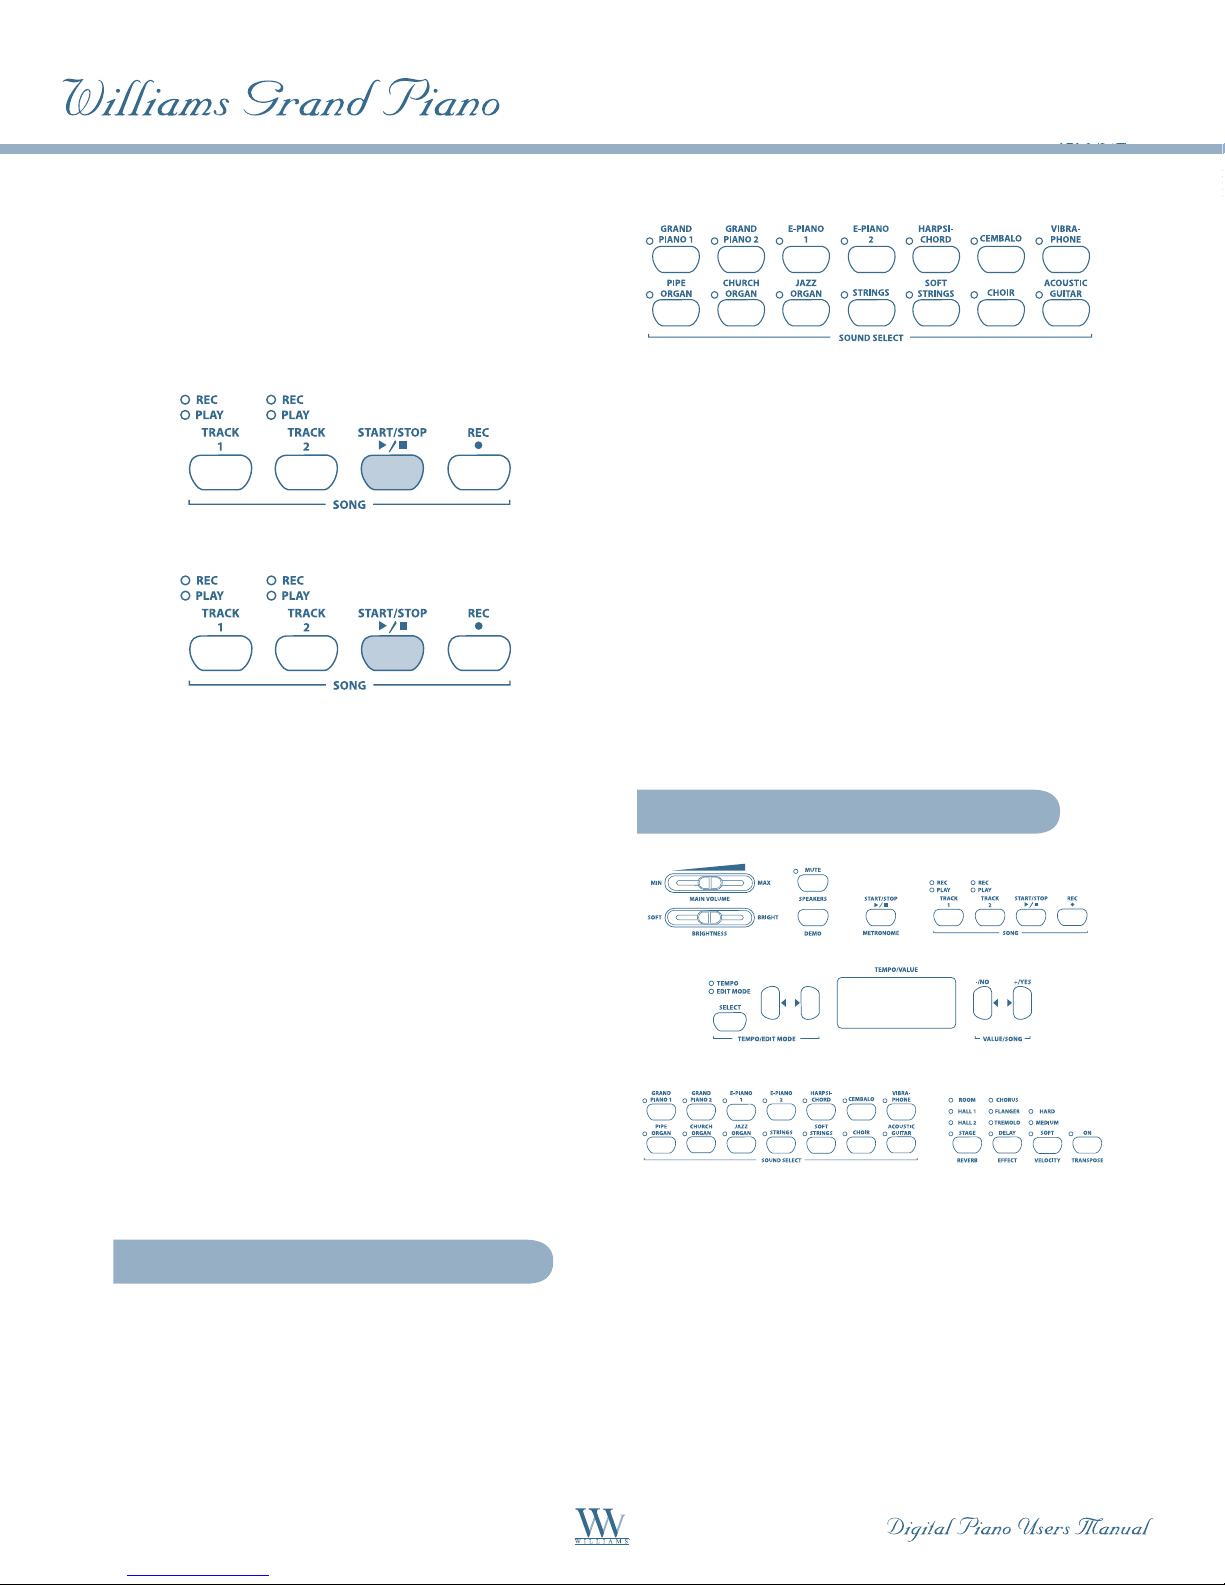
CONTROL ELEMENTS
AND CONNECTIONS
Control Panel
Control Elements of the Piano
The control elements of the piano are described
below. To give you a clear overview of the control
panel, its elements have been grouped in separate
sections.
Press one of the 14 buttons in the SOUND SELECT
section to select the sound of your choice.
8
1
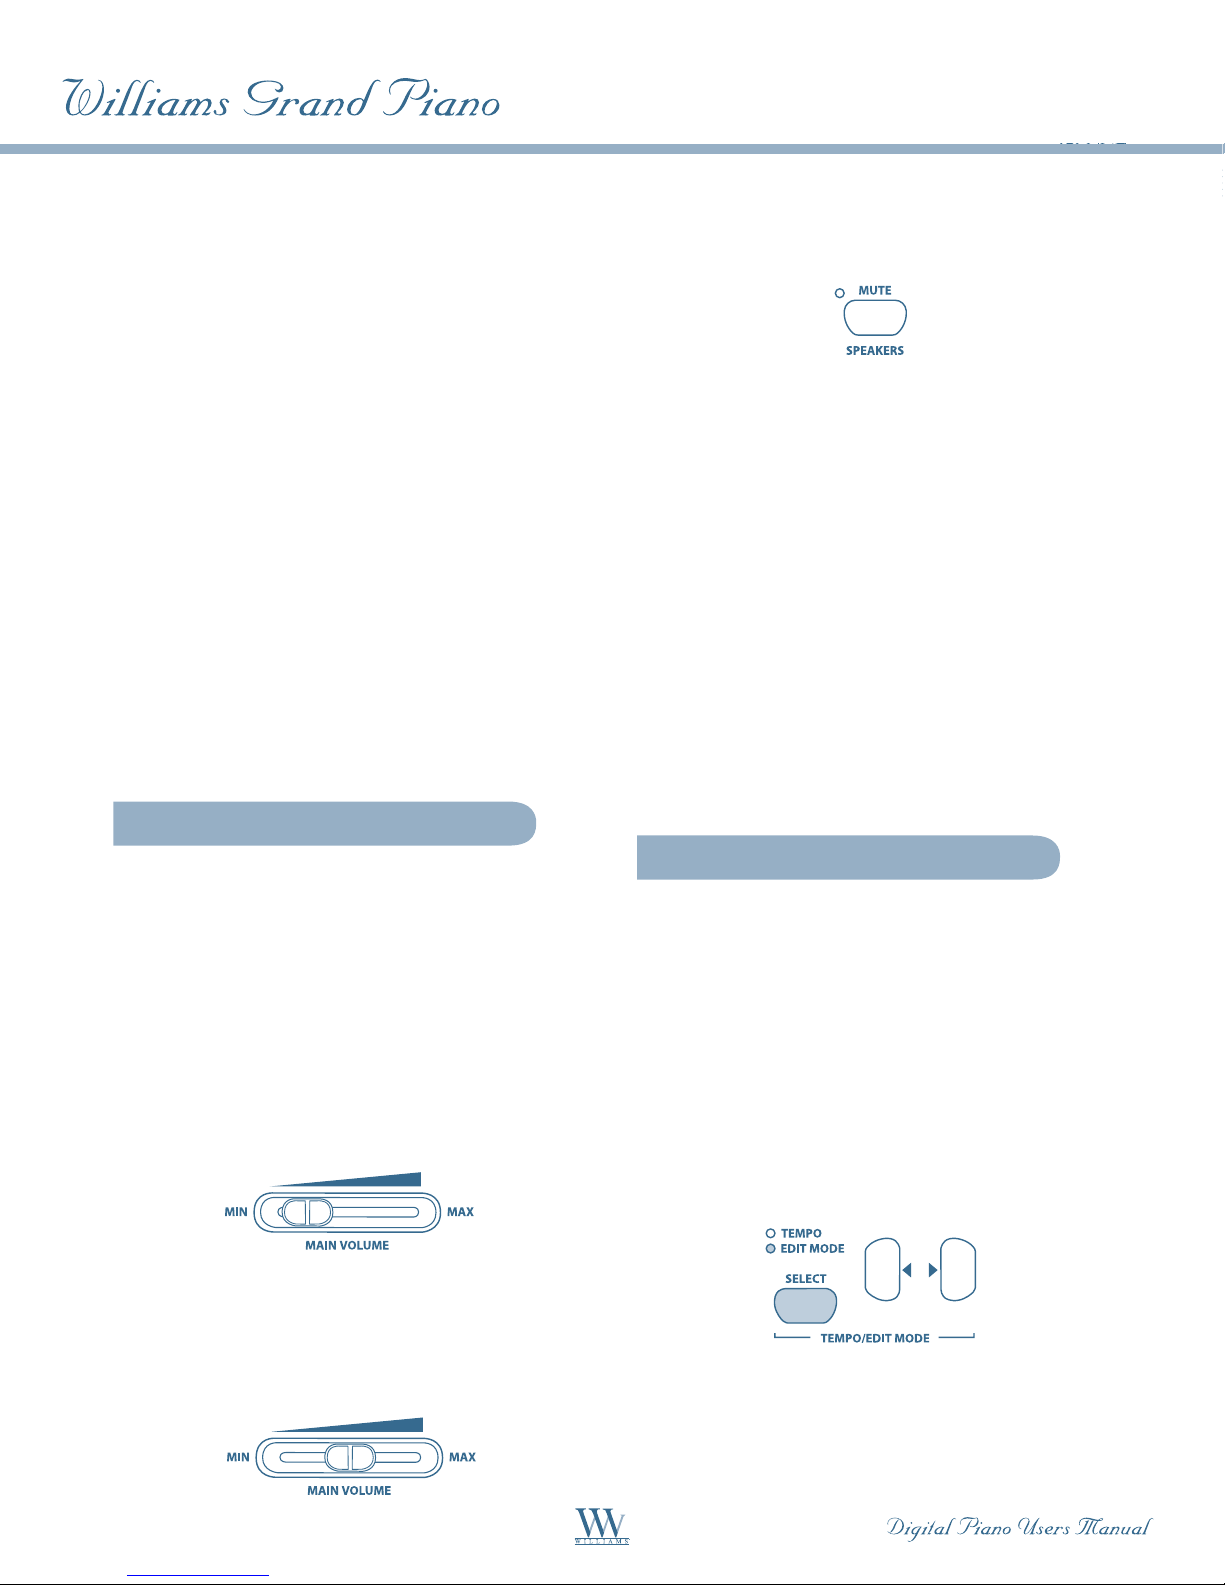
MAIN VOLUME: Is used to adjust the volume
of the built-in loudspeakers, headphone outputs
and LINE OUT 1/4" TRS jacks.
2
BRIGHTNESS: Varies the sound character from
soft (left) to bright (right).
3
SPEAKERS: Switches the built-in loudspeakers
on and off. The MUTE LED lights up only
when the built-in loudspeakers are switched
off. When you insert your headphones this
will automatically switch off the built-in
loudspeakers.
4 DEMO: Enables/disables DEMO mode.
8
START/STOP: Is used to start/stop playback or
recording of the music sequencer.
9
REC: Activates record mode.
10
SELECT: Selects the TEMPO parameter and
menu pages for EDIT mode. The EDIT MODE
LED shows in EDIT mode, the TEMPO LED in
TEMPO mode.
11
Depending on which mode you have selected
with the SELECT button (|}), these two
buttons can be used to enter the tempo or to
scroll through the EDIT mode menu pages.
12
Display: Depending on the function used, the
display reads the tempo, menu numbers or
parameter values.
5
METRONOME: Is used to start/stop the
metronome click.
6
TRACK 1: Selects track 1 for playback or
recording. The REC LED lights up when the
track has been activated for recording. The PLAY
LED lights up when the track has been set for
playback and already contains musical data.
7
TRACK 2: Selects track 2 for playback or
recording. The REC LED lights up when the
track has been activated for recording. The PLAY
LED lights up when the track has been set for
playback and already contains musical data.
13
-/NO, +/YES: Is used to raise/lower the
parameter values shown in the display.
Additionally, the +/YES button executes
certain EDIT functions.
14
SOUND SELECT: These 14 buttons are used for
sound selection. In DEMO mode they are used
to select individual sound color demos.
9
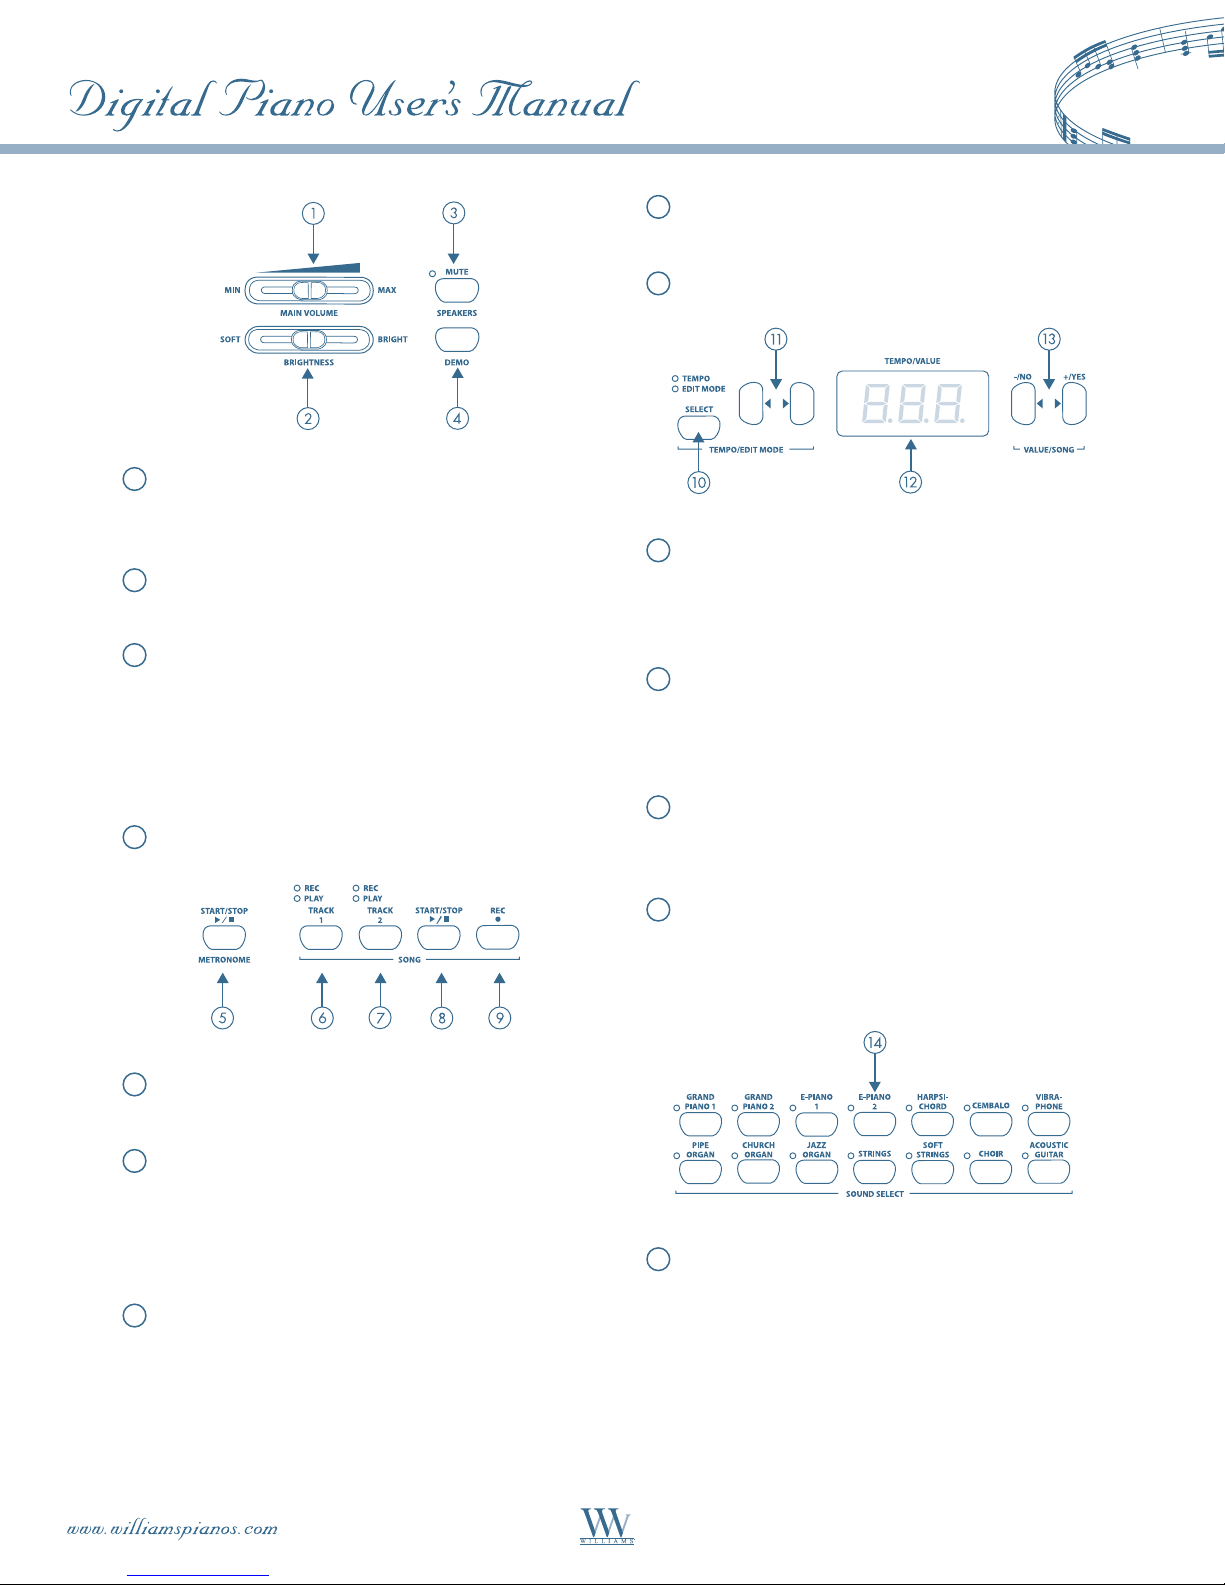
15
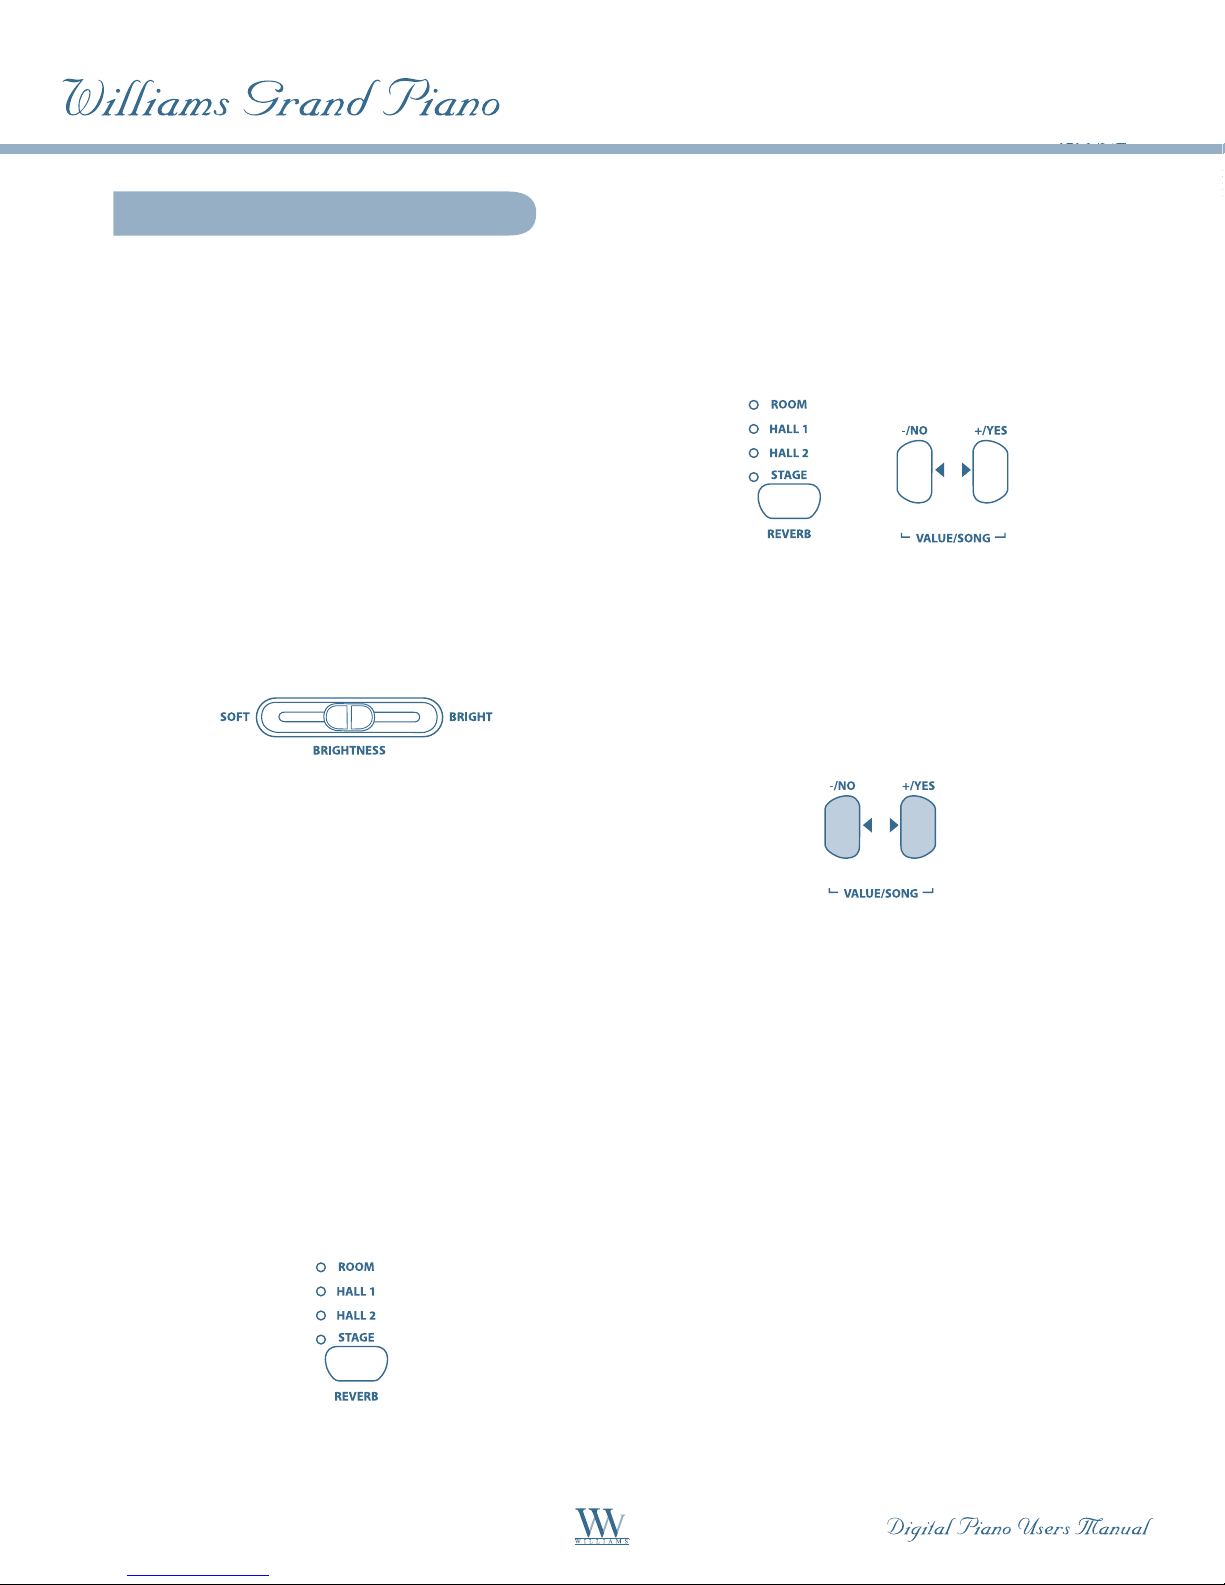
REVERB: Selects one of four room effects
(ROOM, HALL 1, HALL 2, STAGE) for the
selected sound. An LED shows which effect is
currently active. If no LED lights up, no room
effect is active.
16
EFFECT: Is used to select one of four
modulation effects (CHORUS, FLANGER,
TREMOLO, DELAY) for the selected sound.
An LED shows which effect is currently active.
If no LED lights up, no modulation effect
is active.
17
VELOCITY: Is used to set the key velocity to
SOFT, MEDIUM or HARD. An LED shows
which setting is currently active. If no LED
lights up, no key velocity has been selected
and playing a key always triggers a fixed volume
level, irrespective of how hard you play the key.
1
RCA output jacks: The RCA jacks solely provide
the sounds of the piano, but at a fixed volume
level. Signals fed in via the LINE IN jack are not
present here.
2
1/4" output jacks: Use the 1/4" jacks to route
the sounds of devices connected to the LINE
IN jacks to the output of the piano. The level of
the output signal depends on the position of the
MAIN VOLUME control.
3
LINE IN: Is used to connect feeding devices such
as CD players, sound cards or drum machines.
The connected signal sources are routed to the
LINE OUT 1/4" jacks and to the built-in
loudspeakers.
4
MIDI: The three MIDI jacks enable you to
connect external MIDI devices such as
synthesizers, sequencers, etc. to the piano.
MIDI data controlling the sound generator of
the piano are received at the MIDI IN jack.
MIDI data generated by the keyboard, pedals
and some control elements of the piano are sent
from the MIDI OUT jack.
18
TRANSPOSE : Is used for setting keyboard/
pitch transposition.
Connectors
The connectors on the piano are located on the
underside of the playing console (center).
Connectors of the Williams Grand piano
Use the THRU jack to route MIDI data
received at the MIDI IN to the MIDI OUT
without changing them. This jack can be
used to connect additional MIDI devices.
Foot Pedals
The piano has three pedals similar to those found on
acoustic grand pianos.
1
Soft/Piano pedal: Is used for passages to be
played very softly.
10
2
Sostenuto pedal: Is used to sustain tones that
have been played before the pedal is pressed, but
have not yet decayed. All tones played after the
pedal is pressed decay normally.
3
Damper/Forte pedal: Is used to sustain tones
already played but not yet decayed. All tones
played after the pedal is pressed will also
be sustained.
Power Supply
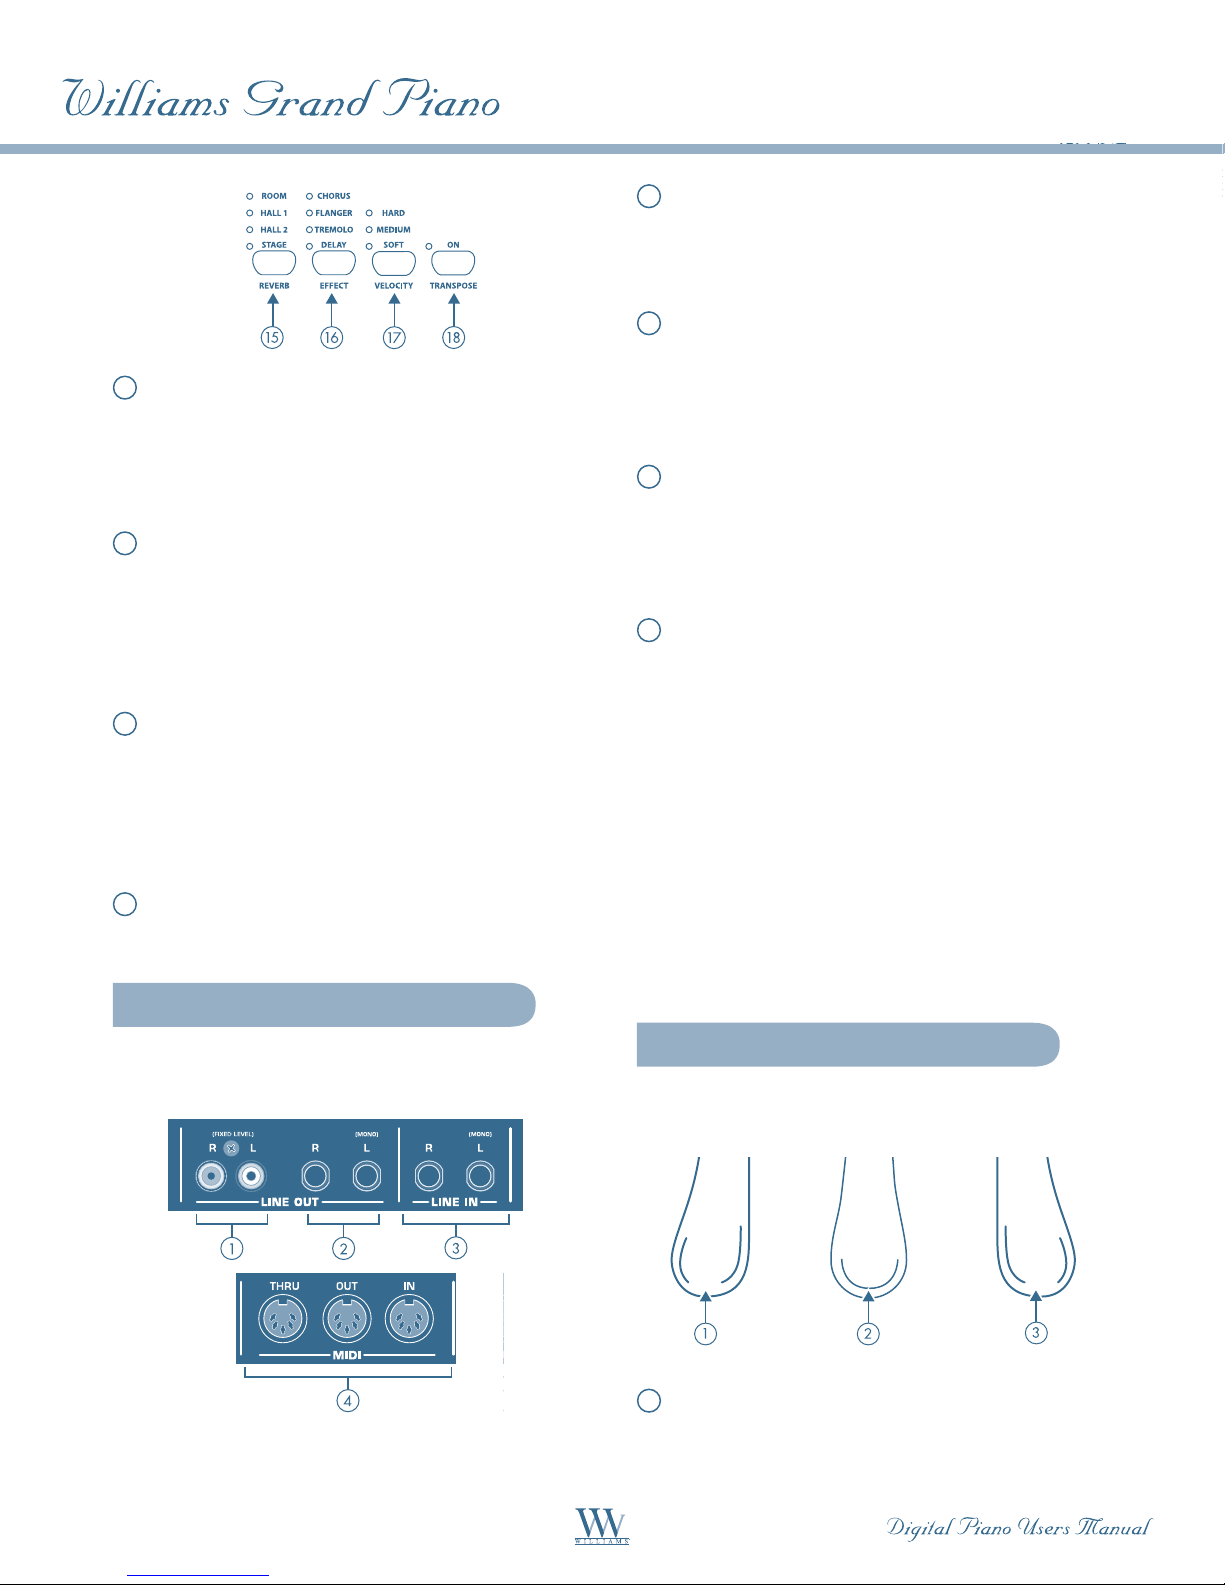
1
POWER: Switches the piano on and off.
Merely switching the unit off does not mean •
that it is fully disconnected from the mains.
If you do not plan to use your piano for a
prolonged period of time, please disconnect
it from the mains by unplugging the power
cable from the wall outlet.
Use these jacks to connect your headphones. It is not
possible to control the volume separately.
BASIC OPERATION
The following chapters describe some further basic
functions which you can use in addition to those
already explained.
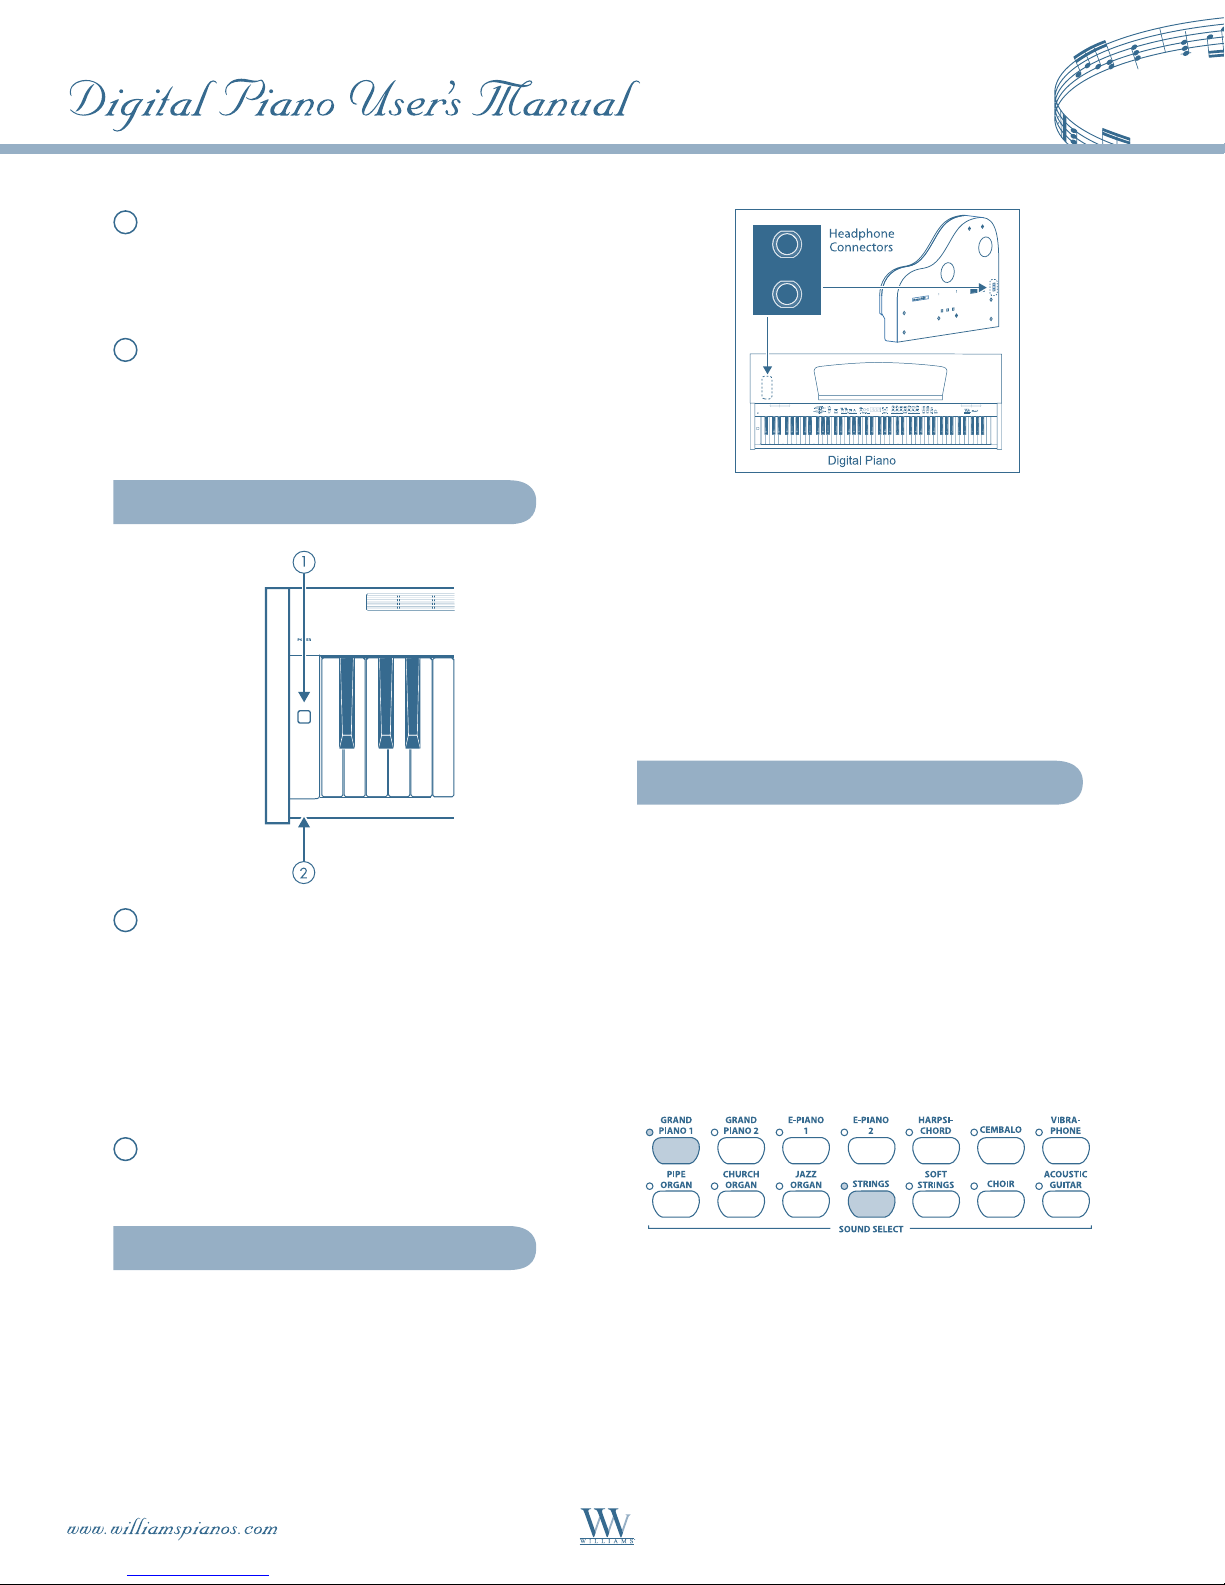
Using Two Sounds (Layer Mode)
Instead of a single sound you can also play two
sounds simultaneously on the piano. These sounds
are layered and can be played together over the
entire keyboard.
In the SOUND SELECT section, simultaneously press
the buttons of the sounds to be layered.
The LEDs above the buttons light up to show that the
associated sounds have been selected.
2
LED: Lights up when the piano is ready
for operation.
Headphone Connectors
The headphone connectors are located on the
underside of the playing console (front left behind
the left leg).
In our example, the sounds "GRAND PIANO 1" and
"STRINGS" are layered.
To quit layer mode, press any button in the •
SOUND SELECT section. This will also select
one single sound again.
11
Changing the Sound Character
If none of the four LEDs lights up, the room •
effect is disabled.
You can change the sound character by using a
room and a modulation effect as well as a
brightness equalizer.
Brightness Equalizer
Use the brightness equalizer to change the sound
character and make it softer or more brilliant.
Change the sound character with the BRIGHTNESS
control as follows:
Move the control to the left (SOFT) for a softer •
sound that is darker in tone.
Move the control to the right (BRIGHT) for a •
more brilliant sound.
Room Effects
Keep the REVERB button pressed while
adjusting the original vs. effect signal ratio in
the VALUE/SONG section using the -/NO
and +/YES buttons.
+
The display reads:
0 ... 20: Effect intensity
(0 = no effect, 20 = maximum effect)
If you want to restore the default settings, keep
the REVERB button pressed, then press -/NO and
+/YES simultaneously.
The piano provides room effects simulating four
reverbs of different room sizes. When you select a
sound, the piano also selects an appropriate effect.
If required, however, you can always select any other
effect. The following reverb room simulations are
available:
ROOM: Simulates a small room.
HALL 1: Simulates a small concert hall.
HALL 2: Simulates a large concert hall.
STAGE: Simulates a typical stage ambience.
Keep pressing the REVERB button until the
effect of your choice has been selected.
The active effect is shown by an LED lighting up next
to the effect name.
Modulation Effects
The piano provides a modulation effect featuring
four different types of effect. When you select a sound,
the piano automatically adds an appropriate effect for
some of the sounds. If required, however, you can
always select any other effect. The following
modulation effects are available:
CHORUS: Chorus effect."Widens" the sound.
FLANGER: Time-shifted layering of sounds.
Produces a "floating" sound.
TREMOLO: Rapid, constantly repeated changes in
the volume of the sound.
DELAY: Echo effect. Produces time-shifted
repetitions of the sound that decay
over time.
Keep pressing the EFFECT button until the
effect of your choice has been selected.
12
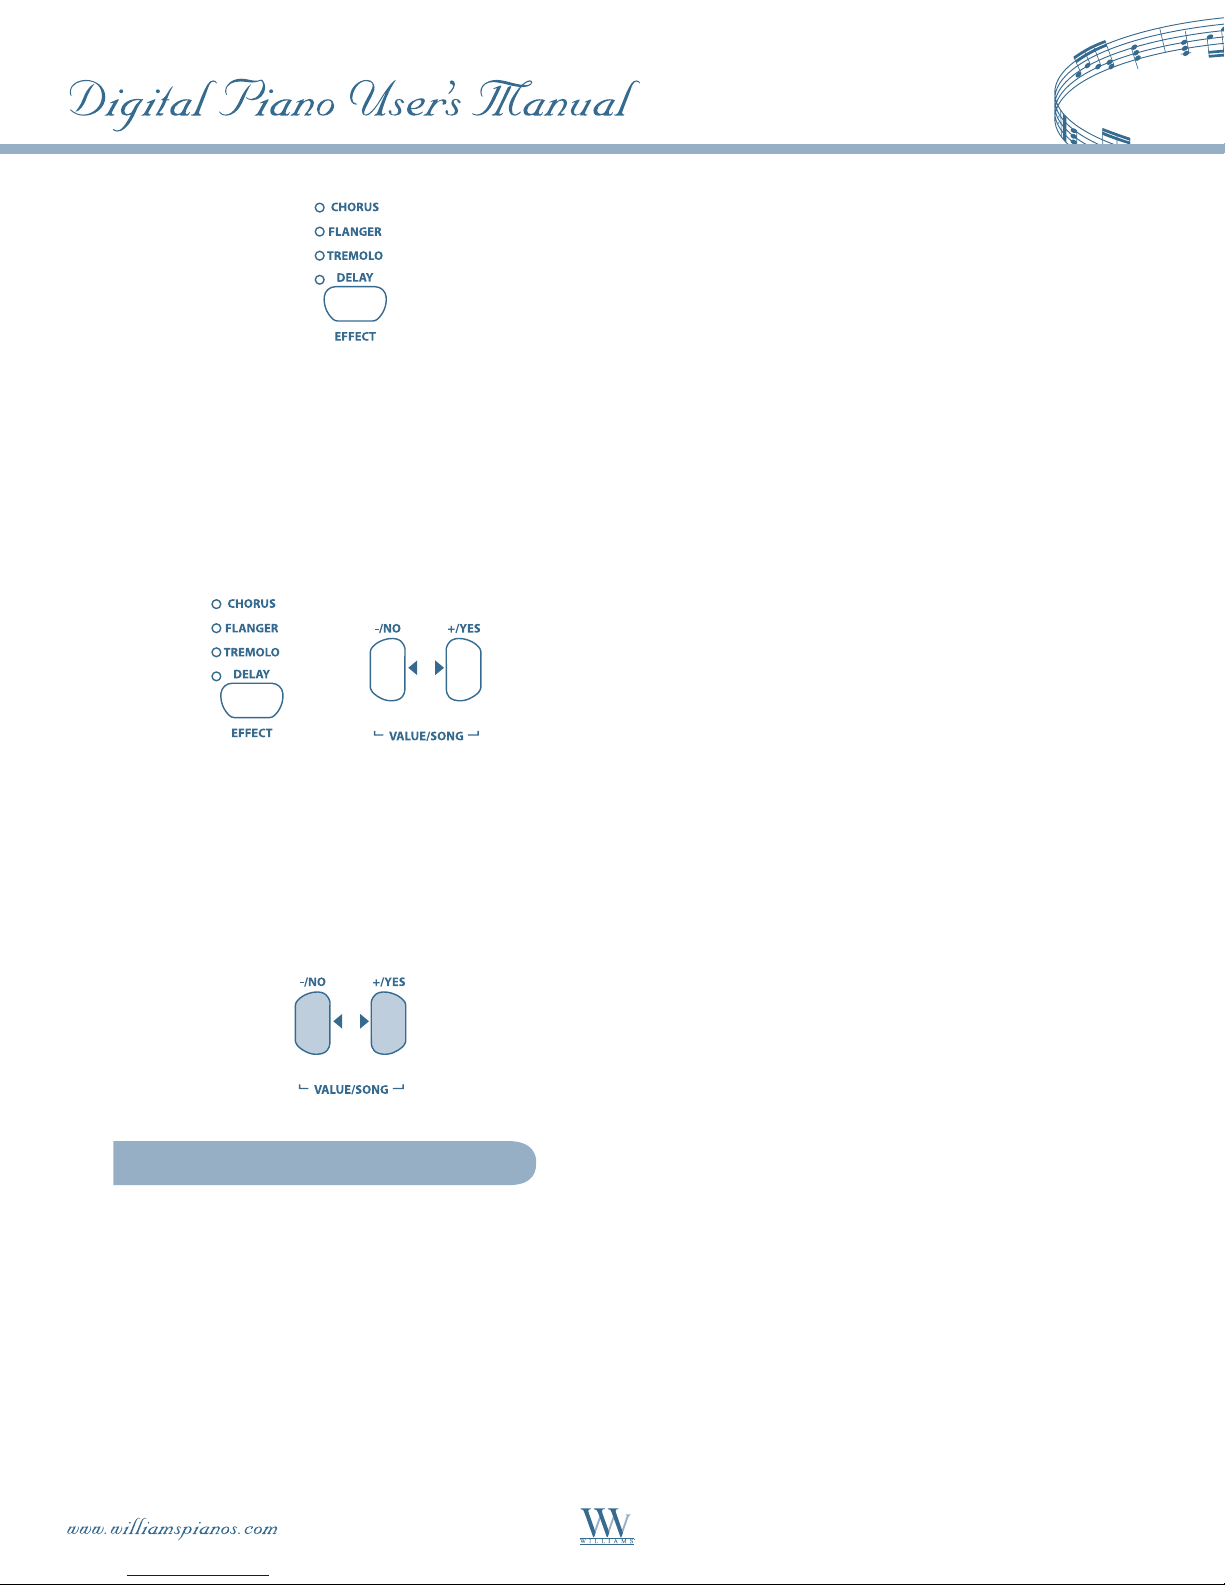
The selected effect is shown by an LED lighting up
next to the effect name.
defined pitch. When you let go of the key, a damper
felt falls down on the strings to stop them from
vibrating any longer. As a result, the tone decays
quickly. However, if the key is held down, the tone is
sustained for a while before it decays completely. In
this case, the tone decays only after a certain time.
This decay characteristic can be influenced using the
three foot pedals.
If none of the four LEDs lights up, the •
modulation effect is disabled.
Keep the EFFECT button pressed while adjusting the
original vs. effect signal ratio in the VALUE/SONG
section using the -/NO and +/YES buttons.
+
The display reads:
0 ... 20: Effect intensity
(0 = no effect, 20 = maximum effect)
If you want to restore the default settings, keep the
EFFECT button pressed, then press -/NO and +/YES
simultaneously.
Using the Pedals
The piano is equipped with three foot pedals
performing the same functions as the pedals on an
acoustic grand piano. Normally, the pedals are used in
accordance with the instructions given in the music,
where they are marked by special symbols. It is useful
to know how sound is produced on an acoustic piano
to better understand how the pedals work.
When you strike a key, a hammer hits several strings
for each note; the strings produce a tone with a
Soft/piano pedal (left):• The soft pedal
produces a soft and intimate sound. Use
this pedal for particularly soft musical
passages (pianissimo).
On an acoustic piano this soft sound results
from a smaller distance between hammer
and strings. On a grand piano, however, the
position of the hammer changes, so that the
hammer does not hit all strings.
Press the pedal to soften all tones played afterwards
with the pedal down.
Let go of the pedal for normal playing.
You can adjust the effect of the soft pedal (see p. 24).
Sostenuto pedal (middle):• Use the sostenuto
pedal to sustain individual tones. The notes
already played – as long as they have not yet
decayed – will be sustained as soon as you
press the pedal. All notes played subsequently
will be dampened as described above. This
allows you to play and sustain a certain note
using the pedal, while all subsequent tones will
be played in a staccato (detached) manner.
When you sustain single notes on an acoustic
piano using the sostenuto pedal, the damper
felts of the notes already played do not
dampen the strings when you release the
keys, but are held in their position.
Play the notes to be sustained.
Press the pedal to sustain the tones you just played.
Play the next notes. These are played with
normal decay.
13
Release the pedal for normal playing.
Damper/Forte pedal (right):• The damper
pedal allows you to sustain the notes already
played (and held) plus all subsequent notes,
without having to hold the keys down. The
damper pedal is often used to achieve a richer
sound. This is the pedal that is used most
often. You can also use it very subtly, for
example, by holding it down only half-way.
On the acoustic piano notes are sustained
by keeping all the damper felts in their
raised position even after releasing the
keys. This allows the notes played to
decay quite naturally.
Play the notes to be sustained.
Press the pedal to sustain the notes you just played
plus all subsequent notes.
If required, the SPEAKERS button allows you to
switch the built-in loudspeakers of the piano on
or off.
The built-in loudspeakers of the piano are •
switched off as soon as you connect a pair
of headphones; the MUTE LED above the
SPEAKERS button lights up.
When you disconnect your headphone •
from the headphones jack, the built-in
loudspeakers of the piano are switched
on again and the MUTE LED above the
SPEAKERS button goes out.
ADVANCED OPERATION
Release the pedal for normal playing.
Using Headphones
The piano is equipped with two headphone jacks
located on the underside of the playing console
(front left). Headphones are ideal for practicing
without disturbing others. The second headphone
jack allows another person, for example a music
teacher, to listen as well so that piano lessons can
also be held using headphones.
Use the MAIN VOLUME control to turn the volume
down (move the slide control to the left half of its
control range).
Connect your headphones to a free headphone jack
on the underside of the playing console.
The following chapters provide information on
advanced operating functions of the piano.
Using Edit Mode
Many advanced operating functions of the piano
are available in EDIT mode. The following sections
describe how to adjust these functions in EDIT mode.
Whenever you are prompted to enter •
EDIT mode, please follow the step-by-step
instructions given below to select a function
and adjust its parameters.
Keep pressing the SELECT button in the TEMPO/
EDIT MODE section until the EDIT MODE LED
lights up.
While playing adjust the volume as desired using the
MAIN VOLUME control.
14
Scroll through the functions using the (|})
buttons, until the appropriate function (e.g. E1)
has been selected.
 Loading...