

Williamson-Thermoflo PMP210 Instructions Manual
Centennial Oil Furnaces
PMP210 Multi-position (High-Boy / Horizontal)
KEEP THESE INSTRUCTIONS
WITH FURNACE FOR FUTURE
REFERENCE.
Hazards that will cause severe personal injury,
death or substantial property damage.
Hazards that can cause severe personal injury,
death or substantial property damage.
INSTALLER – Read all instructions before
installing. Read page 2 first. Follow all instructions
in proper order to prevent personal injury or death.
• Consider ducting, fuel supply, venting and
installation when determining furnace location.
• Any claims for damage or shortage in shipment
must be filed immediately against the transportation
company by the consignee.
Do not store or use gasoline or other flammable
liquids or vapors near this furnace or any other
appliance.
Ventilate house while operating furnace for the first
time. Odors may be emitted for a brief period.
Do not alter this furnace in any way. The
manufacturer will not be liable for any damage
resulting from changes made in the field to the
furnace or its components or from improper
installation. Failure to comply could result in severe
personal injury, death or substantial property
damage.
Hazard definitions
Furnace Manual
Contents Page
Read this first!............................................................................2
1. Prepare furnace location............................................................ 3
2. Prepare furnace and place in position.......................................6
3. Connect supply and return ducts............................................... 8
4. Venting..................................................................................... 11
5. Connect fuel oil piping ............................................................. 12
6. Wire furnace and burner.......................................................... 14
7. Start-up.................................................................................... 17
8. Checkout procedure ................................................................ 17
9. Troubleshooting....................................................................... 19
10. Service and maintenance ........................................................ 20
11. Components and replacement parts........................................ 25
12. Dimensions and ratings ........................................................... 28
13. Owner’s information .................................................................30
Hazards that will or can cause minor personal
injury or property damage.
Special instructions on installation, operation or
maintenance that are important but not related to
personal injury or property damage.
USER – Please read the following. Failure to
comply could result in severe personal injury, death
or substantial property damage.
• This manual is for use only by your qualified
heating installer / service technician.
• Have the furnace serviced by a qualified service
technician, at least annually.
This manual must only be used by a qualified
heating installer / service technician. Furnace and
burner must be installed and serviced only by a
qualified heating installer / service technician.
Failure to comply could result in severe personal
injury, death or substantial property damage.
When calling or writing about the furnace – Please
indicate furnace model number and serial number
from the rating label. You may list the serial number
and model number in the space provided on the
“Installation and service certificate” found on
page 18.
670-000-003/1010
READ THIS FIRST!
Service and maintenance –
1. To avoid electric shock, disconnect electrical supply before
performing maintenance.
2. To avoid severe burns, allow furnace to cool before performing
maintenance.
3. Perform service and maintenance as described in this manual
and the burner manual.
4. Do not attempt to make adjustments to the blower or motor while
the furnace is in operation. Disconnect power to the furnace and
be sure all parts have stopped moving before attempting
adjustments or maintenance.
5. The burner must be set up and adjusted using combustion test
instruments. Visual examination of the flame alone cannot
determine combustion performance.
Operation -
6. Do not use the furnace as a construction heater.
7. Do not operate any furnace if the heat exchanger is damaged,
corroded or pitted. Toxic flue products could enter the air stream.
8. Do not jumper, attempt to by-pass or override any limit control.
9. Do not block flow of combustion or ventilation air to furnace. Do
not block or obstruct the air openings in the furnace casing.
10. Do not store or use combustible materials, gasoline, or other
flammable liquids or vapors in the furnace area.
11. Do not operate the furnace if the furnace area will be exposed to
air contaminants as described on page 5.
12. Should overheating occur, do not turn off or disconnect electrical
supply to furnace. Instead, shut off the oil supply at a location
external to the appliance, if possible.
13. Do not use this furnace if any part has been under water. Call a
qualified service technician immediately, to inspect the furnace
and to replace any part of the furnace, control system or burner
that was submerged in water.
14. Do not operate furnace if temperature rise through heat
exchanger exceeds 85
Installation –
1. Be sure to level the furnace, using a spirit level at the front and
one side. If the furnace is not level, oil can drip into the
combustion chamber after burner cycling and contaminate the
heat exchanger and the burner head.
2. Make sure all legs are in contact with the floor to distribute the
load and prevent the possibility of undue noise or vibration.
Failure to adhere to the guidelines below can result in severe personal injury, death or substantial property damage.
o
F.
Apply the following suggestions to prevent unsatisfactory operation of the furnace.
15. Inspect, clean and replace (if necessary) return air filter regularly.
16. Do not obstruct return air grills or supply air outlets.
17. Supply only #2 fuel oil to the burner. Never attempt to use gas oline ,
a mixture of gasoline and oil, waste fuel, refuse or any other
substance in the burner of furnace.
Installation -
18. Do not block flow of combustion or ventilation air to furnace. Do
not block or obstruct the air openings in the furnace casing.
19. Connect furnace only to a functional vent system in good
condition. Place the furnace to allow proper venting, with the
shortest possible venting and minimum number or elbows.
20. Always connect and seal a return air duct to the furnace unless
the furnace is located in a large space, such as an unpartitioned
basement. Route the return air duct to an adjacent room if no
return air manifold is used.
21. Install furnace maintaining minimum clearances for service and
separation from combustible surfaces described in this manual.
22. Install, start-up, service and maintain burner per instructions in
this manual and the burner manual.
23. Verify burner is properly inserted through the combustion
chamber opening.
24. Furnace must be installed so that burner and control system
components are protected from dripping, spraying water or rain
during operation or service.
25. If installing an air conditioning evaporator coil, install the coil
downstream of, or in parallel with, the furnace to prevent
condensation on the furnace heat exchanger. If the coil is in
parallel, provide means to prevent flow of chilled air into the
furnace, including an interlock to prevent simultaneous operation
of heating and air conditioning.
3. Avoid locating return grills in rooms that may contain undesirable
odors.
4. Never locate a return air grill closer than approximately 20 feet
from the furnace.
5. Locate the furnac e near the center of the supply and return duct
systems.
6. Always check the size of the ducts on a replacement installation,
particularly if adding air conditioning.
2 670-000-003/1010
PMP Oil Furnaces – Furnace Manual
1 Prepare furnace location
Pre-installation checklist
Verify code compliance
Local, state, provincial, and national codes, laws, regulations
and ordinances
NFPA-31, Installation of Oil-Burning Equipment
National Electrical Code
All local codes and/or regulations take precedence over the
instructions in this manual and should be followed accordingly.
PMP furnaces, their burners and controls met safe
lighting and other performance criteria when furnace
underwent tests specified in Underwriters Laboratories
Standard UL727.
Check location and furnace specifications
Furnace heating capacity
Space is large enough to provide required clearances
Verify the installation will meet the requirements of this manual:
Clearances (page 3)
Combustion/ventilation air openings (page 4)
Supply air duct (page 8)
Return air duct (page 8)
Vent system (page 11)
Fuel oil piping (page 12 plus burner manual)
Electrical connection (page 14)
Clearances
Minimum clearance to combustible materials
1. Install the furnace, ductwork and vent such that no combustible
surface is closer than listed in Table 1.
Table 1 Minimum clearances
Location Application Upflow Horizontal
Sides
Back Furnace 2" 2"
Top
Bottom Furnace (combustible floor) 0" 0"
Flue pipe
Front Furnace 24" 24"
Flue pipe clearances must take precedence over
jacket clearances (listed below).
Minimum clearances – combustion materials (inch)
Furnace 2" 2"
Supply plenum within 6 ft of furnace 1" 1"
Furnace or plenum 1" 2"
Horizontal warm air duct within 6' of furnace 1" 3"
Horizontally or below flue pipe 18" 18"
Vertically above flue pipe 18" 18"
Service accessibility clearances
1. Provide no less than the minimum clearances given in Table 1 to
ensure the furnace can be properly operated, serviced and
maintained.
2. Always apply whichever clearance is LARGER – combustible
construction or service accessibility.
Flooring and foundation
Flooring
If a combustible floor is used follow these instructions:
Upflow installation on combustible floor
PMP furnaces are approved for installation on combustible flooring,
but must never be installed on carpeting.
Horizontal installation on combustible floor
Always keep the minimum installation clearances of 2 inches
between the combustible floor and the furnace sides.
Do not install furnace on carpeting even if foundation
is used. Fire can result, causing severe personal
injury, death or substantial property damage.
Foundation
1. Provide a solid brick or minimum 2-inch thick concrete
foundation pad if any of the following is true:
• The floor can become flooded.
• The furnace mounting area is not level.
Residential garage installations
Take the following special precautions when installing the furnace in
a residential garage. Il the furnace is located in a residential garage:
• Mount the furnace a minimum of 18 inches above the floor
of the garage.
• Locate or protect the furnace so it cannot be damaged by a
moving vehicle.
670-000-003/1010 3

PMP Oil Furnaces – Furnace Manual
1 Prepare furnace location (continued)
Air for combustion and ventilation
Adequate combustion and ventilation air ensures
proper combustion and reduces risk of severe
personal injury or death from possible flue gas
leakage and carbon monoxide emissions.
Do not install exhaust fan in furnace room.
Consider building construction
Older buildings with single-pane windows, minimal weather-stripping
and no vapor barrier often provide enough natural infiltration and
ventilation without dedicated openings.
New construction or remodeled buildings are most often built tighter.
Windows and doors are weather-stripped, vapor barriers are used
and openings in walls are caulked. As a result, such tight
construction is unlikely to allow proper natural air infiltration and
ventilation.
For buildings with tight construction, provide openings directly to
outside or to a ventilated crawl space or attic. Size the openings to
the same specifications as for the furnace location per the following
paragraphs.
Follow state, provincial or local codes when sizing adequate
combustion and ventilation air openings. In absence of codes, use
the following guidelines when furnace is in a confined room (defined
by NFPA 31 as less than 7,200 cubic feet per 1 GPH input of all
appliances in area. A room 8 ft. high x 30.0 ft. x 30.0 ft. is 7,200 cu.
ft.).
Provide two permanent openings
Openings locations
One within 12 inches of ceiling, one within 12 inches of floor.
Minimum height or length dimension of each rectangular opening
should be at least 3 inches.
When inside air is used
Each opening must freely connect with areas having adequate
infiltration from outside. Each opening should be at least 140 sq. in.
per 1 GPH input (1 sq. in. per 1,000 BTU input) of all fuel-burning
appliances plus requirements for any equipment that can pull air
from room (including clothes dryer and fireplace).
When outside air is used
Connect each opening directly, by ducts to the outdoors, or to crawl
or attic space that freely connects with outdoors. Size per below:
• Through outside wall or vertical ducts – at least 35 sq. in. per 1
• Through horizontal ducts – at least 70 sq. in. per 1 GPH furnace
• Where ducts are used, they should have the same cross-
Basement installations
When the furnace is located in an unconfined space, such as an
unpartitioned basement, adequate air should normally be available
without additional openings. An unconfined space is defined as one
having no less than 50 cubic feet room volume per 1,000 BTU/h
input of all appliances in the space.
If the house is of tight construction, provide air openings to the
basement directly from outside or from a ventilated attic. Size the
openings as described above under “When outside air is used”.
Closet installations – special NOTICE
Openings in closet doors
Provide TWO openings – one within 6 inches of top of closet door,
the other within 6 inches of the bottom of closet door.
EACH opening must be at least 24 inches wide by 12 inches high.
GPH input (1 sq. in. per 4,000 BTU input) of all fuel burning
appliances plus requirements for any equipment that can pull air
from room (including clothes dryer and fireplace).
input (1 sq. in. per 2,000 BTU input) of all fuel-burning
appliances plus requirements for any equipment that can pull air
from room (including clothes dryer and fireplace).
sectional area as free area of openings to which they connect.
Compensate for louver, grille or screen blockage when
calculating free air openings. Refer to the manufacturers’
instructions for details. If unknown, use:
• Wood louvers, which provide 20-25% free air.
• Metal louvers or grilles, which provide 60-75% free air.
Lock louvers in open position or interlock with equipment to
prove open before furnace operation.
Advise homeowner that the openings to the closet
must never be obstructed or blocked in any way.
Failure to provide adequate air for combustion and
ventilation could result in severe personal injury,
death or substantial property damage.
4 670-000-003/1010

PMP Oil Furnaces – Furnace Manual
1 Prepare furnace location (continued)
Air contamination
Please review the following information on potential combustion air
contamination problems.
See Table 2 for products and areas that may cause contaminated
combustion air.
To prevent the potential of severe personal injury or
death, check for products and/or areas listed below
before installing the furnace. If any of these
contaminants are found:
• Remove contaminants permanently.
-OR-
• Isolate furnace and provide outside combustion air. See
national, provincial or local codes for further information.
Table 2 Corrosive contaminants and likely locations
Products to avoid
Spray cans containing chloro/fluorocarbons
Permanent wave solutions
Chlorinated waxes/cleaners
Chlorine-based swimming pool chemicals
Calcium chloride used for thawing
Sodium chloride used for water softening
Refrigerant leaks
Paint varnish remov ers
Hydrochloric acid/muriatic acid
Cements and glues
Antistatic fabric softeners used in clothes dryers
Chlorine-type bleaches, detergents, and cleaning solvents found in
household laundry rooms
Adhesives used to fasten building products and other similar
products
Areas likely to have contaminants
Dry cleaning/laundry areas and establishments
Swimming pools
Metal fabrication plants
Beauty shops
Refrigeration repair shops
Photo processing plants
Auto body shops
Plastic manufacturing plants
Furniture refinishing areas and establishments
New building construction
Remodeling areas
Garages with workshops
670-000-003/1010 5

PMP Oil Furnaces – Furnace Manual
2 Prepare furnace and place in position
Inspect & prepare furnace
Remove furnace from carton
Remove the furnace from its shipping carton and inspect thoroughly.
Remove access panels to inspect the furnace interior.
Immediately file a claim with the transportation
company if you discover concealed damage.
Do not install or attempt to operate the furnace if the
heat exchanger, burner or controls have been
damaged. Immediately contact your furnace
supplier. Operating a damaged furnace could result
in severe personal injury, death or substantial
property damage.
Prepare burner
Remove the burner from its shipping carton and inspect thoroughly.
Read the burner manual and follow instructions for preparing and
installing the burner.
Install the correct nozzle for the required firing rate, using the burner
manual and the information on Section 12, p. 28 and 29 of this
manual. Follow the burner manual instructions for nozzle installation.
Verify the correct settings of electrodes after nozzle and burner oil
tube assembly are in place.
Openings in walls, floor & ceiling
General
Ensure that the finished door opening to the furnace room is large
enough to install and remove the furnace, water heater or any other
appliances in the room.
Before placing furnace in a closet or small room, cut all openings
required in floor, ceiling or walls for ducts and vent. This will simplify
the work and prevent construction dust from entering the furnace
heat exchanger.
Verify that all clearances to combustible construction
and for service accessibility will be met. The vent
must be no closer than 18 inches to any combustible
surface unless a type “L” double-wall vent pipe is
used or the vent is constructed per the requirements
of the NFPA 31. Provide a ventilated thimble per all
applicable codes where vent pipe passes through a
wall or ceiling. Failure to comply could result in
severe personal injury, death or substantial property
damage.
Duct locations and sizing
Verify that the size of the supply and return duct system is sufficient
for the application. The pressure drop through the duct system must
not exceed 0.2” water column.
Openings in walls, floor…
The total drop through the duct system and air conditioning
condensing coil (if used) must not exceed 0.5” water column.
See suggested duct sizing in this manual. For more detailed sizing
information, refer to ACCA Manual D.
Return air duct
You must install a return air duct, sealed to the furnace, even if no
return manifold is used. The only exception is when the furnace is
located in a large unpartitioned room, such as a basement. (A room
whose volume is at least 50 cubic feet per 1,000 BTU/h input of all
appliances in the room is considered large). For large rooms, return
air may be taken directly at the furnace, without a return air duct. No
return air register should be within 20 feet of the furnace.
Cut the required opening for the return air duct in the wall (or floor or
ceiling) of the room before placing the furnace.
Install filter
Install return air filter of the size listed on Section 12, p. 28.
The filter rack is provided with the unit. You will need to attach the
filter rack to the furnace for all Model PMP.
Verify that the filter will be easily accessible for
removal after the furnace is in place.
When installing on combustible flooring, provide supply plenum
size and floor opening as given in Table 3.
(continued)
Install furnace and burner
Place furnace
Place the furnace in the desired location. Measure clearances and
verify per page 3 of this manual.
Use a spirit level on the front and one side of the furnace. Make sure
each of the legs is firmly in contact with the floor.
Inspect combustion chamber
Inspect the combustion chamber. Verify it is in good condition and
correctly in position inside the heat exchanger. The burner opening
in the chamber must align with the burner heat exchanger opening.
The combustion chamber is constructed of ceramic
fiber materials See the WARNING information on
page 21 of this manual. Comply with these
instructions when handling any ceramic fiber or
fiberglass materials. Failure to adhere to these
guidelines could result in severe personal injury or
death.
Insert burner
Following the burner manual instructions, install the burner and its
gasket in the burner opening.
Secure the burner in place with the four nuts and washers provided.
Wire and pipe fuel to the burner as per the burner manual and this
manual.
Burner orientation
For a horizontal installation, you must turn the burner 90o, to the
normal position. Always keep the motor shaft in horizontal position.
6 670-000-003/1010
PMP Oil Furnaces – Furnace Manual
2 Prepare furnace and place in position(continued)
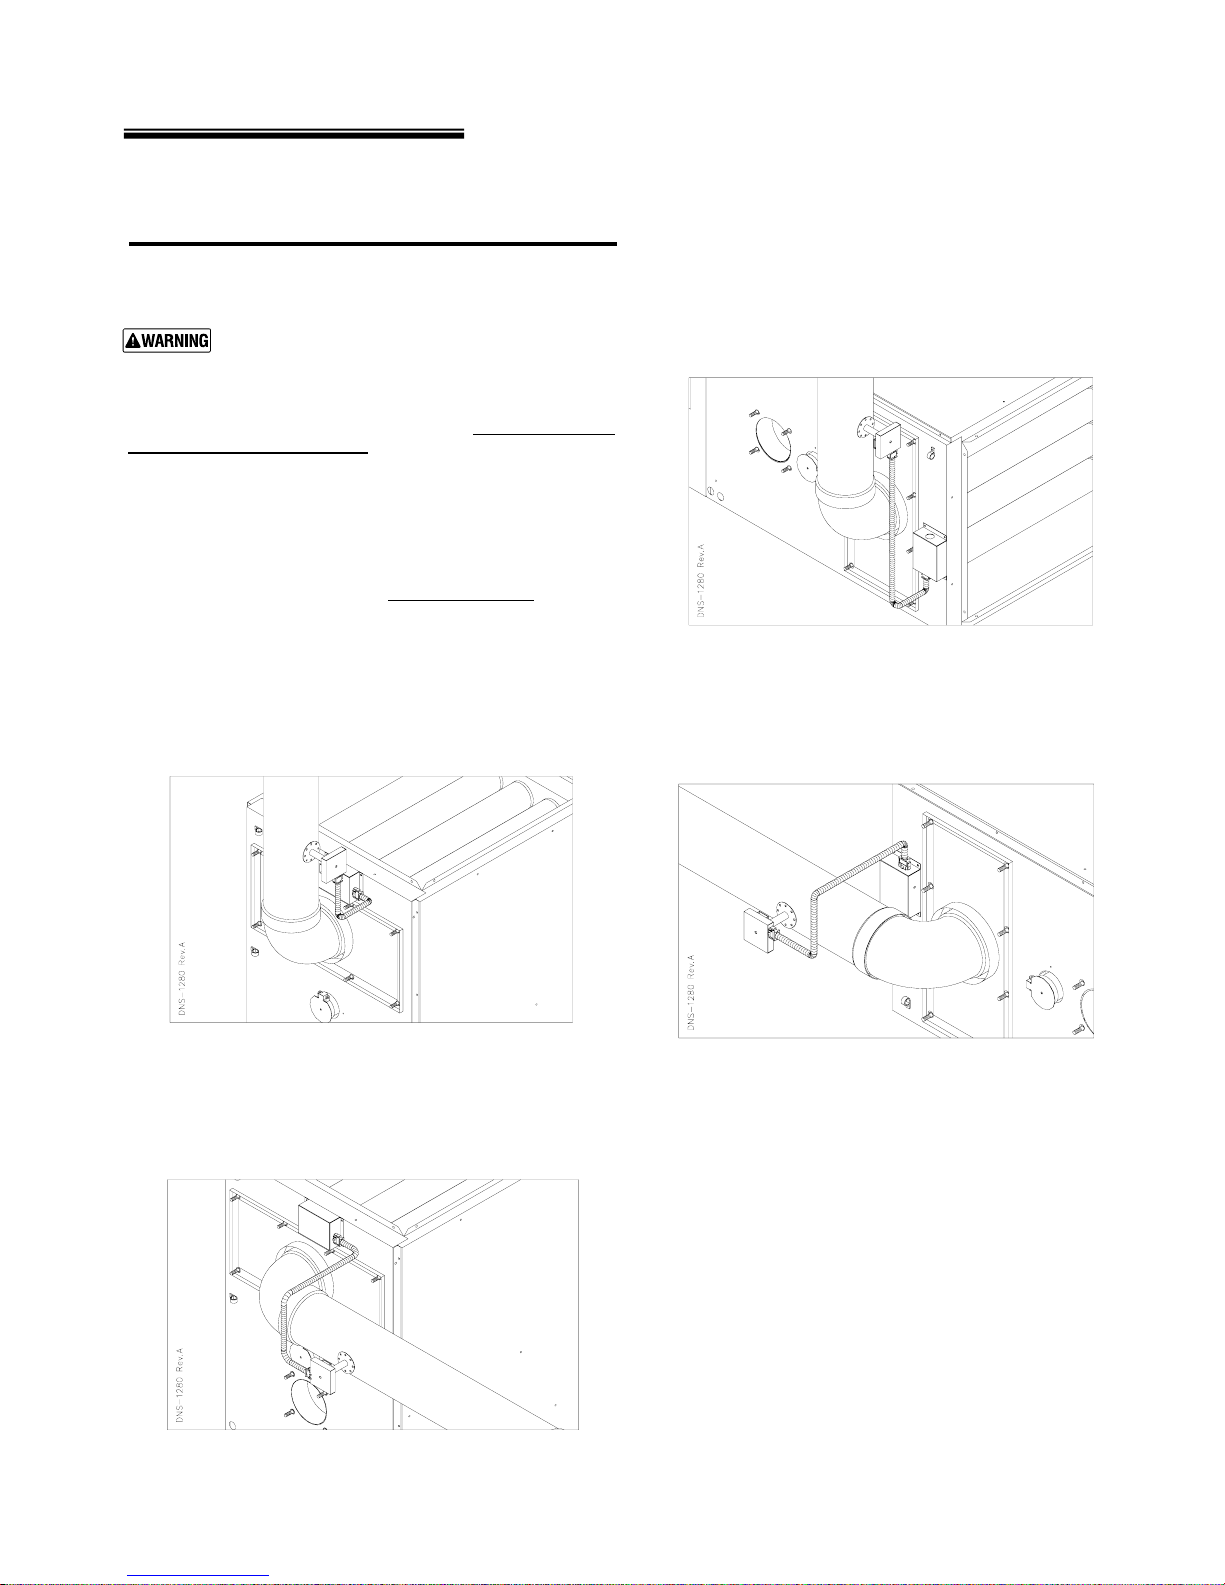
Blocked Vent Shut-Off (BVSO) for chimney venting
(OPTIONAL)
It is imperative that this device be installed by a
qualified agency.
This device is designed to detect the insufficient evacuation of
combustion gases in the event of a vent blockage. In such a case
the thermal switch will shut down the oil burner. The device will then
need to be re-armed MANUALLY.
In the event that the BVSO repetitively shuts down the oil burner, a
qualified technician needs to evaluate the cause of this shut down.
Refer to the figures 5 & 6 at section 6, Wiring Diagrams and detailed
instructions supplied with the BVSO for the installation and wiring
procedures.
It is also essential that the BVSO be maintained annually.
For more details refer to the instructions supplied with the device
itself, as well as the Maintenance Section.
Figure 1
Blocked Vent Shutt-Off device wiring
Installation : Upflow with Vertical exhaust
(Optional)
Figure 3
Blocked Vent Shutt-Off device wiring
Installation : Horizontal left/right with Vertical
exhaust
(Optional)
Figure 4
Blocked Vent Shutt-Off device wiring
Installation : Horizontal left/right with horizontal
exhaust
(Optional)
Figure 2
Blocked Vent Shutt-Off device wiring
Installation : Upflow with Horizontal exhaust
(Optional)
670-000-003/1010 7
PMP Oil Furnaces – Furnace Manual
3 Connect supply and return ducts
Duct sizing
Determine airflow CFM
The temperature rise through the furnace must not exceed 85oF and
should be at least 55
assume a temperature rise of 70
The noticeable temperature change for cooling would be
approximately 27-30
approximately 18-21
To calculate the noticeable heat temperature change (ΔT), you can
use the formula:
ΔT = BTU/h/(1.1 x CFM) Eq. 3-1
To calculate airflow when you know temperature change (ΔT), you
can use:
CFM = BTU/h/(1.1 x ΔT) Eq. 3-2
You can estimate airflow using the following rules of thumb:
Heating: 14 CFM per 1,000 BTU/h output Eq. 3-3
Cooling: 400 CFM per ton air conditioning Eq. 3-4
Determine the required airflow based on whichever is larger –
heating mode or air conditioning mode.
Examples:
1. What would the temperature rise be for a 100,000 BTU/h output
furnace with an airflow rate of 1,200 CFM?
Use Equation 3-1 since you know CFM and BTU/h:
ΔT = 100,000/(1.1 x 1200) = 76
• The temperature rise would be 76
• If the air enters the furnace at 70
furnace at 70
2. What would the airflow be to obtain a 70
120,000 BTU/h output furnace?
Use equation 3-2 since you know ΔT and BTU/h:
CFM = 120,000/(1.1 x 70) = 1,558 CFM
• The airflow would have to be 1,558 CFM to obtain a
temperature rise of 70
3. Estimate the required airflow for a 75,000 BTU/h output furnace
installed with a 2-ton air conditioning evaporator coil.
Heating mode airflow (use Equation 3-3):
CFM = 75 x 14 = 1,050 CFM
Cooling mode airflow (use Equation 3-4):
CFM = 2 x 400 = 800 CFM
• The larger number is 1,050 CFM (heating), so the duct
system should be sized for 1,050 CFM.
• The supply duct would need to be 16” round or a rectangular
equivalent such as 8” x 25” or 12” x 16”, using Table 4,
page 9.
4. Estimate the required airflow for the same furnace installed with
a 4-ton air conditioning evaporator coil.
Heating mode airflow is still 1,050 CFM.
Cooling mode airflow (use Equation 3-4):
CFM = 4 x 400 = 1,600 CFM
• The larger number is 1,600 CFM (cooling), so the duct
system should be sized for 1,600 CFM.
• The supply duct would need to be 18” round or a rectangular
equivalent such as 8” x 36” or 12” x 21”, using Table 4,
page 9.
o
F for comfort. When calculating airflow,
o
F.
o
F. Actual temperature change will be
o
F due to humidity of the air.
o
F
o
F.
o
o
F + 76o F = 146o F.
o
F.
F, it would leave the
o
F rise through a
Always check the size of existing ducts, particularly
if you are adding air conditioning. The air pressure
loss through the cooling evaporator coil reduces
available airflow. If the ducts are too small as well,
the system may not work satisfactorily on either
heating or cooling.
Determine duct dimensions
Table 4, page 9, and Table 5, page 10, provide typical round and
rectangular duct sizes for rectangular and flat oval galvanized ducts.
Do not apply these tables to size ductwork if the total equivalent
length of the duct exceeds approximately 100 feet. For longer
systems or for duct board, fiberglass-lined or flexible duct sizing, use
the ACCA Manual D or the ACCA duct sizing slide rule. These
tables are based on pressure loss of approximately 0.10” water
column per 100 feet equivalent length of duct.
Use Table 3 below to size or check sizing of take-offs to supply
registers or return grills.
Verify the size and type of registers, diffusers and grills from the
manufacturer’s ratings. Do not exceed the recommended flow rate.
The pressure drop allowance for each should not exceed
approximately 0.05” water column.
Install a return air filter, sized per specifications in Section 12, p. 28.
Use only a return air filter mounted to the furnace. Do not add
additional filters unless the duct system is carefully sized to allow for
the additional pressure drop.
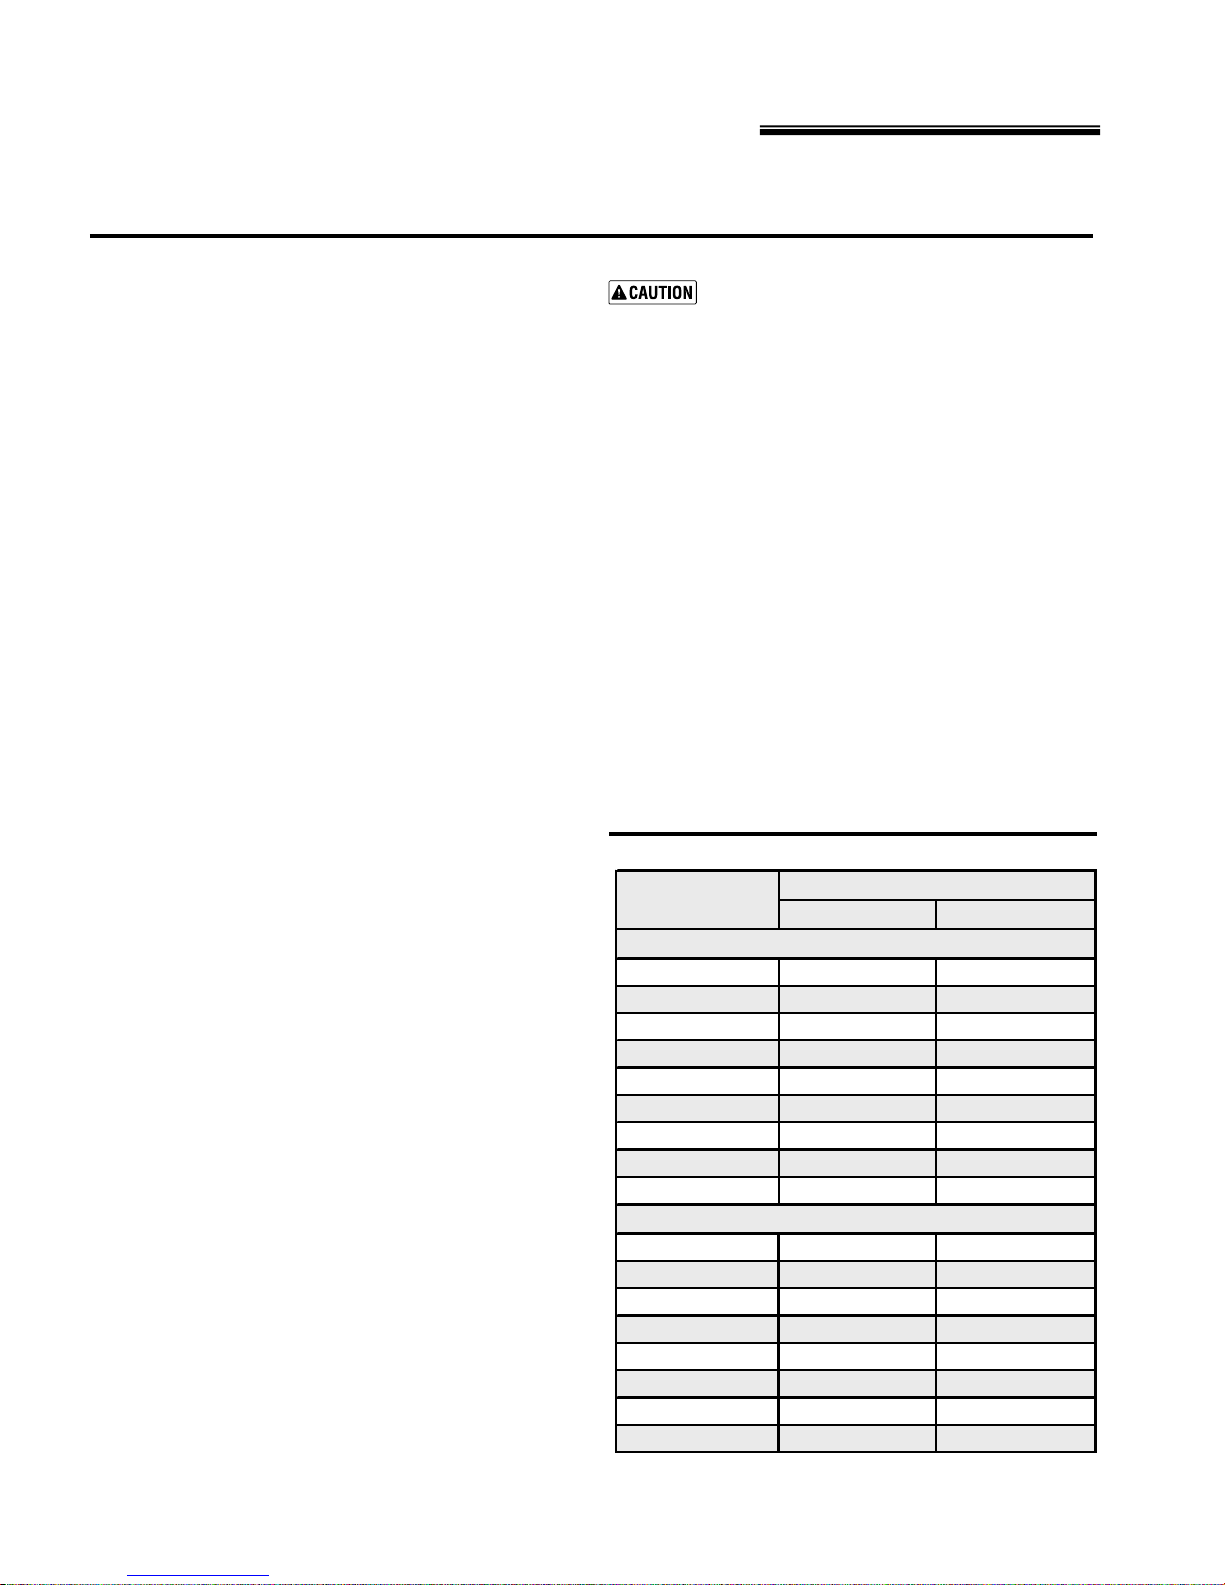
Table 3 Suggested maximum flow to runouts
TAKE-OFF SIZE
(Inches)
Sheet metal or ductboard
5 Round 60 45
6 Round 100 75
7 Round 140 110
8 Round 210 160
3 ¼ x 8 Stack 70 55
3 ¼ x 10 Stack 100 75
3 ¼ x 14 Stack 140 110
2 ¼ x 12 Stack 70 55
2 ¼ x 14 Stack 90 70
Flexible duct (keep bends to minimum)
6 Round 55 40
8 Round 120 90
10 Round 200 160
12 Round 320 250
14 Round 480 375
16 Round 660 530
18 Round 880 680
20 Round 1200 900
SUPPLY RETURN
CFM
8 670-000-003/1010
PMP Oil Furnaces – Furnace Manual
3 Connect supply and return ducts (continued)
Duct sizing (continued)
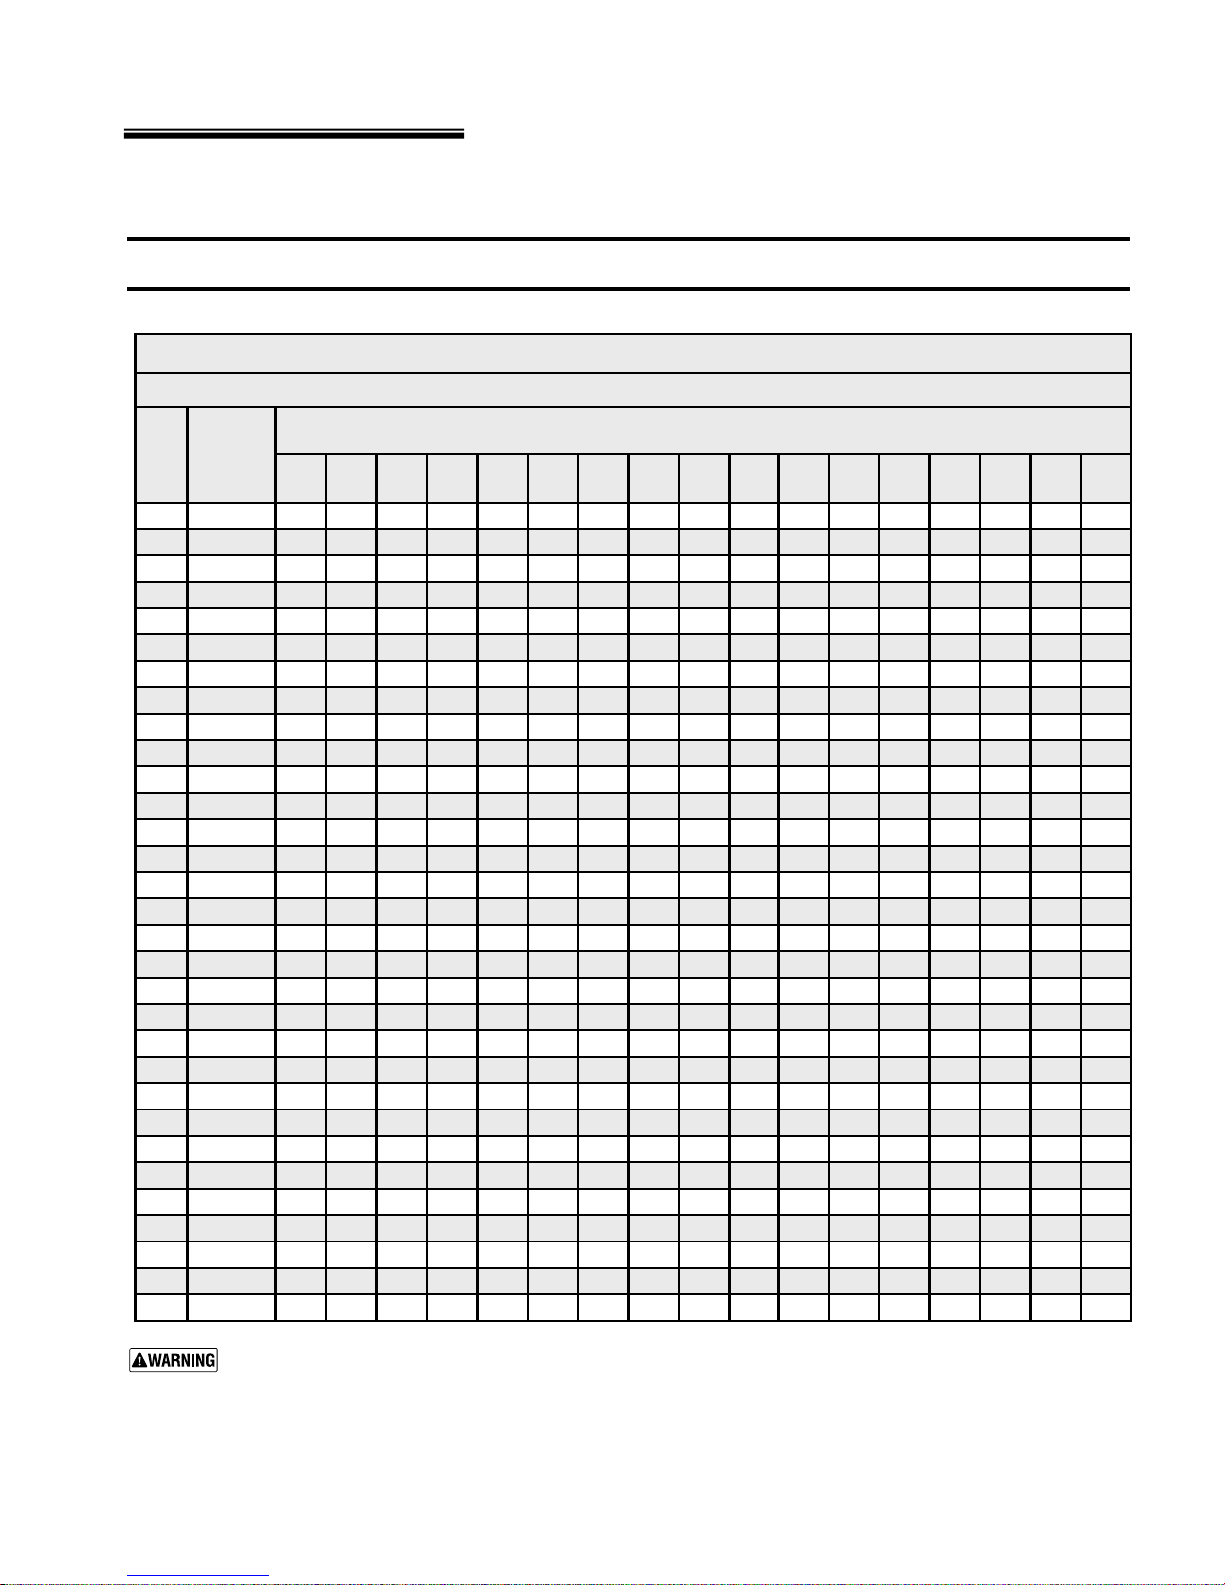
Table 4 Typical duct sizing for systems not over 100 feet equivalent length – round or rectangular galvanized
(For approximat ely 0.10 inch w.c. in a typi c al residential installation of galvanized metal duct)
Round
CFM
duct
diameter4567891012141618202224262830
(inches)xxxxxxxxxxxxxxxxx
45
65
100
150
200
250
300
400
500
600
700
800
900
1000
1100
1200
1300
1400
1500
1600
1700
1800
1900
2000
2200
2400
2600
2800
3000
3500
4000
Rectangular duct equival ent sizes
Mini mum widt h
4
5
6
7
8
9
9
10
12
12
12
14
14
16
16
16
16
18
18
18
18
18
20
20
20
22
22
22
22
24
26
444-------------6544-------------
865544- - - -------1297655544- ------141198766544------181310987665544----20151210987665544---2619151311109876655544322318151312119876665555
3828221815131210987766655
46322520171514111098777666
523628231917151311109887766
5841312521191714121110988777
6445342823201815131110998877
72493830252219161412111099887
-5441332724211715131211109988
- 58443529252218161412111010 9 9 8
- 6347383127241916141312111010 9 9
- 685140342925201715141212111010 9
- 725443363027211816141312111110 9
- - 58 45 38 32 28 23 19 17 15 14 13 12 11 10 10
- - 61 48 40 34 29 24 20 17 16 14 13 12 11 11 10
- - 64 51 42 35 31 25 21 18 16 15 14 13 12 11 11
- - 68 53 44 37 32 26 22 19 17 15 14 13 12 12 11
- - - 5948413528232018161514131212
- - - 6452443830252219171615141312
- - - 6956474132272321191716151413
- - - - 61 51 44 34 29 25 22 20 18 17 15 15 14
- - - - 65 54 47 37 30 26 23 21 19 17 16 15 14
-----635442342926232119181716
-----726147393329262321201918
Do not apply this table for duct systems over approximately 100 equivalent feet length. For longer systems or systems using
other duct materials, refer to ACCA Manual D. Incorrectly sizing duct systems can result in unsafe or uncomfortable
operation.
(inches)
Typical duct sizing
for duct heights
(inches)
of :
670-000-003/1010 9
PMP Oil Furnaces – Furnace Manual
3 Connect supply and return ducts (continued)
Duct sizing
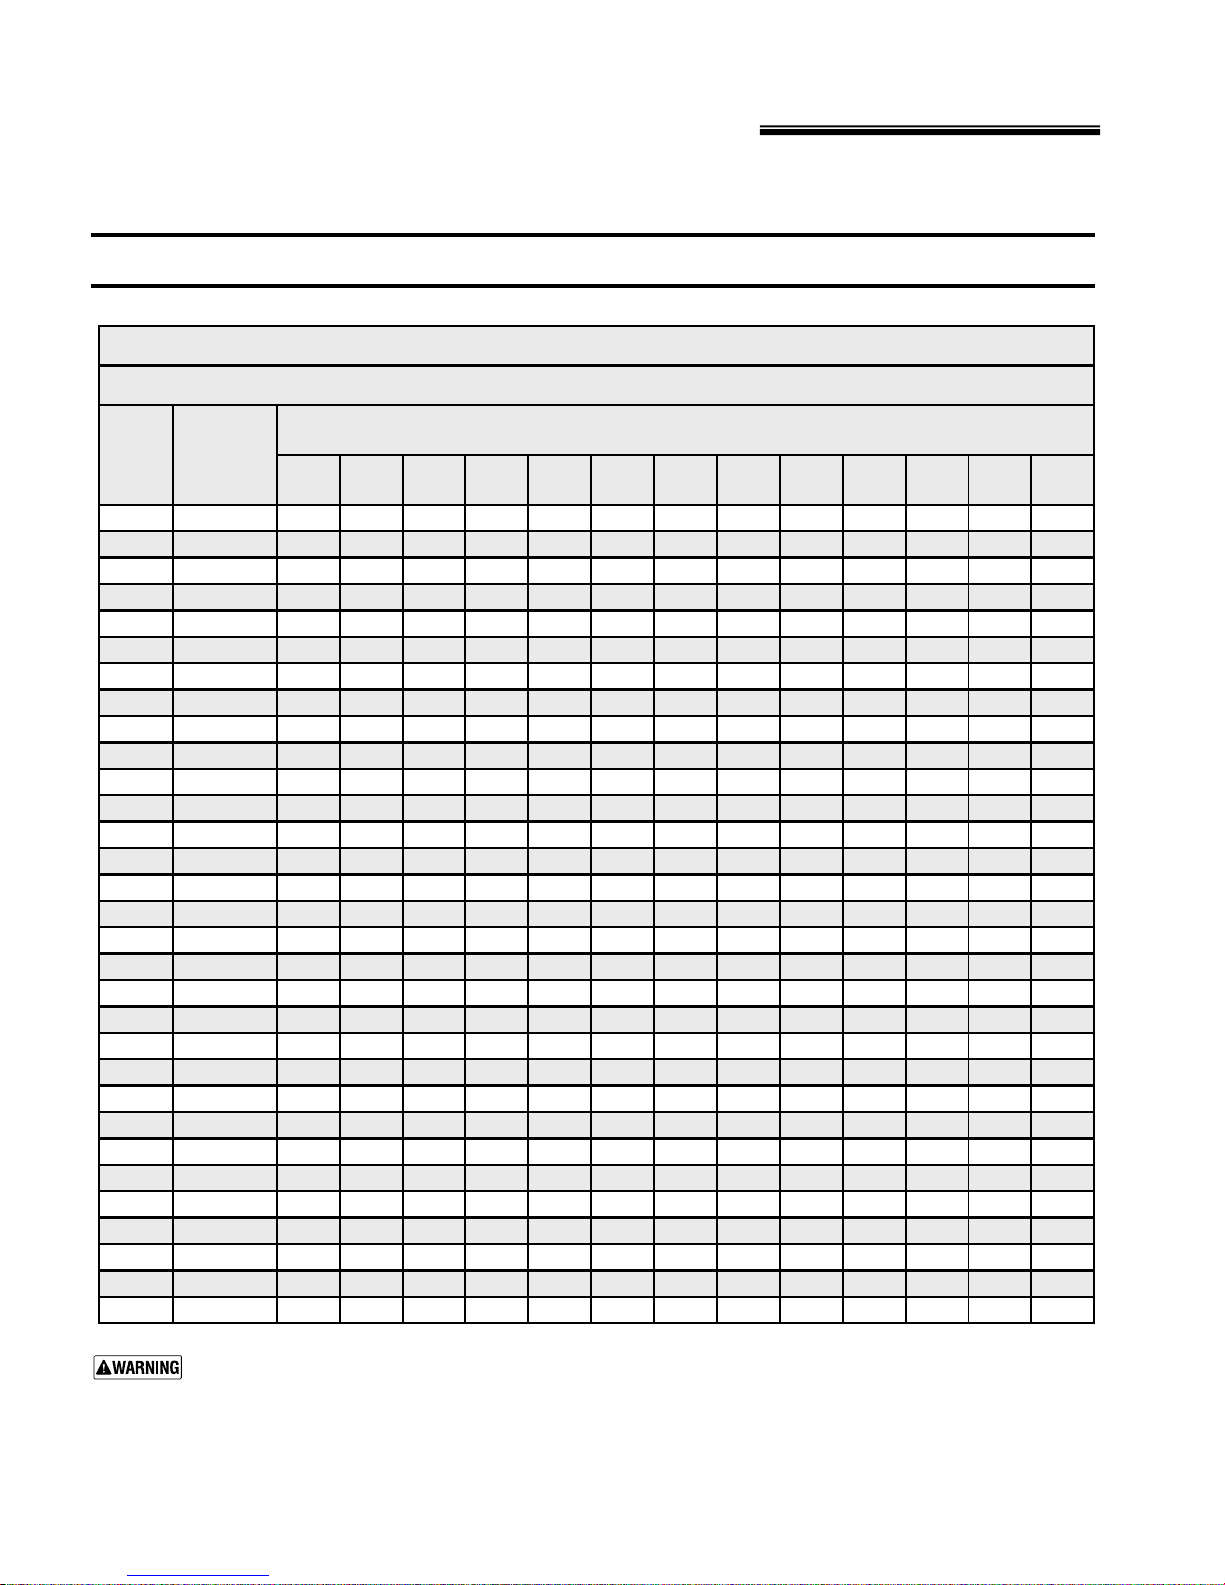
Table 5 Typical duct sizing for systems not over 100 feet equivalent length – round or flat oval galvanized
CFM
45
65
100
150
200
250
300
400
500
600
700
800
900
1000
1100
1200
1300
1400
1500
1600
1700
1800
1900
2000
2200
2400
2600
2800
3000
3500
4000
(continued)
Typical duct sizing
(For approximately 0.10 inch w.c . in a typic al residential installation of galvanized metal duct)
Round
duct
diameter3456789101214161820
(inches)xxxxxxxxxxxxx
10
12
12
12
14
14
16
16
16
16
18
18
18
18
18
20
20
20
22
22
22
22
24
26
Do not apply this table for duct systems over approximately 100 equivalent feet length. For longer systems or systems using
other duct materials, refer to ACCA Manual D. Incorrectly sizing duct systems can result in unsafe or uncomfortable
operation.
Flat oval duct equi val ent sizes
Mini mum width
4
5
6
7
8
9
9
65-----------
86----------1187---------161198--------211511108-------26181411109------302016131110------40262016141211-----4932241916141312----5938282219161513----694432252118161513----
-5036292420181614----
-5641322622201815----
- 634535292422191715 - - -
- 694938312623211816 - - -
- 755341332825221917 - - -
- - 58 44 36 30 26 24 20 18 - - -
- - 62 47 38 32 28 25 21 18 17 - -
- - 66 50 41 34 30 26 22 19 18 - -
- - 71 54 43 36 31 28 23 20 18 - -
- - - 57 46 38 33 29 24 21 19 - -
- - - 60 48 40 35 31 25 22 20 - -
- - - 63 50 42 36 32 26 23 21 19 -
- - - 67 53 44 38 33 27 24 21 20 -
- - - 73 58 48 41 36 29 25 23 21 -
----635244393227242221
----685648423429252322
-----6051443630272423
-----6454473832282624
------63544336322826
------71614840353129
(inches)
for duct heights
(inches)
of :
10 670-000-003/1010
 Loading...