

Wilks USA TX850 Owner's Manual
TX850
GASOLINE PRESSURE WASHER
OWNERS MANUAL

.....GENERAL SAFTEY INSTRUCTION
MAINTENANCE AND STORAGE
.....GETTING TO KNOW YOUR PRESSURE WASHER
ASSEMBLY
.....ASSEMBLY
.....OPERATION AND USE
.....MAINTENANCE
.....TROUBLESHOOTING
.....PUMP PARTS
.....DECLARATION OF CONFORMITY
1
2
3
4-8
9-11
12
13
14
CONTENTS

• Read instructions carefully before operating this product.
• This product is for outdoor use only.
• Keep bystanders away.
• Ensure the engine is stopped before carrying out adjustments,
cleaning or maintenance.
• Always turn off the engine and water supply when finished.
• Do not use the product if found to be damaged.
• Only use with detergents specified by the manufacturer. Other chemicals may compromise
the safety of the product.
• Do not direct the pressure jet towards mechanical parts containing lubricant grease.
• Clean vehicle tyres from a minimum of 50cm to avoid damage by the high pressure jet.
• Do not point high pressure jets at people, animals, live electrical parts or the product itself.
• Do not use accessories such as hoses and connections that are not advised by the manufacturer.
• Engage the high pressure safety catch located on the gun when not in use.
• Do not step/stand on the high pressure hose.
• Ensure the nozzle is securely attached before using the Product. High pressure can cause it to
be fired from the lance with considerable force, and could cause injury damage.
• Be ready for the kick-back force and the sudden torque on the spray assembly
when operating the trigger.
• A high pressure jet can remove paint and other surface finish. It can also damage
tarmac and grouting.
• Switch off completely when not attended.
• The hose is designed specifically for operation with high pressures. Take care to avoid damage
that may prevent correct operation of the product.
• This product is not to be used by children or anyone with reduced capabilities.
• Always completely unwind the high pressure hose prior to operation.
• Make sure that the machine is switched off before unwinding the high pressure hose,
and take care not to pull the machine over.
• Do not let the high pressure hose contact the hot engine exhaust.
• Do not use this product indoors.
• Keep exhaust emissions away from air intakes.
• Do not attempt to modify the product in any way.
• To ensure good operating condition arrange regular servicing from an authorising agent.
• Only use replacement parts supplied by the manufacturer
• Only use fresh,clean and good quality fuel in the engine.
• Never operate the engine without oil.
• Never refuel in close proximity to naked flames, sparks or other sources of ignition e.g. cigarettes.
• Do not refuel when the engine is hot.
• Wipe up and correctly dispose of any fuel spillage immediately with a suitable medium.
• Move away from the refuelling areas before restarting the engine. Store fuel for short periods
only in a suitable container away from heat and direct sunlight.
• Clean the pressure washer thoroughly after each use.
• Regularly check external nuts and fixings to ensure vibration caused by normal use has not
begun loosen them. Remove the spark plug ignition lead from the back of the spark plug and
position the lead to avoid accidental reconnection.
• Store the machine in a secure dry location out of reach of children.
• Empty the fuel tank before storage.
• Make sure to empty the product of any excess water from your hose or gun.
• Do not leave product in freezing conditions as this will cause damage the product.
GENERAL SAFETY INSTRUCTIONS
MAINTENANCE AND STORAGE
1
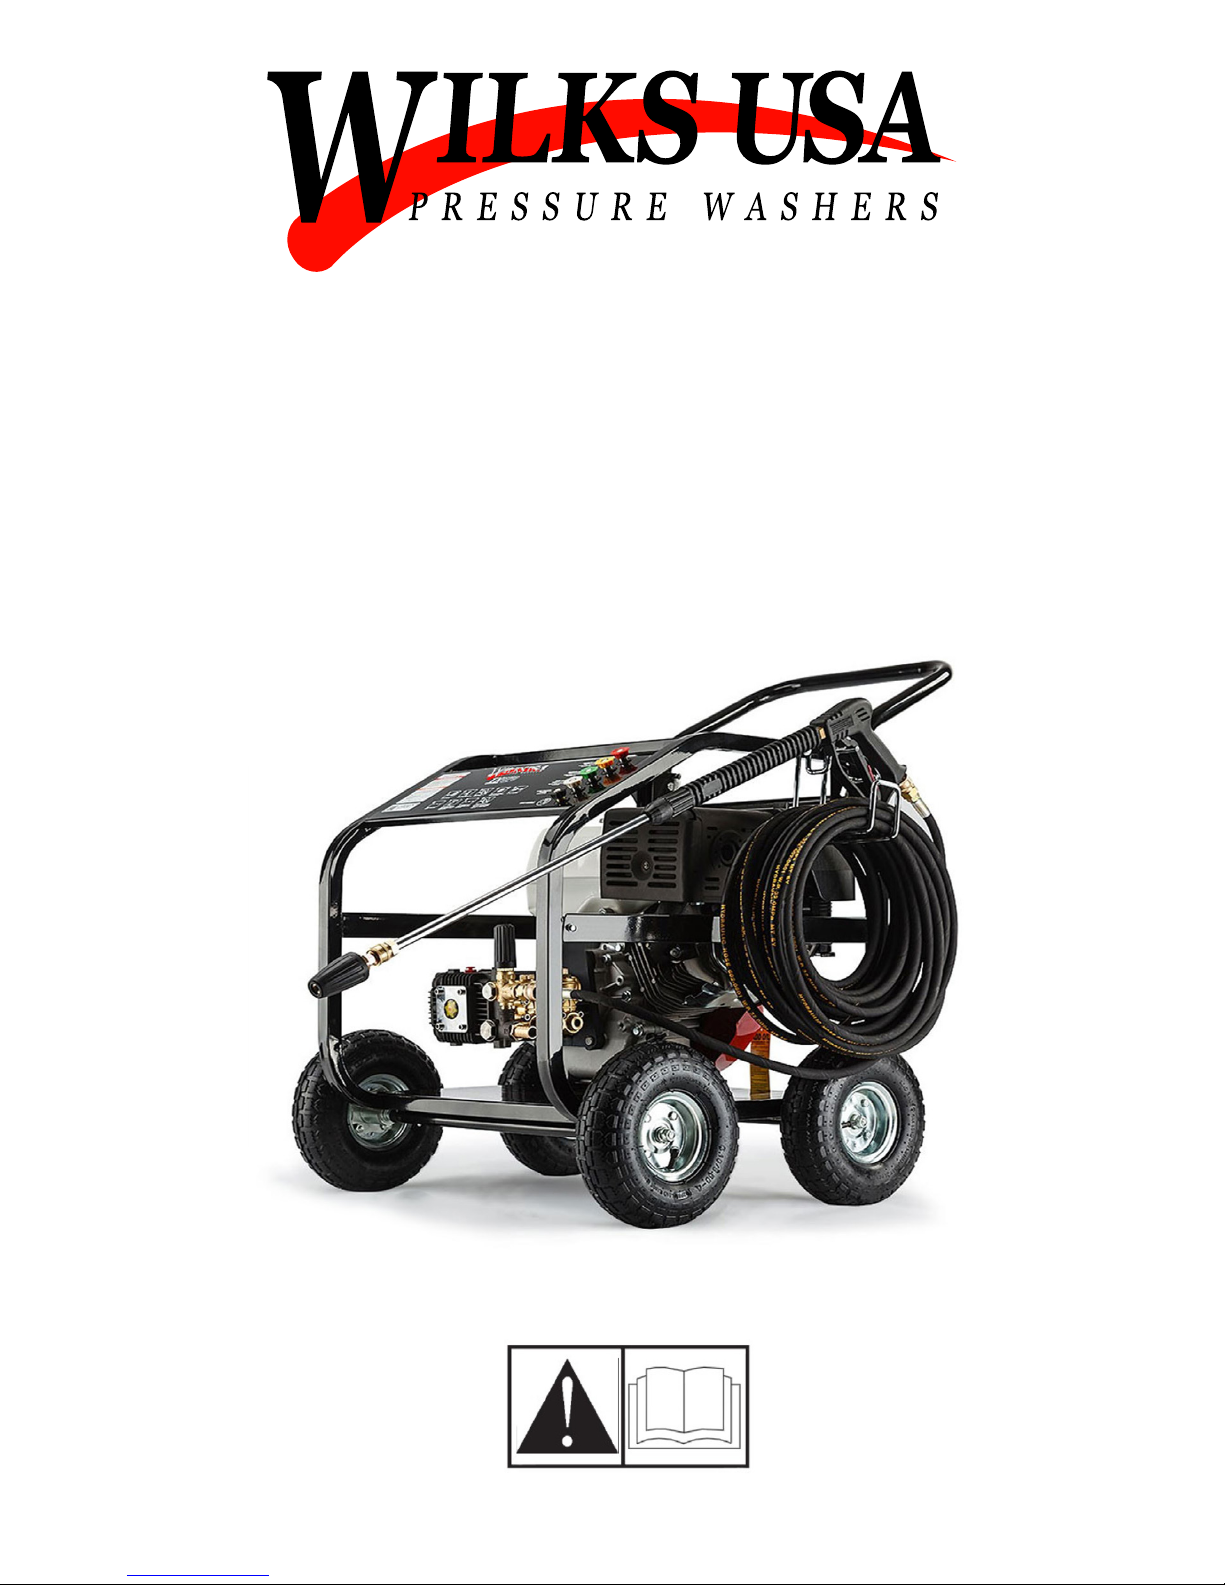
GETTING TO KNOW YOUR PETROL PRESSURE WASHER
ASSEMBLY
• 7. Lower Frame
• 8. Engine Recoil Starter
• 9.Exhaust Silencer
(HOT do not touch)
• 1. Engine
• 2. Pump
• 3. Upper Frame
NOTE: Every machine is tested during the production, so there may be a few
drops of water inside the pump assembly.
FIG. 1
(FIGS. 1 - 3)
FIG. 2
FIG. 3
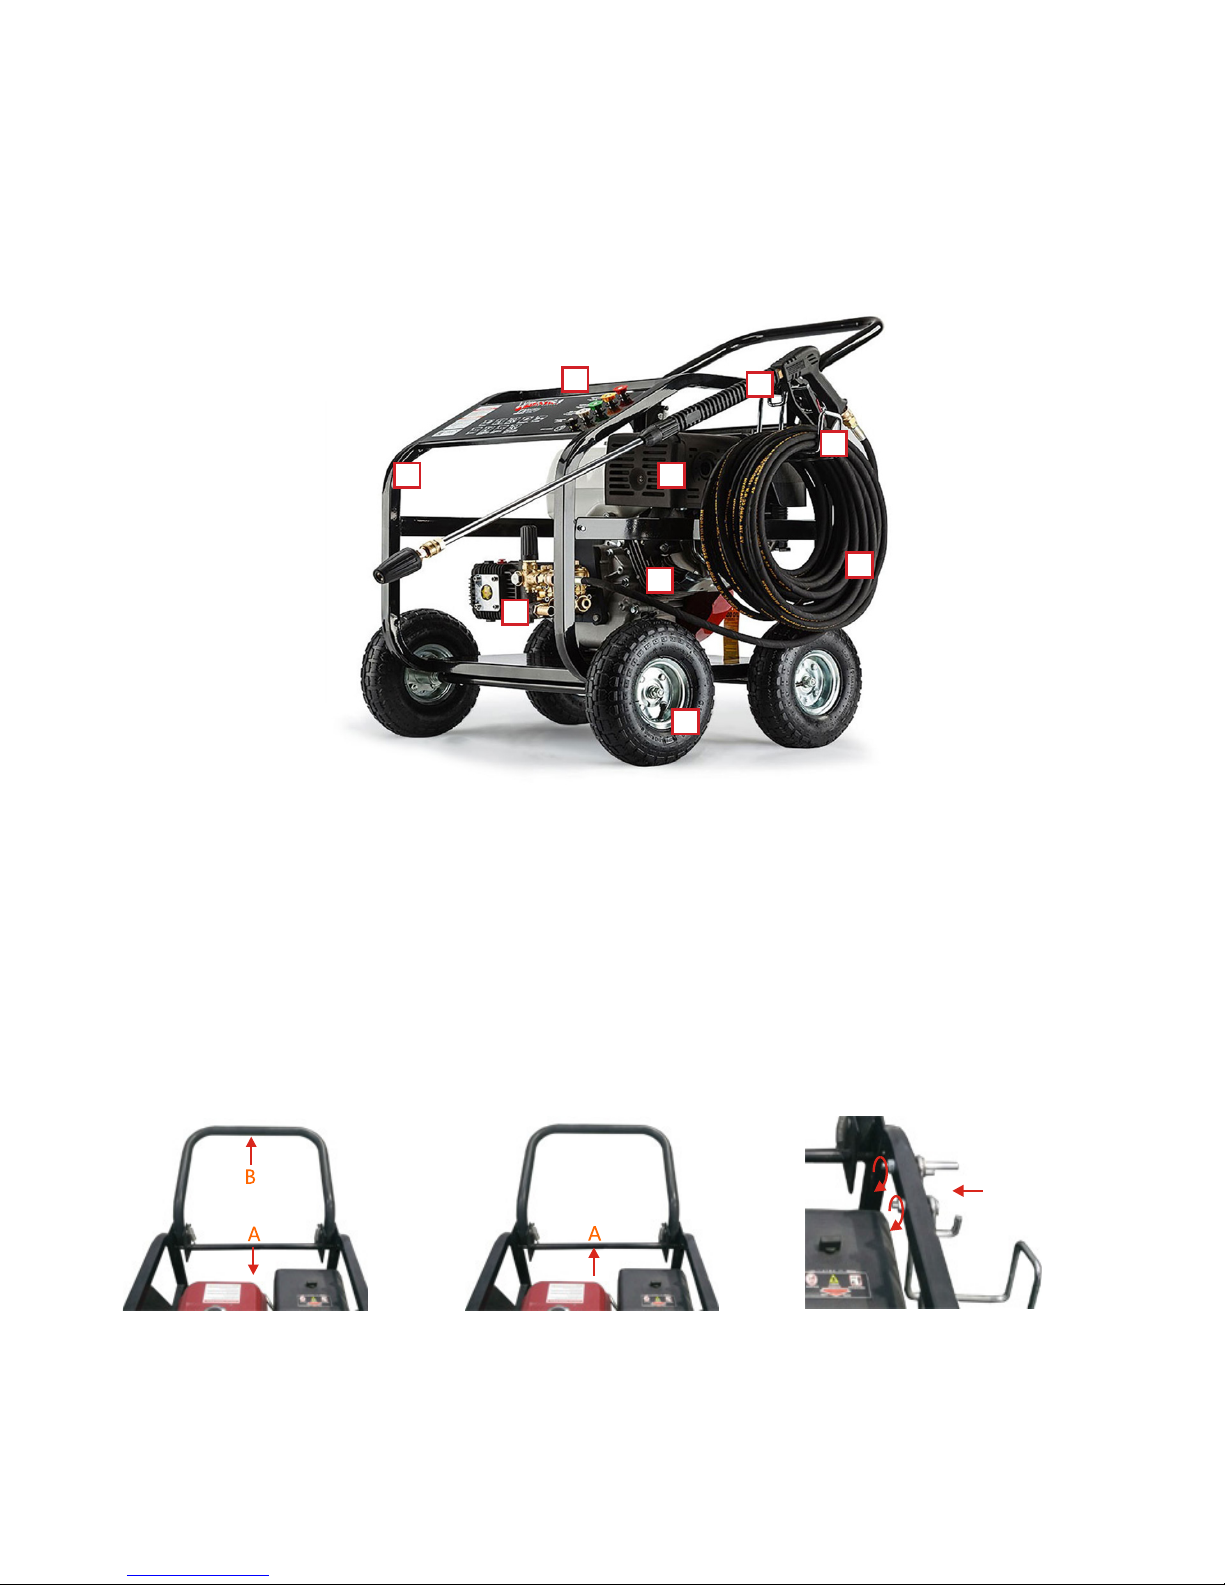
Push bar A down, Lift
handle B.
Then Lift bar A back up.
Locate the hose and
the lance onto the
upper frame and secure
using the nuts and bolts
provided.
• 4. High Pressure Hose
• 5. Hook
• 6. Wheel
1.
6.
8.
7.
3.
5.
4.
2.
9.
2
ASSEMBLY
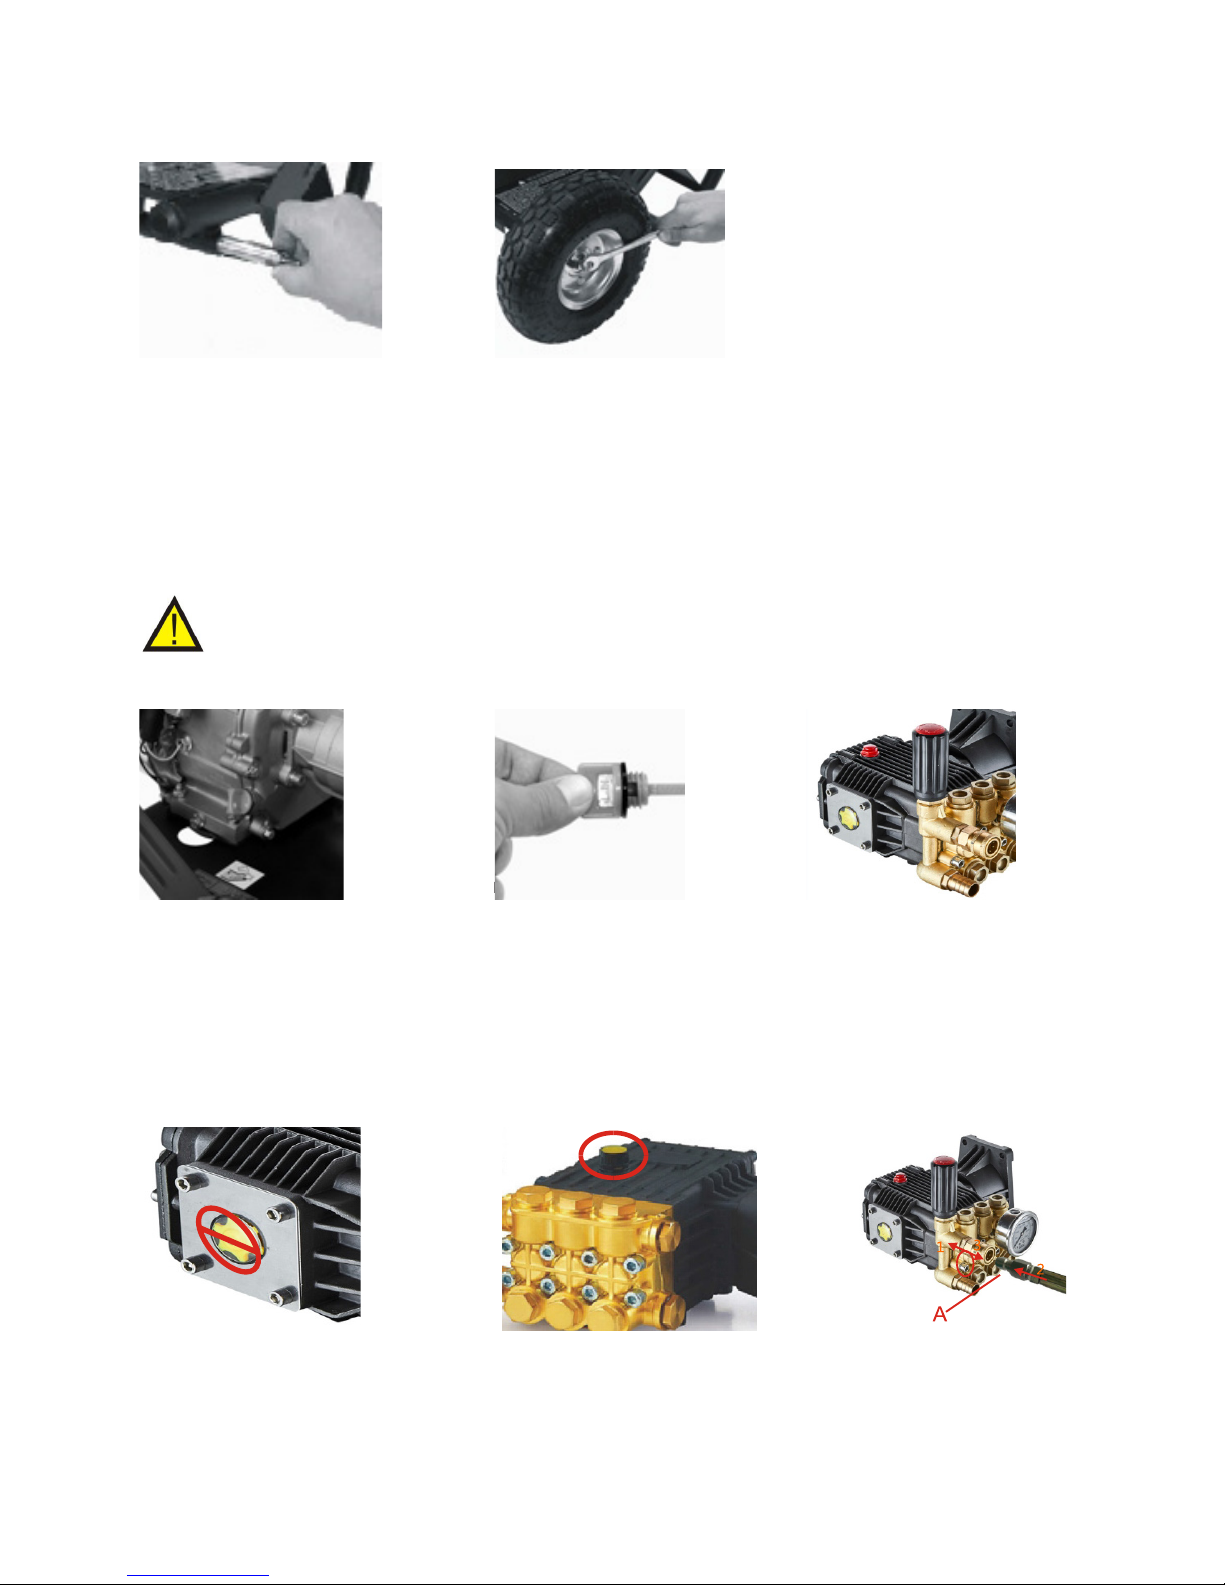
WARNING:
The engine is not provided with oil. It’s necessary to fill the unit before starting the engine.
FIG. 4
FIG. 6
FIG. 9
FIG. 5
FIG. 7
FIG. 10
FIG. 8
FIG. 11
TO ASSEMBLE THE WHEELS
(FIGS. 4 - 5)
ENGINE OIL
(FIGS. 6 - 7)
HIGH PRESSURE
CONNECTION
(FIGS. 11 - 14)
PUMP OIL
(FIGS. 8 - 10)
Ensure the appliance
is kept in the upright
postion. Insert the axle
bar into the axle support
tube on the lower frame,
tighten the bolt to
secure in place.
The engine is not provided with oil. It is necessary to fill
the oil before starting the engine. The engine has two oil
fill points at the front and back of the engine. Remove the
desired cap and fill with the engine oil specified to the
upper level mark. Install the oil filler cap.
Remove the desired
cap and fill with the
engine oil specified
to the upper level
mark. Replace the
oil filler caps.
Connect the high
pressure hose to the
the unit’s high pressure
outlet.
Fit a wheel to the axle
and secure using the
locking nut provided.
Repeat this process
for each wheel.
WARNING:
Must take off this red
plastic part of the pump.
WARNING:
Check the capacity of the
pump oil and see if it’s
reached ½.
WARNING:
Install the yellow plastic
breather plug in place of
the black shipping plug.
3
FIG. 12
FIG. 15
FIG. 13
FIG. 16
FIG. 14
Connect the high pressure
hose to the trigger B. Insert
the lance C into the trigger.
Press firmly against the spring
tension and twist the coupling
into the locked position.
Insert the required nozzle by
retracting the coupling at the
end of the lance, ensure the
nozzle is inserted securely
Pull the trigger to eliminate
trapped air and wait for a
steady flow of water to emerge
from the spray nozzle.
NOTE:
In order to assist the first
startup it is recommended to
press the trigger during the
pulling of the starter handle.
To prevent accidental
operation the trigger is fitted
with a locking facility.
To insert a nozzle, pull back
the locking collar at the end of
the lance, insert nozzle and
release the collar. This will lock
the nozzle in place. Ensure the
nozzle is inserted correctly.
If not it can fly out and injure
personnel or damage property.
Connect the hose to the
unit’ s water inlet connector
(Max. 10 bar, max.
tempreture 40°C) and turn
the water on completely.
INSERTING A
NOZZLE
(FIG. 13)
CONNECTING THE
HOSE
(FIG. 14)
OPERATION AND USE
WARNING: The engine is not filled with oil. It is necessary to fill the unit before starting the engine.
The engine will not produce a spark unless sufficient oil is inside.
CAUTION: Do not run the engine with high or low oil level as this can cause engine damage.
CAUTION: Only use unleaded gasoline.
CAUTION: Avoid damaging your hose by ensuring it does not touch the hot exhaust during and
after use.
CAUTION: Avoid damaging your pump by ensuring the water supply is clean and free of any
foreign objects.
CAUTION: Inlet water temperature must not exceed 40°C and 1Mpa
CAUTION: Never let the appliance operate for more than 2 minutes with the spray gun in theclosed
position.
CAUTION: Never operate the pressure washer with repeated and rapid on and off movements of
the trigger
WATER SUPPLY FROM THE WATER MAIN
• Connect a water supply hose (not supplied) to the water inlet connection of the pressure
washer.
• Turn on the water supply and pull the trigger until water is continually flowing out of the nozzle.
WATER SUPPLIER FROM A CONTAINER
• Unscrew the coupling part for the water inlet.
• Screw the suction hose with filter (not included) onto the water connection of the unit.
• Hang the filter in the container.
• Vent the unit before operation.
• Unscrew the high pressure line at the high pressure outlet of the unit.
• Switch on the unit and let it run until water is free of bubbles at the high pressure outlet.
• Switch off the unit and screw on the high pressure hose again.
4
 Loading...