

Wilks USA TX750, TX750i User Manual
1
© Wilks-USA
TX750 / TX750i
1
READ THIS MANUAL CAREFULLY BEFORE USE – FAILURE TO DO SO MAY RESULT IN INJURY, PROPERTY
DAMAGE AND MAY VOID WARRANTY. • KEEP THIS MANUAL FOR FUTURE REFERENCE. • Products covered by
this manual may vary in appearance, assembly, inclusions, specifications, description and packaging.
V 1.0
Gasoline Pressure Washer
TX750 . TX750i

2
© Wilks-USA
TX750 / TX750i
Contents
02 - Contents
03 - General Safety Instructions
04 - Explanation of the symbols used in this Manual
05 - Maintenance and Storage
Getting to know your petrol washer
06 - Assembly
07 - Operation and Use
08 - Water Supply from the Water Mains
09 - Adjusting the Spray Pattern
10 - Using the Detergent Facility
Clearing a Blockage
Safety Instructions for the Engine
11 - Pre-Operation Inspection
12 - Fuel and Fuel Tank
Fuel Tank Filter
Oil Level Switch
Air Filter
13 - Storage
Winter and Long Term Storage
14 - Maintenance
Exhaust Control System
Maintenance
Replacement of Parts
Modifying
Problems Affecting Exhaust Emissions
Water Suction Filter Checking
15 - Spark Plug Maintenance
Carburettor Idling Adjustment
16 - Transport
Storage
Prepare for Storage
17 - Removal Fom Storage
Service Schedule
Engine Oil Replacement
18 - Service Schedule Table
19 - Troubleshooting
20 - Troubleshooting
21 - Pump Parts Diagram
22 - CE Declaration of Conformity

3
© Wilks-USA
TX750 / TX750i
General Safety Instructions
• GENERAL SAFETY INSTRUCTIONS
• Read instructions carefully before operating this product.
• Keep bystanders away.
• This product is for outdoor use only.
• Ensure the engine is stopped before carrying out adjustments, cleaning or maintenance.
• Always turn off the engine and water supply when finished.
• Do not use the product if found to be damaged.
• Only use with detergents specified by the manufacturer. Other chemicals may compromise the safety of the product.
• Do not direct the pressure jet towards mechanical parts containing lubricant grease. ■
• Clean vehicle tyres from a minimum of 50cm to avoid damage by the high pressure jet. ■
• Do not point high pressure jets at people, animals, live electrical parts or the product itself. ■
• Do not use accessories such as hoses and connections that are not advised by the manufacturer.
• Engage the high pressure safety catch located on the gun when not in use. ■
• Do not step/stand on the high pressure hose.
• Ensure the nozzle is securely attached before using the Product. High pressure can cause it to be fired from the lance
with considerable force, and could cause injury damage. ■
• Be ready for the kick-back force and the sudden torque on the spray assembly when operating the trigger.
• A high pressure jet can remove paint and other surface finish. It can also damage tarmac and grouting.
• Switch off completely when not attended.
• The hose is designed specifically for operation with high pressures. Take care to avoid damage that may prevent
correct operation of the product.
• This product is not to be used by children or anyone with reduced capabilities.
• Always completely unwind the high pressure hose prior to operation.
• Make sure that the machine is switched off before unwinding the high pressure hose, and take care not to pull the
machine over.
• Do not let the high pressure hose contact the hot engine exhaust.
• Do not use this product indoors.
• Keep exhaust emissions away from air intakes.
3
4
© Wilks-USA
TX750 / TX750i
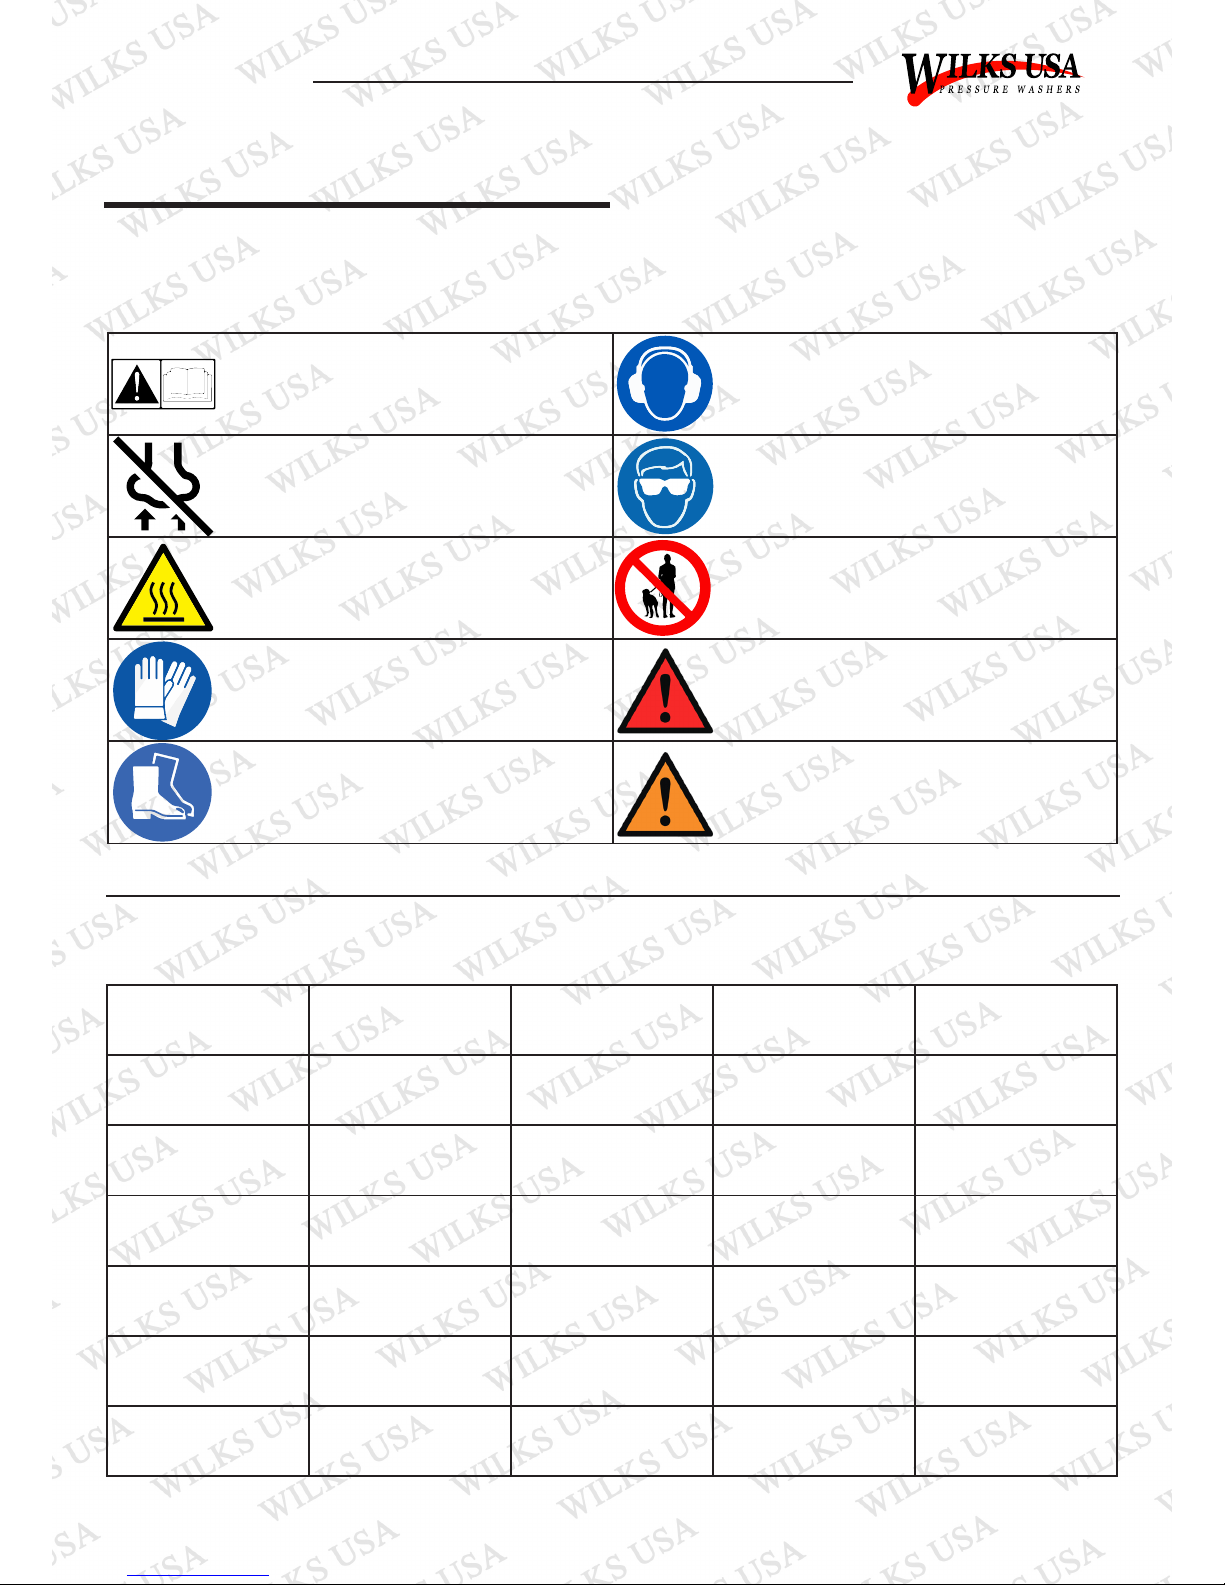
Explanation of the symbols used in this Manual
Technical Paramaters
Warning! Read the operating
Instructions before use!
Wear hearing protection!
Warning! Do not inhale exhaust fumes Wear safety goggles!
Attention! Hot surfaces! Risk of burns!
High-pressure jets can be dangerous
if misused. Do not aim at animals,
electrical appliances or the machine itself.
Wear protective gloves Warning! Risk of injury. Pay special attention
Wear safety shoes Caution! Be aware of potential risks/hazards
Model TX675 TX700 TX725 TX750
Max Pressure 13Mpa (1885 PSI) 17Mpa (2465 PSI) 18Mpa (2610 PSI) 27Mpa (3950 PSI)
Continuous
Pressure
10Mpa (1450 PSI) 15Mpa (2175 PSI) 16Mpa (2320 PSI) 22Mpa (3200PSI)
Max Flow Rate 9.2L/min 9.2L/min 9.2L/min 10L/min
Engine 2.5-4 HP 5.5 HP 6.5 HP 8 HP
Rated Rotation
Speed
3400 RPM 3400 RPM 3400 RPM 3400 RPM
Allowable
Temperature
0-60ºC 0-60ºC 0-60ºC 0-60ºC
5
© Wilks-USA
TX750 / TX750i
• Do not attempt to modify the product In any way.
• To ensure good operating conditions, range regular service from an authorized agent.
• Only use replacement parts supplied by the manufacturer.
• Only use fresh, clean and good quality fuel in the engine.
• Never operate the engine without oil.
• Never refuel in close proximity to naked flames, sparks or other sources of ignition e.g. cigarettes.
• Do not refuel when the engine it hot.
• Wipe up and correctly dispose of any fuel spillage immediately within public guidelines.
• Move away from the refuelling areas before restarting the engine. Store fuel for short periods only in a suitable
container away from heat and direct sunlight.
• Clean the pressure washer thoroughly after each use.
• Regularly check external nuts and fixings to ensure vibration caused by normal caused y normal use has not loosened
them. Remove the spark plug ignition lead (HT Lead) from the back of the spark plug and position the lead to avoid
accidental reconnection.
• Store the machine in a secure dry location out of reach of children.
• Empty the fuel lank before storage.
Maintenance and Storage
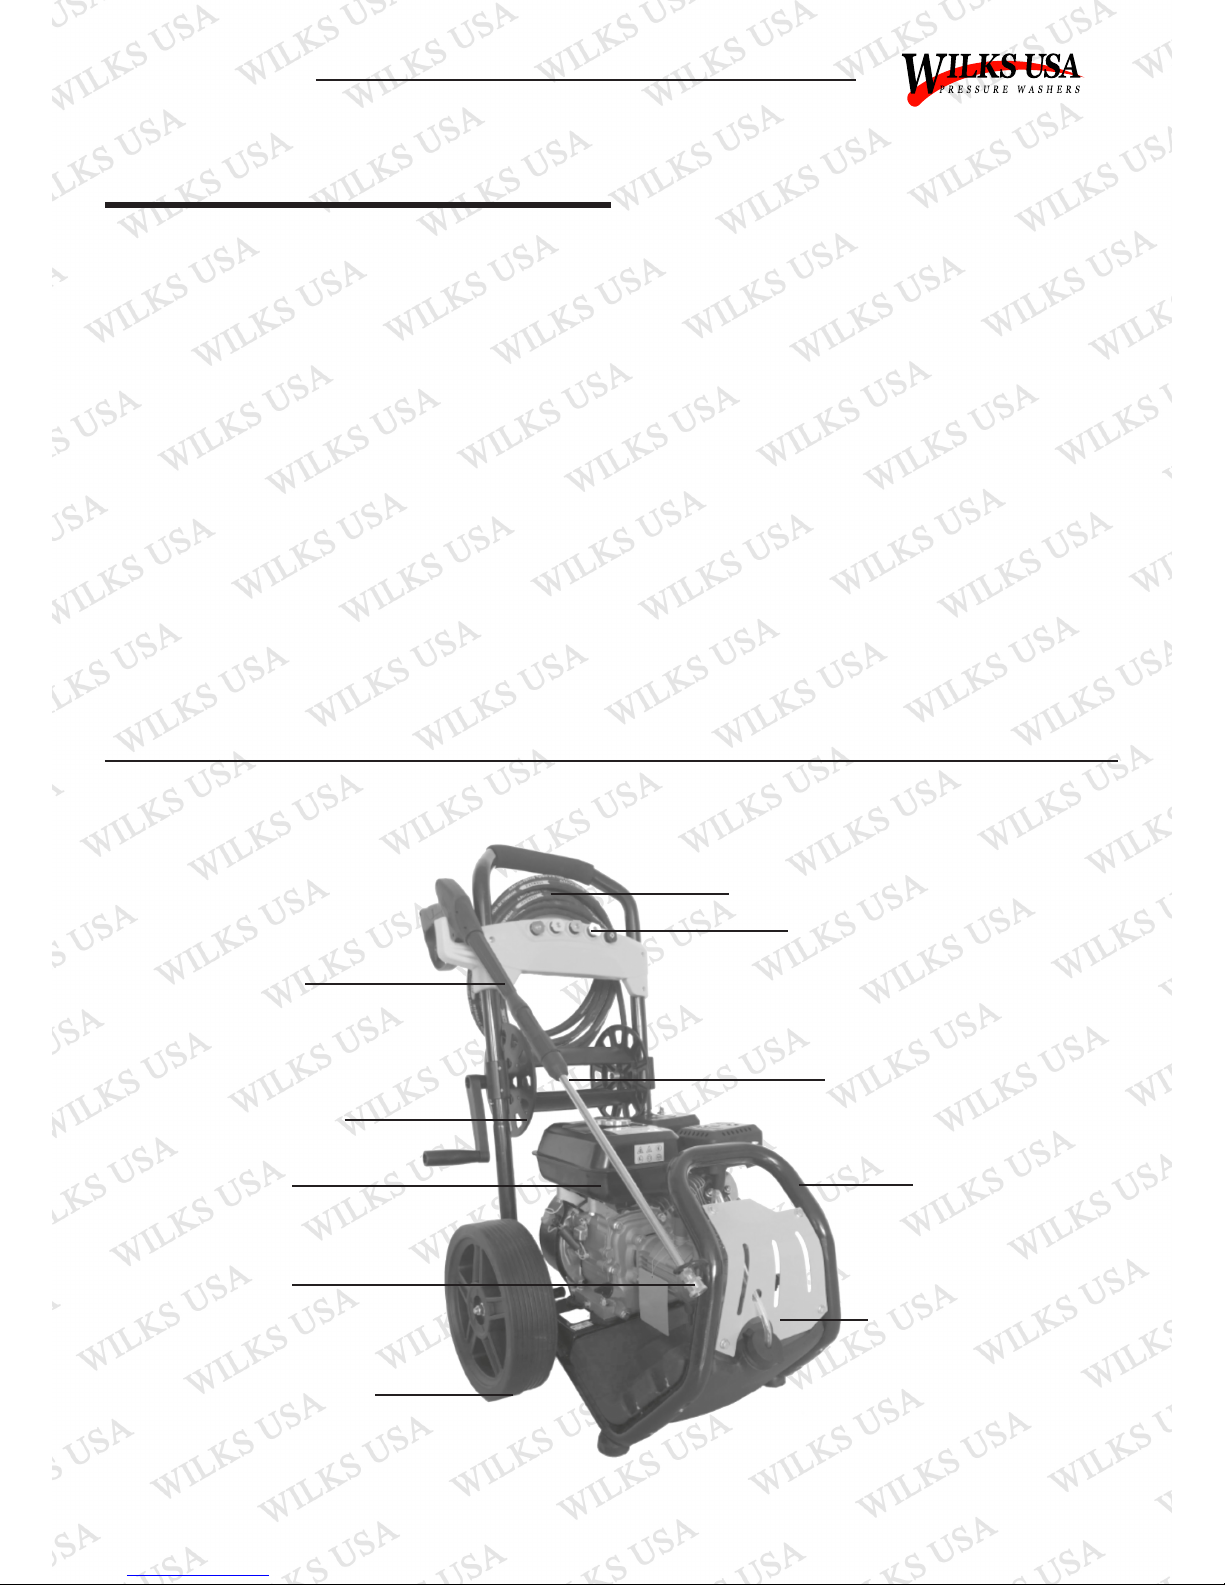
Getting to Know Your Petrol Washer
Fuel Tank
Lance Nozzle End
Wheels
Hose Reel (TX750i)
Gun/Lance
Spare Hose
Nozzle Storage
Lance Extension
Lower Frame
Detergent Tank
6
© Wilks-USA
TX750 / TX750i
Note: Every Machine is tested during production, so there may be a few drops of water inside the pump
assembly
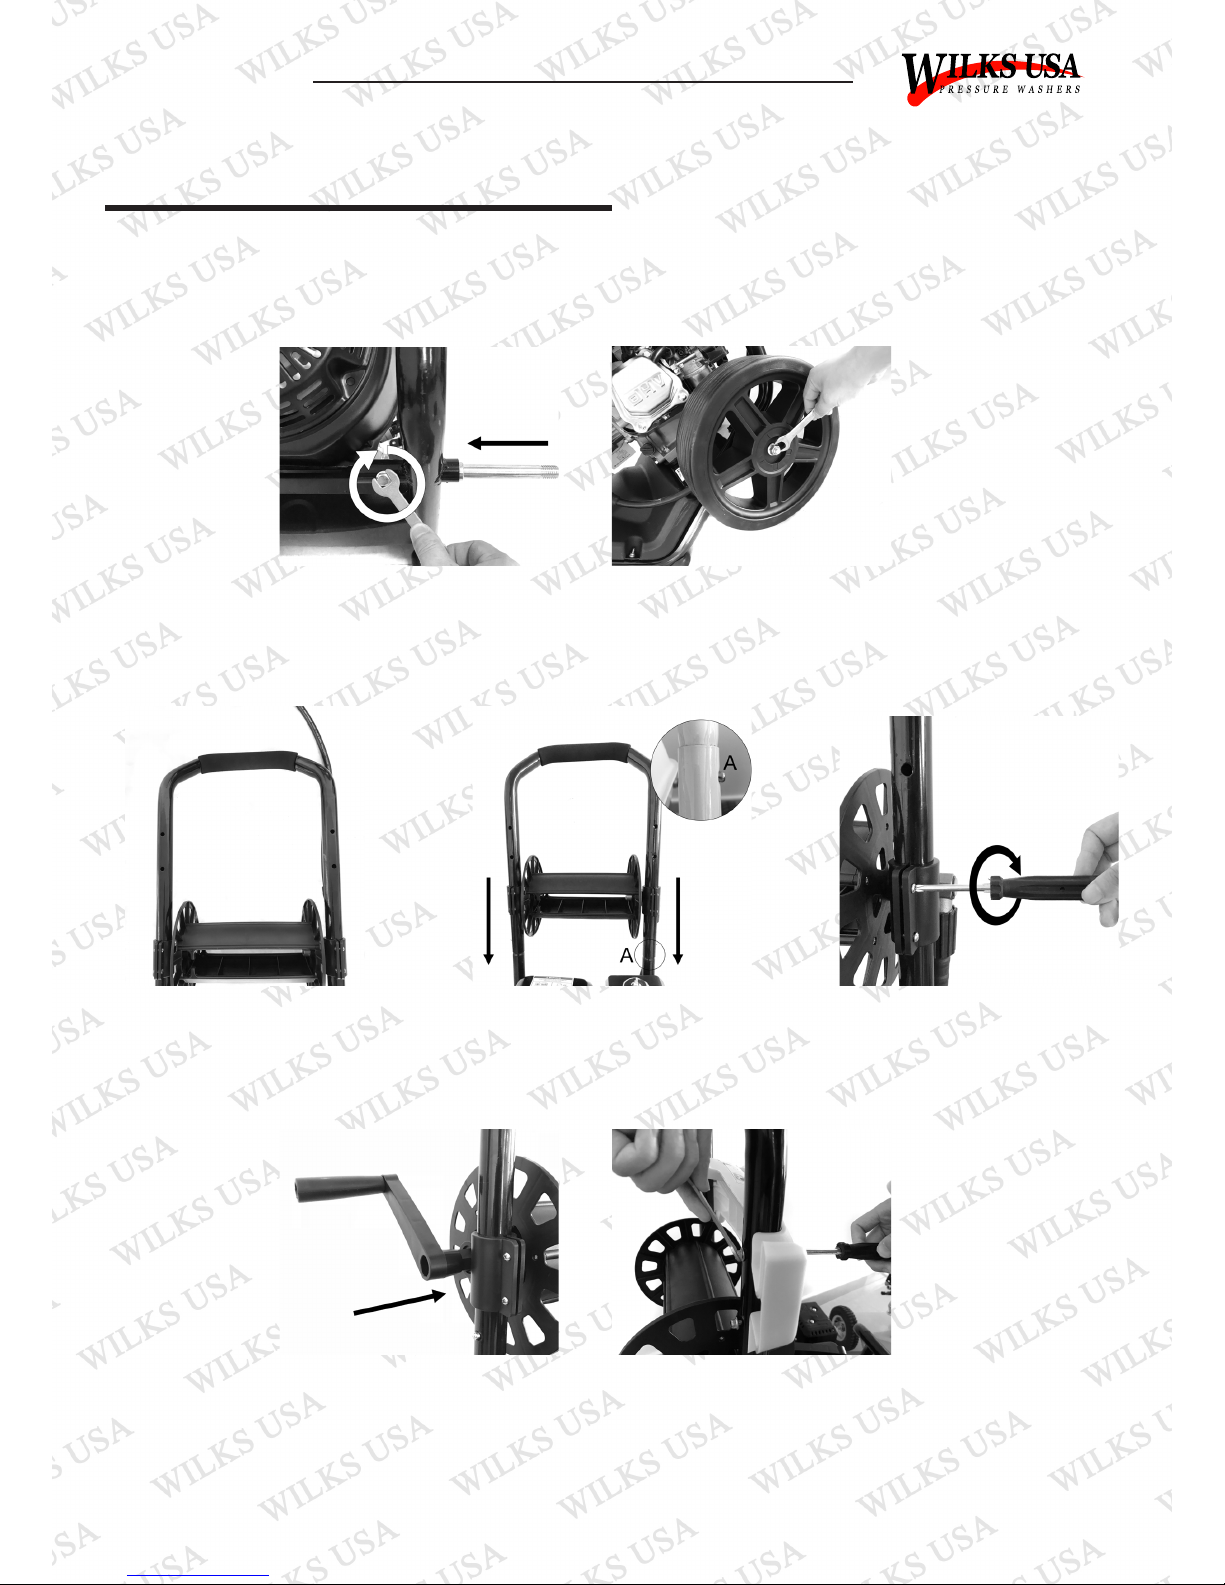
Assembly
To assemble the wheels (figs 1-2)
Insert the axle in to the axle tube
at the bottom of the frame, then
fix with M6 screws.
Fig.01 Fig.02
Assemble the wheel on the axle
and fix it with a nut.
In the direction of the arrow, fix
the hose reel on the frame (TX750i
only)
Fig.03 Fig.04 Fig.05
Fig.06 Fig.07
In the direction of the arrow, insert
the handle of the frame into the
frame, lock it by lock catch A.
In order to avoid the hose reel
moving, fix it with screw and nut
In the direction of the arrow, insert
the handle into the mounting hole
of the hose reel.
Assemble the panel as shown.
7
© Wilks-USA
TX750 / TX750i
Operation and Use
Warning: The engine is not filled with oil. It is necessary to fill the unit before starting the engine. The engine
will not product a spark unless sufficient oil is inside.
Caution: Do not run the engine with high or low oil level as this can cause engine damage.
Caution: Only use unleaded gasoline.
Caution: Avoid damaging your hose by ensuring it does not touch the hot exhaust during or after use.
Caution: Avoid damaging your pump by ensuring the water supply is clean and free of any foreign objects
Caution: Inlet water temperature must not exceed 40ºC and 20 PSI
Caution: Never let the appliance operate for more than 2 minutes with the spray gun in the closed position
Caution: Never operate the pressure washer with repeated and rapid on/off movements of the trigger
WARNING: The engine is not provided with oil. It is necessary to fill the unit before starting the
engine.
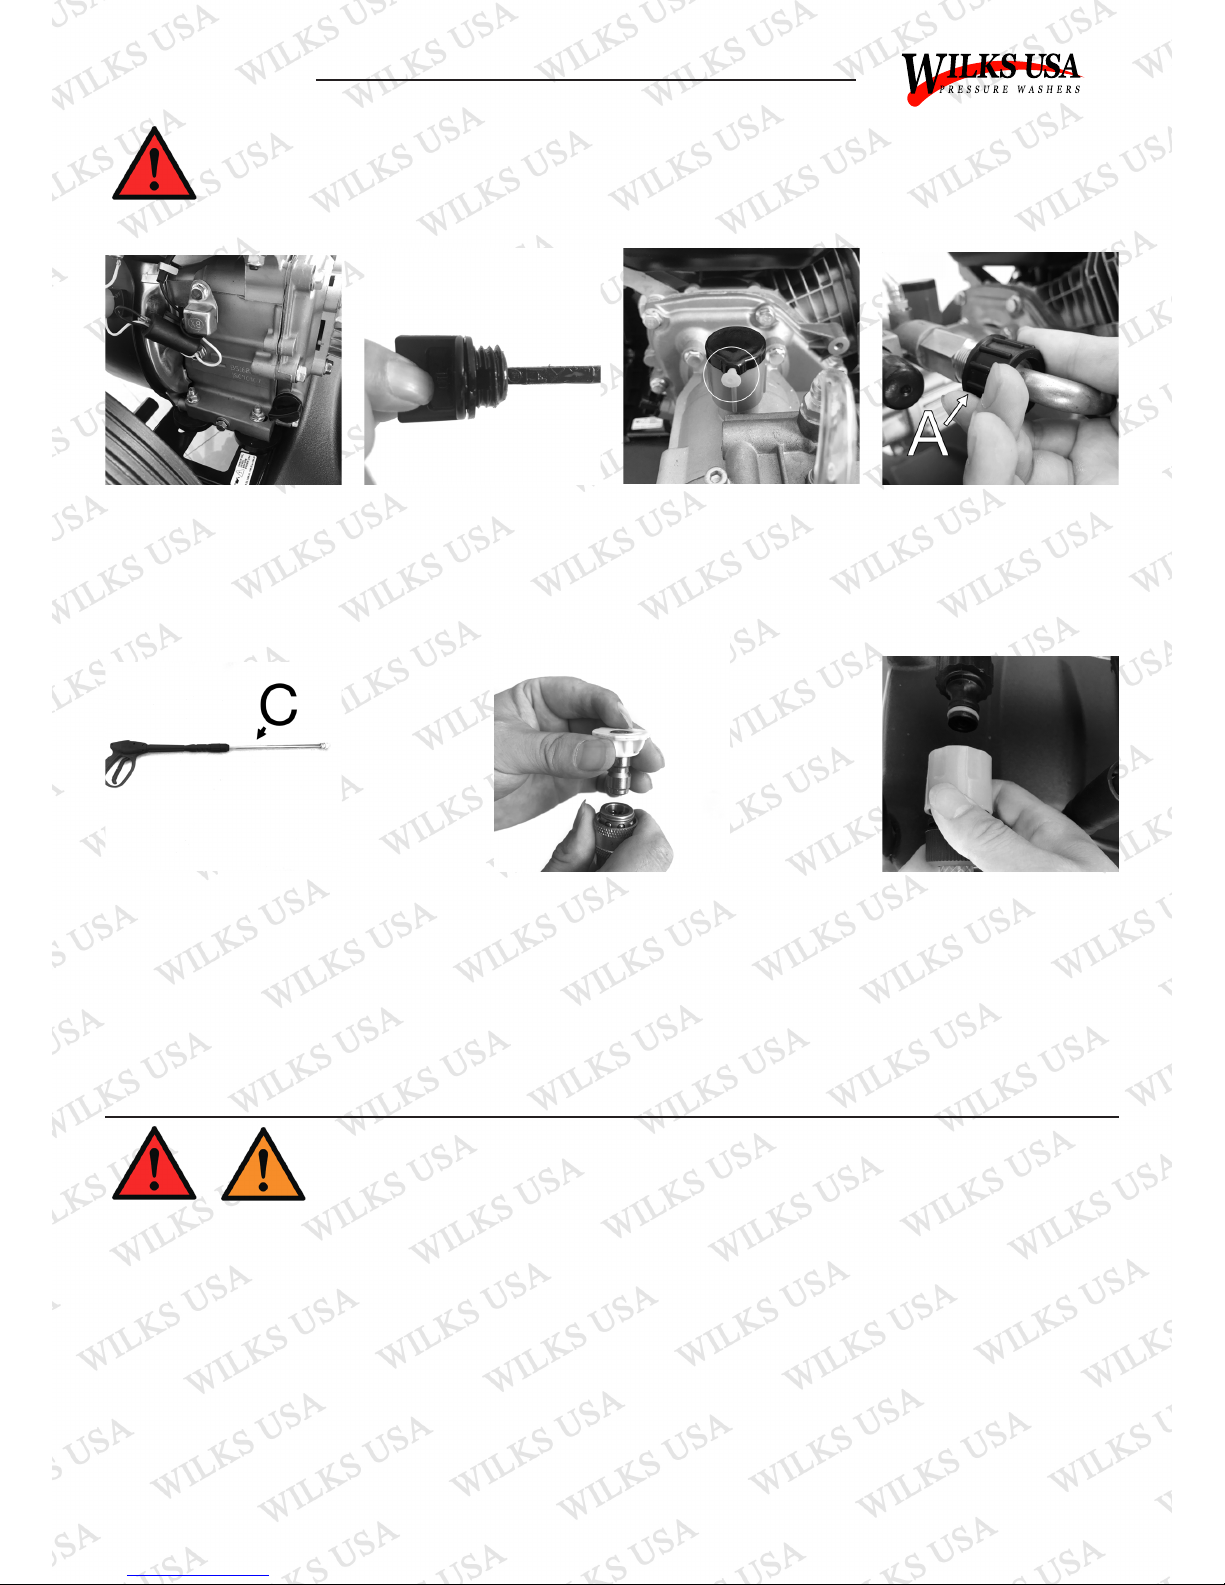
Fig.08
Engine Oil. (g.08-09) Warning: The engine is not provided
with oil. It is necessary to fill the unit before starting the engine.
The engine has two oil fill points at the front and back of the
engine. Remove the desired cap and fill with the engine oil
specified to the upper level mark or base of threads.
Fig.09
Pump Oil. (g.10) Warning:
The YELLOW pin must be
removed from the RED
breather plug before use.
High Pressure Connection
(g.11-14): Connect the
high pressure hose A to the
units high pressure outlet.
Fig.10 Fig.11
Connect the High Pressure
Hose to the Trigger B: Insert
the lance C into the gun
end. Press firmly and twist
the coupling into the locked
position.
Fig.12
Connecting the Hose:
Connect the hose to the
water inlet connector (MAX.
20PSI, MAX 40°C Temp)
and turn the water on
completely.
Fig.14
Inserting a Nozzle (g.13):
To insert a nozzle, pull back
the locking collar at the end
of the lance, insert nozzle
and release the collar. This
will lock the nozzle in place.
Ensure the nozzle is inserted
correctly. If not it can fly
out and injure personnel or
damage property.
Fig.13
 Loading...