

Wilks USA RX550i Quick Start Manual

Read this manual carefully before use and keep it for future reference. Failure to do so may result in injury, property
damage and may void the warranty.
Products covered by this manual may vary in appearance, assembly, inclusions, specifications, description or packaging.
Lisez attentivement ce manuel avant la première utilisation et conservez-le à titre de référence pour la suite. Faute de
suivre ces instructions peut entraîner des blessures, des dommages matériels et peut annuler la garantie. Les produits
décrits dans ce manuel peuvent varier en apparence, en assemblage, en inclusions, en spécifications, en description ou
en emballage.
V 1.0
Electric Pressure Washer
Nettoyeur Haute Pression Électrique
RX550i

2
© Wilks-USA
RX550i
Contents
02 - Contents
03 - Quick start guide
07 - Safety Symbols and Information
08 - Ongoing Maintenance
09 - Troubleshooting & Technical Data
10 - CE Decleration of Conformity
02 - Sommaire
11 - Guide de démarrage rapide
15 - Symboles et consignes de sécurité
16 - Entretien
17 - Dépannage et données techniques
18 - Certificat de Conformité CE
Sommaire
En
3
© Wilks-USA
RX550i
Quick start guide
The following steps describe the quickest method to get your pressure washer
up and running. However, it is essential you fully read this manual to ensure you
are familiar with the general safety features, precautions and functions necessary
to operate the product. Failure to do so may result in injury and damage to your
washer or personal items.
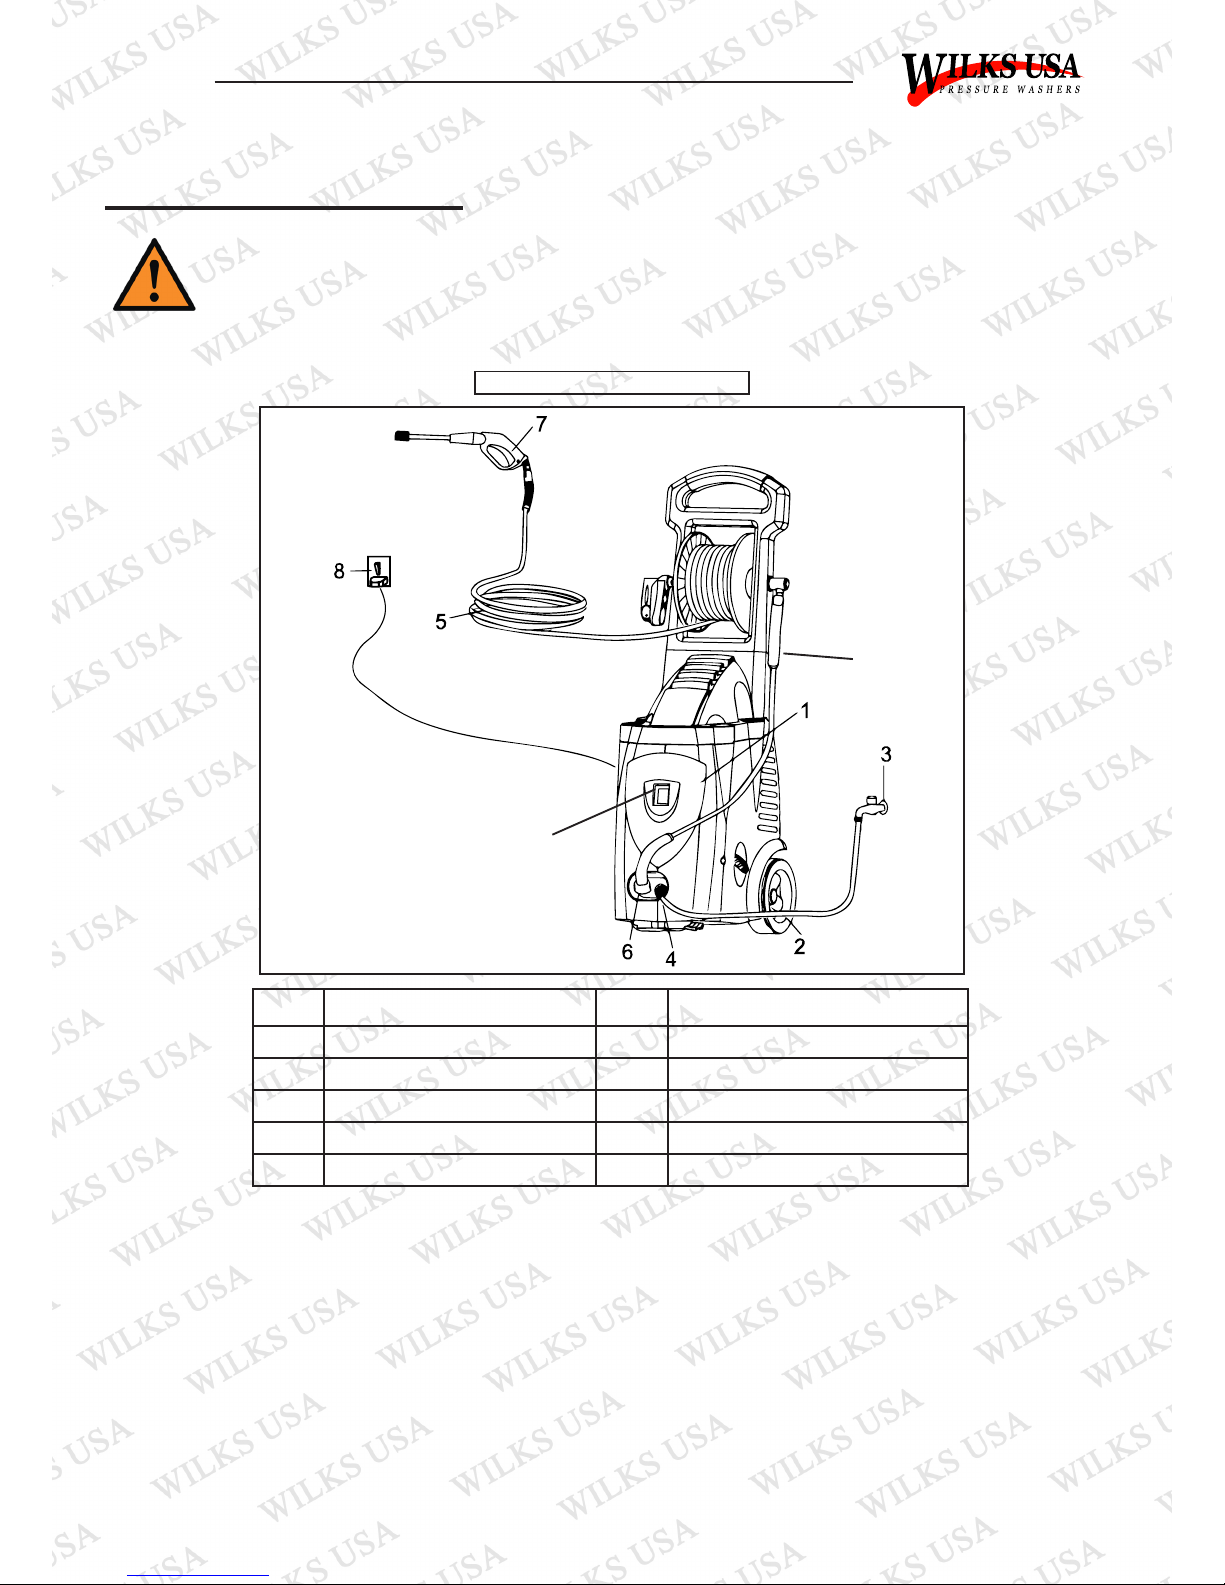
No. Part No. Part
1. Pressure Washer 6. Water Outlet
2. Water Hose (Not included) 7. Gun
3. Water Connection 8. Power Outlet
4. Water Inlet 9. Power Switch
5. High Pressure Hose 10. Link Hose
9
10
ASSEMBLY
1. Attach the link hose to the hose reel and water outlet.
2. Connect the high pressure hose to the gun.
3. Attach the water hose to the water inlet (supply this washer with cold water only).
4. Connect one of the 5 coloured nozzles to the end of the gun.
5. Plug the washer into a power outlet.
6. Turn on water supply and hold the trigger on the gun until a constant stream of water flows.
7. Turn on the power to the unit.
8. Press the trigger on the gun to begin washing.
En
4
© Wilks-USA
RX550i
Unit Shut Down
1. Turn off the motor (push switch to the off position).
2. Unplug the unit from the power source.
3. Turn off the water supply.
4. Press the trigger of the gun to de-pressurise the
system.
5. Ensure that the unit and hoses are fully drained of
water.
6. Wipe all surfaces of the unit with a damp clean cloth.
7. Engage the gun safety lock.
Always turn
off the motor
before turning
off the unit’s
water supply.
Failure to do so can
cause serious damage
to the motor.
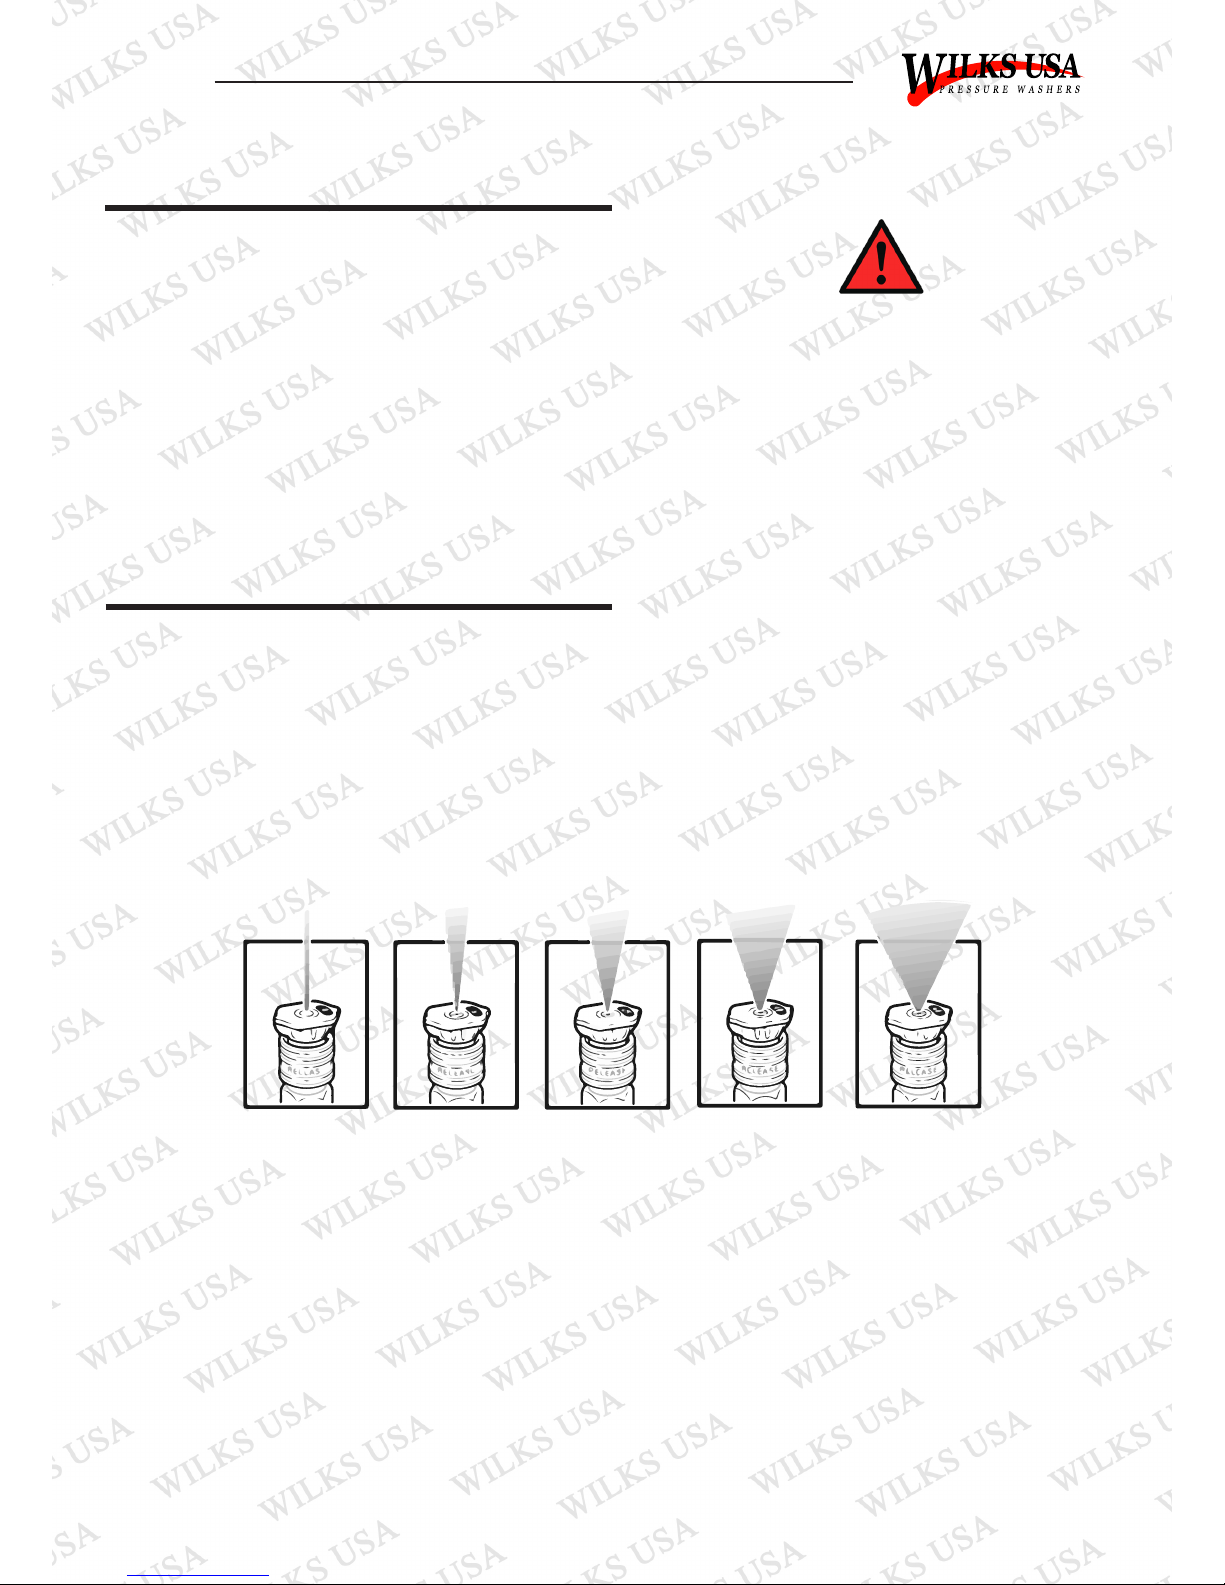
Nozzles
0°Nozzle – Red (Fig.1): This nozzle delivers a pinpoint stream of pressurized water and is
extremely powerful. It should only be directed at surfaces that can withstand high pressure
such as metal or concrete.
15° Nozzle – Yellow (Fig.2): This nozzle delivers a powerful 15-degree spray pattern for intense
cleaning of small areas. This nozzle should only be used on areas and materials that can
withstand very high pressure.
Fig.1 Fig.2 Fig.3 Fig.4 Fig.5
25° Nozzle – Green (Fig.3): This nozzle delivers a 25 degree spray pattern for intense cleaning
of larger areas. This nozzle should only be used on areas that can withstand very high pressure.
40° Nozzle – White (Fig.4): This nozzle delivers a 40-degree spray pattern and a less powerful
stream of water. This nozzle can cover a wide area and can be used for most general cleaning
jobs.
Detergent Nozzle – Blue/Black (Fig.5): This nozzle is used to apply detergent and cleaning
solutions. This nozzle produces the weakest pressure of the three nozzles. Don’t forget that you
can adjust the detergent flow using the dial on the front of the machine.
The nozzles are stored in receptacles on a panel mounted to the handle of the washer.
En

5
© Wilks-USA
RX550i
Cold Weather Storage
It’s not advisable to store your pressure washer in temperatures below freezing. If you must
store your pressure washer in a location where the temperature could reach low levels, you can
minimise the chance of damage to your washer with the following instructions. If stored with
water inside and allowed to freeze, expansion will cause damage to the internal components.
Method 1:
1. Shut off the water supply and relieve pressure in the spray gun by depressing the trigger.
2. Disconnect the garden hose from the pressure washer, but leave the high pressure hose
connected.
3. Tip the unit on its side with the inlet connection pointing up.
4. Insert a small funnel (to prevent spilling) into the inlet and pour in approximately 1/4 cup of
RV antifreeze.
5. Ensure that water is fully drained from all of the hoses, connectors, accessories and the gun.
Method 2:
1. Stop the pressure washer and detach the supply hose and the high pressure hose. Squeeze
the trigger of the gun to drain all water from the wand and hose
2. Restart the pressure washer and let it run briefly (about 5 seconds) until water no longer
discharges from the high pressure outlet.
3. Ensure that water is fully drained from all of the hoses, connectors, accessories and the gun.
En
6
© Wilks-USA
RX550i
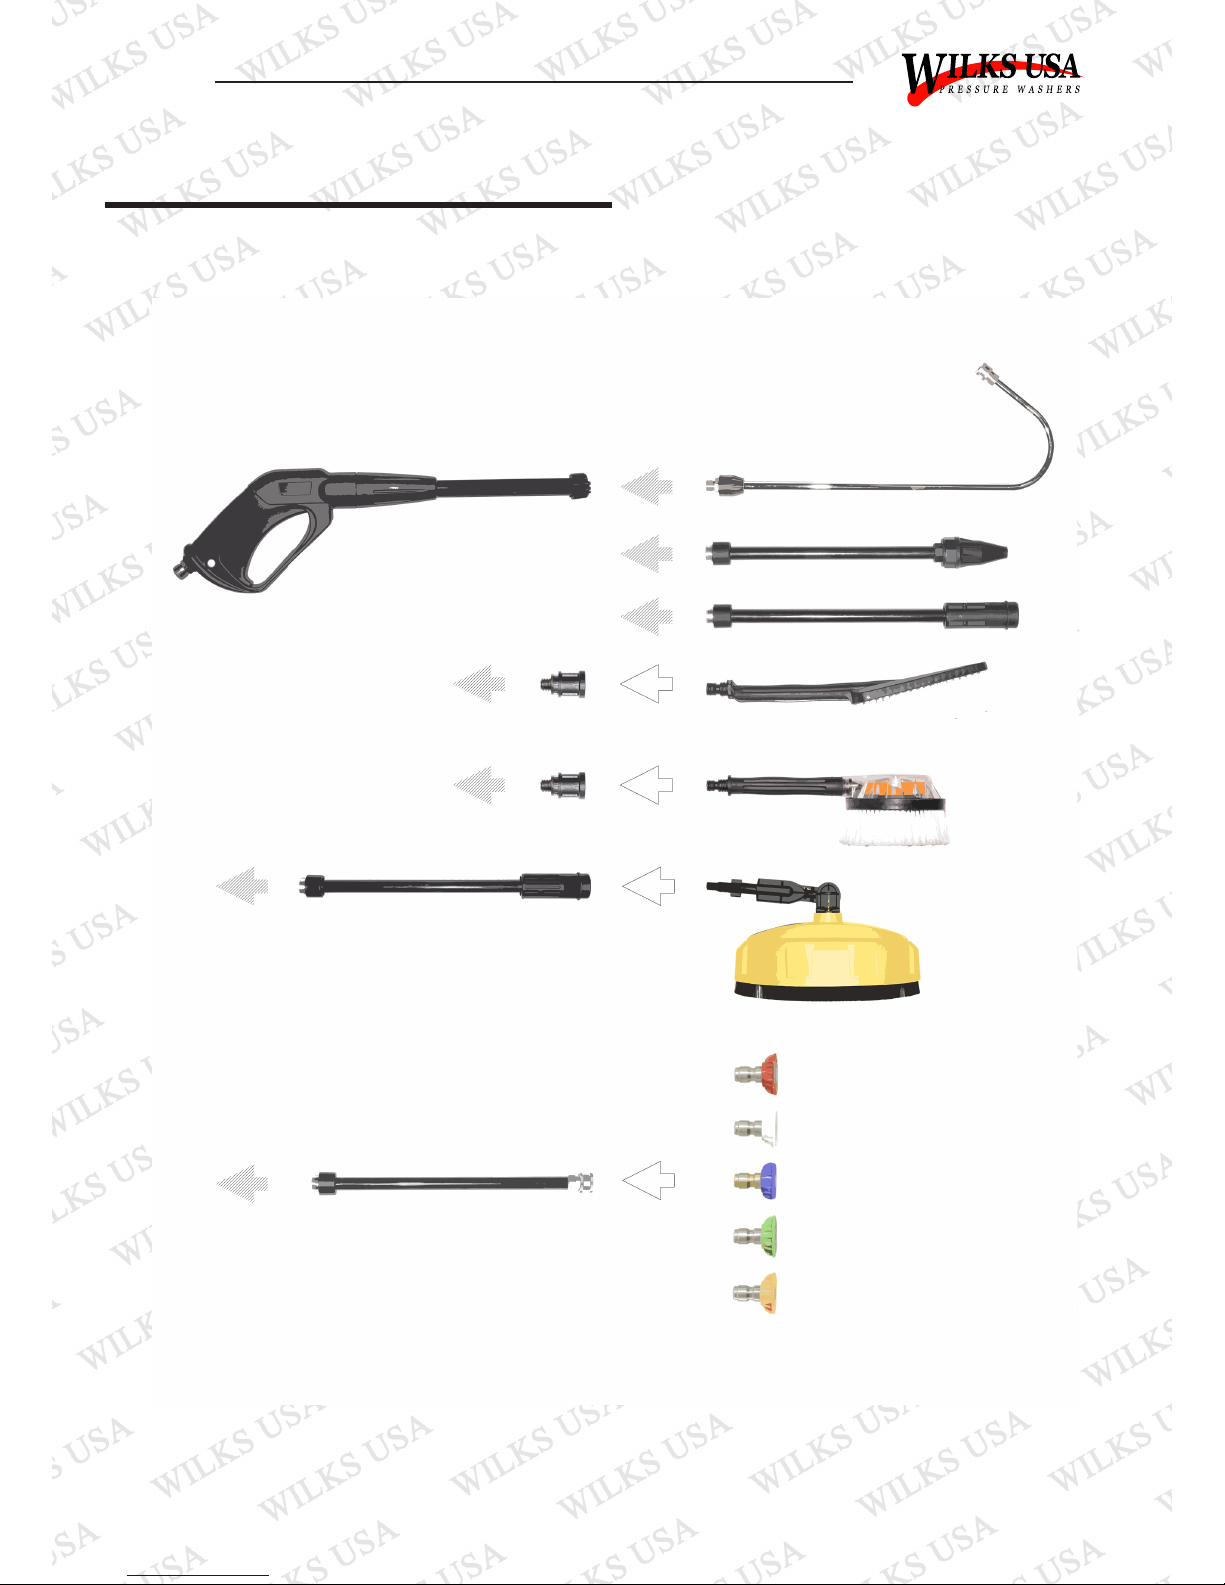
Quick Connection Guide
En
 Loading...