


PIZZA OVEN, GRILL & SMOKER
Assembly instruction (0449312)
1
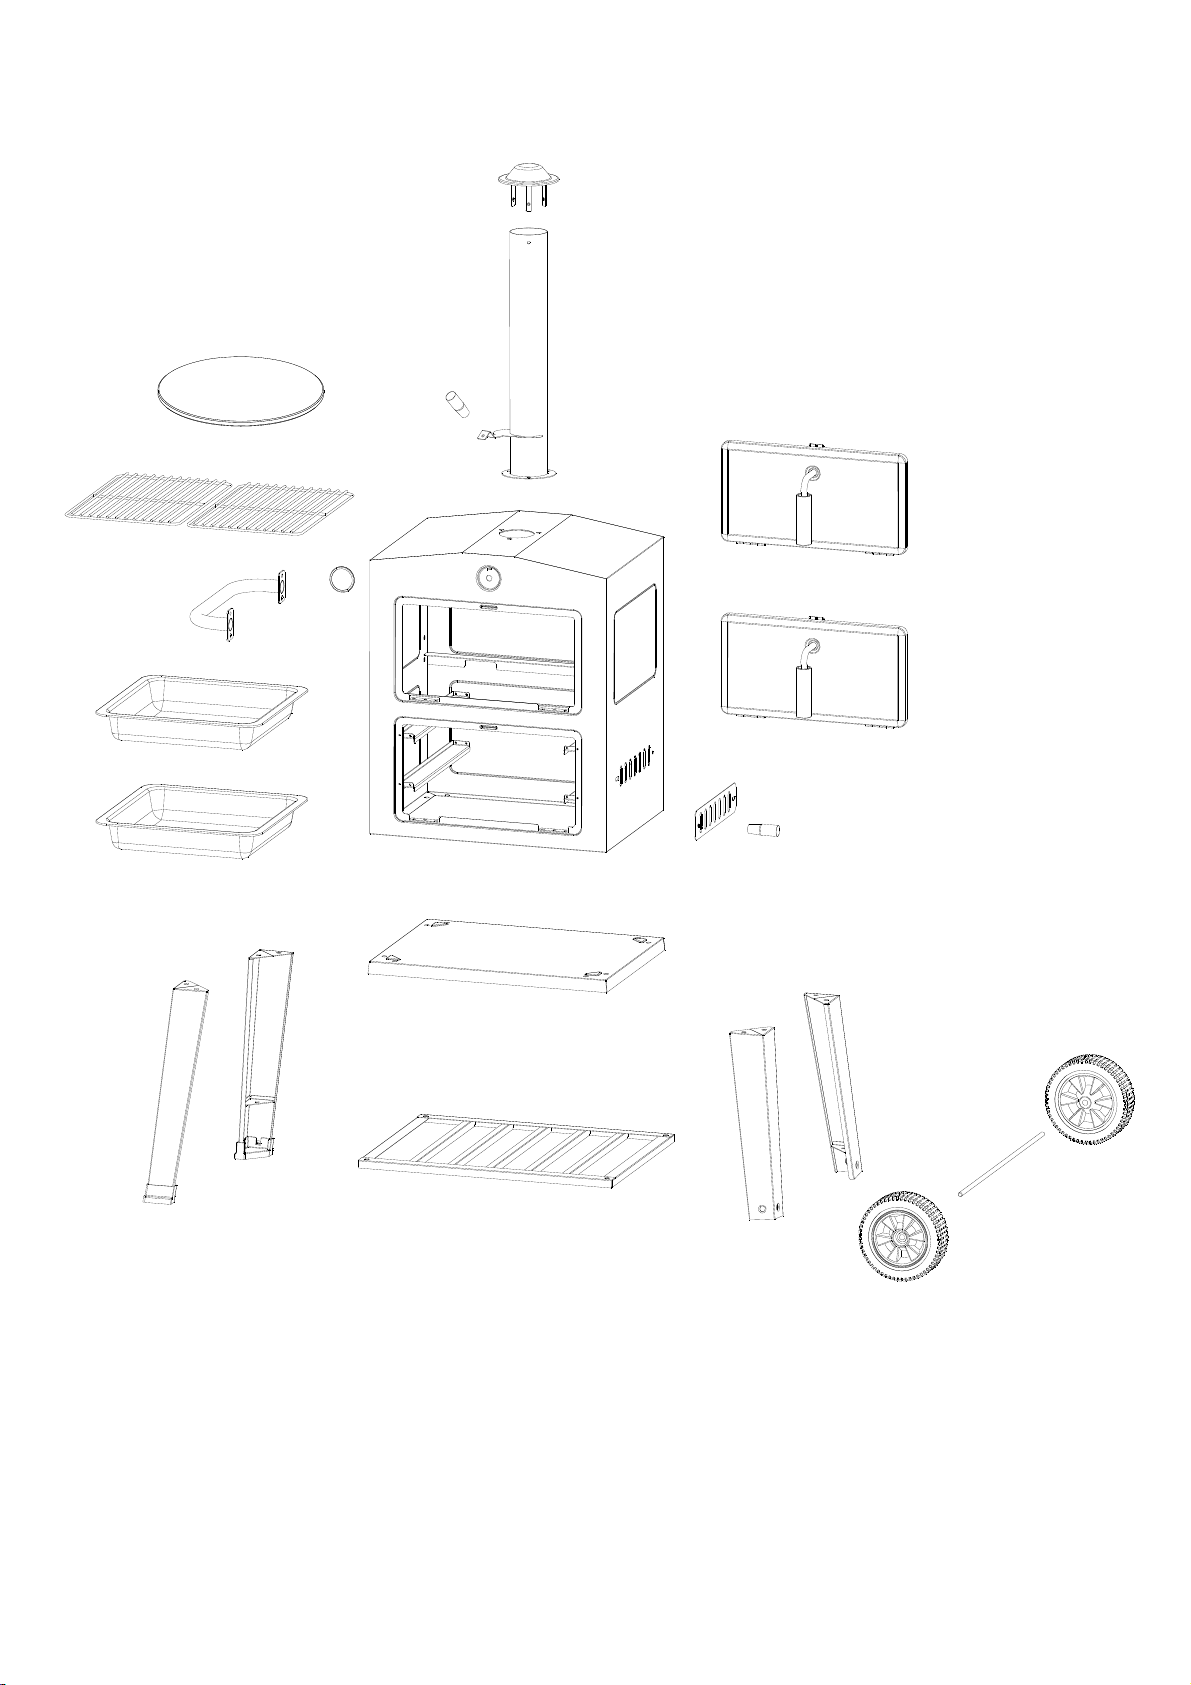
Expanded View
1
2
4
5
5
8
17
9
3
7
6
7
9
10
3
11
12
12
13
14
14
16
15
16
2
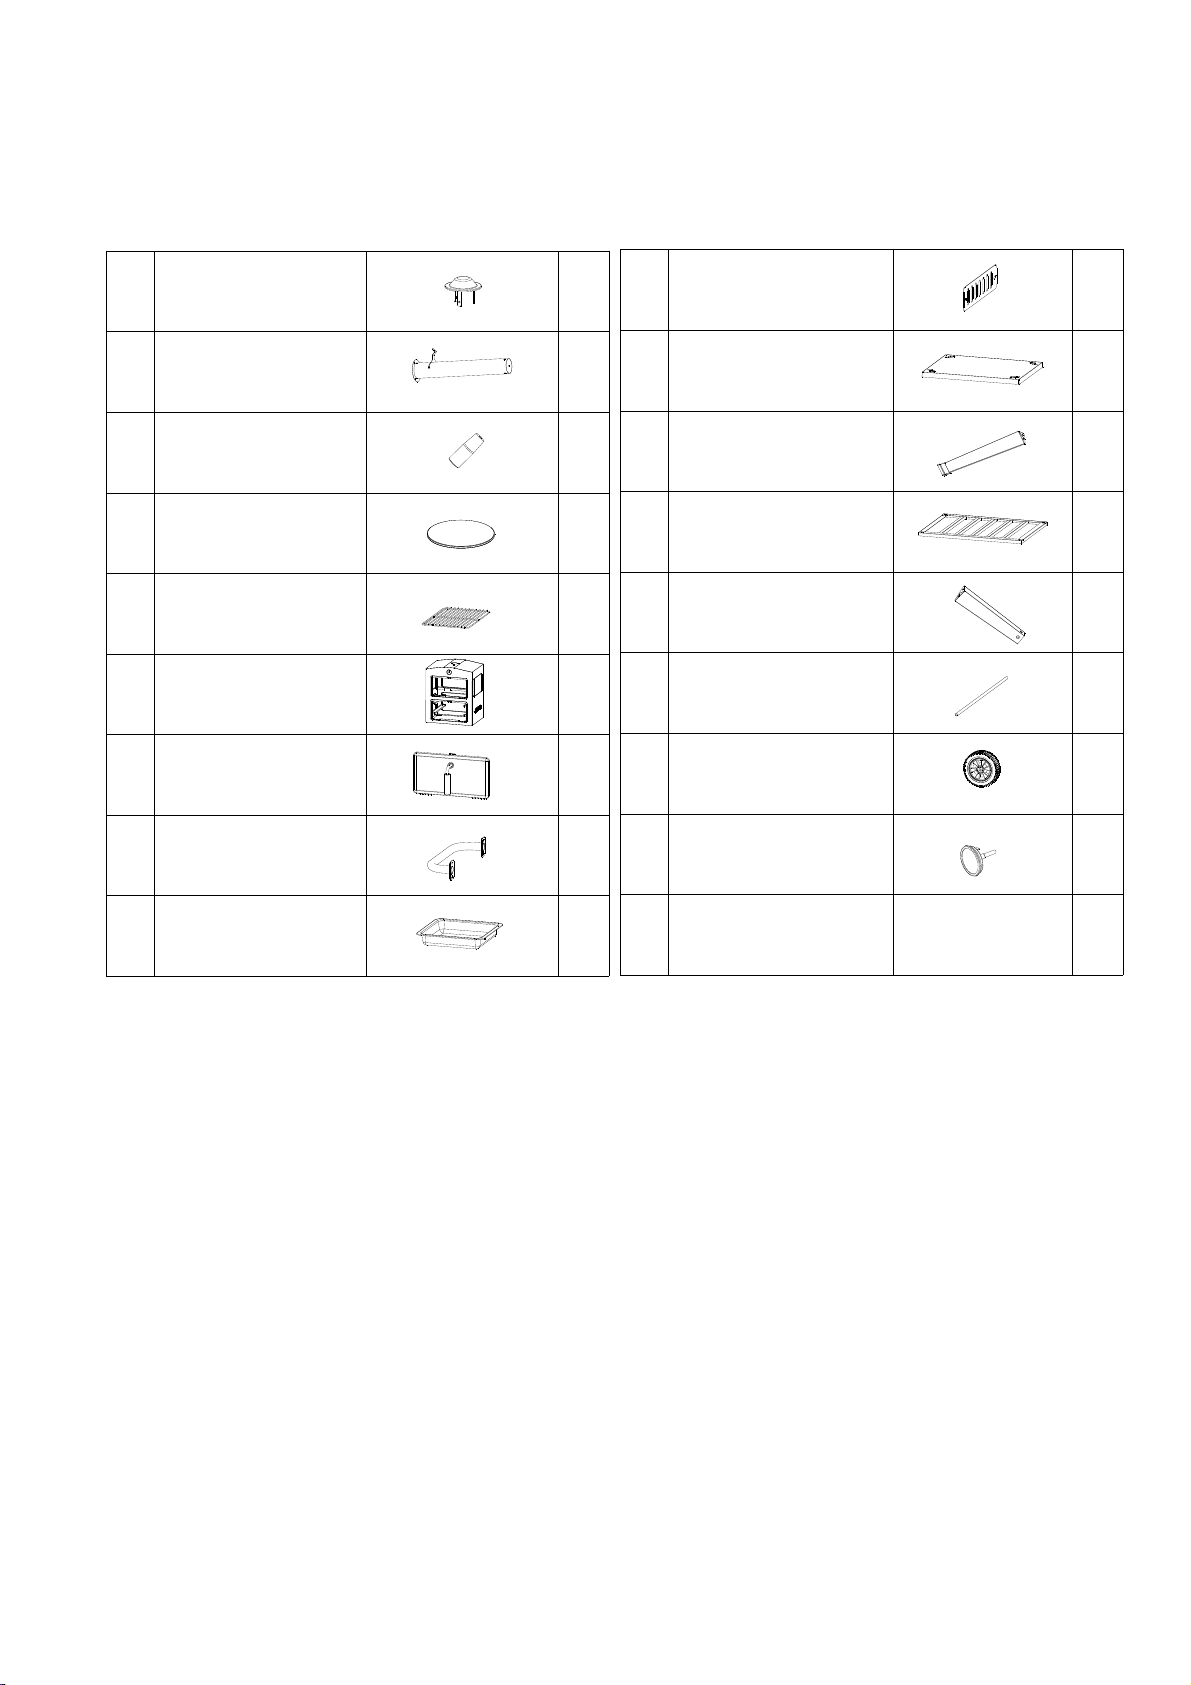
Parts Supplied
Please check parts against the list below before assembling you r Barbecue Grill
Take a few moments to familiarise yourself with the contents. Check that all holes are clear of paint before assembly, if
you find a blockage, please use a screw driver to clear the blocked hole.
10
Chimney top
1
1
Firebowl air vent
1
2
Chimney
Air vent & chimney
3
damper control
knob
1
2
Firebowl base
11
12
Left leg
1
2
13
Pizza stone
4
1
Bottom rack
1
Right Leg
5
Cooking grid
14
2
2
6
Firebowl
Door
7
8
Firebowl handle
Water/charcoal pan
9
Axle
15
1
16
2
1
2
Wheel
17
Temperature gauge
121
1
3
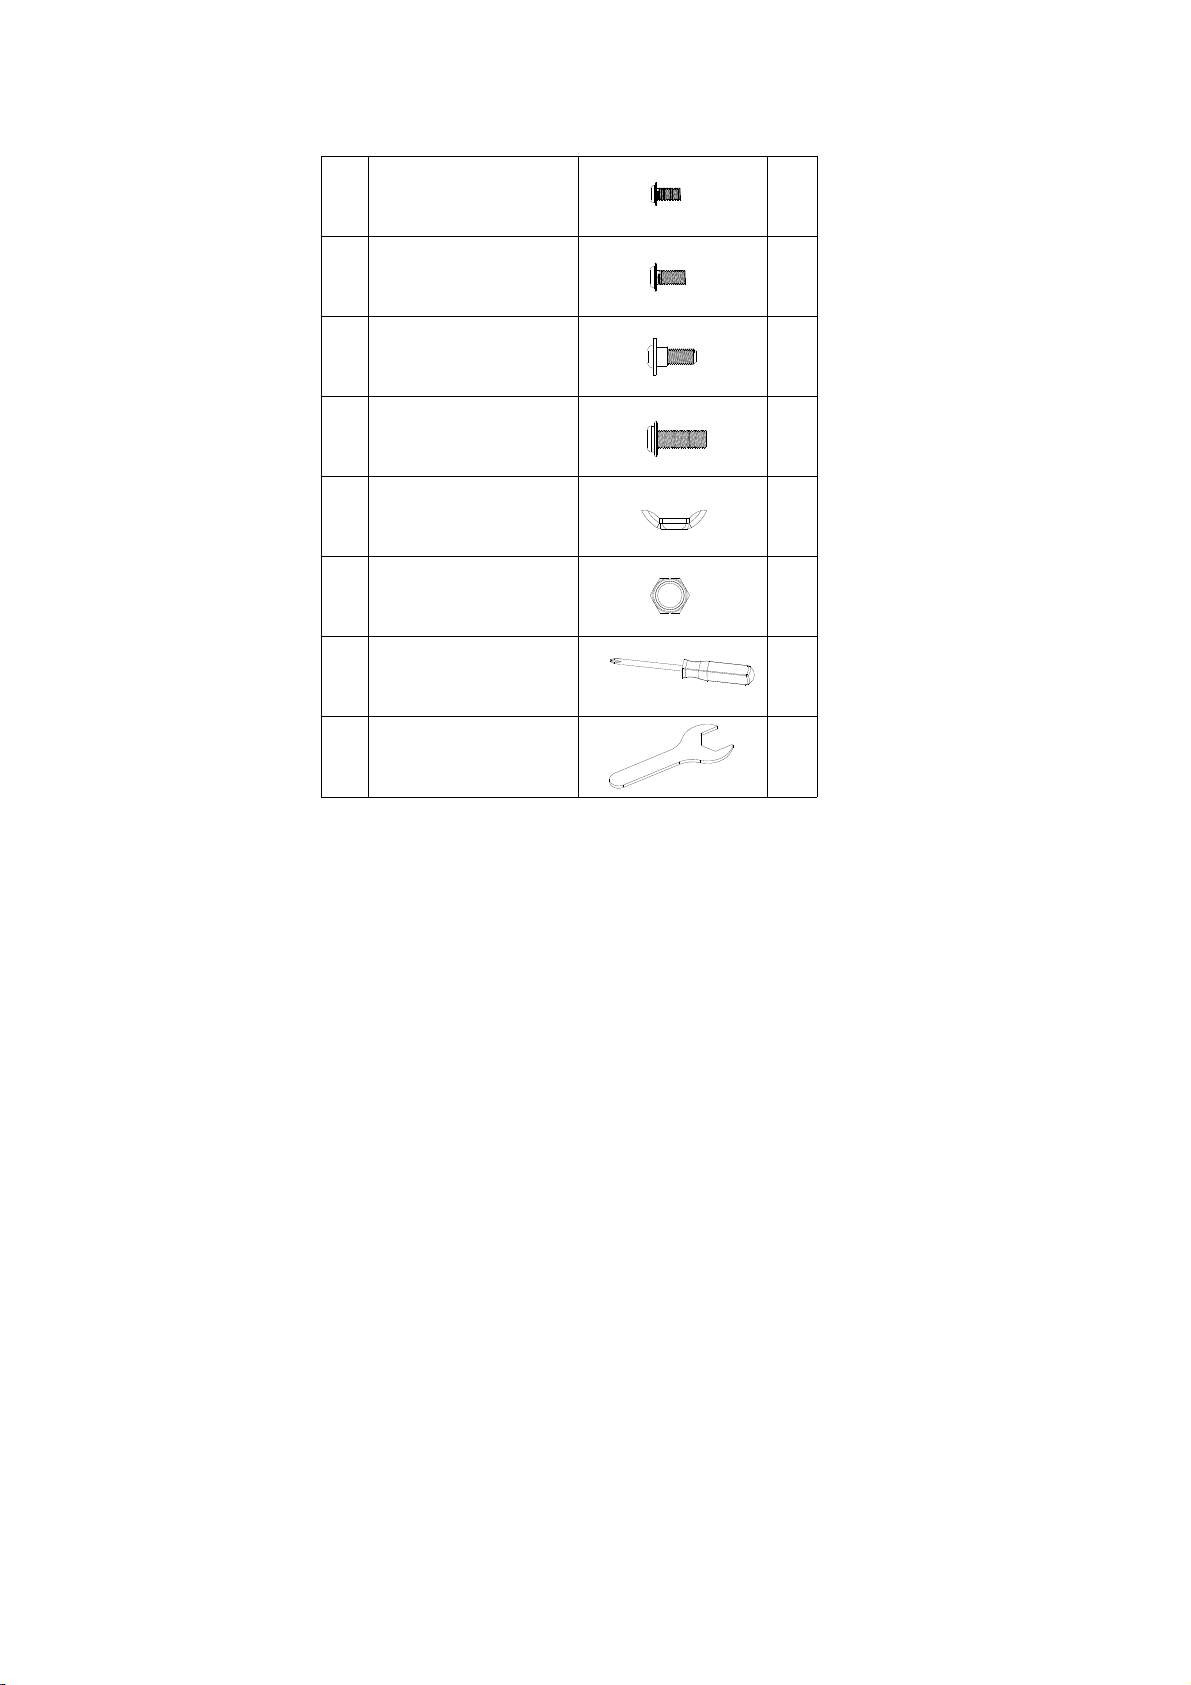
Fittings Supplied
A
Screw M4x12
B
Screw M5x12
Step screw M5x12
C
15
1
1
D
Screw M6x15
19
Wing Nut
E
1
Nut M10
G
Screwdriver
2F
1
Wrench M10
H
Screwdriver (included) and wrench (included) are required to assemble the Barbecue.
• Dispose of all polythene packing carefully and keep out of the reach of children.
• Please read the section on barbecue safety prior to using your Barbecue.
• Two people are recommended for assembly.
Please read all instructions carefully and keep outer packaging to refer to photograph of finished product in case of
difficulty.
2
4
Assembly
Please read all instructions thoroughly before proceeding. Find a large, cle an area in which to assembl e your barbecue.
Please refer to parts list and assembly diagram as necessary. Assembly of the barbecue involves many large
components, it is advisable to have two people assemble the unit.
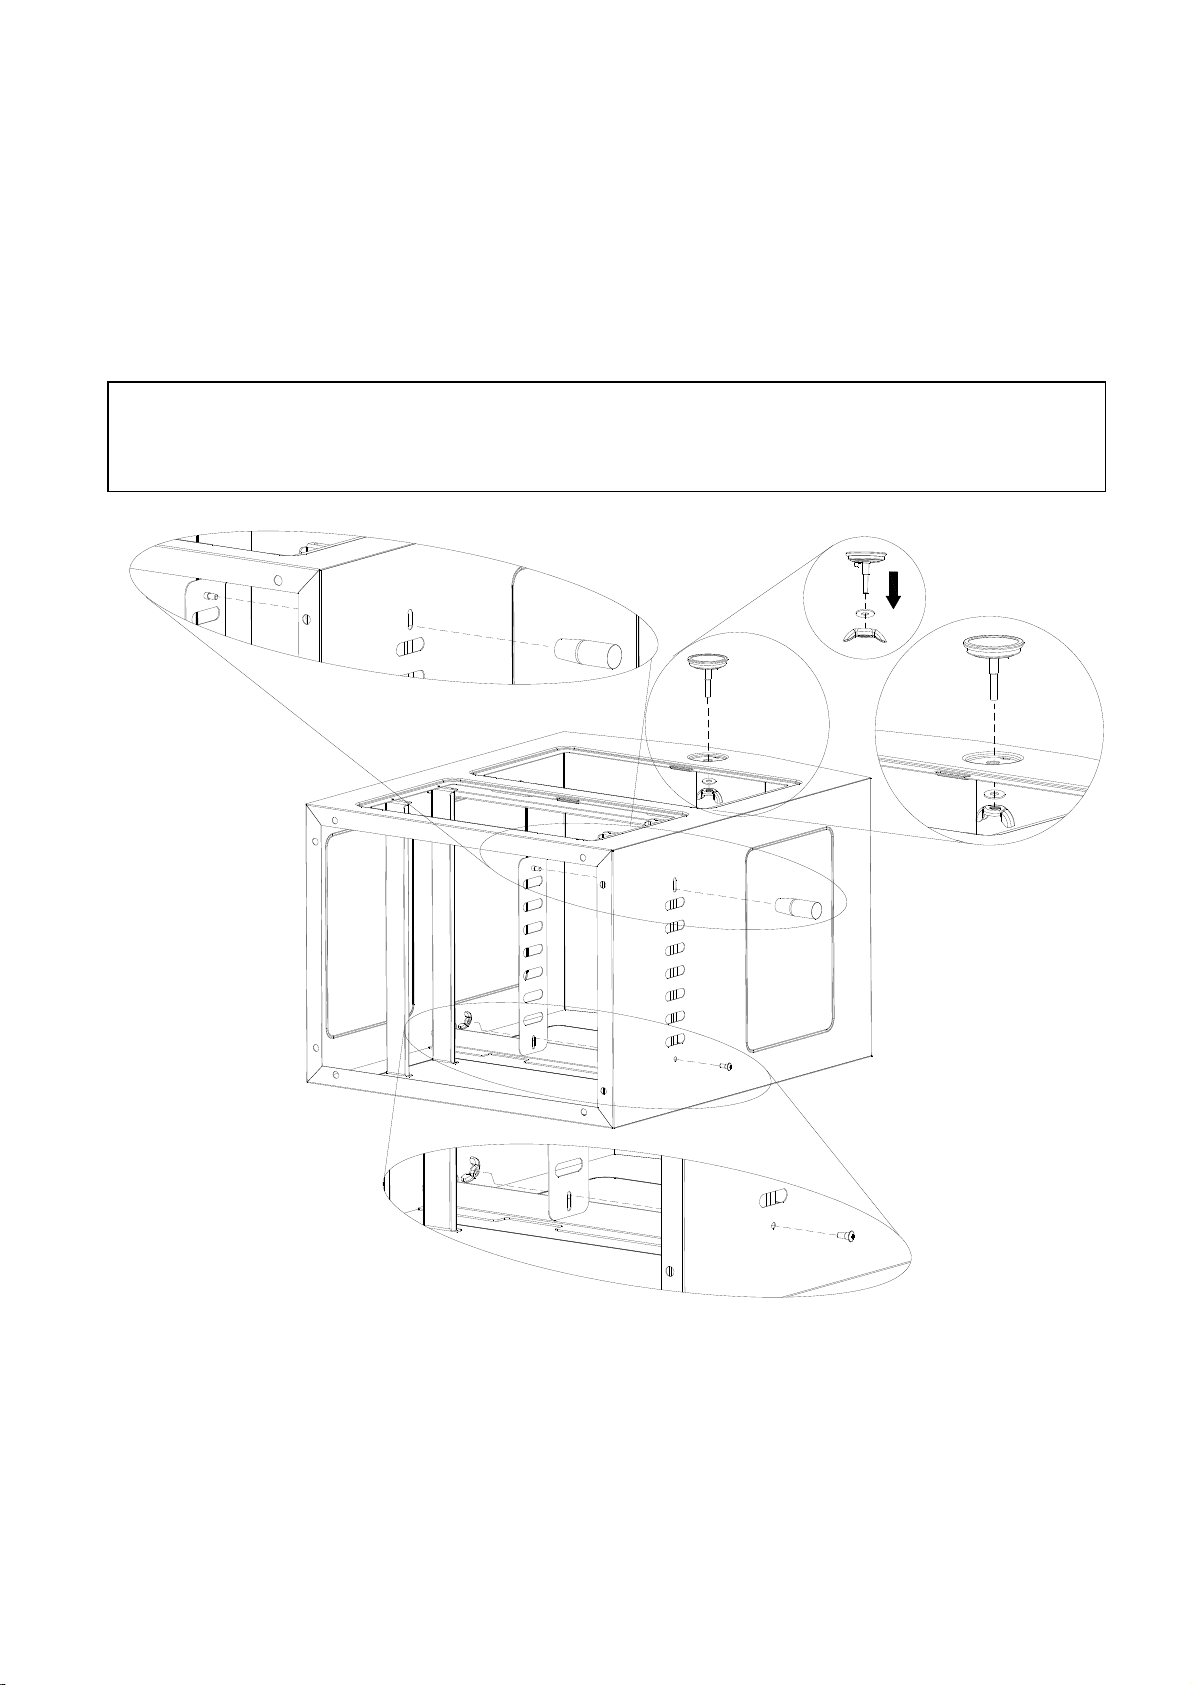
STEP 1:
A: Att ach firebowl air vent (10) to firebowl (6) ((C) Step screw 1Pc / (E) Nut 1Pc).
B: Attach control knob (3) to the screw pre-assembled on the firebo wl air vent (10).
C: Att ach temperature gauge (17) onto firwbowl.
Assembly Tips:
Make sure the firebowl air vent (10) is facing in the correct direction before assembling with firebowl (6).
Please refer to the diagrams as shown below.
(10)
(3)
(17)
(6)
(3)
(10)
(E)
(C)
(E)
(C)
5

STEP 2:
Attach left leg (12), right leg (14) and firebowl base (11) to firebowl ((D) Screw 8Pcs).
Note: Do not fully tighten the screws until all screws are in place.
(12)
(D)
(12)
(14)
(D)
(D)
(D)
(D)
(14)
(D)
(D)
(D)
(11)
STEP 3:
Attach bottom rack (13) to legs ((D) Screw 4Pcs).
Note: Do not fully tighten the screws until all screws are in place.
(13)
(D)
(D)
(D)
(D)
6

STEP 4:
Attach axle (15) and wheels (16) to right legs ((F) Nut 2Pcs).
Note: Use wrenches (H) to tighten the wheel nuts (F).
(F)
(16)
(15)
(F)
(16)
STEP 5:
A: Att ach chimney top (1) to chimney (2) ((A) Screw 3Pcs).
B: Att ach control knob (3) to the chimney damper ((B) Screw 1Pc).
Note: Do not fully tighten the screws until all screws are in place.
.
(1)
(A)
(A)
(A)
(2)
(3)
(B)
7

STEP 6:
A: Att ach chimney to firebowl ((D) Screw 3Pcs).
B: Att ach firebowl handle (8) to firebowl ((D) Screw 4Pcs).
Note: Do not fully tighten the screws until all screws are in place.
(D)
(D)
(D)
(D)
(D)
(D)
(D)
8
(8)

STEP 7:
Attach door (7) to firebowl ((A) Screw 12Pcs).
Note: Do not fully tighten the screws until all screws are in place.
(7)
(7)
(A)
(A)
(A)
(A)
(A)
(A)
(A)
(A)
(A)
(A)
(A)
(A)
9

STEP 8:
Open the lower door and insert the water / charcoal pan (9) into firebowl.
Note: Charcoal pan is located at the lower tier and water pan is located at the upper tier.
(9)
(9)
10

STEP 9:
Open the upper door and insert both cooking grid (5) into firebowl and place the pizza stone (4) onto both cooking grids
(5).
(5)
(4)
(5)
11

Instructions for use
Important: Read all the assembly instructions and safe ty warnings before use and keep these instru ctions in a
safe place for future reference.
1. Make sure the assembly instructions have been followed correctly.
2. Set the barbecue up in a suitable position, on a level surface away from areas likely to catch fire.
3. Use charcoal and a suitable lighting method.
4. During use always use protective gloves when handling with water/charcoal pan (9), cooking grid (5), pizza stone
(4) or touching any part of the barbecue. Never touch by hand directly when the barbecue is hot or in use
General Safety Warnings
Important: Read all the safety warnings and assembly instructions before use and retain all information for future
reference.
1. WARNING! BARBECUES SHOULD NEVER BE USED INDOORS. Only use the barbecue in the open air. Risk�
to life from fumes when used in an enclosed space.
2. Never take a barbecue – or lit charcoal into an enclosed space, like a tent or caravan. Barbecues in enclosed
s
paces are lethal. The carbon monoxide from a badly adjusted barbecue can kill.
3. This barbecue will become very hot, do not move it during operation. Keep children and animals away. Keep away
from flammable objects and materials.
4. Even though great care and attention has been taken to remove sharp edges, you should take care when handling
components to avoid possible injury. The barbecue should be heated until the fuel is red hot at least 30 minutes
before cooking.
5. Always stand your barbecue outdoors and on a level ground away from trees and wooden fencing.
6. CAUTION! Do not use spirit or petrol for lighting or re-lighting. Use only firelighters complying with EN�
1860-3.
7. Do not light the fire with petrol, paraffin, methylated spirit, lighter fuel or alcohol.
8. Use specially formulated BBQ lighting fluid, paste or fire lighters.
9. Do not attempt to light the fire if lighting fluid has been spilt on clothing.
10. Do not try to re-light the fire with lighting fluid as the charcoal may still be hot and cause a flare up.
11. Never touch metal parts which may be hot.
12. During use always use protective gloves when touching any part of the barbecue.
13. Make sure the barbecue has completely cooled before removing the ash.
14. Keep a water sprayer handy to extinguish the flame.
15. Keep a fire extinguisher or fire blanket handy.
16. Never handle charcoal after lighting.
17. Never attempt to move the barbecue after the charcoal has been lit, as it will become very hot. Always wait until the
barbecue has been completely cooled before attempting to move it.
18. Make sure all the doors are securely locked in place before transportation or storage.
19. Keep hands away from folding mechanisms to prevent entrapment or injury.
20. Do NOT operate, light or use this appliance within ten feet (3.05m) of walls, structures or buildings.
21. Minimum clearance from sides and back of unit to combustible constructions is 91.4 cm.
22. Prevent CO poisoning. Make sure exhaust from generators is properly vented away from occupied areas. Carbon
Monoxide (CO) is a colourless, odourless, highly poisonous gas that can kill in minutes. Carbon Monoxide
poisoning can be caused by ANY fuel that burns or smoulders. Watch out for the symptoms – Mild headache /
Dizziness / Nausea Vomiting / Fatigue / Drowsiness.
23. WARNING! MAXIMUM CHARCOAL WEIGHT to be used: TOTAL 0.9 kg.
12

24. Do not use the barbecue in a confined and/or habitable space e.g. houses, tent, caravans, motor homes, boats.
Danger of carbon monoxide poisoning fatality.
13

Barbecue safety hints
1. Outdoor use only.
2. Always stand your barbecue on firm, level and heat-resist surface, well away from wooden fences, overhanging
trees and other flammable materials.
3. The barbecue must always be under the control of a competent adult. Keep young children and pets at a safe
distance once the charcoal has ignited.
4. Never use white spirit, paraffin, petrol, methylated spirit, lighter fuel or similar solvents to light the barbecue. To help
ignition, only use firelighters that comply with EN 1860-3. Never add lighting fuel, once the charcoal has ignited.
5. Never attempt to move the barbecue after the charcoal has been lit, as it will become very hot. Always wait until the
barbecue has completely cooled before attempting to move it.
6. Do not leave a lighted barbecue unattended, even for the shortest period of time.
7. The barbecue should be heated up and the fuel kept red hot for at least 30 minutes prior to the first cooking on the
barbecue.
8. Do not cook before the fuel has a coating of ash.
9. Most metal parts will become very hot during use. The use of protective mittens/gloves is recommended when
handling the grill, turning food, etc.
10. Flare-ups will occur when the hot fat from food drips onto the charcoal. Keep a jet water sprayer at hand to
extinguish any flames and prevent food from burning.
11. When cooking has finished, extinguish the charcoal using a fine water spray or by covering with sand.
12. Remember, ensure the charcoal has completely cooled before attempting to empty the barbecue and clean it.
13. To p rolong the life of the met al part s, do not leave the barbecue out side and unprotected from the weather. Ideally it
should be stored in a garage or garden shed when not in use.
14. If the product is broken or damaged discontinue use immediately.
Barbecue helpful hints
1. To make it easier to clean your barbecue after use line the firebowl with aluminum cooking foil, shine side up.
Remember to leave ventilation holes clear by piercing the foil where necessary.
2. Charcoal is available in lump wood form (large irregular pieces) and as briquets (uniformly sized pieces). As a
guide lump-wood charcoal is best in barbecue for quickly cooked foods such as sausages and burgers whilst
briquets are more suitable for a roast as they burn longer an d hotter.
3. It is not advisable to completely fill the firebowl as the barbecue may become far too hot to cook successfully.
4. If the fire flares up due to dripping fat then douse the flames lightly with a fine water spray.
5. When you have finished cooking never pour cold water directly on the coals to extinguish them as this may
damage your barbecue. Use old cinders, sand or a fine water spray.
6. To clean your barbecue soak the cooking grill and tools in hot soapy water as soon as possible after use. Dry
thoroughly and store in a dry place. Do not leave your barbecue outside unprotected.
14
Produced in China for Wilko, Roebuck Way,
Manton Wood, Worksop, Nottinghamshire, S80 3EG
Careline 08000 329 329 www.wilko.com
 Loading...