


USER GUIDE
336.973.3103 wilkes.net
1

1400 River Street, Wilkesboro, NC 28697
336.973.3103 | 877.973.3104
Repair: 336.973.4000
Email: wilkesinfo@wilkes.net
wilkes.net
2

Table of Contents
REMOTE CONTROL DIAGRAM 4
PLAYBACK CONTROLS 5
WHAT’S ON TV? 6
USING THE CHANNEL GUIDE 6
SEARCH 8
RECORD PROGRAMS 9
WATCH A RECORDED PROGRAM 11
WATCH A PROGRAM WHILE RECORDING 12
REMINDERS 12
FOLDERS 13
STATUS BAR 13
DELETE A RECORDING 14
USING BOOKMARKS 14
WORKING WITH MULTIPLE STREAMS 14
RECORDING CONFLICTS 15
ATTEMPT TO WATCH A LOCKED CHANNEL 15
ATTEMPT TO WATCH A PROGRAM OUTSIDE THE PARENTAL
RATING SETTINGS 15
USING THE LIST BUTTON 16
CREATE A FAVORITES LIST 19
TV MENU 20
RECORDINGS MENU 20
PHONE MENU 21
APPS MENU 22
SETTINGS MENU 24
GUIDE SETTINGS 25
PARENTAL CONTROLS 25
RECORDING SETTINGS 27
COLUMNS AND ROWS DISPLAYED IN GUIDE 28
CALLER ID AND MESSAGE WAITING INDICATION ON THE TV 28
POWERING OFF – OUT OF SYNCH 28
Programming Remote Control
INSTALLING BATTERIES 29
PROGRAMMING DEVICE CONTROL 29
SEARCHING FOR YOUR CODE 29
CHECKING THE CODES 30
USING LEARNING 30
Learning Precautions 30
Programming a Learned Key 30
Deleting a Single Learning Key 31
Deleting All Learned Keys in a Specic Mode 31
PROGRAMMING CHANNEL CONTROL LOCK 31
Unlocking Channel Control 31
Locking Channel Control to STB 31
CHANGING VOLUME LOCK 31
Unlocking Volume Control for a Single Device 31
Unlocking All Volume Control 32
Locking Volume Control To One Mode 32
PROGRAMMING ID LOCK 32
PROGRAMMING MACRO KEYS 32
Programming a Macro Key 32
Clearing a Macro Key 33
USING THE MASTER POWER KEY 33
Programming the Master Power Key 33
Using the Master Power Key 33
Clearing the Master Power Key 33
RE-ASSIGNING DEVICE KEYS 33
CLEARING CUSTOM PROGRAMMING 34
TROUBLESHOOTING 34
FCC NOTICE 35
ADDITIONAL INFORMATION 35
MANUFACTURER’S CODES 36
Setup Codes for TVs 36
Setup Codes for TVs (DLP) 39
Setup Codes for TVs (HDTV) 39
Setup Codes for TVs (LCD) 39
Setup Codes for TV/DVD Combos 40
Controlled by the TV 40
Controlled by the DVD 40
Setup Codes for TV/VCR Combos 40
Controlled by the TV 40
Controlled by the VCR 41
Setup Codes for TV/VCR/DVD Combos 41
Controlled by the TV 41
Controlled by the DVD 41
Controlled by the VCR 41
3
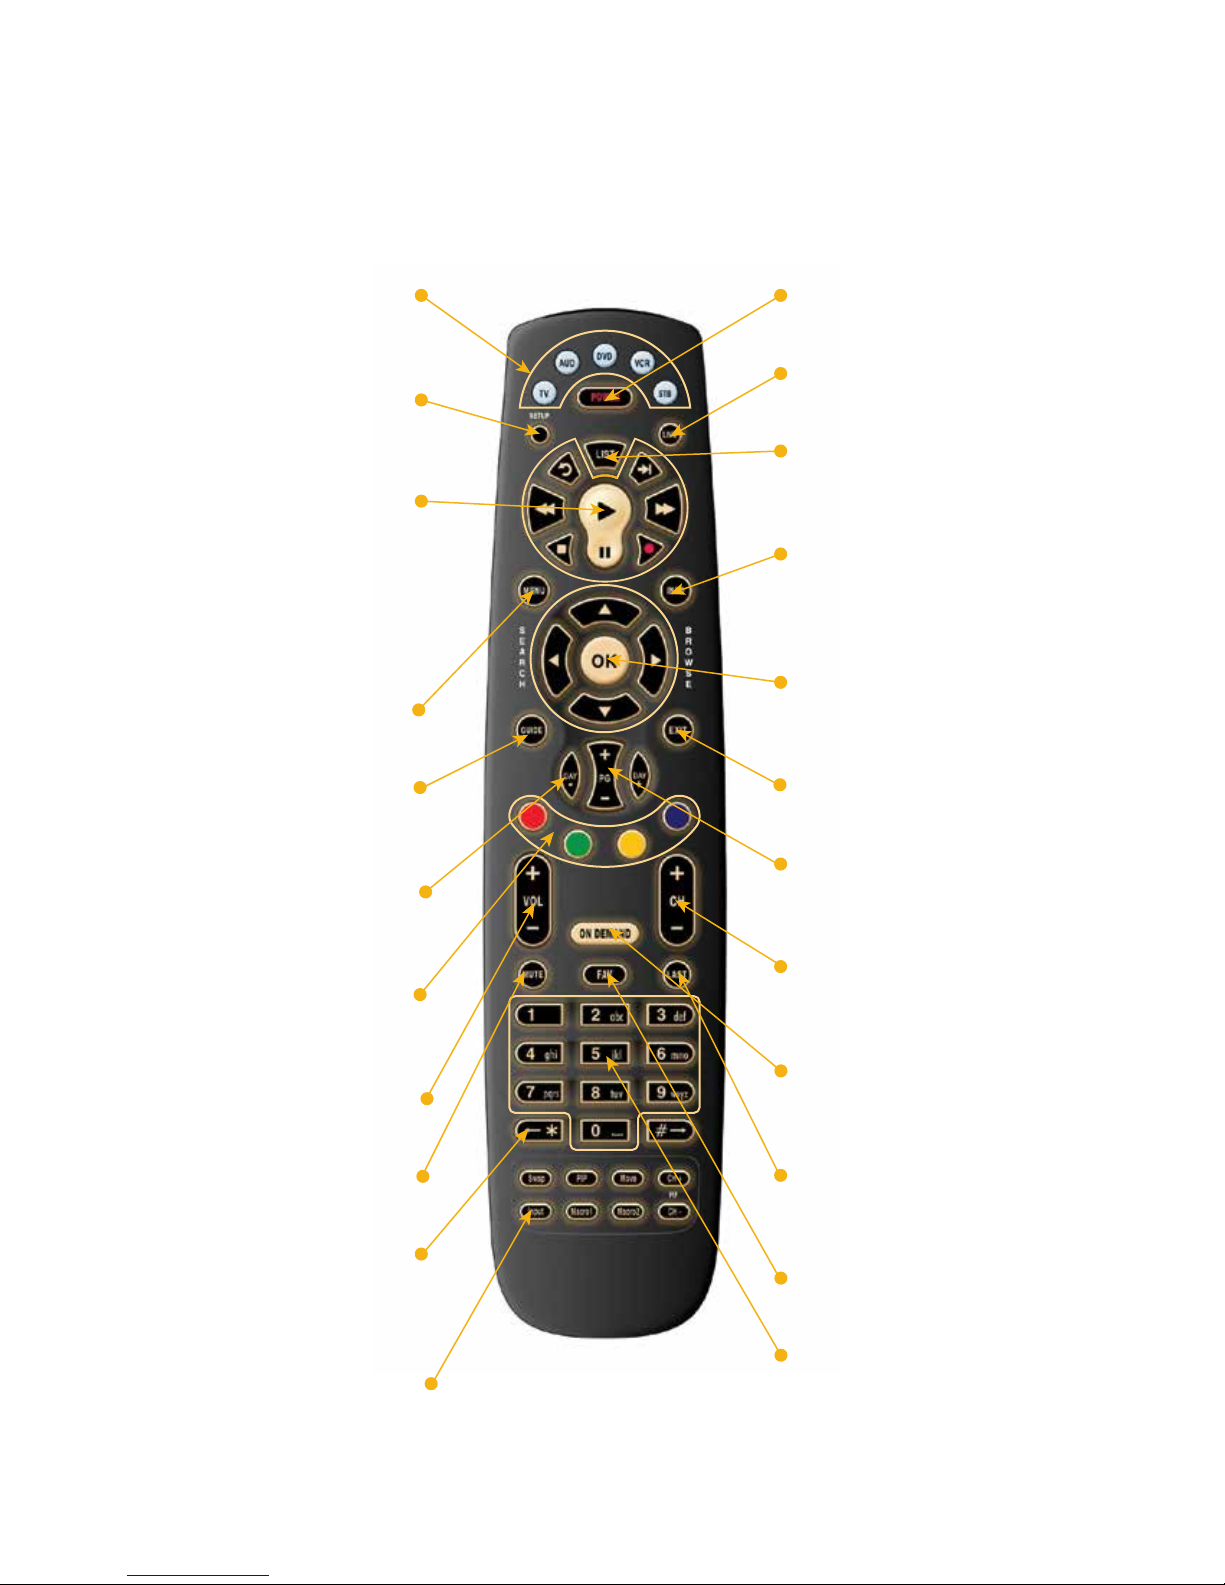
REMOTE CONTROL DIAGRAM
Remote Control Diagram
TV, AUD, DVD, VCR, STB
Use one remote to control
multiple devices.
Setup
Use for programming sequences of
devices controlled by the remote.
Skip Forward, Skip Back, REW,
PLAY, FFWD, STOP, Pause,
Record
In STB mode, these control the
DVR functions. In other modes,
these can control a VCR, DVD
Player or PVR.
Menu
Displays the menu.
Guide
Opens the Interactive Program
Guide.
Day +/-
Jump ahead or back one day in the
Interactive Program Guide.
Red, Green, Yellow, Blue
Access additional features on your
set-top box, including special apps.
Vol +/-
Raise or lower the volume.
Power
Turn on/off a selected device.
Live
Return to watching live TV.
List
Display a list of recorded, future and
series rules on your DVR.
Info
Display the current channel and
program information. Press again for
more detail.
Browse, Search, Arrow and OK
Navigate and select on-screen
choices.
Exit
Exit the current screen.
Page +/-
Page up or down in lists and
Interactive Program Guide.
Channel +/-
Changes to the next higher or
lower channel.
On Demand
Access video on demand services
(future feature).
Mute
Turn the sound off or on.
Aspect Ratio
Temporarily change the conversion
mode from Original Size or Fit
to Screen.
Input
In TV control mode, will change the
input of the device you are
controlling.
Last
Recall the last channel you
were watching.
FAV
View your favorite channels.
Number Keys (0-9)
Directly select a channel or
enter options.
4
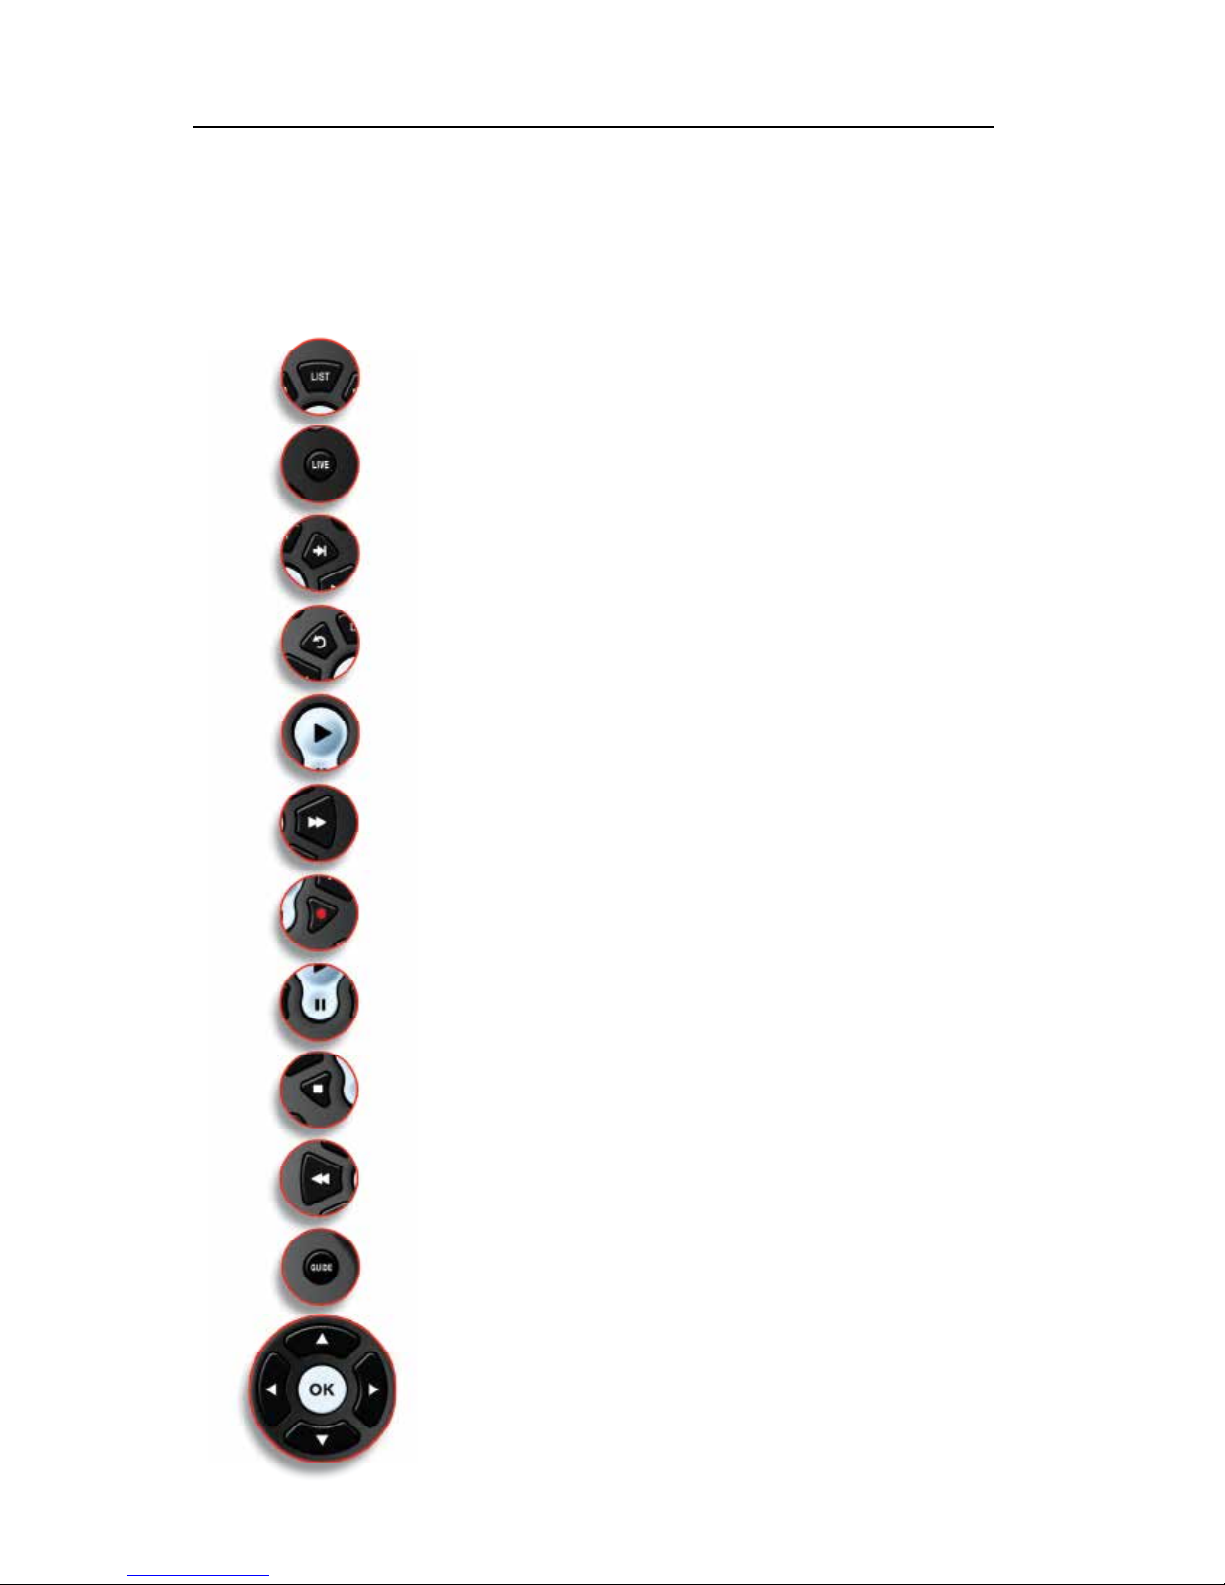
PLAYBACK CONTROLS
Your remote control offers standard capabilities, as well as enhanced remote control
buttons that function similarly to DVD controls.
Here’s what each button does:
List: Select to see a list of recorded programs. Press the LIST button
a second time to see what is scheduled to be recorded. Press LIST a
third time to access your Series Rules.
Live: Select to return to the current part of a live broadcast.
Skip Forward: Skip forward 30 seconds while watching a recording or
live TV.
Skip Back: Skip backward ten seconds while watching a recording or
while watching live TV.
Play: Begin or resume watching a recording. Also display/remove the
status bar.
Fast Forward: Fast forward through parts of a recording. Press multiple times to go forward faster.
Record: Record a program
Pause: Pause the program you are currently watching. While
paused, the Fast- Forward button will play the program frame by
frame in slow motion.
Stop: Stop watching a recording or stop a recording that is in prog-
ress.
Rewind: Rewind through parts of a recording. Press multiple times to
rewind faster.
Guide: Access the program Guide. Press a second time for alternate
view.
Arrows/Browse/Search/OK: Press to navigate through the guides,
menu options or to make selections.
5
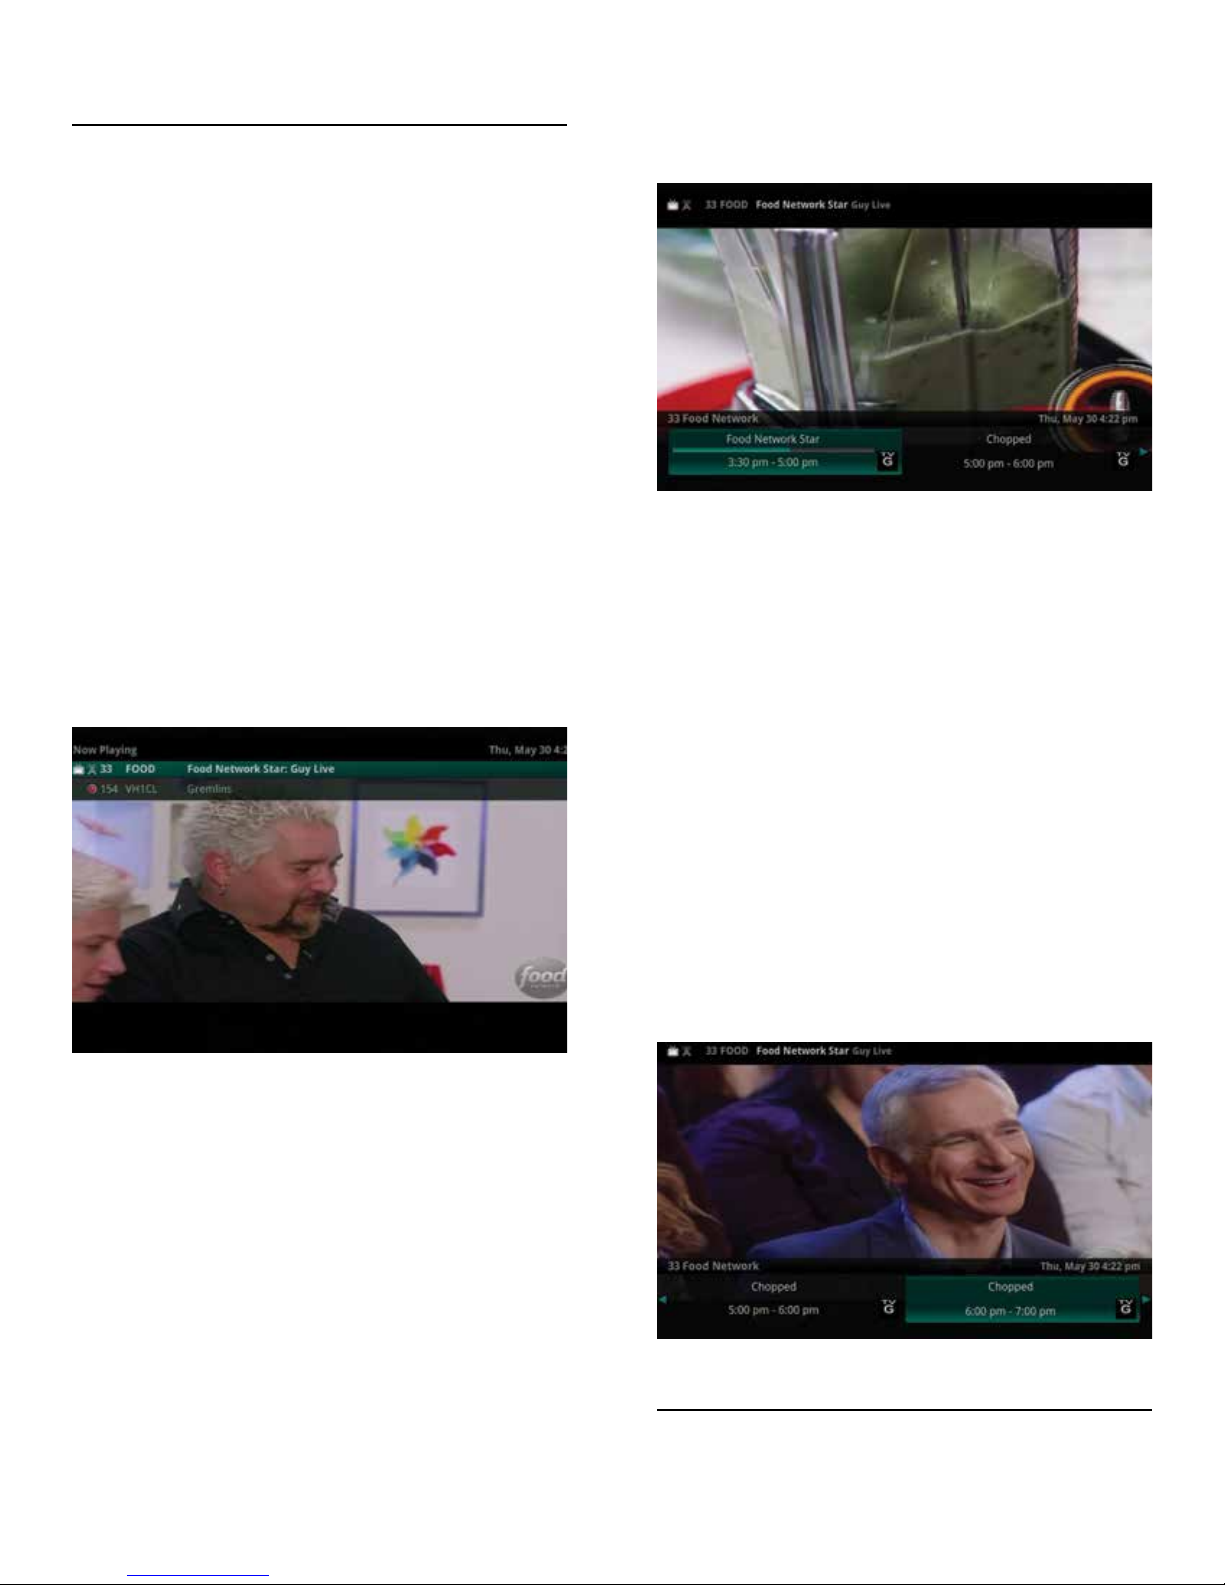
WHAT’S ON TV?
When you rst turn on the TV, there are three easy
ways you can see what is currently showing. You can
use the OK button, the INFO button, or the Browse
(right arrow) button.
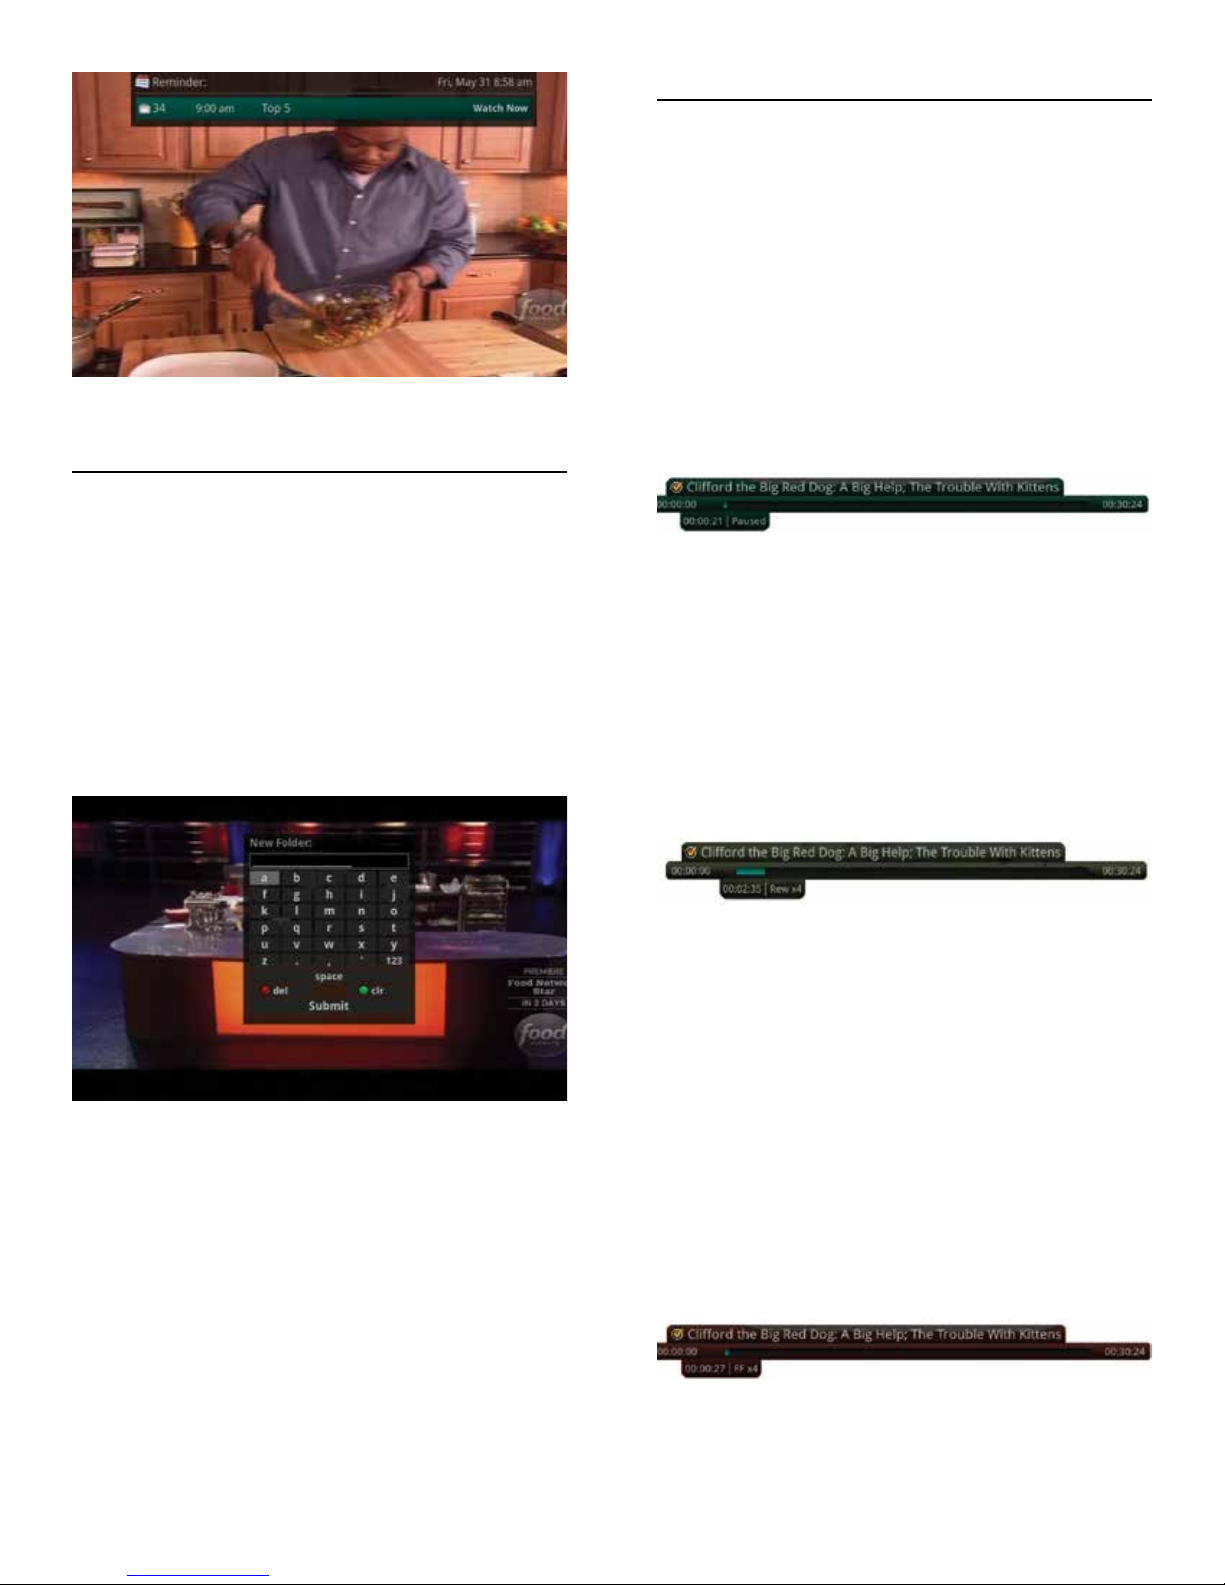
Using the OK Button (Now Playing)
► Press the OK button on the remote control
to see what is playing currently.
► If a program is being recorded (even on
another channel), it will be listed, denoted by
a red circle symbol.
► If the Weather Application is enabled, the
Now Playing window will also provide the
current temperature.
In this example, the TV symbol indicates you are
viewing Food Network Star: Guy Live from channel 33
FOOD. The tower symbol next to channel 33 indicates
what is on live television. Channel 154 is currently
recording as indicated by the red circle symbol.
what is showing on another channel.
3. Press the Day + and Day – buttons to see
what is on this channel 24 hours from now.
Using the Browse Button
1. Press the Browse (right arrow) button on
the remote control. At the top of the screen,
you see the channel you are currently tuned
to. At the bottom of the screen you see the
channel number, channel name, current date
and time, program name, date and time the
program airs, a progress bar showing how far
along the program is, and the program that
airs next.
2. Press the Right/Left arrow buttons to view
what is showing later on the current channel.
Or, press the Up/Down arrow buttons to view
what is showing on another channel.
3. Press the Day + and Day – buttons to see
what is on this channel, 24 hours from now.
Using the INFO Button
1. Press the INFO button on the remote control.
When you press the INFO button, you see
the name and a description of the current
program at the top of the screen. If you are
watching a live program, at the bottom of
the screen you’ll see the channel number,
channel name, current date and time, program name, date and time the program airs,
a progress bar showing how far along the
program is, and the program that airs next.
2. If you are viewing a live program you can
press the Right/Left arrow buttons to view
what is showing later on the current channel
or, press the Up/Down arrow buttons to view
USING THE CHANNEL GUIDE
The Channel Guide is your on-screen tool to see what
is on television and allows you to surf channels while
still watching a program.
6
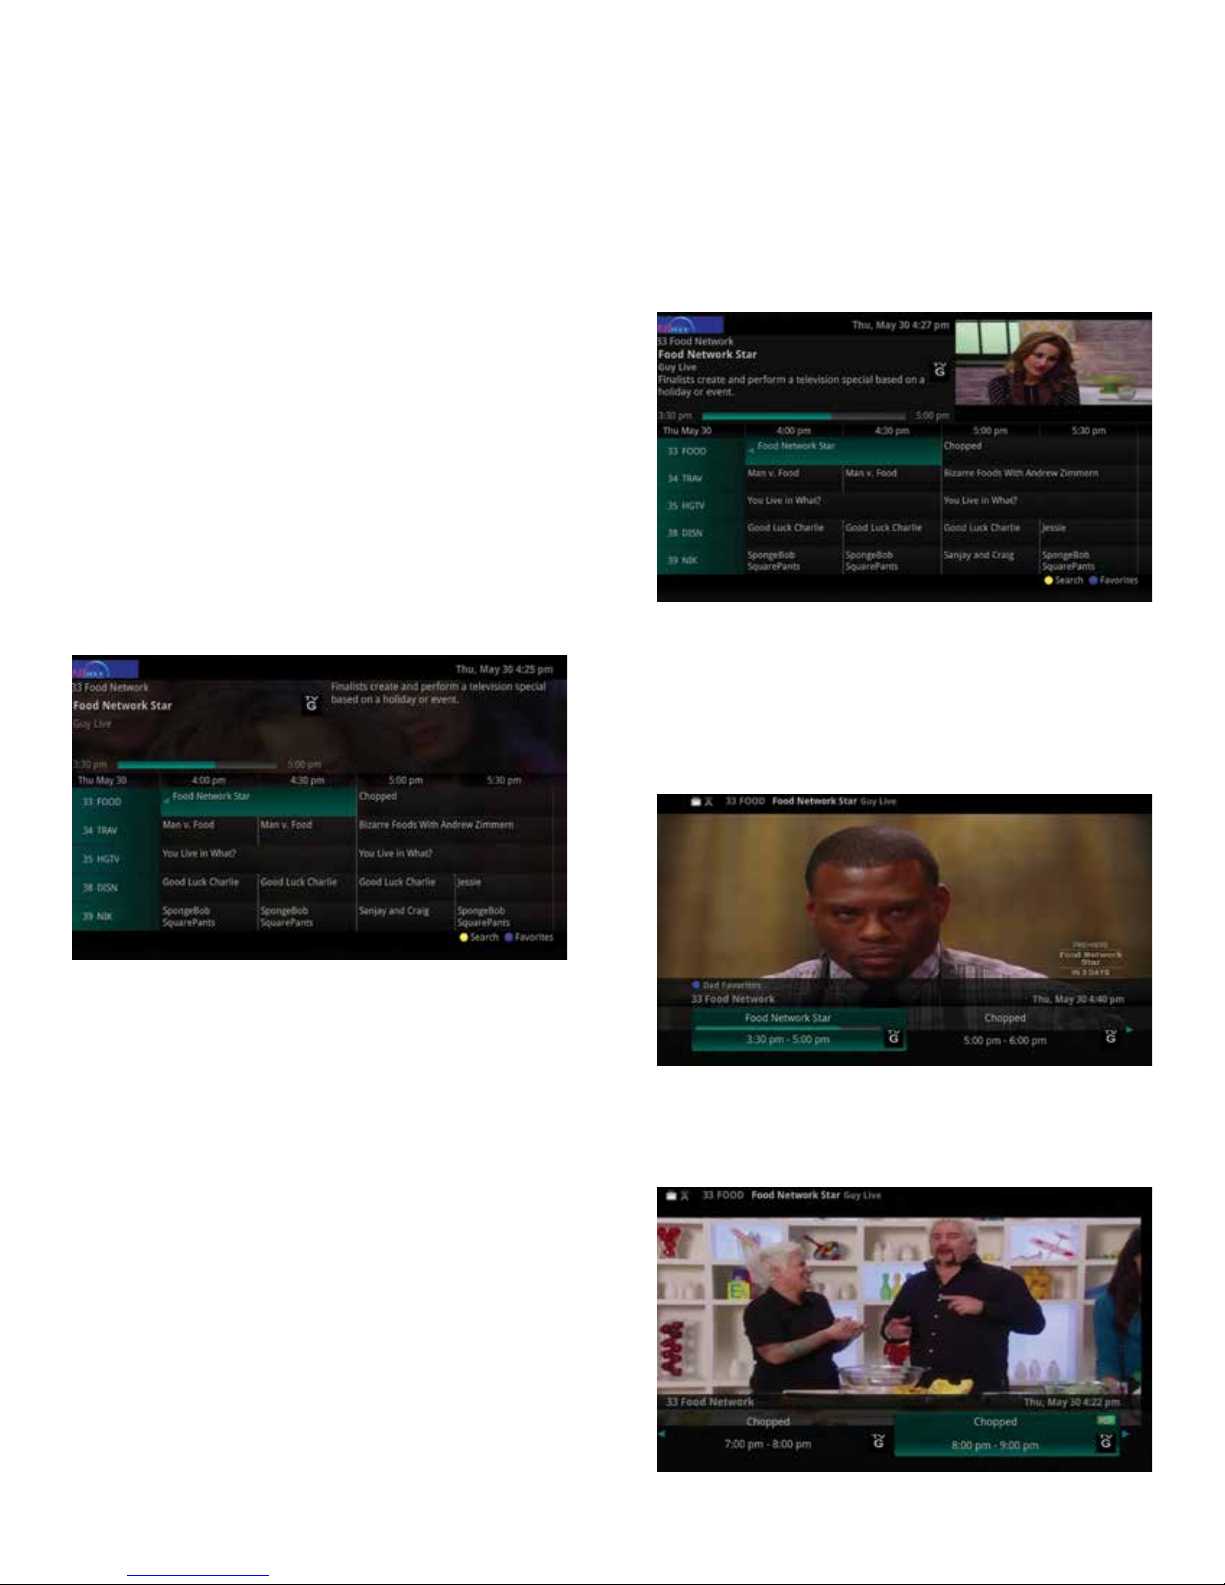
Using the GUIDE Button
1. Press the GUIDE button on the remote con-
trol. Information about the program you are
tuned to displays at the top of the screen
along with indicators showing:
► Whether a program is in HD
► Whether a program is a new episode
► Whether the broadcast is in HD
► Whether the program is available for Pay Per
View purchase
Other channels and their programs will show at the
bottom of the screen. Shows that started prior to
the current time slot are indicated with a blue arrow
prior to the program name. Shows that continue past
the last time slot showing on the guide are indicated
with a blue arrow after the program name. Programs
scheduled for recording will be marked with a red
circle.
guide. If there was a program you missed,
you could search for other programs of the
same name and schedule the DVR to record
the program.
7. While in the Guide, if you press the GUIDE
button a second time, you can view the Guide
in Corner Guide view where similar informa-
tion is displayed in a different format.
8. To browse through the guide using a Favorites
list, press the Blue button or the FAV button.
The list name will appear at the bottom of
the screen. Keep pushing the Blue button to
scroll through the different Favorites lists.
2. To move through the guide one channel at
a time, use the Up/Down arrow buttons on
the remote control. Or, press the Channel +
and Channel – buttons to scroll through the
channels more quickly.
3. To move through the guide one page at a
time, press the Page + and Page – buttons.
4. To move through the guide one screen at
a time, use the Fast Forward and Rewind
buttons.
5. To move through the guide a full 24 hours,
press the Day + and Day – buttons on the
remote control. You cannot use the Day – button to go back to programs that have already
aired, however, you can use it to page back if
you have moved ahead in the guide.
6. To see programs you missed, press the Skip
Back button to go back one page in the
9. Events marked with the green “NEW” symbol
signify a new episode of the program.
7
10. To exit the guide, either press the GUIDE
button a third time or press the EXIT button
on the remote control.
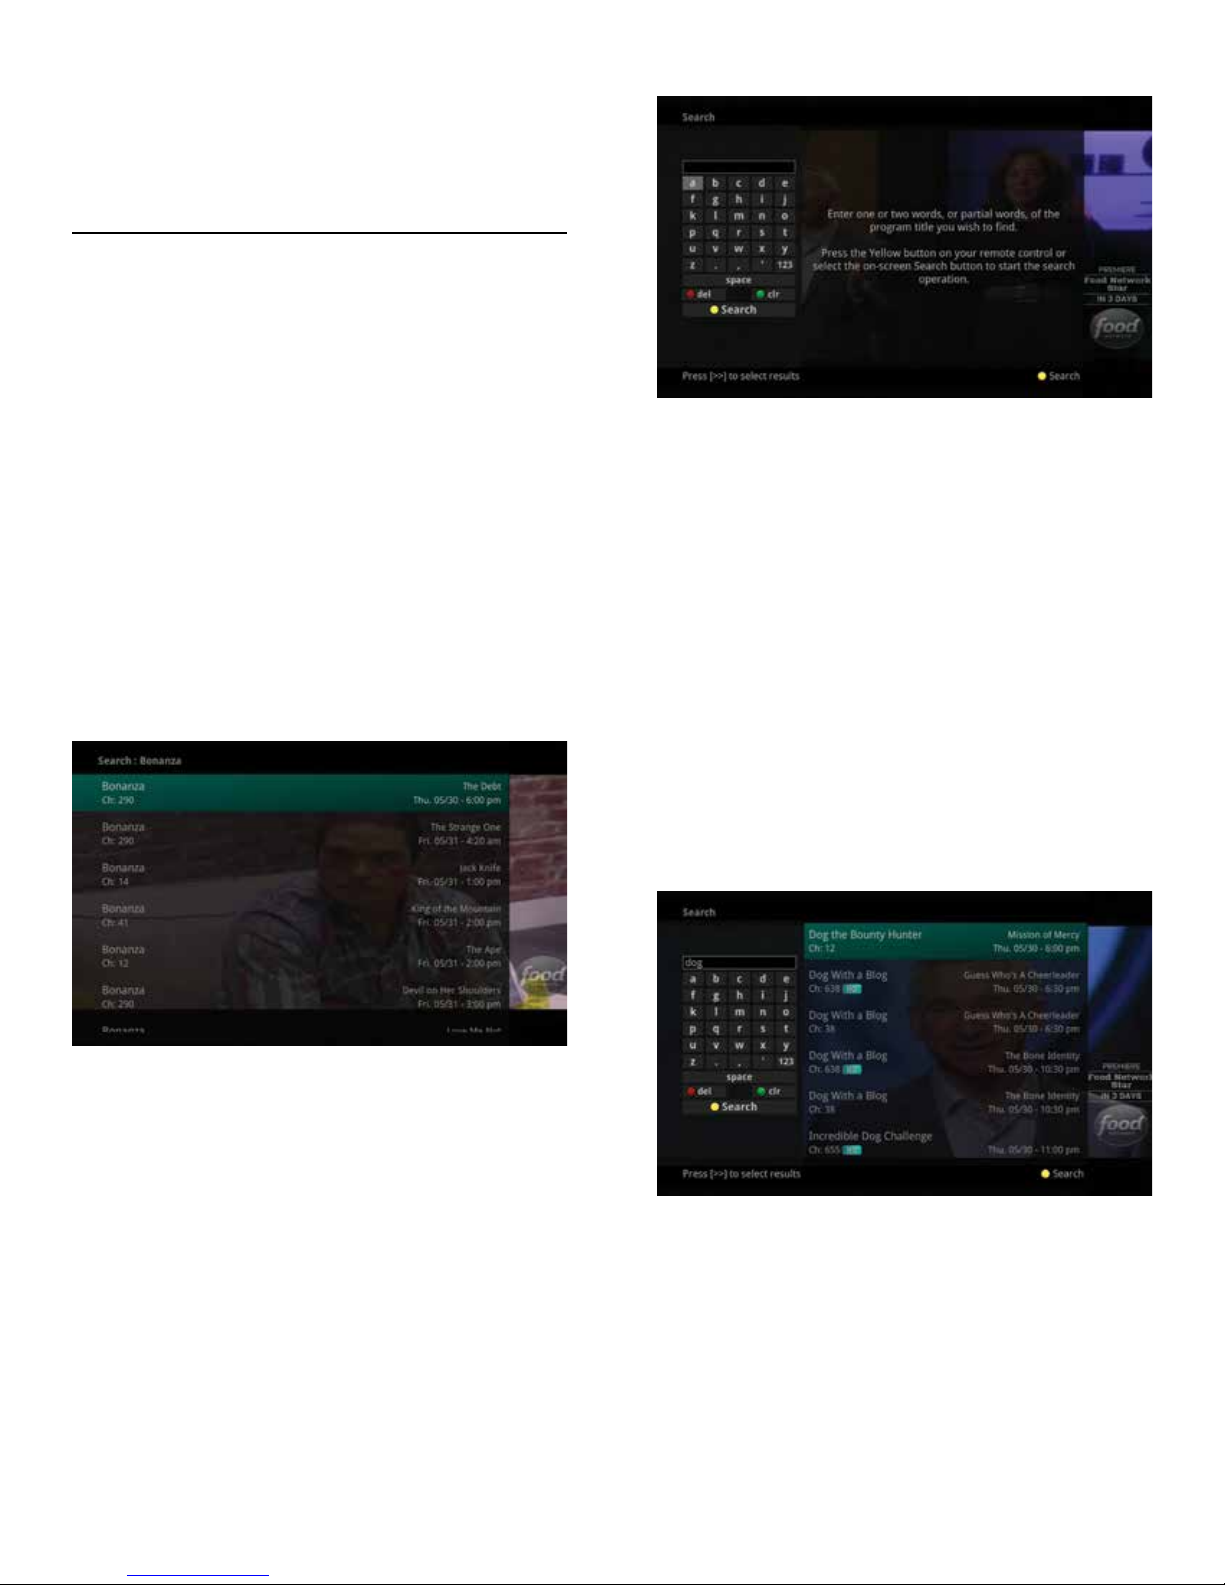
SEARCH
You may either search for a full title of a pro-
gram or for a word or two within a title. You can
use the Search feature in the guide to nd all
instances of a program by title or, you can use
the Search feature to enter a partial name and
search for all instances of the word to locate
the desired program. This works well if you can’t
recall the full name of a program or movie.
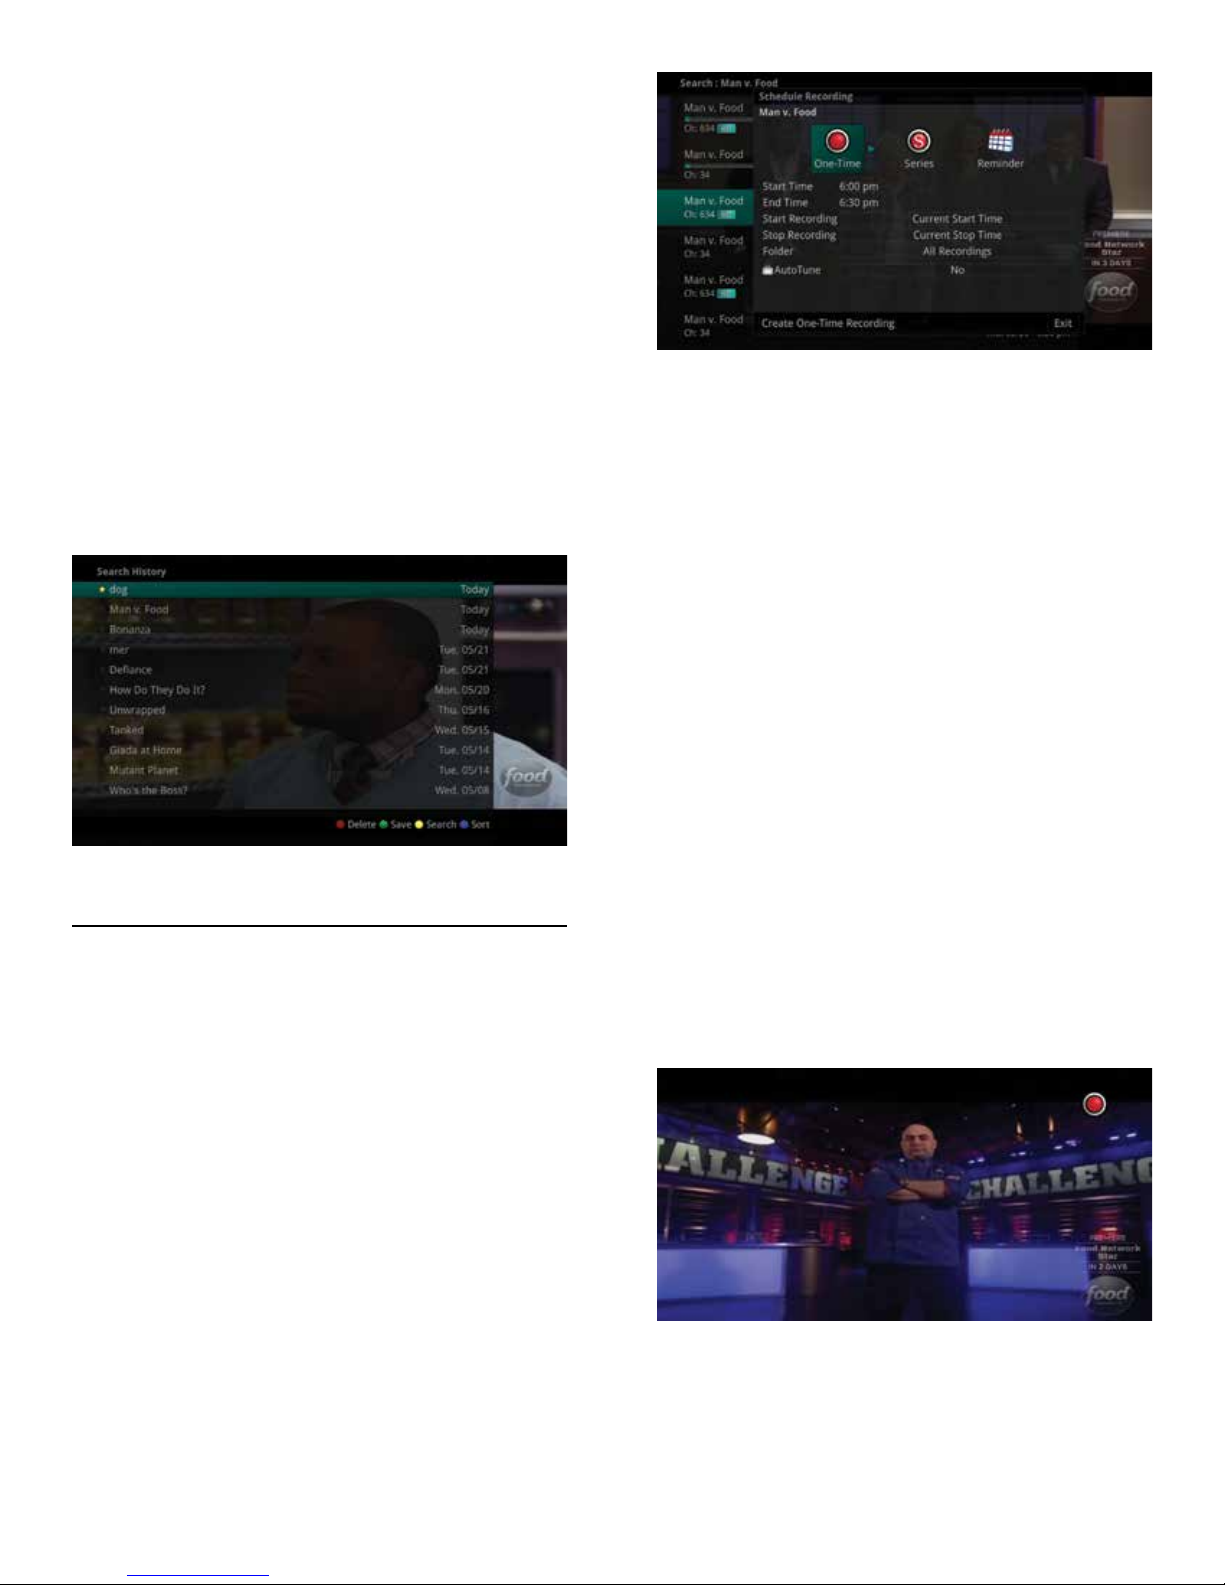
Perform a Title Search Within the Guide
1. While viewing the Guide, select the desired
program using the arrow buttons and, press
the Yellow button on the remote control.
2. This will perform a full title search to return
all shows with the same title. In this example,
the search found all shows titled “Bonanza.”
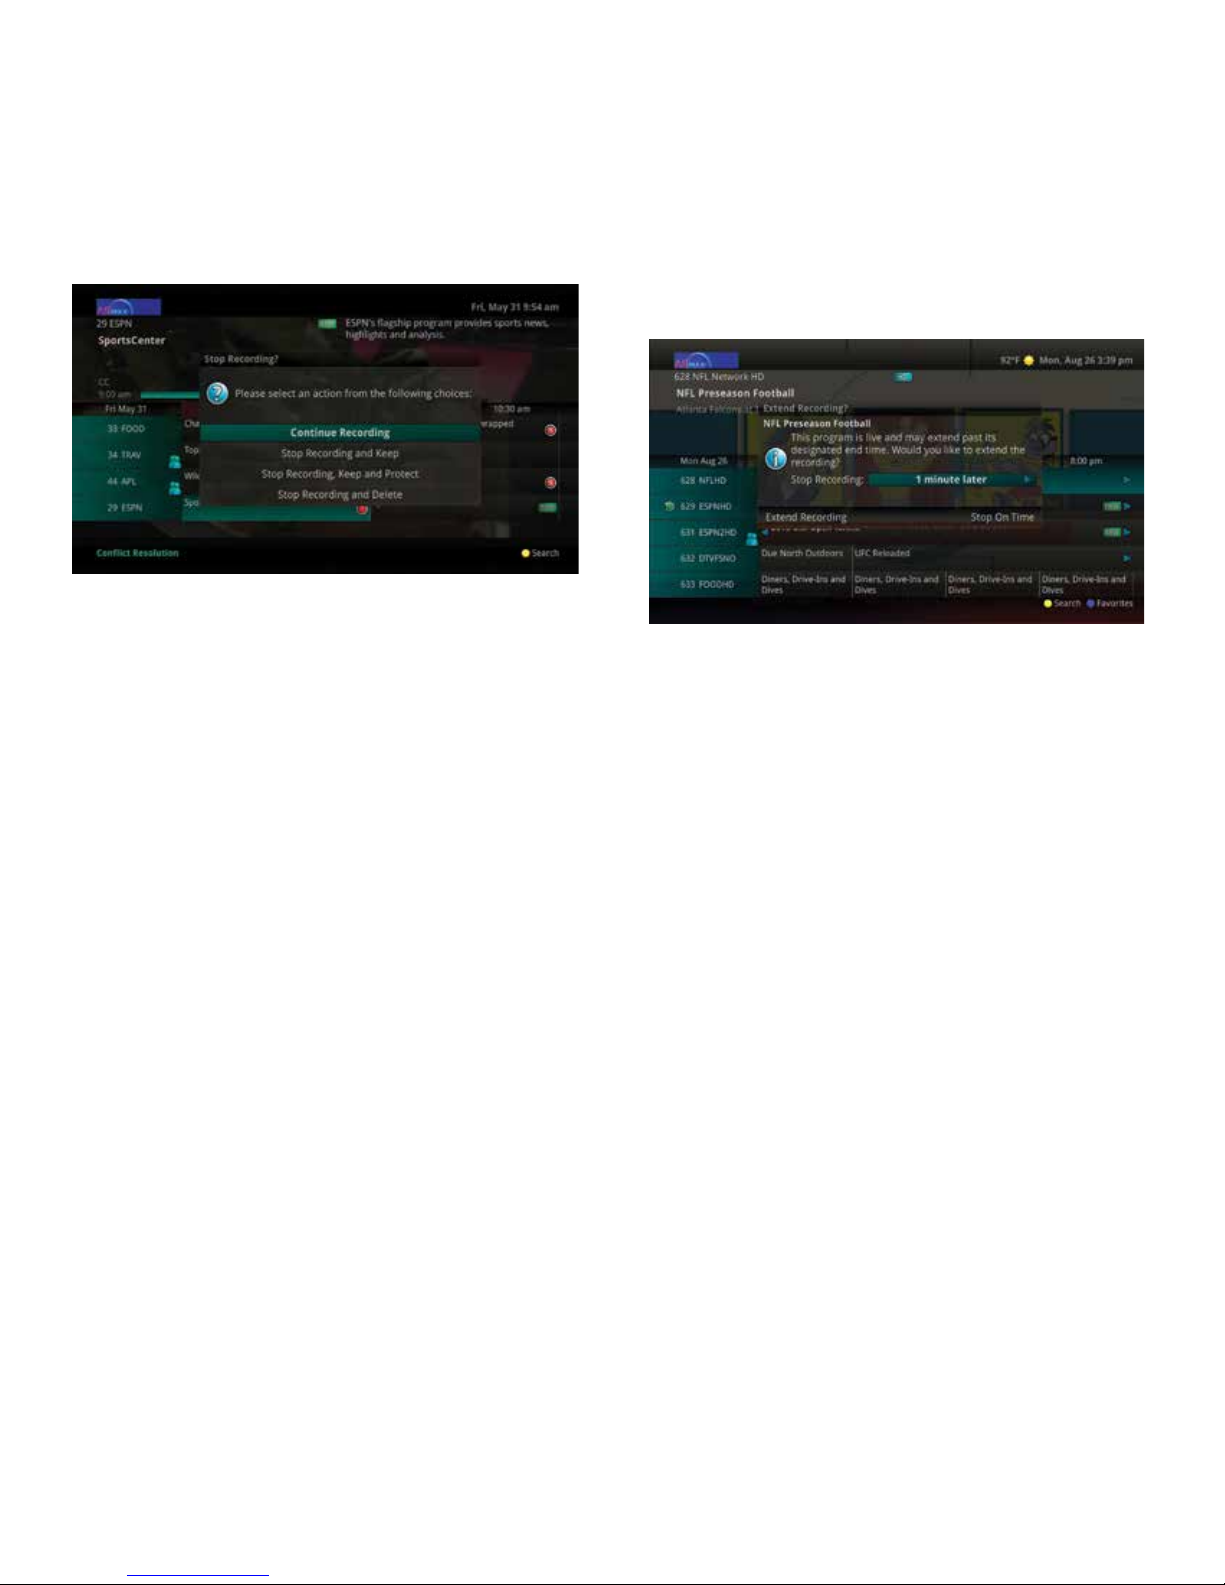
2. Use the arrow buttons on the remote control
to highlight the letters and press the OK but-
ton to select a letter. When you have entered
all the text, arrow down to Submit and press
the OK button or just push the Yellow button
to start the search.
3. To record a program from the search results,
use arrow buttons to highlight the program
and then press OK or Record on the remote
control. Follow the steps to schedule a recording.
4. You may also continue to search for more
programs by the same name. In this exam-
ple, selecting “Dog the Bounty Hunter” and
pushing the Yellow button will search for all
scheduled airings of the program.
3. If there is a program in the search results
you would like to record, you may schedule
a recording from the list of search results.
Use the Up/Down arrow buttons to highlight
the program and press Record or OK on the
remote control. Follow the steps to schedule
a recording.
Using the Search Button
1. While viewing any program (not in the Guide
or other menus), press the Search button
(left arrow) on the remote control. This will
display a search window where you can enter
the rst few letters or one or two words in the
program title.
Search History
The Search History feature will allow you to save up to
18 searches so that they can be used again at a later
time. The oldest searches will automatically be removed as a new search is performed. Frequently used
searches may be saved to prevent removal, and may
be sorted to keep them at the top of the History list.
8
1. Select the MENU button. Select TV | Search
| History.
2. To delete a recent search, select the Red
button on your remote control. The selected
search will be removed.
3. To save a recent search, select the Green
button on your remote control. The search will
now have a yellow star icon next to it acknowledging that it is now a saved search.
4. To use a previous search, select the search
and press the Yellow button on your remote
control.
5. To sort recent searches, select the Blue
button on your remote control. Searches will
be sorted by saved searches in alphabetical
order and then unsaved searches in alphabetical order.
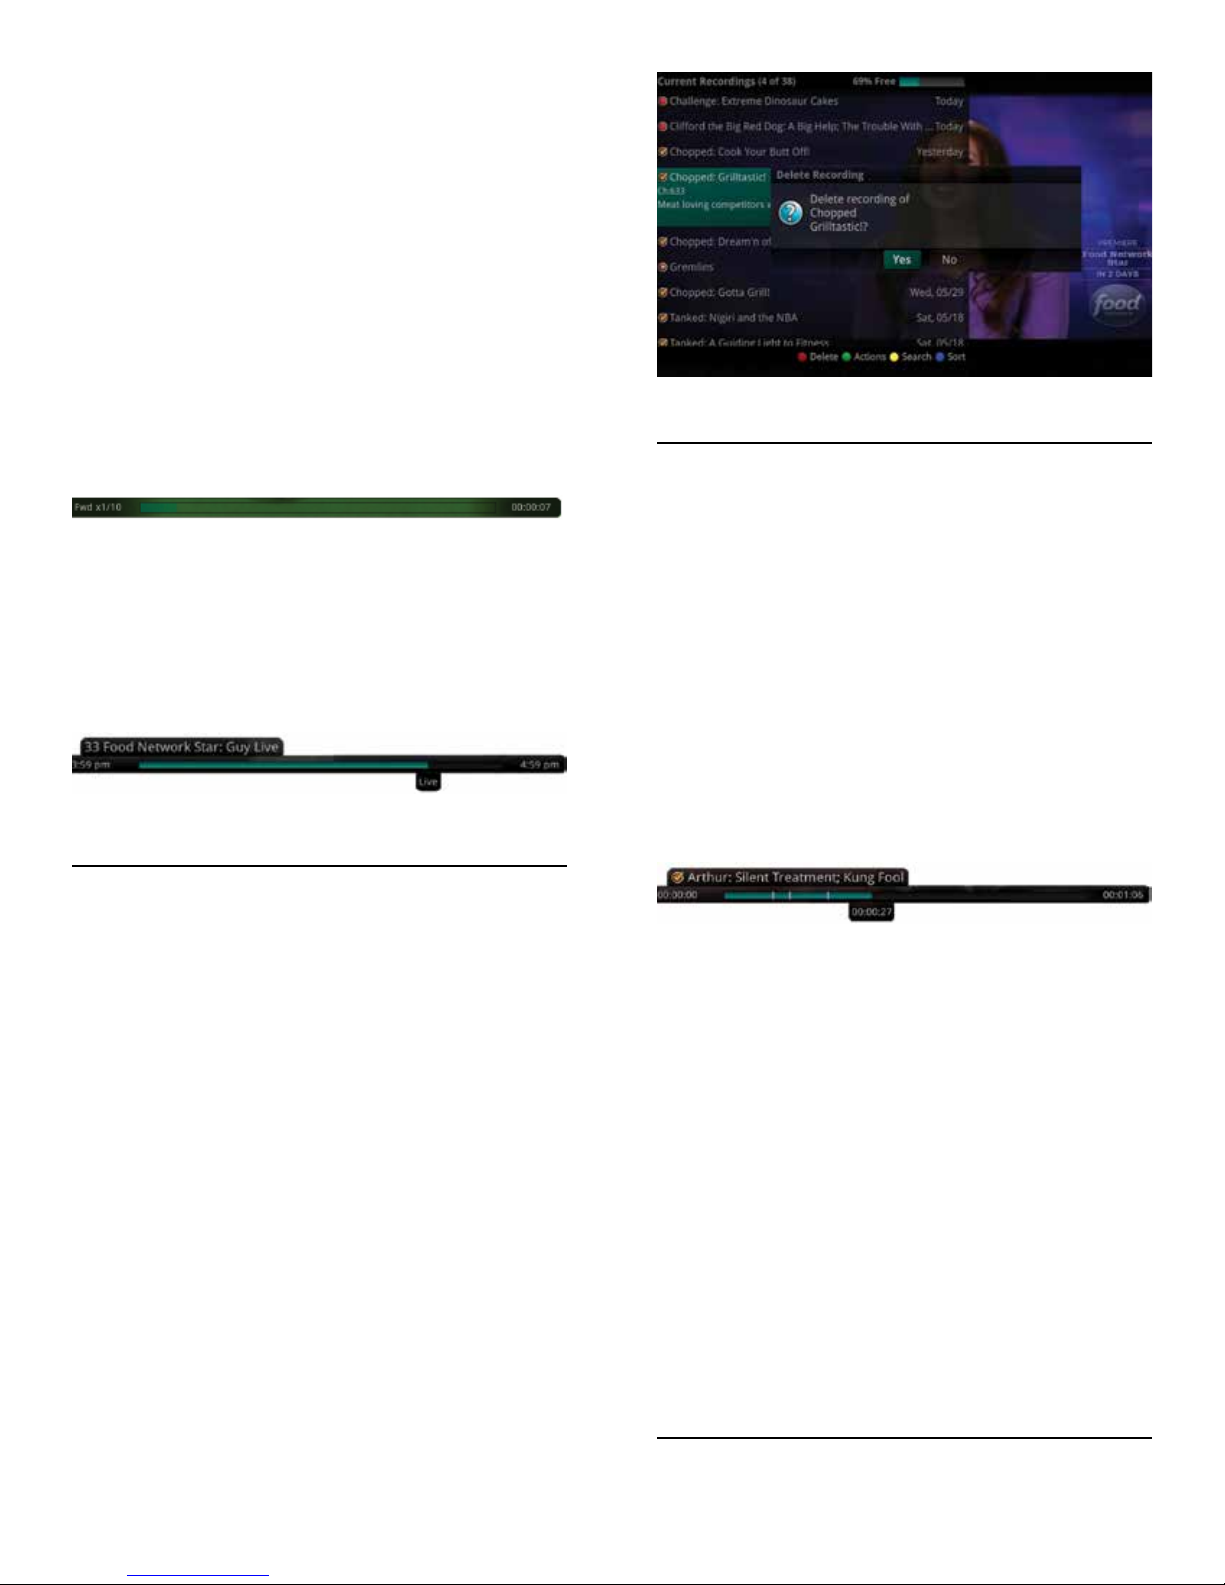
RECORD PROGRAMS
Your DVR service gives you the freedom to record
the program you are watching as you are watching it,
record a program while you watch another, or you can
record a program you see in the program guide. You
can also schedule a series recording so you always
catch all episodes of your favorite programs.
3. Customize your recording selections for start
and stop time and which folder to save the
recording to.
4. The Reminder function may also be selected
from this screen. Select the Reminder func-
tion if you would like your television to remind
you when:
► When the program is going to air
► When a new episode of the program
is going to air
► Each time a program will air
► You may set the reminder for 1, 2, 3,
4, 5, 10 or 15 minutes prior to the
program start.
► AutoTune: You can also choose to
have the television automatically tune
to the channel when the recording
starts. More information on setting
reminders can be found later in this
guide.
5. A Red circle will briey display in the top right
of the screen indicating you are recording the
program.
Note: If a program you record is either locked by parental rating settings or on a channel that is locked,
the DVR will record the program but you will be
required to enter a PIN to view it.
Record What You Are Currently Watching
1. While watching a program, press the Record
button on the remote control.
2. Choose whether this is a one-time recording,
a series recording, or select the Cancel to not
set a recording.
6. If you decide to stop recording the program
before it is complete, press the Stop button.
Choose from the options regarding how to
save the partial recording:
► Stop Recording and Keep – Saves the
recording for future viewing.
9
► Stop Recording, Keep and Protect –
Saves the recording and protects it
from automatic deletion.
► Stop Recording and Delete – Deletes
the recording from memory.
► Continue Recording – Does not stop
recording the program.
Create a One-Time Recording from the Guide
Whether you are choosing a program from the Guide
or if you are currently viewing the program when you
decide to record it, the process to create a one-time
recording is the same:
1. From the Guide, highlight the program you
want to record and press the Record button
on the remote control. The recording options
will display.
2. Choose to create a one-time recording.
3. Use the arrow keys to customize start & stop
times, folder to save the recording to, and
auto tune preferences.
4. Arrow down to “Create One Time Recording”
and click the OK button on your remote control.
5. A Red circle will display in the guide indicating the program will record.
6. You will also be able to nd the recording in
the Future Recordings list.
7. If you change your mind and decide against
recording the program, with the program
highlighted on the guide, press the Stop button on the remote control and the Red circle
will be removed indicating the program will
not record.
live event running longer than originally scheduled in
the programming guide, you have the option to record
up to one hour longer in order to be sure you record
the entire event.
1. From the Guide, highlight the program you
want to record and press the Record button on
the remote control. The recording options will
display.
2. The DVR recognizes from the program guide
information that this is a live broadcast and
warns you that it may extend past the designated end time. Use the Left/Right arrow keys
to choose the Stop Recording option. Choose a
15 minute, 30 minute, or 60 minute extension
time.
3. Arrow down to Extend Recording and press OK
on the remote control.
Note: Live programming options will only be available
when the Guide Data ags the programming as “live”
programming.
Record a Series from the Guide
Whether you are choosing a program from the Guide
or if you are currently viewing the program when you
decide to record it, the process to create a series
recording is the same:
1. If you have found a program that you would
like to record in the Guide, highlight it and
press the Record button on the remote control.
The recording options will display.
Record a ‘Live’ Event
Recording a Live Event (Live sporting event, award
show, etc.) is essentially the same as recording any
other program. However, since there is a chance of a
10
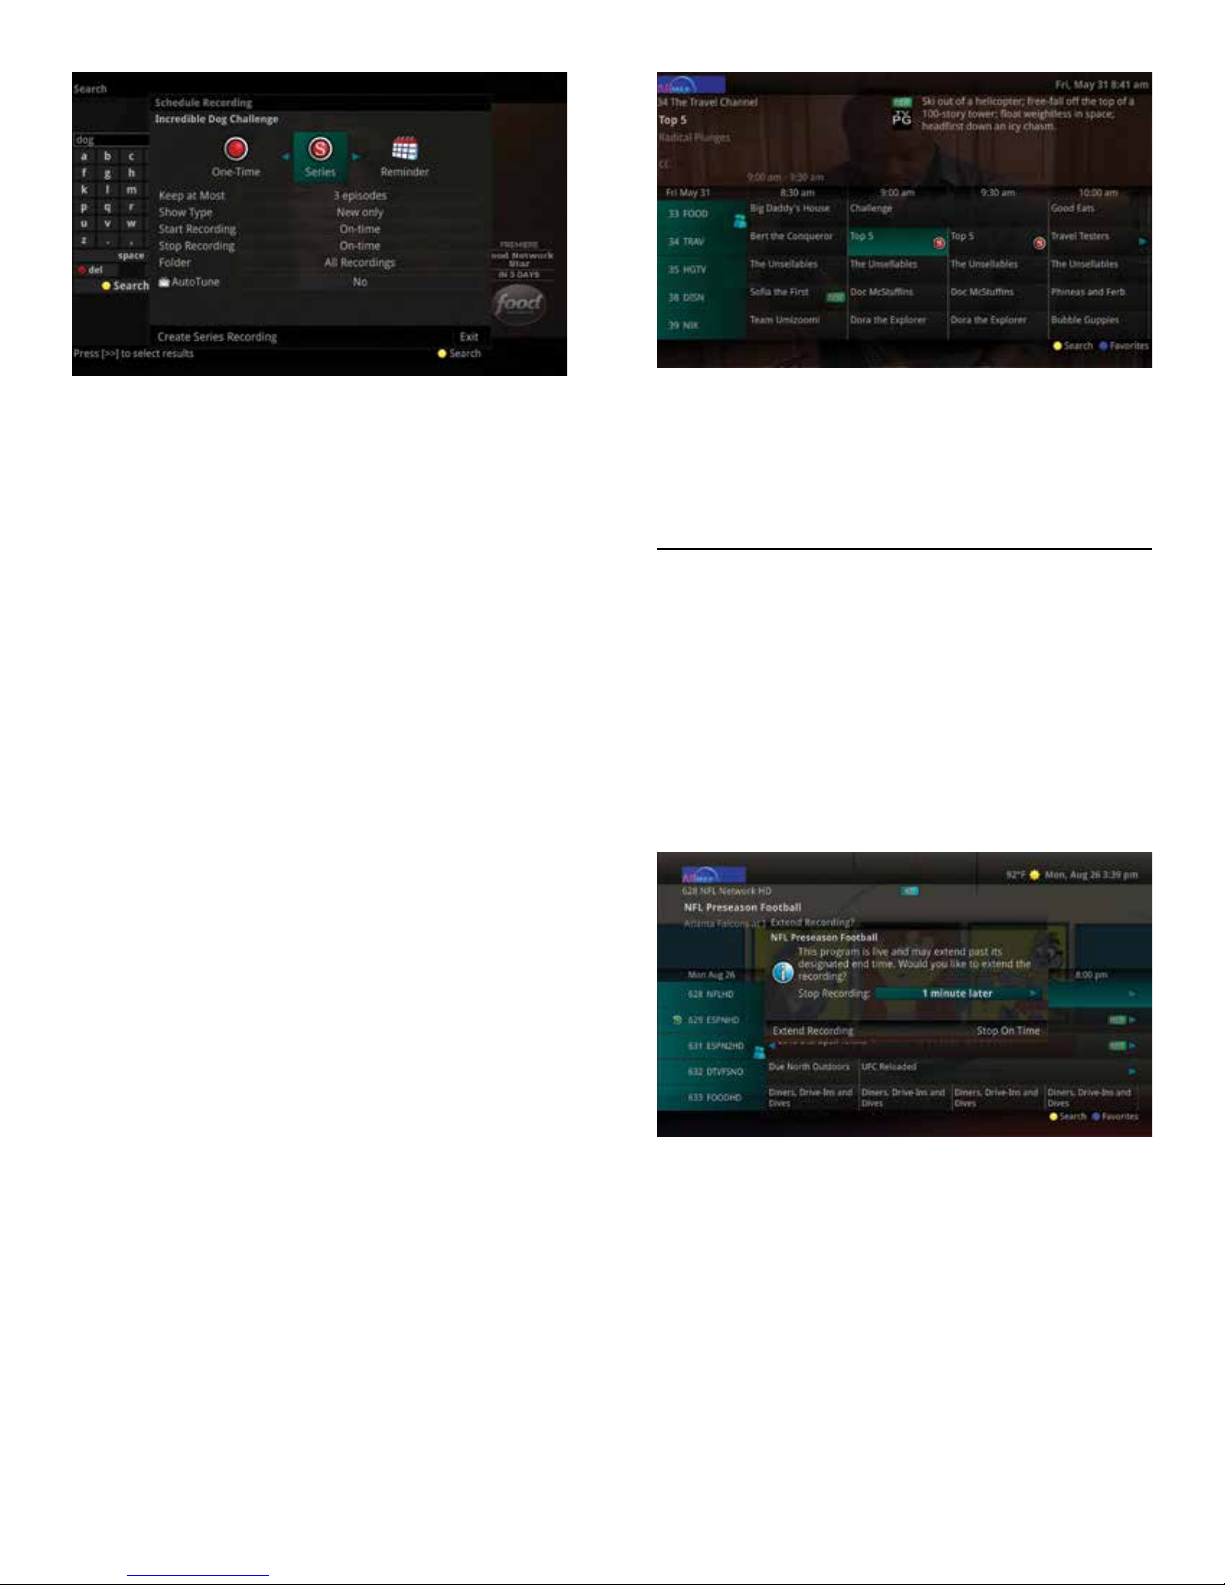
2. Arrow over to select Series and press OK on
the remote control.
3. The Series Recording Options will display.
5. You will also be able to see the scheduled
recording in the Future Recordings list as well
as in the Series Rules list.
► Choose how many episodes to “Keep at
Most” any given time. Options are 1–10 or
All episodes. Use Left/Right arrow buttons to
make your selection.
► Choose the Show Type you wish to record.
You may choose to record All episodes of a
program or only New episodes.
► Choose when to Start Recording. You can be-
gin ‘on time’ when the program is scheduled
to begin. Or you can use the Left/Right arrow
buttons to choose 1, 2, 3, 4, 5, 10, 15, or 30
minutes early.
► Choose when to Stop Recording. You can stop
‘on time’ when the program is scheduled to
end. Or you can use the Left/Right arrow
buttons to choose 1, 2, 3, 4, 5, 10, 15, 30, or
60 minutes late.
► Choose the Folder where you want to save
the recording. By default the folder will be
‘All Recordings’ but you may choose another
existing folder or create a new folder.
► Arrow down to Create Series Recording and
press OK on the remote control to save your
changes. To cancel your changes, press the
EXIT button or highlight Cancel and press OK
on the remote control.
4. A Red circle with an ‘S’ will display in the
guide indicating the program is part of a
series recording.
WATCH A RECORDED PROGRAM
1. To access the list of recorded programs,
press the LIST button on the remote control.
2. From the list of recordings, use the Up/Down
arrow buttons to choose the folder contain-
ing the recorded program you wish to watch.
When you highlight a program, it expands
to show more information, or you may need
to press the INFO button depending on your
conguration.
3. To start playback of the recording, press the
Play button on the remote control.
4. If the program is one that you had previously
viewed and stopped in the middle, you will be
asked if you would like to resume playback
from where you left off or if you would like to
restart from the beginning or if you would like
to exit and return to the Recordings List.
5. As you play back a program, you have the
ability to Fast Forward, Rewind, Pause, Replay, Jump Forward, Jump Backward or Stop
11
the playback.
6. When you reach the end of the program, you
will be asked if you would like to delete the
recording. Select either Yes or No.
WATCH A PROGRAM WHILE RECORDING
After scheduling a recording, you can watch that program from the beginning while it is still recording. You
can either tune to that channel at the start time or if
it has already started, press the OK button. The Now
Playing window will appear. Highlight the program
being recorded - indicated by the red record button,
then press the OK button. The show being recorded
will start from the beginning of that recording. If you
were previously watching the program that is being
recorded and tuned away from it, when you tune
back to it, it will start at the point you left off.
2. Arrow over to select Reminder.
3. Customize your settings for a one-time
reminder, reminders only when a new episode will air, or a reminder or for all program
airings. You can also select how many minutes before the program starts you want your
reminder to appear (1, 2, 3, 4, 5, 10 or 15
minutes early), and whether to automatically
tune to the channel when the program begins. Arrow down to highlight Create Remind-
er and press the OK button on the remote.
4. A reminder icon will appear next to the pro-
gram on the guide to indicate a reminder has
been set for that program.
REMINDERS
Your television can be set to remind you when a
program is about to air and to automatically tune to a
program you don’t want to miss.
1. To set a reminder, press the GUIDE button
and use the arrow buttons to nd and highlight the upcoming program you wish to ag
with a reminder. Press the Record button on
the remote.
5. A reminder pop-up will appear at the top of
your TV screen at the time you designated.
Press the OK button to begin watching the
program at any time or wait for it to change
channels automatically if you set the auto
tune feature.
12
FOLDERS
Folders allow you to organize the recordings on your
DVR by user, program type, or any other way you may
choose.
1. To create folders, simply choose the [New
Folder] option any time you are setting a new
recording. Arrow down to select Create One
Time Recording and select the OK button.
2. You will then be prompted to name the folder.
Enter the folder name and select Submit.
STATUS BAR
The status bar appears whenever you Skip Forward,
Skip Back, Pause, Rewind, or Fast Forward a live or
recorded program. It gives you information such as
the channel you are viewing, the title of the program
you are watching, and the length of the live buffer.
Pause
As you watch live TV or recorded programs, press the
Pause button and the programming on the screen
instantly freezes. Press the Play button to resume
normal play of the program from the point where it
was paused.
Rewind
Do you need to see something again? Press the
Rewind button. Press it again up to four times to in-
crease the rewind speed. x4, x15, and x60 and x300
will display next to the status bar. x4 is the slowest
setting and x300 is the fastest. To slow the Rewind
speed, press the Fast Forward button. At the point
that Rewind mode is slowed as far is it goes, you will
return to normal mode and then Fast Forward mode.
Press the Play button to resume normal play directly.
3. Once the recording is complete, it will be
placed in the designated folder and you can
access it by pressing the LIST button.
4. To move a program to a different folder, nd
the recorded program by pressing the LIST
button. With the program selected, press the
Green button to reveal List Action options and
choose Move to Folder and select the desired
folder.
Fast Forward
Press the Fast Forward button to move forward in a
recorded program. Press it again up to four times to
increase the fast forward speed. x4, x15, x60 and
x300 will display next to the status bar. x4 is the
slowest setting and x300 is the fastest. To slow the
Fast Forward speed, press the Rewind button. At the
point that Fast Forward is slowed as far as it goes,
you will return to normal mode and then to Rewind
mode. Press Play to resume normal play directly. For
programs you are watching live, Fast Forward mode
will be activated if you have paused or rewound the
program.
Skip Back
With Skip Back, you can go back to see the last play
of the game or replay the last scene of your movie.
13
Just press the Skip Back button on your remote control to replay the last 10 seconds. Press the Replay
button repeatedly to continue skipping back in 10
second increments.
Slow Motion
The Slow Motion function allows you to rewind to a
point in a recorded program or within the recorded
(buffer) of the program you are currently watching
and watch a segment of the program in slow motion.
Select the Pause button at the point in the program
that you would like to watch in slow motion. Select
the Fast Forward button to play in slow motion. Press
once to play at x1/4 speed, and press twice to play at
x1/2 speed.
Return to Live TV
Any time you Pause or rewind a live program, the
show continues to be broadcast in real time and
saved in the buffer. To return to live programming,
press the LIVE button.
USING BOOKMARKS
Your DVR is capable of marking specic spots in a recorded program, called Bookmarks. It is an easy way
for you to mark your spot in a program that you might
not be able to watch in its entirety, bookmark a great
play in a sporting event, or the end of a commercial.
1. To work with bookmarks, press the Play
button on the remote control to display the
status bar.
2. As you are recording a program or watching a
recorded program, press the Blue button on
the remote control to add a Bookmark. You
will notice a black line in the status bar.
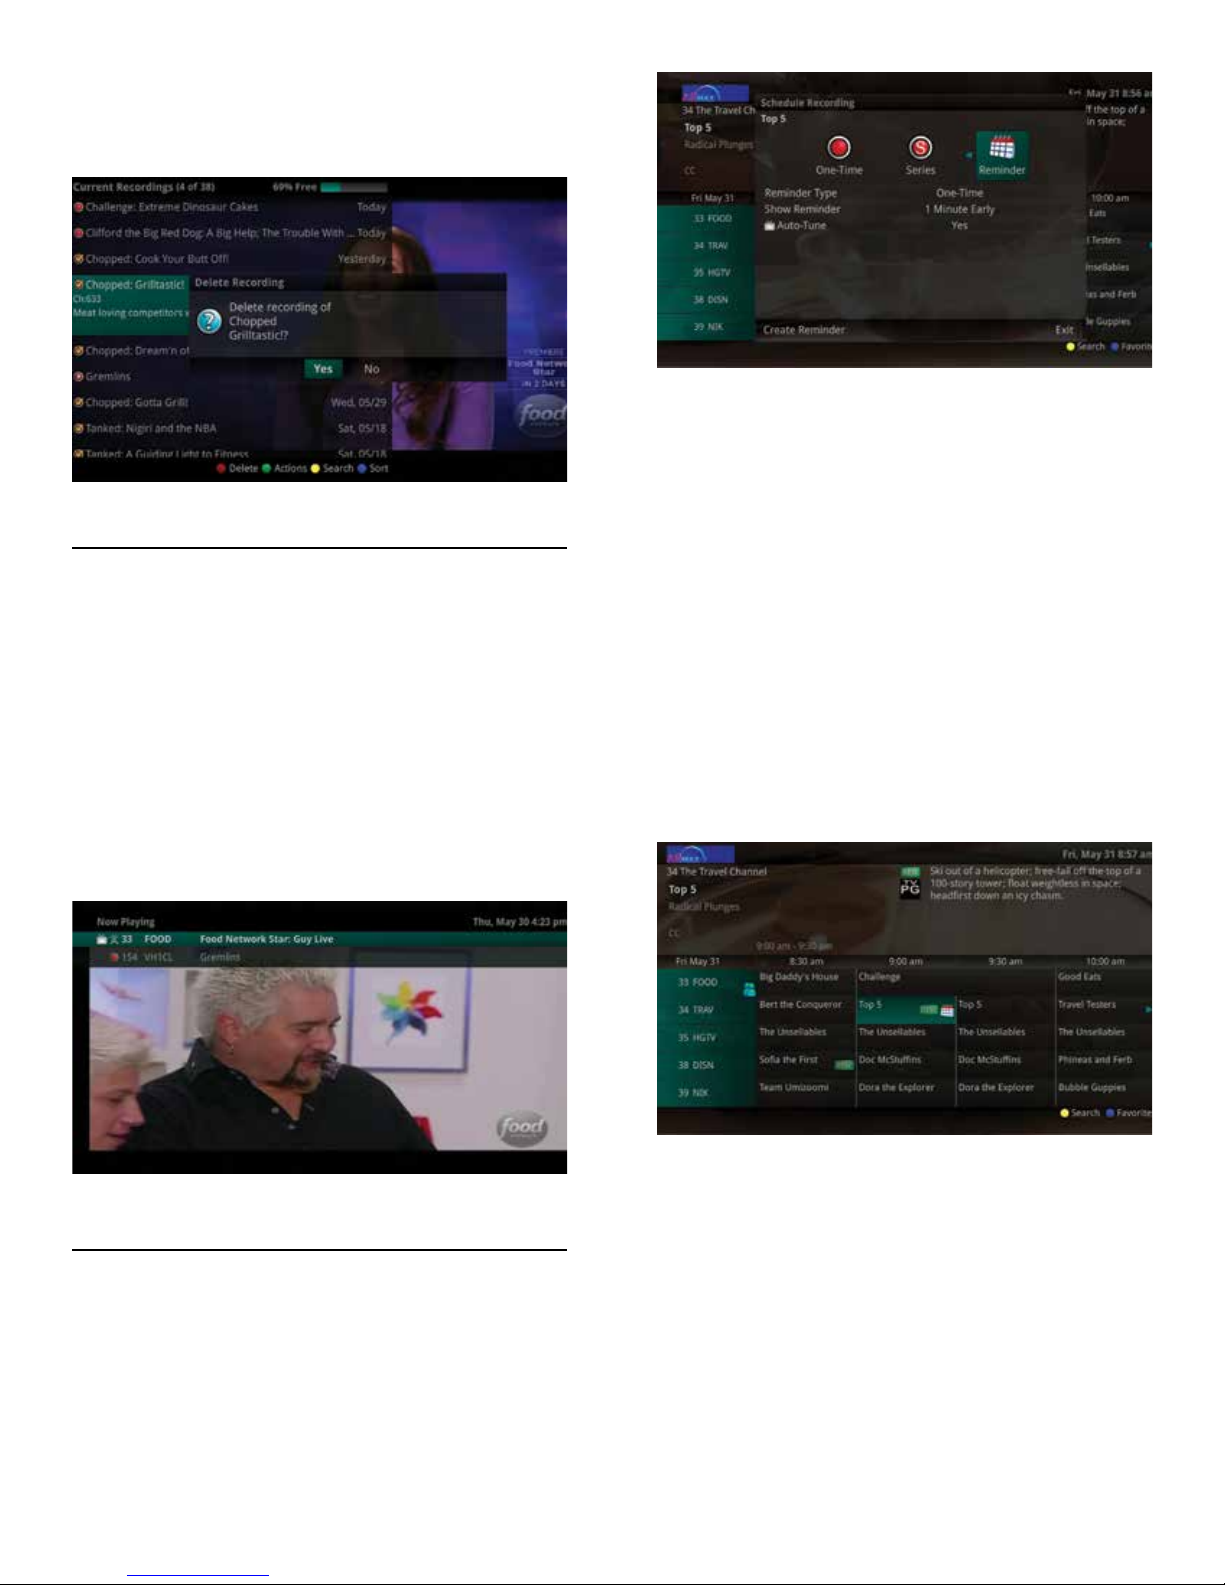
DELETE A RECORDING
In addition to the option to delete a recording when
you have nished viewing it, there are other options
for deleting a recording.
1. To access a list of recorded programs, press
the LIST button on the remote control.
2. From the list of folders, choose the folder
that contains the recordings you want to
delete and use the Up/Down arrow buttons
to highlight the entire folder or the individual
episode you want to delete.
3. Press the Red button to Delete the recording
or group of recordings. Or, press the Green
button to access the Actions menu and then
choose Delete. You have the option to cancel
the process.
3. When you return to the program, you can
press the Up/Down arrow buttons on the remote control to advance to your bookmarked
spot. If there are multiple Bookmarks, keep
pressing the Up/Down arrow buttons until
you are to your desired place in the program.
4. You can remove a Bookmark by moving to
the Bookmark and pushing the Blue button
within three seconds.
Bookmarks are helpful in the case of a television
program that you keep and watch over and over. You
could bookmark the end of commercials so that you
could skip over those sections of the program.
WORKING WITH MULTIPLE STREAMS
Your DVR is capable of recording two programs while
you watch a third program. You can easily tell what
14

your DVR is doing by pressing the OK button. When
you see the red light indicating that something is
being recorded on the DVR, you can quickly nd out
what program is recording.
1. Press the OK button on the remote control to
see what is Now Playing.
2. You may change to view any of the listed
programs by using the Up/Down arrow keys
on the remote control and pressing the OK
button.
3. When you change to view the program that
is recording, the system will start at the last
time you viewed that program. You can go
back to the beginning of the program using
the Rewind button or jump with the down
arrow. You have access to Rewind, Skip Back,
Skip Forward, and Fast Forward to move with-
in the recording.
RECORDING CONFLICTS
ATTEMPT TO WATCH A LOCKED CHANNEL
If you have locked channels from view, you will need
to enter a PIN in order to access programming on
that channel. See the Settings Menu section for
instructions on locking channels.
1. In this example, the channel is locked; you
are prompted to enter a PIN. Until you change
it through the Settings menu, the default PIN
is 0000.
The DVR can record a limited number of programs at
a time. If you attempt to record more programs than
the system is capable of recording at one time, the
DVR will warn you of a recording conict. You may
choose to either resolve the conict or to cancel your
option to record the program.
1. When you choose “Resolve Conict,” a guide
screen will appear showing the other programs currently scheduled to be recorded.
2. Highlight the program you wish to stop
recording and press the Stop button on the
DVR controls. Choose from the stop recording
options. You may now choose the alternate
program you wish to record from the guide
and press the Record or OK button.
2. The Enter PIN screen will remain until a cor-
rect PIN is entered or until you press Exit.
3. Pressing Exit will bring up a screen indicating an invalid PIN was entered. Press the
GUIDE button to browse for another program
to watch. This same result happens when
selecting a locked channel from the Guide.
ATTEMPT TO WATCH A PROGRAM OUTSIDE THE
PARENTAL RATING SETTINGS
If you have set parental ratings in order to prevent
viewing shows beyond a rating that you nd acceptable, you will need to enter a PIN in order to access
programming beyond your specied rating. See the
“Settings Menu” section for instructions on setting
parental controls.
15

1. When the program is rated beyond the view-
ing limits set, you are prompted to enter a PIN.
2. The Enter PIN screen will remain until a valid
PIN is entered or until you press Exit.
3. Pressing Exit will bring up a screen indicating an invalid PIN was entered. Press the
GUIDE button to browse for another program
to watch. This same result will occur when
keying in a channel number on the remote
control.
► Sort the Current Recordings by pressing the
Blue button on the remote control. By default,
Current Recordings are displayed by date and
time. If you press the Blue button, programs
will be sorted by Name.
► Press the Skip Forward button to view record-
ings by title rather than group.
Current Recording Actions
To view the available Actions, press the Green button
on the remote control. The Actions list displays on the
right hand side of the screen. To make it easy for you,
the list of Actions on the screen shows the corresponding button that you could press on the remote
control. It is also possible to highlight your selection
and then press OK on the remote control.
USING THE LIST BUTTON
To access your recordings, the list of future recordings and series rules, press the LIST button on the
remote control multiple times.
Current Recordings
Press the LIST button one time to access the list of
Recording Folders. The All Recordings folder appears
rst and includes all of the recordings you have
stored on your DVR. If grouping is enabled in your set-
ting, each program will also have a folder including all
recordings of that program. To move in and out of the
folders, use the Left/Right arrow buttons. At the top
of the screen you see the number of folders and the
amount of space you have free on the DVR.
When you are in a program folder:
► Delete a recording by pressing the Red button
on the remote control.
► View the available Actions by pressing the
Green button on the remote control. Actions
include Play Recording, Edit Item, Informa-
tion, Go Back, Move to Folder, Protect, Sort
List, Close Actions and Delete Recording.
► Search for programs within the Recording
folders by pressing the Yellow button on the
remote.
16
1. Select Play Recording to start the currently
selected recording.
2. To extend the end recording time on a recording in progress, select Edit Item.
3. To show or hide Information about the record-
ing, press the INFO button. This expands or
hides the view of information. Simply highlighting a recording and pausing for a brief
moment will also display the information.
4. To Go Back to the previous screen showing All
Recording Folders, press LIST.
5. To move the recording to a specic folder
arrow to select Move To Folder.
6. To group the recordings by their titles, select
the Skip Forward button.
7. To Protect a recording so that it does not
automatically get deleted, use the arrow buttons to highlight the protect option and then
press the OK button. When you do, a shield
symbol will display next to the program name
letting you know that this program is protected. If you want to remove protection from the
recording, simply choose Protect again.
8. To Sort the List of Current Recordings, press
the Blue button on the remote control. At the

bottom of the screen you will see the sort
change to being sorted by Name. Press the
Blue button again to change the sort back to
date and time.
9. To Close the Actions, either press the Green
button or press the EXIT button on the remote control.
10. To Delete the Recording, press the Red but-
ton on the remote control. Select Yes or No to
delete and then press the OK button.
Future Recordings
Press the LIST button a second time to view your list
of Future Recordings. These are programming events
that are waiting to happen. At the top of the screen
you see the number of recordings and the amount of
space you have free on the DVR.
When you are in a program folder:
► Delete a future recording by pressing the Red
button on the remote control.
► View the available Actions by pressing the
Green button on the remote control. Actions
include Edit Item, Information, Go Back, Move
to Folder, Sort List, Close Actions, and Delete
Recording.
► Search for programs within the Recording
folders by pressing the Yellow button on the
remote.
► Sort the Current Recordings by pressing the
Blue button on the remote control. By default,
Current Recordings are displayed by date and
time. If you press the Blue button, programs
will be sorted by Name.
► Press the Skip Forward button to view record-
ings by title rather than group.
Future Recording Actions
To view the available Actions, press the Green button
on the remote control. The Actions list displays on the
right side of the screen. To make it easy for you, the
list of Actions on the screen shows the corresponding
button that you could press on the remote control.
You can also highlight your selection and then press
the OK button on the remote control.
1. To Edit the Item, press the OK button on the
remote control. You can change the time that
you Start Recording and Stop Recording. This
allows you to begin and/or end recording to
allow for time padding around the program.
2. To show or hide Information about the record-
ing, press the INFO button. This expands or
hides the view of information. Simply highlighting a recording and pausing for a brief
moment will also display the information.
3. To Go Back to the Future Recordings Folder
List press the LIST button.
4. To group the recordings by their titles, select
the Skip Forward button.
5. To Move the recording to a specic folder
arrow to select Move To Folder.
6. To Sort the List of Future Recordings, press
the Blue button on the remote control. At the
bottom of the screen you will see the sort
change to being sorted by Name. Press the
Blue button again to change the sort back to
date and time.
7. To Close the Actions, either press the Green
button or press the EXIT button on the remote control.
8. To Delete the Recording, press the Red but-
ton on the remote control. Select Yes or No to
delete and then press the OK button.
Series Recording Rules
Press the LIST button a third time to view your Series
Recording Rules. These are the programs that you
have set to record on a regular basis. You can make
adjustments to your series recording rules from this
screen. At the top of the screen you see the number
of Series Rules and the amount of space you have
free on the DVR.
17

1. Delete a rule by pressing the Red button on
the remote control.
2. View the available Actions by pressing the
Green button on the remote control. Actions
include Edit Item, Information, Increase Priority, Decrease Priority, Sort List, Close Actions
and Delete Rule.
3. Search for programs in the recordings folders
by pressing the Yellow button on the remote.
4. Sort the Series Rules by pressing the Blue
button on the remote control. By default,
Series Rules are displayed by Priority. If you
press the Blue button, programs will be sorted by Name.
Series Rules Actions
To view the available Actions, press the Green button
on the remote control. The Actions list displays on the
right side of the screen. To make it easy for you, the
list of Actions on the screen shows the corresponding
button that you could press on the remote control.
You can also highlight your selection and then press
the OK button on the remote control.
1. To Edit the Item, press the OK button and
choose from these options to edit:
► Choose how many episodes to Keep at Most
any given time. Options are 1–10 or All epi-
sodes. Use the arrow buttons to make your
selection.
► Choose the Show Type that you wish to re-
cord. You may choose to record all episodes
of a program or just new episodes.
► Choose when to Start Recording. You can be-
gin ‘on time’ when the program is scheduled
to begin. Or you can use the arrow buttons to
choose 1, 2, 3, 4, 5, 10, or 15 minutes early.
► Choose when to Stop Recording. You can
stop ‘on time’ when the program is scheduled
to end. Or you can use the arrow buttons to
choose 1, 2, 3, 4, 5, 10, 15, 30, 45, or 60
minutes late.
► Choose the Folder where you want to save
the recording and whether you’d like your
television to auto tune to the channel. Arrow
to highlight Update Series Recording and
press the OK button on the remote control to
save your changes.
► To Cancel your changes, highlight Exit and
press the OK button on the remote control.
2. To show or hide information about the record-
ing, press the INFO button. This expands or
hides the view of information.
3. The priority of programs is represented by
their order in the list. The top program on
the list is the highest priority and the bottom
one is the lowest priority. If you have several
programs scheduled to record at once and
the system is unable to provide resources to
record all of them, the DVR will record based
on highest priority. To change Priority, highlight the Action to Increase or Decrease Priority and then press the OK button to adjust
priority.
4. To Sort the List of Series Rules, press the
Blue button on the remote control. By default
Series Rules are sorted by their Priority. You
can change them to sort by Name. Press the
Blue button again to change the sort back to
Priority.
5. To Close the Actions, either press the Green
button or press the EXIT button on the remote control.
6. To Delete the Rule, press the Red button on
the remote control. Select Yes or No to delete
and then press the OK button.
18

CREATE A FAVORITES LIST
If you like to be able to surf within only a specic
set of channels, you can create Favorites lists. By
default, your set top box has grouped channels into
several pre-set Favorites lists including: All Channels,
Subscribed Channels, Movie Channels, Sports Channels, Music Channels, Entertainment Channels, Kids
Channels, News Channels, Business News Channels,
Infotainment Channels, Religious Channels, Regional
Channels and HD Channels. You may create up to
ve additional Favorites lists.
1. Press the MENU button to access the Main
Menu. Highlight TV. Use the arrow buttons to
highlight Edit Favorites and then press the OK
button.
5. Use the arrow buttons to move through the
letters on the screen. Press the OK button on
the remote control to choose a letter. When
you have named your list, arrow down to se-
lect the Submit to accept your name.
6. To Save your favorites list, press the Blue
button on the remote control and then press
the OK button.
7. To Discard a favorites list, press the Red but-
ton on the remote control.
8. Press the EXIT button on the remote control
to leave the menu.
Favorite List Actions
To view the available Actions associated with each
Favorites List, press the Green button on the remote
control. The Actions list displays on the right side of
the screen. To make it easy for you, the list of Actions
on the screen shows the corresponding button that
you could press on the remote control. You can also
highlight your selection and then press the OK button
on the remote control.
2. If you are not already in a ‘New List’ by default, arrow right to access a New List.
3. All available channels will display. Use the
Up/Down arrow buttons on the remote
control to move through the list of channels.
When you are on a channel you want to add
to your list, press the OK button to mark it as
part of this Favorites list.
4. To name the list, press the Yellow button on
the remote control.
► Discard Changes option will exit Edit Favorites
without making any changes.
► Rename List allows you to change the name
of this list without changing the channels that
were previously selected for this list.
► Save List will save any changes made to this
Favorites List.
► Delete List will delete this list from your Favor-
ites.
► Invert List lets you select or deselect chan-
nels in this Favorites List. For example, if you
have selected 10 channels in this Favorites
List and click OK on Invert List, those 10
channels will be deselected and all of your
other subscribed channels will be selected.
If you click OK again those 10 previously se-
lected channels will be back in the list while
the rest of the subscribed channels will be
removed.
19

Access a Favorites List for Surng
1. Press the FAV button on the remote control.
being recorded. This is the same as when
you would press the OK button on the remote
control.
4. If you arrow to the right, highlight Search
and press the OK button, you can search for
a program. This is the same as when you
would press the Search button on the remote
control.
5. If you arrow to the right, highlight What’s Hot
and press the OK button, you can view the
What’s Hot menu.
RECORDINGS MENU
2. All Favorites lists will display. Lists that you
have created will display with a star.
3. Arrow down to highlight the Favorites list you
want to use and then press the OK button on
the remote control. The list you have select-
ed will show just above the channel number. With the favorites list selected, you will
browse channels only within that list.
TV MENU
Along with being able to access almost all functions
with specic buttons on the remote control, you can
also access these controls through the Main Menu.
1. Access the main menu by pressing the MENU
button on the remote control. Under TV you
have options for Guide – Corner, Guide – Full,
Now Playing, Search, and What’s Hot.
Most everything that you do with the LIST button on
the remote control you can do in the Main Menu.
1. Access the Main Menu by pressing the MENU
button on the remote control. Under Recordings you have options for Current, Future, and
Series.
2. If you arrow to the right, highlight Current and
press the OK button, you can view the list of
recorded programs saved on your DVR. This
is the same as if you would press the LIST
button on the remote control.
2. If you arrow to the right, highlight Guide –
Corner or Guide – Full and press the OK
button, you can view the channel guide.
This is the same as when you would press
the GUIDE button on the remote control two
times.
3. If you arrow to the right, highlight Now Playing
and press the OK button, you can view what
is currently playing as well as any programs
3. If you arrow to the right, highlight Future and
press the OK button, you can view the list
of programs that you have scheduled to be
20

recorded. This is the same as if you would
press the LIST button two times on the re-
mote control.
4. If you arrow to the right, highlight Series and
press the OK button, you can view the list of
series rules. This is the same as if you would
press the LIST button three times on the
remote control.
2. To view any sent system messages from the
service provider, select the Messages option
and press the OK button on your remote
control.
PHONE MENU
If you are also subscribed to Caller ID on the TV, you
can have your caller ID display on the TV as well as
on your regular Caller ID device. The Recent Calls List
will store recent caller ID information. Note: The Recent Calls and Voicemail options are only available if
the subscriber also purchases the Wilkes Enhanced
Voice Mail.
Messages
1. You can access the Main Menu by pressing
the MENU button on the remote control. Select the Phone menu.
3. To view a message, use the arrow buttons to
navigate to the desired message and press
the OK button. Press the OK button again
when you want to close the message window.
4. To delete a message, highlight it and press
the Red button. Any deleted messages can
be restored by selecting the Red button again
until the Messages window is closed. Once
the Messages window is exited, deleted messages will be permanently removed.
21

5. When you have an unread message, an envelope icon will appear in the guide. Here is an
example of an on-screen System Message on
the TV:
APPS MENU
The Apps menu allows you to access a number of
entertaining apps, including Games, Weather and
What’s Hot.
Note: Available applications may differ from
shown image based on account availability.
Games
1. To access the available games for your set
top box, select Games from within the Apps
Menu. A listing of games will appear.
2. Arrow up or down to select the game to play
and that game will appear.
Recent Calls
1. You can also access the Recent Calls list by
pressing the Green button on the remote
control.
2. To delete an entry on the Recent Calls list,
highlight it and press the Red button on the
remote control.
Notes: Some games may feature an imbedded
screen view of the program the viewer was previously watching. Not all games are supported
through each set top box version.
22

Weather
The Weather Application allows the current weather
statistics to be viewed through multiple guides and
menus. It can be accessed through the Apps catego-
ry to instantly bring up an on-screen window with the
most current weather information.
1. Select the MENU button on your remote
control. Select Apps, highlight Weather, and
select the OK button.
2. A window will appear on the screen with the
most current weather data for the selected
area. To receive weather information from
a different location, select a new location
within Settings.
4. To access the Radar portion of the Weather
application, select the Yellow button within
the application window.
5. Once in the Radar screen of the Weather
application, select the Blue button to ani-
mate the radar and show a looping of current
weather conditions.
Weather Settings
The Weather option in Settings allows you to select
the location you would like to receive weather information for. This information will be visible in multiple
locations throughout your menus and guides.
3. To access the Forecast portion of the Weath-
er application, select the Green button within
the application window.
1. Select the MENU button. Select Settings and
Weather.
2. The Weather Options window will appear. Select the desired location for which you would
like to receive weather information/statistics.
Select Save.
23

What’s Hot Application
The What’s Hot application allows you to view local
area real time information about what others in your
local area are watching. The end user can easily tune
to one of the “What’s Hot” programs or set a record-
ing.
1. Select the MENU button on your remote con-
trol. Select Apps, highlight What’s Hot, and
select the OK button.
2. A window will appear on the screen with the
most current popular channel information for
the local area. The popular channel informa-
tion may be viewed in multiple categories
by pressing the Right or Left Arrow buttons.
Additional popular channel information may
be viewed by scrolling down by pressing the
Up or Down Arrow buttons.
► Apps
► Display
► Guide
► Parental
► Phone
► Recording
► Weather
Display Settings
If you arrow to the right, highlight Display, and press
the OK button, you can change how the set top box
should display specic things. Typically these items
are set at the time of installation and not changed.
SETTINGS MENU
You have the ability to control certain aspects of how
your service works according to your preferences.
Access the main menu by pressing the MENU button
on the remote control. Under Settings you have
options for:
24
1. Turn Closed Captioning On or Off.
2. Set the Audio Language to English, Spanish
or French.
3. Set the TV Type to either 16:9 or 4:3.
4. Change your Connector settings to Coaxial,
Composite, S-Video, Component or HDMI.
5. View the setting for Conversion Mode, Original Size or Fit to Screen (this may also be
changed temporarily by pressing the * button
on the remote control).
6. Select the Output Resolution for the television.
7. If you feel you have changed something by
accident, select Exit and press the OK button

or just press the EXIT button on the remote to
retain the original settings.
GUIDE SETTINGS
If you arrow to the right, highlight Guide and press
the OK button, you can change how Guide informa-
tion displays.
General Settings
1. Choose the Default Guide setting that you
prefer when you press the GUIDE button one
time. Options are Time Guide or Channel
Guide.
2. Determine what you want to do After Chang-
ing the Channel. Should guide stay open or
should it close upon changing the channel?
3. Set Channel Filter to Yes or No. When set to
Yes, your favorite selection will be remem-
bered (the favorites list that you selected).
PARENTAL CONTROLS
If you arrow to the right, highlight Parental and press
the OK button, you will nd Parental Control options
to Change PIN, Edit Locked, Set Ratings, Time Restrictions, Cancel Override, and Options.
Change PIN
Guide Settings
1. Determine the Number of Rows to display in
the Time Guide. Options are 3, 4, 5 or 6.
2. Determine the Number of Columns to show in
the Time Guide. Options are 3, 4, 5, or 6.
3. Determine how long to wait for Inactivity
Timeout before the guide disappears. Options
range from 1 second to 2 minutes, to never.
4. Specify the Scrolling Behavior to be either
channel by channel or page by page as you
move through the guide.
Browser Settings
1. Specify how long to wait for Inactivity Timeout
before the Browser Bar disappears.
2. If you feel you have changed something by
accident, you can always choose to set all
items back to the original default settings.
1. Within the Parental menu, arrow to the right
and select the Change PIN category (For the
Ratings PIN or Purchase PIN).
2. Use the arrow button to highlight change PIN
and press the OK button.
3. Enter the Old PIN, arrow down and enter your
New PIN, and then arrow down to conrm the
New PIN. Select OK to save your new PIN.
Until you change it, the default PIN is 0000.
4. Once the PIN has been successfully changed,
a prompt will appear. Press the OK button.
25

Edit Locked
1. Within the Parental Menu, arrow to the right
and select the Edit Locked category. The Edit
Locked category allows you to lock specic
channels. This will require you to enter a PIN
in order to view programming on that chan-
nel.
2. A list of channels will display. Use the Up/
Down arrow buttons to move through the list
of channels. When you arrive at one that you
want to lock, press the OK button and the
channel will be added to the locked list.
3. When you are nished making your selec-
tions, press the Blue button on the remote
to lock the selected channels. Press the Red
button on the remote to discard the changes
and return to normal viewing.
Set Ratings
Ratings category allows you to set access to
programming based on TV and Movie ratings.
This will require that a PIN be entered in
order to view programming at or beyond the
rating you specify.
2. Use the Left/Right arrow buttons to choose a
TV Rating. Options are: TV-Y, TV-Y7, TV-Y7 FV,
TV-G, TV-PG, TV-14, TV-MA, off.
3. Use the Left/Right arrow buttons to choose a
Movie Rating. Options are: G, PG, PG-13, R,
NC-17, Adults Only, off.
Time Restrictions
1. Within the Parental menu, arrow to the right
and select the Time Restrictions category.
The Time Restrictions category allows you
to set time periods per day where television
access requires a PIN. These time restrictions
may be set by selecting the Green button to
Add Restriction. A new restriction will appear
to the right of the week schedule. Arrow to
the right to select a day and press the OK
button.
1. Within the Parental menu, arrow to the right
and select the Set Ratings category. The Set
2. Once a day has been selected, use the Up/
Down arrows to select a time and either AM
or PM for both start and end time for the time
restriction. When you are done creating time
restrictions, select the EXIT button.
Cancel Override
26

Within the Parental menu, arrow to the right and
select the Cancel Override category. The Cancel Over-
ride category allows any previous PIN overrides for an
extended period of time to be cancelled. To cancel an
existing override, select OK within the Cancel Override prompt. Once the override has been cancelled,
the parental PIN will need to be used for all Locked
and Rated channels.
Options
1. Within the Parental menu, arrow to the right
and select the Options category. The Options category requires the Ratings PIN to be
entered in order to update any settings. Enter
your PIN and select OK and press the OK
button.
2. Once the Ratings PIN has been entered, you
may choose to have Locked Channels and/
or Show Restricted Titles visible. Selecting a
“No” value for either setting will cause these
programs to not appear in the Guide. Se-
lect OK within the prompt and press the OK
button.
3. A Parental Controls Options prompt will
appear once the changes have been saved
successfully.
RECORDING SETTINGS
Press MENU on the remote, arrow to the right and
choose Settings, then Recording to make changes to
your settings for recorded programs.
Group Titles: Group all recorded episodes with the
same title rather than listing each episode individually. The Skip Forward button will toggle between
Grouped and Ungrouped listings.
Auto Expand Selection: Choose this option to automatically display information for the selected recording.
Show Folders: When the Show Folders eld is set to
“Yes”, all recordings and future recordings will be
grouped into folders when you view your Recordings
Lists. With Show Folders set to No, all recordings and
future recordings will be displayed individually. Keep
in mind that if Group Titles is set to Yes, programs
will be grouped together even if Show Folders is set
to No. When viewing your Recording Lists the Skip
Forward button will toggle between folders and indi-
vidual recordings.
Inactivity Timeout: This setting adjusts the length of
time the Status Bar remains on the screen while you
are watching a recorded program after a period of inactivity. Choose from 1- 10, 12, 15, 30, 45 seconds,
one or two minutes, or Never.
Skip Display: Choose between displaying the playback
bar or the fast forward/replay icons during recorded
show playback.
Skip Ahead: Skip ahead while watching a recording or
27

while watching live TV. This can be set from 1-999
seconds.
Skip Back: Skip back while watching a recording or
while watching live TV. This can be set from 1-999
seconds.
COLUMNS AND ROWS DISPLAYED IN GUIDE
By default, the guide will display four rows and four
columns of programming information. Depending
upon the size of TV you are viewing and your preferences, you may want to show more or fewer columns
and rows. The settings are changed by accessing
Main Menu | Settings | Guide. Arrow down to change
the Number of Rows and the Number of Columns.
CALLER ID AND MESSAGE WAITING INDICATION
ON THE TV
If you are subscribe to Wilkes Caller ID, it is possible
to have your Caller ID information display on the
TV as it displays on your regular Caller ID device. If
you subscribe to Wilkes Enhanced Voice Mail, it is
possible to have a voice mail waiting indication show
on your TV.
Here is an example of Caller ID display on the TV:
Press the Green button at any time to see your Caller
ID Recent Calls list. This handy feature allows you to
review a list of phone numbers that have called your
home phone service. To delete numbers from your
recent calls list use the arrow button to highlight the
number you want to delete and press the Red button
on your remote.
POWERING OFF – OUT OF SYNCH
Your remote control can be programmed to power
off the television and the set top at the same time.
However, if they do become out of synch and the TV
is still on but the set top is turned off, you will see
this message on the TV screen. Simply press the OK
button on your remote to turn the power to the set
top back on.
28

INSTALLING BATTERIES
box, but various TVs, DVD players, VCRs and audio receivers by using the Searching for Your Code instructions found here. The remote comes already prepro-
grammed to operate the Wilkes set-top box, an RCA
TV, a Toshiba DVD player, an RCA VCR, and a Pioneer
audio receiver. To control devices other than these
brands, use the Search method described below.
1
2
3
SEARCHING FOR YOUR CODE
If your home entertainment device does not respond
to the Wilkes Remote Control after trying all of the
codes listed for your brand, or if your brand is not
listed at all, try searching for your code.
For example, to search for a code for your TV:
1. Turn on your TV.
2. On the remote control, press TV once; it will
blink once. Then press and hold SETUP until
the TV key blinks twice.
3. Type 9 9 1. The TV key will blink twice.
4. Aim the remote control at the TV and press
POWER once.
5. Press and release the CH+ key continuously,
then stop when the TV turns off.
1. On the back of the remote control, push the
tab and lift off the battery cover.
2. Locate the two (2) enclosed AA batteries.
Match the + and - marks with those in the
battery case, then insert them.
3. Align the covers keys with the cases holes
and press the cover back into place. The tab
should click when the cover is locked.
4. Test the remote control by pressing any mode
key (e.g. TV). If the batteriers are inserted
correctly the LED (red light) will blink once.
NOTE: When batteries need replacement, the remote
control will cease to operate. Replace the batteries
and the unit will be restored to its full functionality,
complete with your favorite settings.
PROGRAMMING DEVICE CONTROL
The Potenza ST Universal Remote Control can be
programmed to control not only your Wilkes set-top
NOTE:
In the search mode, the remote control will
send IR codes from its library to the selected
device, starting with the most popular code
rst.
6. Press POWER. The TV should turn on, then
press SETUP once to lock in the code. The
LED will blink twice to indicate that the code
is saved.
NOTE: If the TV does not turn on during step 6,
then slowly press and release CH- to go back
through the codes, then press SETUP when
the TV turns on.
7. To search for the codes of your other devices,
repeat steps 1 through 6, but substitute the
appropriate key (e.g., VCR, DVD, AUD, or STB)
for the device you are searching for.
29

CHECKING THE CODES
You may need to nd out which four-digit code is
operating your equipment.
For example, to nd out which code is operating your TV:
1. On the remote control, press TV once; it will
blink once. Then press and hold SETUP until
the TV key blinks twice.
2. Enter 9 9 0. The TV key will blink twice.
3. To view the code for the rst digit, press 1
once. Count the number of times the TV key
blinks (e.g., 3 blinks = 3) and write down the
number in the leftmost “TV Code” box.
NOTE:
If a code digit is 0, the selected mode key will
not blink.
4. Repeat step 3 three more times for the
remaining digits. Use 2 for the second digit,
3 for the third digit, and 4 for the fourth digit.
Finish writing down the code in the TV Code
boxes in this guide.
5. To check for other device codes, repeat steps
1 through 4, but substitute the appropriate
key (e.g., VCR, DVD, AUD, or STB) for the de-
vice you are checking. Write down the codes
in the appropriate boxes.
keys, depending on the code being learned.
► Certain device functions are not learnable
including multi-frequency types, some high
frequency ones, and other unusual formats.
► For optimum learning, avoid high levels of
ambient light such as natural sunlight or
energy-efcient uorescent lights.
NOTE: Please have your original remote controls
handy before programming learning.
Programming a Learned Key
1. Press and hold SETUP until the last-selected
mode key blinks twice, then press 9 7 5.
NOTE: If the LED displays one long ash instead, either your batteries are low, or the Remote Control has
a memory fault.
2. Press a mode key once (i.e., VCR, DVD, AUD,
TV, or STB) to assign a mode for learning.
3. Press the desired key on the Remote once to
store the feature to be learned.
4. Place the Wilkes Remote Control head-tohead (about 2” apart) from your original
remote control. Also locate the key (on your
original remote control) that you want the
Wilkes Remote Control to learn.
USING LEARNING
The Wilkes Remote Control includes a Learning
feature (not available on all models) so you can add
functions that are unique to your home entertainment devices (e.g. VCR Tracking Up or Down). However, there are some considerations.
Learning Precautions
► Your original remote controls must be in work-
ing order for learning to work properly.
► Learned keys are mode-specic, so each one
can store a unique function for each mode.
► Do not use the following keys for learning:
Device Keys, SETUP, Record (•), Tune-In Keys.
► Learning capacity is approximately 16 to 25
5. On the original remote, press and hold the
key to be learned. The Wilkes Remote Control’s LED will blink rapidly, then turn off. Con-
tinue holding the key on the original remote
until the LED blinks twice.
NOTE: If the LED displays one long blink, a learning
error has occurred. Try repeating this step again until
a successful capture occurs. If the function is still
not captured, press and hold SETUP to exit program-
ming and review the “Learning Precautions” on the
previous page. If needed, also see “Troubleshooting.”
After review, start programming again at step 1.
6. Repeat steps 2 through 5 for another mode
and/or key or press and hold SETUP until
the active mode key LED blinks twice to exit
30
programming.

Deleting a Single Learning Key
This process returns the key to its original programming for the mode you select. You can also delete
learned programming by teaching a different function
to the key (see “Programming a Learned Key”).
blink once. Press and hold SETUP until the
STB key blinks twice.
2. Enter 9 7 3. The STB key will blink twice.
NOTE: If more than 15 seconds pass between key
presses, the remote exits programming.
1. Press and hold SETUP until the last-selected
mode key blinks twice, then press 9 7 6.
2. Press a mode key once (i.e., VCR, DVD, AUD,
TV, or STB). The LED on the selected mode
key will blink once.
3. Press the key containing the learned function
to be deleted twice. The active MODE key will
blink twice.
4. Repeat steps 2 through 3 for another key or
press and hold SETUP to exit programming.
Deleting All Learned Keys in a Specic Mode
NOTE: If more than 15 seconds pass between key
presses, the remote exits programming.
3. Press CH- once. The STB key will blink four
times.
Now the remote control will provide TV and VCR channel-control capabilities while in the TV or VCR mode.
Locking Channel Control to STB
1. On the remote control, press STB once; it will
blink once. Press and hold SETUP until the
STB key blinks twice.
2. Enter 9 7 3.The STB key will blink twice.
3. Press CH+ once. The STB key will blink twice.
Now, regardless of what mode you select (except
AUD), the channel keys will only change channels on
your set-top box.
1. Press and hold SETUP until the last-selected
mode key blinks twice, then press 9 7 6.
2.
3. Press a mode key twice (i.e., VCR, DVD, AUD,
TV, or STB) to clear all the learned keys for
that mode. The mode key LED blinks twice.
4. Repeat step 2 for another mode or press and
hold SETUP to exit programming.
PROGRAMMING CHANNEL CONTROL LOCK
By default, the remote control’s channel-control
capabilities are locked to the set-top box. The affected keys* are 1 through 0, CH+, CH-, and LAST. This
will guarantee that you do not inadvertently change a
channel on your TV or VCR. However, you can deactivate this feature to allow full access to these keys in
the TV and VCR modes.
*NOTE: This feature does not affect the AUD mode.
Unlocking Channel Control
1. On the remote control, press STB once; it will
CHANGING VOLUME LOCK
Volume Lock allows you to control the volume
through the device identied as having your primary
speaker(s), regardless of which mode you are using.
On the Wilkes Remote Control, Global Volume Lock is
set to TV, so you can control TV volume while in the
VCR, DVD, TV or STB mode. You can perform Indi-
vidual Volume Unlock on a selected device to set its
volume control for independent operation.
NOTE: The audio mode’s (AUD) volume controls are
active regardless of Volume Lock settings. However,
if you lock the volume controls to the AUD mode, you
will have control of the audio device’s volume in all
other modes (i.e., VCR, DVD, TV, and STB). This can
be an advantage if, for example, you always listen to
home entertainment devices through your receiver’s
speakers.
Unlocking Volume Control for a Single Device
(Individual Volume Unlock)
1. Assuming Global Volume Lock is active,
select a mode on the remote control that you
want to unlock (e.g., STB) and press it once.
Next, press and hold SETUP until the device
31

key blinks twice.
2. Enter 9 9 3. The last-selected device key will
blink twice.
3. Press VOL- once. The last-selected device key
will blink four times.
4. Repeat steps 1 through 3 for each device you
want volume to be unlocked.
Now, after you select a device that has volume un-
locked (e.g., STB), pressing VOL+, VOL-,or MUTE, will
control only that device’s volume.
Unlocking All Volume Control
(Global Volume Unlock)
Now, when you press VOL+, VOL-,or MUTE, the
volume of the selected device (e.g., TV) is controlled
regardless of mode.
PROGRAMMING ID LOCK
The Wilkes Remote Control is locked at the factory to
operate your service provider’s set-top box. However,
if you have another brand or model of set-top box or
satellite service that you would like to control, then
you’ll need to perform the following steps to unlock
the ID Lock, enter a new manufacturer’s code, and
lock the ID Lock again.
1. Turn on the set-top box.
2. On the remote control, press STB once; it will
blink once. Then press and hold SETUP until
the STB key blinks twice.
NOTE: Performing these instructions will set indepen-
dent volume control for all programmed devices.
1. On the remote control, press and hold SETUP
until the last-selected device key blinks twice.
2. Enter 9 9 3. The last-selected device key will
blink twice.
3. Press VOL+ once. The last-selected device
key will blink four times.
Locking Volume Control To One Mode
(Global Volume Lock)
NOTE: The audio mode’s volume controls are active
regardless of Volume Lock settings. However, if you
lock the volume controls to the AUD mode, you will
control the audio device’s volume in all other modes
(i.e., VCR, DVD, TV, or CBL). This can be an advantage
if, for example, you always listen to home entertainment devices through your receiver’s speakers.
1. On the remote control, press and hold SETUP
until the last-selected device key blinks twice.
2. Enter 9 9 3. The last-selected device key will
blink twice.
3. Enter 9 8 2. The STB key will blink four times,
indicating ID Lock is unlocked.
4. Perform the instructions under “Programming
Device Control” to program device control for
the desired cable converter or satellite receiv-
er. When you are done, perform steps 5 and
6 on this page to again lock the ID Lock.
5. On the remote control, press STB once; it will
blink once. Then press and hold SETUP until
the STB key blinks twice.
6. Enter 9 8 2. The STB key will blink twice, indicating ID Lock is again locked.
PROGRAMMING MACRO KEYS
The Wilkes Remote Control includes two macro keys
(located directly below the MUTE and LAST keys).
Macro keys allow you to set up key macros to activate
certain keys in a specic order. For example, you can
set up a key macro to change the channels on your
TV, raise or lower the volume, and start recording on
your VCR, all with the touch of one key. If you want
to change the macros stored in a previously-pro-
grammed macro key, you’ll need to clear the key rst
(see “Clearing a Macro Key”).
3. Select a mode (e.g., TV or AUD) which you
want to use to control the volume. The selected device key will blink twice.
Programming a Macro Key
1. On the Remote Control, press and hold SET-
UP until it blinks twice.
32

2. Enter 9 9 5. The SETUP key blinks twice.
3. Select a macro key (for example, F1) and
press it once.
4. Press the key sequence you want to program
into the macro. For example, to turn on your
TV and raise its volume, press the TV mode
key once, followed by pressing the VOL+ key
once.
NOTE: You can program up to 15 key presses into one
macro.
5. Press and hold SETUP until it blinks twice.
6. To add another macro, repeat steps 1
through 5, substituting the new key sequence
to be added in step 4.
NOTE: Programming more than ve macros on the
same macro key overwrites previous settings.
Clearing a Macro Key
1. On the remote control, press and hold SETUP
until it blinks twice.
2. Enter 9 9 5. The SETUP key blinks twice.
3. Press the macro key you want to clear once.
4. Press and hold SETUP until the active mode
key blinks twice.
3. Press POWER once.
4. For the rst device you want in the power
on sequence, press a device key (e.g., STB)
once. Then press POWER once. For the sec-
ond device in the power sequence, press its
key once (e.g, TV). Then press POWER.
5. Repeat step 4 up to four more times to add
the second, third, fourth, and fth device, as
desired.
6. To save the settings and exit the program:
a. Press STB once.
b . Press and hold SETUP until the STB key
blinks twice.
Using the Master Power Key
1. After programming, point the remote control
at the devices. Press STB once.
2. Press POWER once to sequentially turn the
programmed home entertainment devices on
or off. You will see the devices turn on or off
according to the programmed sequence.
Clearing the Master Power Key
1. On the remote control, press and hold SETUP
until the last-selected device key blinks twice.
2. Enter 9 9 5. The last-selected device key
blinks twice.
USING THE MASTER POWER KEY
The Wilkes Remote Control has a unique feature
that allows you to sequentially turn up to ve of your
home entertainment devices on or off with a single
key press.
NOTE: MASTER POWER (POWER) only works in the
STB mode. If it is not programmed, only the set-top
box will turn on or off. In any other mode, pressing
MASTER POWER (POWER) once will turn the select-
ed device on or off.
Programming the Master Power Key
1. On the remote control, press and hold SETUP
until the last-selected device key blinks twice.
2. Enter 9 9 5. The last-selected device key
blinks twice.
3. Press and release POWER.
4. Press and hold SETUP until the STB key
blinks twice.
RE-ASSIGNING DEVICE KEYS
The Wilkes Remote Control can be set up to control a
second device of an already-assigned type. For example, to have the unit control a TV, a set-top box, and
two audio devices (for example, two audio receivers),
re-assign the unused VCR key to operate the second
audio device as follows:
NOTE: VCR is preset at the factory to control an RCA
VCR. Performing the steps below will overwrite those
settings.
33

1. On the remote control, press VCR once; it will
blink once. Then press and hold SETUP until
the VCR key blinks twice.
2. Enter 9 9 2. The VCR key will blink twice.
3. Press AUD once, then press VCR once. The
VCR key will blink twice.
The VCR key is now ready to be programmed for
your second audio device. See “Programming Device
Control.” To re-assign other device keys, repeat these
and substitute the key sequence using the following
chart:
NOTE: Only one device can be assigned to an unused
device key at a time.
To Re-Assign Perform Key Sequence
VCR as 2nd
AUD key
VCR as 2
TV key
CR as 2
key
VCR back to
VCR
nd
VCR à SETUP à 9 à 9 à 2 à AUD à VCR
nd
VCR à SETUP à 9 à 9 à 2 à TV à VCR
STB
VCR à SETUP à 9 à 9 à 2 à STB à VCR
VCR à SETUP à 9 à 9 à 2 à VCR à VCR
To re-assign another unused device key, substitute
it for the VCR key above and then perform the sequence. For example, to re-assign an unused AUD
key as a second DVD key, perform:
AUD à SETUP à 9 à 9 à 2 à DVD à VCR
When a re-assignment is done, the selected device
key (e.g., AUD) will blink twice to conrm your choice.
At that time, you will need to program device control
(see “Programming Device Control”).
CLEARING CUSTOM PROGRAMMING
The Wilkes Remote Control contains a Custom Programming Reset program. You can use it to remove
all custom programming, except your setup codes
and reassigned device keys.
IMPORTANT: Executing this program will erase all cus-
tom settings for Volume Lock, Learned Keys, Tune-In
Keys, and Channel Lock. However, your device programming remains.
until the last-selected device key blinks twice.
2. Enter 9 8 0. The last-selected device key
blinks twice, pauses, and blinks twice again
to conrm that all custom programming is
cleared.
TROUBLESHOOTING
PROBLEM: Device key does not blink when you press
a key.
SOLUTION: Replace the batteries with two (2) new AA
batteries (see “Installing Batteries”).
PROBLEM: Device key blinks when you press a key,
but home entertainment device does not respond.
SOLUTION: Make sure you are aiming the remote
control at your home entertainment device and that
you are within 15 feet of the device you are trying to
control.
PROBLEM:The remote control does not control home
entertainment devices or commands are not performing properly.
SOLUTION: Try all listed codes for the device brand
being set up. Make sure all devices can be operated
with an infrared remote control.
PROBLEM: TV/VCR Combo does not respond properly.
SOLUTION: Use the VCR codes for your brand. Some
combo units may require both a TV code and a VCR
code for full operation.
PROBLEM: No volume on a second TV.
SOLUTION: Follow instructions under “Changing
Volume Lock.”
PROBLEM: PLAY and STOP keys do not work on a
Motorola DCT-2000 cable converter.
SOLUTION: Re-program the STB key for cable code
0476 (see “Programming Device Control”).
PROBLEM: Tried Search Method and still could not
nd a working code.
SOLUTION: Try the Search Method again after clearing out the device key as follows:
a. Press and hold SETUP until device key
blinks twice.
b. Enter 9 9 2.
c. Press and release the device key to be
cleared twice.
1. On the remote control, press and hold SETUP
34

PROBLEM: Remote control does not turn on Sony or
Sharp TV/VCR Combo.
SOLUTION: For power on, these products require pro-
gramming TV codes on the remote control. For Sony,
use TV code 0000 and VCR code 0032. For Sharp,
use TV code 0093 and VCR code 0048.
FCC NOTICE
This equipment has been tested and found to comply
with the limits for a class B digital device, pursuant to
part 15 of the FCC Rules. These limits are designed
to provide reasonable protection against harmful
interference in a residential installation. This equipment generates, uses and can radiate radio frequency energy and if not installed and used in accordance
with the instructions, may cause harmful interference
to radio communications. However, there is no guarantee that interference will not occur in a particular
installation. If this equipment does cause harmful in-
terference to radio or television reception, which can
be determined by turning the equipment off and on,
the user is encouraged to try to correct the interfer-
ence by one or more of the following measures:
► Connect the equipment into an outlet on a
circuit different from that to which the receiv-
er is connected.
► Consult the dealer or an experienced radio/
TV technician for help.
This equipment has been veried to comply with the
limits for a class B computing device, pursuant to
FCC Rules. In order to maintain compliance with FCC
regulations, shielded cables must be used with this
equipment. Operation with non-approved equipment
or unshielded cables is likely to result in interference
to radio and TV reception. The user is cautioned that
changes and modications made to the equipment
without the approval of manufacturer could void the
user’s authority to operate this equipment.
ADDITIONAL INFORMATION
This product does not have any user-serviceable
parts. Opening the case, except for the battery cover,
may cause permanent damage to your Potenza ST
Universal Remote Control from Wilkes.
► Reorient or relocate the receiving antenna.
► Increase the separation between the equip-
ment and receiver.
336.973.3103 | 877.973.3104
Repair: 336.973.4000
Email: wilkesinfo@wilkes.net
wilkes.net
1400 River Street, Wilkesboro, NC 28697
35

MANUFACTURER’S CODES
Setup Codes for TVs
A-Mark 0003
Abex 0032
Accurian 1803
Action 0873l
Admira 0093, 0463
Advent 0761, 0783, 0815, 0817, 0842,
1933
Adventura 0046
Aiko 0092
Aiwa 0701
Akai 0812, 0702, 0030, 0098, 0672,
1207, 1903, 1935
Alaron 0179, 0183, 0216
Albatron 0700, 0843
Ambassador 0177
America Action 0180
Ampro 0751
Anam 0180, 0004, 0009, 0068
Anam National 0055, 0161
AOC 0030, 0003, 0019, 0052, 0137,
0185, 1365
Apex Digital 0748, 0879, 0765, 0767, 0890,
1217, 1943
Archer 0003
Astar 1548
Audiovox 0451, 0180, 0092, 0003, 0623,
0710, 0802, 0846, 0875, 1284,
1937, 1951, 1952
Aventura 0171
Axion 1937
Belcor 0019
Bell & Howell 0154, 0016
BenQ 1032, 1315
Bradford 0180
Brockwood 0019
Broksonic 0236, 0463, 0003, 1935, 1938
Byd:sign 1309, 1311
Cadia 1283
Candle 0030, 0046, 0056, 0186
Carnivale 0030
Carver 0054, 0170
CCE 0217, 0329
Celebrity 0000
Celera 0765
Champion 1362
Changhong 0765
Cinego 1986
Citizen 0060, 0030, 0092, 0039, 0046,
0056, 0186, 0280
Clairtone 0185
Clarion 0180
Commercial Solutions 1447, 0047
Concerto 0056
Contec 0180, 0157, 0158, 0185
Craig 0180, 0161
Crosley 0054
Crown 0180, 0039
Curtis Mathes 0047, 0054, 0154, 0451, 0093,
0060, 0702, 0030, 0145, 0166,
1347, 1147, 0747, 0466, 0056,
0039, 0016
CXC 0180
CyberHome 0794
Cytron 1326
Daewoo 0451, 0092, 1661, 0019, 0039,
0066, 0067, 0091, 0623, 0661,
0672
Daytron 0019
Dell 1080, 1178, 1264, 1403
Denon 0145, 0511
Denstar 0628
Diamond Vision 1996, 1997
Dumont 0017, 0019
Durabrand 0463, 0180, 0178, 0171, 1034,
0003
Dwin 0720, 0774
Dynatech 0049
Electroband 0000, 0185
Electrograph 1623, 1755
Electrohome 0381, 0389, 0409
Emerson 0154, 0236, 0463, 0180, 0178,
0171, 1963, 1944, 0623, 0282,
0280, 0270, 0185, 0183, 0182,
0181, 0179, 0177, 0158, 0039,
0038, 0019
Emprex 1422, 1546
Envision 0030, 0813, 1365
Epson 0833, 0840, 1290
ESA 0812, 0171, 1944, 1963
Fisher 0154, 0159
FlexVision 0710
Fujitsu 0179, 0186, 0683, 0809, 0853
Funai 0180, 0171, 0179, 1271, 1963
Futuretech 0180
Gateway 1001, 1002, 1003, 1004, 1755,
1756
GE 1447, 0047, 0051, 0451, 0178,
1347, 0747, 0282, 0279, 0251,
0174, 0138, 0135, 0055, 0029,
0027, 0021
Gibralter 0017, 0030, 0019
Go Video 0886
36

GoldStar 0178, 0030, 0001, 0002, 0019,
0032, 0106, 0409
Goodmans 0360
Gradiente 0392
Grunpy 0180, 0179
Haier 1034, 0768
Hallmark 0178
Hannspree 1348, 1351, 1352
Hantarex 1338
Harley Davidson 0043, 0179
Harman/Kardon 0054, 0078
Harvard 0180, 0068
Havermy 0093
Helios 0865
Hello Kitty 0451
Hewlett Packard 1088, 1089, 1101, 1494, 1502
Hisense 074 8
Hitachi 1145, 0145, 0016, 0032, 0038,
0056, 0095, 0097, 0151, 0173,
0227, 0279, 0409, 0413, 0797,
1960
HP 1088, 1089, 1101, 1494, 1502
Hyundai 0849, 1219, 1294
iLo 1286, 1603, 1990
Innity 0054
Initial 1603, 1990
Insignia 0171, 1204, 1326, 1517, 1963,
2002
Inteq 0017
Janeil 0046
JBL 0054
JCB 0000
Jensen 0761, 0050, 0815, 0817, 1299,
1933
JVC 0053, 0036, 0069, 0160, 0169,
0182, 0731, 1253
Kamp 0216
Kawasho 0158, 0216, 0308
Kaypani 0052
KEC 0180
Kenwood 0030, 0019
KLH 0765, 0767, 1962
Kloss 0024, 0046, 0078
KMC 0106
Konka 0628, 0632, 0638, 0703, 0707
Kost 1262, 1483
KTV 0180, 0030, 0039, 0183, 0185,
0217, 0280
LG 1265, 0178, 0442, 0700, 0829,
0856, 1178, 1325, 1423, 1758,
1993
Loewe 0136
Logik 0016
Luxman 0056
LXI 0047, 0054, 0154, 0156, 0178,
0148, 0747
Magnavox 1454, 0054, 0030, 0706, 1963,
1944, 1525, 1254, 1198, 0802,
0386, 0230, 0187, 0186, 0179,
0096, 0036, 0028, 0024, 0020
Majestic 0015, 0016
Marantz 0054, 0030, 0444, 0704, 0854,
0855, 1154, 1398
Matsushita 0250, 0650
Maxent 0762, 1211, 1755
Megapower 0700
Megatron 0178, 0145, 0003
MEI 0185
Memorex 0154, 0463, 0150, 0178, 0016,
0106, 0179
MGA 0150, 0178, 0030, 0019, 0155
Midland 0047, 0017, 0051, 0032, 0039,
0135, 0747
Mintek 1603, 1990
Minutz 0021
Mitsubishi 0093, 1250, 0150, 0178, 0014,
0019, 0098, 0155, 0331, 0358,
0836, 0868, 1550
Monivision 0700, 0843
Motorola 0093, 0055, 0835
Moxell 0835
MTC 0060, 0030, 0019, 0049, 0056,
0091, 0185, 0216
Multitech 0180, 0049, 0217
NAD 0156, 0178, 0866
NEC 0030, 0019, 0036, 0056, 0170,
0434, 0497, 0882, 1398, 1704
Neovia 1338
NetTV 0762, 1755
Nikko 0178, 0030, 0092, 0317
Noblex 0430
Norcent 0748, 0824, 1089, 1365, 1589,
1590, 1591
Norwood Micro 1286, 1296, 1303
Noshi 0018
NTC 0092
Olevia 1144, 1240, 1331, 1610
Olympus 1342
Onwa 0180
Optimus 0154, 0250, 0166, 0650
Optoma 0887
Optonica 0093, 0165
Orion 0236, 0463, 1463, 0179
Panasonic 0250, 0051, 0055, 0162, 0226,
0338, 0375, 0650, 1291, 1410,
1941, 1946, 1947
37

Penney 0047, 0156, 0051, 0060, 0178,
0030, 1347, 0747, 0309, 0149,
0138, 0135, 0110, 0039, 0032,
0027, 0021, 0019, 0018, 0003,
0002
Petters 1523
Philco 0054, 0030, 0019, 0020, 0028,
0096, 0302
Philips 1454, 0054, 0690, 1154, 1483
Pilot 0030, 0019, 0039
Pioneer 0166, 0038, 0172, 0679, 0866,
1260, 1398
Polaroid 0765, 0865, 1262, 1276, 1314,
1316, 1326, 1327, 1328, 1341,
1498, 1523, 1991, 1992
Portland 0092, 0019, 0039
Prima 0761, 0783, 0815, 0817, 1933
Princeton 0700, 0717
Prism 0051
Proscan 1447, 0047, 0747, 1347
Proton 0178, 0003, 0031, 0052, 0466
Protron 1320, 1323
Proview 0835, 1401, 1498
Pulsar 0017, 0019
Quasar 0250, 0051, 0055, 0165, 0219,
0650
RadioShack 0047, 0154, 0180, 0178, 0030,
0019, 0032, 0039, 0056, 0165,
0409, 0747
RCA 1447, 0047, 2002, 1958, 1953,
1948, 1547, 1347, 1247, 1147,
1047, 0747, 0679, 0278, 0174,
0135, 0090, 0038, 0029, 0019,
0018
Realistic 0154, 0180, 0178, 0030, 0019,
0032, 0039, 0056, 0165
Rhapsody 0183, 0185, 0216
Runco 0017, 0030, 0251, 0497, 0603,
1398
Sampo 0030, 0032, 0039, 0052, 0100,
0110, 0762, 1755
Samsung 0060, 0812, 0702, 0178, 0030,
1903, 1575, 1395, 1312, 1060,
0814, 0766, 0427, 0408, 0329,
0056, 0032, 0019
Samsux 0039
Sansui 0463, 1409, 1935
Sanyo 0154, 0088, 0107, 0146, 0159,
0232, 0484, 0799, 0893, 1142
Sceptre 0878, 1217, 1360, 1599
Scimitsu 0019
Scotch 0178
Scott 0236, 0180, 0178, 0019, 0179,
0309
Sears 0047, 0054, 0154, 0156, 0178,
0171, 0015, 0056, 0146, 0148,
0149, 0159, 0168, 0179, 0281,
0747
Sharp 0093, 0039, 0153, 0157, 0165,
0220, 0281, 0386, 0398, 0491,
0688, 0689, 0818, 0851, 1602
Sheng Chia 0093
Sherwood 1399
Shogun 0019
Signature 0016
Signet 1262
SIM2 Multimedia 1297
Simpson 0186, 0187
Sony 1100, 0000, 0011, 0080, 0111,
0273, 0353, 0810, 0834, 1317
Soundesign 0180, 0178, 0179, 0186
Sova 1320, 1952
Soyo 1520
Spectricon 0003, 0137
Squareview 0171
SSS 0180, 0019
Starlite 0180
Studio Experience 0843
Superscan 0093, 0864
Supre-Macy 0046
Supreme 0000
SVA 0748, 0587, 0768, 0865, 0870,
0871, 0872
Sylvania 0054, 0030, 0171, 0020, 0028,
0065, 0096, 0381, 1271, 1944,
1963
Symphonic 0180, 0171, 1944
Syntax 1144, 1240, 1331
Tandy 0093
Tatung 0003, 0049, 0055, 0396, 1101,
1285, 1286, 1287, 1288, 1361,
1756
Technics 0250, 0051
Technol Ace 0179
Technovox 0007
Techview 0 8 47
Techwood 0051, 0003, 0056
Teknika 0054, 0180, 0150, 0060, 0092,
0016, 0019, 0039, 0056, 0175,
0179, 0186, 0312, 0322
Telefunken 0702, 0056, 0074
Tera 0031
Thomson 0209, 0210
TMK 0178, 0056, 0177
TNCi 0017
Toshiba 0154, 1256, 0156, 1265, 0060,
1945, 1935, 1704, 1656, 1635,
1356, 1343, 1325, 1306, 1156,
0845, 0832, 0650, 0149, 0036
Tosonic 0185
Totevision 0039
Trical 0157
38

TVS 0463
Ultra 0391, 1323
Universal 0027
Universum 13 37
US Logic 1286, 1303
Vector Research 0030
Victor 0053
Video Concepts 0098
Vidikron 0054, 0242, 1398
Vidtech 0178, 0019, 0036
Viewsonic 0797, 0857, 0864, 0885, 1330,
1342, 1578, 1627, 1755
Viking 0046, 0312
Viore 1207
Visart 1336
Vizio 0864, 0885, 1499, 1756, 1758
Wards 0054, 0178, 0030, 1156, 0866,
0202, 0179, 0174, 0165, 0111,
0096, 0080, 0056, 0029, 0028,
0027, 0021, 0020, 0019, 0016
Waycon 0156
Westinghouse 0885, 0889, 0890, 1282, 1577
White Westinghouse 0463, 0623
Wyse 1365
Yamaha 0030, 0019, 0769, 0797, 0833,
0839
Zenith 0017, 0463, 1265, 0178, 0092,
0016
Zonda 0003
Setup Codes for TVs (DLP)
Hewlett Packard 1494
HP 1494
LG 1265
Magnavox 1525
Mitsubishi 1250
Optoma 0887
Panasonic 1291
RCA 1447
Samsung 0812, 1060, 1312
SVA 0872
Toshiba 1265, 1306
Vizio 1499
Setup Codes for TVs (HDTV)
Advent 0842
Hitachi 1960
Marantz 0854
Mitsubishi 0150
Panasonic 0250, 0650, 1291
Pioneer 0679
Princeton 0717
RCA 1447
Samsung 0812, 0702
Sharp 0688, 0689
Toshiba 1256
Setup Codes for TVs (LCD)
Accurian 1803
Action 0873
Akai 1935
AOC 1365
Apex Digital 0890, 1217
Astar 1548
Audiovox 0180, 0710, 0802, 0846, 0875,
1284, 1937, 1951, 1952
BenQ 1315
Byd:sign 1309, 1311
Cadia 1283
CyberHome 0794
Dell 1080, 1178, 1264
Emprex 1422, 1546
Envision 0813, 1365
FlexVision 0710
Funai 0171
Go Video 0886
Hannspree 1348, 1351
Hewlett Packard 1088
HP 1088
Hyundai 0849, 1219, 1294
iLo 1286, 1603, 1990
Initial 1603, 1990
Insignia 1204, 1517, 2002
Jensen 1299
Kost 1262
LG 0856, 1178, 1993
Magnavox 1454, 0802, 1198
Marantz 0855
Maxent 0762, 1211
Mintek 1603, 1990
Mitsubishi 1250
NetTV 0762
Norcent 1365, 1589, 1591
Norwood Micro 1286, 1296
Olevia 1144, 1240, 1331, 1610
Panasonic 0650, 1941
Petters 1523
Philips 1454, 1483
Polaroid 1262, 1276, 1316, 1341, 1498,
1523
Protron 1320, 1323
Proview 1401
RCA 0047, 1958
39

Sampo 0762
Samsung 0812, 0766, 0814, 1395, 1575
Sansui 1409
Sanyo 1142
Sceptre 0878, 1217, 1360, 1599
Sharp 0093, 0818, 1602
Sherwood 1399
Signet 1262
Sony 0810
Sova 1320
Soyo 1520
Superscan 0864
SVA 0587, 0870, 0871
Sylvania 0171, 1271
Symphonic 0171
Syntax 1144, 1240, 1331
Tatung 1286
Techview 0 847
Toshiba 0845, 1343, 1635, 1656
Ultra 1323
US Logic 1286
Vidikron 1398
Viewsonic 0857, 0864, 0885, 1330, 1578,
1627
Visart 1336
Vizio 0864, 0885, 1756
Westinghouse 0885, 0889, 0890, 1282, 1577
Wyse 1365
Zenith 1265
Setup Codes for TV/DVD Combos
Controlled by the TV
Accurian 1803
Advent 1933
Akai 1935
Apex Digital 1943
Audiovox 1937, 1951, 1952
Axion 1937
Broksonic 1935
Cinego 1986
Diamond Vision 1997
Emerson 1963
ESA 1963
Funai 1963
Hitachi 1960
iLo 1990
Initial 1990
Insignia 1963, 2002
Jensen 1933
KLH 1962
LG 1993
Magnavox 1963
Mintek 1990
Panasonic 1941
Polaroid 1991
Prima 1933
RCA 1948, 1958, 2002
Samsung 1903
Sansui 1935
Sova 1952
Sylvania 1963
Toshiba 1635, 1935
Controlled by the DVD
Advent 1016
Akai 0695
Apex Digital 0830
Audiovox 1071, 1121, 1122
Axion 1071
Broksonic 0695
Cinego 1399
Diamond Vision 1610
Emerson 0675, 1268
ESA 1268
Funai 1268
Go Vision 1071
Hitachi 1 247
iLo 147 2
Initial 147 2
Insignia 1268
Jensen 1016
KLH 1261
Konka 0719, 0720
LG 1526
Magnavox 1268
Mintek 1472
Panasonic 1490
Philips 0854, 1260
Polaroid 1480
Prima 1016
RCA 1022, 1193
Samsung 0899
Sansui 0695
Sova 1122
Sylvania 0675, 1268
Toshiba 0695
Setup Codes for TV/VCR Combos
Controlled by the TV
America Action 0180
Audiovox 0180
Emerson 0236
40

Controlled by the VCR
America Action 0278
Audiovox 0278
Broksonic 0002, 0479, 1479
Citizen 1278
Colt 0072
Curtis Mathes 1035
Daewoo 0637, 1278
Emerson 0002, 0294, 0479, 0593, 1278,
1479
Funai 0000
GE 0240, 0807, 1035, 1060
GoldStar 1237
Harley Davidson 0000
Hitachi 0000
LG 1037
Lloyd’s 0000
Magnasonic 0593, 1278
Magnavox 0000, 0593, 1781
Magnin 0240
Memorex 0162, 0454, 1037, 1162, 1237,
1262
MGA 0240
Mitsubishi 0807
Optimus 0162, 0454, 0593, 1162, 1262
Orion 0002, 0479, 1479
Panasonic 0162, 1035, 1162, 1262
Penney 0240, 1035, 1237
Quasar 0162, 1035, 1162
RadioShack 0000, 1037
RCA 0240, 0807, 1035, 1060
Samsung 1014
Sansui 0000, 0479, 1479
Sanyo 0240
Sears 0000, 1237
Sony 0000, 1232
Sylvania 1781
Symphonic 0000, 0593
Thomas 0000
Toshiba 0845, 1145
White Westinghouse 0637
Zenith 0000, 0479, 0637, 1479
Magnavox 1944
Panasonic 1946, 1947
Polaroid 1992
RCA 1953
Sylvania 1944
Symphonic 1944
Toshiba 1945
Controlled by the DVD
Akai 0899
Broksonic 0868
Diamond Vision 1609
Emerson 0821
ESA 0821
Funai 1334
Magnavox 0821
Panasonic 1362, 1462
Polaroid 1482
RCA 1132
Sharp 0630
Superscan 0821
Sylvania 0821
Symphonic 0821
Toshiba 1045
Controlled by the VCR
Sharp 0807
Setup Codes for TV/VCR/DVD Combos
Controlled by the TV
Akai 1903
Broksonic 1938
Diamond Vision 1996
Emerson 1944
ESA 1944
336.973.3103 | 877.973.3104
Repair: 336.973.4000
Email: wilkesinfo@wilkes.net
wilkes.net
1400 River Street, Wilkesboro, NC 28697
41

NOTES
42

NOTES
43

1400 River Street, Wilkesboro, NC 28697
336.973.3103 | 877.973.3104
Repair: 336.973.4000
Email: wilkesinfo@wilkes.net
wilkes.net
 Loading...