

OPERATIONAL EFFICIENCY
EN DE FR
UNITOR INSTRUCTION MANUAL
UNTIOR HPC 54/1, 67/1

English .................................................................................................................................... 3
Deutsch ................................................................................................................................ 27
Français ................................................................................................................................ 52

3
1)
Options / model variants
Original instructions
UNITOR HPC 54/1 64/1 67/1
Contents
Symbols used to mark instructions .....................................................................................................4
1 Important safety instructions ...........................................................................................4
2 Description.........................................................................................................................7
2.1 Use per day .............................................................................................................................7
2.2 Purpose ...................................................................................................................................7
2.3 Operating elements .................................................................................................................8
3 Before starting the cleaner ...............................................................................................9
3.1 Setting up the cleaner ..............................................................................................................9
3.2 Check the oil level ....................................................................................................................9
3.3 Fill up detergent tank .............................................................................................................10
3.4 Connecting the high pressure hose .......................................................................................10
3.5 Connecting the water supply .................................................................................................10
3.6 Electrical connection ..............................................................................................................11
3.7 BA valve .................................................................................................................................12
4 Control / Operation ..........................................................................................................13
4.1 Connecting the spray lance to the spray gun ........................................................................13
4.2 Switching on the cleaner when it is connected to a water supply ..........................................13
4.3 Pressure regulation with Tornado Plus lance and PowerSpeedVario Plus lance. .................15
4.4 Pressure regulation with the FlexoPowerPlus nozzle head and
the PowerSpeedVario Plus lance. .........................................................................................15
4.5 Using cleaning agents ...........................................................................................................15
4.6 Lifting with crane ....................................................................................................................16
5 Applications and methods .............................................................................................17
5.1 Techniques .............................................................................................................................17
5.2 Some typical cleaning tasks ..................................................................................................18
6 After using the cleaner ...................................................................................................20
6.1 Switching off the cleaner ........................................................................................................20
6.2 Disconnecting supply lines ....................................................................................................20
6.3 Rolling up the hose and storing of lance ................................................................................20
6.4 Winding up the cable .............................................................................................................20
6.5 Storing the cleaner (below 0°C) .............................................................................................21
7 Maintenance.....................................................................................................................22
7.1 Maintenance plan ..................................................................................................................22
7.2 Maintenance work ..................................................................................................................22
8 Troubleshooting ..............................................................................................................24
9 Further information .........................................................................................................25
9.1 Recycling the cleaner ...........................................................................................................25
9.2 Guarantee ..............................................................................................................................25
9.3 EU Declaration of Conformity ................................................................................................25
9.4 Technical Data .......................................................................................................................26

4
1)
Options / model variants
Original instructions
UNITOR HPC 54/1 67/1
Symbols used to mark
instructions
1 Important safety instructions
For your own safety
The high-pressure cleaner may
only be used by persons instructed in its use and who have
been expressly authorised to do
so.
Although extremely easy to operate, children should not be allowed to use the cleaner.
General
Use of the high-pressure cleaner is subject to the applicable local regulations.
Besides the operating instructions and the binding accident
prevention regulations valid in
the country of use, observe recognised regulations for safety
and proper use.
Do not use any unsafe work
techniques.
Transport
Transport of the high-pressure
cleaner is easy on its large
wheels.
For safe transport in and on vehicles we recommend to prevent
the equipment from sliding and
tilting by fixing it with belts.
For transport at temperatures
around or below 0°C, anti-freeze
should be drawn into the pump
beforehand (see chapter 6).
Before starting the cleaner
If your 3-phase cleaner was
supplied without a plug, have
it fitted with a suitable 3-phase
plug with earth conductor, by an
electrician.
Before use, check that the highpressure cleaner is safe and in
proper condition.
Regularly check whether the
power cord is damaged or
shows signs of ageing.
Use the high-pressure cleaner
only when the mains power lead
is in a safe condition. (risk of
electric shock if damaged!).
Check the rated voltage of the
high-pressure cleaner before
connecting it to the mains power
supply. Ensure that the voltage
shown on the rating plate corresponds to the voltage of the local mains power supply.
We strongly recommend that the
power supply to the high pressure cleaner be connected via a
residual current circuit breaker.
This device stops the supply of
electricity if the leakage current
to earth exceeds 30 mA for 30
ms or it has an earth tester circuit.
Operate the cleaner only in an
upright position!
Please observe the regulations
and provisions applicable in
your country. Before putting the
high-pressure cleaner into service, carry out a visual check of
all the major components.
Safety instructions in these
operating instructions which
must be observed to prevent
risks to persons are marked with
this danger symbol.
Before starting up your highpressure washer for the first
time, this instruction manual
must be read through carefully.
Save the instructions for later
use.
This indicates tips and instructions to simplify work and to ensure safe operation.
This symbol is used to mark
safety instructions that must be
observed to prevent damage
to the machine and its performance.
5
1)
Options / model variants
Original instructions
UNITOR HPC 54/1 67/1
CAUTION!
High-pressure water jets can be
dangerous if misused. The jet
must not be directed at persons,
animals, live electrical equip-
ment or the cleaner itself.
Wear appropriate protective
clothing and eye protectors.
Do not direct the jet towards
yourself or towards other persons in order to clean clothes or
footwear.
During operation of the cleaner,
recoil forces are produced at the
spraying device and, when the
spray lance is held at an angle,
a torque is also created. The
spraying device must therefore
be held firmly in both hands.
Do not use the cleaner when
other people without protective
clothing are in the working area.
Check that cleaning will not
result in dangerous substances (e.g. asbestos, oil) being
washed off the object to be
cleaned and harming the environment.
WARNING!
This machine has been designed for use with the cleaning
agent supplied or recommended by the manufacturer. The
use of other cleaning agents or
chemicals may adversely affect
the safety of the machine.
Risk of explosion – Do not spray
flammable liquids.
Do not clean delicate parts
made of rubber, fabric, etc. with
the 0° jet. Keep some distance
between high pressure nozzle
and surface in order to prevent
the surface from damage.
Do not use the high-pressure
hose for lifting loads.
NOTE!
The maximum permissible
working pressure and temperature are printed on the highpressure hose.
Do not continue to use the cleaner if the mains power lead or
high-pressure hose is damaged.
Ensure adequate air circulation.
Do not cover the cleaner or operate it in inadequately ventilated
rooms!
Store the cleaner where
it will not be exposed to
frost!
Never operate the cleaner without water. Even brief shortages
of water result in severe damage to the pump seals.
Switch off the cleaner after max.
3 minutes.
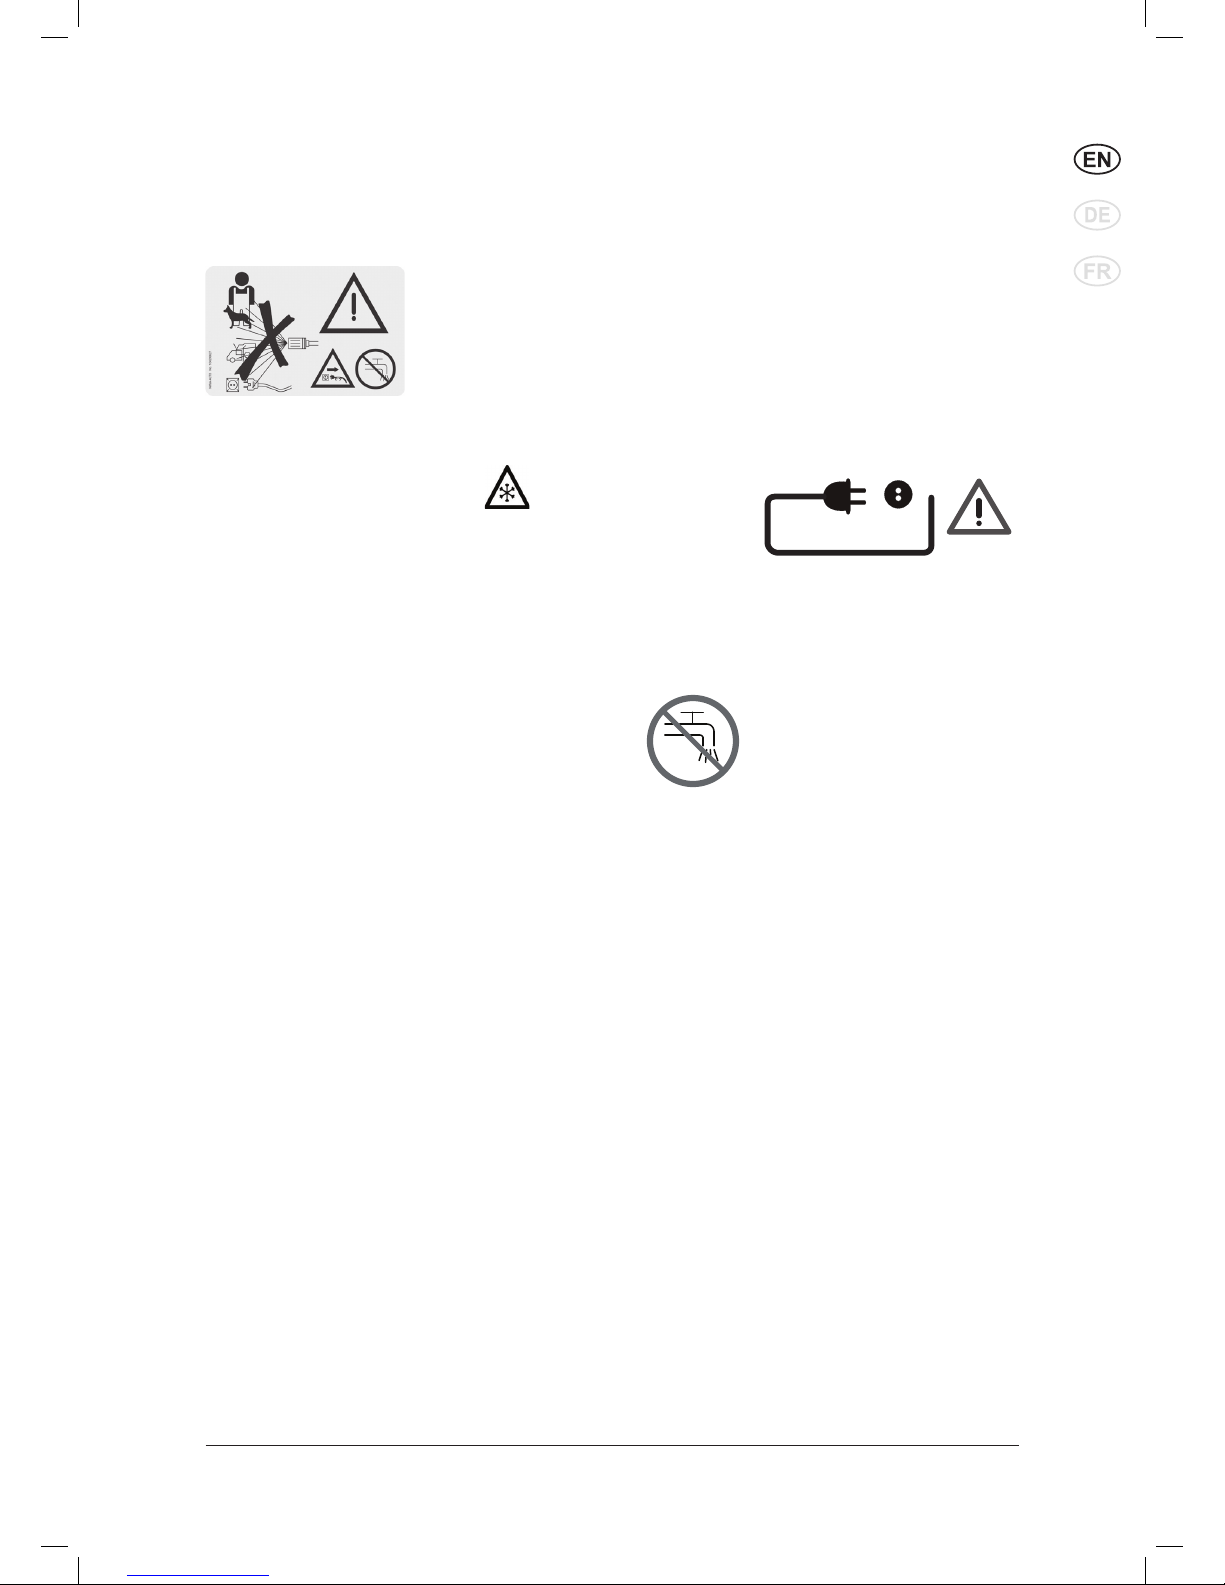
Water connection
This high pressure
washer is only allowed to be connected with the
drinking water mains, when an
appropriate backflow preventer
has been installed, Type BA according to EN 60335-2-79. The
backflow preventer can be ordered under number 10641117
7,106411178,106411179,1064
11184. The length of the hose
between the backflow preventer
and the high pressure washer
must be at least 12 metres (min
diameter 3/4 inch) to absorb
possible pressure peaks. Operation by suction (for example
from a rainwater vessel) is carried out without backflow preventer. Recommended suction
set: 61256. As soon as water
has flown through the BA valve,
this water is not considered to
be drinking water any more.
Operation
CAUTION!
Unsuitable extension leads can
represent a source of danger.
Always unwind cord from the
reels completely to prevent the
power cord overheating.
Plugs and connectors of mains
power leads must be at least
splash water-proof.
Do not damage the mains power
lead (e.g. by driving over it, pulling or crushing it).
Disconnect the power cord by
pulling the plug only (do not pull
or tug the power cord).
Electrical equipment
CAUTION!
Never spray electrical equipment with water: danger for persons, risk of short-circuiting.
The cleaner may only be connected to a correctly installed
plug socket.
Switching on the cleaner may
cause voltage fluctuations.
Voltage fluctuations should not
occur if the impedance at the
transfer point is less than 0.15Ω.
If in doubt ask your local electricity supplier.
Maintenance and repair
CAUTION!
Always remove the plug from
the mains plug socket before
cleaning or carrying out maintenance work on the cleaner.
Carry out only the maintenance
operations described in the operating instructions. Use only original
UNITOR spare parts.
Do not make any technical modifications to the high-pressure
cleaner.
Ensure that the machine is regularly serviced by Authorised UNITOR dealers in accordance with
the maintenace plan. Failure to do
so will invalidate the warranty.

6
1)
Options / model variants
Original instructions
UNITOR HPC 54/1 67/1
CAUTION!
High-pressure hoses, fittings and
couplings are important for the
safety of the cleaner. Use only
high-pressure parts approved by
the manufacturer!
The mains power lead must not
differ from the version specified
by the manufacturer and may only
be changed by an electrician.
Please contact the UNITOR service department or an authorised
specialist work-shop for all other
maintenance or repair work!
Testing
The cleaner conforms to the
German „Guidelines for Liquid Spray Jet Devices“. The
high-pressure cleaner must be
subjected to a safety examination in accordance with the „Accident Prevention Regulations
for Working with Liquid Spray
Jet Devices“ as required, but
at least every 12 months, by an
authorised inspector and this report must be saved.
After all repairs or modifications to electrical equipment,
the protective conductor resistance, the insulation resistance
and the leakage current must
be measured. Furthermore, a
visual inspection of the mains
power lead, a voltage and current measurement and a function test must be carried out.
Our after-sales service technicians are at your disposal as authorised inspectors.
The complete „Accident Prevention Regulations for Working
with Liquid Spray Jet Devices“
are available from the Carl Heymanns Verlag KG, Luxemburger
Strasse 449, 50939 Cologne or
from the appropriate association of employers’ liability insurances.
Unloader valve
Unacceptably high pressure is
fed back without residual pressure via a bypass line into the
intake line of the pump when the
safety device is tripped.
The unloader valve is set and
sealed at the factory and must
not be adjusted.
Safety devices
Thermal sensor:
A thermal sensor protects the
motor against overloading. The
machine will restart after a few
minutes when the thermal sensor has cooled.
Locking device on spray gun:
The spray gun features a locking device. When the pawl is
activated, the spray gun cannot
be ope rated.
Warning
• Inhalation of aerosols can
be hazardous to health.
• Where applicable use a
device in order to avoid or
reduce aerosols production,
e.g., a shield covering the
nozzle.
• For protection against aerosols use a respiratory mark
of class FFP 2 or higher.
O
I
7
1)
Options / model variants
Original instructions
UNITOR HPC 54/1 67/1
2 Description
2.2 Purpose This high-pressure cleaner has been designed for professional use
in:
– marine industry
– food industry
Chapter 5 describes the use of the high-pressure cleaner for various
cleaning jobs.
Always use the cleaner as described in these operating instructions.
Any other use may damage the cleaner or the surface to be cleaned
or may result in severe injury to persons.
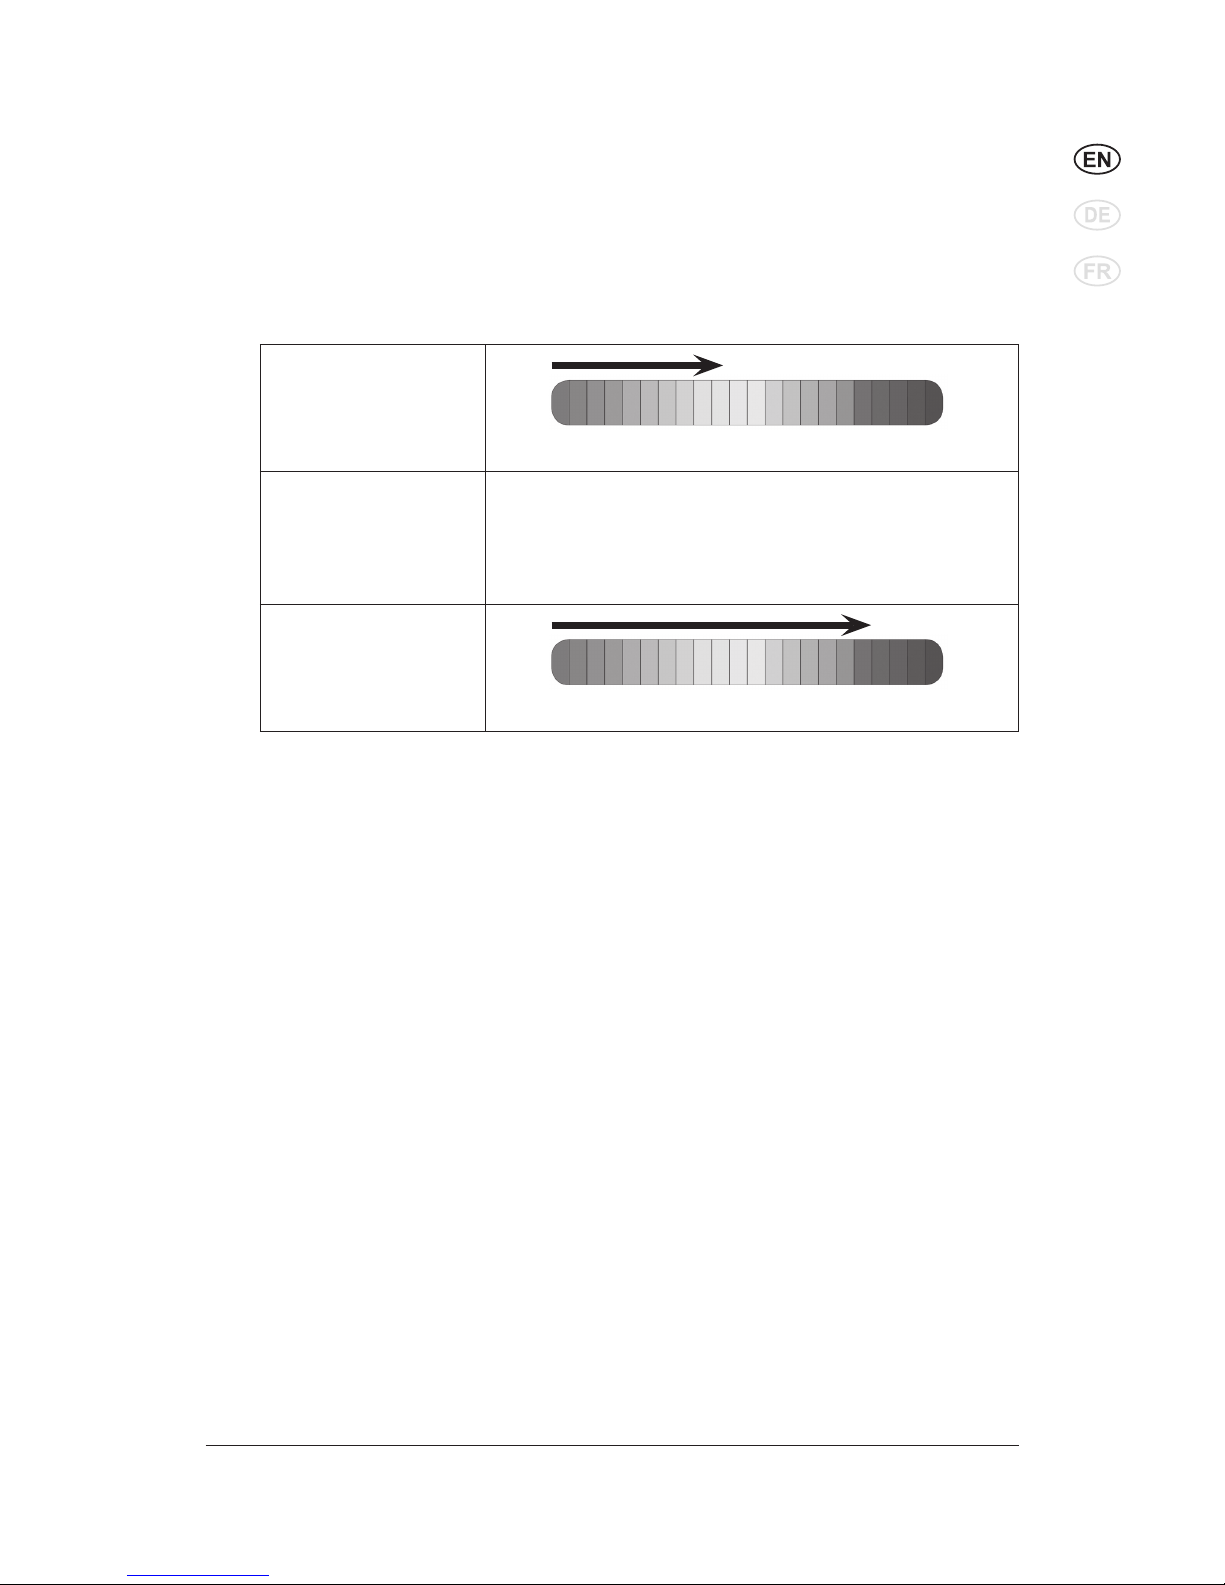
2.1 Use per day We recommend these products for an optional use of approx.
X-hours use per day.
HPC 54/1
HPC 67/1
0 8+
Hours use per day
Recommended for use x hours / day
0 8+
Hours use per day
Recommended for use x hours / day
8
1)
Options / model variants
Original instructions
UNITOR HPC 54/1 67/1
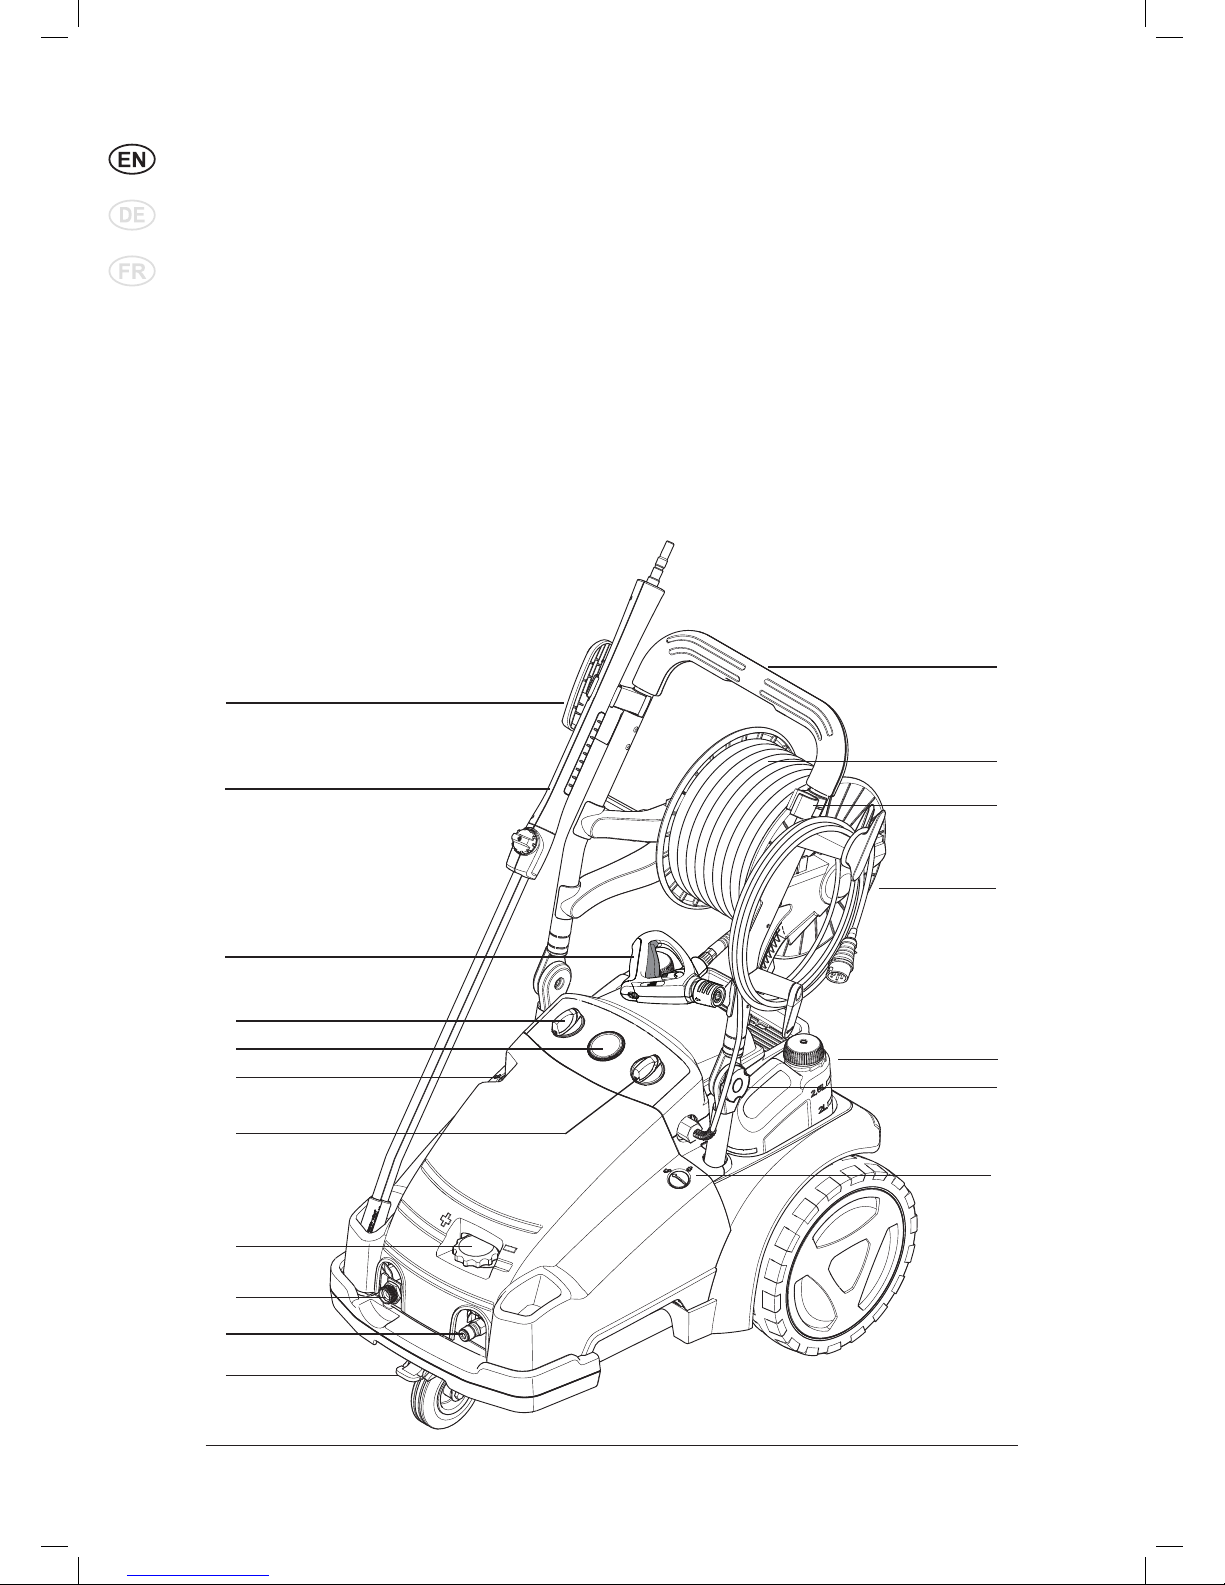
2.3 Operating elements 1. Push/pull handle
2. Spray gun
3. Electrical lead
4. Holder for high pressure hose
5. High-pressure hose
6. Fastening screw
7. Lance
1)
8. Parking brake
1)
9. High-pressure hose connection (on standard models without hose
reel)
1)
10. Water connection and water inlet filter
11. Oil inspection slide
12. Pressure gauge
1)
13. Main switch
14. Chemical dosing regulation
1)
15. Water flow regulation
1)
16. Chemical tank
1)
17. Cover lock
107146700
1
5
4
3
16
6
4
7
2
14
12
11
13
15
10
8
9
17
9
1)
Options / model variants
Original instructions
UNITOR HPC 54/1 67/1
3 Before starting the cleaner
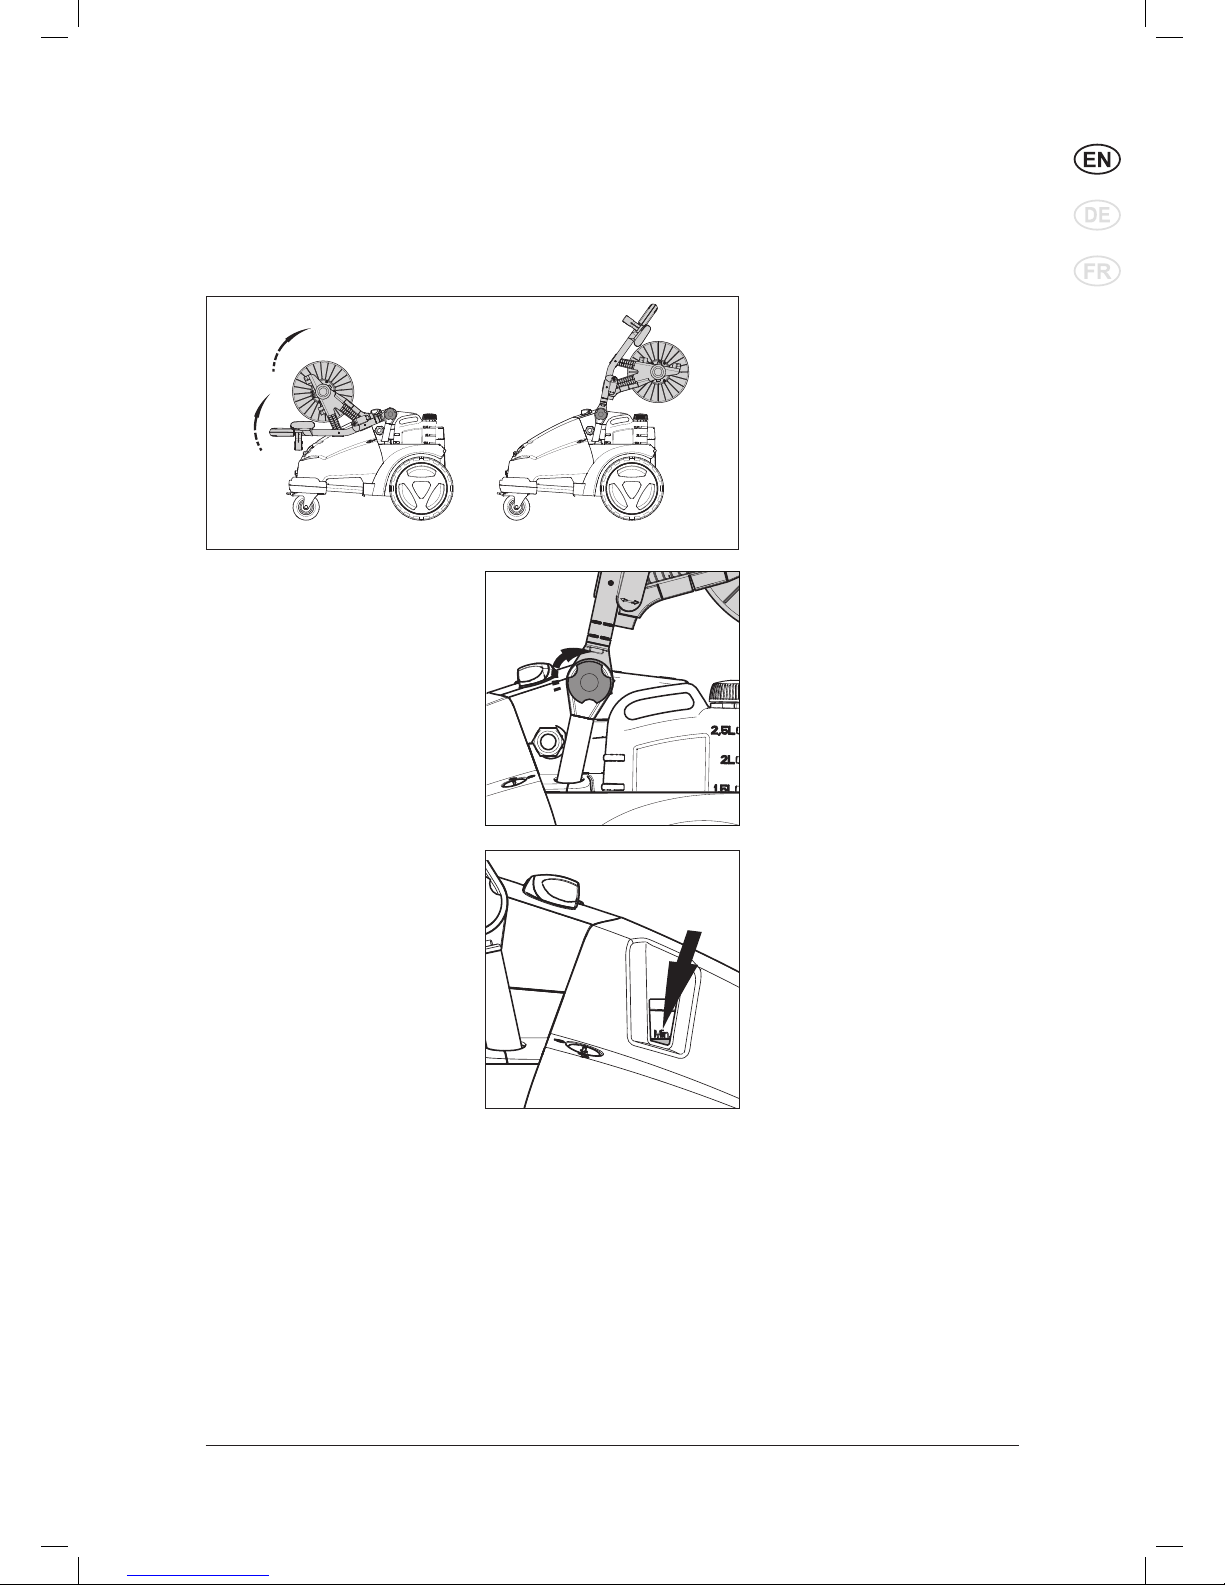
3.1 Setting up the cleaner
3.2 Check the oil level 4. Check the oil level.
On level ground, the oil
should be above MIN level
(A), when the oil is cold.
CAUTION!
Never lift the cleaner alone.
Always ask a second person to
help.
1. Before using the cleaner for
the first time, check it carefully to detect any faults or
damage.
2. In the event of any damage
contact your UNITOR dealer
immediately.
3. Unfold and lock the handle in
working position.
3
A
NOTE! Hose reel is not standard equipment on HPC 54 & 67
10
1)
Options / model variants
Original instructions
UNITOR HPC 54/1 67/1
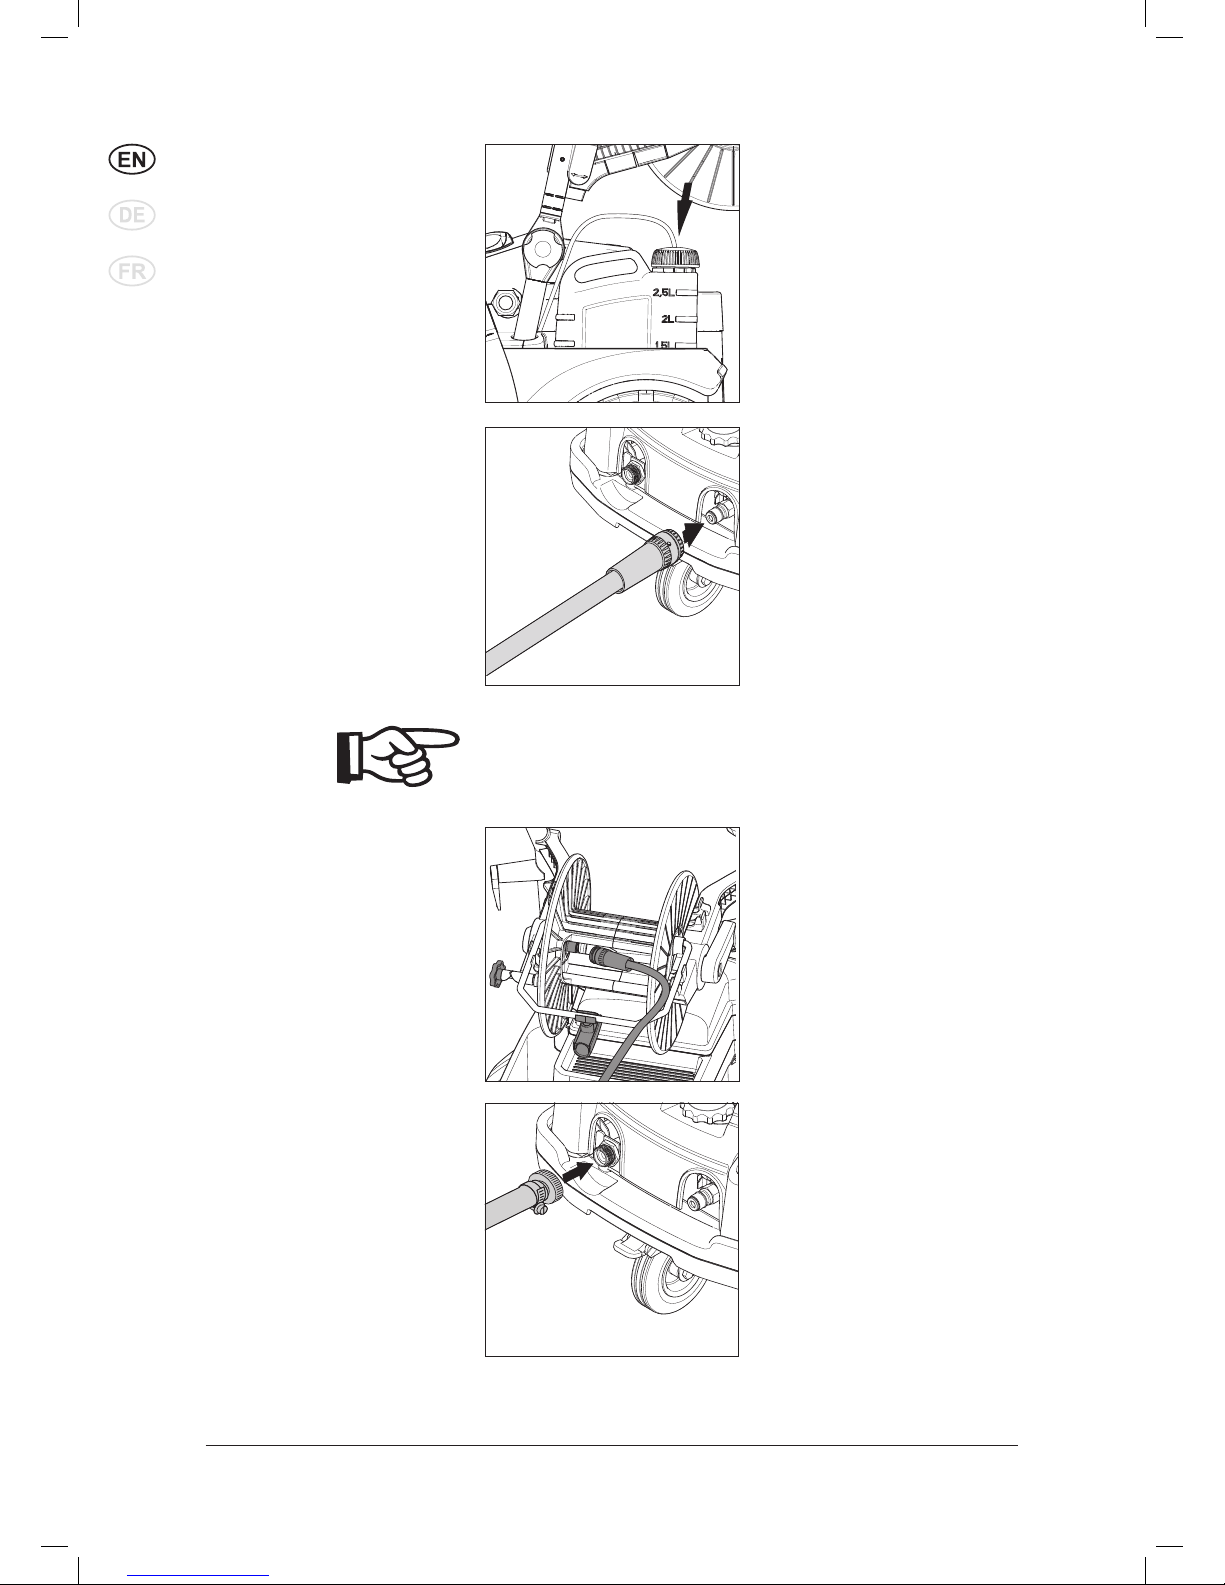
3.5 Connecting the water
supply
1. Rinse the water supply hose
briefly in order to prevent
sand and other dirt particles
entering into the machine.
2. Connect water supply hose
to the machine.
3. Open water tap.
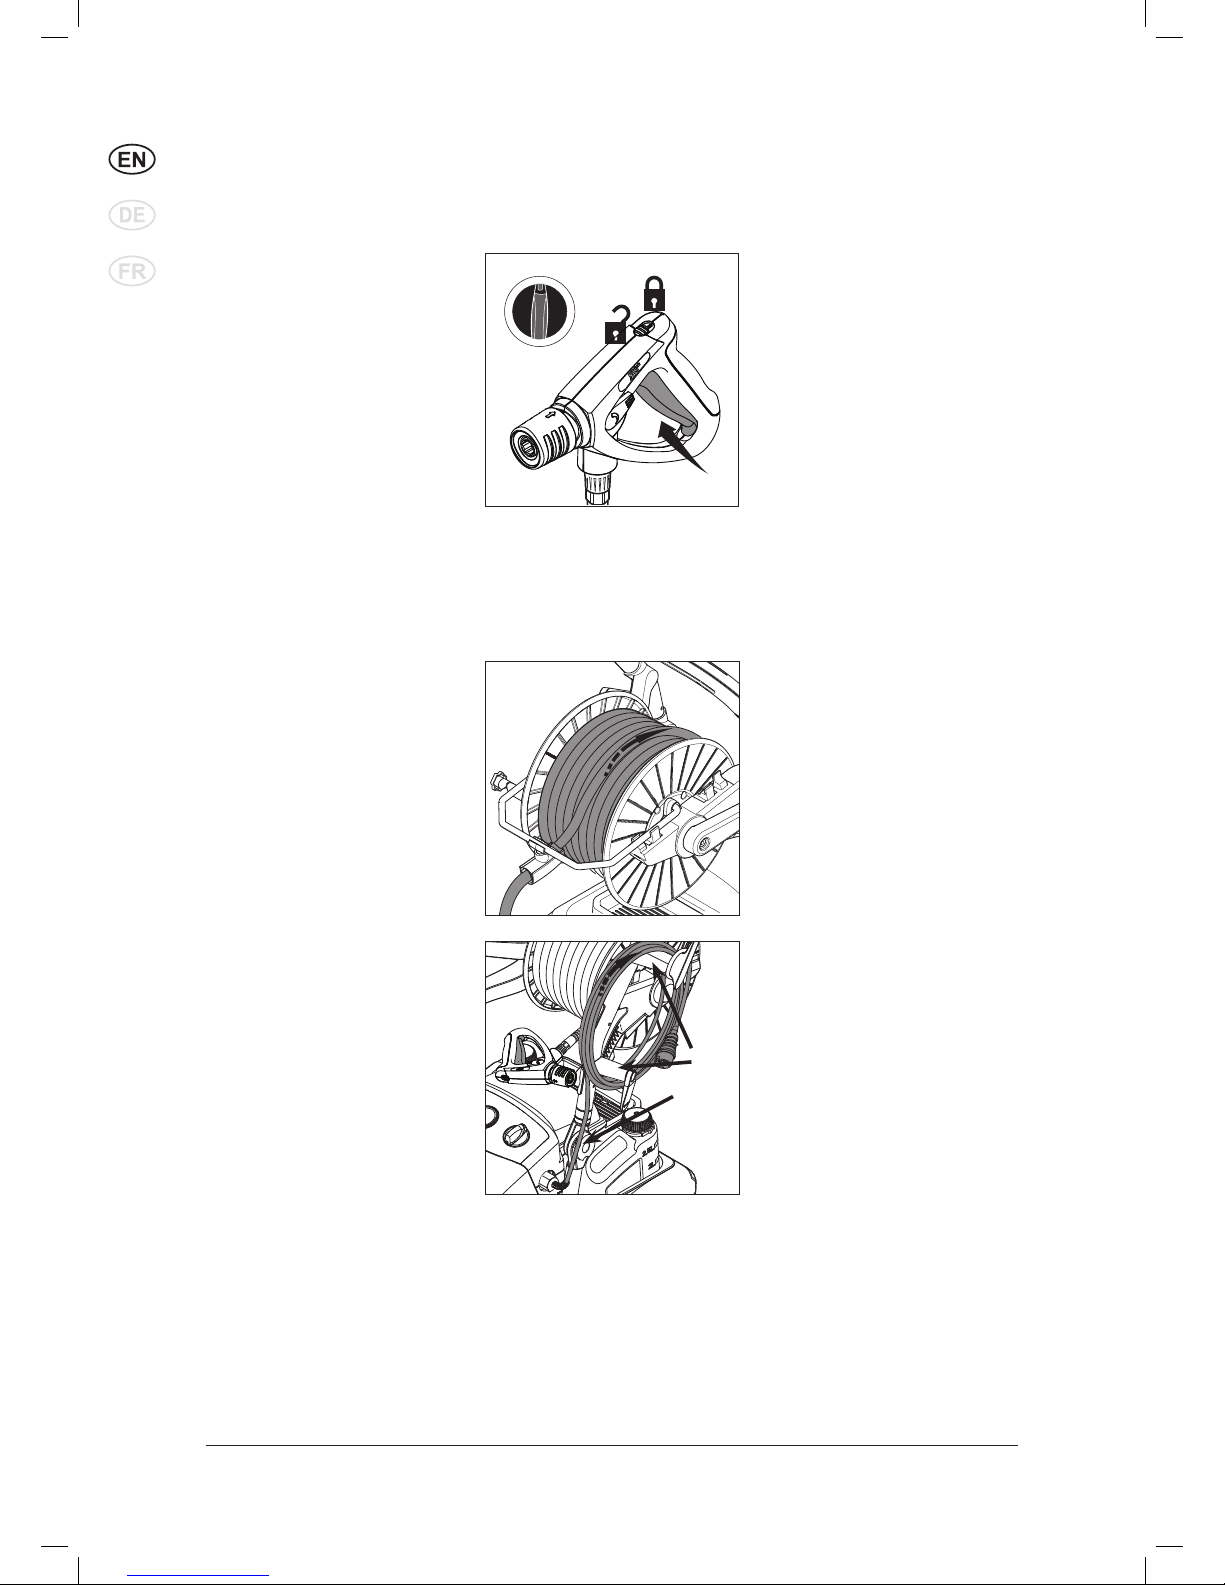
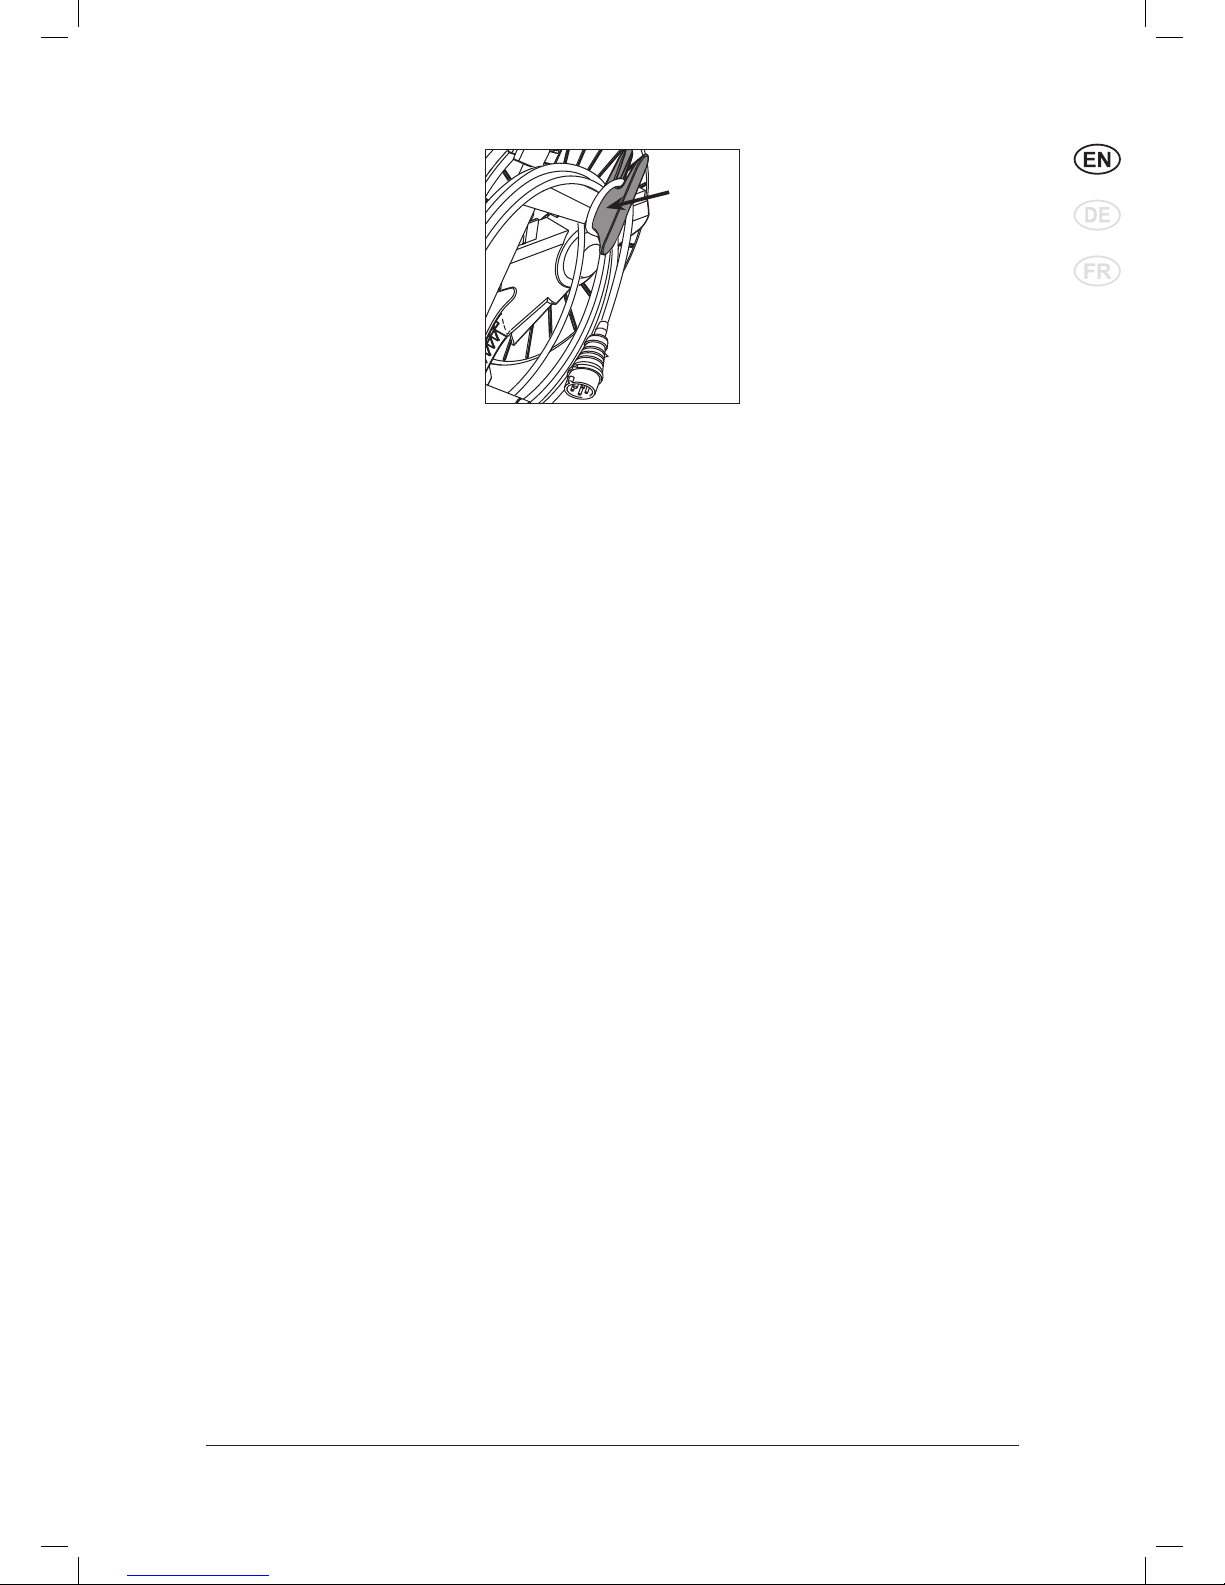
3.4.2 Machines with high
pressure hose reel
1. Put the quick connector of
the high pressure hose (A)
onto the nipple on the axle.
2. Put the high pressure hose
into the hose guide (B) and
fix it with the clip1).
3. Release the brake (C) on the
hose reel guide1) and wind up
the high pressure hose.
A
B
C
3.3 Fill up detergent tank
1)
1. Fill up detergent tank with
prediluted UNITOR detergent.
2. Pull detergent hose and filter
out of the storage and put it
through the opening of the
detergent tank filler cap.
3.4 Connecting the high
pressure hose
3.4.1 Machines without high
pressure hose reel
1. Put the quick connector of
the high pressure hose onto
the nipple on the cleaner.
NOTE!
The maximum length of
high pressure hose is 50 m.
(Not standard equipment!)
11
1)
Options / model variants
Original instructions
UNITOR HPC 54/1 67/1
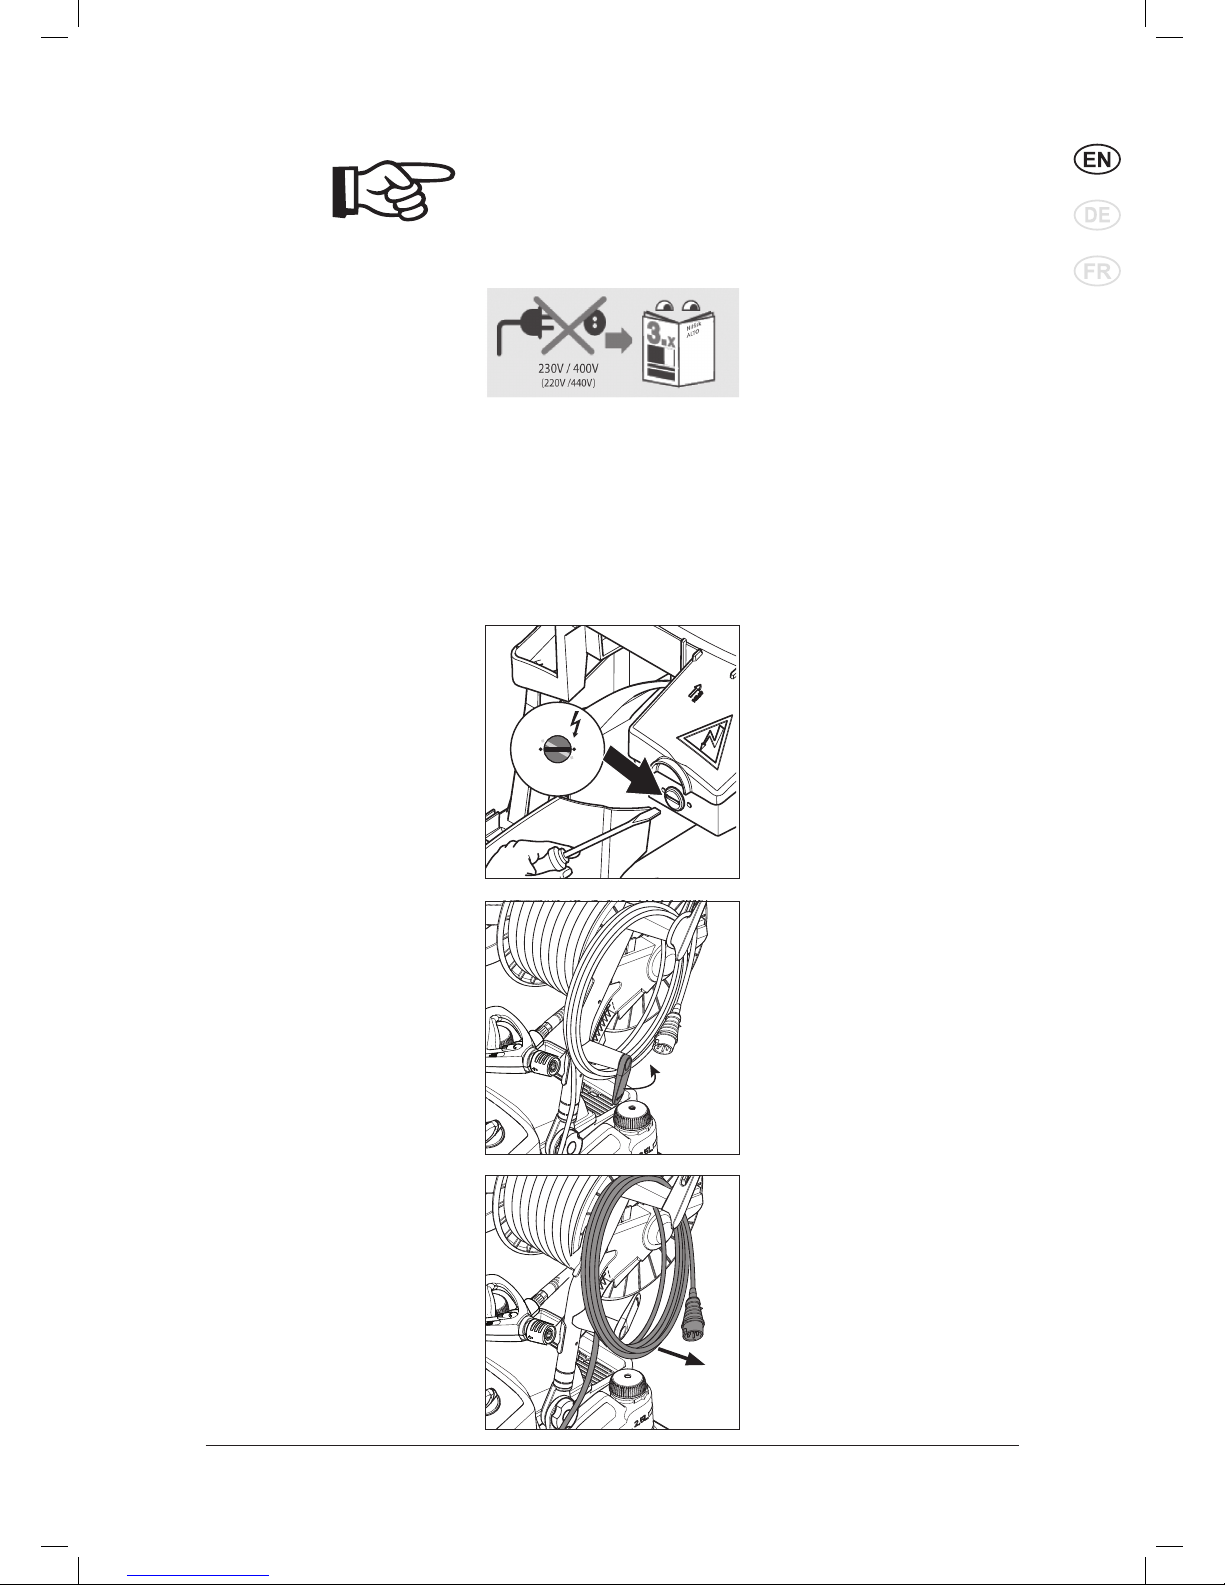
3.6 Electrical connection
CAUTION!
Before connecting devices with
voltage changeover: Check that
the pre-selected voltage on the
machine corresponds with the
voltage of the electrical installation. Otherwise the electrical
devices of the machine can be
destroyed 1).
NOTE!
In the case of poor water quality
(sand, etc.), we recommend that
a fine water filter is fitted to the
machine. Max 50 Micron filter.
We recommend the use of a textile-reinforced water hose with a
nominal diameter of min. 3/4"
(19 mm).
CAUTION!
When using a cord reel:
Unwind the cord completely.
CAUTION!
The cleaner may only be connected to a correctly installed
electrical installation.
1. Observe safety instructions
in chapter 1.
2. Put the plug into the electrical socket.
400V
400V
230V
230V
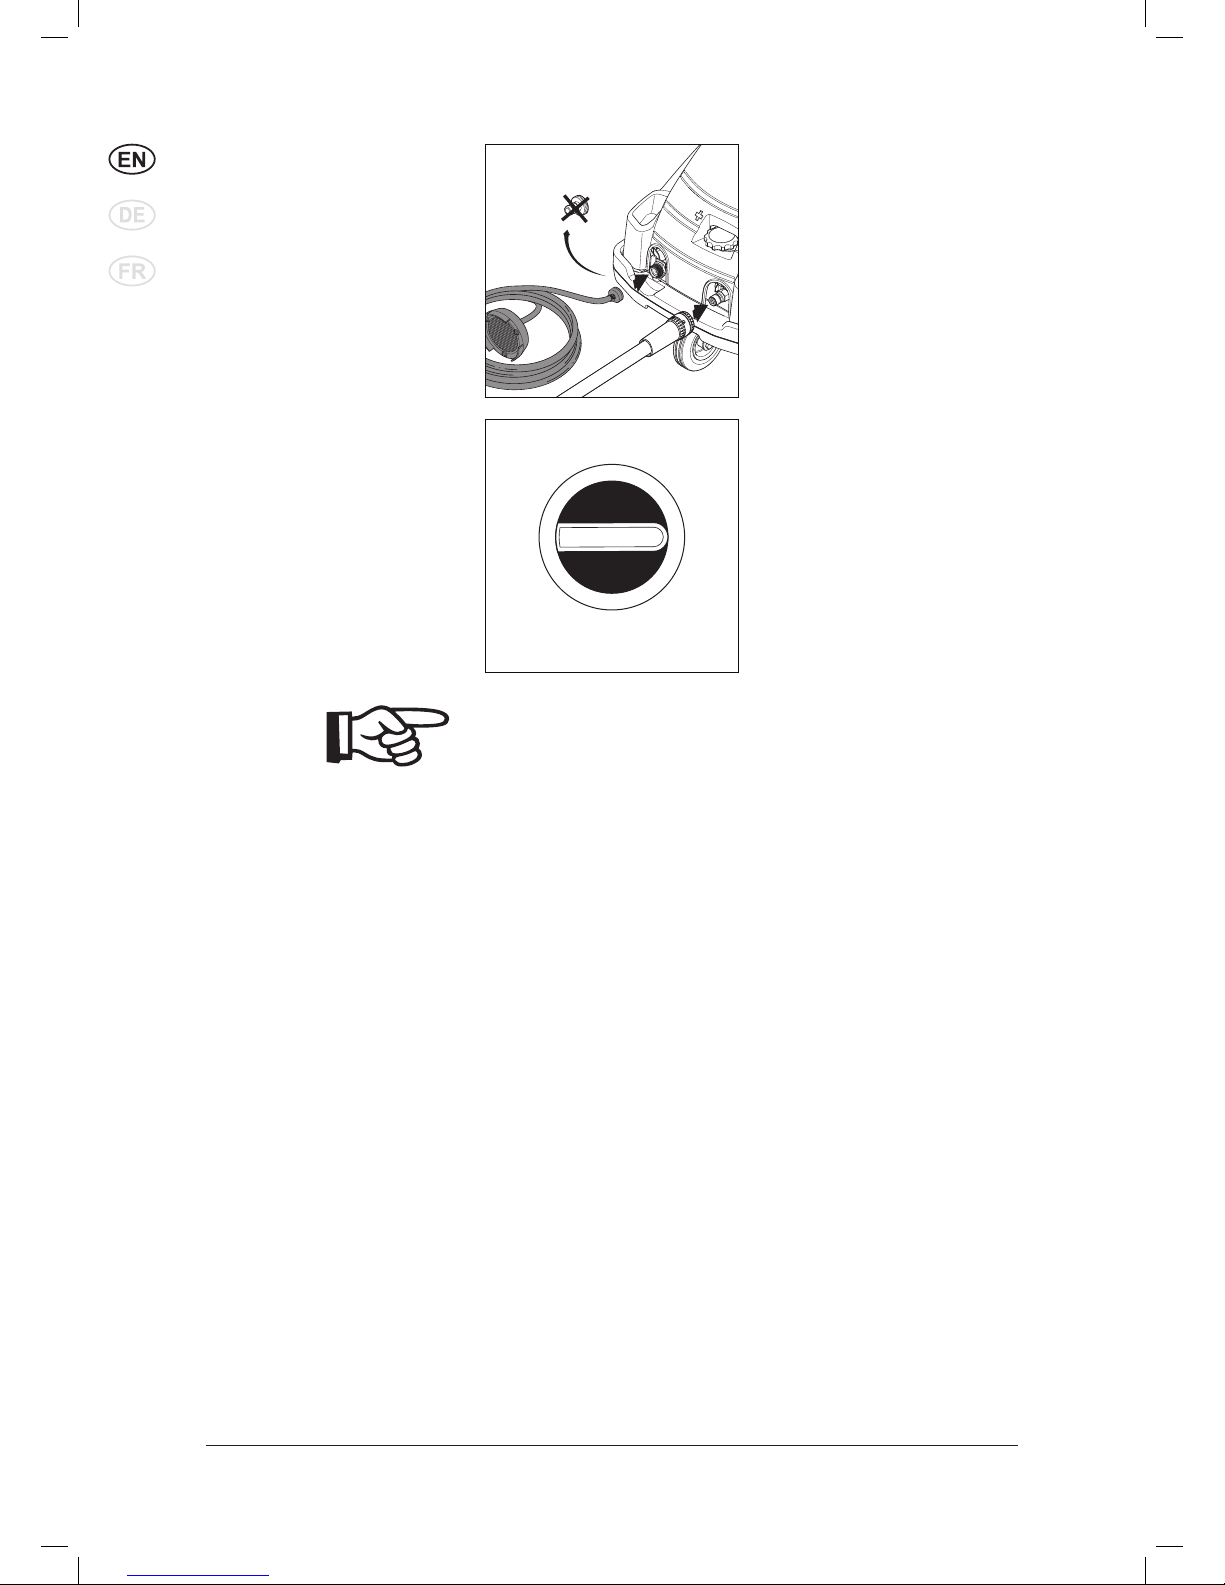
3.6.1 Releasing the cable 1. Turn the cable hook (A).
2. Release the cable (B).
3. Turn back the cable hook.
A
B

12
1)
Options / model variants
Original instructions
UNITOR HPC 54/1 67/1
Installation guide
c c
3.7 BA valve
(a) Female
coupling
BA valve
(b) Male
coupling
Maintenance
1. Mount a male coupling on the water tap.
2. Connect (a) on the BA valve to the water tap.
3. Mount a female coupling on the water inlet hose.
4. Connect (b) on the BA valve to the water inlet hose.
5. Connect the water inlet hose to the high pressure washer.
6. Turn on the water and start the machine.
At least once a year, check the function as follows:
1. After work, switch off the high pressure cleaner.
2. Close the water tap valve.
3. Release the pressure in water the supply hose by triggering the
spray pistol.
4. Dismount the backflow preventer. Water has to come out of the
drain opening (c) (max. 100ml) to ensure separation of the potable
water.
5. If this is not the case, try cleaning the BA valve or contact your UNITOR representative.
This high pressure washer/cleaner is only allowed to be connected with the drinking water mains, when an appropriate
backflow preventer has been installed, Type BA according to
EN 60335-2-79.
•
•
•
•
•
•
•
•
•
•
CAUTION
• The backflow preventer can be mounted either vertically or horizontally, and the drain opening (c) must be mounted pointing
downwards.
• Water flowing from the drain opening (c) must be able to flow
freely.
• If there is a risk of running sands in the inlet water (i.e. from your
own well), an additional filter should be mounted between the
water tap and backflow preventer.
• The length of the hose between the backflow preventer and the
high pressure washer must be at least 12 metres (min diameter
3/4 inch) to absorb possible pressure peaks.
• As soon as water has flown through the BA valve, this water is
not considered to be drinking water any more.
• Protect the backflow preventer to any exposure to frost.
• Keep the backflow preventer clean, and free of dirt.

13
1)
Options / model variants
Original instructions
UNITOR HPC 54/1 67/1
4 Control / Operation
4.1 Connecting the spray
lance to the spray gun
1. Pull back the blue quickrelease grip (A) of the spray
gun.
2. Insert the nipple of the spray
lance (B) into the quickrelease connection and release the coupling (A).
3. Pull the spray lance (or other
accessory) forwards to check
that it is securely attached to
the spray gun.NOTE!
Always remove any dirt from
the nipple before connecting the
spray lance to the spray gun.
4.2 Switching on the
cleaner when it is
connected to a water
supply
1. Main switch
Turn the switch to position
" I ".
2. Unlock the spray gun and
operate it.
3. Lock the spray gun even during short pauses.
NOTE!
Operate the spray gun several
times at short intervals to vent
the system.
The cleaner switches off automatically after the spray gun has
been closed. To start the cleaner
again, operate the spray gun.
DSS-models switch off with a
delay of 20 seconds1).
A
B
O
I
14
1)
Options / model variants
Original instructions
UNITOR HPC 54/1 67/1
4.2.2 Switching on the
cleaner when it is
connected to open
tanks in suction mode
1)
(Flow activated model)
1. Before connecting the
suction set: 61256 to the
cleaner, fill the hose with
water.
2. Turn the main switch to posi
tion " M ".
3. Unlock the spray gun and
operate it.
4. To start the cleaner again,
operate the main switch
again.
0
I
M
NOTE!
The cleaner automatically
switches off after more than 5
minutes of inactivity.
See chapter 9.4 for max. suction
height.
4.2.1 Switching on the
cleaner when it is
connected to open
tanks in suction mode
1)
(Pressure activated
model)
1. Before connecting the
suction set: 61256 to the
cleaner, fill the hose with
water.
2. Turn the main switch to posi
tion " I ".
3. Unlock the spray gun and
operate it.
15
1)
Options / model variants
Original instructions
UNITOR HPC 54/1 67/1
MAX
CHEM
MAX
CHEM
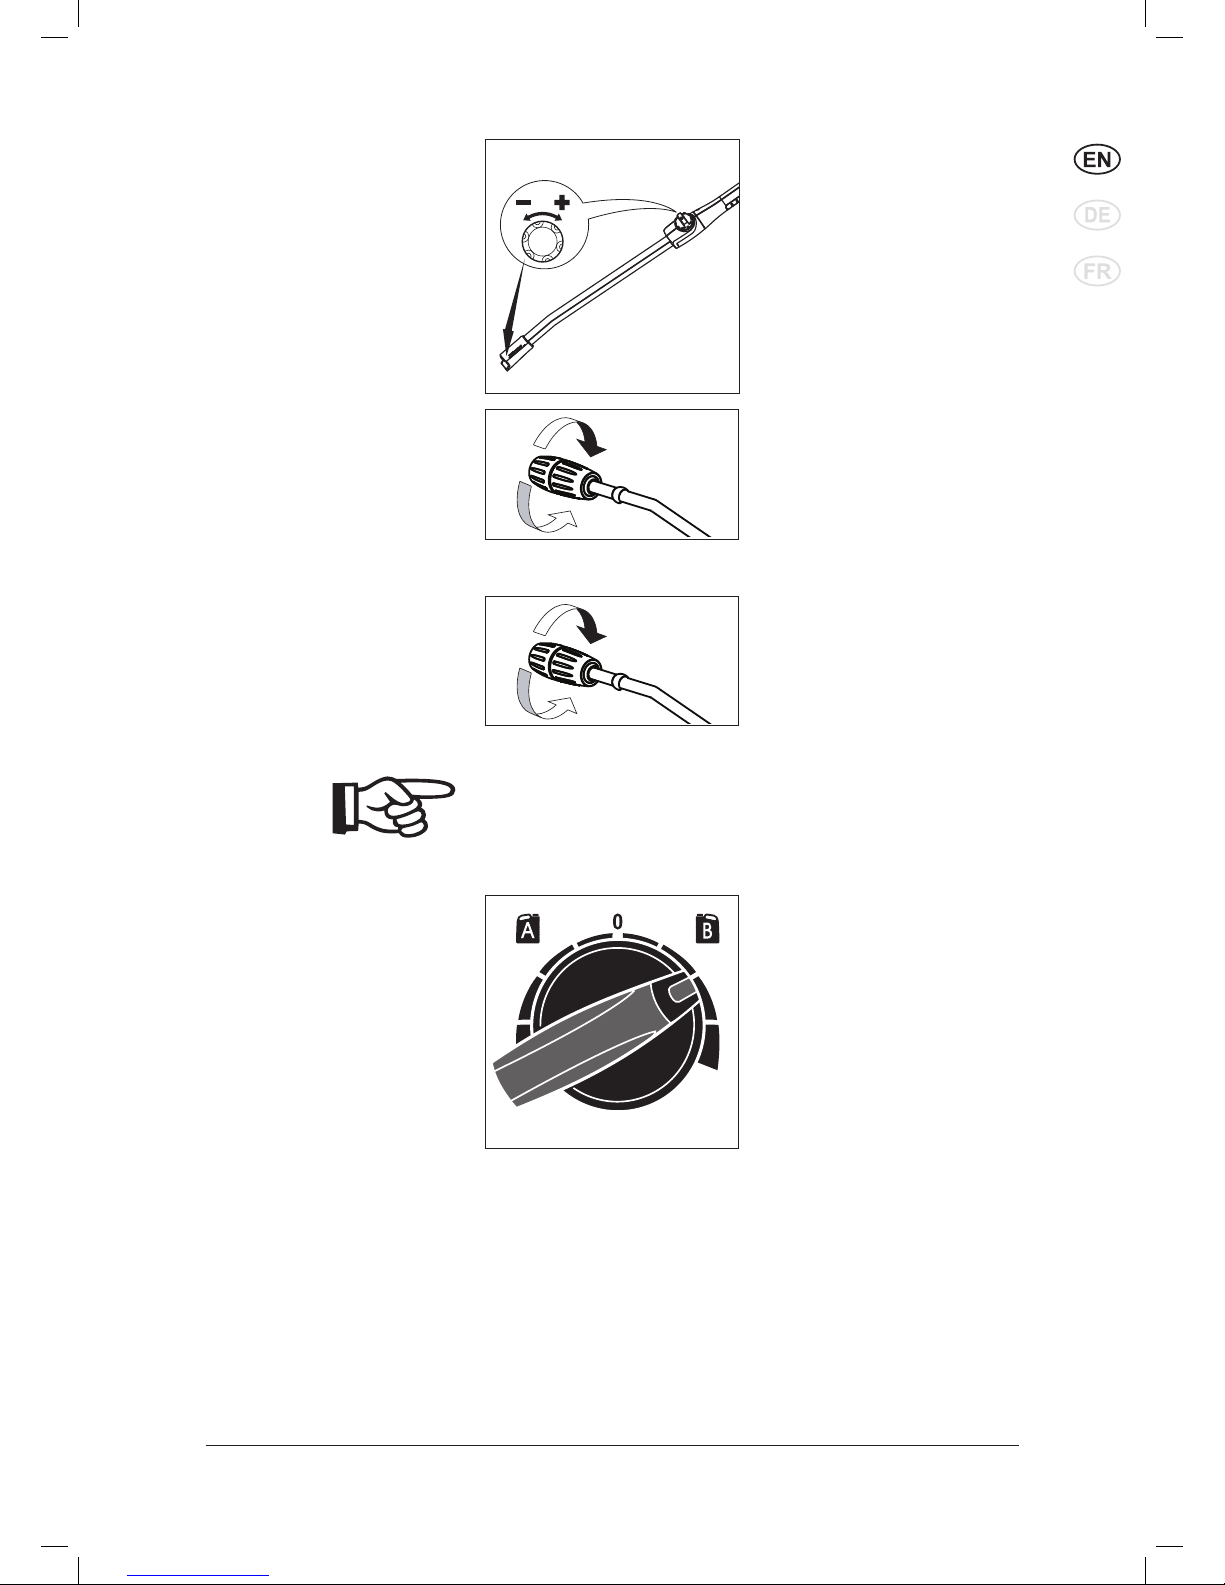
4.3 Pressure regulation
with Tornado Plus
lance and
PowerSpeedVario Plus
lance.
1. Turn the twist grip on the
lance:
– High pressure =
clockwise (+)
– Low pressure =
anticlockwise (–)
4.4 Pressure
regulation with the
FlexoPowerPlus
nozzle head and the
PowerSpeedVario Plus
lance.
1. Twist cap of the FlexoPowerPlus nozzle head:
– High pressure = MAX.
– Low pressure = MIN.
(CHEM)
4.5 Using cleaning agents Cleaning agent can be drawn
in via the injector installed as
standard only in low-pressure
mode:
1. Dilute cleaning agent according to the manufacturer‘s instructions.
2. Tornado Plus lance and PowerSpeedVario Plus lance1):
Set pressure regulation on
spray lance to low pressure
(–), or FlexoPowerPlus
nozzle head1):
Turn cap of the FlexoPow-
erPlus nozzle head towards
„CHEM“ up to the stop.
3. The intaken volume of cleaning agent can be regulated by
turning the metering valve.
4. Select tank A by turning the
merering valve on "A-side".
Select tank B by turning the
metering valve on "B-side"
5. Main switch
Turn the switch to position
" I ".
6. Operate the spray gun.
NOTE!
Never allow cleaning agent
to dry on the surface to be
cleaned. The surface may be
damaged.

16
1)
Options / model variants
Original instructions
UNITOR HPC 54/1 67/1
4.6 Lifting with crane
1. Before crane lifting the
machine should be in
balance. Loosen the screw
(A), push the handle (B) a
little forward.
2. When the two marks are
aligned (C), the handle is in
crane-lifting -position.
3. Be carefull to fasten the
screw (D) in the lifting
position.
4. Wrap a belt strop around
center of the handle (E)
for the crane to hook in.
WARNING!
Do not stand under the
machine hanging in the
air.
A B
D
E
C

17
1)
Options / model variants
Original instructions
UNITOR HPC 54/1 67/1
5 Applications and methods
Efficient high pressure cleaning is achieved by following a few
guidelines, combined with your own personal experience of specific
cleaning tasks. Accessories and detergents, when correctly chosen,
can increase the efficiency of your pressure washer. Here is some
basic information about cleaning.
5.1.1 Soaking Encrusted or thick layers of dirt can be loosened or softened up by
a period of soaking. This is for example an ideal method within agriculture – for example, within pig sties. The ideal soaking method can
be achieved via use of foam or simple alkaline detergent. Let the
product lie on the dirty surfaces for around 10 - 30 minutes before
pressure washing. The result will be a much quicker high pressure
cleaning process.
5.1 Techniques
5.1.2 Detergent and Foam Foam or detergent should be applied onto dry surfaces so that the
chemical product is in direct contact with the dirt. Detergents are
applied from bottom to top, for example on a car bodywork, in order
to avoid “super clean” areas, where the detergent collects in higher
concentration and streams downwards. Let the detergent work for
several minutes before rinsing but never let it dry on the surface
being cleaned.
5.1.3 Temperature Detergents are more effective at higher temperatures. Greases, oils
and fats can be broken down more easily at higher temperatures
also. Proteins can be cleaned at temperatures of around 60°C. Oils,
traffic film around 70°C, and grease can be cleaned at 80°C - 90° C.
5.1.4 Mechanical Effect In order to break down tough layers of dirt, additional mechanical
effect may be required. Special lances and rotary or wash brushes
offer this supplementary effect that cuts through dirt.
5.1.5 High Water Flow or
High Pressure
High pressure is not always the best solution and high pressure may
damage surfaces. The cleaning effect also depends upon water
flow. Pressure levels of around 100 bar may be sufficient for vehicle
cleaning (in association with hot water). Higher flow levels give the
possibility to rinse and flush away large amounts of dirt easily.

18
1)
Options / model variants
Original instructions
UNITOR HPC 54/1 67/1
5.2 Some typical cleaning tasks
Task Accessories Method
Cleaning of
walls, floors and
equipment.
Detergents
Injectors
Foam lance
Powerspeed lance
Floor Cleaner
l
1. Soaking – apply foam to all surfaces (bottom to top)
and wait for approx. 10 - 30 minutes.
2. Remove the dirt from surfaces with the high
pressure lance or chosen accessory. Again, clean
from bottom to top on vertical surfaces.
3. To flush away large quantities of dirt, change to low
pressure mode and use the higher flow to push
away the dirt.
4. Use recommended disinfectant products and
methods to ensure hygiene. Apply
disinfectant once the surfaces are perfectly clean.
Machinery Detergent injection
Powerspeed lances
Curved lances and
underchassis washers
Brushes
1. Apply detergent to vehicle or equipment surfaces in
order to soften up dirt and grime. Apply from bottom
to top.
2. Proceed with cleaning using the high pressure
lance. Clean again from bottom to top. Use
accessories to clean in difficult to reach places.
3. Clean fragile areas such as motors, rubber at lower
pressure levels to avoid damage.
5.2.2
Task Accessories Method

19
1)
Options / model variants
Original instructions
UNITOR HPC 54/1 67/1
5.2.3 Buildings and Equipment
These are merely several examples of cleaning tasks that can be solved by a pressure washer in association with accessories and detergents. Each cleaning task is different. Please consult your local
UNITOR representative in order to discuss the best solution for your own cleaning tasks.
Task Accessories Method
General surfaces
Metallic equipment
Detergents
Foam injectors
Standard lance
Curved lances
Tank cleaning
head
1. Apply thick foam over the surfaces to be cleaned.
Apply on dry surfaces. Apply from top to bottom on
vertical surfaces. Let the foam act for up to 10 - 30
minutes for the optimal effect.
2. Proceed with cleaning using the high pressure
lance. Use applicable accessories. Use high
pressure to dislodge large amounts of incrusted
dirt or grime. Use lower pressure and high water
volume in order to rapidly flush away loose dirt and
rinse surfaces.
3. Apply disinfectant once the surfaces are
perfectly clean.
Areas covered by amounts of loose dirt, such as
animal remains in slaughterhouses, can be removed
by using high water flow to flush away the dirt to
evacuation pits or drains.
Tank cleaning heads can be used to clean barrels,
vats, mixing tanks etc. Cleaning heads may be
hydraulically or electrically powered and give the
possibility for automatic cleaning without a constant
user.
Rusted or
damages surfaces
prior to treatment
Wet Sandblasting
equipment
1. Connect the sandblasting lance to the pressure
washer and place the suction tube in the sand.
2. Always wear protective equipment during
sandblasting.
3. Spray the surfaces to be treated with the mix of
water and sand. Rust, paint etc will be stripped off.
20
1)
Options / model variants
Original instructions
UNITOR HPC 54/1 67/1
6 After using the cleaner
6.1 Switching off the
cleaner
1. Turn the main switch to posi-
tion „OFF“.
2. Close water tap.
3. Squeeze the spray gun handle until the cleaner is depressurised.
4. Lock the safety catch on the
spray gun.
O
I
6.2 Disconnecting supply
lines
1. Remove the water hose from
the cleaner.
2. Pull out the plug from the
electrical socket.
6.3 Rolling up the hose and
storing of lance
Risk of tripping!
To prevent accidents, always
carefully roll up the hose.
1. Wind up the hose as illustrated.
2. Place the spray lance into
the spray lance storage.
1. Winding up the cable from
front over the fastening
screw (A) and clock-wise
around the cable hooks (B).
6.4 Winding up the cable
A
B
21
1)
Options / model variants
Original instructions
UNITOR HPC 54/1 67/1
6.5 Storing the cleaner
(below 0°C)
Store the cleaner in a dry room without danger of frost or protect as
below:
CAUTION!
If the high-pressure cleaner is stored in a room with temperatures
around or below 0°C, anti-freeze should be drawn into the pump
beforehand:
1. Remove the water inlet hose from the cleaner.
2. Remove the spray lance.
3. Switch on the cleaner with the main switch in position
" I " and activate trigger on the spray gun.
Switch off the cleaner after max. 3 minutes.
4. Connect the suction hose to the water inlet of the cleaner and
place it in a tank containing anti-freeze.
5. Switch on the cleaner with the main switch in position " I ".
6. Hold the spray gun over the tank containing anti-freeze and operate it to start suction.
7. During suction operate the spray gun two or three times.
8. Lift the suction hose from the tank containing anti-freeze and operate the spray gun to pump off the remaining antifreeze.
9. Switching off the cleaner
10. To avoid any risks, store the cleaner temporarily in a heated room
before using it again.
2. At last turn, lock the cable
end in the cable lock (C).
C
22
1)
Options / model variants
Original instructions
UNITOR HPC 54/1 67/1
7 Maintenance
7.1 Maintenance plan
Weekly
First time
after 50
operating
hours
Every 500
operating
hours
As required
7.2.1
Cleaning water inlet fi lter
7.2.2
Checking pump oil level
7.2.3
Changing pump oil
7.2.4
First change - and
cleaning of magnet on
drain plug
7.2 Maintenance work
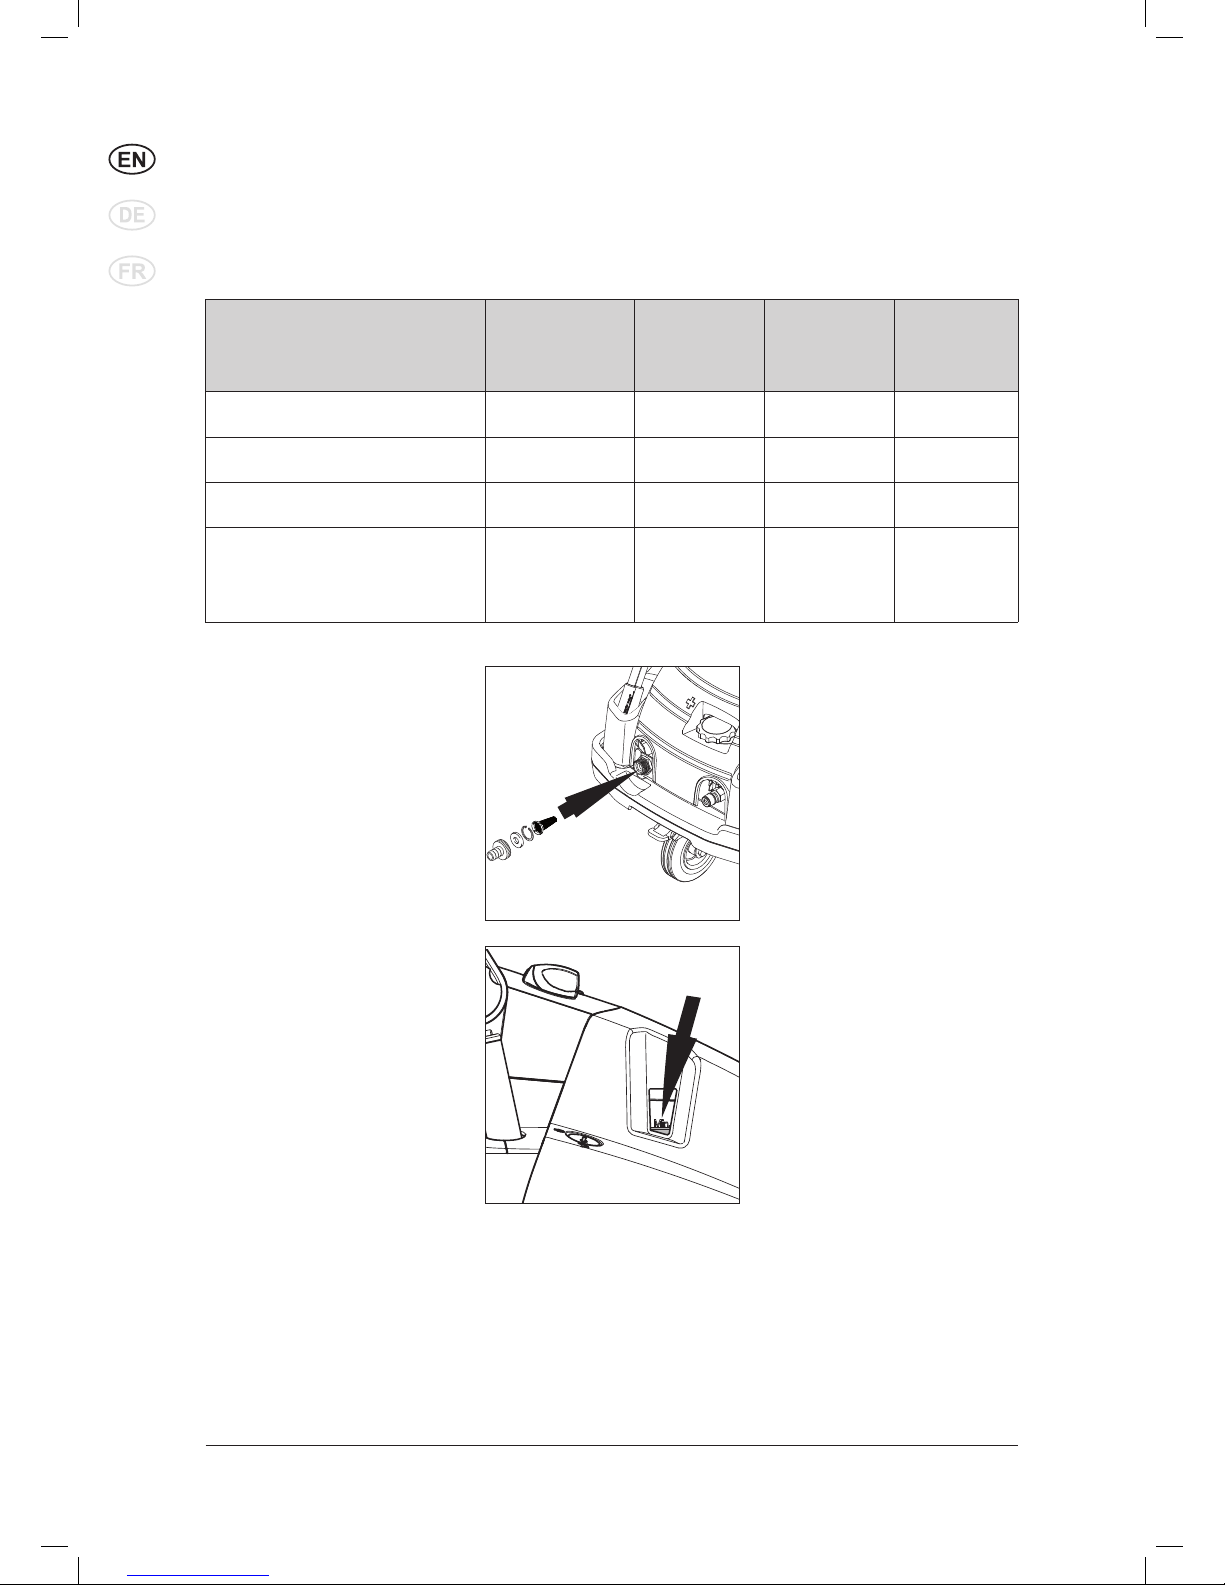
7.2.1 Cleaning water inlet
filter
A water filter is fitted on the water inlet to prevent large particles of dirt from entering into the
pump.
1. Unscrew the quick-release
connection if mounted.
2. Remove the filter and rinse it.
Replace damaged filter.
7.2.2 Checking the pump oil
level
1. Check the oil level.
On level ground, the oil
should be above MIN. level
(A), when the oil is cold.
A
23
1)
Options / model variants
Original instructions
UNITOR HPC 54/1 67/1
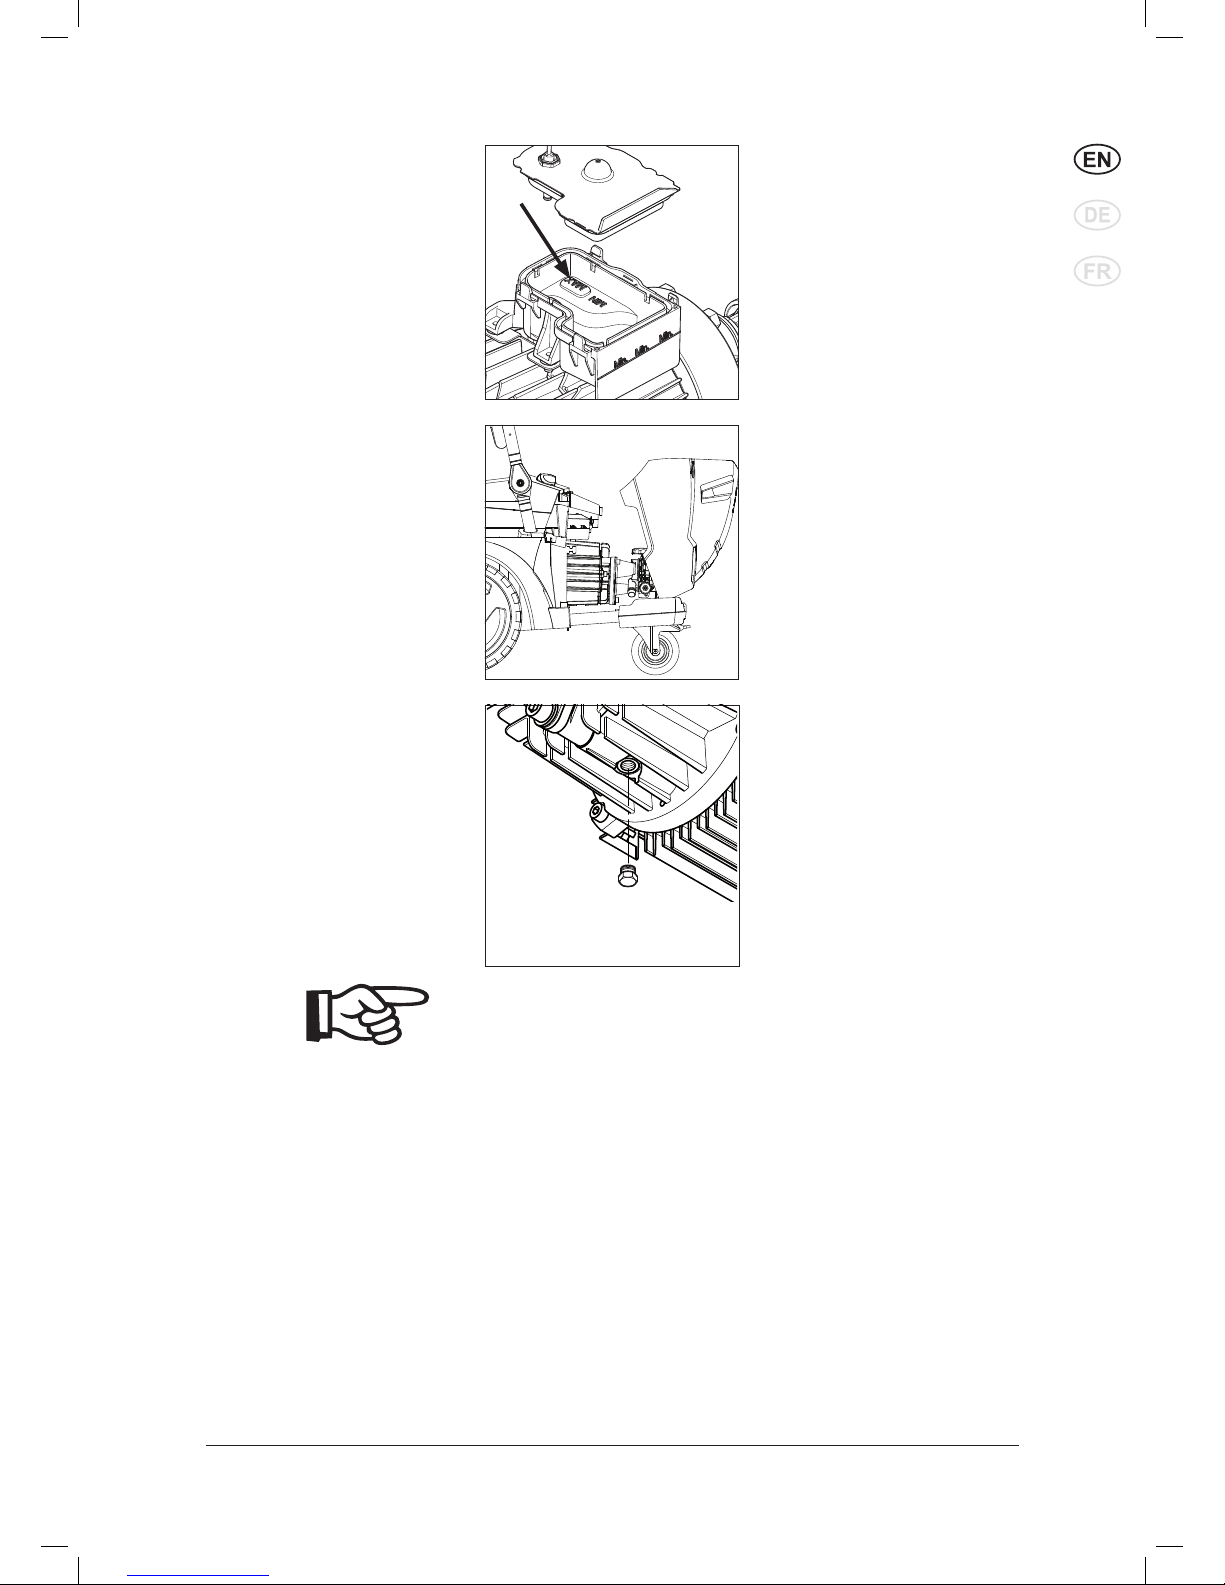
7.2.3 Changing the pump oil 1. Before changing the oil, al-
low the cleaner to become
warm.
2. Remove cabinet.
3. Loosen and remove drain
plug (C).The plug magnet has
to be cleaned with a piece of
cloth/napkin to remove metal
particles. Drain the oil into a
suitable container(min.1 litre)
and dispose the oil in compliance with regulations.
4. Fit drain plug and refill with
oil according to chapter 9.4
Technical Data.
5. Oil should be over the MIN.
level in the oil container at
level ground. Fill to MAX (B).
6. Fit the cabinet again.
NOTE!
Special pump oil is required
if the cleaner is used near food.
Please consult your
UNITOR dealer.
2. If necessary, add oil. Fill to
MAX level (B).
B
C

24
1)
Options / model variants
Original instructions
UNITOR HPC 54/1 67/1
8 Troubleshooting
Fault Cause Remedy
Pressure drop • Air in the system • Vent the system by
operating the spray gun
several times at short
intervals. If necessary,
operate the cleaner for a
short time without the highpressure hose connected.
• High pressure nozzle blocked
worn
• Clean/replace the high
pressure nozzle
• Detergent tank empty • Top up detergent tank or
set detergent to “0”
Pressure fl uctuations • Pump draws in air (only
possible in suction mode)
• Check that the suction set
is air-tight
• Lack of water • Open water tap
• Water inlet hose is too long
or its cross-section too small
• Use a water inlet hose
that can provide the water
fl ow (Q
max
) defi ned for the
machine
• Lack of water caused by
blocked water fi lter
• Clean the water fi lter in the
water connection (never
work without water fi lter)
• Lack of water because max.
permissible suction height
has not been heeded
• See instructions
The motor does not start when
the cleaner is switched on
••The plug is not inserted
properly, i.e. there is no
current
Oil level too low
••Check the plug, lead and
switch and if necessary
have them replaced by a
skilled electrician
Check oil/add oil
••The mains fuse is switched
off
The overload protection
has been activated due to
overheating or overloading of
the motor
••Switch on the mains fuse
Check that the mains
voltage and the cleaner
voltage are the same.
Switch off the cleaner and
allow it to cool for at least 3
minutes
When the cleaner is switched
on the motor buzzes without
starting
• The mains voltage is too low
or there is a phase failure.
• Have the electrical
connection checked
• The pump is blocked or
frozen
• Contact the UNITOR
customer service
• Incorrect cross-section or
length of the extension lead
• Use lead with correct cross
section or length
The motor switches off • The overload protection
has been activated due to
overheating or overloading of
the motor
• Check that the mains
voltage and the cleaner
voltage are the same.
Switch off the cleaner and
allow it to cool for at least 3
minutes
• High-pressure nozzle is dirty • Change the high-pressure
nozzle

25
1)
Options / model variants
Original instructions
UNITOR HPC 54/1 67/1
Fault Cause Remedy
No detergents drawn in • Detergent tank empty • Top up detergent tank
• The cap on the FlexoPower-
Plus nozzle head is not set to
low pressure
• Set to low pressure
• Double lance are not adju-
sted to low pressure.
• Set to low pressure
• Injector is dirty or suction
hose is blocked.
• Clean
9 Further information
9.1 Recycling the cleaner Make the old cleaner unusable immediately.
• 1. Unplug the cleaner and cut the power cord.
Do not discard of electrical appliances with household waste.
As specified in European Directive 2002/96/EC on old electrical and
electronic appliances, used electrical goods must be collected separately and recycled ecologically. Contact your local authorities or
your nearest dealer for further information.
9.2 Guarantee Our general conditions of business are applicable with regard to the
guarantee.
Subject to change as a result of technical advances.
9.3 EU Declaration
of Conformity
EU Declaration of Conformity
Product: High Pressure Washer
Type: Poseidon 5-6-7
The design of the unit corre sponds to
the following pertinent regulations:
EC Machine Directive 2006/42/EC
EC Low-voltage Directive 2006/95/EC
EC EMC Directive 2004/108/EC
EC RoHS Directive 2011/65/EC
Applied harmonised standards: EN ISO 12100-1, EN ISO 12100-2, EN 60335-2-79,
EN 55014-1(2002), EN 55014-2(2001), EN 61000-3-2 (2006)
Applied national standards and technical specifi cations:
IEC 60335-2-79
Name and address of the person
autho rised to compile the technical
fi le:
Anton Sørensen
General Manager, Technical Operations EAPC
Identity and signature of the person
empowered to draw up the declaration
on behalf of the manufacturer:
Anton Sørensen
General Manager, Technical Operations EAPC
Place and date of the declaration: Hadsund, 25-10-2012

26
UNITOR HPC 54/1 67/1
1)
Options / model variants
Original instructions
9.4 Technical Data
HPC
HPC 54/1
HPC 67/1
Country variant 777886 777889
Possible voltage, V/ph/Frez. V/ph/Hz 440-460V/3ph/60Hz 440-460V/3ph/60Hz 400V/3ph/50Hz
Fuse
A 15 15 16
Power rating kW 6,6 8 8
Working pressure p
IEC
bar (MPa) 200 (20) 195 (19,5) 195 (19,5)
Water flow Q
IEC
l/h 940 1180 1180
Max. water pressure p
max
bar (MPa) 250 (25) 250 (25) 250 (25)
Water flow Q
max
l/h 1000 1280 1280
Max. water inlet temperature
Intake-Pressure operation
°C (°F) 60 (140) 85 (185) 85 (185)
Max. water inlet pressure bar (MPa) 10 (1) 10 (1) 10 (1)
Max. dry suction height m 1 1 1
Dimensions, l x w x h mm 735x570x1020 775x570x1020 775x570x1020
Weight of cleaner kg 72 91 91
Sound pressure level L
PA
at a
distance of 1 m
dB(A) 76 75 75
Guarantied sound power level
L
WA
dB(A) 89 88 88
Vibration ISO 5349 m/s² <1,5; +/-1 <1,5; +/-1 <1,5; +/-1
Recoil forces, lance1 / lance 2 N 44,7 / - 60 / - 60 / -
Oil quantity l 0,73 1,1 1,1
Oil type
BP Energol
GR-XP220
Castrol ALPHASyn 150 Castrol ALPHASyn 150
Specifications and details are subject to change without prior notice.
HPC 67/1
777888

27
1)
Sonderzubehör / Modellvarianten
Übersetzung der Originalanleitung
UNITOR HPC 54/1 67/1
Inhalt
Kennzeichnung von Hinweisen .........................................................................................................28
1 Wichtige Sicherheitsinformationen ...............................................................................28
2 Beschreibung ..................................................................................................................31
2.1 Nutzung pro Tag ....................................................................................................................31
2.2 Verwendungszweck ...............................................................................................................31
2.3 Bedienelemente .....................................................................................................................32
3 Vor der Inbetriebnahme ..................................................................................................33
3.1 Aufstellung .............................................................................................................................33
3.2 Prüfen des Ölstands ..............................................................................................................33
3.3 Reinigungsmitteltank füllen ....................................................................................................34
3.4 Hochdruckschlauch anschließen ...........................................................................................34
3.5 Wasserschlauch anschließen ................................................................................................34
3.6 Elektrischer Anschluss ...........................................................................................................35
3.7 BA-Ventil ................................................................................................................................36
4 Bedienung / Betrieb ........................................................................................................37
4.1 Sprührohr an Spritzpistole anschließen .................................................................................37
4.2 Gerät einschalten bei Anschluss an eine Wasserleitung .......................................................37
4.3 Druckregulierung mit Tornado Plus Sprührohr und PowerSpeedVario Plus Sprührohr .........38
4.4 Druckregulierung mit FlexoPowerPlus Düsenkopf und PowerSpeedVario Plus Sprührohr. ..38
4.5 Verwendung von Reinigungsmitteln ......................................................................................39
4.6 Heben mit einem Kran ...........................................................................................................40
5 Anwendungsgebiete und Arbeitsmethoden .................................................................41
5.1 Arbeitstechniken ....................................................................................................................41
5.2 Typische Anwendungen .........................................................................................................42
6 Nach der Arbeit ................................................................................................................44
6.1 Gerät ausschalten ..................................................................................................................44
6.2 Versorgungsleitungen trennen ...............................................................................................44
6.3 Einrollen des Schlauchs und Lagerung des Sprührohrs ........................................................44
6.4 Aufwickeln des Kabels ...........................................................................................................44
6.5 Aufbewahrung (frostsichere Lagerung) .................................................................................45
7 Wartung ............................................................................................................................46
7.1 Wartungsplan .........................................................................................................................46
7.2 Wartungsarbeiten...................................................................................................................46
8 Behebung von Störungen ..............................................................................................48
9 Sonstiges .........................................................................................................................50
9.1 Gerät der Wiederverwertung zuführen ..................................................................................50
9.2 Garantie .................................................................................................................................50
9.3 EG Konformitätserklärung .....................................................................................................50
9.4 Technische daten ...................................................................................................................51

28
1)
Sonderzubehör / Modellvarianten
Übersetzung der Originalanleitung
UNITOR HPC 54/1 67/1
Kennzeichnung von
Hinweisen
1 Wichtige Sicherheitsinformationen
Zu Ihrer eigenen Sicherheit
Der Hochdruckreiniger darf
nur von Personen eingesetzt
werden, die in dessen Bedienung eingewiesen wurden und
ausdrücklich dazu autorisiert
sind.
Auch wenn die Bedienung
einfach ist, dürfen Kinder den
Reiniger nicht bedienen.
Allgemein
Die Nutzung des Hochdruckreinigers unterliegt den gültigen
örtlichen Bestimmungen.
Neben diesem Handbuch und
den Bestimmungen zur Unfallverhütung in Ihrem Land sind
auch die Bestimmungen zur
Sicherheit und verantwortungsvollen Nutzung zu beachten.
Keine unsicheren Arbeitsmethoden einsetzen.
Transport
Dank seiner großen Räder
kann der Hochdruckreiniger problemlos transportiert
werden.
Zum Transport in und auf
Fahrzeugen muss das Gerät
mit Gurten gegen Verrutschen
und Kippen gesichert werden.
Vor dem Transport bei Temperaturen um oder unter 0°
C muss die Pumpe mit Frostschutzmittel befüllt werden
(siehe Kapitel 6).
Vor der Inbetriebnahme des
Reinigers
Wenn Ihr 3-Phasen-Reiniger
ohne Stecker geliefert wurde,
beauftragen Sie einen Elektriker, einen geeigneten 3-Phasen-Stecker mit Erdungsleiter
anzuschließen.
Vor jeder Verwendung sicherstellen, dass der Hochdruckreiniger sich in einem
betriebssicheren und ord-
nungsgemäßen Zustand befi n-
det.
Regelmäßig prüfen, ob das
Stromkabel beschädigt ist oder
Zeichen von Alterung aufweist.
Den Hochdruckreiniger nur
dann verwenden, wenn das
Stromkabel sich in einem guten
Zustand befi ndet (bei Beschä-
digung besteht Stromschlaggefahr!).
Vor dem Anschluss an das
Stromnetz die Nennspannung
des Hochdruckreinigers prüfen.
Sicherstellen, dass die auf dem
Typenschild angegebene Spannung mit der Spannung Ihres
Stromnetzes übereinstimmt.
Wir empfehlen Ihnen, den
Hochdruckreiniger über einen
Fehlerstrom-Schutzschalter an
das Stromnetz anzuschließen.
Das Gerät unterbricht die
Stromversorgung ab einem
Ableitstrom gegen Erde von 30
mA für 30 Sekunden.
Den Reiniger nur in der aufrechten Position betreiben!
Dieses Symbol kennzeichnet Sicherheitshinweise, deren Nichtbeachtung Gefährdungen für
Personen hervorrufen kann.
Sie müssen diese Bedienungsanleitung sorgfältig lesen, bevor Sie Ihren Hochdruckreiniger
zum ersten Mal in Betrieb nehmen. Heben Sie dieses Handbuch für die spätere Verwendung auf.
Dieses Symbol kennzeichnet
Ratschläge oder Hinweise, die
das Arbeiten erleichtern und für
einen sicheren Betrieb sorgen.
Dieses Symbol kennzeichnet
Sicherheitshinweise, deren
Nichtbeachtung Gefahren für
das Gerät und dessen Funktion
hervorrufen kann.

29
1)
Sonderzubehör / Modellvarianten
Übersetzung der Originalanleitung
UNITOR HPC 54/1 67/1
Bitte die Vorschriften und
Bestimmungen Ihres Landes
beachten. Vor der Inbetriebnahme des Hochdruckreinigers
eine Sichtprüfung aller wichtigen Komponenten ausführen.
VORSICHT!
Hochdruck-Wasserstrahlen
können bei falscher Bediendung gesundheitsgefährdend
sein. Den Wasserstrahl niemals
auf Personen, Tiere, Strom führende elektrische Installationen
oder das Gerät selbst richten.
Entsprechende Schutzkleidung
und eine Schutzbrille tragen.
Den Wasserstrahl niemals auf
sich selbst oder auf andere
Personen richten, um Kleidung
und Schuhe zu reinigen.
Während des Betriebs des
Reinigers entstehen hohe
Rückstoßkräfte am Ventil und
dem Sprührohr, und bei abgewinkeltem Sprührohr entsteht
ebenfalls ein Drehmoment. Die
Lanze daher fest mit beiden
Händen halten.
Den Reiniger nicht verwenden,
wenn sich andere Personen
ohne ausreichende Schutzkleidung im Arbeitsbereich aufhalten.
Sicherstellen, dass bei der
Reinigung keine Gefahrenstoffe
(z. B. Asbest, Öl) freigesetzt
werden und somit der Umwelt
schaden.
WARNUNG!
Dieses Gerät wurde für die
Verwendung in Verbindung mit
vom Hersteller mitgelieferten
oder empfohlenen Reinigungsmitteln entworfen. Die Verwendung anderer Reinigungsmittel kann die Sicherheit bei
der Verwendung der Maschine
beeinträchtigen.
Explosionsgefahr – Keine en-
tfl ammbaren Flüssigkeiten ver-
sprühen.
Niemals empfi ndliche Teile aus
Gummi, Stoff, usw. mit der 0°
Düse reinigen. Ausreichenden
Sicherheitsabstand zwischen
der Düse und der zu reinigen-
den Oberfl äche einhalten, um
Beschädigungen zu vermeiden.
Den Hochdruckschlauch niemals zum Anheben von Lasten
verwenden.
HINWEIS!
Der maximale zulässige Arbeitsdruck und die Höchsttemperatur des Schlauchs sind auf
dem Schlauch angegeben.
Sofort den Betrieb des Reinigers einstellen, wenn das
Stromkabel oder der Hochdruckschlauch beschädigt ist.
Stets auf ausreichende Belüftung achten. Den Reiniger nicht
abdecken und nicht in schlecht
belüfteten Räumen betreiben!
Den Reiniger an einem Ort
lagern, an dem er keinem Frost ausgesetzt
ist!
Den Reiniger niemals ohne
Wasser betreiben. Selbst
kürzester Betrieb ohne Wasserzufuhr führt zu schwerwiegenden Schäden an den Pumpendichtungen.
Das Reinigungsgerät nach
höchstens 3 Minuten ausschalten.
Wasseranschluss
Dieser Hochdruckreiniger darf
nur an einen Trinkwasseranschluss
angeschlossen
werden, wenn eine
entsprechende
Rückstausicherung des Typs
BA gemäß EN 60335-2-79
installiert ist. Die Rückstausi-
cherung kann über die Bestellnummern 106411177,1064
11178,106411179,106411184
bestellt werden. Die Länge des
Schlauchs zwischen der Rückstausicherung und dem Hochdruckreiniger muss mindestens
12 Meter betragen (und einen
Durchmesser von mindestens
3/4“ haben), um mögliche
Druckspitzen auszugleichen.
Der Saugbetrieb (z. B. aus einem Regenwasserbehälter) erfolgt ohne Rückstausicherung.
Empfohlener Saugsatz: 61256.
Sobald das Wasser das BA-
Ventil durchfl ossen hat, ist es
kein Trinkwasser mehr.
Betrieb
VORSICHT!
Ungeeignete Verlängerungskabel stellen eine Gefahrenquelle
dar. Immer das Stromkabel vollständig entrollen, um Überhitzung des Kabels zu vermeiden.
Stecker und Verbinder der
Stromversorgung müssen
wenigstens spritzwassergeschützt sein.
Das Stromkabel nicht beschädigen (nicht belasten, ziehen
oder knicken).
Das Stromkabel nur am Stecker
von der Steckdose abtrennen,
niemals am Kabel ziehen.
Elektrische Geräte
VORSICHT!
Niemals elektrische Geräte mit
Wasser besprühen: Gefahr für
Personen durch Stromschlag.
Der Reiniger darf nur an eine
ordnungsgemäß montierte
Steckdose angeschlossen
werden.
Das Einschalten des Reinigers

30
1)
Sonderzubehör / Modellvarianten
Übersetzung der Originalanleitung
UNITOR HPC 54/1 67/1
kann zu Spannungsschwankungen führen.
Diese sollten nicht auftreten,
wenn die Impedanz am Über-
gabepunkt weniger als 0,15Ω
beträgt. Bei Unsicherheiten
wenden Sie sich an Ihren
Elektriker.
Wartung und Reparatur
VORSICHT!
Vor der Reinigung des Geräts
oder vor Wartungsarbeiten immer den Stecker von der Steckdose nehmen.
Nur die in der Bedienungsanleitung beschriebenen Wartungsschritte ausführen. Nur Original-
Nilfi sk-Ersatzteile verwenden.
Keine technischen Änderungen
am Hochdruckreiniger vornehmen.
Für eine regelmäßige Wartung
des Geräts gemäß dem Wartungsplan durch autorisierte
UNITOR Techniker sorgen. Bei
Nichteinhaltung des Wartungsplans erlischt die Garantie.
VORSICHT!
Die Hochdruckschläuche,
Anschlüsse und Kupplungen
tragen entscheidend zur Sicherheit des Geräts bei. Nur Hochdruckteile verwenden, die vom
Hersteller zugelassen sind!
Das Stromkabel muss die
gleichen Spezifi kationen aus-
weisen wie der vom Hersteller
angegebene Version und darf
nur von einem Elektriker ersetzt
werden.
Wenden Sie sich bitte für
alle anderen Wartungs- und
Reparaturarbeiten an den UNITOR Kundendienst oder einen
autorisierten Fachhändler!
Prüfung
Der Reiniger entspricht der
deutschen Richtlinie für Flüssigkeitsstrahler. Der Hochdruckreiniger muss gemäß den
Bestimmungen zur Unfallverhütung mit Flüssigkeitsstrahlern, mindestens jedoch alle 12
Monate, von einer autorisierten
Prüfstelle geprüft werden.
Nach Reparaturen oder Modi-
fi zierungen an elektrischen
Komponenten müssen der
Widerstand des Schutzleiters,
der Isolierung sowie der Ableitstrom geprüft werden. Zudem
müssen eine Sichtprüfung
des Stromkabels, eine Messung der Spannung und des
Stroms sowie ein Funktionstest
durchgeführt werden. Unsere
Servicetechniker stehen Ihnen
als autorisierte Prüfer gerne zur
Verfügung.
Die vollständige Unfallverhütungsrichtlinie für die Arbeit
mit Flüssigkeitsstrahlern ist
bei der Carl Heymanns Verlag
KG, Luxemburger Straße 449,
50939 Köln, oder bei der Haftp-
fl ichtversicherung des entspre-
chenden Arbeitgeberverbands
erhältlich.
Druckregelventil
Bei übermäßig hohem Druck
wird die Sicherheitsvorrichtung
ausgelöst und der Druck über
eine Bypassleitung in die Einlassleitung der Pumpe zurückgeführt.
Das Druckregelventil wird im
Werk eingestellt und darf nicht
verändert werden.
Sicherheitsvorrichtungen
Hitzesensor:
Ein Hitzesensor schützt den
Motor vor Überlastung. Das
Gerät startet nach wenigen Minuten erneut, sobald der Hitzesensor wieder abgekühlt ist.
Sperrvorrichtung an der Sprühpistole:
Die Sprühpistole verfügt über
eine Sperrvorrichtung. Ist die
Sperrklinke eingerastet, kann
die Sprühpistole nicht aktiviert
werden.
WARNUNG!
• Das Einatmen von
Aerosolen kann gesundheitsgefährdend sein.
• Gegebenenfalls eine Vorrichtung verwenden, um die
Erzeugung von Aerosolen
zu vermeiden oder zu verringern, z. B. eine Abdeckung der Düse.
• Zum Schutz gegen Aerosole eine Atemmaske der
Klasse FFP 2 oder höher
verwenden.
O
I

31
1)
Sonderzubehör / Modellvarianten
Übersetzung der Originalanleitung
UNITOR HPC 54/1 67/1
2 Beschreibung
2.2 Verwendungszweck Dieser Hochdruckreiniger wurde ent wic kelt für den pro fes sio nel len
Einsatz in:
– Maritim
– Logistik
– Reinigungsgewerbe
– Lebensmittelindustrie
etc.
Kapitel 5 beschreibt die An wen dung eines Hoch druck rei ni gers für
verschiedene Rei ni gungs auf ga ben.
Das Gerät nur wie in dieser Be triebs an lei tung beschrieben ver wen den. Ein nicht be stim mungs ge mä ßer Ge brauch kann das Gerät
oder die zu rei ni gen de Ober flä che beschädigen oder zu schwe ren
Per so nen schä den füh ren.
2.1 Nutzung pro Tag Wir empfehlen für diese Produkte eine Nutzungsdauer von etwa
X Stunden pro Tag.
HPC 54/1
HPC 67/1
0 8+
Nutzung in Stunden pro Tag
Empfohlene Nutzung von x Stunden/Tag
0 8+
Nutzung in Stunden pro Tag
Empfohlene Nutzung von x Stunden/Tag

32
1)
Sonderzubehör / Modellvarianten
Übersetzung der Originalanleitung
UNITOR HPC 54/1 67/1
2.3 Bedienelemente 1. Schiebegriff
2. Sprühpistole
3. Stromkabel
4. Halterung für Hochdruckschlauch
5. Hochdruckschlauch
6. Stellschraube
7. Sprührohr1)
8. Feststellbremse1)
9. Anschluss Hochdruckschlauch (bei StandardModellen ohne Schlauchtrommel)1)
10. Wasseranschluss und Wasserfilter
11. Ölstandanzeige
12. Druckanzeige1)
13. Hauptschalter
14. Dosierungssteuerung für Reinigungsmittel1)
15. Wassermengensteuerung1)
16. Reinigungsbehälter1)
17. Haubenschloss
107146700
1
5
4
3
16
6
4
7
2
14
12
11
13
15
10
8
9
17

33
1)
Sonderzubehör / Modellvarianten
Übersetzung der Originalanleitung
UNITOR HPC 54/1 67/1
3 Vor der Inbetriebnahme
3.1 Aufstellung
3.2 Prüfen des Ölstands
VORSICHT!
Heben Sie nie die Maschine allein. Immer eine andere Person
um Hilfe bitten.
1. Vor der ersten Inbetriebnahme das Gerät sorgfältig
auf Mängel oder Schäden
überprüfen.
2. Im Schadensfall sofort an
Ihren UNITOR-Händler
wenden.
3. Den Griff ausklappen und in
Betriebsstellung arretieren
4. Ölstand prüfen.
Auf ebenem Untergrund
sollte der Ölstand sich über
der MIN Marke (A) befinden, wenn das Öl kalt ist.
3
A

34
1)
Sonderzubehör / Modellvarianten
Übersetzung der Originalanleitung
UNITOR HPC 54/1 67/1
3.5 Wasserschlauch
anschließen
1. Den Wasserschlauch vor
dem Anschluss an das Gerät kurz mit Wasser spülen,
da mit Sand und andere
Schmutz teil chen nicht in das
Gerät gelangen können.
2. Wasserschlauch mit Schnell kupp lung am Was ser an schluss anschliessen.
3. Wasserhahn öffnen.
3.4.2 Geräte mit
Schlauchtrommel
1. Die Schnellkupplung des
Hochdruckschlauchs (A) an
den Nippel anschließen.
2. Den Hochdruckschlauch
in die Schlauchführung (B)
legen mit der Klemme befestigen1).
3. Bremse (C) an der
Schlauchtrommelführung
lösen
1)
und das Hochdruck-
kabel aufrollen.
A
B
C
3.3 Reinigungsmitteltank
füllen
1)
1. Reinigungsmitteltank mit
UNITOR-Rei ni gungs mit tel
fül len.
2. Reinigungsschlauch und
Filter aus der Halterung
ziehen und durch die Füllkappenöffnung des Reinigungsbehälters führen.
3.4 Hochdruckschlauch
anschließen
3.4.1 Geräte ohne
Schlauchtrommel
1. Hochdruckschlauch mit Schnell kupp lung am Hoch druck an schluss des Gerätes anschließen.
HINWEIS!
Der Hochdruckschlauch darf
nicht länger als 50 m sein.

35
1)
Sonderzubehör / Modellvarianten
Übersetzung der Originalanleitung
UNITOR HPC 54/1 67/1
3.6 Elektrischer Anschluss
VORSICHT!
Vor dem Anschluss von Geräten mit Spannungsumstellung:
Sicherstellen, das die vorausgewählte Spannung am Gerät
mit der Spannung des Stromnetzes übereinstimmt. Anderenfalls können die elektrischen
HINWEIS!
Bei schlechter Wasserqualität
(Sand, usw.) einen Wasserfilter
einsetzen. Max 50 Mikrometer
Filter.
Wir empfehlen den Einsatz
eines gewebeverstärkten
Wasserschlauchs mit einem
Nenndurchmesser von mindestens 3/4" (19 mm).
Verbraucher im Gerät beschädigt werden 1).
VORSICHT!
Bei Nutzung eine Schlauchtrommel:
Den Schlauch immer vollständig abrollen.
VORSICHT!
Der Reiniger darf nur an eine
ordnungsgemäß montierte
Steckdose angeschlossen
werden.
1. Die Sicherheitshinweise in
Kapitel 1 beachten.
2. Den Stecker mit der Steck-
dose verbinden.
400V
400V
230V
230V
3.6.1 Lösen des Kabels 1. Kabelverschluss (A)
drehen.
2. Kabel (B) lösen.
3. Kabelverschluss zurückdre-
hen.
A
B

36
1)
Sonderzubehör / Modellvarianten
Übersetzung der Originalanleitung
UNITOR HPC 54/1 67/1
Montageanleitung
c c
3.7 BA-Ventil
(a) Weibliche
Kupplung
BA-Ventil
(b) Männliche
Kupplung
1. Das männliche Kupplungsstück am Wasserhahn anbringen.
2. (a) am BA-Ventil zum Wasserhahn anschließen.
3. Das weibliche Kupplungsstück am Wasserzulaufschlauch anbringen.
4. (B) am BA-Ventil zum Wasserzulaufschlauch anschließen.
5. Den Wasserzulaufschlauch an den Hochdruckreiniger anschließen.
6. Wasserhahn öffnen und das Gerät starten.
Mindestens einmal pro Jahr folgende Funktionen prüfen:
1. Den Hochdruckreiniger nach dem Betrieb ausschalten.
2. Den Wasserhahn schließen.
3. Den Wasserdruck im Zulaufschlauch durch Betätigen der Sprühpistole ablassen.
4. Den Rückflussverhinderer ausbauen. Aus der Ablassöffnung (c)
muss Waser austreten (max. 100 ml), um die Trennung des Trinkwassers zu gewährleisten.
5. Ist dies nicht der Fall, das BA-Ventil reinigen oder an Ihren UNITOR Ansprechpartner wenden.
VORSICHT
• Der Rückflussverhinderer kann entweder vertikal oder
horizontal montiert werden. Die Abflussöffnung (c) muss
nach unten gerichtet montiert werden.
• Das Wasser muss aus der Abflussöffnung ungehindert
abfließen können.
• Wenn Gefahr von Sandablagerung durch das verwendete
Wasser (z. B. bei Wasser aus dem eigenen Brunnen),
muss ein zusätzlicher Filter zwischen Wasserquelle und
Rückflussverhinderer montiert werden.
• Die Länge des Schlauchs zwischen der Rückstausicherung und dem Hochdruckreiniger muss mindestens 6
Meter betragen (und einen Durchmesser von mindestens
3/4“ haben), um mögliche Druckspitzen auszugleichen.
• Sobald das Wasser das Dosierventil durchflossen hat, ist
es kein Trinkwasser mehr.
• Den Rückflussverhinderer vor Frost schützen.
• Den Rückflussverhinderer sauber und schmutzfrei halten.
Dieser Hochdruckreiniger darf nur an einen Trinkwasseranschluss angeschlossen werden, wenn eine entsprechende
Rückstausicherung des Typs BA gemäß EN 60335-2-79
installiert ist.
•
•
•
•
Die Kupplungen können unter folgender Nummer bestellt werden:
•
•
•
•
•
•
•
Wartung

37
1)
Sonderzubehör / Modellvarianten
Übersetzung der Originalanleitung
UNITOR HPC 54/1 67/1
4 Bedienung / Betrieb
4.1 Sprührohr an
Spritzpistole anschließen
1. Den blauen Schnellkupplungsgriff (A) der Sprühpistole nach hinten ziehen.
2. Den Nippel des
Sprührohres (B) in die
Schnellkupplung stecken
und den Kupplungsgriff (A)
loslassen.
3. Das Sprührohr (oder son-
s ti ges Zubehör) nach vorne
zie hen, um sicherzustellen
dass dieses fest mit mit der
Spritz pis to le ver bun den ist.
HINWEIS!
Den Nippel immer von even tu el len Schmutzteilchen säubern,
bevor das Sprührohr mit der
Spritz pis to le verbunden wird.
4.2 Gerät einschalten bei
Anschluss an eine
Wasserleitung
1. Hauptschalter
in Stel lung " I " bringen.
2. Spritzpistole entriegeln und
betätigen.
3. Sicherungsriegel auch bei
kurzzeitigen Ar beits un ter bre chun gen einlegen.
HINWEIS!
Die Sprühpistole mehrmals in
kurzen Abständen betätigen,
um das System zu entlüften.
Der Reiniger schaltet sich automatisch ab, wenn die Sprühpistole verriegelt wird. Zum
erneuten Starten des Reinigers
die Sprühpistole betätigen.
DSS-Modelle schalten sich
mit einer Verzögerung von 20
Sekunden ab1).
A
B
O
I

38
1)
Sonderzubehör / Modellvarianten
Übersetzung der Originalanleitung
UNITOR HPC 54/1 67/1
4.2.2 Einschalten des
Reinigers bei
Anschluss an
offene Behälter
im Saugmodus
1)
(flussbetätigtes Modell)
1. Vor Anschluss des Saugsatzes: 61256 an den
Reiniger den Schlauch mit
Wasser befüllen.
2. Hauptschalter in Stellung
" M " drehen.
3. Sprühpistole entriegeln und
betätigen.
4. Zum erneuten Starten des
Reinigers den Hauptschalter erneut betätigen.
0
I
M
HINWEIS!
Der Reiniger schaltet sich bei
Betriebsunterbrechungen von
mehr als 5 Minuten selbsttätig
aus.
Siehe Kapitel 9.4 für maximale
Saughöhe.
4.2.1 Einschalten des
Reinigers bei Anschluss
an offene Behälter
im Saugmodus
1)
(druckbetätigtes Modell)
1. Vor Anschluss des Saugsatzes: 61256 an den
Reiniger den Schlauch mit
Wasser befüllen.
2. Hauptschalter in Stellung
" I " drehen.
3. Sprühpistole entriegeln und
betätigen.
MAX
CHEM
4.3 Druckregulierung
mit Tornado Plus
Sprührohr und
PowerSpeedVario Plus
Sprührohr
1. Den Drehknopf am
Sprührohr drehen:
– Hochdruck =
im Uhrzeigersinn (+)
– Niederdruck =
gegen den Uhrzeigersinn (–)
4.4 Druckregulierung
mit FlexoPowerPlus
Düsenkopf und
PowerSpeedVario Plus
Sprührohr.
1. Kappe des FlexoPowerPlus
Düsenkopfs drehen:
– Hochdruck = MAX.
– Niederdruck = MIN.(CHEM)

39
1)
Sonderzubehör / Modellvarianten
Übersetzung der Originalanleitung
UNITOR HPC 54/1 67/1
MAX
CHEM
4.5 Verwendung von
Reinigungsmitteln
Nur im Niederdruckbetrieb können Reinigungsmittel über den
serienmäßig eingebauten Injektor angesaugt werden:
1. Reinigungsmittel gemäß
den Anweisungen des Herstellers verdünnen.
2. Tornado Plus Sprührohr
und PowerSpeedVario Plus
Sprührohr1): Druckregulierung am Sprührohr auf
niedrigen Druck (–) einstellen, oder für FlexoPowerPlus Düsenkopf1): Kappe
am FlexoPowerPlus Düsenkopf bis zum Anschlag in
Richtung „CHEM“ drehen.
3. Mithilfe des Dosierventils
kann die Menge des Reinigungsmittels reguliert
werden.
4. Zur Auswahl von Behälter A
das Dosierventil auf die „ASeite“ drehen. Zur Auswahl
von Behälter B das Dosierventil auf die „B-Seite“
drehen.
5. Hauptschalter Hauptschalter in Stellung „ I “ drehen.
6. Die Sprühpistole betätigen.
HINWEIS!
Reinigungsmittel dürfen nicht
antrocknen. Die zu reinigende
Oberfläche könnte sonst beschädigt werden!

40
1)
Sonderzubehör / Modellvarianten
Übersetzung der Originalanleitung
UNITOR HPC 54/1 67/1
4.6 Heben mit einem Kran
1. Vor dem Heben mit einem
Kran muss das Gerät in
Hebestellung gebracht
werden. Die Schraube (A)
lösen, den Griff (B) leicht
vorwärts drücken.
2. Wenn beide Markierungen
fluchten, befindet sich der
Griff in Hebeposition.
3. Die Schraube (D) in der
Hebeposition anziehen.
4. Ein Hebeband um die Mitte
des Griffs (E) zum Heben
mit dem Kran legen.
WARNUNG!
Niemals unter der frei
schwebenden Maschine
stehen.
A B
D
E
C

41
1)
Sonderzubehör / Modellvarianten
Übersetzung der Originalanleitung
UNITOR HPC 54/1 67/1
5 Anwendungsgebiete und
Arbeitsmethoden
Wirkungsvolle Hoch druck rei ni gung wird erreicht durch Be ach tung
einiger weniger Richt li ni en, kombiniert mit Ihren ei ge nen Er fah run gen in spe zi el len Bereichen. Zubehör und Rei ni gungs mit tel können,
wenn sie korrekt eingesetzt werden, die Rei ni gungs wir kung vestärken. Hier finden sie einige grund sätz li che Hin wei se.
5.1.1 Einweichen Vertrocknete oder dicke Schichten Schmutz können durch Ein-
weichen gelöst oder aufgeweicht werden. Dies ist insbesondere
eine bewährte Methode in der Landwirtschaft bei hartnäckigem
Schmutz wie in Schweineställen. Beste Ergebnisse erzielt man
mithilfe von Schaum oder einfachem alkalischen Reinigungsmittel.
Das Reinigungsmittel etwa 10 bis 30 Minuten einwirken lassen und
anschließend mit Hochdruck abspülen. Das Ergebnis ist ein wesentlich schnellerer Reinigungsprozess.
5.1 Arbeitstechniken
5.1.2 Reinigungsmittel und
Schaum aufbringen
Schaum oder Reinigungsmittel sollte auf trockene Flächen aufgetragen werden, damit der Reiniger direkt auf den Schmutz einwirken
kann. Reinigungsmittel sollten stets von unten nach oben aufgetragen werden, zum Beispiel bei einem Auto, damit das Mittel nicht in
großen Mengen nach unten fließt. Das Reinigungsmittel mehrere
Minuten einwirken lassen, aber niemals auf der Oberfläche
trocknen lassen.
5.1.3 Temperatur Die Rei ni gungs wir kung wird bei höheren Temperaturen ver stärkt.
Insbesondere Fette und Öle kön nen leichter und schnel ler gelöst
werden. Proteine können bei Tem pe ra tu ren um 60°C am bes ten
gelöst werden, Öle und Fette bei 70°C bis 90°C.
5.1.4 Mechanische
Ein wir kung
Um starke Schmutz schich ten aufzulösen, wird zusätzliche me cha ni sche Einwirkung not wen dig. Spezielle Sprüh roh re und (ro tie ren de)
Wasch bür sten bieten den besten Effekt um die Schmutz schicht zu
lösen.
5.1.5 Große Wasserleistung
und hoher Druck
Hoher Druck ist nicht immer die beste Lösung und zu hoher Druck
kann Oberflächen beschädigen. Die Rei ni gungs wir kung hängt
ebenso von der Was ser lei stung ab. Ein Druck von 100 bar ist für
die Fahr zeug rei ni gung aus rei chend (in Verbindung mit war mem
Was ser). Größere Was ser lei stung ermöglicht das Spülen und den
Transport des gelösten Schmutzes.

42
1)
Sonderzubehör / Modellvarianten
Übersetzung der Originalanleitung
UNITOR HPC 54/1 67/1
5.2 Typische Anwendungen
5.2.1 Landwirtschaft
Anwendung Zubehör Methode
Reinigung der
Wände, Böden,
Geräte.
Reinigungsmittel
Reinigungsschaumdüsen
Schaumrohr
Powerspeed Sprührohr
Bodenreiniger
1. Einweichen – Schaum auf alle Oberflächen (von
unten nach oben) auftragen und etwa 10 bis 30
Minuten warten.
2. Schmutz mit Hochdruck und ggf.
ent spre chen dem Zubehör entfernen. An
senkrechten Flächen wieder von unten nach
oben arbeiten.
3. Zum Transport von großen Schmutzmengen auf
größt mög li chen Wasserdurchsatz einstellen
4. Um die Hygiene sicherzustellen, nur
emp foh le ne Des in fek ti ons mit tel benutzen.
Des in fek ti ons mit tel nur nach
vollständiger Entfernung des Schmutzes
auf tra gen.
Fuhrpark Standard Lanze
Rei ni gungs mit tel in jek tor
Powerspeed Lanze
Gebogene Lanze und
Unterbodenwäscher
Bürsten
1. Reinigungsmittel auf die Oberfläche aufbringen
um den Schmutz zu lösen. Von unten nach
oben ar bei ten.
2. Mit dem Hochdruckstrahl abspülen. Wieder
von unten nach oben arbeiten. Benutzen Sie
Zubehör um an schwer zugänglichen Stellen zu
reinigen.
3. Reinigen sie empfindliche Teile wie Motoren
und Gum mi mit niedrigerem Druck um
Beschädigungen zu ver mei den.
5.2.2
Anwendung Zubehör Methode

43
1)
Sonderzubehör / Modellvarianten
Übersetzung der Originalanleitung
UNITOR HPC 54/1 67/1
5.2.3 Bau und Industrie
Dies sind nur einige An wen dungs bei spie le. Jede Rei ni gungs auf ga be ist un ter schied lich. Bitte setzen Sie
sich bezüglich der besten Lösung für Ihre Reinigungsaufgabe mit Ihrem UNITOR Händler in Ver bin dung.
Anwendung Zubehör Methode
Allgemeine
Flächen
Metallflächen
Reinigungsmittel
Schaumdüsen,
Standardrohre
Gebogene Sprührohre
Tankreinigungskopf
1. Eine dicke Schaumschicht auf die zu reinigenden
Flächen auftragen. Auf trockene Flächen auftragen.
Bei senkrechten Flächen von unten nach oben
auftragen. Für eine optimale Wirkung den Schaum
10 bis 30 Minuten einwirken lassen.
2. Mit dem Hochdruckstrahl abspülen. Benutzen Sie
entsprechendes Zubehör . Hohen Druck verwenden
um den Schmutz zu lösen. Niederen Druck und
hohe Was ser men ge verwenden um den Schmutz
ab zu trans por tie ren.
3. Desinfektionsmittel nur nach
vollständiger Ent fer nung des Schmutzes auftragen.
Starke Verschmutzungen, z.B. in Schlachthöfen,
können mit großer Wassermenge abtrtansportiert
werden.
Tankreinigungsköpfe dienen zur Reinigung
von Fäs sern, Bottichen, Mischtanks usw.
Tank rei ni gungs köp fe sind hy drau lisch oder elektrisch
angetrieben und er mög li chen eine automatische
Reinigung ohne stän di ge Be o b ach tung..
Verrostete,
be schä dig te
Ober flä chen vor
der Be hand lung
Nassstrahleinrichtung 1. Naßstrahleinrichtung mit dem Hochdruckreiniger
ver bin den und Saugschlauch in den Sandbehälter
ste cken.
2. Während der Arbeit Schutzbrille und -kleidung
tragen.
3. Mit dem Sand/Wasser-Gemisch kann Rost und
Lack entfernt werden.

44
1)
Sonderzubehör / Modellvarianten
Übersetzung der Originalanleitung
UNITOR HPC 54/1 67/1
6 Nach der Arbeit
6.1 Gerät ausschalten 1. Hauptschalter ausschalten,
Schalter auf Stellung " 0 ".
2. Wasserhahn schlie ßen.
3. Spritzpistole be tä ti gen, bis
das Gerät drucklos ist.
4. Sicherungsriegel der
Spritzpistole einlegen.
O
I
6.2 Versorgungsleitungen
trennen
1. Wasserschlauch vom Gerät
trennen.
2. Gerätestecker aus der Steck do se ziehen.
6.3 Einrollen des
Schlauchs und
Lagerung des
Sprührohrs
Stolpergefahr!
Zur Unfallverhütung den
Schlauch immer vorsichtig
aufrollen.
1. Den Schlauch wie abgebildet aufrollen.
2. Das Sprührohr in seine
Halterung legen.
1. Das Kabel von der Vorderseite
über die Befestigungsschraube
(A) und im Uhrzeigersinn um
die Kabelverschlüsse aufwickeln.
6.4 Aufwickeln des Kabels
A
B

45
1)
Sonderzubehör / Modellvarianten
Übersetzung der Originalanleitung
UNITOR HPC 54/1 67/1
6.5 Aufbewahrung
(frostsichere Lagerung)
Gerät in einem trockenen, frostgeschützten Raum abstellen.
ACHTUNG!
Wird der Hochdruckreiniger in einem Raum abgestellt, in dem Temperaturen um oder unter 0°C auftreten, muß vorher Frostschutzmittel durch die Pumpe angesaugt werden:
1. Wasserzulaufschlauch vom Gerät trennen.
2. Sprührohr abnehmen.
3. Gerät einschalten, Schalterstellung " I " und Spritzpistole betätigen.
Nach maximal 3 Minuten Gerät ausschalten.
4. Ansaugschlauch an den Wasserzulauf des Gerätes anschließen
und in einen Behälter mit Frostschutzmittel stecken.
5. Gerät einschalten, Schalterstellung " I ".
6. Spritzpistole über den Behälter mit Frostschutzmittel halten und
betätigen um den Ansaugvorgang zu starten.
7. Während des Ansaugvorgangs Spritzpistole 2 bis 3 mal betätigen.
8. Ansaugschlauch aus dem Behälter mit dem Frostschutzmittel
heben und Spritzpistole betätigen, um das restliche Frostschutzmittel abzupumpen.
9. Gerät ausschalten.
10. Um jedes Risiko zu vermeiden, ist das Gerät vor der Wiederinbetriebnahme möglichst in einem beheizten Raum zwischenzulagern.
2. Abschließend das Kabel
um die Kabelklemme
(C) wickeln.
C

46
1)
Sonderzubehör / Modellvarianten
Übersetzung der Originalanleitung
UNITOR HPC 54/1 67/1
7 Wartung
7.1 Wartungsplan
Wöchentlich
Nach den ersten
50 Betriebs-
stunden
Alle 500
Betriebsstunden
Bei
Bedarf
7.2.1
Wasserfi lter reinigen
7.2.2
Ölstandskontrolle
7.2.3
Ölwechsel
7.2.4
Erster Wechsel und Reinigung des Magneten an
der Ablassschraube
7.2 Wartungsarbeiten
7.2.1 Wasserfilter reinigen
Am Wassereinlaß ist ein Wasserfilter montiert, welches
das Eindringen von groben
Schmutzpartikeln in die Pumpe
verhindern soll.
1. Schnellkupplung abschrau-
ben falls aufgesetzt.
2. Filter entnehmen und aus-
spülen. Beschädigtes Filter
ersetzen.
7.2.2 Ölstandskontrolle 1. Ölstand prüfen. Auf eben-
em Untergrund sollte der
Ölstand sich über der MIN
Marke (A) befinden, wenn
das Öl kalt ist.
2. Sofern erforderlich, Öl
nachfüllen. Bis zur MAX
Marke (B) auffüllen.
A
B

47
1)
Sonderzubehör / Modellvarianten
Übersetzung der Originalanleitung
UNITOR HPC 54/1 67/1
7.2.3 Ölwechsel 1. Vor dem Ölwechsel den
Reiniger warm werden lassen.
2. Haube entfernen.
3. Die Ablassschraube (C)
lösen und entfernen. Der
Schraubenmagnet muss
mit einem Tuch gereinigt
werden, um die Metallpartikel zu entfernen. Das Öl
in einen geeigneten Behälter (mindestens 1 Liter)
ablassen und gemäß den
örtlichen Bestimmungen
entsorgen.
4. Die Ablassschraube festziehen und Öl entsprechend
Kapitel 9.4 Technische
Daten nachfüllen.
5. Der Ölstand muss bei
ebenem Stand mindestens
die MIN Marke im Ölbehälter erreichen. Bis zur
MAX Marke (B) auffüllen.
6. Haube wieder montieren.
HINWEIS!
Spezielles Pumpenöl ist
erforderlich, wenn der Reiniger
in der Nähe von Lebensmitteln
eingesetzt wird. Wenden Sie
sich bitte an Ihren
UNITOR Händler.
C

48
1)
Sonderzubehör / Modellvarianten
Übersetzung der Originalanleitung
UNITOR HPC 54/1 67/1
8 Behebung von Störungen
Störung Ursache Behebung
Druckabfall • Luft im System • System entlüften, dazu
Spritzpistole in kurzen
Zeitabständen mehrmals
betätigen, evtl. Maschine
ohne angeschlossenen
Hochdruckschlauch
kurzzeitig in Betrieb
nehmen.
• HD-Düse verstopft/abgenutzt • HD-Düse reinigen/
wechseln
• Reinigungsmitteltank leer • Den Reinigungsbehälter
auffüllen oder den Schalter
für Reinigungsmittel auf „0“
stellen.
Druckschwankungen • Pumpe saugt Luft an (nur im
Saugbetrieb möglich)
• Luftdichtigkeit des
Saugsets überprüfen
• Wassermangel • Wasserhahn öffnen
• Wasserzulaufschlauch
zu lang bzw. zu geringer
Querschnitt
• Einen Wassereinlassschlauch
verwenden, der für den
Wasserdurchsatz (Q
max
)
dieses Gerätes geeignet ist
• Wassermangel durch
verstopften Wasserfi lter
• Wasserfi lter im
Wasseranschluss reinigen
(nie ohne Wasserfi lter
arbeiten!)
• Wassermangel durch
Nichtbeachten der max.
zulässigen Ansaughöhe
• Siehe Inbetriebnahme
Beim Einschalten läuft der
Motor nicht an
••Stecker ist nicht
richtig eingesteckt,
Stromunterbrechung
Ölstand zu niedrig
••Stecker, Kabel und Schalter
prüfen und, sofern erforderlich,
von einem ausgebildeten
Elektriker austauschen lassen
Öl kontrollieren/nachfüllen
••Netzsicherung ist
abgeschaltet
Überlastschutz hat ausgelöst
wegen Überhitzung oder
Überlastung des Motors
••Netzsicherung einschalten
Übereinstimmung von
Versorgungsspannung
und Gerätespannung
überprüfen lassen.
Ausschalten und
mindestens 3 Minuten
abkühlen lassen

49
1)
Sonderzubehör / Modellvarianten
Übersetzung der Originalanleitung
UNITOR HPC 54/1 67/1
Störung Ursache Behebung
Motor brummt beim
Einschalten, ohne anzulaufen
• Netzspannung ist zu niedrig,
oder Phasenausfall
• Elektrischen Anschluss
überprüfen lassen
• Pumpe ist blockiert oder
eingefroren
• UNITOR-Kundendienst
verständigen
• Falscher Querschnitt
oder Länge des
Verlängerungskabels
• Richtigen Kabelquerschnitt
bzw Länge verwenden.
Motor schaltet aus ••Überlastschutz hat ausgelöst
wegen Überhitzung oder
Überlastung des Motors
Hochdruckdüse verschmutzt••
Übereinstimmung von
Versorgungsspannung
und Gerätespannung
überprüfen lassen.
Ausschalten und
mindestens 3 Minuten
abkühlen lassen
Hochdruckdüse wechseln
Es wird kein Reinigungsmittel
gesprüht
•
•
•
•
Reinigungsbehälter ist leer
Die Kappe am FlexoPowerPlus Düsenkopf ist nicht auf
niedrigen Druck eingestellt
Doppel-Sprührohr ist nicht
auf niedrigen Druck eingestellt.
Einspritzdüse ist verschmutzt
oder Saugschlauch ist blockiert.
•
•
•
•
Reinigungsbehälter auffüllen
Auf niedrigen Druck einstellen
Auf niedrigen Druck einstellen
Reinigen

50
1)
Sonderzubehör / Modellvarianten
Übersetzung der Originalanleitung
UNITOR HPC 54/1 67/1
9 Sonstiges
9.1 Gerät der
Wiederverwertung
zuführen
Das ausgediente Gerät sofort unbrauchbar machen.
• 1. Netzstecker ziehen und Anschlussleitung durchtrennen.
Werfen Sie Elektrogeräte nicht in den Hausmüll!
Gemäß Europäischer Richtlinie 2002/96/EG über Elektro- und
Elektronik-Altgeräte müssen verbrauchte Elektrogeräte getrennt gesammelt und einer umweltgerechten Wiederverwertung zugeführt
werden.
Bei Fragen wenden Sie sich bitte an Ihre Gemeindeverwaltung oder
Ihren Händler.
9.2 Garantie Für Garantie und Ge währ lei stung gelten unsere all ge mei nen
Geschäftsbedingungen. Än de run gen im Zuge tech ni scher
Neuerungen vorbehalten.
9.3 EG
Konformitäts-
erklärung
EG Konformitätserklärung
Produkt: Hochdruckreiniger
Typ: Poseidon 5-6-7
Das Design des Geräts entspricht den
folgenden relevanten Vorschriften:
EG Maschinenrichtlinie 2006/42/EC
EC Niederspannungs-Richtlinie 2006/95/EC
EC EMV Richtlinie 2004/108/EC
EC RoHS Richtlinie 2011/65/EC
Angewendete harmonisierte Normen: EN ISO 12100-1, EN ISO 12100-2, EN 60335-2-79,
EN 55014-1(2002), EN 55014-2(2001), EN 61000-3-2 (2006)
Angewendete nationale Normen und
technische Spezifikationen:
IEC 60335-2-79
Name und Anschrift der Person, die
bevollmächtigt ist, die technische
Unterlagen zusammenzustellen:
Anton Sørensen
General Manager, Technical Operations EAPC
Identität und Unterschrift der Person,
die bevollmächtigt ist, die Erklärung im
Namen des Herstellers auszustellen:
Anton Sørensen
General Manager, Technical Operations EAPC
Ort und Datum der Erklärung: Hadsund, 25-10-2012

51
UNITOR HPC 54/1 67/1
1)
Sonderzubehör / Modellvarianten
Übersetzung der Originalanleitung
9.4 Technische daten
HPC
HPC 54/1
HPC 67/1
Ländervarianten 777886 777889
Mögliche Spannung, V/ph/Freq. V/ph/Hz 440-460V/3ph/60Hz 440-460V/3ph/60Hz 400V/3ph/50Hz
Sicherung A 15 15 16
Nennleistung kW 6,6 8 8
Arbeitsdruck p
IEC
bar (MPa) 200 (20) 195 (19,5) 195 (19,5)
Wasserdurchsatz Q
IEC
l/h 940 1180 1180
Max. Wasserdruck p
max
bar (MPa) 250 (25) 250 (25) 250 (25)
Wasserdurchsatz Q
max
l/h 1000 1280 1280
Max. Wassereinlasstemperatur
– Druckbetrieb
°C (°F) 60 (140) 85 (185) 85 (185)
Max. Wassereinlassdruck bar (MPa) 10 (1) 10 (1) 10 (1)
Max. Trockensaughöhe m 1 1 1
Maße L x B x H mm 735x570x1020 775x570x1020 775x570x1020
Gewicht kg 72 91 91
Berechneter Schalldruckpegel
L
PA
in 1 m Entfernung
dB(A) 76 75 75
Garantierter Schallleistung-
spegel L
WA
dB(A) 89 88 88
Schwingungen ISO 5349,
Sprührohr 1 / Sprührohr 2
m/s² <1,5; +/-1 <1,5; +/-1 <1,5; +/-1
Rückstoßkraft, Sprührohr 1 /
Sprührohr 2
N 44,7 / - 60 / - 60 / -
Ölmenge l 0,73 1,1 1,1
Öltyp
BP Energol
GR-XP220
Castrol ALPHASyn 150 Castrol ALPHASyn 150
Technische Daten und Details des Geräts können sich ohne vorherige Ankündigung ändern.
HPC 67/1
777888

52
1)
Accessoire optionnel / variantes de modèle
Traduction du mode d’emploi d’origine
UNITOR HPC 54/1 67/1
Sommaire
Symboles de mise en garde ..............................................................................................................53
1 Consignes de sécurité importantes ..............................................................................53
2 Description.......................................................................................................................56
2.1 Utilisation quotidienne ............................................................................................................56
2.2 Affectation ..............................................................................................................................56
2.3 Organes de fonctionnement ..................................................................................................57
3 Avant la mise en service .................................................................................................58
3.1 Installation ..............................................................................................................................58
3.2 Contrôle du niveau d'huile .....................................................................................................58
3.3 Remplissage du réservoir de détergent .................................................................................59
3.4 Raccordement du flexible haute pression ..............................................................................59
3.5 Raccordement du flexible à eau ............................................................................................59
3.6 Raccordement électrique .......................................................................................................60
3.7 Valve BA ................................................................................................................................61
4 Commande / Fonctionnement ........................................................................................62
4.1 Raccordement du pistolet à la lancev ....................................................................................62
4.2 Mise en marche de l’appareil raccordé à une conduite d’eau ...............................................62
4.3 Régulation de la pression avec la lance Tornado Plus et la lance PowerSpeedVario Plus ...64
4.4 Régulation de la pression avec la tête de buse FlexoPowerPlus
et la lance PowerSpeedVario Plus. ........................................................................................64
4.5 Emploi de détergents .............................................................................................................64
4.6 Levage à l'aide d'une grue .....................................................................................................65
5 Domaines d‘utilisation et méthodes de travail .............................................................66
5.1 Indications générales .............................................................................................................66
5.2 Utilisations typiques ...............................................................................................................67
6 Après le travail.................................................................................................................69
6.1 Arrêt de l’appareil ...................................................................................................................69
6.2 Séparation des conduites d’alimentation ...............................................................................69
6.3 Enroulement du flexible et rangement de la lance .................................................................69
6.4 Enroulement du cordon .........................................................................................................69
6.5 Conservation de la machine (entreposage à l‘abri du gel) ....................................................70
7 Maintenance.....................................................................................................................71
7.1 Plan de maintenance .............................................................................................................71
7.2 Travaux de maintenance........................................................................................................71
8 Suppression de dérangements ......................................................................................73
9 Divers ...............................................................................................................................75
9.1 Affectation de la machine au recyclage ................................................................................75
9.2 Garantie .................................................................................................................................75
9.3 Déclaration de conformité CE ................................................................................................75
9.4 Caractéristiques techniques ..................................................................................................76

53
1)
Accessoire optionnel / variantes de modèle
Traduction du mode d’emploi d’origine
UNITOR HPC 54/1 67/1
Symboles de mise en garde
1 Consignes de sécurité importantes
Pour la propre sécurité de
l'utilisateur
Le nettoyeur haute pression ne
doit être utilisé que par des personnes formées à son utilisation et qui y ont été autorisées.
Bien que très facile d'utilisation,
les enfants ne doivent pas être
autorisés à se servir du nettoyeur.
Généralités
L'utilisation d'un nettoyeur
haute pression est soumise aux
réglementations locales applicables.
En dehors des instructions
d'utilisation et des réglementations de prévention des accidents applicables obligatoirement dans le pays d'utilisation,
observer les règles admises
de sécurité et de conformité
d'utilisation.
Ne pas utiliser de techniques
de travail à risque.
Transport
Grâce à ses grandes roues, le
nettoyeur haute pression est
facile à transporter.
Pour un transport sûr, dans un
véhicule ou sur un véhicule,
nous recommandons de fi xer
l'équipement avec des sangles
pour l'empêcher de glisser et
de basculer.
Pour le transport à des températures autour de 0 °C ou audessous, verser préalablement
de l'antigel dans la pompe (cf.
chapitre 6).
Avant de démarrer le
nettoyeur
Si votre nettoyeur à trois
phases vous a été fourni sans
prise, le faire équiper par un
technicien d'une prise triphasée
avec un conducteur de terre.
Avant utilisation, il faut vérifi er
que le nettoyeur haute pression
est sûr et propre.
Vérifi er régulièrement si le cor-
don d'alimentation est endommagé ou montre des signes
d’usure.
Utiliser le nettoyeur haute pression uniquement si le cordon
d'alimentation est en bon état.
(Un choc électrique peut se
produire si le cordon est endommagé !)
Vérifi er la tension nominale
indiquée sur le nettoyeur haute
pression avant de le raccorder
à l'alimentation secteur locale.
Veiller à ce que la tension affi -
chée sur la plaque signalétique
corresponde à la tension de
l’alimentation secteur locale.
Nous vous recommandons
fortement de raccorder le nettoyeur haute pression par un
coupe-circuit à courant résiduel.
Ce dispositif coupera
l'alimentation si le courant de
fuite vers la terre est supérieur
à 30 mA pour 30 ms. À défaut,
un dispositif qui vérifi era le
circuit de terre peut également
être prévu.
Dans ce manuel, les consignes
de sécurité dont l‘inobservation
peut mettre des personnes en
danger sont marquées particulièrement par ce symbole de
danger.
Veuillez lire attentivement ce
manuel d'utilisation avant la
première utilisation de votre
nettoyeur haute pression. Conservez les instructions pour
consultation ultérieure.
Des conseils ou des indications qui facilitent le travail et
pourvoient à la sécurité de fonctionnement figurent ici.
Vous trouverez ce symbole en
face des consignes de sécurité
dont l‘inobservation peut engendrer des risques pour l‘appareil
et son fonctionnement.

54
1)
Accessoire optionnel / variantes de modèle
Traduction du mode d’emploi d’origine
UNITOR HPC 54/1 67/1
Le nettoyeur doit uniquement
être utilisé en position verticale !
Il y a lieu de respecter les règlementations et dispositions
en vigueur dans votre pays.
Avant de mettre le nettoyeur
haute pression en service, il
faut effectuer un contrôle visuel
des principaux composants.
ATTENTION !
Les jets d'eau à haute pression
peuvent être dangereux s'ils
sont mal utilisés. Le jet d'eau
ne doit jamais être dirigé vers
des personnes, des animaux,
des équipements électriques
sous tension ni vers la machine
elle-même.
Porter les protections vestimentaires appropriées ainsi que
des protections oculaires.
Ne jamais diriger le jet vers soimême ni vers d'autres personnes dans le but de nettoyer des
vêtements ou des chaussures.
Pendant le fonctionnement du
nettoyeur, des forces de recul
apparaissent au niveau du
pistolet et de la lance de pulvérisation. Si la lance n'est pas
tenue droite, un couple apparaît
également. Le pistolet doit par
conséquent être tenu fermement et à deux mains.
Ne pas utiliser le nettoyeur si
d'autres personnes non équipées de vêtements de protection travaillent à proximité.
Vérifi er que le nettoyage des
objets n'est pas susceptible
de lessiver ou expulser des
substances dangereuses (par
exemple de l'amiante, du pétrole) qui pourraient nuire à
l'environnement.
AVERTISSEMENT !
Cette machine a été conçue
pour être utilisée avec le détergent fourni ou recommandé
par le fabricant. L’utilisation
d'autres détergents ou produits
chimiques peut avoir un effet
négatif sur la sécurité de la
machine.
Risque d’explosion – Ne pas
vaporiser des liquides infl am-
mables.
Ne pas nettoyer de pièces fragiles en caoutchouc, tissus, etc.
avec la buse 0°. Afi n de ne pas
endommager la surface à nettoyer, respecter une certaine
distance entre la buse haute
pression et celle-ci.
Ne pas utiliser le fl exible haute
pression pour soulever des
charges.
REMARQUE !
La pression et la température
de travail maximales admissi-
bles sont indiquées sur le fl ex-
ible haute pression.
Ne plus utiliser le nettoyeur si
le cordon d'alimentation ou le
fl exible haute pression est en-
dommagé.
Assurer une circulation d'air
suffi sante. Ne pas recouvrir le
nettoyeur ni le faire fonctionner
dans une pièce insuffi samment
ventilée.
Ne pas entreposer le
nettoyeur dans un endroit exposé au gel.
Ne jamais faire fonctionner le
nettoyeur sans alimentation en
eau. Le fonctionnement sans
eau, même bref, peut endommager gravement les joints de
la pompe.
Couper le nettoyeur après max.
3 minutes.
Raccordement à
l’eau
Il vous est uniquement permis de
raccorder ce netto-
yeur haute pression aux prises
principales d’eau potable si
un dispositif anti-refoulement
approprié a été installé (type
BA selon EN 60335-2-79).
Le dispositif anti-refoulement
peut être commandé sous les
références 106411177,10641
1178,106411179,106411184
. La longueur du tuyau entre le
dispositif anti-refoulement et le
nettoyeur haute pression doit
être d’au moins 12 mètres (diamètre minimum : ¾ de pouce)
pour absorber les éventuelles
crêtes de pression. Le fonctionnement par aspiration (par
exemple à partir d’un récipient d’eau de pluie) est assuré
sans dispositif anti-refoulement.
Kit d'aspiration recommandé
: 61256. Dès que l’eau s’est
écoulée par la valve BA, elle
n’est plus considérée comme
étant de l’eau potable.
Fonctionnement
ATTENTION !
Des prises de rallonge incorrectes peuvent représenter
une source de danger. Toujours dérouler complètement
le cordon du dévidoir pour
éviter la surchauffe du cordon
d'alimentation.
Les prises et connecteurs du
cordon d'alimentation doivent
au minimum être résistants aux
éclaboussures.
Ne pas endommager le cordon
d'alimentation, par ex. ne pas
rouler ni tirer dessus, ne pas le
pincer.
Débrancher le cordon
d'alimentation en tirant uniquement sur la prise. Ne pas tirer
sur le cordon lui-même.

55
1)
Accessoire optionnel / variantes de modèle
Traduction du mode d’emploi d’origine
UNITOR HPC 54/1 67/1
Équipements électriques
ATTENTION !
Ne jamais pulvériser de l'eau
sur les équipements électrique
: danger pour les personnes,
risque de court-circuit.
Le nettoyeur peut uniquement
être branché dans une prise
installée selon les prescriptions.
La mise en marche du netto-
yeur peut provoquer des fl uc-
tuations de tension.
Aucune fl uctuation de ten-
sion ne doit se produire si
l'impédance au point de transfert est inférieure à 0,15. En cas
de doute, consulter un électricien local.
Maintenance et réparation
ATTENTION !
Toujours débrancher la prise de
l'alimentation principale avant
d'effectuer tout travail de maintenance sur le nettoyeur.
Effectuer uniquement les opérations de maintenance décrites
dans le manuel d'utilisation.
N'utiliser que des pièces de
rechange d'origine UNITOR.
N'effectuer aucune modifi cation
technique du nettoyeur haute
pression.
S'assurer que la machine est
régulièrement entretenue par
un distributeur agréé UNITOR
et selon le calendrier de maintenance. Le non-respect de
cette clause entraîne la nullité
de la garantie.
ATTENTION !
Les fl exibles, raccords et ac-
couplements haute pression
sont importants pour la sécurité
du nettoyeur. N'utiliser que des
pièces haute pression approuvées par le constructeur.
Le cordon d'alimentation ne
peut pas différer de la version
spécifi ée par le fabricant. Il peut
uniquement être remplacé par
un électricien.
Veuillez contacter le SAV UNITOR ou un atelier spécialisé
agréé pour tous les autres
travaux de maintenance et de
réparation !
Essai
Le nettoyeur est conforme aux
« Directives sur les machines
à pulvérisation de liquide »
en vigueur en Allemagne. Le
nettoyeur haute pression doit
subir un contrôle de sécurité
en conformité avec la « réglementation de prévention des
accidents lors du travail avec
les machines à pulvérisation
de liquide » chaque fois que
nécessaire et au moins tous
les 12 mois par un inspecteur
agréé. Ce rapport doit être conservé.
Après chaque réparation ou
modifi cation de l'équipement
électrique, il faut mesurer
l'impédance du conducteur de
terre, la résistance d'isolation
et le courant de fuite à la terre.
Il faut en outre effectuer une
inspection visuelle du cordon
d'alimentation, une mesure
de tension et de courant ainsi
qu'un essai de fonctionnement.
Les techniciens de notre ser-
vice après-vente sont qualifi és
pour ces inspections et à la
disposition de nos clients.
La « réglementation de prévention des accidents lors du
travail avec les machines à
pulvérisation de liquide » est
disponible auprès de la société Carl Heymanns Verlag
KG, Luxemburger Strasse
449, D-50939 Cologne ainsi
qu'auprès des groupements
des assurances de responsabilité des employeurs.
Soupape de décharge
La haute pression inacceptable
est renvoyée sans pression résiduelle via une ligne de dérivation vers la ligne d'admission de
la pompe lorsque le dispositif
de sécurité se déclenche.
La soupape de décharge est
préréglée et scellée en usine.
Elle ne doit pas être modifi ée.
Dispositifs de sécurité
Capteur de température :
Un capteur de température
protège le moteur contre la
surcharge. La machine redémarrera après quelques minutes, une fois que le capteur de
température aura refroidi.
Dispositif de verrouillage du
pistolet :
Le pistolet est équipé d'un dispositif de verrouillage. Lorsque
le cliquet est enclenché, le
pistolet ne peut pas être mis en
service.
AVERTISSEMENT !
• L'inhalation d'aérosols peut
être dangereuse pour la
santé.
• Lorsque cela s'applique,
utilisez un dispositif adapté
(par exemple un écran couvrant la buse) pour prévenir
ou réduire la formation
d'aérosols.
• Portez un masque respiratoire de classe FFP 2 ou
plus élevée pour vous protéger des aérosols.
O
I

56
1)
Accessoire optionnel / variantes de modèle
Traduction du mode d’emploi d’origine
UNITOR HPC 54/1 64/1 67/1
2 Description
2.2 Affectation
Ce nettoyeur haute pression a été conçu pour l’usage professionnel dans:
– la logistique
– les activités de nettoyage
L‘utilisation du nettoyeur haute pression pour divers travaux de nettoyage
est décrite dans le chapitre 5.
Employer l‘appareil uniquement de la manière décrite dans cette notice
d‘utilisation. Un emploi non conforme à sa destination peut endommager
l‘appareil ou la surface à nettoyer et provoquer des blessures graves.
2.1 Utilisation
quotidienne
Nous vous recommandons d'utiliser ce produit pendant
env. X/heures par jour.
HPC 54/1
HPC 67/1
0 8+
Heures d'utilisation quotidienne
Utilisation recommandée : x heures/jour
0 8+
Heures d'utilisation quotidienne
Utilisation recommandée : x heures/jour
– Maritime

57
1)
Accessoire optionnel / variantes de modèle
Traduction du mode d’emploi d’origine
UNITOR HPC 54/1 67/1
2.3 Organes de
fonctionnement
1. Poignée pousser/tirer
2. Pistolet de pulvérisation
3. Cordon d’alimentation
4. Support pour flexible haute pression
5. Flexible haute pression
6. Vis de fixation
7. Lance
1)
8. Frein de parking
1)
9. Raccord pour flexible haute pression (sur les modèles
standard sans dévidoir)
1)
10. Raccordement à l'eau et filtre de l'entrée d'eau
11. Regard d'inspection de l'huile
12. Manomètre
1)
13. Interrupteur principal
14. Réglage du dosage du détergent
1)
15. Réglage du débit d'eau
1)
16. Réservoir à détergent
1)
17. Verrouillage du couvercle
107146700
1
5
4
3
16
6
4
7
2
14
12
11
13
15
10
8
9
17

58
1)
Accessoire optionnel / variantes de modèle
Traduction du mode d’emploi d’origine
UNITOR HPC 54/1 67/1
3 Avant la mise en service
3.1 Installation
3.2 Contrôle du niveau
d'huile
PRUDENCE!
Ne soulevez jamais l’appareil
tout seul. Demandez toujours à
une personne de vous aider.
1. Avant la première mise
en service, assurez-vous
minutieusement qu’il ne
présente pas de défauts ou
de dommages.
2. An cas d’avarie, adressezvous immédiatement à votre dépositaire UNITOR.
3. Déplier et verrouiller la poignée en position de travail.
4. Contrôle du niveau d'huile.
Lorsque le nettoyeur est
posé sur un sol plat, le
niveau d'huile doit être
supérieur au niveau MIN
(A) lorsque l'huile est froide.
3
A

59
1)
Accessoire optionnel / variantes de modèle
Traduction du mode d’emploi d’origine
UNITOR HPC 54/1 67/1
3.5 Raccordement du
flexible à eau
1. Avant de raccorder le flexible à l’appareil, rincez-le
rapidement à l’eau afin
que du sable et d’autres
particules de saleté ne
puissent pas pénétrer dans
l’appareil.
2. Raccordez le flexible à la
prise d’eau au moyen du
raccord rapide.
3. Ouvrez le robinet d’eau.
3.4.2 Appareils avec tambour
de flexible
1. Connecter le raccord rapide
du flexible haute pression
(A) avec l'embout de l'axe.
2. Connecter le flexible haute
pression au guide pour flexible (B) et le fixer à l'aide du
clip1).
3. Relâcher le frein (C) du
guide du dévidoir du flexible
1)
et enrouler le flexible
haute pression.
A
B
C
3.3 Remplissage
du réservoir de
détergent1)
1. Remplissez le réservoir
avec du détergent UNITOR.
2. Détacher le tuyau à détergent et le filtre du support
de rangement et les glisser
dans l'ouverture du bouchon de remplissage du
réservoir à détergent.
3.4 Raccordement du
flexible haute pression
3.4.1 Appareils sans
tambour de flexible
1. Raccordez le flexible haute
pression à la prise de haute
pression de l’appareil au
moyen du raccord rapide.
REMARQUE!
La longueur maximale du tuyau
haute pression est 50 m.

60
1)
Accessoire optionnel / variantes de modèle
Traduction du mode d’emploi d’origine
UNITOR HPC 54/1 67/1
3.6 Raccordement
électrique
ATTENTION !
Avant de raccorder les appareils munis d'un sélecteur de
tension : Vérifier que la tension
présélectionnée sur la machine
correspond à la tension de
l'installation électrique. Dans le
cas contraire, les équipements
électriques de la machine peuvent subir des dégâts1).
REMARQUE :
Si l'eau est de piètre qualité
(sable, etc.), nous vous recommandons d'équiper la machine
d'un filtre à eau pure. Filtre de
max. 50 microns. Nous recom
mandons l'utilisation d'un tuyau
d'alimentation en eau renforcé
d'un élément tissé et d'un diamètre nominal minimal de 3/4"
(19 mm).
ATTENTION !
Si un dévidoir pour cordon est
utilisé :
Dérouler entièrement le cordon.
ATTENTION !
Le nettoyeur peut uniquement
être raccordé à une installation
électrique réalisée selon les
prescriptions.
1. Respecter les consignes de
sécurité données au chapitre 1.
2. Brancher la prise.
400V
400V
230V
230V
3.6.1 Libération du cordon 1. Tourner le crochet du cor-
don (A).
2. Libérer le cordon (B).
3. Retourner le crochet du
cordon dans sa position
initiale.
A
B

61
1)
Accessoire optionnel / variantes de modèle
Traduction du mode d’emploi d’origine
UNITOR HPC 54/1 67/1
Consignes d’installation
c c
3.7 Valve BA
(a) Accouplement
femelle
Valve BA
(b) Accouplement
mâle
Maintenance
1. Montez un accouplement mâle sur le robinet d’eau.
2. Raccordez (a) à la valve BA sur le robinet d’eau.
3. Montez un accouplement femelle sur le flexible.
4. Raccordez (b) à la valve BA sur le flexible.
5. Raccordez le flexible au laveur haute pression.
6. Ouvrez l’eau et mettez la machine en marche.
Vérifiez son fonctionnement au moins une fois par an, en procédant
comme suit :
1. Après le travail, désactivez le nettoyeur à haute pression.
2. Fermez la vanne du robinet d’eau.
3. Evacuez la pression dans le flexible d’alimentation en déclenchant
le pistolet de pulvérisation.
4. Démontez le dispositif anti-refoulement. L’eau doit sortir de
l’ouverture d’écoulement (c) (maximum 100 ml) pour garantir la
séparation entre l’eau potable et l’eau contenue dans le flexible.
5. Si tel n’est pas le cas, essayez de nettoyez la valve BA ou contactez votre représentant UNITOR.
ATTENTION
• Le dispositif anti-refoulement peut être monté soit verticalement, soit horizontalement, et l’ouverture de vidange
(c) doit être montée de manière à pointer vers le bas.
• L’eau qui s’écoule de l’ouverture de vidange (c) doit pouvoir couler librement.
• S’il y a un risque d’écoulement de sable dans l’eau
d’alimentation (par ex. de votre propre puits), il convient
de monter un filtre supplémentaire entre le robinet d’eau
et le dispositif anti-refoulement.
• La longueur du tuyau entre le dispositif anti-refoulement
et le laveur haute pression doit être d’au moins 12 mètres (diamètre minimum : ¾ de pouce) pour absorber les
éventuelles crêtes de pression.
• Dès que l’eau s’est écoulé par la valve BA, elle n’est plus
considérée comme étant de l’eau potable.
• Protégez le dispositif anti-refoulement contre toute exposition au gel.
• Gardez le dispositif anti-refoulement bien propre et exempt de saletés.
Il vous est uniquement permis de raccorder ce laveur/ nettoyeur
haute pression aux prises principales d’eau potable si un dispositif anti-refoulement approprié a été installé, de type BA
selon EN 60335-2-79.
•
•
•
•
•
•
•
•
•
•
•

62
1)
Accessoire optionnel / variantes de modèle
Traduction du mode d’emploi d’origine
UNITOR HPC 54/1 67/1
4 Commande / Fonctionnement
4.1 Raccordement du
pistolet à la lancev
1. Tirer vers l’arrière la poignée à déclenchement
rapide bleue (A) du pistolet
pulvérisateur.
2. Enfoncer l'embout de la
lance de pulvérisation (B)
dans le raccord rapide, puis
relâcher l'accouplement
(A).
3. Tirez la lance (ou un autre
accessoire) en avant pour
vous assurer qu‘elle est
solidement assemblée avec
le pistolet.
REMARQUE!
Avant d‘assembler la lance et le
pistolet, nettoyez le nipple pour
éliminer les éventuelles particules de saleté.
4.2 Mise en marche de
l’appareil raccordé à
une conduite d’eau
1. Mettez le commutateur
principal dans la position
" Ι ".
2. Déverrouillez le pistolet et
actionnez-le.
3. Mettez le cran de sûreté
même lors de courtes interruptions du travail.
REMARQUE :
Faire fonctionner le pistolet de
pulvérisation plusieurs fois à
intervalles brefs afin de ventiler
le système.
Le nettoyeur s'éteint automatiquement une fois que le pistolet de pulvérisation a été fermé.
Pour redémarrer le nettoyeur,
actionner le pistolet pulvérisateur.
Les modèles DSS s’éteignent
au bout de 20 secondes1).
A
B
O
I

63
1)
Accessoire optionnel / variantes de modèle
Traduction du mode d’emploi d’origine
UNITOR HPC 54/1 67/1
4.2.2 Mise en marche du
nettoyeur lorsqu'il
est connecté à des
réservoirs ouverts en
mode aspiration
1)
(Modèle à activation
par le débit)
1. Avant de brancher le kit
d'aspiration 61256 au nettoyeur, remplir le flexible
d'eau.
2. Mettre l'interrupteur principal sur la position « M ».
3. Déverrouiller le pistolet de
pulvérisation et l'actionner.
4. Pour redémarrer le nettoyeur, actionner une
nouvelle fois l'interrupteur
principal.
0
I
M
REMARQUE :
Le nettoyeur se coupe automatiquement après une pause de
plus de 5 minutes.
Pour connaître la hauteur
d'aspiration maximale, consulter le chapitre 9.4.
4.2.1 Mise en marche du
nettoyeur lorsqu'il
est connecté à des
réservoirs ouverts
en mode aspiration
1)
(Modèle à activation
par la pression)
1. Avant de brancher le kit
d'aspiration 61256 au nettoyeur, remplir le flexible
d'eau.
2. Mettre l'interrupteur principal sur la position « I ».
3. Déverrouiller le pistolet de
pulvérisation et l'actionner.

64
1)
Accessoire optionnel / variantes de modèle
Traduction du mode d’emploi d’origine
UNITOR HPC 54/1 67/1
MAX
CHEM
MAX
CHEM
4.3 Régulation de la
pression avec la lance
Tornado Plus et la
lance PowerSpeedVario
Plus
1. Tourner la molette sur le
lance :
– haute pression = dans le
sens horaire (+)
– basse pression = dans le
sens antihoraire (–)
4.4 Régulation de la
pression avec
la tête de buse
FlexoPowerPlus et la
lance PowerSpeedVario
Plus.
1. Tourner le bouchon de la
tête de buse FlexoPowerPlus :
– Haute pression = MAX.
– Basse pression = MIN.
(CHEM)
4.5 Emploi de détergents Les détergents ne peuvent être
aspirés avec l’injecteur intégré
en série que dans le mode à
basse pression :
1. Diluer le détergent confor-
mément aux instructions du
fabricant.
2. Lance Tornado Plus et
lance PowerSpeedVario
Plus
1)
: Régler la pression
de la lance de pulvérisation sur basse pression (–),
ou la tête de buse FlexoPowerPlus 1) : Pousser le
bouchon de la tête de buse
FlexoPowerPlus dans la
sens « CHEM » jusqu'au
blocage.
3. La quantité de détergent
peut être régulée en tournant la valve doseuse.
4. Sélectionner le réservoir A
en tournant la valve doseuse sur le « côté A ». Sélectionner le réservoir B en
tournant la valve doseuse
sur le « côté B ».
5. Interrupteur principal Mettre
l'interrupteur sur la position
« I ».
6. Actionner la lance de pulvérisation.
REMARQUE!
Les détergents ne doivent pas
sécher, sinon la surface à nettoyer pourrait être endommagée.

65
1)
Accessoire optionnel / variantes de modèle
Traduction du mode d’emploi d’origine
UNITOR HPC 54/1 67/1
4.6 Levage à l'aide d'une grue
1. La machine doit être en
équilibre pour procéder à
un levage à l'aide d'une
grue. Desserrer la vis (A) et
pousser légèrement la poignée (B) vers l'avant.
2. Lorsque les deux marques
sont alignées (C), la poignée se trouve dans la
bonne position pour procéder au levage à l'aide
d'une grue.
3. Serrer les vis (D) dans la
position de levage.
4. Enrouler une sangle autour
du centre de la poignée (E)
pour que la grue puisse s'y
accrocher.
AVERTISSEMENT !
Ne pas se tenir sous la
machine lorsqu'elle
est suspendue dans les
airs.
A B
D
E
C

66
1)
Accessoire optionnel / variantes de modèle
Traduction du mode d’emploi d’origine
UNITOR HPC 54/1 67/1
5 Domaines d‘utilisation et méthodes
de travail
Vous obtiendrez un nettoyage à haute pression efficace en observant quelques directives et en vous basant sur vos expériences personnelles dans des domaines spéciaux. Accessoires et détergents
peuvent, s’ils sont employés correctement, renforcer l’effet du nettoyage. Vous trouverez ici quelques indications fondamentales.
5.1.1 Détremper Des couches épaisses ou incrustées de saletés peuvent être dé-
collées ou ramollies en les faisant tremper. Cette méthode est par
exemple idéale dans l’agriculture – par exemple, dans les porcheries. La méthode de trempage idéale peut être obtenue avec de la
mousse ou un simple détergent alcalin. Laisser le produit agir sur
les surfaces sales pendant environ 10 à 30 minutes avant de procéder au nettoyage sous pression. Le résultat permet un nettoyage
à haute pression bien plus rapide.
5.1 Indications générales
5.1.2 Appliquer détergent et
mousse
La mousse ou le détergent doit être appliqué sur des surfaces
sèches afin de permettre au produit chimique d'entrer en contact
direct avec la saleté. Les détergents doivent être appliqués de bas
en haut, par exemple sur une carrosserie de voiture, afin d'éviter
les zones « ultra nettes ». Ces zones sont dues à une concentration plus élevée de détergent qui s'écoule ensuite vers le bas. Laisser agir le détergent pendant quelques minutes afin de procéder au
rinçage mais ne jamais le laisser sécher sur la surface à nettoyer.
5.1.3 Température Des températures relativement élevées renforcent l’effet du nettoy-
age. Graisses et huiles, notamment, peuvent se dissoudre plus vite
et plus facilement. Les protéines se dissolvent le mieux à des températures autour de 60°C, les huiles et les graisses entre 70°C et
90°C.
5.1.4 Action mécanique La dissolution de couches de saleté épaisses nécessite en plus une
action mécanique. Des lances spéciales et des brosses de lavage
(rotatives) produisent le meilleur effet pour détacher la couche de
saleté.
5.1.5 Grand débit d’eau et
haute pression
La haute pression n’est pas toujours la meilleure solution et une
pression trop forte peut endommager les surfaces. L’effet du nettoyage dépend également du débit d’eau. Une pression de 100 bars
est suffisante pour nettoyer des véhicules (avec de l’eau chaude).
Un débit d’eau plus important permet de rincer et d’entraîner la saleté détachée.

67
1)
Accessoire optionnel / variantes de modèle
Traduction du mode d’emploi d’origine
UNITOR HPC 54/1 67/1
5.2 Utilisations typiques
5.2.1 Agriculture
Emploi Accessoires Méthode
Nettoyage de
murs, sols et
équipements
Détergents
Injecteurs à mousse
chimique
Lance à mousse
Lance Powerspeed
Détergent pour sol
Désinfectant
1. Trempage : appliquer la mousse sur toute la surface
(de bas en haut) et laisser agir pendant environ 10
à 30 minutes.
2. Enlevez la saleté avec la haute pression et
éventuellement un accessoire adapté.
Travaillez de bas en haut sur les surfaces
verticales.
3. Pour entraîner de grandes quantités de saleté,
réglez sur le plus grand débit d’eau possible.
4. Pour assurer l’hygiène, utilisez uniquement les
désinfectants recommandés.
N’appliquez le désinfectant qu’après élimination
complète de la saleté.
Lance standard
Injecteur de détergent
Lance Powerspeed
Lance coudée et
laveur de dessous de
caisse
Brosses
1. Appliquez le détergent sur la surface pour
dissoudre la saleté. Travaillez de bas en haut.
2. Rincez avec le jet haute pression en commençant
par le bas. Servez-vous d’accessoires pour nettoyer
les endroits d’accès difficile.
3. Nettoyez les pièces fragiles telles que moteurs et
caoutchouc avec une pression plus faible pour ne
pas les endommager.
5.2.2 Véhicules
Emploi Accessoires Méthode
Carrosserie de
voiture
Détergents
Lance standard
Injection de détergent
Lances incurvées et
brosses permettant
d'aller sous le châssis
1. Appliquez le détergent sur la surface pour
dissoudre la saleté. Travaillez de bas en haut.
Pour enlever des traces d’insectes, vaporiser
préalablement de l’Allosil p. ex., puis rincez à faible
pression et nettoyez tout le véhicule en ajoutant du
détergent. Laissez agir le produit env. 5 minutes.
Les surfaces métalliques peuvent être nettoyées
avec RimTop.
2. Rincez avec le jet haute pression en commençant
par le bas. Servez-vous d’accessoires pour nettoyer
les endroits d’accès difficile. Employez des brosses.
Les lances courtes sont pour le nettoyage de
moteurs et de passages de roues. Utilisez des
lances coudées ou des laveurs de dessous de
caisse.
3. Nettoyez les pièces fragiles telles que moteurs et
caoutchouc avec une pression plus faible pour ne
pas les endommager.
4. Appliquez de la cire liquide avec le nettoyeur haute
pression pour diminuer le nouvel encrassement.

68
1)
Accessoire optionnel / variantes de modèle
Traduction du mode d’emploi d’origine
UNITOR HPC 54/1 67/1
5.2.3 Bâtiment et industrie
Ce ne sont là que quelques exemples d’application. Chaque tâche de nettoyage est différente. Pour trouver
la meilleure solution pour vos travaux de nettoyage, veuillez vous adresser à votre dépositaire UNITOR.
Emploi Accessoires Méthode
Surfaces générales
Équipement
métallique
Détergents
Injecteurs à mousse
lance standard
Lances incurvées
Tête de nettoyage
du réservoir
1. Appliquer une couche de mousse épaisse sur les
surfaces à nettoyer. Appliquer le produit sur des
surfaces sèches. Appliquer le produit de bas en
haut sur les surfaces verticales. Laisser agir la
mousse pendant 10 à 30 minutes pour obtenir un
effet optimal.
2. Rincez avec le jet haute pression. Servez-vous
d’accessoires adaptés. Utilisez la haute pression
pour détacher la saleté. Utilisez une pression plus
faible et une grande quantité d’eau pour entraîner la
saleté.
3. N’appliquez du désinfectant qu’après élimination
complète de la saleté.
Les salissures importantes, p. ex. dans des abattoirs,
peuvent être entraînées avec une grande quantité
d’eau.
Les têtes de nettoyage de réservoirs servent pour
les fûts, auges, réservoirs de mélange etc. Elles sont
dotées d’un entraînement hydraulique ou électrique
et permettent un nettoyage automatique sans
surveillance permanente.
Surfaces rouillées,
endommagées avant
le traitement
Dispositif
d’hydrosablage
1. Raccordez le dispositif d’hydrosablage au nettoyeur
haute pression et plongez le flexible d’aspiration
dans le réservoir de sable.
2. Portez des lunettes et des vêtements de protection
pendant le travail.
3. Rouille et peinture peuvent être enlevées avec le
mélange sable/eau.

69
1)
Accessoire optionnel / variantes de modèle
Traduction du mode d’emploi d’origine
UNITOR HPC 54/1 67/1
6 Après le travail
6.1 Arrêt de l’appareil 1. 1. Coupez le commuta-
teur principal en le tournant
sur la position " 0FF ".
2. Fermez le robinet d’eau.
3. Actionnez le pistolet jusqu’à
ce que l’appareil soit sans
pression.
4. Mettez le cran de sûreté
sur le pistolet.
O
I
6.2 Séparation
des conduites
d’alimentation
1. Séparez le flexible à eau de
l’appareil.
2. Débranchez la fiche de
l’appareil de la prise de
courant.
6.3 Enroulement du flexible
et rangement de la
lance
Risque de dérapage !
Afin de prévenir les accidents, il faut toujours enrouler
soigneusement le flexible.
1. Enrouler le flexible comme
illustré.
2. Placer la lance de pulvérisation dans le rangement
pour lance de pulvérisation.
1. Enrouler le cordon par-dessus
la vis de fixation (A) et autour
des crochets (B) (dans le sens
horaire).
6.4 Enroulement du cordon
A
B

70
1)
Accessoire optionnel / variantes de modèle
Traduction du mode d’emploi d’origine
UNITOR HPC 54/1 67/1
6.5 Conservation de la
machine (entreposage
à l‘abri du gel)
Rangez l’appareil dans un local sec et protégé contre le gel.
ATTENTION!
Si le nettoyeur haute pression est entreposé dans un local où les
températures sont égales ou inférieures à 0°C, il faut auparavant
aspirer de l’antigel avec la pompe :
1. Déconnectez le flexible d’arrivée d’eau de l’appareil.
2. Retirez la lance.
3. Mettez l’appareil en marche, position " I " du commutateur.
L’appareil s’arrête au bout de 3 minutes maximum.
4. Raccordez le flexible d’aspiration à l’arrivée d’eau de l’appareil
et plongez l’autre extrémité dans un réservoir contenant de
l’antigel.
5. Mettez l’appareil en marche, position " I " du commutateur.
6. Tenez le pistolet au-dessus du réservoir d’antigel et actionnezle pour amorcer l’aspiration.
7. Actionnez le pistolet 2 à 3 fois pendant l’aspiration.
8. Soulevez le flexible d’aspiration hors du réservoir d’antigel et
actionnez le pistolet pour pomper le reste d’antigel.
9. Arrêtez l’appareil.
10. Pour éviter tout risque, entreposez temporairement l’appareil
dans un local si possible chauffé avant de le remettre en service.
2. Pour terminer, insérer le cordon et verrouiller
l'extrémité dans le verrouillage pour cordon (C).
C

71
1)
Accessoire optionnel / variantes de modèle
Traduction du mode d’emploi d’origine
UNITOR HPC 54/1 67/1
7 Maintenance
7.1 Plan de maintenance
Chaque
semaine
Première
fois après 50
heures de
service
Toutes les
500 heures de
fonctionnement
Au besoin
7.2.1
Nettoyage du fi ltre à eau
7.2.2
Contrôle du niveau d’huile
7.2.3
Vidange d’huile
7.2.4
Premier remplacement et
nettoyage de l'aimant du
bouchon de vidange.
7.2 Travaux de
maintenance
7.2.1 Nettoyage du filtre à
eau
Un filtre destiné à empêcher
la pénétration de particules de
saleté grossières dans la pompe est monté dans l’admission
d’eau.
1. Dévissez le raccord rapide
si un tel a été monté.
2. Retirez le filtre et rincez-le.
Remplacez-le s’il est endommagé.
7.2.2 Contrôle du niveau
d’huile
1. Contrôle du niveau d'huile.
Lorsque le nettoyeur est
posé sur un sol plat, le
niveau d'huile doit être supérieur au niveau MIN (A)
lorsque l'huile est froide.
A

72
1)
Accessoire optionnel / variantes de modèle
Traduction du mode d’emploi d’origine
UNITOR HPC 54/1 67/1
7.2.3 Vidange d’huile 1. Avant de changer l'huile,
faire chauffer le nettoyeur.
2. Retirer le capot.
3. Desserrer et retirer le
bouchon de vidange (C).
L'aimant du bouchon doit
être nettoyé à l'aide d'un
chiffon/d'une serviette afin
d'éliminer les particules métalliques. Verser l'huile dans
un récipient adapté (min. 1
litre) et l'éliminer conformément aux réglementations
locales en vigueur.
4. Remettre le bouchon de vidange et rajouter de l'huile
conformément au chapitre
9.4 Caractéristiques techniques.
5. Le niveau d'huile doit être
supérieur au niveau MAX
du réservoir d'huile lorsque
le nettoyeur est posé sur un
sol plat. Remplir jusqu'au
niveau MAX (B).
6. Remettre le capot.
REMARQUE :
De l'huile pour pompe spéciale
est requise si le nettoyeur est
utilisé à proximité d'aliments.
Veuillez consulter votre revendeur UNITOR.
2. Si nécessaire, ajouter de
l'huile. Remplir jusqu'au
niveau MAX (B).
B
C

73
1)
Accessoire optionnel / variantes de modèle
Traduction du mode d’emploi d’origine
UNITOR HPC 54/1 67/1
8 Suppression de dérangements
Dérangement Cause Suppression
Chute de pression • Air dans le système • Purger l‘air du système
en actionnant plusieurs
fois le pistolet à de
brefs intervalles, mettre
éventuellement la machine
en marche un court instant,
sans que le tuyau haute
pression soit raccordé
• Buse HP obstruée/usée • Nettoyer/remplacer la buse
HP
• Réservoir de détergent vide • Vider le réservoir à
détergent ou placer le
détergent sur la position
« 0 ».
Fluctuations de pression • La pompe aspire de l’air
(possible seulement en mode
d’aspiration)
• Contrôler l’étanchéité à l’air
du groupe d’aspiration
• Manque d’eau • Ouvrir le robinet d’eau
• lexible d’arrivée d’eau trop
long ou de section trop petite
• Utiliser un robinet d'eau
qui peut fournir le débit
d'eau (Q
max
) requis par la
machine.
• Manque d’eau dû au
colmatage du filtre à eau
• Nettoyer le filtre à eau dans
la prise d’eau (ne jamais
travailler sans filtre !)
• Manque d’eau dû à
l’inobservation de la hauteur
d’aspiration max. permise
• Voir notice d’utilisation
Le moteur ne démarre pas lors
de la mise en marche
••Fiche pas branchée
correctement, coupure du
courant
Niveau d'huile trop faible
••Contrôler la prise, le
cordon et l'interrupteur
et, le cas échéant, les
faire remplacer par un
électricien expérimenté.
Contrôler le niveau d'huile/
Ajouter de l'huile
••Le fusible de secteur a
déclenché
La protection contre la
surcharge a réagi à cause
d’un échauffement ou d’une
surcharge du moteur
••Réenclencher le fusible de
secteur
Faire vérifi er que la tension
d’alimentation correspond
à celle de l’appareil.
Arrêter l’appareil et le
laisser refroidir au moins 3
minutes

74
1)
Accessoire optionnel / variantes de modèle
Traduction du mode d’emploi d’origine
UNITOR HPC 54/1 67/1
Dérangement Cause Suppression
Le moteur ronfl e sans démarrer
lors de la mise en marche
• Tension du réseau trop faible,
ou défaillance de phase
• Faire contrôler le
raccordement électrique
• Pompe bloquée ou gelée • S’adresser au service
après-vente UNITOR
• Câble de rallonge trop long
ou de section trop petite
• Utiliser un câble ayant la
bonne longueur et la bonne
section
Le moteur s’arrête • La protection contre la
surcharge a réagi à cause
d’un échauffement ou d’une
surcharge du moteur
• Faire vérifi er que la tension
d’alimentation correspond
à celle de l’appareil.
Arrêter l’appareil et le
laisser refroidir au moins 3
minutes
• Buse haute pression
encrassée
• Remplacer la buse haute
pression
Pas de détergent •
•
•
•
Réservoir à détergent vide
Le bouchon de la tête de
buse FlexoPowerPlus ne se
trouve pas sur la position
basse pression
La lance double n'est pas
réglée sur basse pression
L'injecteur est sale ou le tuyau d'aspiration est bouché
•
•
•
•
Vider le réservoir à détergent
Régler le bouchon sur basse pression
Régler la lance double sur
basse pression
Procéder à un nettoyage

75
1)
Accessoire optionnel / variantes de modèle
Traduction du mode d’emploi d’origine
UNITOR HPC 54/1 67/1
9 Divers
9.1 Affectation de la
machine au recyclage
Rendez immédiatement inutilisable l’appareil qui ne sert plus.
• Débranchez la fiche secteur et sectionnez le cordon.
Ne jetez pas les appareils électriques dans les ordures ménagères !
D’après la directive européenne 2002/96/CE sur les déchets
d’équipements électriques et électroniques usés, les appareils électriques doivent faire l’objet d’une collecte sélective et d’un recyclage
écologique.
Pour toutes questions, veuillez vous adresser à l’administration de
votre commune ou au revendeur le plus proche.
9.2 Garantie La garantie et les prestations couvertes sont régies par nos Condi-
tions générales de vente.
Sous réserve de modifications impliquées par des innovations techniques.
9.3 Déclaration de
conformité CE
Déclaration de conformité CE
Produit: Laveuse à haute pression
Type: Poseidon 5-6-7
La conception de l’unité est conforme
aux réglementations pertinentes
suivantes :
Directive “Machines” 2006/42/EC
Directive “Basse tension” 2006/95/EC
Directive “Compatibilité électromagnétique” 2004/108/EC
Directive RoHS 2011/65/EC
Normes harmonisées appliquées : EN ISO 12100-1, EN ISO 12100-2, EN 60335-2-79,
EN 55014-1(2002), EN 55014-2(2001), EN 61000-3-2 (2006)
Normes nationales appliquées et spécifi cations techniques :
IEC 60335-2-79
Nom et adresse de la personne autori-
sée à compiler le fi chier technique :
Anton Sørensen
General Manager, Technical Operations EAPC
Identité et signature de la personne
habilitée à faire la déclaration au nom
du fabricant :
Anton Sørensen
General Manager, Technical Operations EAPC
Endroit et date de la déclaration : Hadsund, 25-10-2012

76
UNITOR HPC 54/1 67/1
1)
Accessoire optionnel / variantes de modèle
Traduction du mode d’emploi d’origine
9.4 Caractéristiques techniques
HPC
HPC 54/1
HPC 67/1
Selon le pays 777886 777889
Tension autorisée, V/phase/
fréquence
V/ph/Hz 440-460V/3ph/60Hz 440-460V/3ph/60Hz 400V/3ph/50Hz
Fusible
A 15 1 15 16
Puissance nominale kW 6,6 8 8
Pression de service p
CEI
bar (MPa) 200 (20) 195 (19,5) 195 (19,5)
Débit d'eau Q
CEI
l/h 940 1180 1180
Pression d'eau maximale p
max
bar (MPa) 250 (25) 250 (25) 250 (25)
Débit d'eau Q
max
l/h 1000 1280 1280
Température max. de l'entrée
d'eau en mode admission/pression
°C (°F) 60 (140) 85 (185) 85 (185)
Pression maximale de l’entrée
d’eau
bar (MPa) 10 (1) 10 (1) 10 (1)
Hauteur d'aspiration à sec max. m 1 1 1
Dimensions l x p x h mm 735x570x1020 775x570x1020 775x570x1020
Poids du nettoyeur kg 72 91 91
Niveau de pression acoustique
L
PA
à une distance de 1 m
dB(A) 76 75 75
Niveau de puissance acoustique
garanti L
WA
dB(A) 89 88 88
Vibration ISO 5349 m/s² <1,5; +/-1 <1,5; +/-1 <1,5; +/-1
Forces de recul, lance 1 / lance
2
N 44,7 / - 60 / - 60 / -
Quantité d'huile l 0,73 1,1 1,1
Type d'huile
BP Energol
GR-XP220
Castrol ALPHASyn 150 Castrol ALPHASyn 150
Ces spécifications et détails sont susceptibles d’être modifiés sans préavis.
HPC 67/1
777888

Part of Wilhelmsen Maritime Services,
a Wilh. Wilhelmsen group company
Wilhelmsen Ships Service
Postal address
PO Box 33
N-1324 Lysa k er
Norway
T (+47) 67584550
F (+47) 67584570
E wss.info@wilhelmsen.com
www.wilhelmsen.com/shipsservice
Visiting address
Strandveien 20
N-1366 Lysaker
Norway
MARINE PRODUCTS
MARINE CHEMICALS
SAFETY
MARITIME LOGISTICS
SHIPS AGENCY
OPERATIONAL EFFICIENCY
 Loading...