

WILDWOOD OVENS &BBQ’S ROMA Installation Instructions Manual
R
OMA OVEN INSTALLATION INSTRUCTIONS 4.0
W
ILDWOOD OVENS &BBQ’S
5020 EAGLE ROCK BLVD.
LOS ANGELES, CA 90041
TEL. 323-255-6578
FAX. 323-306-5689
www.wildwoodovens.com
i
nfo@wildwoodovens.com
S
AVE THESE INSTRUCTIONS!
READ ALL INSTUCTIONS BEFORE INSTALLING AND USING THE APPLIANCE. WHEN THIS OVEN IS
NOT PROPERLY INSTALLED, A FIRE MAY RESULT. TO REDUCE THE RISK OF FIRE, FOLLOW THE
INSTRUCTIONS. A MAJOR CAUSE OF OVEN RELATED FIRES IS FAILURE TO MAINTAIN REQUIRED
CLEARANCES (AIR SPACES) TO COMBUSTIBLE MATERIALS. IT IS OF UTMOST IMPORTANCE THAT
THIS OVEN BE INSTALLED ONLY IN ACCORDANCE WITH THESE INSTRUCTIONS.
WE RECOMMEND THAT YOU CONTACT A LOCAL BUILDING OR FIRE OFFICIAL CONCERNING
ANY INSTALLATION RESTRICTIONS OR NEED FOR INSPECTION OF THE OVEN INSTALLATION
PRIOR TO CONSTRUCTION. THIS OVEN IS TO BE INSTALLED BY A QUALIFIED PERSONNELL ONLY.
OBTAIN THE NECESSARY PERMIT TO CONSTRUCT. IN MOST AREAS THIS WILL INCLUDE A PERMIT
TO CONSTRUCT THE OVEN AND A PERMIT FOR THE EXHAUST SYSTEM. ALL CONSTRUCITON
MUST COMPLY WITH LOCAL BUILDING CODES. WHICHEVER IS MOST RESTRICTIVE MUST BE
FOLLOWED.
TO MAINTAIN THE U.L. LISTING OF THE OVEN THE VENTING APPLICATION MUST BE INSTALLED
PER UL-103 STANDARD AND NEEDS TO BE INSTALLED IN ACCORDANCE WITH THE GUIDELINES
SPECIFIED IN THIS INSTALLATION INSTRUCTION GUIDE.

T
ALBE OF CONTENTS
RO
MA Oven Kit Parts List 1
Oven Base and Enclosure Material List 2
Minimum Clearances 3
Minimum Footprint Requirements 4
Wood-Fired Oven Operating Tips 5
Wood-Fired Oven Maintenance Tips 7
Pre-Construction Checklist 8
Building Foundation and Base 9
Oven Assembly Instructions 11
Roofing and Finishing the Exterior 14
Chimney Assembly 14
Curing the Oven 17
Cooking Pizza in the Oven 18
Using Your Oven 19
Rom
Wood Fired Oven
Installation Instructions
Version 4.0
INSTALLATION INSTRUCTIONS: Failure to follow instructions may result in significant oven damage
a
nd may void your warranty.
a
Be
fore you Begin
Pl
ease read this entire manual before installing the oven. Failure to follow instructions may result
in property damage, bodily injury, or even death. Be sure to place orders early for any items
that are necessary to complete your project. It is best to have everything you need prior to
beginning construction.
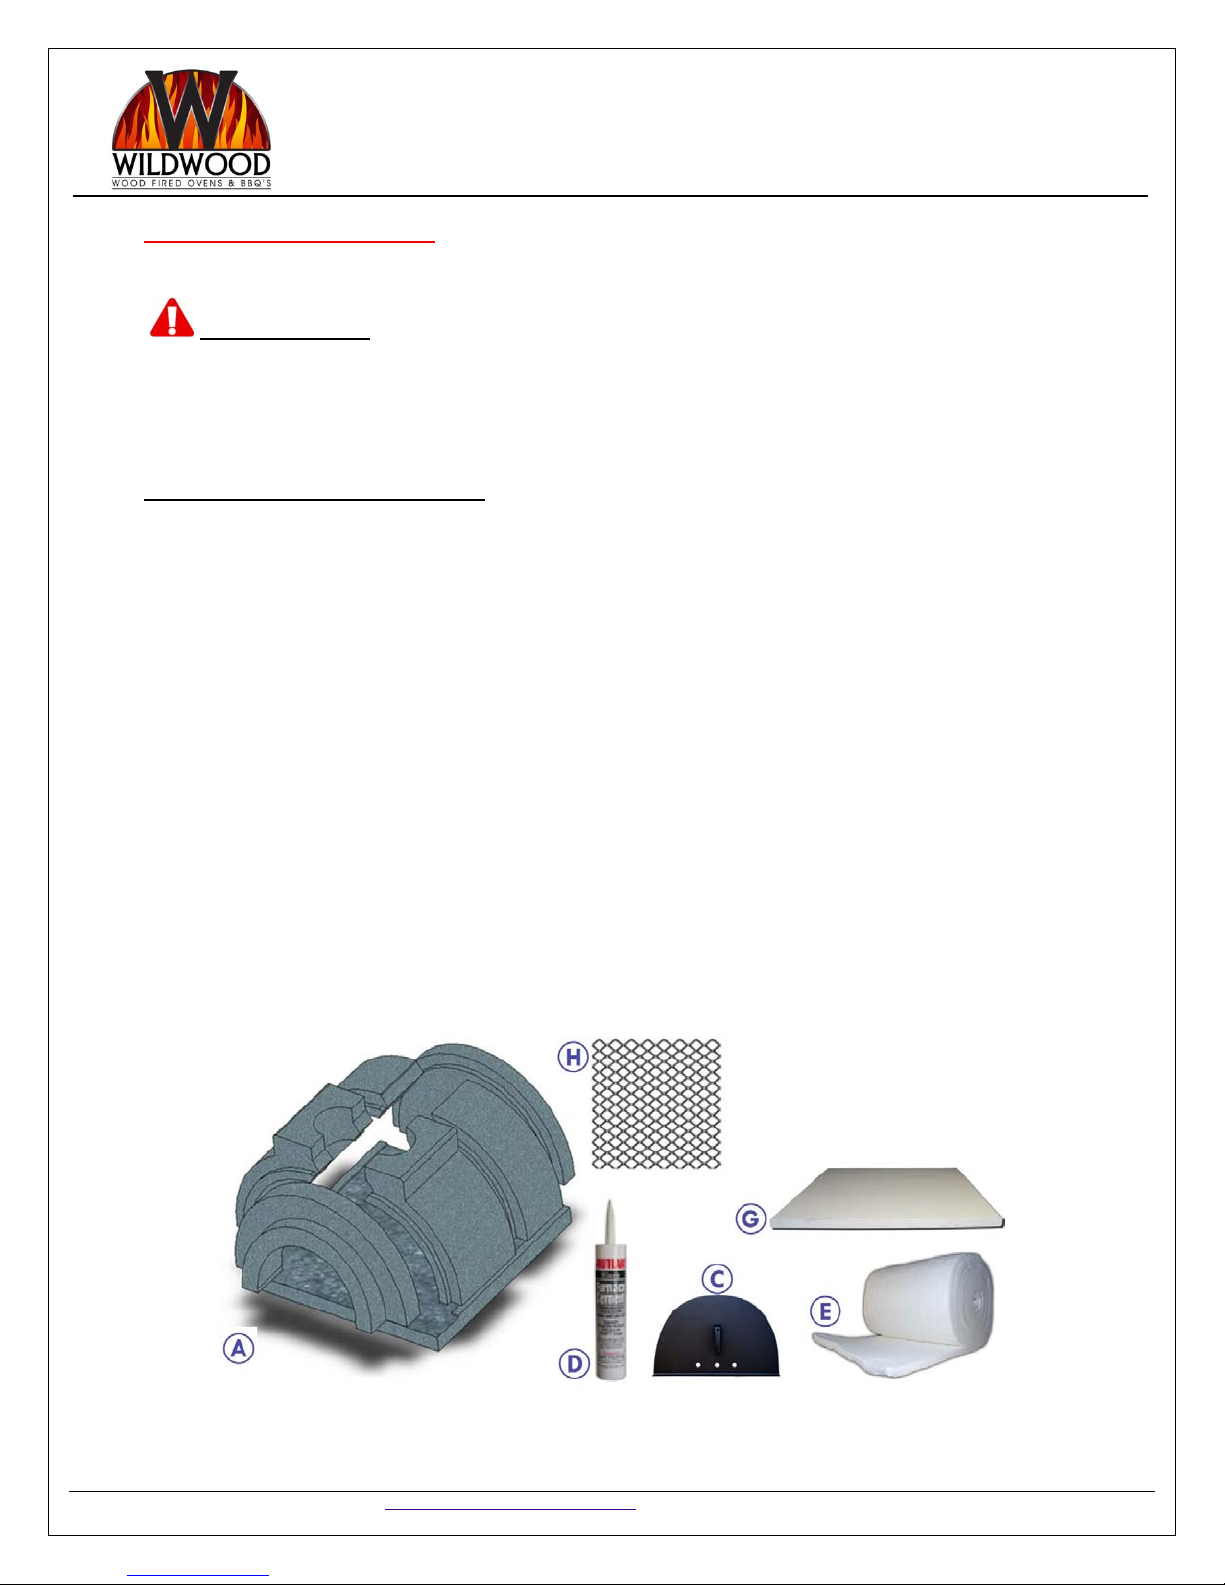
ROMA OVEN KIT PARTS LIST
A
1-Pre-cast hearth sections
B 6-Pre-cast dome sections
C 1-Steel oven door (available in stainless steel)
D 2-Tubes Fireplace Mortar *
E 1-Fiber insulation blanket (5 ft roll, 24 in wide)
ADDITIONAL RECOMMENDED MATERIALS:
G 1-1” Thick Heat stopper board (36”x36”)
H 1 Roll of Diamond Lath Mesh (3 ft roll, 27 in wide) ***
• Chimney System customized to fit the oven application (se
e pg 14 for contact information)
• 1-Tube of high temperature sealant for anchor plate
• 4 concrete screws: ¼” diameter and 2-1/4” long. Use 3/16” drill bit.
• 24-48 Alcohol Can Heat (used for buffet tray warmers) Available at Wildwood!
*Oven has to reach 350 degrees on first initial curing. Never cure an un-insulated oven.
*Fireplace Mortar provided by Wildwood is tested and approved to meet safety standards and therefore must be
the only sealant/adhesive used in oven assembly. Do not use an alternate sealant/adhesive.
*** DIAMOND LATH MESH can be purchased from any local home improvement/hardware store.
©Wildwood Ovens and BBQs LLC 2009 WWW.WILDWOODOVENS.COM 323.255.6587 All specifications subject to change without notice
1

Rom
Wood Fired Oven
Installation Instructions
Version 4.0
OVEN BASE AND ENCLOSURE MATERIAL LIST
T
he following list is provided for your convenience only; the materials are not part of the oven kit.
List may vary depending on construction method.
a
MASONARY CONSTRUCTION METHOD
F
OUNDATION AND SLAB
Stakes and forms (for smooth finish melamine can be used to build forms)
1500 Lb or higher strength concrete mix
#4 Rebar
WALLS & SHELF
Forms
6” x 8” x 16” masonry blocks
Masonry mortar
#4 Rebar
1500 Lb or higher strength concrete mix
Optional alternative metal stand (contact a wildwood representative for prices)
ROOF
Non-flammable roofing material
CHIMNEY SYSTEM *
Anchor plate for 6” pipe
1
1 Double or triple wall chimney pipe (exact length will depend on individual installation
needs)
1 Chimney cap with spark arrestor
1 Tube high temperature sealant for anchor plate (withstanding up to 2000 degrees F)
4 concrete screws. ¼” diameter and 2-1/4” long. Use 3/16” drill bit.
I
MPORTANT:
Oven shall only be installed with exhaust hoods constructed in accordance with NFPA 96 or
LISTED building heating appliance chimneys also LISTED as grease ducts.
* Material list for chimney system may vary depending on oven application. Interior installations may require
dditional parts.
a
©Wildwood Ovens and BBQs LLC 2009 WWW.WILDWOODOVENS.COM 323.255.6587 All specifications subject to change without notice
2
Rom
Wood Fired Oven
Installation Instructions
Version 4.0
a
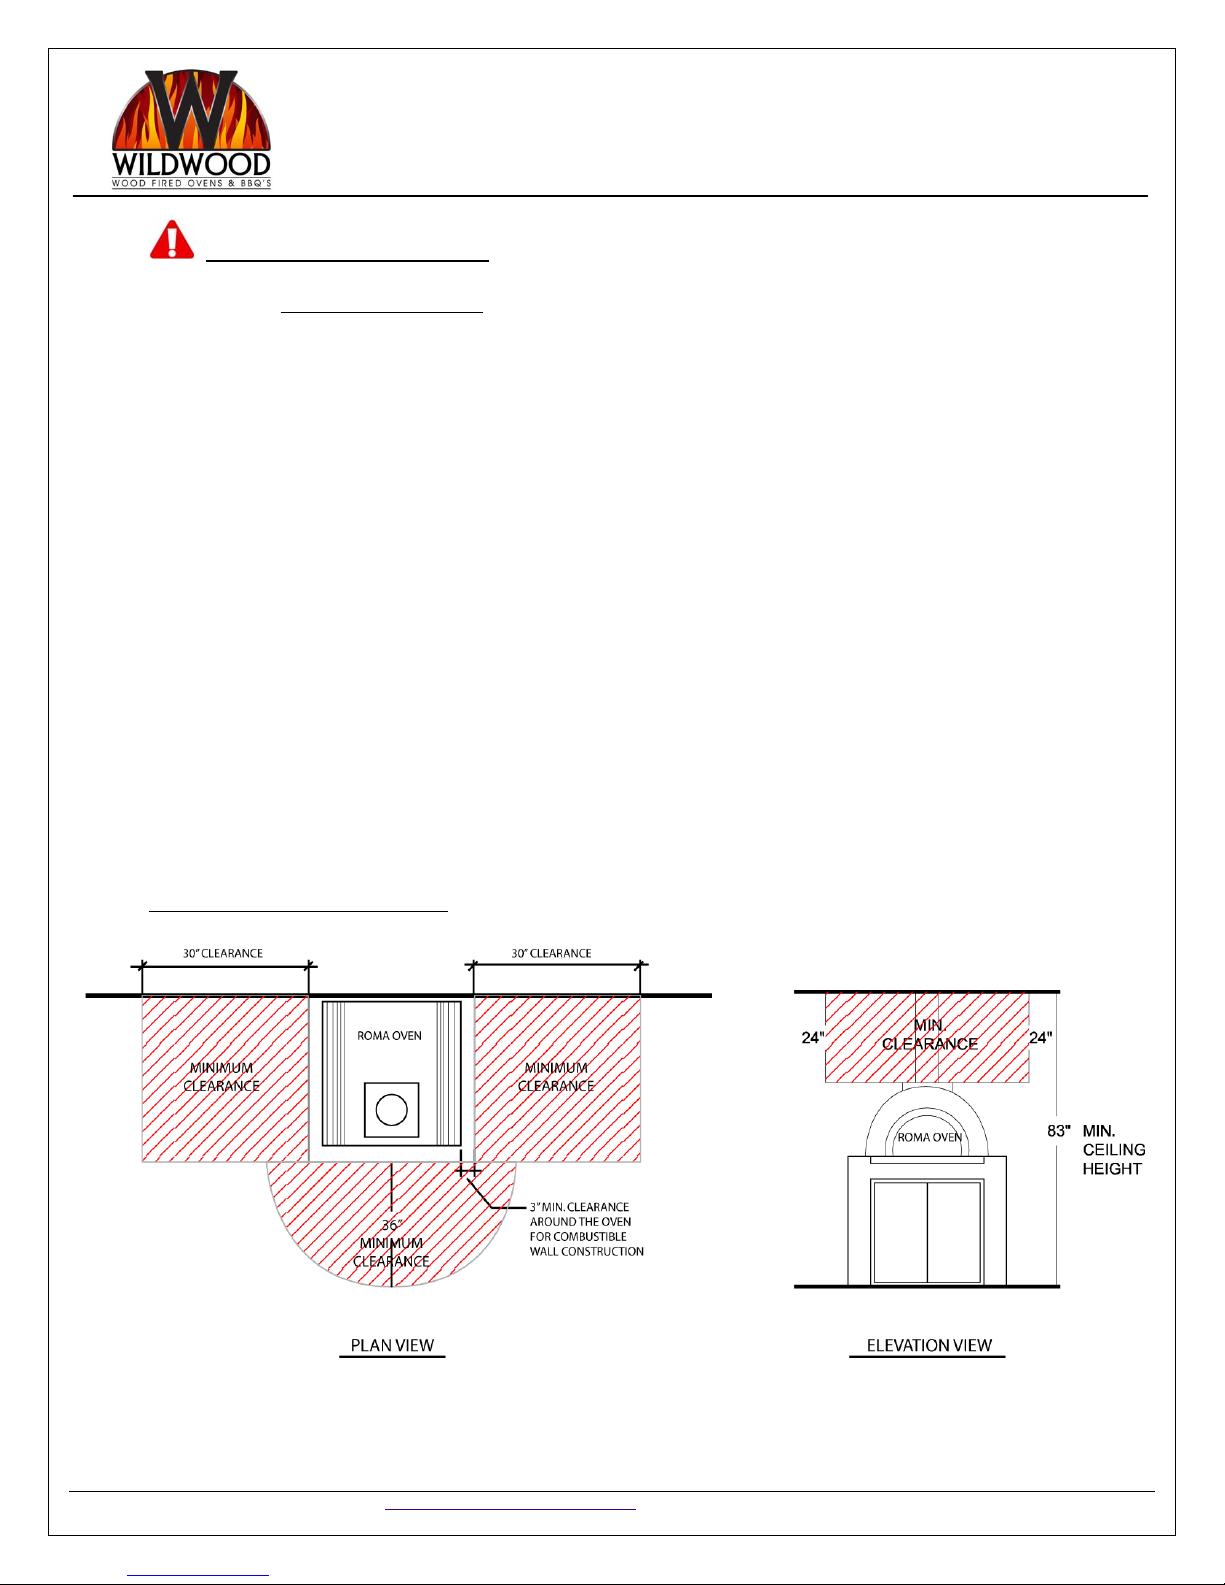
M
INIMUM CLEARANCES
P
lease refer to the Minimum Clearance Diagram
1
. Build your oven in such an area where smoke will not infiltrate your home or homes close to
you. The minimum clearance from combustibles is 30 inches (762 mm) to each side of the door
opening, and 36 inches (914 mm) in front of the door opening. The minimum clearance from noncombustible materials to the oven is 3” from the side walls, 24” from the top of the oven and 1”
from side of the oven base. WARNING: DO NOT PACK REQUIRED CLEARANCES (AIR SPACES)
WITH INSULATION OR OTHER MATERIALS.
2. Check that there is adequate clearance at the ceiling. A height of 83 inches is needed for a
basic installation with direct venting.
3. Check that there is a minimum clearance of 3 inches around assembled oven (measured off of
the fiber insulation blanket and wire mesh) to any adjacent sidewall construction composed of
combustibles. Any adjacent combustible sidewalls which projects beyond the front of the oven
opening must be a minimum of 48 inches, measured from the side of the oven opening closest to
the wall to the surface of the wall. If the distance is less than 48 inches a wall shield must be
mounted on the wall. Any adjacent combustible floor which projects in front of the oven opening
must be a minimum of 30 inches away from each side of the door opening and 36 inch from the
front of the door opening.
below.
Minimum Clearance Diagram:
• NOTE: 3” minimum clearance is measured from the outer edge of the diamond lath mesh, not the oven refractory.
3
©Wildwood Ovens and BBQs LLC 2009 WWW.WILDWOODOVENS.COM 323.255.6587 All specifications subject to change without notice
Rom
Wood Fired Oven
Installation Instructions
Version 4.0
a
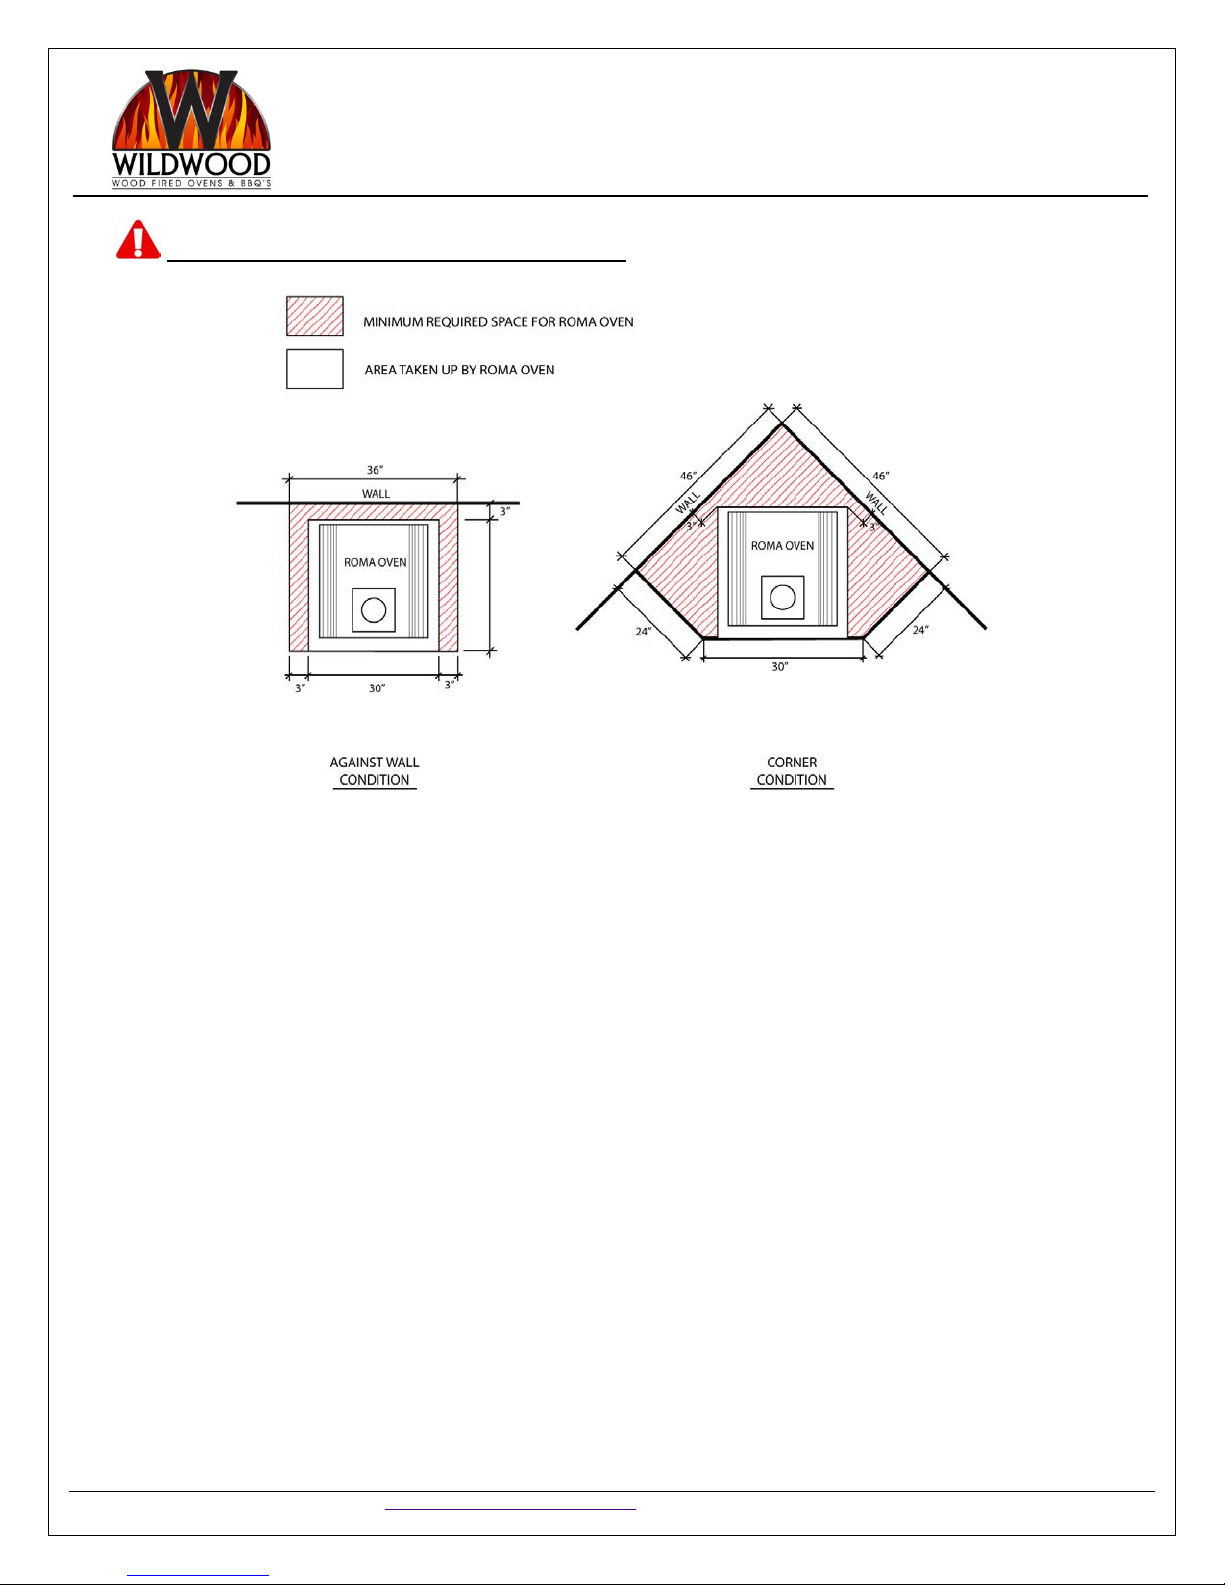
M
INIMUM FOOTPRINT REQUIREMENTS
*
material varies based on design.
Minimum footprint illustrated above does not include thickness of the enclosure and finish material. Enclosure and finish
NOTE:
©Wildwood Ovens and BBQs LLC 2009 WWW.WILDWOODOVENS.COM 323.255.6587 All specifications subject to change without notice
4
Rom
Wood Fired Oven
Installation Instructions
Version 4.0
WOOD-FIRED OVEN OPERATING TIPS
W
ARNING-KEEP THESE INSTRUCTIONS FOR FUTURE REFERENCE
WOOD-FIRED OVEN IS INTENDED FOR OPERATION BY TRAINED AND QUALIFIED
PERSONNEL ONLY. INQUIRE ABOUT OUR OVEN OPERATION/COOKING CLASSES AT
WILDWOOD!
THIS OVEN IS A HIGH HEAT PRODUCING APPLIANCE AND MAY CAUSE SEVERE BURNS IF
TOUCHED DURING OPERATION.
DO NOT OVERFIRE THE OVEN. IF FLAME SPILLS OUT OR TEMPERATURE E
FAHRENHEIT, YOU ARE OVERFIRING. OVER-FIRING CAN CAUSE OVEN DAMAGE AND IS NOT
RECOMMENDED. SPILLAGE OCCURS WHEN FLAME PERMEATES THE CHIMNEY AND THE
OPENING-PHYSICALLY COMING BEYOND THE OPENING FOR THE OVEN DOOR.
IMPORTANT! A WOOD-FIRE RATED FIRE EXTINGUISHER MUST BE KEPT IN CLOSE
PROXIMITY TO THE OVEN AT ALL TIMES. NOTIFY ALL OVEN OPERATORS ABOUT THE
LOCATION AND USE DURING EMERGENCIES.
IN CASE OF OVERFIRING THE OVEN, CLOSE DOOR TIGHTLY.
CAUTION: NEVER USE GASOLINE, GASOLINE-TYPE LANTERN FUEL, KEROSENE,
CHARCOAL LIGHTER FLUID, OR SIMILAR LIQUIDS TO START OR ‘FRESHEN UP’ A FIRE IN
THIS OVEN. KEEP ALL SUCH LIQUIDS WELL AWAY FROM THE OVEN WHEN IN USE.
WHEN USED INDOORS, PROVISIONS MUST BE MADE TO SUPPLY SUFFICIENT
COMBUSTION MAKE-UP AIR INTO STRUCTURE, WHEN USING THIS OVEN.
COMBUSTION AIR MUST BE SUPPLIED IN ACCORDANCE WITH LOCAL BUILDING
CODES.
DO NOT ELEVATE THE FIRE. BUILD THE FIRE DIRECTLY ON THE HEARTH.
DO NOT LEAVE A FIRE UNATTENDED. YOU MUST CLOSE THE OVEN DOOR TIGHTLY TO
EXTINGUISH THE FIRE BEFORE LEAVING OVEN UNATTENED.
XCEEDS 700 DEGREES
a
©Wildwood Ovens and BBQs LLC 2009 WWW.WILDWOODOVENS.COM 323.255.6587 All specifications subject to change without notice
5
 Loading...