

Page 1
User Guide for Logo Projector
Professional Entertainment Technology
Page 2

1-
.
TABLE OF CONTENTS
1. Introduction
2. Safety Instruction
3. Description
4. Operation and Technical Specification
5. Lamp Installation or Replacement
6. Inserting/Exchanging Rotating Gobos
7. Beam Angle
8. Stand-alone Operation
9. Troubleshooting
10. Fixture Cleaning
Page 3
2-
1. Introduction
Thank you for purchasing Wild Tech’s Logo Projector. The fixture is a powerful tool creating
a long lasting visual effect. It comes with 7 D size gobos and an inter-changeable slot for
custom-made gobos. With speed and direction adjustable function, the Logo projector is
perfect for discos, restaurants, department stores, etc.
2. Safety Instruction
WARNING
♦ Please keep this user guide for future consultation. If you sell the unit to another user,
please be sure they also receive this instruction booklet.
♦ Unpack and check carefully about there is no transportation damage before using the
unit.
♦ Before operating, ensure that the voltage and frequency of power supply match the
power requirements of the unit.
♦ It’s important to ground the yellow/green conductor to earth in order to avoiding electric
shock.
♦ For indoor use only and only in a dry location.
♦ The unit must be installed in a location with adequate ventilation, at least 50cm from
adjacent surfaces. Be sure that no ventilation slots are blocked.
♦ Disconnect mains power before fuse/lamp replacement or servicing.
♦ Replace fuse/lamp with the same type only.
♦ Make sure there are no flammable materials close to the unit as it is fire hazard.
♦ Use safety cable when fixes this unit.
♦ Maximum ambient temperature is TA: 40℃. Don’t operate it where the temperature is
higher than this.
♦ Surface temperature may reach up to 85℃ during oper ating. Don’t touch t he housing
barehanded during its operation. Turn off the power and allow about 15 minutes for the
unit to cooling down before replacing bulb or serving.
Please read the instruction carefully which includes important
information about the installation
,
usage and maintenance.
Page 4

3-
♦ In the event of serious operating problem, stop using the unit immediately. Never try to
repair the unit by yourself. Repairs by unskilled people can lead to damage or
malfunction. Please contact the nearest authorized technical assistance center.
Always use the same type spare parts.
♦ Don’t connect the device to any dimmer pack or power pack.
♦ Do not touch any wire during operation as high voltage might be causing electric
shock.
.
Warning
♦ To prevent or reduce the risk of electrical shock or fire, do not expose the unit to rain or
moisture.
♦ Never touch bulb with bare fingers as it is very hot after using.
♦ Hot lamp explosion hazard. Do not open the unit within five minutes after switching off.
♦ Do not start on the unit without bulb enclosure or housing is damaged.
♦ The housing, the lenses, or the ultraviolet filter must be replaced if they are visibly
damaged.
♦ Do not look directly at the light while the bulb is on.
Caution
There are no user serviceable parts inside the unit. Do not open the housing or attempt
any repairs yourself. If the unit requires service, please contact your nearest dealer.
Rigging the fixtures
The unit should be mounted via its screw holes on the bracket. Always ensure that the
unit is firmly fixed to avoid vibration and slipping while operating. Always ensure that the
structure to which you are attaching the unit is secure and is able to support a weight of 10
times of the unit’s weight. Also always use a safety cable that can hold 12 times of the
weight of the unit when installing the fixture.
The installation must be carried out by qualified service people only. The device should be
installed out of reach of people and outside areas where persons may walk by or be seated.
Page 5
4-
3. Description
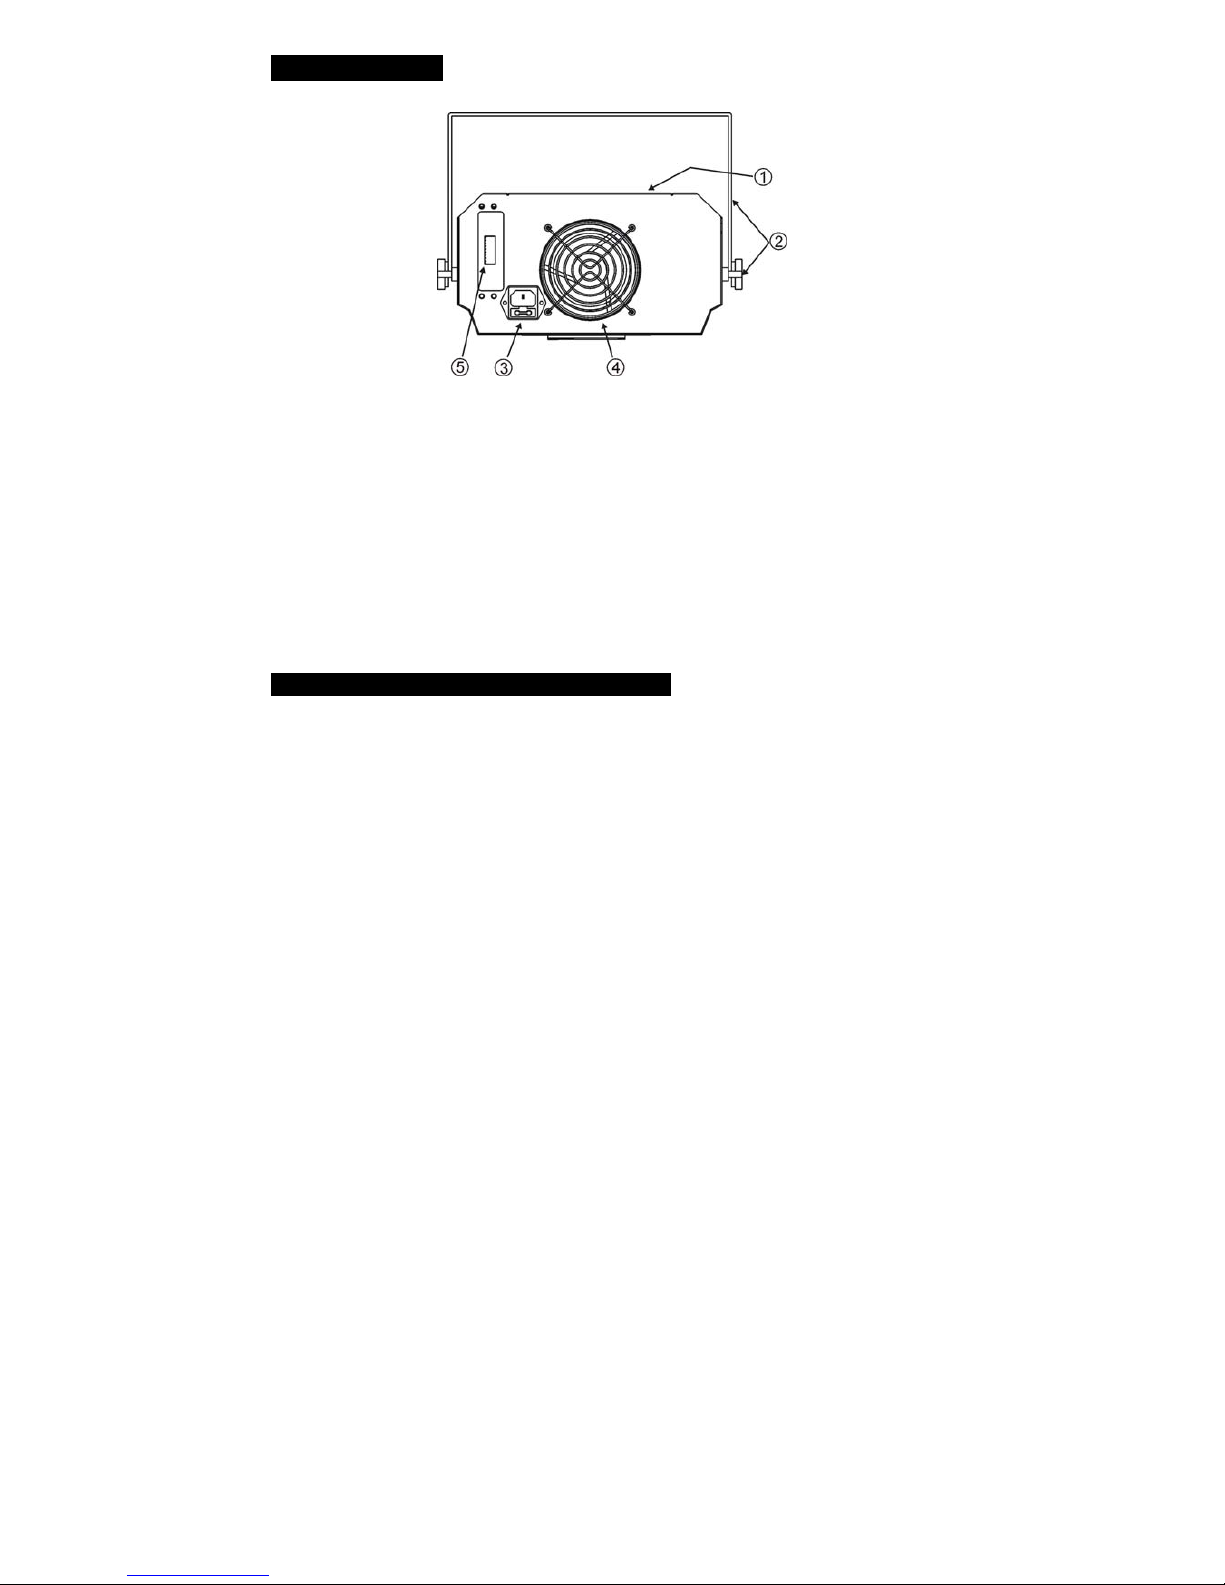
1. Optical lens: Manual focus adjustment.
2. Hanging bracket: with 2 knobs on both sides to fasten the unit and a mounting hole to fix
a mounting hook.
3. Mains input:IEC socket and integrated fuse holder, connect to main power cable.
4. Cooling fan: Cool down the working temperature.
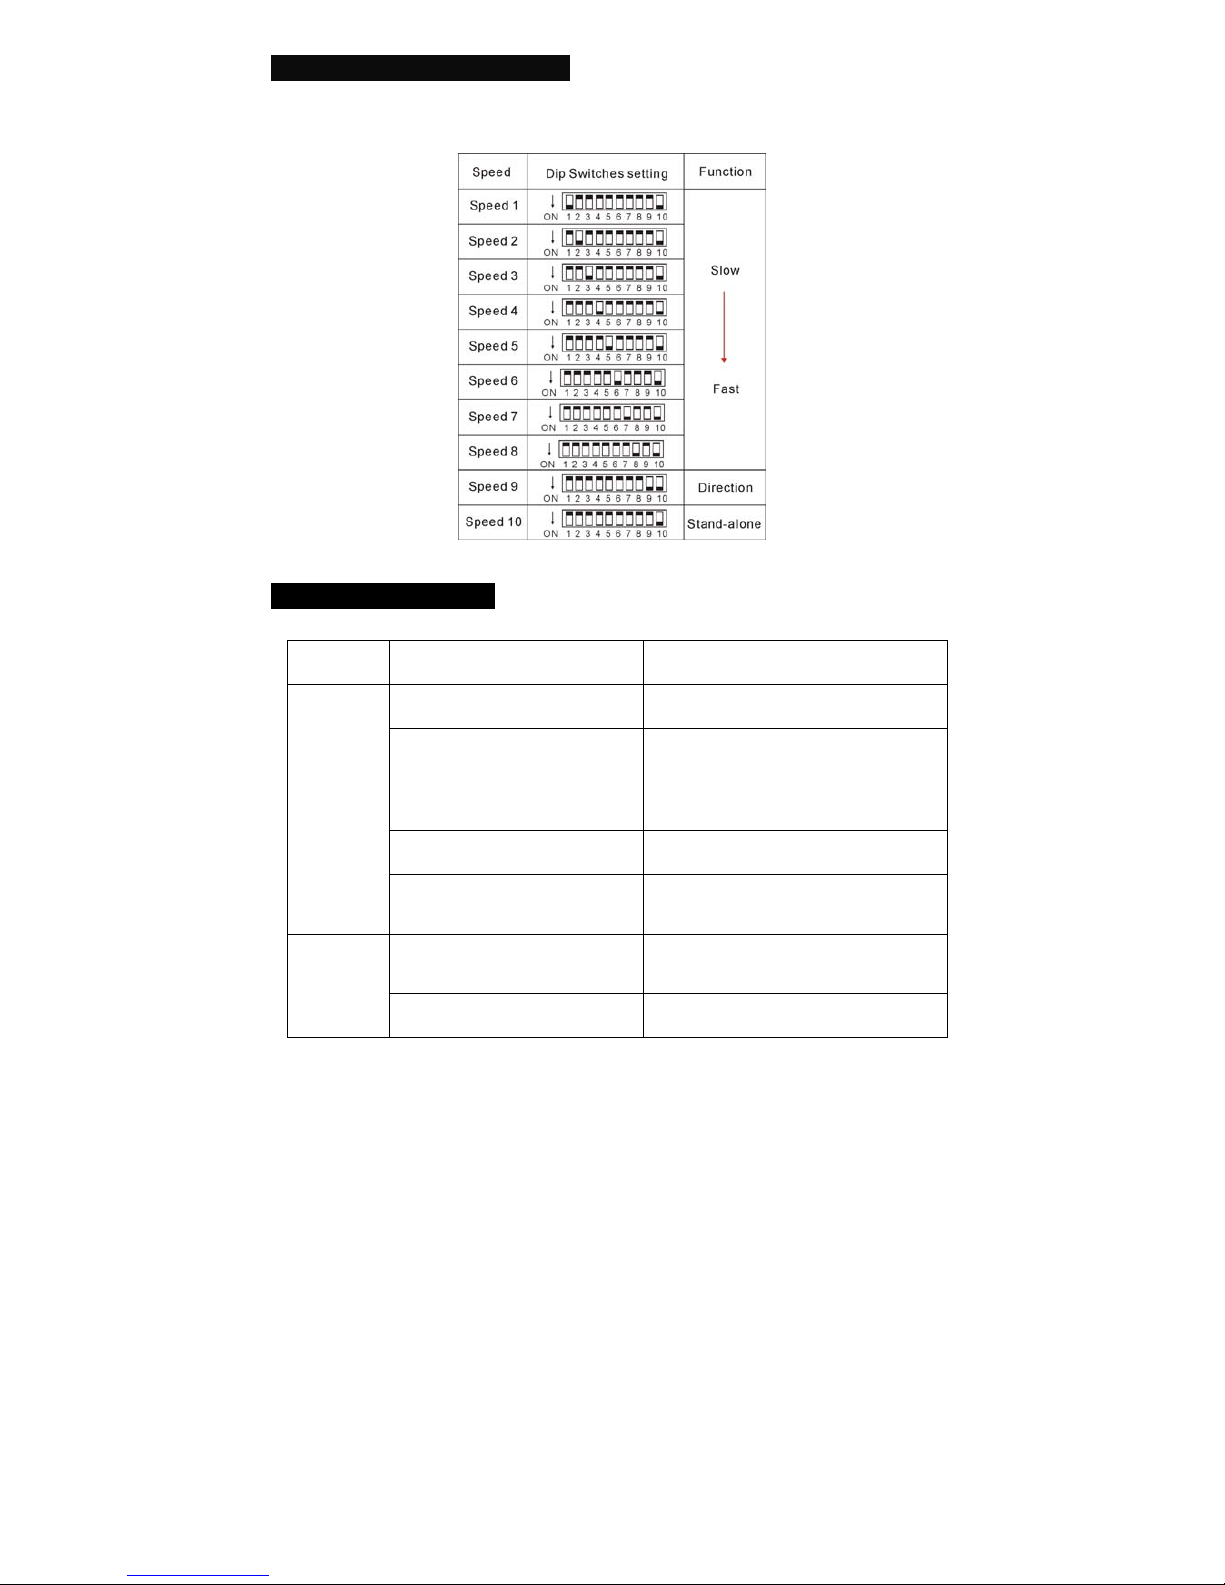
5. Dip switches:Enable stand-alone model:
Pin 10 is ON: Pin 9 for motor direction & pins 1~8 for speed adjustable
Pin 10 is OFF: The unit stops rotating.
4. Operation and Technical Specification
• Plugging into the mains power, the fixture starts running. The Logo Projector runs in
automatic mode.
• Adjustable gobo rotation direction and speed by dip switches.
• Focus adjustable and fan cooled.
Specification:
• Voltage: AC 120V~60Hz 230V/240V/250V~50Hz/60Hz
• Fuse: 20mm glass 250V T6.3A / 20mm glass 250V T5A
• Bulb: EHJ 24V 250W
• Dimension: 306 x 263 x 140 mm
• Weight: 8.2 kgs
Page 6
5-
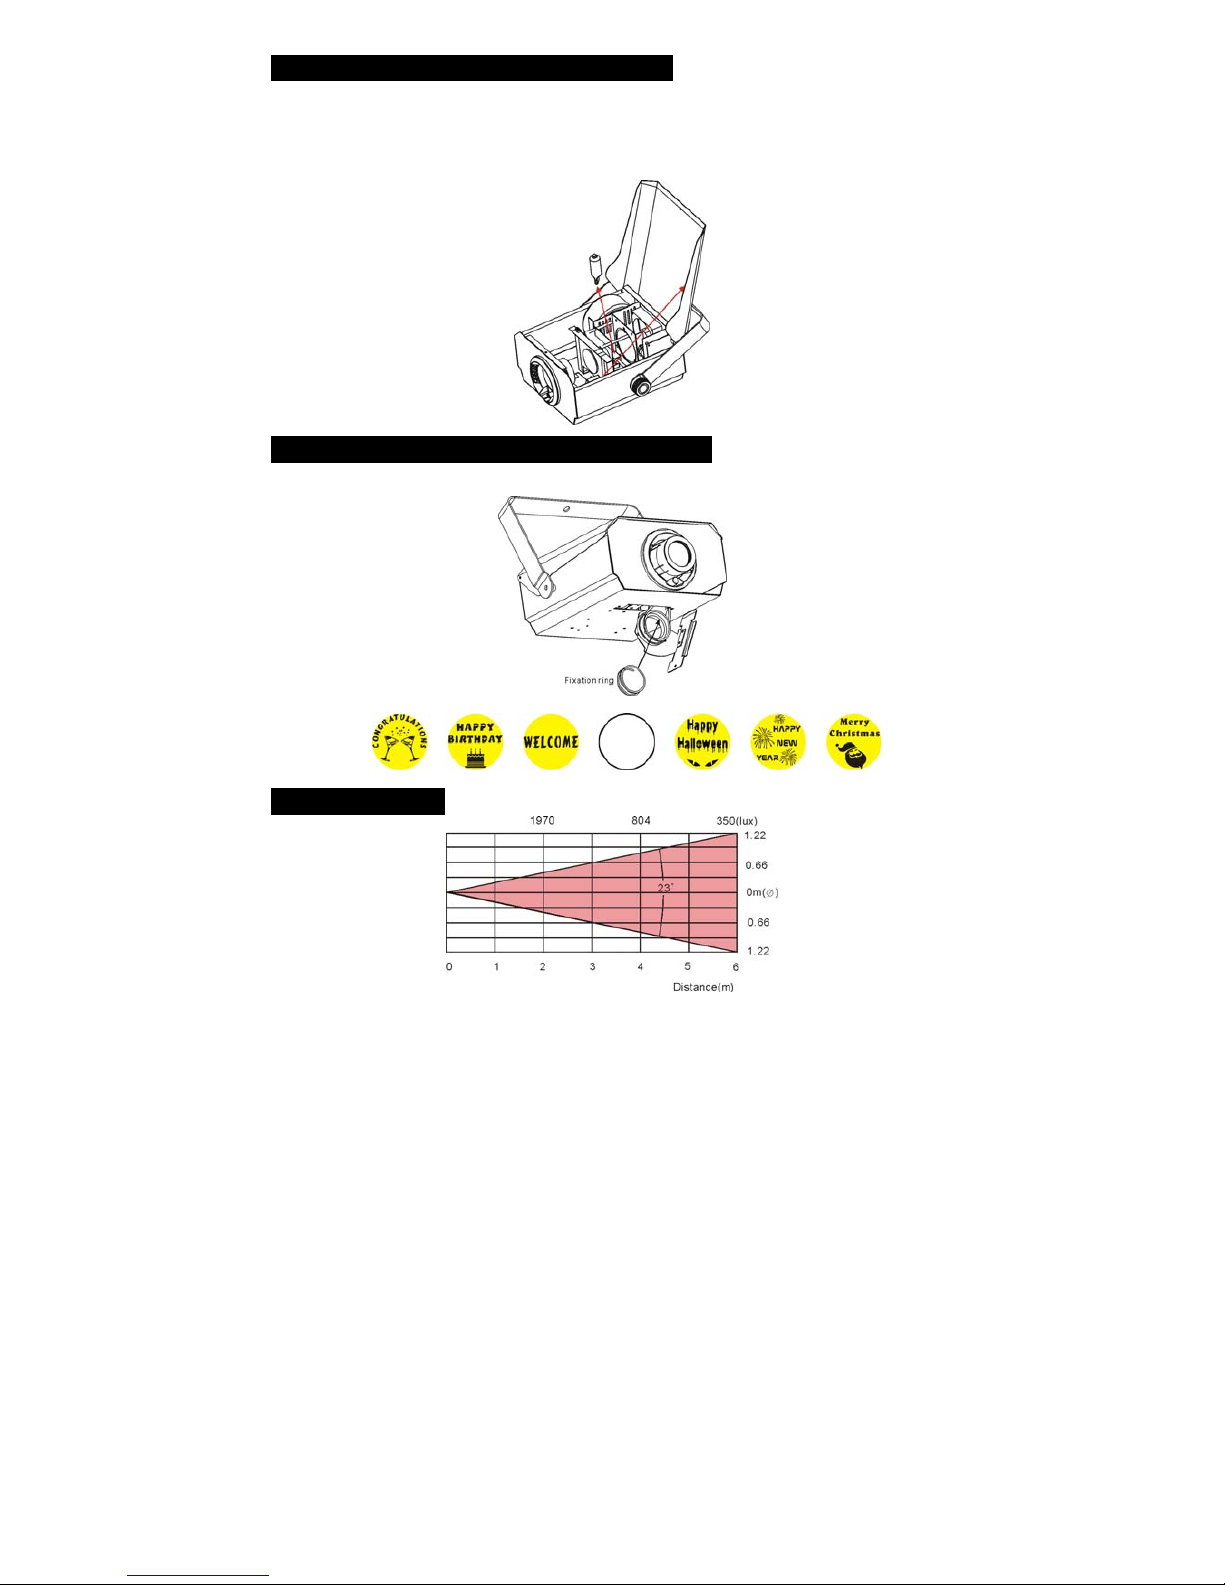
5. Lamp installation or replacement
• Always switch off the mains supply and never handle the lamp or luminarie when it is hot.
• Do not touch the bulb with bare hands. If it happen, clean the lamp with denatured alcohol
and wipe with a lint free cloth before installing.
6. Inserting/Exchanging rotating gobos
Gobo list:
7. Beam angle
The Projector is best to be placed 5 meters from wall, and from this distance the light
effect will cover an area of 2.1 m x 2.1 m.
Page 7
6-
8 . Stand-Alone Operation
Enable stand-alone model: Pin 10 is ON: Pin 9 for motor direction & pins 1~8 for speed
adjustable
9. Troubleshooting
Problem Probable cause(s) Suggested remedy
No power to the fixture Check power connections
Blown fuse
If power is applied but does not light,
please check and replace fuse if
necessary.
Burned out lamp Install new lamp.
No light
Fixture too hot
Allow to cool down. Improve air flow
around the unit.
Sound too low to activate
control circuit
Increase volume.
No action
Electrical malfunction Refer to service technician.
Page 8

7-
10. Fixture Cleaning
The cleaning of internal and external optical lenses and/or mirrors must be carried out
periodically to optimize light output. Cleaning frequency depends on the environment in
which the fixture operates: damp, smoky or particularly dirty surrounding can cause greater
accumulation of dirt on the unit’s optics.
Clean with soft cloth using normal glass cleaning fluid.
Always dry the parts carefully.
Clean the external optics at least every 20 days. Clean the internal optics at least every
30/60 days.
EC Declaration of Conformity
We declare that our products (lighting equipments) comply with the following
specification and bears CE mark in accordance with the provision of the
Electromagnetic Compatibility (EMC) Directive 89/336/EEC.
EN55014-2: 1997 A1:2001, EN61000-4-2: 1995; EN61000-4-3:2002;
EN61000-4-4: 1995; EN61000-4-5: 1995, EN61000-4-6:1996,
EN61000-4-11: 1994.
&
Harmonized Standard
EN60598-1: 2000+ALL:2000+A12:2002
Safety of household and similar electrical appliances
Part 1 : General requirements
Innovation , Quality , Performance
 Loading...