

Instruction Manual (Ref. 863NRG-S; rev.20151029)
WildSpy Camera Outdoor Products
No Red Glow Infra-Red Black Flash Scouting Camera
Model No: AC-863NRG-S
Thank you for purchasing the WildSpy Camera product. This No Red Glow Infra-Red Black Flash WildSpy Cam has been designed for wide range
applications such as Animal trail, Hunting trial, Home security, Warehouse monitoring as a surveillance device. It provides great illumination up to 50 feet
with internal true black flash w/o visible grow to avoid spooking animals or thief. The Rapid-Pulsing Infrared Technology helps to brighten for higher
quality pictures and videos with lower power consumption. It will be triggered by any movement of live animals or human in a location, detected by a sensitive
Passive Infra-Red (PIR) motion sensor, and take a capture instantly within almost a second. It is built-in with a 8M pixels high-resolution digital camera with
many benefits of advanced features and newest technology for maximize your scouting efforts and more easily operation. To help achieve this, the controls are
divided into two sections, Digital Camera Control section and Motion Sensor Control section. Setting and operating with the upper portion for the digital
camera is similar to be operated as many traditional digital cameras that you are already familiar with.. The 2.4’ color screen on top allows you to program for
many camera options and view pictures in the field. Another small LCD on the lower displays all scouting settings directly and monitor the current scouting
status, event counts, as well as battery life. The buttons in lower portion are used corresponding to each scouting options change individually. It is also support
external wireless NRG-IR boosters (referred to our IR booster series IRX-22BW) to increase much illumination depend on a number of boosters to be
configured.. The product is specially designed for outdoor application and is resistant against water and snow.
1 Features:
• Built-in Rapid-Pulsing High Power Black (Invisible) IR-flasher for a great illumination within 50 feet
• Taking Up to 8 Mp high quality pictures and up to 90 seconds 720P HD video clip
• All video clips with natural audio sound.
• 1second Fast Capturing Time when a motion is sensed at FAST mode.
• Hunting Diary / Voice Diary Memo recording
• Date and Time Stamp on each picture and video
• Built-In 2.4 inch Color Screen for field viewing
• Programmable Time Lapse Capturing
• Two modes for extending long battery life and Turbo snap mode (Fast shot )
• Card Slot support 32G SDHC SD card
• Auto switching IR- cut filter for taking true color of day time pictures and videos
• Motion detect activity selection: DAY – NIGHT – 24 HOUR
• Video length option: 3 ~ 90 seconds.
• TV output support NTSC and PAL TV
• USB port for downloading images to computer and firmware upgrade
• External Solar Powered port support external Solar Power Pack system (Model:SO6-6W-9V)
• Separated LCD screens and keys to simplify setting for camera and motion sensor controls
• Pause setting options: 0,1,3,5,10,20,30,60,90 minutes
• Quick Shot mode allow for more detections up to 3 pictures.
• Burst Mode for up to 5 rapid shots in one event
• Motion Sensor Radar Animation for Sensor ON- activity status
• Memory Full Indicator
• Video mode Indicator
• Walk-Test light for Distance and setup mode
• Dial for adjusting sensitivity of motion sensor
• Back light for scouting LCD viewing.
• Battery Powered: D cell x 6pcs (Internal batteries will work as back up source while using external Solar Power Pack: Model:SO6-6W-9V)
1-1 Accessory Included
• USB Cable x1 pc
• AV Cable x1 pc
• Belt x 1 pc
• Lens Hood x1 pc
• Main unit x1 set
1-2 Optional Accessory
Metal Mount Bracket x 1 pc
U bar x1
2 QUICK VIEW
Carefully read this instruction manual before operating device.
2-1 Preparation
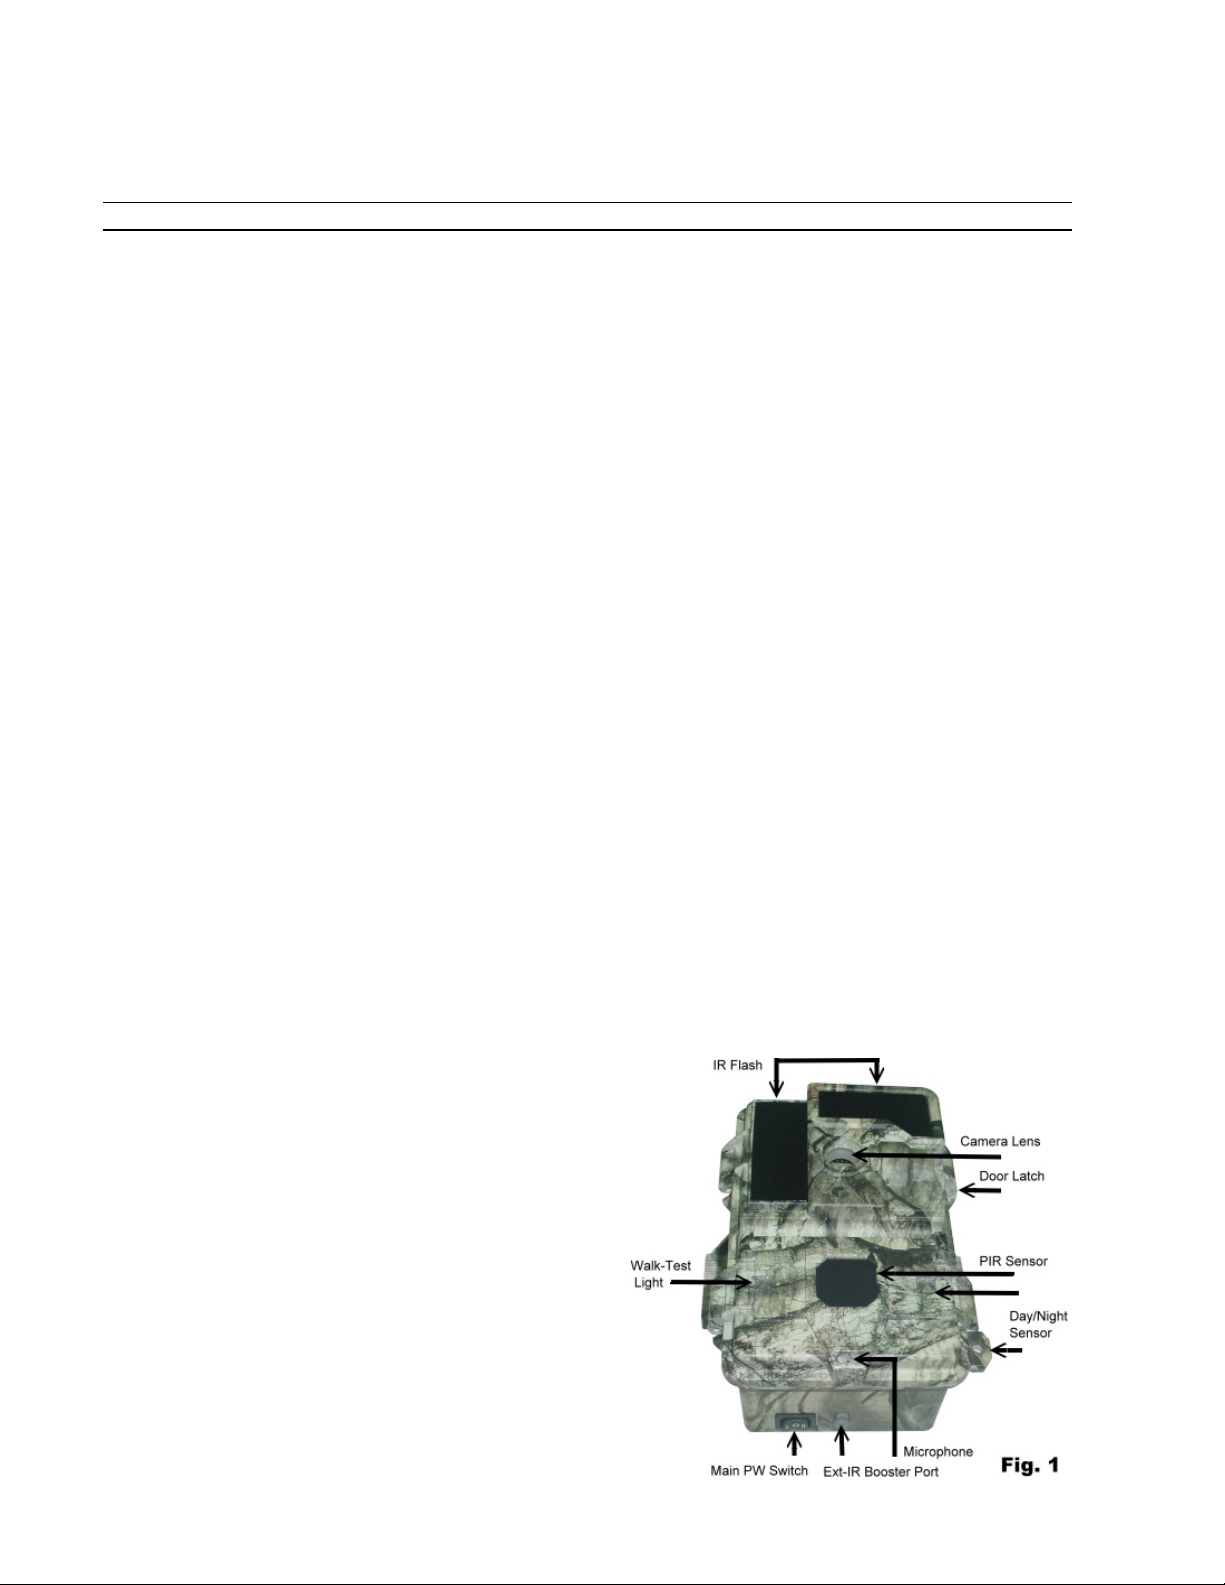
1. Push the Main Power Switch to OFF (Center). See Fig.1
2. Install 6 pc D type Alkaline batteries to the compartment. It is not required if you
just prefer to work under non-battery mode after using an External Solar PW
system.
3. Install a SD card and be careful to insert the SD card according to direction
shown on the card and the printing on the inner panel. before replacing a SD card,
be sure the PW switch is already at OFF position in order to avoid the data in the
card might be flushed. accidentally.
4. Remove the protective PE sheets from the IR lens; Camera lens and PIR
(motion sensor ) fresnel lens.
2-2 Quick Start Fig.2
An easy way below to tell you step by step for getting a quick start
with the WildSpy Camera, it will run under the factory default if
you do not change any parameters. When the device does quit from
setting mode or no key-in since PW ON, it will goes to the scouting
operation mode automatically after 30 seconds. That means when an
animal or human is detected, an event will be recorded and the
camera will shot immediately. The event counter will be renewed
instantly too.
1. Unit will work only since a SD to be inserted. Regarding a
SD card usage, skip to the paragraph below for “Using a
SD Card” to view further description
2. Push the main power switch which is allocated in the
bottom of cabinet to ON
3. Set date and time to update the Current time. Enter to
system setup and choose “Date and time”
4. Optional to set other parameters of scouting if you expect
to do. And then, exit from the setting mode. (See more
paragraphs about the setting of 3. ADVANCED
OPERATION with User’s Setting )
5. Turn the sensor gain (sensitivity) control to the Max.
usually.
6. Mount the unit on a steady tree around 0.5-1 meter height that point to the zone which you wish to trail.
7. Push the main PW switch to TEST and walk in front of motion sensor in order to verify how long a distance and a zone you will be detected
according to the blinking walk-test light .
8. Push PW back to ON and leave. Now the scouting camera will be ready to work after 30 seconds of warm-up time.
CAUTION: Before left, be sure to double check the latches if the door is closed completely and the Ext-Solar Power port is covered before left.
2-3 Factory Default Settings:
For Camera: Capture = Single Picture /Auto Exposure / 3M pixels resolution / Burst Mode =Off / Shutter Speed = Auto / Quality =Normal / Stamp =ON /
Language = English / TV =NTSC / Download =MSDC / Video Resolution = VGA 640x480 / Frame rate = 15 F/S
For Motion detection: Pause= 1 minute / Quick-Shot =1 / Turbo = PW-Save / Work Duty = 24 HRs / 3 seconds Video length
It is suggested to customize your settings if you are an experience user.
3 ADVANCED OPERATION with User’s Setting
Every times you want to change for a new setting during a normal scouting operation, you must switch OFF the main Power and back ON. While switch the
main PW to ON, the lower LCD shows the current settings and the upper color screen is always OFF. When you want to turn ON the camera for set up or view
picture, Just press CAM-ON and then press DISPLAY key enable the screen at LIVE- VIEW mode.
Caution: All keys are no function temporarily if a capture event is being processing. If you switch OFF with the main PW at this moment, the WildSpy Cam
will still wait for the current event to be done and goes to OFF later.
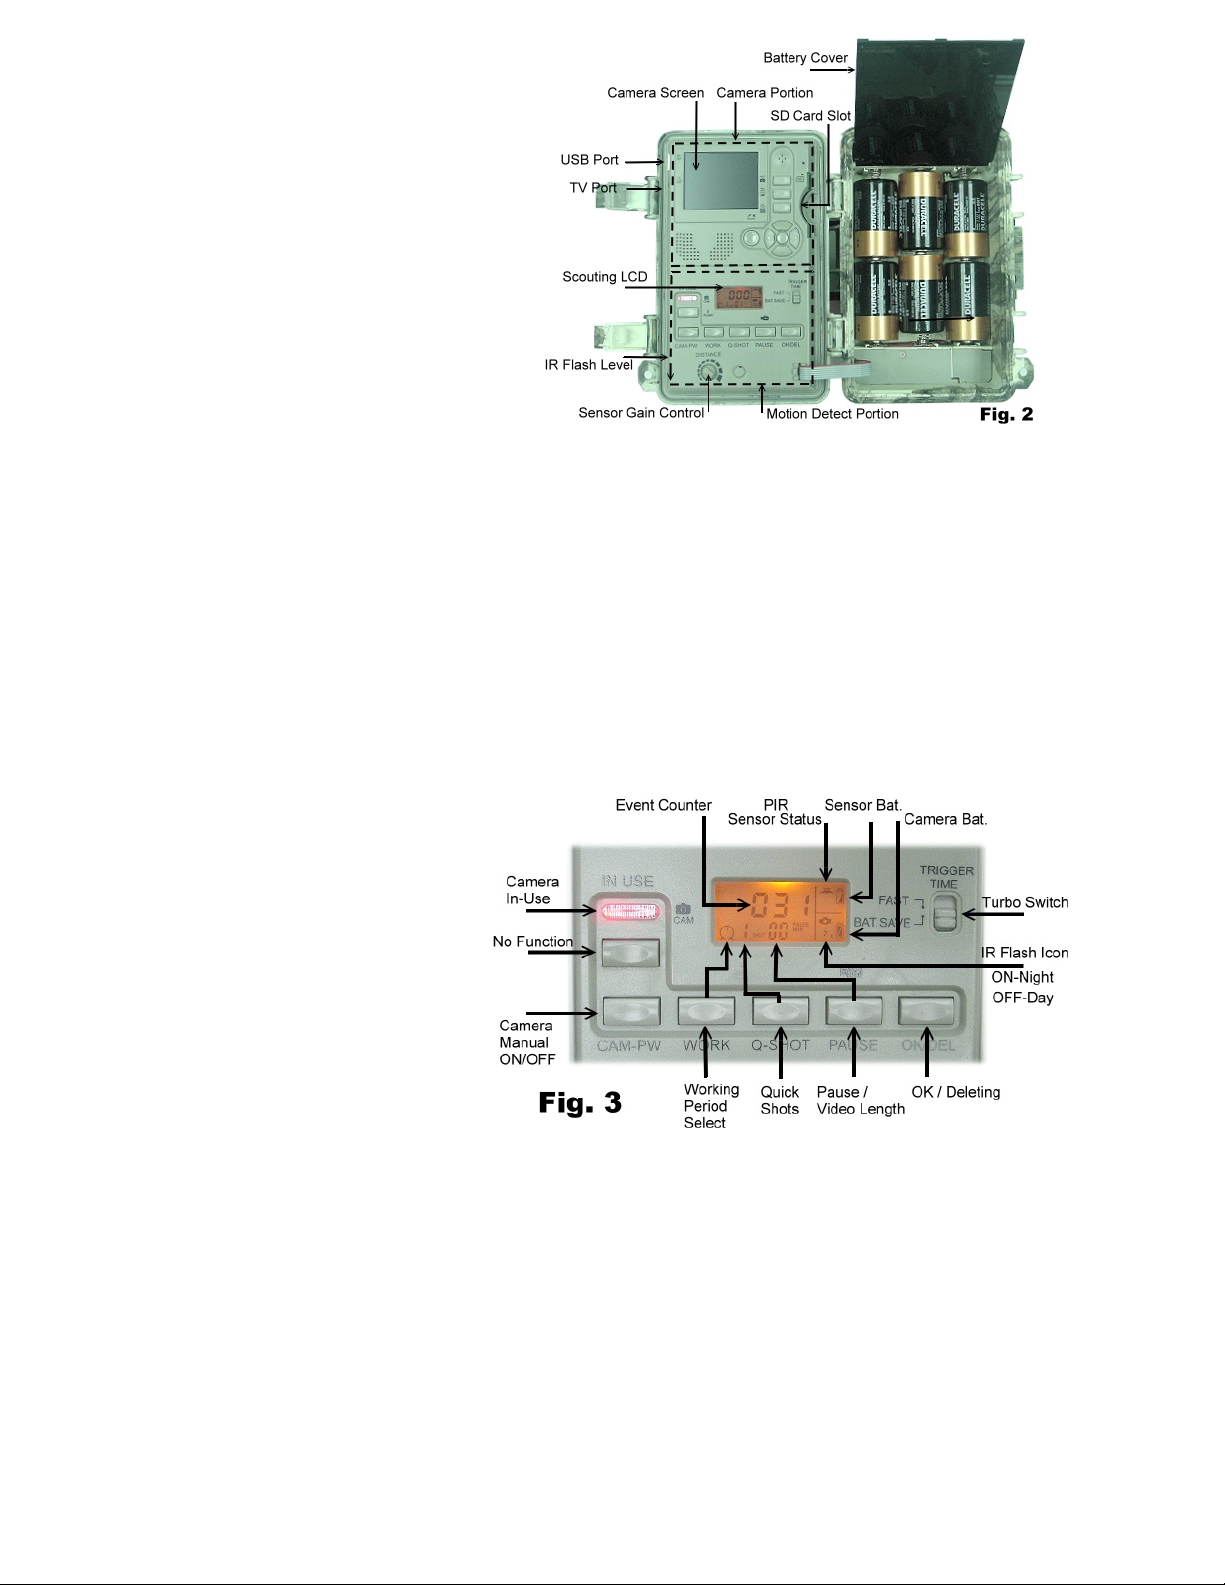
Setting for Motion Sensor Operation (PIR Sensor) Fig 3
3-1 Select ON DUTY for Day, Night or 24 hours period
The WORK button is pressed once to enter the 24 HOUR >
NIGHT > DAY options, the 24 Hrs(Clock icon) icons will
remain blinking. Press again to move the blinking icon to the
SUN, once more will move it to the Moon. Press the
OK/DEL key on the right to accept the desired icon and then
it become stable. The Clock icon is represented for motion
detection will be active day and night. The SUN is
represented for day working only. The MOON is
represented for Night working only. During the sensor does
active period, (ON Duty is effective), a Radar icon will run
with animation to show the device can sense any motion in
this time.
3-2 Select for Quick Shot
Quick Shot option allows for more images to be taken if
additional motions may be detected after the 1st image and
the camera will not shut down to be ready for more instant
shots. You can choose 1~3 images in order to take a group animals passing-by. “1” is the default that only one picture to be taken and then goes to PAUSE
time. “2” or “3” will re-arm the sensor for taking the second and third picture if more animals are following. (Example of use: On a trail when you want to
take one more picture what is following the first young deer. Like a smart buck, it always walk at the last). A time-out of each shot is around 20
seconds. The system will goes to Pause mode after a total number of events according to Quick-Shot setting are done or time-out.
3-3 Pause Time
This is a time lapse between the motion sensor does able to detect event again after the previous event. The sensor will not work within the time lapse. You
can select 00 ,01, 03, 05, 10, 20, 30, 45, 60 minutes for a PAUSE option. Press the PAUSE button once to enter for setting, The default 01 will be blinking.
Press again to change it until the desired choice appears. Press OK/DEL on right to accept it.
3-4 Change Movie Length
The PAUSE key is shared for two functions. One is explained as above. The second option will let you define how long to take each video. There are 3, 5,
10, 20, 30, 45, 60, 90 seconds of video length to be selected. To do this, press and hold the PAUSE key for 3 seconds, a blinking video camera icon will
appear and enter for video length setting. Then press PAUSE repeatedly until your desired Length appears. Confirm the updated change by the OK/DEL key.
Caution: You must also select VIDEO option in the camera setting when you wish to enable video taking mode. Otherwise, the device still does take
pictures.
3-5 OK/DEL
It is a key for shared with two functions. Any time you have done for programming of the WORK, Q-SHOT and PAUSE / Video Length, just press the
OK/DEL key to accept a new change. On the other hand, press and hold it with 3 seconds, it perform the CLEAR function that all event counts on the lower

LCD will be renewed for [000]. But it is not effect to any image or video contents in the camera memory
3-6 Event Counter
The event counter are included three digits in the center of the lower LCD to let you know how many motion records that up to 999 events for a trail history.
If you want to renew the counter anytime, simply to press and hold the OK/DEL button until LCD become blinking, then it will resume to [000]
Caution: The camera will keep going to capture continually even the scouting event counter is already reach to [999] full. On the other hands, the event
counter will keep going to renew in case the memory on camera are full.
3-7 Battery Icon
The Bat-icon on the upper and lower on right are represented for motion sensor and camera power. All Bat-icons will indicate three status as below:
GOOD: Battery Icon show with solid.
LOW: Battery Icon is half blank.
BAD: Battery icon is totally blank. In this case, the Lighting Flash icon will also disappear. It does alert that you must replace them with new batteries
immediately. Camera will not work at night if battery is bad and still will work at day time till to camera will not be wake up any more..
Caution: If you notice batteries are bad, you have to replace all batteries with brand new completely. Do Not try to replace some of them only. After
replacement, remember to re-boot the device by the main PW switch.
Important: Since this unit detects batteries becoming too weak and an blank battery icon appear, the unit will stop working at night but will still takes day
time pictures or video continually.
MAIN UNIT OPERATION MODES
This is a mode switch in the bottom of cabinet. There are three modes to be selected under difference operation.
3-8 PW-ON Mode
The WildSpy Cam will be always required working under this mode. Since the PW-SW is pushed to ON mode, the motion sensor will begin to warms up for
1 minute, then start to detect motion for taking pictures/ Video.
3-9 PW-OFF Mode
Slide the PW to the center position to turn the system power OFF. All pictures and current settings will be retained at this mode and internal real time clock
will still run.
Caution: Remember to remove all batteries in case you will no longer to use it in order to avoid the metal terminals to be oxidized due to the leakage current
from battery itself to damage the terminal contacts.
3-10 WALK-TEST Mode / Sensitivity Adjustment
Walk-Test Mode is used to verify the detection range and pointing zone before placing it in the field. After mounted the unit on a tree, push the PW switch
to Walk-TEST. The Walk-Test LED will light up last 1 minute to warm up. A radar animation icon with TEST alert is remaining blinking during Walk-Test
mode. Then, Walk-Test Light will goes off and will alert with 3 times flashing once you will be detected in front of the device. Now you try to go far away to
check how long the PIR motion sensor will still see you. The camera does not take any picture during this test process.
Note: The system will resume to normal Scouting ON DUTY mode automatically after 3 minutes (Time-Out) since no longer detection of walk-test to be
triggered in order to avoid user may forget to push the PW switch back to ON before he left.
Sensitivity Adjustment
The DISTANCE dial on inner panel is used for adjusting sensitivity of the motion sensor (Gain Control). By turning the dial to the right, sensor sensitivity is
set to the Max to detect animal over 50 feet away. You may reduce the detection distance for taking picture with a larger animal target.
Caution: It is recommended to set MAX in warmer environment like in the summer time.
3-11 Walk-Test LED+ DC In-Use Indicator
Both lights will be ON during the first minute of Walk-Test mode warm-up and Camera setting mode. They will blink for 3 times once a walk-test motion is
detected.
In the PIR scouting setting mode, an instant flash is response to each valid key input.
3-12 Turbo Shot
There is switch knob on the right of the scouting LCD. Slide the Trigger Time switch to FAST mode, the DC will be set for the fastest speed for shooting. In
this mode, capture speed will be 1 second that double faster than the setting in the BAT-Save while a motion is detected. Setting of BAT_SAVE will be ideal
for extending longer battery life. In case you expect to resume the FAST mode to be Bat-Save, slide the knob for BAT-SAVE and then reboot the Device.
Caution: During the FAST mode is activated, you will not be able to turn on the camera by pressing CAM-PW key except rebooting the device.
3-13 Day / Night Exchange Status
A sensor will sense an environment of Day / Night exchange to control the camera to take a colorful picture at day and monochrome picture at night time
automatically. At a moment of exchanging, an animation “F” is moving in the scouting LCD. The motion sensor will not be triggered at this period. When it
sense a night time, the inhibited symbol of the IR Flash icon on the scouting LCD will disappear.
Setting for CAMERA / Operation
Description for Camera Operation Keys which are in the upper portion of the inner panel. See Fig. 4
SHOT
PREVIEW
DISPLAY
MENU (OK Key in Center) Fig. 4
NAVIGATOR KEYS
UP/DOWN/LEFT/RIGHT
SOUND
3-14 CAM-PW (Camera Power Button)
This button is located on the left of the lower portion. See Fig. 3
Before a programming for the camera, be sure the Main Power switch at ON
position. There are two modes that called LIVE VIEW and PREVIEW for
camera OPERATION. Once you press CAM-PW to turn on the Camera, it works
at the default of the LIVE VIEW. Then, both the IN-USE and Walk-Test LED are
lighted. The camera status small LED on the right top will alerts with red light for
2 seconds to show camera is PW ON already. As a default, camera screen is
always remaining black until either DISPLAY or PREVIEW key is pressed. When

you did finish using the camera, remember to turn the camera OFF by pressing the toggle switch CAM-PW again.
Caution: During camera is ON manually, motion sensor will stop sensing until CAM-PW is turned to OFF. Also, if there is a SD which has been stored a
thousand of pictures or videos already, it need to take a few seconds or longer for initialization, camera screen will not response during this period even you
pressing any key when you just attempt to turn ON the screen. You have to wait until the camera internal processing finish shortly.
3-15 Navigator Keys / Menu Button Usage:
Four directional keys represent for the Left / Right / Up / Down keys. The center knob is the MENU button. All camera settings will be programmed with
them. Press the MENU to display the option title of modes. Select a title that you wish to change by pressing the left or right navigator key. Highlight your
choice from a pull down list of the displaying title by the Up or Down Key. Press the MENU to accept the change and exit.
3-16 Camera Setting Menu
Navigator Disk / Function Keys / Menu Button:
Menu Key
The key in the centre is bring up the modes /system- menu under CAMERA is ON manually. It is also used for accept a change after modification.
Navigator Disk
Four sides of disk represent for the Left / Right / Up / Down keys. The center knob is the MENU button. All camera settings will be programmed with them.
Press the MENU to display the 2 titles of setting modes. Select a title that you wish to change by pressing the left or right navigator key. Highlight your choice
from an item list under the displaying title by the Up or Down Key. Press the MENU to enter the option and change it with UP/DOWN keys. And press OK to
confirm. After finish a setting, quit to the main screen by pushing LEFT key.
More Function Keys
Shot key : It is used for taking picture or video mamaully in LIVE mode and Play-Back media files in PREVIEW mode. Push it to take a picture at any
time while camera start up manually even TFT screen still is remaining OFF (screen is always OFF by default) . For taking a video clip manually, your 1st
press SHOT to start taking, a stop watch counter will work and press again to stop.
Preview key: (Play-Back)
Press PREVIEW key, camera will be switched to Play-Back mode and show the last image. It is also a springboard to skip between Live View and Play-Back
mode. During in Play-Back mode, the DISPLAY key become as a spring board for Enlarge View an image vs Thumbnail pictures / videos. So, you have two
ways to enjoy and search entire images /videos.
Display key : (Live)
Press it to turn on the screen for LIVE mode, then press it repeatedly to change for more status like turn ON screen > Clean Up Screen > Resume information
on screen.
Sound key:
It is a KEY that you want to record a diary voice memo on camera manually, push this toggle key to switch between camera and sound recorder mode
instantly.
Menu Title (2 Tabs) for Camera Operating Modes
There are two main menus. Once camera is ON manually, press MENU key to access the setting menu that consist 2 titles: A. System Setup Mode; B.
Working Option Mode. Both Live View and Play-Back menus are including their related titles which described as below:
A. System Setup Mode
B. Working Option Mode
A. System Setup Mode
Press MENU to enter to Working Option Mode firstly, and then press the RIGHT key, you will enter to System Setup Mode, see the items below by
pressing DOWN key. Then, enter to further options change by pressing the RIGHT key, push the MENU key to confirm a change. Finally, press LEFT to quit
the menu. If you want to skip to the Current Working Mode, press the UP key to the top of menu, then, press LEFT to highlight the Working Mode Tab.
See the options on System Setup Tab as below:
A-1 Video Sound : Default is ON.
A-2 Camera Mode : Default is IR Flash. This model does not support Strobe Flash. So, always ignore this option.
A-3 Date and time Setting:
Before you would place this unit in the field, you are recommended to update with your local time first. After entering to the setting, press Right key to move
the High light for calendar pattern and change it by UP or DOWN key. Press Menu to accept . NOTE: The calendar is shown in military fashion with 24
hour format. Example: 2:00 pm will be shown as 14:00.00. (Hour: Minute: Second)
A-4 Calendar Stamp:
Toggle the Stamp option ON/OFF to show whatever the calendar on all images and video or not.
A-5 TV-OUT
It is used to define what TV system is set for matching your TV- NTSC /PAL system.
Caution: In case your TV is out of options of the WildSpy Cam listing, you have to change your TV set for NTSC before connecting a cable to TV set.
A-6 USB
This option is defined which interface for a purpose of down loading files to PC or working under PCCAM. The default “MSDC” is already compatible for
1. Video Sound > On /Off
2. Camera Mode > IR /Strobe Flasher (Not support a strobe flasher with this model)
3. Date & Time: a. 2013/01/01 12:00 / b. YYYY / MM / DD (Calendar Display Format)
4. Language: a. English / b. French / c. Chinese
5. TV out: a. NTSC (Default setting, Used in North America) / b. PAL
6. USB
a. MSDC (Default for frequently used to download files to PC under all Windows platform)
b. PCCAM (Only for upgrade Firmware purpose)
7. Format (Erase Every things in entire storage media)
8. Reset All Yes = Proceed (Select it to restore all factory default settings)
9. Time Lapse > On /Off
a. Time Lapse Interval
b. Time Lapse Capacity
You can disable a sound recording for all video clips when an in-need for security against a legal issue in your country .

all users w/o driver installation required
Caution: This camera under PCCAM function mode is reserved for upgrade the FW purpose. While you want to use this function, a proper driver will be
required. You need to download the DRIVER from See the paragraph below: “5- Installing Driver”
A-7 FORMAT
After proceed this function, all files in the entire card and internal flash memory will be removed completely. Be careful to save the files to PC before you
try to do it.
A-8 Reset All
Select this option to reset all settings to the factory default instantly. All data in the entire disks are safe after the Reset event will be done.
A-9 Time Lapse Operation:
You can activate the Time lapse function during any scouting period. It will work fine day and night by sliding the Turbo switch to Time Lapse ON and
enable the Time Lapse option in the camera menu setting. Camera will take shots automatically according to the further programming in the Time Lapse
settings. The Time Lapse event will start to run since one scouting image to be taken. Therefore, be sure you have to trigger the 1st shot by yourself before
leaving from the site. Otherwise it will be triggered to start up by animal.
A-10 Further settings for Time Lapse:
Once you enable the Time Lapse setting, you will have two further options for configuration as below:
A-10 -1 Interval: Adjust the default 5 seconds for your desired periodic time. The camera will take shots repeatedly according to your update. An adjustable
interval set will be from 1 second to 23:59:59
Important: Time lapse capture event will be always interrupted during day / night transition and will be resumed after the 1st one scouting event is triggered
during each transition.
A-10 -2 Capacity: You can limit a Maximum total shots for a mission. More shots will be created for a longer Time Lapse Video. A Max. capture capacity
will be 99,999 shots.
A-11 Research QTY of Time Lapse captured:
Turn on Camera manually, enter to the Capacity Setting of Time Lapse option. The first data line is showing how many images are captured. This result will
be erased once you turn the Time Lapse function to OFF in the system menu. Otherwise, this counter will continue when the camera resume for the Time
Lapse mission.
A-12 View Images from Time Lapse mission:
Touch the PREVIEW key after turn on Camera manually, you will see the last scouting image usually. Press RIGHT key once, the preview mode will be
changed for viewing the last image of time lapse mission. In case you want to view back the scouting image or video, you have to quit and turn on the camera
again. Touch the LEFT key to review all scouting images when you are already at PREVIEW mode.
A-13 Create A Time Lapse Video:
All of images are required to import to a time lapse software for converting a video. There are many choices from web-sites or you can download from our
recommended web for a freeware. You can try to get the software “Videomach” from www.computechnic.com/download.html
B. Setup under Working Options Mode
There are three main menus for following modes:
1. Live View Mode
2. Preview Mode
3. Voice Memo Mode
Those menus under Live View / Play-Back /Voice are including difference titles which are described as below:
You have two ways entering to either working option mode. When you press MENU key after turn ON the camera manually, or you are in System Setting
Menu w/o highlight any optional title, just press the LEFT to skip to the Working Option Mode. In this mode, you will find difference options depend on you
are currently at PICTURE or VIDEO or Voice status
B-1-1 Single (Picture) Mode (Default)
There are several items below by pressing DOWN key:
1. Switch To Video
2. Resolution : a. 3264 x 2448 (8 Mp ) / b. 2592 x 1944 (5 Mp) / c. 2048 x 1536 (3 Mp) /d. 1024 x768 (1.3 Mp)
3. Quality : a. Super Fine / b. Fine / c. Normal (Adjust Image quality, it will affect capture speed to slow down)
4. Exposure : - / + Adjust (Adjusting for brightness of image instead of factory default)
5. Burst Mode : OFF > 2 > 3 > 4 (Off = 1 shot for an event; 4 =4 images will be captured repeatedly in an event )
6. Shutter / ISO
a AUTO (ISO 100~ ISO 400, It is the default for most of events and recommended)
b .Fast (Fixed at ISO-200 (Used to take a clear image against a moving animal. Sometimes for very short distance capturing setting at night to
avoid images to be over exposure.)
7. Date Stamp a. Off / b. On ( Calendar stamp ON/OFF option to show whatever the calendar on all images and videos.)
B-1-2 Items 1~4; 5~ 7
They are the general functions as many of digital cameras which you did already familiar as usual.
B-1-3 Burst Mode
It is a shooting mode for shooting a several pictures by one event triggered when the subject is in successive motion. You can select 2~4 shoot a time.
B-1-4 Shutter / ISO
Camera Shutter is set ISO-200. It is normally to apply at night for expecting to capture within a very short distance to avoid images over exposure or less
blur effect against a fast movement object
Caution: During camera is setting at FAST Mode, brightness on pictures will be always darker than AUTO due to a faster shutter speed. So, it is
recommended to use one or more external invisible boosters to increase illumination around the scene.
B-2-1 Video Mode
While VIDEO mode is selected, the unit will take video clips day or night. Since a 1st event is recorded, a video-cam icon will appear in the lower scouting
LCD showing you are working at video mode. Each video clip length will be defined in the PIR setup chapter. Refer to the Chapter above (3-4 Change Movie
Length)
In case you would switch back for Single Picture mode, just need to turn ON camera to change the Capture Mode manually. Then, re-boot the unit by turn
off the main PW and back ON. You will see the Video-cam icon to disappear. Otherwise, the camera will not work properly.

There are the optional items below by pressing DOWN key to highline at Video mode:
1. Switch To Single
2. Movie Size : a. 1280 x 720 (HD) / b. 720 x 480 / c. 640 x 480 (VGA)
Caution: Inhibit Audio Recording in Video Clips
Against a law related to the private protection policy in some countries, you may need to stop audio recording in a video clip when the camera will be used
for security purpose. You can inhibit the audio sound recording function on each video clips in setting of VIDEO MIC in the SYSTEM SETUP MENU.
B-2-2 Preview (Play-Back) Image and videos
Since press Preview to watch image, screen will always show a full screen of the last shot. Use the left or right key to view other previous or next image. If
you expect to view more pictures a time, press Display Key for a thumbnail screen. See more images by pressing Left / Right key. Then enlarge it by
pressing Display again. In a thumbnail screen, simply to press SHOT key for Slide Show images. If you want to watch video clip, Press SHOT to play-back a
video at full screen or slide show videos at a thumbnail screen.
NOTE: The last picture taken will be the first to appear and will include a display of the total number of pictures stored and the number of this picture.
Example: 0024/0036 is the 24th picture of a total of 36 pictures.
B-3. VOICE MEMO Mode
scene with a details description; a hunting experience; a reminder for hunting; a diary for every day etc.
voice options, just switch back to the previous camera stage by pressing SOUND again.
again to stop this recording and a rest of memory on the top left corner will renew immediately.
and use RIGHT key for the newer voice. Press SHOT key to play back the desired message. Press the LIVE key for more voice files, you can listen all voice
clips one by one automatically after pressing the SHOT key.
RIGHT to select another voice clip and press MENU to delete for one more. Finally you can quit from the menu by press LEFT key.
Caution: A play-back either with internal screen or TV will only display the image or video files corresponding to the current setting. You have to change the
setting once if you want to view other kind of media files.
B-4 More Operation Setting at PREVIEW
When you are in Preview mode for viewing Picture or Video, press the MENU key to display the Operating Menu with items below:
B-4-1 Digital Zoom for Still Image
When in the Preview to view a full size picture, press the UP key to Zoom In and the DOWN key to Zoom Out for a closer shoot or see more details when
enjoying an image.
B-4-2 Deleting Photos
Press MENU key under the preview mode, then highlight Delete for Single or all photos to erase . Press MENU key to confirm deletion.
B-4-3 Protect an Image or Video
During viewing an image or video which you would like to retain in the memory without wash-out by delete processing, press MENU and highlight the LOCK
option once. Then an icon with small lock on the left top corner of this image to show it is protected. Repeat the same processing to unlock it.
All of protected items will not be deleted except you try to format the memory or the SD card.
5 Using a SD card
Note: Be sure the Main PW Switch is OFF before replacing a SD card in order to minimize a risk to damage your card or loss data partially. Avoid
to hot plug or retract your card during the Camera power is ON.
Important: If a SD card can not be inserted smoothly, you must retract it and check if the direction of card is correct or not. Never force to push hardly with
the card. Most of case with a problem on card usage was found to be caused by an improper insertion.
Warning: Before using a brand new SD card, or ever been used in other cameras, it is suggested to transfer all data to PC and format it before trying to apply
it to entire camera. Otherwise, the system may not recognize the media on this SD and camera will not work properly.
Caution: In case you have a SD which are already stored with a large quantity of images or videos and attempt to turn on camera screen manually each time,
you will find all camera keys will not response for a few seconds while just turn on CAM-PW until to system initialize the memory of SD card completely.
More contents in the memory card will take much longer for initialization. So, in order to avoid this case, it is highly to recommend to move the files to PC as
soon as when you retract the card from the field and clean up the card to reserve more room for the space if possible.
6. Installing Driver for Upgrade FW in your camera
If you just want to download or upload files between PC and this camera, there is no driver to be required. In case you want to upgrade the FW in future,
3. Frame Rate : a. High (30 f/s) / b. Low (15f/s)
1.View Image/ Video by Built-in Screen
2.View Image /Video with TV
The unit is equipped with a TV-out port that allowed you to connect to TV with an attached cable. Be sure two RCA ends are plugged in the TV
Video-In (Yellow) ; Audio-In (White) properly. After camera is working at Play-Back mode, displaying contents will be moved to TV screen. If you pull
out the TV cable, the internal viewing screen will be switched back to display automatically.
The camera provide a good feature for users who would like to record a voice message at anytime, anywhere against something to record by voice like a trail
To do for a recording, you must turn ON the camera, then, enter to the Voice REC Mode by pressing SOUND key. After finished operation with any
B-3-1. To Record: Press SHOT key once for starting a voice recording. Then, a stop-watch start to count a time of the current recording. Press SHOT
B-3-2. Play-back: Press PREVIEW key to the Play-Back mode, the last message is selected. You can rewind to a previous desired voice memo by LEFT
B-3-3. Delete ONE: Press MENU key to bring up the Erase Title. Highlight the option “Delete One” then press MENU to delete it. Press LEFT or
B-3-4 Delete ALL: In the Play-Back page, press MENU key and highlight for “Deleting ALL”. Press MENU key to remove all voice memories at once.
1. Lock
a. Lock / Unlock One
b. Lock All (Protect all same media files in the memory and they will not be deleted)
c. Unlock All (Unprotect all of protected files)
2. Delete
a. One (Delete One photo)
b.. All (Delete All items except protected items)
3. Rotate
a. Rotate
b. Save
c. Back
4. Resize
a. Showing all available resolution that you may change
It does support up to 32G SDHC SD card to get a large storage capacity that allow more than ten thousands of pictures to be saved.

you have to install the driver firstly which will be available downloading from the dealer’s web-site. The first time after installed the driver, connect the camera
to your computer, the computer will detect a new USB device has been connected and try to looking for a driver. After a driver installation is done, the
PC-Cam function will be available which you can ready to upgrade the existing on board FW. Please refer the further instruction which will be provided your
dealer to finish the FW update processing.
7. Downloading photos/ Movies to your
computer
Press CAM-PW to turn the camera ON manually
at the LIVE mode.
- Connect your computer and the camera with
USB cable.
- A pop up to show the mobile hard disk
which is assigned for the camera
device.
- For example: “H” or
“I”:\DCIM\100MEDIA
- Click into the proper directory to see all
8. MOUNTING DEVICE
not be less than 6 inch (15cm) and located not higher than 1M with your desired mounting method that following the installation method as shown as below.
The design is reserved to fit for two ways of mounting.
Cam. The “Master Lock” brand is a good choice.
provide stronger security ability. You can buy this accessory from your local dealer.
9. CONNECT An External wireless Invisible IR Booster
many skills. WldSpy Cam provide an option that the wireless booster like IRX-22BW will enhance
the camera simply. Thus, you will get several times higher illumination depend on a number of
boosters to be configured.
Sensor against the IR light source on the camera. Just need a single transmitter to control unlimited
wireless boosters which they will be set with same frequency around 100 feet.
9 . USE LENS HOOD
10. Solar Power Pack Connection:
Touch the PW button on the controller to supply the solar power to the camera. The solar powered pack will always supply energy in 24/7 and will be charged
under sun light automatically. It isn’t a matter there are some days with cloudy because a high capacity storage power pack will support this camera to work
for more than 10 days or a few thousand shots after one time of fully charged on the Solar Pack.
11. Power Management:
files inside.
Before starting to put this camera in the field for scouting game, the camera must be mounted in a certain place properly or on a tree whose diameter will
8-1 Belt Mount: This belt is attached in the packing. See Fig.5
8-2 Python Adjustable Locking Cable (Not including in this packing): See Fig. 6
You can able to use a Python adjustable locking cable to provide more security to your WildSpy
8-3 Belt Mount with Metal Bracket and U locked : (Optional Accessory ) See Fig. 7
With an optional choice, a steel mounting bracket and U type security bar can be used to
For an experienced user, you always would expect to get extreme quality pictures and videos by
Refer to the user guide and snap the transmitter to the belt or Python easily. Set the IR trigger
This lens hood is come with the packing that is used for installing on the camera lens to prevent sun light reflection too much into the camera sensor
and snow as well as rain or snow-fall stacked in front of the lens.
If you also have bought a Solar Power Pack ( Model: SO6-6W-9V), plug the Solar pack controller cable to the Solar PW port on the camera unit simply.
It is an optional but highly recommended to install all Alkaline batteries into the camera compartment even you prefer to always use a solar system. The
backup battery dose stand by only while the solar pack energy still be enough to support Camera operation as usual. Batteries will be drained since the
power pack goes to the OFF w/o any charging for a long time. It is ideal for remaining the scouting settings even no more supply from Solar pack.
Troubleshooting Guide /Useful Skills
12-1 No animal showing in some pictures:
- Check if the unit is pointed the direction where the sun is rising or sunset that the sensor might be triggered.
- The PIR sensor may detect an animals through vegetation out of view from the camera.
- If the animal was moving quickly, camera may not capture it in time while an animal still staying in the zone.
- Make sure that the unit was mounted on a steady tree or other place that does not wobble.
12-2 The Camera In-Use light is remaining ON, but the camera does not respond:
- The camera may be time-out and shut down automatically. Repeat to press the CAM-PW to resume the camera ON.
- Battery may be too lower that could not support the camera operation. Check the battery icon for the level.
- The Trigger Time is set on the FAST mode. You have to switch OFF the main PW and back ON.
12-3 The CAM-PW switch does not respond:
Attempt to turn the camera ON too quickly after the main power ON. Wait for about 10 seconds until the back light of scouting LCD goes to OFF. Then try
again.
12-4 Don’t satisfy a brightness on night Pictures. It seems too dark
-You might set the Shutter / ISO to be FAST, try to change for AUTO or add an external booster.
-Batteries may too lower or quality is not good or they are not Alkaline type that the battery set could not afford a high current consumption moment when
the internal IR light was ON. Need to replace with a good quality brand new battery set.

12-5 Don’t satisfy a blur night Pictures. It seems not so clear to view a moving animal.
Simply to set the Shutter /ISO to FAST. To a get better result, it is highly recommended to apply more external IR boosters.
12-6 The Light in the front of the housing does always remain ON:
-The unit just is set for Walk-Test mode. The light remains ON steady within 60s warming up period.
-The CAM-PW is not OFF. Remember to turn camera OFF after finishing for camera usage.
12-7 How can I get more pictures against a small animal like raccoon; hare?
Try to mount the camera at 0.5~0.7 meter height on a tree.
12-8 It seems camera did not capture any image or video at night, it can still capture at day:
Check the camera batteries if they are bad already. Try to replace with new batteries to test again
12-9 Why are every things displayed on TV mode without color?
It might be caused by improper setting of TV signal format. Try to change for another setting like TV-PAL <> TV-NTSC. If it is still fail, you have to
change your TV set to be the NTSC to match the signal protocol with the camera.
12-10 Why does the battery icon still show BLANK after replaced with new batteries already?
You must re-boot the device by the main PW switch every times you did replace for batteries.
12-11 Why does the memory full icon still blinking rapidly after deleted files from SD card already?
You must re-boot the device by the main PW switch every times you did clear memory or replace with a new SD card.
Important Note:
12-12 Why can’t I wake up the camera screen ON and seems No response while pressing any keys?
-You forget to press the CAM-PW firstly before trying to operate the camera.
-You have to wait for a performing event to be finished itself and then, press the CAM-PW.
-Check if there is SD card with huge amount of images stored in the slot. If YES, you have to wait for a few seconds until the card initializing to be done
since CAM-PW is ON. And, it is highly to recommend you to save the file to PC frequently and clean up the card in order to get more empty space.
12-13 I expect to see the scout counter to start from 000 while resume a new trail.. How can I do?
Press the OK/DEL and hold for 3 seconds to eliminate the old records. Now you will see 000.
12-14. What are difference between the Feature QUICK Shots vs BURST Shots?
The QUICK shots is defined how many times to be allowed to take shots once an event will be detected. Additional shots will be triggered by further
movements up to 3 times. If no more movement will be detected, it means you will just get only one image even you had set for 3 quick shots. Other than
QUICK Shot, you can enable the BURST mode to take more shots during each event. Camera will take a several shots automatically once a moment will be
detected. There is no need further detections required and you will get an user defined quantity of images within one event.
12-15. Why I could not see the Videos or Pictures which I just toke previously?
You need to know the screen will only display the image or video files corresponding to the current setting. You have to change the setting once if you want
to view other kind of media files.
12-16. Camera seems NOT write any picture into my “Empty SD” card and displayed with Memory Full:
1. You must format the SD card which was ever used in the other device before applying it in this camera.
2. Check the current SD card and try to use a brand New SD card instead of your current SD.
12-17. Reset the Unit out of System Halt:
In case the event counter stopped to respond for any sensing, or you notice the LCD is always blank even the Power switch is ON, the system may halt
already to cause the problem. Remove all batteries out of compartment for more than 10 minutes in order to reset the unit. All pictures will be retained and the
unit will resume to the factory default settings. You will need to reprogram with your desired parameters before use.
Please consult your dealer if you have any technical questions or problem while you use the
product before you request to send back for repairing. Most of problem issues may easily be solved
with help from the telephone support.
 Loading...