

WildSpy CAM AC-856 Instruction Manual

Instruction Manual (Ref. AC856; rev. 20151028)
Solar Powered WildSpy Cam
Solar Powered - Time Lapse IR Scouting Camera
Model No: AC-856
This 3 in 1 compact unit has been designed to build-in a Solar system and will keep
your wildspy camera on the go without worrying battery issue in wild field. It is fulfill an
intelligent concept that the solar source is powered in priority and, alkaline battery will works for
backup in order to avoid camera run out of working during a long period of cloudy days. Device
is built-in a 8M pixels high-resolution digital camera and perform 720P vidoe with audio to let you
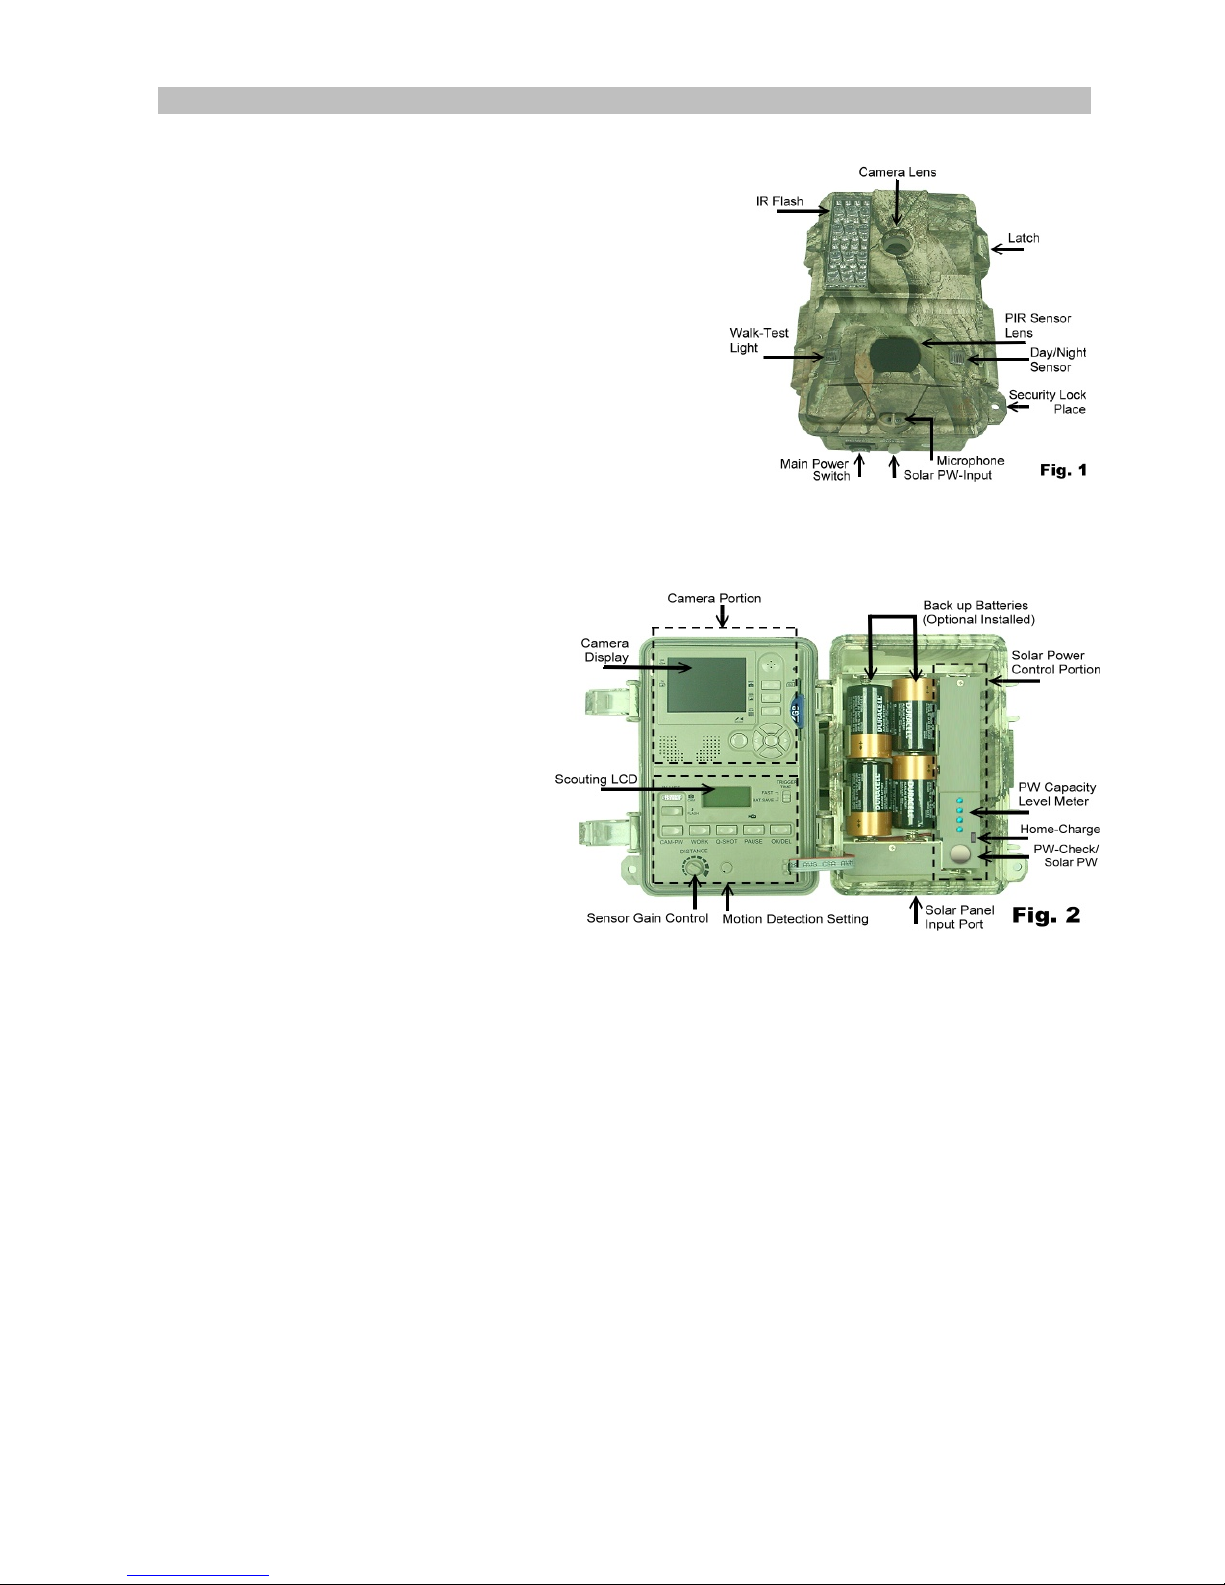
enjoy every wonderful games. The design offer many advanced features while trying to simplify a
hunting game as easy as possible. To help achieve this, the controls are divided into two sections,
Digital Camera Control section and Motion Sensor Control section. Setting and operating with
upper buttons for the digital camera is similar to operate as many other traditional digital
cameras that you are already familiar with. The 2.4’ color screen on top allows you to view
pictures in the field and program for general camera options. Another small LCD and the buttons
on the lower displays and control all scouting settings of the motion sensor to let you know all
details of current scouting status immediately when you just open the cover.
Not only be a scounting camera, it is an all in one solution for creating Time Lapse images. All
shots will be converted to a time lapse video with our recommended free software. Just turn it on,
set the time interval and shot capacity, frame your subject, let it record, you will get amazing
time lapse videos during scouting period !
Features
• Direct connected with a 3W high efficiency polycrystalline solar panel on adjustable mounting for
optimal sun angle from 15 to 90 degrees
• Built-in Replaceable 3000mA/H Lithium Ion Battery on board with a 4 leval capcity indicators
• Over charge/ discharge protection
• Adjustable Solar panel bracket
• Taking Up to 8 Mp high quality pictures and 720P HD (1280x720) video when a motion is detected.
• Dual missions for Programmable Time Lapse Capturing even scounting event is on duty.
• Dual power supported. Intelligent design with priority Solar Powered and 4 pc alkaline
batteries as a back up
• Date and Time Stamp on each picture and video
• All video clips with natural audio sound
• Voice Hunting Diary / Memo recording
• Built-In 2.4” Color Screen for viewing images and videos in field
• 1 second Fast Capture at Night Shot under Fast Trigger mode
• Two modes for extending long battery life and Turbo snap shot speed
• Card Slot support up to 32G SDHC card
• Auto switching IR-cut filter for true color of day time pictures and videos
• Motion detect on duty selection: DAY – NIGHT – 24 HOUR
• Video length option: 3 ~ 90 seconds.
• TV out port support NTSC and PAL TV
• USB port for downloading images to computer and firmware upgrade
• Solar power port to accept 6V/1V DC input from solar pack or equivalent
• Powerful Infra-Red flash to take monochrome clear picture and video at night within 50 feet.
• Separated LCD screens and keys to simplify setting for camera and motion sensor controls
• PIR Pause setting option: 0,1,3,5,10,20,30,60 minutes silent time
• Quick Shot mode allowed for more detection up to 3 events before to next period of pause.
• Burst Mode for upto 5 rapid shots in one event
• Low Battery indicator
• Motion Sensor Radar Icon for Sensor ON- Duty status
• Memory Full Icon
• Video mode Icon
• Walk-Test / In-Used light for Distance and setup
• Dial for adjusting sensitivity of motion sensor
• Back light for Scouting LCD viewing.
• Power Supply: Direct Solar panel powered; Optional back up with D cell Alkaline battery x 4pcs
• Solar Panel Port support a series of optional solar power panels 3W/ 6W /10W; 5V Output max.
• Main unit x1
• AV Cable x1
• USB Cable x1
• Belt Strap x1
• Lens Hood x1
• Instruction Manual x1
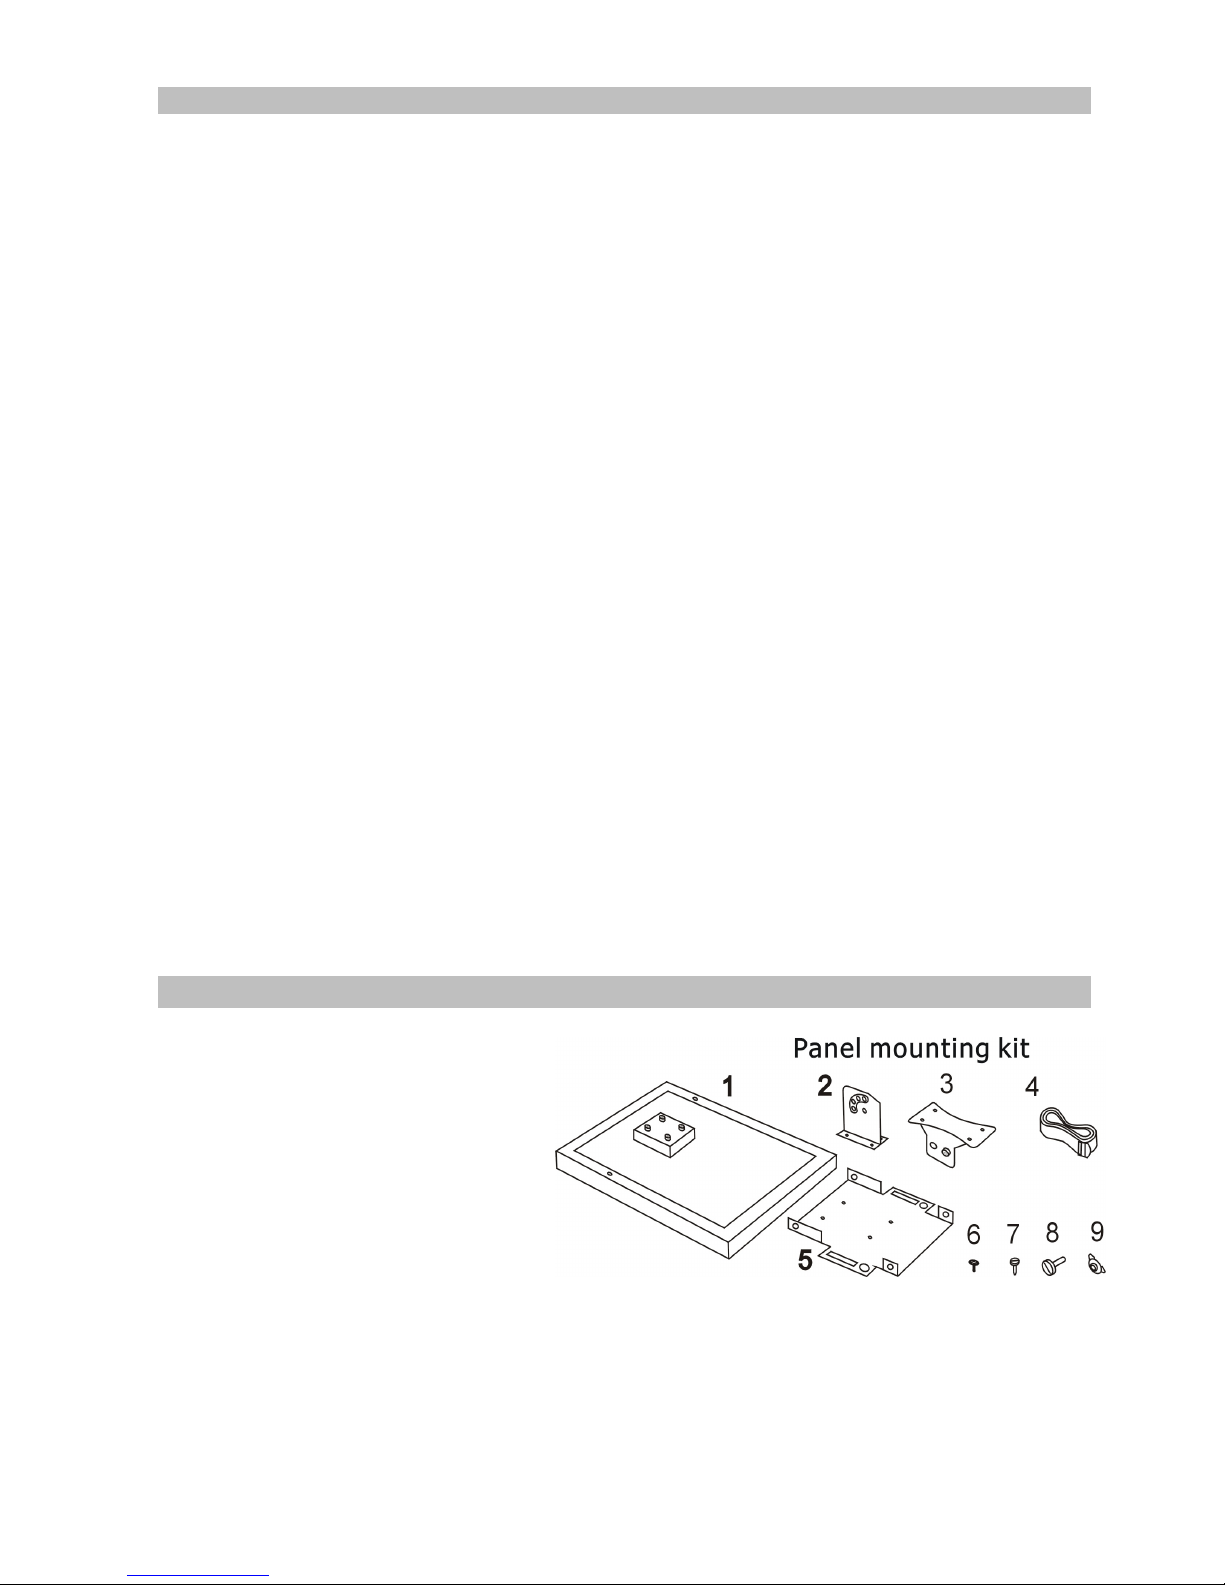
• Solar Panel mounting kit
>Mounting Kit Check List:
1. Solar Panel x1
2. Adjustable Junction -A x1
3. Adjustable Junction –B x1
4. Strap x1
5. Mount Bracket x1
6. Screw-A type x4
7. Screw-B type x5
8. Screw-C type x1
9. Butterfly Screw Nut x1
Accessory Included
OPERATING INSTRUCTIONS
Preparation
1. Remove the Steel security bar (Optional parts) and open
the front door by pulling up the two latches on the side of
the cabinet. Push the Main power switch to OFF (Center).
2. If you are ready to use a solar pack, need to charge the
solar power controller for 100% full by any standard
cellphone charger which is available with 5V/1V output..
3. Install 4 pcs D type Alkaline batteries to the compartment
optionally. It is recommended if the solar pack is not
ready while you want to configure the camera and they
will be used as a back up power in normal operation.
4. This camera must be required a SD card to operate.
Before replacing for another SD card, be sure the Main
PW switch is already at OFF position in order to avoid the data in the SD might be flushed. After that,
formatting the new SD card firstly before operation will be highly recommended if it is the first time to
be used in this device.
Quick Start
An easy way below to tell you step by step
for getting a quick start, it will run under the
factory default Settings if you do not
change any parameter.
1. Push the main power switch
which is allocated in the bottom
of out-side cabinet to ON
2. After PW is ON, system will be
ready for setup. Press CAM-PW
to switch On the Camera.
3. Set the initial date and time for
the Camera and choose either at
Picture or Video mode.(See the
paragraph below for “Date and
time Setting”; Still Picture / Video Mode)
4. Set other parameters of scouting and exit the setting mode after finished. (See more paragraphs
about the Setting for Motion Sensor below). You can ignore this step if you still are not yet
understand what they are.
5. Put it on table or hang unit on a steady tree around 1 meter height with the attached belt and set
the motion PIR sensor almost point to the area which you wish to monitor.
6. Slide the main PW switch to TEST and turn the Sensor Gain Control to Max. (Clock-wise) as well as
wait for after 1 minute. After the SELF-TEST light goes OFF, try to walk in front of motion sensor
to verify how much distance and a zone you will be detected according to the blinking walk-test
light .
7. Push PW back to ON and you can leave. Now the scouting camera will be ready to work stand-by
after 10 seconds. Once an event will be detected, camera will take a shot to save an image as well
as event counter will increase a record automatically.
Factory default settings
For Camera: Capture = Single Picture /Auto Exposure / 3M pixels resolution / Burst Mode =Off / Shutter
Speed = Auto / Quality =Normal / Stamp =ON / Language = English / TV =NTSC / Download =MSDC / Video
Resolution = VGA 640x480 / Frame rate = 15 F/S /Time Lapse =OFF / Camera Mode =IR Flasher /Video
Sound =Enable
For Motion detection: Pause= 1 minute / Quick-Shot =1 / Turbo = PW-Save / Work Duty = 24 HRs / 3
seconds Video length
Start up with User’s Setting
It is suggested to customize your settings after
you have experience to use this device for a few
times.
Switch the PW ON, the lower scouting LCD
show the default settings. You can able to
program with your desired parameters instead of
the Factory default. When the unit exit from
setting mode or no change since PW ON, it will
goes to the motion detection ON Duty mode
automatically after 1 minute.
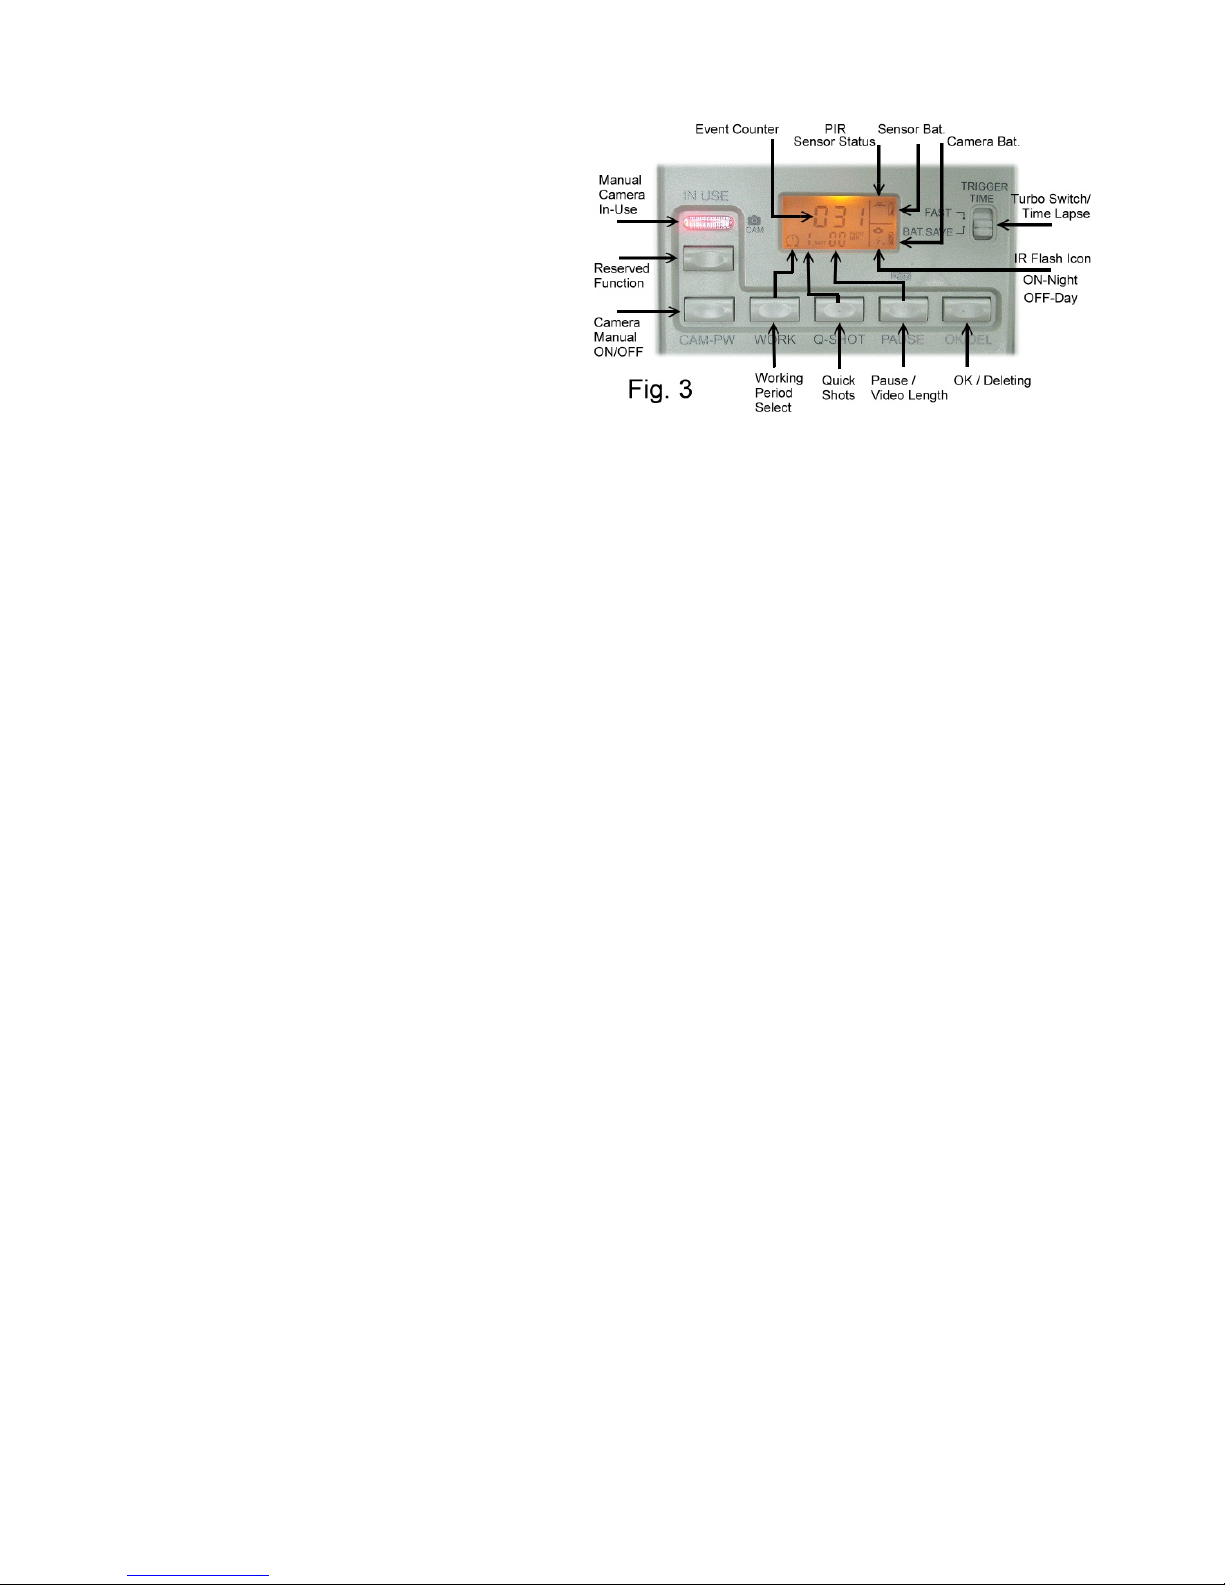
Setting for Motion Sensor Operation (PIR Sensor)
The settings explaination below is referred to keys on the lower portion of the inner panel. See the Fig.3
Select ON DUTY for Day, Night or 24 hours
The WORK button is pressed once to enter the 24 HOUR > NIGHT > DAY options, the 24 (Clock) On Duty
icons will be blinking. Press the key again to move the blinking icon to the SUN; Moon. Press the OK/DEL key
on right to accept for the desired status and then it become stable. The Clock icon is represented for motion
detection will be valid 24 hours. The SUN is represented for day working. The MOON is represented for Night
only. If ON Duty is ready, an animation Radar will run to show the device can sense a motion in this period.
Select for Quick Shot
Quick Shot allows for more images to be taken if additional motions may be detected after the 1st
motion and the camera will still be ready for more shots of instant motions. If the Burst mode is set for OFF,
you can choose 1~3 additional events which will allow camera to shot between every 20 seconds in order to
have a group images when many animals are passing-by. “1” is the default that only one picture to be taken
and then goes to PAUSE time. “2” or “3” will re-arm the sensor for taking shots in further the second and third
event if more animals are following. (Example of use: On a trail when you want a picture of what is
following the first young deer. Like a smart buck, it always walk on the last). A time-out of each shot
is around 20 seconds. The system will goes to Pause mode after a total number of events are done or time-out.
Note: This function is not the same as the burst mode. Burst will be used for difference purposes.
Pause Time
This is a silent period between motion sensor does able to detect each event for a capture. The sensor will not
work within the gap. You can select 00, 01, 03, 05, 10, 20, 30, 45, 60 minutes for a PAUSE option. Press the
PAUSE button once to enter for setting. Press again to change the blinking No. until the desired time appearing.
Press OK/DEL to accept it.
Change for Movie Length
This option will let you determine how long for each video to take. There are 3, 5, 10, 20, 30, 45, 60, 90
seconds of video length to be selected. The PAUSE key is shared for two functions. Press and hold the PAUSE
key for 3 seconds, a blinking video camera icon will appear to let you know you already enter for video length
setting mode. Then press PAUSE repeatedly until your desired length appears. Confirmed by the OK/DEL key.
NOTE: To take Video during scounting, not only to preset a video length, you also must be required to change
for VIDEO mode in the camera setting. Otherwise, the device still does take pictures.
OK/DEL
It is a key for shared with two functions. Any time you have done to program the WORK, Q-SHOT and
PAUSE / Video Length, just press the OK/DEL key to accept a new change. On the other hand, press and hold
it with 3 seconds, it perform the DELETE function that all event counts on the scouting LCD will be cleared. All
images and videos in camera are still safe even the event counter is cleared to zero.
 Loading...