

WildSpy Camera Outdoor Products ™
Operating Instruction
Ref.: 8200 ver.20110628
DIGITAL TRAIL CAMERA
Model No: AC-820
Thank you for purchasing the WildSpy Cam. This unit has been designed for friendly used, plug and
play operation. With a built-in 4MG picture quality digital camera in a water proof case for outdoor
installation, the unit is ideal for wide range applications such as Animal trail, Hunting trial, Home
security, Warehouse monitoring as a surveillance device. It is great for an entry level user who just pay
affordable expenses to enjoy a digital game camera in the first time. It can be triggered by any movement
of live animals or human in a location, detected by a highly sensitive Passive Infra-Red (PIR) motion
sensor, and take a capture instantly and keep record in the event counter. Those collected event data is
useful to let you study their activity within a specified period. You may set the event sensor activity in
day time; after sunset or 24 hours. The device will keep all events in memory and display them fro a low
temperature LCD. This WildSpy Cam can take 4M pixels pictures or 3~90 seconds of AVI movies
which stored in 16M internal flash memory or an external CF memory card. In order to simplify the
operation, the controls are divided into two sections, Digital Camera Control section and Motion Sensor
Control section. Setting and operating for the digital camera is similar to operate as many traditional
digital cameras that you are already familiar with. The 1.6’ color screen on top allows you to view
pictures in the field and program for many camera options. Another small LCD on the lower displays all
scouting settings directly and monitor the current scouting status, event counts, as well as battery
capacity. Push buttons on upper portion are used for operation of camera options, other buttons in lower
portion are used corresponding to each scouting setting change individually. Two battery supply system
can able to retain all scouting parameters for a very long time even camera power is dead in the field. It
is ideal for no longer to worry about lost any parameters setting during either bank of battery are bad or
replacement.
1 Features:
• Taking Up to 4 Mp high quality pictures and up to 90 seconds QVGA video clip
• Date and Time Stamp on each picture
• Built-In 1.5 inch Color Screen for field viewing
• Two modes for extending long battery life and Turbo snap mode (Fast shot )
• 16 Mb internal flash memory
• Card Slot support standard CF card
• Motion detect activity selection: DAY – NIGHT – 24 HOUR
• Video length option: 3 ~ 90 seconds.
• TV output support NTSC and PAL TV
• USB port for downloading images to computer and firmware upgrade
• Powerful strobe flash to take clear colorful pictures day and night within 50 feet.
• Separated LCD screens and keys to simplify setting for camera and motion sensor controls
• Pause setting options: 1,3,5,10,20,30,60,90 minutes
• Quick Shot mode allow for more detections up to 3 pictures.
• Max 400 events counter display
• Separate Icons for Battery Power of Motion sensor and Camera
• Radar Animation for Motion Sensor ON- activity status
• Memory Full Display
• Video mode Display
• Walk-Test light for Distance and setup mode
• Dial for adjusting sensitivity of motion sensor
• Back light for scouting LCD viewing.
• Separated battery system for Camera (D cell x 4pcs) and Motion sensor (C Cell x3pcs)
1-1 Accessory Included
• USB Cable x1 pcs
• TV Cable x1 pcs
• CD ROM for Camera Driver x1
pcs
• Belt x 1 pcs
• Main unit x1 set
• Steel mounting bracket plus U
bar
provides several mounting options x1 set
(Optional, May not included in this
package)
2 Preparation
2.1 You should save the packing material
and gift box that in case you should require
to ship this unit.
1. Push the power switch to OFF (Center). Open the top cover by pull up the latches.
2. Install 3 pcs UM-2 (C type) size Alkaline batteries into the right of battery compartment for
scouting sensor operation
3. Install 4 pcs D type Alkaline batteries to the left of compartment for Camera operation. Pay
attention to the battery polarity according to marking on the compartment because 2pcs are in paralleled
installed
4. Install CF card: The system will support Max 4G CF card. Insert a CF card according to direction
shown on panel. The CF' card trademark must be faced up.
5. Remove the protective sheets from the flash lens; Camera lens and PIR (motion sensor ) fresnel
lens.
CAUTION: Before replacing a CF card, be sure the PW switch is already at OFF position in order to
avoid the data in the card might be flushed.
2.2Quick Start
An easy way below to tell you step by step for getting a quick start with the WildSpy Camera, it will
run under the factory default if you do not change any parameters. When the device does exit from
setting mode or no key-in since PW ON, it will goes to the scouting operation mode automatically after
30 seconds. That means when an animal or human is detected, an event will be recorded and the camera
will shot immediately. The event counter will be renewed at once.
1. Push the main power switch which is allocated in the bottom of cabinet to ON
2. Calendar Setting: Set date and time to update the Current time.
3. Choose either Picture or Video as your desired capturing mode.(See the paragraph below for “Date
and time Setting”; Still Picture / Video Mode)
4. Turn the sensor gain (sensitivity) control to the Max.
5. Mount the unit on a steady tree around 0.5-1 meter height that point to the zone which you wish to
monitor or just put it on table for a trial test only
6. Push the main PW switch to TEST and walk in front of motion sensor in order to verify how much
distance and a zone which you will be detected according to the flashing walk-test light .
7. Push PW back to ON and leave. Now the scouting camera will be ready to work after 60 seconds of
warm-up time.
CAUTION: Before left, be sure to double check the latches if the door is closed completely
2-3 Factory Default Settings:
For Camera: Capture = Single Picture /Auto Exposure / 2M pixels resolution / Quality =Normal /
Stamp =ON / Language = English / TV =NTSC / Download =MSDC
For Motion detection: Pause= 1 minute / Quick-Shot =1 / Trigger Time = PW-Save / Work Duty =
24HRs
Now you can try to get back the device to see if you have been captured for a few pictures. It is
suggested to customize your settings if you are an experience user.
3 ADVANCED OPERATION with User’s Setting
Every times you want to change for a new setting during a normal scouting operation, you must switch
OFF the main Power and back ON. While switch the main PW to ON, the lower LCD shows the current
settings and the upper color screen is always OFF. Now you can able to program with your desired
parameters instead of the system default for motion sensing operation.
Caution: All keys seems no function temporarily if an event is being processing or a few seconds after
just power up. If you switch OFF for the main PW at any time, the WildSpy Cam will wait for the
current event to be done and goes to OFF later.
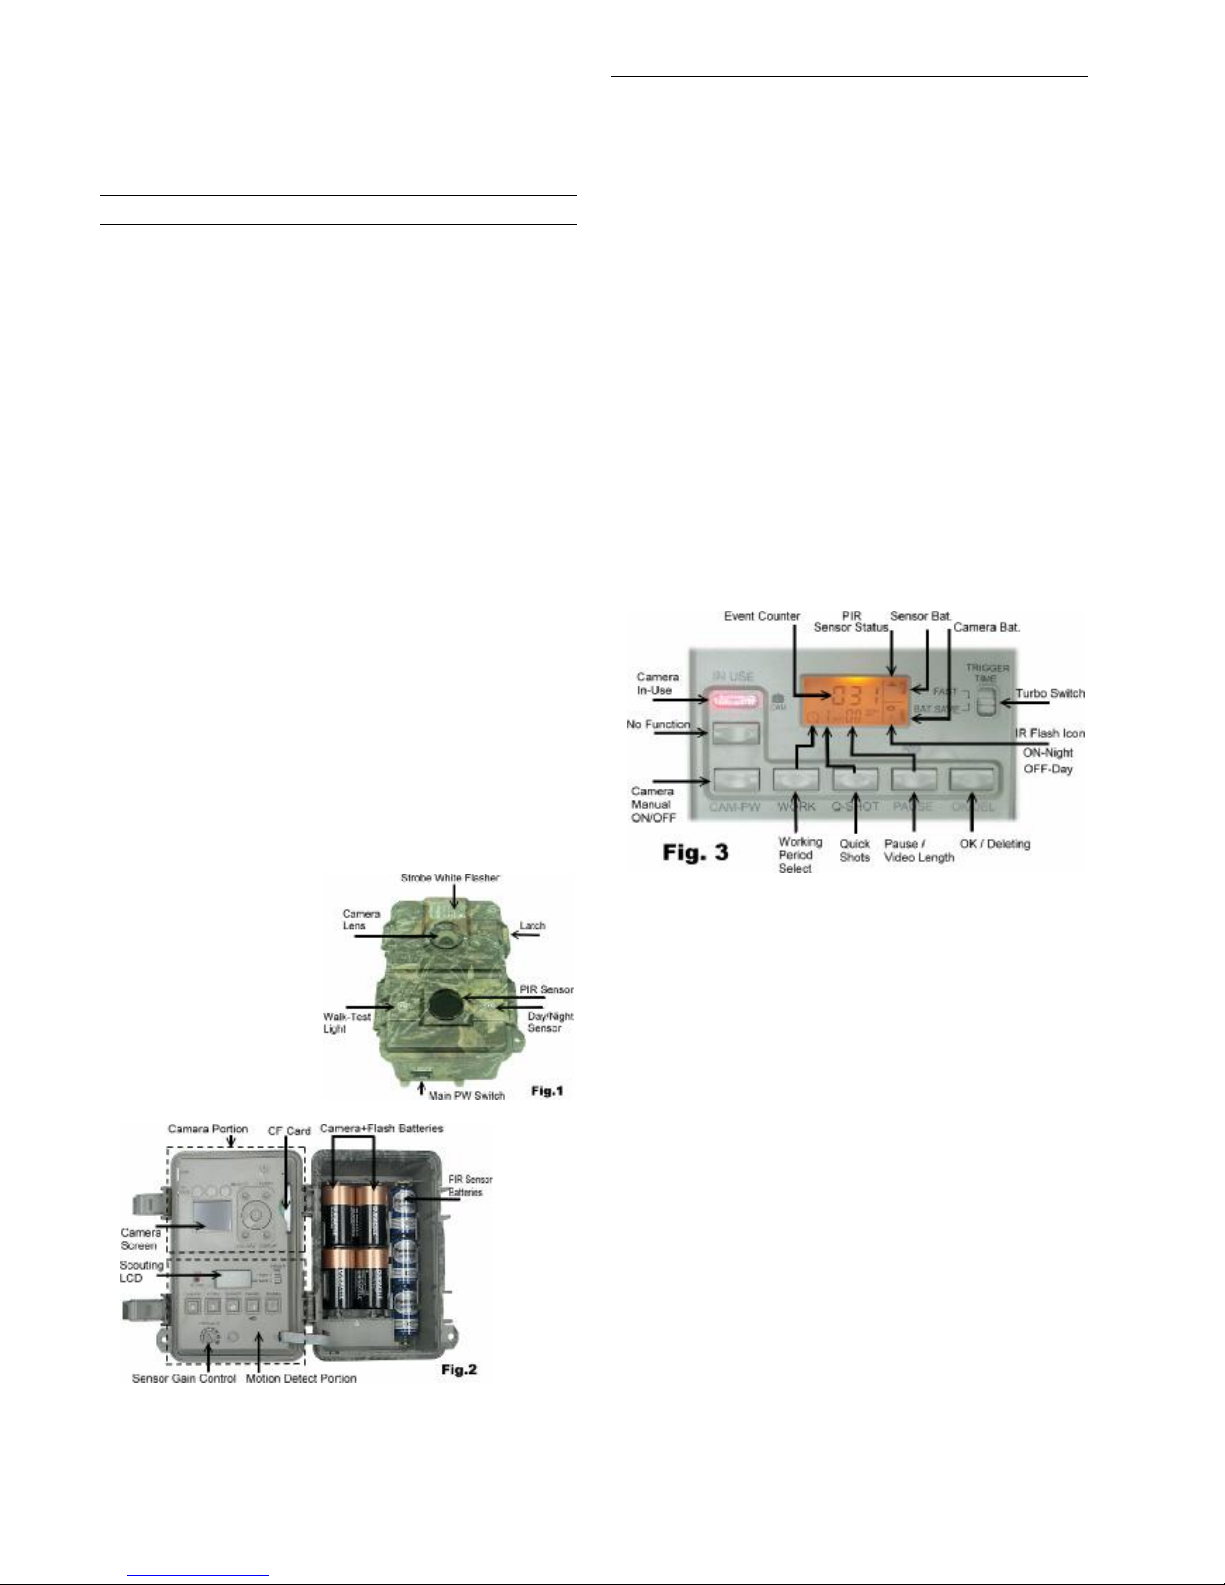
Setting for Motion Sensor Operation (PIR Sensor)
3-1 Select WORK for Day, Night or 24 hours period
You may define a specified period for the sensor to detect an event by pushing the WORK button. A
corresponding icon will flash for your choose. Then press OK/ DEL key to confirm. There are three
period to be selected as DAY; NIGHT; 24 Hours which are represented by the SUN;MOON;CLOCK
icons.
3-2 Select forQ-SHOT ( Quick Shot)
Push Q-SHOT, the current setting will be flashing on LCD, press one more time to change for your
desired number of shot during an event. The Max shots will be available up to 3 times within each event.
Interval of each shot will be about 20 seconds. An interval times may be longer at night depending on the
charging time of FLASHER.
3-3 Event Pause
This is a time lapse between the motion sensor does able to detect event again after the previous event.
The sensor will not work within the time lapse. You can select 01, 03, 05, 10, 20, 30, 45, 60, 00
minutes for a PAUSE option. Press the PAUSE button once to enter for setting, The default 01 will
be blinking. Press again to change it until the desired choice appears. Press OK/DEL on right to
accept it.
CAUTION: Within the PAUSE period, there is no an animation on the radar icon.
3-4 Movie Recording Length:
The PAUSE key is shared for two functions. One is explained as above. The second option will let you
define how long to take each video. Press and hold PAUSE key for 3 seconds, a video camera icon will
be blinking. Press one more time to change for your desired time of recording from 3-90 seconds. Press
OK / DEL key to confirm. This setting will be effective only when you already set the capture mode for
VIDEO. See the description in the chapter of Shooting with Movie Mode below.
3-5 OK/DEL
It is a key for shared with two functions. Any time you have done for programming of the WORK,
Q-SHOT and PAUSE / Video Length, just press the OK/DEL key to accept a new change. On the other
hand, press and hold it with 3 seconds, it perform the CLEAR function to renew all event counts to be
[000]. But it is not effect to any image or video contents in the camera memory
3-6 Battery Check
Two icons are for difference battery banks. The Bat-icon on the upper right corner is represented for
motion sensor power. The second on the lower is for camera and IR flash power. All Bat-icons will
indicate three status as below:
GOOD: Battery Icon show with solid.
LOW: Battery Icon is half blank.
BAD: Battery icon is totally blank. In this case, the Lighting Flash icon will be also disappear. It does
alert that you must replace them with new batteries immediately. Camera will not work at night under
this battery bad condition.
Caution: If you notice one of a bank is bad, you just have to replace all batteries with blank new
completely against the corresponding battery bank. Do not try to replace some of them only. But two
battery banks are independent to each other in the system. So you do not need to replace for the other
battery bank. Normally, the batteries for PIR sensor will last more than 4-6 months if the battery quality
is good. After replaced either battery bank, remember to re-boot the device by the main PW switch.
3-7 Sensitivity Adjustment
The DISTANCE dial on inner panel is used for adjusting sensitivity of the motion sensor (Gain Control).
By turning the dial to the right, sensor sensitivity is set to the Max to detect animal over 50 feet away.
You may reduce the detection distance for taking picture with a larger animal target.
Caution: It is recommended to set MAX in warmer environment like in the summer time.
3-8 Operation Modes
After finished above initialized installation, now the device is ready to detect for an event. Firstly you
have to mount the unit firmly on a suitable place like on a tree by a strap.
The mode switch is in the lower of cabinet. There are three modes to be selected under difference
operation.
3-8-1 PW-ON Mode
The WildSpy Cam will be always required working under this mode. Since the PW-SW is pushed to
ON mode, the motion sensor will begin to warms up for 1 minute, then start to detect motion for taking
pictures/ Video.
3-8-2 PW-OFF Mode
Slide the PW to the center position to turn the system power OFF. All pictures and current settings as
well as event counts will be retained at this mode and internal real time clock will still run.
Caution: Remember to remove all batteries in case you will no longer to use it in order to avoid the
metal terminals to be oxidized due to the leakage current from battery itself.
3-8-3 WALK-TEST Mode
Walk-Test Mode is used to verify the detection range and pointing zone before placing it in the field.
After mounted the unit on a tree, push the PW switch to Walk-TEST. The Walk-Test LED will light up
last 1 minute to warm up. A radar animation icon with TEST alert is remaining blinking during
Walk-Test mode. Then, Walk-Test Light will goes off and will alert with 3 times flashing once you will
be detected in front of the device. Now you try to go far away to check how long the PIR motion sensor
will still see you. The camera does not take any picture during this test process.
Note: The system will resume to normal Scouting ON DUTY mode automatically after 3 minutes
(Time-Out) since no longer detection of walk-test to be triggered in order to avoid user might forget to
push the PW switch back to ON before he left.
3-9 Walk-Test LED+ DC In-Use Indicator
Both lights will be ON during the first minute of Walk-Test mode warm-up and Camera setting mode.
They will blink for 3 times once a walk-test motion is detected.
In the PIR scouting setting mode, an instant flash is response to each valid key input.
3-10 Event Count Display
Within a specified working period, when an animal or human is closing to the trail monitor, an event
will be recorded and the digital camera will take a picture automatically. A max count will be up to 400
You will be alerted with a blinking signal continually with “FULL” in LCD, and the digits 400 will be
flashing. In this case the PIR sensor and camera will still work for sensing and taking images even the
event count reach to FULL.
3-11 Delete Events
Press OK/DEL key and hold for 3 seconds to delete all records. The TOTAL EVENTS will be
flashing for 2 seconds to confirm you that the counter to be renew successfully.
3-12 Turbo Shot
There is switch knob on the right of the scouting LCD. Slide the Trigger Time switch to FAST mode,
the DC will be set for the fastest speed for shooting. In this mode, capture speed will be 1.3 second that
double faster than the setting in the BAT-Save while a motion is detected. Setting of BAT_SAVE will be
ideal for extending battery life. In case you expect to resume the FAST mode to be Bat-Save, slide the
knob for BAT-SAVE and then reboot the Device.
Caution: During the FAST mode is activated, you will not be able to turn on the camera by pressing
CAM-PW key any time except rebooting the device.
3-13 Flasher Operation
The internal FLASHER will work and to be charged after a night shooting automatically at night. It
will not work and not be charged in day time. A normal charging time will be taken 20~ 30 seconds. The
Flash icon on the scouting LCD will be blinking slowly during charging.
If the battery become too weak to cause a charging time may be longer then 60 seconds and, the
charging processing will be stopped automatically and the digital camera will no longer to take picture at
night time till to replace new batteries. The FLASHER with inhibit symbol on the scouting LCD will
become with faster blinking. But the camera may still working at day time even battery is bad.
Setting for CAMERA / Operation
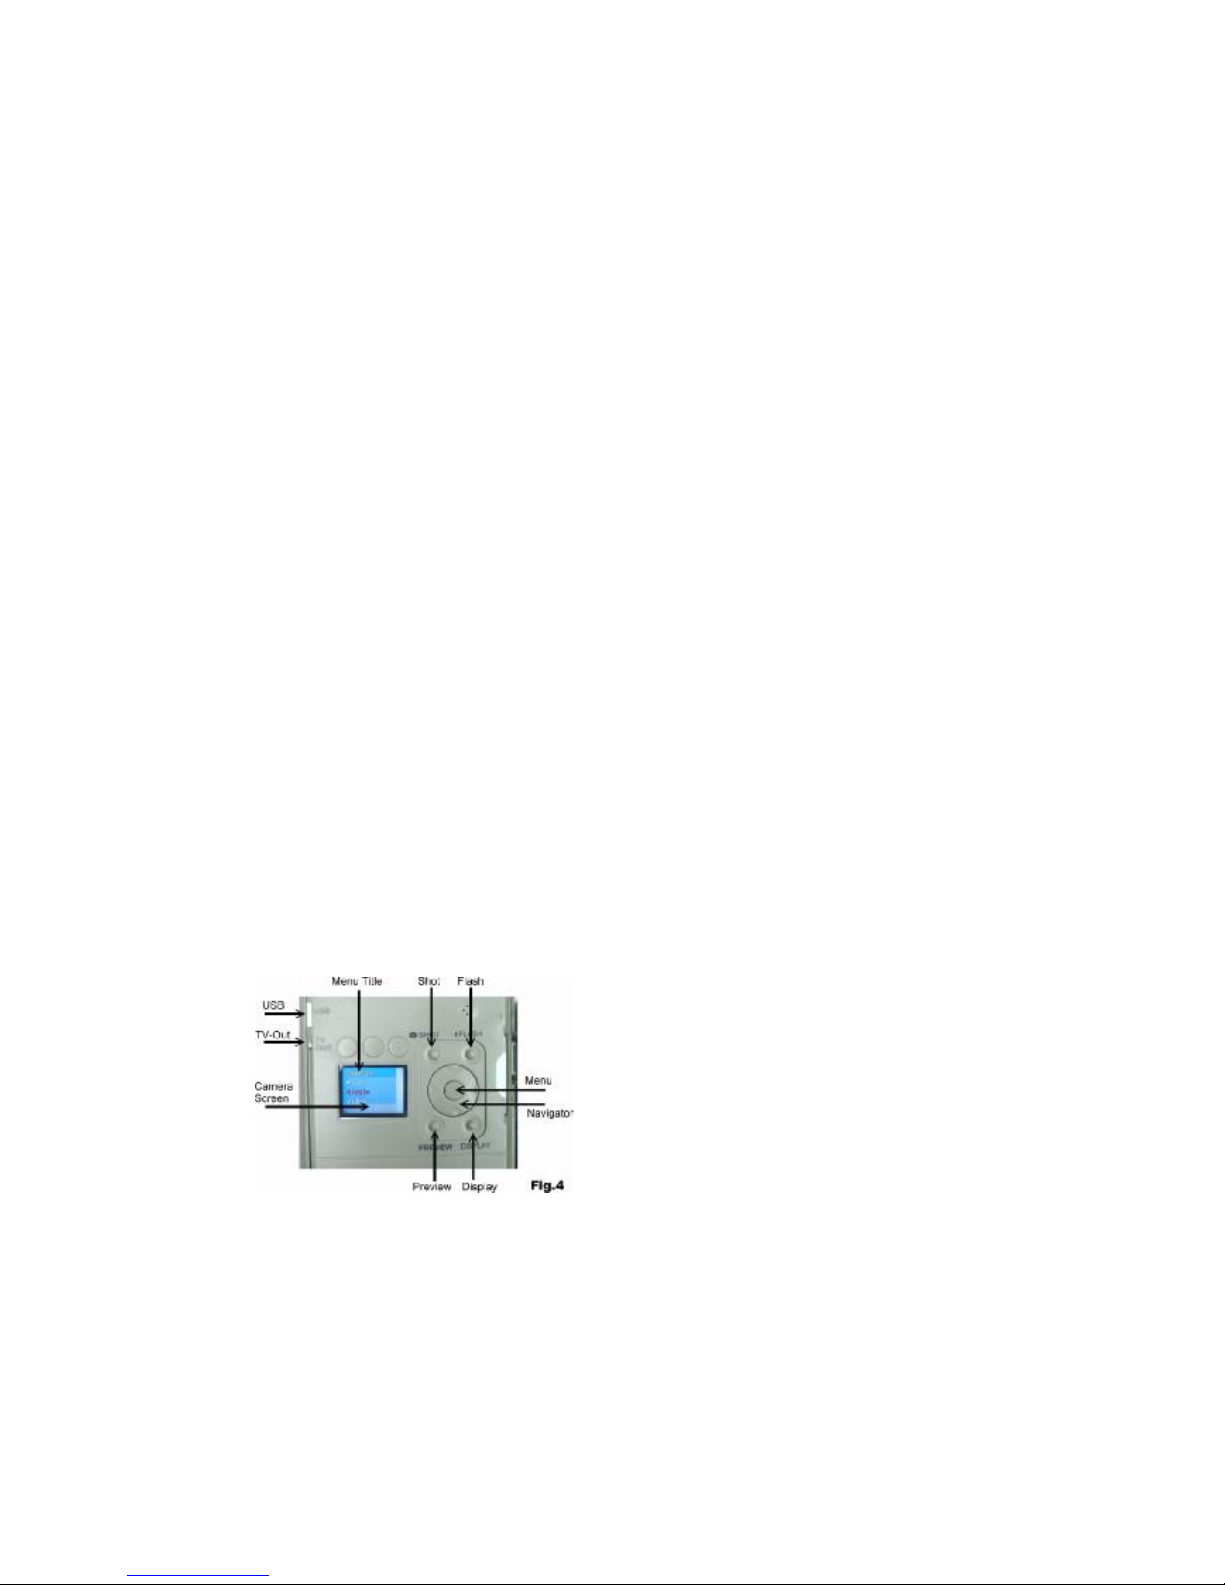
3-14 Description for Camera Operation Keys which are in the upper portion of the inner panel
See Fig.4
SHOT
FLASH
PREVIEW
DISPLAY
MENU (OK Key in
Center)
Navigation Keys
UP/DOWN/
LEFT/RIGHT
3-15 CAM_PW (Camera
Power Button)
This button is located on
the left of the lower portion
of inner panel. You have to
use this button to switch on
the camera manually when you need to change the camera setting or down load pictures from camera.
3-15-1 Turn Camera ON: Before turn ON the camera, be sure the Main Power switch at ON position
and wait for 10 seconds after Power UP. Press CAM_PW once, Both the IN-USE and Walk-Test LED
are lighted. The camera status small light on the top right corner will alerts with red light for 2 seconds
to show camera is PW ON already. Camera will start to works at the default of the LIVE VIEW mode.
But camera screen is remaining black until either DISPLAY or PREVIEW key is pressed. There are two
modes that called LIVE VIEW and PREVIEW for camera OPERATION. In either modes, you can
change a setting of camera, preview pictures, take a picture manually, download pictures to PC.
3-15-2 Turn Camera OFF: When you did finish using the camera, remember to turn the camera OFF by
pressing the CAM-PW switch again.
Caution: During camera ON period, motion sensor will stop sensing until CAM-PW is turned to OFF.
3-16 Navigator Keys / Menu Button Usage:
Four directional keys represent for the Left / Right / Up / Down keys. The center knob is the MENU
button. All camera settings will be programmed with them. Press the MENU to display the option title of
modes. Select a title that you wish to change by pressing the left or right navigator key. Highlight your
choice from a pull down list of the displaying title by the Up or Down Key. Press the MENU to accept
the change and exit.
3-17 Camera Setting Menu
There are two main menus for each modes:
A. Live View Mode
B. Preview Mode
Both Live View and Preview menu come with difference titles which are described as below:
A. Live View Mode
A-1 Display key:
Press DISPLAY to turn ON the camera screen and then touch it time by time to change for difference
functions. For Example: Turn ON screen > Clean Screen (Remove information from screen) > turn
screen OFF repeatedly.
With the Live display mode, it is used for a manual shot or change setting of camera parameters like
selecting picture /video mode; resolution; image quality; calendar stamp; firmware upgrade…..
A-2 Taking a Photo/ Video Manually
SHOT key :
Push it once to take a picture any time while camera is ON whatever the screen is OFF or ON. For
taking a video clip, press SHOT to start taking, a stop watch counter will work and press again to stop.
FLASH Key : Turn the FLASHER on / off during you would like to take a picture manually. It is a
toggle switch button. The flasher status will be indicated on the top right corner of the screen.
A-3 Change Camera Capture Setting
Since camera is ON, press MENU key to enter the camera capture setting menu that consist of 7 titles. .
All of the Title / Items scrolling in the setting menu one by one are explained below:
1. Capture
a. Exit
b. Single (Take Picture)
c. Video (Take Movie)
2. Resolution
a. Exit
b. High 4 M 2304x1728
c. Normal 2 M 1600x1200
d. Basic VGA 640x480
3. Quality
a. Exit
b. High
c. Normal
4. Date / Time
a. Exit
b. Set
c. Stamp ON/OFF (A Choice for calendar showing on each image)
5. TV out
a. Exit
b. NTSC 60Hz (Default setting, Used in North America)
c. PAL 50Hz
6. Language
a. English
b. French
7. Bright-ISO
a. Exit
b. Auto (No selection for user here)
A-4 Capture Mode
A-4-1 Single (Taking a Picture)
The system default setting is Single Still Picture Mode for capturing colorful images at day and night.
Once the motion sensor does detect a motion, camera will snap it into the memory. Scouting EVENT
counter will renew the reading after each event.
A-4-2 Video Mode (Taking a Picture)
Move the highlight to Video and press MENU key, now the VIDEO mode is selected. The unit will
take video clips at day time only. Since an event is recorded, a video-cam icon will appear in the
lower scouting LCD that to alter you are in video mode now.
In case you would switch back for Single Picture mode, it is required to restart the WildSpy Cam and
turn ON camera by pressing CAM-PW, then highlight the SINGLE from Capture Title.
Important: If the unit detects the camera battery bank becoming too weak and a blank battery icon
appear, WildSpy Cam will stop taking pictures at night time. But it can still take day time pictures or
video.
A-4-3 Resolution
You can choose a desired mega pixels from 1.3Mp / 2Mp / 3Mp / 7Mp by UP and DOWN key.
A-4-4 Quality
This option is defined the JPEG file compression. High means an image file will be larger under better
quality of image.
A-4-5 Date and Time Setting
Since you are the first time to use WildSpy Cam, it is required to update with your local time. In either
of modes since CAM-PW power ON, press the MENU key to view the camera setting menu. Then Press
Right key to find Date /Time titles. Highlight “SET” by using the DOWN key. Push the center “MENU”
button to display the Calendar and move the cursor staying at the desired item by RIGHT or LEFT
button and change them with the UP or Down until to finish. Press Menu to accept with YES.
Caution: The calendar is shown in military fashion with 24 hour format. Example: 2:00 pm will be
shown as 14:00.00. (Hour: Minute: Second)
Stamp ON/OFF
Toggle the Stamp option ON/OFF to show whatever the calendar on all images or not. But this
feature will not function in video mode.
B Preview Mode :
B-1 View Images
Every times you want to view images on the color screen or TV set during a scouting mode, you must
switch OFF the main Power and back ON and then press CAM-PW. While camera is ON and press
PREVIEW key, Camera will be switched to Preview mode at once and show the last image. It is also a
toggle button let you skip between Live View vs Preview mode. During in Preview mode, the DISPLAY
key become for skipping Full View of an image > Clean screen > >Thumbnail pictures.
B-1-1.View Image /Video with TV
The RCA end is plugged in the TV Video-In of your TV. To view pictures on TV set, the
camera is required in Preview mode. If you pull out the TV cable, the digital camera will switch
to the internal viewing screen display automatically.
Caution: The last picture taken will be the first to appear and will include a display of the total number
of pictures stored and the number of this frame. Example: 0024/0036 is the 24th picture of a total of 36
pictures.
B-1-2 Clean Screen for Viewing
During viewing enlarged 1:1 images or videos, press DISPLAY key to clear the On Screen
Information for a clean screen. It is a toggled function.
B-1-3 Digital Zoom
Whenever in the live display mode or viewing a full size picture at Preview mode, press the UP key to
Zoom In and the DOWN key to Zoom Out for a closer shoot manually or see more details when
enjoying an image.
B-1-4 Pan after Zoom
After Zoom-In, you can press MENU key to activate the Pan function to view more details of image
by pressing either 4 directional keys.
B-2 Change Camera Preview Setting
When you are in Preview mode, press the MENU key to display the menu with 4 titles.
1. Erase Mode
a. Exit
b. One (Delete One photo)
c. All (Delete All items except protected items)
d. Format(Delete Every things in disk)

e. Protect (Protect an image /video)
2. Date / Time
a. Exit
b. Set
c. Stamp ON/OFF (Same as Live View)
3. TV Out
a. Exit
b. NTSC (Same as Live View)
c. PAL
4. USB
a. Exit
b. MSDC (Default for all users to down pictures at any Window platform)
c. SIDC (Only for Win-XP user to download depend on personal hobby)
B-2-1Erase (Deleting Photo)
Press MENU key under the preview mode, Choose deletion of single or all photos by DOWN key
under ERASE title. Press MENU key to confirm deletion.
B-2-2 Protect an Image or Video
During viewing an image or video which you would like to retain in the memory without wash-out by
delete processing, press MENU and highlight the PROTECT option once. Then a small lock icon on the
top left corner of current image to show it is protected already. Repeat the same processing to unlock it.
All of protected items will not be deleted except formatting
B-2-3 Format
After proceed this function, all files in the entire card and internal flash memory will be removed
completely. Be careful to save the files to PC before you try to do it.
B-2-4 TV-OUT
It is used to define what TV system is set for matching your TV set.
Caution: In case your TV is out of options of the WildSpy Cam listing, you have to change your TV set
for NTSC before connecting a cable to TV set.
B-2-5 USB
This option is defined which an user interface method will be chosen for down loading files to PC.
There is no need to change the default “MSDC” which already compatible for most users.
Caution: Before use the USB for down loading images while it is the first time to build a connection
with your PC, a proper driver in the attached CD ROM is required to be installed firstly. See the
paragraph below: “4- Installing Driver”
4 Installing Driver / Down Load Image / FW Upgrade
Once the first time that you connect the camera to computer, PC will detect a new USB device has
been connected and try to looking for a driver. So that, you are required to run the attached CD-ROM
for installing a proper driver firstly before connecting USB cable. Follow the instructions to complete the
driver and software installation.
4-1 Installing USB Driver
Since the CD-Rom is inserted, an auto-run will show a pop up installation menu. If your computer
does not run the setup program automatically, please run "SETUP" file under root directory of the
CD-Rom. Then, click the DRIVER button on the pop up window. Follow the instruction until to
complete itself.
Caution: Every times you want to view or down load images, it is required to re-boot the device before
proceeding when you just terminate a scouting mission.
4-2 Installing Photo Editing Software
There are two simple photo / video editing software for entry level user. You may skip this option and
exit directly if you already have other existing or better software for viewing the pictures or videos.
- Insert the installation CD. Click “ Photo Express “ Button on the Welcome Screen.
- Choose the operation language which you need.
- Install the software according to hints.
- Restart your PC.
4-3 Downloading photos/ Movies to your computer
- Be sure the driver has been installed successfully. Press CAM-PW to turn the camera ON, then press
PREVIEW to view an image.
- Connect your computer and the camera by an attached USB cable.
- A pop up to show the mobile hard disk which is assigned for the removable device. Click
into the proper directory to see all files inside.
- For example: X:\DCIM\100IMAGE\ for Image and Video files. X:\MP3\ for Voice
Memo files.
4-4 Firmware Upgrade / PC-CAM
- WildSpy Cam provide an option that user can able to upgrade with the newest Firmware if need. This
processing is required the camera is turned ON for the Live View mode and a specified FW file offered
by your dealer ; distributor or down load from manufacturer’s web-site. You have to run the Upgrade
program firstly then plug in the USB to camera vs PC. The screen will show “PC-CAM”, follow the
instructions in the pop-up window to do. Reboot the device to finish the upgrade processing. If you are
not ready to upgrade with any new Firmware, your current mode is PC-CAM mode which WildSpy Cam
does become a typical PC camera at this mode.
5 Using CF card:
WilsSpy Cam has built-in with 16Mb internal flash memory. Therefore, the camera can capture for
some images or videos immediately even no CF card in the slot. In fact, a 1G CF card is recommended
to increase more storage capacity that allow more than a few thousands of pictures to be saved when
you will leave it in the field.
Caution: Be sure the Main PW Switch is OFF before replacing a CF card in order to minimize a risk
to damage your CF card or loss data partially. This device does support up to 4G CF card. Also, before
using a blank new SD card or used in other cameras, it is always suggested to format it before usage.
Important: If a CF card can not be inserted smoothly, you must retract it and check if a direction of
card is correct or not. Never force to push it hardly. Most of cases with a problem with card usage were
found that caused by an improper insertion.
6 MEMORY MANAGEMENT
In case either built-in or CF card memory is full, a memory FULL and Camera icons will be blinking
on the scouting LCD. The camera will stop to capture. But PIR will still sensing events in order to let
you still know how many total events to be recorded even without images. Replace an empty card or
delete some or all contents then reboot the unit to refresh the memory status. After clear for free
memory, remember to re-boot the device by the main PW switch. The camera will not resume to work
without rebooting the system.
7 MOUNTING DEVICE
Before starting to put this camera in the field for
scouting game, the camera must be mounted in a certain
place properly or on a tree whose diameter will not be
less than 6 inch (15cm) and located not higher than 1M
with your desired mounting method that following the
installation method as shown as below. The design is
reserved to fit for two ways of mounting.
7-1 Belt Mount: This belt is attached in the packing.
See the Fig.5
7-2 Python Adjustable Locking Cable (Not including in this packing): See the Fig. 6
You can able to use a Python adjustable locking cable to provide more security to your WildSpy
Cam. The "Master Lock" brand is a good choice.
With an optional choice, a steel mounting bracket
and U type security bar can be used to provide stronger
security ability. You can buy this accessory from your
local dealer.
Detection distance seems too short …1.Be sure the Sensor Gain control is at Max.
2. Environment may too hot in summer time
No display; and no other response …… 1.It is correct if it goes into scanning mode already
during normal scanning operation
2. The system may halt, uninstall all batteries for 10
minutes and reload again.
A new setting of PAUSE seems…… 1.The new event PAUSE setting will be effected after a always
running wrong previous old event is finished.
2. Reboot the device after change the setting.
No animal showing in some pictures…1.Check if the unit is pointed the direction where the sun is
rising or sunset that the sensor might be triggered.
2. The PIR sensor may detect an animal through vegetation out
of view from the camera.
3. If the animal was moving quickly, camera may not capture it
in time while an animal still staying in the zone.
4. Make sure that the unit was mounted on a steady tree or
other place that does not wobble
Not Detect Motion but LCD seems OK…1. Be sure nothing is in front of the PIR lens.
2. Check the battery status of PIR main battery.
3. Be sure you have turned OFF the DC when
you just finished to use DC for preview or
down loading images. The Self LED in front
must be OFF.
Could not go to TEST mode Try to push the POWER SW to
OFF firstly then wait for 2s, push to TEST again.
No working with USB……………………1. Before use USB, you are required to install a
correct driver. Be sure you have done the
driver installation as the chapter Installation
Driver for Down Load images from USB
2. Check the USB cable plugged between PC and
monitor correctly.
No working with TV……………………. 1. Do not try to use third party cable because it may not
compatible for application.
An image taken less than………. Yes. The focus of this trail monitor is set for take a
2 meter is not clear. picture over 3 meter
Only with many events but less……… The D type batteries may become bad.
or without pictures
Camera In-Use light is remaining ON, ……1. The camera may be time-out and shut down
automatically. but the camera does not Repeat to press the CAM-PW to resume the camera
respond ON.
2. Battery may be too low that could not support the camera
staying ON. Replace with 4pcs D type blank new batteries.
3. The Trigger Time is set on the FAST mode. You have to
switch OFF the main PW and back ON after you try to
operate with the camera
CAM-PW switch does not respond……..1 You may attempt to turn the camera ON too quickly after
the main power ON. Normally, wait for about 10 seconds
until the back light of scouting LCD goes to OFF.
Reset the Unit out of System Halt………In case the event counter does stop to respond for any
sensing, or you notice the LCD is always blank even the Power
switch is ON, the system may halt already to cause the problem.
Remove all batteries out of compartment for more than 10
minutes in order to reset the unit. All pictures will be retained
in the memory and the unit will resume to the factory default
settings. You will need to reprogram with your desired
scouting parameters before use.
Why are every things displayed on…… It might be caused by improper setting of TV signal format.
TV mode without color? Try to change for another setting like TV-PAL <>
TV-NTSC.
If it is still fail, you have to change your TV set to be the
NTSC to match the signal protocol with the camera.
 Loading...