

Instruction MANUAL I HANDLEIDING
WILDPIX X1
English I Nederlands
V1.2

English
V1.2

English
1
Test Condition: LCD screen off. Mode: “Power On” _PIR intelligent automatically monitoring.
12AA Alkaline Batteries
Photos shot per day
Working time
Video clips shot per day
Working time
IR LEDs On
IR LEDs On
1. Introduction
Thank you for choosing the Wildpix X1. We at Wildpix want to offer the highest quality for the
best price, we have certainly succeeded with the Wildpix X1. Also take a look at
www.wildpixcamera.com
1.1 Fully Functionality Introduction
Besides all the functions you may experience from any other similar product. This digital camera
is aimed to offer user the most easy to use experience with many extraordinary features, like
52°FOV lens, 40pcs IR LEDs, 0.8 seconds trigger time, and 1 photo/sec (up to 7 photos per
trigger) multi-shot to capture the whole track of object, user friendly operational menu, etc.
1.2 Application
This digital camera is an ideal product for housing security, warehouse surveillance, and
monitoring wild animals with its camouflage appearance and nice shape. It is convenient to install
or fasten, could be used to take photographs manually and carry on long-time videos in Test
mode.
a. Instant surveillance camera for home, office, construction site, and warehouse, etc.
b. Motion-triggered infra-red night vision surveillance.
c. Animal observation and hunting.
1.3 Power Supply
A. Batteries
Camera runs on 6 or 12AA size batteries, can work with alkaline and high-quality NI-MH batteries.
And we suggest not to use Lithium batteries.
Batteries should be inserted as indicated inside the battery case. Upside down batteries
electrode may cause device malfunction. Also, we strongly recommend changing the batteries
when power icon on camera screen or photo stamp is empty.
Note: Don’t mix batteries types! Different batteries to be used in camera may cause
permanent damage which also violates warranty policy!
Due to different settings, objects activities within camera detection zone, different brands and
quality of batteries, and using environment, etc; we’re not able to list out exact number of photos
and videos that camera can achieve. So given table below only shows approximate number of
photos or videos camera can take with
12AA alkaline batteries.

English
2
12MP
100 photos
64 days
VGA
10 sec
10 clips
59 days
16MP
100 photos
61 days
HD
10 sec
10 clips
57 days
24MP
100 photos
57 days
FHD
10 sec
10 clips
54days
IR LEDs Off
IR LEDs Off
12MP
100 photos
72 days
VGA
10 sec
20 clips
163 days
16MP
100 photos
67 days
HD
10 sec
20 clips
151 days
24MP
100 photos
61 days
FHD
10 sec
20 clips
140 days
SD
Size
Capacity
1GB
2 GB
4 GB
8 GB
16 GB
32 GB
Photo (pictures)
12MP
391
733
1613
3371
6887
13919
16MP
299
560
1232
2575
5260
10630
24 MP
201
376
827
1728
3530
7134
Video (hours)
VGA
00:05:27
00:10:13
00:22:28
00:46:57
01:35:56
03:13:52
HD
00:03:56
00:07:23
00:16:13
00:33:53
01:09:14
02:19:56
FHD
00:02:04
00:03:53
00:08:31
00:17:48
00:36:20
01:13:21
B. Solar Panel
To bring users better using experience, our engineers designed this camera to be able to work
with most standard 12V/1~2A lithium battery build-in solar panels. However, as rechargeable AA
NI-MH need higher voltage for charging that solar panel can’t charge the batteries in using in
camera batteries cases.
C. Power Adaptor—Security Surveillance Purpose
This camera can also be powered by an external 12V/1~2A DC adaptor. Recommend to remove
the AA size batteries when power adapter is used. Electrical power is recommended for security
purposes.
1.4 SD Card Selection
Using a memory card is required to operate the camera. When the camera is "ON" and no
memory card is used, the screen displays "Please insert memory card". The SD slot of the
camera has a 32 GB memory capacity. Before inserting or removing the memory card, the
camera must be turned "OFF". Failing to do so may cause loss of or damage the pictures already
recorded from the memory card. When the SD card is full, the viewing screen indicates "Memory
Full". The following data shows an approximate quantity of photos which can be recorded by the
camera depending on the memory card capacity.
Chart below will show you the approximate capacity of different size SD cards. Please
check to see which size card can fit your needs best.

English
3
1.5 USB Connection
When camera is connected via USB cable; screen display “MSDC”, press “Menu” once, “MSDC”
turns to “PC Cam”, camera now can be used as a PC camera; press “Menu” again, camera exits
PC camera mode.
1.6 Attention
1. Insert the SD memory card correctly, camera does not support SD card hot swap (insertion).
2. Please use high-quality AA batteries in order to prevent battery cells from corrosion of leaked
acid.
3. Use right adaptor (12V/1~2A) of this camera to supply power, and do not invert the electrode
when put in batteries.
4. In Test mode, camera will automatically turn off if no keypad touching within 5 minutes. If you
want to let camera enter PIR Auto Mode again, please manually switch the button to “ON”.
5. In the condition of light screen, no matter in the main interface or menu interface, without any
keypad operations within 5 minutes, camera will turn off automatically.
6. Don’t interrupt power supply during system upgrade, please deliver it back to factory if the
device doesn’t work after upgrading.
7. Do not frequently insert or pull out SD card and battery or plug in and out the adapter when
the camera is on.
8. Do not have any floating objects, such as leaves, strings, or ribbons in the 3M motion detection
zone of cameras, to avoid mistaking photograph or videos.
9. Do not keep camera next to hot irrelevant objects, air conditioner exhaust vents, and light, etc.
to avoid mistaking photos or videos.
10. With a 52° FOV lens and 40pcs IR LEDs, camera need to be inserted with high qualified AA
batteries, in order to deliver enough amperage to power the illuminator consistently in dark
environments.
11. Programmed Date/Time can be saved in camera for 12 hours as long as camera was
powered 1 hour above.
1.7 Key Features
1. 0.8-1s trigger speed;
2. 52 degree FOV lens; 60 degree PIR angle;
3. 24MP/ 1080P@15FPS;
4. Programmable 12/16/24 Megapixel high-quality resolution;
5. 40pcs invisible IR LEDs, offer 20 meters(65 feet) real night vision distance;
6. Crystal clear day & night photo/video quality;
7. 1 photo burst per second to get full moving track of object;
8. Support multiple functions: adjustable PIR sensitivity, Multi-shot (1~7 photos
per trigger), programmable delay between motions, Time Lapse, Timer, stamp
of (camera ID, date/time, temperature, moon phase) on every single photo;
9. Available operation temperature: -25℃ to 60℃;
10. Built-in 2.0" TFT color screen.

English
4
1
3
4
2
576
8
9
11
10
13
14
12
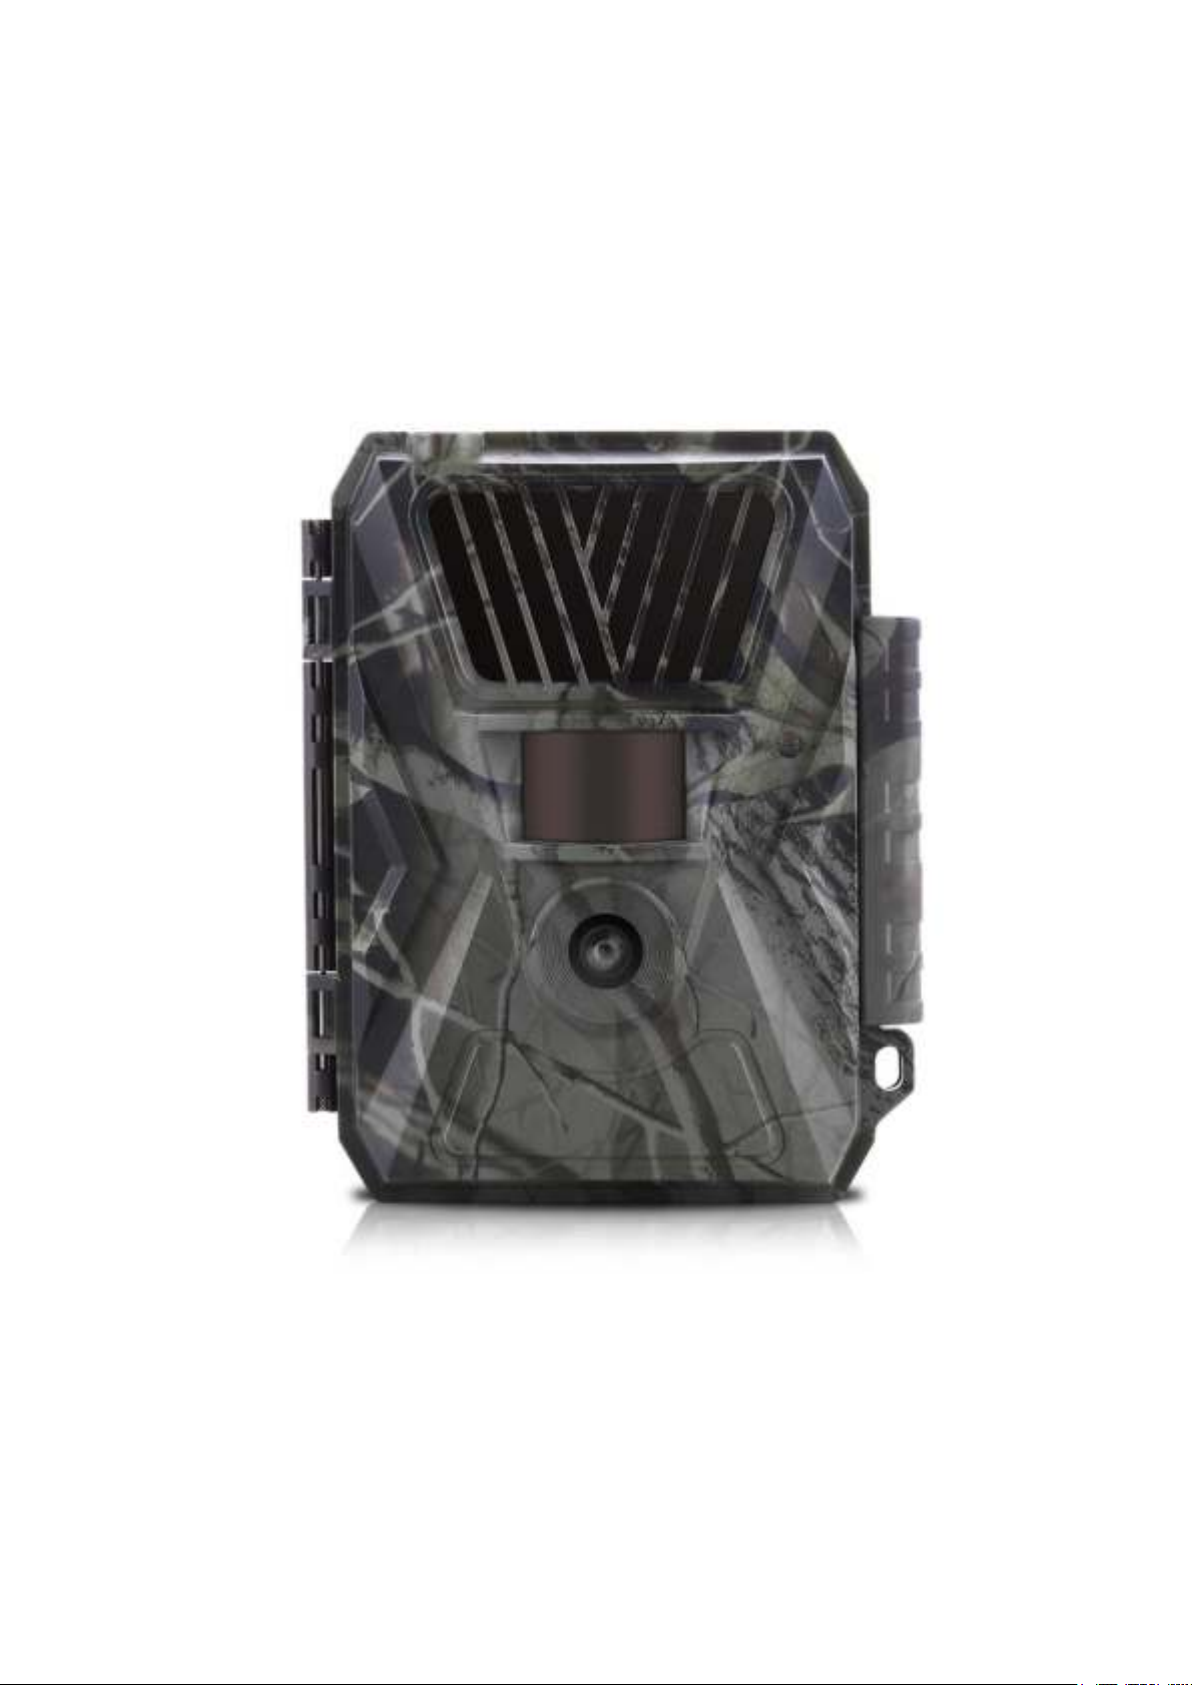
2. Whole View and Details of Camera
2.1 Figure 1: Front View of Camera;
Front View
Bottom View
Internal View
English
5
Note:
1. IR LEDs
2. Indicator LED
3. PIR Sensor
4. Lens
5. DC-in (12V/1~2A)
6. Mini USB Port
7. SD Card Slot (supports 8GB to 32GB)
8. Color LCD Screen (2.0”)
9. Menu Button
10. Navigation Buttons
11. Mode Switch (Power Switch)
12. Battery Compartment (A)
For first group of 6pcs of AA batteries.
13. Battery Compartment (B)
14. OK (Set/Save) Button
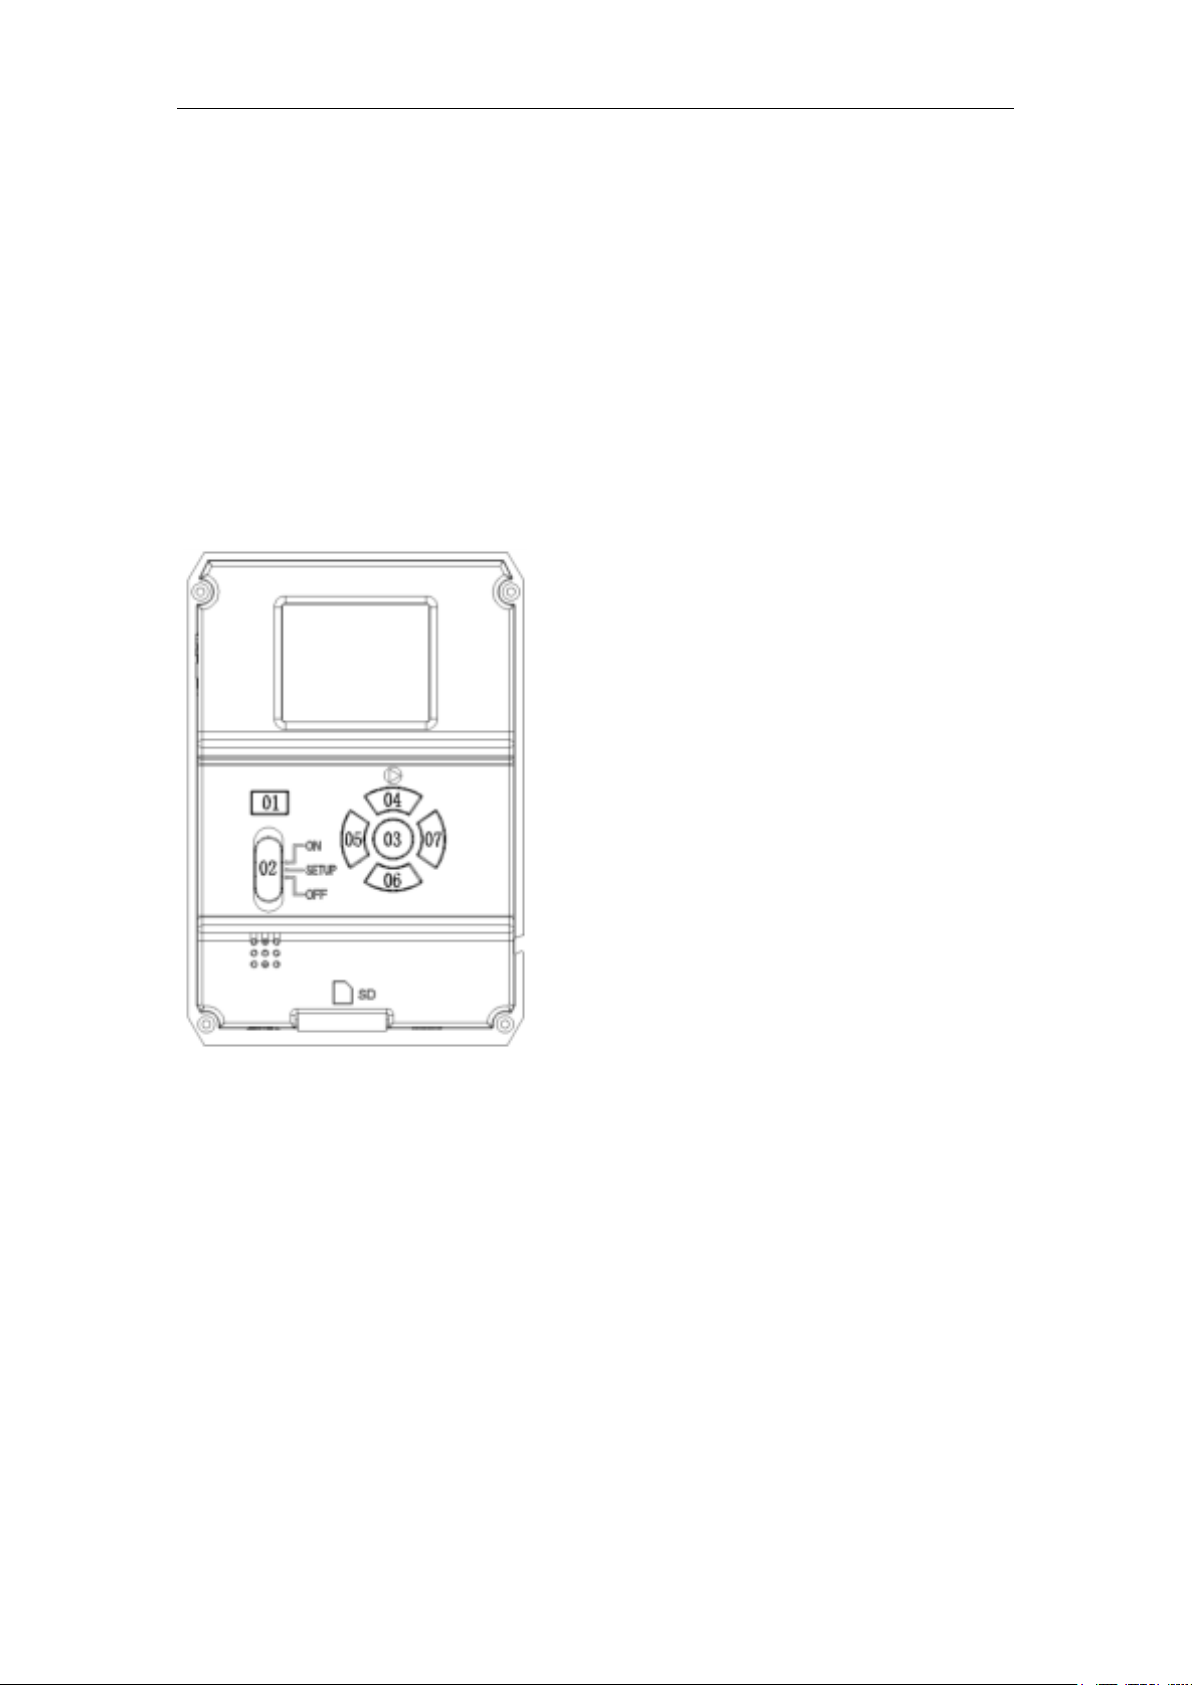
2.2 Figure 1: Function Keys & Other Details
For second group of 6pcs of AA batteries.
01. Menu Button:
When the camera is set at the setup mode, the color LCD screen will light up. When the color LCD is
activated, press the Menu button to enter the camera menu. When under the camera menu, the Menu
button is used as Exit button.

6
Power Switch
1) Switch camera “ON”, the indicator LED will flash 5 times, then camera
enter PIR Auto mode;
2) Switch camera “Setup”, the camera LCD screen will be lightened, then
camera enter Test mode;
3) Switch button “Off”, camera turn off.
02. Mode Switch (Power Switch):
a. OFF: Power off mode
b. SETUP: Setup mode
When the camera is set at the setup mode, the color LCD screen will light up. When the color LCD
is activated, press the Menu button to enter the camera menu for settings, playback…etc. When
under the camera menu, the Menu button is used as Exit button.
NOTE: THE CHANGED SETTINGS WILL ONLY BE SAVED AFTER THE MENU BUTTON IS
PRESSED TO EXIT THE CAMERA MENU.
c. ON: On mode (working mode)
When the camera is set at on mode, the color LCD screen will turn off and start working as the
settings.
English
03. OK (Set/ Save) Button
04. Up Button:
When the camera is set at the setup mode, press the up button can enter the playback mode.
05. Left Button
06. Down Button
07. Right Button:
When the camera is set at the setup mode, press the right button can display time on the color LCD
screen.

7
3. Quick Start
3.1 How to Start the Camera?
Switch ON “Power Switch”
Note: Camera comes pre-programmed with factory default settings. So for test purpose,
user only needs to insert a SD card and batteries to start test by powering on.
3.2 How to Set the Functions?
a. Switch to “Setup”, camera LCD screen is lightened, camera enter Test Mode.
use navigation buttons“←”, “↑”, “→”, or “↓”to obtain favored settings; press
“OK” for confirmation and save the preferred change, press “Menu” to exit current page.
b. Switch to “ON”, camera LCD screen off, camera enter PIR Auto Mode.
c. Camera LED indicator flashes 5 times before it gets into PIR auto working mode.
Note: For some settings, user needs to press “Menu”to save & exit the configuration after
pressing “OK”to confirm (Cam ID, Delay, Time Lapse, Timer, Password)

Nederlands
Hunting
Security
Language
English…
Date/Time
YYYY/MM/D
Camera
Cam
Name
Password
OFF/ON
Camera Mode
Picture/Video/PIC+Video
Image
Image Size
12MP/16MP/24M
Multi-
Video Size
FHD/
HD/VGA
Video
Video Frame
30FPS/15FPS
Video Length
/SS 05-60s
PIR Sensitivity
High/Middle/Low
Timer
OFF/ON
Time Lapse
OFF/ON
Delay
OFF/ON
Battery Type
Alkaline/NI-MH
Other
SD Cycle
OFF/ON
Frequency
50Hz/60Hz
Reset
No/Yes
About
Version:
3.3 Camera Default Settings in
Red Letter
V1.2

English
4. Operation List
4.1 Video/Photo Playback
Switch to “Setup”, camera LCD screen is lightened, camera enter Test Mode;
press arrow button “↑” to enter Playback; press “←” and “→” for selection, “OK” to play
photo/video.
1) Press button “↑” again to exit.
2) In Playback Mode, press “Menu” button to delete files, or format SD card; press “Menu” again
to exit.
4.2 Delete
a. Delete one: delete selected photo/video
Press “OK” to choose, press“↑” and “↓”for selection, “Yes” to confirm, “No” to exit to previous
page.
b. Delete All
4.3 Format of SD Card
a. No
b. Yes: to format SD card via camera
Press “←” and “→” for selection, “Yes” to confirm, “No” to exit to previous page.
4.4 Auto Power Off
In Test mode, camera will automatically enter PIR Auto mode if no keypad touching within 5
minutes. Please manually turn ON it as if you want to do some further configuration.
Note: camera stay in “Test” mode if camera is in Menu configuration pages.
4.5 Operation Menu
Test mode, Press “Menu” once to enter camera setting menu; to navigate setting interface by
pressing “←”, “↑”, “→”, or “↓”, press “OK” for selection, “Menu” to exit to previous page, and
“Menu” to switch alpha/ digits/ symbols.
Note: For some settings, user needs to press “Menu” to save & exit the configuration after
pressing “OK” to confirm (Cam ID, Deley, Time Lapse, Timer, Password)

English
Auto Modes
Settings
Programmable Options
Hunting
Camera default settings are: multi-shot 3P, 12M photo size, 5sec Delay
Security
Camera default settings are: photo + video, 12M photo size, multi-shot 5P,
1080P video size, 10sec video length
Setup
Settings
Programmable Options
Language
English…
Time/Date
Month : date : year; hour : minute : second
Note: Please adjust camera date/time to ensure some functions work as expected.
Camera ID
Cam Name
Select “ON”, press “OK”, to set 4 digits/ alphabets for each camera. Such
function can help user to identify photos are from where and which camera.
Password
Select “ON”, press “OK”, to enable password protection for your camera;
support totally 6 digits/ alphabets long password access.
Camera Mode
Select camera working mode in the menu
Image Setup
Image Size
12MP (4000*3000), 16MP (4608*3456), 24MP (5632*4224)
Multi-shot
Programmable 1~7 photos per trigger

English
Video Setup
Video Size
FHD(1920*1080),HD( 1280*720),VGA( 640*480)
Video Frame
30FPS,15FPS
Video length
05~60 Secs
PIR
Sensitivity
High, Middle, Low
Higher sensitivity is 1) more sensitive to movements by smaller subjects; 2)
longer detection distance; 3) easier for sensor to detect difference between
body heat and outdoor temperature; 4) easier to trigger camera to record. In
high temperature environment, body heat of subjects and environment
temperature is hard to tell by camera, suggest setting
High.
Timer
Select “ON”, press “OK”, to set the beginning time and end time (hour/minute);
camera will only work during the time period user set. i.e.: 15:00 – 18:00;
camera only works during 15:00 – 18:00
Time Lapse
Select “ON”, press “OK”, to set the interval; PIR sensor of camera will be
turned off; camera will shoot pics or video clips automatically upon the interval
user set.
Configurable interval: 5 seconds to 24 hours.
Note: Pls don’t turn ON Time Lapse and Delay simultaneously!
Delay
Select “ON”, press “OK”, to set a time interval that you desire between
photos/videos upon motion. This option avoid camera taking too many photos
or videos.
Example: Camera will wait 1 minute between photo/video recordings with
motion if pre-set time interval is 00:01:00
Configurable delay time: 0 second to 24 hours.
Note: Pls don’t turn ON Time Lapse and Delay simultaneously!
Other
Battery Type
Alkaline/ NI-MH
Choose the correct types of batteries for the camera to perform its best effects.
SD Cycle
Select “ON”, press “OK”, camera will continue to record photos/videos by
deleting earliest photos or video clips.
Frequency
50HZ, 60HZ; improper setting may cause camera screen flicker
Reset
Select “Yes” to reset camera back to factory default settings.
About
Firmware version in camera

English
Effective Pixels
2560x1920
Day/Night Mode
Yes
IR range
20m
IR Setting
All: 40LED, Part: 20 LED
Memory
SD Card (8MB – 32GB)
Operating keys
7
Lens
F=3.0; FOV=52°; Auto IR-Cut-Remove (at night)
LCD Screen
2” TFT, RGB, 262k
PIR distance
15m
PIR Angle
60 degree
Picture size
12MP/16MP/24MP =
4000x3000/4608x3456/5632x4224
Picture Format
JPEG
Video resolution
FHD (1920x1080): 15FPS, HD (1280x720), VGA(640x480)
Video Format
AVI
Video Length
05-60sec. programmable
Shooting Numbers
1-7
Trigger Time
0.8~1s
Trigger Interval
5s-7s
Camera + Video
Yes
Device Serial No.
Yes
Time Lapse
Yes
Microphone
Yes
SD Card cycle
ON/OFF
Operation Power
Battery: 9V; DC: 12V
Battery Type
12AA
External DC
12V
Stand-by Current
0.15mA
Stand-by Time
5~8 months (6×AA~12×AA)
Auto Power Off
Switch to “Setup”, camera LCD screen lightened. In the
condition of lightened screen, no matter in the main
interface or menu interface, without any keypad operation
within 5 minutes, camera will turn off automatically.
Power Off Voltage
Alkaline battery: 6.3V
NI-MH battery: 6.0V
DC power: 6.5V
Interface
USB/SD Card/DC Port
Mounting
Strap; Tripod
Operating Temperature
-25°C to 60°C
Storage temperature
-30°C to 70°C
Operation Humidity
5%-90%
5. Specification

English
Waterproof spec
IP66
Dimensions
144*118*78 mm
Weight
348 g
Certification
CE FCC RoHs
6. Trouble Shooting
6.1 Photos Do Not Capture Subject of Interest
1. Check the “Sensor Level” (PIR sensitivity) parameter setting. For warm environmental
conditions, set the Sensor Level to “High” and for cold weather use, set the sensor for “Low”.
2. Try to set your camera up in an area where no heat resources are in the camera’s field of view.
3. In some cases, set the camera near water will make the camera take images with no subject
in them. Try to aim the camera over ground.
4. Try to set camera on stable and immovable objects, i.e.: large trees.
5. At night, motion detector may detect beyond range of the IR illumination. Reduce distance
setting by adjusting sensor sensitivity.
6. Rising sun or sunset can trigger sensor. Camera must be reoriented.
7. If person/animal moves quickly, it may move out of the camera’s field of view before photo
is taken. Move camera further back or redirect camera.
6.2 Camera Stops Taking Images or Won’t Take Images
1. Please make sure that the SD card is not full. If the card is full, camera will stop taking images.
Or user can turn on Cycle Recording to avoid such problem.
2. Check batteries to make sure that NI-MH or AA batteries left power is enough for camera to
work.
3. Make sure that the camera power switch is in the “On” position and not in the “Off” or “Test”
modes.
4. Please format the SD card with camera before using or when camera stops taking images.
6.3 Night Vision Flash Range Doesn’t Meet Expectation
1. Please install 6 or 12pcs AA batteries;
2. Please check to make sure that batteries are fully charged or left power is enough;
3. To ensure accuracy and quality of night time image, please mount camera to dark environment
without any obvious light sources;
4. A certain surroundings (like trees, walls, ground, etc.) within flash range can get you better
night time images; please do not aim camera to total open field where there is nothing within IR
flash range to reflect flash back; it’s like shinning a flashlight into sky in night, you just can’t see
anything; same does camera.

English
6.4 Photos Do Not Capture Subject of Interest
1. Check the “Sensor Level” (PIR sensitivity) parameter setting. For warm environmental
conditions, set the Sensor Level to “High” and for cold weather use, set the sensor for “Low”.
2. Try to set your camera up in an area where there is not a heat source in the camera’s line of
sight.
3. In some cases, set the camera near water will make the camera take images with no subject
in them. Try aiming the camera over ground.
4. Try to avoid setting the camera up on small trees that are prone to being moved by strong
winds.
5. Remove any limbs which are right in front of the camera lens.

English
7. Warranty
With great pride and full confidence in our products, we always keep our words which are given
to our customers as specified warranty terms and services below. Based on a strict QC system,
we initially offer all our customers
chargeable
Our products are warranted against defects in materials and workmanship for a period of one
year from the date of original purchase. If a defect exists, we will, at our option and to extent
permitted by law will (1) repair the product at no charge using new or refurbished parts; (2)
exchange the product with a functionally equivalent product that is new or refurbished. Provided
the product is returned freight charge paid.
This warranty excludes damage resulting from abuse, accident, modifications or other causes
that are not defects in materials and workmanship, or by someone other than our authorized
technicians. This warranty only covers failures due to defects in materials or workmanship under
normal usage.
To obtain warranty service, please contact us to determine the nature of problem before return
the product under this warranty (with a written description of the problem and print samples) for
repairing or exchanging.
renewal policy of warranty as one, two, three, or four years.
one year long time limited warranty, come along with selectable

Nederlands

Nederlands
1
Test Conditie: LCD scherm uit. Modus: “Power On” _PIR intelligentie automatisch.
12AA Alkaline Batterijen
Foto’s per dag
Werkingsduur
Videoclips per dag
Werkingsduur
IR LEDs Aan
IR LEDs Aan
12MP
100 Foto’s
64 Dagen
VGA
10 sec
10 clips
59 Dagen
16MP
100 Foto’s
61 Dagen
HD
10 sec
10 clips
57 Dagen
24MP
100 Foto’s
57 Dagen
FHD
10 sec
10 clips
54 Dagen
IR LEDs Uit
IR LEDs Uit
12MP
100 Foto’s
72 Dagen
VGA
10 sec
20 clips
163 Dagen
16MP
100 Foto’s
67 Dagen
HD
10 sec
20 clips
151 Dagen
24MP
100Foto’s
61Dagen
FHD
10 sec
20 clips
140 Dagen
1. Introductie
Bedankt dat u gekozen hebt voor de Wildpix X1. Wij van Wildpix willen de hoogste kwaliteit
aanbieden voor de beste prijs, dit is ons zeker weer gelukt met de Wildpix X1.
Omdat wij een Nederlands merk zijn, willen wij ook graag een Nederlandse handleiding kunnen
aanbieden. Deze Nederlandse handleiding biedt de basis om te kunnen starten. Wilt u een
uitgebreidere handleiding of een instructievideo? Kijk dan op www.wildpixcamera.nl
1.1 Gebruik
De Wildpix X1 is de ideale camera om wild te observeren en te onderzoeken, maar de camera
is ook ideaal voor het bewaken van uw huis, bedrijf of magazijn. De Wildpix X1 is zeer
onopvallend door zijn gecamoufleerde uiterlijk. De Wildpix X1 is makkelijk en snel te installeren,
bekijk de installatievideo’s op www.wildpixcamera.nl.
1.2 Voeding
1. Batterijen;
De Camera werkt op 6 of 12AA Batterijen. Gebruik hiervoor alkaline of (goede kwaliteit) NI-MH
batterijen. Gebruik AUB geen Lithium batterijen!
Plaats de batterijen altijd zoals aangegeven op de batterijhouder, bij het verkeerd plaatsen van
de batterijen kunnen storingen optreden. Wij adviseren om altijd de batterijen te vervangen zodra
de camera dit aangeeft.
Belangrijk: Combineer geen batterij types! Het gebruik van verschillende batterij types
kan permanente schade aan de camera toebrengen! Schades door verschillende batterij
types kunnen niet op de garantie verhaald worden.
Onderstaande tabel toont een indicatie van het aantal Foto’s en Video’s wat gemaakt kan
worden met
instellingen, aantal triggers, kwaliteit van de batterijen, de omgeving, enz.
12AA alkaline batterijen. Dit is slechts een indicatie en hangt af van de gekozen

Nederlands
2
SD
1GB
2 GB
4 GB
8 GB
16 GB
32 GB
Aantal Foto’s
12MP
391
733
1613
3371
6887
13919
16MP
299
560
1232
2575
5260
10630
24 MP
201
376
827
1728
3530
7134
Video (Uren)
VGA
00:05:27
00:10:13
00:22:28
00:46:57
01:35:56
03:13:52
HD
00:03:56
00:07:23
00:16:13
00:33:53
01:09:14
02:19:56
FHD
00:02:04
00:03:53
00:08:31
00:17:48
00:36:20
01:13:21
2. Zonnepaneel;
Voor een nog betere ervaring hebben onze engineers de Wildpix X1 zo ontworpen, dat de meest
standaard 12V/1~2A zonnepanelen aangesloten kunnen worden. Omdat oplaadbare NI-MH
batterijen een hogere laadspanning hebben, zal het zonnepaneel de batterijen niet opladen,
maar de camera wel van voeding voorzien.
3. Voedingsadapter;
De camera kan ook voorzien worden van een 12V/1~2A DC-adapter. Als u een adapter gebruikt
adviseren wij om de AA Batterijen te verwijderen. De 12V adapter is aan te raden als de camera
voor bewakingsdoeleinden gebruikt wordt..
1.3 SD Kaart
Een SD geheugenkaart is vereist om de camera te laten werken. Wanneer de camera AAN staat
en er geen geheugenkaart geplaatst is, zal de camera op het scherm “Plaats SD Kaart”
weergeven. De camera ondersteund SD kaarten tot 32GB. Als u een SD kaart wilt plaatsen of
verwijderen, moet uw de camera altijd uitzetten, als u dit niet doet kan dit leiden tot beschadiging
of verlies van de bestanden op de SD Kaart. Wanneer de SD Kaart vol is zal de camera
“geheugen vol”aangeven. De volgende tabel toont een Indicatie van de geheugencapiciteit bij
verschillende geheugenkaarten.
1.4 USB Connectie
Wanneer de camera aangesloten is via een USB kabel zal de camera “MSDC” weergeven op
het scherm, druk 1 keer op de “Menu” knop, “MSDC” zal veranderen in “PC Cam”, de camera
kan nu gebruikt worden als PC camera, druk nog een keer op de “Menu” knop om de camera
weer van “PC Cam” af te halen.

Nederlands
3
1.5 Belangrijk!
1. Let op dat de SD kaart altijd op de juiste manier geplaatst wordt.
2. Gebruik altijd AA Batterijen van goede kwaliteit.
3. Als u een adapter wilt gebruiken, zorg dan dat u een 12V/1-2A adapter gebruikt. Verwijder bij
gebruik van een adapter de batterijen.
4. Wanneer de camera in testmodus staat, en het toetsenbord wordt langer als 5 minuten niet
gebruikt zal de camera zichzelf uitschakelen. Als u de camera weer wilt gebruiken in PIR Automodus moet uw de camera handmatig aan zetten.
5. Als het LCD scherm aanstaat en u gebruikt de toetsen langer als 5 minuten niet, zal de camera
zichzelf uitschakelen.
6. Verbreek de voeding nooit tijdens een update. Als de camera problemen ondervindt na een
UPDATE, neem dan contact met ons op.
7. Plaats of verwijder de SD kaart, batterijen en adapter niet als de camera aan staat.
8. Zorg ervoor dat er bij het installeren van de camera geen losse objecten voor de sensor
hangen, denk hierbij aan taken, bladeren, linten enz.
9. Zorg ervoor dat u de camera niet op plaatsen installeerd waar ventilatieopeningen zitten die
luchtstromen genereren of op plaatsen waar het warm is door apparatuur.

Nederlands
4
134
257
6
8
9
11
10
13
14
12
2.0 De Camera
2.1 De Details van de Camera
1,IR LEDs
2.Indicator LED
3.PIR Sensor
4.Lens
5.DC-in (12V/1~2A)
6.Mini USB Poort
7.SD Kaart Slot (ondersteund 8GB t/m 32GB)
8.Kleuren LCD Scherm (2.0”)
9.Menu Knop
10.Navigatie Knoppen
11.Hoofdschakelaar (Aan/Uit Knop)
12.Batterijen Compartiment (A)
(Voor de eerste 6 AA Batterijen)
13.Batterijen Compartiment (B)
(Voor de tweede 6 AA Batterijen).
14.OK (Kies/Opslaan) Knop

Nederlands
5
Hoofdschakelaar
1.Schakel de camera op “ON”, de indicatie LED zal 5 keer knipperen en
de camera zal in PIR Auto modus gaan;
2.Schakel de camera op “Setup”, het LCD scherm zal oplichten en de
camera zal in Test modus gaan;
4) Schakel op “Off”, de camera gaat uit.
2.2 Functie Knoppen
01. Menu Knop:
Wanneer de Hoofdschakelaar (02) op Setup geplaatst is, zal het LCD scherm oplichten. Wanneer het
LCD scherm aan staat, kunt u op de Menu knop(01) drukken, om in het camera menu te komen. Als u
uit het camera menu wilt, kunt u de menu knop(01) weer indrukken, om het menu te verlaten.
LET OP: Als u de instellingen wijzigt, zullen deze alleen opgeslagen worden als het menu afgesloten
wordt via de menu knop, zoals hierboven beschreven.
02. Hoofdschakelaar (Aan/Uit Schakelaar):
A. OFF: UIT, de Camera uitschakelen.
B. SETUP: Instellingen, hier kunt u de parameters aanpassen.
C. ON: AAN, de camera is nu te gebruiken.
Wanneer de camera op ON staat, zal het LCD scherm uitgaan en zal de camera gaan werken
volgens de gekozen instellingen.
03. OK (Kies/ Opslaan) Knop
04. Boven Knop (↑):
Wilt u foto’s/video’s terugkijken? Druk op de boven(↑) knop als de hoofdschakelaar op SETUP staat.
05. Linker Knop (
06. Beneden Knop (↓)
07. Rechter Knop (
Wanneer de hoofschakelaar op SETUP staat, kunt u met de rechter (→) knop de tijd laten
←)
→),
weergeven op het LCD scherm.

Nederlands
6
3. Snelle Start
3.1 De Camera gebruiken.
Schakel de hoofdschakelaar op ON
Let Op: De camera staat standaard op fabrieksinstellingen. Om de camera te gebruiken
hoeft er alleen een SD kaart geplaatst te worden en moet de camera op ON gezet worden.
3.2 De Camera Instellen.
1.Zet de hoofdschakelaar op “Setup”, het LCD scherm zal oplichten, de camera komt nu in Test
Modus.
Gebruik de navigatie knoppen“←”, “↑”, “→”, of “↓”om door de instellingen
te scrollen; druk op “OK” om de parameters aan te passen en op te slaan, druk op de “Menu”
knop om terug te gaan.
2.Zet de hoofdschakelaar op “ON”, het LCD scherm gaat uit en de camera komt in PIR Auto
Modus.
3.De LED indicator zal 5 keer knipperen voor de camera in PIR auto modus schakelt.

Nederlands
7
Jachtmodus
Beveiliging
AAN/UIT
Talen
Engels
Nederlands
Datum/Tijd
YYYY/MM/D
Camera
Cam
Naam
Wachtwoord
UIT/AAN
Camera Modus
Foto/Video/Foto+Video
Foto Inst.
Resolutie
12MP/16MP/24M
Burst-Mode
Resolutie
FHD/
HD/VGA
Video Inst.
Video Snelheid
30FPS/15FPS
Video Lengte
/SS 05-60s
PIR Gevoeligheid
Hoog/Middel/Laa
Timer
UIT/AAN
Time Lapse
UIT/AAN
Vertraging
UIT/AAN
Batterij Type
Alkaline/NI-MH
Overig
SD Overschr.
UIT/AAN
Frequentie
50Hz/60Hz
Reset
Nee/Ja
Toetstelinfo
Versie:
3.3 Fabrieksinstellingen van de Camera in Rode Letters

Nederlands
8
Auto Modes (Standaard staat de camera op Engels ingesteld)
Instellingen
Hier kunt u de instellingen aanpassen
Hunting
Jachtmodus
De instellingen zijn: Burst-Modus 3F, 12MP Resolutie, 5sec Vertraging
Security
Beveiliging
De instellingen zijn: Foto + Video, 12MP Resolutie, Burst-Modus 5F, 1080P video
resolutie, 10sec video lengte
4. Instellingen
4.1 Video/Foto Terugkijken
1. Schakel de hoofdschakelaar naar “Setup”, het LCD scherm zal gaan branden en de camera
zal in test modus gaan;
Druk op de knop met de pijl naar boven “↑” om Video’s/Foto’s terug te kijken; druk op “←” en
“→” om door de bestanden te scrollen, druk op “OK” om een Foto/Video te selecteren.
2. Druk nog een keer op de boven knop “↑” om af te sluiten.
3. In de terugkijk modus, druk op de knop “Menu” om bestanden te verwijderen, of om de SD
kaart te formatteren; druk nog een keer op “Menu” om terug te gaan.
4.2 Instellingen
Als de hoofdschakelaar op SETUP staat bent u in testmodus. Druk een keer op “Menu” om in
het instellingen menu te komen; scroll met de pijltjes door de instellingen “←”, “↑”, “→”, “↓”, en
druk op “OK” om er een aan te passen, druk nogmaals op “Menu” om terug te gaan naar de
vorige pagina.
Let Op: Voor het opslaan van sommige instellingen moet de gebruiker op “Menu” drukken
nadat er op OK gedrukt is om de gegevens op te slaan(Cam ID, Vertraging, Time Lapse,
Timer, Wachtwoord)

Nederlands
9
Instellingen
Programmeerbare Opties
Taal
Engels, Nederlands
Tijd/Datum
Maand : datum : jaar: uur : minuut : seconde
LET OP: Pas de Tijd/Datum aan voor een goede werking van de functies
Camera ID
Cam Naam
Kies “AAN” en druk op “OK” om de camera een naam te geven. Deze functie
kan helpen als u meerdere camera’s heeft deze te onderscheiden.
Wachtwoord
Kies “AAN” en druk op “OK” om de camera een wachtwoord te geven. Het
wachtwoord kan max. 6 letters/cijfers bevatten.
Camera Modus
Kies camera modus voor verdere instellingen.
Foto Inst.
Resolutie
12MP (4000*3000), 16MP (4608*3456), 24MP (5632*4224)
Burst-Modus
Programmeerbaar 1~7 fotos per trigger
Video Inst.
Resolutie
FHD(1920*1080),HD( 1280*720),VGA( 640*480)
Video Snelheid
30FPS,15FPS
Video lengte
05~60 Secs
PIR
Gevoeligheid
Hoog, Middel, Laag
Hoe hoger de gevoeligheid, hoe eerder de trigger geactiveerd wordt.
Timer
Kies “AAN” en druk op “OK” om de begin- en eindtijd in te stellen
(Uren/Minuten). De camera zal nu alleen werken binnen dit tijdsvak.
Voorbeeld.: 15:00 – 18:00; de camera werkt nu alleen tussen 15:00 – 18:00.

Nederlands
10
Time Lapse
Kies “AAN” en druk op “OK” om de interval in te stellen; PIR sensor gaat in
deze modus uit. De camera zal nu foto’s/video’s maken volgens de
geprogrammeerde instellingen.
Interval tijd: 5 seconds tot 24 uur.
LET OP! Zet Time Lapse en Vertraging nooit gelijk aan.
Vertraging
Kies “AAN” en druk op “OK” om de interval tussen de foto’s/video’s in te stellen.
Door deze optie zal de camera niet te veel beelden van hetzelfde onderwerp
maken.
Voorbeeld: Camera zal 1 minuut wachten tussen foto/video opname als er
gekozen is bij vertraging voor 00:01:00
Vertragingstijd: 5 seconden tot 24 uur.
LET OP! Zet Time Lapse en Vertraging nooit gelijk aan.
Overig
Batterij Type
Alkaline/ NI-MH
LET OP! Kies hier altijd het juiste batterij type
SD Overschr.
Kies “AAN” en druk op “OK” de camera zal ook blijven werken bij een volle
geheugenkaart, door de eerste opnames te overschrijven.
Dit is vooral interressant voor bewakingsdoeleinden.
Frequentie
50HZ, 60HZ
Reset
Kies “Ja” als u de camera naar fabrieksinstellingen wilt zetten.
Over
Firmware versie van de camera
 Loading...