

Wildlife Acoustics SM4BAT FS User Manual

See Page 1 for
Quick Start Checklist
Song Meter SM4BAT FS
BIOACOUSTICS RECORDER
User Guide
Last updated on March 19, 2018.

Wildlife Acoustics, Inc. page ii
CONTENTS
1 Quick Start Checklist 1
2 Overview 2
2.1 Introduction............................................................................................ 2
2.2 Visual Tour .............................................................................................. 3
2.3 The Main Menu ...................................................................................... 3
3 Setup and Installation 5
3.1 Opening the Recorder ............................................................................ 5
3.2 Turning Power On and Off ..................................................................... 6
3.3 Installing Internal Batteries ................................................................... 6
3.4 Connecting External Power ................................................................... 7
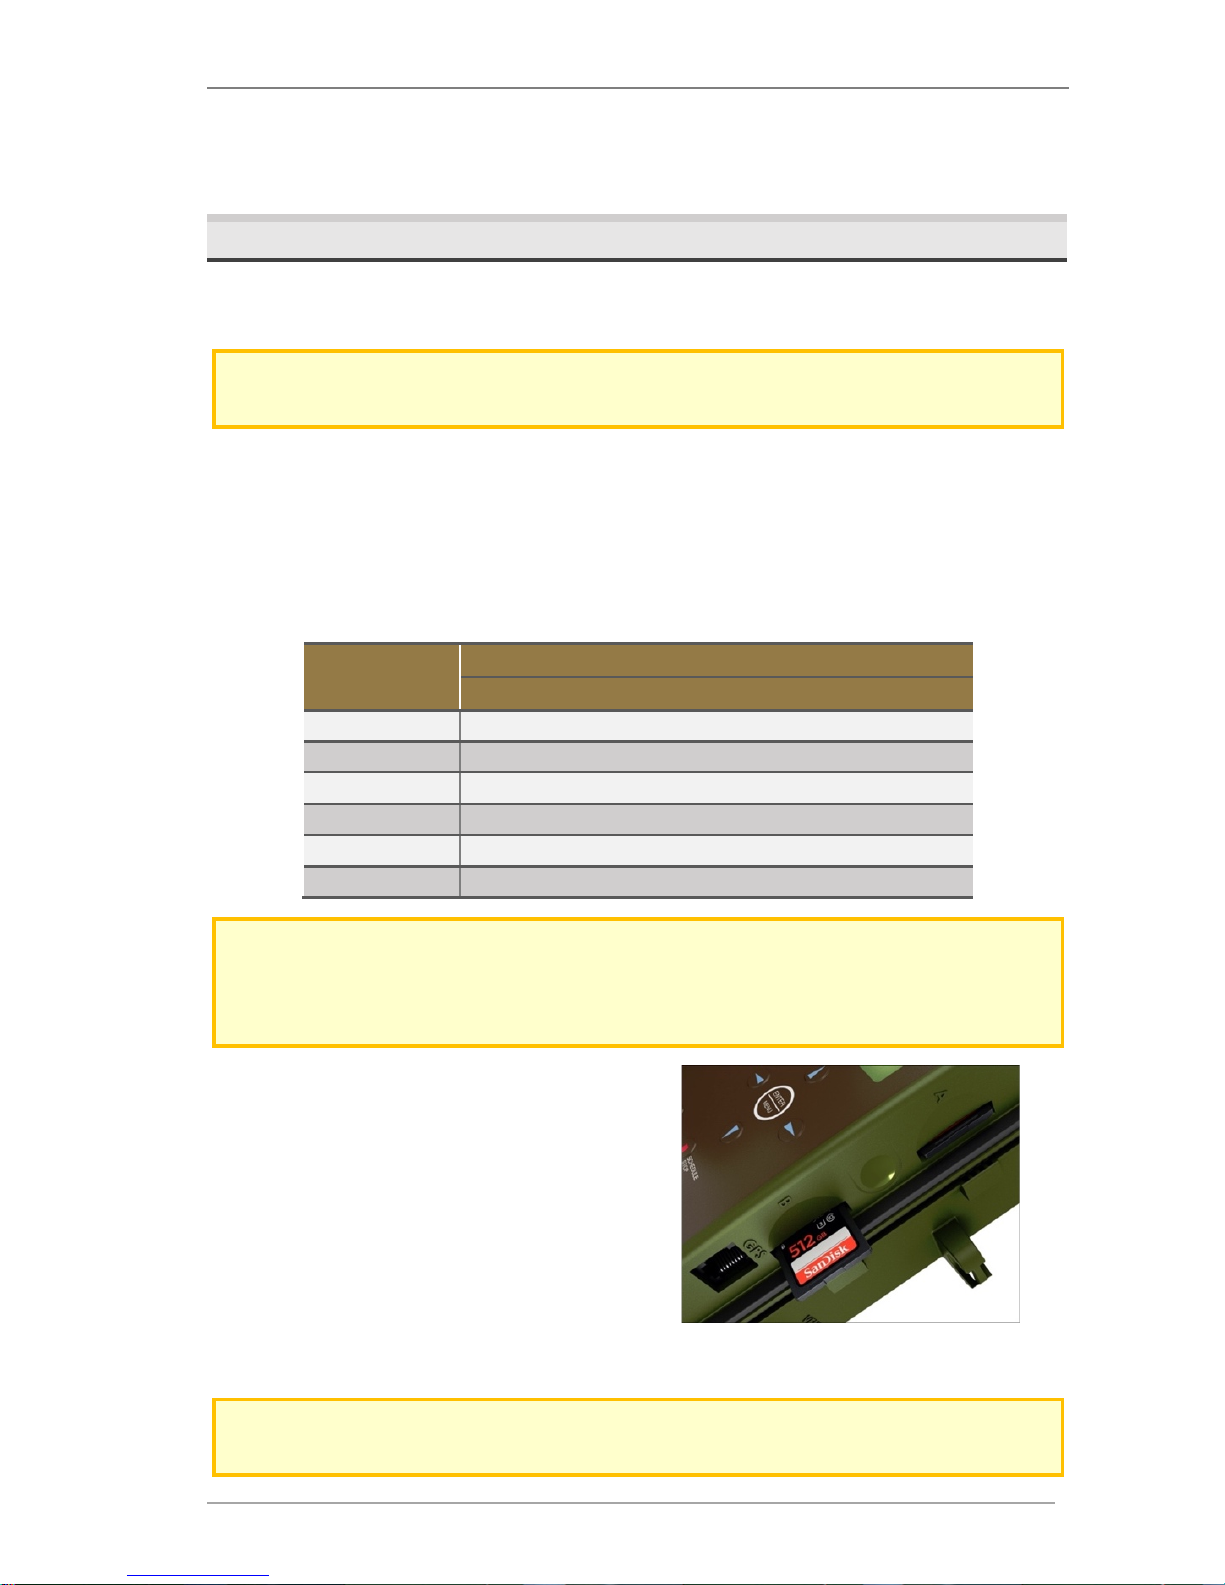
3.5 Inserting SD Memory Cards ................................................................... 8
3.6 Connecting and Mounting a Microphone ............................................. 9
3.7 Protecting the Microphone ................................................................. 12
3.8 Connecting the GPS Accessory ............................................................ 14
3.9 Securing the Recorder .......................................................................... 15
3.10 Locking the Keypad .............................................................................. 15
3.11 Mounting the Recorder........................................................................ 16
3.12 Replacing the Clock Battery ................................................................. 17
3.13 Reading the Recorder Temperature .................................................... 17
4 Settings 18
4.1 Navigating the Menus .......................................................................... 18
4.2 Setting the Date and Time ................................................................... 18
4.3 Setting the Device Prefix for Recorded Files ....................................... 19
4.4 Setting the Location and Time Zone .................................................... 19
4.5 Setting the Solar Calculation Method ................................................. 20
4.6 Audio Settings ...................................................................................... 20
4.7 Setting a Delayed Start ........................................................................ 24
4.8 Setting the LED Indicator Mode........................................................... 24
4.9 Advanced Settings ................................................................................ 24
5 Making Scheduled Recordings 26
5.1 Recording Operation Overview ........................................................... 26
5.2 Using a Quick Start Schedule ............................................................... 26
5.3 The Recording Screens ......................................................................... 27
5.4 Checking the Status of the Recorder ................................................... 28
5.5 Stopping a Recording Schedule ........................................................... 29
5.6 Making an Instant Recording ............................................................... 29
5.7 Retrieving and Analyzing Recordings .................................................. 30
5.8 Recording Files ..................................................................................... 30

Song Meter SM4BAT FS User Guide Contents
Wildlife Acoustics, Inc. page iii
5.9 Recording Metadata ............................................................................ 31
5.10 Recording Summary Text File .............................................................. 31
6 Creating Custom Simple Schedules 33
6.1 Schedule Blocks .................................................................................... 33
6.2 SM4 Configurator Software ................................................................. 34
6.3 Editing a Schedule ................................................................................ 35
6.4 Adding or Deleting Schedule Blocks .................................................... 35
6.5 Schedule Block Examples ..................................................................... 36
7 Creating Custom Advanced Schedules 39
7.1 Creating and Editing an Advanced Schedule....................................... 39
7.2 Using Loops .......................................................................................... 40
7.3 Advanced Schedule Commands .......................................................... 41
7.4 How to Work with the Schedule Checker ........................................... 42
7.5 How to Resolve Schedule Checker Errors ........................................... 43
8 Importing and Exporting Schedules 44
8.1 SM4 Configurator Software ................................................................. 44
8.2 Importing a Schedule ........................................................................... 44
8.3 Exporting a Schedule ............................................................................ 45
9 Utilities 46
9.1 Exporting Diagnostics ........................................................................... 46
9.2 Resetting to Factory Default Settings .................................................. 46
9.3 Calibrating Microphones...................................................................... 46
9.4 Monitoring Ultrasound in Time Expansion Mode .............................. 49
9.5 Formatting SD Memory Cards ............................................................. 50
9.6 Updating the Firmware ........................................................................ 51
10 Specifications 52
10.1 Physical ................................................................................................. 52
10.2 Power .................................................................................................... 53
10.3 SD Memory Cards ................................................................................. 53
10.4 Ultrasonic Audio ................................................................................... 53
10.5 SMM-U2 Ultrasonic Microphone......................................................... 54
10.6 SMM-U1 Ultrasonic Microphone......................................................... 56
11 Warranty and Disclosures 58

Song Meter SM4BAT FS User Guide Contents
Wildlife Acoustics, Inc. page iv
Revised and Translated User Guides
This guide is regularly updated and improved. New versions can be downloaded
from http://www.wildlifeacoustics.com/support/documentation. It is also
available from the same webpage in Spanish, French, German, Chinese and
Japanese translations.
Tutorial Videos
Visit http://www.wildlifeacoustics.com/support/tutorial-videos to view tutorial
videos for the SM4BAT.

Song Meter SM4BAT FS User Guide 1 Quick Start Checklist
Wildlife Acoustics, Inc. page 1
1
Quick Start Checklist
q Release the side latch, open the security cover, and then open the middle
section to access the battery bay.
q Install four (4) new alkaline or NiMH D batteries. Close the middle section.
To us e ex t e r na l b at t e r ie s, se e Connecting External Power in Chapter 3.
q Insert one SD memory card in slot A and an optional second card in slot B.
q Reformat card(s) using the built in format utility (see Formatting SD Memory
Cards in Chapter 7).
q Slide the power switch down to INT for internal battery power. The recorder
powers on and the main menu appears on the display. (If using an external
power source, slide the switch up to EXT.)
q Press CHECK STATUS to verify the time, microphone, firmware, SD memor y
cards, battery voltage, and temperature.
q Use the keypad to select Quick Start and choose a recording schedule.
q Navigate to Main Menu > Settings to set the time and date. For schedules
that start or end at times relative to sunrise or sunset (for example, Record
Sunset®Rise), you must also set the latitude and longitude and time zone.
Alternatively, temporarily attach the available GPS accessory to auto-set, the
location, date, and; however, you must manually set the time zone. It is not
set by the GPS and must be set prior to plugging in the GPS for the
recorder to correctly calculate local time from GPS time.
q Press the SCHEDULE START button. The schedule begins:
■
The SM4BAT sleeps (display goes blank) to conserve battery power if a
recording is not scheduled in the next 45 seconds.
■
The SM4BAT wakes (display illuminates) at the next scheduled recording
start time and saves recordings to the SD memory card(s).
■
The display shows the next recording period and ARMED when listening
for bats. TRIGGERED appears when recording.
q Close the security cover and latch. To secure the recorder, attach an optional
lock. Mount the recorder in a suitable location and leave.
q When the deployment ends, press and hold SCHEDULE STOP to finish
recording. Eject the SD memory card(s) and review the recordings.
Contacting Support
For issues or questions not addressed in this guide, contact the Wildlife
Acoustics Support Team:
■
Email: support2018@wildlifeacoustics.com
■
North America (toll-free): 1-888-733-0200
■
Outside North America: US+1 978-369-5225 (Toll charges may apply.)

Song Meter SM4BAT FS User Guide 2 Overview
Wildlife Acoustics, Inc. page 2
2
Overview
2.1 Introduction
The latest generation in the Song Meter series, the SM4BAT FS is a weatherproof,
programmable, single channel, full-spectrum, ultrasonic recorder designed for
the periodic, seasonal, and long-term monitoring of bats and other ultrasound
wildlife in almost any environmental condition. The SM4BAT FS creates highquality, full-spectrum 16-bit WAV recordings that can be easily viewed or
analyzed using our Kaleidoscope software (or third-party software).
Yo u can schedu le d ai ly re co rdings to meet a variety of needs including times
that are relative to sunrise and sunset, specific duty cycles with on/off recording
patterns, and continuous monitoring all day and all night. The SM4BAT FS
optimizes battery life and memory capacity to record for extended periods of
time. Using both memory slots and new alkaline batteries, a typical deployment
can record for up to 450 hours spanning weeks or months.
Features
■
Lightweight, portable, and completely weatherproof
■
One-channel full-spectrum 16-bit WAV recorder
■
Intelligent recording trigger and noise scrubber to minimize false recordings
of non-bat activity
■
Up to 45 nightly 10-hour recordings using four (4) alkaline D batteries
■
SMM-U2 and SMM-U1 microphones support cables up to 100m(includes 3m)
■
Supports one or two standard SDHC or SDXC memory cards
■
Weatherproof keypad and backlit display for easy entr y and status
■
Dual-color LED indicator provides recording and triggering feedback
■
Integrated top and bottom mounting flanges are designed to work with cable
locks, screws, radiator clamps, bungee cords, and other fasteners
■
Easy to set up and use with convenient Quick Start daily recording schedules
and one-touch start
■
Advanced Schedule mode allows creation of more advanced schedules
■
Customize schedules and estimate impacts on SD memory cards and battery
life with the free SM4 Configurator software
■
One-touch status check shows memory card utilization, batter y voltage, and
other recorder health information without interrupting recordings
■
External power option using an SM3/SM4 power cable (sold separately)
■
Self-generated diagnostics assist in basic troubleshooting
■
Internal temperature and battery voltage logging
■
Headphone port for real-time monitoring and system verification
■
Optional GPS accessory automatically sets the date, time, latitude, and
longitude and logs recording coordinates
Song Meter SM4BAT FS User Guide 2 Overview
Wildlife Acoustics, Inc. page 3
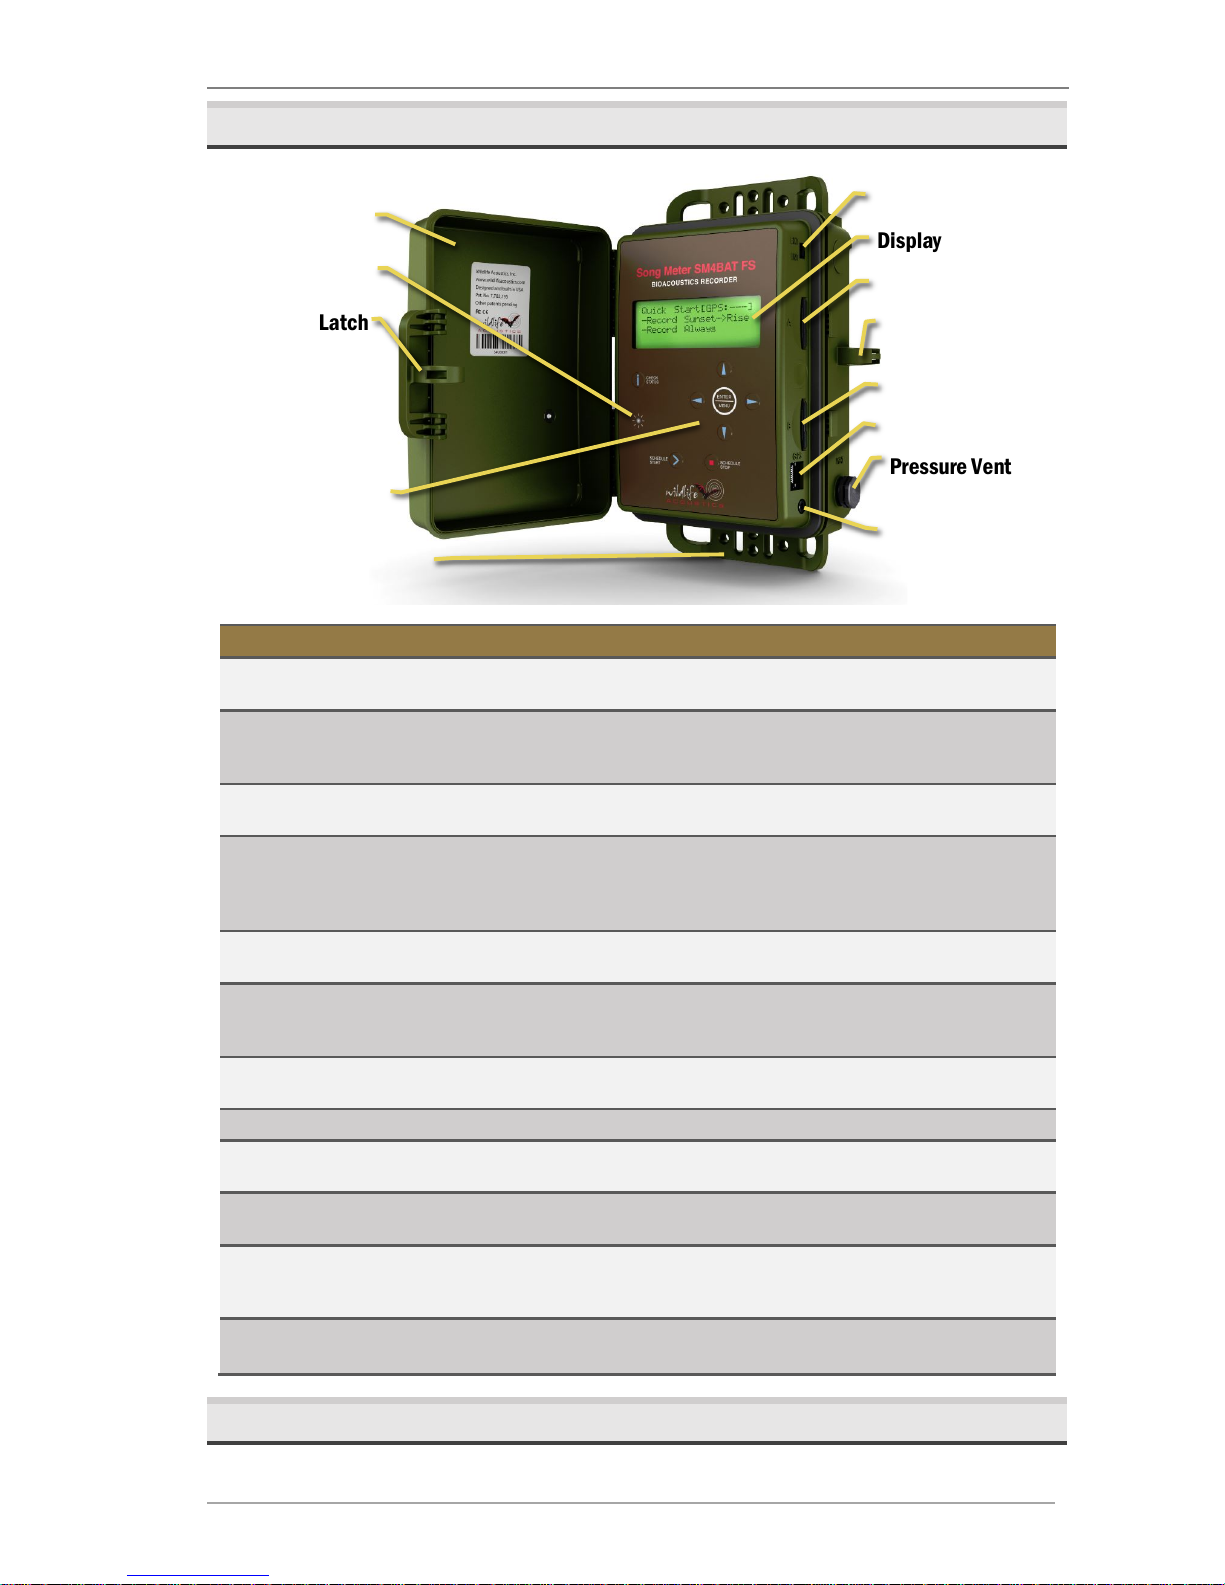
2.2 Visual Tour
ITEM:
DESCRIPTION:
Security Cover
Protects the recorder. The cover swings open/closed and can
be secured with a standard lock (sold separately).
LED Status Indicator
Flashes ☼ red once every two seconds when armed and
waiting for a triggered recording to start and ☼ green
once a second while triggered and making a recording.
Latch
Grip and pull to open the security cover. To close, push
the security cover down until the latch clicks.
Keypad
Press the keypad buttons to navigate the menus and
options on the display. Buttons include ▲Up or ▼Down,
◄
Left or ►Right, ENTER, SCHEDULE START, SCHEDULE STOP,
and CHECK STATUS.
Mounting Flanges
Rugged and ready for almost any environment. Use the top
and bottom cutouts to mount the recorder.
Power Switch
Slide down to turn power on using internal battery (INT).
Slide up to use optional external power (EXT) or to turn
off (if no external power).
Display
Backlit screen displays all main menu items, settings,
values, message prompts, and status information.
Memory Slots A and B
Insert removable SD memory cards to store recordings.
Lock Ring
Insert the shackle of an optional key or combination lock
to secure your recorder.
GPS Connection
Use the available GPS option to automatically set the
date, time, and location settings.
Pressure Vent
Temperature, UV, and water-resistant vent and a selfregenerating desiccant packet control humidity and
prevent condensation.
Headphone Jack
Connect headphones and listen to live bat activity using
Time Expansion mode.
2.3 The Main Menu
Refer to the following table when navigating the main menu on the display.
Security Cover
Latch
Mounting Flange
Display
Memory Slot A
Keypad
Power Switch
Memory Slot B
Pressure Vent
GPS Connection
Lock Ring
LED Indicator
Headphone Jack

Song Meter SM4BAT FS User Guide 2 Overview
Wildlife Acoustics, Inc. page 4
Menu Item
Description
Quick Start
Record Sunset®Rise
Based on your location, date, and sunrise/sunset
settings, records continuously from sunset until sunrise.
Record Always
Records continuously 24 hours a day.
Settings
Audio
Configure audio settings for recordings.
Date and Time
Set the local date and time for your recorder.
Location
Set the recorder prefix ID and the latitude, longitude,
and time zone for your location.
Sunrise/Sunset Type
Set the method used to calculate the sunrise and sunset
times. Choices include astronomical, civil, or nautical
twilights or the actual sunrise/set times
Delay Start
Delay the start of your daily schedule until 00:00 on a
specified date.
LED Indicator
Choose to display LED indicators always or only for the
first several minutes after you start the schedule.
Advanced
Settings for advanced users.
Schedule
Edit Schedule
Add, modify, or delete schedule blocks.
Import Sched+Setts
Import a schedule and settings from an SD card.
Export Sched+Setts
Export the current schedule and settings to an SD card.
Utilities
Time Expansion Mode
Listen to bat activity through headphones.
Export Diagnostics
Save status and troubleshooting information to an SD card
to send to the Wildlife Acoustics Support Team.
Set factory default
Restore the original recorder settings to their factoryfresh values and revert to a like-new state.
CAUTION: Any custom schedules or settings are replaced.
Calibrate Mic
Test the sensitivity levels of the connected microphone
with the available Ultrasonic Calibrator.
Format all cards
Erase and reformat the SD memory cards.
CAUTION: All data on the cards is permanently lost.
Firmware Update
Update the recorder with a new firmware file that you
download to an SD memory card.
Song Meter SM4BAT FS User Guide 3 Setup and Installation
Wildlife Acoustics, Inc. page 5
3
Setup and Installation
3.1 Opening the Recorder
When instructed by the procedures in this guide to open the recorder,
follow the steps below.
1. Locate the handle for the security cover on the front right side of the
recorder as shown.
2. Grip the handle and lightly pull it to release the latch. The cover flips open
and rotates along its hinged spine like a book, exposing the display and
keypad in the middle section. At this point, you can insert memor y cards,
adjust the power switch, and connect an optional GPS or headphones.
Continue with the next step only when you are installing batteries.
3. Press the small circular indentation between SD memory card slots A and B
with your thumb to release the middle section. If it is difficult to release the
section, press down closer to the gasket seam. This section swings open
exposing the battery bay.
To c lo s e t h e cov e r, r ev er s e t he s te p s:
1. Gently and firmly push the middle section (display and keypad) down until it
snaps into place.
2. Gently and firmly push the security cover down until it snaps into place.
3. Align the security cover latch with the locking ring and snap into place.
Song Meter SM4BAT FS User Guide 3 Setup and Installation
Wildlife Acoustics, Inc. page 6
3.2 Turning Power On and Off
Follow these steps to switch recorder power on and off based on your choice of
internal or external power source. Only one power source (internal or external)
can be active at a time.
1. Open the cover to access the power switch on the side of the middle
section above memory slot A.
2. Slide the switch down to INT to turn power on when using internal
batteries; slide the switch up to EXT to turn power on when connected to an
external battery. Only one power source is used at a time. Whichever
position does not have a battery installed is functionally off.
3. When you want to turn the recorder off to conserve battery power, slide the
switch to the opposite position (EXT when using internal batteries and INT
when using an external battery).
NOTE: Do not turn the power off when a recording is in progress. To safely exit from
recording, press SCHEDULE STOP, allow the recorder to return to the Main Menu, and
then switch the power off. Avoid quickly switching power off and on again (avoid quick
switches between INT and EXT). The recorder can interpret this sudden loss and
restoration of power as an error and may start creating diagnostics.
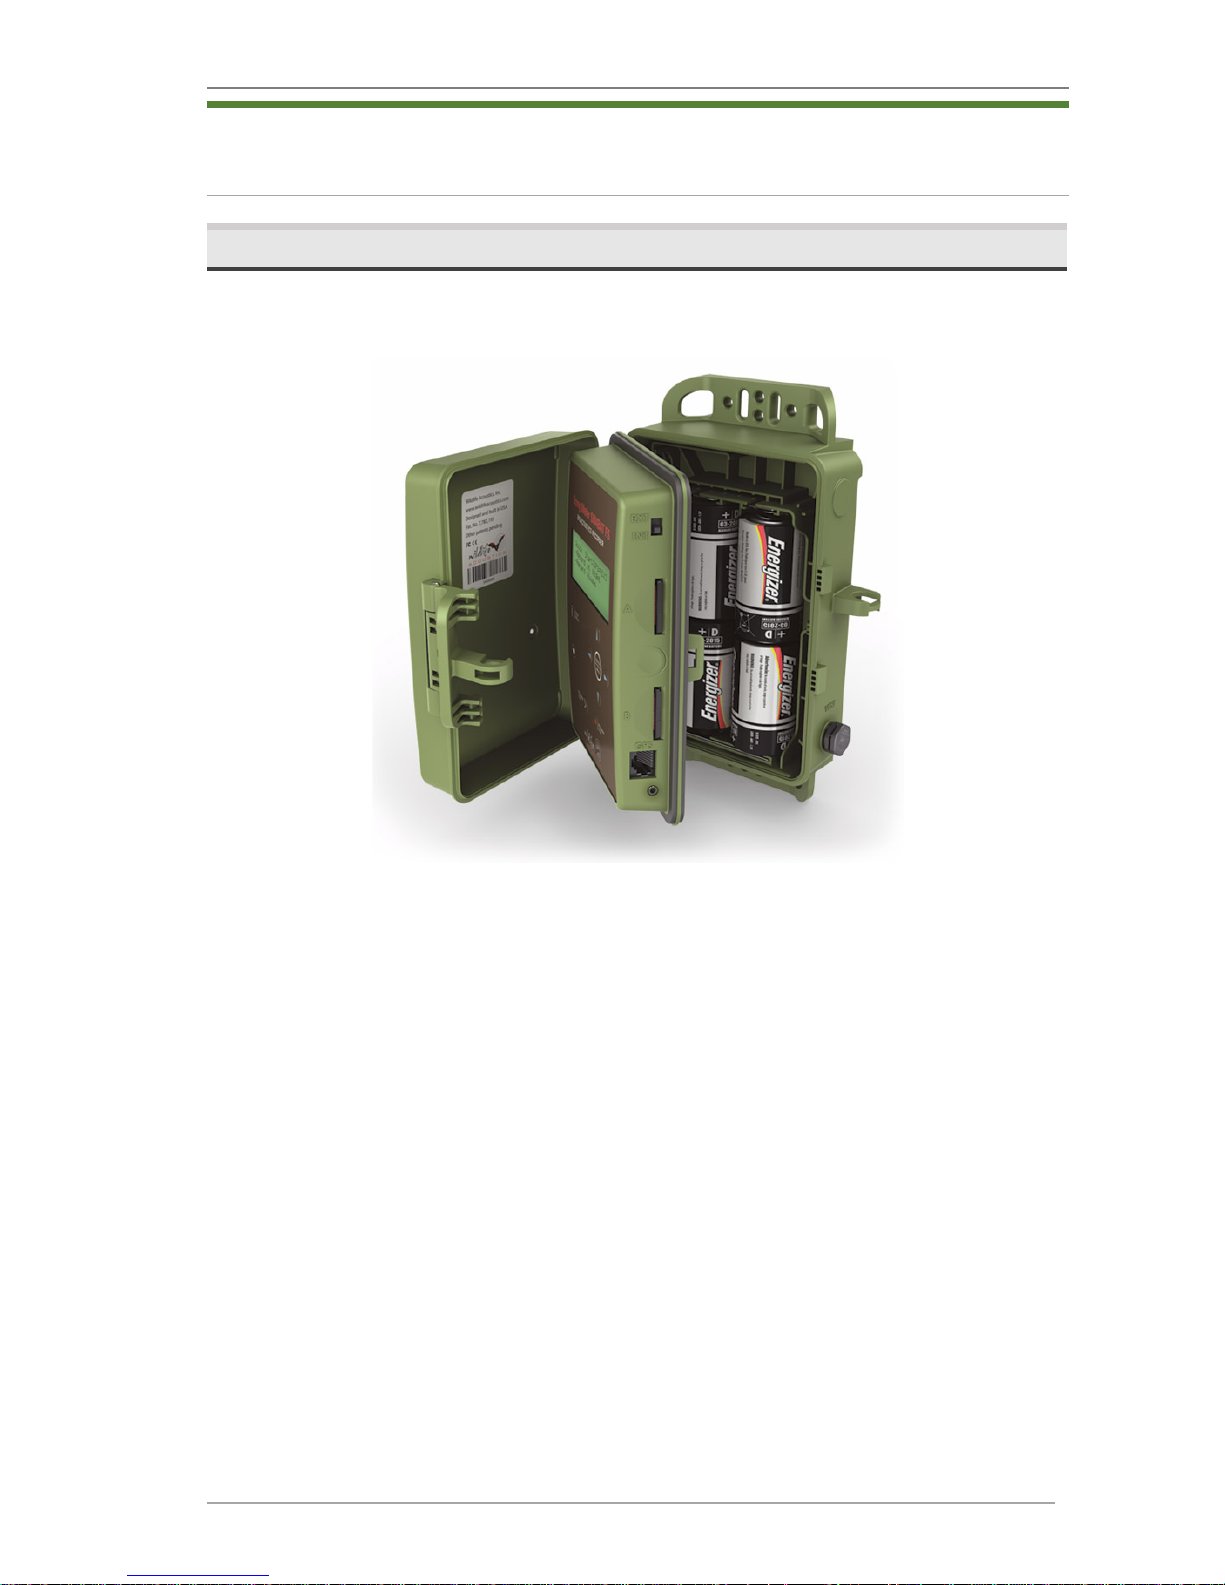
3.3 Installing Internal Batteries
The recorder uses four size D alkaline or NiMH batteries.
NOTE: We prefer Energizer brand of alkaline batteries for their superior performance.
The SM4BAT FS enters a very low-power sleep state between scheduled
recordings to conserve energy and maximize efficiency for long deployments.
TIP: Prior to installation, we recommend that you test all batteries with a high-quality
pulse load battery tester such as the ZTS MINI-MBT.
1. Open the recorder.
2. Insert batteries with their polarity (+/-) orientation as shown on the battery
bay markings.
NOTE: Do not mix batteries of different types, and do not mix old and new batteries.
Remove batteries before storing the recorder for an extended time.
3. Close the middle section and gently press down until it snaps into place.
4. To t ur n o n po w er , s li de the po we r s w itc h to INT.
5. When not in use, set the power switch to EXT to conserve internal battery
power. With no external battery source, consider the EXT position to be off.
Only one power source (internal or external) can be active at a time.
Song Meter SM4BAT FS User Guide 3 Setup and Installation
Wildlife Acoustics, Inc. page 7
TIP: Use the Song Meter SM4 Configurator software to estimate the recording
requirements for your schedules including battery life and memory storage.
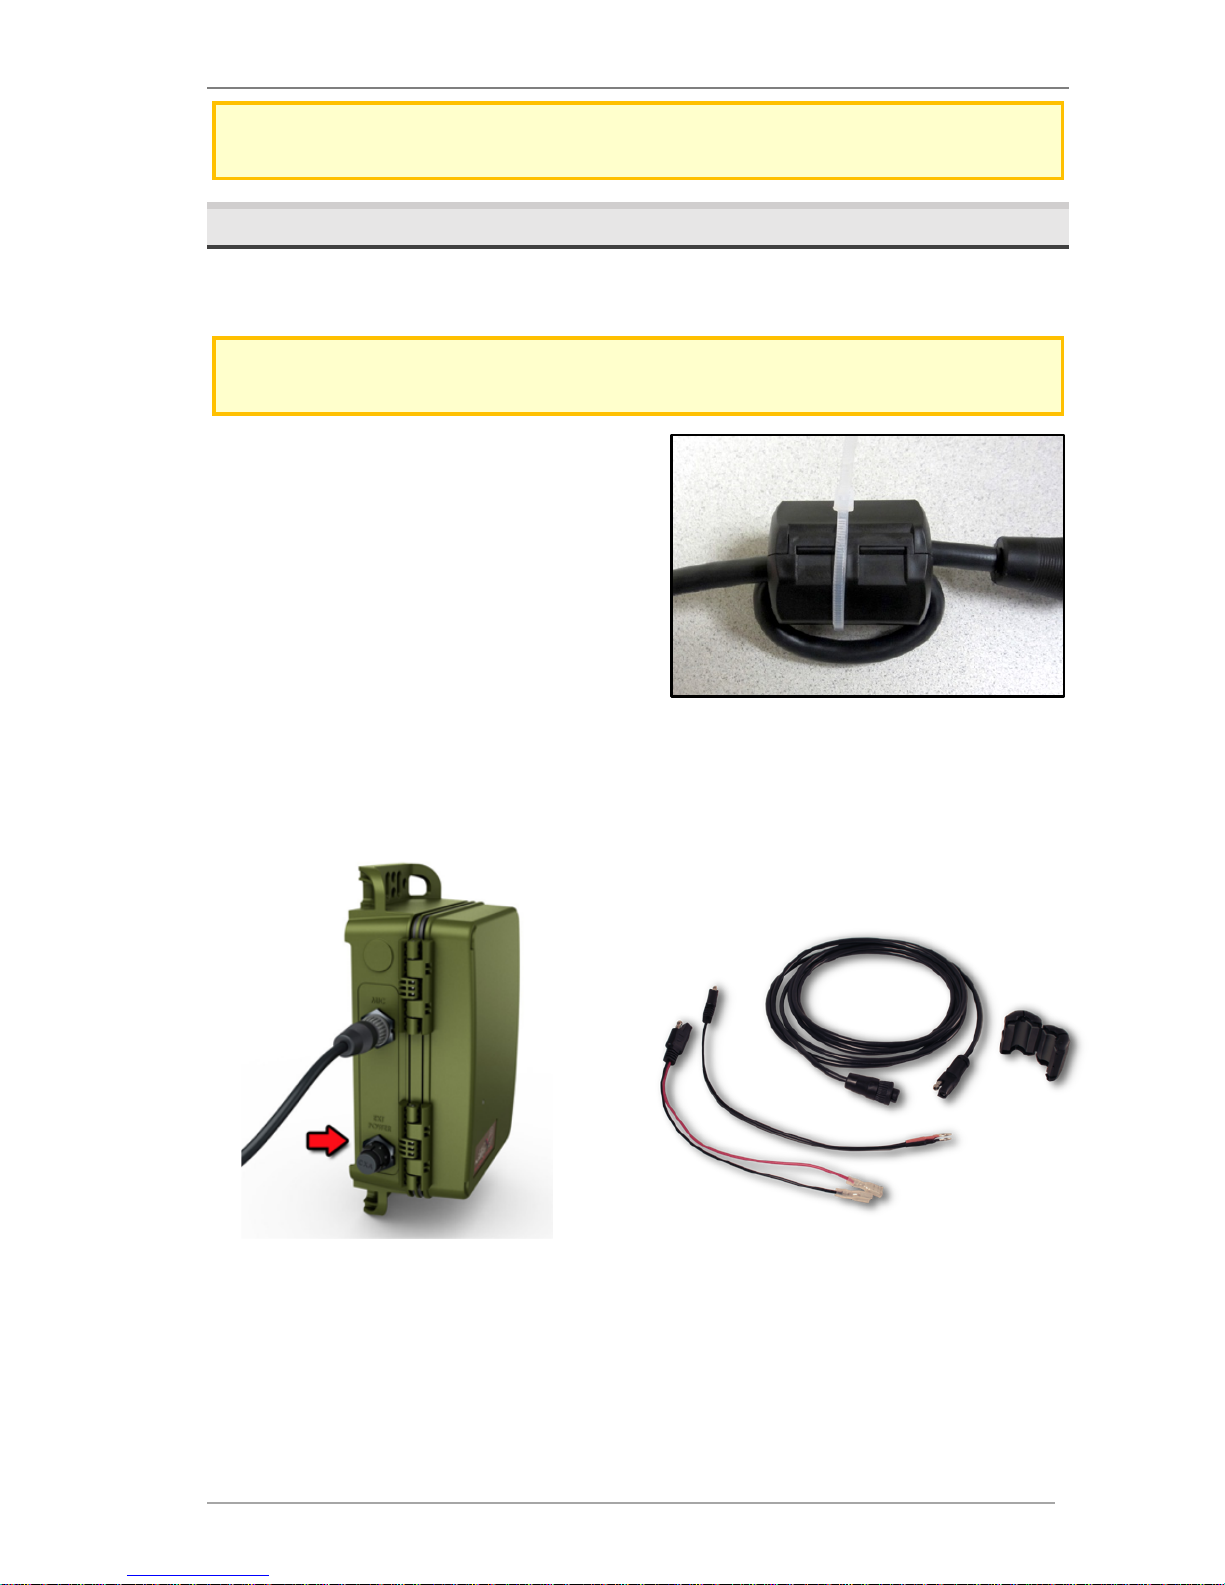
3.4 Connecting External Power
With the optional external power cable, the power connector can accept
voltages from 5-17 volts DC. It is intended for 6 or 12-volt external batteries.
CAUTION: If you are unfamiliar with configuring external battery and power systems,
consult a local installer for assistance.
1. Each power cable is shipped with a
snap-on ferrite to meet standards
limiting electromagnetic emissions
and protecting against electrostatic
discharge. Install the ferrite near the
end of the cable as close to the
recorder as possible.
2. Loop the cable through and snap
the ferrite shut. A zip tie is included
for further securing the ferrite. The
image shows the ferrite as shipped (right) and as installed (left).
3. Align and seat the cable into the EXT POWER port on the side of the
recorder. Turn the grey locking ring (black on older SM3 cables) clockwise P
firmly until it locks into place.
4. The external power cable includes F2-size spade connectors and ring
terminals. Connect the cable to a 6 or 12-volt battery using one of the
connectors provided. The SM4BAT FS provides protection against accidental
reverse polarity connections.
5. Open the security cover and slide the power switch up to EXT.
6. (Optional) Set a minimum voltage to prevent damage to lead-acid batteries
that are not designed for deep discharge.
Song Meter SM4BAT FS User Guide 3 Setup and Installation
Wildlife Acoustics, Inc. page 8
7. When not in use, set the power switch down to INT to conserve external
battery power. With no internal batteries installed, consider the INT position
to be off.
3.5 Inserting SD Memory Cards
The SM4BAT FS saves recordings to one or two SD memory cards installed in
the memory card slots.
NOTE: Be sure the card’s write protection switch is “off”. The SM4BAT will not record to
a write-protected card.
On a typical night of bat activity with no rain, the recorder might use about half
a gigabyte (0.5 GB). With considerable bat activity it is possible to use several
gigabytes per night.
The following table shows the total recording capacity in hours for each card size
by sampling rate to help you choose the right memory card size. This is the total
time of all triggered or non-triggered WAV files.
SD Memory
Card (GB)
Sample Rate:
192 kHz
256 kHz
384 kHz
500 kHz
16
12 9 6
5
32
23
17
12
9
64
46
35
23
18
128
93
70
47
36
256
185
139
93
71
512
370
278
185
142
NOTE: The above table shows recording capacity for uncompressed WAV recordings.
Three levels of compression can be set in the Audio Settings menus that will significantly
increase these times. More information can be found in the Audio Settings section 4.6
of this guide.
1. Open the security cover and locate
memory slots A and B on the side
below the power switch.
2. Insert one required SD memory card
in slot A or B. Push the card straight
in until it clicks into place. Make sure
the small read/write switch on the
card is set to allow write access.
3. (Optional) To e xtend dep lo yme nts, or
to have a redundant card in case there is an issue with the first, insert a
second SD memory card in the remaining slot.
NOTE: You can use slot A, slot B, or both for recording; however, when importing and
exporting schedules or updating the firmware you must use slot A.

Song Meter SM4BAT FS User Guide 3 Setup and Installation
Wildlife Acoustics, Inc. page 9
4. Reformat card(s) using the built-in format utility (see Formatting SD Memory
Cards in Chapter 7).
5. Press Check Status and verify that the card is shown with an appropriate
capacity.
6. To remove a card when recording is completed, push it in and release it. The
spring-loaded slot ejects your card so you can pull it away.
NOTE: Do not remove SD memory cards while the SM4BAT FS is recording. This could
corrupt the card.
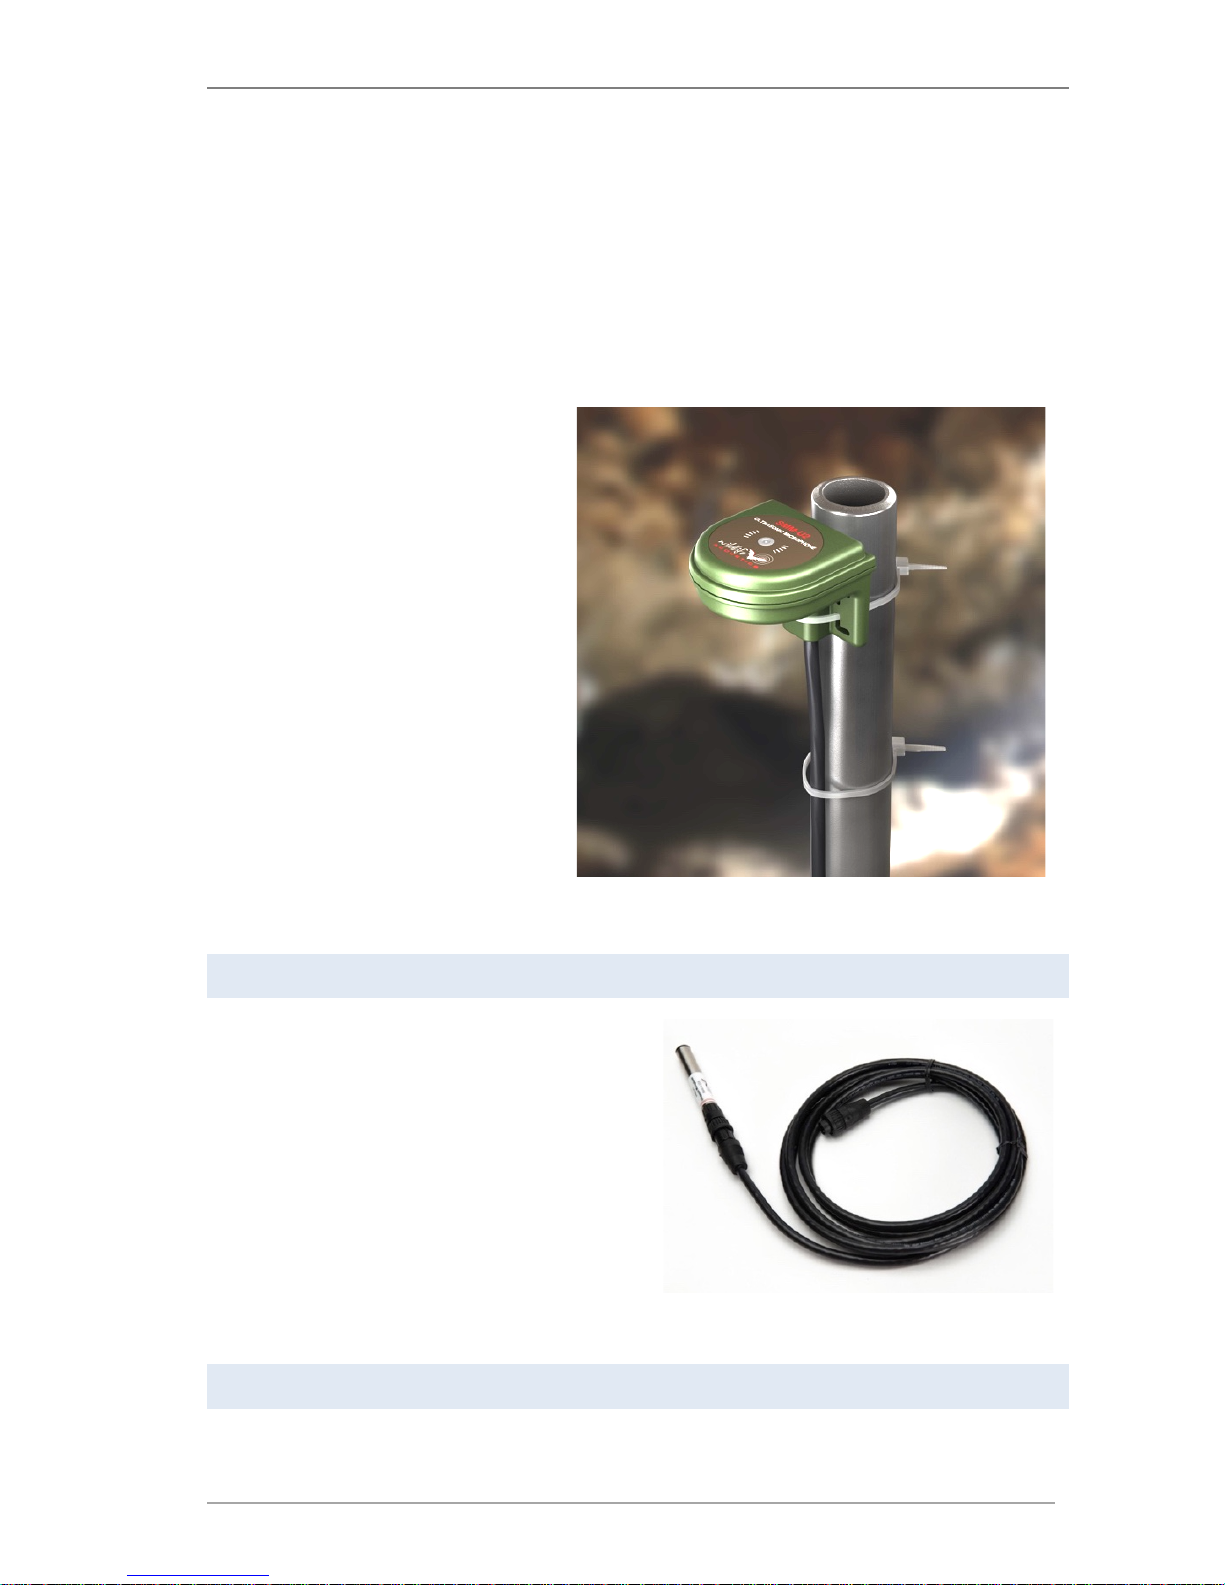
3.6 Connecting and Mounting a Microphone
Yo u must connect an available SMM-U2 or SMM-U1 microphone to record bats.
SMM-U2
The SMM-U2 is the newest generation of
microphone and improves upon the
SMM-U1 with lower noise, better
weather protection, and much lower cost.
The SMM-U2 also draw less power than
the SMM-U1, resulting in approximately
10% longer run times. The SMM-U2
microphone's low noise and superior
sensitivity results in quieter recordings,
recording bats at greater distances, and
longer triggered recordings.
The SMM-U2’s higher signal-to-noise ratio, shown in the chart below, results in
more and longer recordings with lower noise.
Song Meter SM4BAT FS User Guide 3 Setup and Installation
Wildlife Acoustics, Inc. page 10
The higher signal-to-noise ratio means less noise from the microphone and
higher signal. This allows the microphone to pick up fainter or more distant bats
when recording. The SMM-U2 covers approximately 8 times as much airspace as
the SMM-U1. The quieter recordings also result in cleaner, easier to analyze
recordings that last longer and include more bat echolocation pulses. The
microphone has a differential output which significantly reduces noise from
electromagnetic sources.
The enclosure's innovative weatherproof design includes a built-in mounting
bracket that allows for a wide range of mounting options. The SMM-U2 has a
cardioid sensitivity pattern
which means it is most sensitive
to the front and sides and less
sensitive to the back. For most
applications, it is recommended
to mount the microphone
pointing straight up to the sky.
That will maximize coverage
volume in the air and minimize
ground noises from insects. The
microphones built-in mounting
bracket has L-shaped zip-tie
holes that also allow mounting
horizontally for applications
where the bat activity is from a
known direction, such as a cave
exit.
To l ea rn m o re a bo ut th e SM M -U2, see Specifications.
SMM-U1
The previous generation microphone,
the SMM-U1, can still be purchased
when it is necessary to maintain the
same sensitivity and directionality for
your research projects. The SMM-U1
features similar sensitivity to all major
brands of bat recorders, but we
recommend the SMM-U2 for its
superior signal-to-noise ratio and
weather protection.
To l ea rn m o re a bo ut th e SM M -U1, see Specifications.
Connecting the Microphone to the SM4BAT
The SMM-U2 microphone comes with a 5-meter cable permanently attached
and the SMM-U1 microphone includes a 3-meter extension cable. Both
Song Meter SM4BAT FS User Guide 3 Setup and Installation
Wildlife Acoustics, Inc. page 11
microphones can be extended up to 100 meters with available extension cables
in 10 and 50-meter lengths with no signal attenuation or degradation. All
connections are fully waterproof.
1. Each extension cable is shipped with a snap-on ferrite to meet standards
limiting electromagnetic emissions and protecting against electrostatic
discharge. Install the ferrite near the end of the cable as close to the
recorder as possible.
2. Loop the cable through and snap the ferrite shut. A zip tie is included for
further securing the ferrite. The image shows the ferrite as shipped (right)
and as installed (left).
3. Align and seat the cable into the keyed MIC connector.
4. Tur n the g re y lo cking rin g (bl ac k on SM3 cab le s) on the microphone or
cable clockwise P firmly until it locks into place.
5. Replace the windscreen when the foam begins to break down and flake.
With normal outdoor use over time, the foam windscreen fades to brown;
however, color degradation does not indicate a loss of integrity.
Mounting the Microphone for the Best Recording Quality
To a ss ur e th e b es t p os si b le re c o rd i ng :
1. Tes t the m ic ro ph one when it is firs t received a nd re gularl y th ereaft er using
an Ultrasonic Calibrator available from Wildlife Acoustics. This will allow you
to quickly detect a loss in sensitivity.
2. Mount the microphone away from all solid surfaces including the recorder
itself, walls, ground, water, tree branches and trunks and foliage to avoid
recording echoes or dispersing the sound.
3. Position the microphone in the middle of the bat flyway to assure that the
bat is as close as possible to the microphone.
Song Meter SM4BAT FS User Guide 3 Setup and Installation
Wildlife Acoustics, Inc. page 12
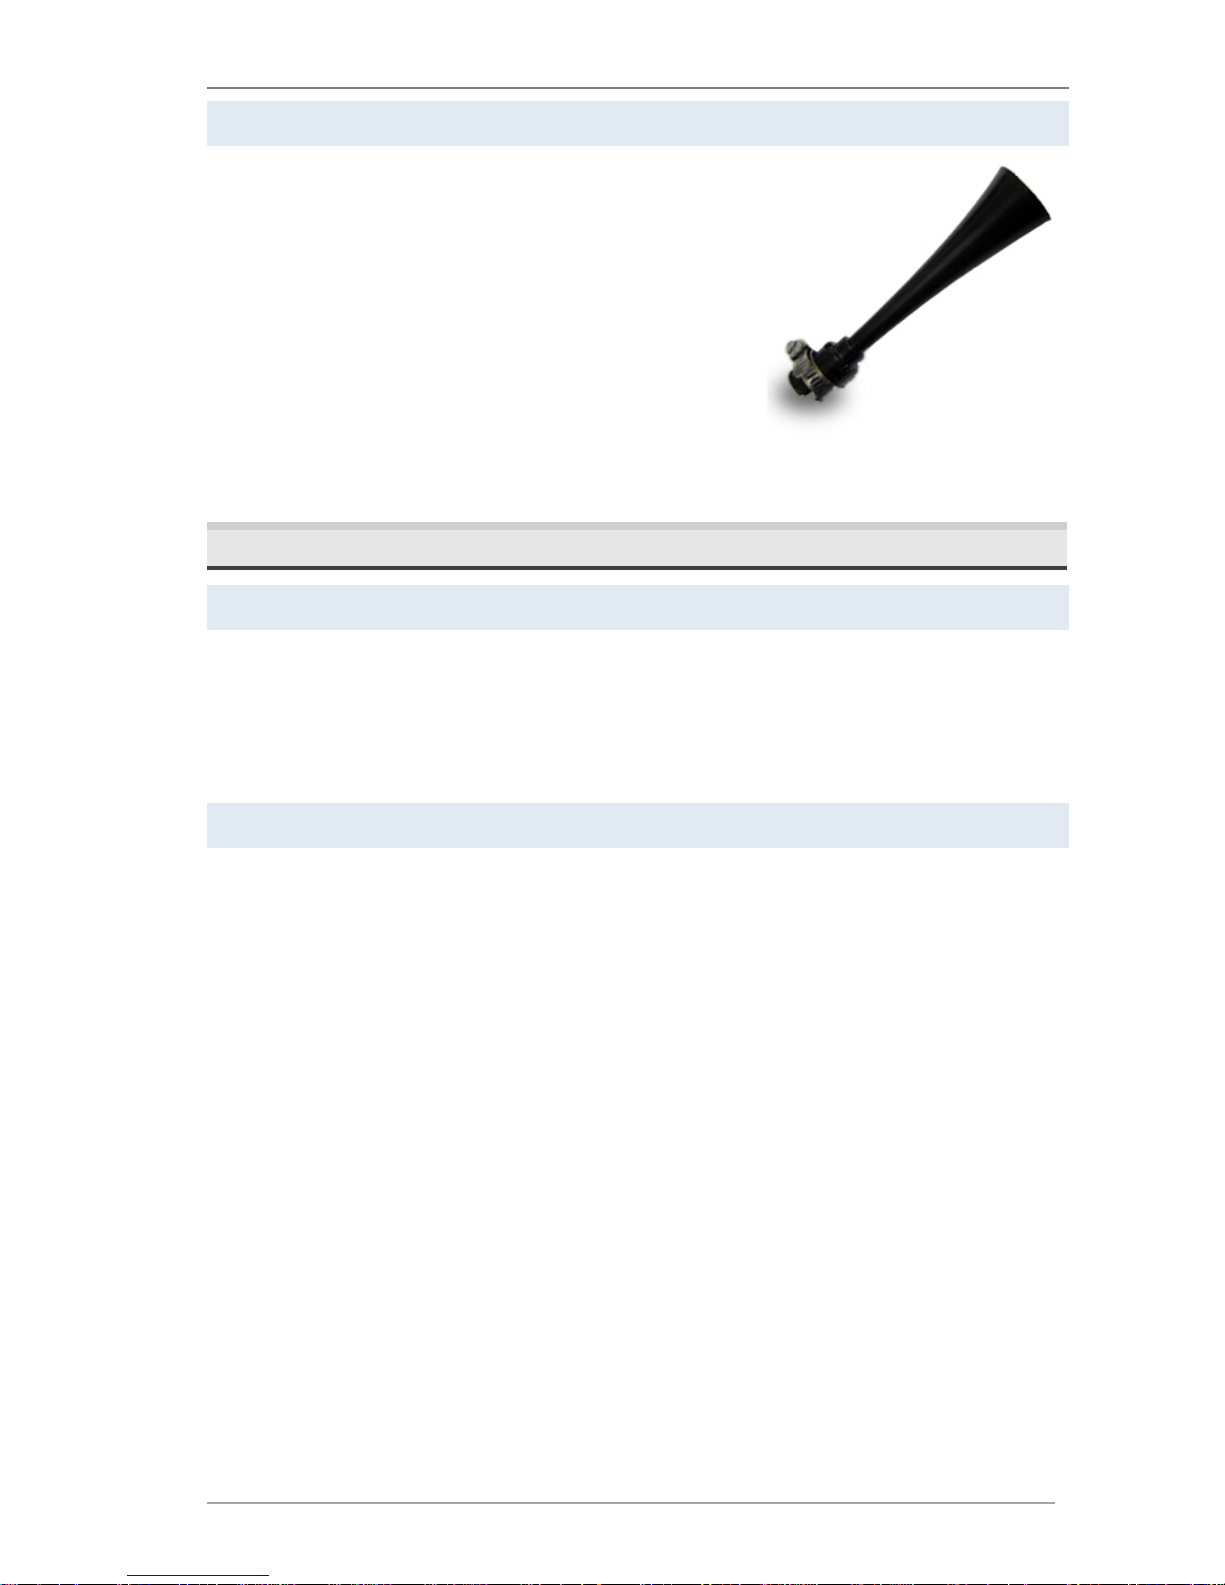
Ultrasonic Directional Horn Attachment for SMM-U1
The cardioid SMM-U2 and omnidirectional SMMU1 are ideal for unattended monitoring where the
precise direction of bat activity is not known in
advance. In applications requiring more
directionality, the SMM-U1 microphone can be
adapted for directional sensitivity with the
available directional horn.
The Ultrasonic Directional Horn converts the
SMM-U1 into a highly directional microphone,
while preserving echolocation call quality. The
attachment remains weatherproof at angles up to 45-degrees from horizontal.
3.7 Protecting the Microphone
Weather Protection for SMM-U2
The SMM-U2 is completely weatherproof and needs no additional protection
from the elements. The microphone element is protected by an IP67
(submersible) rated vent. The microphone can be mounted facing straight up or
horizontally and, in either orientation, does not need a windscreen or any other
form of protection.
Weather Protection for SMM-U1
When installed correctly, the SMM-U1 microphone is completely weatherproof.
It features a hydrophobic membrane that is transparent to acoustic or
ultrasound signals. This membrane prevents unpressurized water from entering
the microphone.
The included microphone windscreen should be installed for long-term
deployments in all areas susceptible to heavy wind-driven rain to avoid
permanent damage to the microphone element due to water penetration. For
short-term deployments in dry climates, windscreens are not necessary, but
recommend as a precaution. Windscreens attenuate ultrasound by only a 1-2 dB
when dry, however, when wet they can attenuate by another 3-5 dB until dry
again. Drying time can vary significantly based on temperature, humidity, and
wind conditions, but in as little as ten minutes, a couple dB will have been
regained.
Secure the windscreen to the SMM-U1 microphone with the included C-clip.
Allow an air gap between the windscreen and the microphone as shown.
Song Meter SM4BAT FS User Guide 3 Setup and Installation
Wildlife Acoustics, Inc. page 13
Do not handle or remove a wet windscreen as it is easy to accidentally squeeze
the windscreen and push water into the end of the microphone.
We also recommend positioning the microphone so that it is aimed at least
slightly downward to minimize water entry. Bat activity from above is still
recorded in this orientation because the microphone is omnidirectional.
The above recommendations on the use
of a microphone windscreen also apply
to the Horn attachment. When advised,
secure the large windscreen with the
included zip-tie as shown.
Avoiding Damage from Electrical Discharge
Improper mounting of microphones, especially in dry or windy conditions, could
result in microphone damage from electro-static build-up. We recommend
checking with a professional licensed electrician or installer with experience in
outdoor antennas or weather instruments for advice suitable to your situation.
Here are some tips to avoid damage:
■
Avoid mounting microphones on tall plastic masts including those made of
fiberglass or nylon for deployments in dry conditions. A breeze flowing over
the plastic mast can build up a sizeable electrical charge much like rubbing a
balloon. Eventually, the electric charge will be strong enough to discharge
with an attraction to the mass of metal in the cable resulting in a spark that
could damage the microphone. Wood or metal masts will mitigate this
problem.
■
If electrical storm activity is a possibility you need to protect the microphone
and equipment from damage from electrical discharge. If the best path to
ground is through the microphone and/or SM4BAT then the microphone
and/or the recorder could be severely damaged. To protect against this, you
need to create a better and safer alternate path to ground, much the way a
lightning rod on a house functions. One way to do this is to use a pipe clamp
to clamp a heavy gauge (18AWG) wire from the microphone to ground by
securing the other end of the wire to the metal frame of a grounded tower
structure, or securing the wire to a metal pipe planted 2 meters into the
earth. The connections must be electrically strong with low resistance.
Song Meter SM4BAT FS User Guide 3 Setup and Installation
Wildlife Acoustics, Inc. page 14
■
It is better to not ground the Song Meter or its power source so there is not a
clear path to ground through the SM4BAT.
3.8 Connecting the GPS Accessory
The optional GPS accessory automatically sets the date, time, latitude, and
longitude of the recorder. If you have several SM4BAT recorders to deploy in the
field, you can use a single GPS accessory to set them up. The real-time GPS
location will be saved in the recording’s meta-data if the GPS is attached during
recording. This can be useful for transect surveys.
1. Navigate to Main Menu > Settings > Location > Timezone and set the
time zone. The GPS does not set the time zone.
NOTE: The time zone must be set prior to using the available GPS accessory to
automatically set the correct time. The SM4BAT FS adjusts the time from the GPS based
on the time zone setting and sets the recorder’s clock after this calculation. If you
change the time zone after the clock has been set, this automatic adjustment does not
take place and the clock will not be set correctly.
2. Open the security cover and plug
the GPS cable into the GPS port
on the side of the recorder.
3. The recorder automatically
detects the presence of the GPS.
When the recorder wakes up, the
GPS is powered up.
4. Wait for the GPS to communicate
with the satellites.
a. A few seconds after connecting the GPS Accessory, the GPS status is
shown on the top right of all menu screens. When the GPS has
successfully communicated with the satellites, the status changes
from asterisks to FIX.
b. Or, on the CHECK STATUS screen, a question mark (?) appears
between the date and time to indicate that the GPS accessory is
attempting to acquire satellite data.
5. When the GPS has successfully acquired satellite data, the question mark (?)
changes to a number sign (#) and the location, date, and time are
automatically set. Coordinates are given in decimal degrees and use the
WGS-84 coordinate system.
NOTE: The Location Settings coordinates as seen on the display in the main menu are
read-only when the GPS is attached. You cannot change them.
6. Disconnect the GPS. The available GPS accessory consumes about 90 mA of
additional current—more than four times the current of the recorder itself.
For passive recording, we recommend that you use the GPS to automatically
Song Meter SM4BAT FS User Guide 3 Setup and Installation
Wildlife Acoustics, Inc. page 15
set the clock and location at the beginning of the deployment but do not
keep it attached for the duration of the deployment.
NOTE: If you are still prompted for latitude and longitude when starting a schedule, it
most likely means the GPS accessory does not yet have a fix. Be aware that it can be
difficult to acquire a GPS signal in thick vegetation. Also note that the GPS cannot be
used for precision time synchronization on the SM4BAT FS as it can on the SM3BAT.
3.9 Securing the Recorder
Close the cover to protect the recorder from environmental conditions.
To s e cu r e th e r ec or de r w it h a s t an d a rd key or combination lock, press the latch
down and insert the lock shackle through the lock ring.
Observe the following size requirements for the lock:
Minimum:
Maximum:
Shackle Diameter
1/8 inch (3 mm)
3/8 inch (9 mm)
Vertical Clearance
5/8 inch (16 mm)
1.0 inch (25 mm)
Horizontal Clearance
1/2 inch (13 mm)
1.0 inch (25 mm)
NOTE: The lock should be rated for outdoor use.
3.10 Locking the Keypad
For large scale projects, it is occasionally desirable to lock down the SM4BAT
such that only authorized personnel are able to modify the configuration. This
can prevent modifications by someone who may inadvertently put deployments
at risk by making changes without understanding their consequences.
The SM4 Configurator software can be used to export an .SM4S configuration
file that will require a user-selectable 4-digit code to change any settings on the
recorder. The user can still navigate through all the menus and screens. However,
any attempt to change configuration settings or the clock will fail with an error.
The time and GPS coordinates may still be set/updated by plugging in the GPS
accessory.
Song Meter SM4BAT FS User Guide 3 Setup and Installation
Wildlife Acoustics, Inc. page 16
NOTE: This is not a cryptographic solution but the level of security is sufficient to
prevent the casual user from changing configuration settings that could impact the
success of a deployment.
A locked recorder will show [LOCKED] in the lower right corner of the Main
Menu.
Use the steps below in the SM4 Configuration Utility to lock or unlock a
recorder.
1. Configure your schedule and settings as normal in the SM4 Configuration
program.
2. Save the .SM4S configuration file using the menu selection "File->Save with
lock/unlock code...". The user is prompted to enter a 4-digit code and
indicate if the configuration is to be locked or unlocked.
3. When the .SM4S configuration file is imported into the SM4BAT from
the "Schedule->Import Sched+Setts" menu, the recorder will be in one of the
following states depending on whether the recorder was locked or unlocked
and if the .SM4S is locked with a code or not:
a. If the SM4BAT was unlocked and the .SM4S file is locked with a
code, the SM4BAT configuration will be updated and locked with
the code. The user will first be prompted to make sure they
understand that the configuration will be locked.
b. If the SM4BAT was locked, and the .SM4S file is unlocked with a
matching code, the SM4BAT configuration will be updated and
unlocked. This is how an SM4BAT can be returned to an unlocked
state.
c. If the SM4BAT was locked, and the .SM4S file is locked with a
matching code, the SM4BAT configuration will be updated and the
SM4BAT remains locked with the code. This is how a locked
configuration can be updated with a new locked configuration.
d. If the SM4BAT was locked, and the .SM4S does not contain a
matching code, then the import will fail with an appropriate error.
3.11 Mounting the Recorder
Use the holes in the top and bottom
mounting bracket for mounting the
recorder with cable locks, screws,
radiator clamps, bungee cords, or other
fasteners. The enclosure is fully
weatherproof and does not require
additional protection.
 Loading...