

Page 1

Model # LO8
User’s Manual
Invisible Infrared Digital Scouting Camera
Page 2
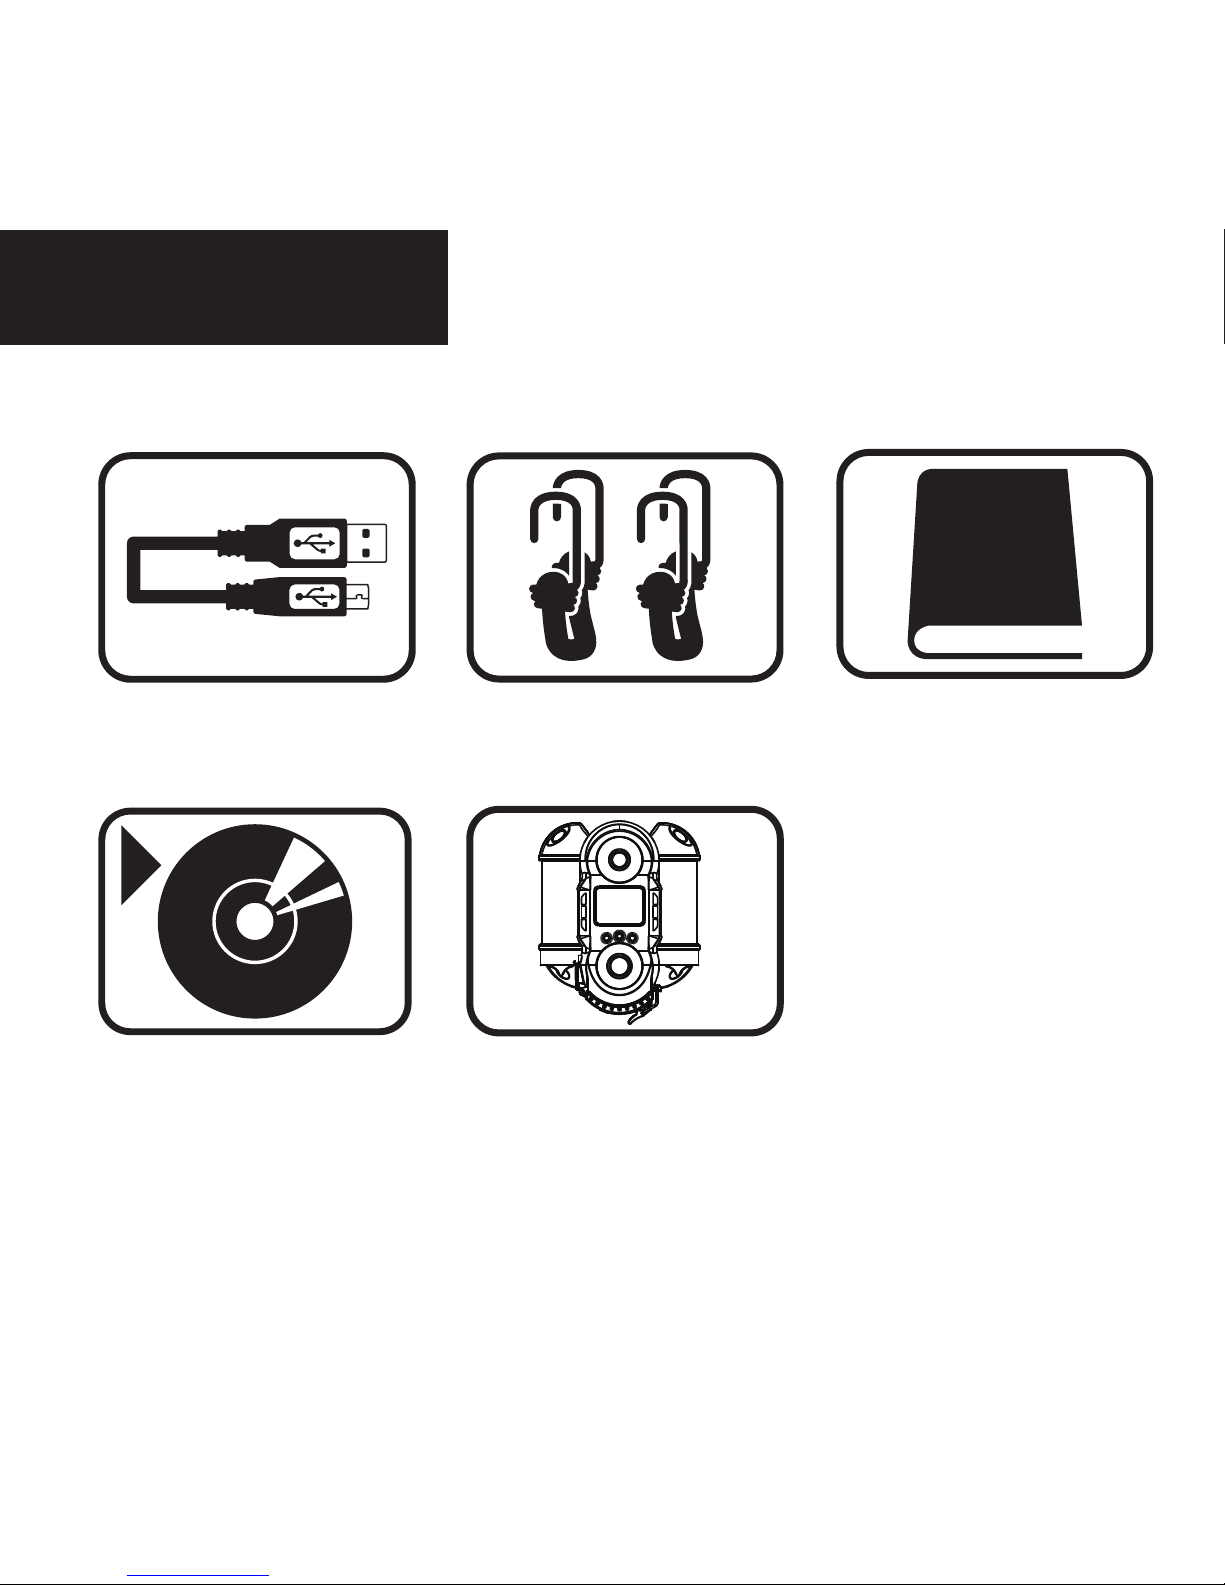
Includes
USB Cable 2 - Bungee Cords
User Manual
Camera UnitFlextime Player
Software
page 1
NOTE: Flextime Player Software is optional.
Flextime files can be played by using most
media players.
Page 3

Features
RESOLUTION
FLASH
FLASH RANGE
SENSOR
SENSOR RANGE
IMAGE FORMAT
MEMORY
USB
IMAGE RESOLUTION
POWER SUPPLY
AUXILIARY POWER
BATTERY LIFE
ONBOARD POWER
HOUSING
MOUNTING
REDUX
MAX: 8 MP
60 High Intensity Invisible IR LED’s
up to 70 feet
Passive Infrared Sensor (PIR)
Detects Motion and Heat
up to 75 feet
JPEG - Digital Still / AVI - Digital Video
up to 32GB SD Card (not included and required)
5-PIN Mini USB style - included
High (8MP)
Medium (6MP)
Low (4MP)
12 AA batteries (not included and required)
External power port
Estimated up to 3 months (in PIR mode)
Battery life may be reduced in Flextime mode
(depending on Flextime setting)
Built in battery to retain Time and Settings
Weather resistant with rubber gaskets
2 Bungee cords - included
Technology to reduce motion blur during
transition time
page 2
Page 4
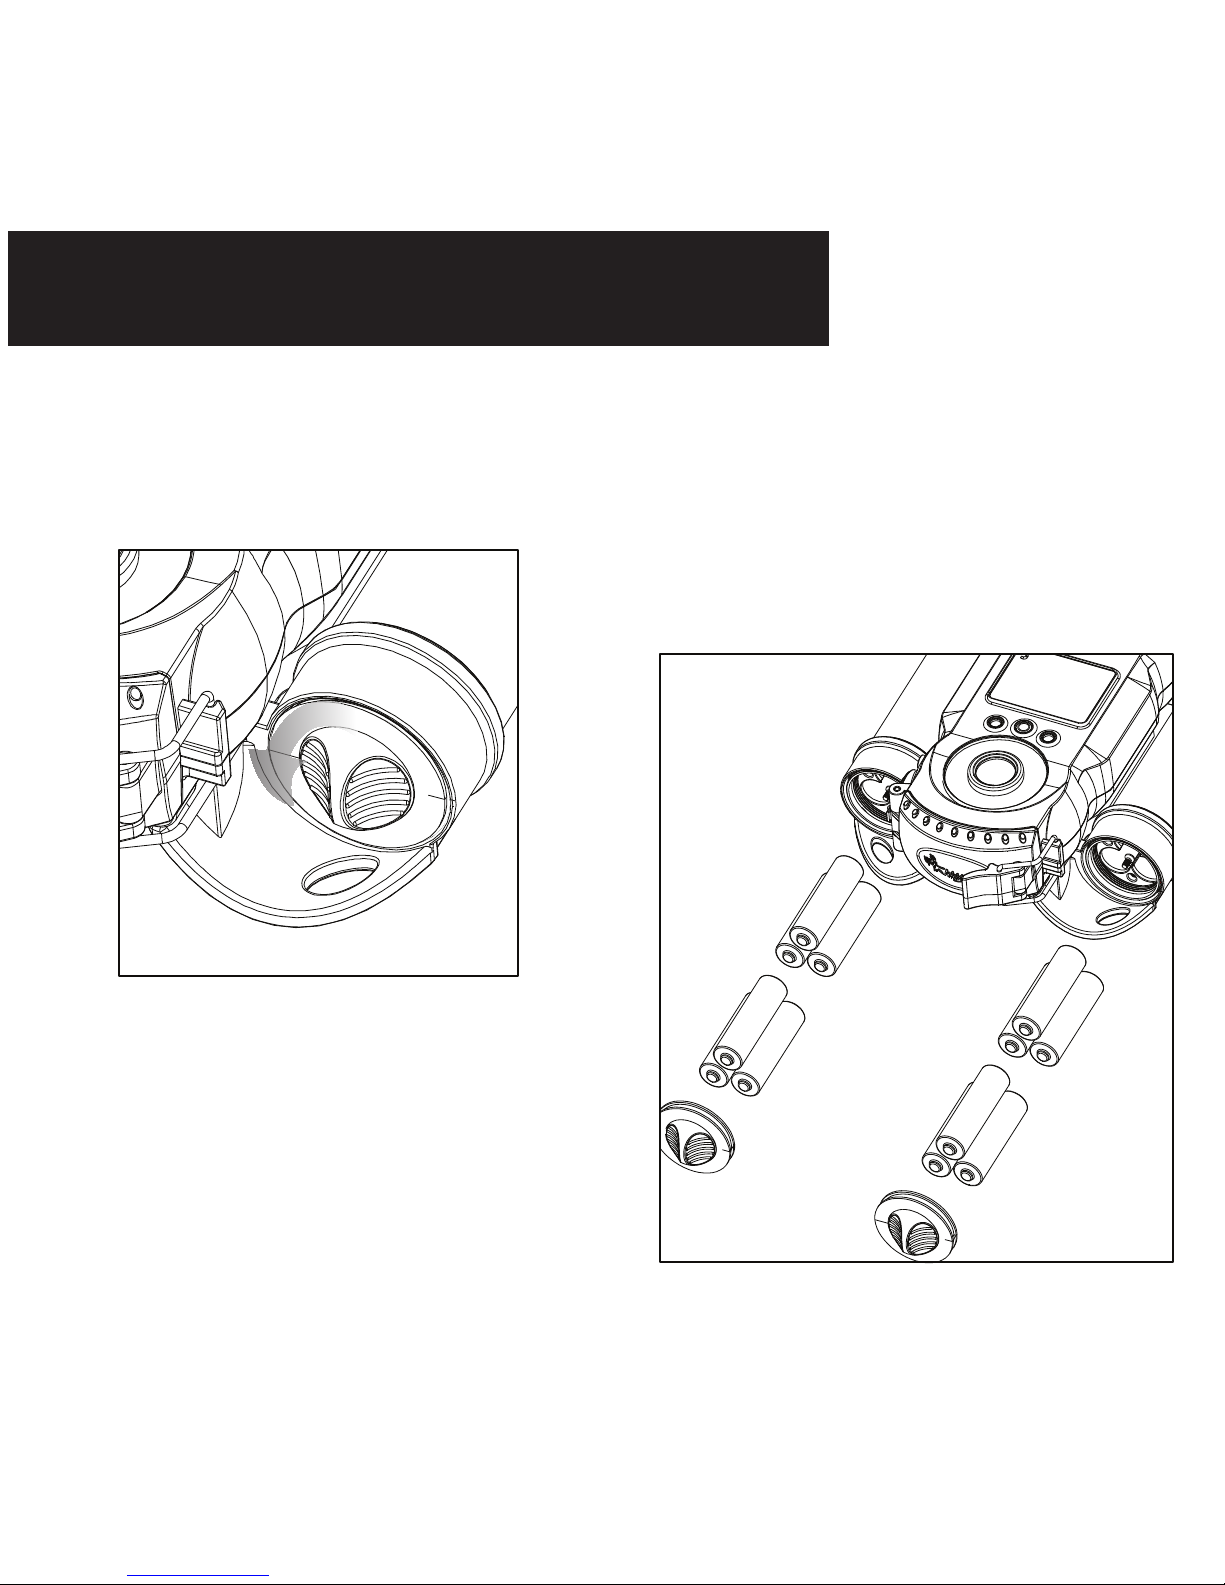
Installing Batteries
With the camera facing up, open
the battery compartment at the
bottom of the camera by turning
them to the left.
1.
With the bottom of the camera
towards you, load 6 AA batteries with
the positive ends towards you in the
left battery chamber and load 6 AA
batteries with the positive ends
towards you in the right battery
chamber.
2.
page 3
Page 5
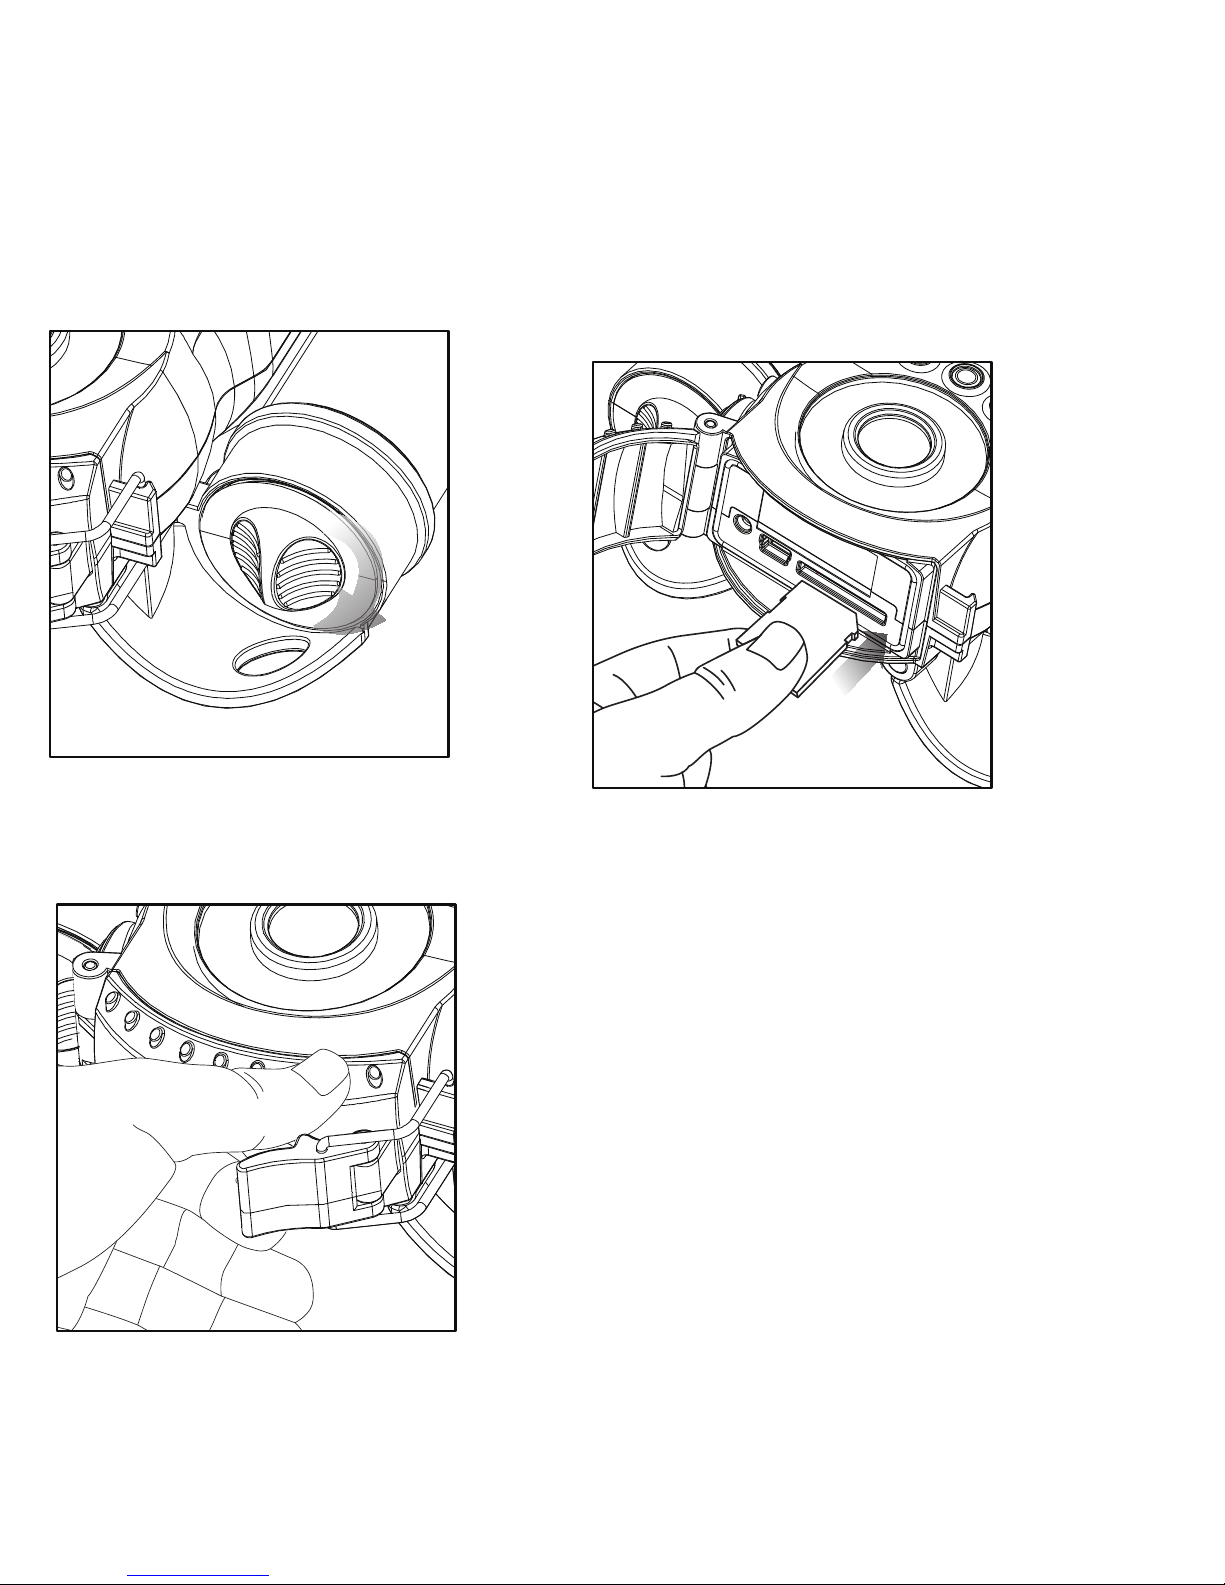
Close battery compartment cover
by turning them to the right.
3.
Open the door at the bottom of
the camera by unlatching the
locking tabs.
4.
Load SD memory card (up to 32GB not
included) into the SD card slot with the
connectors facing down.
5.
TIPS:
Make sure the SD Card is unlocked (small
switch on the side of the SD Card) or the
camera LCD will read “LOCK”.
IMPORTANT:
Make sure the camera is powered off before
removing or installing an SD card.
If you are using an SD card from other
cameras, please make sure to format the SD
card in your computer prior to use in your
camera. New cards are ok to use straight from
the package.
page 4
Page 6
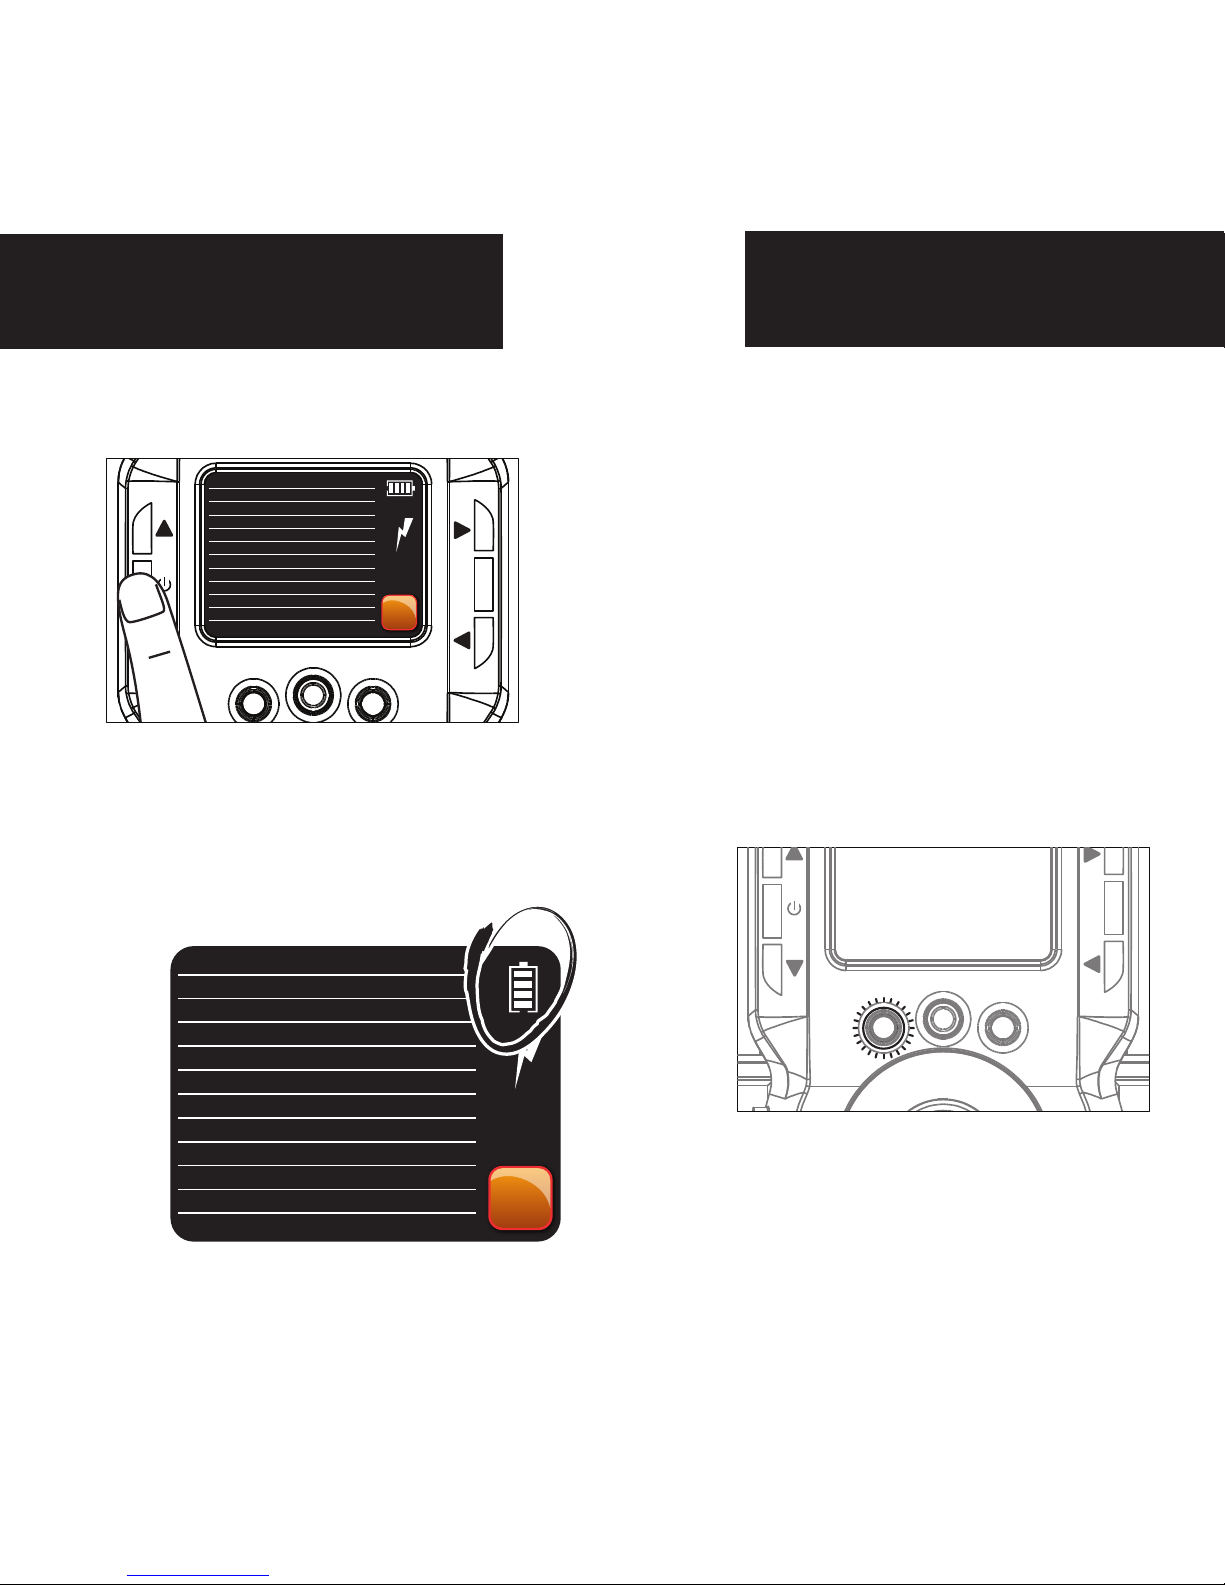
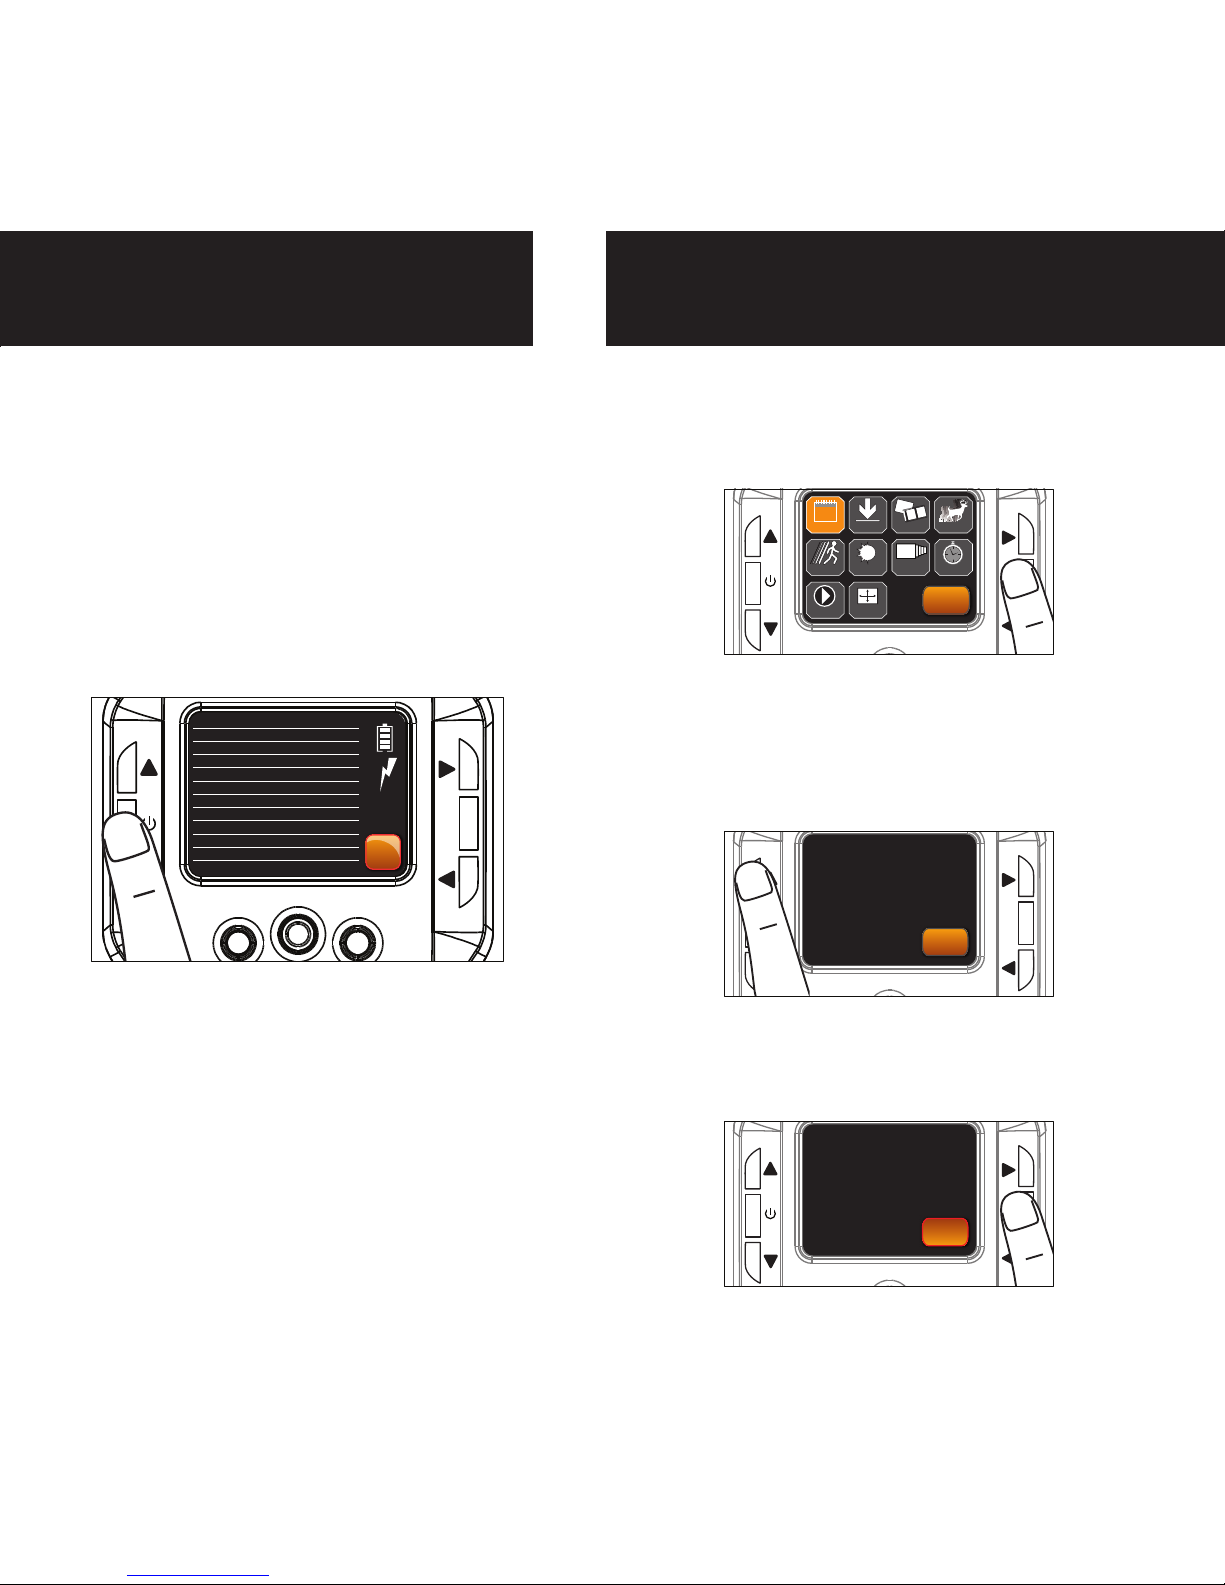
Power On
1.
Check the battery level icon to ensure
the batteries just installed contain the
proper charge level. If so, you are ok to
proceed with camera use.
2.
To turn the unit ON press and release
the power button.
page 5
Test Mode
PIR LED Status Light: During the first
2 minutes of Ready Mode, the red light
will illuminate when a PIR event is
triggered. The red light will blink for
2-3 seconds when photo is taken
during this first 2 minutes. After 2
minutes all indicator lights will turn
off until a button is pressed.
1.
LCD Ready Mode: The camera will
automatically enter Ready Mode if a
button is not pressed for greater than
30 seconds. The status lights will
illuminate for a total of 2 minutes.
2.
UP
OK
L
R
DN
304 2PM
UP
OK
L
R
DN
TIME / DATE
LOCATION
IMAGE TYPE
TRIGGER
PIC RESOLUTION
VID RESOLUTION
PIR SENSITIVITY
ACTIVE TIME
FLEXTIME
DELAY
PICTURES TAKEN
PICTURES REMAINING
LOC1
STILL - WIDE
BOTH
HIGH
REGULAR
MED
24 HR
Inter - 1M
15S
0000
0000
MENU
00:00 PM 00/00/00
TIME / DATE
LOCATION
IMAGE TYPE
TRIGGER
PIC RESOLUTION
VID RESOLUTION
PIR SENSITIVITY
ACTIVE TIME
FLEXTIME
DELAY
PICTURES TAKEN
PICTURES REMAINING
LOC1
STILL - WIDE
BOTH
HIGH
REGULAR
MED
24 HOURS
Inter - 00:01:00
00:00:15
0000
0000
MENU
00:00 PM 00/00/00
Page 7
Power Save
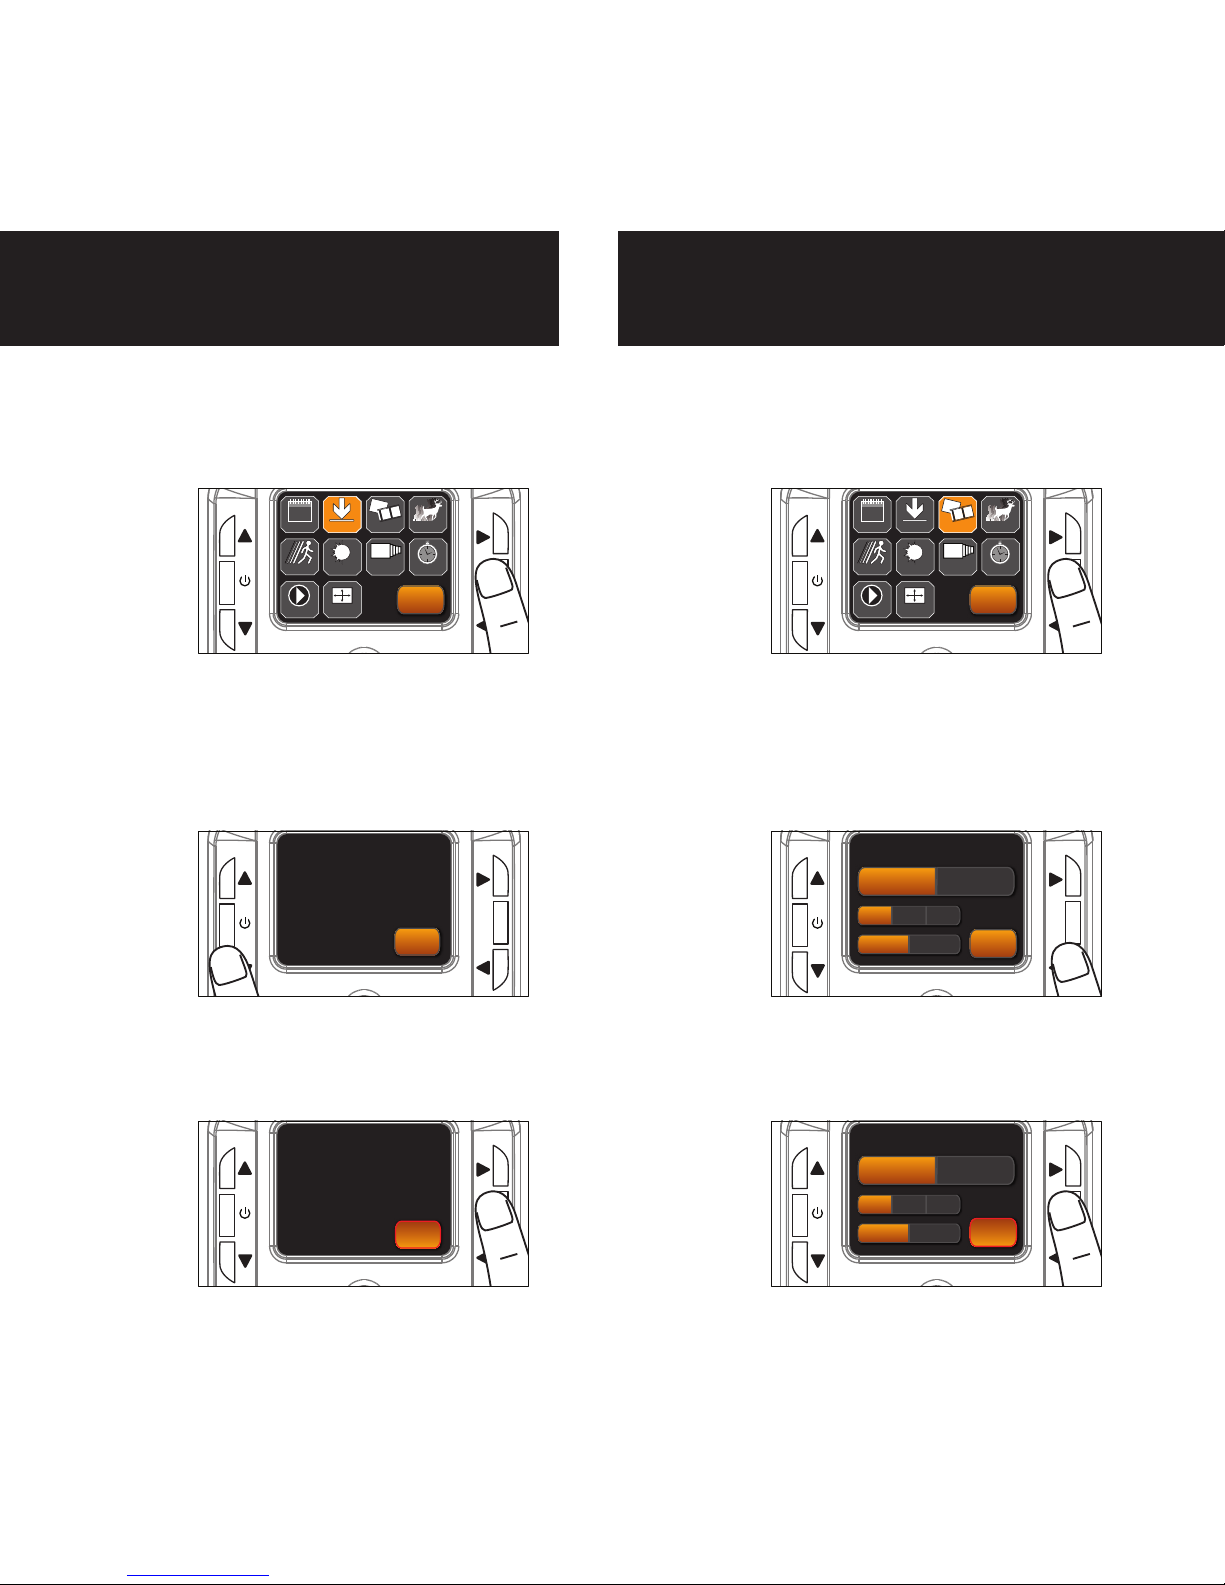
Date/Time
1.
To change Date & Time, enter
MENU and press the UP,DN,L or
R buttons to navigate to the DATE
& TIME icon and press OK.
2.
Press the UP or DN navigation
button to go up or down in
sequence. Press L or R to move to
the next digit.
3.
When the Time & Date are set, press
OK to save and press OK again to go
back to the MENU.
page 6
After 30 seconds without any buttons
being pushed, the LCD will turn off and
camera enters into Power Save or
Ready Mode.
1.
The LCD screen can be awakened by
pressing the Power button briefly.
Note: The LCD will not “wake up” when
camera is writing to memory.
2.
UP
OK
L
R
DN
UP
OK
L
R
DN
BACK
ACTIVE TIME
LOCATION TRIGGER
DELAY
PIR SENSITIVITY
FLEXTIME +™
+
DATE & TIME
30
PLAY BACK
IMAGE TYPE
VIEW ASSIST
DATE & TIME
30
UP
OK
L
R
DN
_ _ :__
__/__/__
TIME/DATE
AM
MONTH DAY YEAR
PM
BACK
1
1 1 0 1 1 2
2 0 0
UP
OK
L
R
DN
__:__
__/__/__
TIME/DATE
AM
MONTH DAY YEAR
PM
BACK
1
1 1 0 1 1 2
2 0 0
TIME / DATE
LOCATION
IMAGE TYPE
TRIGGER
PIC RESOLUTION
VID RESOLUTION
PIR SENSITIVITY
ACTIVE TIME
FLEXTIME
DELAY
PICTURES TAKEN
PICTURES REMAINING
LOC1
STILL - WIDE
BOTH
HIGH
REGULAR
MED
24 HR
Inter - 1M
15S
0000
0000
MENU
00:00 PM 00/00/00
Page 8
page 7
Location
1.
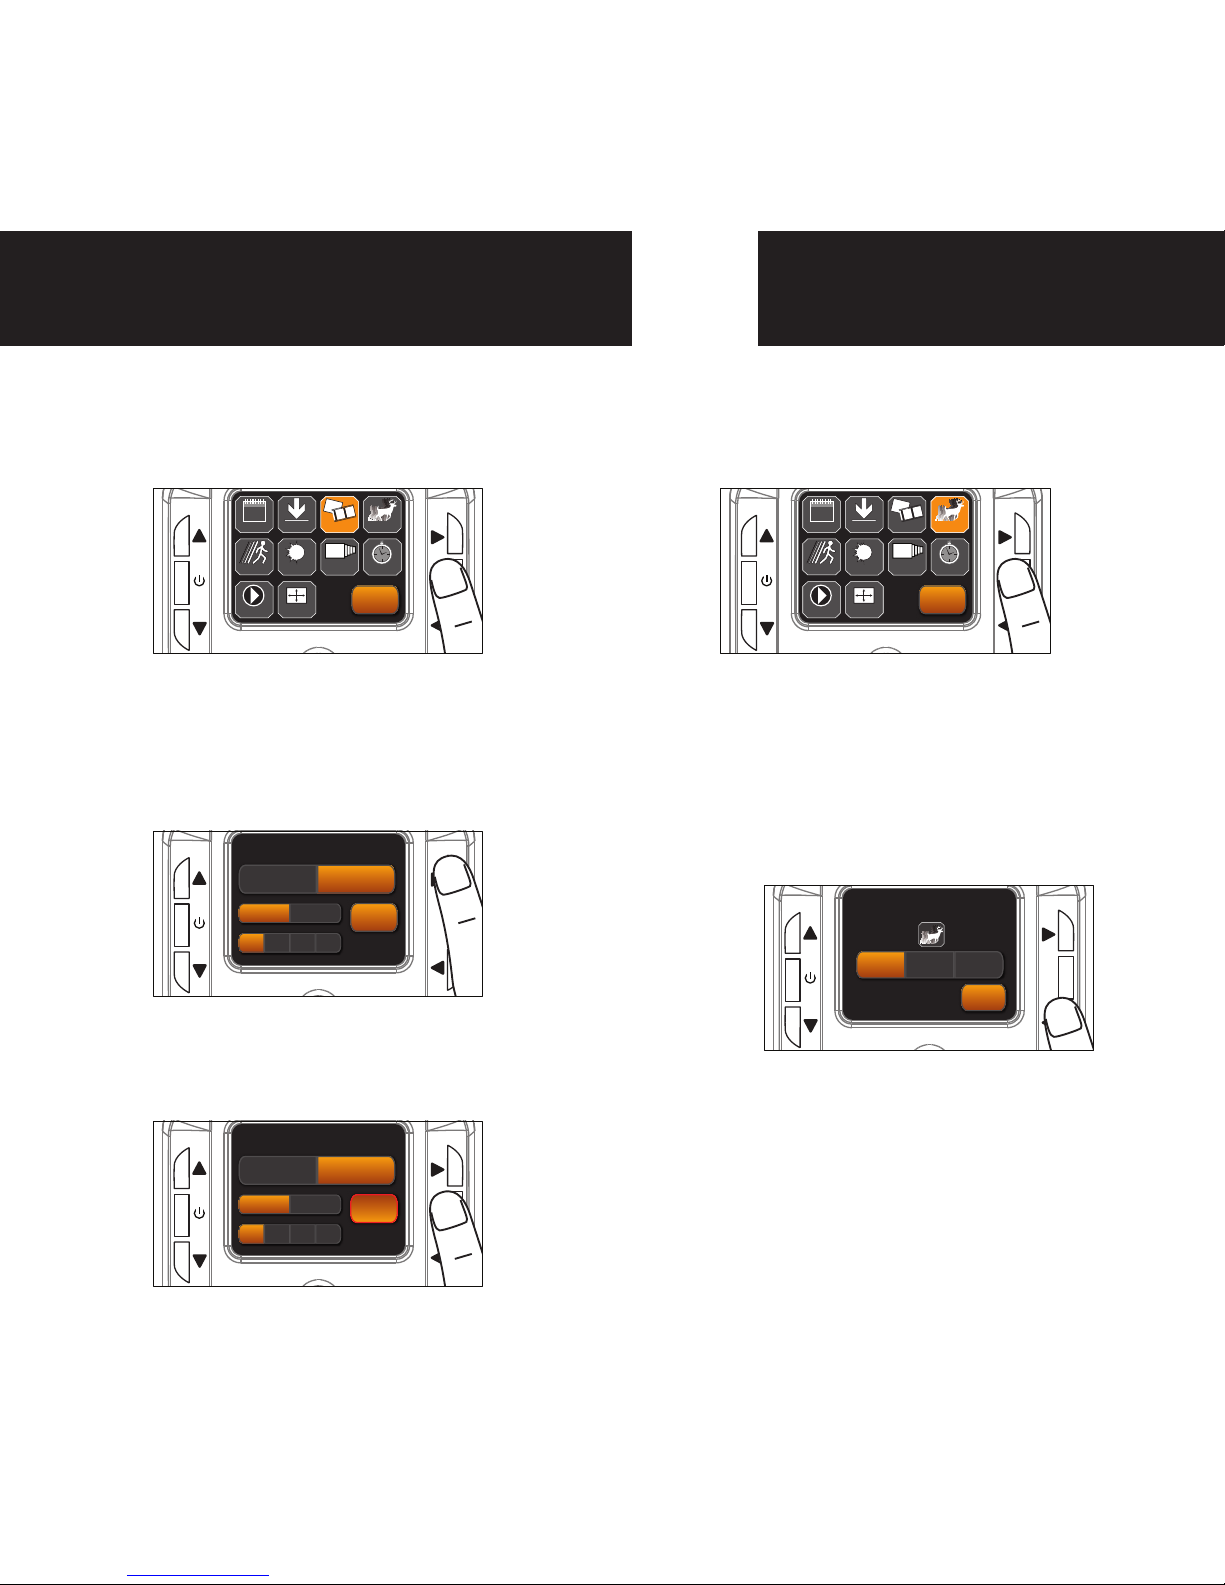
To change Location, enter MENU
and press the UP,DN,L or R
buttons to navigate to the
LOCATION icon and press OK.
2.
Press the UP or DN navigation
button to go up or down in
sequence. Press L or R to move to
the next digit.
3.
When the Location is set, press OK to
save and press OK again to go back to
the MENU.
UP
OK
L
R
DN
BACK
ACTIVE TIME
LOCATION TRIGGER
DELAY
PIR SENSITIVITY
FLEXTIME +™
+
DATE & TIME
30
PLAY BACK
IMAGE TYPE
VIEW ASSIST
UP
OK
L
R
DN
UP
OK
L
R
DN
BACK
LOCATION
_ _ ______
LOCATION
A B
BACK
LOCATION
____ ____
A B C D
Image Type:Still
1.
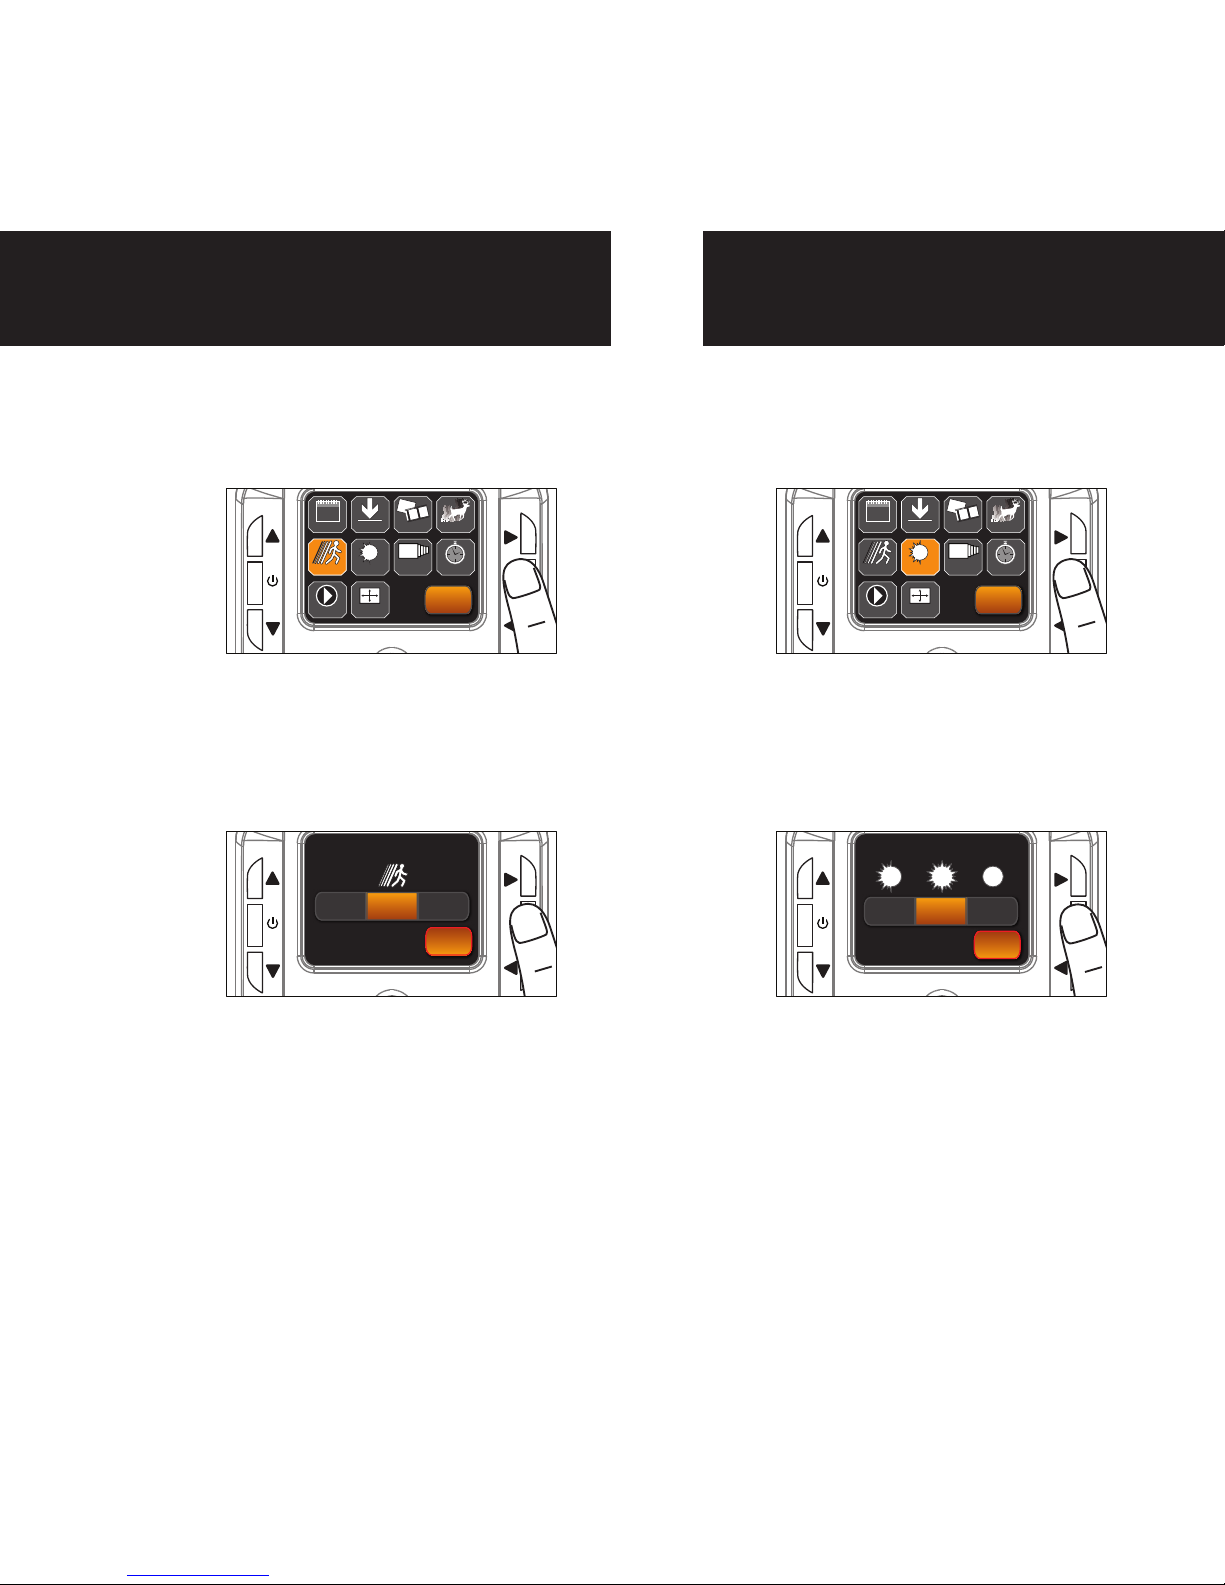
To change Image Type, enter
MENU and press the UP,DN,L or
R buttons to navigate to the
Image Type icon and press OK.
2.
Press the L, R button to select
STILL and press OK. Then select
the Resolution and press OK. Then
select the aspect and press OK.
3.
When the Image Type is set, press OK
to save and press OK again to go back
to the MENU.
UP
OK
L
R
DN
BACK
ACTIVE TIME
LOCATION TRIGGER
DELAY
PIR SENSITIVITY
FLEXTIME +™
+
DATE & TIME
30
PLAY BACK
IMAGE TYPE
VIEW ASSIST
UP
OK
L
R
DN
UP
OK
L
R
DN
IMAGE TYPE
BACK
STILL VIDEO
HI MED LOW
REGULAR WIDE ANGLE
RESOLUTION
IMAGE TYPE
BACK
STILL VIDEO
HI MED LOW
REGULAR WIDE ANGLE
RESOLUTION
IMAGE TYPE
Page 9
Trigger
page 8
TRIGGER:
PIR MODE: Takes a photo or video only
when the PIR sensor is triggered.
FLEXTIME
(Time Lapse): Takes time lapse
images at set intervals during the key
movement periods of the day, depending
on your Flextime settings.
BOTH: Both PIR and Flextime are active.
1.
To change Trigger, enter MENU
and press the UP,DN,L or R
buttons to navigate to the Trigger
icon and press OK.
2.
Press the L, R button to select
Trigger Mode. Then select the OK
to save. If PIR is selected press OK
again to go back to the MENU. If
FlexTime or Both is selected you
will be redirected to the Flextime
Menu (see page 11).
UP
OK
L
R
DN
BACK
ACTIVE TIME
LOCATION TRIGGER
DELAY
PIR SENSITIVITY
FLEXTIME +™
+
DATE & TIME
30
PLAY BACK
IMAGE TYPE
VIEW ASSIST
UP
OK
L
R
DN
Image Type:Video
1.
To change Image Type, enter
MENU and press the UP,DN,L or
R buttons to navigate to the
Image Type icon and press OK.
2.
Press the L, R button to select
VIDEO and press OK. Then select
the Resolution and press OK. Then
select the length and press OK.
3.
When the Image Type is set, press OK
to save and press OK again to go back
to the MENU.
UP
OK
L
R
DN
BACK
ACTIVE TIME
LOCATION TRIGGER
DELAY
PIR SENSITIVITY
FLEXTIME +™
+
DATE & TIME
30
PLAY BACK
IMAGE TYPE
VIEW ASSIST
UP
OK
L
R
DN
UP
OK
L
R
DN
IMAGE TYPE
BACK
STILL VIDEO
HD
WVGA
15s 30s 1m 2m
VIDEO LENGTH
IMAGE TYPE
BACK
STILL VIDEO
HD
REGULAR
15s 30s 1m 2m
VIDEO LENGTH
IMAGE TYPE
BACK
PIR
FlexTime
BOTH
TRIGGER
TRIGGER
Page 10
PIR ACTIVE:
24 HR: The PIR can be active at all
times.
DAY: The PIR can be active in
daylight hours only.
NIGHT: The PIR can be active in
nighttime hours only.
page 9
PIR Sensitivity
1.
To change PIR Sensitivity, enter
MENU and press the UP,DN,L or
R buttons to navigate to the PIR
Sensitivity icon and press OK.
2.
Press the L, R button to select the
sensitivity and press OK to save.
Then press OK again to go back to
the MENU.
UP
OK
L
R
DN
BACK
ACTIVE TIME
LOCATION TRIGGER
DELAY
PIR SENSITIVITY
FLEXTIME +™
+
DATE & TIME
30
PLAY BACK
IMAGE TYPE
VIEW ASSIST
UP
OK
L
R
DN
BACK
HI MED LOW
PIR SENSITIVITY
Active Time
1.
To change the Active Time, enter
MENU and press the UP,DN,L or
R buttons to navigate to the
Active Time icon and press OK.
2.
Press the L, R button to select the
active time and press OK to save.
Then press OK again to go back to
the MENU.
UP
OK
L
R
DN
BACK
ACTIVE TIME
LOCATION TRIGGER
DELAY
PIR SENSITIVITY
FLEXTIME +™
+
DATE & TIME
30
PLAY BACK
IMAGE TYPE
VIEW ASSIST
UP
OK
L
R
DN
BACK
24 HR DAY NIGHT
ACTIVE TIME
PIR SENSITIVITY
ACTIVE TIME
Page 11
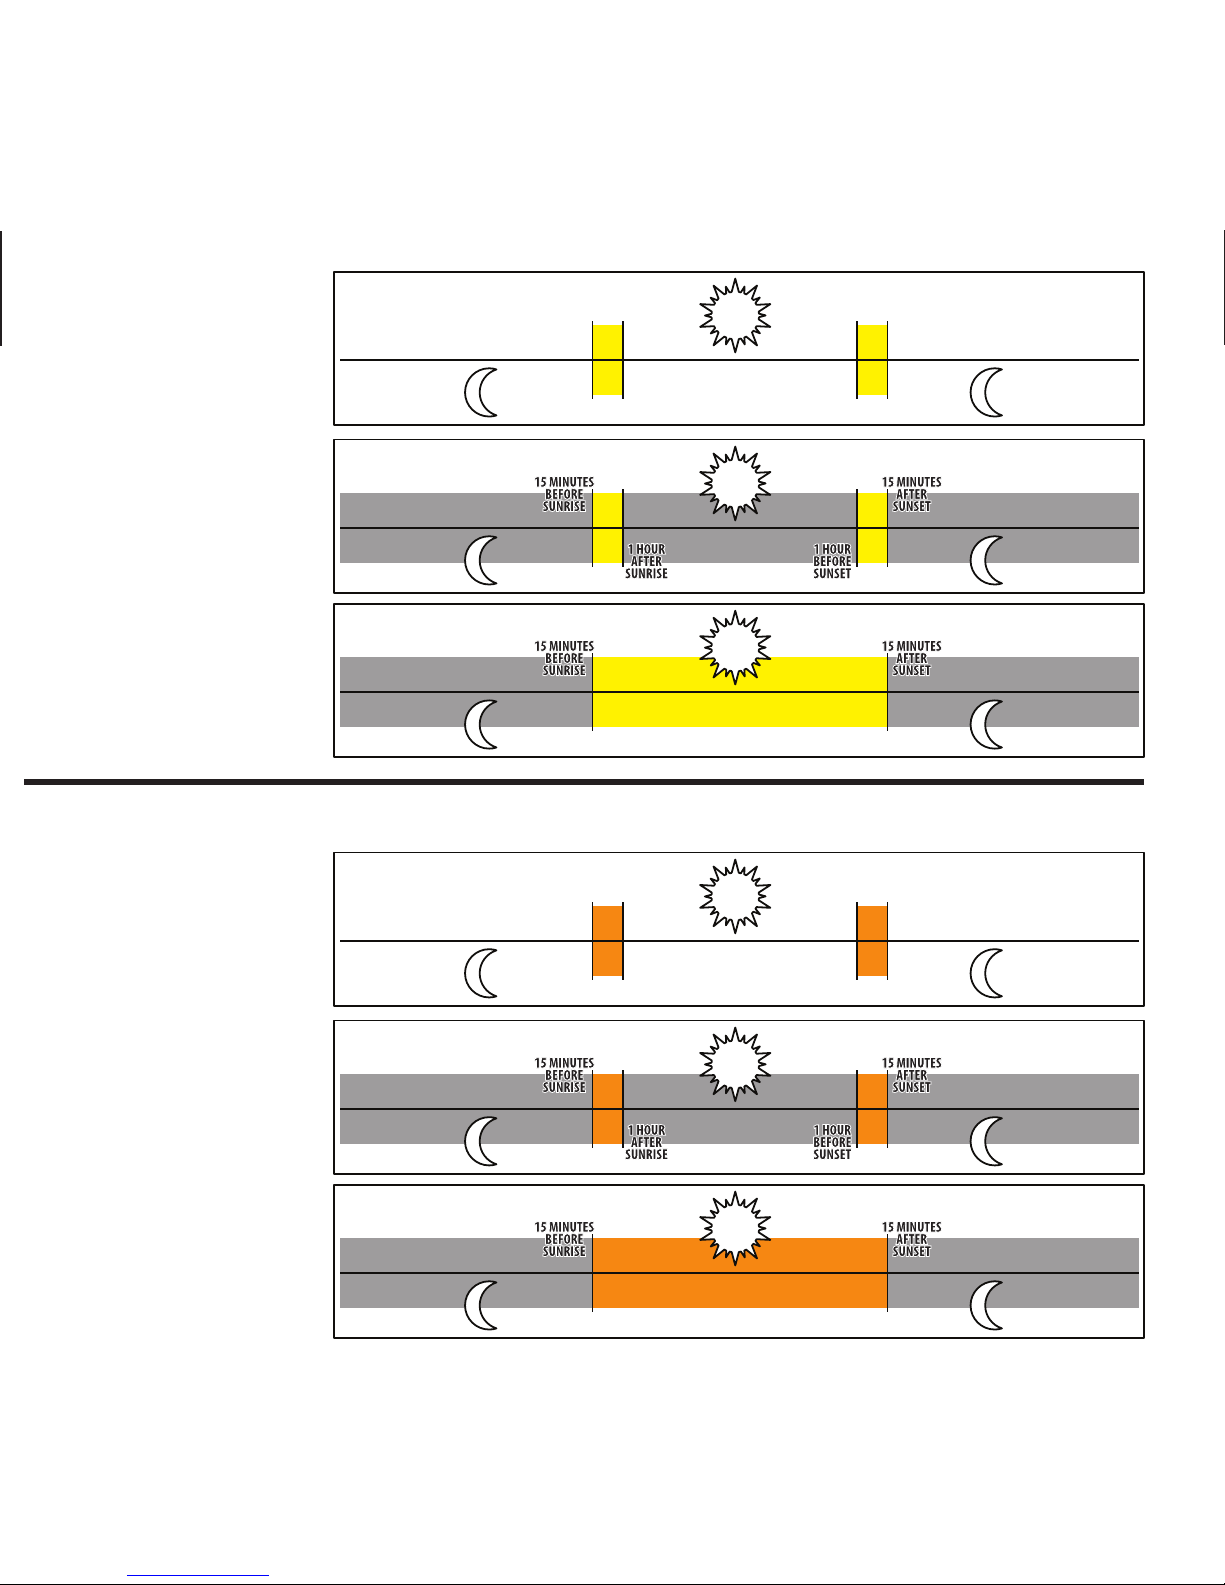
page 10
Flextime period:
1. 15 min before Sunrise
to 1 hour after Sunrise.
2. 1 hour before Sunset
to 15 min after Sunset
Flextime period:
1. 15 min before Sunrise
to 1 hour after Sunrise.
2. 1 hour before Sunset
to 15 min after Sunset
Flextime period:
1. 15 min before Sunrise
to 15 min after Sunset
1 HOUR
AFTER
SUNRISE
1 HOUR
BEFORE
SUNSET
15 MINUTES
BEFORE
SUNRISE
15 MINUTES
AFTER
SUNSET
FLEX
TIME
FLEX
TIME
FLEX
TIME
FLEX
TIME
PIR
INACTIVE
Camera is inactive before and after Flextime periods.
Flextime is active twice a day.
Flextime is active twice a day.
Flextime is active during daytime.
Camera is in PIR mode before and after Flextime periods.
Camera is in PIR mode before and after Flextime periods.
INACTIVE
INACTIVE
INACTIVE
INACTIVE
INACTIVE
PIR
PIR
FLEXTIME
PIR PIR
P1
FLEXTIME selected
BOTH selected
P2
INTERVAL
Flextime + PIR period:
1. 15 min before Sunrise
to 1 hour after Sunrise.
2. 1 hour before Sunset
to 15 min after Sunset
Flextime + PIR period:
1. 15 min before Sunrise
to 1 hour after Sunrise.
2. 1 hour before Sunset
to 15 min after Sunset
Flextime + PIR period:
1. 15 min before Sunrise
to 15 min after Sunset
P1
P2
INTERVAL
1 HOUR
AFTER
SUNRISE
1 HOUR
BEFORE
SUNSET
15 MINUTES
BEFORE
SUNRISE
15 MINUTES
AFTER
SUNSET
FLEX
TIME
FLEX
TIME
FLEX
TIME
FLEX
TIME
PIR
PIR PIR
PIR PIRPIR
PIR
FLEXTIME & PIR
PIR PIR
Camera is inactive before and after Flextime + PIR periods. Flextime + PIR is active twice a day.
Camera is in PIR mode before and after Flextime + PIR periods. Flextime + PIR is active twice a day.
Camera is in PIR mode before and after Flextime + PIR periods. Flextime + PIR is active during daytime.
Page 12
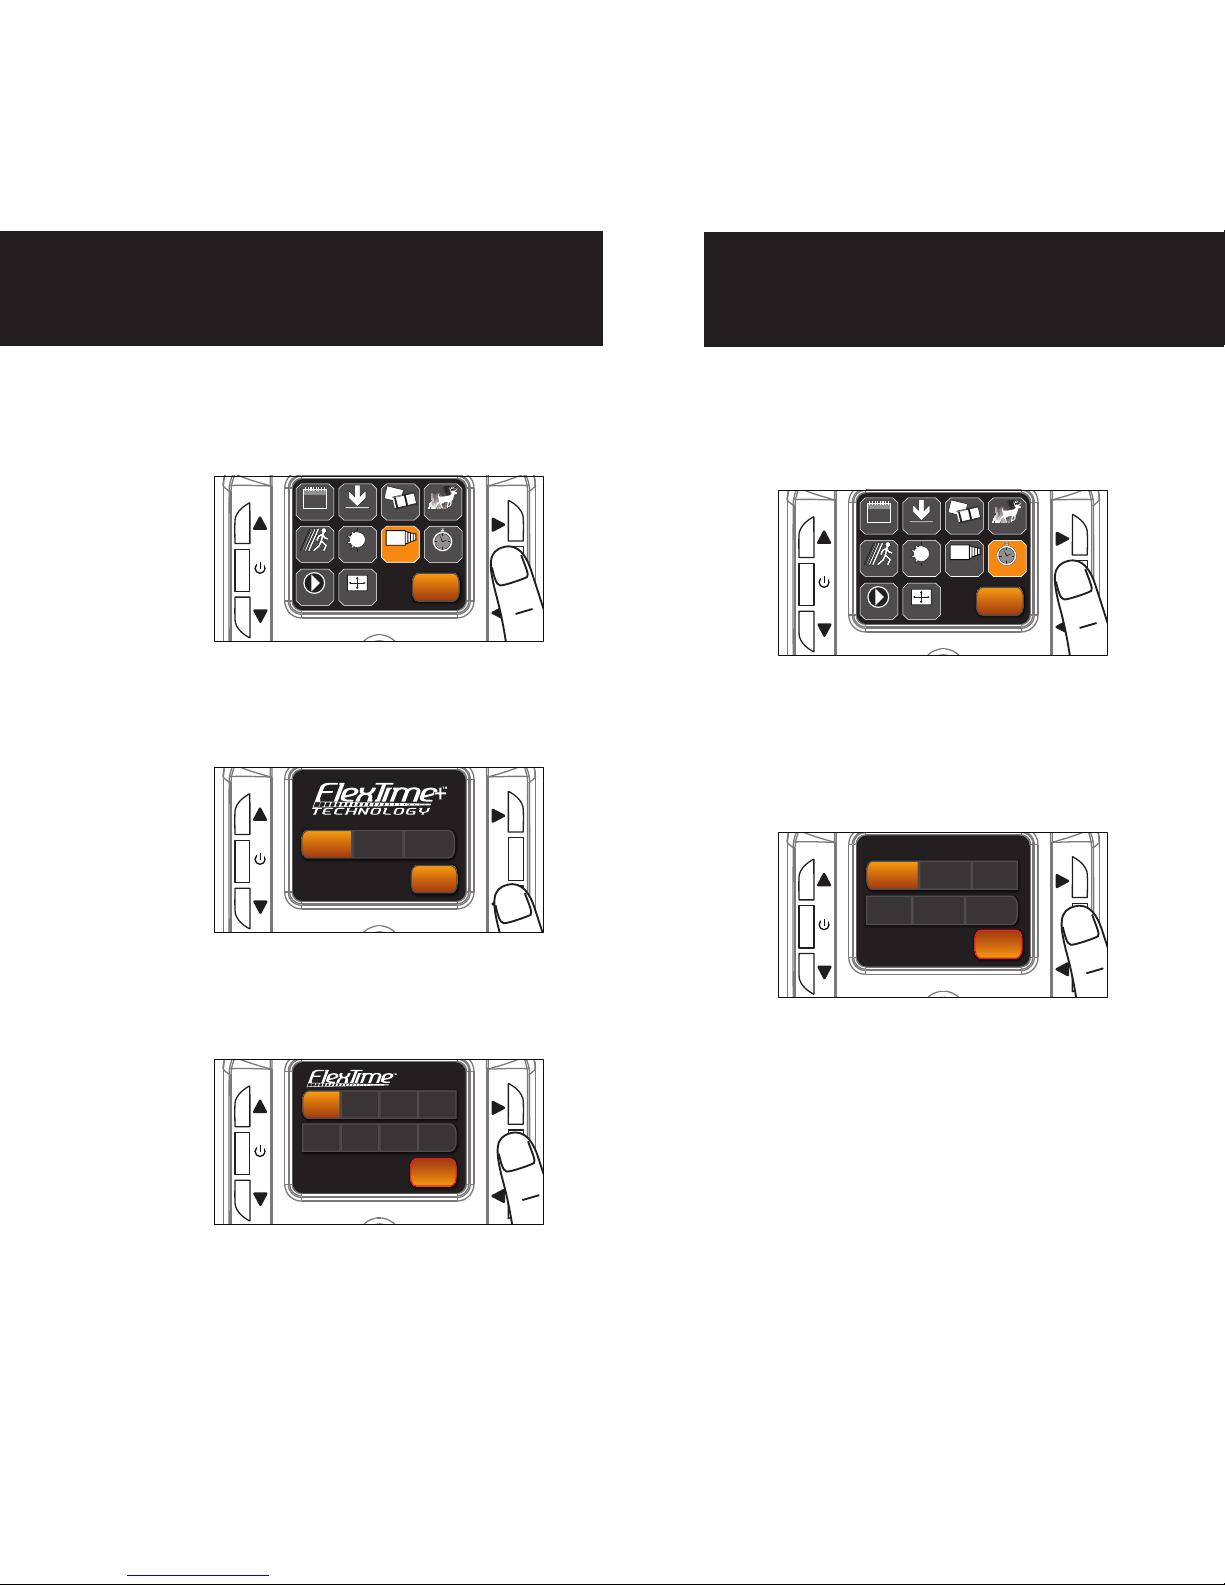
Flextime +™
1.
To change Flextime™, enter
MENU and press the UP,DN,L or
R buttons to navigate to the
Flextime™ icon and press OK.
2.
Press the L, R button to select the
mode and press OK to save. Then
press OK again to go back to the
MENU.
(See chart on pg 10 for mode descriptions)
UP
OK
L
R
DN
BACK
ACTIVE TIME
LOCATION TRIGGER
DELAY
PIR SENSITIVITY
FLEXTIME +™
+
DATE & TIME
30
PLAY BACK
IMAGE TYPE
VIEW ASSIST
UP
OK
L
R
DN
NOTE: Camera needs at least 48 hours
in the field to acclimate to the environment for Flextime to function properly.
BACK
P1 P2 Interval
3.
Press the L, R button to select the
time between images and press OK
to save. Then press OK again to go
back to the MENU.
UP
OK
L
R
DN
FLEXTIME +™
+
DELAY
BACK
1min 2min 5min 10min
15min 20min 25min 30min
page 11
Delay
1.
To change the Delay, enter MENU
and press the UP,DN,L or R
buttons to navigate to the Delay
icon and press OK.
2.
Press the L, R button to select the
time between pictures in PIR mode
and press OK to save. Then press
OK again to go back to the MENU.
UP
OK
L
R
DN
BACK
ACTIVE TIME
LOCATION TRIGGER
DELAY
PIR SENSITIVITY
FLEXTIME +™
+
DATE & TIME
30
PLAY BACK
IMAGE TYPE
VIEW ASSIST
UP
OK
L
R
DN
DELAY
BACK
15s 30s 1min
2min 5min 10min
DELAY
Page 13
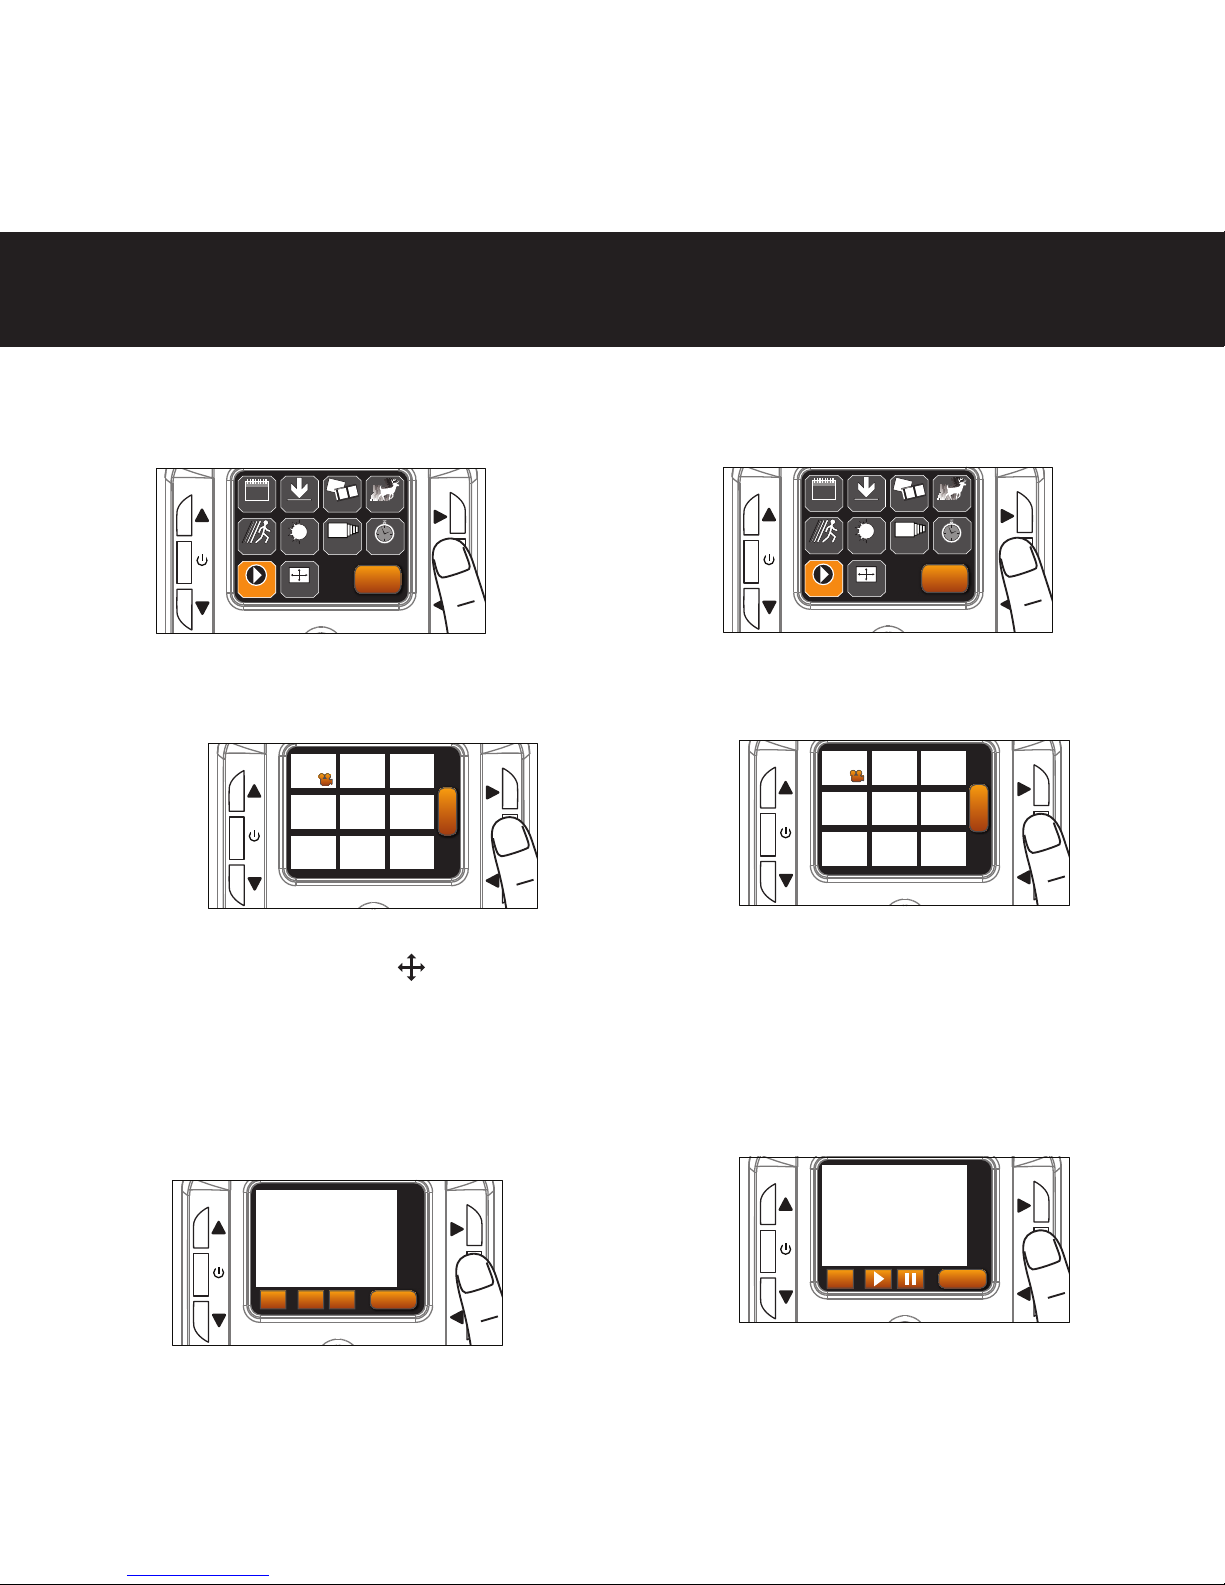
page 12
Playback: Stills
1.
To view your images, enter MENU
and press the UP,DN,L or R
buttons to navigate to the
Playback icon and press OK.
2.
Press the UP,DN,L or R button
navigate through media. To view a
image press OK on the desired image.
UP
OK
L
R
DN
BACK
ACTIVE TIME
LOCATION TRIGGER
DELAY
PIR SENSITIVITY
FLEXTIME +™
+
DATE & TIME
30
PLAY BACK
IMAGE TYPE
VIEW ASSIST
UP
OK
L
R
DN
PLAY BACK
BACK
3.
ZOOM: Press L or R then select the
Zoom In button. Select to scroll
with the UP, DN, L, or R while zoomed
in. Select Back to return to normal
size. Press Back again to return to
Playback menu.
DELETE: Press L or R then select the
Delete button to delete the selected
image.
UP
OK
L
R
DN
BACK
ZOOM
IN
DELETE
ZOOM
OUT
Playback: Videos
1.
To view your videos, enter MENU
and press the UP,DN,L or R
buttons to navigate to the
Playback icon and press OK.
2.
Press the UP,DN,L or R button
navigate through media. To view a
video press OK on the desired video.
UP
OK
L
R
DN
BACK
ACTIVE TIME
LOCATION TRIGGER
DELAY
PIR SENSITIVITY
FLEXTIME +™
+
DATE & TIME
30
PLAY BACK
IMAGE TYPE
VIEW ASSIST
UP
OK
L
R
DN
PLAY BACK
BACK
3.
PLAY: Press L or R then select the
Play button. Select Pause to freeze
the playback. Press Back to return to
Playback menu.
DELETE: Press L or R then select the
Delete button to delete the selected
video. NOTE: Once deleted the file
cannot be recovered.
UP
OK
L
R
DN
DELETE
BACK
Page 14
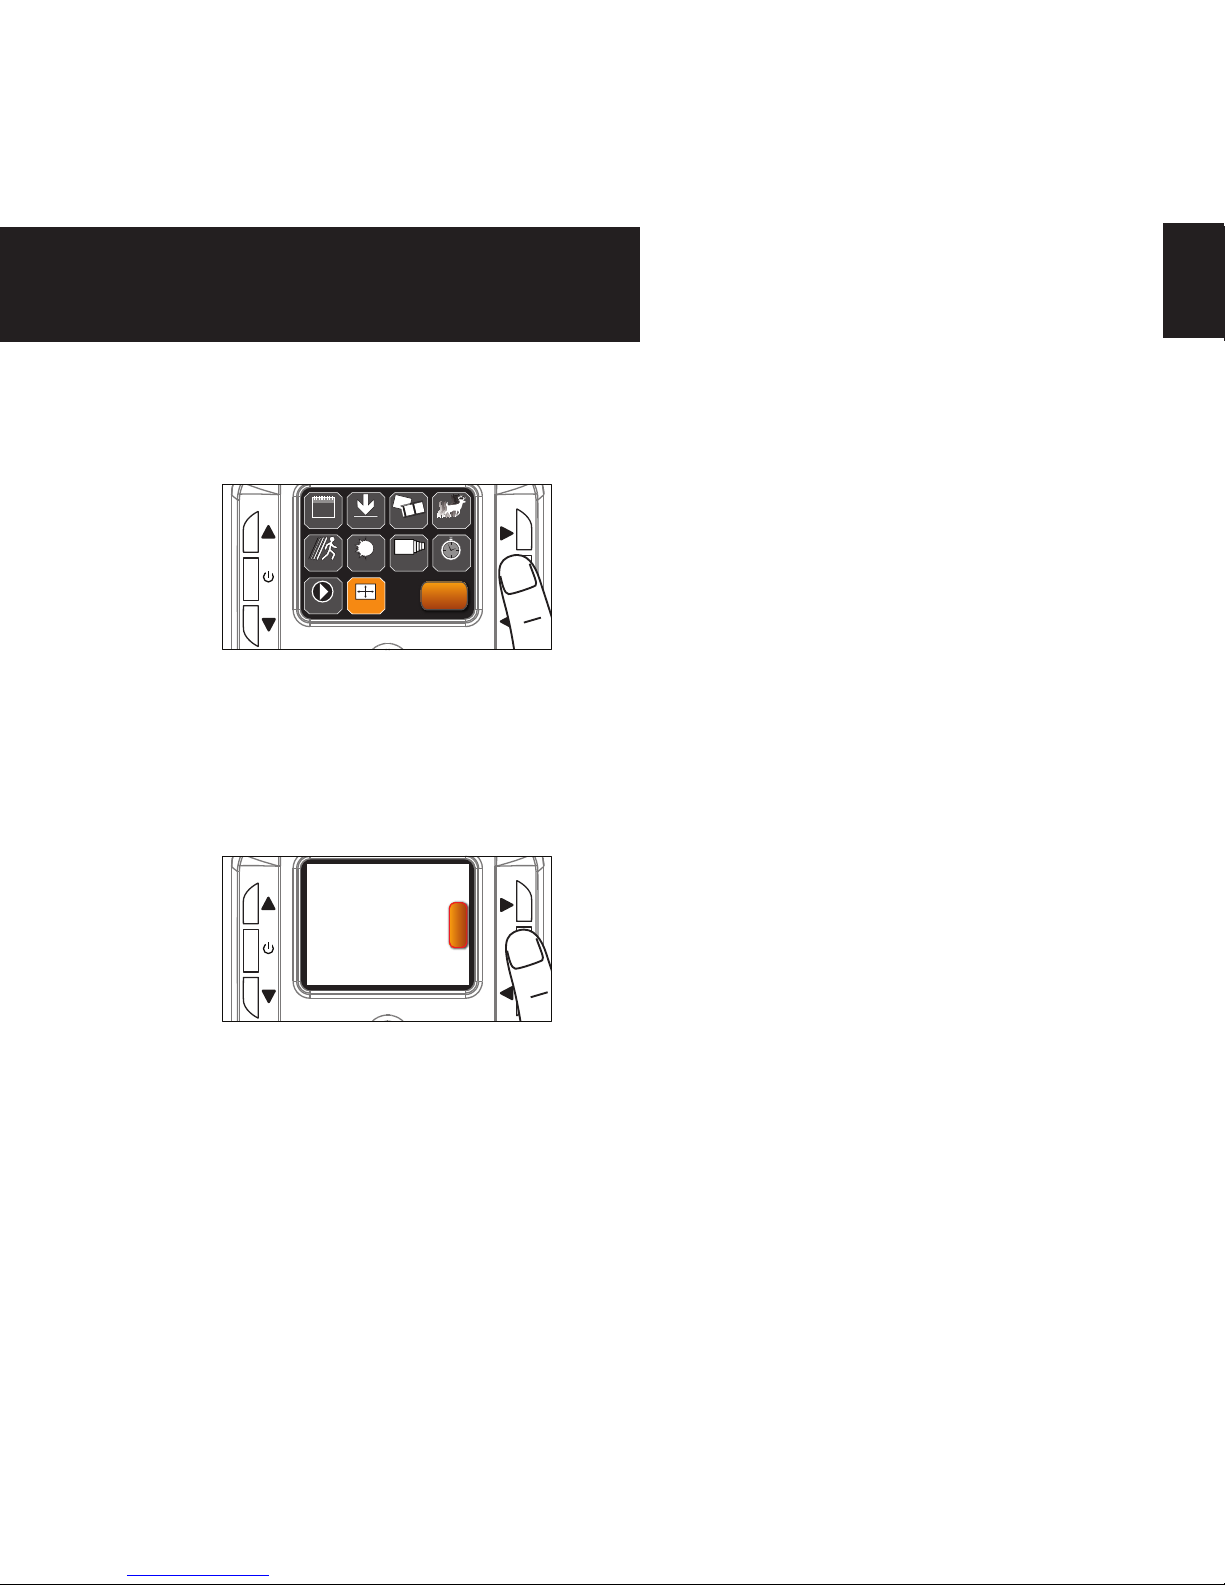
page 13
View Assist
1.
To use View Assist, enter MENU
and press the UP,DN,L or R
buttons to navigate to the View
Assist icon and press OK.
2.
Once in View Assist, the camera
will show a live view of the lens.
Adjust the camera locations to your
liking and then press OK to return
to the MENU.
UP
OK
L
R
DN
BACK
ACTIVE TIME
LOCATION TRIGGER
DELAY
PIR SENSITIVITY
FLEXTIME +™
+
DATE & TIME
30
PLAY BACK
IMAGE TYPE
VIEW ASSIST
UP
OK
L
R
DN
VIEW ASSIST
BACK
Page 15
page 14
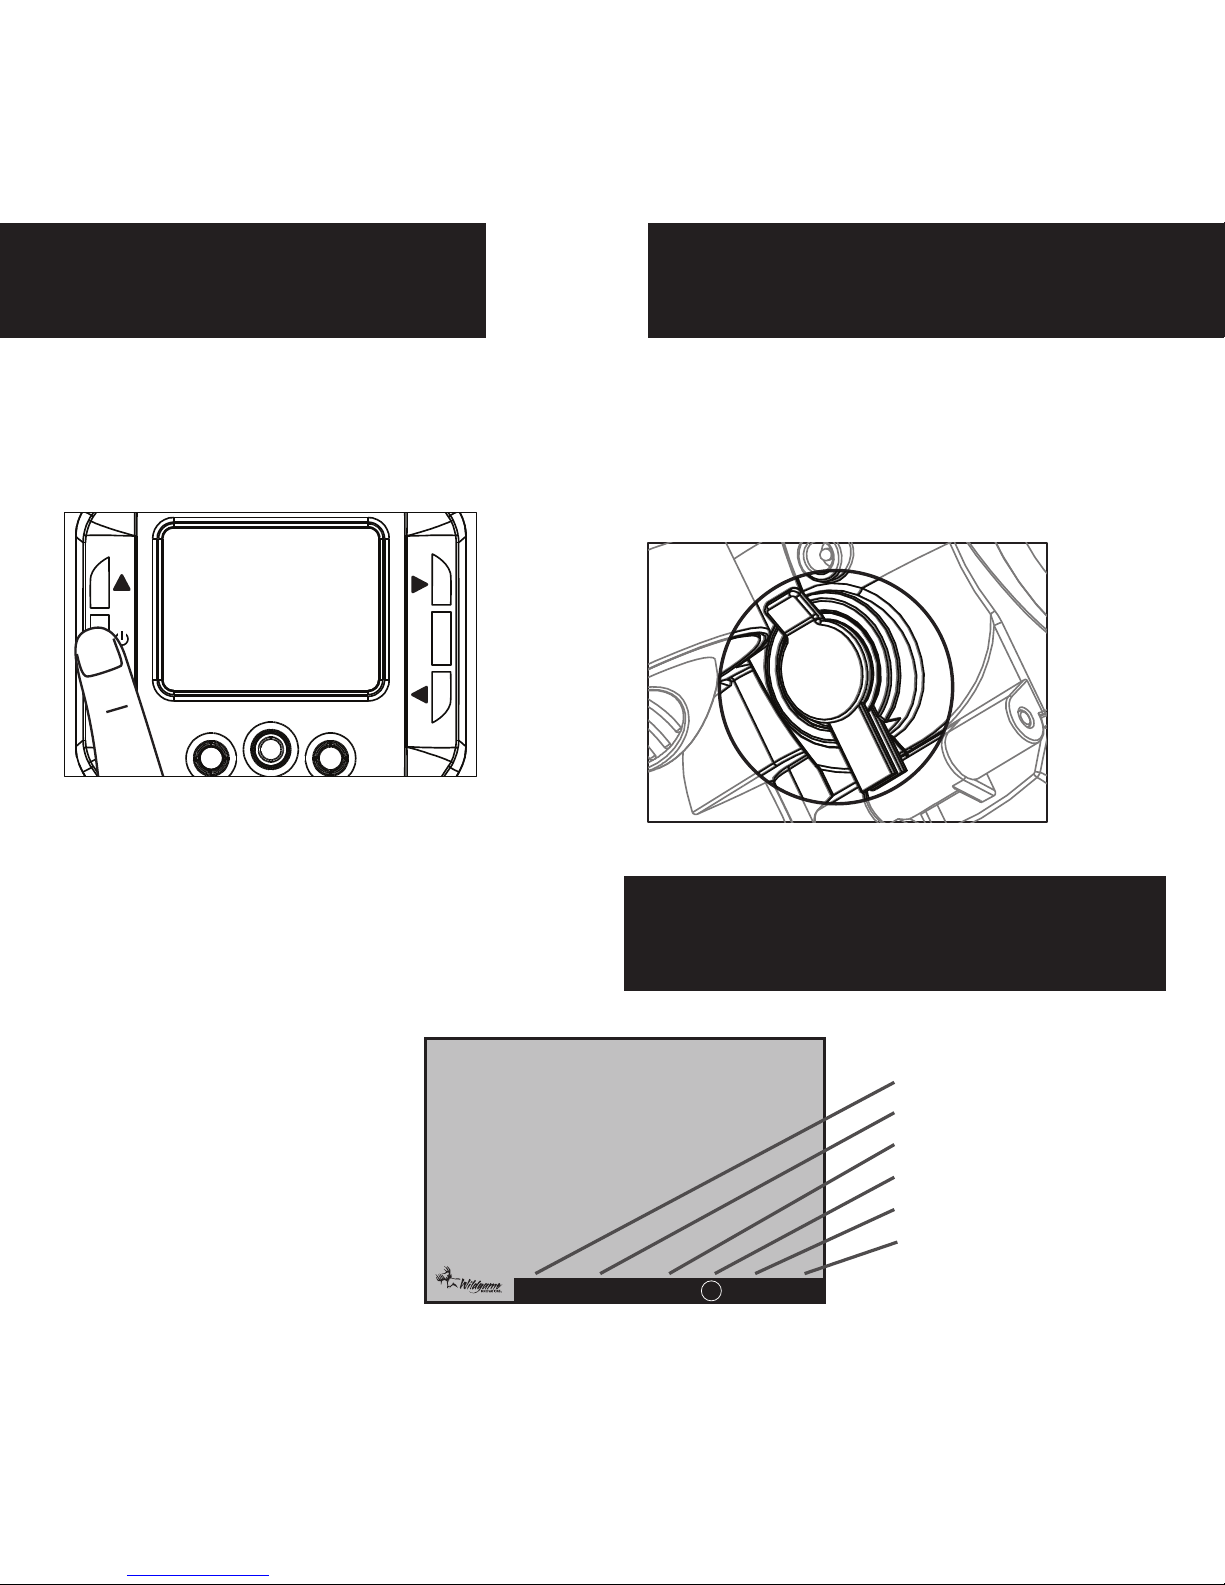
Power Off Power Port
Image Stamp
1.
WGI Cameras come standard with an
external power port. You must open
the weather resistant cover and use a
Wildgame Innovations 6 Volt camera
battery accessory.
1.
To turn the unit off, first wake
up the LCD screen and then
depress and hold the power
button until the LCD turns off.
Pictures Display:
-Temperature
- Time
- Date
- Moon Phase
- Photo Count
- Location
076F 08:15PM 11-12-2011 0290 T08
UP
OK
L
R
DN
Page 16
page 15
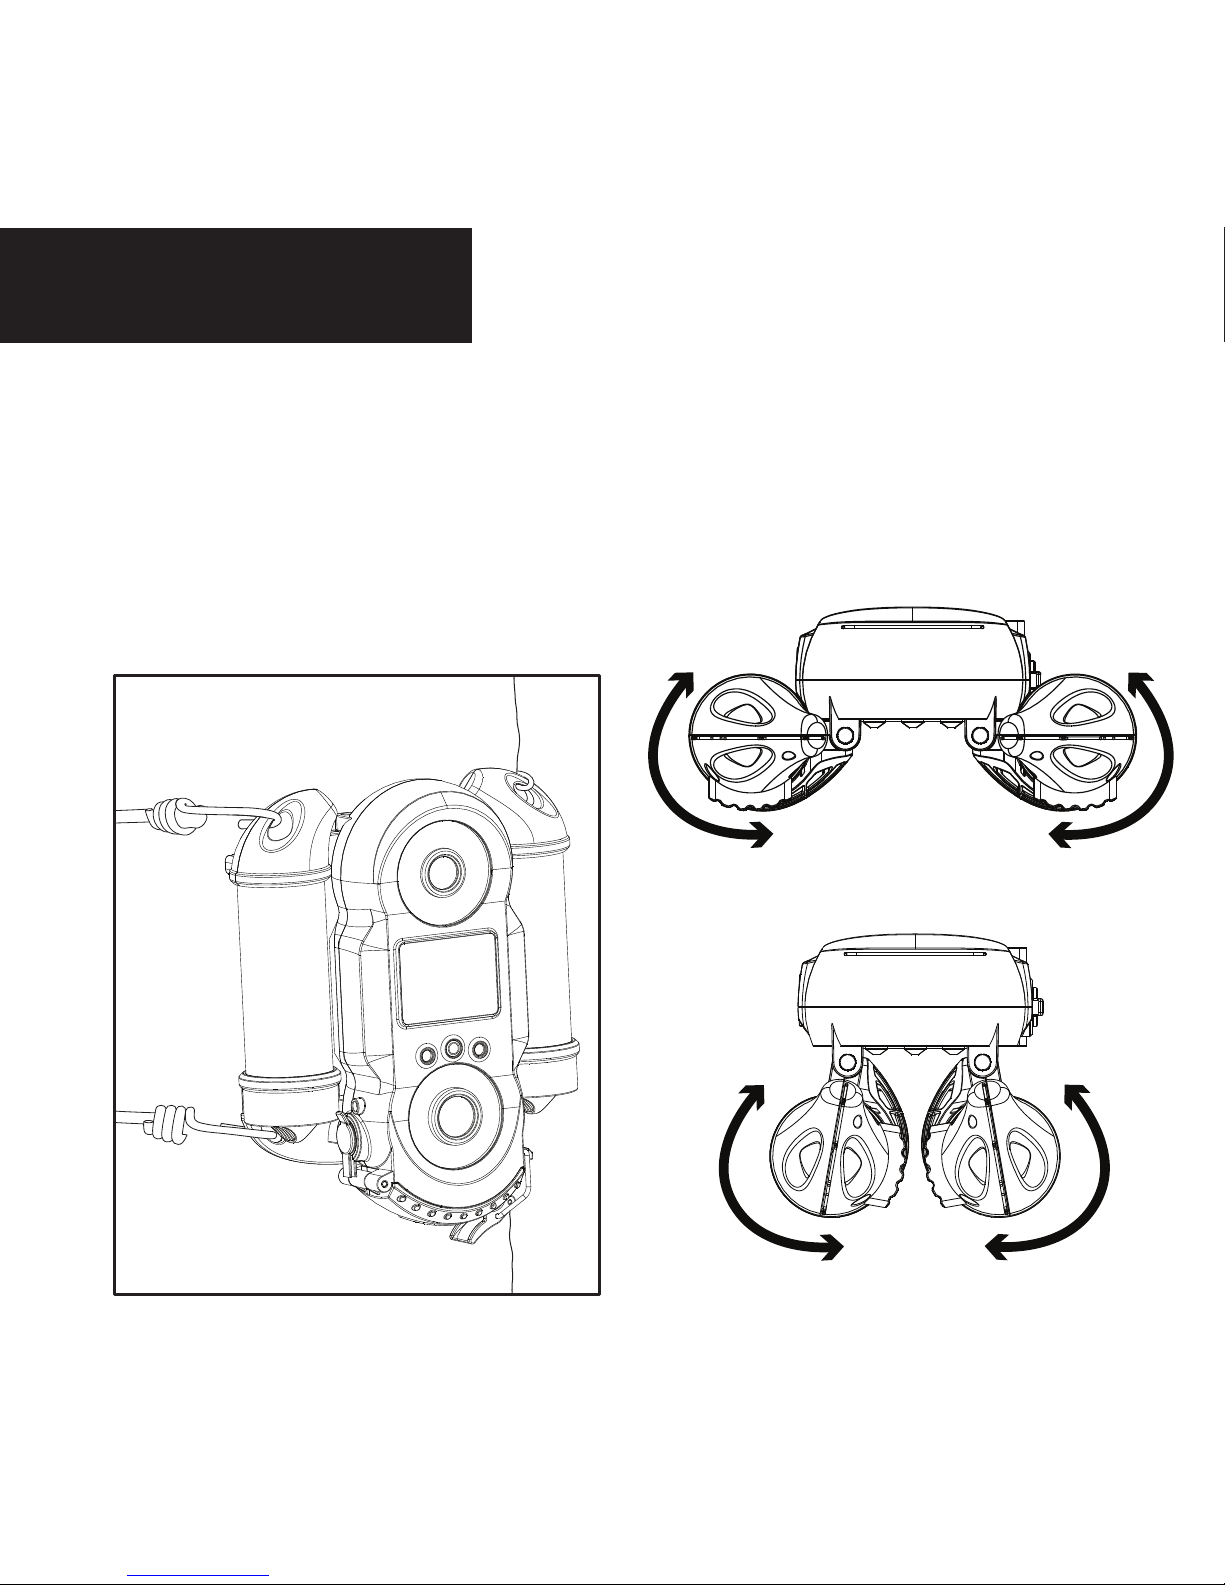
Mounting
When mounting to a tree, first
latch the 2 bungee cords through
the mounting holes on the left or
right side of the camera. Then,
stretch the cords around the tree
and latch the other ends of the
bungee cords through the
mounting holes on the opposite
side of the camera.
1.
Adjustable sides to fit almost any size tree.
Page 17

page 16
Important
Once you connect the camera to your computer via the USB cable/ports, the camera
will then draw power from the computer. When completing the viewing, transferring, copying or deletion of images, please make sure that you DISCONNECT THE
USB CABLE FROM BOTH THE CAMERA AND THE COMPUTER, as you will not be
able to power the camera OFF until you do so.
The directions as contained herein assume that you are using a Microsoft operating
system and not Linux or a Mac-based operating system. Even said, there may be
slight variations in your process based on the specific version of the operation
system that you are using as well as the predefined user preference for each
computer. The below listed steps are to serve as a guideline and may have to be
slightly modified based on the specific operating system and preference as on your
personal computer.
TIPS:
Recommended distance from target area is 25-30 feet for optimal imaging quality.
To improve the quality of your images, try not to mount the unit facing the rising
or the setting sun in order to avoid direct sunlight into the camera lens.
If mounting to a feeder unit or dusty environment, be sure to clean the camera
lens cover, incandescent flash cover, and the PIR sensor cover on a regular basis.
Periodically check the mounting of the camera to insure it is not loose.
Make sure that you securely latch the door closed each and every time you use
the unit, as the moisture seal will not be activated unless closed properly.
Check batteries frequently to insure no corrosive build-up, as this may cause
harm to the camera.
Page 18

page 17
Retrieving Images (SD Card in Camera)
Method 1: Leave SD card in camera
A. First, make sure that the camera is
powered OFF. Next, plug the USB cable into
the camera and then into the USB port on
your computer. Once this is complete (in this
order only), then power the camera ON.
B. Once complete, your computer may
automatically launch “AutoPlay”, a window
recognizing a new Removable disk (the
camera).
C. If so, it should give you three selections:
1. Import pictures
2. View pictures
3. Open folder to view files
D. Select the method from the list provided
that best suits your requirements. Once a
selection is made, you can then view the
images located on the SD Card and manipulate them as needed.
E. If your computer does not automatically
launch the AutoPlay window recognizing the
Removable Disk (the camera), then you will
need to go to the “Start Menu” at the bottom
left of your screen and select “Computer”.
The summary view will then be illustrated
on the right hand side of the window where
the “Devices with Removable Storage” will
be listed. The computer will recognize the
camera as Removable Disk. Please select
Removable Disk from this menu (or double
click on the graphical icon).
F. This will then direct you into the SD Card
file folder. Images are in the MEDIA folder
while Flextime files are in the FLEX folder.
G. Once open, you will then see all of the
photo files that are located on the SD Card.
Select each image individually to view. The
default viewing browser for your computer
will then automatically launch.
H. Repeat for viewing all or other photos.
I. If you determine that you want to delete
the image, select the image by placing your
cursor on it and clicking your mouse only
once. Right click on your mouse and select
delete. This will delete the image permanently, so be absolutely sure you want to do
this before selecting delete.
TIP: The software drivers necessary to use
and view the camera are automatically
downloaded to the computer when you
connect your camera to the computer via the
included USB cable.
TIP: View Flextime Player Software CD for
more information on Flextime.
Page 19

page 18
Retrieving Images (SD Card reader)
Method 2: Remove SD card and use card
reader
A. First, remove the SD Card from the
camera unit itself by pressing on it to where
it automatically ejects.
B. Next, insert the SD card into your SD
card reader.
C. Once inserted into your computer it may
automatically launch “AutoPlay”, a window
recognizing a new Secure Digital Storage
Device (the SD Card).
D. If so, it should list several options for the
next steps (not limited to the following):
1. Picture Options
a. Import pictures
b. View pictures
c. Copy Disc
d. Transfer pictures
2. General Options
a. Open folder to view files
E. Select the method from the list provided
that best suits your requirements. If the
selection is made to “View pictures”, you can
then view the images located on the SD Card
and manipulate them as needed.
F. If your computer does not automatically
launch the AutoPlay window recognizing the
Removable Disk (the SD Card), then you will
need to go to the “Start Menu” at the bottom
left of your screen and select “Computer”.
The summary view will then be illustrated
on the right hand side of the window where
by the “Devices with Removable Storage”
will be listed. The computer will recognize
the reader as “Secure Digital Storage
Device”. Please select “Secure Digital
Storage Device” from this menu (or double
click on the graphical icon).
G. This will then direct you into the SD Card
file folder. Images are in the MEDIA folder
while Flextime files are in the FLEX folder.
H. Once open, you will then see all of the
photo files that are located on the SD Card.
Select each image individually to view. The
default viewing browser for your computer
will then automatically launch.
I. Repeat for viewing all or other photos.
J. If you determine that you want to delete
the image, select the image by placing your
cursor on it and clicking your mouse only
once. Right click on your mouse and select
delete. This will delete the image permanently, so be absolutely sure you want to do
this before selecting delete.
Page 20

Warranty
DISCLAIMERS
WGI Innovations, LTD is not responsible for damage, expense or injury caused by the unauthorized use
of, alterations to, improper connection of and abuse or neglect of the WGI Innovations™ products.
WARRANTY
You must register your product warranty online at www.wildgameinnovations.com. Follow the on
screen directions to complete the process.
WGI Innovations, LTD will replace any product that may encounter material or workmanship defects free
of charge for ONE (1) YEAR after the date of purchase and thereafter the cost will vary per incident.
This warranty DOES NOT COVER damage, expense or injury caused by unauthorized repairs, alterations,
improper connection, shipping, abuse, theft, accident, neglect or collateral loss.
When returning product for service you MUST obtain a Return Merchandise Authorization (RMA)
number from WGI Innovations, LTD. Please include name, UPS address (no P.O. Box), telephone number,
RMA number and a complete description of the problem on all enclosed correspondence.
When possible, pack product carefully in original carton. Customers are responsible for any shipping
cost to WGI Innovations™. WGI Innovations™ will pay shipping cost of replacement product to the
customer. We are not responsible for damage incurred in returning items for repair.
CUSTOMER SERVICE
WGI Innovations, LTD stands behind every product we manufacture for a one year product workmanship warranty and a strong commitment to customer service. If you are in need of customer service for
missing parts or need assistance with the operation or assembly of your product, we encourage you to
call one of our customer service representatives and let us assist you with your WGI Innovations™
product.
DISCLAIMER
WGI Innovations, LTD reserves the right to make changes to product features, functionality and physical
design at its sole discretion. As a result, such changes may not be reected in this version of the manual.
page 19
Page 21

FCC CE
FCC STATEMENT
Product Name: Game Trail Camera
Trade Name: Wildgame Innovations
Model# LO8
This device complies with Part 15 of the FCC Rules. Operation is subject to the following two criteria: (1)
This device may not cause harmful interference, and (2) This device must accept any interference
received, including interference that may cause undesired operation.
Warning: Changes or modications to this unit not expressly approved by the party responsible for
compliance could void the user’s authority to operate the equipment.
NOTE: This equipment has been tested and found to comply with the limits for a Class B digital device,
pursuant to Part 15 of the FCC Rules. These limits are designed to provide reasonable protection against
harmful interference in a residential installation. This equipment generates, uses and can radiate radio
frequency energy and, if not installed and used in accordance with the instructions, may cause harmful
interference to radio communications.
However, there is no guarantee that interference will not occur in a particular installation. If this
equipment does cause harmful interference to radio or television reception, which can be determined
by turning the equipment o and on, the user is encouraged to try to correct the interference by one or
more of the following measures:
-Reorient or relocate the receiving antenna.
-Increase the separation between the equipment and receiver.
-Connect the equipment into an outlet on a circuit dierent from that to which the receiver is
connected.
-Consult the dealer or an experienced radio/TV technician for help.
page 20
Page 22

602 Fountain Parkway
Grand Prairie, TX 75050
800.847.8269
“Wildgame Innovations” and the “Button Logo” are TM trademarks of Wildgame Innovations, LLC.
“Sport Responsible” , “Redux” and “Flextime” are TM trademarks of WGI Innovations, LTD.
 Loading...