

Wildfire LT-404S/FF Kit, LT-404S/FG Kit, LT-404S/FH Kit, LT-404S/FI Kit, LT-404S/F1 Kit Operation Manual
...
LT-404S/FF Kit
LT-404S/FG Kit
LT-404S/FH Kit
LT-404S/FI Kit
LT-404S/F1 Kit
LT-404S/F2 Kit

Table of Contents
Introduction 3
Safety Statements 3
Specifications 4
Setup & Operation 5
Unpacking 5
Installation 5
Operation 5
DMX Address Mode 6
Lamp Timer Mode 6
DMX Data Mode 6
Dark Mode 6
Focusing 6
Maintenance & Troubleshooting 7
Lamp Replacement 7
Cleaning 7
Troubleshooting 7
Diagrams 8
Isometric & Line Views, Lamp Assembly 8
Isometric & Line Views, Ballast 9
Exploded View, Lamp Assembly 10
Part List, Lamp Assembly 11
Exploded View, Ballast LT-404S/F(F)(G)(H)(I) 12
Part List, Ballast LT-404(F)(G)(H)(I) 13
Exploded View, Ballast LT-404S/F(1)(2) 14
Part List, Ballast LT-404(1)(2) 15
Schematic, LT-404S/F(F)(G)(H)(I) 16
Schematic, LT-404S/F(1)(2) 17
Spectral Transmission Graph 18
Photometrics Chart 18
2

Introduction
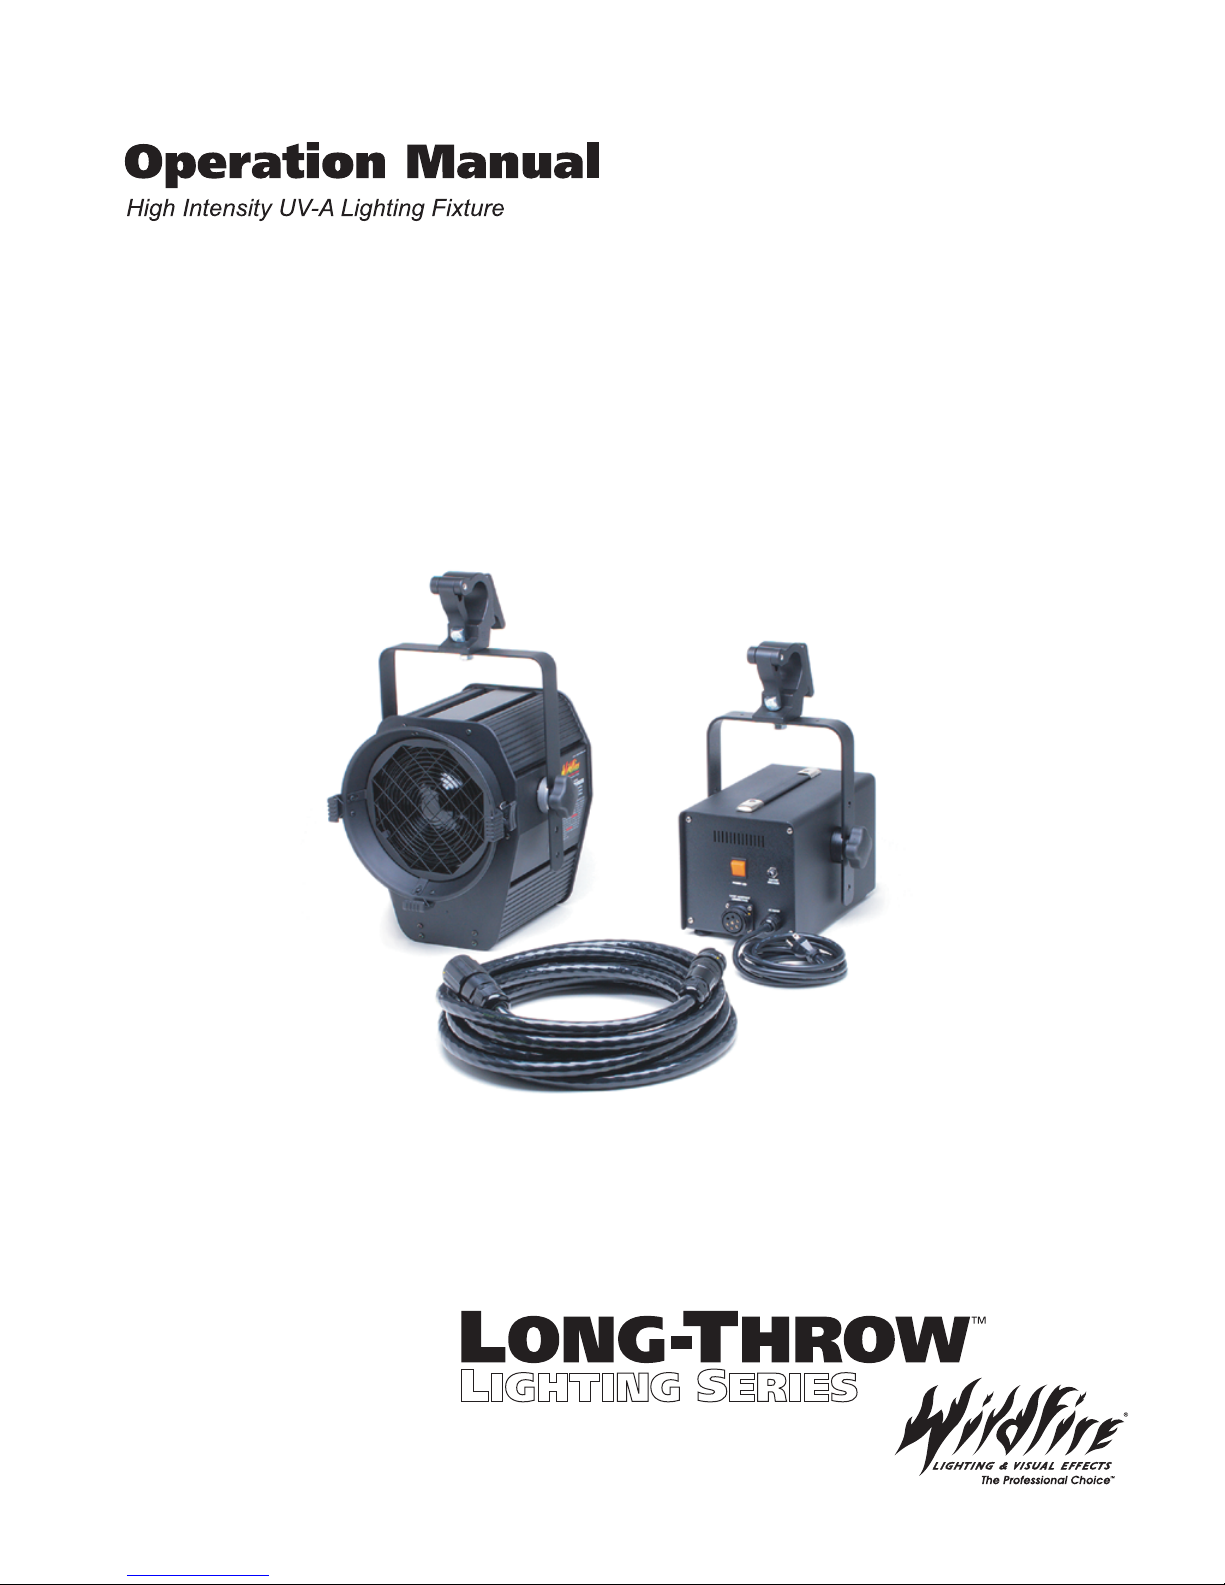
Congratulations on your purchase of a Wildfire Long-Throw 404S/F UV-A Lighting Fixture. Designed to
powerfully illuminate fluorescent objects at distances up to 100’ the 404S/F has been a long time favorite for film
and television production. The easy slide focus mechanism and soft focus fresnel lens enables this fixture to
adjust quickly from an 8° Spot to a 59° flood. New state of the art digital DMX control with four user selectable
modes, offers increased flexibility and easy integration with intelligent lighting systems. Please take a moment to
read this manual thoroughly before attempting to operate this fixture. Improper set-up, use or servicing may
cause damage to the fixture and/or lamp and void the unit’s warranty.
Safety Statements
CAUTION – RISK OF EXPOSURE TO ULTRAVIOLET (UV) RADIATION DO NOT OPERATE WITHOUT
COMPLETE LAMP ENCLOSURE IN PLACE, OR IF FILTER GLASS LENS IS DAMAGED
DANGER – INTENSE HEAT AVOID CONTACT BY PERSONS AND MATERIAL.
CAUTION – RISK OF ELECTRICAL SHOCK AND FIRE DISCONNECT FIXTURE BEFORE RELAMPING. USE
WITH MAX 400W LAMP WILDFIRE IRONARC MODEL LMP-400D. DRY LOCATIONS ONLY. NOT FOR
RESIDENTIAL USE.
WARNING – THIS FIXTURE CONTAINS A HIGH INTENSITY UV METAL HALIDE LAMP, WHICH IS SAFELY
CONTAINED WITHIN AN INTERLOCKING HOUSING. WHEN THIS FIXTURE IS USED IN ACCORDANCE
WITH THE MANUFACTURERS OPERATING INSTRUCTIONS, NO HAZARDS EXIST TO MOST PEOPLE
STANDING WITHIN THE BEAM OF THE FIXTURE. HOWEVER INDIVIDUALS SUFFERING FROM A RANGE
OF SUNLIGHT EXPOSURE DISORDERS, APHAKIC AND PSEUDOAPHIKIC, OR THOSE INDIVIDUALS
RECEIVING PHOTOSENSITIVE MEDICATION MAY RECEIVE DISCOMFORT IF EXPOSED TO
ULTRAVIOLET LIGHT.
HG – THE LAMP IN THIS FIXTURE CONTAINS MERCURY. MANAGE IN ACCORDANCE WITH DISPOSAL
LAWS. SEE:
WWW.LAMPRECYCLE.ORG OR CALL 1-800-937-8065
3

Specifications
Ballast:
Magnetic
Electronic Power Factor > 92%
Rating:
120VAC / 60Hz. / 5 Amps Max / 400W (Mag.)
220VAC / 50-60Hz / 2 Amps Max / 400W (Elec.)
Optional Magnetic Ballast Electrical Configurations:
100VAC / 50Hz. (Mag.)
100VAC / 60Hz. (Mag.)
120VAC / 50Hz. (Mag.)
Electronic Ballast Features:
Flicker & Noise Free
Automatic Lamp Failure Shutdown
Automatic High Temperature Shutdown
Automatic Hot Re-strike Prevention
Circuit Protection:
7 Amp Magnetic Over-current Breaker Switch (100-120VAC)
5 Amp Magnetic Over-current Breaker Switch (220VAC)
Lamp:
Wildfire IronArc 400 Watt Metal Halide Model LMP-400D (1000 Hr. Rated)
Beam:
Adjustable 8° to 59°
Reflector:
Alzak Coated Aluminum
Lens:
8” UV-A Transmitting Fresnel Filter Glass
Peak Spectral Transmission:
350-365nm
Optimum Operating Temperature:
50°F to 110°F
Weight:
Lamp Assembly 17.6Lbs. / 8.0Kg.
Ballast 26.35Lbs. / 11.95Kg. (Mag.)
Ballast 16.55Lbs. / 7.51Kg. (Elec.)
Dimensions:
Lamp Assembly 13.5”/34.29cm High x 10.76”/27.33cm Wide x 14.25”/36.19cm Long
Ballast 9.25”/23.50cm High x 12.74”/32.40cm Wide x 9.25”/23.50cm Long
Accessory Bracket:
10” / 25.4cm Bracket Assembly
Standard Equipment:
25’ Connection Cable (CBL-0001)
Lamp (LMP-400D)
2 Pipe Mounting Clamps (ACC-0026)
2 Safety Cables (ACC-0027)
Specifications subject to change without notice
4

Setup & Operation
Unpacking
Unpack the fixture and carefully inspect for any signs of physical damage. Report any damage to Wildfire or
your local distributor immediately. Included with each unit should be the following items:
1. Lamp Assembly
2. Ballast
3. 25’ connection cable
4. Two pipe mounting clamps, designed to attach the fixture and ballast to a 11/2” to 2” pipe truss
5. Two safety cables, provided to secure the fixture and ballast when mounted on a pipe truss
6. Wildfire IronArc
Before mounting the fixture you will need to install the lamp refer to Lamp Replacement on page 6 for correct
installation.
Installation
After installing the lamp place the fixture in desired location the fixture is equipped with a yoke assembly for
mounting. The yoke may be fitted with either a pipe clamp (included) for mounting on a pipe truss or a baby bail
block or junior pin for mounting on a light stand.
If the fixture or ballast are mounted on a pipe truss be sure to use the included safety cables looping them
through the yoke assembly and around the pipe truss this will prevent the fixture or ballast from falling and
possibly causing injury in the event that the pipe clamp was not securely tightened.
To adjust the angle of the fixture loosen the knobs on either side of the unit slightly, rotate to desired angle and
tighten. Care should be taken to support the front of the fixture while loosening the knobs to prevent the fixture
from rotating forward and possibly causing injury.
The fixture comes standard with a 10” Bracket assembly for attaching dowsers and scrollers such as Wybron’s
Eclipse or Coloram Series as well as barndoors and other accessories. When using accessories with this fixture
be sure to attach the safety cable provided by the accessory manufacturer to the fixtures yoke assembly.
Connect the lamp assembly to the ballast using the included 25’ connection cable. This connection cable is
designed to connect in only one way. Once the lamp assembly and ballast have been connected plug the ballast
into the appropriate power source. If you are controlling the unit with a lighting control board you will need to
make sure it is plugged into a non-dim circuit if the fixture is plugged into a dimmable circuit it will not operate.
Operation
To strike the fixture push the power/breaker switch on the ballast to the on position after striking the lamp allow
at least 2 minutes for the lamp to get to full brightness. Once the fixture has been powered up and the lamp has
ignited if you shut it off you will need to wait approximately 5 minutes to allow the lamp to cool before the fixture
can re-strike. On models LT-404S/F(F)(G)(H)(I) DO NOT leave the power/breaker switch in the on position
during this cool down period, this will cause the fixture to continue trying to strike the lamp potentially causing
damage to the ignitor.
On models LT-404S/F(1)(2) it’s ok to leave the power/breaker switch in the on position during the cool down
period as the hot re-strike prevention circuitry in the ballast will prevent the lamp from striking until it is
completely cooled. Once it has cooled sufficiently it will strike automatically. These models are also equipped
with automatic lamp failure protection circuitry that shuts the fixture down if the lamp should fail for any reason,
preventing any damage to the fixture. In addition they are equipped with high temperature protection circuitry
that shuts the fixture down if the ballast case temperature exceeds 85° C. When the fixture cools it will strike
again automatically.
®
Lamp, Model LMP-400D
5

DMX Address Mode
Select the DMX address mode by pressing the select button until the yellow DMX Address LED is lit. The
display will read the last DMX address selected. Set the desired DMX address (001 to 512) by pressing the up
or down buttons. Pressing either the up or down buttons for longer then 3 seconds will cause the display to
move up or down rapidly. Once the fixture receives a DMX signal with a data value of 140 or above the lamp will
strike. When the data value falls to 120 or below the lamp will extinguish. If power and or DMX signal to the
fixture is lost the last address selected will be retained when power and or DMX signal is regained. The DMX
input/output connector pin configuration is: Common Pin 1, Data Minus Pin 2 and Data Plus Pin 3. Pins 4 and 5
are not used at this time.
To operate the fixture without DMX set the address to 702. This forces the fixture on regardless if DMX signal is
present or not. This is the default address setting when the fixture ships from the factory.
Lamp Timer Mode
Select this mode by pressing the select button until the red Lamp Timer LED is lit. The display will show the
current hours on the lamp in the fixture. When it reaches 1000 the red LED will flash continuously to let you
know it is time to change the lamp. If another mode is selected when the lamp timer is at 1000 hours or over the
display will always default back to the lamp timer mode within 10 seconds until the lamp timer is reset or rolls
over at 9999 hours. Pressing and holding the up & down buttons simultaneously for 5 seconds while in the lamp
timer mode will reset the lamp timer. If the fixture is powered up and the lamp doesn't ignite the display will flash
"O F F" while in this mode until the lamp ignites. If another mode is selected at this time the display will always
default back to the Lamp Timer mode in 10 seconds until the lamp ignites. The lamp timer will retain the current
hours on the lamp even when the fixture is unplugged.
DMX Data Mode
To select this mode press the select button until the green DMX Data LED is lit. The display will read the data
value of the DMX signal being received. When a DMX data value of 140 or greater is received the fixture will
turn on. When a data value of 120 or less is received the fixture will turn off. If power is removed and DMX
signal is still present the current data value being sent to the fixture will be read as soon as power is reapplied. If
no DMX signal is being received or DMX signal is lost, the DMX data LED will flash, the display will read "0 0 0 "
and the fixture will default to off unless the DMX address is set to 702 as indicated above. If another mode is
selected at this time the display will always default back to the DMX data mode in 10 seconds until the DMX
signal is restored or the address is set to 702.
Dark Mode
Pressing and holding the select button for 5 seconds in any of the three modes will darke n the display and LED
while still retaining all information. To turn the display back on press the select button again.
Focusing
Once the fixture is pointed in the correct direction Move the focus control on the rear of the lamp assembly as
required. Moving it towards S (spot) produces a narrower beam. Moving it towards F (flood) produces a wider
beam. To adjust the focus control tension, hold the focus control with one hand and use a 7/16” so cket wrench
to adjust the tension nut, located on the bottom of the lamp assembly to the desired tension.
6
 Loading...