

Wildfire EM-23S, EM-43S Operation Manual
Operation Manual
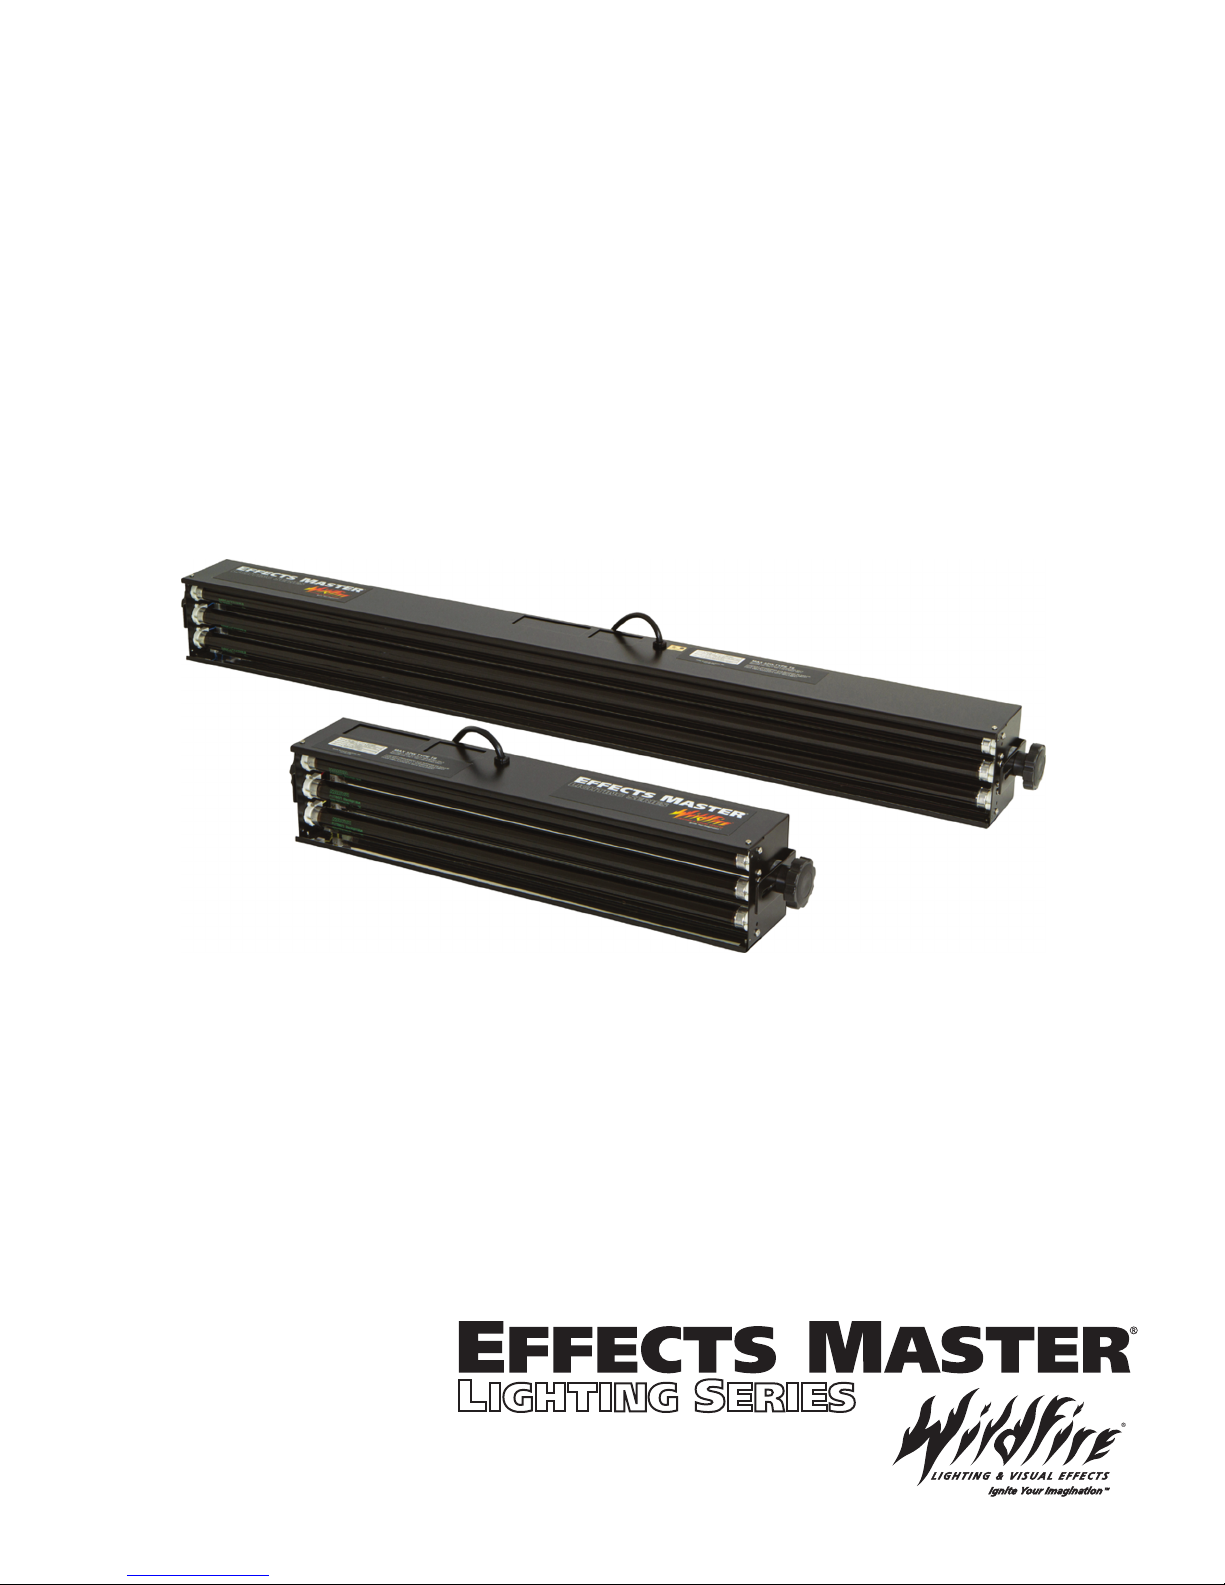
Ultraviolet Fluorescent Lighting Fixtures
EM-23S
EM-43S

Table of Contents
Specifications 3
Introduction 4
Unpacking 4
Optional Accessories 4
Setup 4
Maintenance & Troubleshooting 5
Lamp Replacement 5
Cleaning 5
Troubleshooting 5
Diagrams 6
Isometric & Line Views 6
Exploded View & Part List, EM-42S 7
Exploded View & Part List, EM-22S 8
Schematic 9
Spectral Output Graph 10
Photometrics Chart 10
Limited Warranty 11
2

Specifications
This unit is to be operated in accordance with the way it was designed and tested.
OPERATE IN DRY INDOOR LOCATIONS ONLY.
USE WITH MAX 60W T8, T10, T12 LAMPS ONLY.
SUITABLE FOR SURFACE MOUNTING ONLY.
Ballast:
Electronic VHO Power Factor > 70%
Rating:
EM-23S: 100, 120 or 240VAC / 50-60Hz / 3.0A max. / 130W
EM-43S: 100, 120 or 240VAC / 50-60Hz / 4.5A max. / 220W
Circuit Protection:
One 7A Slow Blow Fuse
Lamps:
EM-23S: F20T(12)(10)(8) Non Energy Saver Type Lamps
EM-43S: F40T(12)(10)(8) Non Energy saver Type Lamps
Lamp Life:
8,000 Hrs.
Beam:
40’ Throw, 165° Spread
Reflector:
Polished Everbright Aluminum
Peak Spectra Output:
368nm With Wildfire SableLux Lamps Installed.
Optimum Operating Temperature:
50° F to 100° F
Weight:
EM-23S: 9.95 lbs./4.51 kg.
EM-43S: 15.75 lbs./7.14 kg.
Dimensions:
EM-23S: 4.18”/10.62cm High x 4.90”/12.44cm Wide x 24”/60.96cm Long
EM-43S: 4.18”/10.62cm High x 4.90”/12.44cm Wide x 48”/1.21m Long
Standard Equipment:
Adjustable Mounting Brackets
Optional Accessories:
UVT Protective Lens Kit (2’ 138-010)(4’ 138-011)
Louver Kit (2’ 138-013)(4’ 138-014)
Light Stand Mount (2’ 147-004)(4’ 147-005)
Floor Mount (147-006)
T-Bar Ceiling Mount (147-003)
Quick Trigger Clamp (147-020)
Specifications subject to change without notice
Made in the USA
3

Introduction
Congratulations on your purchase of an Effects Master Standard Series Fixture by Wildfire. These powerful and
versatile ultraviolet fluorescent lighting fixtures feature triple
electronic VHO ballasts. Each Effects Master Fixture is precision engineered to provide you with years of
art
trouble free service. Please take a moment to read this manual thoroughly before attempting to operate this
fixture. I mproper set-up, use or servicing may cause damage to the fixture and/or lamps and v oid the unit’s
warranty.
Unpacking
Unpack the fixture and carefully inspect it for any signs of physical damage. Report any damage to Wildfire or
your local distributor immediately. Included with each unit should be the following items:
1. Two “L” shaped mounting brackets with one 1/2” mounting hole for mounting the fixture to a standard c-clamp
and two 3/8” mounting holes for mounting the fixture to Unistrut or a flat surface.
2. Two rubber friction washers that are to be placed between the mounting brackets and the end caps on either
end of the fixture allowing it to be held firmly in place upon tightening the locking knobs
3. Two locking knobs with ¼-20 threaded studs that screw into the end caps.
Optional Accessories:
UVT Protective Lens Kit - This kit consists of an acrylic plastic lens that slides into the housing to protect the
lamps. Included in this kit are two small brackets that mount on either end of the fixture holding the lens in
place. This protective lens is made from a special UV transmitting plastic and is designed not to yellow or
become brittle under normal operating conditions. Contact Wildfire or your local distributor for pricing
Louver Kit- This aluminum louver features 1” long blades spaced 2” apart that run perpendicular with the
lamps. Included in the louver are two small brackets that mount on either end of the fixture holding it in place.
Contact Wildfire or your local distributor for pricing.
Light Stand Mount - This aluminum mount enables you to attach your Effects Master fixture to any standard
light stand. (Optional 5/8” baby pin or TVMP adapter required) Contact Wildfire or your local distributor for
pricing.
Floor Mount Kit- This aluminum stand set enables you to mount your Effects Master fixture on the floor for
footlight applications. Contact Wildfire or your local distributor for pricing.
T-Bar Ceiling Mount- These brackets enable you to mount your Effects Master fixture to the t-bars in a
standard drop ceiling. Contact Wildfire or your local distributor for pricing.
Setup
The first step is to install the mounting brackets on either end of the fixture (see fig. 2 in the Diagrams section of
this manual). Next install the lamps refer to Lamp Replacement on page 7 for correct installation.
Plug the fixture into the appropriate power source. If you are controlling the unit with a lighting control board you
will need to make sure it is plugged into a non-dim circuit. Do not at any time plug the fixture into a
dimmable circuit, doing so will damage the ballast in the fixture and void the warranty.
lamps, polished everbrite reflectors and state of the
4
 Loading...