

Wilderness Systems Tsunami Owner's Manual
WILDERNESS SYSTEMS
OWNERS MANUAL

THANK YOU FOR CHOOSING A WILDERNESS SYSTEMS KAYAK.
GET READY TO EXPLORE YOUR WORLD WITHOUT BOUNDARIES.
This is not just any kayak. It’s the right kayak. Attention to detail, performance, and
quality have made this the number one choice for enthusiasts year after year.
Your premium kayak will provide you many years of enjoyment. We hope you take
advantage of all the adventure that awaits you.
This owner’s manual and additional information is available at WildernessSystems.com
CONTENTS
3 Kayak Anatomy
4 Outfitting
5 Rudder Installation
6
Phase 3® AirPro MAX Seating System
8 Phase 3® AirPro Seating System
14 Storage
15 Transportation
16 Care & Maintenance
17 Safety
18 Accessories
20 Limited Lifetime Warranty
21 Service & Support
3
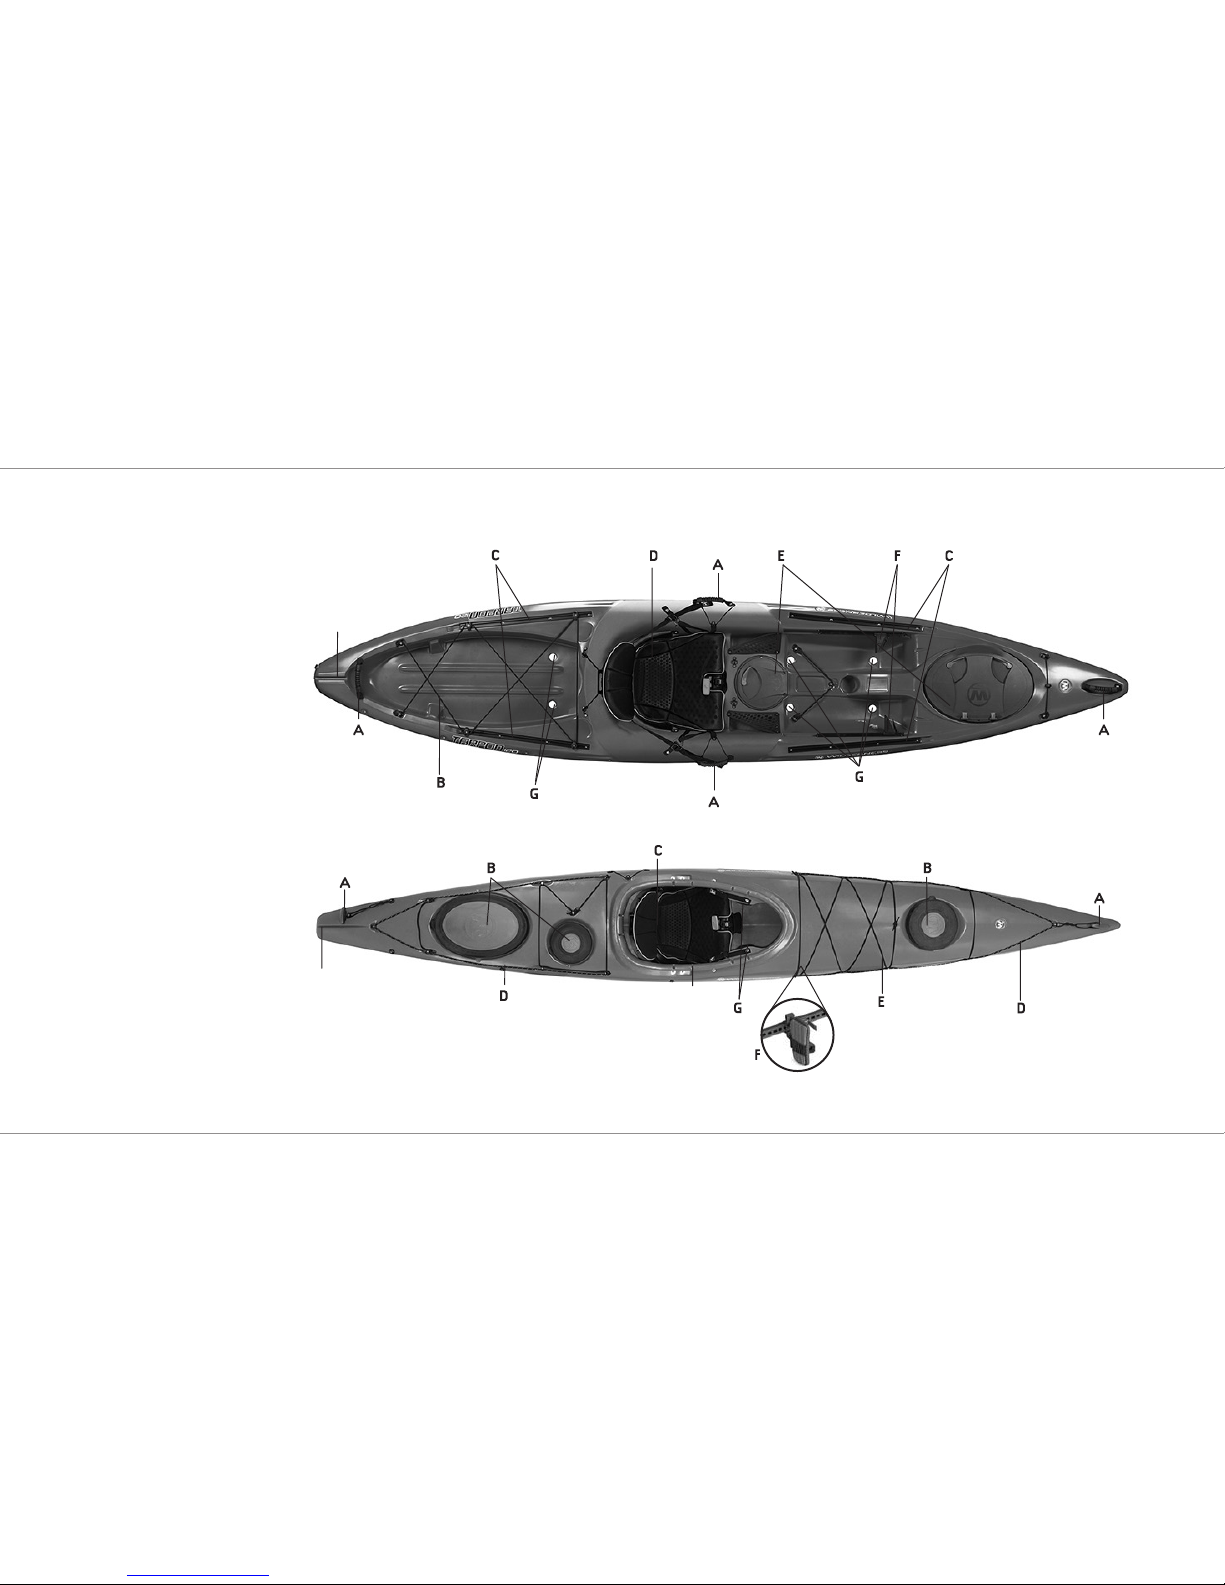
KAYAK ANATOMY
SIT ON TOP
A: Carry handle
B: Tankwell with bungee
C: SlideTrax accessory system*
D: Seating system
E: Cargo hatch
F: Footbraces
G: Self-bailing scupper tubes
H: Optional rudder location*
SIT INSIDE
A:
Carry handles
B: Cargo hatches
C: Seating system
D: Safety lines
E: Bungee
F: Footbraces
G: Thighbraces
H: Cockpit coaming
I: Optional rudder location*
*Not available on all models
BOW
BOWSTERN
STERN
H
H
I

4
OUTFITTING
USING THE RUDDER SYSTEM
Some kayaks come with an optional factory rudder system
included. After market rudder systems are also available. Please
contact your local dealer for any questions regarding setup or
installation, or visit WildernessSystems.com for video
instruction.
Once your rudder is installed, use the lift line (located on the
right side of the boat, towards the rear of the cockpit) to drop the
rudder into the water by pulling it forward.
To operate the rudder, use the footbrace pedals. To maintain a
straight position, both pedals should be even with each other. To
steer the kayak right, push the right pedal down similarly to a
gas pedal. To steer the kayak left, push the left pedal down.
ORBIX HATCH COVERS
Lever-release open and close.
RUBBER DOME HATCHES
To remove the covers, find the tab
and peel o. To replace the cover,
line up ends first and then sides.
Then hook it under the hatch rim
and press it on firmly the entire
way around. Sealed bulkheads, if
equipped, add flotation and dry
storage to the hatch area.
SLIDELOCK XL FOOTBRACES
The SlideLock Footbrace system is easy to
access from inside the boat. Find the black plastic
rod that is on the side of the cockpit extending
from the footbrace.Lift it up and slide forward or
back so your foot is resting comfortably on the
footpeg and there is a slight bend in your leg.
Release the rod to drop into position locking the
footbrace.
KEEPERS XL FOOTBRACES
The adjustment lever is located on the backside
of the footpedal. To adjust, squeeze the lever
and slide the footpeg to the desired location.
Release the lever to lock it in place.

5
RUDDER INSTALLATION
CONNECTING RUDDER CABLES
a. Pull eyelet at end of each rudder cable back to line up
with wings on rudder head.
b. Remove the ring pin from rudder head and lift pin
from rudder head. Make sure to attach right side
cable end to right side of rudder head.
c. Place eyelet on end of rudder cable on top of wing on
rudder head and insert pin. Secure pin with ring pin.
Repeat on other side.
SECURE RUDDER TO KAYAK
a. Center rudder blade and then raise it so it flips over end of
kayak and settles into notch on deck. A variety of rudder
lock-downs are used to secure rudder to deck and these
should be put in place to secure rudder when transporting
on top of your vehicle.
b. Make sure to release lock-down before entering your kayak
to go paddling.
INSTALLING THE RUDDER
INSTALL THE RUDDER BRACKET
a. Remove the two filler screws on stern and set aside.
b. With the raised “stop” pin facing up, align the bracket with the
mounting holes in hull. Place ¼” lock washers (2 on each screw) over
¼-20 x ⁄” hex head screws and thread screws into mounting holes
using the ⁄” Allen head wrench provided with owners’ manual.
c. Start both screws before tightening either one completely.
Tighten each screw fully.
INSTALL THE RUDDER
a. Unwind the up-haul cord coiled around the rudder.
b. Make sure the cord runs straight and true along the
starboard (right) side of the kayak when viewed from the stern.
c. Remove the ring pin from end of rudder post and insert
post into bracket.
d. Secure rudder in bracket by inserting ring pin in post
below bracket.
e. Test up-haul cord by pulling on top or bottom run of cord to
raise or lower rudder. Learn which run raises and which run
lowers rudder.
6
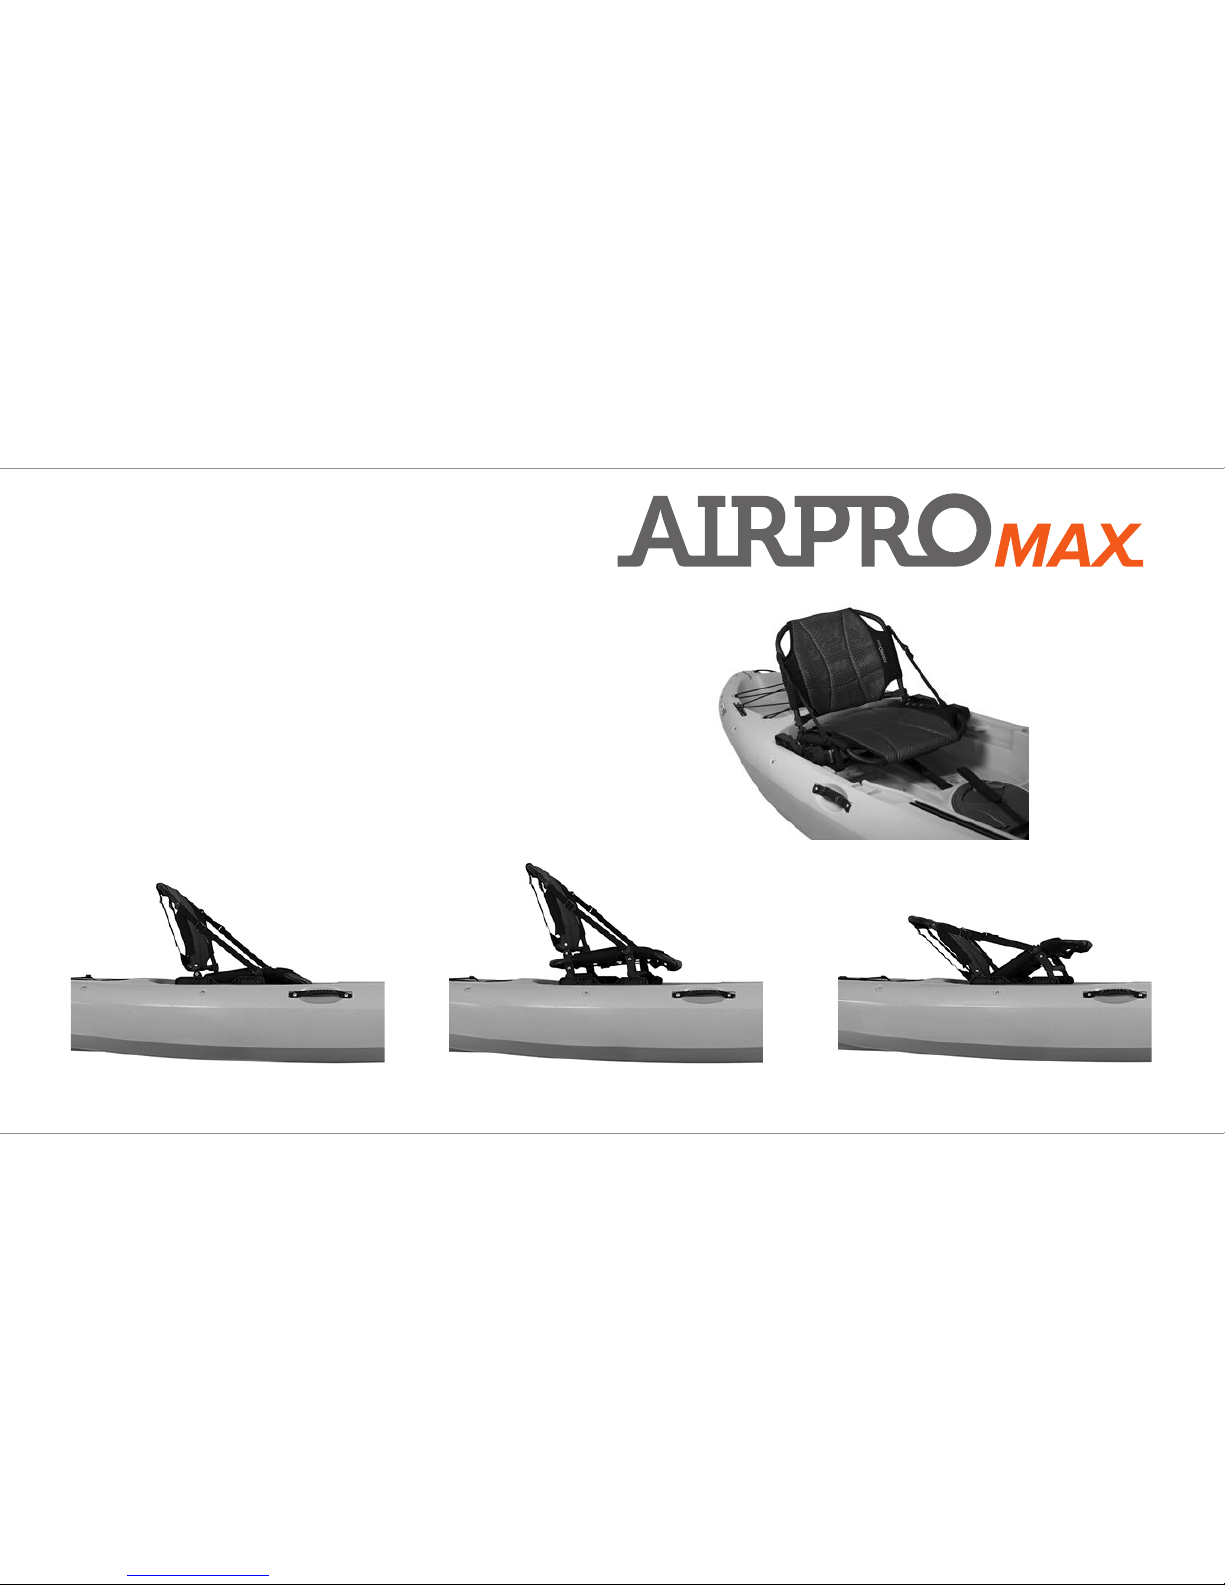
The new Phase 3 AirPro MAX high/low seating system is poised to
give kayak anglers the competitive advantage they need to sight fish
from the seat of their Ride. The AirPro MAX preserves the popular
innovations found in most Phase 3 seats – adjustability, comfort
features and high-quality materials – yet it is a true advancement in
design. Fully functional in existing Ride models with great ease of
installation, the patent-pending seat has a full forward/aft trim range
and three phase (high, low and recline) positioning without any clipping
or loosening of straps. Standing room remains ample and the seat back
can be folded and sat upon for even more height on the water. The
aluminum tube frame construction is highly durable with an all-weather,
breathable textile that aords both comfort and functionality. The
injection molded slide rails provide a platform for adding gear with the
ultimate accessibility.
INTRODUCING PHASE 3 AIRPRO MAX RIDE
PHASE 3® AIRPRO MAX SEATING SYSTEM
Recline PositionHigh PositionLow Position
7
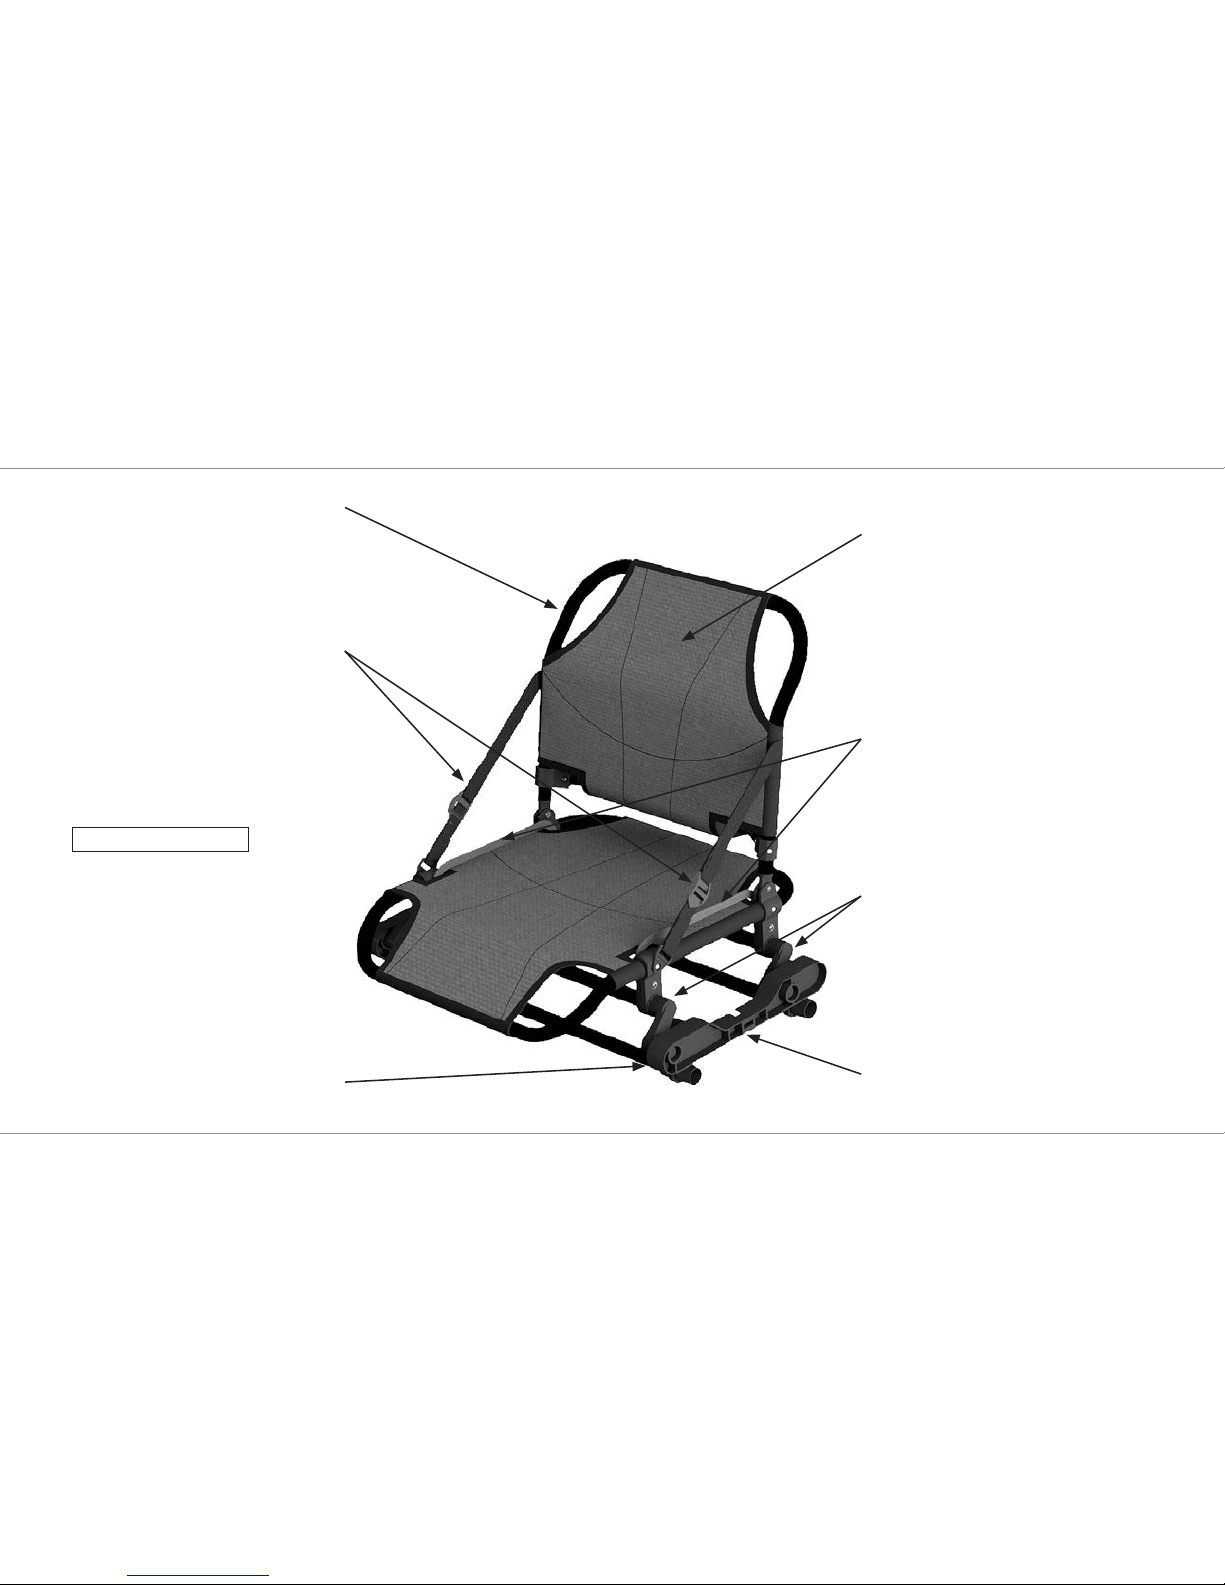
Aluminum Tube Frame Premium all-weather, breathable
textile combining an open weave
fabric with a 3D mesh filler for the
ultimate in comfort.
Easy access grab handles allow the
seat to adjust quickly to low, high
or recline by unweighting the seat
and shifting.
Backrest straps allow for
adjustments of the seat
back angle.
Provisions have been made
in the slide rail to easily attach
accessories.
Forward/aft seat positioning in
existing Ride models is preserved
with a unique injection molded rail.
Cam Rotational Pivots
HIGH POSITION
PHASE 3® AIRPRO MAX SEATING SYSTEM
 Loading...