

USER’S MANUAL
Scouting Trail Camera

Contents
1. Whole View and Details of Camera ..............................................................- 1 -
Figure 1: Front View of Camera ..........................................................................- 1 -
Camera Screen Display (Test Mode Main Interface) ...........................................- 2 -
2. Camera Menu List Introduction ....................................................................- 3 -
3. Quick Start ..................................................................................................- 4 -
Power On Camera ...............................................................................................- 4 -
Manual Photographing/ Video Recording ..........................................................- 4 -
Enter Menu for Setup Functions .........................................................................- 4 -
Power Off Camera ...............................................................................................- 4 -
Camera Operation Flow Chart ............................................................................- 5 -
4. Detail Setups ...............................................................................................- 6 -
Camera Modes (Default Settings) .......................................................................- 6 -
Camera Settings (Default Settings) .....................................................................- 7 -
Photo Settings (Default Settings) ..................................................................... - 10 -
Video Settings(Default Settings) ...................................................................... - 10 -
Software Upgrade ............................................................................................ - 11 -
USB Connection ............................................................................................... - 12 -
5. TF Card Selection & Battery Life Test Report ............................................... - 13 -
TF Card Selection.............................................................................................. - 13 -
Battery Life Test Report for Reference ............................................................. - 13 -
6. Specification .............................................................................................. - 14 -
7. Warranty ................................................................................................... - 16 -
- 1 -
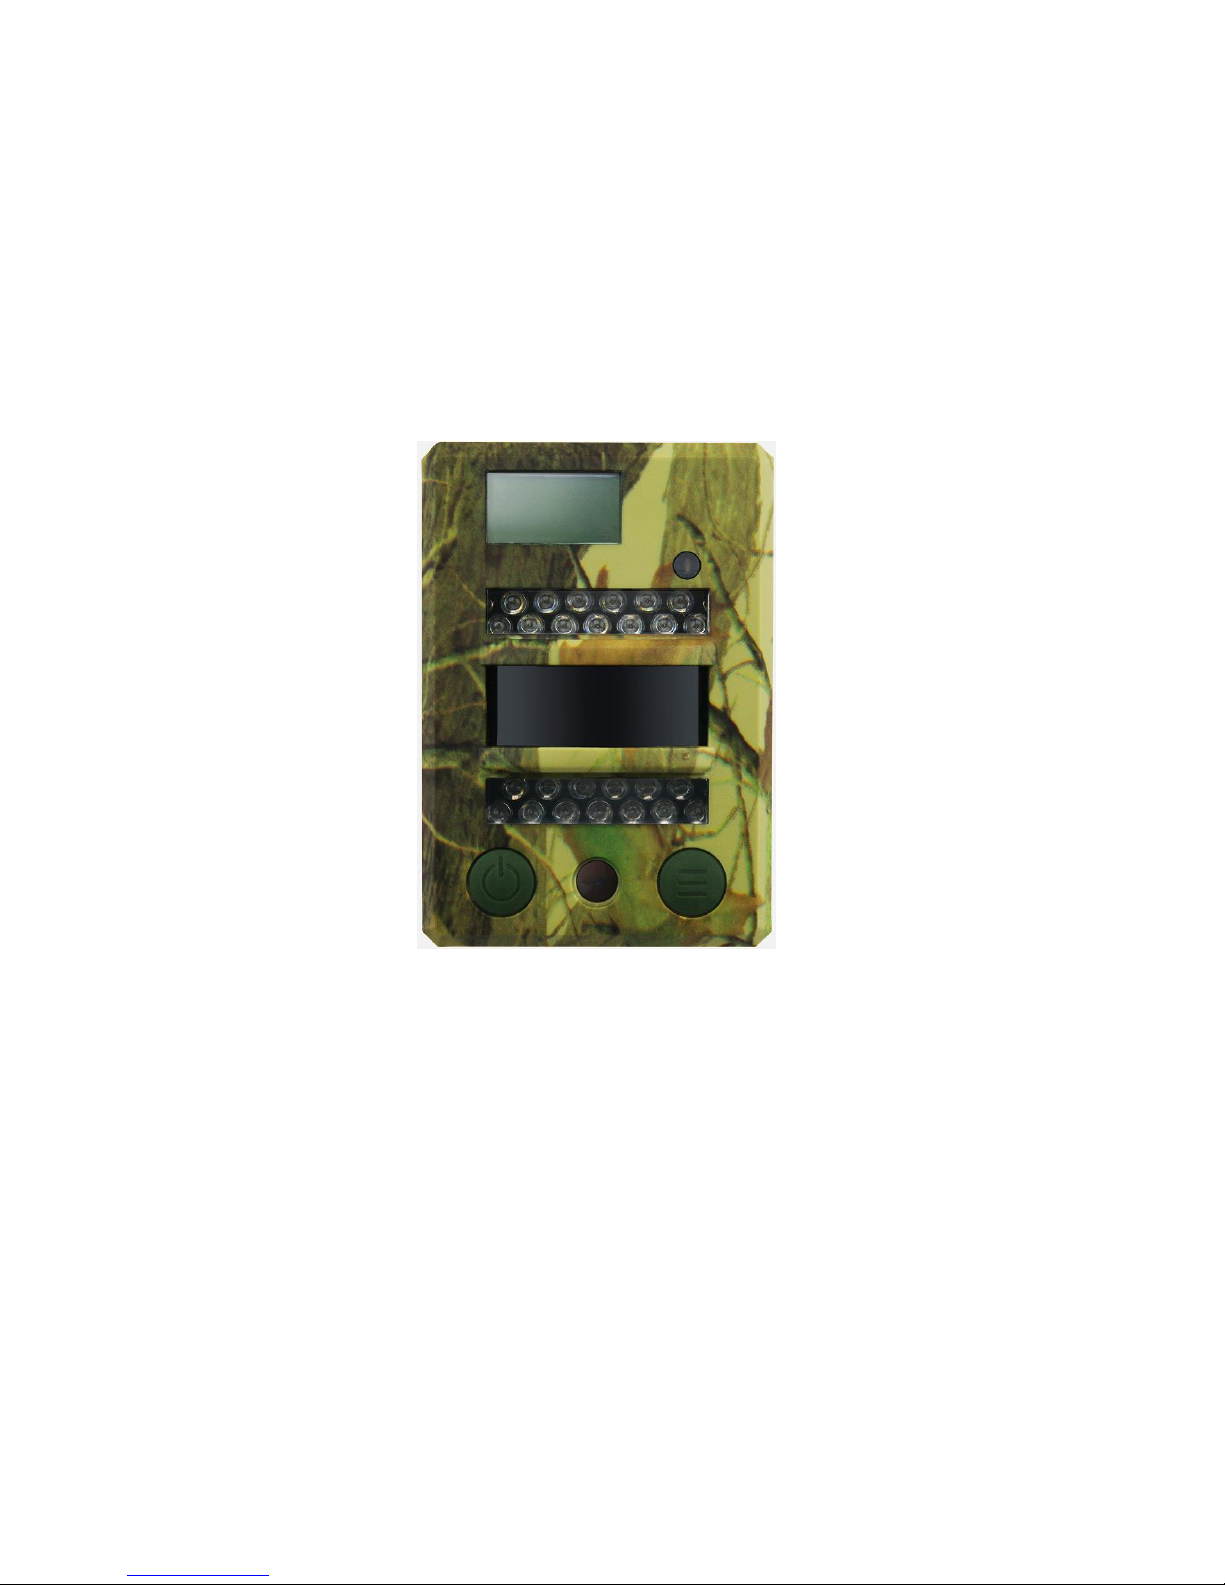
1. Whole View and Details of Camera
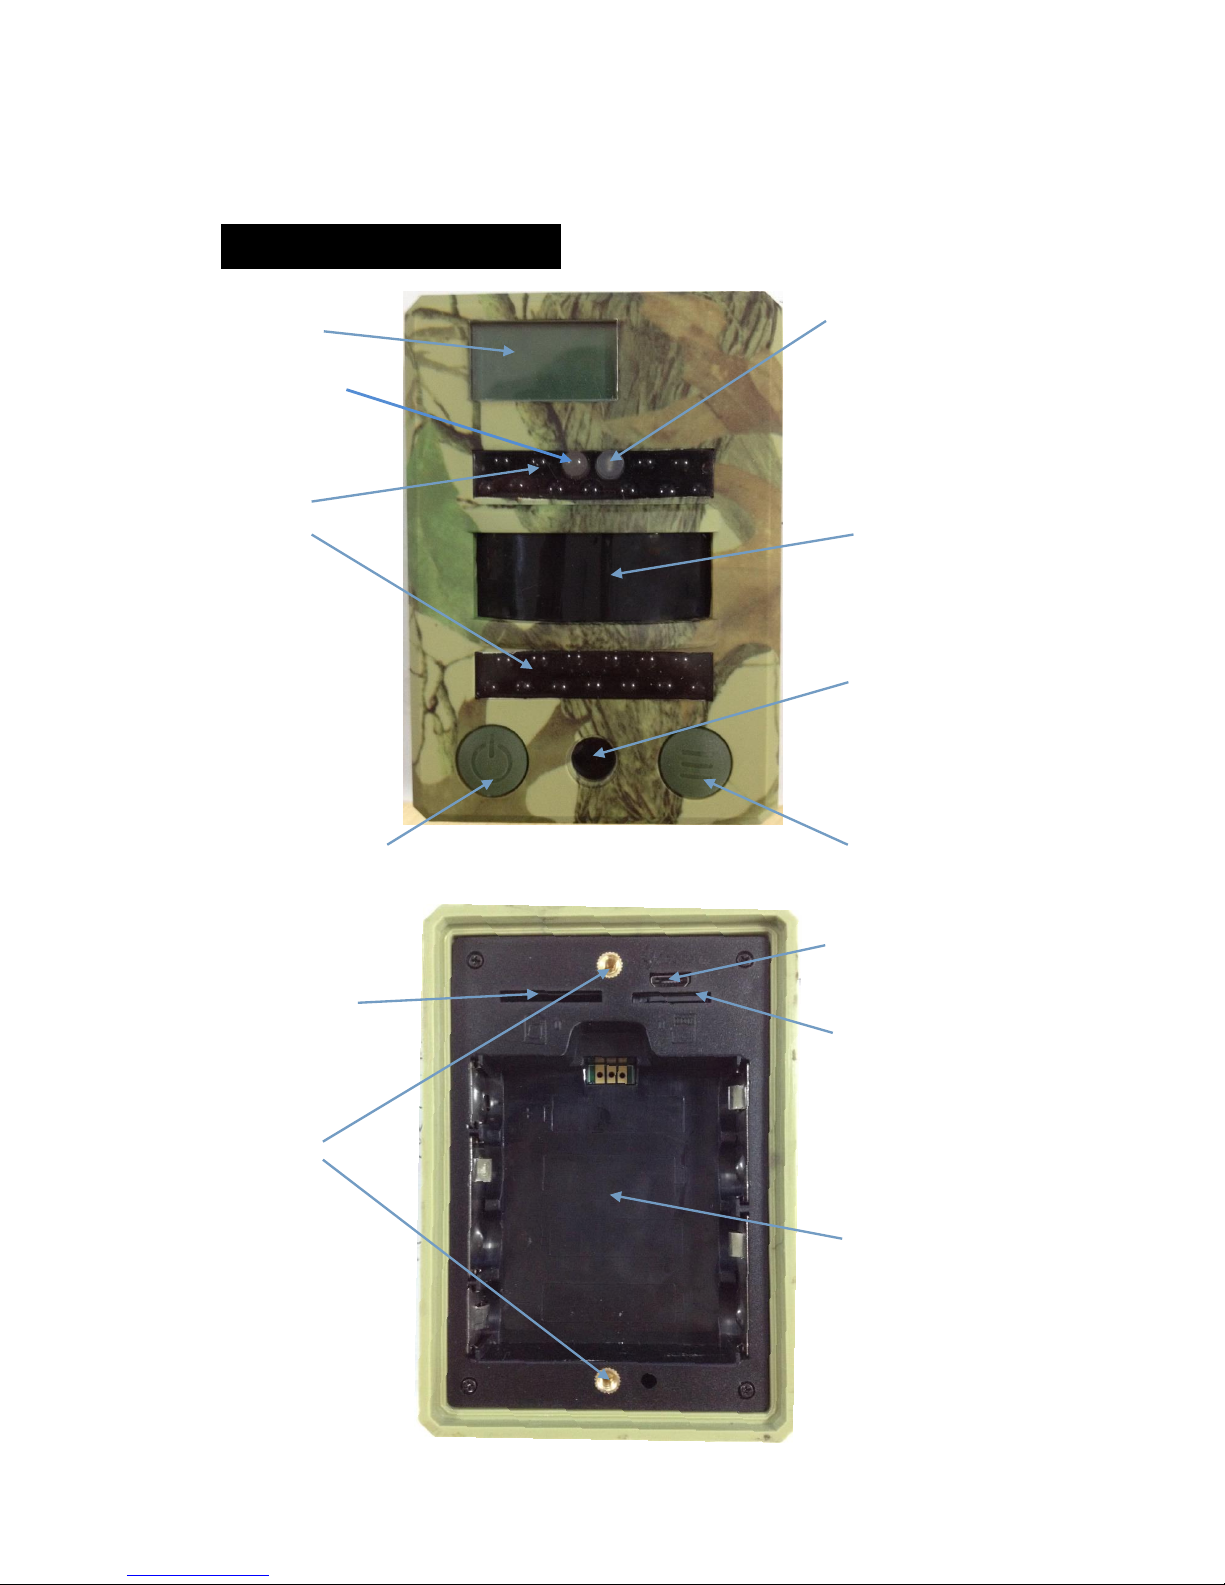
Figure 1: Front View of Camera
Light Sensor
LCD Screen day/night
Indicator Light
11 IR LEDs
13 IR LEDs PIR Sensor
Lens
Power/Navigation Button Menu/OK Button
USB Port/ DC in
SIM Card Slot
Invalid Currently TF Card Slot
Screw Slot
Battery Slot
- 2 -
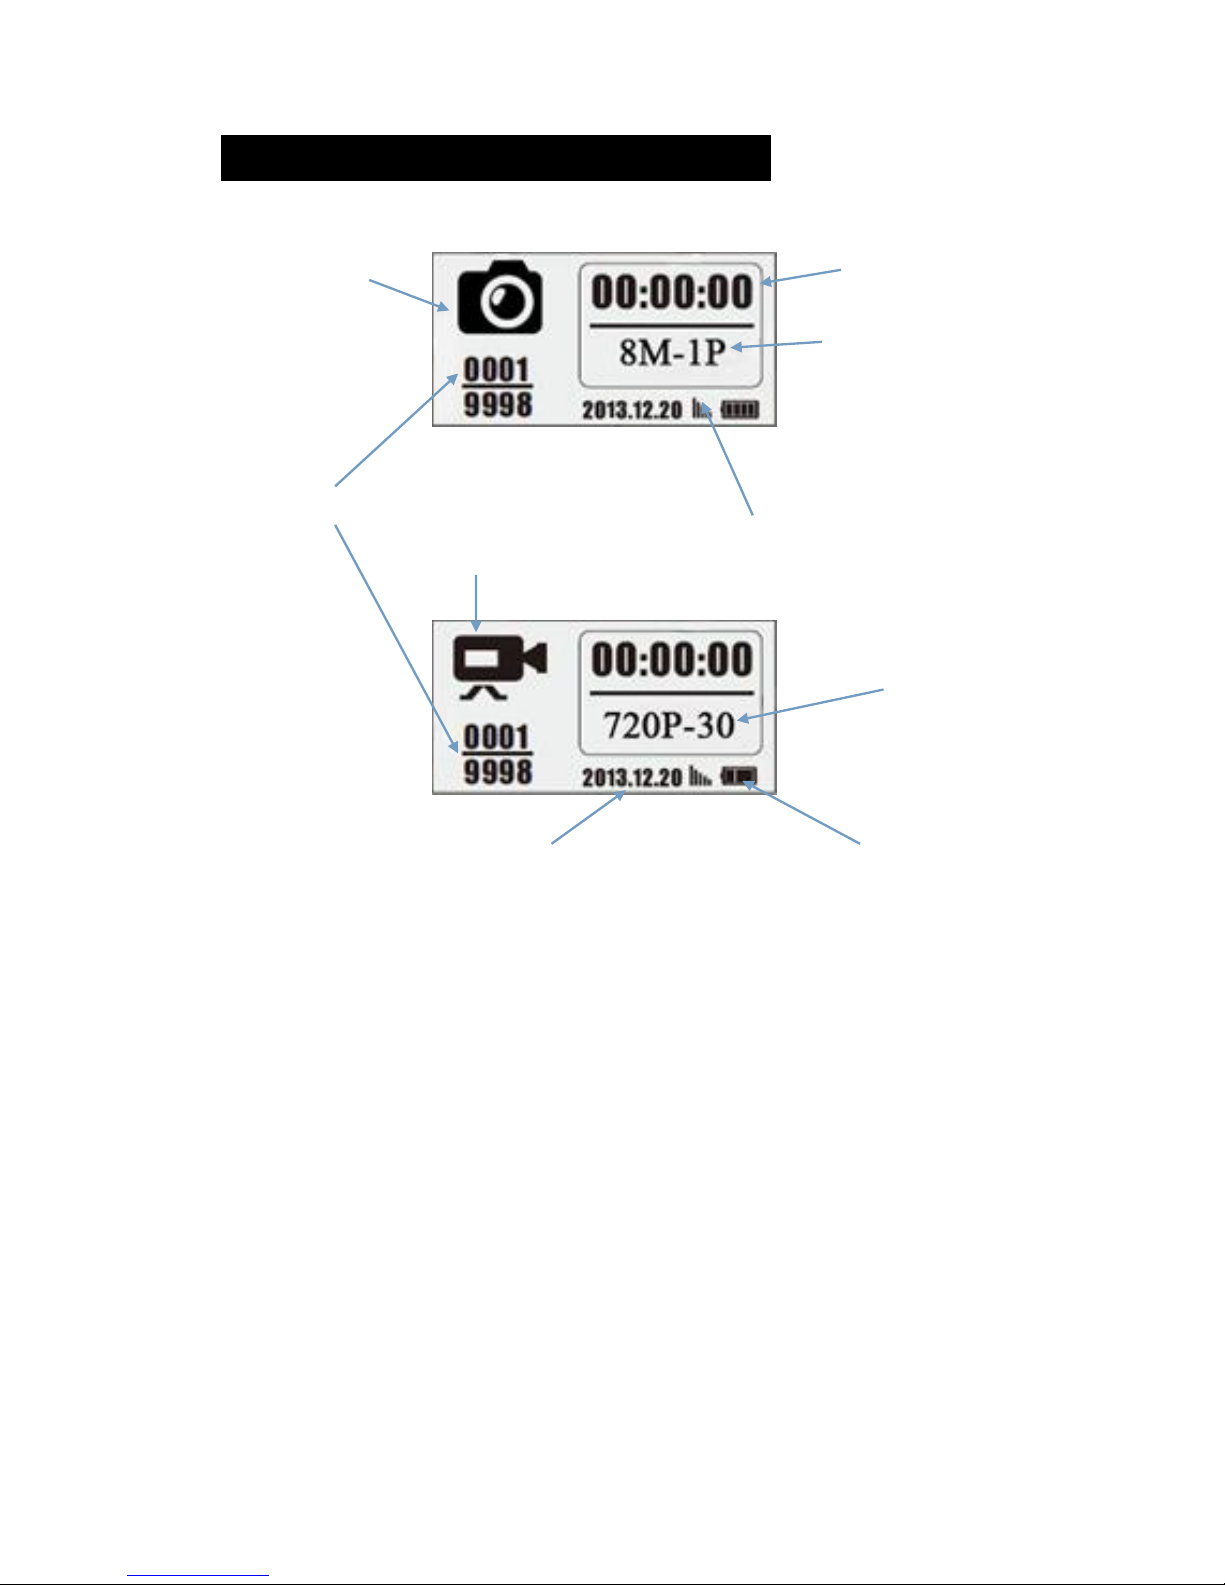
Camera Screen Display (Test Mode Main Interface)
Photo Mode Interface
Photographing hour/min/sec
Photo Resolution
Multi Shot Number
Photos/Videos Number
GPRS Signal Bar (Invalid Currently)
Video Recording
Video Mode Interface
Video FPS
Video Resolution
Year/month/date Battery Left Volume
Note 1): camera support camera, video, camera + video three different working
modes; screen display will be different based on different working mode.
- 3 -
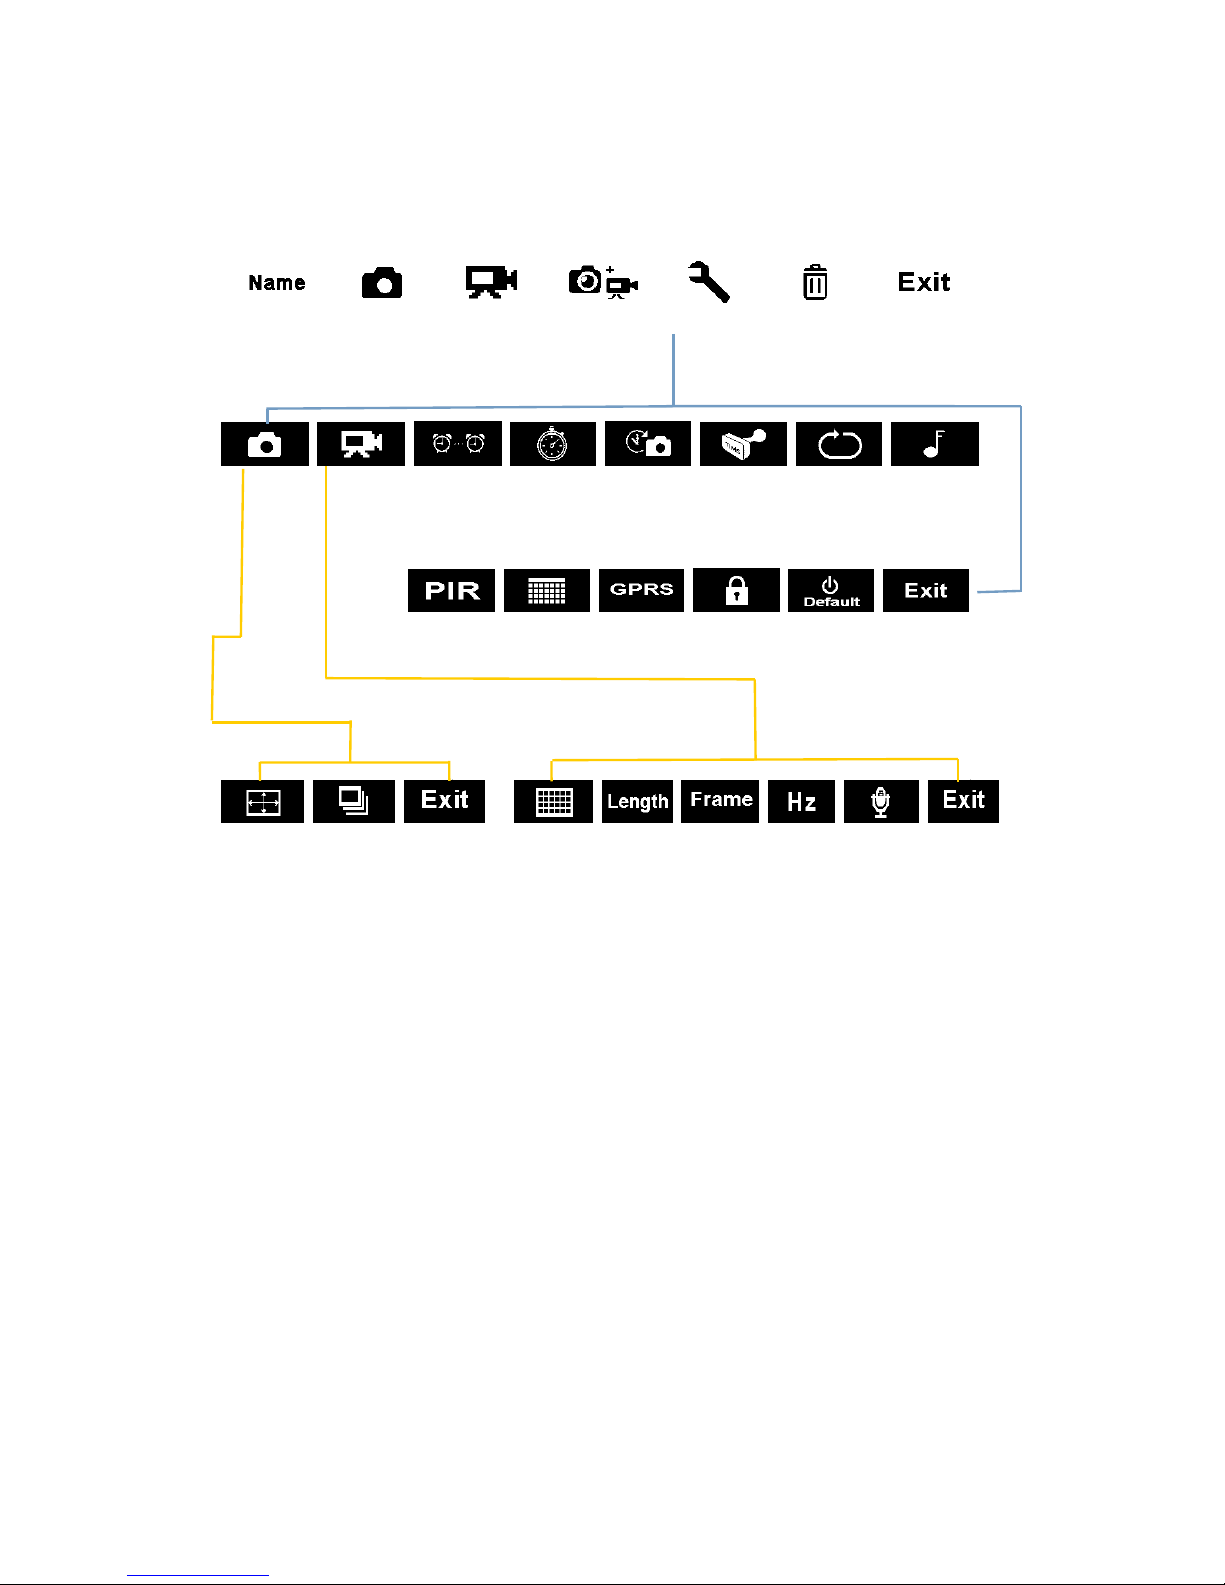
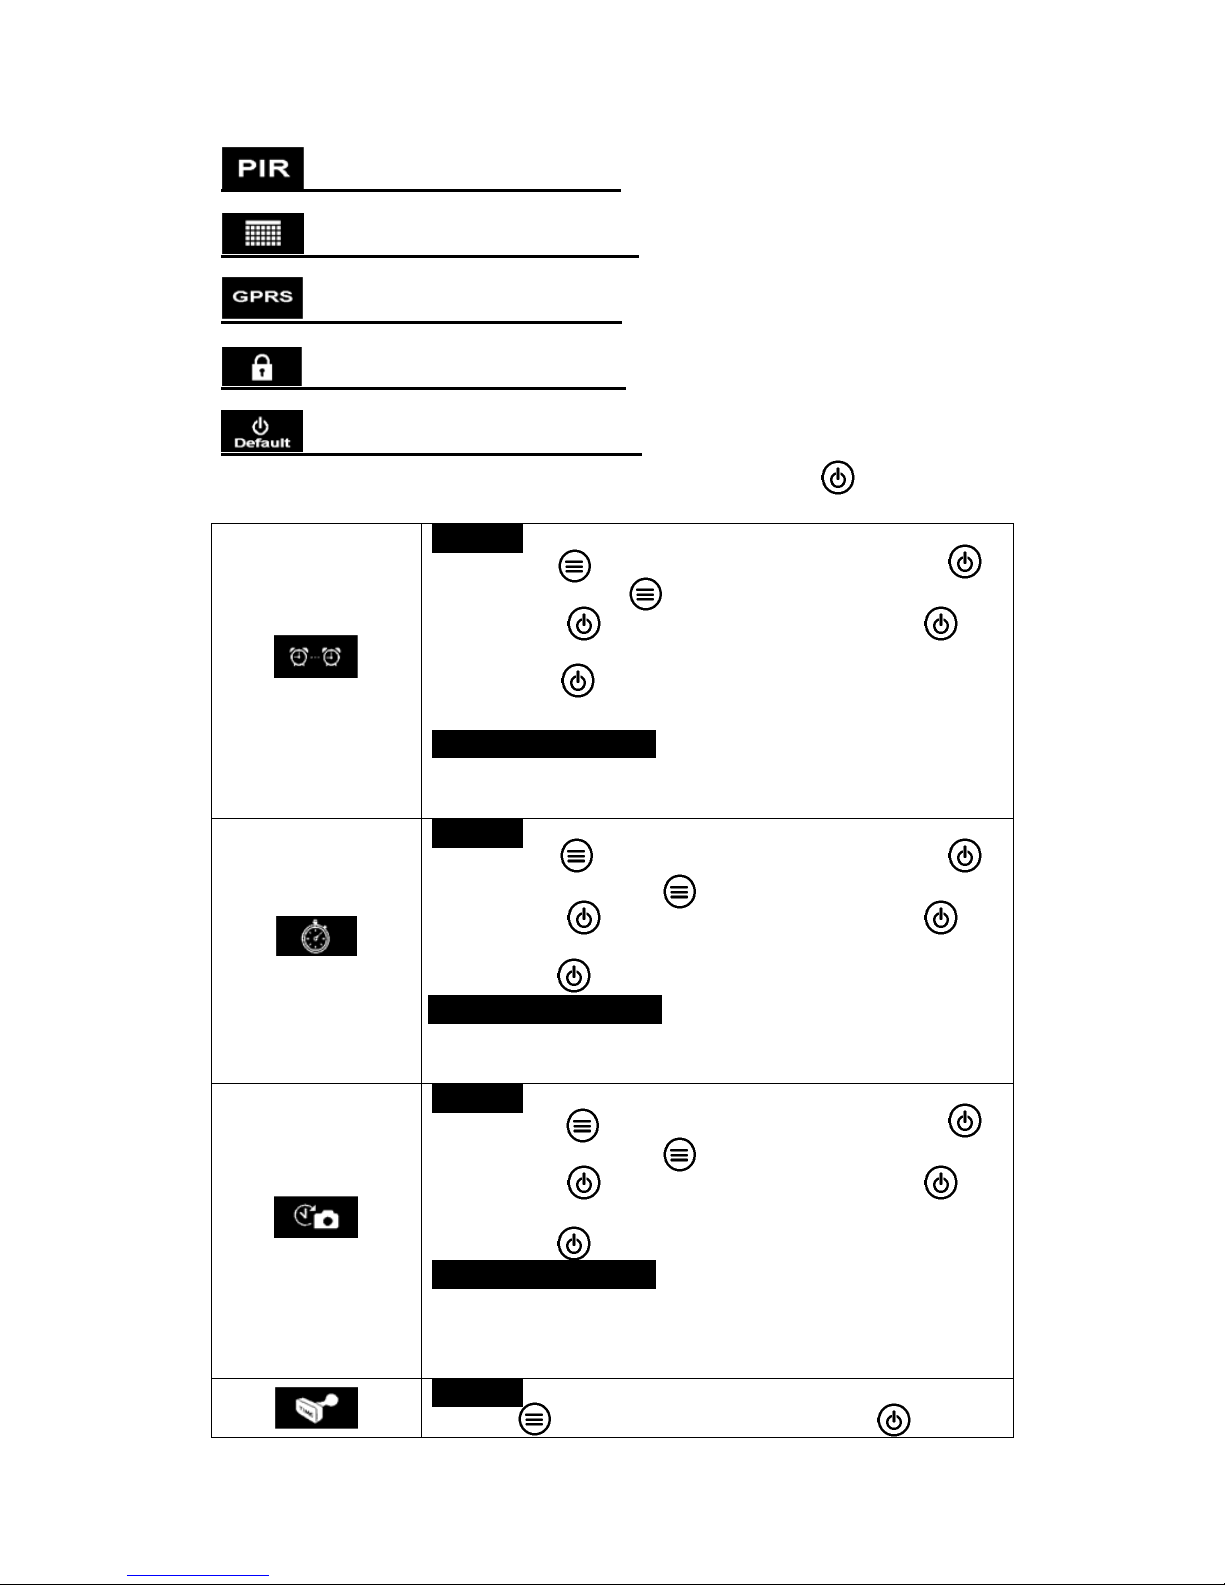
2. Camera Menu List Introduction
1) First Navigation Menu
2) Second Navigation Menu: Settings:
3) Third Navigation Menu
Photo Settings Video Settings
Back to
Previous Page
Delete
Settings
Photo+Video
Video
Camera ID
Photo
Camera Sound
Stamp
Time Lapse
Video
Photo
SD Cycle
Delay
Timer
PIR Sensitivity
Date/Time
GPRS ON/OFF
Password
Reset
Back to
Previous Page
Multi Shot
Photo Size
Video
Frame
Video
Resolution
Video
Length
Frequency
Video
Sound

- 4 -
3. Quick Start
1. Open back cover to insert TF card and batteries;
Power On Camera
2. Press and hold Power/Navigation button for 3 sec; camera will enter PIR Auto Working
mode after indicator flashes 5 times;
3. Press Menu/OK button once to wake up camera LCD screen to enter TEST Mode;
Manual Photographing/ Video Recording
4. Test Mode Main Interface, press Power/Navigation button again to shoot photos,
videos, or photo + video based on camera settings; stop by pressing again Power/Navigation
button
Enter Menu for Setup Functions
5. Test Mode Main Interface, press Menu/OK button to enter settings menu; now
button is always for navigation; button is always for OK to save/confirm needed
setup;
6. Press and hold button for 3 seconds to return Test Mode Main Interface (Camera Modes
Menu) after all settings are done;
7. Test Mode Main Interface, press and hold button for 3 seconds to enter PIR Auto
Working Mode; (indicator LED will flash 5 times, Screen will be off.)
Power Off Camera
8. Press and hold button for 5 seconds to turn off camera.

- 5 -
Camera Operation Flow Chart
Press and hold Power / Navigation button for
3 sec; camera will enter PIR Auto Working mode
after indicator flashes 5 times;
In PIR Auto Working Mode, press Menu / OK
button once to wake up camera LCD screen
to enter TEST Mode;
Press and hold Power / Navigation button
for 5 seconds to turn off camera.
In TEST Mode, press Menu/OK button to
enter settings menu; now button is always
for navigation; button is always for OK to
save/confirm needed setup;
Press and hold button for 3 seconds to
return back to First Navigation Menu after all
settings are done
In First Navigation Menu, press and hold button
for 3 seconds to enter PIR Auto Working Mode;
1. Set Camera, or Video, or Camera + Video
First Navigation Menu
, press Menu / OK button ; camera is in camera mode;
, press Menu / OK button ; camera is in video mode;
, press Menu/OK button ; camera is in cam+video mode
2. After configuration above, press and hold button for 3
seconds to return back to TEST Mode main interface; then press
Power/Navigation button ; camera now is recording photo/
video/ photo + video;
3. Press Power/Navigation button again to stop video
recording;
Note:
1) To ensure camera functions well; plz adjust camera to be with correct time;
2) Plz don’t turn on Time Lapse and Delay at the same time;
3) Camera can be turned off by pressing and holding button any time.
PIR Auto
Working Mode
TEST Mode
Power Off
ON/OFF Camera
(PIR Auto, TEST, OFF)
Manual Recording
Functions
Setup
Configuration
Return to First
Navigation Menu
Enter PIR Auto Working
Mode from Test Mode

- 6 -
4. Detail Setups
Camera Modes (Default Settings)
Camera ID OFF
Photo 2MP
Video VGA (640*480)
Photo+Video OFF
Settings
Delete
Back to Previous Page
If wanted setting icon is not showing on camera LCD screen, press repeatedly until
it appears.
Camera ID
a. Set up
Press to enter configuration page, press to set the next
digit/ alphabet; totally 4 digits/ alphabets for each camera.
b. How does this work?
Selected 4 digits/ alphabets will show on the photo stamp.
Such function can help user to identify photos are from where
and which camera.
Photo
a. Set up
Press to enter Photo mode; icon OK appears at right bottom
of interface
b. Take a Photo
Press and hold button for 3 seconds to return back to TEST Mode
main interface; then press to take a photo
Video
a. Set up
Press to enter Video mode; icon OK appears at right bottom
of interface

- 7 -
b. Start Recoding
Press and hold button for 3 seconds to return back to TEST Mode
main interface; then press to take a video clip.
Photo + Video
a. Set up
Press to enter Photo + Video mode; icon OK appears at
right bottom of interface
b. Start Recoding; Photo(s) First, then Recording Video
Press and hold button for 3 seconds to return back to TEST Mode
main interface; then press to take a photo
Settings
Press to enter camera settings.
Delete
Set up
1) Press to enter configuration page, press to choose
to delete One or All recorded file(s), or Format SD card;
2) Press choose Yes/ No, press again to confirm
deletion/ Format.
Note: Menu will stay in Yes/No interface in deleting One file; plz
press No to get back to previous interface.
This is designed to enable user to delete several files together
without pressing more buttons.
Press to get back to TEST Mode main interface
Camera Settings (Default Settings)
Timer OFF
Time Lapse OFF
Delay OFF
Stamp ON
SD Cycle Recording OFF
Camera Sound ON
- 8 -
PIR Sensitivity High
Time/Date
GPRS Switch OFF
Camera Password OFF
Reset NO
If wanted setting icon is not showing on camera LCD screen, press repeatedly until
it appears.
Timer
a. Set up
3) Press to enter configuration page, press to
choose ON; press again to set timer;
4) Press to choose wanted time, press to
confirm wanted number and move to next number;
5) Press again after Start time and End T ime is set
to Exit.
b. How does this work?
Camera will only work during pre-set Start Time and End
Time.
Time Lapse
a. Set up
1) Press to enter configuration page, press to
choose ON; press again to set Time Lapse;
2) Press to choose wanted time, press to
confirm wanted number and move to next number;
3) Press again to confirm.
b. How does this work?
Camera will take photos/ videos automatically upon the
interval user set.
Delay
a. Set up
1) Press to enter configuration page, press to
choose ON; press again to set Delay;
2) Press to choose wanted time, press to
confirm wanted number and move to next number;
3) Press again to confirm.
b. How does this work?
Camera will take photos/ videos based on the pre-set time
interval upon motion. This option prevents from taking too
many photos or videos.
a. Set up
Press to enter configuration page, press to choose

- 9 -
Stamp
ON/OFF; press to confirm setting.
b. How does this work?
Left battery volume, Moon phase, Temperature, Date/Time,
and pre-set Camera ID will be displayed on every photo.
SD Cycle Recording
a. Set up
Press to enter configuration page, press to choose
ON/OFF; press to confirm setting.
b. How does this work?
Select “ON”, camera will continue to record photos/videos by
deleting earliest photos or video clips recorded in SD card.
Camera Sound
a. Set up
Press to enter configuration page, press to choose
ON/OFF; press to confirm setting.
b. How does this work?
Select “OFF” to turn off camera speaker.
PIR Sensitivity
a. Set up
Press to enter configuration page, press to choose
High/Middle/Low; press to confirm setting.
b. How does this work?
High/ Middle/ Low;
Higher sensitivity is 1) more sensitive to movements by
smaller subjects; 2) longer detection distance; 3) easier for
sensor to detect difference between body heat and outdoor
temperature; 4) easier to trigger camera to record. In high
temperature environment, body heat of subjects and
environment temperature is hard to tell by camera, suggest to
set High.
Time/Date
a. Set up
1) Press to enter configuration page, press to
choose ON; press again to set Time/Date;
2) Press to choose wanted time, press to
confirm wanted number and move to next number;
3) Press again to confirm.
b. How does this work?
Date/Time; Date: “month/ date/ year”; Time: “hour/minute”
Note: Plz adjust Time/Date when you turn on camera to
ensure camera to function well as expected.
GPRS Switch
a. Set up
Press to enter configuration page, press to choose
ON/OFF; press to confirm setting.
b. How does this work?
To enable/ disable GPRS/MMS function.
a. Set up
1) Press to enter configuration page, press to

- 10 -
Camera Password
choose ON; press again to set Password;
2) Press to choose wanted password combination,
press to confirm wanted digit/ alphabet and
move to next number;
3) Press again to confirm.
b. How does this work?
Enable password protection for your camera; support totally 6
digits/ alphabets long password access.
Reset
a. Set up
Press to enter configuration page, press to choose
ON/OFF; press to confirm setting.
b. How does this work?
To enable/ disable GPRS/MMS function.
Photo Settings (Default Settings)
Image Size 2M
Multi-shot 1P
Image Size
Set up
Press to enter configuration page, press to
choose desired Photo Size
(8MP/5MP/2MP: 3264x2448, 2592x1944, 1920x1080)
Multi-shot
Set up
Press to enter configuration page, press to
choose desired Photo Burst number;
(Support 1~7 photos per burst/ trigger.)
Video Settings(Default Settings)
Video Size VGA
Video Length 5s
Video Frame 30FPS
Frequency 50Hz
Audio Recording ON

- 11 -
Video Size
Set up
Press to enter configuration page, press to choose
desired Video Size
(720P/VGA/CIF: 1280x720/640x480/320x160)
Video Length
Set up
Press to enter configuration page, press to choose
desired Video Length per Burst/ Trigger; press to confirm
setting.
(Support 5~60 seconds)
Video Frame
Set up
Press to enter configuration page, press to choose
desired Video Frame; press to confirm setting.
(Optional 15FPS and 30FPS)
Frequency
Set up
Press to enter configuration page, press to choose
desired Frequency based on local Country Frequency; press
to confirm setting.
(Optional 50HZ and 60HZ)
Audio Recording
Set up
Press to enter configuration page, press to choose to turn
ON/ OFF audio recording in video; press to confirm setting.
Select “ON”, audio available in video clips.
Software Upgrade
1. Copy the upgrade software files (3 files) into TF card;
Note: Suggest to use 1 or 2 GB SD card to do the upgrade.
2. Insert TF card into camera;
3. Insert batteries/ or plug in USB power cable, choose “DC”.
4. Press and hold Power/Navigation button , camera speaker emits one Beep
Sound;
5. Release button when you see red indicator led flashes;
6. Then press and hold Menu/OK button ;
Note: red indicator LED stops flashing but keeps lighting up;
7. Release button after you see until ISP interface shows up in screen
8. Upgrade succeeds when red indicator led is off;
9. Plug out batteries/or power cable;
10. Insert batteries/ or power cable; turn on camera. Done.
Note: Don’t cut off power supply somehow; otherwise, camera will not be able to be
turned on again unless software upgrade via PC.

- 12 -
USB Connection
When camera is connected via USB, press and hold button , camera speaker
emits one Beep Sound, and red indicator LED lights up; then interface below appears.
Press to choose DC in, or PC connection; press to confirm choosing.
a. DC in for Power Supply
Camera enters Test Mode Main Interface.
b. PC Connection to Read TF Card
Camera screen shows interface as below. Now you can read TF card contents via
PC.
By pressing again, camera will be turned into a PC camera; press again
to Exit.

- 13 -
5. TF Card Selection & Battery Life Test Report
TF Card Selection
A memory card is required to operate the camera. When the camera is "ON"
and no memory card is inserted, screen displays "No SD Card". TF card slot of camera
supports up 32 GB memory card. Before inserting or removing the memory card, the
camera must be powered OFF. Failing to do so may cause loss of or damage the
pictures already recorded in the memory card. Following data shows an approximate
quantity of photos which can be recorded by the camera depending on the memory
card capacity.
Chart below will show you the approximate capacity of different size SD cards.
Pls check to see which size card can fit your needs best.
SD
Size
Capacity
1GB
2 GB
4 GB
8 GB
16 GB
32 GB
Photo (pictures)
2 MP
1645
3195
6197
12401
23786
50146
5 MP
653
1244
2356
4453
7957
14241
8 MP
421
796
1488
2873
4864
8092
Video (hours)
720P HD
00:09:50
00:18:41
00:35:15
01:06:51
02:11:18
04:20:54
640x480
00:21:31
00:41:58
01:22:13
02:47:27
05:29:13
13:01:16
320x160
00:50:45
01:44:18
03:21:04
06:37:45
13:22:58
27:00:20
Battery Life Test Report for Reference
Test Condition: LCD screen off. Mode: “Power On” _PIR intelligent automatically monitoring
4AA Alkaline Batteries (MMS/GPRS Off, or basic model)
Photos shot per day
Working time
Video clips shot per day
Working time
IR LEDs On
2MP
100 photos
26 days
320× 240
10 sec
10 clips
47 days
5MP
100 photos
24 days
640× 480
10 sec
10 clips
44 days
8MP
100 photos
21 days
1280× 720
10 sec
10 clips
41 days
IR LEDs Off
2MP
100 photos
51 days
320× 240
10 sec
10 clips
185 days
5MP
100 photos
48 days
640× 480
10 sec
10 clips
170 days
8MP
100 photos
46 days
1280× 720
10 sec
10 clips
161 days

- 14 -
6. Specification
Model
2.8C
Recording
Video Format
.avi
Video Compression
MPEG4
Video Resolution
720P (1280*720)
D1 (640*480)
CIF (320x240)
Video Frame Rate
15 / 30 FPS; programmable
Video Length
5-60sec. programmable
Still Image Format
JPEG
Still Image Resolution
2MP (1920x1080)
5MP (2560x1920)
8MP(3264x2448)
Shooting Numbers
1~7 photos/trigger(programmable)
Photo Stamp
Logo
Battery left volume
moon phase
temperature
Date & time
camera ID—4 digits
(Programmable by User)
Record Delay
1second~23h 59min 59sec
Night Vision
Night Vision Distance
8~10m, 40 feet
No. of Infra-Red LEDs
26pcs
General
Image Sensor
1.3 Mega Pixels Color CMOS
Effective Pixel Size
1280x960
Lens
F=3.0; FOV=49°; Auto IR-Cut-Remove
Effective IR Flash
8 meters
Infrared Cut Filter
Yes
White Balance
Automatic
Day/Night Mode
Color during day / B&W at night
Minimum Illumination
0 Lux (IR on)
Effective PIR Angle
100°
PIR Sensitivity
High / Normal / Low 3 levels
Audio Recording
Yes
Operation Power
6~12V DC (1~2A)
Battery Type
4 AA
Auto Power Off
automatically power off in 1min without any operations

- 15 -
Specifications are subject to change without prior notice
Interface
USB; Micro SD card slot
Memory Type and Size
SD Card, up to 32G
Display
1.0 inch B/W Screen
Playback Zoom In
Yes
Language
English
Sensor Type
PIR (Passive Infrared)
Sensor Range
12~15m; 50 feet
Sensor Trigger Speed
0.8-1 sec
Power Consumption
150mA(350mA--IR LEDs on)
Low Battery Alert
Yes
Stand-by Time
4 months (4AAbatteries)
Operating Temperature
(-20 - 60)°C
Operation Humidity
5%-90%
Waterproof spec
IP54
Dimensions
100.4*70.44*51.32mm
Weight
171.2 g
Certification
CE, FCC, RoHs
Functions
Photo+Video
Yes
Time Lapse
Yes
Timer
Yes
Time Lapse Delay
Yes
Password Protection
Yes, 6 digits
SD Card Cycle Recording
Yes
Auto Power Off in Test Mode
Yes
Water/WeatherProof
Yes
SD Card
Support up to 32GB
MMS & GPRS
Not available yet
MMS Phone
N/A
MMS Email
N/A
SMTP Email
N/A
FTP Upload Photos
N/A

- 16 -
7. Warranty
With great pride and full confidence in our products, we always keep our words
which are given to our customers as specified warranty terms and service below.
Based on a strict QC system, we initially offer all our customers one year long time
limited warranty, come along with selectable chargeable renewal policy of warranty
as one, two, three, or four years.
Our products are warranted against defects in materials and workmanship for a
period of one year from the date of original purchase. If a defect exists, we will, at
our option and to extent permitted by law will (1) repair the product at no charge
using new or refurbished parts; (2) exchange the product with a functionally
equivalent product that is new or refurbished. Provided the product is returned
freight charge paid.
This warranty excludes damage resulting from abuse, accident, modifications or
other causes that are not defects in materials and workmanship, or by someone
other than our authorized technicians. This warranty only covers failures due to
defects in materials or workmanship under normal usage.
To obtain warranty service, please contact us to determine the nature of problem
before return the product under this warranty (with a written description of the
problem and print samples) for repairing or exchanging.
 Loading...