

Page 1
Installation and User Instructions .........................8
GB
20.11.2017 / 53-0772
WIKING Mini 2
Page 2
2
A
B
Page 3
3
C
D1
Page 4
4
D3
D2
Page 5

5
Contents
Figures .................................................................................................................. 2
Welcome ...............................................................................................................6
For UK -The Clean Air Act 1993 and Smoke Control Areas ................................. 7
Installation Instructions ..................................................................................... 8
User Instructions .............................................................................................. 12
Using the Air Damper .......................................................................................... 13
Some Things Worth Knowing about Firing ......................................................... 13
Lighting and Firing your WIKING Wood-Burning Stove ...................................... 14
Some Things Worth Knowing about the Smoke Pipe ......................................... 15
Some Things Worth Knowing about the Chimney .............................................. 16
Cleaning and Maintaining your Wood-Burning Stove ......................................... 17
Declaration of Performance ................................................................................ 18
Trouble Shooting ................................................................................................. 19
Guarantee and Claim Conditions ........................................................................ 20
Guarantee Certicate ......................................................................................... 24
Page 6

6
Welcome
Dear WIKING owner,
We would like to congratulate you on your new WIKING wood-burning stove and hope you
will be pleased with your purchase. For more than 30 years now, WIKING has developed and
produced high-quality wood-burning stoves, and we are known throughout all of Europe for
our design and high technical standards. As a WIKING owner, you have assured yourself a
wood-burning stove with a timeless design and a long service lifetime.
Please read through this installation/user’s manual before setting up your wood-burning stove
so that you can avoid any potential problems and get to enjoy your WIKING wood-burning
stove as soon as possible.
Guarantee
All WIKING wood-burning stoves are tested and approved in accordance with EN 13240
(European Standard) and NS 3058 and NS 3059 (Norwegian standards for particle emissi-
ons). We guarantee that your wood-burning stove fulls the European norms pertaining to safety, quality and environmentally sound combustion. WIKING provides a ve-year guarantee
on your wood-burning stove.
Advantages of Your New Wood-Burning Stove
WIKING Mini is a beautiful wood-burning stove that ts in any home where pure and simple
lines are desired. This stove has a large front pane, allowing the ames to be viewed from
many angles. At the same time, air from the ’pane-ush’function ensures that, with proper
ring, the glass pane will not be covered in soot so that you and your family will always be able
to enjoy it and the ames inside. You control the wood-burning stove’s air supply with a user-
friendly, one-lever system located beneath the door. The simple lever makes it easy for you to
control combustion. For WIKING Mini wood-burning stoves, the air is regulated automatically
through WIKING Automatic when the re is started and when restoking. You get more warmth
for the wood you add, and in turn, better heating economy. WIKING Mini is both effective and
attractively designed, and will bring you great pleasure for years to come.
Enjoy your new wood-burning stove!
Page 7

7
Norsk
For UK -The Clean Air Act 1993 and Smoke Control Areas
Under the Clean Air Act local authorities may declare the whole or part of the district of the
authority to be a smoke control area. It is an offence to emit smoke from a chimney of a buil-
ding, from a furnace or from any xed boiler if located in a designated smoke control area. It
is also an offence to acquire an ”unauthorised fuel” for use within a smoke control area unless
it is used in an ”exempt” appliance (”exempted” from the controls which generally apply in the
smoke control area).
In England appliances are exempted by publication on a list by the Secretary of State in accordance with changes made to sections 20 and 21 of the Clean Air Act 1993 by section 15 of
the Deregulation Act 2015. Similarly in Scotland appliances are exempted by publication on
a list by Scottish Ministers under section 50 of the Regulatory Reform (Scotland) Act 2014.
In Northern Ireland appliances are exempted by publication on a list by the Department of
Agriculture, Environment and Rural Affairs under Section 16 of the Environmental Better Regulation Act (Northern Ireland) 2016. In Wales these are authorised by regulations made by
Welsh Ministers.
Further information on the requirements of the Clean Air Act can be found here: https://www.
gov.uk/smoke-control-area-rules. Your local authority is responsible for implementing the
Clean Air Act 1993 including designation and supervision of smoke control areas and you can
contact them for details of Clean Air Act requirements.
The WIKING Mini stoves detailed below have been recommended as suitable for use in smoke
control areas when burning wood logs. The appliance has been tted with a modied secondary air control (to prevent closure beyond the 26% open position).
Appliances recommended as suitable for use in Smoke Control Areas :
• WIKING Mini 2 with a base
• WIKING Mini 2 with low legs
• WIKING Mini 2 with high legs
Refuelling on to a low re bed
If there is insufcient burning material in the rebed to light a new fuel charge, excessive
smoke emission can occur. Refuelling must be carried out onto a sufcient quantity of glowing
embers and ash that the new fuel charge will ignite in a reasonable period. If there are too few
embers in the re bed, add suitable kindling to prevent excessive smoke.
Fuel overloading
The maximum amount of fuel specied in this manual should not be exceeded, overloading
can cause excess smoke.
Operation with door left open
Operation with the door open can cause excess smoke. The appliance must not be operated
with the appliance door left open except as directed in the instructions.
Dampers left open
Operation with the air controls or appliance dampers open can cause excess smoke. The appliance must not be operated with air controls, appliance dampers or door left open except as
directed in the instructions.
Page 8

8
Installation Instructions
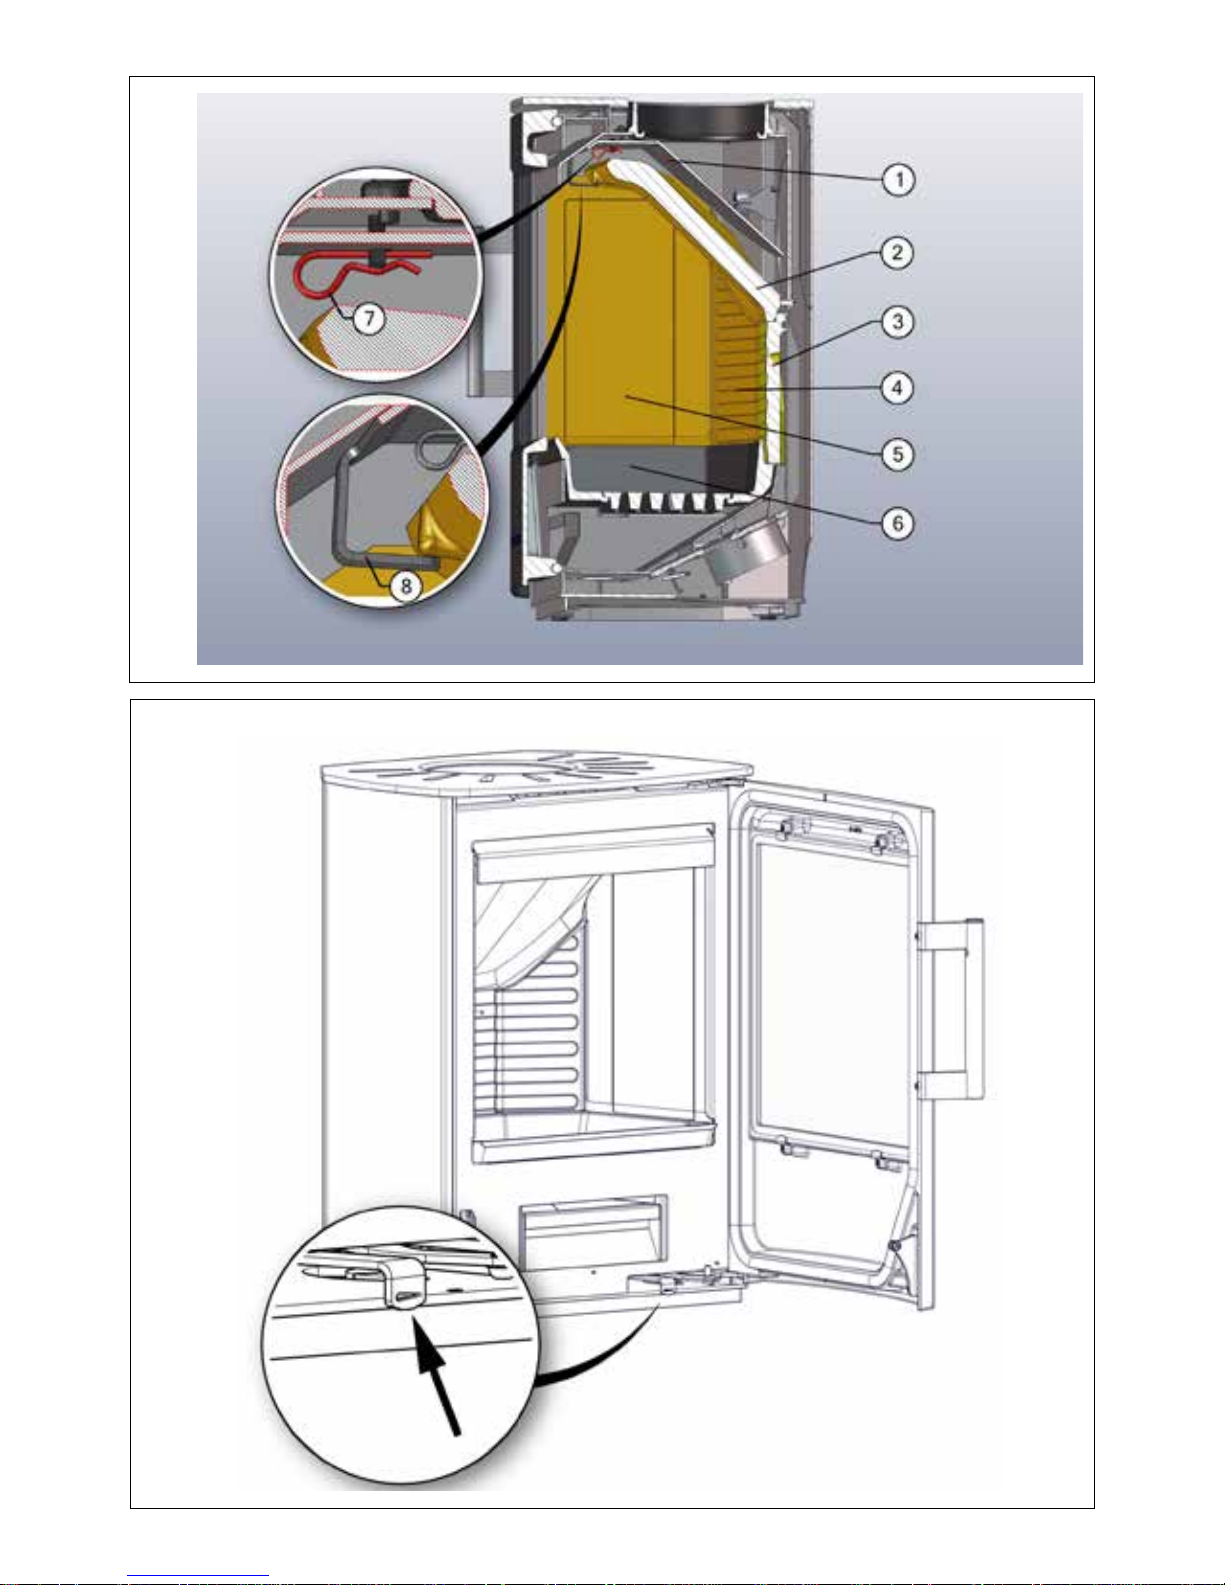
Before You Start (Figure A)
Figure A is a cross-sectional view of your wood-burning stove. Here you can gain an overview of
the parts of which your stove consists.
1. Steel smoke deector.
2. Vermiculite smoke deector.
3. Vermiculite rear plate.
4. Vermiculite corner plate.
5. Vermiculite side plate.
Please note: The combustion chamber is covered with plates made of vermiculite, which is a
heat-insulating material. These plates ensure that the optimal combustion temperature is quickly
reached, and they must therefore remain inside in the wood-burning stove.
The steel smoke deector and the vermiculite smoke deector ensure that the passage of
smoke through the stove is as long as possible, so that the ue gasses have more time to emit
their warmth within the stove and the surrounding area. In this way you get more warmth from
the wood you add to the stove, as the warm smoke is not simply sent out through the chimney.
Arrangement of Individual Components (Figure A)
It is important to ensure that all individual components are in place and no damage was done
to them during transport. Check that all insulation plates of the combustion chamber have
been properly placed, i.e. that the bottom plate is horizontal and that the side plates are vertical and reach all the way up to the steel sides of the combustion chamber and down to the
bottom plate. In Figure A you can see the parts that you must inspect:
1. The steel bafe plate (1) is hung from two hooks and equipped with two pins (7) that serve
as protection during transportation. Remember to remove the two pins before you start using the stove.
2. The vermiculite smoke deector (2) plate must rest on the two ttings (8) at the top and front
of the combustion chamber and must be pushed as far back as possible into the combustion chamber.
3. The rear plate (3) must be pushed all the way back in the combustion chamber.
4. The cast iron bottom plate (6) should lie at in the bottom of the combustion chamber.
Only when you are condent that the individual components are in place, you may begin with
the installation of the wood-burning stove.
Changing the Smoke Outlet from Top Outlet to Rear Outlet
Proceed as follows to change the smoke outlet from top outlet to rear outlet:
1. Lift the top plate off the stove.
2. Remove the smoke ring on the top of the stove by unscrewing the three screws and lifting it off.
3. There is a cut-out for the ue duct in the back plate. Break off the plate within this cut-out to
make a hole that the ue duct can t into.
4. Remove the cover plate on the back of the stove by unscrewing the three screws (Torx Bit
no. 30) and lifting it off.
5. Install the cover plate on top of the stove with the three screws.
Page 9
9
6. Place the smoke ring in the smoke outlet hole in the back of the stove and secure it with the
three screws.
7. Replace the top plate on the stove.
A top cover can be bought as an accessory to cover the hole in the top plate of the stove if the
stove is connected to a rear smoke outlet.
General Information
When installing your WIKING wood-burning stove, you must ensure that all local regulations,
including those referring to national and European standards, are observed. It is always a
good idea to consult a chimney sweep before installing your stove, as it is he/she who must
ultimately approve the installation. Always follow the instructions of the manual carefully and
make sure that the installation is carried out by a qualied professional. WIKING packaging
material should always be handled in accordance with the local rules for waste handling.
Room Requirements
It must always be possible to deliver fresh combustion air to the room in which the woodburning stove is to be installed. A window that can be opened or an adjustable air valve is
considered to be sufcient. The adjustable air valve/air grate must not be blocked. Exhaust
fans running in the same room as where the stove is installed may cause problems.
Technical Data
If the wood-burning stove is to be placed on a oor made of combustible material, the area
around the stove must be covered with a non-combustible material. The oor construction
must also be able to withstand the weight of the stove and the chimney. The chimney’s weight
must be calculated in relation to dimension and height.
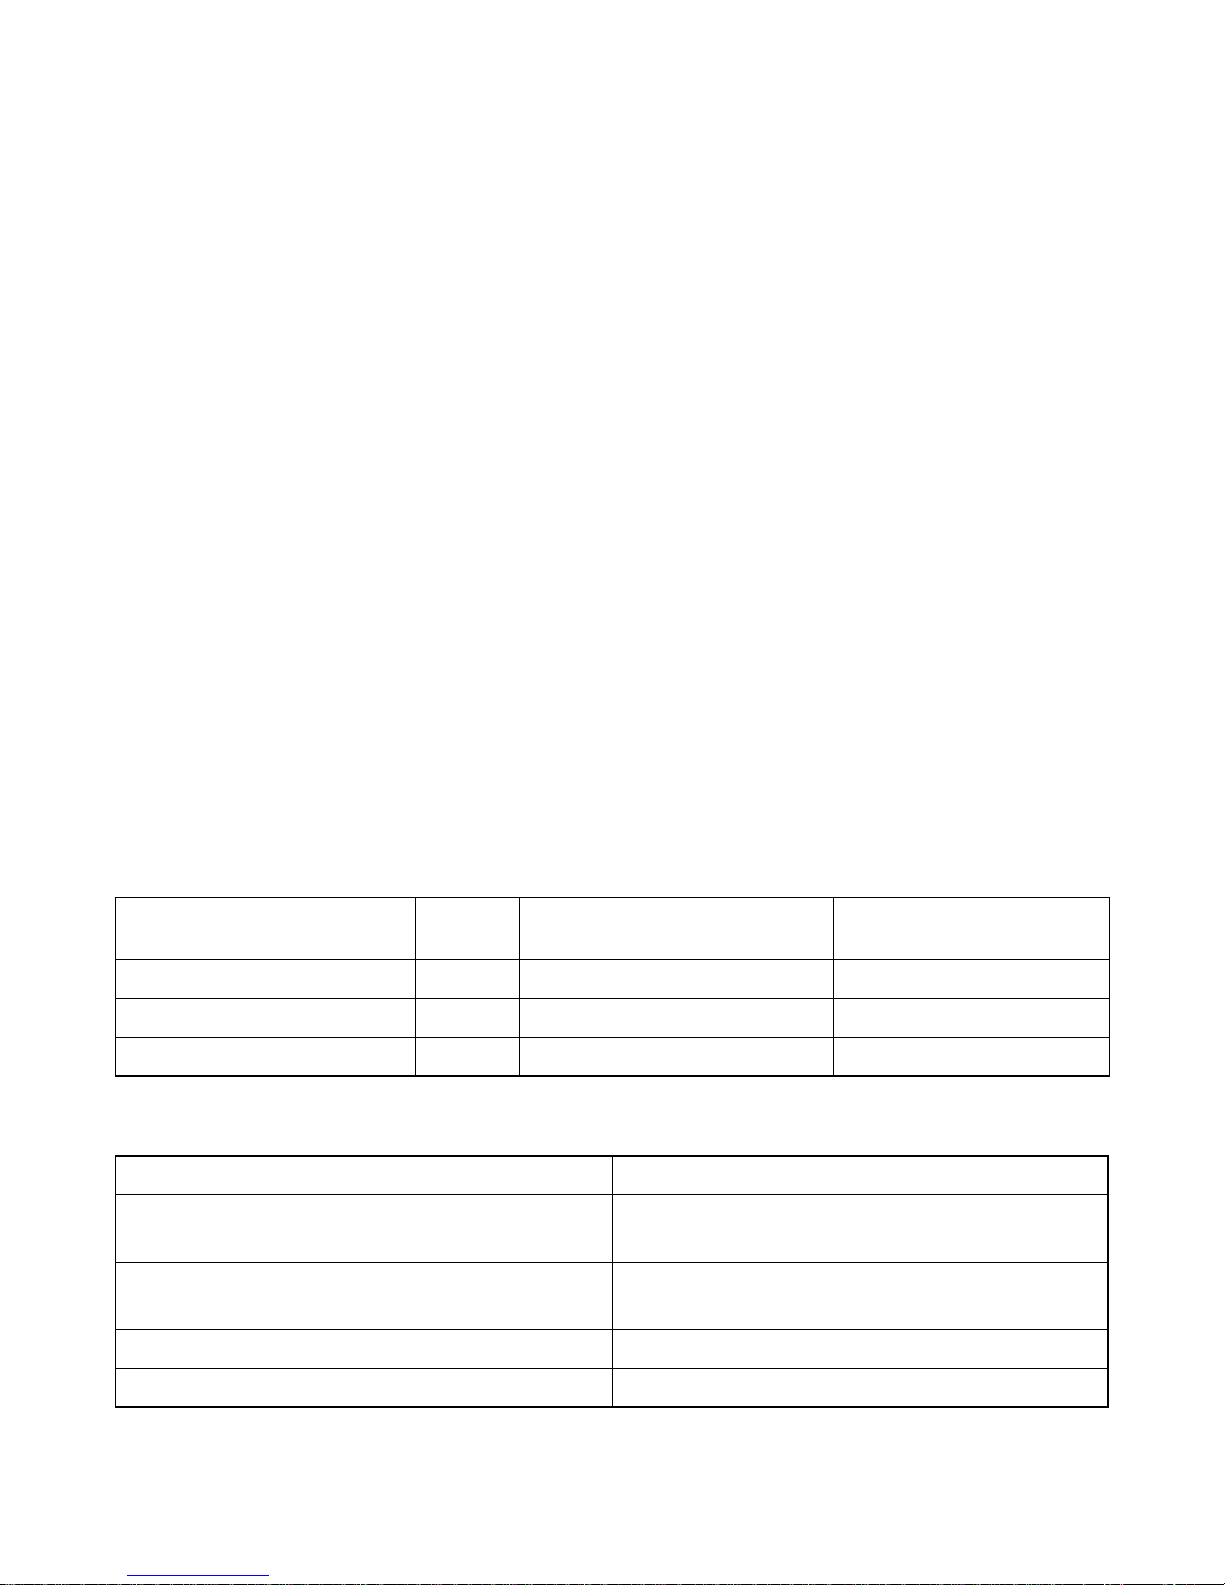
In the table below you’ll nd important information about your wood-burning stove.
Weight Dimension (h x w x d) Distance to furniture - in
front
Mini 2 with a base 73 kg 60.8 x 46.8 x 35.6 cm 100 cm
Mini 2 with short legs 73 kg 65.2 x 46.8 x 35.6 cm 100 cm
Mini 2 with long legs 74 kg 83.2 x 51.7 x 37.1 cm 100 cm
The stove is mainly made of sheet iron, with some items made of cast iron.
Nominal heat output: 4.5 kW according to EN norm
Flue gas temperature
EN 13240 measurement point:
236
o
C
Flue gas temperature
measured in the outlet socket:
283
o
C
Exhaust gas mass ow: 3,6 g/s
Gross and net efciency: 76% / 83%
Page 10
10
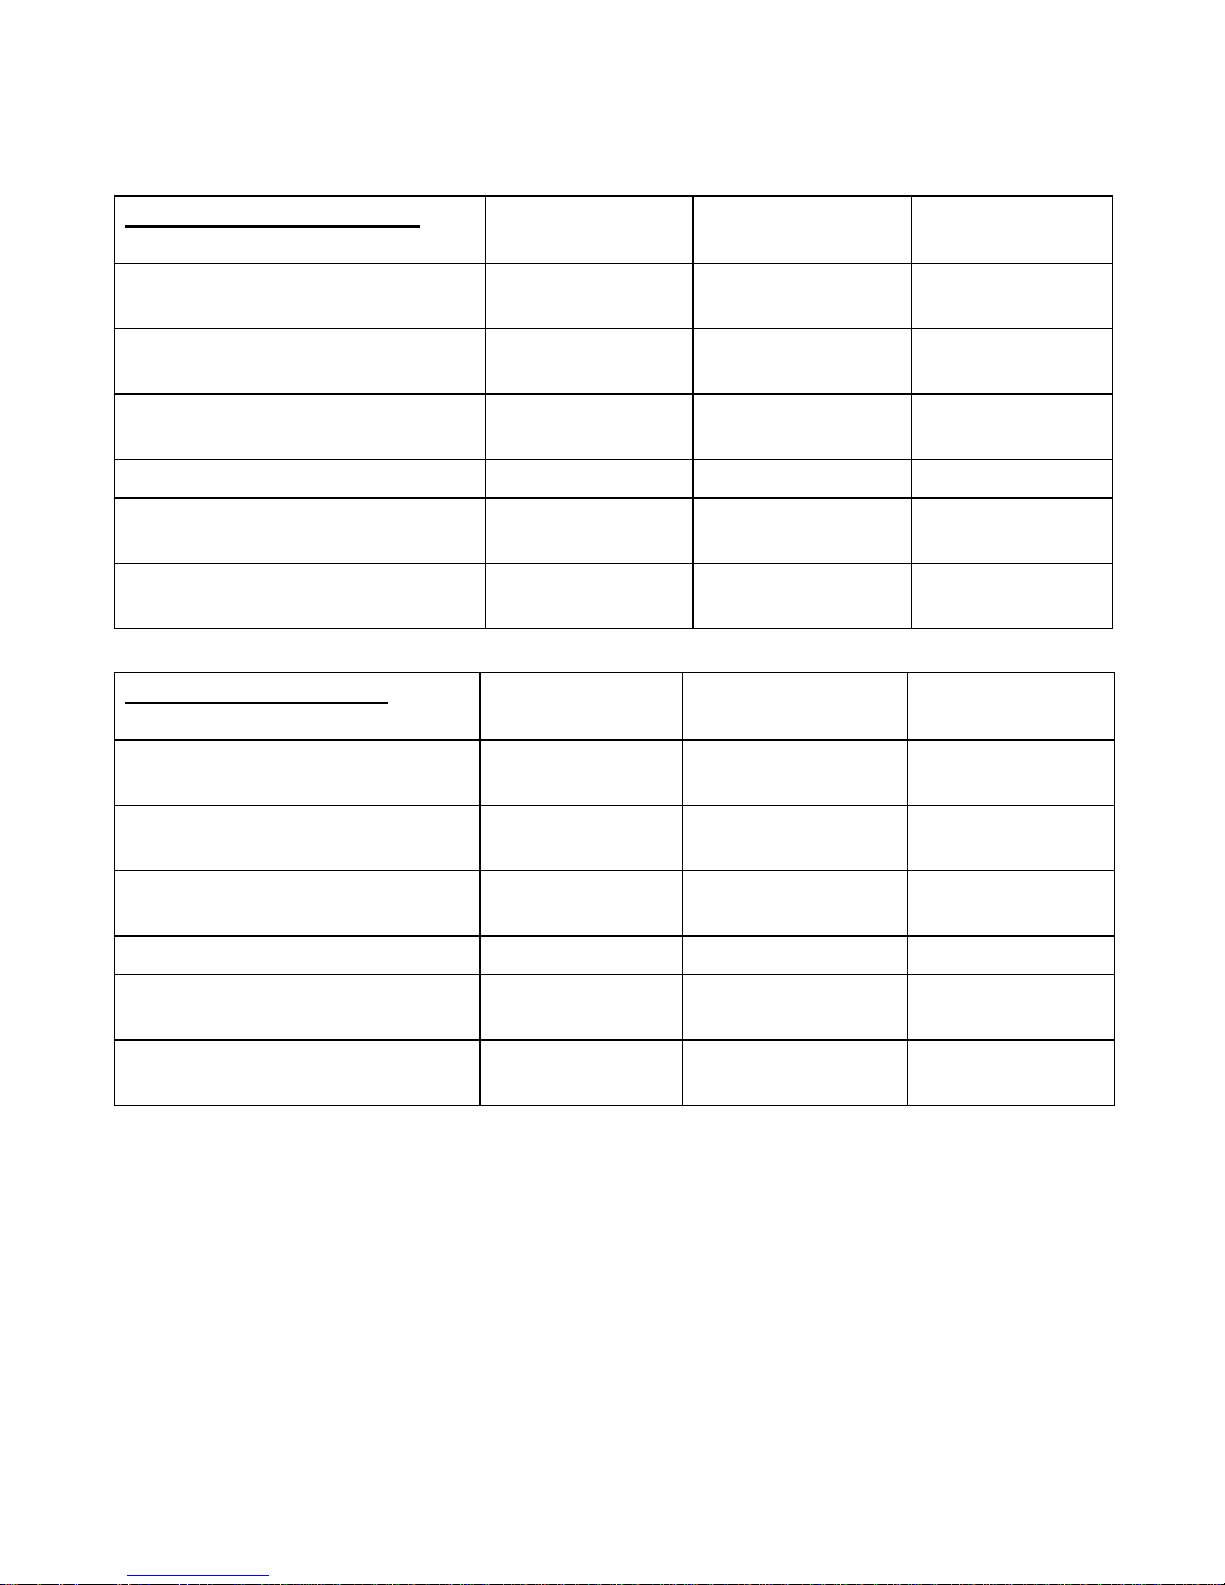
Distance to Inammable Materials
In the table below you can see the minimum distance to the closest combustible and noncombustible walls.
Uninsulated ue gas pipe WIKING Mini 2
with a base
WIKING Mini 2
with short legs
WIKING Mini 2
with long legs
Distance from the
Wood-burning Stove to…
Distance, cm Distance, cm Distance, cm
- non-combustible wall behind
the unit
5 5 5
- non-combustible wall to the
side of the unit
10 10 10
- combustible wall behind the unit 12.5 12.5 12.5
- combustible wall to the side of
the unit
32.5 32.5 32.5
- combustible wall to the sides,
at 45
o
in a corner
7.5 7. 5 7.5
Insulated ue gas pipe WIKING Mini 2
with a base
WIKING Mini 2
with short legs
WIKING Mini 2
with long legs
Distance from the
Wood-burning Stove to…
Distance, cm Distance, cm Distance, cm
- non-combustible wall behind
the unit
5 5 5
- non-combustible wall to the
side of the unit
10 10 10
- combustible wall behind the unit 7. 5 7. 5 7.5
- combustible wall to the side of
the unit
32.5 32.5 32.5
- combustible wall to the sides,
at 45
o
in a corner
5 5 5
Please note that if the rear dimension is less than 10 cm it may be prudent to install the stove
so it can be removed for servicing the Autopilot. Other distances are minimum distances for
safety reasons.
Remember to pay attention to applicable regulations concerning the required distance
between the wall and smoke pipe.
Please be aware that not all glass parts are heat-resistant. For this reason, a glass wall should
sometimes be treated as a ammable wall, in which case we ask that you please contact your
local chimney sweep or glass producer to hear at what distance the stove should be kept from
glass.
Page 11

11
IMPORTANT
Combustible materials may not be placed under the stove.
WIKING Mini with a base and WIKING Mini with short legs must not be mounted on
combustible oors. It is still considered a combustible oor even if an ember catching,
non-combustible oor plate is placed on top of the combustible oor.
A non-combustible structure under WIKING Mini with a base and low legs must extend
at least 400 mm in front of the stove.
For UK
The variant with small legs and the variant with a base must be installed on a BS non combustible/constructional hearth. The non combustible/constructional hearth must extend 300 mm in
front of the appliance.
Floor in front exceed 100°C demand closer than 300 mm in front of the stove with a 20 mm base.
Floor directly beneath the stove with 20 mm base does not exceed 65K or 100°C
Height Requirements
The WIKING Mini has a smoke outlet at the top and at the back. It can be installed with an
approved smoke pipe and a steel chimney, or connected to a brick chimney with a fullform
smoke pipe.
Connection to the Chimney
The chimney must be of a proper height to ensure that the draft is sufcient and that smoke
does not become bothersome. If the chimney is so high that it cannot be cleaned from the
top, an easily accessible cleaning hatch must be installed. We recommend, however, that you
always contact your local chimney sweep before purchasing a chimney.
Make sure that the chimney is tight and that no false draft is caused around neither the cover
plate, in connection with a covered smoke outlet, nor the cleanout door and pipe connections.
Please note that bent and/or horizontal smoke pipes will reduce the effect of the chimney draft.
Requirements for Chimney and Smoke Pipe
Nominal draft: Approximately 12 Pascal/1.2 mm water gauge.
Minimum clearance: Ø125 or Ø150 mm, depending on the threaded hose connection of your
WIKING wood-burning stove. The clearance inside the chimney must at least be of the same
diameter as the threaded hose connection.
Smoke pipe and chimney must always be suitable for a stove connection. Ask your WIKING
dealer for more information.
Page 12

12
Norsk
User Instructions
Before Using the Wood-Burning Stove
It is important that you ensure the following:
• That all of the wood-burning stove’s individual components are in place.
• That the chimney has been approved by your local chimney sweep.
• That fresh air can be supplied to the room in which the wood-burning stove is to be installed.
Some Things Worth Knowing about Fuels
Permitted Fuel Types
The wood-burning stove is only EN-approved for ring with wood. Using dry wood with a maximum water content of 18% is recommended. Firing with wet wood results in soot, environmen-
tal strain and poor fuel efciency. It is recommended to purchase a hygrometer to continuously
check that the rewood has the correct moisture content before using it for ring.
Recommended Wood Types
All types of wood, such as birch, beech, oak, elm, ash, coniferous and fruit trees can be used
as fuel in your wood-burning stove. The big difference is found not in the heat value, but in the
wood’s weight per cubic meter. As beech weighs more per cubic meter of wood than common
spruce (e.g.), more common spruce must be added to provide the same amount of warmth the
beech provides.
Prohibited Fuel Types
Firing with the following is prohibited: Printed matter • Plastic • Rubber • Chipboards • Liquid
fuels • Waste, such as milk cartons and the like • Lacquered, painted or impregnated wood
• Fossil fuels.
The reason why you cannot re with the abovementioned is that, during combustion, unhealthy and environmentally damaging substances are created. These substances can also
damage your wood-burning stove, which will result in the guarantee being voided.
Firing with Coal or Coke
The WIKING Mini is not approved for ring with coal and coke.
Storing Wood
Water content of maximum 18% is achieved by storing the wood for at least one year - preferably two years - outdoors, beneath a shed roof. Wood that is stored indoors tends to become
too dry and burn too quickly; though kindling is best when stored indoors a couple of days
before being used.
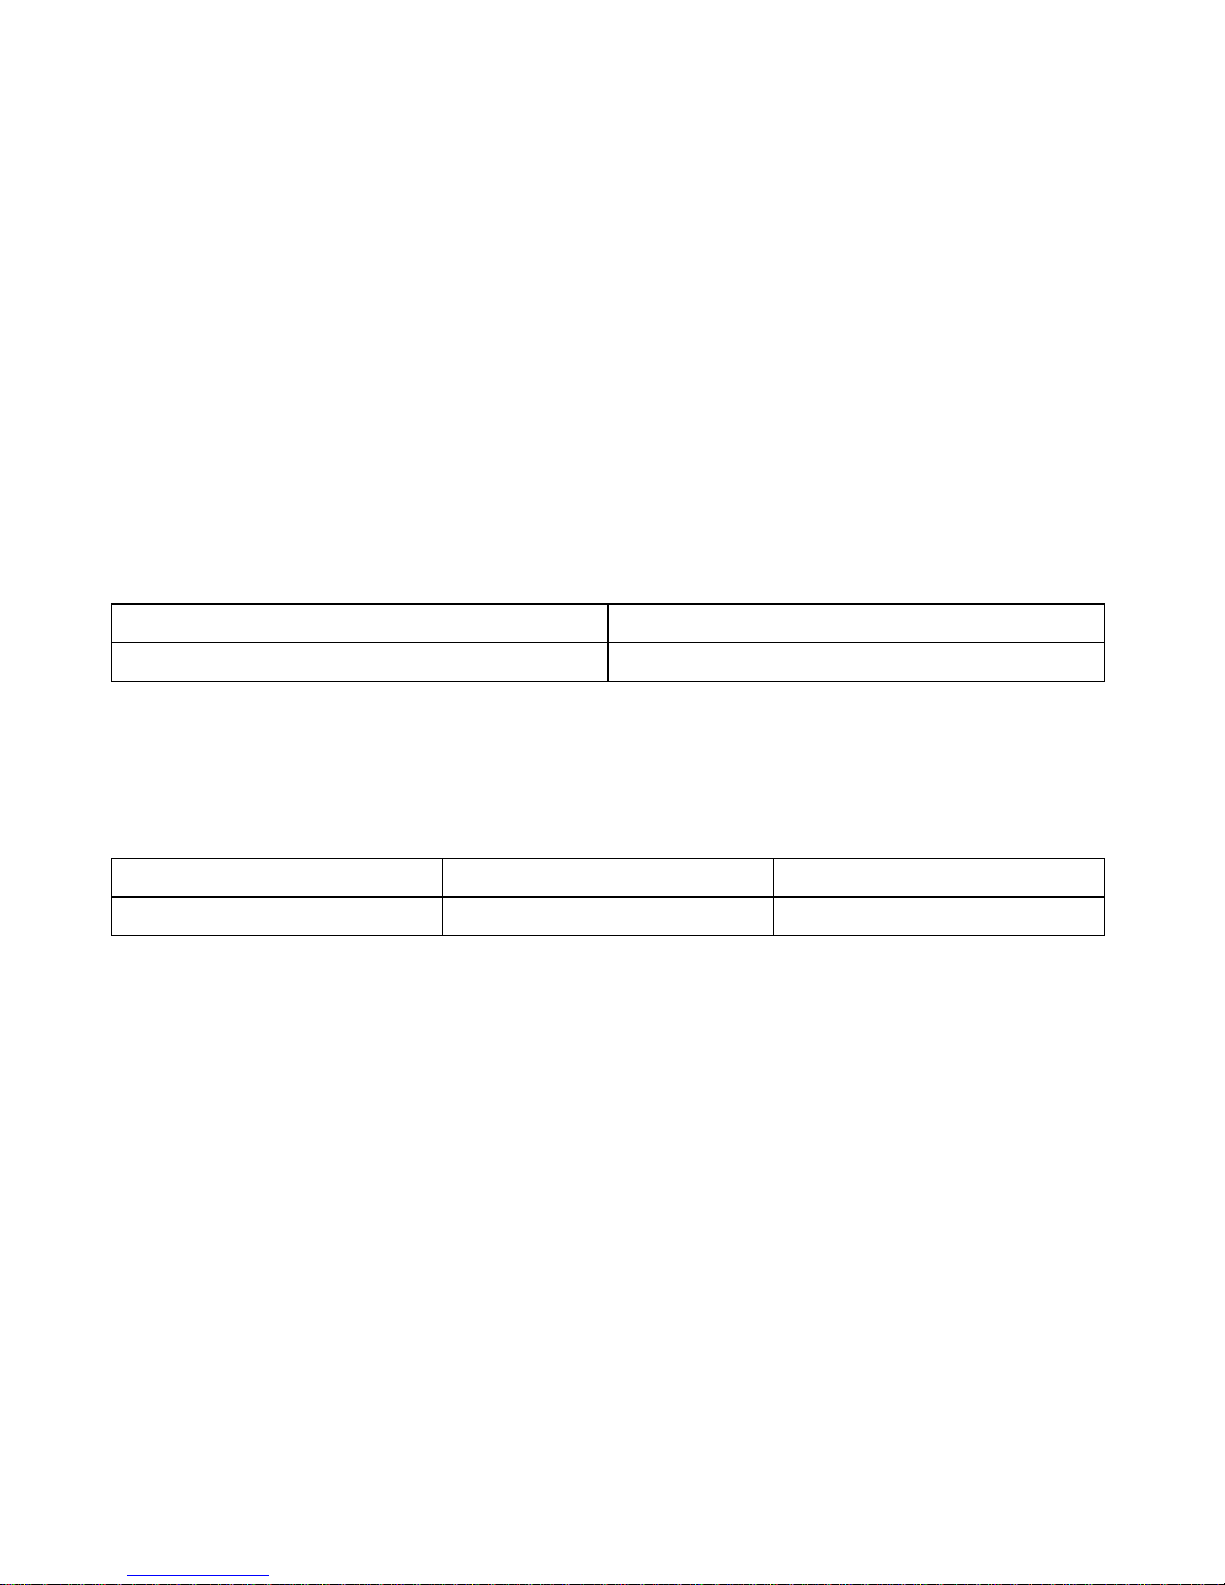
Recommended Dimensions
The fuel’s dimensions are important for good combustion, and should be as follows:
Fuel type Length in cm Diameter in cm
Kindling (nely split rewood) 16-28 2-4
Split rewood 16-28 6-9
Page 13
13
Using the Air Damper
To achieve good combustion, which results in better heating efciency, it is important to add
the right amount of air to the re. Air is regulated with a user-friendly, one-lever system that is
located under the stove door; see Figure B.
When lighting a cold stove and when fuellingwith new wood, the regulating lever must be
pushed to the extreme left to give the re maximum air supply. When the re is burning well,
the air supply can be gradually reduced by moving the regulating lever to the right.
The re will die out if the regulating lever is moved to the extreme right. This setting should
only be used in the case of overheating, if there is a re in the chimney and when the re in the
stove has been allowed to go out completely in connection with cleaning, for instance.
Some Things Worth Knowing about Firing
Maximum Firing Amount
Fuel Maximum amount per hour
Wood 2.4 kg
Warning: Too much heat can destroy your wood-burning stove, the chimney and your replace ducts. Therefore, if you exceed the abovementioned limits, your wood-burning stove,
chimney and replace duct will no longer be covered by the factory guarantee.
Normal Firing Interval for Nominal Firing
Fuel kg Normal ring interval
Wood 1.0 45 min
Please note: The stove is approved for intermittent use.
The EN test is performed with 2 logs, both with a length of 16 cm, cross-section approximately
7.5 x 7.5 cm placed in vermiculite back plate to door orientation. It is burned with the air control
set to max (the control lever pushed all the way to the left). After three minutes, it is regulated
down to 40% (control lever set slightly less than half way to the right).
The Difference between Short and Long Combustion Times
Short combustion time
You achieve a rapid and strong heat if you burn several, smaller pieces of wood.
Prolonged burning
You achieve a long burning time if you burn a few, slightly larger pieces of wood (max. 1 kg per
piece, and always 2 pieces). You can extend the burn time by further closing off the air when
the ames are dying out. When stoking, adjust up for maximum air (control lever is moved fully
to the left). When the wood is burning well, slowly adjust the air down (control lever is moved to
the right). You should not regulate below the point where there are continuously large, visible
ames from the wood. When the wood has burned about 20 minutes and the ames are not as
active, the air intake can be adjusted further down.
Page 14

14
Achieving the Best Possible Combustion
Use Dry, Clean Wood
Wet wood results in poor combustion, excess smoke and soot. In addition, more warmth will
be used to dry the wood instead of heating the room.
Fire a Bit at a Time
You achieve the best possible combustion by ring often and a bit at a time. If you add too
much rewood at once, too much time will pass before the temperature becomes high enough
for you to achieve good combustion.
Make Sure there is the right Amount of Air in the Combustion Chamber
You should also make sure that there is an ample amount of air - especially in the beginning
- so that the temperature inside the wood-burning stove quickly rises. Gases and particles
released during burning are then more easily burned off. Otherwise, they gather as soot in
the chimney (which increases the risk of chimney re) or are emitted unburned into the atmosphere. The wrong amount of air supply creates inefcient combustion and a modest effect.
Don’t Savour the Fire during Night Time
We advise against adding re wood to your stove and reducing the air supply at night in an attempt to still have some embers left in the morning. If you do so, large amounts of hazardous
smoke will be emitted, and your chimney will be exposed to unnecessarily large amounts of
soot with the risk of a chimney re.
Lighting and Firing your WIKING Wood-Burning Stove
The First Firing
The rst time you re your wood-burning stove, you must do so carefully, as all materials
need to adjust to the heat. This means that the stove must be heated slowly, until it reaches
its maximum heat level. Afterwards, you should re a few times so that the stove is thoroughly
heated throughout.
Be Careful of the Lacquer
The lacquer used to treat the wood-burning stove will harden the rst 2-3 times the stove is
red, and this can create unpleasant smoke and odours. Ensure therefore that the room is well
ventilated. The door must also be carefully opened; otherwise there is a risk that the seals will
stick to the lacquer.
Warning: The accompanying glove may wear the surface paint off. Be careful not to touch the
varnished surfaces and the handle the rst two to three times you light the re. Even after the
paint has hardened, repeated use of the glove may wear the surface paint off.
Lighting
A successful combustion process requires that the wood is lit in the right way. A cold stove
and a cold chimney challenge the combustion process. It is important to achieve a high ue
gas temperature quickly.
1. Moving the regulating lever to the extreme left fully opens the air supply to the combustion
chamber.
Page 15

15
2. Place 2 pieces of rewood (4-7 cm in diameter) horizontally at the bottom of the rebox burn
chamber (corresponding to a total of 0.75 to 1 kg). Place 6-10 pieces (a total of about 1 kg)
kindling crisscross on top.
3. Place four relighters between the top layer of kindling. WIKING recommends using highquality relighters, as they do not produce smoke or odours.
4. Light up the re-lighters and close the stove door.
5. When the re has taken hold of the wood, move the regulating lever little by little to the right,
to achieve a smooth and steady combustion.
Warning: The door may only be kept open when lighting, adding rewood or cleaning the
wood-burning stove; otherwise combustion becomes too powerful, which in turn increases the
risk of the stove becoming overheated.
Firing (Adding Firewood)
When there are no more visible ames and there is a nice but not too thick layer of embers,
you can stoke it again.
1. Carefully open the door to prevent smoke and embers from escaping.
2. Make sure that there is an opening in the ember layer down to the grate (preferably in the
middle of the grate), so that air from the grate can easily pass through the embers
to the wood.
3. Add 2-3 pieces of chopped rewood (about 1-2 kg) on the embers. The rewood should
not be stacked higher than the holes in the vermiculite back plate. If the rewood is
stacked up past the holes, the air from the holes in the back plate will act as the “initiator”,
which is not the purpose of the air.
4. Shut the door again and fully open the air supply by moving the regulating lever to the
extreme left.
5. When the wood has caught re properly, the air supply can be gradually reduced by moving
the regulating lever to the right until uniform, steady combustion is achieved. The further to
the right the regulating lever is moved, the less heat the stove will give off. But it is important
not to regulate the air supply below a level at which there are still visible ames and steady
combustion.
Warning: During combustion, the stove’s surfaces and door become extremely hot - exercise
great caution.
Some Things Worth Knowing about the Smoke Pipe
Description of the Smoke Pipe’s Function
The smoke pipe is the duct located between your wood-burning stove and chimney. Your WIKING wood-burning stove is tted with a threaded hose connection with a diameter of 125mm or
150mm. If your stove is to be connected to a brick chimney, it is best to mount a curved smoke
pipe to the stove’s top outlet. This solution - in which the smoke pipe extends a half meter over
the stove before connecting to the chimney - provides your home with 1 kW of extra warmth.
The curved shape ensures minimum soot build-up in the pipe and thereby lessens the risk
of chimney res. We only recommend this solution provided that your brick chimney is completely sealed and has a sufcient draft. You can read more on the chimney in the next section.
Page 16

16
Some Things Worth Knowing about the Chimney
Description of the Chimney’s Function
The chimney serves as the wood-burning stove’s ‘motor’, and it is crucial to the stove’s proper
functioning. The chimney draft creates a vacuum inside the wood-burning stove. This vacuum
serves two purposes:
1. To remove smoke from inside the wood-burning stove.
2. To suck air in through the air damper during lighting and combustion, and to keep the
glass pane free of soot.
How to Create the Best Possible Chimney Draft
Even a quality chimney can function poorly if used improperly. It is crucial that both your woodburning stove and the chimney are installed in accordance with the directions; otherwise it will
not be possible to attain satisfactory combustion.
Chimney draft is created by the difference in temperature between the inside and outside of
the chimney. The higher the temperature inside the chimney, the better the chimney draft. This
means that it is very important for the chimney to be heated thoroughly before you reduce the
air supply to limit combustion in the stove, cf. the section on lighting and fuelling your WIKING
stove. Please be aware that it takes longer to heat a brick chimney than a steel chimney.
On days when weather and wind conditions create a poor draft in the chimney, it is especially
important to heat up the chimney as quickly as possible. When lighting, use extra-nely split
rewood and an extra relighter, as ames quickly heat up the stove.
After a Longer Period of Disuse
If you have not used your wood-burning stove in a while (e.g. for an entire summer season),
it is important to check for blockage in the chimney duct. Contact your local chimney sweep.
Connecting Several Heating Sources to the Same Chimney
It is possible to connect several units to some chimneys. All applicable regulations must rst
be consulted, in your building code and with your local chimney sweep.
Chimney Fire
In the event of a chimney re:
• Close all dampers in the chimney and push the regulating handle on the stove to the ex-
treme right. Contact the re brigade.
Before using the wood-burning stove again, your local chimney sweep must rst inspect the
chimney.
Page 17

17
Cleaning and Maintaining your Wood-Burning Stove
Warning: Cleaning and maintenance of your wood-burning stove may only be performed
when it is cool.
External Cleaning
The outside of your stove can be dusted as needed with a soft cloth or dust brush. Do not use
water, spirit or any other kind of cleaner, as this will damage the lacquer.
Cleaning the Glass Door
Your WIKING wood-burning stove is equipped with a pane-ush system, which reduces the
build-up of soot on the glass. If soot somehow accumulates on the pane, it can be cleaned by
wiping the glass with a moist paper towel dipped in ash. Afterwards, dry with a clean paper
towel. When cleaning, we recommend that you use vertical strokes. You should also ensure
that air gaps in the door frame are free of ash and soot particles. Also ensure that the seals on
the stove are soft and fully intact; if they are not, ’false’ air can enter the stove, which makes it
more difcult to control combustion and can in turn cause overheating or soot accumulation.
Faulty or worn seals should therefore be replaced and can be purchased at your local woodburning stove dealer.
Emptying the Ash Pan
Important: Be aware that embers in the ash can remain hot for up to 24 hours after the re in
the stove has gone out!
The ash pan is most easily emptied by pulling a waste bag over the pan, turning the pan upside
down, and then carefully pulling it up and out of the bag again.
Cleaning the Combustion Chamber
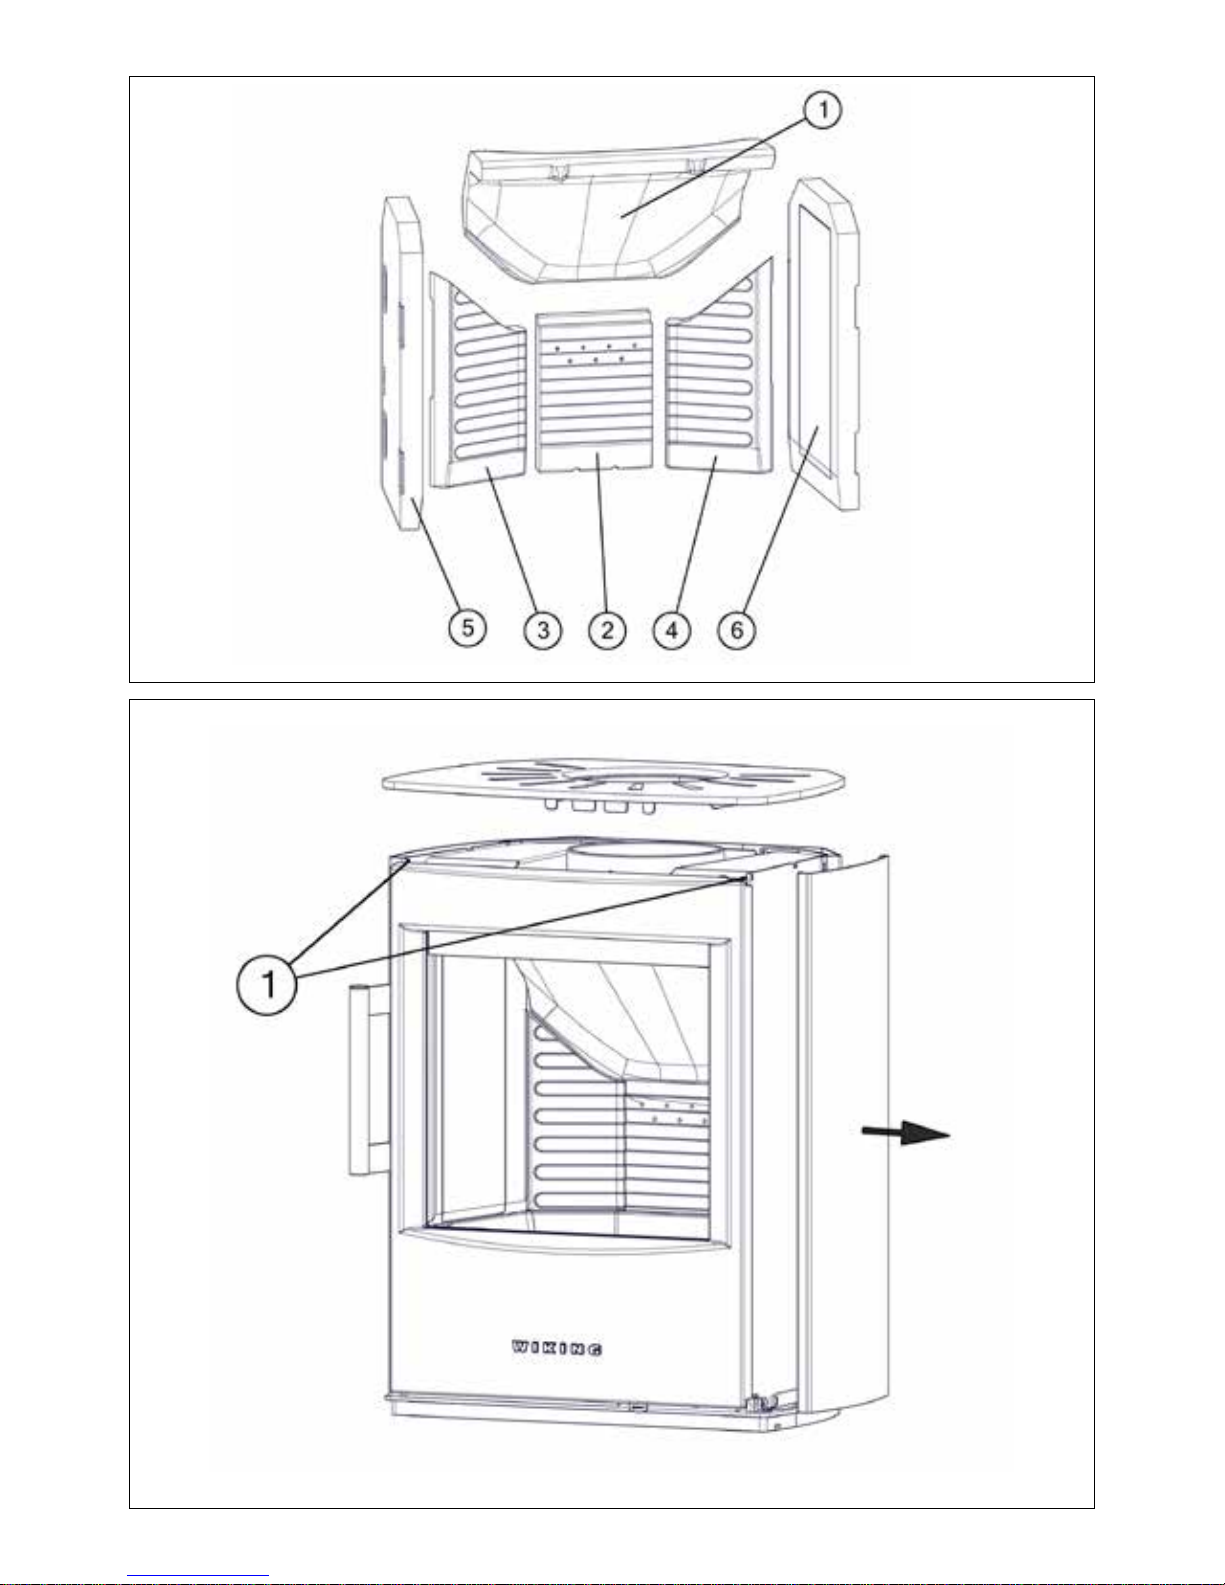
In order to extend the service lifetime of the wood-burning stove, it should be thoroughly serviced once a year. First remove ash and soot from the combustion chamber. In Figure C you
can see which plates are found inside the combustion chamber. Carefully remove the vermiculite plates, one after the other, in the following sequence:
1. Smoke deector (top plate)
2. Rear plate
3. Left corner plate
4. Right corner plate
5. Left side plate
6. Right side plate
After cleaning, the vermiculite plates are carefully reinserted in reverse order, starting with the
right side plate.
Over time, the combustion chamber’s effective yet porous insulation can become worn and
damaged. A crack in the back plate can cause secondary air to become incorrectly distributed
in the combustion chamber, and it should therefore be replaced. Cracks in the other plates will
not affect the efciency of the wood-burning stove. They should, however, be replaced when
worn down to half of their original thickness.
Page 18

18
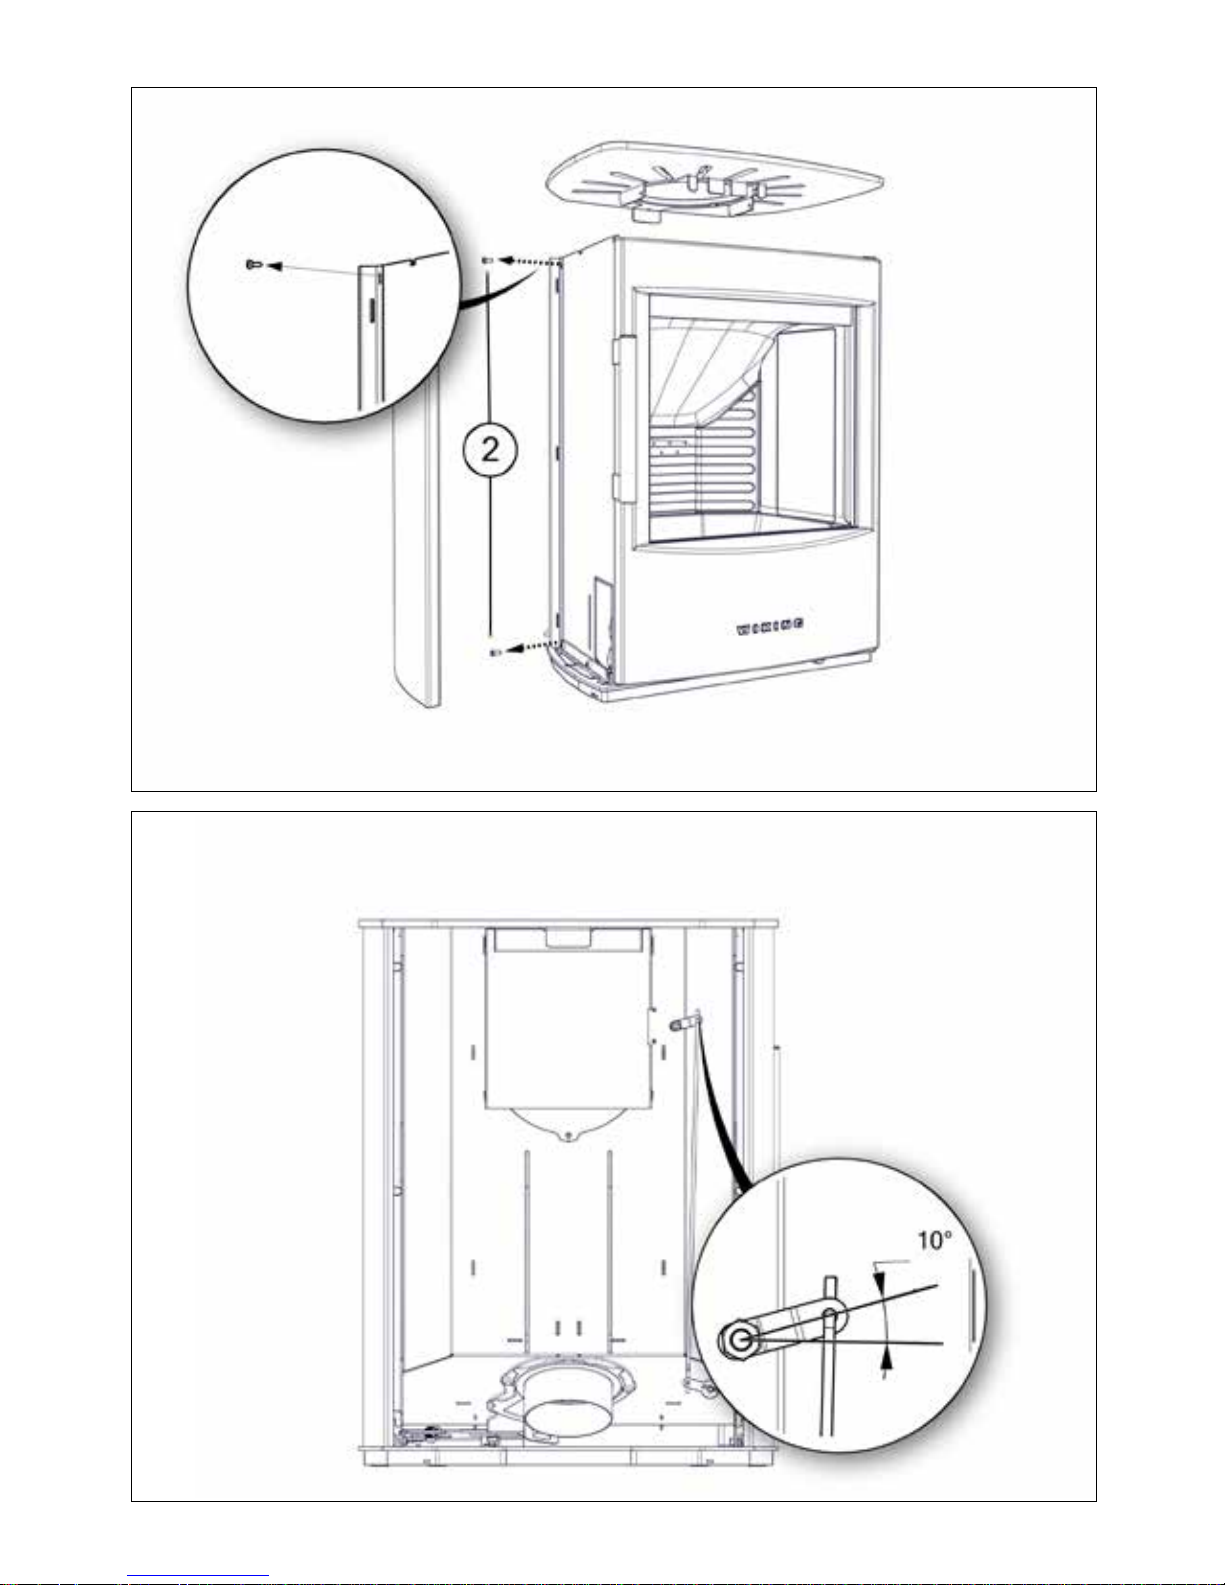
Automatics (Drawing D1-D3)
The spring in the automatism should be controlled at least once every second year. Lift the top
plate off the stove. Remove the two screws (1) in the top of both side plates. Remove both side
plates. Remove the rear plate of the stove (2). On a cold stove, the starting point of the feeler is
controlled. The starting point on a cold stove is about 10
0
above horizontal. It should feel easy
going and bouncy when you push it, no matter if the stove is cold or hot. Mount the rear plate,
the side plates and the top plate again.
Surface Treatment
It is normally not necessary to treat the wood-burning stove’s surfaces. If the lacquer has been
damaged, you can repair it by using a special senotherm spray, which can be purchased from
your local wood-burning stove dealer.
Chimney Sweeping
In order to prevent against the risk of chimney res, the chimney must be cleaned once a year.
The smoke pipe and smoke chamber above the steel smoke deector must be cleaned at the
same time as the chimney. If the chimney’s height makes cleaning from above impossible, a
cleaning hatch must be installed.
Service Inspection
WIKING recommends a thorough service inspection every other year, so that your wood-
burning stove will last for many years. The service inspection must be performed by a qualied
serviceman, and only original spare parts should be used.
Among other things, a service inspection includes:
• A thorough cleaning of the stove.
• Greasing of the hinges with copper grease.
• Inspection of the heat-insulating plates (the vermiculite set).
• Check that the regulating lever moves smoothly.
• Inspection of the seals and the replacement of worn parts.
If you have any questions, please consult our FAQ page at www.wiking.com, or contact your
local wood-burning stove dealer.
Declaration of Performance
The DoP can be downloaded from our website via the following links:
WIKING Mini 2 www.wiking.com/dop/mini2
Page 19

19
Problem Possible Cause Try the Following
I cannot make a
sufcient re in
the stove.
Incorrect lighting. Further information: See the section on
lighting and ring the stove.
Poor chimney draft. Ensure that the smoke pipe or chimney is not
blocked. Ensure that the chimney height is
correct in relation to its surroundings.
The glass pane
is covered in
soot.
The wood is too
moist.
Only re with rewood that has dried for at
least 12 months beneath a covered shed and
with a maximum water content of 18%.
A seal in the door is
loose.
The seals should be soft and exible. If they
are not, replace them. New seals can be
purchased from your local wood-burning stove
dealer.
Insufcient supply of
secondary air to the
pane-ushing system.
Move the regulating handle further to the left.
The temperature inside
the stove is too low.
Put more wood in the stove and move the
regulating lever further to the left.
Smoke enters
the room when I
open the door.
The damper in the
chimney is closed..
Open the damper.
Poor chimney draft. Ensure that the smoke pipe or chimney is not
blocked. Ensure that the chimney height is
correct in relation to its surroundings.
The rewood is in
ames.
Never open the door if the rewood is in
ames.
The re-proof
materials in the
combustion
chamber are
blackened after
ring.
You have not red
enough, i.e., there
is not enough air or
rewood.
Move the regulating handle further to the left.
Moreover, igniting a larger quantity of wood
might be needed.
Combustion is
uncontrollable.
A seal in the door or
ash drawer is loose.
The seals should be soft and exible. If they
are not, replace them. New seals can be
purchased from your local wood-burning stove
dealer.
Excess chimney draft. Close the damper in the chimney a bit at a time
until the problem is solved. At the same time,
move the regulating lever further to the right.
The door is not completely sealed.
Close the door completely. If it cannot close
completely, it must be replaced with an original
spare part.
Trouble Shooting
If you experience that your wood-burning stove is not functioning optimally, consult this table to
nd some usual problems that may arise and how to solve them. If you cannot solve them and/
or other problems occur, pleas contact your maintenance man or wood-burning stove dealer.
Page 20

20
Guarantee and Claim Conditions
- Five Years’ Extended Right to Invoke Lack of Conformity
Congratulations on the purchase of your new WIKING wood-burning stove.
All of our products are of high-quality craftsmanship, manufactured in rst-class materials
and subject to a thorough quality control process. That is why we are convinced that you have
purchased a product that will function problem-free for many years to come. Should a problem
arise, however, you are naturally guaranteed the best possible service available.
In addition to the rights you have in accordance with the ordinary rules of the Sale of Goods Act,
HWAM A/S provides an extended, ve-year right to submit claims from the date of purchase.
You must save your original receipt with purchase date as proof of the date of purchase.
Extent
The extended complaint entitlement covers the basic construction of the stove such as panel
components, welding, etc., and includes components which must be replaced or repaired in
accordance with HWAM’s evaluation. Wear parts are not covered by the guarantee.
The complaint entitlement is given to the rst buyer of the product and cannot be transferred
(except in connection with resale).
The complaint entitlement is only valid in the country to which the product was originally delivered.
Shipping and handling expenses incurred when sending the stove or individual parts for replacement or repair will not be covered by HWAM A/S.
Limitations/loss of Guarantee
Certain things are not covered by the guarantee, and the right to invoke lack conformity may
lapse if the stove is not maintained and operated in accordance with the instructions. Among
other things, this applies to the following:
• Faults or damage arising through:
· Incorrect tting, installation or connection of the stove.
· Incorrect operation, incorrect use or misuse of the stove.
· Fire, accidents or similar situations.
· Repairs carried out by others than HWAM A/S or authorised distributors.
· The use of spare parts not manufactured by HWAM A/S.
· Lacking or inadequate service and maintenance.
· Changes made in the product or its accessories in relation to the original state
and construction of the stove.
• Construction modications made to the wood-burning stove.
• If the serial number of the stove has been damaged or removed.
• Deterioration of wearing parts and moving parts.
• Corrosion.
• Transport costs.
• Transport damage.
• Costs in connection with any dismantling and reassembling the stove.
• Extra costs of any kind and any consequential damage that may occur.
Page 21

21
Surface treatment
If surface treatment is lacking on the factory’s behalf, this should become apparent after the
rst few rings. In other respects, no claims will be accepted related to the lacquer.
Wear parts
A number of parts of your wood-burning stove are designated as wear parts and are therefore
not covered by the right to invoke a lack of conformity. Wear parts include:
• Heat insulating material. Either reproof stone or special panels made of vermiculite.
• Smoke deection plates.
• Glass.
• Tiles, soapstone and natural stone.
• Cast iron parts at the base, such as the grate.
• Gaskets.
• All moving parts.
Damage to wearing parts will only be covered by the guarantee if the buyer can show that the
damage was present when the stove was delivered.
Service and Maintenance
We recommend that you maintain the wood-burning stove and comply with the recommended
inspections called for in the user instruction manual. This will help to ensure that the product
functions problem-free.
Claims
All claims must be directed to the dealer from whom the wood-burning stove was purchased.
HWAM A/S does not accept claims directly from the end-user. Always provide the serial num-
ber of your stove – you will nd it on the type sign on the back of the stove.
Unwarranted Claims/Service Calls
Before registering a claim, you should inspect your WIKING wood-burning stove for possible
faults that you yourself can rectify; consult the enclosed user instruction manual as needed.
Should your claim and repair demand prove to be unwarranted, you will be invoiced for the
related costs.
Page 22

22
Page 23

23
Page 24
24
made by
HWAM A/S
DK-8362 HØRNING
www.wiking.com
Serial no.
Warranty service
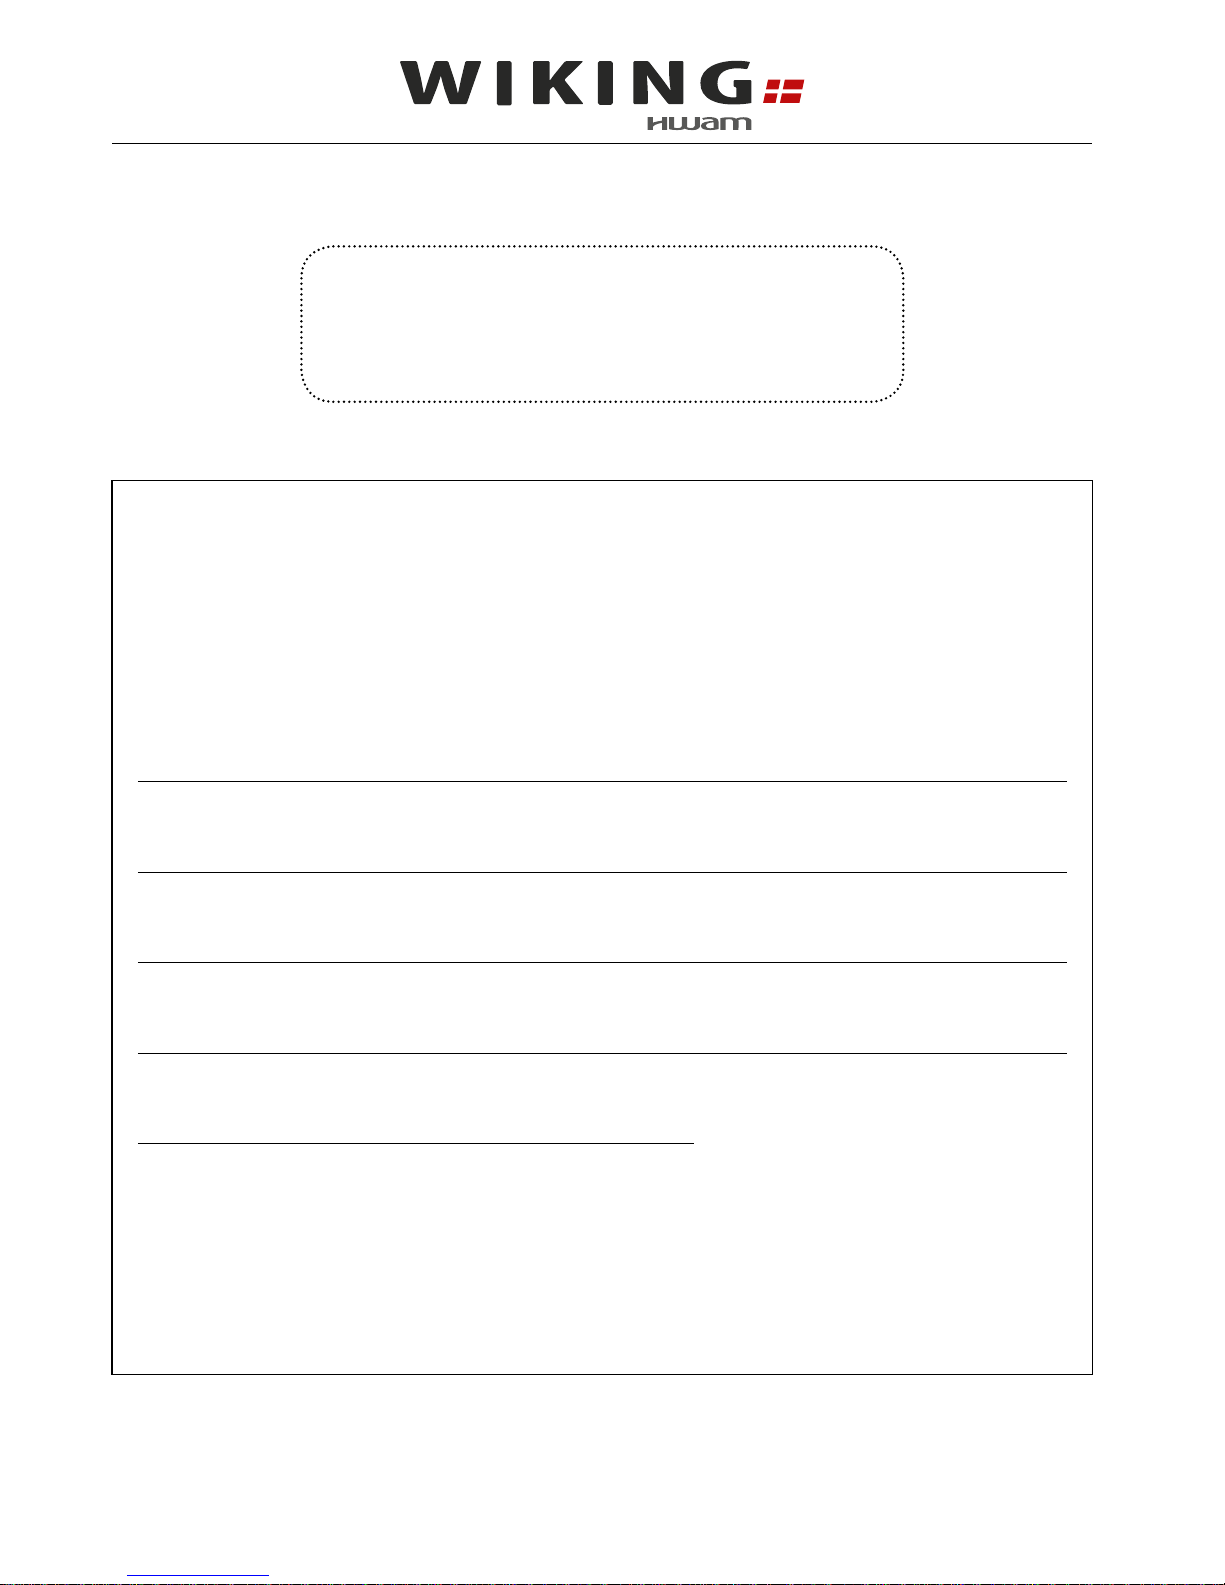
It is important that you record your dealers name, address and telephone number on
this section, as he is responsible for any ajustment which may be required during the
warranty period.
Model type
Date of purchase
Dealer
Adress
Tel.
 Loading...