

Page 1

Operating instructions
Betriebsanleitung
Process transmitter for hazardous areas
Model UPT-20, UPT-21
Prozesstransmitter für explosionsgefährdete Bereiche
Typ UPT-20, UPT-21
EN
DE
Process transmitter, model UPT-20
Page 2

EN
Operating instructions model UPT-2x Page 3 - 70
DE
Betriebsanleitung Typ UPT-2x Seite 71 - 137
© 2015 WIKA Alexander Wiegand SE & Co. KG
All rights reserved. / Alle Rechte vorbehalten.
®
WIKA
is a registered trademark in various countries.
®
WIKA
ist eine geschützte Marke in verschiedenen Ländern.
Prior to starting any work, read the operating instructions!
Keep for later use!
Vor Beginn aller Arbeiten Betriebsanleitung lesen!
Zum späteren Gebrauch aufbewahren!
2
WIKA operating instructions process transmitter, model UPT-2x
14111166.02 04/2015 EN/DE
Page 3

Contents
Contents
1. General information ...............................................6
2. Design and function ...............................................7
2.1 Design .................................................................7
2.2 Description..............................................................7
2.3 Scope of delivery.........................................................8
3. Safety ...........................................................9
3.1 Explanation of symbols....................................................9
3.2 Intended use ............................................................9
3.2.1 Special conditions for safe use......................................10
3.3 Personnel qualification ...................................................10
3.4 Risks in hazardous areas .................................................11
3.5 Handling of hazardous media..............................................11
3.6 Labelling, safety marks...................................................11
4. Transport, packaging and storage ..................................13
5. Commissioning, operation ........................................14
5.1 Mechanical mounting ....................................................14
5.1.1 Requirements for mounting point ....................................14
5.1.2 Mounting the process transmitter....................................15
5.2 Electrical installation .....................................................17
5.2.1 Safety instructions ................................................17
5.2.2 Requirements for connection cable ..................................17
5.2.3 Requirements regarding intrinsic voltage supply........................18
5.2.4 Opening the case.................................................18
5.2.5 Shielding and grounding ...........................................18
5.2.6 Connection......................................................19
5.2.7 Pin assignments..................................................20
EN
6. Display and operating unit, model DI-PT-U ...........................21
6.1 Design and description...................................................21
6.2 Accessing/exiting the operating menu.......................................21
6.3 Installation/Removal .....................................................22
6.4 Setting the main display ..................................................23
6.5 Setting the additional display ..............................................24
7. Configuration without display and operating unit .....................25
7.1 Performing a mounting correction (offset)....................................25
7.2 Configuring over HART® interface..........................................26
14111166.02 04/2015 EN/DE
WIKA operating instructions process transmitter, model UPT-2x
3
Page 4

EN
Contents
8. Configuration via display and operating unit .........................27
8.1 Configuring the measuring task . . . . . . . . . . . . . . . . . . . . . . . . . . . . . . . . . . . . . . . . . . . . 27
8.1.1 Configuring pressure measurement..................................27
8.1.2 Configuring level measurement .....................................28
8.1.3 Configuring the volume measurement ................................29
8.1.4 Characteristic curves..............................................32
8.2 Setting the units.........................................................34
8.2.1 Setting the pressure unit . . . . . . . . . . . . . . . . . . . . . . . . . . . . . . . . . . . . . . . . . . . 34
8.2.2 Set length unit (for level measurement) ...............................34
8.2.3 Setting the volume unit ............................................35
8.2.4 Setting the density unit and density value .............................36
8.2.5 To set the temperature unit .........................................36
8.3 Scaling the measuring range ..............................................37
8.3.1 Performing a wet adjustment .......................................37
8.3.2 Performing a dry adjustment........................................38
8.4 Setting the mode ........................................................39
8.5 Mounting correction (offset) . . . . . . . . . . . . . . . . . . . . . . . . . . . . . . . . . . . . . . . . . . . . . . . 40
8.5.1 Performing a wet adjustment .......................................40
8.5.2 Performing a dry adjustment........................................40
8.6 Setting the damping .....................................................41
8.7 Write protection .........................................................42
8.7.1 Activating/deactivating the write protection ............................42
8.7.2 Change PIN .....................................................42
9. Diagnostic functions .............................................43
9.1 Simulations ............................................................43
9.1.1 Performing a pressure simulation....................................43
9.1.2 Performing a current simulation .....................................43
9.2 Display/reset drag pointer.................................................44
9.2.1 Drag pointer P
9.2.2 Drag pointer PV
9.2.3 Drag pointer T
min
min
/ P
............................................44
max
/ PV
min
/ T
.........................................45
max
............................................45
max
9.3 Display/reset operating time...............................................45
10. Detailed settings.................................................46
10.1 Setting the language .....................................................46
10.2 Marking the measuring point (TAG) .........................................46
10.2.1 Setting the TAG short..............................................46
10.2.2 Setting the TAG long ..............................................46
10.3 Setting the alarm signal ..................................................47
10.4 Setting the signal limits ...................................................47
10.5 Setting the contrast of the LC display .......................................48
10.6 Restoring factory setting..................................................48
4
WIKA operating instructions process transmitter, model UPT-2x
14111166.02 04/2015 EN/DE
Page 5

Contents
10.7 Setting the HART® communication .........................................49
10.7.1 Setting the short address (multidrop mode) ...........................49
10.7.2 Activate/deactivate constant current .................................49
11. Instrument information ...........................................50
11.1 Display measuring range .................................................50
11.2 Display settings .........................................................50
11.3 Display date of manufacture...............................................50
11.4 Display firmware version..................................................50
11.5 Display serial number ....................................................51
12. Maintenance and cleaning.........................................51
12.1 Maintenance ...........................................................51
12.2 Cleaning...............................................................51
12.3 Recalibration ...........................................................51
13. Faults ..........................................................52
14. Dismounting, return and disposal ..................................53
15. Specifications ...................................................55
16. Accessories.....................................................62
Appendix 1: EC Declaration of conformity model UPT-2x ..................63
EN
Appendix 2: Menu tree, basic setting...................................64
Appendix 3: Menu tree, display........................................66
Appendix 4: Menu tree, diagnositic ....................................68
Appendix 5: Menu tree, detail setup....................................69
Appendix 6: Menu tree, info...........................................70
Declarations of conformity can be found online at www.wika.com
14111166.02 04/2015 EN/DE
WIKA operating instructions process transmitter, model UPT-2x
5
Page 6

EN
1. General information
1. General information
■
The process transmitter described in the operating instructions has been designed
and manufactured using state-of-the-art technology. All components are subject
to stringent quality and environmental criteria during production. Our management
systems are certied to ISO 9001 and ISO 14001.
■
These operating instructions contain important information on handling the instrument. Working safely requires that all safety instructions and work instructions are
observed.
■
Observe the relevant local accident prevention regulations and general safety regulations for the instrument's range of use.
■
The operating instructions are part of the product and must be kept in the immediate
vicinity of the instrument and readily accessible to skilled personnel at any time.
■
Skilled personnel must have carefully read and understood the operating instructions
prior to beginning any work.
■
The manufacturer's liability is void in the case of any damage caused by using the
product contrary to its intended use, non-compliance with these operating instructions, assignment of insuciently qualied skilled personnel or unauthorised modications to the instrument.
■
The general terms and conditions contained in the sales documentation shall apply.
■
Subject to technical modications.
■
Further information:
- Internet address: www.wika.de / www.wika.com
- Relevant data sheet: PE 86.05
- Application consultant:
Tel.: +49 9372 132-0
Fax: +49 9372 132-406
info@wika.com
6
WIKA operating instructions process transmitter, model UPT-2x
14111166.02 04/2015 EN/DE
Page 7

2. Design and function
2. Design and function
2.1 Design
EN
Process connection, thread
Process connection, spanner ats
Sensor housing
Ex-relevant data
Case head
2.2 Description
The process transmitter processes the prevailing pressure and converts it into a current
signal. This current signal can be used for the evaluation, control and monitoring of the
process.
Push-on cap
Product label
Ground screw, outside
Electrical connection, cable gland
Second bore for cable gland (delivered sealed
with blind plug)
®
HART
(option)
The instrument version with HART
Measuring range scaling (turndown)
The start and end of the measuring range can be set within dened ranges.
14111166.02 04/2015 EN/DE
WIKA operating instructions process transmitter, model UPT-2x
®
can communicate with a controller (master).
7
Page 8

2. Design and function
Display and operating unit (accessory)
The display and operating unit model DI-PT-U has a main and an additional display.
The main display and the additional display are able to be set in almost any way. In the
factory setting, the main display shows the pressure value of the output signal.
EN
The process transmitter can be congured via the display and operating unit.
Adaptable to mounting position
The process transmitter is tted with a case head which can be turned through 330°.
The display and operating unit can be attached in 90° steps. Thus the measured value
can be read irrespective of the mounting position.
Rotatable case head
330°
Displaceable display and operating unit
2.3 Scope of delivery
■
Pre-assembled process transmitter
■
Ordered accessories
■
Operating instructions
■
Measured value protocol
Cross-check scope of delivery with delivery note.
8
WIKA operating instructions process transmitter, model UPT-2x
14111166.02 04/2015 EN/DE
Page 9

3. Safety
3. Safety
3.1 Explanation of symbols
DANGER!
... indicates a potentially dangerous situation in the hazardous area that can
result in serious injury or death, if not avoided.
WARNING!
... indicates a potentially dangerous situation that can result in serious injury
or death, if not avoided.
CAUTION!
... indicates a potentially dangerous situation that can result in light injuries
or damage to equipment or the environment, if not avoided.
Information
... points out useful tips, recommendations and information for ecient and
trouble-free operation.
3.2 Intended use
The intrinsically safe process transmitter measures gauge pressure, absolute pressure
and vacuum. The physical quantity pressure is converted into an electrical signal.
EN
Only use the intrinsically safe process transmitter in applications that lie within its technical performance limits (e.g. max. ambient temperature, material compatibility, ignition
protection type, ...). Instruments with a ush process connection must not be used with
media which might damage the diaphragm of the process connection.
→ Performance limits see chapter 15 “Specications”.
ATEX and IECEx approval
Process transmitter approved for use in hazardous areas, type tested in accordance
with the following standards:
IEC 60079-0:2011 + Corr.1:2012 + Corr.2:2013 / EN 60079-0:2012 + A11:2013
IEC 60079-11:2011 + Corr.1:2012 / EN 60079-11:2012
IEC 60079-26:2006 + Corr.1:2009 / EN 60079-26:2007 + Corr.1:2009
Approval ratings ATEX and IECEx
■
Gases and mist Mounting to zone 0 (EPL Ga/Gb)
Installation in zone 1 (EPL Gb) and zone 2 (EPL Gc)
■
Dusts
14111166.02 04/2015 EN/DE
WIKA operating instructions process transmitter, model UPT-2x
Mounting to zone 20 (EPL Da/Db); installation in zone 21 (EPL Db)
9
Page 10

3. Safety
The instrument has been designed and built solely for the intended use described here,
and may only be used accordingly.
The manufacturer shall not be liable for claims of any type based on operation contrary
to the intended use.
EN
3.2.1 Special conditions for safe use
For the case “mounting to zone 0 (EPL Ga/Gb)”
The instrument's internal separation (diaphragm) from the wetted area has a wall thickness of < 0.2 mm in order to ensure proper functioning. In operation, it must be ensured
that any impairment of the separation, e.g. by aggressive media or through mechanical
damage, is eliminated.
3.3 Personnel qualication
WARNING!
Risk of injury should qualication be insucient!
Improper handling can result in considerable injury and damage to equipment.
▶
The activities described in these operating instructions may only be
carried out by skilled personnel who have the qualifications described
below.
Skilled personnel
Skilled personnel are understood to be personnel who, based on their technical training,
knowledge of measurement and control technology and on their experience and knowl-
edge of country-specic regulations, current standards and directives, are capable of
carrying out the work described and independently recognising potential hazards.
Special operating conditions require further appropriate knowledge, e.g. of aggressive
media, compatibility of materials.
Special knowledge for working with instruments for hazardous areas:
The skilled personnel must have knowledge of ignition protection types, regulations and
provisions for equipment in hazardous areas.
10
WIKA operating instructions process transmitter, model UPT-2x
14111166.02 04/2015 EN/DE
Page 11

3. Safety
3.4 Risks in hazardous areas
Observe the information given in the type examination certicate and the country-specic
regulations for installation and use in hazardous areas (e.g. IEC 60079-14, NEC, CEC). If
this is not observed, serious injuries and damage could occur.
Do not commission any damaged instruments within hazardous areas. Damaged instruments cannot reliably guarantee any explosion protection. Obvious damage must be
reported immediately.
3.5 Handling of hazardous media
For hazardous media such as oxygen, acetylene, ammable or toxic gases and liquids
and refrigeration plants, compressors, etc., in addition to all standard regulations, the
appropriate existing codes or regulations must also be followed.
Residual media in the dismounted process transmitter can result in a risk to personnel,
the environment and equipment. Take sucient precautionary measures.
3.6 Labelling, safety marks
Product label
EN
Pin assignment
Power supply
Output signal
Measuring range
14111166.02 04/2015 EN/DE
WIKA operating instructions process transmitter, model UPT-2x
Model
Model code
Date of manufacture YYYY-MM
S# Serial no.
P# Product no.
Permissible ambient temperature
Approval ratings
11
Page 12

3. Safety
Symbols
Before mounting and commissioning the instrument, ensure you read the
operating instructions!
EN
Instruments bearing this mark comply with the relevant European directives.
ATEX European Explosion Protection Directive
(Atmosphère = AT, explosible = EX)
Instruments bearing this mark comply with the requirements of the
European directive 94/9/EC (ATEX) on explosion protection.
Output signal
Power supply
12
WIKA operating instructions process transmitter, model UPT-2x
14111166.02 04/2015 EN/DE
Page 13

4. Transport, packaging and storage
4. Transport, packaging and storage
4.1 Transport
Check the process transmitter for any damage that may have been caused by transport.
Obvious damage must be reported immediately.
4.2 Packaging
Do not remove packaging until just before mounting.
Keep the packaging as it will provide optimum protection during transport (e.g. change
in installation site, return for calibration).
4.3 Storage
Permissible conditions at the place of storage:
■
Storage temperature: -40 ... +80 °C
■
Humidity: 35 ... 93 % relative humidity (no condensation)
Avoid exposure to the following factors:
■
Proximity to hot objects, when permissible storage temperature is exceeded by
radiation.
■
Mechanical vibration, mechanical shock (putting it down hard), when the permissible
values are exceeded, see chapter 15 “Specications”.
■
Soot, vapour, dust and corrosive gases
■
Hazardous areas and ammable atmospheres where the instruments are not suitable
for installation in or mounting to equipment in explosive atmospheres.
EN
Store the process transmitter in its original packaging in a location that fulls the conditions listed above. If the original packaging is not available, then store the instrument
in a container that is similar to the original packaging, so that the instrument cannot be
scratched and is protected against damage if dropped.
14111166.02 04/2015 EN/DE
WIKA operating instructions process transmitter, model UPT-2x
13
Page 14

5. Commissioning, operation
5. Commissioning, operation
The process transmitter should only be commissioned and operated by skilled personnel.
The skilled personnel must have knowledge of ignition protection types, regulations and
provisions for equipment in hazardous areas.
EN
5.1 Mechanical mounting
DANGER!
Danger to life from explosion
Incorrect mounting and non-compliance with the contents of this chapter
can lead to a risk of explosion.
▶
Carefully read and comply with the following sub-chapters.
5.1.1 Requirements for mounting point
The process transmitter can be adjusted to the installation site.
→ see chapter 2.2 “Description”
■
Sucient space for a safe electrical installation.
■
Operating elements can be accessed following the mounting.
■
Permissible ambient and medium temperatures remain within the temperature
classes.
■
Consider possible restrictions on the ambient temperature range caused by mating
connector used.
■
Protect the process transmitter from heat sources (e.g. pipes or tanks).
Additional for instruments with cooling element:
■
Mount the process transmitter as horizontally as possible and ensure an unhindered
air circulation at the cooling element.
■
The cooling element should have as little soiling as possible, otherwise the cooling
action cannot be guaranteed. Ensure as much space as possible so that the cooling
element can be cleaned.
14
WIKA operating instructions process transmitter, model UPT-2x
14111166.02 04/2015 EN/DE
Page 15

5. Commissioning, operation
5.1.2 Mounting the process transmitter
DANGER!
Damaged diaphragm of the ush process connection
If the diaphragm is damaged, the explosion protection is no longer guaranteed. Through any explosion resulting from this, there will be a high danger
to life.
▶
Before commissioning, the diaphragm should be checked for visible
damage. Leaking fluid is indicative of damage.
▶
Protect the diaphragm from contact with abrasive media and against any
impacts.
Sealing
Parallel threads
Seal the sealing face with at gaskets,
sealing rings or WIKA prole sealings.
Tapered threads
Wrap threads with sealing material,
e.g. PTFE tape.
EN
per EN 837 per DIN 3852-E
14111166.02 04/2015 EN/DE
WIKA operating instructions process transmitter, model UPT-2x
NPT, R and PT
15
Page 16

5. Commissioning, operation
Screwing in
CAUTION!
Improper mounting
Process transmitter is damaged.
▶
EN
Screw the process transmitter into the mounting location with a spanner using the
spanner ats.
The tightening torque depends on the dimensions of the process connection and the
gasket used (form/material).
Tighten the process transmitter using the spanner flats.
▶
Do not tighten using the sensor housing or the case head.
▶
Use a suitable open-ended spanner.
▶
Do not cross the threads.
16
Spanner ats
Sensor housing
Case head
For information on tapped holes and welding sockets, see Technical information IN 00.14 at www.wika.com.
WIKA operating instructions process transmitter, model UPT-2x
14111166.02 04/2015 EN/DE
Page 17

5. Commissioning, operation
5.2 Electrical installation
DANGER!
Danger to life from explosion
Incorrect mounting and non-compliance with the contents of this chapter
can lead to a risk of explosion.
▶
Carefully read and comply with the following sub-chapters.
Observe the information given in the type examination certicate and the country-specic
regulations for installation and use in hazardous areas (e.g. IEC 60079-14, NEC, CEC)
this is not observed, serious injuries and damage could occur.
→ Type examination certicate is available for download at www.wika.com.
5.2.1 Safety instructions
■
Only connect with the voltage disconnected.
■
If any overvoltage is expected, install surge protection devices.
■
Exposed cables must not run close to bare metal components. Maintain a minimum
clearance of 5 mm.
■
Ensure that the cables are properly installed and the cable gland or plug connections
are securely closed and sealed.
. If
EN
5.2.2 Requirements for connection cable
■
Use and assemble connection cable that is suitable for the application. For cables
with exible wires, always use ferrules appropriate for the wire cross-section.
■
Where there is electromagnetic radiation above the test values per EN 61326, a
shielded connection cable must be used.
■
When using an M12 x 1 (4-pin) circular connector, the mating connector is supplied
by the customer. Ensure the matching design from the connector manufacturer.
Electrical connections
Cable gland M20 x 1.5 and spring-loaded
terminals
Angular connector DIN 175301-803A with
mating connector
Circular connector M12 x 1 (4-pin) without
mating connector
Ground screw, inside 0.13 ... 2.5 mm²
Ground screw, outside 0.13 ... 4 mm²
14111166.02 04/2015 EN/DE
WIKA operating instructions process transmitter, model UPT-2x
Ingress protection: IP 66/67
Cable diameter: 7 ... 12 mm
Wire cross-section max. 2.5 mm
Single cable: 0.13 ... 2.5 mm²
End splices: 0.13 ... 1.5 mm²
For cable diameters outside of 7 ... 12 mm,
change the seal and cable gland
Ingress protection: IP 65
Cable diameter: 6 ... 8 mm
Wire cross-section: max. 1.5 mm²
Ingress protection: IP 65
Observe manufacturer's specications
2
(AWG 14)
17
Page 18

5. Commissioning, operation
5.2.3 Requirements regarding intrinsic voltage supply
■
Power the process transmitter via an intrinsically safe circuit (Ex ia). Both the internal
capacitance and inductance must be considered (→ see chapter 15 “Specications”).
■
Provide the required voltage supply separation between Ex and non-Ex areas
with a certied isolated barrier or Zener barrier (suitable isolated barrier, model
EN
KFD2-STC4-Ex1).
■
For applications that require EPL Gb or Db, the power supply and signal circuit should
have a protection level of “ib”. Then the interconnections and the transmitter will have
a protection level of II 2G Ex ib IIC T4/T5/T6 Gb or II 2D Ex ib IIIC T4/T5/T6 Db, even if
the process transmitter is marked otherwise (→ see EN 60079-14 section 5.4).
5.2.4 Opening the case
CAUTION!
Ingress of moisture
Moisture can destroy the process transmitter.
▶
Protect the opened process transmitter against moisture.
▶
Screw off the case head cover by hand and pull out the display and operating unit or
push-on cap.
5.2.5 Shielding and grounding
The process transmitter must be shielded and grounded in accordance with the grounding concept of the plant.
▶
Connect the cable shield with the equipotential bonding.
▶
Connect the process connection or the external grounding screw with the equipotential bonding
18
WIKA operating instructions process transmitter, model UPT-2x
14111166.02 04/2015 EN/DE
Page 19

5. Commissioning, operation
5.2.6 Connection
1. Pass the connection cable through the cable gland and connect it.
Ensure that no moisture can enter at the cable end.
→ For pin assignment see chapter 5.2.7 “pin assignments”.
2. Tighten the cable gland.
■
Recommended tightening torque 1.5 Nm
■
Check that the seals are correctly seated in order to guarantee the ingress
protection.
3. Perform a mounting correction.
→ Without display, see chapter 7.1 “Performing a mounting correction (oset)”
→ Via HART
®
, see chapter 7.2 “Conguring the HART® interface”
→ With display, see chapter 8.5 “Mounting correction (oset)”
4. Attach the push-on cap or display and operating unit and screw the case head cover
tight down to the stop.
EN
14111166.02 04/2015 EN/DE
WIKA operating instructions process transmitter, model UPT-2x
19
Page 20

5. Commissioning, operation
1
2
3
4
3
1
2
5.2.7 Pin assignments
Spring-loaded terminal
Pin assignmentOutlet for connection cable
EN
Cable gland
Process connection
Positive power supply terminal +
Angular connector DIN 175301-803 A
+ 1
Negative power supply terminal –
Ground screw, inside (GND)
Circular connector M12 x 1 (4-pin)
+ 1
– 2
Shield GND
The shield connection is located on the inside of the instrument.
20
WIKA operating instructions process transmitter, model UPT-2x
– 3
Shield 4
14111166.02 04/2015 EN/DE
Page 21

6. Display and operating unit, model DI-PT-U
6. Display and operating unit, model DI-PT-U
6.1 Design and description
The display and operating unit model DI-PT-U is available as an accessory.
It can be plugged into the instrument electronics at 90° increments. Thus the display can
be read, whether the process transmitter is mounted laterally or upside down.
Description
Direction key [▲]
Escape key [ESC]
Additional display
Unit
Main display
Trend indication
Bar graph with over/under limit
arrows and drag pointer function
Enter key [↵]
Direction key [▼]
EN
6.2 Accessing/exiting the operating menu
Accessing: Press [↵].
Exiting: Press [ESC] repeatedly until the menu has been exited.
If after 3 min. no entry is made, the menu will automatically be exited and the
last set display mode will be activated.
If there is an invalid entry, the message “Input error” will show in the display
for 2 seconds, and the previous menu will be accessed.
14111166.02 04/2015 EN/DE
WIKA operating instructions process transmitter, model UPT-2x
21
Page 22

6. Display and operating unit, model DI-PT-U
6.3 Installation/Removal
CAUTION!
Ingress of moisture.
Moisture can destroy the process transmitter.
▶
EN
1. Screw o the case head cover by hand.
2. Installation
Pull out the push-on cap and attach the display and
operating unit into any of the locking positions (0°, 90°,
180°, 270°).
Removal
Pull out the display and operating unit and attach the
push-on cap.
Protect the opened process transmitter against moisture.
▶
Close the case head tightly.
3. Screw on the case head cover.
Ensure that the case head is tightly closed.
22
WIKA operating instructions process transmitter, model UPT-2x
14111166.02 04/2015 EN/DE
Page 23

6. Display and operating unit, model DI-PT-U
6.4 Setting the main display
The main display can indicate the following values:
■
Pressure Applied pressure is displayed.
■
Level Level is displayed.
■
Volume Volume is displayed.
■
Current Output signal is displayed.
■
PV percent Output signal is displayed as a percentage.
■
Sensor temperature Temperature at the sensor is displayed.
■
PV (primary value) The value corresponding to the mode will be displayed.
If the mode is changed, then the main display will change.
1. Open the operating menu with [↵].
Select “Display” and conrm with [↵].
2. Select “Main display” and conrm with [↵].
EN
3. Select value and conrm with [↵].
» Main display indicates the selected value.
14111166.02 04/2015 EN/DE
WIKA operating instructions process transmitter, model UPT-2x
23
Page 24

6. Display and operating unit, model DI-PT-U
6.5 Setting the additional display
The additional display can indicate the following values:
■
Pressure Applied pressure is displayed.
■
EN
Level Level is displayed.
■
Volume Volume is displayed.
■
Current Output signal is displayed.
■
PV percent Output signal is displayed as a percentage.
■
Sensor temperature Temperature at the sensor is displayed.
■
PV (primary value) The value corresponding to the mode will be displayed.
If the mode is changed, then the main display will change.
Drag pointer values
■
P
/ P
min
PV
T
min
min
/ T
max
/ PV
max
max
■
■
Further data
■
TAG short (max. 8 capital letters and gures)
■
TAG long (max. 32 alphanumeric characters)
■
Empty (additional display switched o)
1. Open the operating menu with [↵].
Select “Display” and conrm with [↵].
2. Select “Add. display” and conrm with [↵].
3. Select value and conrm with [↵].
» Additional display indicates the selected value.
24
WIKA operating instructions process transmitter, model UPT-2x
14111166.02 04/2015 EN/DE
Page 25
7. Conguration without display and operating unit
7. Conguration without display and operating unit
7.1 Performing a mounting correction (oset)
The mounting correction corrects a zero oset in the output signal by dening a new
zero point. The zero oset is caused by the mounting position.
Correction range: ±20 % of maximum measuring range
Required tool: Multimeter (ammeter)
1. Screw o the case head cover and pull out the push-on cap.
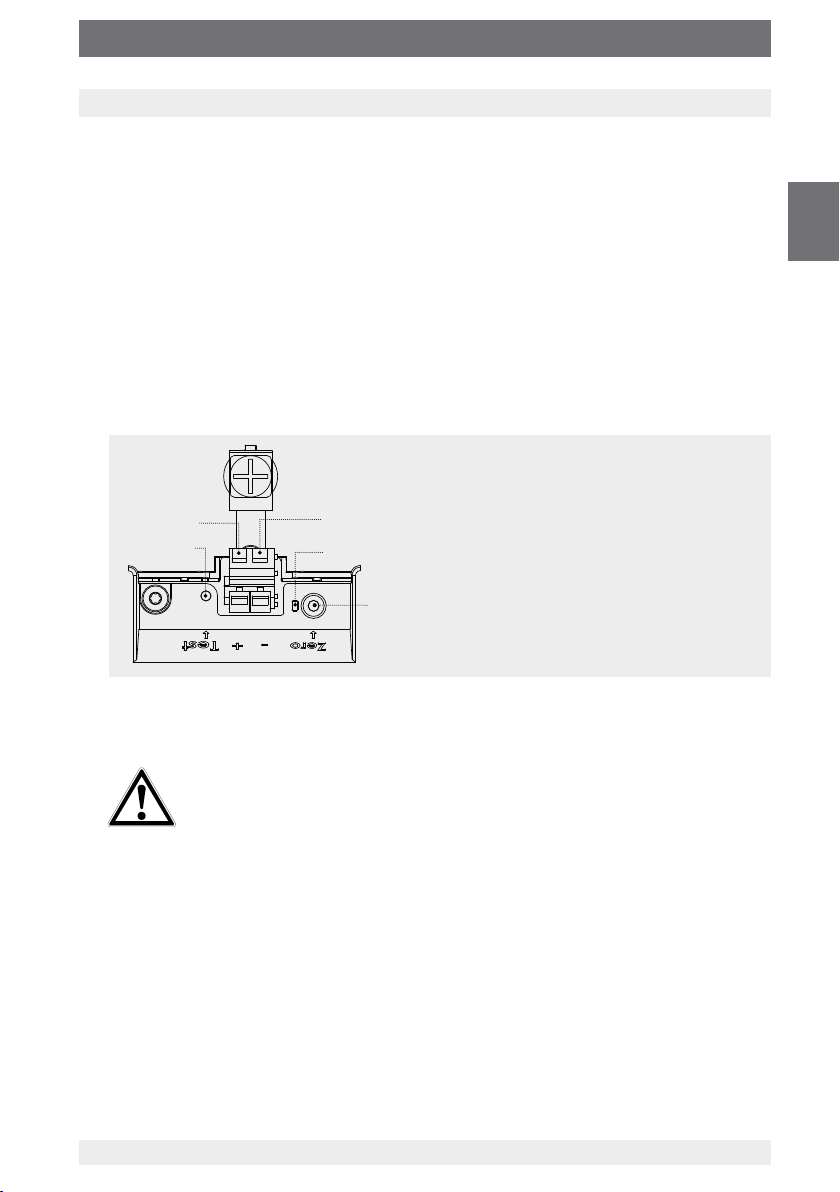
2. Press [Zero] for approx. 2 s (e.g. with measuring tip of a multimeter).
» Mounting correction successful: Control diode lights up for 2 s.
» Mounting correction unsuccessful: Control diode blinks 5 times.
EN
3. Check the output signal as follows.
CAUTION!
Incorrect connection
A short circuit will destroy the process transmitter.
▶
Ensure that the multimeter does not come into contact with the
positive power supply terminal.
▶
Set the multimeter to current measurement.
▶
Connect the positive measuring line of the multimeter to the test contact.
▶
Connect the negative measuring line of the multimeter to the negative power
supply terminal.
» The result of the current measurement should give a value between 4 ... 20 mA
in the pressure-free condition. If the ambient atmospheric pressure is outside
the measuring range, the measured current can be < 4 mA or > 20mA.
Control diode
Mounting correction, [Zero] key
Test contact
Positive power supply terminal +
Negative power supply terminal –
14111166.02 04/2015 EN/DE
WIKA operating instructions process transmitter, model UPT-2x
25
Page 26

7. Conguration without display and operating unit
7.2 Conguring over HART® interface
®
HART
-compatible process transmitters can be operated and congured with operat-
ing software (e.g. PACTware
®
), process control software (e.g. AMS or Simatic PDM) or
a hand-held device (e.g. FC475 from Emerson).
The operation of the respective menus is described in the associated online help.
EN
The device drivers are available for download from www.wika.com.
®
Connecting process transmitter to PC (HART
)
Any work should only be carried out in a safe area.
1. Connect HART
2. Connect HART
Ex-Bereich Sicherer Bereich
Hazardous area Non-hazardous area
®
modem to process transmitter.
®
modem to PC or notebook..
HART-Widerstand 250 ohm
HART resistor 250 ohm
HART-Modem
HART modem
RS-232
=
~
Spannungsquelle
Voltage source
26
WIKA operating instructions process transmitter, model UPT-2x
14111166.02 04/2015 EN/DE
Page 27

8. Conguration via display and operating unit
8. Conguration via display and operating unit
8.1 Conguring the measuring task
8.1.1 Conguring pressure measurement
1. Open the operating menu with [↵].
Select “Basic setting” and conrm with [↵].
2. Select “Application” and conrm with [↵].
3. Select “Pressure” and conrm with [↵].
4. Select “Unit” and conrm with [↵].
5. Select pressure unit and conrm with [↵].
» Pressure unit is set.
6. Go back one menu level using [ESC].
Select “Mode” and conrm with [↵].
EN
7. Select “Pressure” and conrm with [↵].
» Mode is set.
8. Scale the measuring range.
→ See chapter 8.3 “Scaling the measuring range”.
9. Perform a mounting correction.
→ See chapter 8.5 “Mounting correction (oset)”.
» Pressure measurement is congured.
14111166.02 04/2015 EN/DE
WIKA operating instructions process transmitter, model UPT-2x
27
Page 28

8. Conguration via display and operating unit
8.1.2 Conguring level measurement
Requirement
■
Length unit for the lling height is known
■
The density of the medium is known
1. Open the operating menu with [↵].
EN
Select “Basic setting” and conrm with [↵].
2. Select “Application” and conrm with [↵].
3. Select “Level” and conrm with [↵].
4. Select “Unit” and conrm with [↵].
5. Select length unit and conrm with [↵].
» Length unit is set.
6. Select “Density” and conrm with [↵].
7. Select “Density unit” and conrm with [↵].
8. Select density unit and conrm with [↵].
» Density unit is set.
9. Select “Density value” and conrm with [↵].
10. Set digit using [▲] [▼] and conrm with [↵].
» The cursor moves to the next digit.
» Repeat for each digit.
» Density value is set.
11. Go back two menu levels using [ESC].
Select “Mode” and conrm with [↵].
12. Select “Level” and conrm with [↵].
» Mode is set.
13. Perform a mounting correction.
→ See chapter 8.5 “Mounting correction (oset)”.
» Level measurement is congured.
28
WIKA operating instructions process transmitter, model UPT-2x
14111166.02 04/2015 EN/DE
Page 29

8. Conguration via display and operating unit
8.1.3 Conguring the volume measurement
Requirement
■
Length unit for the lling height is known
■
Medium density is known
■
Characteristic curve of the tank is known (→ see chapter 8.1.4
“Characteristic curves”)
1. Open the operating menu with [↵].
Select “Basic setting” and conrm with [↵].
2. Select “Application” and conrm with [↵].
3. Select “Level” and conrm with [↵].
4. Select “Unit” and conrm with [↵].
5. Select length unit and conrm with [↵].
» Length unit is set.
6. Select “Density” and conrm with [↵].
7. Select “Density unit” and conrm with [↵].
EN
8. Select density unit and conrm with [↵].
» Density unit is set.
9. Select “Density value” and conrm with [↵].
10. Setting the density of the medium.
Set digits using [▲] [▼] and conrm with [↵].
» The cursor moves to the next digit.
» Repeat for each digit.
» Density value is set.
11. Go back two menu levels using [ESC].
Select “Volume” and conrm with [↵].
12. Select “Scale in” and conrm with [↵].
14111166.02 04/2015 EN/DE
WIKA operating instructions process transmitter, model UPT-2x
29
Page 30

8. Conguration via display and operating unit
13. Select “Low” and conrm with [↵].
14. Select “change” and conrm with [↵].
EN
15. Setting the start of the measuring range referred to the lling
height of the tank.
Set digits using [▲] [▼] and conrm with [↵].
» The cursor moves to the next digit.
» Repeat for each digit.
» Start of the measuring range is set.
16. Go back one menu level using [ESC].
Select “High” and conrm with [↵].
17. Select “change” and conrm with [↵].
18. Setting the end of the measuring range referred to the lling
height of the tank.
Set digits using [▲] [▼] and conrm with [↵].
» The cursor moves to the next digit.
» Repeat for each digit.
» End of the measuring range is set.
19. Go back two menu levels using [ESC].
Select “Characteristic” and conrm with [↵].
20. Select characteristic curve and conrm with [↵].
→ Explanation of characteristic curves, see chapter 8.1.4
“Characteristic curves”
21. Select “Scale out” and conrm with [↵].
22. Select “Unit” and conrm with [↵].
23. Select volume unit and conrm with [↵].
■
Volume unit: Standard units (e.g. litres, m³, ...)
■
Free input: Freely denable unit (selectable under
“Volume unit“)
» Volume unit is set.
30
WIKA operating instructions process transmitter, model UPT-2x
14111166.02 04/2015 EN/DE
Page 31

8. Conguration via display and operating unit
24. Go back one menu level using [ESC].
Select “Low 0%” and conrm with [↵].
25. Set the initial value of the volume measurement with respect
to 0 % of the lling height (e.g. 0 % lling height corresponds
to 3 litres).
» The cursor moves to the next digit.
» Repeat for each digit.
» Initial value is set.
26. Select “High 100%” and conrm with [↵].
27. Set the end value of the volume measurement with respect
to 100 % of the lling height (e.g. 100 % lling height corresponds to 1,000 litres).
» The cursor moves to the next digit.
» Repeat for each digit.
» Initial value is set.
28. Go back one menu level using [ESC].
Select “Mode” and conrm with [↵].
29. Go back one menu levels using [ESC].
Select “Volume” and conrm with [↵].
» Mode is set to volume.
EN
30. Perform a mounting correction.
→ See chapter 8.5 “Mounting correction (oset)”.
» Volume measurement is congured.
14111166.02 04/2015 EN/DE
WIKA operating instructions process transmitter, model UPT-2x
31
Page 32

8. Conguration via display and operating unit
8.1.4 Characteristic curves
Linear
Used for vertical tanks.
EN
Horizontal tank
Used for horizontal tanks.
32
WIKA operating instructions process transmitter, model UPT-2x
14111166.02 04/2015 EN/DE
Page 33

8. Conguration via display and operating unit
Spherical tank
Used for spherical tanks.
Linearisation table
Will be used for special designs. The linearisation table can, as an option, be loaded at
the factory or can be transferred via HART
®
.
EN
14111166.02 04/2015 EN/DE
WIKA operating instructions process transmitter, model UPT-2x
33
Page 34

8. Conguration via display and operating unit
8.2 Setting the units
8.2.1 Setting the pressure unit
1. Open the operating menu with [↵].
EN
Select “Basic setting” and conrm with [↵].
2. Select “Application” and conrm with [↵].
3. Select “Pressure” and conrm with [↵].
4. Select “Unit” and conrm with [↵].
5. Select pressure unit and conrm with [↵].
» Pressure unit is set.
8.2.2 Set length unit (for level measurement)
1. Open the operating menu with [↵].
Select “Basic setting” and conrm with [↵].
2. Select “Application” and conrm with [↵].
3. Select “Level” and conrm with [↵].
4. Select “Unit” and conrm with [↵].
5. Select length unit and conrm with [↵].
» Length unit is set.
34
WIKA operating instructions process transmitter, model UPT-2x
14111166.02 04/2015 EN/DE
Page 35

8. Conguration via display and operating unit
8.2.3 Setting the volume unit
1. Open the operating menu with [↵].
Select “Basic setting” and conrm with [↵].
2. Select “Application” and conrm with [↵].
3. Select “Volume” and conrm with [↵].
4. Select “Scale out” and conrm with [↵].
5. Select “Unit” and conrm with [↵].
6. Select volume unit and conrm with [↵].
■
Volume unit: Standard units (e.g. litres, m³, ...)
■
Free input: Freely denable unit (selectable under
“Volume unit“)
» Volume unit is set.
EN
14111166.02 04/2015 EN/DE
WIKA operating instructions process transmitter, model UPT-2x
35
Page 36

8. Conguration via display and operating unit
8.2.4 Setting the density unit and density value
1. Open the operating menu with [↵].
Select “Basic setting” and conrm with [↵].
2. Select “Application” and conrm with [↵].
EN
3. Select “Level” and conrm with [↵].
4. Select “Density” and conrm with [↵].
5. Select “Density unit” and conrm with [↵].
6. Select unit and conrm with [↵].
» Density unit is set.
7. Select “Density value” and conrm with [↵].
8. Set digit using [▲] [▼] and conrm with [↵]. The cursor
moves to the next digit. Repeat for each digit.
»Density value is set.
8.2.5 To set the temperature unit
Temperature unit °C and °F selectable.
1. Open the operating menu with [↵].
Select “Basic setting” and conrm with [↵].
2. Select “Application” and conrm with [↵].
3. Select “Sensor temp.” and conrm with [↵].
4. Select temperature unit and conrm with [↵].
» Temperature unit is set.
36
WIKA operating instructions process transmitter, model UPT-2x
14111166.02 04/2015 EN/DE
Page 37

8. Conguration via display and operating unit
8.3 Scaling the measuring range
8.3.1 Performing a wet adjustment
For the start of the measuring range and end of the measuring range, the values will be
taken from the running measurement. The respective output signal can be adjusted.
Requirement Measurement is running.
Setting range Start of measuring range: -10 ... +110 % of measuring range
End of measuring range: 1 ... 120 % of measuring range
Max. turndown: 100 : 1 (recommended max. 20 : 1)
1. Open the operating menu with [↵].
Select “Basic setting” and conrm with [↵].
2. Select “Scale setting” and conrm with [↵].
3. Select “Wet adjustm.” and conrm with [↵].
4. Dening the current measured value as start of measuring
range or end of measuring range:
To dene as start of measuring range:
Conrm “min. adjustm.” with [↵].
To dene as end of measuring range:
Conrm “max. adjustm.” with [↵].
5. Change digit using [▲] [▼] and conrm with [↵]. The cursor
moves to the next digit. Repeat for each digit. When the last
digit is exited, the menu moves back to step 2.
EN
With the input of current values that are not
either 4 mA or 20 mA the pressure value is
converted into the standardised current signals
as soon as the current value entered is accepted.
14111166.02 04/2015 EN/DE
WIKA operating instructions process transmitter, model UPT-2x
37
Page 38

8. Conguration via display and operating unit
8.3.2 Performing a dry adjustment
Via the dry adjustment, the values for the start of the measuring range and the end of the
measuring range are entered manually. The respective output signal can be adjusted.
Requirement Process transmitter does not have to be installed.
EN
Setting range Start of measuring range: -10 ... +110 % of measuring range
1. Open the operating menu with [↵].
Select “Basic setting” and conrm with [↵].
2. Select “Scale setting” and conrm with [↵].
3. Select “Dry adjustm.” and conrm with [↵].
4. Dening the start of measuring range or end of measuring
range:
No measurement is running. If there is a running measurement, the
output signal can alter abruptly.
End of measuring range: 1 ... 120 % of measuring range
Max. turndown: 100 : 1 (recommended max. 20 : 1)
To dene start of measuring range
Conrm “min. adjustm.” with [↵].
To dene end of measuring range
Conrm “max. adjustm.” with [↵].
5. Change digit using [▲] [▼] and conrm with [↵]. The cursor
moves to the next digit. Repeat for each digit.
When the last digit is exited, the cursor moves to the output
signal (step 6).
6. Change digit using [▲] [▼] and conrm with [↵]. The cursor
moves to the next digit. Repeat for each digit.
digit is exited, the menu moves back to step 2.
With the input of current values that are not
either 4 mA or 20 mA the pressure value is
converted into the standardised current signals
as soon as the current value entered is accepted.
38
WIKA operating instructions process transmitter, model UPT-2x
When the last
14111166.02 04/2015 EN/DE
Page 39

8. Conguration via display and operating unit
8.4 Setting the mode
The mode denes which measurement parameter will be transmitted via the current
output (pressure, volume).
If the main display is set to PV (primary value), the measurement parameter
set under “Mode” will always be displayed.
1. Open the operating menu with [↵].
Select “Basic setting” and conrm with [↵].
2. Select “Application” and conrm with [↵].
3. Select “Mode” and conrm with [↵].
4. Select measurement parameter and conrm with [↵].
» Mode is set.
EN
14111166.02 04/2015 EN/DE
WIKA operating instructions process transmitter, model UPT-2x
39
Page 40

8. Conguration via display and operating unit
8.5 Mounting correction (oset)
8.5.1 Performing a wet adjustment
Zero point will be taken from measurement in operation.
EN
Requirement:
■
Deviation ≤ 20 % of the measuring range.
■
Absolute vacuum with absolute pressure measuring instruments.
Not to be carried out without suitable equipment.
1. Open the operating menu with [↵].
Select “Basic setting” and conrm with [↵].
2. Select “Application” and conrm with [↵].
3. Select “Pressure” and conrm with [↵].
4. Select “Mounting corr.” and conrm with [↵].
5. Select “apply” and conrm with [↵].
Current measured value will be used as the new zero point.
8.5.2 Performing a dry adjustment
The mounting correction is registered manually via the dry adjustment. For all future
measurements, the mounting correction will be subtracted.
Requirement: Deviation ≤ 20 % of the measuring range.
1. Open the operating menu with [↵].
Select “Basic setting” and conrm with [↵].
2. Select “Application” and conrm with [↵].
3. Select “Pressure” and conrm with [↵].
40
WIKA operating instructions process transmitter, model UPT-2x
14111166.02 04/2015 EN/DE
Page 41

8. Conguration via display and operating unit
4. Select “Mounting corr.” and conrm with [↵].
5. Select “change” and conrm with [↵].
6. Change digit using [▲] [▼] and conrm with [↵]. The cursor
moves to the next digit. Repeat for each digit.
» Entered value will be used as the new zero point.
8.6 Setting the damping
The damping prevents the uctuation of the output signal when there are short-term
uctuations in the measured value. Safety shut-downs due to turbulent processes are
thus prevented.
Pressure spikes will still be registered, e.g. as P
in the menu point
max
“Diagnostic”.
Setting range 0 ... 99.9 s
1. Open the operating menu with [↵].
Select “Basic setting” and conrm with [↵].
2. Select “Damping value” and conrm with [↵].
3. Change digit using [▲] [▼] and conrm with [↵]. The cursor
moves to the next digit. Repeat for each digit.
» Damping is set.
EN
14111166.02 04/2015 EN/DE
WIKA operating instructions process transmitter, model UPT-2x
41
Page 42

8. Conguration via display and operating unit
8.7 Write protection
An active write protection locks the settings so that these cannot be changed via the
display and operating module nor via HART
that the write protection is active.
®
. A key icon above the main display signals
EN
Activation/deactivation of the write protection and changing the PIN is also
possible via HART®.
8.7.1 Activating/deactivating the write protection
1. Open the operating menu with [↵].
Select “Basic setting” and conrm with [↵].
2. Select “Write protect” and conrm with [↵].
3. Select “on/o” and conrm with [↵].
4. Activate write protection:
Select “on” and conrm with [↵].
» Write protection is activated.
Deactivate write protection:
Select “o” and conrm with [↵].
Enter PIN and conrm with [↵].
» Write protection is deactivated.
8.7.2 Change PIN
Factory setting: 0000
1. Open the operating menu with [↵].
Select “Basic setting” and conrm with [↵].
2. Select “Write protect” and conrm with [↵].
3. Select “Change PIN” and conrm with [↵].
4. Change digit using [▲] [▼] and conrm with [↵]. The cursor
moves to the next digit. Repeat for each digit.
» Pin is changed.
42
WIKA operating instructions process transmitter, model UPT-2x
14111166.02 04/2015 EN/DE
Page 43

9. Diagnostic functions
9. Diagnostic functions
Requirement: Display and operating unit tted.
9.1 Simulations
9.1.1 Performing a pressure simulation
A pressure value within the measuring range must be entered and is converted into a
current value and output.
1. Open the operating menu with [↵].
Select “Diagnostic” and conrm with [↵].
2. Select “Simulation” and conrm with [↵].
3. Select “Press. simu.” and conrm with [↵].
4. Change digit using [▲] [▼] and conrm with [↵]. The cursor
moves to the next digit. Repeat for each digit.
» Simulation is active.
5. Ending the simulation. Press [ESC] to do this.
EN
9.1.2 Performing a current simulation
The selected or entered current value will be simulated and output as the PV (primary
value).
1. Open the operating menu with [↵].
Select “Diagnostic” and conrm with [↵].
2. Select “Simulation” and conrm with [↵].
3. Select “Current sim.” and conrm with [↵].
4.
Select the current value or dene via “Input”.
Change digit using [▲] [▼] and conrm with [↵]. The cursor
moves to the next digit. Repeat for each digit.
» Simulation is active.
5. Ending the simulation. Press [ESC] to do this.
14111166.02 04/2015 EN/DE
WIKA operating instructions process transmitter, model UPT-2x
43
Page 44

9. Diagnostic functions
9.2 Display/reset drag pointer
The drag pointer function indicates the limit values reached since the last reset. These
limit values can be displayed and reset.
9.2.1 Drag pointer P
EN
Displays the minimum and maximum pressure that has occurred since the last reset.
min
/ P
max
Displays
1. Open the operating menu with [↵].
Select “Diagnostic” and conrm with [↵].
2. Select “Drag pointer” and conrm with [↵].
3. Select “P min/max” and conrm with [↵].
4. Select “display” and conrm with [↵].
» Limit values are displayed.
P
= P
▼
min
P▲ = P
max
Resetting
1. Open the operating menu with [↵].
Select “Diagnostic” and conrm with [↵].
2. Select “Drag pointer” and conrm with [↵].
3. Select “P min/max” and conrm with [↵].
4. Select “reset” and conrm with [↵].
5. Select limit value and conrm with [↵].
■
P▼ = P
P▲ = P
min
max
■
» Limit value is reset.
44
WIKA operating instructions process transmitter, model UPT-2x
14111166.02 04/2015 EN/DE
Page 45

9. Diagnostic functions
9.2.2 Drag pointer PV
min
/ PV
max
Displays the minimum and maximum value of the primary value since the last reset.
→ For display and reset see chapter 10.2.1 “Drag Pointer P
9.2.3 Drag pointer T
min
/ T
max
min
/ P
max
“
Displays the minimum and maximum temperature of the temperature sensor, measured
since the last reset.
→ For display and reset see chapter 10.2.1 “Drag Pointer P
min
/ P
max
“
9.3 Display/reset operating time
Displays the operating time since the last reset.
Displaying
1. Open the operating menu with [↵].
Select “Diagnostic” and conrm with [↵].
2. Select “Operat. time” and conrm with [↵].
3. Select “display” and conrm with [↵].
» Operating time is displayed.
EN
Resetting
1. Open the operating menu with [↵].
Select “Diagnostic” and conrm with [↵].
2. Select “Operat. time” and conrm with [↵].
3. Select “reset” and conrm with [↵].
4. Conrm operating time with [↵].
» Operating time is reset.
14111166.02 04/2015 EN/DE
WIKA operating instructions process transmitter, model UPT-2x
45
Page 46

10. Detailed settings
10. Detailed settings
Requirement: Display and operating unit tted.
10.1 Setting the language
Available languages: German, English, French, Spanish
EN
1. Open the operating menu with [↵].
Select “Detail setup” and conrm with [↵].
2. Select “Language” and conrm with [↵].
3. Select language and conrm with [↵].
» Language is set.
10.2 Marking the measuring point (TAG)
10.2.1 Setting the TAG short
TAG short enables 8 gures with a limited character set (numbers and capital letters).
TAG short can be displayed in the additional display.
1. Open the operating menu with [↵].
Select “Detail setup” and conrm with [↵].
2. Select “Marking” and conrm with [↵].
3. Select “TAG short” and conrm with [↵].
4. Change gure using [▲] [▼] and conrm with [↵]. The cursor
moves to the next gure. Repeat for each gure.
» TAG short is set.
10.2.2 Setting the TAG long
TAG long enables 32 gures with alphanumeric characters (all characters in accordance
with HART
Setting is made as described in chapter 10.2.1 “TAG short”.
46
®
revision 7). TAG long can be displayed in the additional display.
WIKA operating instructions process transmitter, model UPT-2x
14111166.02 04/2015 EN/DE
Page 47

10. Detailed settings
10.3 Setting the alarm signal
Alarm signal downscale (3.5 mA)
In the event of a failure in the process transmitter, the output signal changes itself to
3.5 mA.
Alarm signal upscale (21.5 mA)
In the event of a failure in the process transmitter, the output signal changes itself to
21.5 mA.
1. Open the operating menu with [↵].
Select “Detail setup” and conrm with [↵].
2. Select “Current out” and conrm with [↵].
3. Select “Alarm signal” and conrm with [↵].
4. Select alarm signal and conrm with [↵].
3.5 mA = alarm signal downscale
21.5 mA = alarm signal upscale
» Alarm signal is set.
10.4 Setting the signal limits
The signal limits dene the current range within which the output signal can be. Above
or below the signal limits are the preset limits for the output signal.
Setting range 3.8 ... 20.5 mA or 4.0 ... 20.0 mA (NAMUR recommendation for process
instruments is 3.8 ... 20.5 mA)
EN
1. Open the operating menu with [↵].
Select “Detail setup” and conrm with [↵].
2. Select “Current out” and conrm with [↵].
3. Select “Limits” and conrm with [↵].
3. Select signal limits and conrm with [↵].
» Signal limits are set.
14111166.02 04/2015 EN/DE
WIKA operating instructions process transmitter, model UPT-2x
47
Page 48

10. Detailed settings
10.5 Setting the contrast of the LC display
Setting range: 1 ... 9 (in steps of 1)
1. Open the operating menu with [↵].
EN
Select “Detail setup” and conrm with [↵].
2. Select “Contrast” and conrm with [↵].
3. Change gure using [▲] [▼] and conrm with [↵].
» Contrast is set.
10.6 Restoring factory setting
1. Open the operating menu with [↵].
Select “Detail setup” and conrm with [↵].
2. Select “Reset” and conrm with [↵].
3. Select the settings that are to be reset and conrm with [↵].
Instrument specications
Instrument settings will be reset to their as-delivered settings.
Drag pointer
The drag pointer values are reset.
4. Conrm reset with [↵].
» The settings are reset.
48
WIKA operating instructions process transmitter, model UPT-2x
14111166.02 04/2015 EN/DE
Page 49

10. Detailed settings
10.7 Setting the HART® communication
10.7.1 Setting the short address (multidrop mode)
Setting range: 0 ... 63
1. Open the operating menu with [↵].
Select “Detail setup” and conrm with [↵].
2. Select “HART” and conrm with [↵].
3. Select “Short addr.” and conrm with [↵].
4. Change digit using [▲] [▼] and conrm with [↵]. The cursor
moves to the next digit. Repeat for each digit.
» Short address is set.
10.7.2 Activate/deactivate constant current
The constant current aects the output of current values, e.g. in the additional
display
1. Open the operating menu with [↵].
Select “Detail setup” and conrm with [↵].
2. Select “HART” and conrm with [↵].
EN
3. Select “Cons. current” and conrm with [↵].
3. Activate/deactivate constant current.
Select “on” or “o” and conrm with [↵].
» Constant current is activated/deactivated.
14111166.02 04/2015 EN/DE
WIKA operating instructions process transmitter, model UPT-2x
49
Page 50

11. Instrument information
11. Instrument information
11.1 Display measuring range
1. Open the operating menu with [↵].
Select “Info” and conrm with [↵].
EN
2. Select “Measuring range” and conrm with [↵].
» Measuring range is displayed.
11.2 Display settings
1. Open the operating menu with [↵].
Select “Info” and conrm with [↵].
2. Select “Setting” and conrm with [↵].
» Mode is displayed.
» Scaling is displayed (4 mA und 20 mA).
11.3 Display date of manufacture
1. Open the operating menu with [↵].
Select “Info” and conrm with [↵].
2. Select “Date manufac.” and conrm with [↵].
» Date of manufacture is displayed.
11.4 Display rmware version
1. Open the operating menu with [↵].
Select “Info” and conrm with [↵].
2. Select “Version” and conrm with [↵].
» Firmware version is displayed.
50
WIKA operating instructions process transmitter, model UPT-2x
14111166.02 04/2015 EN/DE
Page 51

11. Instrument information / 12. Maintenance and cleaning
11.5 Display serial number
1. Open the operating menu with [↵].
Select “Info” and conrm with [↵].
2. Select “Serial number” and conrm with [↵].
» Serial numbers are displayed.
S# = Serial number
H# = HART serial number (the device responds with this
serial number in the process control system)
12. Maintenance and cleaning
12.1 Maintenance
Repairs must only be carried out by the manufacturer.
Clear the cooling element of soiling at regular intervals. The duration of maintenance
intervals is dependent on the application location. In dust-Ex areas, a soiled cooling
element can lead to an explosion, and thus cleaning is required at short intervals.
12.2 Cleaning
EN
CAUTION!
■
The exterior should only be cleaned when the instrument is closed and
sealed. This applies to the case head cover and all openings, e.g. the
cable glands.
■
Use a cloth moistened with soapy water or isopropanol.
■
Electrical connections must not come into contact with moisture.
■
Wash or clean the dismounted instrument before returning it, in order to
protect persons and the environment from exposure to residual media.
■
Residual media in the dismounted process transmitter can result in a risk
to personnel, the environment and equipment.
Take sucient precautionary measures.
For information on returning the instrument see chapter 14.2 “Return”.
12.3 Recalibration
DKD/DAkkS certicate - ocial certicates:
We recommend that the process transmitter is regularly recalibrated by the manufacturer, with time intervals of approx. 12 months.
14111166.02 04/2015 EN/DE
WIKA operating instructions process transmitter, model UPT-2x
51
Page 52

13. Faults
13. Faults
In the event of any faults, rst check whether the process transmitter is mounted
correctly, mechanically and electrically. For instruments with display and operating units,
the error code with error text will be displayed in the event of a failure.
EN
Faults Causes Measures
Display does not indicate
anything
Error code Error text Causes Measures
E001 Hardware fault Lack of communication Restart the instrument
E002 Sensor missing Communication to the
1)
E003
E004 Characteristic curve error Overow in calculation
E005 Temperature sensor Temperature sensor faulty Restart the instrument
1)
E006
E007 Sensor temperature Temperature exceeded
1) Error message can also appear when the pressure is greater than the nominal pressure range.
Sensor faulty Pressure status sensor
Overpressure sensor Overload pressure sensor Restart the instrument
Instrument is not mounted
correctly
sensor faulty
faulty
chain
at the pressure sensor,
limit monitoring in the
electronics
Install the electrical connection
and/or the display and operating unit correctly
Return the instrument
Restart the instrument
Return the instrument
Restart the instrument
Return the instrument
Restart the instrument
Switch to a linear
characteristic curve
Check the inputs
Return the instrument
Return the instrument
Depressurise the instrument (ambient pressure)
and restart
Return the instrument
Return the instrument
52
WIKA operating instructions process transmitter, model UPT-2x
14111166.02 04/2015 EN/DE
Page 53

13. Faults / 14. Dismounting, return and disposal
CAUTION!
If faults cannot be eliminated by means of the measures listed above, shut
down the process transmitter immediately, and ensure that pressure and/or
signal are no longer present, and secure the instrument from being put back
into operation inadvertently.
In this case, contact the manufacturer.
If a return is needed, please follow the instructions given in chapter 14.2
“Return”.
14. Dismounting, return and disposal
WARNING!
Residual media in the dismounted process transmitter can result in a risk to
personnel, the environment and equipment.
Take sucient precautionary measures.
14.1 Dismounting
Switch the pressure measuring instrument to a depressurised and unpowered state.
Observe the information given in the type examination certicate and the country-specic
regulations for installation and use in hazardous areas (e.g. IEC 60079-14, NEC, CEC)
this is not observed, serious injuries and damage could occur.
. If
EN
14.2 Return
WARNING!
Strictly observe the following when shipping the instrument:
All instruments delivered to WIKA must be free from any kind of hazardous
substances (acids, bases, solutions, etc.).
When returning the instrument, use the original packaging or a suitable transport
packaging.
14111166.02 04/2015 EN/DE
WIKA operating instructions process transmitter, model UPT-2x
53
Page 54

14. Dismounting, return and disposal
To avoid damage:
1. Place the protection cap onto the process connection.
2. Wrap the instrument in an antistatic plastic lm.
3. Place the instrument, along with the shock-absorbent material, in the packaging.
Place shock-absorbent material evenly on all sides of the transport packaging.
4. If possible, place a bag containing a desiccant inside the packaging.
EN
5. Label the shipment as carriage of a highly sensitive measuring instrument.
Information on returns can be found under the heading “Service” on our local
website.
14.3 Disposal
Incorrect disposal can put the environment at risk.
Dispose of instrument components and packaging materials in an environmentally
compatible way and in accordance with the country-specic waste disposal regulations.
54
WIKA operating instructions process transmitter, model UPT-2x
14111166.02 04/2015 EN/DE
Page 55

15. Specications
15. Specications
Measuring range
Measuring range See product label
Vacuum tightness Is provided, except for instruments for oxygen
Overpressure limit Measuring range ≤ 16 bar/300 psi: 3-fold
Accuracy specications
Accuracy see product label, model code
Mounting correction -20 ... +20 %
Non-repeatability ≤ 0.15 % of span
Behaviour with turndown
■
For measuring spans ≥ 1.6 bar
- TD ≤ 5:1 No inuence on the accuracy
- TD > 5:1 ... ≤ 100:1 Ges = GG + 0.03 % x (TD − 5)
■
For measuring spans < 1.6 bar
- TD = 1:1 No inuence on the accuracy
- TD > 1:1 ... ≤ 100:1 Ges = GG + 0.03 % x (TD − 1)
Long-term stability (referred to basic measuring
range)
Thermal change zero point/span (reference
temperature 20 °C)
applications
Measuring range > 16 bar/300 psi: 2-fold
UPT-2*-***-**-**-*****-****1*-** = 0.10 %
UPT-2*-***-**-**-*****-****2*-** = 0.15 %
UPT-2*-***-**-**-*****-****3*-** = 0.20 %
Including non-linearity, hysteresis, zero oset
and end value deviation (corresponds to
measured error per IEC 61298-2)
< 1 bar: 0.35 %/year
≥ 1 bar: 0.15 %/year
≥ 1.6 bar: 0.1 %/year
≥ 40 bar: 0.05 %/year
In compensated range 10 ... 70 °C:
no additional temperature error
EN
Thermal change of the current output (reference
temperature 20 °C)
Ges: Overall accuracy via turndown
GG: Accuracy (e.g. 0.15 %)
TD: Turndown factor (e.g. 4:1 corresponds to TD factor 4)
14111166.02 04/2015 EN/DE
WIKA operating instructions process transmitter, model UPT-2x
Outside compensated range:
Typical < 0.1 % / 10 K
< 18 °C and > 28 °C
0.1 % / 10 K (max. 0.15 %)
55
Page 56

15. Specications
Operating conditions
Range of applications Indoor and outdoor application
Humidity ≤ 93 % r. h.
EN
Ignition protection types See product label
Vibration resistance 4 g (5 ... 100 Hz) per GL characteristic curve 2
Shock resistance 150 g (3.2 ms) per IEC 60068-2-27
Ingress protection IP 66/67
Permissible temperature ranges
Temperature class / surface temperatures for all variants except for
UPT-2*-*I*-**-**-*****-*4****-** (model without cooling element):
Direct exposure to sunlight is permitted.
II 1/2G Ex ia IIC T4/T5/T6 Ga/Gb
II 2G Ex ia IIC T4/T5/T6 Gb
II 3G Ex ic IIC T4/T5/T6 Gc
II 1/2D Ex ia IIIC T135°C Da/Db
II 2D Ex ia IIIC T135°C Db
IP 65 for versions with circular connector,
angular connector or overvoltage protection
Ingress protection only applies with closed case
head and closed cable glands.
Temperature class / surface temperature Ambient and medium temperature (°C)
T5, T6 -40 ≤ Ta ≤ +60
T4 -40 ≤ Ta ≤ +80
T135 °C
-40 ≤ Ta ≤ +40 for Pi = 750 mW
-40 ≤ Ta ≤ +70 for Pi = 650 mW
-40 ≤ Ta ≤ +80 for Pi = 550 mW
Temperature classes / surface temperatures only for variant
UPT-2*-*I*-**-**-*****-*4****-** (model with cooling element):
Temperature class Max. medium temperature (°C)
T4 120 -40 ≤ Ta ≤ +50
T3 150 -40 ≤ Ta ≤ +40
56
WIKA operating instructions process transmitter, model UPT-2x
Ambient temperature (°C)
14111166.02 04/2015 EN/DE
Page 57

15. Specications
Restrictions to temperature ranges
Ambient temperature
■
Instrument with display -20 ... +60 °C
■
Instrument without display -40 ... +80 °C
■
Instrument without display and with angular
connector
■
Instrument without display and with circular
connector
Medium temperature
■
Oxygen application -20 ... +60 °C
■
Gas hazardous application Temperature class (maximum ambient
■
Dust hazardous application maximum output values of the current supply
■
Sealings NBR: -20 ... +105 °C
-30 ... +80 °C
-30 ... +80 °C
temperature)
(EN/IEC 60079-11, section 5.6.5).
FKM: -20 ... +105 °C, -20 ... +150 °C (for
process connection with cooling element)
EPDM: -40 ... +105 °C, -40 ... +150 °C (for
process connection with cooling element)
EPDM only with hygienic process connection
EN
Materials
Wetted parts Model UPT-20, measuring range ≤ 40 bar:
Stainless steel 1.4404
Model UPT-20, measuring range > 40 bar:
Stainless steel 1.4404 and stainless steel
2.4711
Model UPT-21: Stainless steel 1.4435
Sealings NBR, FKM, EPDM
Case head Plastic (PBT) with conductive surface per
EN 60079-0:2012
Colour: night blue RAL5022
Pressure transmission medium Model UPT-20
Measuring range ≤ 40 bar:
Synthetic oil, halocarbon oil
Measuring range > 40 bar:
Dry measuring cell
Model UPT-21
Synthetic oil, halocarbon oil
14111166.02 04/2015 EN/DE
WIKA operating instructions process transmitter, model UPT-2x
57
Page 58

EN
15. Specications
Display and operating unit (option)
Refresh rate 200 ms
Main display 4 ½-digit
Additional display Selectable, three-line scale range
Bar graph display 20 segments, radial, pressure gauge simulation
Colours Background: light grey, digits: black
Operating state Display via symbols
Output signal
Output signal See product label
4 ... 20 mA, 4 ... 20 mA with HART
- U
Load in Ω (U
) / 0.023 A
B
Bmin
UB = Applied power supply
U
= Minimum permissible power supply
Bmin
Damping 0 ... 99.9 s, adjustable
After the set damping time the instrument
outputs 63 % of the applied pressure as output
signal.
Settling time t
90
Refresh rate 20 ms without HART
60 ms without HART
80 ms with HART
50 ms with HART
®
®
®
®
®
signal
Voltage supply
Power supply U
B
DC 12 ... 30 V
Maximum voltage Ui DC 30 V
Maximum current li 100 mA
Maximum power Pi (gas) 1,000 mW
Maximum power Pi (dust, depending on the
750/650/550 mW
max. ambient temperature)
Eective internal capacitance 11 nF
Eective internal inductance 100 μH
58
WIKA operating instructions process transmitter, model UPT-2x
14111166.02 04/2015 EN/DE
Page 59

15. Specications
Electrical connections
Cable gland M20 x 1.5 and spring-loaded
terminals
Angular connector DIN 175301-803A with
mating connector
Circular connector M12 x 1 (4-pin) without
mating connector
Ground screw, inside
The stated ingress protection only applies when plugged in using mating connectors
that have the appropriate ingress protection.
Reference conditions
Temperature 23 °C ± 2 °C
Power supply DC 23...25 V
Atmospheric pressure 860 ... 1,060 mbar
Humidity 35 ... 93 % r. h.
Characteristic curve determination Terminal method per IEC 61298-2
Curve characteristics Linear
Reference mounting position Vertical, diaphragm points downward
IP 66/67
max. 2.5 mm
IP 65
max. 1.5 mm
IP 65
(86 ... 106 kPa, 12.5 ... 15.4 psig)
2
(AWG 14)
2
EN
CE conformity
Pressure equipment directive 97/23/EC
EMC directive 2004/108/EG interference emission (group 1,
class B) and immunity per EN 61326-1:2013
(industrial application), EN 61326-2-3:2013 and
per NAMUR NE 21:2011
During interference, increased measuring
deviations of up to 0.15 % can occur
ATEX directive 94/9/EC
14111166.02 04/2015 EN/DE
WIKA operating instructions process transmitter, model UPT-2x
59
Page 60

15. Specications
Dimensions in mm
Process transmitter, models UPT-20 and UPT-21
EN
Process connections for model UPT-20
G L1
G ⅜ B 16
G ½ B 20
M20 x 1.5 20
Hexagon dimension: 12 mm
Spanner width: 27 mm
60
G L1
¼ NPT 13
½ NPT 19
Hexagon dimension: 12 mm
Spanner width: 27 mm
WIKA operating instructions process transmitter, model UPT-2x
G L1 L2 D1
½ NPT, female 20 19 26.5
Hexagon dimension: 12 mm
Spanner width: 27 mm
14111166.02 04/2015 EN/DE
Page 61

15. Specications
Process connections for model UPT-21
EN
G L1 L2 L3 D1
G ½ B 23 20.5 10 18
Hexagon dimension: 12 mm
Spanner width: 27 mm
G L1 L2 L3 D1
G 1 B 23 20.5 10 30
Hexagon dimension: 13 mm
Hygienic Hygienic
G L1 L2 L3 D1
G 1 B 28 25 9 29.5
Hexagon dimension: 13 mm
G L1 L2 L3 L4 D1
G 1 B 28 25 9 15.5 29.5
Hexagon dimension: 13 mm
G L1 L2 D1
G 1 ½ B 25 22 55
Hexagon dimension: 14 mm
14111166.02 04/2015 EN/DE
WIKA operating instructions process transmitter, model UPT-2x
61
Page 62

EN
16. Accessories
16. Accessories
Description Order no.
Welding socket
■
for process connection G ½ ush 1192299
■
for process connection G 1 ush 1192264
■
for process connection G 1 ½ ush 2158982
■
for process connection G 1 hygienic ush 2166011
Instrument mounting bracket
for wall or pipe mounting, stainless steel
Overvoltage protection
for transmitter, 4 ... 20 mA, M20 x 1.5
®
modem with USB interface 11025166
HART
Overvoltage protection Ex d with ameproof enclosure 12140503
Display and operating unit, model DI-PT-U
The display and operating unit can be attached in 90° steps. The display and
operating unit features a main display and an additional display.
The main display indicates the set main value, e.g. the pressure value. The
additional display shows dierent values , at the same time as the main display -
these values can be selected by the user.
The process transmitter can be congured via the display and operating unit.
14058660
14002489
14090181
62
WIKA operating instructions process transmitter, model UPT-2x
14111166.02 04/2015 EN/DE
Page 63

Appendix 1: EC Declaration of conformity model UPT-2x
EN
14111166.02 04/2015 EN/DE
WIKA operating instructions process transmitter, model UPT-2x
63
Page 64

Appendix 2: Menu tree, basic setting
EN
Basic
setting
1 Scaling 11
Application
Dry
111 Min. adjustment
adjustment
Max. adjustment
Wet
112 Min. adjustment
adjustment
Max. adjustment
12 Unit bar, mbar, ...
Pressure 121
Mounting
correction
Level 122 Unit m, cm, ...
Density Density unit
Offset change
change
apply
Density value
apply
kg/dm³, lb/ft³
64
Volume 123 Scale In Low
High
Characteristic Linear
Horiz. tank
Spherical tank
Linear. table
change
apply
change
apply
WIKA operating instructions process transmitter, model UPT-2x
14111166.02 04/2015 EN/DE
Page 65

Appendix 2: Menu tree, basic setting
Level 122 Unit m, cm, ...
Density Density unit
Density value
kg/dm³, lb/ft³
Offset change
apply
Volume 123 Scale In Low
High
change
apply
change
apply
Characteristic Linear
Horiz. tank
Spherical tank
Linear. table
Mode 124 Pressure
Sensor-
125 °C, °F
temp.
Damping
13
value
Write
protect
0 … 99,9 s
14 On/Off 141 On
Change
142
PIN
Scale Out Unit Volume unit L, m³, gal, in³, ...
Free input
Level
Volume
Off
Low 0 %
High 100 %
EN
14111166.02 04/2015 EN/DE
WIKA operating instructions process transmitter, model UPT-2x
65
Page 66

Appendix 3: Menu tree, display
EN
Display 2
Main
display
Additional
display
21 Pressure 211
Level 212
Volume 213
Current 214
PV
percent
Sensor-
temp.
PV 217
22 Pressure 221
Level 222
Volume 223
Current 224
PV
percent
Sensor-
temp.
215
216
225
226
66
Pmin/max 227
PVmin/max
228
Tmin/max 229
TAG short 22A
TAG long 22B
blank 22C
WIKA operating instructions process transmitter, model UPT-2x
14111166.02 04/2015 EN/DE
Page 67

Display 2
Main
display
21 Pressure 211
Level 212
Volume 213
Current 214
PV
percent
215
Sensor-
temp.
216
PV 217
Additional
display
22 Pressure 221
Level 222
Volume 223
Current 224
PV
percent
225
Sensor-
temp.
226
Pmin/max 227
PVmin/max
228
Tmin/max 229
TAG short 22A
TAG long 22B
blank 22C
Appendix 3: Menu tree, display
Bargraph 23
Min.
display
231 Off
Trend
24 Off 241
indicator
Max.
display
On 242
232 Off
On
EN
On
14111166.02 04/2015 EN/DE
WIKA operating instructions process transmitter, model UPT-2x
67
Page 68

Appendix 4: Menu tree, diagnositic
EN
Diagnostic 3 Simulation 31
Drag
pointer
Operating
time
Pressure
311
simulation
Current
312 4 mA
simulation
20 mA
Input
32 Pmin/max 321 display
reset
PVmin/max 322 display
reset
Tmin/max 323 display
reset
33 display 331
reset 332
68
WIKA operating instructions process transmitter, model UPT-2x
14111166.02 04/2015 EN/DE
Page 69

Appendix 5: Menu tree, detail setup
Detail setup 4 Language 41 Deutsch 411
English 412
Francais 413
Espanol 414
Marking 42 TAG short 421
TAG long 422
Current
43 Alarm signal 431 3.5 mA
output
21.5 mA
Limits 432 3.8 … 20.5 mA
4.0 … 20.0 mA
Contrast 44 0 … 9
EN
Reset 45
HART 46
Instrument
spec.
Drag
pointer
Short
address
Constant
current
451
452
461 Input
462 On
Off
14111166.02 04/2015 EN/DE
WIKA operating instructions process transmitter, model UPT-2x
69
Page 70

Appendix 6: Menu tree, info
EN
Info 5
Measuring
manufactur.
51
range
Setting 52
Date
53
Version 54
Serial no. 55 S# device number
H# HART number
70
WIKA operating instructions process transmitter, model UPT-2x
14111166.02 04/2015 EN/DE
Page 71

Inhalt
Inhalt
1. Allgemeines.....................................................74
2. Aufbau und Funktion .............................................75
2.1 Aufbau ................................................................75
2.2 Beschreibung ..........................................................75
2.3 Lieferumfang ...........................................................76
3. Sicherheit.......................................................77
3.1 Symbolerklärung ........................................................77
3.2 Bestimmungsgemäße Verwendung.........................................77
3.2.1 Besondere Bedingungen für den sicheren Betrieb ......................78
3.3 Personalqualifikation.....................................................78
3.4 Gefahren in explosionsgefährdeten Bereichen................................79
3.5 Umgang mit gefährlichen Messstoffen ......................................79
3.6 Beschilderung, Sicherheitskennzeichnungen.................................79
4. Transport, Verpackung und Lagerung ...............................81
5. Inbetriebnahme, Betrieb ..........................................82
5.1 Mechanische Montage ...................................................82
5.1.1 Anforderungen an Montagestelle ....................................82
5.1.2 Prozesstransmitter montieren.......................................83
5.2 Elektrische Installation ...................................................85
5.2.1 Sicherheitshinweise...............................................85
5.2.2 Anforderungen an Anschlusskabel...................................85
5.2.3 Anforderungen an eigensichere Spannungsversorgung .................86
5.2.4 Gehäuse öffnen ..................................................86
5.2.5 Schirmung und Erdung ............................................86
5.2.6 Anschließen .....................................................87
5.2.7 Anschlussbelegungen.............................................88
DE
6. Anzeige- und Bedieneinheit, Typ DI-PT-U ............................89
6.1 Aufbau und Beschreibung ................................................89
6.2 Bedienmenü aufrufen/verlassen ...........................................89
6.3 Ein-/Ausbau ............................................................90
6.4 Hauptanzeige einstellen ..................................................91
6.5 Zusatzanzeige einstellen .................................................92
7. Konfiguration ohne Anzeige- und Bedieneinheit ......................93
7.1 Lagekorrektur durchführen (Offset) .........................................93
7.2 Über HART-Schnittstelle konfigurieren .....................................94
14111166.02 04/2015 EN/DE
71WIKA Betriebsanleitung Prozesstransmitter, Typ UPT-2x
Page 72

DE
Inhalt
8. Konfiguration über Anzeige- und Bedieneinheit ......................95
8.1 Messaufgabe konfigurieren ...............................................95
8.1.1 Druckmessung konfigurieren .......................................95
8.1.2 Füllstandsmessung konfigurieren....................................96
8.1.3 Volumenmessung konfigurieren .....................................97
8.1.4 Kennlinien.......................................................99
8.2 Einheiten einstellen.....................................................101
8.2.1 Druckeinheit einstellen ...........................................101
8.2.2 Längeneinheit einstellen (zur Füllstandsmessung).....................101
8.2.3 Volumeneinheit einstellen.........................................102
8.2.4 Dichteeinheit und Dichtewert einstellen..............................103
8.2.5 Temperatureinheit einstellen.......................................103
8.3 Messbereich skalieren ..................................................104
8.3.1 Nassabgleich durchführen ........................................104
8.3.2 Trockenabgleich durchführen ......................................105
8.4 Modus einstellen .......................................................106
8.5 Lagekorrektur (Offset)...................................................107
8.5.1 Nassabgleich durchführen ........................................107
8.5.2 Trockenabgleich durchführen ......................................107
8.6 Dämpfung einstellen ....................................................108
8.7 Schreibschutz .........................................................109
8.7.1 Schreibschutz aktivieren/deaktivieren ...............................109
8.7.2 PIN ändern .....................................................109
9. Diagnosefunktionen .............................................110
9.1 Simulationen ..........................................................110
9.1.1 Drucksimulation durchführen ......................................110
9.1.2 Stromsimulation durchführen ......................................110
9.2 Schleppzeiger anzeigen/zurücksetzen .....................................111
9.2.1 Schleppzeiger P
9.2.2 Schleppzeiger PV
9.2.3 Schleppzeiger T
min
min
/ P
.........................................111
max
/ PV
min
/ T
......................................112
max
.........................................112
max
9.3 Betriebsdauer anzeigen/zurücksetzen .....................................112
10. Detaileinstellungen..............................................113
10.1 Sprache einstellen......................................................113
10.2 Messstelle kennzeichnen (TAG)...........................................113
10.2.1 TAG-kurz einstellen ..............................................113
10.2.2 TAG-lang einstellen ..............................................113
10.3 Alarmsignal einstellen...................................................114
10.4 Signalgrenzen einstellen.................................................114
10.5 Kontrast der LC-Anzeige einstellen . . . . . . . . . . . . . . . . . . . . . . . . . . . . . . . . . . . . . . . .115
10.6 Werkseinstellung wiederherstellen ........................................115
72
WIKA Betriebsanleitung Prozesstransmitter, Typ UPT-2x
14111166.02 04/2015 EN/DE
Page 73

Inhalt
10.7 HART-Kommunikation einstellen.........................................116
10.7.1 Kurzadresse einstellen (Multidrop-Modus) ...........................116
10.7.2 Strom konstant aktivieren/deaktivieren ..............................116
11. Geräteinformationen ............................................117
11.1 Messbereich anzeigen ..................................................117
11.2 Einstellungen anzeigen..................................................117
11.3 Herstelldatum anzeigen .................................................117
11.4 Firmware-Version anzeigen ..............................................117
11.5 Seriennummer anzeigen.................................................118
12. Wartung und Reinigung..........................................118
12.1 Wartung ..............................................................118
12.2 Reinigung.............................................................118
12.3 Rekalibrierung .........................................................118
13. Störungen .....................................................119
14. Demontage, Rücksendung und Entsorgung.........................120
15. Technische Daten ...............................................122
16. Zubehör .......................................................129
Anlage 1: EG-Konformitätserklärung Typ UPT-2x........................130
DE
Anlage 2: Menübaum, Grundeinstellung...............................131
Anlage 3: Menübaum, Anzeige .......................................133
Anlage 4: Menübaum, Diagnose......................................135
Anlage 5: Menübaum, Detaileinstellung ...............................136
Anlage 6: Menübaum, Info...........................................137
Konformitätserklärungen nden Sie online unter www.wika.de
14111166.02 04/2015 EN/DE
73WIKA Betriebsanleitung Prozesstransmitter, Typ UPT-2x
Page 74

DE
1. Allgemeines
1. Allgemeines
■
Der in der Betriebsanleitung beschriebene Prozesstransmitter wird nach dem
aktuellen Stand der Technik konstruiert und gefertigt. Alle Komponenten unterliegen
während der Fertigung strengen Qualitäts- und Umweltkriterien. Unsere Manage-
mentsysteme sind nach ISO 9001 und ISO 14001 zertiziert.
■
Diese Betriebsanleitung gibt wichtige Hinweise zum Umgang mit dem Gerät. Voraussetzung für sicheres Arbeiten ist die Einhaltung aller angegebenen Sicherheitshinweise und Handlungsanweisungen.
■
Die für den Einsatzbereich des Gerätes geltenden örtlichen Unfallverhütungsvorschriften und allgemeinen Sicherheitsbestimmungen einhalten.
■
Die Betriebsanleitung ist Produktbestandteil und muss in unmittelbarer Nähe des
Gerätes für das Fachpersonal jederzeit zugänglich aufbewahrt werden.
■
Das Fachpersonal muss die Betriebsanleitung vor Beginn aller Arbeiten sorgfältig
durchgelesen und verstanden haben.
■
Die Haftung des Herstellers erlischt bei Schäden durch bestimmungswidrige Verwen-
dung, Nichtbeachten dieser Betriebsanleitung, Einsatz ungenügend qualizierten
Fachpersonals sowie eigenmächtiger Veränderung am Gerät.
■
Es gelten die allgemeinen Geschäftsbedingungen in den Verkaufsunterlagen.
■
Technische Änderungen vorbehalten.
■
Weitere Informationen:
- Internet-Adresse: www.wika.de / www.wika.com
- zugehöriges Datenblatt: PE 86.05
- Anwendungsberater:
Tel.: +49 9372 132-0
Fax: +49 9372 132-406
info@wika.de
74
WIKA Betriebsanleitung Prozesstransmitter, Typ UPT-2x
14111166.02 04/2015 EN/DE
Page 75

2. Aufbau und Funktion
2. Aufbau und Funktion
2.1 Aufbau
DE
Prozessanschluss, Gewinde
Prozessanschluss, Schlüsseläche
Sensorgehäuse
Ex-relevante Daten
Gehäusekopf
2.2 Beschreibung
Der Prozesstransmitter verarbeitet den anstehenden Prozessdruck und wandelt diesen
in ein Stromsignal um. Dieses Stromsignal kann zur Auswertung, Steuerung und
Regelung des Prozesses verwendet werden.
HART
(Option)
Die Geräteausführung mit HART
Messbereichsskalierung (Turndown)
Messbereichsanfang und Messbereichsende können innerhalb denierter Bereiche
eingestellt werden.
14111166.02 04/2015 EN/DE
kann mit einer Steuerung (Master) kommunizieren.
Aufsteckkappe
Typenschild
Erdungsschraube, außen
Elektrischer Anschluss, Kabelverschraubung
Zweite Önung für Kabelverschraubung
(im Auslieferzustand mit Blindstopfen
verschlossen)
75WIKA Betriebsanleitung Prozesstransmitter, Typ UPT-2x
Page 76

2. Aufbau und Funktion
Anzeige- und Bedieneinheit (Zubehör)
Die Anzeige- und Bedieneinheit Typ DI-PT-U verfügt über eine Haupt- und Zusatzanzeige.
Die Hauptanzeige und die Zusatzanzeige sind fast beliebig einstellbar. In der Werkseinstellung zeigt die Hauptanzeige den Druckwert des Ausgangssignals an.
Der Prozesstransmitter kann über die Anzeige- und Bedieneinheit konguriert werden.
An Einbauposition anpassbar
Der Prozesstransmitter ist mit einem Gehäusekopf ausgestattet, der sich um 330°
drehen lässt.
DE
Die Anzeige- und Bedieneinheit lässt sich um jeweils 90° versetzt aufstecken. Dadurch
lassen sich die Messwerte unabhängig der Einbauposition ablesen.
Drehbarer Gehäusekopf
330°
Versetzbare Anzeige- und Bedieneinheit
2.3 Lieferumfang
■
Vormontierter Prozesstransmitter
■
Bestelltes Zubehör
■
Betriebsanleitung
■
Messwertprotokoll
Lieferumfang mit dem Lieferschein abgleichen.
76
WIKA Betriebsanleitung Prozesstransmitter, Typ UPT-2x
14111166.02 04/2015 EN/DE
Page 77

3. Sicherheit
3. Sicherheit
3.1 Symbolerklärung
GEFAHR!
... weist auf eine möglicherweise gefährliche Situation im explosionsgefährdeten Bereich hin, die zum Tod oder zu schweren Verletzungen führen kann,
wenn sie nicht gemieden wird.
WARNUNG!
… weist auf eine möglicherweise gefährliche Situation hin, die zum Tod oder
zu schweren Verletzungen führen kann, wenn sie nicht gemieden wird.
VORSICHT!
… weist auf eine möglicherweise gefährliche Situation hin, die zu geringfügigen oder leichten Verletzungen bzw. Sach- und Umweltschäden führen
kann, wenn sie nicht gemieden wird.
Information
… hebt nützliche Tipps und Empfehlungen sowie Informationen für einen
ezienten und störungsfreien Betrieb hervor.
3.2 Bestimmungsgemäße Verwendung
Der eigensichere Prozesstransmitter misst Relativdruck, Absolutdruck und Vakuum. Die
physikalische Größe Druck wird in ein elektrisches Signal umgewandelt.
DE
Den eigensicheren Prozesstransmitter nur in Anwendungen verwenden, die innerhalb
seiner technischen Leistungsgrenzen liegen (z. B. max. Umgebungstemperatur, Materialverträglichkeit, Zündschutzart, ...). Geräte mit frontbündigem Prozessanschluss dürfen
nicht mit Messstoen verwendet werden, welche die Membrane des Prozessanschlusses beschädigen könnnen.
→ Leistungsgrenzen siehe Kapitel 15 „Technische Daten“.
Zulassung ATEX und IECEx
Prozesstransmitter zur bestimmungsgemäßen Verwendung in explosionsgefährdeten
Bereichen, bauartgeprüft nach folgenden Normen:
IEC 60079-0:2011 + Corr.1:2012 + Corr.2:2013 / EN 60079-0:2012 + A11:2013
IEC 60079-11:2011 + Corr.1:2012 / EN 60079-11:2012
IEC 60079-26:2006 + Corr.1:2009 / EN 60079-26:2007 + Corr.1:2009
Zulassungseigenschaften ATEX und IECEx
■
Gase und Nebel Anbau an Zone 0 (EPL Ga/Gb)
Einbau in Zone 1 (EPL Gb) und Zone 2 (EPL Gc)
■
Stäube Anbau an Zone 20 (EPL Da/Db); Einbau in Zone 21 (EPL Db)
14111166.02 04/2015 EN/DE
77WIKA Betriebsanleitung Prozesstransmitter, Typ UPT-2x
Page 78

3. Sicherheit
Das Gerät ist ausschließlich für den hier beschriebenen bestimmungsgemäßen
Verwendungszweck konzipiert und konstruiert und darf nur dementsprechend verwendet werden.
Ansprüche jeglicher Art aufgrund von nicht bestimmungsgemäßer Verwendung sind
ausgeschlossen.
3.2.1 Besondere Bedingungen für den sicheren Betrieb
Für den Fall "Anbau an Zone 0 (EPL Ga/Gb)"
Die geräteinterne Trennwand (Membrane) zum medienberührten Bereich weist funkti-
DE
onsbedingt eine Wandstärke < 0,2 mm auf. In der Verwendung ist sicherzustellen, dass
eine Beeinträchtigung der Trennwand z. B. durch aggressive Medien oder durch mechanische Gefährdungen ausgeschlossen wird.
3.3 Personalqualikation
WARNUNG!
Verletzungsgefahr bei unzureichender Qualikation!
Unsachgemäßer Umgang kann zu erheblichen Personen- und Sachschäden führen.
▶
Die in dieser Betriebsanleitung beschriebenen Tätigkeiten nur durch
Fachpersonal nachfolgend beschriebener Qualifikation durchführen
lassen.
Fachpersonal
Das Fachpersonal ist aufgrund seiner fachlichen Ausbildung, seiner Kenntnisse der
Mess- und Regelungstechnik und seiner Erfahrungen sowie Kenntnis der landesspezi-
schen Vorschriften, geltenden Normen und Richtlinien in der Lage, die beschriebenen
Arbeiten auszuführen und mögliche Gefahren selbstständig zu erkennen.
Spezielle Einsatzbedingungen verlangen weiteres entsprechendes Wissen, z. B. über
aggressive Medien, Verträglichkeit von Materialien.
Besondere Kenntnisse bei Arbeiten mit Geräten für explosionsgefährdete
Bereiche:
Das Fachpersonal muss Kenntnisse haben über Zündschutzarten, Vorschriften und
Verordnungen für Betriebsmittel in explosionsgefährdeten Bereichen.
78
WIKA Betriebsanleitung Prozesstransmitter, Typ UPT-2x
14111166.02 04/2015 EN/DE
Page 79

3. Sicherheit
3.4 Gefahren in explosionsgefährdeten Bereichen
Die Angaben der Baumusterprüfbescheinigung und die landesspezischen Vorschriften zur Installation und Einsatz in explosionsgefährdeten Bereichen einhalten (z. B.
IEC 60079-14, NEC, CEC). Werden diese nicht eingehalten, können schwere Körperverletzungen und Sachschäden entstehen.
Keine beschädigten Geräte in explosionsgefährdeten Bereichen in Betrieb nehmen.
Beschädigte Geräte gewährleisten keinen zuverlässigen Explosionsschutz. Oensichtliche Schäden unverzüglich mitteilen.
3.5 Umgang mit gefährlichen Messstoen
Bei gefährlichen Messstoen wie z. B. Sauersto, Acetylen, brennbaren oder giftigen
Stoen, sowie bei Kälteanlagen, Kompressoren etc. müssen über die gesamten allge-
meinen Regeln hinaus die einschlägigen Vorschriften beachtet werden.
Messstoreste im ausgebauten Prozesstransmitter können zur Gefährdung von Personen, Umwelt und Einrichtung führen. Ausreichende Vorsichtsmaßnahmen ergreifen.
3.6 Beschilderung, Sicherheitskennzeichnungen
Typenschild
DE
AnschlussbelegungTyp
Hilfsenergie
Ausgangssignal
Messbereich
14111166.02 04/2015 EN/DE
Typcode
Herstelldatum JJJJ-MM
S# Serien-Nr.
P# Erzeugnis-Nr.
Zulässige Umgebungstemperatur
Zulassungseigenschaften
79WIKA Betriebsanleitung Prozesstransmitter, Typ UPT-2x
Page 80

DE
3. Sicherheit
Symbole
Vor Montage und Inbetriebnahme des Gerätes unbedingt die
Betriebsanleitung lesen!
Geräte mit dieser Kennzeichnung stimmen überein mit den zutreenden
europäischen Richtlinien.
ATEX Europäische Explosionsschutz-Richtlinie
(Atmosphère = AT, explosible = EX)
Geräte mit dieser Kennzeichnung stimmen überein mit den Anforderungen der europäischen Richtlinie 94/9/EG (ATEX) zum Explosionsschutz.
Ausgangssignal
Hilfsenergie
80
WIKA Betriebsanleitung Prozesstransmitter, Typ UPT-2x
14111166.02 04/2015 EN/DE
Page 81

4. Transport, Verpackung und Lagerung
4. Transport, Verpackung und Lagerung
4.1 Transport
Prozesstransmitter auf Transportschäden untersuchen.
Oensichtliche Schäden unverzüglich mitteilen.
4.2 Verpackung
Verpackung erst unmittelbar vor der Montage entfernen.
Die Verpackung aufbewahren, denn diese bietet bei einem Transport einen optimalen
Schutz (z. B. wechselnder Einbauort, Rücksendung zur Kalibrierung).
4.3 Lagerung
Zulässige Bedingungen am Lagerort:
■
Lagertemperatur: -40 ... +80 °C
■
Feuchtigkeit: 35 ... 93 % relative Feuchte (keine Betauung)
Folgende Einüsse vermeiden:
■
Nähe zu heißen Gegenständen, wenn die zulässige Lagertemperatur durch Abstrahlung überschritten wird.
■
Mechanische Vibration, mechanischer Schock (hartes Aufstellen), wenn die zulässi-
gen Werte überschritten werden, siehe Kaptiel 15 „Technische Daten“.
■
Ruß, Dampf, Staub und korrosive Gase
■
Explosionsgefährdete Umgebung, entzündliche Atmosphären, bei Geräten die nicht
ausdrücklich für den Ein- oder Anbau an Einrichtungen in explosiver Atmosphäre
geeignet sind.
DE
Prozesstransmitter in der Originalverpackung an einem Ort lagern, der die oben gelisteten Bedingungen erfüllt. Wenn die Originalverpackung nicht vorhanden ist, dann
das Gerät in einen zur Originalverpackung vergleichbaren Behälter aufbewahren, so
dass das Gerät nicht verkratzt werden kann und gegen Schäden durch Herunterfallen
geschützt ist.
14111166.02 04/2015 EN/DE
81WIKA Betriebsanleitung Prozesstransmitter, Typ UPT-2x
Page 82

5. Inbetriebnah
me, Betrieb
5. Inbetriebnahme, Betrieb
Prozesstransmitter nur durch Fachpersonal in Betrieb nehmen und betreiben.
Das Fachpersonal muss Kenntnisse haben über Zündschutzarten, Vorschriften und
Verordnungen für Betriebsmittel in explosionsgefährdeten Bereichen.
5.1 Mechanische Montage
GEFAHR!
DE
5.1.1 Anforderungen an Montagestelle
Der Prozesstransmitter kann an den Einbauort angepasst werden.
→ siehe Kapitel 2.2 „Beschreibung“
■
Ausreichend Platz für eine sichere elektrische Installation.
■
Bedienelemente sind nach der Montage erreichbar.
■
Zulässige Umgebungs- und Messstotemperaturen bleiben innerhalb der Temperaturklassen.
■
Mögliche Einschränkungen des Umgebungstemperaturbereichs durch verwendeten
Gegenstecker berücksichtigen.
■
Prozesstransmitter vor Wärmequellen schützen (z. B. Rohre oder Tanks).
Lebensgefahr durch Explosion
Bei fehlerhafter Montage und Nichtbeachten der Inhalte dieses Kapitels
besteht Explosionsgefahr.
▶
Folgende Unterkapitel aufmerksam lesen und einhalten.
Zusätzlich für Geräte mit Kühlstrecke:
■
Prozesstransmitter möglichst waagerecht montieren und eine ungehinderte Luftzirkulation am Kühlelement sicherstellen.
■
Kühlstrecke sollte möglichst wenig verschmutzen, da sonst die Kühlwirkung nicht
gewährleistet ist. Auf ausreichend Platz achten, damit die Kühlstrecke gereinigt
werden kann.
82
WIKA Betriebsanleitung Prozesstransmitter, Typ UPT-2x
14111166.02 04/2015 EN/DE
Page 83

5. Inbetriebnah
5.1.2 Prozesstransmitter montieren
GEFAHR!
Beschädigte Membrane des frontbündigen Prozessanschlusses
Bei einer beschädigten Membrane ist der Explosionsschutz nicht mehr
gewährleistet. Durch eine daraus resultierende Explosion besteht höchste
Lebensgefahr.
▶
Vor Inbetriebnahme die Membrane optisch auf Beschädigungen überprüfen. Auslaufende Flüssigkeit weist auf eine Beschädigung hin.
▶
Die Membrane vor Kontakt mit abrasiven Messstoffen und gegen Schläge
schützen.
Abdichten
Zylindrische Gewinde
Dichtäche mit Flachdichtungen,
Dichtlinsen oder WIKA-Proldichtungen
abdichten.
Kegelige Gewinde
Gewinde mit Dichtwerkstoen
umwickeln, z. B. PTFE-Band.
me, Betrieb
DE
nach EN 837 nach DIN 3852-E
14111166.02 04/2015 EN/DE
NPT, R und PT
83WIKA Betriebsanleitung Prozesstransmitter, Typ UPT-2x
Page 84

5. Inbetriebnah
Einschrauben
VORSICHT!
Unsachgemäße Montage
Prozesstransmitter wird beschädigt.
▶
Prozesstransmitter über Schlüsselfäche festziehen.
▶
Nicht über Sensorgehäuse oder Gehäusekopf festziehen.
▶
Passenden Gabelschlüssel verwenden.
▶
Gewindegänge nicht verkanten.
Den Prozesstransmitter mit einem Schraubenschlüssel über die Schlüsseläche in die
DE
Montagestelle schrauben.
Das Anzugsmoment ist abhängig von der Dimension des Prozessanschlusses sowie
der verwendeten Dichtung (Form/Werksto).
me, Betrieb
84
Schlüsseläche
Sensorgehäuse
Gehäusekopf
Angaben zu Einschraublöchern und Einschweißstutzen siehe Technische
Information IN 00.14 unter www.wika.de.
WIKA Betriebsanleitung Prozesstransmitter, Typ UPT-2x
14111166.02 04/2015 EN/DE
Page 85

5. Inbetriebnah
me, Betrieb
5.2 Elektrische Installation
GEFAHR!
Lebensgefahr durch Explosion
Bei fehlerhafter Montage und Nichtbeachten der Inhalte dieses Kapitels
besteht Explosionsgefahr.
▶
Folgende Unterkapitel aufmerksam lesen und einhalten.
Die Angaben der Baumusterprüfbescheinigung und die landesspezischen Vorschriften
zur Installation und Einsatz in explosionsgefährdeten Bereichen einhalten (z. B. IEC
60079-14, NEC, CEC). Werden diese nicht eingehalten, können schwere Körperverletzungen und Sachschäden entstehen.
→ Baumusterprüfbescheinigung steht unter www.wika.de zum Download bereit.
5.2.1 Sicherheitshinweise
■
Nur im spannungslosen Zustand anschließen.
■
Falls Überspannungen zu erwarten sind, Überspannungsschutzgeräte installieren.
■
Freiliegende Kabelstellen dürfen nicht in der Nähe von blanken Metallteilen liegen.
Einen Mindestabstand von 5 mm einhalten.
■
Sicherstellen, dass die Kabel ordnungsgemäß installiert sind und die Kabelverschraubung oder Steckeranbindung sicher verschlossen und abgedichtet sind.
5.2.2 Anforderungen an Anschlusskabel
■
Für die Anwendung geeignetes Anschlusskabel verwenden und konfektionieren.
Bei Kabeln mit exiblen Adern immer dem Aderquerschnitt entsprechende
Adernendhülsen verwenden.
■
Bei elektromagnetischer Strahlung über den Prüfwerten nach EN 61326, ein
abgeschirmtes Anschlusskabel verwenden.
■
Bei Verwendung von Rundsteckverbinder M12 x 1 (4-polig) wird der Gegenstecker
vom Kunden beigestellt. Auf passende Ausführung des Stecker-Herstellers achten.
DE
Elektrische Anschlüsse
Kabelverschraubung M20 x 1,5 und
Federkraftklemmen
Winkelstecker DIN 175301-803A mit
Gegenstecker
Rundstecker M12 x 1 (4-polig) ohne
Gegenstecker
Erdungsschraube, innen 0,13 ... 2,5 mm²
Erdungsschraube, außen 0,13 ... 4 mm²
14111166.02 04/2015 EN/DE
Schutzart: IP 66/67
Kabeldurchmesser: 7 ... 12 mm
Aderquerschnitt: max. 2,5 mm
Einzelkabel: 0,13 ... 2,5 mm²
Aderendhülsen: 0,13 ... 1,5 mm²
Für Kabeldurchmesser außerhalb 7 ... 12 mm,
Dichtung und Kabelverschraubung tauschen
Schutzart: IP 65
Kabeldurchmesser: 6 ... 8 mm
Aderquerschnitt: max. 1,5 mm²
Schutzart: IP 65
Spezikationen gem. Hersteller beachten
2
(AWG 14)
85WIKA Betriebsanleitung Prozesstransmitter, Typ UPT-2x
Page 86

5. Inbetriebnah
me, Betrieb
5.2.3 Anforderungen an eigensichere Spannungsversorgung
■
Den Prozesstransmitter aus einem eigensicheren Stromkreis (Ex ia) versorgen. Die
innere wirksame Kapazität und Induktivität beachten (→ siehe Kapitel 15 „Technische
Daten“).
■
Die nötige Trennung der Spannungsversorgung zwischen Ex- und Nicht-Ex-Bereich
mit einer bescheinigten Trennbarriere oder Zenerbarriere herstellen. (Geeignete
Trennbarriere Typ KFD2-STC4-Ex1)
■
Bei Anwendungen, die einen EPL Gb oder Db erfordern, darf der Versorgungs- und
Signalstromkreis das Schutzniveau „ib“ haben. Dann besitzt die Zusammenschaltung und der Transmitter das Schutzniveau II 2G Ex ib IIC T4/T5/T6 Gb oder II 2D Ex
DE
ib IIIC T4/T5/T6 Db, auch wenn der Prozesstransmitter anders gekennzeichnet ist
(→ siehe EN 60079-14 Abschnitt 5.4)
5.2.4 Gehäuse önen
VORSICHT!
Eindringende Feuchtigkeit
Feuchtigkeit kann den Prozesstransmitter zerstören.
▶
Geöffneten Prozesstransmitter vor Feuchtigkeit schützen.
▶
Gehäusekopfdeckel per Hand abschrauben und Anzeige- und Bedieneinheit bzw.
Aufsteckkappe abziehen.
5.2.5 Schirmung und Erdung
Der Prozesstransmitter muss entsprechend dem Erdungskonzept der Anlage geschirmt
und geerdet werden.
▶
Kabelschirm mit Potentialausgleich verbinden.
▶
Prozessanschluss oder außenliegende Erdungsschraube mit Potentialausgleich
verbinden.
86
WIKA Betriebsanleitung Prozesstransmitter, Typ UPT-2x
14111166.02 04/2015 EN/DE
Page 87

5. Inbetriebnah
me, Betrieb
5.2.6 Anschließen
1. Anschlusskabel durch Kabelverschraubung führen und anschließen.
Sicherstellen, dass am Kabelende keine Feuchtigkeit eintreten kann.
→ Anschlussbelegung siehe Kapitel 5.2.7 „Anschlussbelegungen“.
2. Kabelverschraubung festziehen.
■
Empfohlenes Anzugsmoment 1,5 Nm
■
Dichtungen auf korrekten Sitz überprüfen, um Schutzart zu gewährleisten.
3. Lagekorrektur durchführen.
→ Ohne LC-Anzeige, siehe Kapitel 7.1 „Lagekorrektur durchführen (Oset)“
→ Über HART
®
, siehe Kapitel 7.2 „Über HART-Schnittstelle kongurieren“
→ Mit LC-Anzeige, siehe Kapitel 8.5 „Lagekorrektur (Oset)“
4. Aufsteckkappe bzw. Anzeige- und Bedieneinheit aufstecken und
Gehäusekopfdeckel bis zum Anschlag festschrauben.
DE
14111166.02 04/2015 EN/DE
87WIKA Betriebsanleitung Prozesstransmitter, Typ UPT-2x
Page 88

5. Inbetriebnah
1
2
3
4
3
1
2
5.2.7 Anschlussbelegungen
Federkraftklemme
me, Betrieb
AnschlussbelegungZugang für Anschlusskabel
DE
Kabelverschraubung
Prozessanschluss
Positiver Versorgungsanschluss +
Winkelstecker DIN 175301-803 A
+ 1
Negativer Versorgungsanschluss –
Erdungsschraube, innen (GND)
Rundstecker M12 x 1 (4-polig)
+ 1
– 2
Schirm GND
Der Schirmanschluss ist im Geräteinneren aufgelegt.
88
WIKA Betriebsanleitung Prozesstransmitter, Typ UPT-2x
– 3
Schirm 4
14111166.02 04/2015 EN/DE
Page 89

6. Anzeige- und Bedieneinheit, Typ DI-PT-U
6. Anzeige- und Bedieneinheit, Typ DI-PT-U
6.1 Aufbau und Beschreibung
Die Anzeige- und Bedieneinheit Typ DI-PT-U ist als Zubehör erhältlich.
Sie kann in 90°-Schritten auf die Geräteelektronik aufgesteckt werden. Dadurch kann
die LC-Anzeige abgelesen werden, wenn der Prozesstransmitter seitlich oder kopfüber
eingebaut ist.
Beschreibung
Richtungstaste [▲]
Escape-Taste [ESC]
Zusatzanzeige
Einheit
Hauptanzeige
Trendanzeige
Bargraph mit Über-/Unterlastpfeilen
und Schleppzeigerfunktion
Eingabetaste [↵]
Richtungstaste [▼]
DE
6.2 Bedienmenü aufrufen/verlassen
Aufrufen: [↵] drücken.
Verlassen: [ESC] wiederholt drücken, bis Menü verlassen ist.
Erfolgt 3 min. keine Eingabe wird das Menü automatisch verlassen und der
zuletzt eingestellte Anzeigemodus wird aktiviert.
Bei ungültiger Eingabe erscheint auf der LC-Anzeige für 2 Sekunden „Eingabefehler“, und das vorherige Menü wird aufgerufen.
14111166.02 04/2015 EN/DE
89WIKA Betriebsanleitung Prozesstransmitter, Typ UPT-2x
Page 90

6. Anzeige- und Bedieneinheit, Typ DI-PT-U
6.3 Ein-/Ausbau
VORSICHT!
Eindringende Feuchtigkeit.
Feuchtigkeit kann den Prozesstransmitter zerstören.
▶
Geöffneten Prozesstransmitter vor Feuchtigkeit schützen.
▶
Gehäusekopf dicht verschließen.
1. Gehäusekopfdeckel per Hand abschrauben.
DE
2. Einbau
Aufsteckkappe abziehen und Anzeige- und Bedieneinheit
in beliebiger Rastposition (0°, 90°, 180°, 270°) aufstecken.
Ausbau
Anzeige- und Bedieneinheit abziehen und Aufsteckkappe
aufstecken
3. Gehäusekopfdeckel verschrauben.
Sicherstellen, dass Gehäusekopf dicht verschlossen ist.
90
WIKA Betriebsanleitung Prozesstransmitter, Typ UPT-2x
14111166.02 04/2015 EN/DE
Page 91

6. Anzeige- und Bedieneinheit, Typ DI-PT-U
6.4 Hauptanzeige einstellen
Die Hauptanzeige kann folgende Werte anzeigen:
■
Druck Anliegender Druck wird angezeigt.
■
Füllstand Füllstand wird angezeigt.
■
Volumen Volumen wird angezeigt.
■
Strom Ausgangssignal wird angezeigt.
■
PV-Prozent Ausgangssignal als prozentualer Anteil wird angezeigt.
■
Sensortemperatur Temperatur am Sensor wird angezeigt.
■
PV (Primary Value) Dem Modus entsprechender Wert wird angezeigt.
Wird der Modus verändert, ändert sich auch die Hauptanzeige.
1. Bedienmenü mit [↵] önen.
„Anzeige“ auswählen und mit [↵] bestätigen.
2. „Hauptanzeige“ auswählen und mit [↵] bestätigen.
DE
3. Wert auswählen und mit [↵] bestätigen.
» Hauptanzeige zeigt ausgewählten Wert an.
14111166.02 04/2015 EN/DE
91WIKA Betriebsanleitung Prozesstransmitter, Typ UPT-2x
Page 92

6. Anzeige- und Bedieneinheit, Typ DI-PT-U
6.5 Zusatzanzeige einstellen
Die Zusatzanzeige kann folgende Werte anzeigen:
■
Druck Anliegender Druck wird angezeigt.
■
Füllstand Füllstand wird angezeigt.
■
Volumen Volumen wird angezeigt.
■
Strom Ausgangssignal wird angezeigt.
DE
■
PV-Prozent Ausgangssignal als prozentualer Anteil wird angezeigt.
■
Sensortemperatur Temperatur am Sensor wird angezeigt.
■
PV (Primary Value) Dem Modus entsprechender Wert wird angezeigt.
Wird der Modus verändert, ändert sich auch die Hauptanzeige.
Schleppzeigerwerte
■
P
/ P
min
PV
T
min
min
/ T
max
/ PV
max
max
■
■
Weitere Daten
■
TAG-kurz (max. 8 Großbuchstaben und Zahlen)
■
TAG-lang (max. 32 alphanumerische Zeichen)
■
Leer (Zusatzanzeige ausgeschaltet)
1. Bedienmenü mit [↵] önen.
„Anzeige“ auswählen und mit [↵] bestätigen.
2. „Zusatzanzeige“ auswählen und mit [↵] bestätigen.
3. Wert auswählen und mit [↵] bestätigen.
» Zusatzanzeige zeigt ausgewählten Wert an.
92
WIKA Betriebsanleitung Prozesstransmitter, Typ UPT-2x
14111166.02 04/2015 EN/DE
Page 93

7. Konguration ohne Anzeige- und Bedieneinheit
7. Konguration ohne Anzeige- und Bedieneinheit
7.1 Lagekorrektur durchführen (Oset)
Die Lagekorrektur korrigiert einen Nullpunktversatz des Ausgangsignals, indem der
Nullpunkt neu festgelegt wird. Der Nullpunktversatz ist durch die Einbaulage bedingt.
Korrekturbereich: ±20 % vom maximalen Messbereich
Benötigtes Werkzeug: Multimeter (Strommesser)
1. Gehäusekopfdeckel abschrauben und Aufsteckkappe abziehen.
2. [Zero] ca. 2 s betätigen (z. B. mit Messspitze eines Multimeters).
» Lagekorrektur erfolgreich: Kontrolldiode leuchtet 2 s.
» Lagekorrektur nicht erfolgreich: Kontrolldiode blinkt 5 mal.
DE
3. Ausgangssignal wie folgt kontrollieren.
VORSICHT!
Falsche Kontaktierung
Kurzschluss zerstört den Prozesstransmitter.
▶
Sicherstellen, dass Multimeter nicht mit positivem Versorgungsanschluss in Berührung kommt.
▶
Multimeter auf Strommessung stellen.
▶
Positive Messleitung des Multimeters mit dem Testkontakt verbinden.
▶
Negative Messleitung des Multimeters mit dem negativen Versorgungsanschluss
verbinden.
» Das Ergebnis der Strommessung sollte im drucklosen Zustand einen Wert
zwischen 4 ... 20 mA ergeben. Liegt der Umgebungsluftdruck außerhalb des
Messbereiches, kann der gemessene Strom < 4 mA oder > 20mA sein.
Kontrolldiode
Lagekorrektur, [Zero]-Taste
Testkontakt
Positiver Versorgungsanschluss +
Negativer Versorgungsanschluss –
14111166.02 04/2015 EN/DE
93WIKA Betriebsanleitung Prozesstransmitter, Typ UPT-2x
Page 94

7. Konguration ohne Anzeige- und Bedieneinheit
7.2 Über HART-Schnittstelle kongurieren
®
HART
-fähige Prozesstransmitter können mit einer Bediensoftware (z. B. PACTware®),
einer Prozesssteuerungssoftware (z. B. AMS oder Simatic PDM) oder einem Handheld
(z. B. FC475 von Emerson) bedient und konguriert werden.
Die Bedienung der jeweiligen Menüs wird in den zugehörigen Online-Hilfen beschrieben.
Die Gerätetreiber stehen auf www.wika.de zum Download bereit.
DE
Prozesstransmitter mit PC verbinden (HART
Alle Arbeiten nur im sicheren Bereich durchführen.
1. HART
2. HART
®
-Modem mit Prozesstransmitter verbinden.
®
-Modem mit PC oder Notebook verbinden.
Ex-Bereich Sicherer Bereich
®
)
HART-Widerstand 250 ohm
HART-Modem
RS-232
=
~
Spannungsquelle
94
WIKA Betriebsanleitung Prozesstransmitter, Typ UPT-2x
14111166.02 04/2015 EN/DE
Page 95

8. Konguration über Anzeige- und Bedieneinheit
8. Konguration über Anzeige- und Bedieneinheit
8.1 Messaufgabe kongurieren
8.1.1 Druckmessung kongurieren
1. Bedienmenü mit [↵] önen.
„Grundeinstell.“ auswählen und mit [↵] bestätigen.
2. „Anwendung“ auswählen und mit [↵] bestätigen.
3. „Druck“ auswählen und mit [↵] bestätigen.
4. „Einheit“ auswählen und mit [↵] bestätigen.
5. Druckeinheit auswählen und mit [↵] bestätigen.
Druckeinheit ist eingestellt.
6. Mit [ESC] eine Menüebene zurück springen.
„Modus“ auswählen und mit [↵] bestätigen.
DE
7. „Druck“ auswählen und mit [↵] bestätigen.
» Modus ist eingestellt.
8. Messbereich skalieren.
→ Siehe Kapitel 8.3 „Messbereich skalieren“.
9. Lagekorrektur durchführen.
→ Siehe Kapitel 8.5 „Lagekorrektur (Oset)“.
» Druckmessung ist konguriert.
14111166.02 04/2015 EN/DE
95WIKA Betriebsanleitung Prozesstransmitter, Typ UPT-2x
Page 96

8. Konguration über Anzeige- und Bedieneinheit
8.1.2 Füllstandsmessung kongurieren
Voraussetzung
■
Längeneinheit für Füllstandshöhe ist bekannt.
■
Dichte des Messstoes ist bekannt
1. Bedienmenü mit [↵] önen.
„Grundeinstell.“ auswählen und mit [↵] bestätigen.
2. „Anwendung“ auswählen und mit [↵] bestätigen.
DE
3. „Füllstand“ auswählen und mit [↵] bestätigen.
4. „Einheit“ auswählen und mit [↵] bestätigen.
5. Längeneinheit auswählen und mit [↵] bestätigen.
» Längeneinheit ist eingestellt.
6. „Dichte“ auswählen und mit [↵] bestätigen.
7. „Dichteeinheit“ auswählen und mit [↵] bestätigen.
8. Dichteeinheit auswählen und mit [↵] bestätigen.
» Dichteeinheit ist eingestellt.
9. „Dichtewert“ auswählen und mit [↵] bestätigen.
10. Zier über [▲] [▼] einstellen und mit [↵] bestätigen.
» Cursor springt zur nächsten Zier.
» Vorgang für alle Ziern wiederholen.
» Dichtewert ist eingestellt.
11. Mit [ESC] zwei Menüebenen zurück springen.
„Modus“ auswählen und mit [↵] bestätigen.
12. „Füllstand“ auswählen und mit [↵] bestätigen.
» Modus ist eingestellt.
13. Lagekorrektur durchführen.
→ Siehe Kapitel 8.5 „Lagekorrektur (Oset)“.
» Füllstandsmessung ist konguriert.
96
WIKA Betriebsanleitung Prozesstransmitter, Typ UPT-2x
14111166.02 04/2015 EN/DE
Page 97

8. Konguration über Anzeige- und Bedieneinheit
8.1.3 Volumenmessung kongurieren
Voraussetzung
■
Längeneinheit für Füllstandshöhe ist bekannt
■
Messstodichte ist bekannt
■
Kennlinie des Tanks ist bekannt (→ siehe Kapitel 8.1.4 „Kennlinien“)
1. Bedienmenü mit [↵] önen.
„Grundeinstell.“ auswählen und mit [↵] bestätigen.
2. „Anwendung“ auswählen und mit [↵] bestätigen.
3. „Füllstand“ auswählen und mit [↵] bestätigen.
4. „Einheit“ auswählen und mit [↵] bestätigen.
5. Längeneinheit auswählen und mit [↵] bestätigen.
» Längeneinheit ist eingestellt.
6. „Dichte“ auswählen und mit [↵] bestätigen.
7. „Dichteeinheit“ auswählen und mit [↵] bestätigen.
8. Dichteeinheit auswählen und mit [↵] bestätigen.
» Dichteeinheit ist eingestellt.
DE
9. „Dichtewert“ auswählen und mit [↵] bestätigen.
10. Dichte des Messstoes einstellen.
Ziern über [▲] [▼] einstellen und mit [↵] bestätigen.
» Cursor springt zur nächsten Zier.
» Vorgang für alle Ziern wiederholen.
» Dichtewert ist eingestellt.
11. Mit [ESC] zwei Menüebenen zurück springen.
„Volumen“ auswählen und mit [↵] bestätigen.
12. „Scale In“ auswählen und mit [↵] bestätigen.
14111166.02 04/2015 EN/DE
97WIKA Betriebsanleitung Prozesstransmitter, Typ UPT-2x
Page 98

8. Konguration über Anzeige- und Bedieneinheit
13. „Low“ auswählen und mit [↵] bestätigen.
14. „ändern“ auswählen und mit [↵] bestätigen.
15. Messbereichsanfang bezogen auf die Füllhöhe des Tanks
einstellen.
Ziern über [▲] [▼] einstellen und mit [↵] bestätigen.
» Cursor springt zur nächsten Zier.
DE
» Vorgang für alle Ziern wiederholen.
» Messbereichsanfang ist eingestellt.
16. Mit [ESC] eine Menüebene zurück springen.
„High“ auswählen und mit [↵] bestätigen.
17. „ändern“ auswählen und mit [↵] bestätigen.
18. Messbereichsende bezogen auf die Füllhöhe des Tanks
einstellen.
Ziern über [▲] [▼] einstellen und mit [↵] bestätigen.
» Cursor springt zur nächsten Zier.
» Vorgang für alle Ziern wiederholen.
» Messbereichsende ist eingestellt.
19. Mit [ESC] zwei Menüebenen zurück springen.
„Kennlinie“ auswählen und mit [↵] bestätigen.
20. Kennlinie auswählen und mit [↵] bestätigen.
» Kennlinie ist eingestellt.
→ Erklärung der Kennlinien siehe Kapitel 8.1.4 "Kennlinien"
21. „Scale Out“ auswählen und mit [↵] bestätigen.
22. „Einheit“ auswählen und mit [↵] bestätigen.
23. Volumeneinheit auswählen und mit [↵] bestätigen.
■
Volumeneinheit: Standardeinheiten (z. B. Liter, m³, ...)
■
freie Eingabe: frei denierbare Einheit (auswählbar unter
„Volumeneinheit“)
» Volumeneinheit ist eingestellt.
98
WIKA Betriebsanleitung Prozesstransmitter, Typ UPT-2x
14111166.02 04/2015 EN/DE
Page 99

8. Konguration über Anzeige- und Bedieneinheit
8.1.4 Kennlinien
Linear
Wird bei stehenden Tanks verwendet.
Tank liegend
Wird bei liegenden Tanks verwendet.
DE
14111166.02 04/2015 EN/DE
99WIKA Betriebsanleitung Prozesstransmitter, Typ UPT-2x
Page 100

DE
8. Konguration über Anzeige- und Bedieneinheit
Kugeltank
Wird bei kugelförmigen Tanks verwendet.
Linearisierungstabelle
Wird für Sonderformen verwendet. Die Linearisierungstabelle ist optional ab Werk
hinterlegt oder kann mit HART
®
übertragen werden.
100
WIKA Betriebsanleitung Prozesstransmitter, Typ UPT-2x
14111166.02 04/2015 EN/DE
 Loading...