Page 1
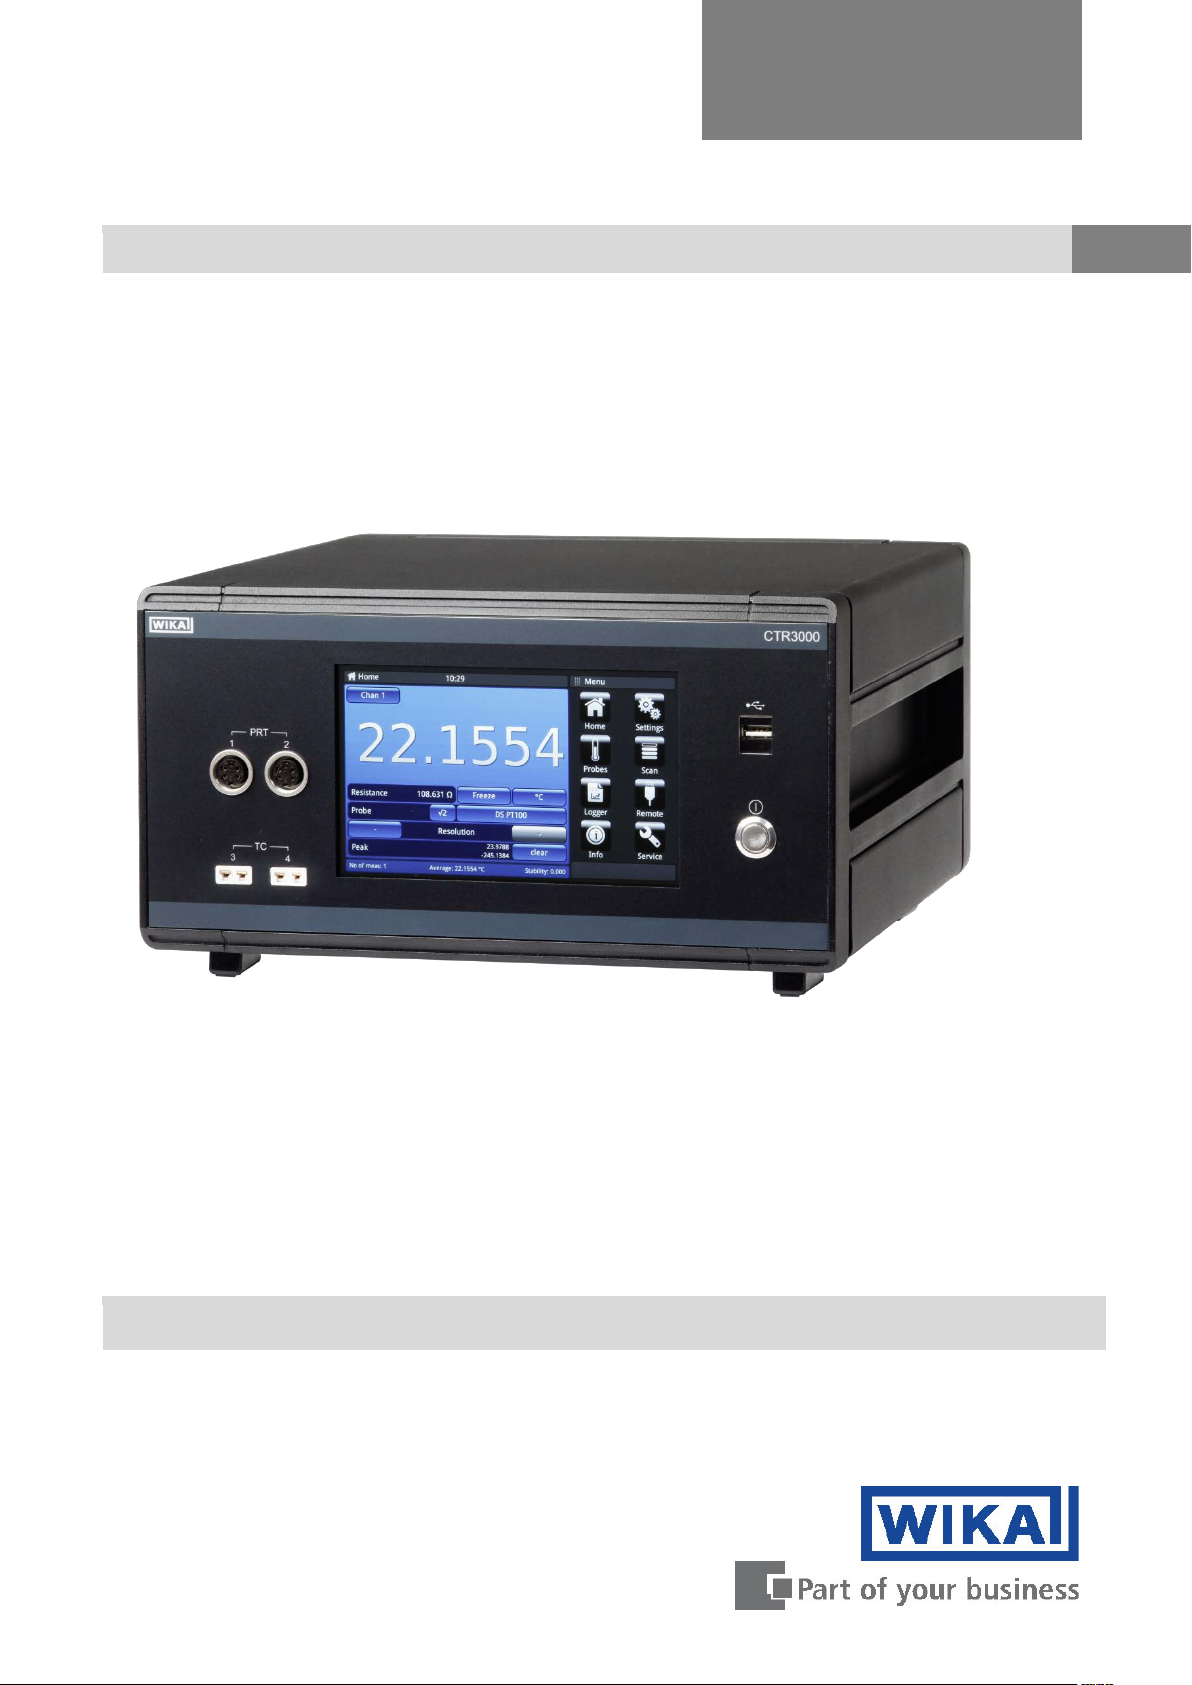
Multi-functional precision thermometer, model CTR3000
GB
Multi-functional precision thermometer, model CTR3000
Operating instructions
Page 2

14191761.01 03/2017 EN
GB
Multi-functional precision thermometer, model CTR3000
Page
1 - 67
Further languages can be found at www.wika.com.
© 2016 WIKA Alexander Wiegand SE & Co. KG
All rights reserved.
WIKA® is a registered trademark in various countries.
Prior to starting any work, read the operating instructions!
Keep for later use!
2 WIKA Operating Instruction, model CTR3000
Page 3

Contents
EN
14191761.01 03/2017 EN
1. General Information ............................................................................................................. 6
1.1 Software license agreement ............................................................................................. 6
2. Short overview ..................................................................................................................... 7
2.1 Overview ............................................................................................................................ 7
2.2 Description ........................................................................................................................ 7
2.3 Scope of delivery ............................................................................................................... 7
3. Safety .................................................................................................................................. 8
3.1 Explanation of symbols .................................................................................................... 8
3.2 Intended use ...................................................................................................................... 8
3.3 Improper use .................................................................................................................... 10
3.4 Responsibility of the operator ........................................................................................ 10
3.5 Personnel qualification ................................................................................................... 10
3.6 Personal protective equipment ...................................................................................... 11
3.7 Labelling, safety marks ................................................................................................... 11
4. Design and Function .......................................................................................................... 12
4.1 Overview .......................................................................................................................... 12
4.2 Principles of measurement ............................................................................................. 13
4.2.1 PRT measurement ............................................................................................................. 13
4.2.2 Thermocouple measurement ............................................................................................. 13
4.2.3 Thermocouple reference junction compensation ................................................................ 13
4.3 Front panel ....................................................................................................................... 14
4.3.1 Overview ........................................................................................................................... 14
4.3.2 Warm up time .................................................................................................................... 14
4.3.3 Main screen; Home ............................................................................................................ 15
4.3.4 Thermometer inputs ........................................................................................................... 16
4.3.4.1 Resistance thermometers ................................................................................. 16
4.3.4.2 Thermocouples ................................................................................................. 17
4.4 Application selection and parameter inputs ................................................................. 17
4.5 Rear panel ........................................................................................................................ 18
4.5.1 USB interface (standard).................................................................................................... 18
4.5.2 Ethernet interface .............................................................................................................. 18
4.5.3 RS232 Communication interface card ................................................................................ 18
4.5.4 Power input ........................................................................................................................ 18
4.5.5 Input channel expansion port (CTS Expansion, TC Expansion) .......................................... 19
4.5.6 Name plate ........................................................................................................................ 19
4.6 Applications and their functions .................................................................................... 20
WIKA Operating Instruction, model CTR3000 3
Page 4

Contents
EN
14191761.01 12/2016 EN
4.6.1 Application <<Home>> ...................................................................................................... 20
4.6.1.1 Status bar ......................................................................................................... 21
4.6.1.2 Channel selection ............................................................................................. 21
4.6.1.3 Freeze function ................................................................................................. 22
4.6.1.4 Unit selection .................................................................................................... 22
4.6.1.5 √2 current multiplier ........................................................................................... 23
4.6.1.6 Probe selection ................................................................................................. 23
4.6.1.7 Resolution “+/-“function ..................................................................................... 24
4.6.1.8 Peak “clear” function ......................................................................................... 24
4.6.1.9 Information bar .................................................................................................. 25
4.6.2 Application <<Settings>> ................................................................................................... 26
4.6.2.1 Language .......................................................................................................... 26
4.6.2.2 Backlight-Off ..................................................................................................... 26
4.6.2.3 Brightness ......................................................................................................... 27
4.6.2.4 Time and Date .................................................................................................. 27
4.6.2.5 Sound ............................................................................................................... 28
4.6.2.6 Data separator .................................................................................................. 28
4.6.2.7 Factory reset ..................................................................................................... 28
4.6.2.8 Display – Average value .................................................................................... 29
4.6.2.9 Probes – Standard probe settings ..................................................................... 29
4.6.2.10 Probes – Alarm for probes ................................................................................. 30
4.6.3 Application <<Probes>> .................................................................................................... 31
4.6.3.1 New probe <<Resistance thermometers>> ....................................................... 32
4.6.3.2 New probe <<thermocouples>> ........................................................................ 35
4.6.3.3 New probe <<thermistors>> .............................................................................. 38
4.6.3.4 Configure existing probes ................................................................................. 40
4.6.3.5 SMART probes ................................................................................................. 41
4.6.4 Application <<Scan>> ........................................................................................................ 42
4.6.4.1 Configuring a scan ............................................................................................ 42
4.6.4.2 View .................................................................................................................. 43
4.6.5 Application <<Logger>> ..................................................................................................... 46
4.6.5.1 General ............................................................................................................. 47
4.6.5.2 Log files ............................................................................................................ 48
4.6.6 Application <<Remote>> ................................................................................................... 50
4.6.7 Application <<Info>> .......................................................................................................... 51
4.6.8 Application <<Service>> .................................................................................................... 51
4.6.8.1 Firmware update ............................................................................................... 51
4.6.8.2 Program SMART probe ..................................................................................... 52
4.6.8.3 WIKA service level ............................................................................................ 52
4.7 Download function .......................................................................................................... 53
4.7.1 Log files ............................................................................................................................. 53
4 WIKA Operating Instruction, model CTR3000
Page 5

Contents
EN
14191761.01 03/2017 EN
4.7.2 Screenshot ........................................................................................................................ 54
4.7.3 Measured Probes .............................................................................................................. 54
4.7.4 SMART probes .................................................................................................................. 55
4.7.5 All probes .......................................................................................................................... 55
4.7.6 Instrument details .............................................................................................................. 56
4.8 Calibration services ........................................................................................................ 56
4.9 Remote operation ............................................................................................................ 56
5. Transport, packaging and storage ...................................................................................... 57
5.1 Transport ......................................................................................................................... 57
5.2 Packaging and storage ................................................................................................... 57
6. Commissioning, operation ................................................................................................. 58
7. Faults................................................................................................................................. 59
8. Maintenance, cleaning and servicing ................................................................................. 60
8.1 Maintenance .................................................................................................................... 60
8.2 Cleaning ........................................................................................................................... 60
8.3 Recalibration ................................................................................................................... 60
9. Dismounting, return and disposal ....................................................................................... 61
9.1 Dismounting .................................................................................................................... 61
9.2 Return ............................................................................................................................... 61
9.3 Disposal ........................................................................................................................... 62
10. Specifications .................................................................................................................... 63
11. Technical information ......................................................................................................... 64
11.1 Measurement uncertainty and traceability .................................................................... 64
11.2 International temperature scale ..................................................................................... 64
11.3 Measurement ................................................................................................................... 65
11.3.1 Thermocouple ................................................................................................................... 65
11.3.1.1 Introduction ....................................................................................................... 65
11.3.1.2 Connection ....................................................................................................... 66
11.3.2 Resistance thermometer .................................................................................................... 66
11.3.2.1 Linearization functions for resistance thermometers .......................................... 66
Declarations of conformity can be found online at www.wika.com.
WIKA Operating Instruction, model CTR3000 5
Page 6

1. General Information
EN
14191761.01 12/2016 EN
(S)PRT/RTD
Resistance thermometer
TC
Thermocouple
1. General Information
• The instrument described in the operating instructions has been designed and manufactured
using state-of-the-art technology. All components are subject to stringent quality and
environmental criteria during production. Our management systems are certified to ISO 9001
and ISO 14001.
• These operating instructions contain important information on handling the multi-functional
precision thermometer CTR3000. Working safely requires that all safety instructions and
work instructions are observed.
• Observe the relevant local accident prevention regulations and general safety regulations for
the range of use of the multi-functional precision thermometer CTR3000.
• The operating instructions are part of the instrument and must be kept in the immediate
vicinity of the multi-functional precision thermometer CTR3000 and readily accessible to
skilled personnel at any time.
• Skilled personnel must have carefully read and understood the operating instructions, prior
to beginning any work.
• The general terms and conditions, contained in the sales documentation, shall apply.
• Subject to technical modifications.
• Factory calibrations/DKD/DAkkS calibrations are carried out in accordance with international
standards.
Further information:
- Internet address: www.wika.de / www.wika.com
- Relevant data sheet: CT 60.15
- Application consultant: Tel.: +49 9372 132-0
Fax: +49 9372 132-406
info@wika.de
Abbreviations, definitions
1.1 Software license agreement
The software included in this product contains copyrighted software that is licensed under the
GPL/LGPL. A copy of the license texts can be found at the end of this document. You may obtain
the complete Corresponding Source code from us for a period of three years after our last shipment
of this product and/or spare parts therefor, which will be no earlier than 01/01/2030, for a fee of 10€.
Please write an e-mail to CTServiceteam@wika.com
and write „Corresponding Source for
CTR3000“ in the subject line. This offer is valid to anyone in receipt of this information.
WARNING! Installing modified versions of open source software components on the
product will result in the loss of warranty. Also support service and software updates will
be refused. Make sure to follow the safety precautions in the user manual. Improper access
to the instrument is likely to result in its damaging.
6 WIKA Operating Instruction, model CTR3000
Page 7
3. Safety
EN
14191761.01 03/2017 EN
2. Short overview
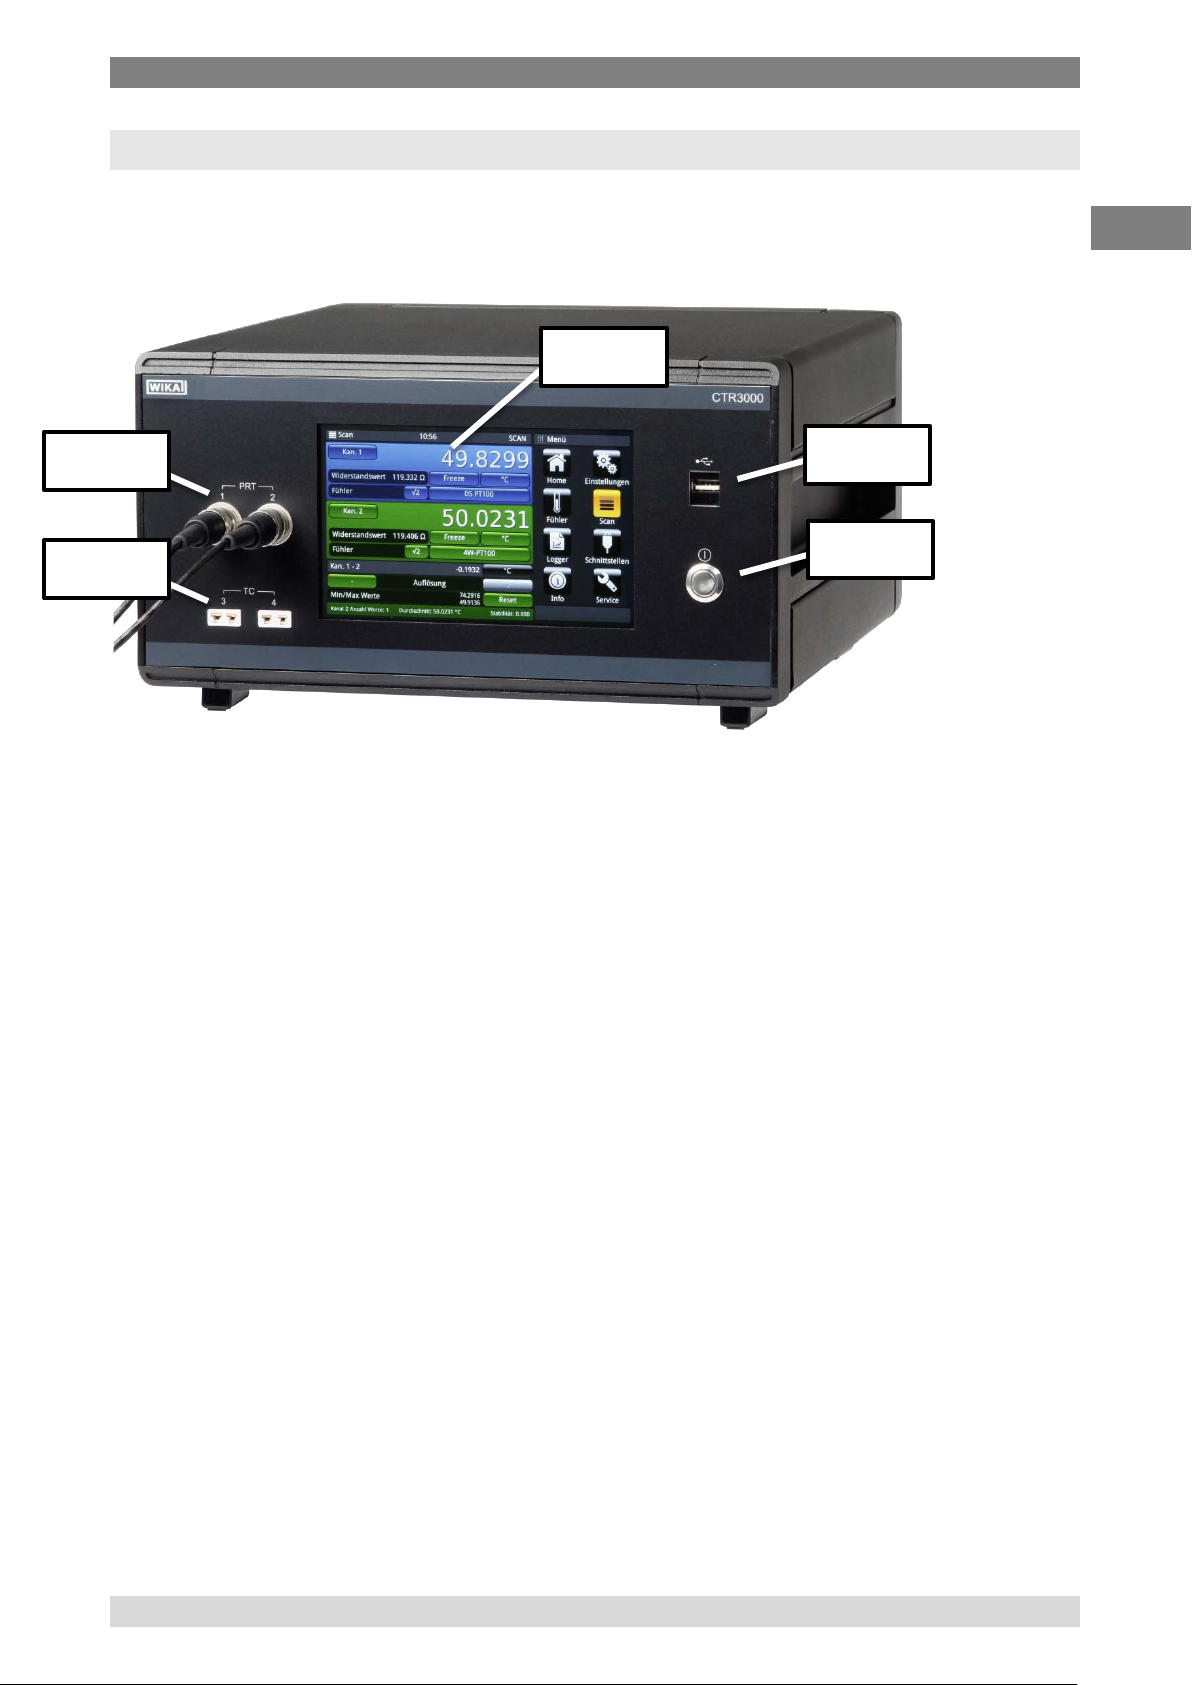
2.1 Overview
Input for resistance thermometers or thermistors (5-DIN plug)
Input for thermocouples (standard miniature plug)
User interface, touchscreen
Front end USB: Upload and download function
Power on/off
2.2 Description
The model CTR3000 precision thermometer provides a complete measurement and control
interface for users wishing to make high-accuracy temperature measurements or calibrate
thermometers. It supports a wide range of thermometer types including 25 Ω SPRTs, 100 Ω PRTs,
thermistors and thermocouples.
The CTR3000 is a high-accuracy instrument designed for laboratory and industrial temperature
measurement and calibration applications.
2.3 Scope of delivery
■ Model CTR3000 multi-functional precision thermometer incl. power cord
■ Choice of model CTP5000/CTP9000 temperature probes, when ordered
WIKA Operating Instruction, model CTR3000 7
Page 8
3. Safety
EN
14191761.01 12/2016 EN
3. Safety
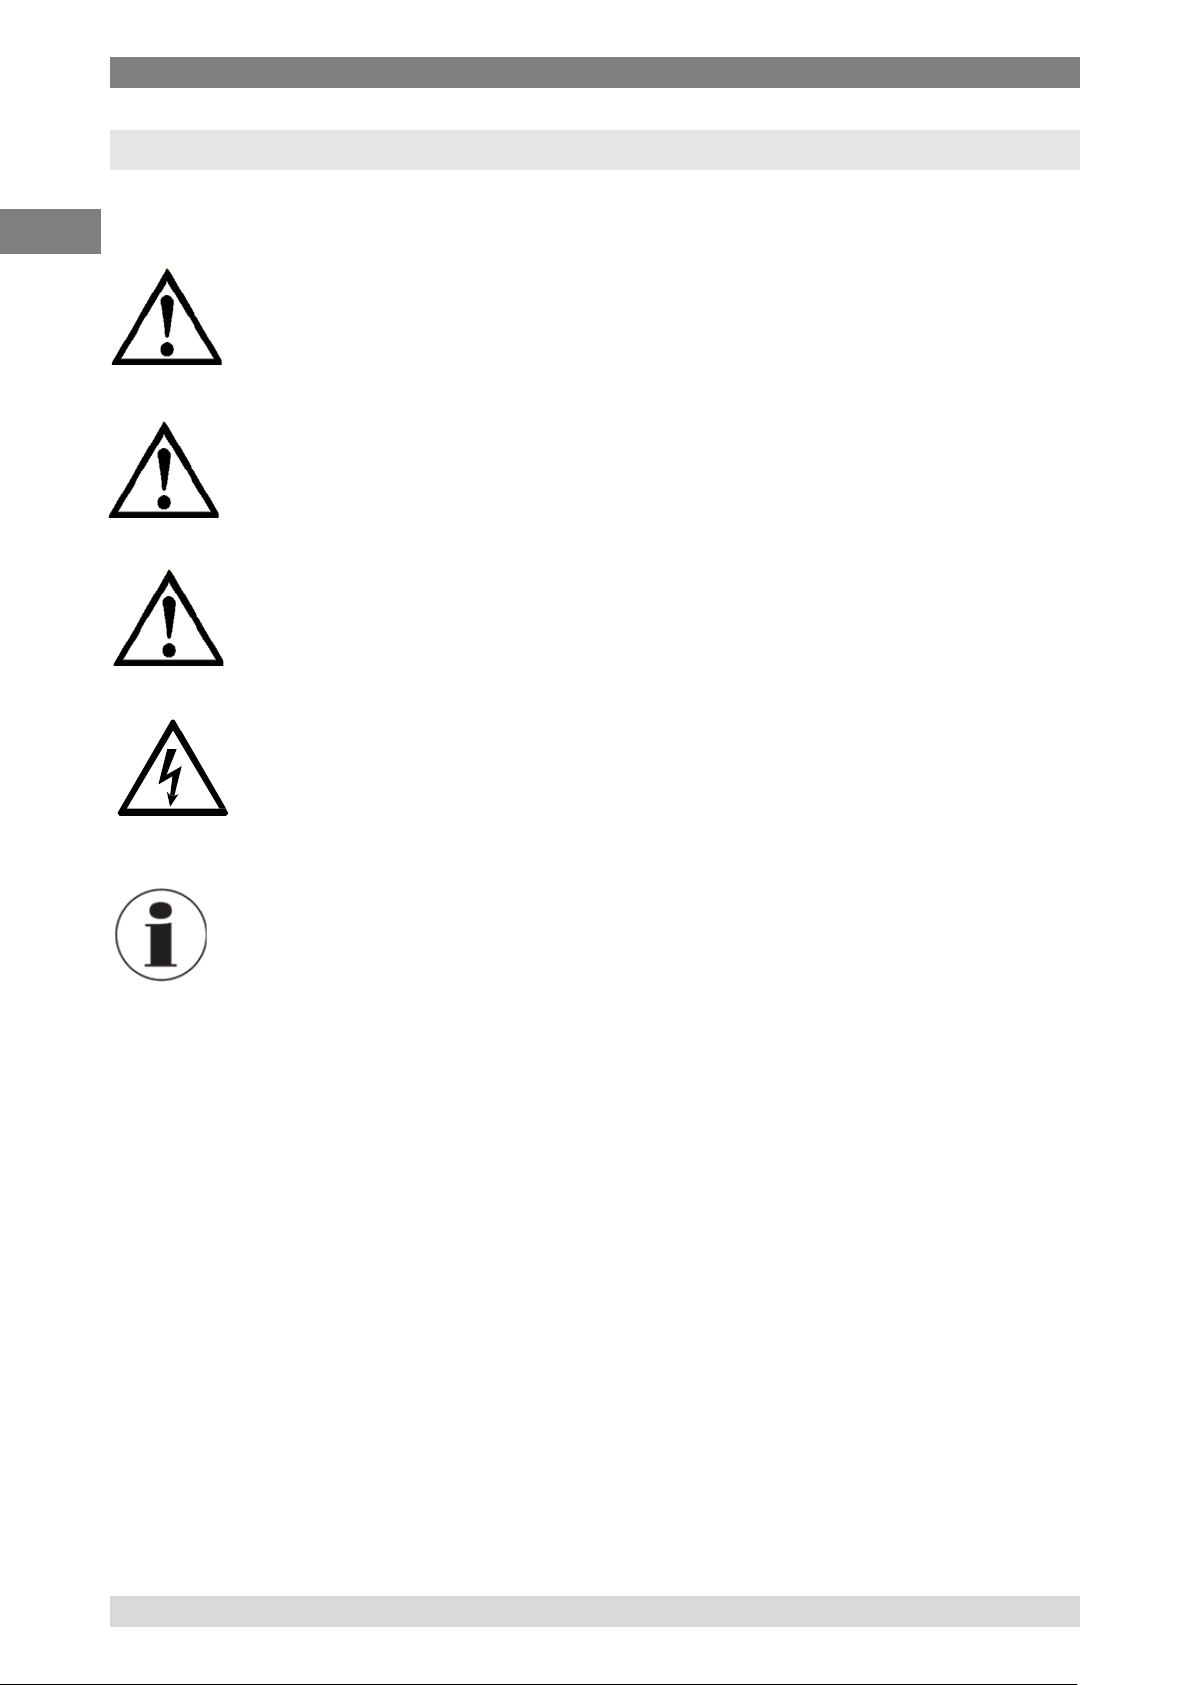
3.1 Explanation of symbols
DANGER!
... indicates a directly dangerous situation resulting in serious injury or
death, if not avoided.
WARNING!
... indicates a potentially dangerous situation that can result in serious injury or death, if
not avoided.
CAUTION!
... indicates a potentially dangerous situation that can result in light injuries or damage
to property or the environment, if not avoided.
DANGER!
... identifies hazards caused by electrical power. Should the safety instructions not be
observed, there is a risk of serious or fatal injury.
Information
... points out useful tips, recommendations and information for efficient and
trouble -free operation.
3.2 Intended use
Application
The model CTR3000 precision thermometer provides a complete measurement and control
interface for users wishing to make high-accuracy temperature measurements or calibrate
thermometers. It supports a wide range of thermometer types including 25 Ω SPRTs, 100 Ω PRTs,
thermistors and thermocouples.
The CTR3000 is a high-accuracy instrument designed for laboratory and industrial temperature
measurement and calibration applications intended to be used in a basic electromagnetic
environment.
Functionality
The instrument will operate with all 3- and 4-wire (S)PRTs (25 Ω, 100 Ω) platinum resistance
thermometers as well as most standard international thermocouple types and NTC thermistors. The
following temperature measurement units are selectable: °C, °F, K. Base measuring units mV and Ω
are also displayed. The temperature values will be calculated through common conversion of the
base measurement.
8 WIKA Operating Instruction, model CTR3000
Page 9

3. Safety
EN
14191761.01 03/2017 EN
Due to the wide range of this instrument it makes individual instruments needless and makes the
calibration cost-effective.
Features included:
■ Dual capability for both thermocouple and resistance thermometer measurements
■ Input channels can be expanded up to 44
■ Large graphic touchscreen for temperature measurement values as well as configuration settings
and statistical results
■ Logger and log-data transfer to USB stick or communication interface
■ Scan function with a live screen and graph
■ Communication interfaces available for automated monitoring and calibration applications
This instrument is not permitted to be used in hazardous areas!
The instrument has been designed and built solely for the intended use described here, and may
only be used accordingly.
The technical specifications contained in these operating instructions must be observed. Improper
handling or operation of the instrument outside of its technical specifications requires the instrument
to be taken out of service immediately and inspected by an authorised WIKA service engineer.
Handle electronic precision measuring instruments with the required care (protect from humidity,
impacts, strong magnetic fields, static electricity and extreme temperatures, do not insert any
objects into the instrument or its openings). Plugs and sockets must be protected from
contamination.
The manufacturer shall not be liable for claims of any type based on operation contrary to the
intended use.
For indoor use only
Use only the delivered power supply STONTRONICS 3A-182WP06
Input of external Power supply: 100/240 V~, 50-60 Hz, 0.6 A
Don't connect lines within a building which are longer than 30 m, or leave the building (including
lines of outdoor installations).
WIKA Operating Instruction, model CTR3000 9
Page 10
3. Safety
EN
14191761.01 12/2016 EN
3.3 Improper use
WARNING!
Injuries through improper use
Improper use of the instrument can lead to hazardous situations and injuries.
▶
Refrain from unauthorised modifications to the instrument.
▶
Do not use the instrument within hazardous areas.
▶
Do not use the instrument with abrasive or viscous media.
Any use beyond or different to the intended use is considered as improper use.
3.4 Responsibility of the operator
The CTR3000 multifunctional precision thermometer is a high accuracy instrument designed for
laboratory and industrial temperature measurement and calibration applications.
The operator is therefore responsible for legal obligations regarding safety at work.
The safety instructions within these operating instructions, as well as the safety, accident prevention
and environmental protection regulations for the application area must be maintained.
The operator is obliged to maintain the product label in a legible condition.
To ensure safe working on the instrument, the operating company must ensure
■
that the operating personnel are regularly instructed in all topics regarding work safety, first aid
and environmental protection and know the operating instructions and in particular, the safety
instructions contained therein.
■
that the instrument is suitable for the particular application in accordance with its intended
use.
■
that personal protective equipment is available.
3.5 Personnel qualification
WARNING!
Risk of injury should qualification be insufficient
Improper handling can result in considerable injury and damage to equipment.
▶
The activities described in these operating instructions may only be
carried out by skilled personnel who have the qualifications described below.
10 WIKA Operating Instruction, model CTR3000
Page 11
3. Safety
EN
14191761.01 03/2017 EN
Skilled personnel
Skilled personnel, authorised by the operator, are understood to be personnel who, based on
their technical training, knowledge of measurement and control technology and on their
experience and knowledge of country-specific regulations, current standards and directives,
are capable of carrying out the work described and independently recognising potential
hazards.
Special operating conditions require further appropriate knowledge, e.g. of aggressive media.
3.6 Personal protective equipment
The personal protective equipment is designed to protect the skilled personnel from hazards that
could impair their safety or health during work. When carrying out the various tasks on and with
the instrument, the skilled personnel must wear personal protective equipment.
Follow the instructions displayed in the work area regarding personal protective
equipment!
3.7 Labelling, safety marks
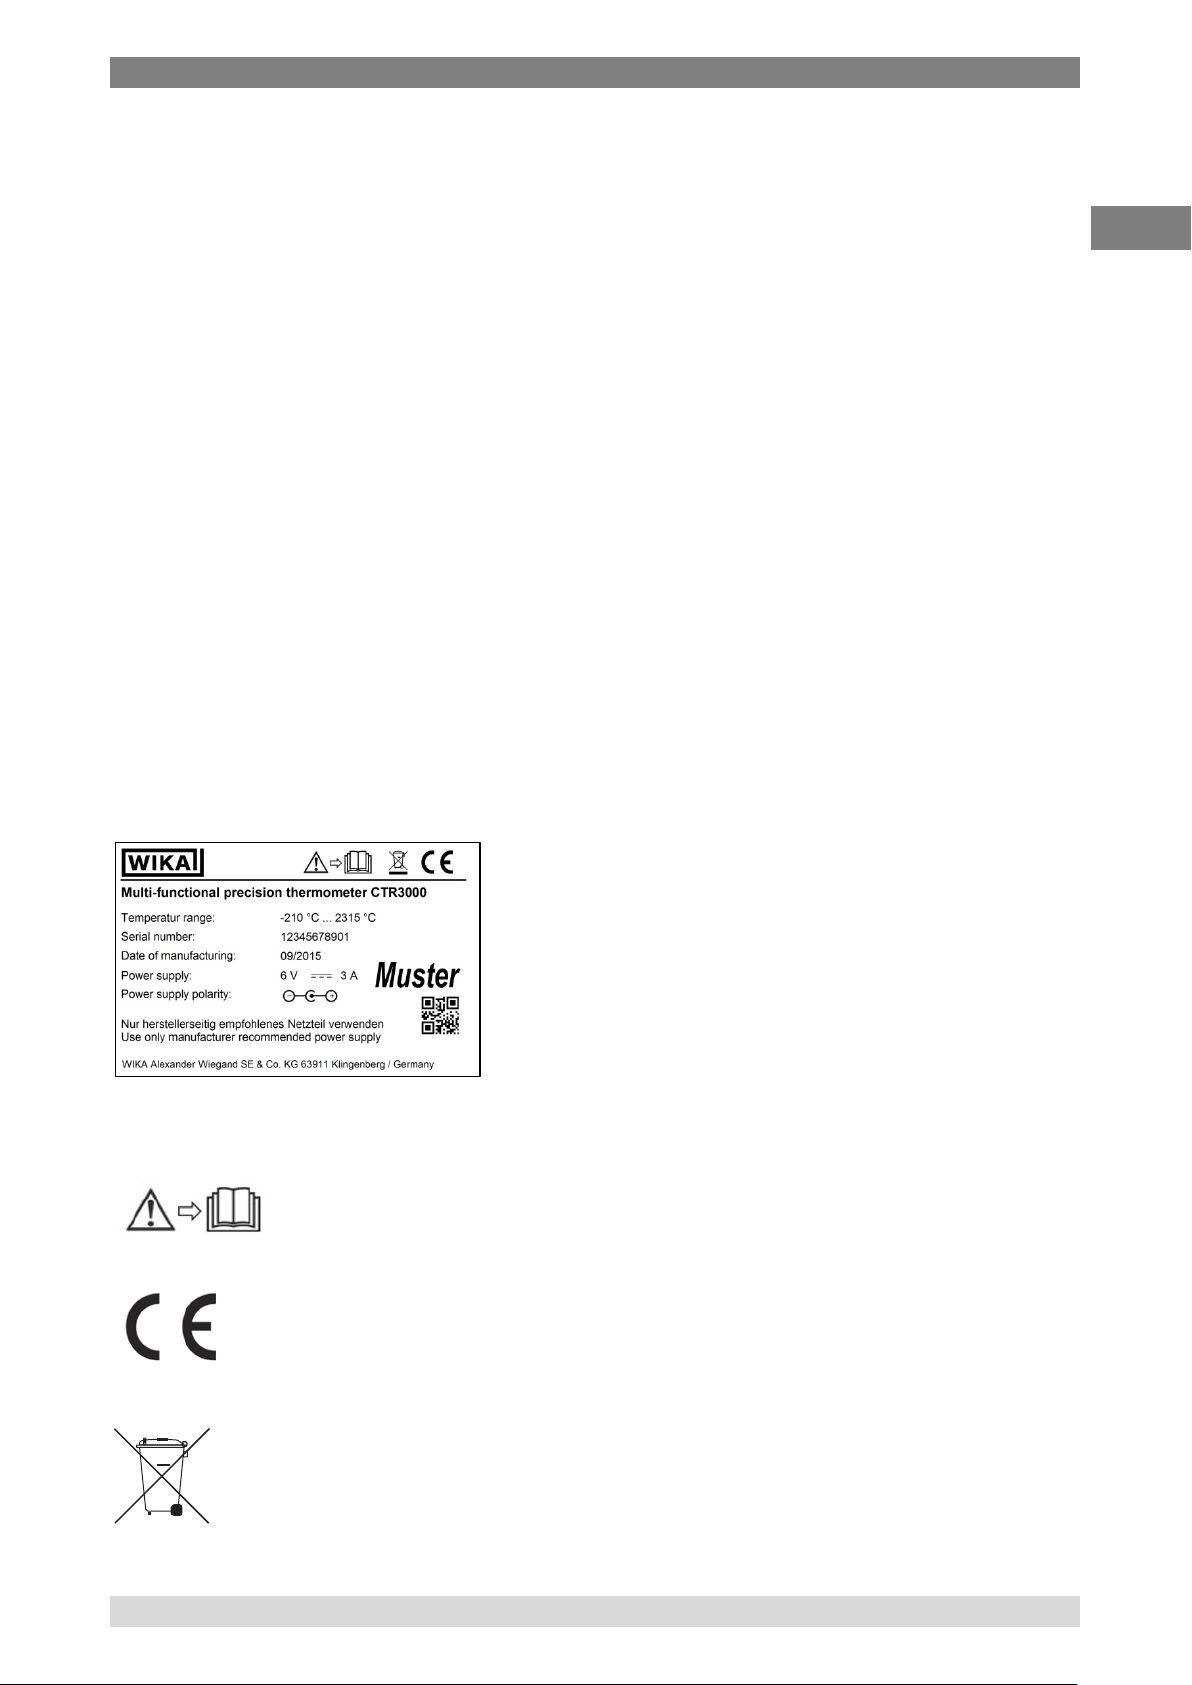
Product label
Symbols
Before mounting and commissioning the instrument, ensure you read the
operating instructions!
CE, Communauté Européenne
Instruments bearing this mark comply with the relevant European directives.
This marking on the instruments indicates that they must not be disposed of in
domestic waste. The disposal is carried out by return to the manufacturer or by the
corresponding municipal authorities (see EU directive 2012/19/EU).
WIKA Operating Instruction, model CTR3000 11
Page 12

4. Design and Function
EN
14191761.01 12/2016 EN
4. Design and Function
4.1 Overview
The CTR3000 is a high accuracy instrument designed for laboratory and industrial temperature
measurement and calibration applications.
Features include:
• unique dual capability for both thermocouple and resistance thermometer
measurements;
• number of input channel can be expanded from four to forty-four channels;
• large graphic touchscreen for temperature measurement values as well as
configuration settings and statistical results;
• advanced functions include differential measurement, programmable scanning
routines, programmable timer, data logging, statistical reporting;
• USB and Ethernet (RS232 as an option) communication interfaces available for
automated monitoring and calibration applications;
The CTR3000 will operate with all 3 and 4-wire Pt100 (100 Ohm) platinum resistance thermometers
as well as most standard international thermocouple types. Temperature measurement units are
selectable by front panel operation; °C, °F, K. Base measurement units mV,Ω are also displayed.
Resistance accuracy is better than ±2mΩ equivalent to temperature measurement precision of
±5mK for Pt100 thermometers.
Standard miniature sockets allow convenient connection for thermocouple inputs. Connection
sockets incorporate integral temperature compensation sensors making high accuracy
thermocouple measurement possible without the use of an external reference junction.
12 WIKA Operating Instruction, model CTR3000
Page 13

4. Design and Function
EN
14191761.01 03/2017 EN
4.2 Principles of measurement
4.2.1 PRT measurement
The CTR3000 measures the voltage (Vt) developed across the unknown sensor resistance (Rt) and
the voltage (Vs) across a stable internal reference resistance (Rs) connected in series and passing
the same current. The voltages are in proportion to the resistances so the thermometer resistance is
derived from: Rt = Rs x Vt / Vs This technique achieves immunity from slow moving time and
temperature drift in the electronics as it is not affected by voltage measurement gain variations or
current source fluctuations.
In the same way that AC resistance measurement eliminates thermal EMFs, switched DC achieves
a similar advantage. Switched DC works by reversing the current flow on alternate measurement
cycles and taking the average value, thereby cancelling any thermal EMF offsets from the
measurement.
For PRTs, the relationship between resistance and temperature varies slightly from one PRT to
another. Therefore, no matter how accurately the CTR3000 measures the PRT resistance, if the
relationship between resistance and temperature for a particular PRT is not known, accurate
temperature measurement is not possible.
The CTR3000 uses PRT calibration data to overcome this problem and calculates temperature from
temperature conversion functions stored in internal memory. This method enables the CTR3000
accurately to convert resistance to temperature, uniquely for each PRT used. It is very important
therefore that a PRT is used on the correct and properly configured input channel.
4.2.2 Thermocouple measurement
As well as the PRT resistance measurement facility the CTR3000 also functions as a precision
millivolt-meter. Designed for high accuracy measurement over the EMF voltage range of all
standard base and precious metal thermocouples, the CTR3000 achieves a basic voltage accuracy
of better than ±0,004 % + 2 μV over the full measurement range.
Thermocouple EMFs are converted to temperature using the EN60584 linearization functions.
The voltage input connection is specially designed to minimise the thermal gradient between the
terminals. This is particularly important when the internal reference junction compensation is used,
as any temperature difference at the connection junction will influence the measurement result.
4.2.3 Thermocouple reference junction compensation
The electrical connection between the thermocouple element and the CTR3000 input connector is
often referred to as the internal reference junction. All standard thermocouple reference functions
are defined relative to 0°C. To eliminate the physical need to reproduce this temperature inside the
CTR3000, the actual connection temperature is accurately measured with an internal PRT. This
temperature is converted to an equivalent EMF and added to the actual thermocouple voltage
measurement, thereby correcting for the connection temperature.
For high precision thermocouple measurement applications, i.e. calibration, an external reference
junction may be used. Using an external reference junction eliminates the uncertainties associated
with reference junction compensation.
WIKA Operating Instruction, model CTR3000 13
Page 14
4. Design and Function
EN
14191761.01 12/2016 EN
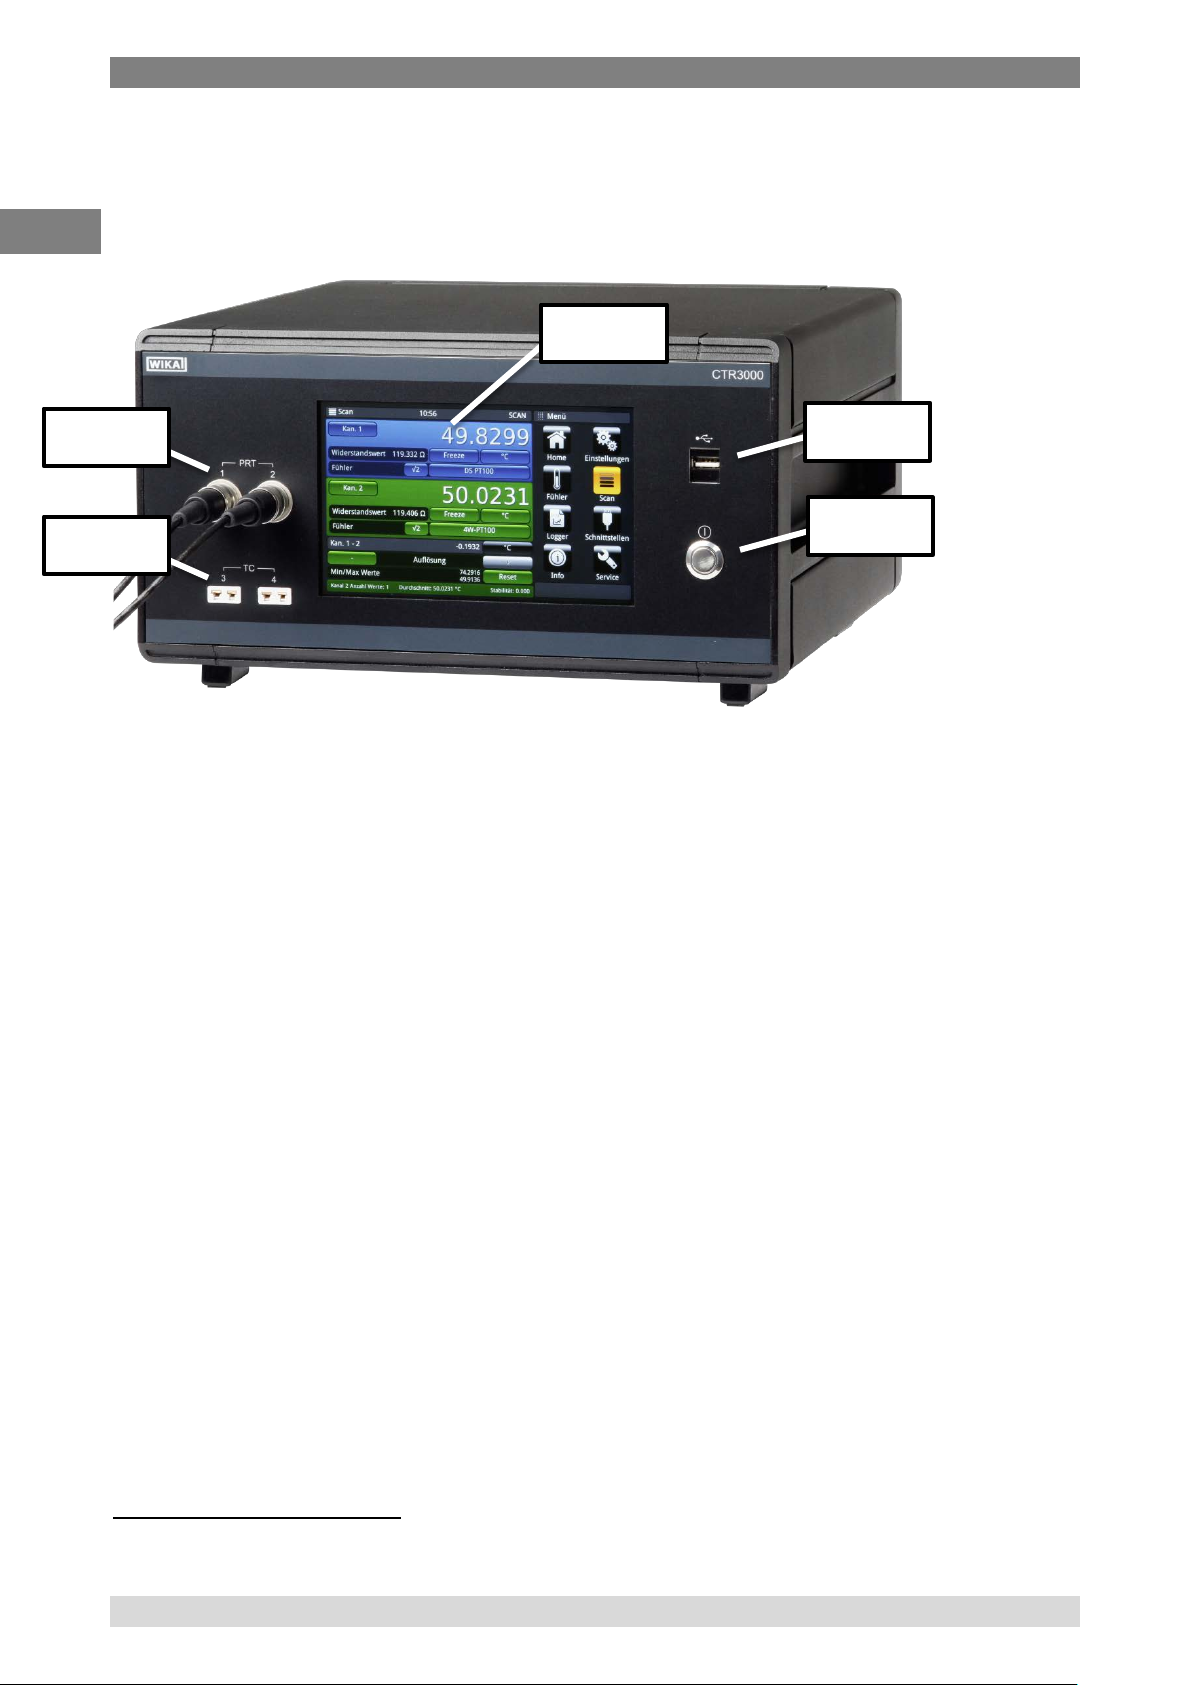
4.3 Front panel
4.3.1 Overview
Input for resistance thermometers or thermistors (5-DIN plug)
Input for thermocouples (standard miniature plug)
User interface, touchscreen
Front end USB: Upload and download function
Power on/off
4.3.2 Warm up time
It is recommended that the CTR3000 be warmed up before use to stabilize the environmentally
controlled components. This will ensure the best performance to the specifications. We recommend
1
a warm up time of 1 hour for full accuracy specifications.
1
The internal cold junction compensation needs up to 2 hours for performing best.
14 WIKA Operating Instruction, model CTR3000
Page 15
4. Design and Function
EN
14191761.01 03/2017 EN
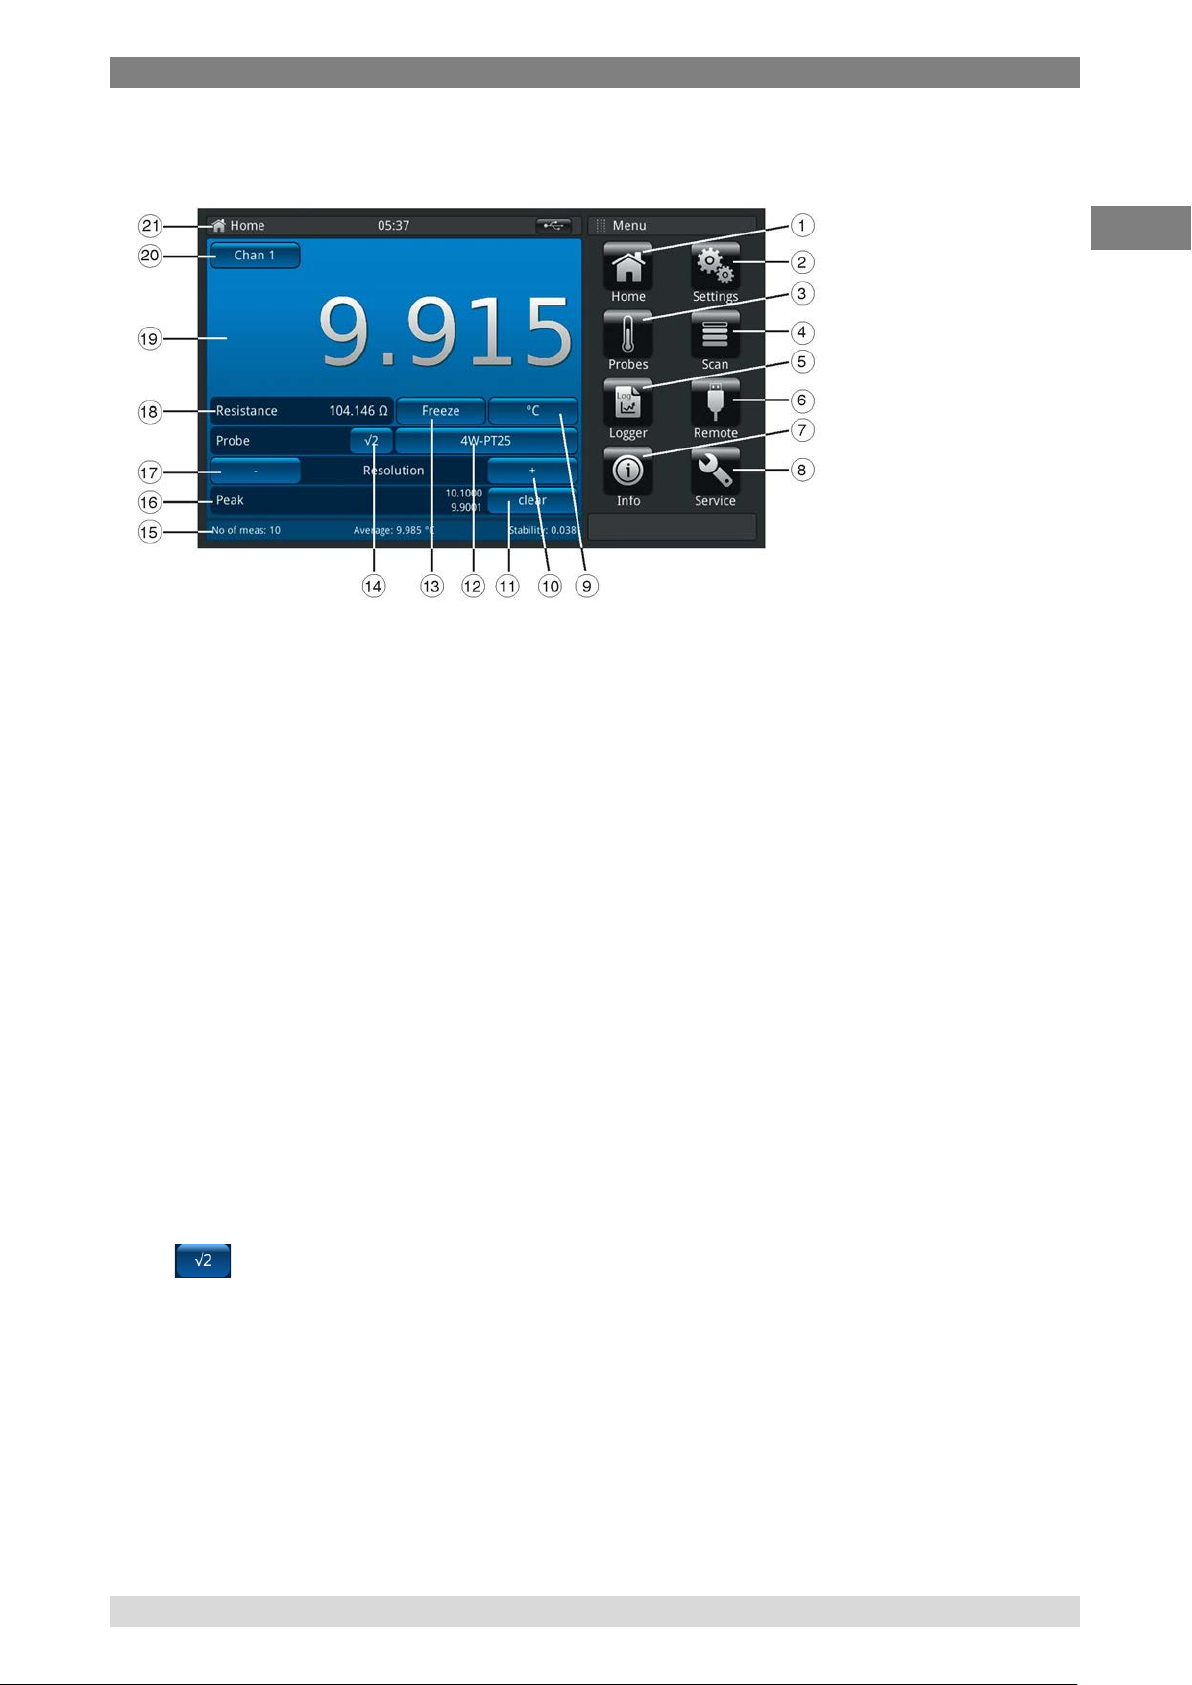
4.3.3 Main screen; Home
1 Home application
2 General settings
3 Probe settings
4 Scan settings
5 Logger settings
6 Remote settings
7 Info display
8 Service settings
9 Unit; shortcut
10 Plus decimal place
11 Clear the peak values (min, max
measured since starting the
instrument)
12 Selected probe (standard or custom);
shortcut
* Selecting √2 current multiplier
This option increases current through the probes by √2 (double-power), to determine any probe selfheating. The best method of using this option is first to let the sensor reach a steady temperature
and note the value. It may take some time to stabilise. Note the value down.
13 Freeze the display; function key
14 Root 2 for sensor current PRT;
function key*
15 Current displaying of average, stability
and number of measurements
16 Peak displaying
17 Minus decimal place
18 Measured value in the base unit
according to probe, e.g. Ω for Pt100
and mV for TC (displays °C, if the base
unit is selected using button 9)
19 Current measured value**
20 Selected channel; shortcut
21 Current application name
Press the probe will increase the heating effect on the probe, and the value displayed will
represent the temperature due to the increased current. When the reading has stabilised, note the
temperature and calculate the temperature change.
** The selected input channel is interrogated before each measurement cycle, and when enabled,
SMART probes are identified by ‘SMART´ appearing as (S) beside the field 14. Open circuit
thermometer input channels will display nothing, the symbol “OL” displays that the measurement
value is out of range.
WIKA Operating Instruction, model CTR3000 15
Page 16
4. Design and Function
EN
14191761.01 12/2016 EN
4.3.4 Thermometer inputs
4.3.4.1 Resistance thermometers
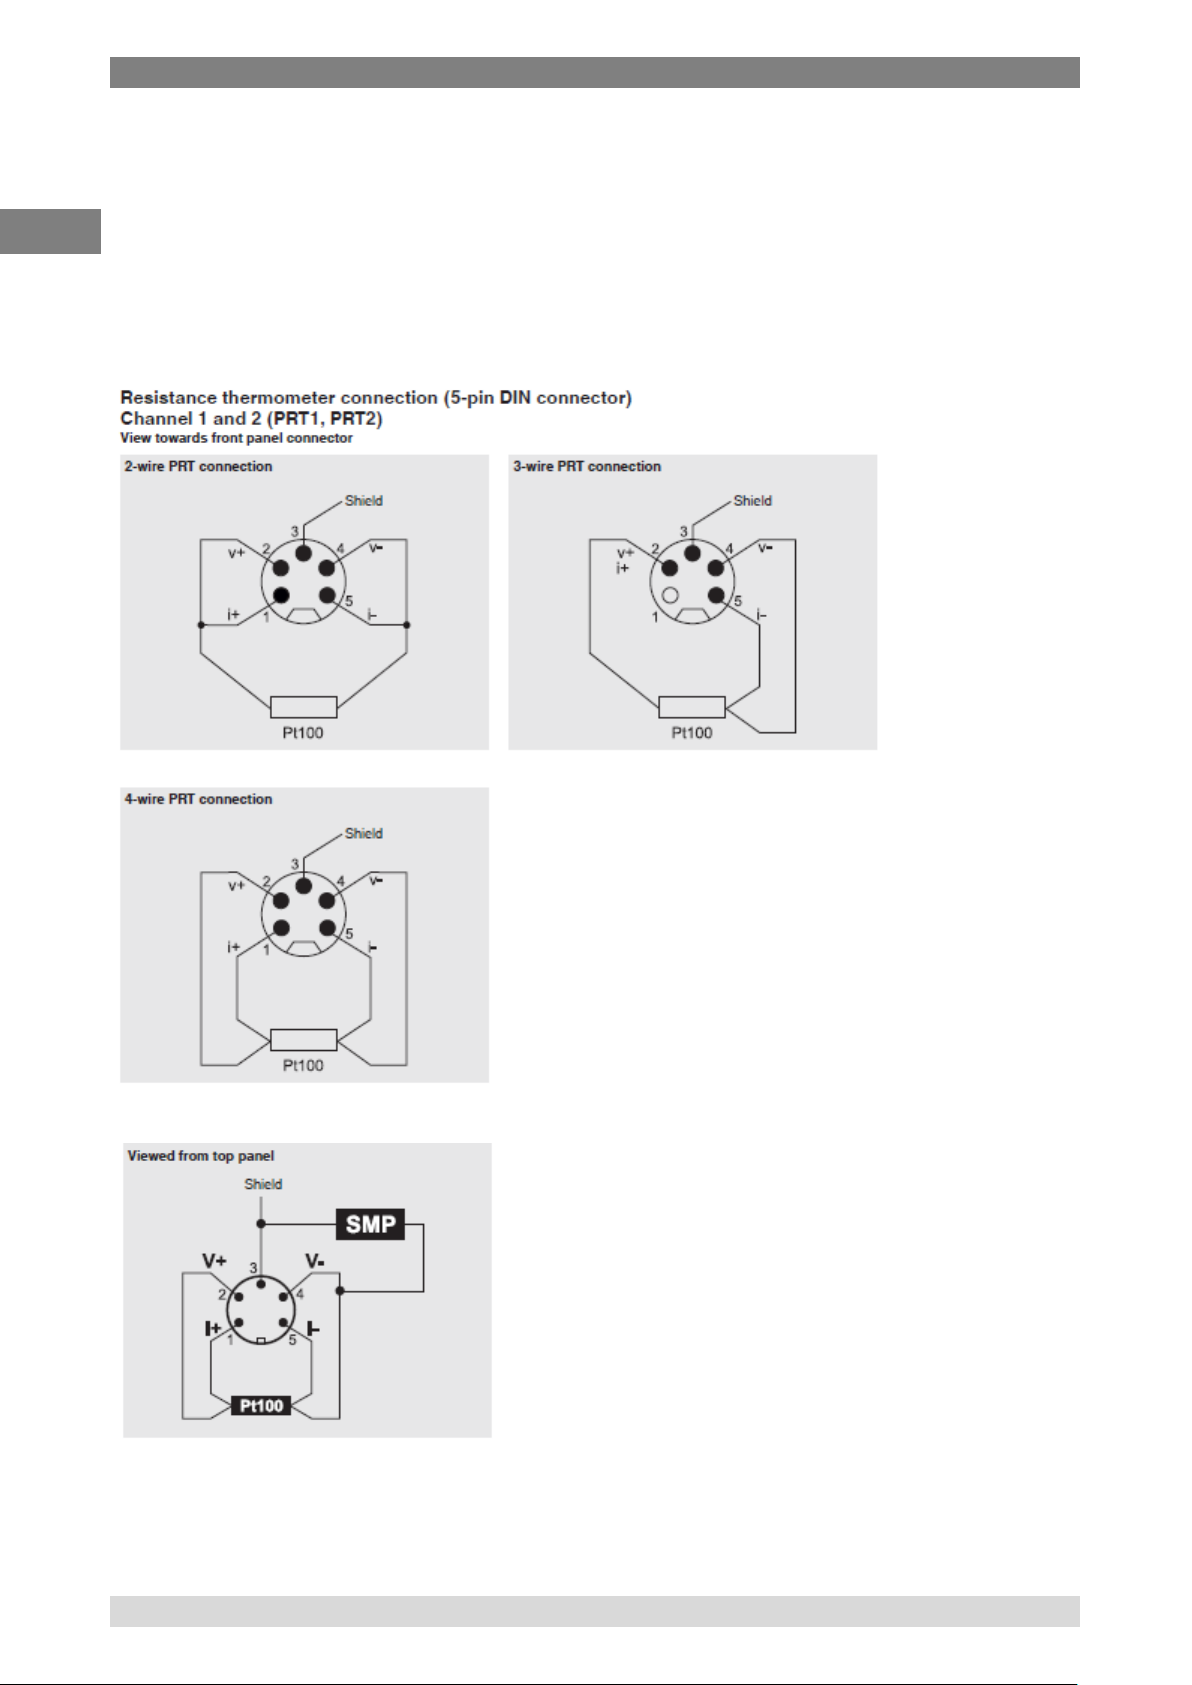
The CTR3000 has two resistance thermometer and two thermocouple input channels, the input
sockets are located on the instruments front panel.
PRTs are connected via the 5 pin DIN sockets. You may connect 2, 3, or 4 wire PRTs as shown
below. Un-terminated platinum resistance thermometers may be connected through an optional
adapter box which is available as an accessory, (CTA5000-ADAP5-Z).
Options - with DIN plug or SMART plug
With the SMART connector on the probes, storing the
data is needed only once - in the connector! The
calibration data stays with the probe - permanently. It can
even be used on another instrument without any further
action.
The SMART connector saves time and reduces error. If there are existing calibrated or uncalibrated
probes, no problem, CTR3000 automatically registers if a probe is SMART or normal.
16 WIKA Operating Instruction, model CTR3000
Page 17
4. Design and Function
EN
14191761.01 03/2017 EN
Application title Input title
4.3.4.2 Thermocouples
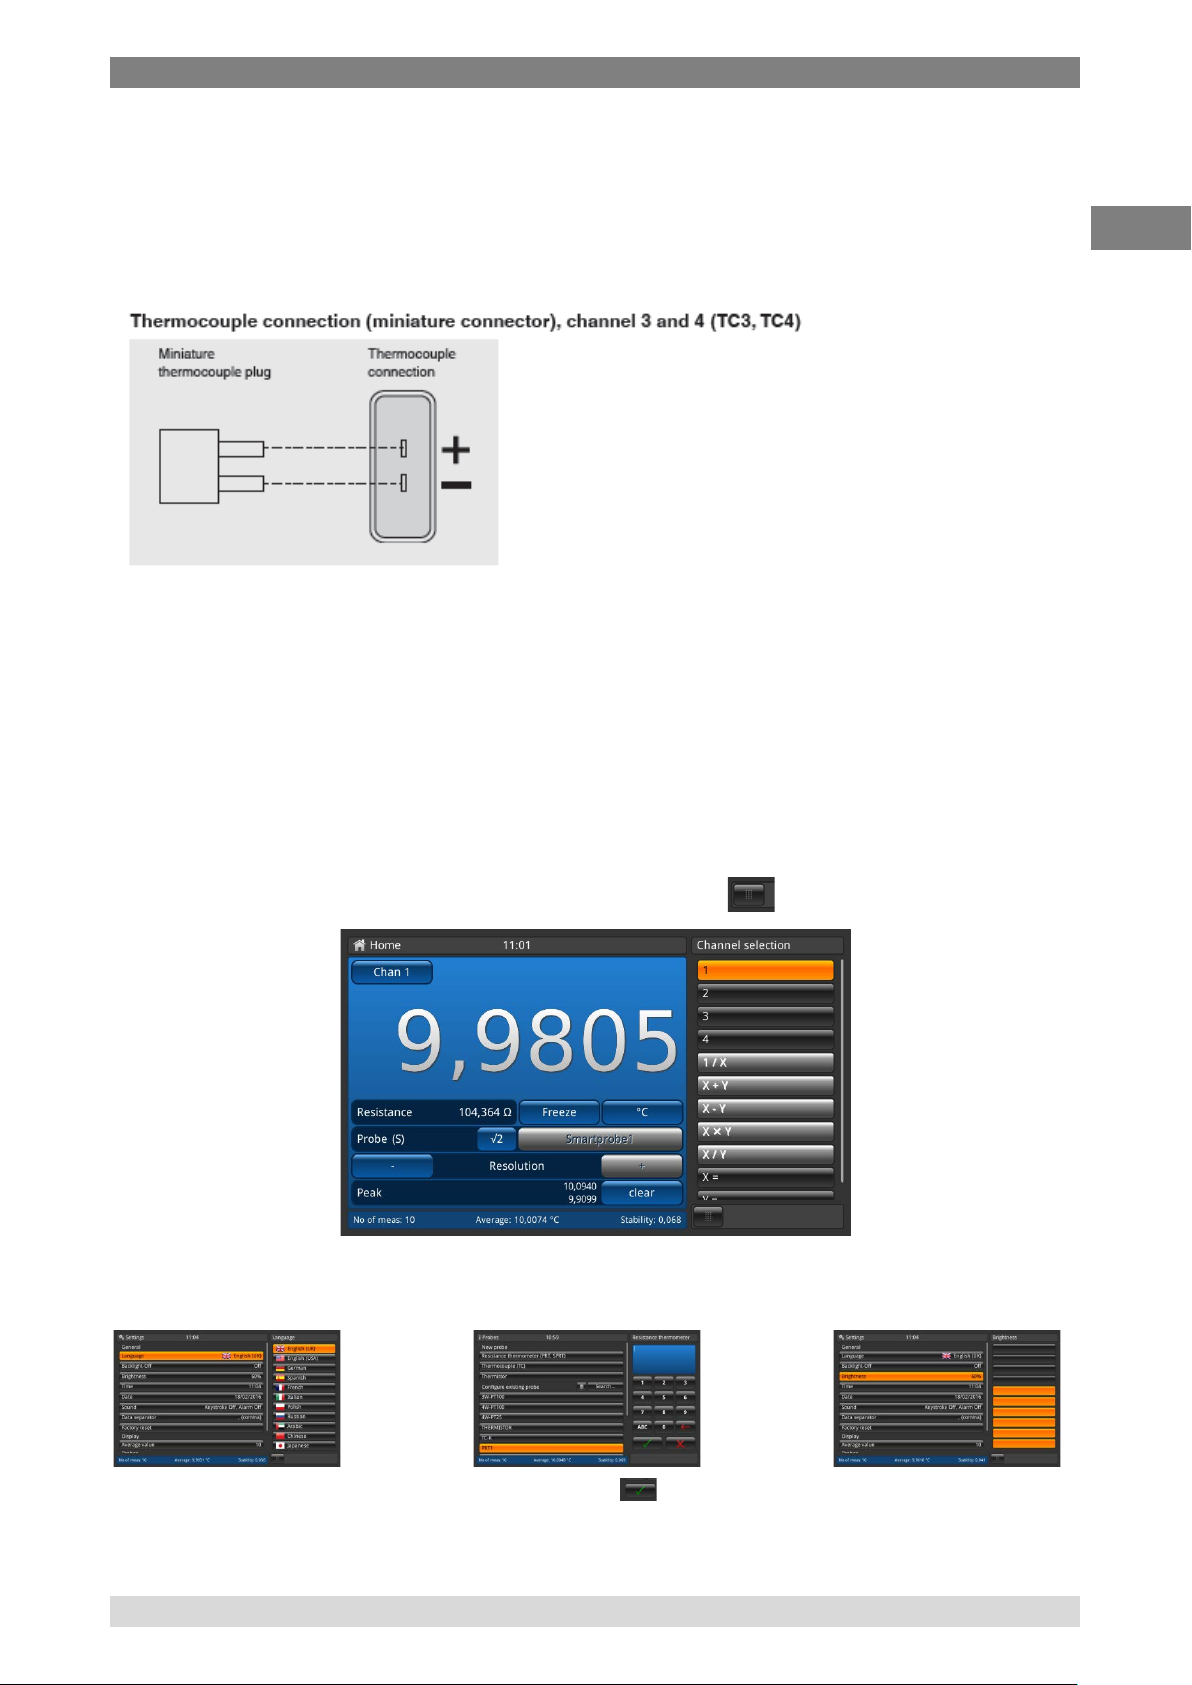
Thermocouples may be directly connected to the CTR3000 at the standard miniature sockets.
These sockets are within a temperature compensated isothermal block which eliminates the need
for an external ice point reference junction. However, the CTR3000 may also be used with an
external ice point reference for high precision measurement and calibration work.
4.4 Application selection and parameter inputs
The application selection area on the right side of the screen is the area where settings, probes,
logger, service and other apps can be chosen. As each App is chosen, related application
parameters will appear on the left of the screen along with the name of the application, and a
reduced size icon in the top title section. When a parameter is chosen, related selections, sliding
scales or a data entry key pad will appear in the input area on the right where the application
selection buttons were previously displayed. An example of each type of input is shown below. To
return to the App selection menu, simply press the Menu button below the input area.
Parameter inputs:
Related selections Data entry key pad Sliding scales
The selection will be presented on the right Confirm the values with
side of the function key for the input. Min/max values will be indicated below the blue screen
also QWERTZ keyboard available
WIKA Operating Instruction, model CTR3000 17
Page 18
4. Design and Function
EN
14191761.01 12/2016 EN
4.5 Rear panel
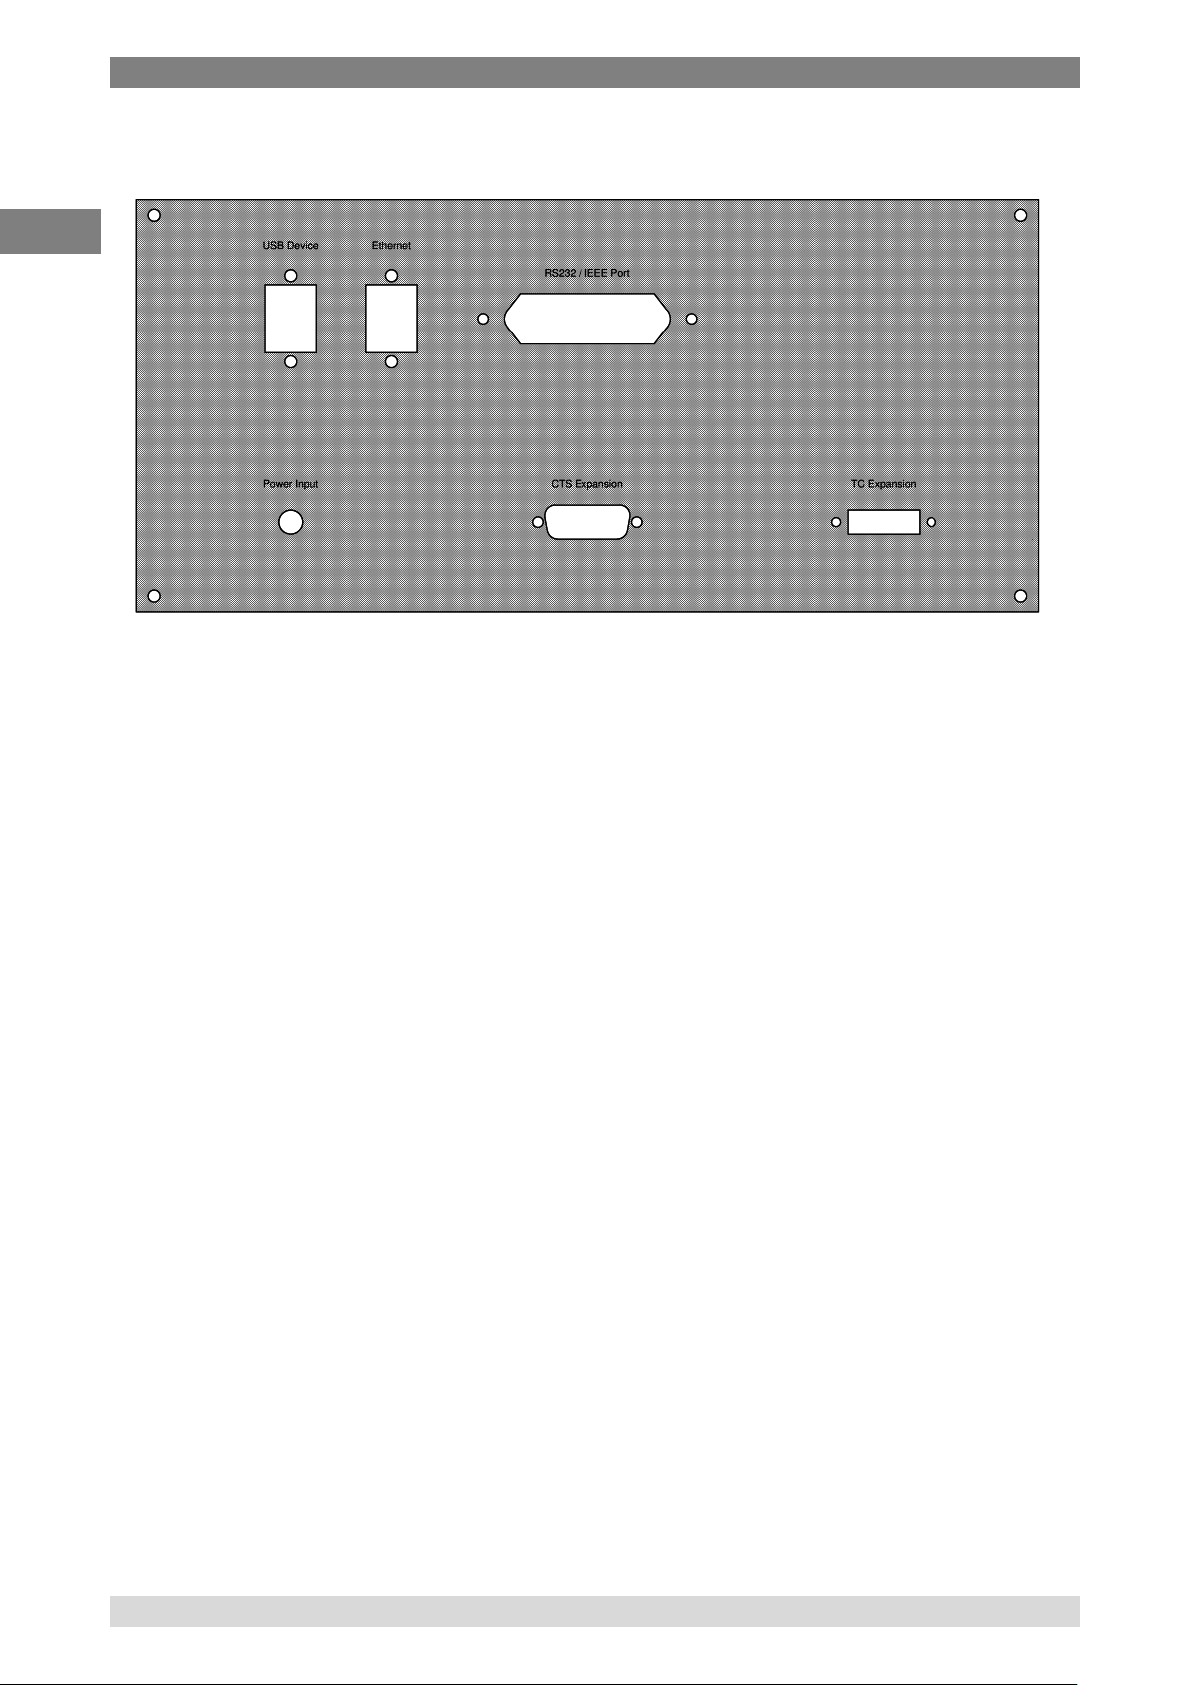
4.5.1 USB interface (standard)
The USB connector is fitted as standard. Communication requires the installation of the USB driver
on a PC.
The instrument can be controlled through simple SCIPI commands and can transmit SCIPI resultdata, which may be recorded using a simple terminal program.
Please refer to section 4.6.6 Application <<Remote>> for further details.
4.5.2 Ethernet interface
The Ethernet function allows the user to set the following by inputting a numeric value in each
separate field:
IP
Netmask
Gateway
Port
DHCP settings
Set the Ethernet communication parameters as described in Section 4.6.6 Application
<<Remote>>.
4.5.3 RS232 Communication interface card
Optional RS232 communication interface card slot. A blanking plate is fitted if there is no
communication interface card.
The CTR3000 may (optionally) be fitted with one of these interfaces. Operation is similar for all
communication interfaces. Please refer to section 4.6.6 Application <<Remote>> for further details.
4.5.4 Power input
Use only the delivered power cable!
18 WIKA Operating Instruction, model CTR3000
Page 19

4. Design and Function
EN
14191761.01 03/2017 EN
4.5.5 Input channel expansion port (CTS Expansion, TC Expansion)
Optional input channel expansion ports.
An expansion port connector is provided on the rear panel. The CTS expansion connector enables
up to four CTS5000 switchboxes to be used to expand the number of input connections to provide
up to 64 additional channels.
The universal switchbox CTS3000 will follow.
4.5.6 Name plate
Please see all details in chapter 3.7 Labelling, safety marks.
WIKA Operating Instruction, model CTR3000 19
Page 20
4. Design and Function
EN
14191761.01 12/2016 EN
4.6 Applications and their functions
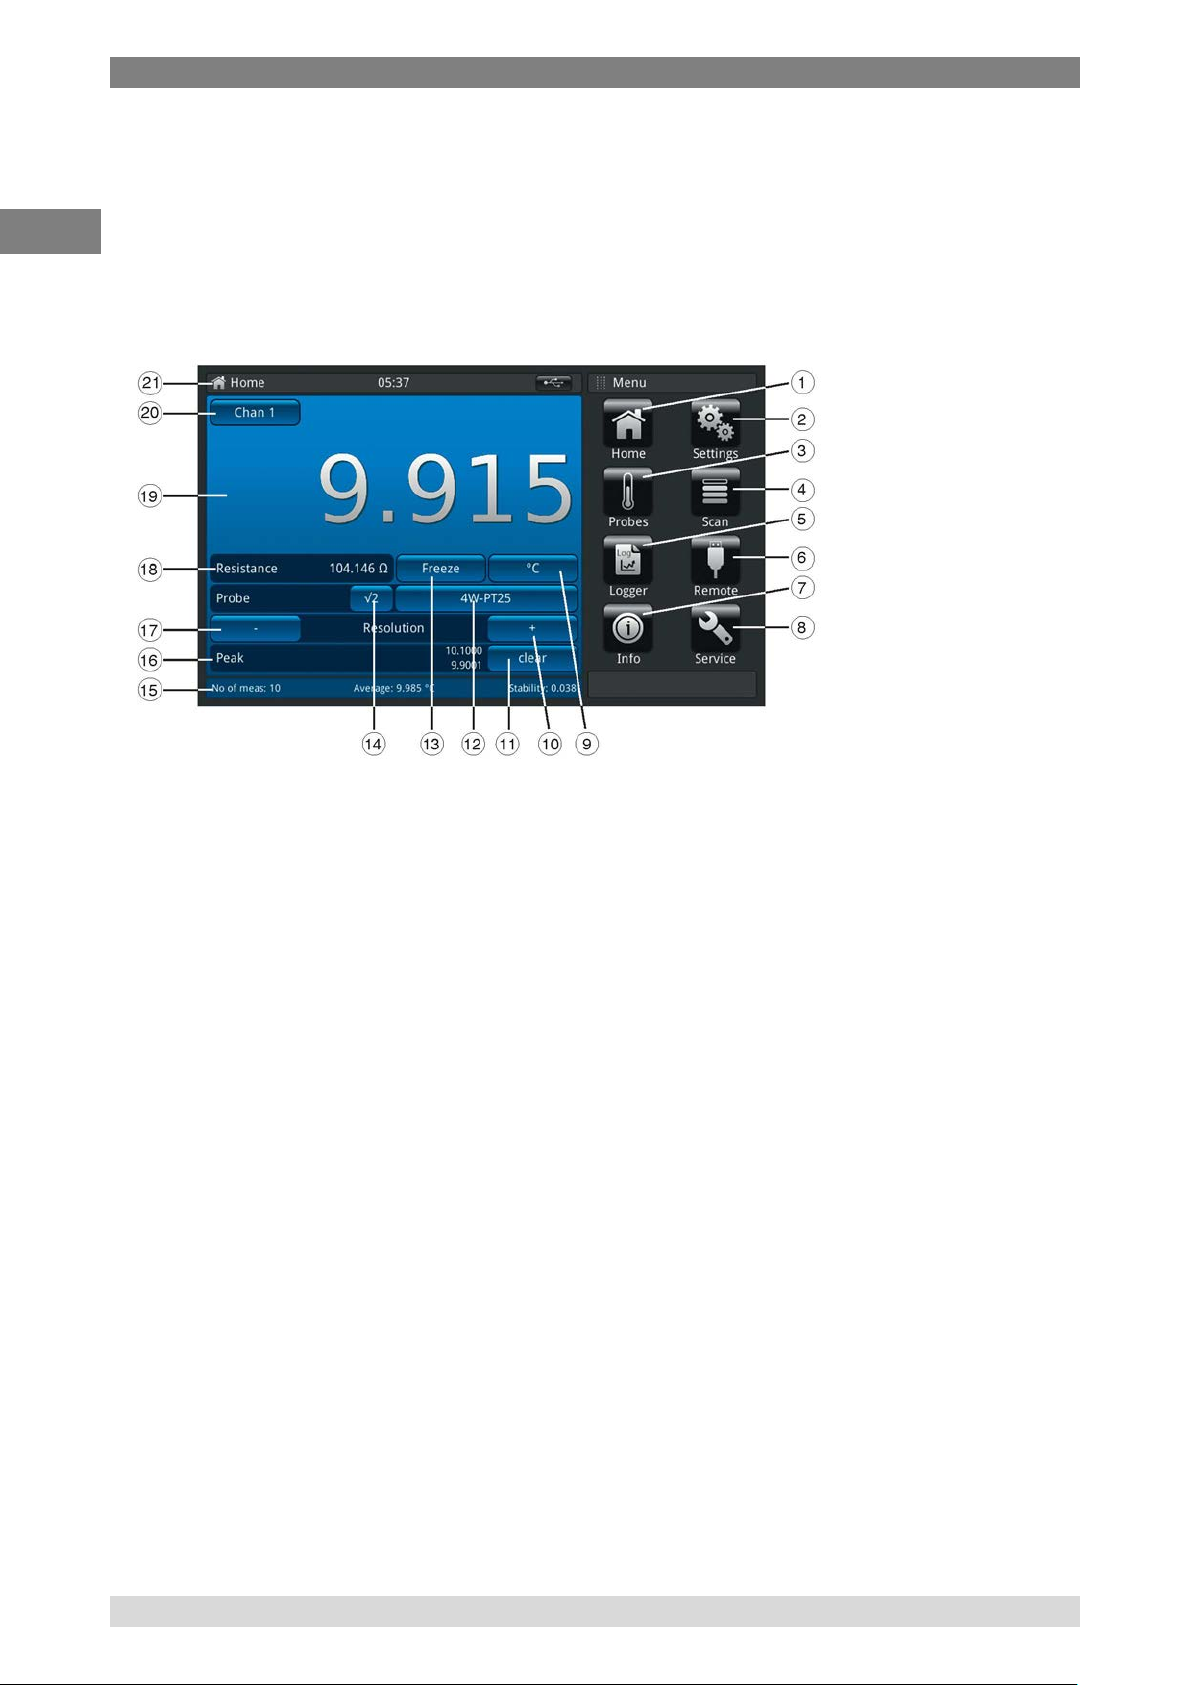
4.6.1 Application <<Home>>
The Home App is the normal operation screen. This application is different from the others in that it
is not use to setup the configuration but is used to monitor the temperature measurement values
applied to this device.
1 Home application
2 General settings
3 Probe settings
4 Scan settings
5 Logger settings
6 Remote settings
7 Info display
8 Service settings
9 Unit; shortcut
10 Plus decimal place
11 Clear the peak values (min, max
measured since starting the
instrument)
12 Selected probe (standard or custom);
shortcut
13 Freeze the display; function key
14 Root 2 for sensor current PRT;
function key*
15 Current displaying of average, stability
and number of measurements
16 Peak displaying
17 Minus decimal place
18 Measured value in the base unit
according to probe, e.g. Ω for Pt100
and mV for TC (displays °C, if the base
unit is selected using button 9)
19 Current measured value**
20 Selected channel; shortcut
22 Current application name
20 WIKA Operating Instruction, model CTR3000
Page 21
4. Design and Function
EN
14191761.01 03/2017 EN
4.6.1.1 Status bar
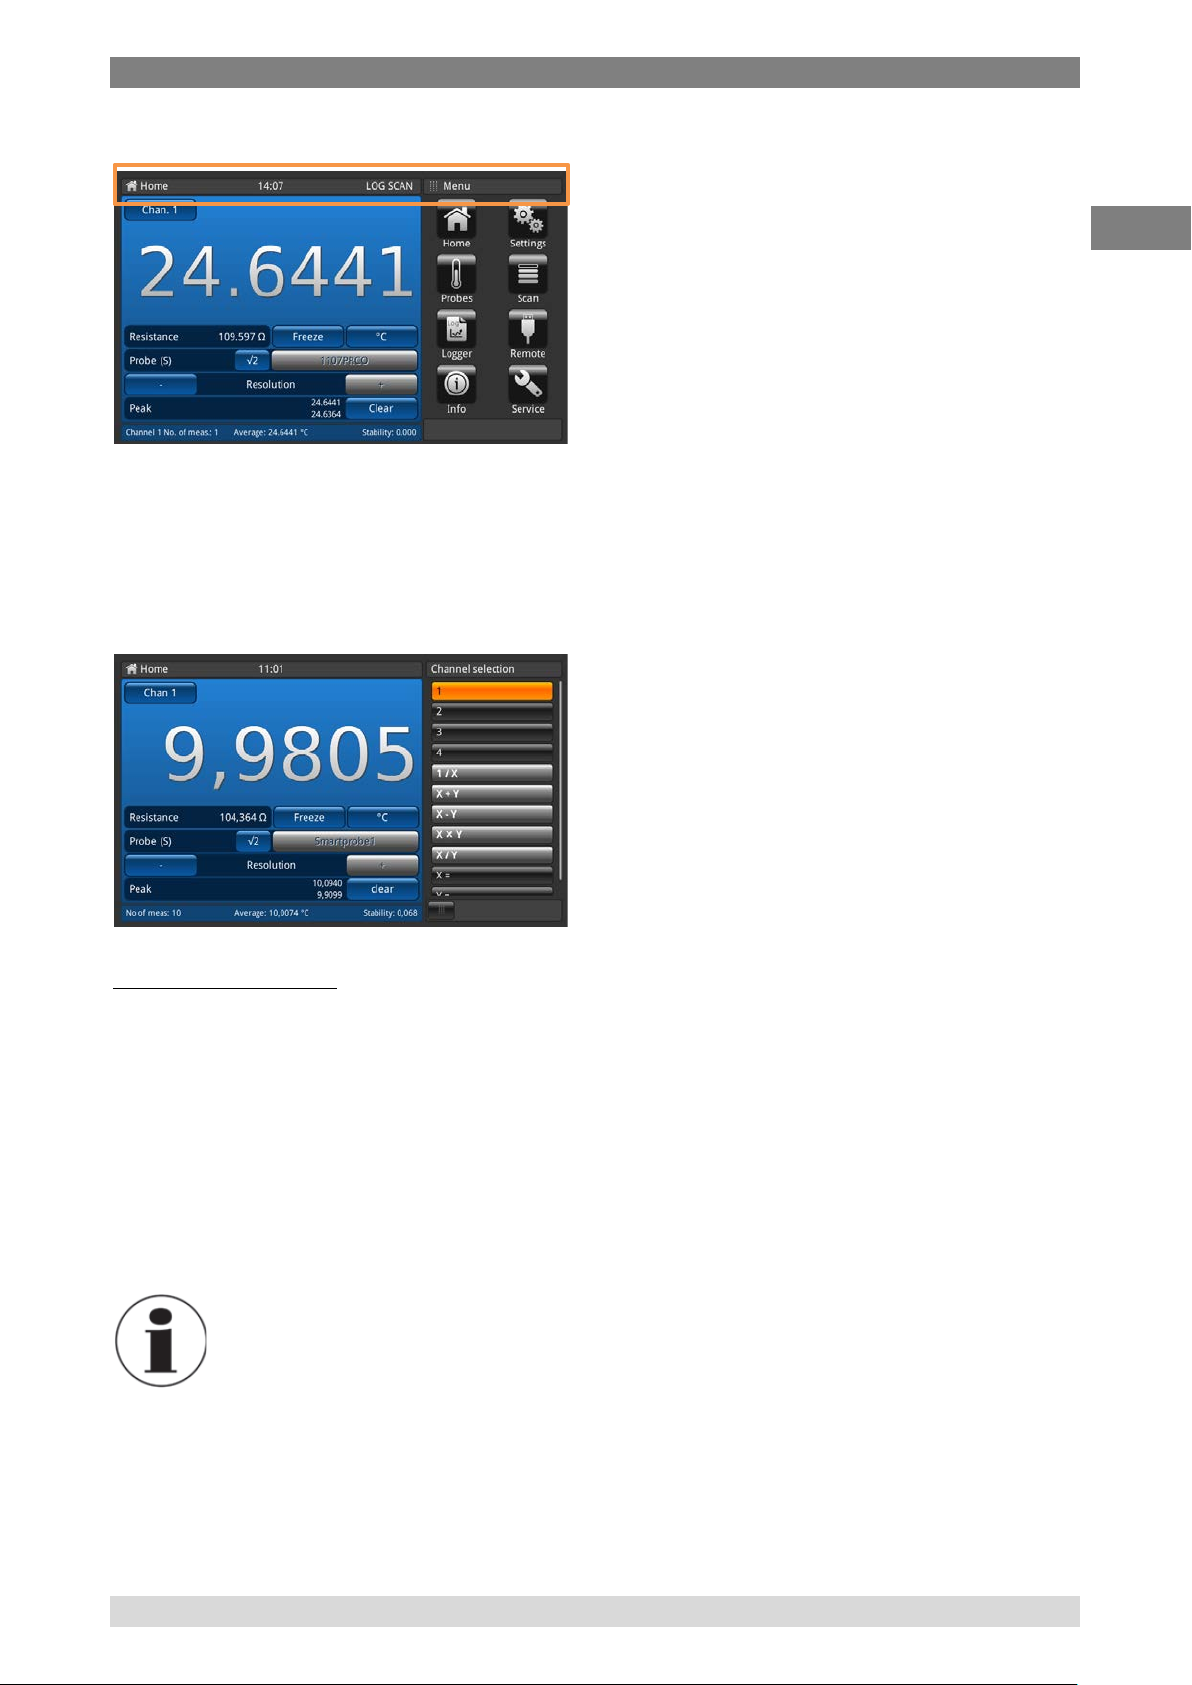
The status bar at the top end of the screen gives a
description of the actual operating mode of the
device.
Log = Logger is active
SCAN = Scan is running
REM = Interface is active
4.6.1.2 Channel selection
By pressing function key 20 (refer to section 4.3.3 Main screen; Home) the menu for the channel
selection opens on the right side. Back via the menu button on the bottom line.
1 = PRT 1
2 = PRT 2
3 = TC 3
4 = TC 4
The selected channel will be indicated in the
function key 20 like Chan “#selection#”.
Mathematical functions
The CTR3000 can display several mathematical functions between two different channels (X, Y).
The unit can be selected after the selection of the channel via function key 9 (refer to section 4.3.3
Main screen; Home). If the units for these two channels do not match (like PRT and TC), the value
will be displayed in a temperature unit like °C, °F, or K.
- Input necessary for X and Y
- If you click on “X=” or “Y=”then a list of available channels opens on the right side
o Only numbers for channels selectable, which are connected
o If an invalid number is selected, an information dialog appears.
SMART probes take time to read their stored information. The SMART probe ’read on
channel change’ is disabled once a difference mode is selected. To change probes,
select a single channel before reselecting a difference mode with SMART probes.
WIKA Operating Instruction, model CTR3000 21
Page 22

4. Design and Function
EN
14191761.01 12/2016 EN
4.6.1.3 Freeze function
While clicking on the button “Freeze” (function key 13 please refer to section 4.3.3 Main screen;
) the colour turns into orange and the display freezes/ holds.
Home
This function helps the user to read easier the values.
4.6.1.4 Unit selection
By pressing function key 9 (refer to section 4.3.3 Main screen; Home) the menu for the unit selection
opens on the right side. Back via the menu button on the bottom line.
Sequence as shown left for all PRT channels.
Sequence for all TC channels like °C, °F, K and
mV.
The selected unit will be indicated in the function
key 9 like “#selection#”.
Beside the “Freeze” Button on the left side the
corresponding value is displayed, e.g.:
- Pt100 and °C then show Ohm
- TC and mV then show °C
Calculation and units
1 °Celsius
x °C * 1,8 + 32 = y °Fahrenheit
x °C + 273,15 = y Kelvin
Temperature units
The temperature cannot be measured. The device measures Ohm or mV.
These electrical signals are calculated into temperature through the conversion of the probe.
22 WIKA Operating Instruction, model CTR3000
Page 23

4. Design and Function
EN
14191761.01 03/2017 EN
4.6.1.5 √2 current multiplier
This option increases current through the probes by √2 (double-power), to determine any probe selfheating. The best method of using this option is first to let the sensor reach a steady temperature
and note the value. It may take some time to stabilize.
Press the function key 14 (refer to section 4.3.3 Main screen; Home) and immediately the increased
current through the probe will increase the heating effect on the probe, and the value displayed will
represent the temperature change due to the increased current. When the reading has stabilized,
note the temperature change. The result is the actual temperature with the effect of probe selfheating eliminated.
4.6.1.6 Probe selection
By pressing function key 12 (refer to section 4.3.3 Main screen; Home) the menu for the probe
selection opens on the right side. Back via the menu button on the bottom line.
Standard probes see below.
Stored probes: List of all configured probes in the
menu “Probes”. Details see below.
The selected channel will be indicated in the function key 12 like “#selection#”.
Standard probes for all PRT channels:
- Default 3w PRT (Pt100): Pt100, 3w, DIN conversion, internal 100 Ohm 3W-PT100
- Default 4w PRT (Pt100): Pt100, 4w, DIN conversion, internal 100 Ohm
- Default SPRT (Pt25): Pt25, 4w, DIN conversion, internal 25 Ohm
- Default Thermistor: 500 kOhm, no temperature conversion
4W-PT100
4W-PT25
THERMISTOR
Standard probes for all TC channels:
- Default Thermocouple: TC K, internal reference cold junction
Stored probes:
- List of all configured probes in the menu “Probes”. Details see below.
- “+” allows the user to configure a new probe and the user is directly linked to the menu
“probes” (details in section 4.6.3 Application <<Probes).
- Sequence of the listed probes acc. ABC
A probe can only be assigned to one channel at a time, so it is not possible to e.g.
assign stored probe PRT1 to channel 1 and 2 at the same time. This means that if a
probe, which is currently assigned to a channel, is assigned to another channel. it is
no longer assigned to the first channel. If no probe is explicitly assigned to a channel,
the default probe for the channel type will be used. For PRT channels, this is 4WPT100, for TC channels TC(K).
WIKA Operating Instruction, model CTR3000 23
Page 24

4. Design and Function
EN
14191761.01 12/2016 EN
Easy access to probe settings:
Holding the button of the stored probes (in the home screen) >2s opens the probe menu for editing
the selected probe. Please find more details how to edit/change probes in section 4.6.3 Application
<<Probes>>.
If a SMART probe is connected to a channel this
function is invalid. Probe selection list will not show
up, button is disabled. The SMART probe’s
identifier is shown in the button; the label shows
“Probe (S)” to indicate the SMART probe.
4.6.1.7 Resolution “+/-“function
By pressing function key 17/10 (refer to section 4.3.3 Main screen; Home) the resolution will be
lower/higher. Means the numbers of decimal places are configured.
By pressing „+“ a digit after the point/comma will be
added, by pressing „-“ a digit after the point/comma
will be deleted.
The buttons will turn inactive if the maximum or
minimum setting is reached.
By changing the unit the numbers of the settable decimal places will change.
Minimum = 0 (no comma/point)
Maximum = 0.0001K/°C/°F / 0.00001Ω (PRT) / 0.00001mV (TC)
4.6.1.8 Peak “clear” function
The peak function (Min/Max) shows the maximum and minimum value for the actual recorded
measurement in the unit displayed in the function key 9.
The peak field 16 (refer to section 4.3.3 Main
screen; Home) shows in the first line Peak_Max
and in the second line Peak_Min.
By pressing the „Clear“ function key 11 (refer to
section 4.3.3 Main screen; Home) the values will
be deleted and the values are refreshed.
24 WIKA Operating Instruction, model CTR3000
Page 25

4. Design and Function
EN
14191761.01 03/2017 EN
Resolution fixed at 4 respectively 5 decimal places, only depending on unit selection.
Temperature selected 4 places
Base value selected 5 places
So only a change of the unit causes change of peak values.
4.6.1.9 Information bar
The information bar, field 15 (refer to section 4.3.3 Main screen; Home), displays relevant
measurements which help you to have an easier calibration documentation.
Values
- Number of measurements: Setting in Settings >> Display >> Average value
- Average : Average value over the last xy values; displayed in the
selected unit on the home screen
- Stability: shows the standard deviation
- Difference: displays the difference between the reference (first probe
marked as reference) and the device under test (all other
channels); displayed in the unit of the device under test
(only shown in scan mode when the selected view is
calibration, please refer to section 4.6.4 Application
<<Scan>>)
Information bar has the same colour as the corresponding channel selection on the
home screen (blue, green, red and orange). If channels are displayed in a list or no
channel relevant information is displayed the information bar will be displayed in grey.
WIKA Operating Instruction, model CTR3000 25
Page 26
4. Design and Function
EN
14191761.01 12/2016 EN
4.6.2 Application <<Settings>>
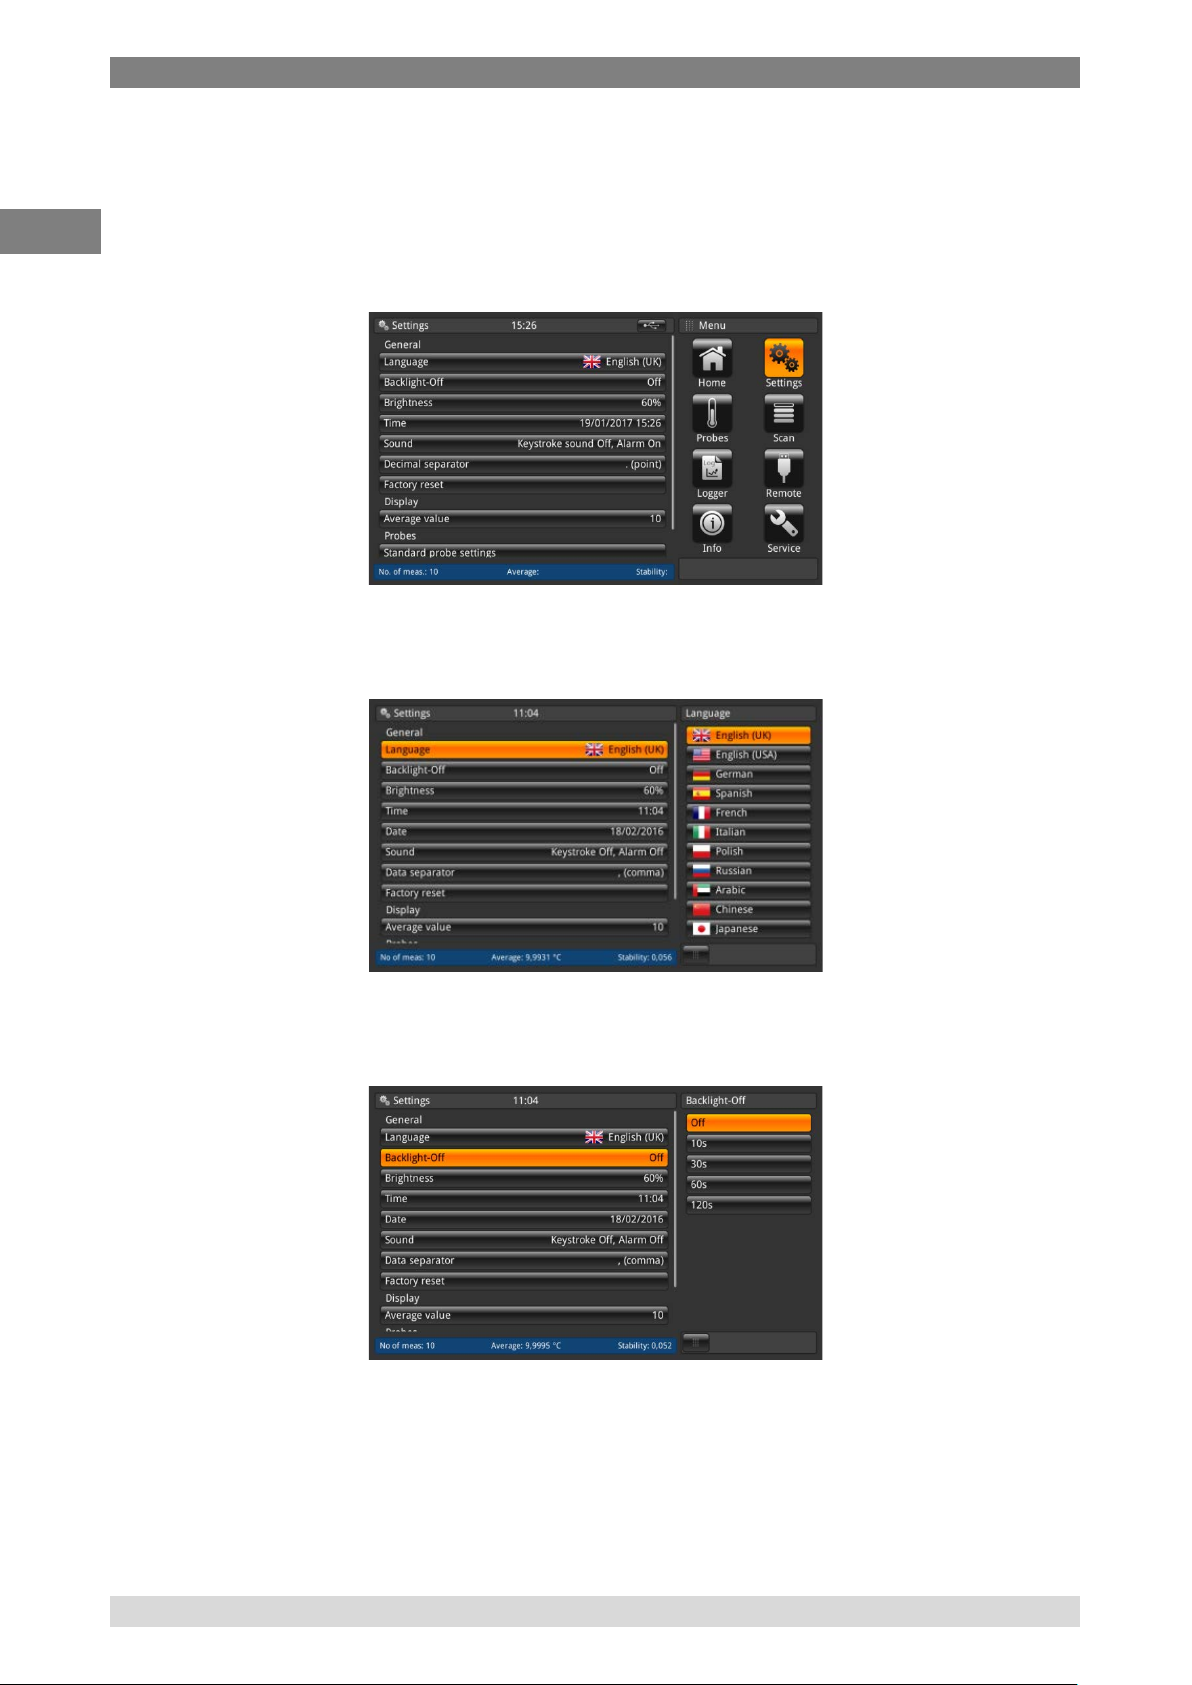
General settings can be done in this menu in the following categories: general, display and probes.
Pressing on the home screen the button “settings” guides the user into the sub-menu. This will open
on the left side. For every entry settings can be done by clicking on the button. The settings menu
opens on the right side.
4.6.2.1 Language
The language parameter provides a selection of different languages. Once a language is chosen all
words within all menus will appear in the chosen language. This will not affect the decimal separator.
4.6.2.2 Backlight-Off
This setting will mean that the backlight will switch off, if no button is pressed for the set time.
Options are displayed below.
26 WIKA Operating Instruction, model CTR3000
Page 27

4. Design and Function
EN
14191761.01 03/2017 EN
4.6.2.3 Brightness
The brightness setting provides a sliding scale to increment the screen brightness in all screens.
Sliding your finger along the bar graph or touching anywhere in the bar graph will change the
brightness of the screen. After the setting is made and your finger is removed from the screen the
menu will show the brightness percent selected and revert back to the main settings menu.
4.6.2.4 Time and Date
This setting ensured the correct time and date for your country. Different time and date formats are
available.
Time changes on the main screen e.g. home view according to this setting. Date changes affect the
stored calculation of the recalibration date.
Instrument has to restart after date or time change due to technical reasons. The
instrument has no internal battery for the clock. This means that when the instrument
remains powered off for several days, it loses the date and time setting.
WIKA Operating Instruction, model CTR3000 27
Page 28
4. Design and Function
EN
14191761.01 12/2016 EN
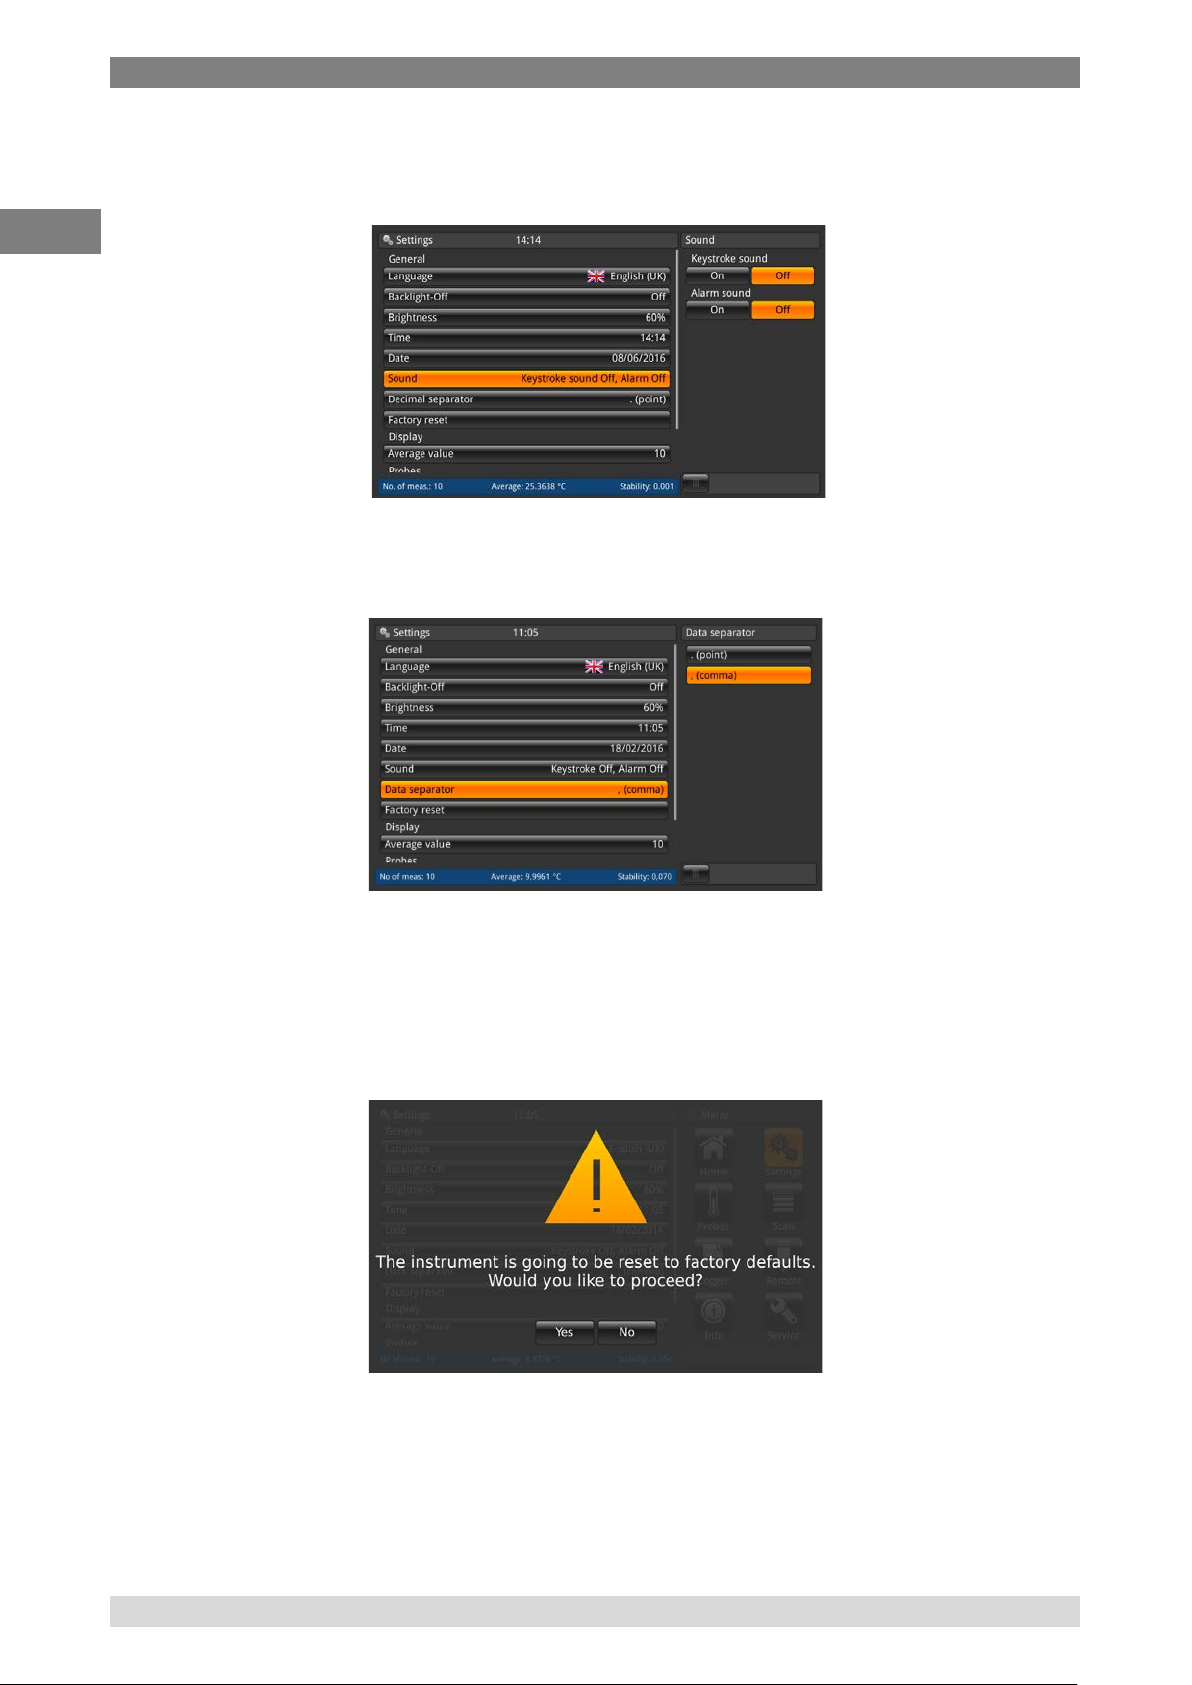
4.6.2.5 Sound
The setting enables/disables the keystroke sound and the alarm sound.
,
4.6.2.6 Data separator
The setting of the radix character (decimal mark) can be done from a dot (.) to a comma (,) or vice
versa.
4.6.2.7 Factory reset
This function resets all values to their standard. Defined user probes won’t be deleted. Factory reset
overwrites the user calibration data with the factory calibration data.
The following dialog will follow by pressing the button <<Factory reset>> in which the user must
obviously confirm that he resets the values to the standard ones.
28 WIKA Operating Instruction, model CTR3000
Page 29

4. Design and Function
EN
14191761.01 03/2017 EN
4.6.2.8 Display – Average value
The average value is stated in the information bar on the home screen or other measuring screens.
Definition: Average value = arithmetic average over the last measurements.
The setting defines the “n” value for the formula above. When clicking on the button below <<sample
count>> the numpad opens.
4.6.2.9 Probes – Standard probe settings
By clicking on the “Standard probe settings” button on the left side, the sub menu opens on the right.
This function helps because these standard settings are pre-configured, if the user wants to store a
new probe. Repeating types of thermometers can be easily pre-configured in this way.
For each section (standard conversion PRT, standard internal resistor, standard conversion TC and
standard reference junction) one selection is necessary! For more details refer to chapter 4.6.3
Application <<Probes>>.
Standard settings are marked in orange.
WIKA Operating Instruction, model CTR3000 29
Page 30

4. Design and Function
EN
14191761.01 12/2016 EN
4.6.2.10 Probes – Alarm for probes
By clicking on the “alarm for probes” button on the left side, the sub menu opens on the right.
The option is between having an alarm for probes or not.
If ON is clicked, then the measured temperature is compared with Tmax (set under probes). If Tmax
< measured temperature, then an error appears (exclamation mark left beside the function key 12).
30 WIKA Operating Instruction, model CTR3000
Page 31

4. Design and Function
EN
14191761.01 03/2017 EN
4.6.3 Application <<Probes>>
Higher accuracy measurements can be made using calibrated thermometers whose
characteristics have been determined. Before being used, the thermometer and its calibration
details must be entered into the CTR3000 in the application <<probes>> (press the button
<<probes>> while being in the <<Home>> application) under <<new probe>>. The
thermometer will then appear in the thermometer list below <<configure existing probes>> (refer
to the following chapters).
Existing thermometers can be deleted via the recycle bin. These can also be find quick by
searching the thermometers with the text search button (refer to section 4.6.3.4 Configure
existing probes
).
The maximum cable length of a temperature probe is 2 m.
WIKA Operating Instruction, model CTR3000 31
Page 32

4. Design and Function
EN
14191761.01 12/2016 EN
4.6.3.1 New probe <<Resistance thermometers>>
To configure a new resistance thermometer click on the button <<resistance thermometer (PRT,
SPRT)>> and the menu with all settings opens on the right. Once all settings are done the changes
must be confirmed with <<Store>>.
1. Probe name
Please enter a unique name (e.g. certificate number or serial number) for the new
thermometer. This name is also shown later under the existing probes and for this name a
search can be done. The input can be done via the qwertz keyboard.
2. Reference
Please mark the thermometer as reference or not. This is important for the scan mode - view
calibration because the difference between the first reference and the device under test will
be calculated and displayed in the information bar.
3. Probe type
Is the thermometer a Pt25 or Pt100?
4. Wiring
Will be the connection a 3-wire or 4-wire?
5. Keep warm current
The device has the facility to drive deselected resistors or PRTs from a constant DC current
source. This allows them to be kept at their normal working temperature, and so decrease
settling time for each channel.
The keep warm current is user selectable as ON/OFF. If set on, the CTR3000 automatically
adjusts the PRT current (from 1 mA for the 100 ohm reference) to 2 mA for the 25 ohm
reference.
6. Int. resistor
The CTR3000 allows the choice between two internal reference resistors (25Ω and 100Ω) or
the Auto-function. The 25 ohm resistor should only be used when a 25 ohm PRT (or lower) is
used. Use the 100Ω reference resistor for all probes with R0 values above 25 Ω
The menu allows the use of Auto selection. The auto selection looks at the R0 value of the
probe. If R0 is below 50 ohms, the 25 ohm reference is selected; any R0 value equal to or
above 50 ohms will use the 100 ohm reference.
The CTR3000 automatically adjusts the PRT current (from 1 mA for the 100 ohm reference)
to 2 mA for the 25 ohm reference.
32 WIKA Operating Instruction, model CTR3000
Page 33

4. Design and Function
EN
14191761.01 03/2017 EN
7. Tmin
Probes may have a minimum temperature set for them (positive or negative). When the
probe is assigned to a channel, the probe’s temperature is checked against the set minimum
and a range error (exclamation mark left beside the function key 12) issued if the minimum
temperature is exceed.
8. Tmax
Probes may have a maximum temperature set for them (positive or negative). When the
probe is measured and active on a channel, the probe’s temperature is checked against the
set maximum and a range error (exclamation mark left beside the function key 12) issued if
the maximum temperature is exceed.
9. Last cal.
Please enter the last calibration date of the thermometer.
If the system date = last cal date + 1 year then a pop up is coming up which reminds that the
probe is due to recalibration.
The recalibration cycle depends mainly on the thermal stress on the thermometer. The
calibration time can only be estimated and is decided on by the user. Therefore check
the calibration system at the triple point or freezing point of water on a regular basis
(independent of the recalibration cycle). Recommendation is a calibration once a year.
WIKA Operating Instruction, model CTR3000 33
Page 34

4. Design and Function
EN
14191761.01 12/2016 EN
10. Conversion
PRTs and SPRTs can be calibrated individually (resistance-temperature characteristics
determined) in order to achieve low uncertainties. There are two algorithms used to
represent the thermometer’s characteristic (the Callendar Van Dusen equation and the
ITS90 equations). The Callendar Van Dusen equation was developed first and was used as
the primary conversion algorithm for all PRTs up until 1990. It is still applicable for PRTs and
SPRT, although better uncertainty can be achieved by using the ITS90 equations
(particularly important when using higher accuracy SPRTs).
In 1990, the International Temperature Scale was revised and a new set of equations were
defined for converting the resistance of a PRT to temperature. These equations (commonly
referred to as ITS90) comprise a nominal conversion that represent the average conversion
characteristic and deviation functions that provide the adjustment for the characteristics of
the individual thermometer. They are intended for use with high purity platinum and provide a
better fit than can be achieved with the older Callendar Van Dusen equation. The ITS90
equations are sometimes also used with industrial PRTs made using the lower sensitivity
-1
0.00385K
wire and can provide a small improvement in uncertainty compared with the
Callendar Van Dusen equation.
a. EN60751 as defined in the standard
You can use the generic EN60751 conversion with PRTs that are made with a grade
of wire that meets the requirements of the standard. The measurement uncertainty
will depend on the class of thermometer and its temperature.
Standard coefficients:
= 100 Ohm
R
0
b. Callendar-van-Dusen like specified in the calibration certificate: R0, A, B and C
This follows the formula:
c. ITS 90 as specified in the calibration certificate: R0.01, an, bn, ap, bp, cp, dp
Make sure using the correct calibration parameters for the thermometer, since incorrect
calibration parameters lead to erroneous results. The coefficients can be found in the
calibration certificate while ordered a calculation.
If you order a CTR3000 with a resistance thermometer and a system calibration with
calculation of the coefficients, the probe will be stored under the serial number and will
be calibrated with the normal sensor current. No root 2.
A = 3.9083x10⁻³ °C–1
B = -5.775x10⁻⁷ °C–2
C = -4.183x10
Rt = R0[1 + At + Bt
(C = 0, if t> 0 °C )
–12
–4
°C
2
+ C(t - 100°C) t3]
34 WIKA Operating Instruction, model CTR3000
Page 35
4. Design and Function
EN
14191761.01 03/2017 EN
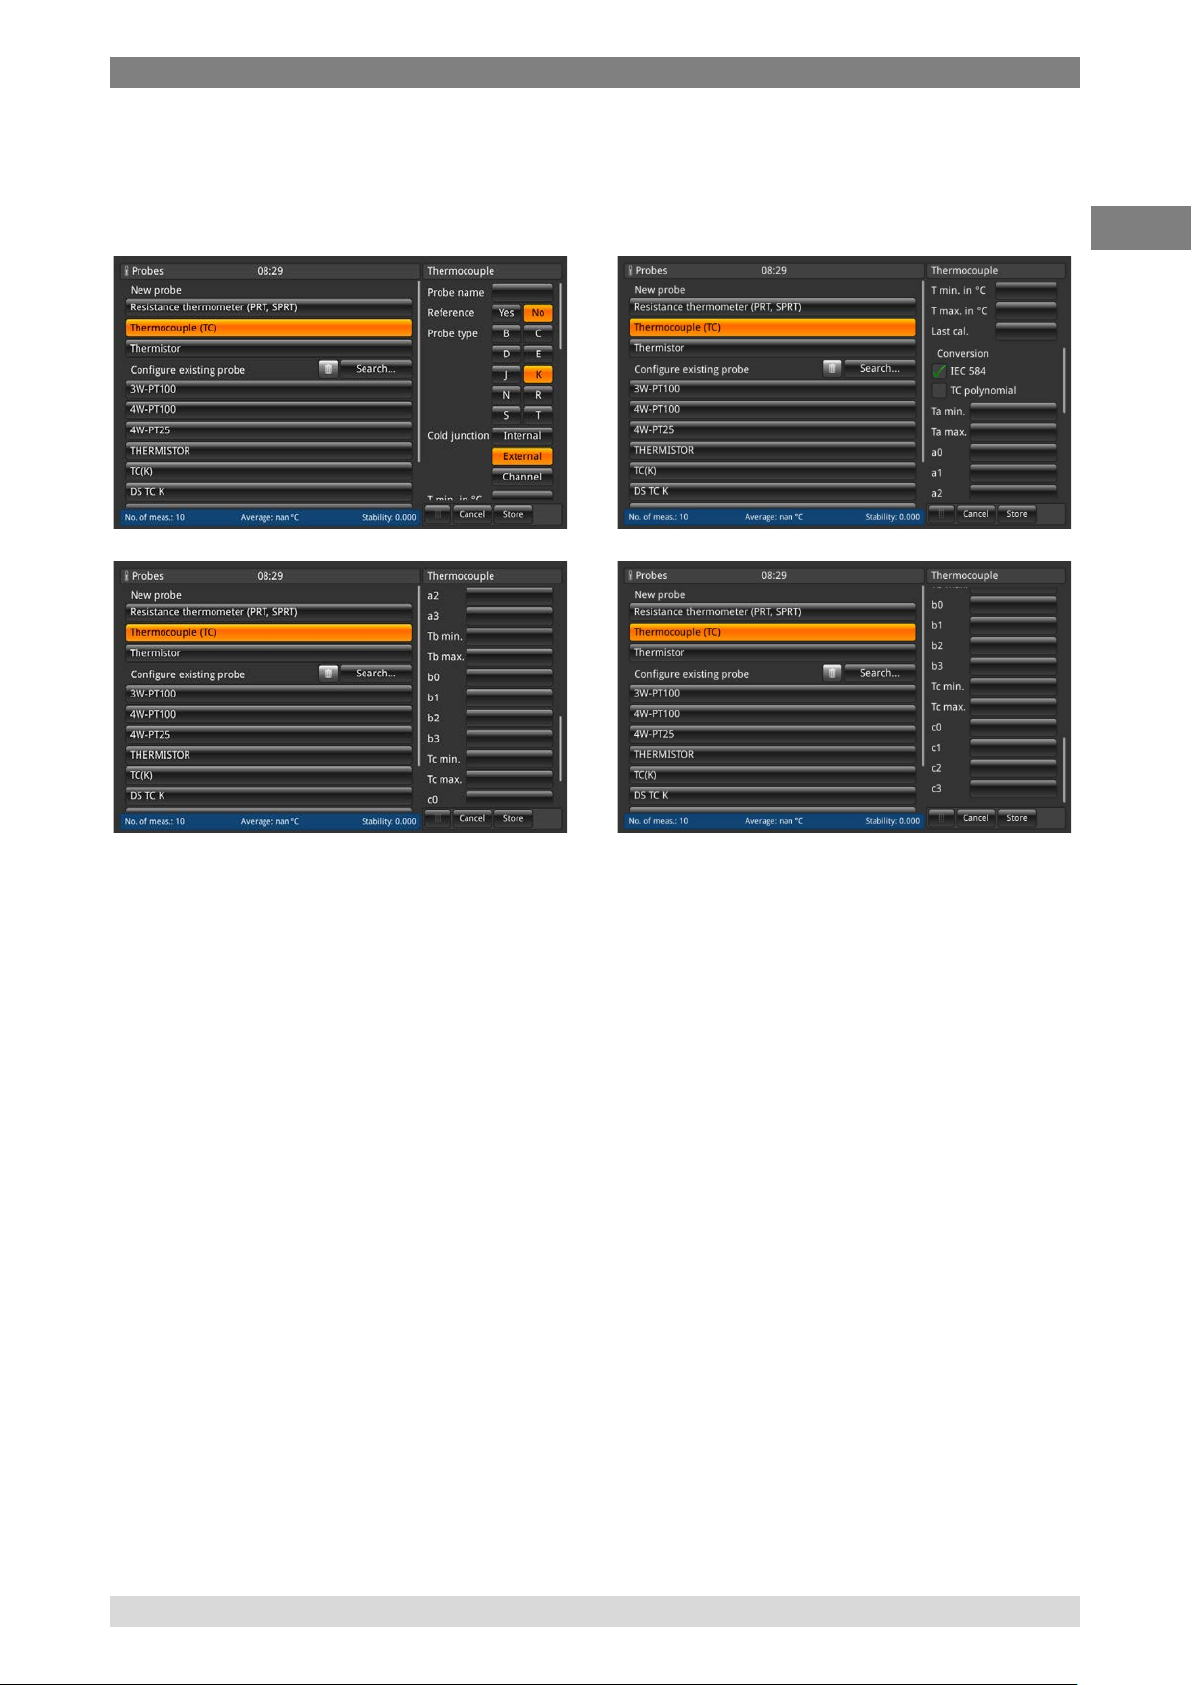
4.6.3.2 New probe <<thermocouples>>
To configure a new thermocouple click on the button <<thermocouple (TC)>> and the menu with all
settings opens on the right. Once all settings are done the changes must be confirmed with
<<Store>>.
The CTR3000 can be used with any thermocouple (calibrated or uncalibrated) fitted with a standard
miniature thermocouple connector. Connect your thermocouple to either of the miniature
thermocouple connectors on the front panel.
1. Probe name
Please enter a unique name (e.g. certificate number or serial number) for the new
thermometer. This name is also shown later under the existing probes and for this name a
search can be done.
2. Reference
Please mark the thermometer as reference or not. This is important for the scan mode - view
calibration because the difference between the first reference and the device under test will
be calculated and displayed in the information bar.
3. Probe type
Is this thermocouple type B, E, J, K, N, R, S or T?
WIKA Operating Instruction, model CTR3000 35
Page 36

4. Design and Function
EN
14191761.01 12/2016 EN
4. Cold junction
Three selections can be done: internal, external, channel
The selected issue turns into orange. If channel is selected then the num pad opens to
define the channel. The number of the channel is right-aligned showed left to the button
<<channel>>. Below the button <<channel>> the name of the probe is displayed.
a. Internal
Internal reference junction compensation using the internal temperature
compensated copper isothermal junction. This is the default mode.
For direct temperature connection with no external reference junction. High
accuracy measurement, requiring additional connection reference junctions.
b. External
No reference junction compensation applied to the measurement. All
measurements are made with respect to 0°C. Used with an external ice point
reference junction. Suitable for highest precision measurement.
c. Channel
External reference junction compensation using PRT measurement of reference
junction. No measurement channels are lost as the reference channel PRT uses
the corresponding input channel. For temperature controlled or ovenised
reference junctions.
5. Tmin
Probes may have a minimum temperature set for them (positive or negative). When the
probe is assigned to a channel, the probe’s temperature is checked against the set minimum
and a range error (exclamation mark left beside the function key 12) issued if the minimum
temperature is exceed.
6. Tmax
Probes may have a maximum temperature set for them (positive or negative). When the
probe is measured and active on a channel, the probe’s temperature is checked against the
set maximum and a range error (exclamation mark left beside the function key 12) issued if
the maximum temperature is exceed.
7. Last cal.
Please enter the last calibration date of the thermometer.
If the system date = last cal date + 1 year then a pop up is coming up which reminds that the
probe is due to recalibration.
The recalibration cycle depends mainly on the thermal stress on the thermometer. The
calibration time can only be estimated and is decided on by the user. Therefore check
the calibration system at the triple point or freezing point of water on a regular basis
(independent of the recalibration cycle). Recommendation is a calibration once a year.
36 WIKA Operating Instruction, model CTR3000
Page 37

4. Design and Function
EN
14191761.01 03/2017 EN
8. Conversion
The EMF-temperature characteristics of thermocouples are non-linear and the CTR3000
uses standard algorithms (from IEC584) to convert the measured EMF to a temperature.
Thermocouples can be calibrated individually to achieve better measurement uncertainty.
The calibration is presented as a deviation function polynomial.
a. IEC 584 as defined in the standard
b. TC polynomial like specified in the calibration certificate
ΔV = C
+C1t +C2 t 2 +C3 t3
0
where t is the temperature in °C and ΔV is the correction in millivolts.
Thermocouples are standardised, and the reference function for the most common
thermocouple types is defined in IEC 584. The characteristic of individual
thermocouples is usually close to the reference function. Therefore it is
recommended to determine the deviation function from the reference function for the
thermocouple under test in up to three temperature ranges, which must be indicated.
Make sure using the correct calibration parameters for the thermometer, since
incorrect calibration parameters lead to erroneous results. The coefficients can be
found in the calibration certificate while ordered a calculation.
WIKA Operating Instruction, model CTR3000 37
Page 38

4. Design and Function
EN
14191761.01 12/2016 EN
4.6.3.3 New probe <<thermistors>>
To configure a new thermistor click on the button <<thermistor>> and the menu with all settings
opens on the right. Once all settings are done the changes must be confirmed with <<Store>>.
The CTR3000 can be used with thermistors. These are typically NTCs (negative temperature
coefficient). Compared with PRTs/SPRTs, thermistors have a much higher resistance (typically
measured in tens of kΩ), operate over a more limited temperature range (typically < 150°C) are
highly non-linear (essentially logarithmic).
1. Probe name
Please enter an unique name (e.g. certificate number or serial number) for the new
thermometer. This name is also shown later under the existing probes and for this name a
search can be done.
2. Reference
Please mark the thermometer as reference or not. This is important for the scan mode - view
calibration because the difference between the first reference and the device under test will
be calculated and displayed in the information bar.
3. Tmin
Probes may have a minimum temperature set for them (positive or negative). When the
probe is assigned to a channel, the probe’s temperature is checked against the set minimum
and a range error (exclamation mark left beside the function key 12) issued if the minimum
temperature is exceed.
38 WIKA Operating Instruction, model CTR3000
Page 39

4. Design and Function
EN
14191761.01 03/2017 EN
4. Tmax
Probes may have a maximum temperature set for them (positive or negative). When the
probe is measured and active on a channel, the probe’s temperature is checked against the
set maximum and a range error (exclamation mark left beside the function key 12) issued if
the maximum temperature is exceed.
5. Last cal.
Please enter the last calibration date of the thermometer.
If the system date = last cal date + 1 year then a pop up is coming up which reminds that the
probe is due to recalibration.
The recalibration cycle depends mainly on the thermal stress on the thermometer. The
calibration time can only be estimated and is decided on by the user. Therefore check
the calibration system at the triple point or freezing point of water on a regular basis
(independent of the recalibration cycle). Recommendation is a calibration once a year.
6. Conversion
a. None, only the resistance is displayed
b. Steinhart-Hart like specified in the calibration certificate: a, b, and c
The Steinhart-Hart equation is commonly used to convert the measured resistance to
temperature.
c. Polynomial like specified in the calibration certificate; c0, c1, c2 and c3
1
= + ln() + ()
1
= + ln() + () + ()
Make sure using the correct calibration parameters for the thermometer, since incorrect
calibration parameters lead to erroneous results. The coefficients can be found in the
calibration certificate while ordered a calculation.
WIKA Operating Instruction, model CTR3000 39
Page 40

4. Design and Function
EN
14191761.01 12/2016 EN
4.6.3.4 Configure existing probes
Under the menu section <<configure existing probe>> existing standard or user-defined probes can
be changed or updated e.g. with new calibration data.
As soon as you click on a probe on the left side, all parameters (detailed description in the chapters
before) depending on the probe type (resistance thermometer, thermocouple or thermistor) will
open on the right side.
For the standard probes 3W-PT100, 4W-PT100, 4W-PT25, Thermistor and TC (K) only a few
changes can be done. All other user defined probes can be configured as needed.
Delete
The recycle bin has been placed on the left side of the search field. This function deletes existing
probes if they are selected in the list below. Every time the CTR3000 needs a confirmation for
deleting probes.
Search
By clicking on the “search” button on the left side, the text pad opens on the right. There you are
able to search after the probe name and the search button allows filtering the thermometer list,
which is helpful to find thermometers within a large list. The character * can be used as wildcard to
show all thermometers matching a name pattern. Found results are displayed then on the left side
under the menu section <<configure existing probe>>.
To get all existing probes again displayed please press the button <<clear>> beside the filter.
40 WIKA Operating Instruction, model CTR3000
Page 41

4. Design and Function
EN
14191761.01 03/2017 EN
Whenever you have changed the settings of your user-defined probe, you are able to restore the
last configuration over the <<restore>> button at the end of the setting dialog. The CTR3000 wants
to have a confirmation for restoring the last probe data. And then again the <<store>> button must
be pressed as a confirmation.
4.6.3.5 SMART probes
Under the menu section <<SMART probes>> you can disable SMART probes. When a SMART
probe is disabled for a channel, the instrument uses the probe settings assigned to the channel.
By clicking on the button << list connected SMART probes>> all connected SMART probes will be
listed on the right side with their probe name. Every probe highlighted in orange is enabled/active
and all others not. Clicking on the button of an active SMART probe means that this will be disabled.
This setting has to be confirmed.
When SMART probe disabled for a channel, the instrument uses the probe settings
assigned to the channel.
The scan of listed smart probes cannot be done while a scan is active.
WIKA Operating Instruction, model CTR3000 41
Page 42

4. Design and Function
EN
14191761.01 12/2016 EN
4.6.4 Application <<Scan>>
The application <<scan>> (via button <<scan>> in the right application menu) describes the
function of this device that sequentially measures each channel and either temporarily shows the
data on the display in the selected view. Scans are started manually by the user. To scan a channel,
the CTR3000 sequentially cycles through the channels that are selected and makes measurements.
Therefore this function allows the user to see more channels on the screen and to have a more or
less automatic measurement of several channels.
Modules are only available and selectable if these are connected.
4.6.4.1 Configuring a scan
Under the menu section <<channel configuration>> all or user-defined channels can be selected for
the scan routine. Same procedure as for all other inputs: click on the left side and the input options
will open on the right side.
Select the channels you want to measure and
then store the configuration by pressing the
button <<store>>.
Please ensure that for all configured resistance thermometers the keep warm current is
<<ON>>. This allows quicker and more accurate measurements.
Select the channels you want to measure and
then store the configuration by pressing the
button <<store>>. By pressing the buttons
<<select all>>/ <<deselect al>> the selection
is easier by choosing all or nothing with one
click.
42 WIKA Operating Instruction, model CTR3000
Page 43

4. Design and Function
EN
14191761.01 03/2017 EN
To set up a proper scan a hold time is needed. This value means how long the device stays at one
channel before it switches to the next channel. The input of the value is via the numpad on the right
side.
Valid values: 3 …600 s
Means the quickest changing between the channels is 3s.
After all settings are done start the scan via the button <<start>>. Also in this menu the scan routine
can be stopped, by pressing the button <<Stop>>. This button is active if the scan is already started.
Vice versa the start button is only active if the scan is stopped.
4.6.4.2 View
By pressing the button <<selected view>> the sub menu opens on the right side. Scan or calibration
view means that you see all channels you selected on the screens. According to the numbers of
selected channels the view changes a little bit. Please see below for details. The graph view shows
a graphic version with all selected channels.
To activate the selected view press the button <<Activate view>> (only active if the scan is started),
this action guides to the selected scan view.
While changing from the scan application to the home application, please note that the
scan is still active. This will be seen status and information bar.
WIKA Operating Instruction, model CTR3000 43
Page 44

4. Design and Function
EN
14191761.01 12/2016 EN
Scan/Calibration view:
The difference between these two views is the information bar at the bottom of the device. In this a
difference for the calibration view is displayed. The difference is the difference between the
reference (probe marked as reference and listed first) and the device under test (all other channels),
displayed in the unit of the device under test.
The function buttons and their behavior are known from the home application.
Scan/Calibration view: 2 channels selected Scan/Calibration view: 3 channels selected
Scan/Calibration view: 3 channels selected Scan/Calibration view: more than 4 channels
selected
Pressing again the application <<scan>>, during seeing the different views of the scan,
guides the user into the application <<scan>> menu, where all settings can be done and
the scan can be stopped. Please refer to section 4.6.4.1 Configuring a scan.
44 WIKA Operating Instruction, model CTR3000
Page 45
4. Design and Function
EN
14191761.01 03/2017 EN
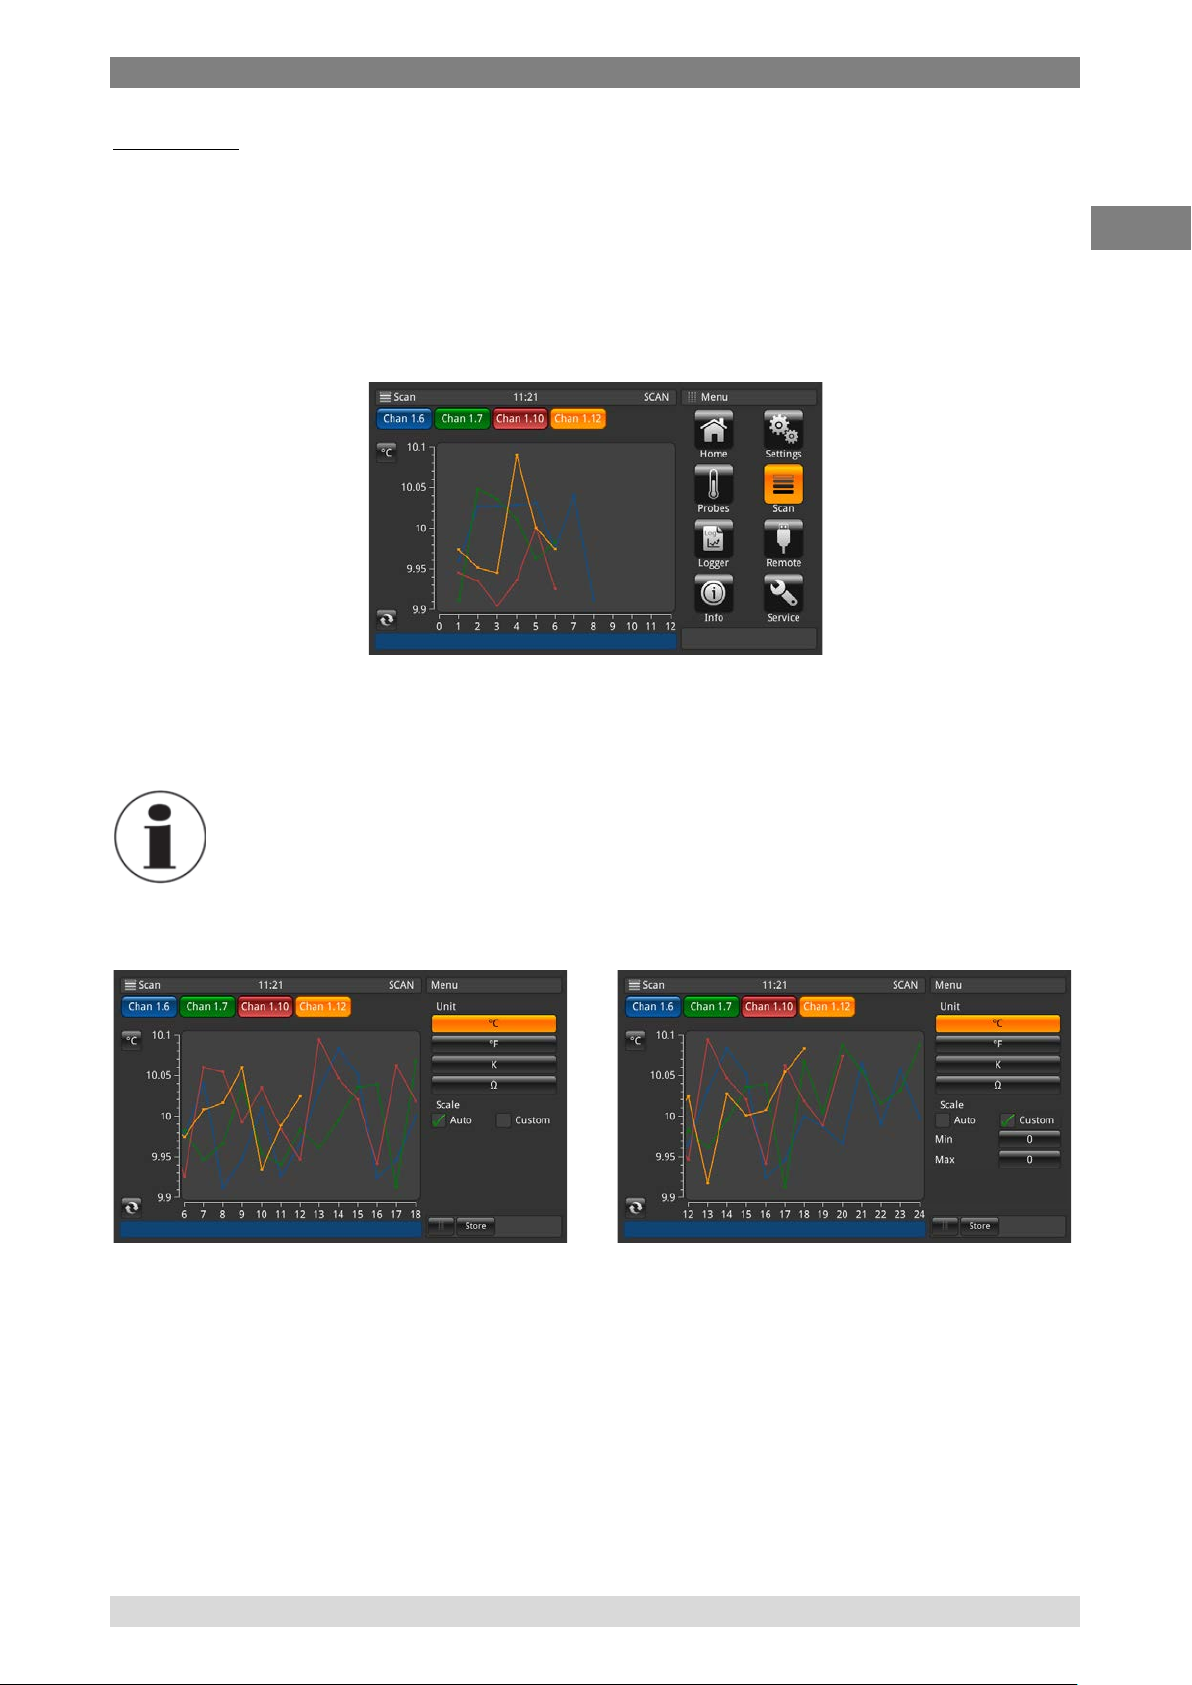
Graph view:
With the graphic feature, channel measurement data for up to ten channels can be plotted and
viewed on the display.
A probe must be assigned to a channel before on the home screen or via the function button in the
graphic view itself. Also the unit must be chosen via the function button, which is indicated at the top
of the y-axis. Only the same units can be displayed. E.g. Chan PRT1=Ohm, Chan 8.1=mV
displaying the graph in °C/°F/K is possible, but not in Ohm/mV. If the unit changes the y-axis is
switched to auto scale.
The x-axis shows the numbers of measurement. This is scrollable from the left to the right and vice
versa. (Re-fresh button go to the actual measurement point in the graph) The y-axis shows the
measuring values.
Pressing again the application <<scan>>, during seeing the different views of the scan,
guides the user into the application <<scan>> menu, where all settings can be done and
the scan can be stopped. Please refer to section Configuring a scan.
Adjustment of the graph
Via clicking on the button <<unit>>, in this case <<°C>>, a sub menu opens where the unit and the
scale can be adjusted. Please take care that you set the right values for the customized scale in
<<min>> and <<max>>, so that all measured values are displayed in the graph. The division will be
choosen automatically. The closer min/max the better the resolution. Please confirm all inputs by
pressing the button <<store>>.
WIKA Operating Instruction, model CTR3000 45
Page 46

4. Design and Function
EN
14191761.01 12/2016 EN
4.6.5 Application <<Logger>>
The application <<logger>> (via button <<logger>> in the right application menu) describes the
function of this device that logs all data which is displayed on the <<Home>> or <<Scan>>
Application. If a scan is active the actual channel will be logged. The different possible settings are
explained in the following sections.
To start a logger with the preferred settings (described below) press the button <<Start>>. Then the
<<LOG>> appears in the status line, which shows that the logger is active. By pressing <<Stop>>
the logger is stopped and the <<LOG>> disappears in the status line.
While the logger is active, please do not change the probe configuration, including
plugging or unplugging of SMART probes.
46 WIKA Operating Instruction, model CTR3000
Page 47
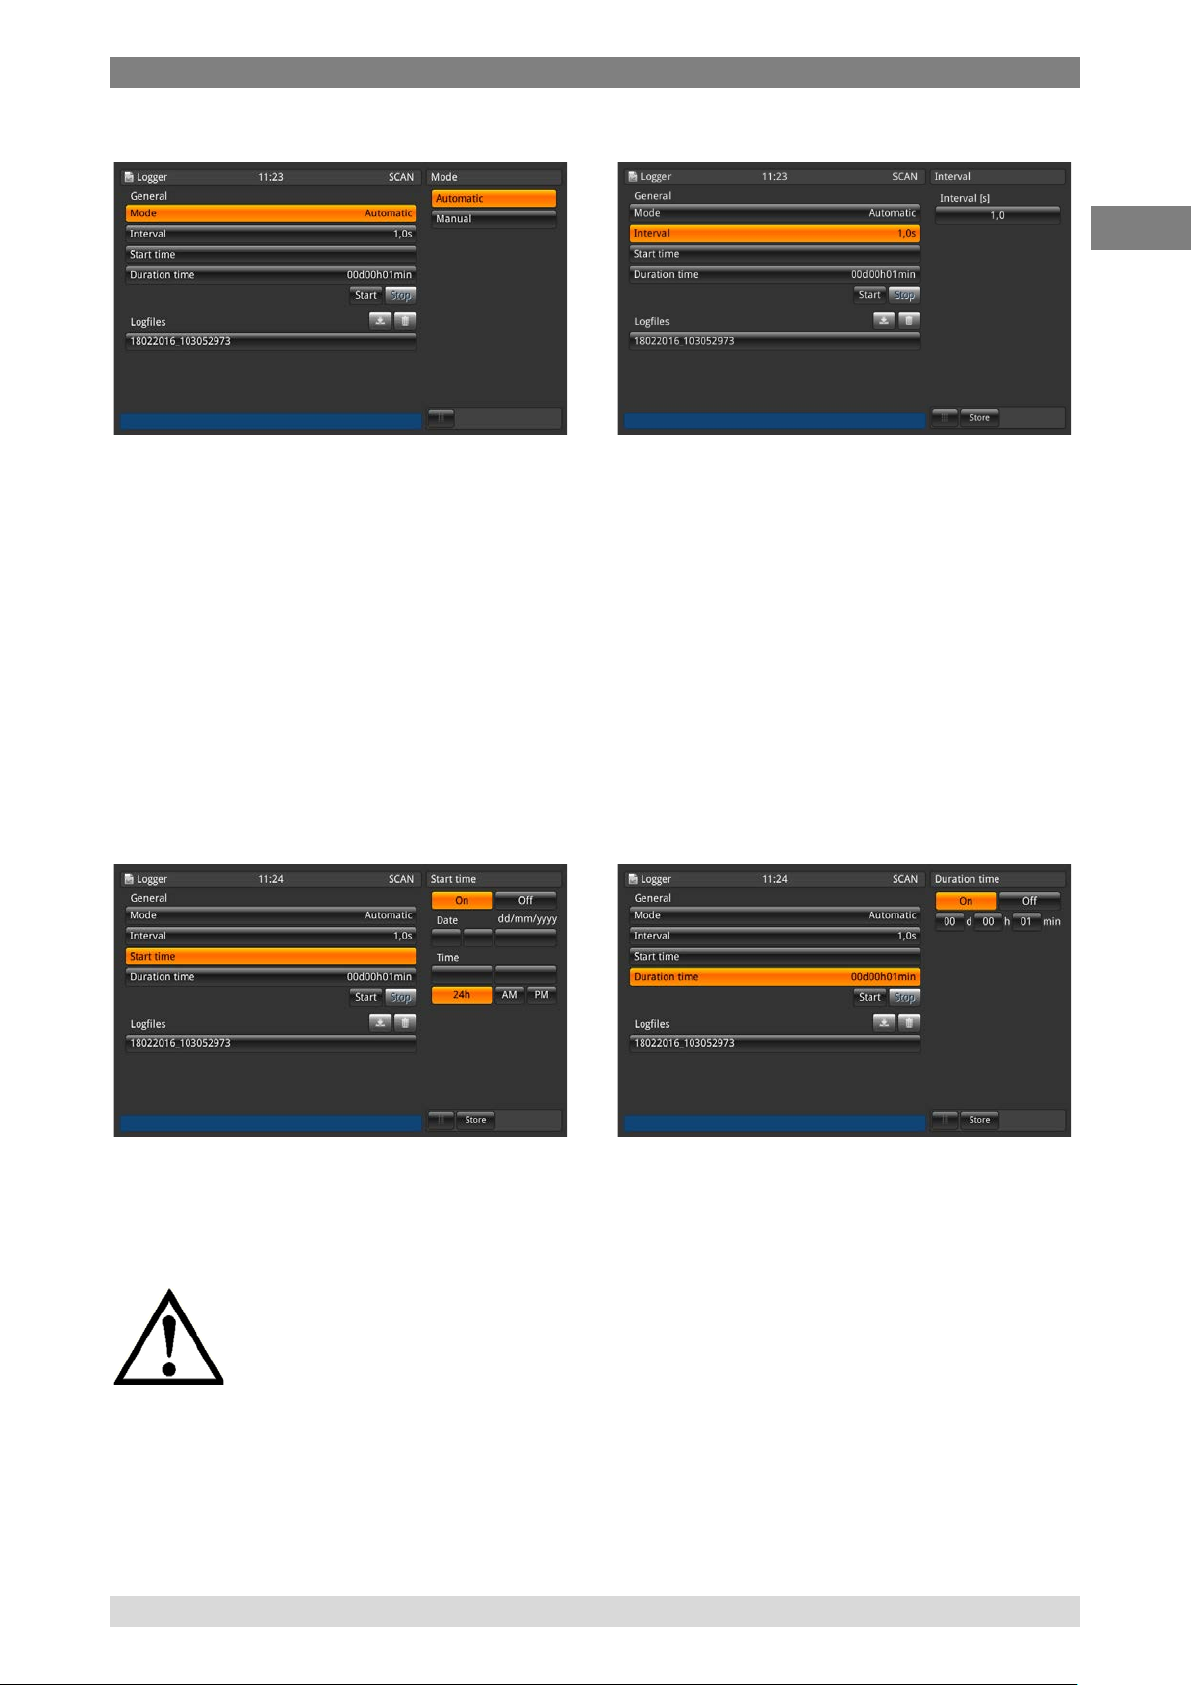
4. Design and Function
EN
14191761.01 03/2017 EN
4.6.5.1 General
Click on the button <<mode>> and two
options are visible on the right side: Automatic
and manual
- Automatic mode requires the setting
<<interval>>
- Manual mode: A value is taken while
pressing the <<Log>> button 3s long,
when being in the application
<<Home>>
The interval describes the time when the
device takes automatically a value from the
measurement. Clicking on the button on the
right side under the capture <<Interval [s]>>
opens a num pad.
Settable values:
- Minimum 0.5 s
- Maximum 3600 s
- Step 0.5
- Standard value = 1 s
Please store the setting.
Start time describes the time, when the log
starts. A date and a time have to be defined.
Please store the setting.
Please ensure that the date and
time is set correct under
<<Settings>>.
WIKA Operating Instruction, model CTR3000 47
Duration time describes the time, when the log
ends after starting. A setting in days, hours or
minutes has to be done. Please store the
setting.
Page 48

4. Design and Function
EN
14191761.01 12/2016 EN
4.6.5.2 Log files
The device itself has a capability of approx. 1.4 Mio values. If the storage is full, no log files will be
overwritten. An error log rises up and requests to delete data from the device.
By pressing the button <<Start>> a new log is created and named under log files with a time/date
stamp according to the set time/date format. If a start or duration time is selected the button displays
also the time until the log starts and then shows the remaining time until it stop.
While clicking on the created log file in the list, the log data will be viewed on the right side and will
be updated after every recorded value (the values will be added on the top, that the newest value is
always visible).
By pressing the button <<Stop>> the log is done and stored completely under log files.
Delete, download function of log files
By clicking on an existing log file the values appear
on the right side. The head line displays the name
of the log file.
Moreover the download and clear button are
active.
An active log file cannot be downloaded
and deleted!
Click on the log file you want to edit. Then click on the download or delete symbol.
If a download is required please ensure that a USB memory stick is inserted in the front end USB!
When the download is completed, please ensure that you eject the USB memory stick properly via
the sign in the status line. More details in section Fehler! Verweisquelle konnte nicht
gefunden werden. Fehler! Verweisquelle konnte nicht gefunden werden..
If the delete button is pressed, a dialog pops up which needs again a confirmation.
If the device cannot detect a memory stick, the download button is inactive.
48 WIKA Operating Instruction, model CTR3000
Page 49

4. Design and Function
EN
14191761.01 03/2017 EN
Stored log data
Via a USB memory stick in the front end USB the log data can be downloaded and can be viewed in
e.g. Excel. Open Excel and import the file. Please take care that the data format is chosen with
8.
Please ensure that the decimal separator setting on the device match to your setting on
the PC.
Data which is displayed on the screen will be logged. E.g. scan is activated for 2 channels -> 2
channels will be logged.
General data:
- Instrument name
- Serial number, Firmware
- Per channel the probe data (what probe and all settings)
- Start date
- Start time
UTF-
Log data:
- Time/date stamp
- Channel
- measurement value in °C (or other set standard unit)
- measurement raw data/ electrical value
If one channel is marked as reference, then for all other channels the difference is calculated:
- difference in °C (or other set standard unit)
- difference in raw data/ electrical value
Differences can only be calculated, if the units match.
WIKA Operating Instruction, model CTR3000 49
Page 50
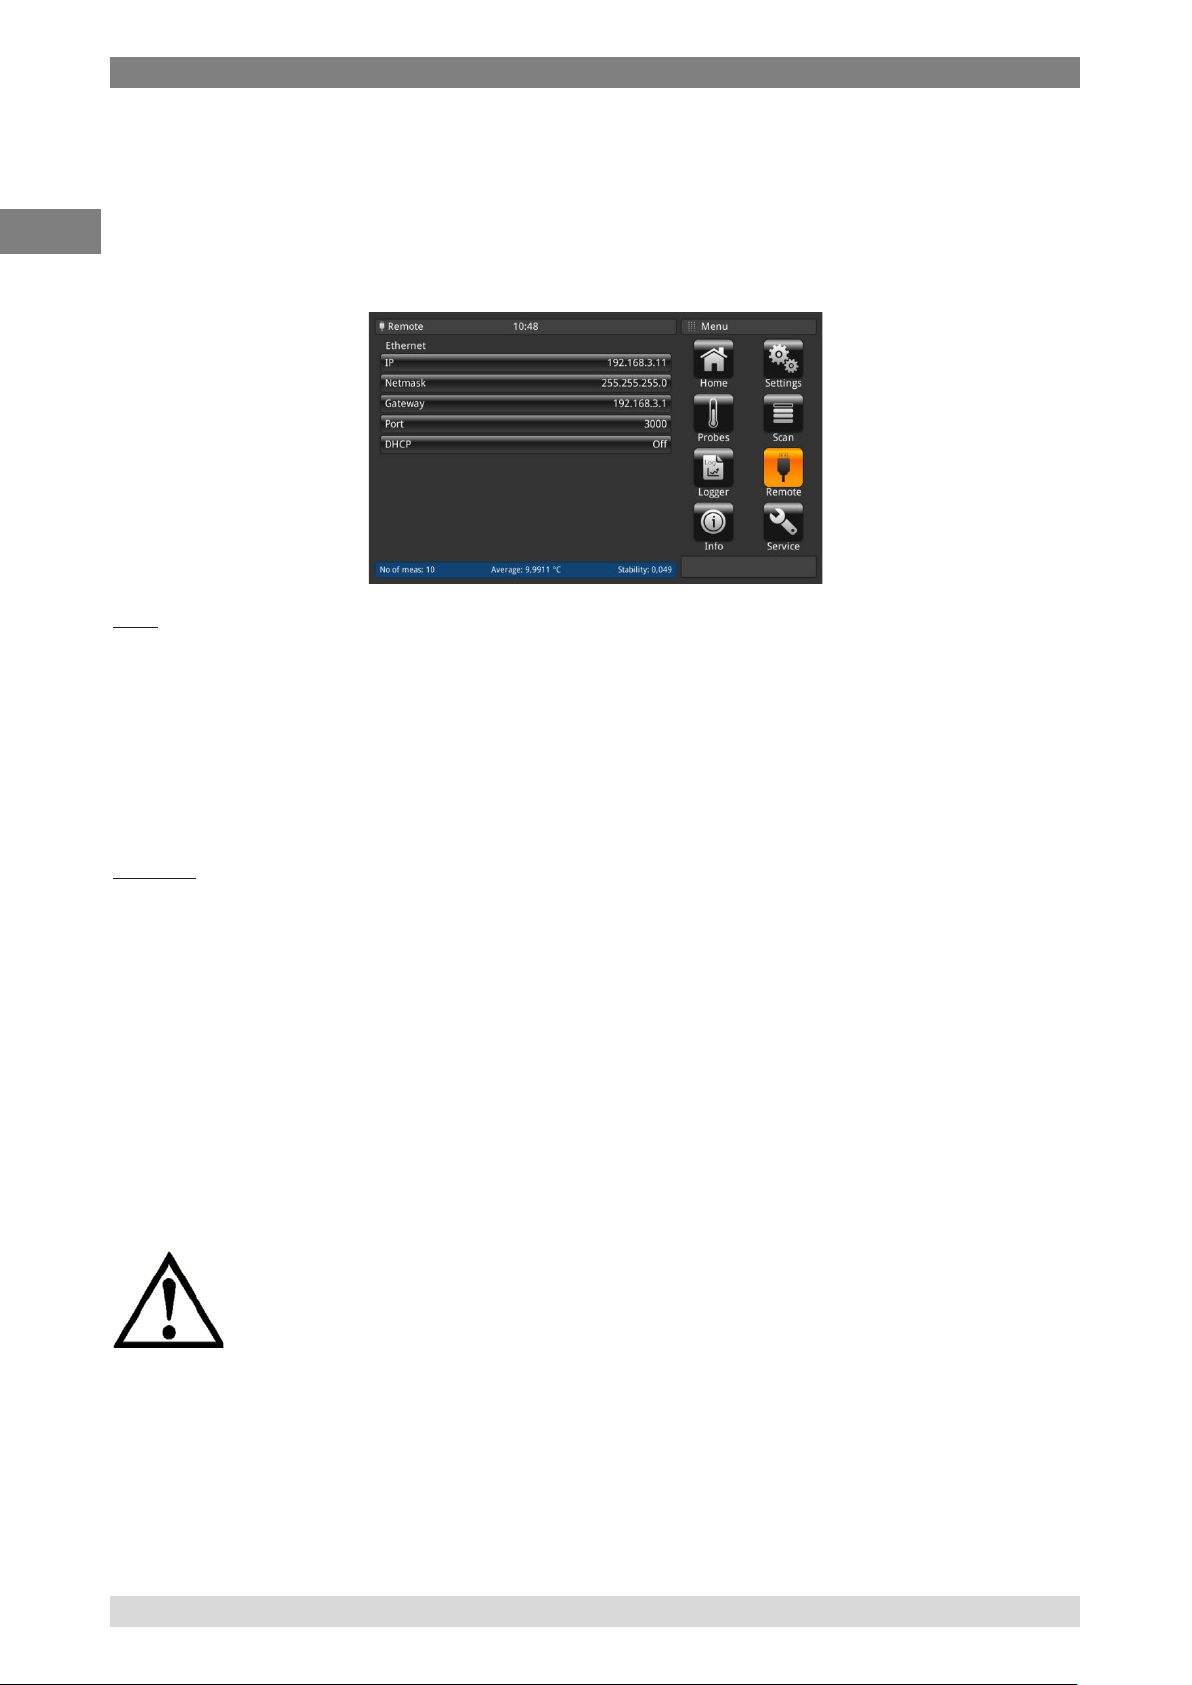
4. Design and Function
EN
14191761.01 12/2016 EN
4.6.6 Application <<Remote>>
This application <<Remote>> allows to operate the device with SCIPI commands (command set
available in a separate document) over a rear panel USB/Ethernet or RS232 connection.
With the Remote Settings application users can select the remote command set for all interfaces.
The Ethernet network parameters and Serial parameters can also be set here.
*As a RS232 card is connected more functions will be displayed.
USB
The USB PC interface will be installed as a virtual COM driver. The communication protocol is:
- Bits per second 9600
- Data bits 8
- Stop bits 1
- Parity none
- Flow control none
Ethernet
The Ethernet function allows the user to set the following by inputting a numeric value in each
separate field:
- IP
- Netmask
- Gateway
- Port
- DHCP settings
The Ethernet communication parameters are set as a default.
Before using Ethernet communication, four parameters must be set up: IP, Netmask, Gateway, and
Port.
Please contact the network administrator for proper settings.
Please consult the computer resources department prior to connecting this instrument
to your network to verify there are no conflicts with existing IP addresses.
50 WIKA Operating Instruction, model CTR3000
Page 51

4. Design and Function
EN
14191761.01 03/2017 EN
4.6.7 Application <<Info>>
The Information Application displays information about the instrument, including:
- WIKA address
- Model number, serial number and manufacturing date
- Measuring system serial number and firmware version
- User interface serial number and user interface software version
- Used storage
4.6.8 Application <<Service>>
4.6.8.1 Firmware update
Entering the application <<service>> a firmware update under the customer service level can be
done while pressing the button <<Firmware update>>. The menu opens on the right side.
Please ensure that a
USB/memory stick with the
folder “CTR3000” and the
suitable file is inserted.
Otherwise the CTR3000 will
not recognize the new
version.
If the file cannot be found, an error log is raised.
The firmware update does not delete the settings, probes and log files!
WIKA Operating Instruction, model CTR3000 51
If a USB stick is inserted
press on the button <<Look
for a new version>> and
then the device search for a
suitable file on the USB
stick. If one is found the new
version number is shown in
the field “new version” to
install this press the button
<<apply update>>.
Please confirm with
<<yes>> to update the
device with the new
firmware. The answer will
be <<Firmware update
ok>>.
Page 52

4. Design and Function
EN
14191761.01 12/2016 EN
4.6.8.2 Program SMART probe
Entering the application <<service>> the SMART probes can be programmed under the customer
service level can be done while pressing the button <<Program SMART probe>>. The menu opens
on the right side.
Here all settings can be done which are stored on the EEPROM on this SMART probe. Similar to the
settings for new probes. Please refer to section 4.6.3.1 New probe <<Resistance thermometers>>
to understand the meaning of these settings.
No history is stored on the memory!
This can only be done while a SMART probe is connected and on the home screen,
the channel is selected where the SMART probe is connected. Otherwise an error log
is raised.
4.6.8.3 WIKA service level
Only accessible with a password!
Only for authorized users.
52 WIKA Operating Instruction, model CTR3000
Page 53

4. Design and Function
EN
14191761.01 03/2017 EN
4.7 Download function
The device first stores all data on the device, which can be downloaded later on to a USB memory
drive. A direct storing process on the USB memory drive is not possible. To enter the download
function the device must detect an USB memory stick. Then the symbol appears in the status
bar. Get access to the function while clicking on this symbol .
Please ensure that you eject the USB drive every time when you are ready via the
function button, to be sure that all data is saved!
All downloaded data will be stored in the directory “CTR3000” in the USB stick’s file system root.
The directory will be created, if it does not exist.
4.7.1 Log files
Clicking on log files a dialog opens on the right side. All created log files are listed there.
To select or delete these please use the right function button.
Function button Result
Select all Ticks all log files with a in the box in front of the log file´s name
Deselect all Removes the in the box in front of the log file´s name
Download selected Downloads all log files marked with a to the USB memory stick
Delete selected Deletes all log files marked with a from the device
The downloaded log file is a file in the format *.txt, which can be easily opened in e.g. EXCEL.
Name of a log file in the directory *CTR3000 \Logfiles:
Ddmmyyyy_hhmmss
(This can change according to the set time and date format in the application <<settings>>.)
For details regarding the content of the downloaded log file please refer to section 4.6.5.2 Log files
WIKA Operating Instruction, model CTR3000 53
.
Page 54

4. Design and Function
EN
14191761.01 12/2016 EN
4.7.2 Screenshot
Clicking on screenshots a dialog opens on the right side. All created screenshots are listed there.
To select or delete these please use the right function button.
Function button Result
Select all Ticks all screenshots with a in the box in front of the screenshot´s name
Deselect all Removes the in the box in front of the screenshot´s name
Download selected Downloads all screenshots marked with a to the USB memory stick
Delete selected Deletes all screenshots marked with a from the device
The downloaded screenshot is a file in the format *.png.
Name of a screenshot in the directory *CTR3000\Screenshots:
Ddmmyyyy_hhmmss
(This can change according to the set time and date format in the application <<settings>>.)
4.7.3 Measured Probes
Clicking on the button <<measured probes>> downloads all details into a *.txt file on the USB
memory stick. Only the assigned probes are downloaded.
A window pops up which shows that the download is complete.
Following information is stored in the file in the directory *CTR3000\measured probes:
- Probe name
- Probe type
- Reference probe
- T min.
- T max.
- Last calibration:
- Thermocouple type [only for thermocouples]
- Cold junction compensation [only for thermocouples]
- PRT type [only for resistance thermometers]
- Wiring [only for resistance thermometers]
- Internal resistor [only for resistance thermometers]
- Standby current [only for resistance thermometers]
- Conversion
54 WIKA Operating Instruction, model CTR3000
Page 55

4. Design and Function
EN
14191761.01 03/2017 EN
4.7.4 SMART probes
Clicking on the button <<SMART probes>> downloads all details into a *.txt file on the USB memory
stick. Only the connected SMART probes are downloaded. SMART probes are only available as
resistance thermometers.
A window pops up which shows that the download is complete.
Following information is stored in the file in the directory *CTR3000\SMART probes:
- Probe name
- Probe type
- Reference probe
- Last calibration
- Next calibration
- Calibration source
- Internal resistor
- Conversion
- [Conversion coefficients according to selected conversion]
- Working range
- Locked
4.7.5 All probes
Clicking on the button <<all probes>> downloads all details into a *.txt file on the USB memory stick.
All probes which are configured on the device are downloaded.
A window pops up which shows that the download is complete.
Following information is stored in the file in the directory *CTR3000\all probes:
- Probe name
- Probe type
- Reference probe
- T min.
- T max.
- Last calibration:
- Thermocouple type [only for thermocouples]
- Cold junction compensation [only for thermocouples]
- PRT type [only for resistance thermometers]
- Wiring [only for resistance thermometers]
- Internal resistor [only for resistance thermometers]
- Standby current [only for resistance thermometers]
- Conversion
WIKA Operating Instruction, model CTR3000 55
Page 56

4. Design and Function
EN
14191761.01 12/2016 EN
4.7.6 Instrument details
Clicking on the button <<instrument details>> downloads all details into a *.txt file on the USB
memory stick.
A window pops up which shows that the download is complete.
Following information is stored in the file in the directory *CTR3000\instrument_details:
- Model
- Instrument serial number
- Measuring serial number
- User interface serial number
- User interface version
- Firmware version
4.8 Calibration services
DKD/DAkkS certificate - official certificates:
We recommend that the instrument is regularly recalibrated by the manufacturer, with
time intervals of approx. 12 months. The basic settings will be corrected if necessary.
If a RTD or TC simulator is connected to one of the instrument’s channels and both the simulator and the CTR3000 are connected to the
same computer via USB, please use a USB isolator between the simulator and the computer. Otherwise there is a chance that the
measurement value is affected.
4.9 Remote operation
All commands can be found in a separate document.
56 WIKA Operating Instruction, model CTR3000
Page 57

5. Transport, packaging and storage
EN
14191761.01 03/2017 EN
5. Transport, packaging and storage
5.1 Transport
Check the instrument for any damage that may have been caused by transport.
Obvious damage must be reported immediately.
CAUTION!
Damage through improper transport
With improper transport, a high level of damage to property can occur.
▶
When unloading packed goods upon delivery as well as during internal transport,
proceed carefully and observe the symbols on the packaging.
▶
With internal transport, observe the instructions in chapter 5.2 “Packaging and
storage”.
If the instrument is transported from a cold into a warm environment, the formation of condensation
may result in instrument malfunction. Before putting it back into operation, wait for the instrument
temperature and the room temperature to equalise. A warm up time of 30 minutes is recommended.
Please refer to section 4.3.2 Warm up time for any details.
5.2 Packaging and storage
Do not remove packaging until just before mounting.
Keep the packaging as it will provide optimum protection during transport (e.g. change in installation
site, sending for repair).
Permissible conditions at the place of storage:
■
Relative humidity: 0 … 80 % r. h. (no condensation)
■
Storage temperature -20 ... +50 °C (-4 ... +122 °F)
Avoid exposure to the following factors:
■
Direct sunlight or proximity to hot objects
■
Mechanical vibration, mechanical shock (putting it down hard)
■
Soot, vapour, dust and corrosive gases
■
Hazardous environments, flammable atmospheres
Store the instrument in its original packaging in a location that fulfils the conditions listed above. If
the original packaging is not available, pack and store the instrument as described below:
1. Wrap the instrument in an antistatic plastic film.
2. Place the instrument, along with shock-absorbent material, in the packaging.
3. If stored for a prolonged period of time (more than 30 days), place a bag, containing a desiccant,
inside the packaging.
WIKA Operating Instruction, model CTR3000 57
Page 58

6. Commissioning, operation
EN
14191761.01 12/2016 EN
6. Commissioning, operation
Personnel: Skilled personnel
Only use original parts (see chapter 11 “Accessories”).
CAUTION!
Damage to the instrument
When working on open electrical circuits (printed circuit boards) there is a risk of
damaging sensitive electronic components through electrostatic discharge.
▶
The correct use of grounded working surfaces and personal armbands is required.
DANGER!
Danger to life caused by electric current
Upon contact with live parts, there is a direct danger to life.
▶
The instrument may only be installed and mounted by skilled personnel.
▶
Operation using a defective power supply unit (e.g. short-circuit from the mains
voltage to the output voltage) can result in life-threatening voltages at the
instrument!
58 WIKA Operating Instruction, model CTR3000
Page 59

7. Fault
EN
14191761.01 03/2017 EN
Faults
Causes
Measures
OL
No reading
Check if probe is proper connected.
7. Faults
Personnel: Skilled personnel
For contact details, please see chapter 1 “General information” or the back page of the
operating instructions.
WIKA Operating Instruction, model CTR3000 59
Page 60

8. Maintenance, cleaning and servicing
EN
14191761.01 12/2016 EN
8. Maintenance, cleaning and servicing
Personnel: Service personnel
8.1 Maintenance
This instrument is maintenance-free.
Repairs must only be carried out by the manufacturer.
Only use original parts (see chapter 11 “Accessories”).
8.2 Cleaning
CAUTION!
Physical injuries and damage to property and the environment
Improper cleaning may lead to physical injuries and damage to property and the
environment. Residual media in the dismounted instrument can result in a risk to
personnel, the environment and equipment.
▶
Carry out the cleaning process as described below.
1. Before cleaning, correctly disconnect the thermometer from the temperature heater, switch
the device off and disconnect it from the mains.
2. Use the requisite protective equipment.
3. Clean the instrument with a moist cloth.
Electrical connections must not come into contact with moisture!
CAUTION!
Damage to the instrument
Improper cleaning may lead to damage to the instrument!
▶
Do not use any aggressive cleaning agents, alcohol or thinners.
▶
Do not use any hard or pointed objects for cleaning.
▶
Do not use a hard or abrasive brush.
Wash or clean the dismounted instrument, in order to protect persons and the
environment from exposure to residual media.
8.3 Recalibration
DKD/DAkkS certificate - official certificates:
We recommend that the instrument is regularly recalibrated by the manufacturer, with time intervals
of approx. 12 months. The basic settings will be corrected if necessary
.
60 WIKA Operating Instruction, model CTR3000
Page 61

9. Dismounting, return and disposal
EN
14191761.01 03/2017 EN
9. Dismounting, return and disposal
Personnel: Skilled personnel
WARNING!
Physical injuries and damage to property and the environment through
residual media
Residual media in which the thermometer is inserted can result in a risk to persons, the
environment and equipment.
▶
Wear the requisite protective equipment (see chapter 3.6 “Personal protective
equipment”).
▶
Observe the information in the material safety data sheet for the corresponding
medium.
▶
Wash or clean the dismounted instrument, in order to protect persons and the
environment from exposure to residual media.
9.1 Dismounting
WARNING!
Risk of burns
During dismounting there is a risk of dangerously hot media escaping.
▶
Let the instrument/thermometer cool down sufficiently before dismounting it!
DANGER!
Danger to life caused by electric current
Upon contact with live parts, there is a direct danger to life.
▶
The dismounting of the instrument may only be carried out by skilled personnel.
▶
Only disconnect the pressure measuring instrument/measuring assembly/test and
calibration installations once the system has been disconnected from the power!
9.2 Return
Strictly observe the following when shipping the instrument:
All instruments delivered to WIKA must be free from any kind of hazardous substances (acids,
bases, solutions, etc.) and must therefore be cleaned before being returned.
WARNING!
Physical injuries and damage to property and the environment through
residual media
Residual media in the dismounted instrument can result in a risk to persons, the
environment and equipment.
▶
With hazardous substances, include the material safety data sheet for the
corresponding medium.
▶
Clean the instrument, see chapter 8.2 “Cleaning”.
WIKA Operating Instruction, model CTR3000 61
Page 62

9. Dismounting, return and disposal
EN
14191761.01 12/2016 EN
When returning the instrument, use the original packaging or a suitable transport packaging.
To avoid damage:
1. Wrap the instrument in an antistatic plastic film.
2. Place the instrument along with shock-absorbent material in the packaging. Place shockabsorbent material evenly on all sides of the transport packaging.
3. If possible, place a bag containing a desiccant inside the packaging.
4. Label the shipment as carriage of a highly sensitive measuring instrument.
Information on returns can be found under the heading “Service” on our local website.
9.3 Disposal
Incorrect disposal can put the environment at risk.
Dispose of instrument components and packaging materials in an environmentally compatible way
and in accordance with the country-specific waste disposal regulations
This marking on the instruments indicates that they must not be disposed of in
domestic waste. The disposal is carried out by return to the manufacturer or by the
corresponding municipal authorities (see EU directive 2012/19/EU).
.
62 WIKA Operating Instruction, model CTR3000
Page 63

10. Specifications
EN
14191761.01 03/2017 EN
Working Range [°C]
Working Range [mV]
min
max
min
max
B
250
1820
0.291
13.820
E
-200
1000
-8.825
76.373
J
-210
1200
-8.095
69.553
K
-200
1372
-5.891
54.886
N
-200
1300
-3.990
47.513
R
-50
1768
-0.226
21.103
S
-50
1768
-0.235
18.693
T
-200
400
-5.603
20.872
10. Specifications
For further specifications see WIKA data sheet CT 60.15 and the order documentation.
More specific data for thermocouples
TC-Type
Type of probe Accuracy
B ± 0.09 °C + ± 0.025 % of rdg.
E ± 0.05 °C + ± 0.031 % of rdg.
J ± 0.07 °C + ± 0.030 % of rdg.
K ± 0.09 °C + ± 0.035 % of rdg.
N ± 0.08 °C + ± 0.035 % of rdg.
R ± 0.27 °C + ± 0.020 % of rdg.
S ± 0.27 °C + ± 0.020 % of rdg.
T ± 0.09 °C + ± 0.025 % of rdg.
The maximum cable length of all attached cables e.g. temperature probe or interface
cables is 2 m.
To reach the maximal accuracy an ambient temperature between 17°C and 23°C must be fulfilled.
In the event of interference caused by high-frequency electromagnetic fields in a frequency range from 400 to 480 MHz, an increased
measuring deviation of up to 0.29 K is expected for resistance thermometers. In a frequency range from 380 to 480 MHz, an increased
measuring deviation of up to 0.12 K is expected for thermocouples. Intended to be used in a basic electromagnetic environment.
WIKA Operating Instruction, model CTR3000 63
Page 64

11 Technical information
EN
14191761.01 12/2016 EN
11. Technical information
11.1 Measurement uncertainty and traceability
Measurement is usually made on the assumption that there is a true value. Whenever a
measurement is performed it is unlikely that the measured value will equal the true value. The
difference between the two values is the measurement error which will lie within the specified limits
of uncertainty. Uncertainty is defined as an estimate characterising the range of values within which
the true value lies.
By taking a statistically significant number of measurement samples, a distribution of results will
emerge. Confidence in the distribution increases as more measurements are made. Using statistical
methods, the distribution may be described in terms of mean, variance and standard deviation. The
uncertainty or precision limit of a particular measurement is characterised by this distribution.
Traceability is defined as the property of a measurement that may be related to appropriate
reference standards through an unbroken chain of comparisons. Through traceability it is possible to
demonstrate the accuracy of a measurement in terms of SI units.
11.2 International temperature scale
The purpose of the International Temperature Scale is to define procedures by which certain
specified practical thermometers including PRTs and thermocouples of the required quality can be
calibrated. The values of temperature obtained from them can be precise and reproducible,
matching at the same time the corresponding thermodynamic values as closely as current
technology permits.
Since 1968 when the International Practical Temperature Scale of 1968 (IPTS68) was adopted,
there have been significant advances in the techniques employed in establishing temperature
standards and in the measurement of thermodynamic temperature. The International Temperature
Scale of 1990 (ITS-90) gives practical effect to these improvements. Particular features are:
• ITS-90 specifies the use of the PRT up to the freezing point of silver, 961.78°C. The platinum
10% rhodium/platinum thermocouple is no longer specified for use in the scale, though it and
other noble metal thermocouples will continue to be used as secondary standards.
• New, more precise, fixed points have been introduced and mathematical procedures for
calculating resistance temperature equivalents have been revised so as to reduce the 'nonuniqueness' of the scale: that is, to reduce the differences which occur between different,
identically calibrated PRTs. In particular, the calibration of a PRT can no longer be
extrapolated beyond the freezing point of zinc, 419.527°C, but requires a measurement at
the freezing point of aluminium, 660.323°C.
• Alternative definitions are permitted in certain sub-ranges; the calibration of a PRT can be
terminated at almost any fixed point. This allows primary calibrations to be carried out with
suitable PRTs over reduced ranges, and will be of special importance to metrology
standards departments which need to make precise measurements at ambient
temperatures.
64 WIKA Operating Instruction, model CTR3000
Page 65

11 Technical information
EN
14191761.01 03/2017 EN
• The part of the ITS-90 scale which may be measured by PRTs extends from 83.8058 K (-
189.3442°C) to 961.78°C. The CTR3000 is specified to measure temperature over the range
-200°C to +962°C. The actual range of temperatures which may be measured depends on
the type and range of the PRT.
The ITS-90 scale has much improved continuity, precision and reproducibility compared with
IPTS68. The implementation of the ITS-90 scale according to its definition calls for changes in
equipment and procedure compared with IPTS68, but lower uncertainties of calibration are
achievable in all parts of the range. However, the instruments and equipment needed to implement
the ITS-90 scale in calibration laboratories will be substantially the same.
11.3 Measurement
11.3.1 Thermocouple
11.3.1.1 Introduction
Very broadly the thermoelectric effect occurs when an electrical circuit consisting of dissimilar metal
conductors is subjected to a temperature gradient. An electric potential or voltage is developed
along the conductors. This voltage potential varies proportionally with temperature and provides a
means by which to measure temperature.
There are two categories of thermocouple:
Rare metal, Platinum based types
Rare metal, platinum types are mostly used
for high temperature precision thermometry.
Maximum temperatures of 1700°C and
measurement uncertainties of up to 0.4°C are
possible. The sensitivity of platinum based
thermocouples is usually in the region of
10µV/ °C, which means that high accuracy,
high resolution measurements require
sensitive instruments such as the CTR3000.
Base metal, Nickel based
Base metal thermocouples operate over a
wide temperature range with high temperature
types designed for use up to 1600°C.
Temperatures above 2300°C are possible
with new high temperature tungsten rhenium
types. Typical sensitivity figures of >30µV/ °C
characterise most of the base metal
thermocouple family.
These are easily affected by contamination
effects which results in recalibration and drift.
This is especially pronounced at high
temperatures where drift figures of the order
of 10°C are possible. It is important to be
aware of the particular contamination effects
and to select the correct thermocouple for the
measurement environment. The N type
thermocouple offers the best performance in
terms of reproducibility and measurement
uncertainty, operating up to 1250°C. It is the
best choice for most general measurement
applications, calling for accuracy with low time
and temperature drift
WIKA Operating Instruction, model CTR3000 65
Page 66

11 Technical information
EN
14191761.01 12/2016 EN
α
α
11.3.1.2 Connection
Thermocouples measure temperature difference. As all practical thermocouples consist of at least 2
junctions, it is important when performing absolute temperature measurement that one of the
junctions is referenced to a known temperature.
The reference junction and voltage measurement precision significantly influence the overall
temperature measurement accuracy. Intermediate connection junctions such as connectors and
extension cables between the measurement thermocouple and the CTR3000 also influence the
measurement result.
11.3.2 Resistance thermometer
The CTR3000 will operate with a range of 3 and 4-wire 25/100 Ohm PRTs. The best performance
will be achieved only where good quality PRTs are used from reputable, proven sources. As with
any measured parameter, the performance of a measurement system depends upon its stability and
repeatability. Low quality PRTs are likely to reduce system performance.
The relationship between temperature and resistance depends on several factors, including the
alpha value and the PRT calibration. Consequently more than one equation is required for
resistance to temperature conversion. Calibration data for the PRTs takes the form of Callendar van
Dusen coefficients.
WIKA provides a range of proven PRTs of the series CTP5000 especially for use with the CTR3000,
as well as offering a service to provide customised PRTs to meet individual customers’
requirements.
High “alpha” PRTs: The best possible system accuracy is achieved using high "alpha" (α) PRTs,
or more correctly, PRTs using high
Low "alpha" PRTs: Low α PRTs contain a higher level of impurities in the platinum resistance wire
used. This affects the resistance value at a given temperature (the temperature coefficient). As
impurities already exist in the platinum resistance wire, additional contamination has a reduced
effect and hence low
industrial applications. To ensure a robust PRT, the detector within the PRT is contained within
materials, which can themselves be the source of contamination at elevated temperatures. The
PRTs supplied by WIKA have been optimised for the temperature ranges for which they are
specified and, when calibrated, are temperature cycled to enhance stability in use.
PRTs are more immune to contamination and are therefore better for
(high purity) platinum wire.
PRTs which are used outside their design and/or calibration temperature range, especially at higher
temperatures, risk irreversible alteration to their calibration either by induced thermal stresses or by
contamination.
11.3.2.1 Linearization functions for resistance thermometers
The CTR3000 provides one standard and 2 user definable algorithms for converting resistance to
temperature. The choice will depend on the type of PRT and its calibration.
66 WIKA Operating Instruction, model CTR3000
Page 67

11 Technical information
EN
14191761.01 03/2017 EN
• Standard: EN60751 (2009):- used for un-calibrated industrial PRTs with 0.003851 “alpha”
value, to provide a conversion of resistance to temperature in accordance with the EN60751
(ITS 90) standard.
Selecting EN60751 from the standard menu selects the standard coefficients from BS
EN60751 based on ITS90. The coefficients for EN60751 are as follows:
= 100 Ohm
R
0
A = 3.9083x10⁻³ °C–1
–7
–12
°C–2
°C
–4
B = -5.775x10
C = -4.183x10
WIKA Operating Instruction, model CTR3000 67
 Loading...