

Wijas PERFECT 4.0 MIX, PERFECT 4.5 MIX, PERFECT 3.5 MIX, PERFECT 5.0 MIX, PERFECT 5.5 MIX Installation And Operating Instructions

EN
INSTALLATION
AND OPERATING
INSTRUCTIONS
PERFECT 3.5, 4.0, 4.5, 5.0, 5.5 MIX
instantaneous water heaters
1. Purpose and characteristics
PERFECT 3.5 – 5.5 MIX instantaneous water heaters are designed to supply hot water to such
sanitary devices as sinks and washbasins in households, washrooms, bathrooms, workshops and
catering outlets. Thanks to the electronic system controlling the performance of the heater, all most
unreliable mechanical parts such as a membrane and switch contacts, which are used in this type
of heaters, have been eliminated. This way, the reliability and durability of the devices have been
cantly improved. The water heater can only be connected to the cold water pipe.
signi
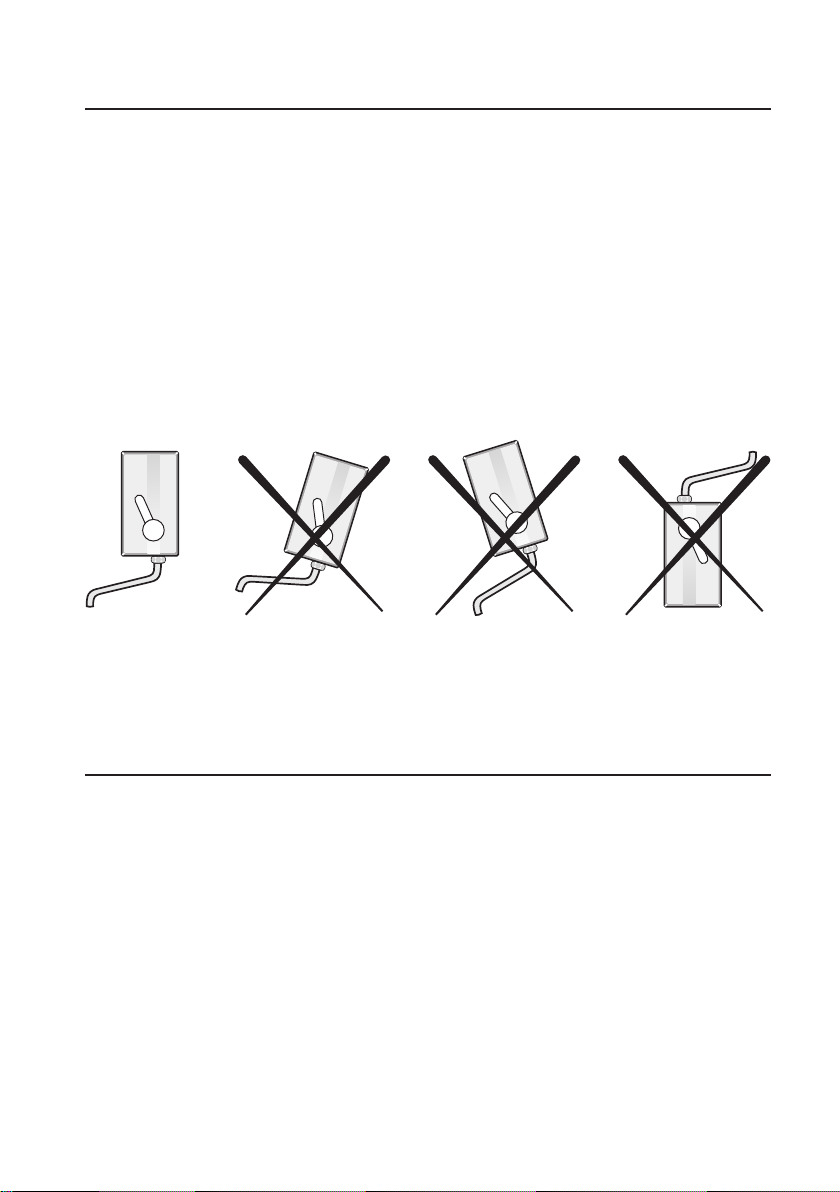
Caution!!! You mustn’t install, disconnect or move the heater to the sides
while the power supply is turned on. The device can operate only in the
position shown in the gure below. Any attempt to start the device in
other positions will cause damage to the heating element and the loss
of warranty.
CORRECT INCORRECT INCORRECT INCORRECT
g. 1
2. Safety recommendations
– Only a qualied electrician can connect the device to the electrical wiring and check the ef-
ciency of the anti electric shock protection.
– The heater must be earthed and neutrally grounded.
– The heater must be permanently connected to the electrical wiring.
– The wiring must be equipped with a residual current circuit breaker.
– The air temperature in the rooms where the heater is installed cannot decrease below 0OC.
– Periodically check the condition of the electrical wiring (voltage drops) – in particular the electri-
cal connection.
– Cut off the power supply before each disconnection of the heater from the faucet.
– The heater can operate only in the position shown in gure 1.
– The device can be used only when it is fully operational and it has been installed properly.
– In case of malfunctioning of the heater, cut off the power and water supply
– Do not take off the case when the device is connected to the power source.
– Water ow in the heater ought to be controlled in such a way that the water temperature does
not cause the feeling of heat (especially as far as children are concerned).
2
– The device cannot be installed in an aggressive environment or the environment exposed to
explosion.
– The heater should not be used with the load voltage lower than 200 V.
– Only original parts can be used.
– All maintenance works should be conducted when the device is disconnected from the power
source.
– Do not allow the electrical wiring to become wet.
–
Regularly clean the faucet aerator.
–
Children should be supervised to ensure that they do not play with the device.
–
This device may be used by children over three years old and people with limited physical,
sensory or mental abilities, or with no experience and knowledge if they are supervised or
were provided with instructions regarding the use of the device in a safe way and understand
possible dangers.
3. Installation of the heater
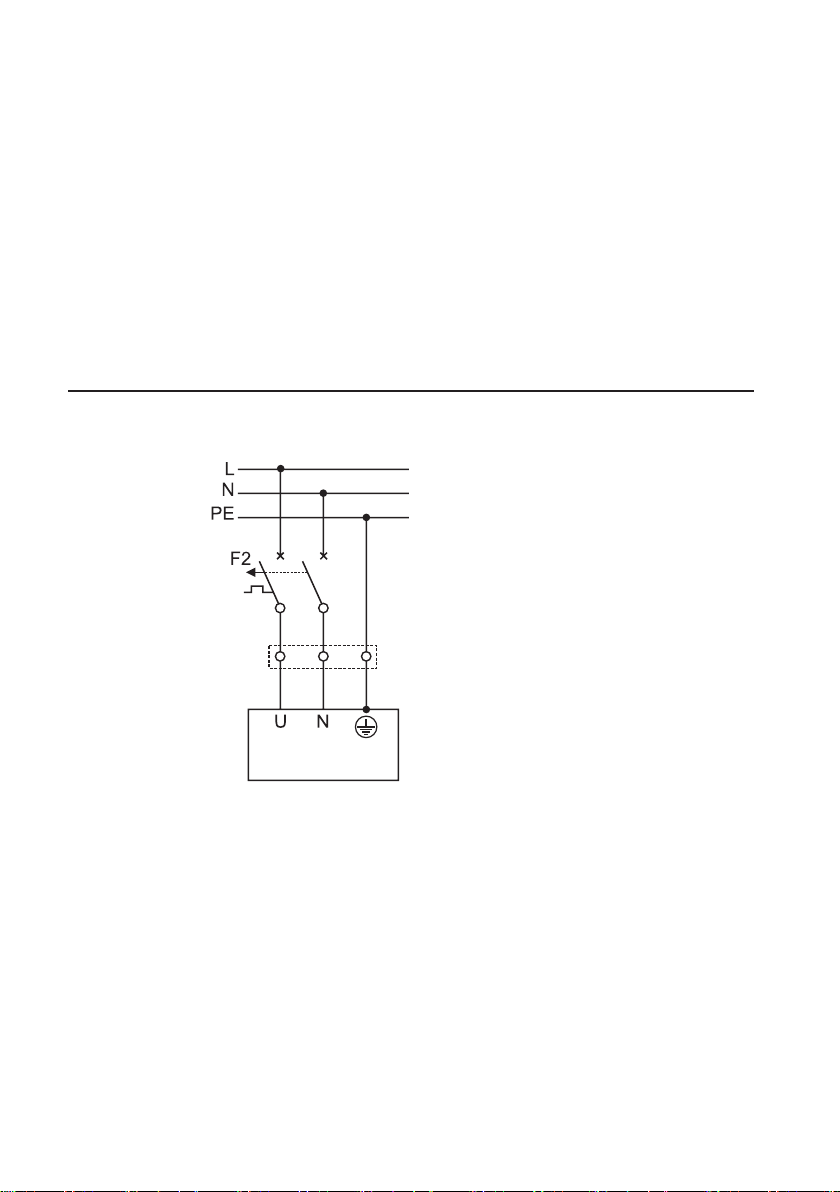
Wiring diagram
TN-S earthing system
F2 – bipolar circuit breaker
L – phase wire
N – neutral
PE – protective earth
heater
Minimum recommended cross section of cables
Perfect 3.5 MIX – 1,5 mm
Perfect 4.0 – 5.5 MIX – 2,5 mm
Recommended breakers:
Perfect 3.5
Perfect 4.0 – 5.5 MIX
MIX
– 16 A
– 25 A
2
2
3

g. 2
Installation
Caution!!!
Each time the device is cut off from the cold water outlet, it must be
previously disconnected from the power supply. Otherwise, the heating
element may be damaged. Non-compliance with the instructions will lead
to the loss of warranty.
Firmly screw the half union of the heater (1) with the gasket (2) to the cold water pipe (3) ended with
1/2” external thread. If the heater is rmly screwed to the water pipe, there is no need to screw it
to the wall. However, the heater ought to be screwed to the wall in case it moves to the sides while
using it. To do that, take off the cover of the knob (4) g. 3, unscrew the screw (5) g. 3 and take
off the knob. Then, unscrew the screws on both sides of the heater case. Take off the heater case.
Screw the half union of the heater (1) with the gasket (2) to the cold water pipe. Mark the place on
the wall where the hole of 6 mm diameter for a rawlplug is to be drilled (6). Adjust the length of the
spacer sleeves (5) by shortening them. Unscrew the heater from the cold water outlet. Drill a hole
in the wall for the rawlplug. Insert the rawlplug into the hole. (6) Lightly screw the half union of the
heater (1) with the gasket (2) to the cold water outlet. Then, rmly screw the screw to the rawlplug,
bearing in mind that the spacer sleeves (5) must be put between the wall and the back of the case.
Firmly screw the half union. Put on the case and screw the screws. Install the knob. Check leak
4

g. 3
tightness of hydraulic connections. Turn on the hot water tap for a few seconds in order to release
the air from the heater. Connect the heater to the electrical wiring. Turn on the power supply.
4. Temperature adjustment
Caution!!!
The outlet water temperature depends on:
– water ow (the lower water ow, the higher temperature and the higher
water ow, the lower temperature)
– inlet water temperature
– voltage drops in the electrical wiring while using the device
Inlet water temperature 15 OC
Water ow [l/min] 1,5 2 2,5 3
Perfect 3.5 MIX [OC] 48 40 35 32
Perfect 4.0 MIX [OC] 53 43,5 38 34
Perfect 4.5 MIX [OC] 59,5 48,5 41 37
Perfect 5.0 MIX [OC] 62,5 50,5 43,5 39
Perfect 5.5 MIX [OC] – 54 46 41
5

How to adjust water temperature
– It is advisable to start the adjustment by turning the knob to the left and pulling it towards you.
Then, control the water ow by pulling the knob slowly towards the heater. (g. 4a)
– The water temperature can be decreased by mixing cold and hot water by turning the knob to
the right. (g. 4b)
– Excessive hot water ow control or turning the knob too much may cause that the heater will
turn off.
– The highest hot water ow rate is obtained by turning the knob to the left and by regulating the
water ow slowly .
1
23
g. 4b g. 4a
5. Cleaning sediment from the heater
Caution!!!
Each time the device is cut off from the cold water outlet, it must be
previously disconnected from the power supply. Otherwise, the heating
element may be damaged. Non-compliance with the instructions will lead
to the loss of warranty.
Cleaning the water lter
1. Disconnect the device from the power supply.
2. Cut off the heater from the water piping by unscrewing the half union (1) g. 2. If the heater is
screwed to the wall, take off the cover of the knob (4) g. 3. Unscrew the screw (5) g. 3 and take
off the knob. Then, unscrew the screws on both sides of the heater case. Take off the heater
case. Unscrew the rawlplug screw (4) g. 2. After cleaning the water lter, screw the half union
and the heater to the wall. Put on the case and the knob head. Screw the screws fastening the
case and the knob head. Then, follow the instructions given in points 5,6,7 in section 5 of the
manual.
6

water lter
g. 5
3. Clean the water lter in the half union.
4. Firmly screw the heater to the water piping.
5. Check leak tightness of hydraulic connections.
6. Turn on the hot water tap for a few seconds in order to release the air from the heater.
7. Turn on the power supply.
Cleaning the faucet aerator.
1. Unscrew the aerator (7) g. 2.
2. Clean the holes in the faucet aerator.
3. Reinstall the faucet aerator.
6. Defects and their countermeasures
Too low water ow:
– clogged water lter (clean it according to the instructions given in section 5 of the manual),
– clogged aerator (clean it according to the instructions given in section 5 of the manual),
– too low water pressure in the water distribution system
The heater does not activate:
– excessive water ow control,
– the head knob turned to the right too much (turn the knob head to the left as far as possible
and adjust the water ow).
– no power supply
The heater does not heat despite the fact that the light indicating device activation is turned on:
– too high water ow (adjust it according to the instructions given in section 4 of the manual)
– the head knob is turned to the right too much (turn the knob to the left as much as possible and
adjust the water ow),
– very low inlet water temperature,
– signicant voltage drops in the electrical wiring
Too high outlet water temperature:
– excessive water ow control
– clogged water lter (clean it according to the instructions given in section 5 of the manual),
– clogged aerator (clean it according to the instructions given in section 5 of the manual)
The heater turns on and immediately turns off:
– pressure uctuations in the water distribution system
– excessive water ow control
Abrupt changes in the outlet water temperature:
– voltage uctuations in the electrical wiring
– changes in water ow rate caused by sudden water pressure drops in the water distribution
system
7

Technical data
Type
Power 230V 50Hz 230V 50Hz 230V 50Hz 230V 50Hz 230V 50Hz
Power consumption 15,2 A 17,4 A 19,6 A 21,7 A 23,9 A
Heating coil power 3500 W 4000 W 4500 W 5000 W 5500 W
Heating coil resistance
Minimum activation ow
rate
Maximum input water
pressure
Minimum input water
pressure
Outlet water pressure 0 Bar 0 Bar 0 Bar 0 Bar 0 Bar
Minimum water resistivity
O
at 15
C
IP rating IP25 IP25 IP25 IP25 IP25
Perfect
3.5 MIX
15,2 Ω 13,3 Ω 11,8 Ω 10,6 Ω 9,6 Ω
1,2 l/min. 1,3 l/min. 1,4 l/min. 1,5 l/min. 1,6 l/min.
0,65 MPa 0,65 MPa 0,65 MPa 0,65 MPa 0,65 MPa
0,04 MPa 0,05 MPa 0,06 MPa 0,07 MPa 0,08 MPa
1300 Ωcm 1300 Ωcm 1300 Ωcm 1300 Ωcm 1300 Ωcm
Perfect
4.0 MIX
Perfect
4.5 MIX
Perfect
5.0 MIX
Perfect
5.5 MIX
Set contents
Instantaneous water heater 1 piece
Faucet 1 piece
Gasket 1 piece
Rawlplug with a screw 1 piece
The list of service points 1 piece
Spacer sleeves 2 pieces
SAFE DISPOSAL OF WASTE
Pursuant to the provisions of the Act dated 29 July 2005 on Waste Electrical and Electronic
Equipment , it is forbidden to dispose of the waste equipment marked with a crossed-out bin to the
communal waste bins.
A user who intends to get rid of this product is obliged to take the equipment he no longer uses
to the collection point. Such points are run, among others, by wholesalers or retailers of such equipment and by local organisational units specialising in waste collection.
The above statutory regulations have been introduced in order to limit the amount
of the electrical and electronic waste, as well as to ensure the suitable level of waste
collection and its recycling. The heater contains no hazardous substances which
have a negative impact on health and environment.
The materials used in the device are reusable. Thanks to it, when you reuse
them you contribute to environment protection.
 Loading...