

Page 1

USER GUIDE
for Amino 540 DVR
Page 2

CCoonntteennttss
Table of Contents........................................................... i
Remote Control Functions ........................................... iii
1. Initial Startup ........................................................... 1
Loogg iinn........................................................................................................................................................................................................................1
L
2. Basic TV Controls ........................................................ 2
CChhaannggee tthhee cchhaannnneell...........................................................................................................................................................................
VViieeww CCuurrrreenntt CChhaannnneell IInnffoorrmmaattiioonn.........................................................................................................................
SSeett FFaavvoorriitteess...........................................................................................................................................................................................
VViieeww tthhee CChhaannnneell GGuuiiddee.............................................................................................................................................................
AAuuttoottuunnee...............................................................................................................................................................................................................
SSeeaarrcchh ffoorr pprrooggrraammss.........................................................................................................................................................................6
Quick Search..............................................................................................6
Advanced Search.......................................................................................7
AAcccceessss mmeennuuss.........................................................................................................................................................................................
GGeett hheellpp...........................................................................................................................................................................................................
LLoogg oouutt.............................................................................................................................................................................................................
3. Optional Menu Features ........................................... 10
WWeeaatthheerr............................................................................................................................................................................................................1
AAlleerrttss......................................................................................................................................................................................................................1
....2
....3
....9
...
...
.2
.4
.5
8
8
11
12
.1
4. Paid Programming (PPV, PPB) ................................. 13
PPaayy ppeerr VViieeww..............................................................................................................................................................................................1
PPaayy ppeerr BBlloocckk............................................................................................................................................................................................114
13
5. Video on Demand (VOD)........................................... 15
RReenntt aa VViiddeeoo oonn DDeemmaanndd mmoovviiee..................................................................................................................................1
Quick search by category......................................................................... 15
Search by expanded category list ............................................................16
Advanced Search..................................................................................... 17
NNaavviiggaattee iinn aa VViiddeeoo oonn DDeemmaanndd mmoovviiee.............................................................................................................
15
.18
6. My DVR ..................................................................... 19
RReeccoorrdd aa pprrooggrraamm oorr sseerriieess................................................................................................................................................1
Record a Program Once ..........................................................................19
Record a Series .......................................................................................20
Set a Manual Recording...........................................................................21
VViieeww aa rreeccoorrddeedd pprrooggrraamm........................................................................................................................................................2
RReemmoovvee oorr ssttoopp rreeccoorrddiinnggss.................................................................................................................................................
19
22
.24
Page 3

Contents
MMaannaaggee MMyy DDVVRR................................................................................................................................................................................2
Select Default DVR Settings .................................................................... 25
Select Recording Priorities....................................................................... 26
25
7. “My Services” Options .............................................. 28
On-Screen Call Display. ...........................................................................................................................................................
28
8. Account Services ...................................................... 29
AAcccceessss tthhee AAccccoouunntt mmeennuu...................................................................................................................................................
CChhaannggee ppaasssswwoorrdd.............................................................................................................................................................................
AAccttiivvaattee PPIINN PPrrootteeccttiioonn..............................................................................................................................................................3
Set Purchase PIN .................................................................................... 31
Set Rating PIN ......................................................................................... 32
CCrreeaattee aa uusseerr............................................................................................................................................................................................3
SSeett ppaarreennttaall ccoonnttrroollss ((LLoocckkss))...........................................................................................................................................
Lock user out of TV for a set time ............................................................ 35
Lock user out of a program/channel......................................................... 36
Lock user out of TV indefinitely ................................................................ 36
MMaannaaggee SSuubbssccrriippttiioonnss...............................................................................................................................................................
View Purchased Subscriptions................................................................. 37
MMaannaaggee uusseerr aaccttiioonnss.................................................................................................................................................................... 38
SSeett AAuuttoollooggiinn...........................................................................................................................................................................................
VViieeww ssuubbssccrriibbeerr ddeettaaiillss.............................................................................................................................................................
VViieeww bbiilllliinngg aaccttiivviittyy............................................................................................................................................................................4
9. Set Preferences ........................................................ 42
FFaavvoorriittee CChhaannnneellss.............................................................................................................................................................................
MMeennuu LLaanngguuaaggee...................................................................................................................................................................................
CChhaannnneell SSeettttiinnggss...............................................................................................................................................................................
AAppppeeaarraannccee...............................................................................................................................................................................................
SSeett--ttoopp bbooxx SSeettuupp.............................................................................................................................................................................
. 29
. 30
31
33
. 35
. 37
. 40
. 40
41
. 43
. 44
. 44
. 45
. 46
Technical Support........................................................ 47
Page 4

Remote Control Functions
TV
Turns TV
on and off
REW, PLAY,
FFWD, STOP, PAUSE
Use to control
On Demand services
LIST
Display Menu
MENU
Display available
interactive services
OK/SELECT
Use arrows to move in the
program guide and menu.
Press OK/SELECT to select
highlighted program or service.
GUIDE
Display program guide
CBL
Turns set-top box
on and off
SETUP
Use for all programming
sequences
INFO
Display current channel and
program information
EXIT
Exit out of menu
and guide
LAST
Recall last
channel viewed
A
Display Help screen
DAY + or DAY -
Move forward or back
on program guide
POLARIS UNIVERSAL REMOTE CONTROL
HOME
HOME KEY
Reload set-top box
PAGE + or PAGE -
Page up and down through
menu screens and
program guide
VOD
Display Menu to access
Wightman On Demand
Page 5

1. Initial Startup
LLoogg iinn
If the set-top box is off, turn it on by pressing CBL.
1
The Welcome screen will appear.
*****
Welcome screen
To log in as a user other than the one displayed, press V to
2
select a different name. Press
Be sure to use the manager user name and password
OK.
when you sign in for the first time.
Enter the numeric password for the selected user (using the
3
number keys). Press
OK.
The default password is 1 2 3 4.
1
Page 6
22.. BBaassiicc TTVV CCoonnttrroollss
You can control all services from the remote control.
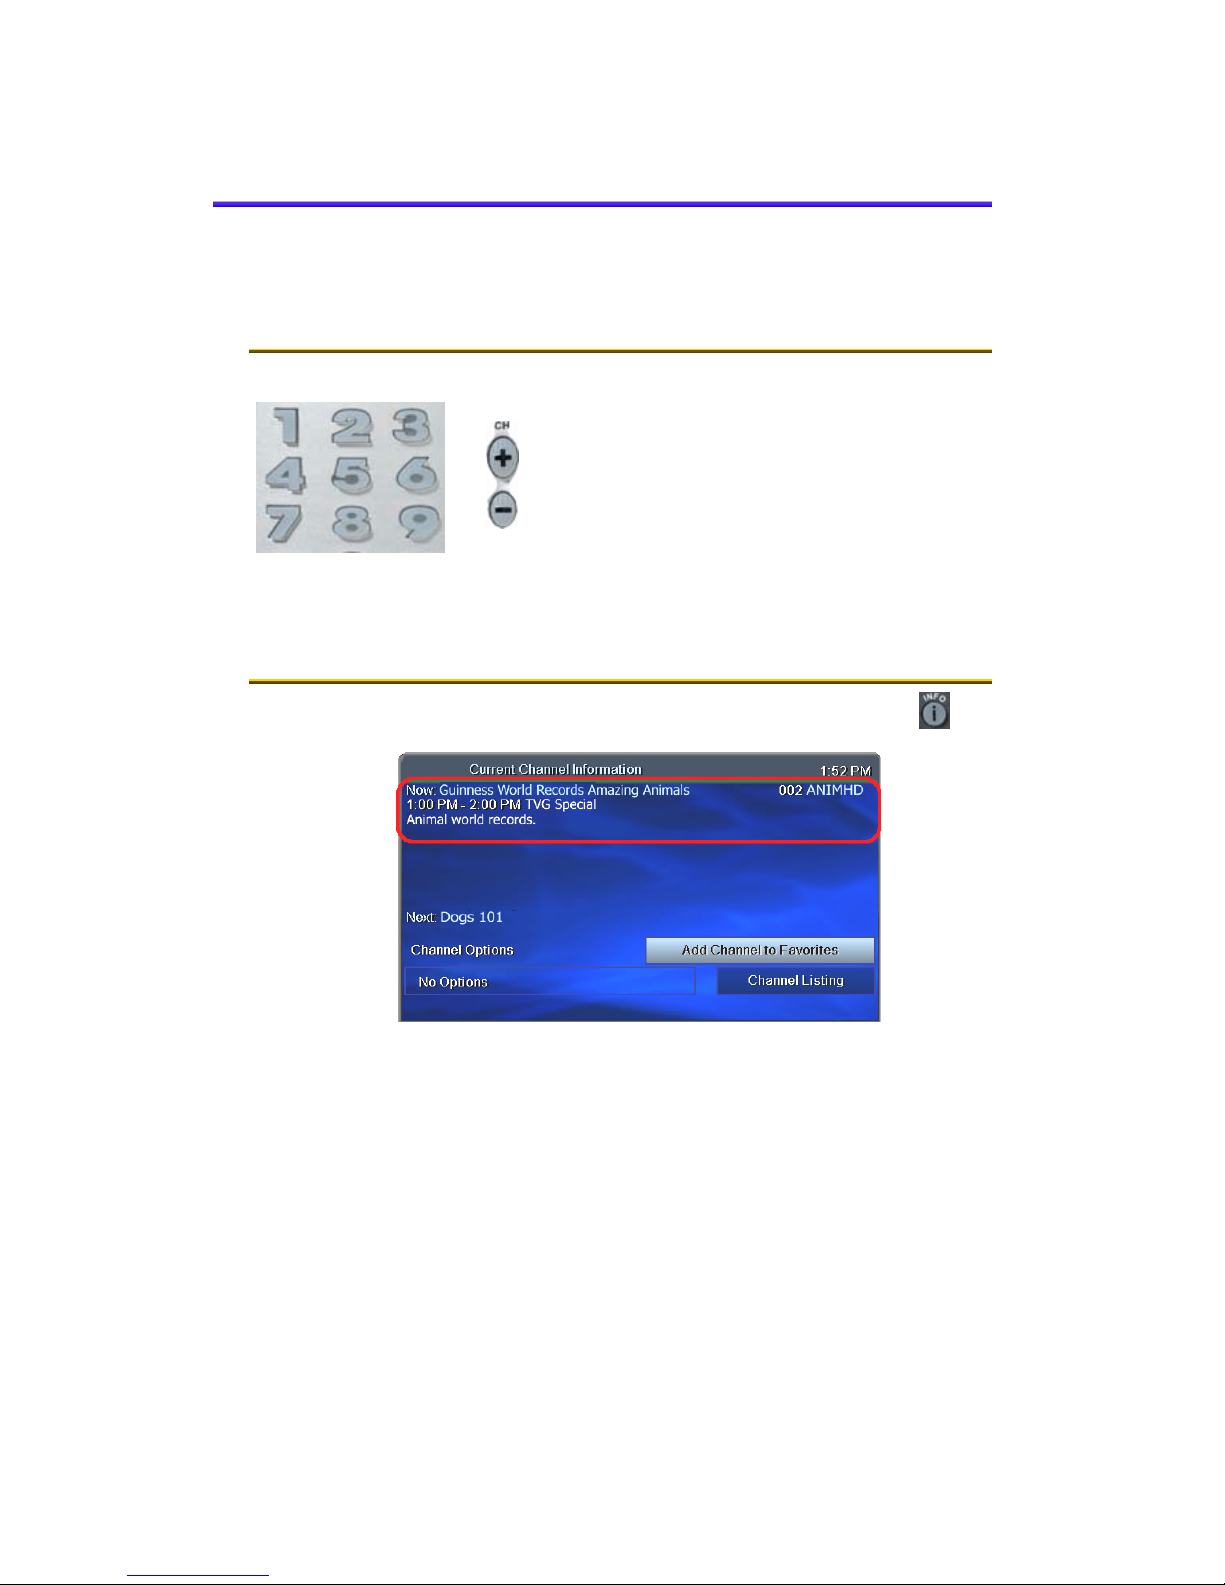
CChhaannggee tthhee cchhaannnneell
Using Number buttons, enter the channel
number.
~ OR~
On the CH (Channel) buttons, scroll up or
down one channel at a time.
VViieeww CCuurrrreenntt CChhaannnneell IInnffoorrmmaattiioonn
Press INFO to see a description of the program you’re watching.
info
Current channel information
Page 7
2. Basic TV Controls
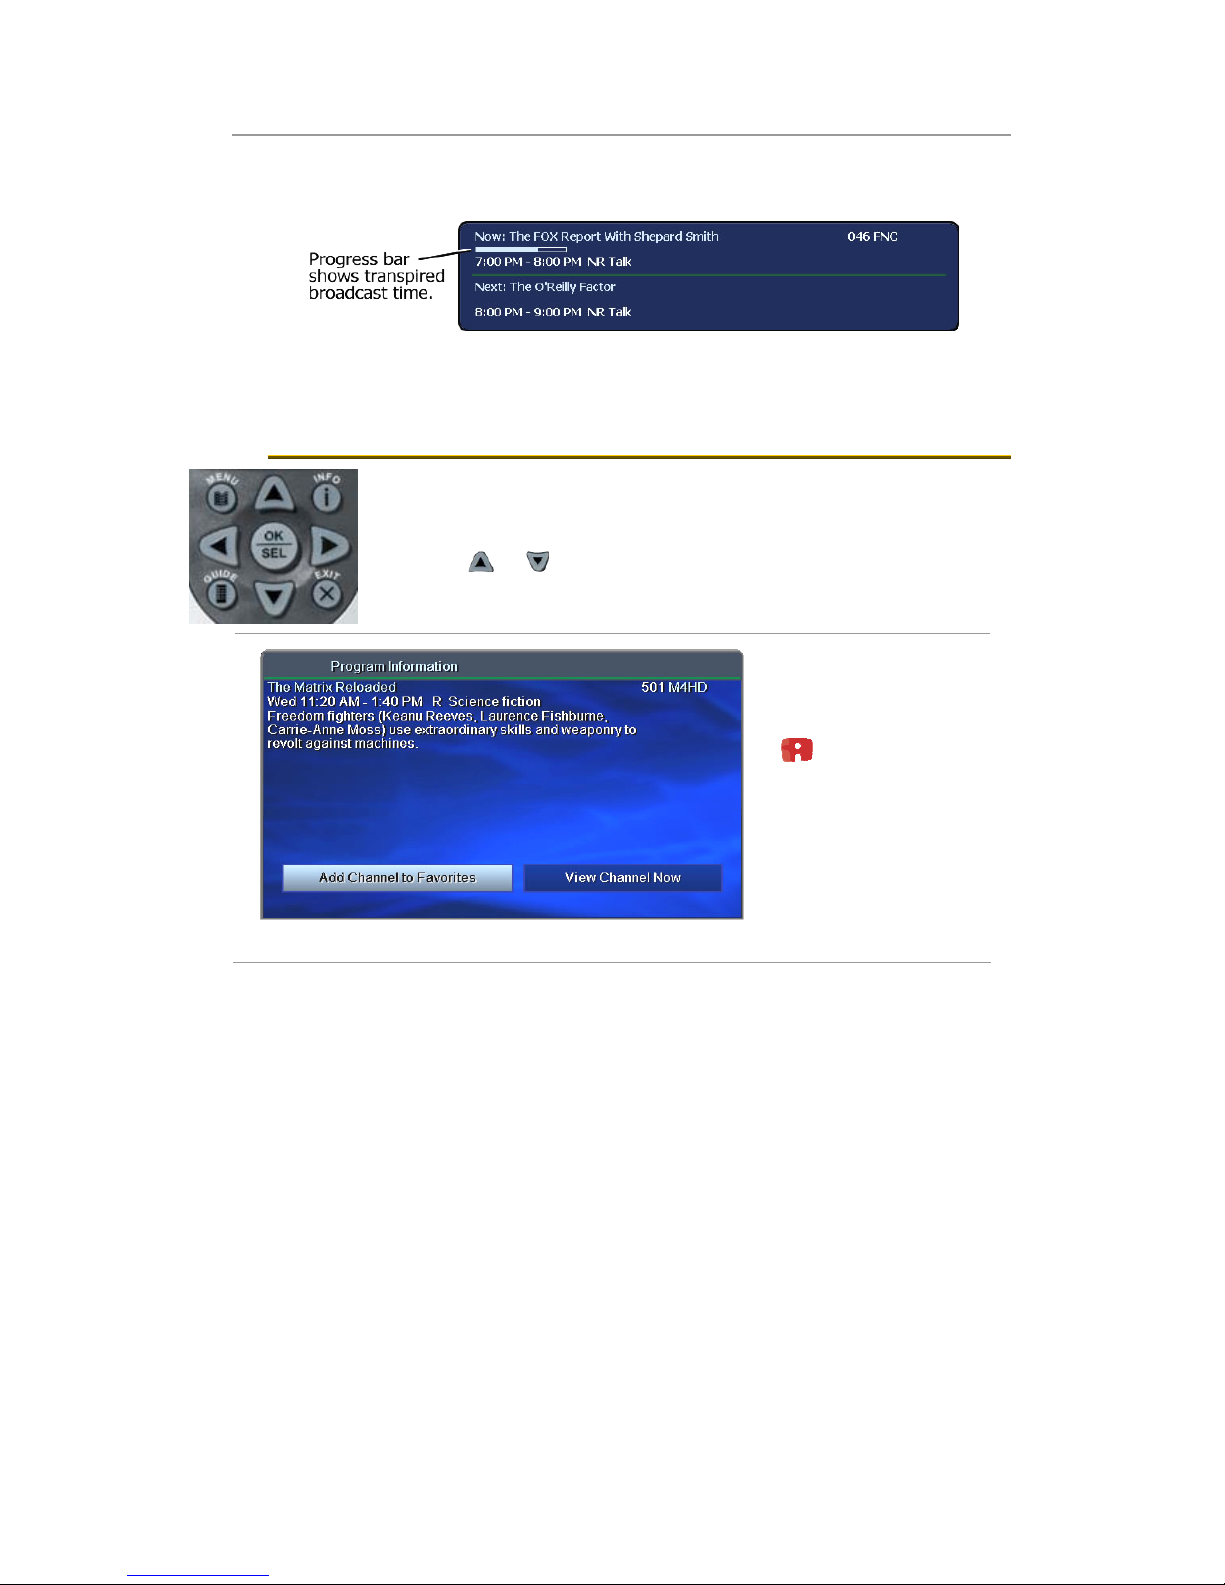
View Current Channel Information
In addition, every time you change the channel, a programming banner
displays channel information and a program progress bar.
SSeett FFaavvoorriitteess
When you set Favorite channels, you create a separate program guide
just for the channels you watch the most – your Favorites!
Press GUIDE twice to see My Channels program guide.
•
Use U and V buttons to select a channel you want to add to your
•
Favorites program guide.
Press the INFO button to see program information.
•
With ‘Add Channel to
Favorites’ selected, press
OK on the remote control.
After you set up
Favorite channels, press
GUIDE three times to see
the Favorites program
guide.
3
Page 8
2. Basic TV Controls
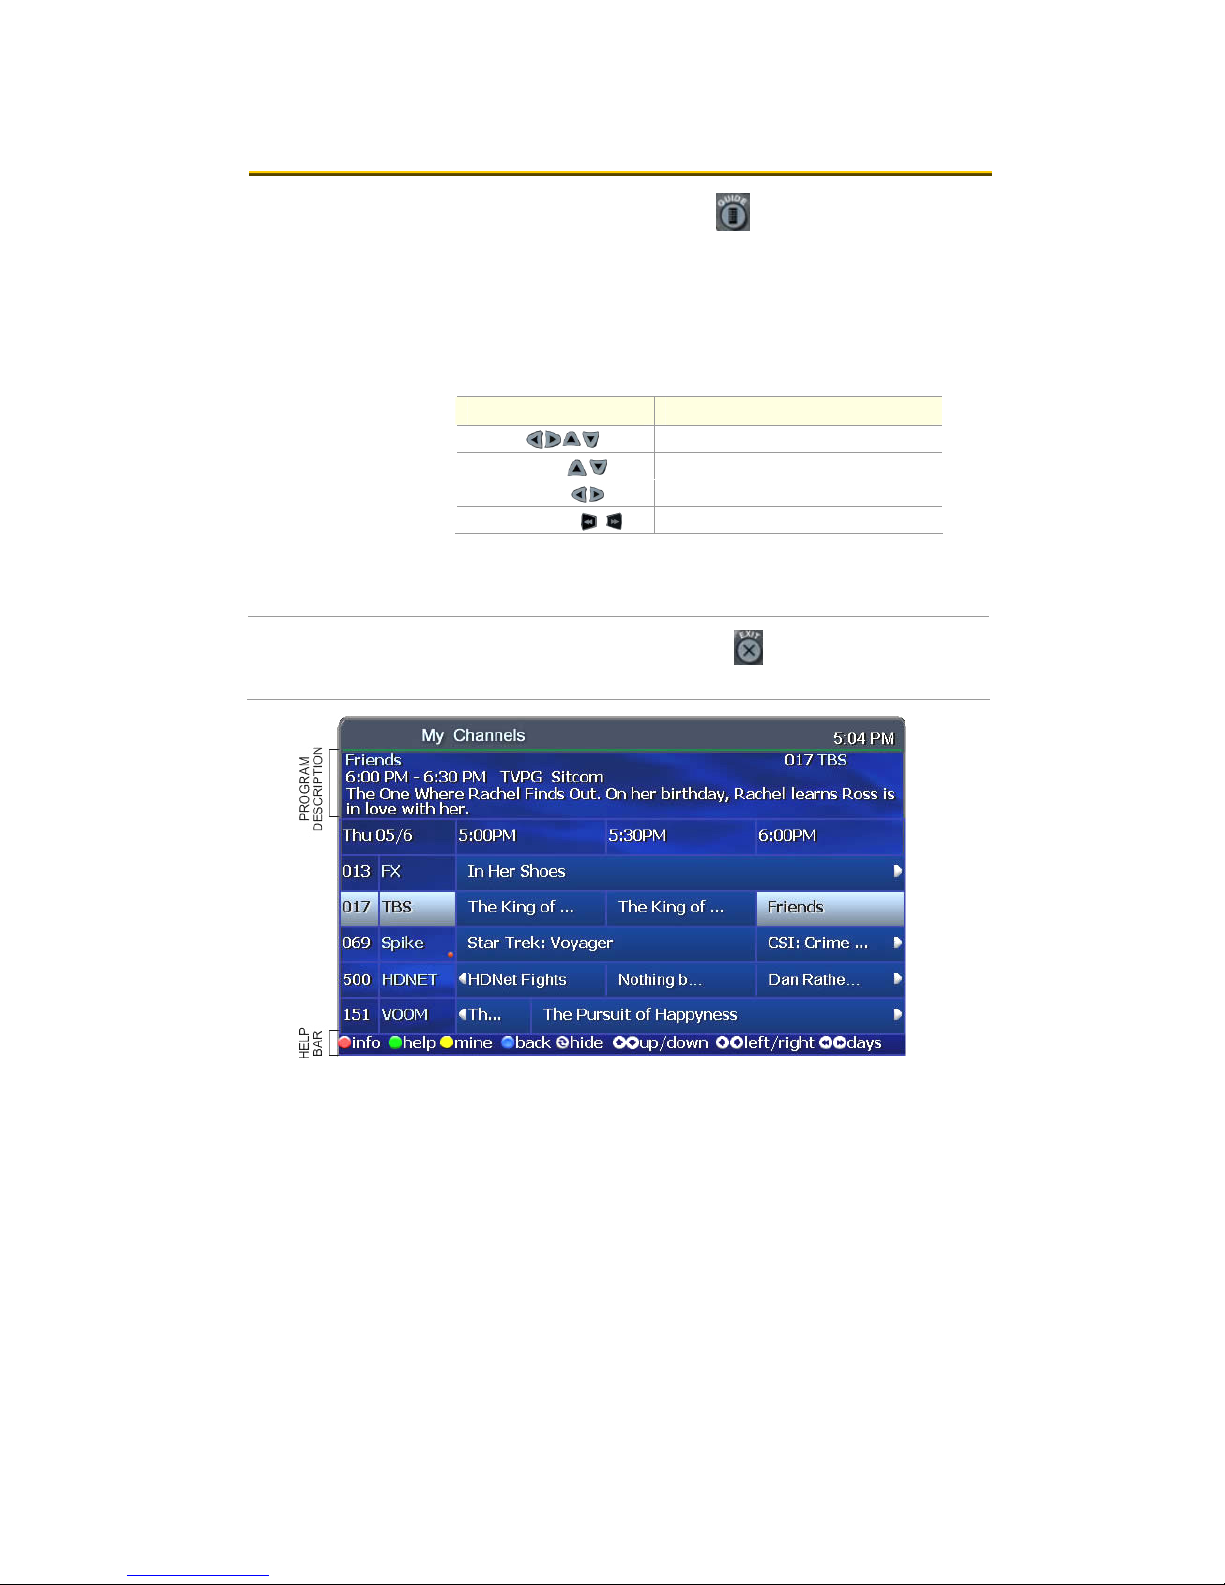
VViieeww tthhee CChhaannnneell GGuuiiddee
Press GUIDE to see a Channel Guide.
Press once for Offered Channels (all channels available from your
Service Provider).
Press twice for My Channels (channels you subscribe to currently).
Press three times for Favorites (channels you’ve set as favorites).
Refer to page 3 to set up Favorite channels.
The Help Bar (below the guide) provides a key to the remote control
buttons that navigate through channels and program times.*
Buttons Function
Arrows (Y Z U V) Scroll through channels and times.
Pg Up/Down (
Pg Back/Fwd (
Rewind/FastFwd ( ) Jump to previous/next day.
* Help Bar appears only if activated. Refer to “Appearance” on page 45
for more information.
In the Help Bar, “mine” denotes the Favorites guide.
Press EXIT to clear the channel guide.
The Guide window times out after a set period of inactivity.
) Jump to previous/next channels.
) Jump to previous/next times.
Channel Guide shows programming and a description of the selected program.
4
Page 9
2. Basic TV Controls
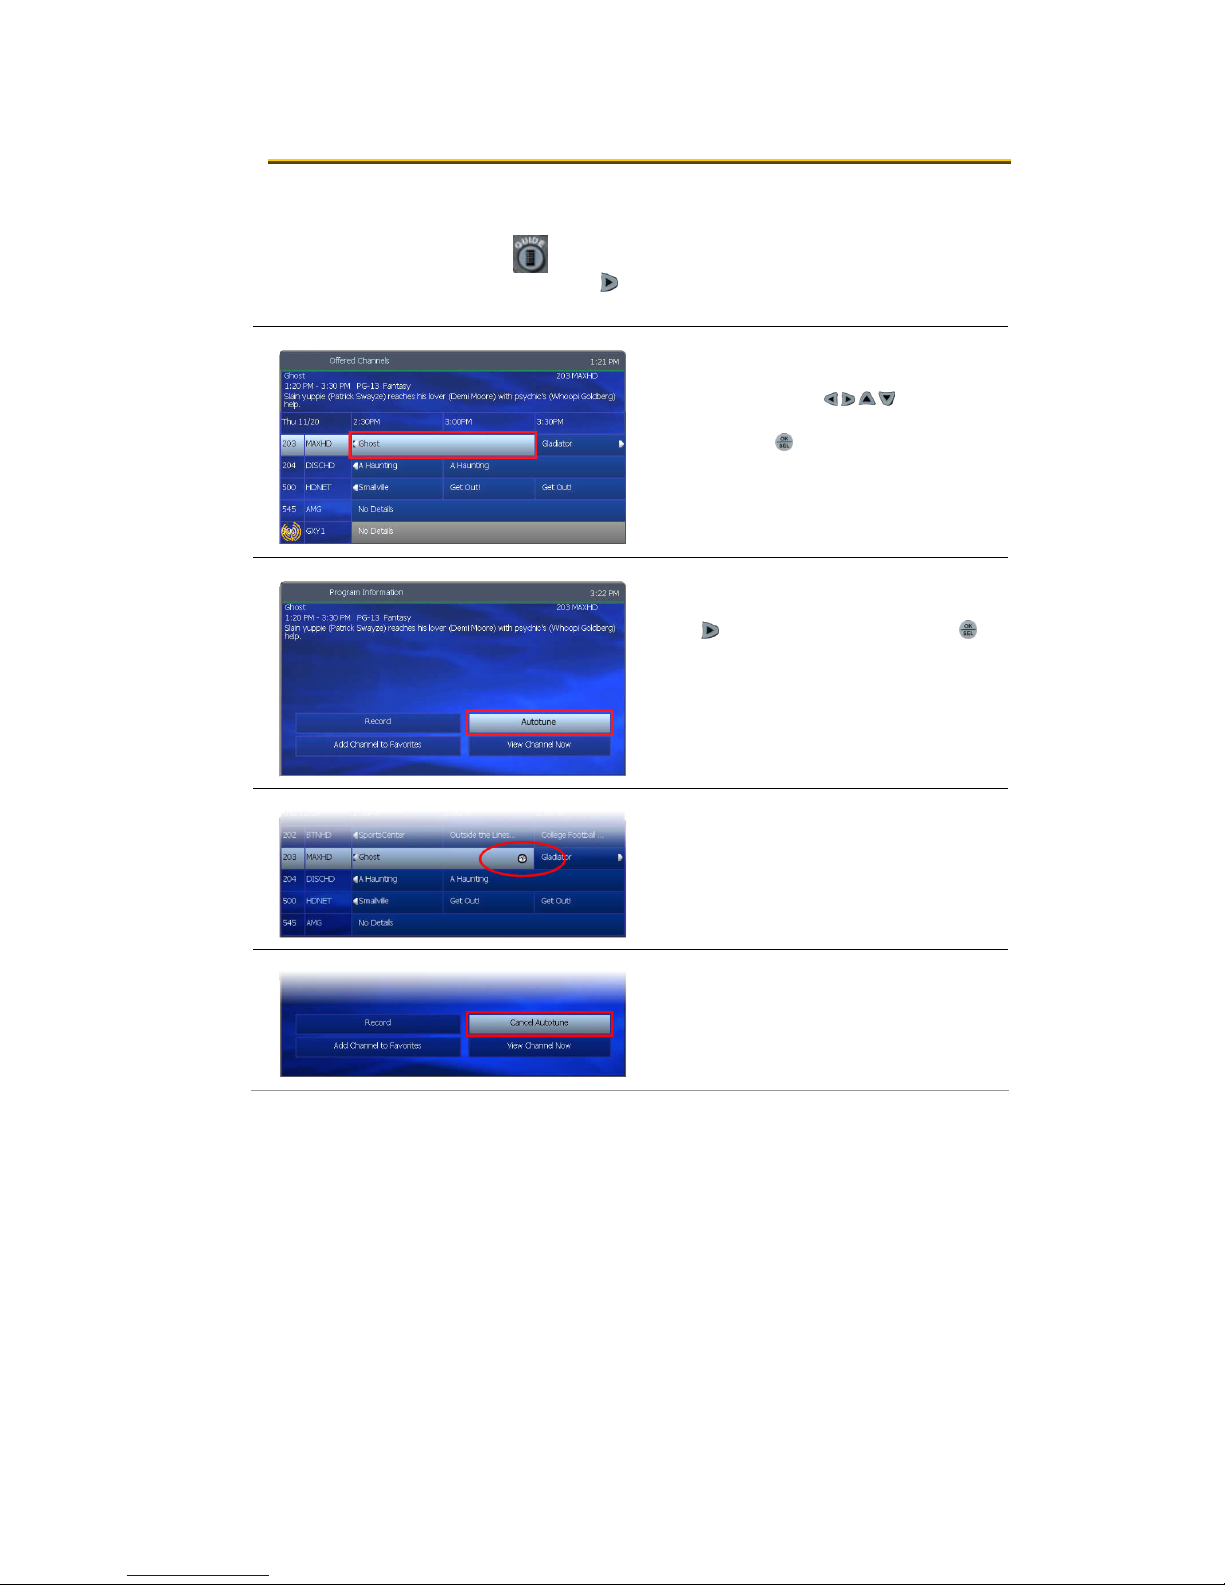
AAuuttoottuunnee
Use the remote control to set your TV to tune to a later program
automatically.
guide
guide / [selected program] + ok
Press GUIDE to see the Channel Guide.
Press
Z as many times as needed to see later
programming.
Using arrow buttons (Y Z U V), navigate
to the program you want your TV to tune to
later. Press OK.
Press Z to select Autotune. Press OK.
guide
guide / [selected program] + ok
In the Channel Guide, a clock icon
indicates that the program is selected for
Autotune.
To cancel an Autotune selection,
navigate to the program, press
Cancel Autotune, and press
OK, select
OK again.
5
Page 10
2. Basic TV Controls
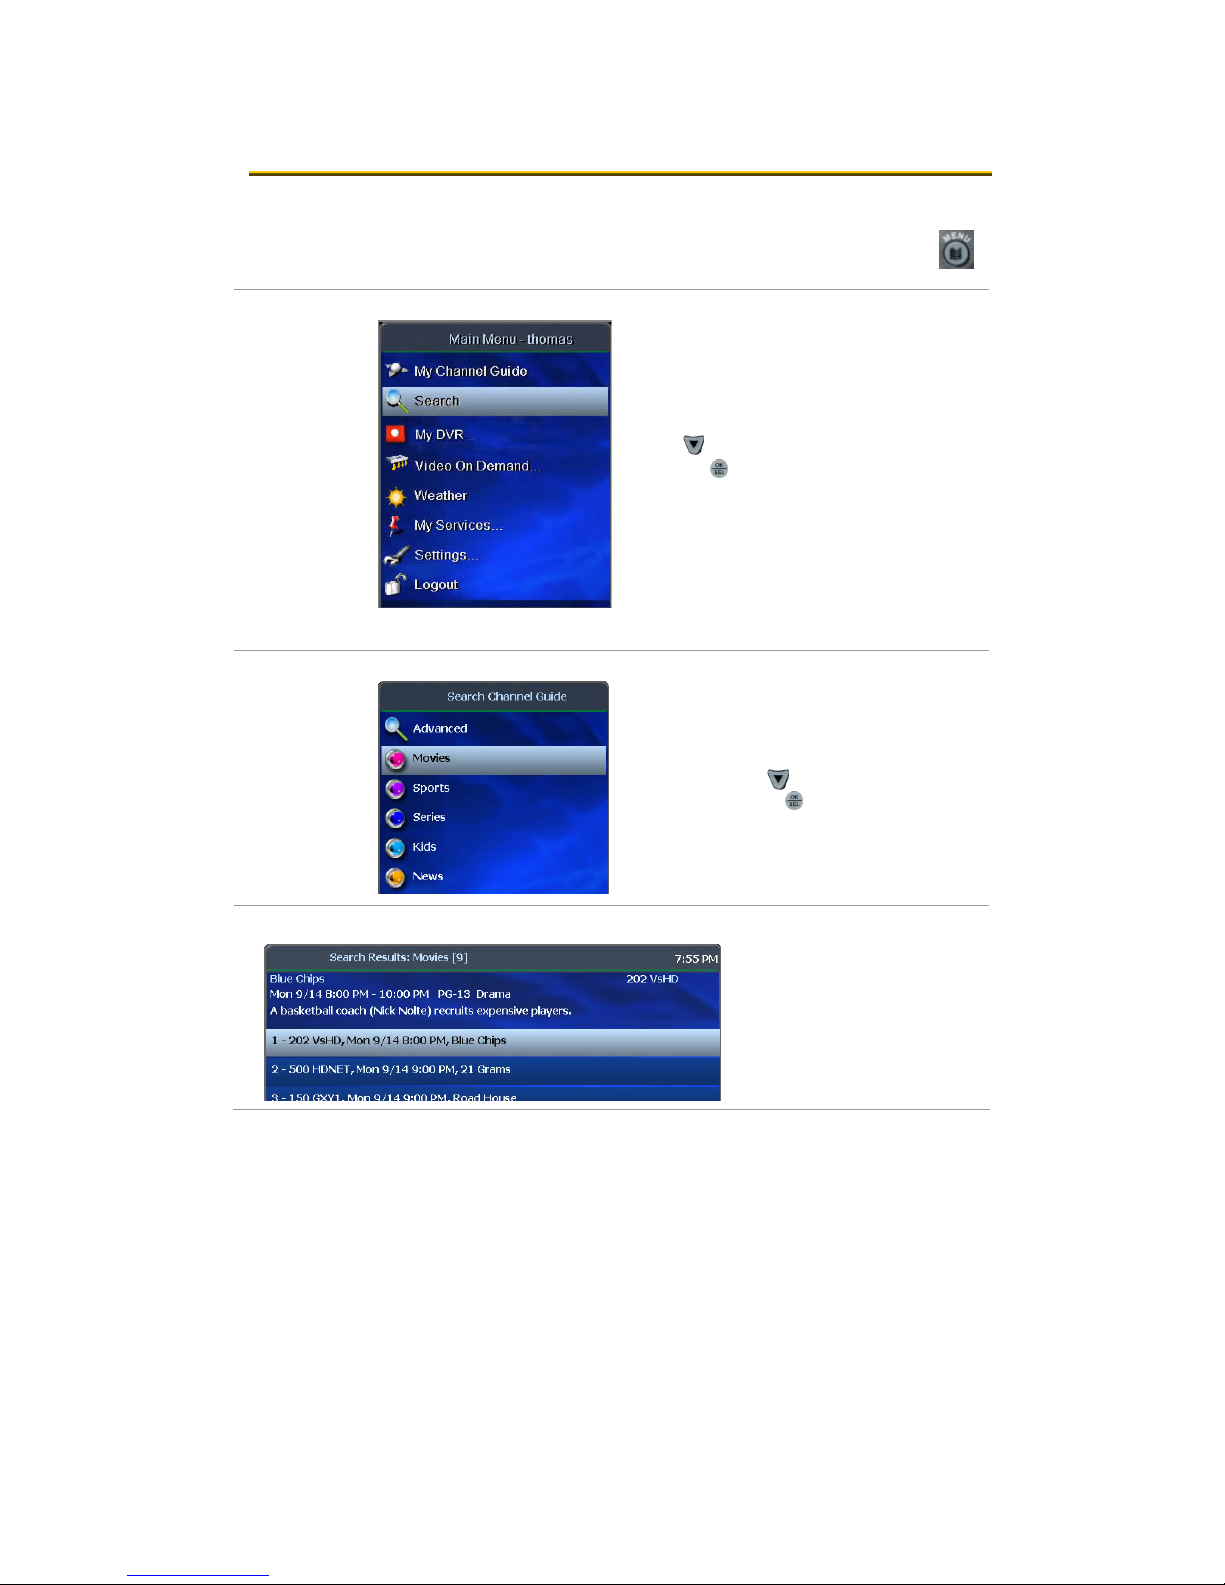
SSeeaarrcchh ffoorr pprrooggrraammss
Search for specific programming in the Channel Guide.
menu
menu / search
Press MENU to access the Main Menu.
Press V to select Search, and then
OK.
press
Quick Search
To search for a category of programming
(such as movies, sports, series, or kids’
programs) press V to make your selection
and then press
OK.
menu / search / [movies]
6
View the Search Results of
upcoming programs for the
category you selected.
Use arrow buttons to select
an individual program and
see its description at the top
of the window.
Press
OK to see the options.
Page 11

2. Basic TV Controls
Search for programs
menu / search
Advanced Search
To search for specific programming using
search filters—such as program title,
channel, or day—press V to make your
Press
OK.
OK to scroll
selection, and then press
menu / search / advanced
Press arrow buttons to
select one or more
categories: Genre, Day,
From (start time), To (end
time), Channel, Title.
through options in the fields
on this screen.
If you search by Title, you’ll spell the
program name in the pop-up keyboard.
(Partial spelling is okay.)
Use arrow buttons to select the letters and
press
OK after each. When you’re done,
select the check mark and press
OK.
In the Search Channel Guide window,
select Search and press
OK.
7
Page 12
2. Basic TV Controls
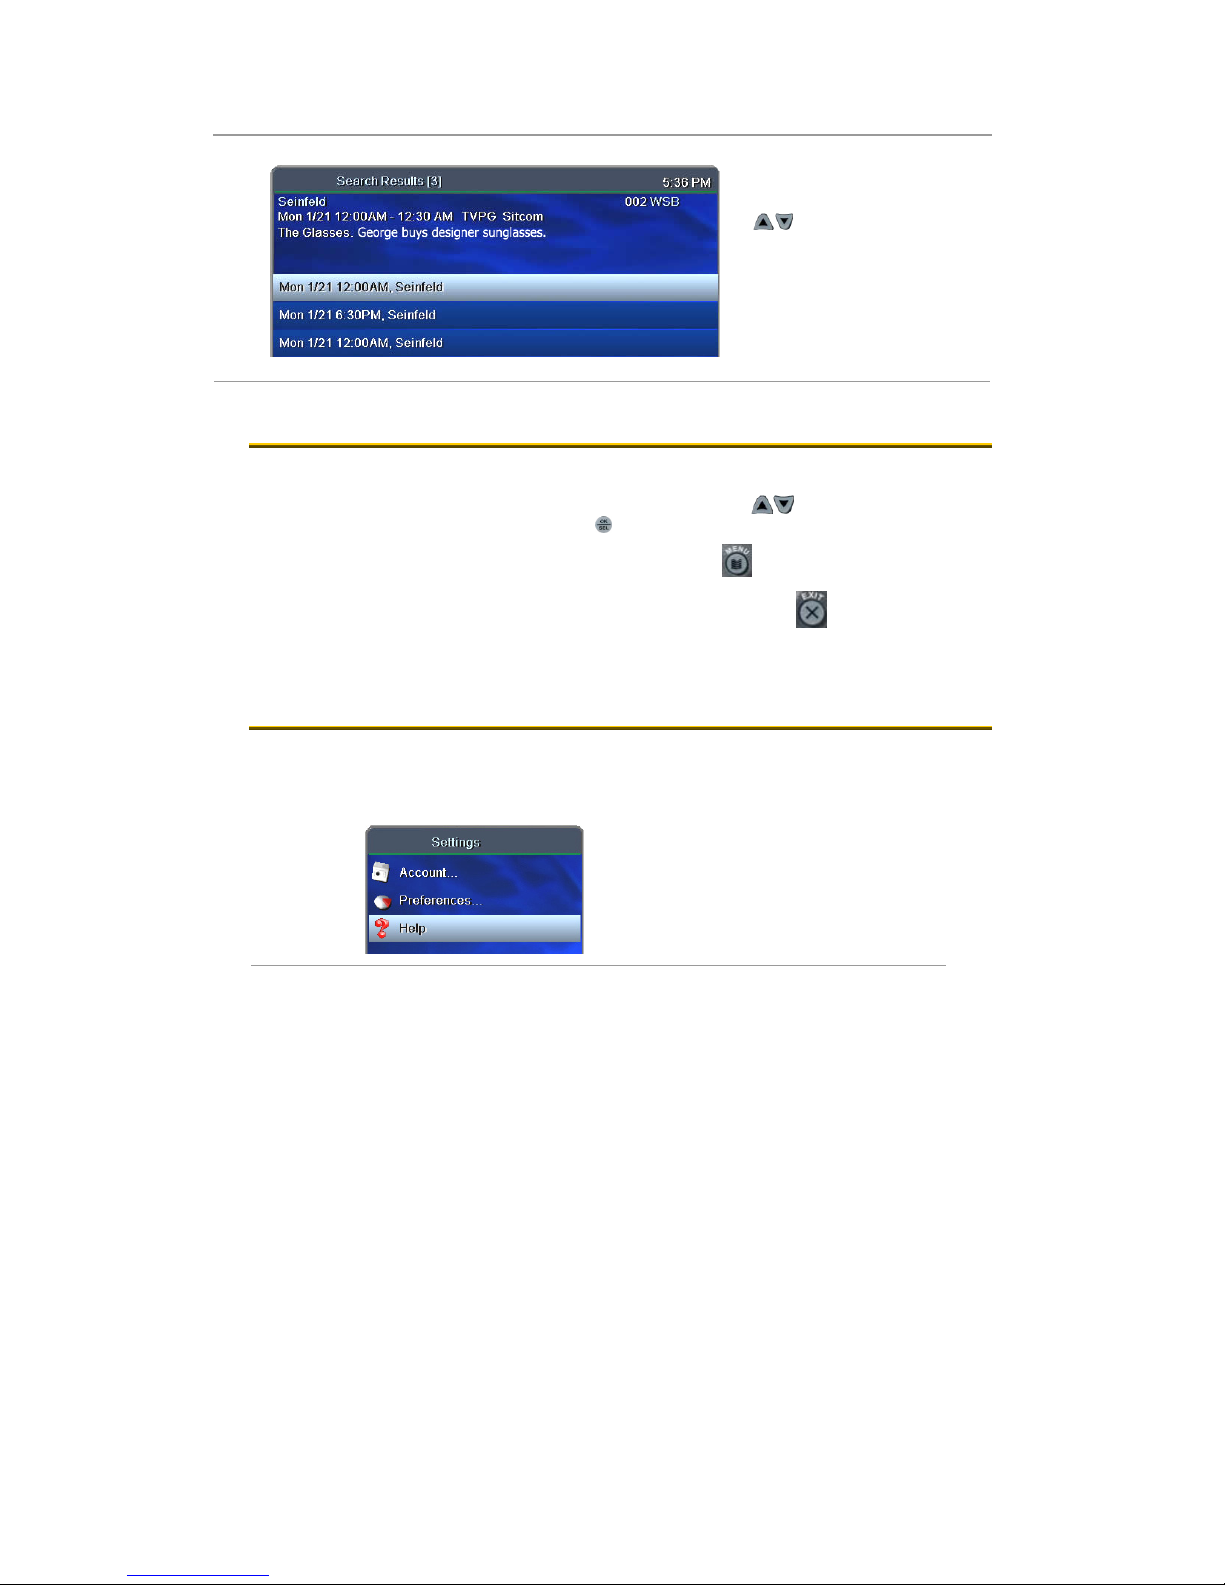
Search for programs
View Search Results.
Press arrow buttons
(U V) to select a program
from the list and see its
description at the top of the
window.
OK on any selected
Press
program to see the available
options.
AAcccceessss mmeennuuss
The Main Menu is the gateway to most features.
On the remote control, press arrow buttons
selection, and then press OK.
Press MENU to access the Main Menu.
•
Press EXIT to return to the previous menu.
•
Press EXIT to clear all menus from the screen.
•
GGeett hheellpp
Help provides instructions on your TV screen for using the remote
control and fs|cdn features.
menu / settings
(U V) to make your menu
Starting at the Main Menu, select
Settings [+
.
OK] and then Help [+OK]
8
Page 13

2. Basic TV Controls
menu / settings / help
Press V or U to
select a topic.
OK.
Press
LLoogg oouutt
Turn off your TV when you're not watching. To log in as a different user,
follow the steps listed below.
menu
Press MENU to access the Main
Menu.
Press V to select Logout. Press
OK.
The TV will display the user login
screen, allowing you to log in again
as the same or different user.
9
Page 14
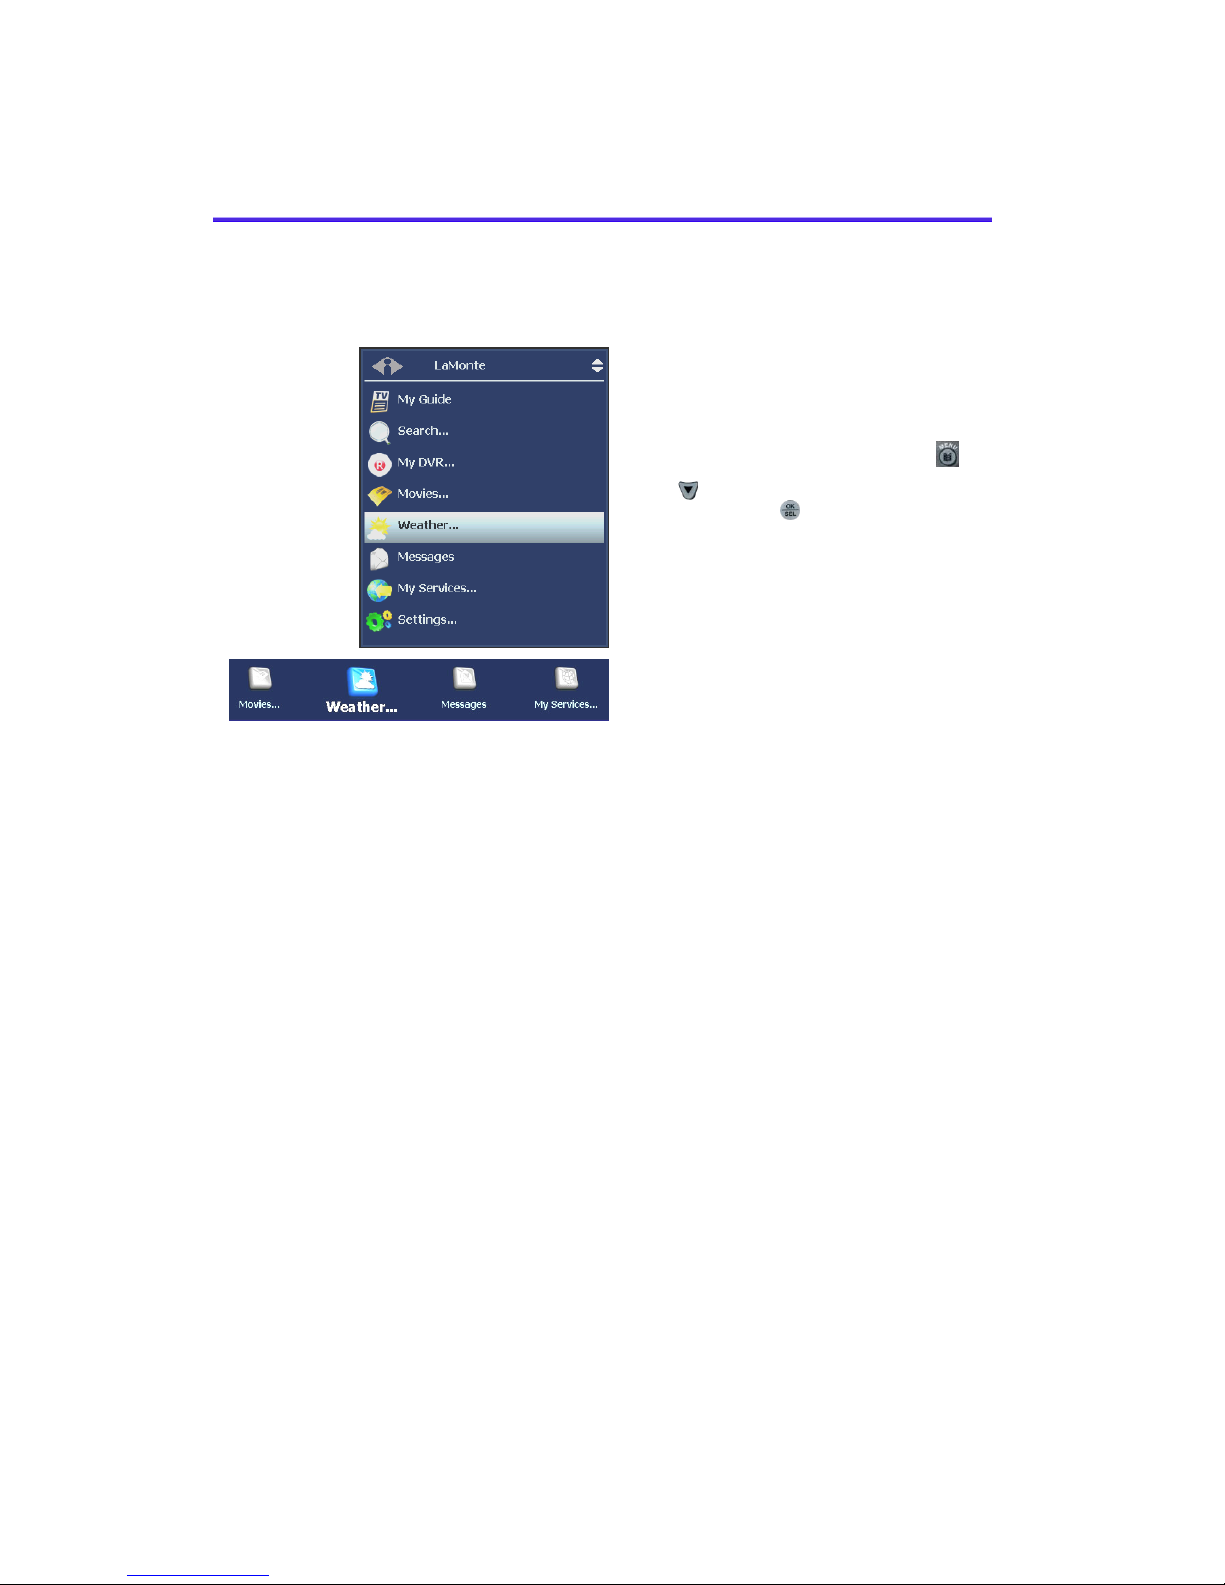
Along with standard features, the Main Menu lists optional features
you can purchase from your service provider.
menu
Press MENU to access the Main Menu.
Press V to select the feature you want,
and then press
Features described below are:
Weather
Alerts
OK.
Sample ‘Old’ and ‘New’ Main Menus
(your menus may look different)
Page 15

4. Paid Programming (PPV, PPB)
WWeeaatthheerr
Select Weather from the Main Menu to display a 6-day forecast for
available locations.
Menu / Weather
Z to view alternate
Press
locations.
11
Page 16
4. Paid Programming (PPV, PPB)
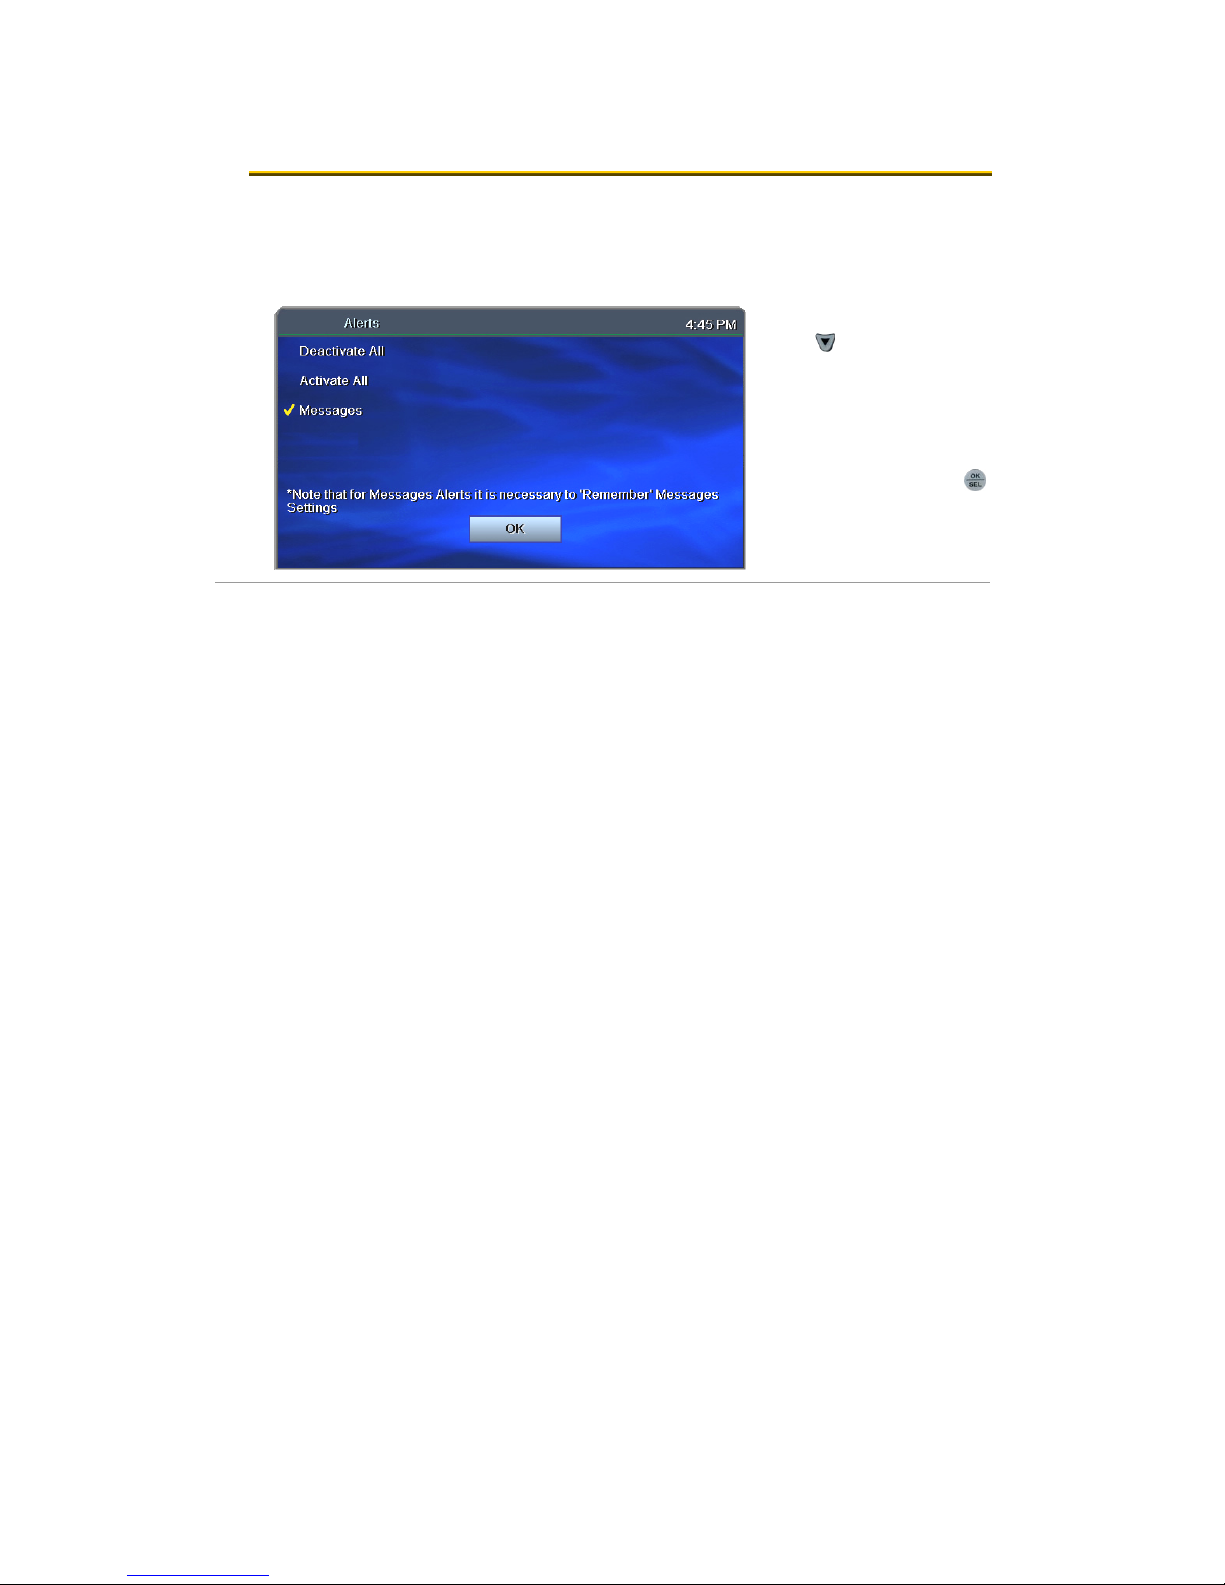
AAlleerrttss
menu / alerts
Alerts lets you activate or deactivate on-screen notification for
On Screen Call Display and Message se
subscrib
er.
rvices, if you are a
Press V to select a
service. Press
deactivate/activate the
service.
A check mark indicates
service is activated.
Select OK and press
OK to
OK.
12
Page 17

4. Paid Programming (PPV, PPB)
44.. PPaaiidd PPrrooggrraammmmiinngg ((PPPPVV,, PPPPBB))
Pay per View and Pay per Block services give you access to special
broadcasting.
PPaayy ppeerr VViieeww
Pay to view specific paid programming broadcasts.
guide
Access the Channel
Guide.
In the Pay per View
channel listing, select
the program you wish to
view. Press
OK.
Use the number keys to enter your PIN and
then select Buy. Press
You will be able to view the selected
broadcast on this channel at its scheduled
time.
To set up a PIN, refer to “Activate PIN
Protection” on page 31.
OK.
13
Page 18

4. Paid Programming (PPV, PPB)
PPaayy ppeerr BBlloocckk
Purchase blocks of viewing time on specified channels [where
available].
guide
Press GUIDE to open the
Channel Guide.
Select a Pay per Block
channel. Press
Use the number keys to enter your PIN
and then select Buy.
OK.
Press
To set up a PIN, refer to “Activate PIN
Protection” on page 31.
OK.
14
Page 19

55.. VViiddeeoo oonn DDeemmaanndd ((VVOODD))
Video on Demand (VOD) lets you rent movies for immediate viewing.
RReenntt aa VViiddeeoo oonn DDeemmaanndd mmoovviiee
Quick search by category
main menu / movies
In the Main Menu, select Movies.
Press V or U to select a movie category.
Press
OK.
Press V or U to scroll through the Search
Results.
Select a movie and press
OK.
main menu / video on demand / search
Press Z or Y to select Rent
(order movie), Plot (read
movie plot), or Trailer (view
movie trailer, when available).
Press OK and follow the onscreen instructions.
When PIN Protection is
activated, the system will ask
for your PIN. Refer to page
31 to learn about PINs.
15
Page 20

5. Video on Demand (VOD)
Rent a Video on Demand movie
Search by expanded category list
Use this method to narrow your search by category and/or rating.
main menu / video on demand
main menu / video on demand / search
main menu / video on demand / search / [movie]
With Search selected, press
Press arrow buttons to
select Genre and Rating
categories.
Press
category options.
Select Search and press OK.
Select options in as
few or as many
categories as you wish.
Press V or U to scroll
through Search Results.
Select a movie and
press OK.
Follow instructions on the
bottom of page 15 to rent
the movie.
OK.
OK to scroll through
16
Page 21

5. Video on Demand (VOD)
Rent a Video on Demand movie
Advanced Search
Advanced Search is useful to find movies that meet specific criteria.
You can search by title, director, or actor.
main menu / video on demand / search
Press Z to select
Advanced Search
and press
main menu / video on demand / search / advanced search
Press the arrow keys
to select the ABC box
at the category you
want to search: Title,
Director, or Actor.
Press
OK.
OK.
In the pop-up keyboard, select and press OK
for each letter to spell the movie title, director
last name, or actor last name (partial spelling
is okay).
When you’re done, select the check mark
symbol and press OK.
Select Search and press
Press V or U to scroll through Search
Results.
Select a movie and press OK.
OK.
Follow instructions on the bottom of page 15 to
rent the movie.
17
Page 22

5. Video on Demand (VOD)
NNaavviiggaattee iinn aa VViiddeeoo oonn DDeemmaanndd mmoovviiee
When you navigate with the remote control in a VOD movie, the
Progress Bar (below) appears.
Button Function Progress Bar Indication
Play (►) Start or resume the movie. Shows current place in the movie
by section and minute (mm:ss).
Stop () Pause the movie. Press ► to resume. Shows the section and time
(mm:ss) where paused.
Pause () Pause the movie. Press ► to resume. Shows the section and time
(mm:ss) where paused.
Rewind / Fast
Fwd ( / )
Number keys
(0–9) OR
arrow keys
(Y Z)
MENU View Progress Bar.
EXIT Hide Progress Bar.
B key "HOME" Exit the VOD movie and return to regular
Rewind / fast-forward the movie. Press
repeatedly to increase speed.
Skip among the ten movie sections.
Number keys: Press the number of
sections to skip over; for example, press
6 to start at section 7 of the movie. (0
takes you to the beginning.)
Arrow keys: Press right or left arrow key
(Y Z) to skip forward or back among
movie sections; press
programming.
To return to the VOD movie, press Menu
and select the movie as you did when
you rented it.
Movies are available for viewing during
the 24 hours after purchase.
OK.
Indicates Rewind or Fast Forward
mode and rate; 2x = twice as fast
as Play speed, 4x = four times as
fast, and so on.
Shows the selected movie section
and minutes transpired in the movie
(mm:ss).
18
Page 23

6. My DVR
66.. MMyy DDVVRR
The Recorded Programs feature lets you record programming for
repeated viewing or viewing at a later time. Use My DVR to view the
programming you record.
RReeccoorrdd aa pprrooggrraamm oorr sseerriieess
Press GUIDE twice or three times to see your programs or Favorites.
Use the arrow buttons to select the program you wish to record, and then press
OK to see program information.
From the Program Information window, you can set the program to be
recorded—just one time, or several times if it’s a series. In this section:
Record a Program Once
Record a Series
Set a Manual Recording
Record a Program Once
First select a program in the channel guide.
guide / [selected program]
To record the selected
program only, select Record
and press
OK.
guide
To record a program you’re
already watching, press the
Record button on the remote
control.
After you set the
recording …
In the Channel Guide, a
Record icon indicates that
the program is set to record.
19
Page 24

6. My DVR
Record a Series
If you selected a series, you can record several episodes.
guide / [selected program]
Press Z to select Record
series and then press
The Settings screen displays.
OK.
guide / [selected program] / record series
Once you schedule a program to Record, you can
watch real-time TV—or even schedule another program
to Record—without interrupting the recording process.
To set DVR defaults, select Guide> My DVR > Default
DVR Settings (see page 25).
guide
Use the arrow buttons (Y Z
U V) to select up or down
arrows, then press OK to
select the options you want
for recording the series:
Start offset—Number of
minutes to start recording
before the program is
scheduled to start
End offset—Number of
minutes to continue
after program is scheduled to
end
Keep at least
episodes to store
Record episodes
new episodes, or new episodes
and reruns
recording
—Number of
—Record only
Select Record series and
press OK.
Press Exit to return to
regular viewing mode.
After you set the
recording …
In the Channel Guide, a
Record icon indicates that
the series is set to record.
20
Page 25

6. My DVR
Set a Manual Recording
Manual recordings let you specify a specic time, channel, and/or date to
record without using the channel guide. For example, you could record one
channel for an entire evening.
main menu / my dvr
In the Main Menu, select My DVR >
Set Manual Recording .
main menu / my dvr / set manual recording
Use the arrow buttons (
) to select up or down
arrows at each eld, then
OK to scroll to the
press
setting you want:
Channel
From/To —Start/end times
Repeat
these settings, such as Just
Once, Weekdays only, Daily,
Weekends only, or a day of the
week
Period start —Date to start
recording
Note: To clear the “From,” “To,” and “Period
Start” elds, use the REPLAY button.
—How often to record at
21
Page 26

6. My DVR
Set a Manual Recording
If you want to name this settings group, click the
Name tab.
In the pop-up keyboard, press arrow buttons to
select letters. Press
the name, and then select the check mark or OK.
If you don’t select a name, the system will assign
one. You will see it when you check recording
schedules at My DVR > Scheduled.
On the Set Manual Recording window, select Set
and then press OK. Click OK in the confirmation
window.
To view a list of programs you’ve scheduled,
select My DVR > Scheduled.
OK after each letter to spell
VViieeww aa rreeccoorrddeedd pprrooggrraamm
menu
In the Main Menu, select My DVR, and then press
OK.
22
Page 27

View a recorded program
6. My DVR
menu / My DVR
menu / My DVR / recorded programs
menu / recorded programs / [selected program]
In the My DVR menu, press V to scroll
down to the item you want, then press OK.
These menu options let you view recorded
programming:
Recorded—All programs recorded
Scheduled—All programs scheduled to be
recorded
Series Folders—Series episodes recorded
Manual Recordings—Manual recordings
All…—All recordings for the user logged in
All users’ recordings—All recordings made or
scheduled by all users on this set-top box
For information about different types of
recording, see “
starting on page 19.
Record a program or series”
In the list that appears, press
V to select a program and
press
OK. Information at the
top of the window describes
the selected program.
Symbols show the status of
each listing:
Completed successfully
Unsuccessful
In progress
Scheduled
Interrupted
Select Start to start the program at
the beginning, or select Resume to
continue watching a previous
program from the point where you
stopped. Press
OK.
To navigate in the recorded
program, use VOD control buttons
(Play, Stop, Pause, Rewind, Fast
Fwd).
23
Page 28

6. My DVR
RReemmoovvee oorr ssttoopp rreeccoorrddiinnggss
menu / my dvr
menu / my dvr / recorded / [selected program/series]
In the Main Menu, select My DVR >
Recorded, select to view
recordings listed by date or by title,
and press
From the list of programs, select
the program to remove and then
press
To remove the selected program or
stop recording a series, select one
of these options and press
Remove—Erase the selected program
from the Recorded list
Remove all—Erase all programs in
the Recorded list
Interrupt series—Keep the series
already recorded, but stop recording
future episodes
OK.
OK.
OK:
24
The window includes other controls for the selected program:
Start—Play the recording
Resume—Continue to play the program if it has already been started
Settings—Change recording preferences for the program (for more
information about recording preferences, see “
Settings
” on page 25.)
Select Default DVR
Page 29

6. My DVR
MMaannaaggee MMyy DDVVRR
Managing your recordings will optimize My DVR performance when
you record programs for later viewing. This section describes how to
set these controls:
Default DVR Settings
•
Recording Priorities
•
Select Default DVR Settings
Use this option to pre-set your recording preferences for different types of
programs such as series, movies, and sports.
main menu / my dvr
In the Main Menu, select My DVR > Default
DVR Settings.
25
Page 30

6. My DVR
Manage My DVR
main menu / my dvr / default dvr settings
Use the arrow buttons (Y Z U
V) to select up or down arrows
at each field, then press
OK to
scroll to the setting you want
(settings vary depending on the
Type):
Type—Type of recording, such as Series Recordings, Single
series episodes, Movies, Shows, Sports, Manual Recordings
Start offset—Number of minutes to start recording before the
program is scheduled to start
End offset—Number of minutes to continue
program is scheduled to end
Keep until
Keep at least
Record episodes
and reruns
—How long to store recorded programs
—Number of episodes to store
—Record only new episodes, or new episodes
recording after
Select Apply and press OK.
26
Select Recording Priorities
If the number of recordings scheduled at one time is more than allowed, use
this option to choose which program to record. This is useful if you have
scheduled a series, which records repeatedly and may conflict with other
programs you schedule.
main menu / my dvr
In the Main Menu, select My DVR >
Priorities.
Page 31

Manage My DVR
6. My DVR
main menu / my dvr / priorities
Programs scheduled for
recording display in a list.
The higher the program in
the list, the higher its priority:
To move a program higher or
lower, follow these steps :
To move higher—Select the
program, then press
To move lower—Select the
program, then press the
Info button
OK
27
Page 32

My Services are optional services you can order from your service
provider.
menu
Find available service options on the
Main Menu or by selecting My
Services.
Some services are described below:
Telephony
Messages
Chat
2Q
6FUHHQ
caller id pop−up
Sample ‘Old’ and ‘New’ Main Menus
(your menu may look different)
&DOO'LVSOD\
The On Screen Call Display feature displays a Caller ID pop-up alert at
the top of your TV screen when you have an incoming phone call.
The alert shows phone numbers for the receiver and caller.
When the call alert appears,
simply wait for it to time out,
or press OK on the remote
control to close the alert.
To activate Caller ID, refer to
“Alerts” on page 12.
Page 33

88.. AAccccoouunntt SSeerrvviicceess
Account setup may include some or all of these procedures, depending
on the services you’ve ordered:
Access the Account menu (page 29)
Change password (page 30)
Activate PIN Protection (page 31)
Create a user (page 33)
Set parental controls (Locks) (page 35)
View subscription packages (page 37)
Manage subscriptions (page 37)
Manage user actions (page 38)
Set Autologin (page 40)
View subscriber details (page 40)
View billing activity (page 41)
AAcccceessss tthhee AAccccoouunntt mmeennuu
To set up or change your services, first access the Account menu.
menu / settings
Press MENU to access the Main Menu.
Press V to select Settings. Press
With Account selected, press
OK.
OK.
Page 34

8. Account Services
Access the Account menu
From the Account menu, select the activity
you want.
Some account activities are described in
this section:
Change Password (page 30, see below)
Purchase PIN (page 31)
Rating PIN (page 32)
Manage Users (page 33 and 35)
Manage Subscriptions (page 37)
CChhaannggee ppaasssswwoorrdd
These instructions will change the current user’s password. To change
another user’s password, refer to “Manage user actions’ on page 38.
menu / settings / account / change password
Access the Account
menu (page 29) and
select Change Password.
Complete the fields:
Old – Use number buttons
to enter old password.
New – Use number buttons
to enter new password.
Confirm – Enter the
password numbers again.
Press V to select OK.
Press
OK.
30
Page 35

AAccttiivvaattee PPIINN PPrrootteeccttiioonn
Wightman TV features two types of optional personal identification
numbers (PINs): Purchase PIN allows secure purchase of subscriptions
or services, and Rating PIN allows parental controls.
Set Purchase PIN
When activated, a Purchase PIN is required to purchase subscriptions
and Video on Demand, Pay per View, and Pay per Block services.
menu / settings / account / purchase pin
Access the Account menu (page 29)
and select Purchase PIN.
Complete the fields:
New PIN – Use number buttons to enter
4-digit PIN.
Confirm new PIN – Enter the PIN again.
Password – Enter your 4-digit numeric
password.
Enable PIN Protection – Press
select Yes or No. (Will appear only if PIN
Protection is activated.)
Click Apply and press OK.
OK to
Page 36

8. Account Services
Activate PIN Protection
Set Rating PIN
A Rating PIN allows a user to view programming with a higher rating
than the rating specified when the user was created (see “Create a
user” on page 33). The manager user may set Rating PINs.
menu / settings / account / rating pin
Access the Account menu (page 29)
and select Rating PIN.
Complete the fields:
New PIN – Use number buttons to enter
the 4-digit PIN.
Confirm new PIN – Enter PIN again.
Password – Enter your 4-digit numeric
password.
Enable PIN Protection – Press
select Yes or No. (Will appear only if PIN
protection is activated.)
If No, then this user cannot view
programming with a higher rating under
any circumstances.
PIN Protected Rating – Press
the highest rating user can view without a
Rating PIN.
Select Apply and press OK.
OK to
OK to select
32
Example:
John is a 13-year-old user specified with a TV-14
rating. His parents also assigned John a PINprotected rating of R.
The following rules apply to John:
PIN-Protection
enabled
(option ‘Yes’)
9 May view programming as high as
TV-14 without PIN
9 May view R with PIN
9 May not ever view higher than R
PIN-Protection
disabled
(option ‘No’)
9 May view as high as TV-14 only
Page 37

CCrreeaattee aa uusseerr
The Manager User for a subscriber account can create additional
users in the account.
menu / settings / account / manage users
menu / settings / account / manage users / create new
Access the Account menu
(page 29) and select
Manage Users.
Select Create New and
press
OK.
If you don’t see the
Create New option, it’s
because your account
already has the maximum
number of users. Contact
Customer Service to add
users.
With ABC selected,
press
OK.
Page 38

8. Account Services
Create a user
In the pop-up keyboard, press arrow buttons
(Y Z U V) to select letters. Press OK after each
letter to spell the new username.
Select the check mark and press
OK.
Complete the remaining fields:
Password Press number buttons on the
Confirm Enter the password numbers again.
Rating Press OK to scroll through ratings.
Sp.Limit Press number buttons to enter
Can(not)
Subscribe
remote to enter a numeric password
of your choice.
If you make a mistake, press Day -
Stop at the highest rating level you
want this user to view.
Users will need a Rating PIN to view
programming higher than the rating
you specify here. Refer to page 32
for details.
amount this user may spend per
billing period (for VoD, PPV, etc.).
Press OK to toggle between Can
and Cannot Subscribe.
Can Subscribe means this user will
be able to add subscription services.
34
Select OK and press OK to save settings.
Page 39

SSeett ppaarreennttaall ccoonnttrroollss ((LLoocckkss))
The manager user can control user viewing in several ways:
Lock user out of TV for a set time (page 35, see below)
Lock user out of a program / channel (page 36)
Lock user out of TV indefinitely (page 36)
For all Lock settings, access the Account menu (page 29) and
select Manage Users.
menu / settings /
account / manage users
For all Lock settings, begin by selecting
Manage Users, and then select the user
you wish to control. Press OK.
menu / settings /
account / manage users / [username]
Select Locks and press OK.
Continue with the instructions below for
the action you want (lock user out of
program, out of channel, or out of TV).
Lock user out of TV for a set time
menu / settings /
account / manage users / [username] / locks
Choose the lockout period:
Complete the From,
Duration, and Daily fields
by pressing
through options.
With the fields set, select
Lock and press
OK to scroll
OK.
Page 40

Lock user out of a program/channel
menu / settings /
account / manage users / [username] / locks
Select the user account as
described above.
Select Channel Locks and
OK.
press
Select the program to lock, or
any program in the channel to
lock, and press OK.
Select Lock Program or Lock
Channel, and press
OK.
To unlock, repeat these steps,
except select Unlock.
The channel guide will show a
padlock symbol to identify the
program or channel as locked.
Lock user out of TV indefinitely
menu / settings /
account / manage users / [username] / locks
Select the user account as
described on page 29.
Select Lock Now and
OK.
press
This user will be blocked from
logging in.
To unlock the user, repeat these
steps, except select Unlock
Now.
Page 41

MMaannaaggee SSuubbssccrriippttiioonnss
To purchase a subscription, please contact Wightman's Customer Care
at 1-888-477-2177.
View Purchased Subscriptions
View subscription bundles already purchased for the user logged in.
menu / settings / account / my own subscriptions
Access the Account
menu (page 29) and
select My Own
Subscriptions.
Select a subscription and
OK.
press
View the description of the
subscription you chose
above.
Page 42

MMaannaaggee uusseerr aaccttiioonnss
From the main user account you can create or modify settings for
additional users in the account.
User settings include parental locks, password, and
Autologin.
menu / settings / account / manage users
Access the Account
menu (page 29) and
select Manage Users.
Select the user name and
OK.
press
Changes you make in the
next screens will be for
the user you select here.
Page 43

Select a User Action category to view or
modify. Press
OK.
The manager user may take these actions for
the selected user:
My Own Sub. View current subscriptions for the
Locks Activate/deactivate parental
Modify View or change user info including
Activity View billing activity.
Autologin Set the user login so it doesn’t
Delete Delete selected user. (Select Yes
selected user.
control for programs or channels.
Follow steps in “Set parental
control (Locks)” on page 35.
password and rating.
require a password.
or No.)
Page 44

8. Account Services
SSeett AAuuttoollooggiinn
When you set Autologin, the login procedure becomes disabled and no
password is required.
menu / settings / account / autologin
VViieeww ssuubbssccrriibbeerr ddeettaaiillss
View subscriber settings for the user who is currently logged on.
Access the Account
menu (page 29) and
select Autologin.
Press V to select Set
Autologin User.
OK.
Press
Use the same steps to
turn off Autologin.
Other users will be
able to access your
account when Autologin
is enabled.
menu / settings / account / details
40
Access the Account menu
(page 29) and select
Details.
To change settings, please
contact Customer Service.
Page 45

VViieeww bbiilllliinngg aaccttiivviittyy
View current billing activity for a specific user or for all of the users in
an account.
menu / settings / account / activity
Access the Account menu
(page 29) and select
Activity.
If you have questions about
your bill, please contact
Customer Service.
Page 46

9. Set Preferences
99.. SSeett PPrreeffeerreenncceess
Preferences are customized settings you can make for your Wightman TV
system to control:
Favorite channels
•
Menu language
•
Channel settings
•
Appearance of menus and windows
•
Set-top box setup
•
menu
Press MENU to access the Main Menu.
Press V to select Settings, and then
OK.
press
The Settings menu displays.
42
Sample ‘Old’ and ‘New’ Main Menus
(your menu may look different)
Page 47

menu / settings
To go to Preferences, select
Settings in the Main Menu
FFaavvoorriittee CChhaannnneellss
The channels you set up as Favorites will appear in a separate
program guide. This way, you can avoid scrolling through dozens of
channels to find the ones you watch most.
menu / settings / preferences / favorite channels
Press V to select Preferences, and then
OK.
press
In the Preferences menu, select from the
options and press
• Favorite Channels—Make it easy to see the
channels you watch most (see page 43, see below)
• Menu Language—Change the language in
on-screen menus and windows (see page 44)
• Channel Settings—Select an alternate
language for broadcasts (see page 44)
• Appearance—Select a different color or
design for menus and windows (see page 45)
• Set-top box Setup—Change advanced set-
top box settings (see page 46)
OK:
Select Menu > Settings >
Preferences > Favorite Channels.
Select a channel in the left column and press OK
to add it to your Favorites list.
Select a channel in the right
column and press OK to remove it from your
Favorites.
Add as many Favorite
channels as you like—there is no
limit.
Page 48

9. Set Preferences
MMeennuu LLaanngguuaaggee
Menu Language controls the language for on-screen menus and
windows.
menu / settings / preferences / menu language
CChhaannnneell SSeettttiinnggss
Channel Settings control broadcast language and audio format.
menu / settings / preferences / channel settings
Select Menu > Settings > Preferences > Menu
Language.
Press V to select the language you want, and
OK.
press
Language order remains the same.
Select Menu > Settings > Preferences >
Channel Settings.
Press V to select the setting you want to
change, and press
• Language—Select a different language for
broadcasts, when available
• Audio—Change the audio format options
OK:
44
Page 49

AAppppeeaarraannccee
Appearance controls the on-screen format for menus and windows.
menu / settings / preferences / appearance
Menu Help Bar
Channel Guide Help Bar
Select Menu > Settings >
Preferences > Appearance.
Press arrow buttons to move
through Appearance options.
Press
OK to make a selection.
Transparency
Transparent–Current program
shows through on-screen
windows.
Opaque–On-screen windows
are opaque.
Color Schemes Change menu
and font colors.
Font Size Type size in onscreen windows.
Font Weight Bold or plain.
GUI Type New or old.
Help Bar (at left) When “on,”
keys to shortcut buttons appear
below Channel Guide and
menus.
Thumbnail Video When “on,” a
small video image of your current
program shows while you view
the Channel Guide.
With your selections made,
arrow to Apply and press OK.
Page 50

9. Set Preferences
Appearance
Sample color schemes
SSeett--ttoopp bbooxx SSeettuupp
Set-top box Setup controls advanced settings for your set-top box.
menu / settings / preferences / set−top box setup
Select Menu > Settings >
Preferences > Set-top box
Setup.
Use the arrows to select the
settings you want:
Digital Audio Output—Off or
on
Component Output—SD
(standard definition) or HD (high
definition)
Output Aspect Ratio—AUTO
(automatic), 4:3, or 16:9
With your selections made,
arrow to Apply and press OK.
46
Page 51

Technical Support
If you have questions or problems with your Wightman TV service,
please contact Wightman Telecom.
Customer Care
1-888-477-2177 (Toll-Free)
519-327-8012 (Local)
Customer Care Call Centre Hours: Mon-Fri 8am-7pm, Saturday 10am-4pm
Cliord Oce Hours: Mon-Fri 9am-4:30pm
Technical Support (Located in Hanover)
1-877-327-4440 (Toll-Free)
519-327-4440 (Local)
Technical Support Hours: 24 hours a day, 7 days a week
Email
support@wightman.ca
Fax
1-888-241-1100 (Toll-Free)
519-327-8010 (Local)
Page 52

IInnddeexx
Account menu, 29
account services, setup, 29
actor, search for VOD movie by, 17
advanced search for VOD movie, 17
alerts, activate, 12
appearance, choosing, 45
audio format, 44
Autologin, 40
Autotune, 5
billing activity, 41
category, search for VOD movie by, 16
change password, 30
user’s, 38
channel
changing, 2
locks, 36
view information for, 2
channel guide
quick search, 6
search for programs in, 6, 7
viewing, 4
channel settings, selecting, 44
director, search for VOD movie by, 17
DVR
manage, 25
priorities, 26
settings, 25
exit fs|cdn, 9
Favorite channels, setting, 43, 3
font, setting, 45
genre
search for program by, 6
search for VOD movie by, 16
guide. See channel guide.
Help Bar, 4
turning on, 45
language
for broadcasts, 44
for menus and window
language for menus, 44
lock user
out of a program, 36
out of TV, 35
out of TV indefinitely, 36
locks, program/channel, 35
log in, 1
log out, 9
Main Menu, accessing, 10
manager user actions, 38
manual recording, 21
menu
accessing, 10
choosing appearance, 45
My DVR, 19
My Services. See services.
On Screen Call Display, 28
paid programming, 13
parental control, 35
password
change, 30
changing user’s, 38
default, 1
Pay per Block, 14
Pay per View, 13
PIN
activating, 31
protection, setting, 32
purchase, setting, 31
rating, setting, 32
using for Pay per Block, 14
using for Pay per View, 13
plot, view for a VOD movie, 15
PPB, 14
PPV, 13
preferences, setting, 42
programs
quick search, 6
search for, 6
purchase PIN, 31
s, 44
Page 53

Index
purchase subscription packages, 37
quick search, 6
rating PIN, setting, 32
ratings
assign level to user, 34
definitions, 34
search for VOD movie by, 16
setting a PIN for, 32
recorded programs
recording a program, 19
remove, 24
resume, 24
viewing, 22
recording
a program once, 19
default settings, 25
manual, 21
priorities, 26
series episodes, 20
remote control, iii
rent a VOD movie, 15
search
advanced, for VOD movie, 17
for programs, 6
for VOD movie, 15, 16
series
interrupt, 24
recording, 20
services
activate alerts, 12
on screen call display, 28
Settings menu, 42
set-top box
exiting, 9
setup, 46
validate, 1
spend limit, 34
startup, 1
stop a VOD movie, 18
subscribe, assign privilege to user, 34
subscriber details, 40
subscription packages, 37
subscriptions
purchase, 37
view purchased, 37
technical support, 47
television. See TV.
thumbnail, turning on, 45
title
search for program by, 6
search for VOD movie by, 17
trailer, view for a VOD movie, 15
TV
basic controls, 2
user
actions, manage, 38
create new, 33
modify settings for, 38
set program/channel locks for, 36
Video on Demand. See VOD movie.
VOD movie
advanced search for, 17
pausing, 18
quick search for, 15
resuming, 18
rewinding, 18
search for by actor, 17
search for by category, 15
search for by director, 17
search for by genre, 16
search for by title, 17
starting, 18
stopping, 18
weather, 11
welcome screen, 1
 Loading...