

THE ULTIMATE
WIGGLY GUIDE
--- Getting Started & Troubleshooting ---
WELCOME TO THE
URBALIVE
WORM
COMPOSTER
WORM COMPOSTING AT IT’S VERY BEST
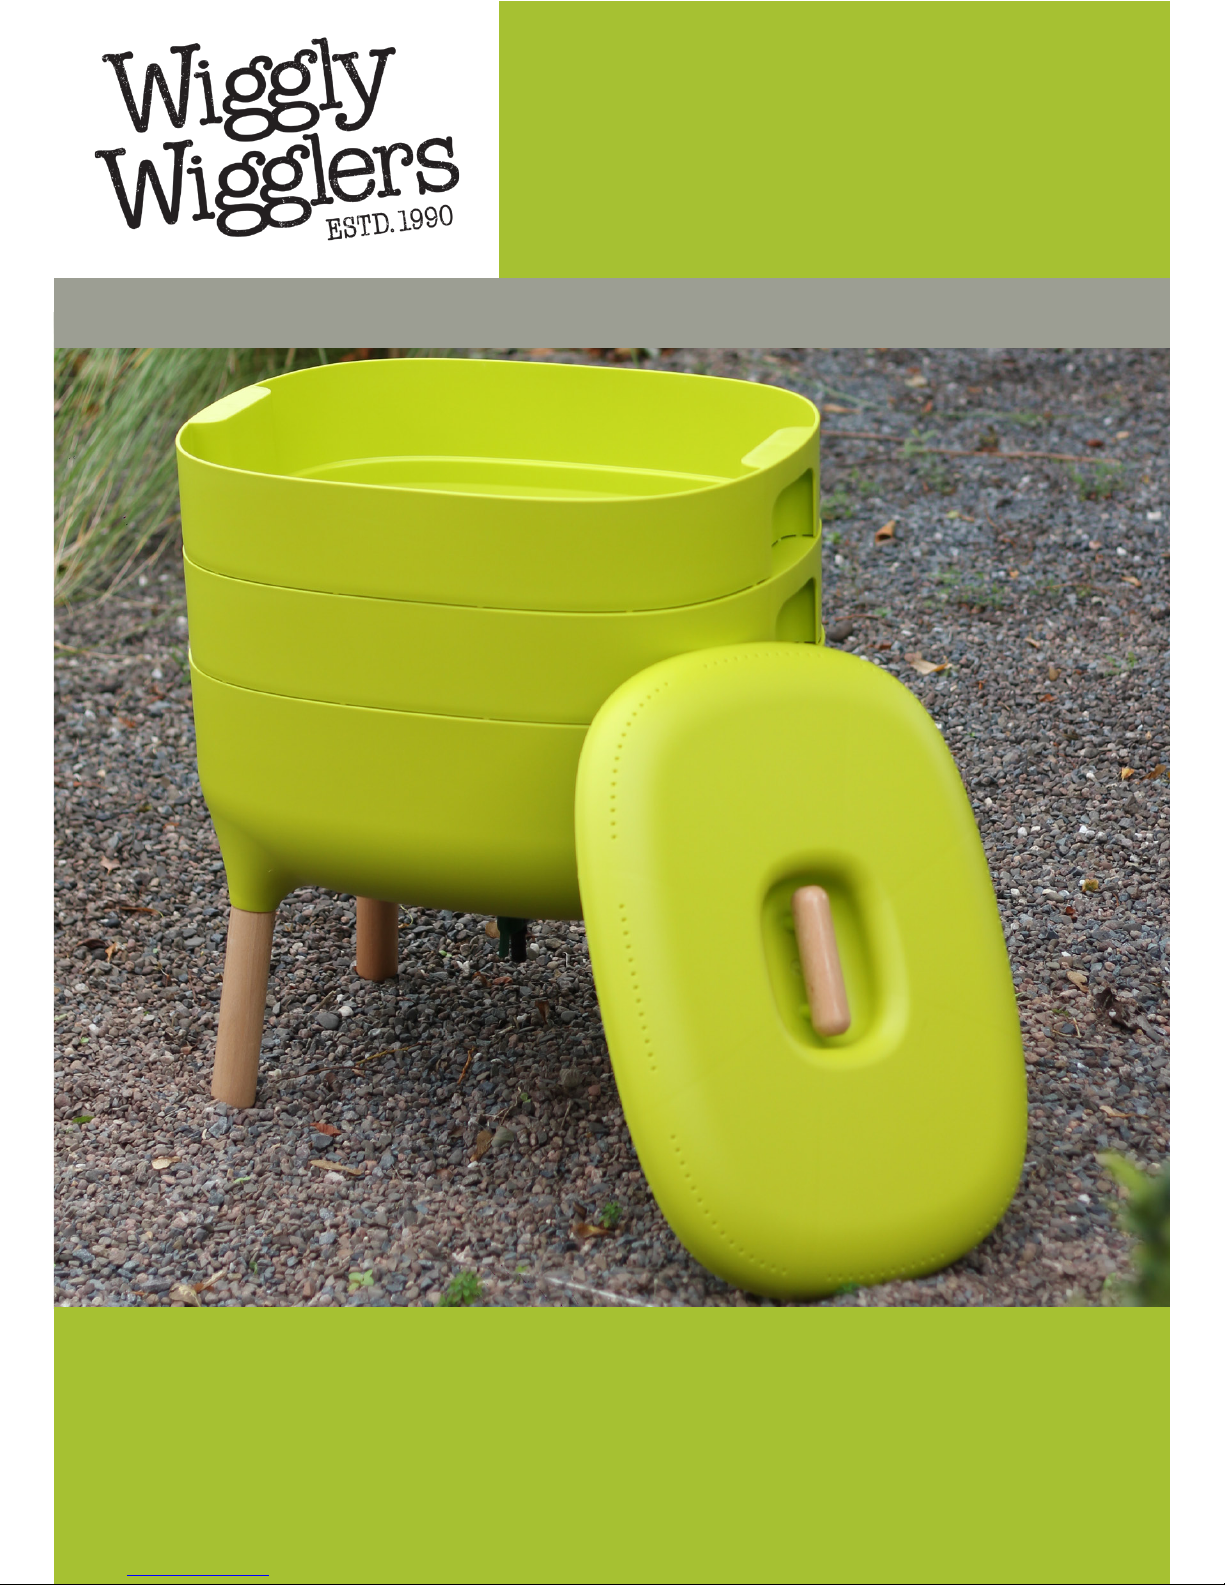
Wiggly Wigglers Urbalive
is a worm-assisted composting
system which converts food waste
from your kitchen and garden into
a rich, dark growing medium and
liquid feed. It is simple to operate (the
worms do all the hard work!) and, if
properly maintained, will repay your
investment many times over.
Besides helping yourself you will, of
course, also be helping the
environment by reducing the volume
of food waste being added to the
nation’s landfill rubbish tips. Food
waste in such tips is simply left to rot
away: releasing methane, one of the
‘greenhouse’ gases, into the
atmosphere as it does so.
Urbalive consists of two trays - with
an option to add extra if you have lots
of waste. The bottom tray, with the
solid base and tap, is the
Collector Tray or Sump. Worm Tea
drains through the upper trays down
into the Collector where it can be
tapped and used as a liquid fertiliser.
The worms are started off in the
bottom working Tray by putting them
into the Bedding Block provided.
They then eat their way up, wriggling
into the Tray above when they detect
the food scraps you have left there.
By the time the top Working Tray is
full, most of the worms will have left
the original Working Tray. This tray
your urbalive
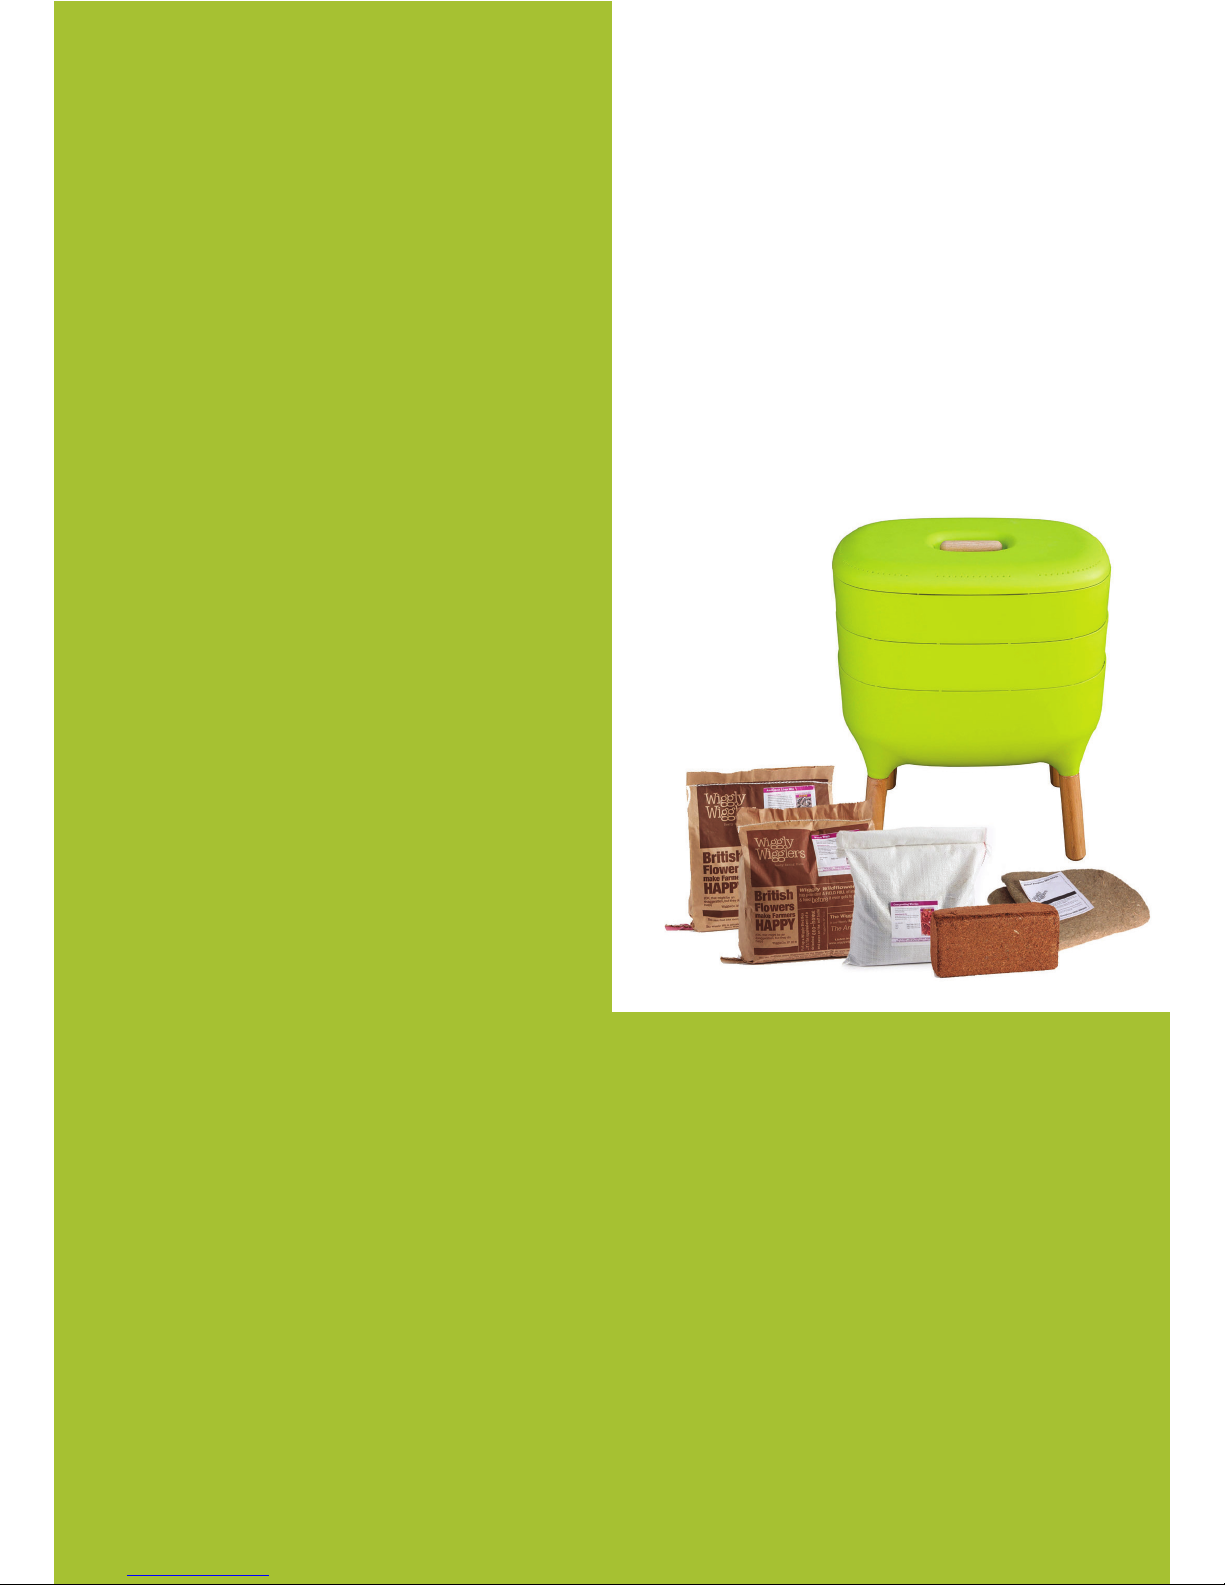
KIT CONTains
1 Lid (PART A)
2 Working Trays (PART B1 & B2)
1 Collector Tray/Sump (PART C)
1 Plastic Tap
4 Legs (and screws)
A Moisture Mat
500g Composting Worms
1 Bedding Block
2kg Worm Treat
2kg Lime Mix
PLUS Gloves,
a handy scoop
and this guide!
will be filled with compost. You can
now remove this bottom Working
Tray, harvest the compost and return
it to the top of the stack as a new
Working Tray.
This cycle is never ending: you will
always have a convenient, natural
and efficient way to dispose of your
food waste, while at the same time
ensuring constant supplies of your
own top quality compost and liquid
plant feed.
ASSEMBLING
YOUR URBALIVE
Fix the four legs to the collector
tray (PART C) using the
screws provided - make sure
they are firmly in place.
Screw the tap into the collector tray
(PART C)
Attach the grate onto the top of the
collector tray (PART C)
Slot PART B2, B1 and the lid
(PART A) into place.
1
2
3
4
COMPOSTING
WORMS
Our composting worms are a mixture
of species (mainly reds and dendras)
selected for their composting ability.
Composting worms are native to the
UK and in the wild can be found on the
surface of the ground, generally in leaf
litter. They are not the same as
earthworms, which are deep
burrowing creatures and not suitable
for composting systems. Composting
worms will eat all manner of
household waste from fruit and
vegetable peelings, cardboard, paper,
bread, pasta right through to the
contents of your vacuum cleaner.

The Top Ten Tips for
great Worm Composting
The following tips represent the result of a great deal of experience in worm-assisted composting.
Please read them carefully and try to follow their advice. If you follow them properly you will have
a contented stock of worms which, in due course, will produce for you a steady stream of rich
dark compost.
Don’t try to rush things: it will take several months for the worms to produce their first Tray full of
compost. Initially, when adding waste, do not add large amounts at one time, little bits of food at
frequent intervals is the best recipe. However, worms can eat half their own weight in food every
day so, as the kit becomes established and the worms start breeding, add more waste each day.
Do not pile up fresh waste to a depth greater than 50–100mm (2–4”) at any one time. You can add
waste as long as you can see worms working in the top layer of waste, just under the surface within a few centimetres of the moisture mat.
At least 25% of what you add to the wormery needs to be dry material. Cardboard, egg boxes and
shredded paper are great - these will help keep the wormery aerated.
If your worms get behind in their feeding and uneaten waste begins to build up in the bin, stop
feeding for a few days. (Remember, though, worms do not have teeth and therefore the waste
must start to go slightly mouldy before the worms can eat it.) Start feeding again when the worms
are working in the top layer. Large quantities of uncomposted waste will start to putrefy. Putrefied
waste will upset the worms and its smell will upset you, but not the rats and flies it will attract!
Try many different foods. Just like us, worms enjoy variation in their meals. If certain types of
food prove unpopular and don’t get eaten, try to avoid including them in future feedings. Once
every few weeks add in a handful of Wiggly Wigglers Worm Treat (a special mixture of all the
things that worms love best), it will give your composting a boost.
Grass clippings and leaves cannot be composted in your kit. Grass will heat up in the bin and
release ammonia before the worms can act on it, both conditions will harm your worms.
Worms are not happy in conditions that are acidic (pH less than 6). If you have a pH meter check
the contents regularly, pH7 is ideal, pH6 to 8 is acceptable. To prevent acidity avoid adding any
very acidic wastes such as citric fruits or onions. Sprinkle a handful of Wiggly Wigglers Lime
Mix onto the surface of the waste every couple of weeks, this will counteract the natural acidity of
much kitchen waste.
Worms like dark moist conditions so keeping a moisture mat on top of the freshest waste will
ensure that your worm composter doesn’t start to dry out. Don’t allow the contents to become
waterlogged (see Tip 9) as this will lead to a lack of air in the bin. The contents of your Urbalive
should be as moist as a freshly wrung sponge.
It will take a couple of months for the liquid feed to build up but then you should drain the sump
in the Collector Tray frequently, depending on how much liquid you are getting, by opening the
Tap. The liquid that you drain off makes an excellent houseplant and tomato feed. Dilute it with
ten parts water before use.
If too much water gets into your kit and the contents become waterlogged you will need to drain
off the excess liquid from the sump. Then try to dry out the contents by mixing in some shredded
newspaper or cardboard (glossy magazine style paper is bad, toilet roll centres are good). As you
mix in the paper try to ‘fluff up’ the contents to aerate the system. If your kit is producing a lot of
liquid fertiliser, or rain water gets into the kit, it can be a good idea to leave the tap open with a
container underneath. (Rainwater may occasionally get in as the lid is not airtight).
Avoid all oral contact with the bin’s contents and remember to wash your hands afterwards.
1
2
3
4
5
6
7
8
9
10

EXTRA BITS AND BOBS!
Worm Composting isn’t a full time job, generally once the Composter has been
established and the worms are comfortable you won’t need to do much, just
keep feeding them. Here are a couple more things you’ll need.
WORM TREAT
Worm Treat is our natural
accelerator for any worm-assisted
composting system. It is a special
mixture of all the things that worms
love best. Mix a handful into your
composter every few weeks to give it
a boost. The pellets also soak up any
excess moisture in your composter and
swell up in volume. Worm Treat helps
keep your system in peak form!
ANTI ACID LIME MIX
Add a handful of our Lime Mix neutraliser to your wormery every couple
weeks to prevent acid build up. Lime
Mix also helps prevent smells, flies and
white worms. Because it contains grit it
also aids the worm’s digestion, and its
drying properties make it good for wet
or under-performing kits. Good
composting conditions are achieved
when the contents are close to pH7.
IF YOU NEED MORE SUPPLIES, MOISTURE MATS
WORM TREAT AND LIME MIX ARE AVAILABLE TO ORDER
INDIVIDUALLY AT WIGGLYWIGGLERS.CO.UK
MOISTURE MATS
Worms work best in dark, moist conditions. Our breathable Moisture Mats
provide these conditions where they are most needed, on the surface of
your composter. They encourage the worms to work in the
freshest waste, thereby speeding up
composting and reducing odours.
Moisture Mats disintergrate over time
so these will need replacing every
few weeks. Our Moisture Mats for the
Urbalive are made from 600g/sq.m
hemp fibre matting.

PLEASE NOTE: If your kit contains live worms you will
need to get it set up within 24 hours. Choose a site for your
Wiggly Urbalive that is sheltered, preferably in a shed, utility room or greenhouse.
starting worm composting
with urbalive
THE COLLECTOR TRAY (c)
This tray acts as a sump. Excess liquid drains into
it from the working trays above. Do not put any
worms, compost or scraps in here! The cover in
the collector tray allows any worms that fall into
this tray to climb back up.
The bottom working tray (B2)
Half fill a bucket with warm water. Put your
Bedding Block into the water.
As the block soaks-up the water, begin to
break it up into an even mix. It should take an
hour or so. Squeeze out any excess moisture
when finished.
Evenly distribute half of the soaked bedding
into this tray - a couple of inches is plenty.
The left over soaked coir is a great potting base.
Empty your bag of worms onto the bedding.
Worms are light sensitive, so leave the lid off for
a couple of hours to encourage them to burrow
down into the bedding.
Once the worms have burrowed into the
bedding you’re ready to add your first waste.
Spread it evenly on top of the bedding: a few
handfuls is all you need this first time.
Cover the waste with your Moisture Mat. This
will be munched by your worms over time so be
sure to order a few spares.
1
2
3
4
5

PART B2
THe bottom
working tray
PART B1
THe TOP
working tray
PART C
THe SUMP/
COLLECTOR
T R AY
Slowly, over the next few weeks, add more waste (small amounts at a time) until
the tray is full. The key to worm composting is that you don’t need to wait until
the worms have eaten all the previous waste: as long as they are working just
below the surface they’re ready for you to add a little more.
THE TOP working tray (B1)
Place the Top Working Tray on top of the first Working Tray only when you are
sure its base will touch the material beneath. Always place your Moisture Mat
(and Lid) on top of the freshest waste. Ensure that the waste level touches the
base of the new Tray before fitting it—as the worms continuously reduce the
volume of the waste this level sinks all the time! Now you can
continue to add waste to the new Tray. Before adding any more waste
ensure that the worms are working just
below the surface of the
existing waste.
THe MOISTURE MAT

HARVESTING YOUR COMPOST
Gradually add waste until the top tray is completely full. This will take longer
than you think because every time you add waste and the worms process it - it
drastically reduces in volume. At this stage most of the worms will be in the Top
Tray - the Bottom Tray will contain fully worked waste, ie worm casts. Now is
the time to take out the Bottom Working Tray and harvest the rich casts. Once
you have emptied this Bottom Working Tray it goes back on the top of the pile
becoming the new Top Working Tray and you start adding scraps here to begin
the process all over again.
Note: When starting the a new Working Tray you don’t need to add further
bedding as you did when first setting up the kit. The worms will make their own
bedding as they progress up through the system.
It may take over 6 months for your system to become ready to harvest its first
compost. Thereafter you should be able to harvest new bottom trays full of
compost on a regular basis. Important: Add a handful of Lime Mix and Worm
Treat every couple of weeks with your kitchen scraps.
Worm Tea: You will produce an on-going supply of worm tea which is really rich
in nutrients. Dilute 1 part worm tea to 10 parts water and use on houseplants
and throughout your garden.

USING YOUR COMPOST
The compost is very rich in nutrients and organic matter and can be used as an
excellent medium to grow plants in. It is rich in soluble plant foods and its fine
crumbly texture will greatly improve soil structure. It is not necessary to sterilise
the compost before using it in the garden, its bacterial content comprises
beneficial species which will not harm your plants. It can be used in all the
situations where compost is normally used, for example when planting seeds or
shrubs; or as a top dressing for fast growing plants.
As a Top Dressing
House plants in pots eventually use
up the supply of fertilisers in their soil.
Top dressing with Worm Compost is
the ideal way to replenish the
nutrient levels. Scoop out the top 12mm
of compost from the pot and replace
with fresh Worm Compost, then gently
mix this in. The foodstuffs in the Worm
Compost will be carried down to the
roots by watering.
As a Compost
Worm Compost is an ideal base for
mixing fine composts. The mix of
products in your own compost ‘recipe’
is, up to you, but the following
proportions will give good results:
- For potting:
25% Organic Compost, 25% Coir,
25% Perlite, 25% Sand
- For seeds:
25% Organic Compost, 25% Perlite, 50% Coir
(Ground Bark or Coco Peat are suitable
alternatives to standard Moss Peat.)
As a Fertiliser
Worm Compost is much more than just
a simple fertiliser, it can be used to keep
favourite specimen plants in peak
condition. Used around the plant’s base
it will both feed the plant and help
retain moisture for the roots. When
planting out seedlings, beans etc
sprinkle a little along the bottom of the
trench to give them the best start in life.
As an Organic Soil Improver
Most soils can benefit from an increase
in organic matter and natural fertiliser.
To produce your own soil improver mix
5 litres of Worm Compost with the
contents of a 50 litre bag of finely
ground bark. Dig into the area of
garden to be treated, applying 2 litres
per square metre. For an acidic garden
bed (such as those containing
Rhododendron species) a low pH
material should be used instead of the
ground bark.

TROUBLEshooting guide
COULD my worms die?
Yes: Occasionally this can happen. It may be
because of excess moisture in the wormery.
Excess moisture by itself shouldn’t hurt earth
worms, but the problem may be lack of oxygen
related to high moisture levels. It may be because
of decaying food. Mouldy bio-waste in itself also
shouldn’t kill earthworms. But should you find
mouldy food leftovers in the wormery, remove
them. It may possibly be that the worms are
starving. Earthworms may starve and die after
only several weeks without a food supply. If you
managed to compost your worms, don’t panic.
Try again with a new hatch of earthworms!
I’m finding worms in the
COLLECTOR TRAY OR outside the
composter. What’s wrong?
The earthworms shouldn’t be crawling into the
collecting container on their own, just as they
shouldn’t be outside the wormery. If they do,
it means they don’t like something inside the
container. It could be excess food, so take some
away. It could be the lack of air. Check that the
moisture level in your wormery isn’t too high.
How do I handle fruit flies?
Fruit flies (together with other organisms) are a
part of vermicomposting to a lesser or greater
extent. We can avoid reproduction of fruit flies
in your wormery by covering the surface of the
compost with your Moisture Mat. You can cover
the newly added food a little or possibly cover the
surface with already processed compost.
You can also create one of the recommended
traps. For example, you can put a piece of banana
at the bottom of a jar, create a paper cone with
a tiny opening and place it point down into the
glass, sealing around the edges. Or mix 3
tablespoons of water, 1 tablespoon of vinegar, 4
drops of dishwashing liquid and a pinch of
baking yeast and place a container with this mix
near your wormery.
If the flies do hatch, they don’t get out and that
can be a success. Unfortunately, you may repeatedly introduce the flies into the composter with
fruit and vegetable peels containing fruit fly eggs.
What to do if my wormery
has an odour?
Properly maintained compost doesn’t have
an unpleasant odour. Should odours appear,
it’s most often because the earthworms can’t
manage to process all the bio waste, so lower
the amount. The unprocessed bio-waste also
causes high level of moisture of the
composted material that then decays and
smells. You can dry the contents of the
composter with pieces of shredded paper,
newspapers, cardboard or egg crates. The
cause of the odour can also be remnants of
stalk vegetables or potatoes. These should be
introduced to the composter only after several
months, when the earthworms are sufficiently
active for timely processing.
What to do when there is
mould in the compoST?
If the contents of the wormery decay or mould
appears, it means that the worms can’t
manage to process the waste fast enough.
Remove rotten or mouldy pieces from your
wormery, reduce the volume of kitchen
waste you put into the composter and only once
you see that the worms manage to process the
food you give them, begin gradually increasing
the volume of waste.
HOW do I decrease the
moisture level in the
wormery?
Higher moisture is good for the production of
worm tea, but an excess of anything is
damaging. You can reduce moisture by
adding materials that bind moisture, such as
paper towels, newspaper, egg crates and similar
dry material.

COMMON FAQ’S
Which worms are used
for composting?
Our composting worms are a mixture of species
(mainly reds and dendras) selected for their
composting ability. Available with or without
bedding. These types of worms are productive
at consuming organic leftovers. Common garden
earthworms don’t perform as well in the same
conditions.
How long does it take to
compost one full container?
Creating quality composts takes approximately
2-3 months. It mainly depends on the number of
earthworms and the quality of “food”.
Is the composting method
different at the beginning
from later on?
Yes, and it’s very important to remember this.
Give your worms enough time to settle and
reproduce, don’t swamp them with food from the
get go. You will know that the earthworms are
well adjusted when they begin to process the
food you give them more quickly and you will
also be able to feed them more often.
Should I rake through the
compost regularly?
Not at all. The nosy among you beware and also
make your children understand this - it’s not
useful to disturb the compost, particularly during
the initial breeding. Add the food to the top. This
prevents you from disturbing the worms
and disrupting their homes – they only lay eggs
in specific places. You can carefully rake the
compost if it appears too wet or lacking air.
Can I leave for a
longer holiday?
A holiday is no problem. The worms easily manage even a two-week fasting. However they can
survive without food upto four weeks.
What should I do if I have a
TRAY full?
Once you fill one tray and it looks like worms
soon will not have anything to eat, load the next
tray as well as at the start composting. Compost
from the bottom of the tray can then be used as
fertilizer or dry it for later.
How can I dilute and use
worm tea?
Worm tea is an excellentliquid fertilizer for herbs
and indoor plants as well as the garden.
It contains high amounts of nutrients and
enzymes that promote growth and help build
plant resistance against pests. You can collect
worm tea in a plastic or glass bottle. It’s ideal to
dilute it with 10 parts water. Use the
diluted worm tea for watering plants or spray it
on their foliage.
What should I do with excess
compost or worm tea?
Anyone who grows plants will appreciate
compost and worm tea. If you can’t find anyone
who could use it for gardening, use the compost
to fertilize trees, bushes or even planters in public
spaces. Likewise with the worm tea.

Wiggly Wigglers • Lower Blakemere Farm, Blakemere, Herefordshire HR2 9PX
www.wigglywigglers.co.uk
ANY MORE QUESTIONS?
If there are any other queries you have about your new Urbalive Wormery or Worm
Composting please don’t hesitate to give our Office Wigglets a call on 01981 500391,
drop us an email to wiggly@wigglywigglers.co.uk,
grab us on instant chat at www.wigglywigglers.co.uk
(open 10am-5pm mon-fri, leave us a message when closed)
or send us a message on Facebook at facebook.com/wigglywigglers!
COMMON FAQ’S CONTINUED
Where do I put my wormery? Indoors or outdoors? Which
temperatures are optimum for my worms? Composting with worms
operates year-around. You can place your wormery either indoors or outdoors. It is important to
always ensure that the earthworms have an optimal temperature of approximately 20 °C/ 68 °F as
well as a correct level of moisture in the substrate. During winter you shouldn’t leave your wormery
without insulation, so it doesn’t freeze through. In the summer it shouldn’t be exposed to direct
sunlight, to prevent water evaporation andoverheating. The temperature in your wormery should
not drop below 5 °C or exceed 25 °C.
What should and shouldn’t I put into my wormery? Your wormery
composter is particularly suitable for peelings and leftovers of fruit and vegetables, such as potato
peels, apple cores, green tops of vegetables, etc. Don’t forget tea-bags, as worms often reproduce
in them. Just be careful not to put in the plastic types (usually in pyramid shape sold with more
expensive teas). Coffee grounds and paper coffee filters are also suitable. So are left overs of
cooked vegetables, crushed egg shells, paper napkins, dampened cardboard, dry baked goods and
remainders of indoor and outdoor plants. Do not put intensely spicy foods into your wormery, such
as ginger or an excessive amount of citruses, as well as milk products, meat products, bones, oils,
lard and other fats.
WILL COMPOST WELL
Cooked Food Scraps, Tea Leaves, Coffee
Grounds and Vegetable Peelings
Dried & Crushed Egg Shells
(help worms digest)
Shredded & scrunched Paper or Cardboard
(helps stop the contents getting too wet)
Vacuum Cleaner Dust, Hair, Wool & Cotton
DO NOT COMPOST
Citric Fruits (causes acidic conditions)
Plant Seeds (not dead so not eaten by worms)
Diseased Plant Material (may upset worms)
Glossy Printed Paper (too many additives)
Grass Clippings and Leaves (heat up)
Glass, Plastic and Metal (not biodegradable)
Dog/Cat Droppings (carry human pathogens)
Anything in excess!
 Loading...