

Wifx Sarl LORIXONE User Manual
LORIX One User manual revision 1.4
EN
1
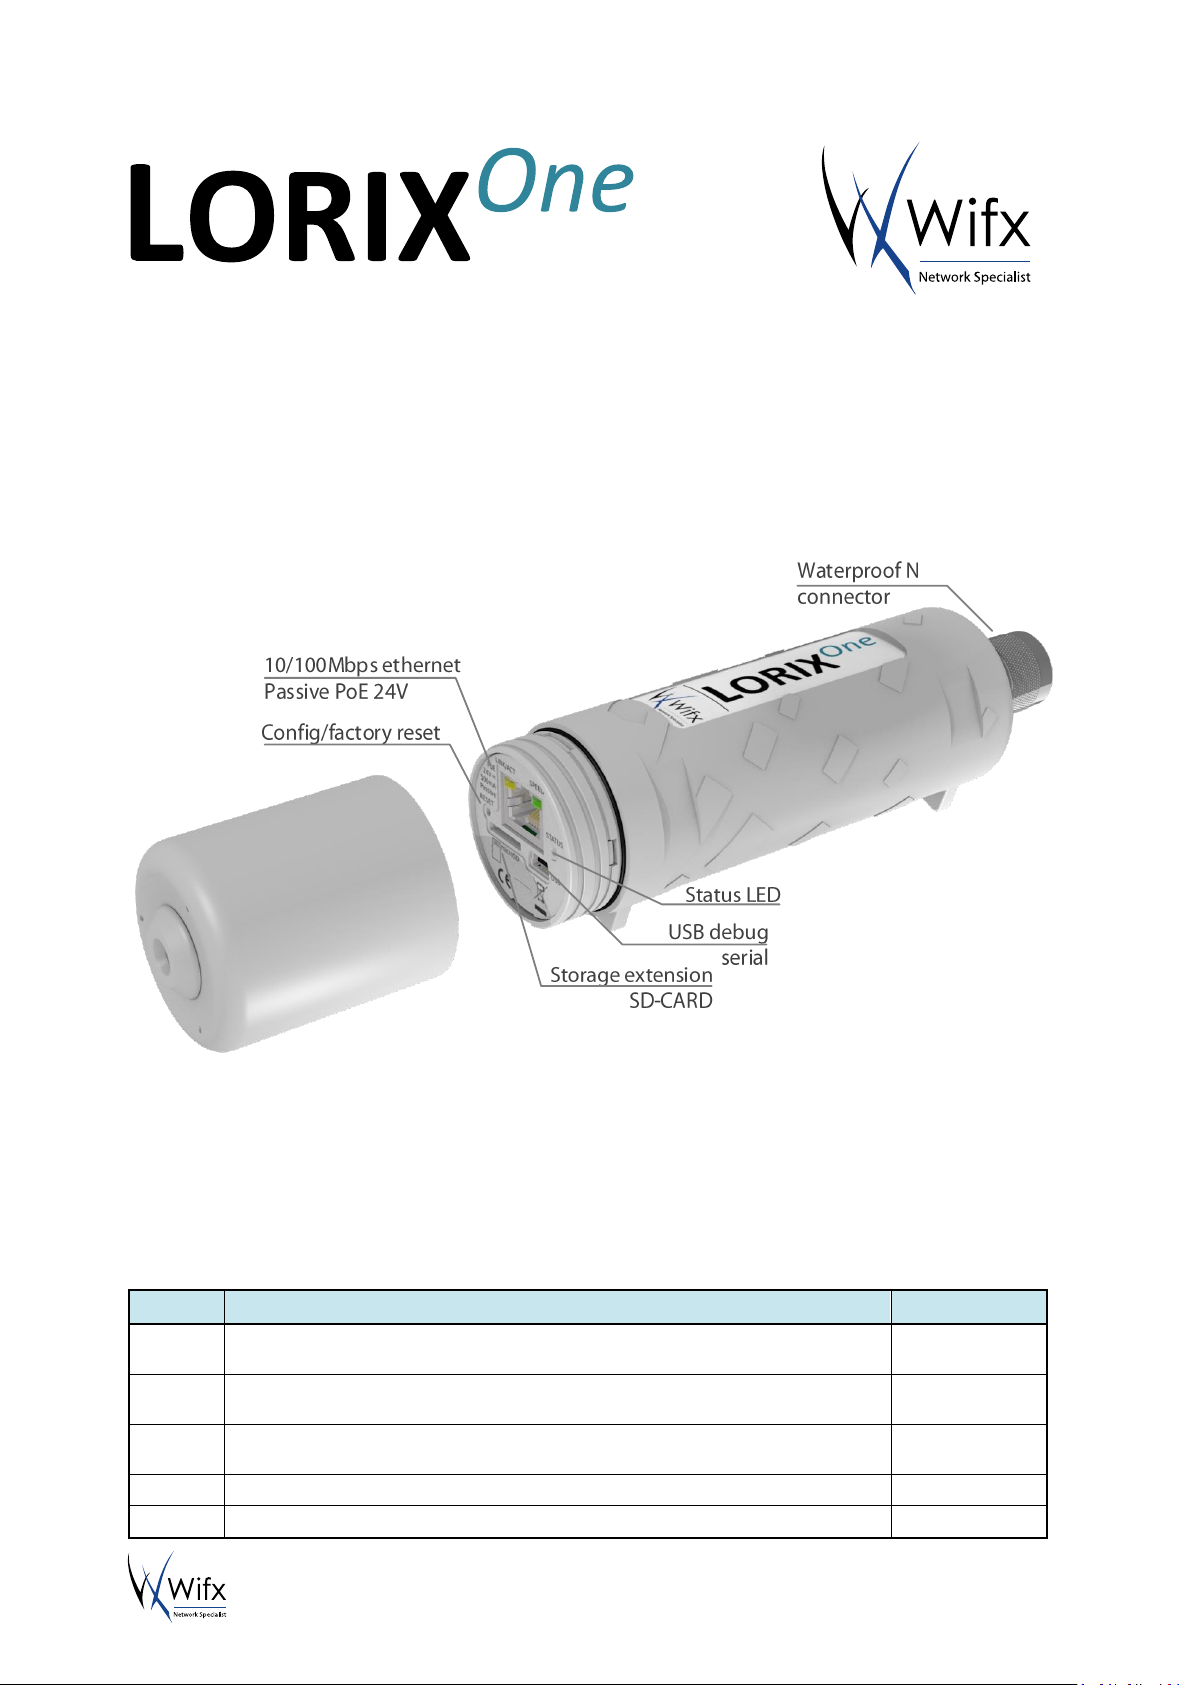
Low cost LoRa IP43/IP65 gateway
User manual
Versions:
Revision
Note
Date
1.0
Added TTN cloud application
Added system update
05/03/2017
1.1
Updated operating temperature and power supply following safety certification
requirements
07/30/2017
1.2
Added Kersing packet-forwarder and updated others packet-forwarders and
clouds-manager with manual forwarder option
21/04/2018
1.3
Added US version
08/05/2018
1.4
Updated FCC and IC legal texts and added installation description
06/07/2018

LORIX One User manual revision 1.4
EN
2
1 SUMMARY
1 Summary ................................................................................................................................................................. 2
2 Product Specifications ............................................................................................................................................. 4
3 Regulations .............................................................................................................................................................. 5
3.1 Version 868MHz band ...................................................................................................................................... 5
3.1.1 Europe / CE................................................................................................................................................ 5
3.2 Version 915MHz band ...................................................................................................................................... 6
3.2.1 USA / FCC .................................................................................................................................................. 6
3.2.2 Canada / IC ................................................................................................................................................ 6
4 General information ................................................................................................................................................ 8
4.1 Wiki ................................................................................................................................................................... 8
4.1.1 Update information .................................................................................................................................. 8
4.1.2 Troubleshooting ........................................................................................................................................ 8
4.1.3 Open source licenses................................................................................................................................. 8
4.2 Connectivity/Interface ...................................................................................................................................... 8
4.3 Start/Reset........................................................................................................................................................ 8
4.3.1 Procedures ................................................................................................................................................ 9
5 Ethernet/PoE ......................................................................................................................................................... 11
5.1 Power through passive PoE ............................................................................................................................ 11
6 Administration terminal access ............................................................................................................................. 12
6.1 USB ................................................................................................................................................................. 12
6.2 SSH .................................................................................................................................................................. 13
7 System access & configuration.............................................................................................................................. 14
7.1 Login ............................................................................................................................................................... 14
7.2 User/Password ............................................................................................................................................... 14
7.2.1 Define or change a password .................................................................................................................. 14
7.3 Root privileges ................................................................................................................................................ 14
7.3.1 Sudo command ....................................................................................................................................... 14
7.3.2 Su command ........................................................................................................................................... 15
7.4 Edit a file ......................................................................................................................................................... 15
7.4.1 Using Vi ................................................................................................................................................... 15
7.4.2 Using Nano .............................................................................................................................................. 16
7.5 Configuring LAN connection parameters ....................................................................................................... 16
7.5.1 Static configuration ................................................................................................................................. 16
7.5.2 DHCP configuration ................................................................................................................................. 17
7.5.3 Network restarting .................................................................................................................................. 17
7.6 System update ................................................................................................................................................ 17
7.6.1 Main server ............................................................................................................................................. 17
7.6.2 Manual update ........................................................................................................................................ 17
7.6.3 Package installation ................................................................................................................................ 18

LORIX One User manual revision 1.4
EN
3
7.7 Cloud applications .......................................................................................................................................... 19
7.7.1 LORIOT .................................................................................................................................................... 19
7.7.2 Semtech packet-forwarder ..................................................................................................................... 21
7.7.3 TTN Packet-forwarder ............................................................................................................................. 23
7.7.4 Kersing mp-packet-forwarder ................................................................................................................. 25
7.7.5 Wifx clouds-manager .............................................................................................................................. 27
7.8 LoRa concentrator utilities ............................................................................................................................. 28
7.8.1 Gateway ID update script ........................................................................................................................ 28
7.8.2 SX1301 reset pin control ......................................................................................................................... 28
7.8.3 Test binaries ............................................................................................................................................ 29
7.8.4 Util binaries ............................................................................................................................................. 29
8 SD Card .................................................................................................................................................................. 30
8.1.1 Insertion/Removal................................................................................................................................... 30
8.1.2 SD card detection .................................................................................................................................... 30
8.1.3 SD card (un)mounting ............................................................................................................................. 30
9 Electrical ................................................................................................................................................................ 31
9.1 Power consumption ....................................................................................................................................... 31
10 Mechanical ............................................................................................................................................................ 32
10.1 LORIX One ....................................................................................................................................................... 32
10.1.1 IP43 (Semi-waterproof) ........................................................................................................................... 32
10.1.2 IP65 (Waterproof) ................................................................................................................................... 32
10.2 Antenna 4dbi (868 & 915 versions) ................................................................................................................ 32
10.3 Antenna 2.15dbi (868 versions) ..................................................................................................................... 33
11 Setup guide ........................................................................................................................................................... 34
11.1 General recommendations ............................................................................................................................. 34
11.2 Standard mounting using a pole..................................................................................................................... 34
LORIX One User manual revision 1.4
EN
4
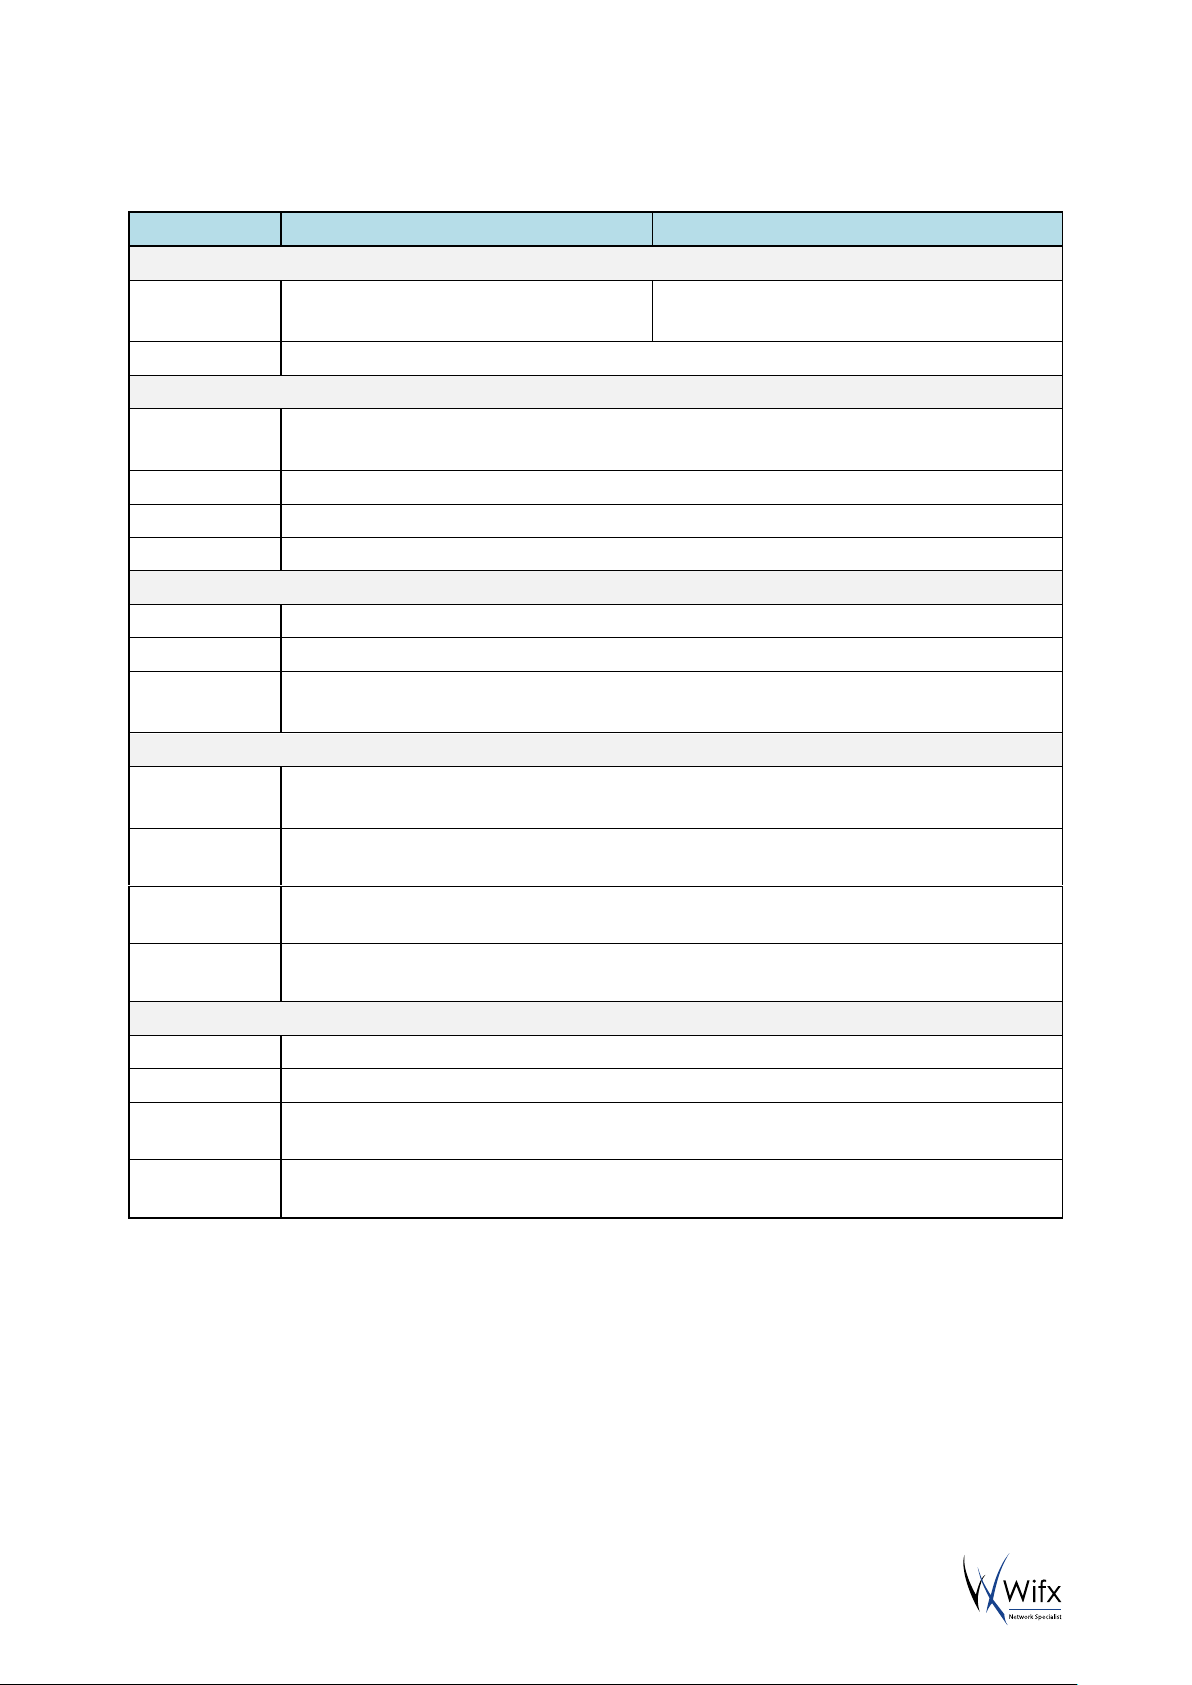
2 PRODUCT SPECIFICATIONS
Version
IP43 (Semi-waterproof)
IP64 (Waterproof)
Physical specifications
Dimensions
See 10.1.1 IP43 (Semi-waterproof)
See 10.1.2 IP65 (Waterproof)
Weight
< 230 grams
Connectors
1 RJ45 Ethernet 10/100Mbps port
Max 100m. length, use shielded cable for outdoor use
1 USB micro-B service connector (service access only)
1 N type RF antenna connector
1 microSD SD Memory Card Specification v2.0 slot
Power specifications
Input supply
24VDC 500mA (through passive PoE)
Power supply
See 5.1 Power through passive PoE
Consumption
See 9.1 Power consumption
Climatic specifications
Operating
temperature
-30°C to +55°C
-5°C to +40°C for the power supply (S-)HNP12-240L6, indoor use only
Storage
temperature
-20°C to +70°C
Operating
humidity
10% to 90% RH Non-condensing
Storage
humidity
5% to 90% RH Non-condensing
System
CPU
ARM® Cortex™-A5 @ 600MHz
RAM
128 MBytes DDR2 @ 200MHz
Internal
memory
256 MBytes NAND FLASH with 4bit hardware ECC
External
memory
microSD card slot, SDHC compatible, can be used as boot source
TABLE 1 PRODUCT SPECIFICATIONS
LORIX One User manual revision 1.4
EN
5
3 REGULATIONS
3.1 VERSION 868MHZ BAND
3.1.1 EUROPE / CE
The LORIX One (IP43 & IP65) 868MHz version complies with requirements listed in article 3 of the RED 2014/53/EU
Directive :
Certification compliance
Radio & EMC
RED 2014/53/EU (European Radio Equipment Directive)
ETSI EN 300 220-2
EN 61000-6-1:2007
IEC 61000-6-1:2005 (ed2.0)
ETSI EN 301 489-3 V1.6.1:2013
Human safety
EN 62209-2
IEC/EN 62479-1
Electrical safety
EN 60950
TABLE 2: CERTIFICATION COMPLIANCE VERSION 868MHZ FOR EUROPE
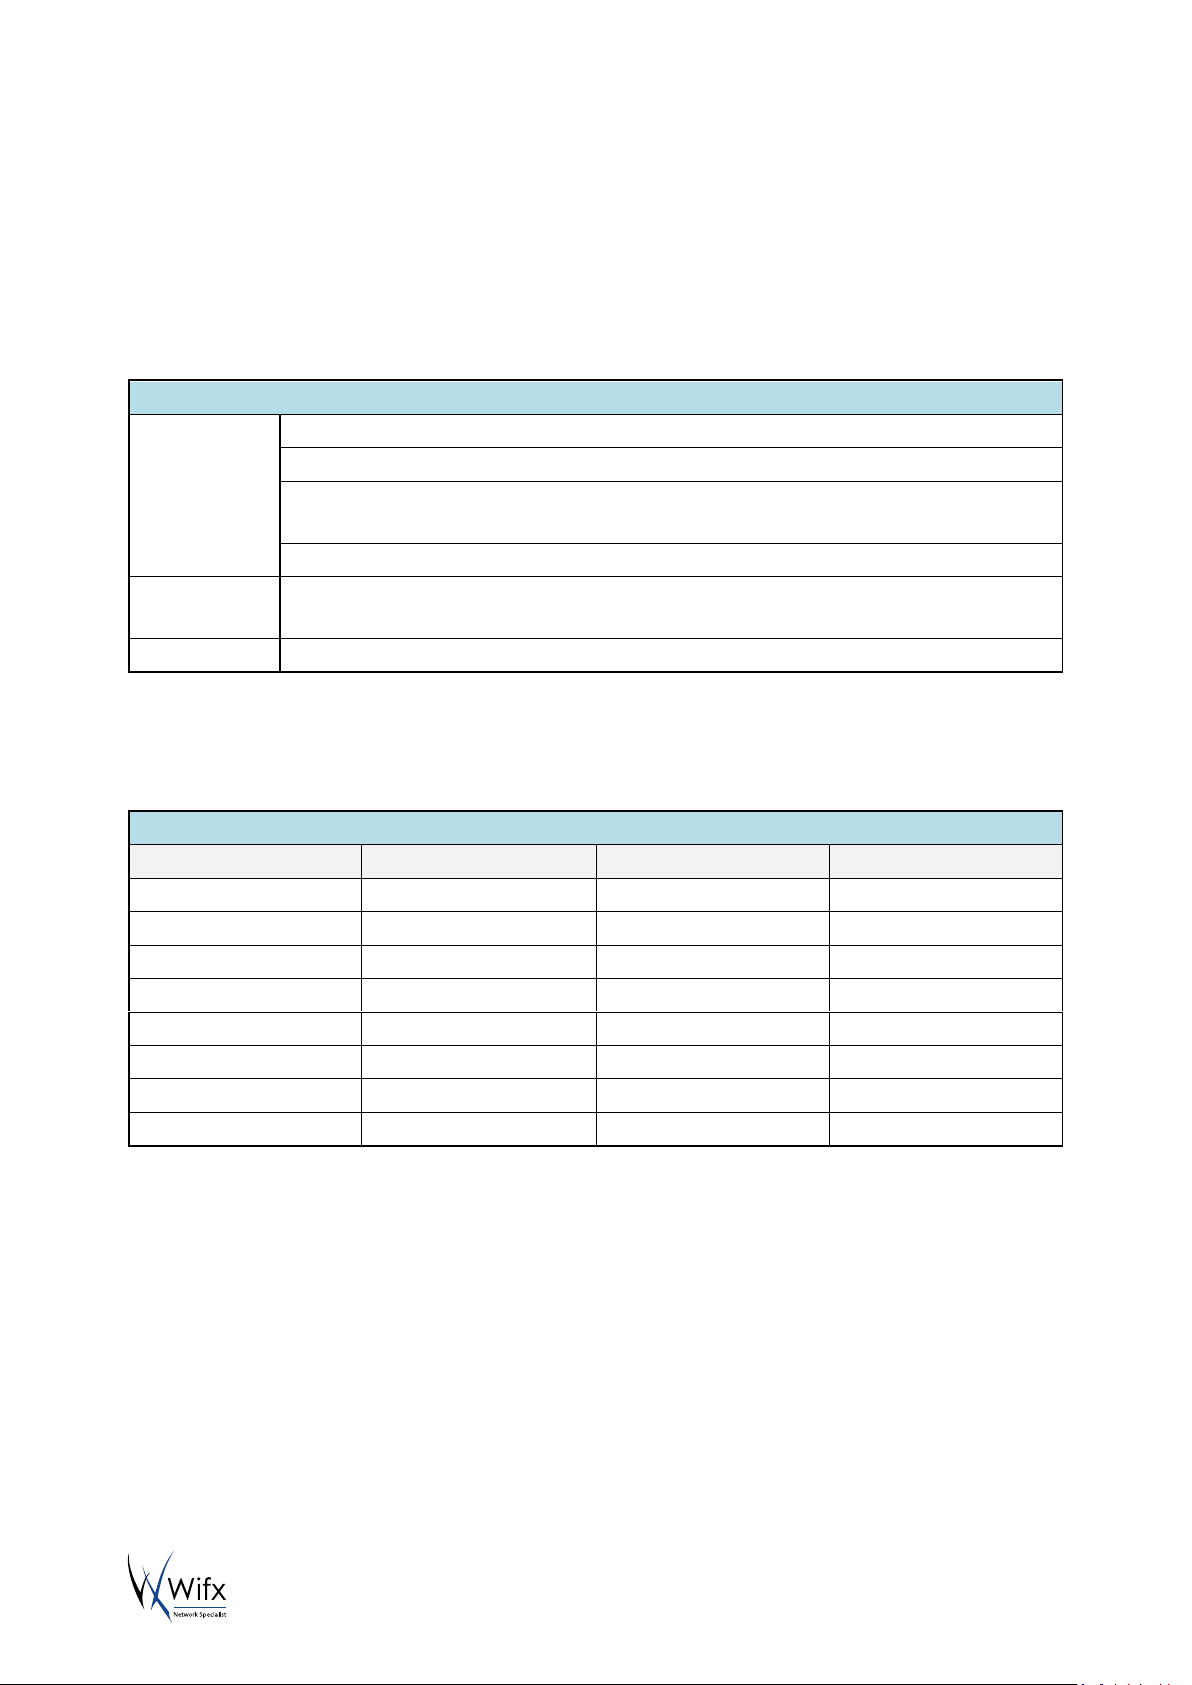
For use in Europe, the LORIX One must comply with the ERC 70-3 requirements regarding duty cycle and maximum
EIRP. These parameters are summarized in the following table:
Duty cycle and maximum EIRP
ERC 70-3 Band
Frequency (MHz)
Power
Duty cycle
h1.3
863 – 865
14dBm ERP
0.1%
h1.3
865 – 868
14dBm ERP
1%
h1.4
868 – 868.6
14dBm ERP
1%
h1.5
868.7 – 869.2
14dBm ERP
0.1%
h1.6
869.4 – 869.65
27dBm ERP
10%
h1.7
869.7 – 870
14dBm ERP
1%
h2
870 – 873
14dBm ERP
1%
h2.1
870 – 873
14dBm ERP
1%
TABLE 3: DUTY CYCLES AND MAXIMUM EIRP VERSION 868MHZ FOR EUROPE
If the antenna is changed, the output power must be adjusted to take into account the antenna gain to avoid
exceeding the values defined by the ERC 70-3 regulation.
Warning: some countries in Europe may have a specific frequency range, a maximum EIRP and duty cycle regulation.
Please check the local regulations before installing and using the LORIX One 868MHz version.
For countries outside Europe, please check that the frequency range, the maximum allowed EIRP and duty cycle are
authorized.
LORIX One User manual revision 1.4
EN
6
3.2 VERSION 915MHZ BAND
The LORIX One (IP43 & IP65) 915MHz version complies with both FCC and IC regulation:
Certification compliance
CFR 47 FCC Part 15
FCC 47 CFR Part 15 : 2014 - Part 15- Radio frequency devices
RSS 247
RSS-Gen – Issue 5, Avril 2018 – General requirements and Information for the Certification
of radio Apparatus
RSS-247 Issue 2, February 2017 – Digital Transmission Systems (DTSS), Frequency Hopping
Systems (FHSS) and License-Exempt Local Area Network (LE-LAN) Devices
TABLE 4: CERTIFICATION COMPLIANCE VERSION 915MHZ FOR US/CANADA
The associated FCC and IC identifiers of the LORIX One 915MHz version are:
FCC ID : 2APAZ-LORIXONE
IC : 23715-LORIXONE
Model : LORIX One
Some conditions must be met to maintain the FCC and IC compliance of the devices in the USA and Canada. These
conditions are detailed in the following paragraphs. For other countries, please check the specific regulations
regarding maximum allowed EIRP and duty cycle.
3.2.1 USA / FCC
This device complies with Part 15 of the FCC Rules. Operation is subject to the following two conditions: (1) this
device may not cause harmful interference, and (2) this device must accept any interference received, including
interference that may cause undesired operation.
Any changes or modifications not expressly approved by the party responsible for compliance could void the user's
authority to operate the equipment.
This equipment has been tested and found to comply with the limits for a Class A digital device, pursuant to part 15
of the FCC Rules. These limits are designed to provide reasonable protection against harmful interference when the
equipment is operated in a commercial environment. This equipment generates, uses, and can radiate radio
frequency energy and, if not installed and used in accordance with the instruction manual, may cause harmful
interference to radio communications. Operation of this equipment in a residential area is likely to cause harmful
interference in which case the user will be required to correct the interference at personal expense.
This device must be professionally installed.
Also, some specific recommendations for exposure to magnetic fields must be followed: This equipment complies
with FCC’s radiation exposure limits set forth for an uncontrolled environment under the following conditions:
1. This equipment should be installed and operated such that a minimum separation distance of 20 cm is
maintained between the radiator (antenna) and user’s/nearby person’s body at all times.
2. This transmitter must not be co-located or operating in conjunction with any other antenna or transmitter.
3.2.2 CANADA / IC
This device complies with Industry Canada’s license-exempt RSS standards. Operation is subject to the following two
conditions:
1. This device may not cause harmful interference, and
2. This device must accept any interference received, including interference that may cause undesired
operation of the device.
Le présent appareil est conforme aux CNR d'Industrie Canada applicables aux appareils radio exempts de licence.
L'exploitation est autorisée aux deux conditions suivantes :

LORIX One User manual revision 1.4
EN
7
1. L’appareil ne doit pas produire de brouillage;
2. l'utilisateur de l'appareil doit accepter tout brouillage radioélectrique subi, même si le brouillage est
susceptible d'en compromettre le fonctionnement.
Under Industry Canada regulations, this radio transmitter may only operate using an antenna of a type and maximum
(or lesser) gain approved for the transmitter by Industry Canada. To reduce potential radio interference to other
users, that antenna type and its gain should be so chosen that the equivalent isotropically radiated power (EIRP) is
not more than that necessary for successful communication.
This radio transmitter has been approved by Industry Canada to operate with the antenna types listed as accessories
with the maximum permissible gain and required antenna impedance for each antenna type indicated. Antenna
types not included in this list, having a gain greater than the maximum gain indicated for that type, are strictly
prohibited for use with the device.
This equipment should be installed and operated such that a minimum separation distance of 20 cm is maintained
between the radiator (antenna) and user’s/nearby person’s body at all times.
LORIX One User manual revision 1.4
EN
8
4 GENERAL INFORMATION
4.1 WIKI
The LORIX One wiki is accessible at www.lorixone.io/wiki and contains information about technical use of the
product. It contains information such as explanations on how to use the toolchain to create custom binaries or to
flash the internal NAND memory.
4.1.1 UPDATE INFORMATION
The modifications made between each new release of the Yocto Linux are described under the Wiki changelog page
http://lorixone.io/wiki/Changelog
4.1.2 TROUBLESHOOTING
Frequent encountered problems are summarized under the Wiki troubleshooting page, with suggested solutions:
http://lorixone.io/wiki/Troubleshooting
4.1.3 OPEN SOURCE LICENSES
All the licenses of the open source software used or available in the packages repository of the LORIX One are
available at the following address: https://lorixone.io/yocto/licenses/2.1.2
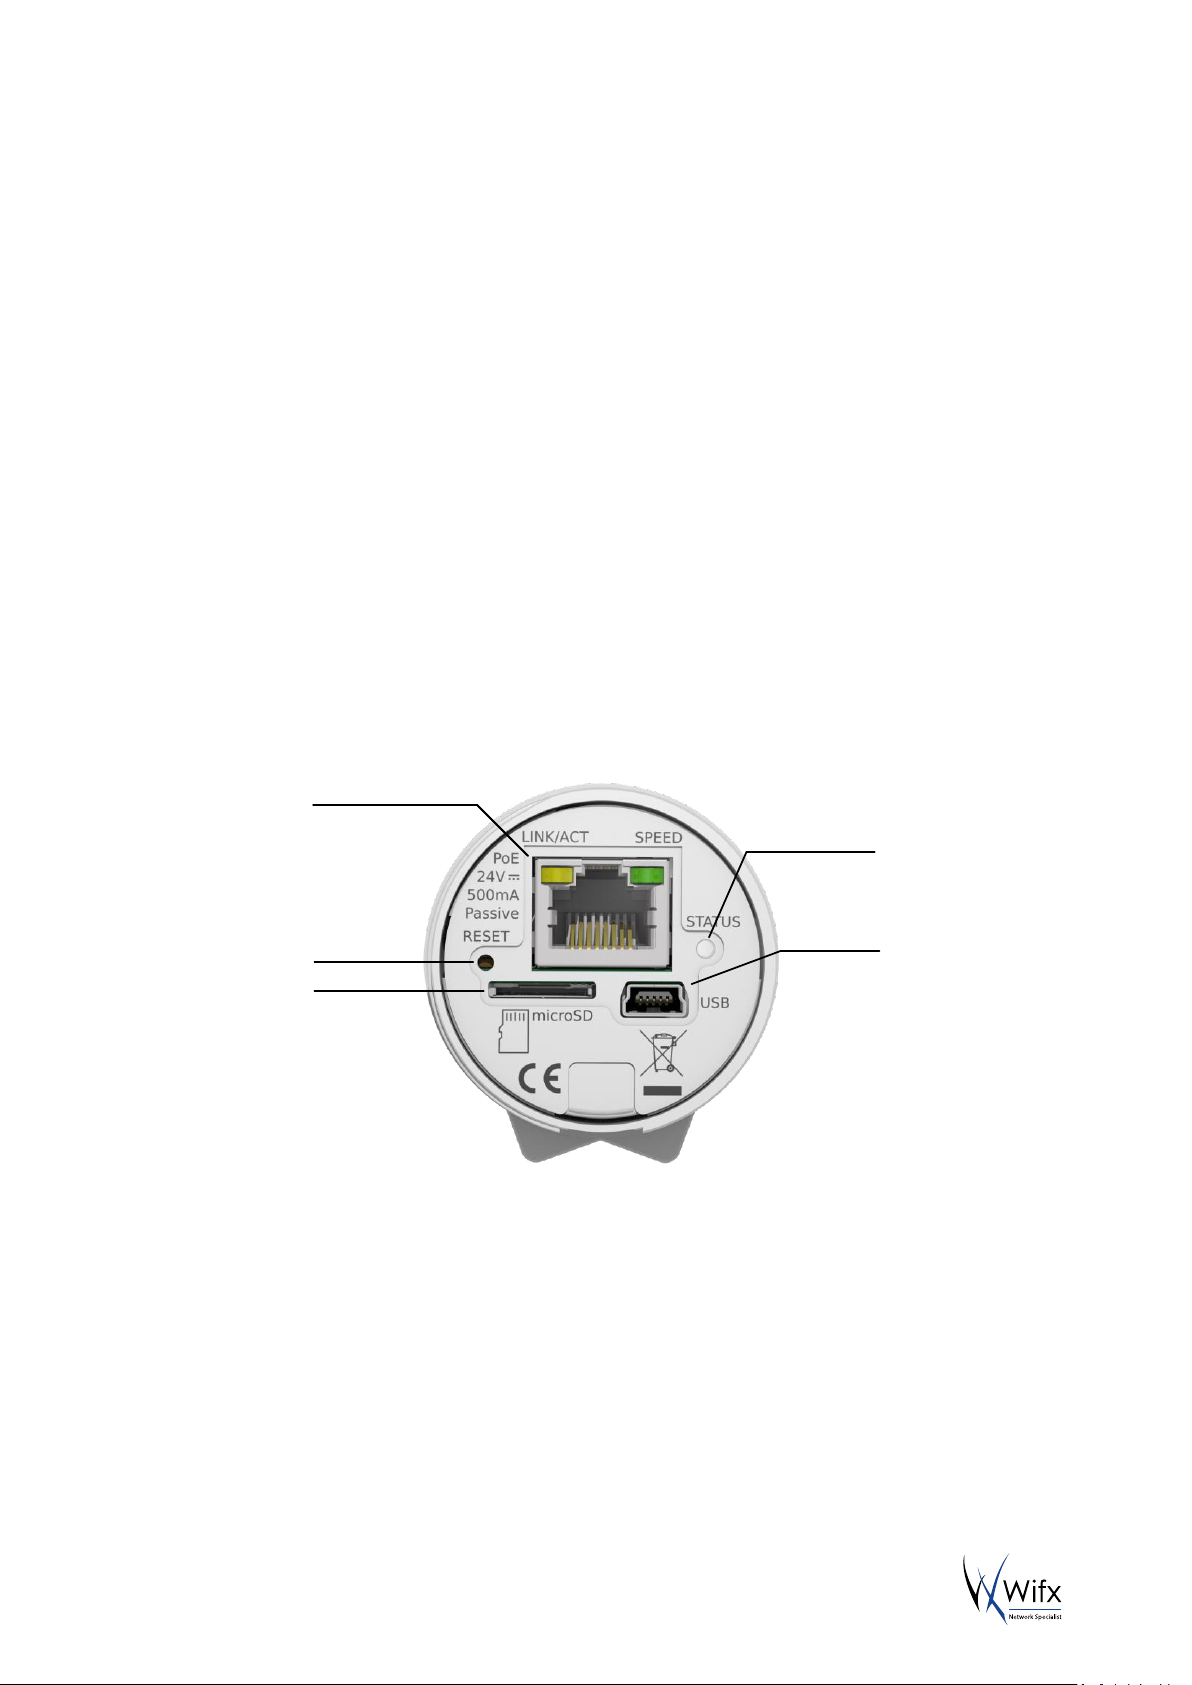
4.2 CONNECTIVITY/INTERFACE
Ethernet connector
PoE injection
Reset button
microSD
slot
Status
LED
USB service
connector
4.3 START/RESET
The gateway automatically boots when connected to a power supply through passive PoE on the Ethernet cable.
After start-up, the status LED should blink briefly and turn off. Once the Linux OS starts, the status LED will start
blinking in “heartbeat” mode.
The reset button can be used to reset the gateway, to reset it close to its original factory settings, or to enter in
programming mode. For a simple reset, shortly press the reset button with a thin tool such as a paper clip. Upon
release, the status LED will briefly flash and then stop to signal the reset action.
LORIX One User manual revision 1.4
EN
9
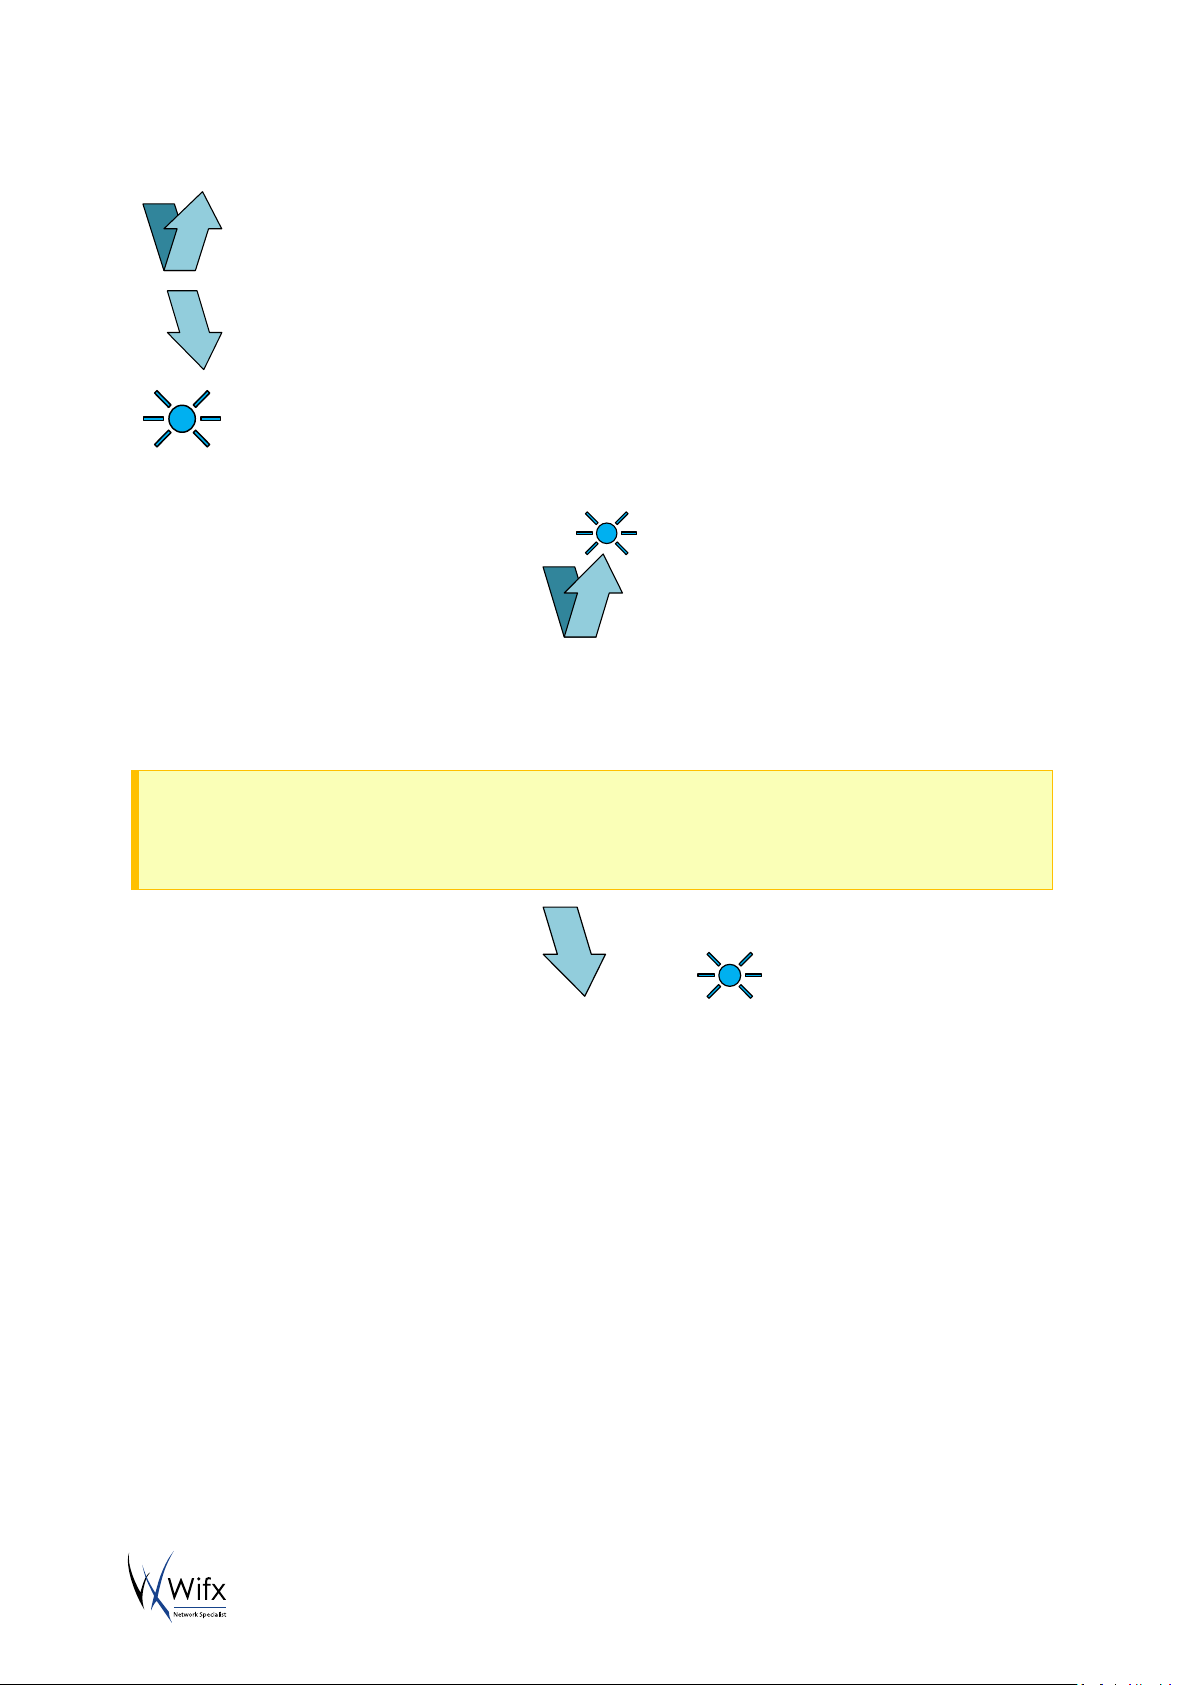
4.3.1 PROCEDURES
Short-press
Press briefly, for less than 1 second. The blue LED will briefly blink upon release
Long-press
Press and hold for several seconds. The blue LED will briefly blink after the delay specified below
Status LED
A short flash of the blue LED
Normal reset procedure
1. Short-press
2. The status LED will flash upon
release and the gateway will
reboot
Factory reset procedure
The factory reset procedure can be used to reset the initial default configuration and thus restore the device to
its original settings. This procedure is useful to solve a network misconfiguration or to recover a forgotten
password.
Scope of the factory reset
The factory reset does not reset the device to its original factory settings. It does not perform a complete
restoration and some issues cannot be solved. A complete factory reset can be done following the procedure
described on the NAND Programming page of the wiki.
1. Wait at least 1 second after
another reset pressure
2. Long-press for at least 10 seconds
3. After the LED starts blinking,
release the reset button
4. The gateway will boot in factory
reset mode. When Linux has
started, a script will copy the
default files
> 10sec
Programming mode procedure
This procedure is used to enter in programming mode. It enables the possibility to reprogram the gateway using
the Atmel SAM-BA programming tool through the USB port as summarized on the NAND Programming page of
the wiki.

LORIX One User manual revision 1.4
EN
10
1. Remove the microSD card from
the device
2. Wait at least 1 second for
another reset pressure
3. Perform 2 short presses with less
than 1 second between each
press
4. Perform a third long press for
more than 3 seconds (but less
than 5 seconds)
< 1sec < 1sec
> 3sec
LORIX One User manual revision 1.4
EN
11
5 ETHERNET/POE
Connector details:
RJ45 Pin
number
Wire color
Function
1
Green
TX+
2
Green/white
TX- 3
Orange
RX+ 4
Blue
VPOE1
Voltage 1 for PoE powering (must be connected with pin 5)
5
Blue/white
VPOE1
Voltage 1 for PoE powering (must be connected with pin 4)
6
Orange/white
RX- 7
Brown
VPOE2
Voltage 2 for PoE powering (must be connected with pin 8)
8
Brown/white
VPOE2
Voltage 2 for PoE powering (must be connected with pin 7)
TABLE 5 ETHERNET/POE CONNECTION
The yellow LED shows the LINK and the ACTIVITY on the Ethernet connection:
OFF No link
ON Link
Blink Link and activity
The green LED shows the actual SPEED of the Ethernet connection:
OFF 10Base-T
ON 100Base-TX
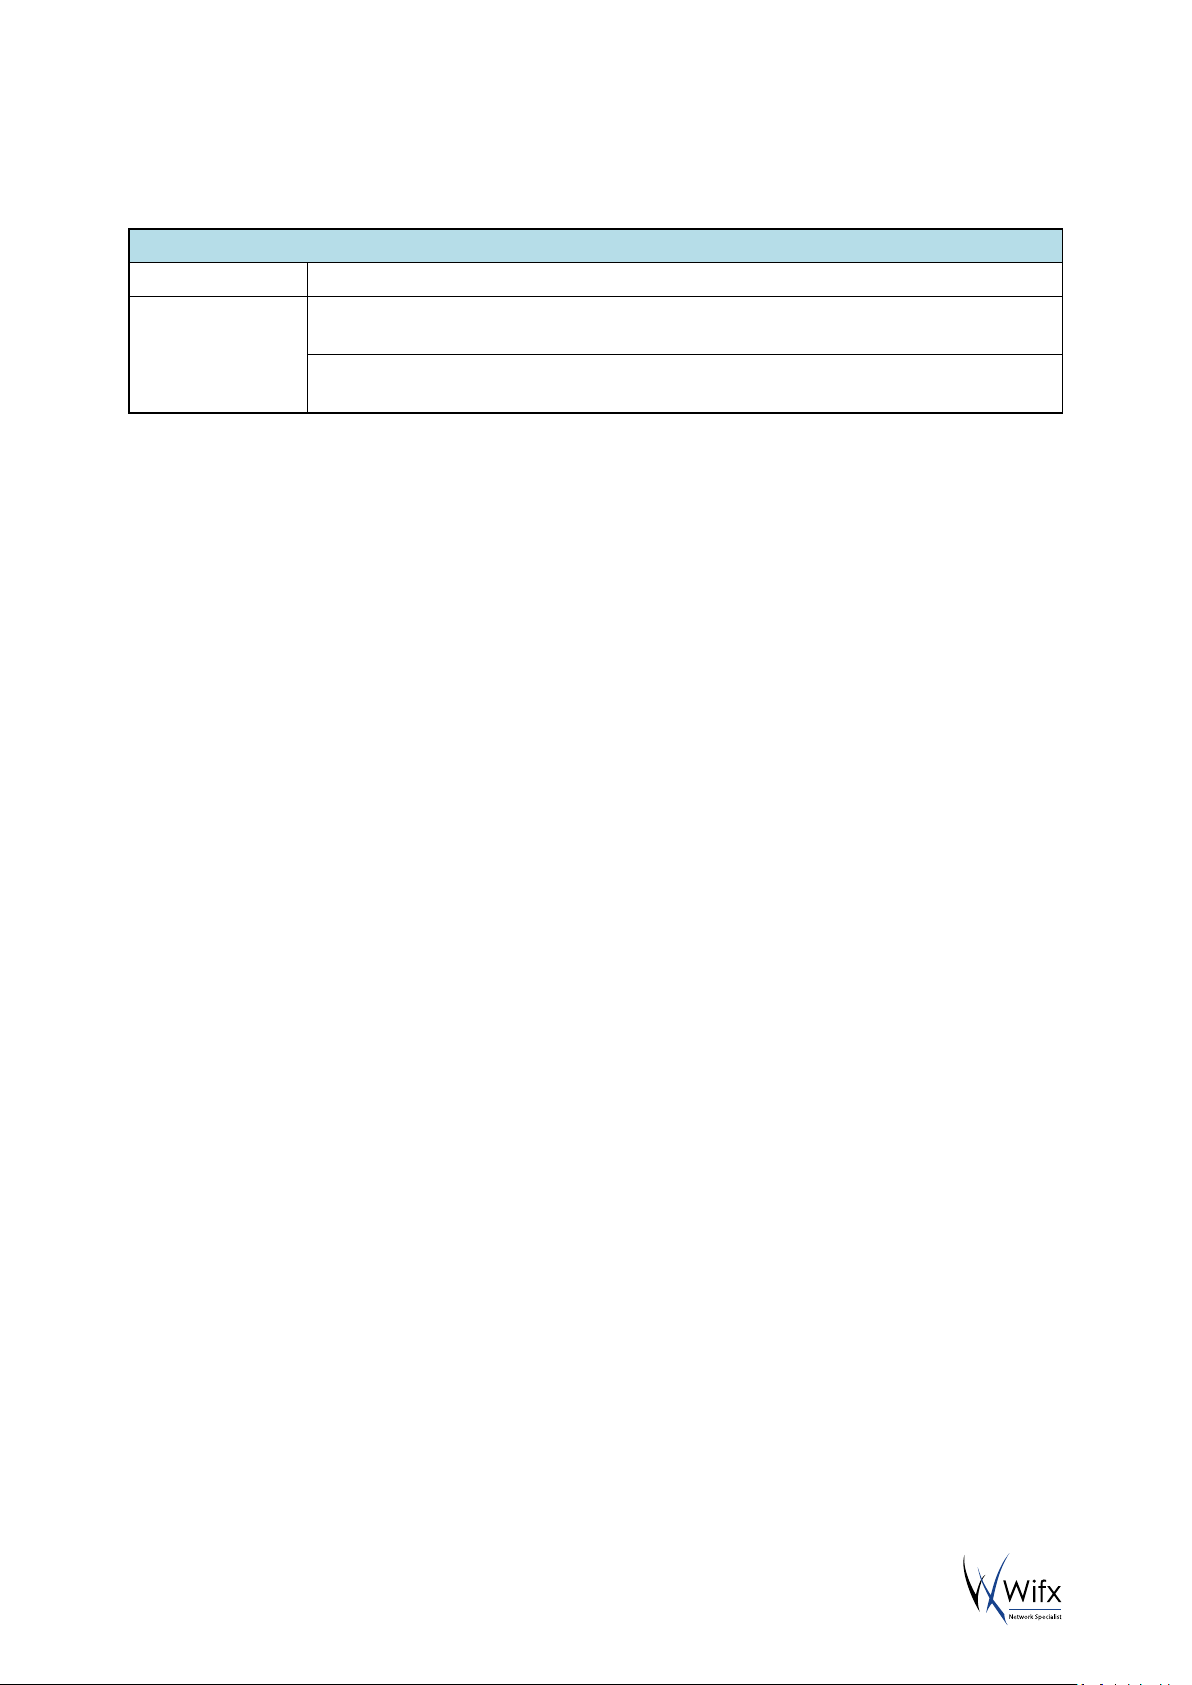
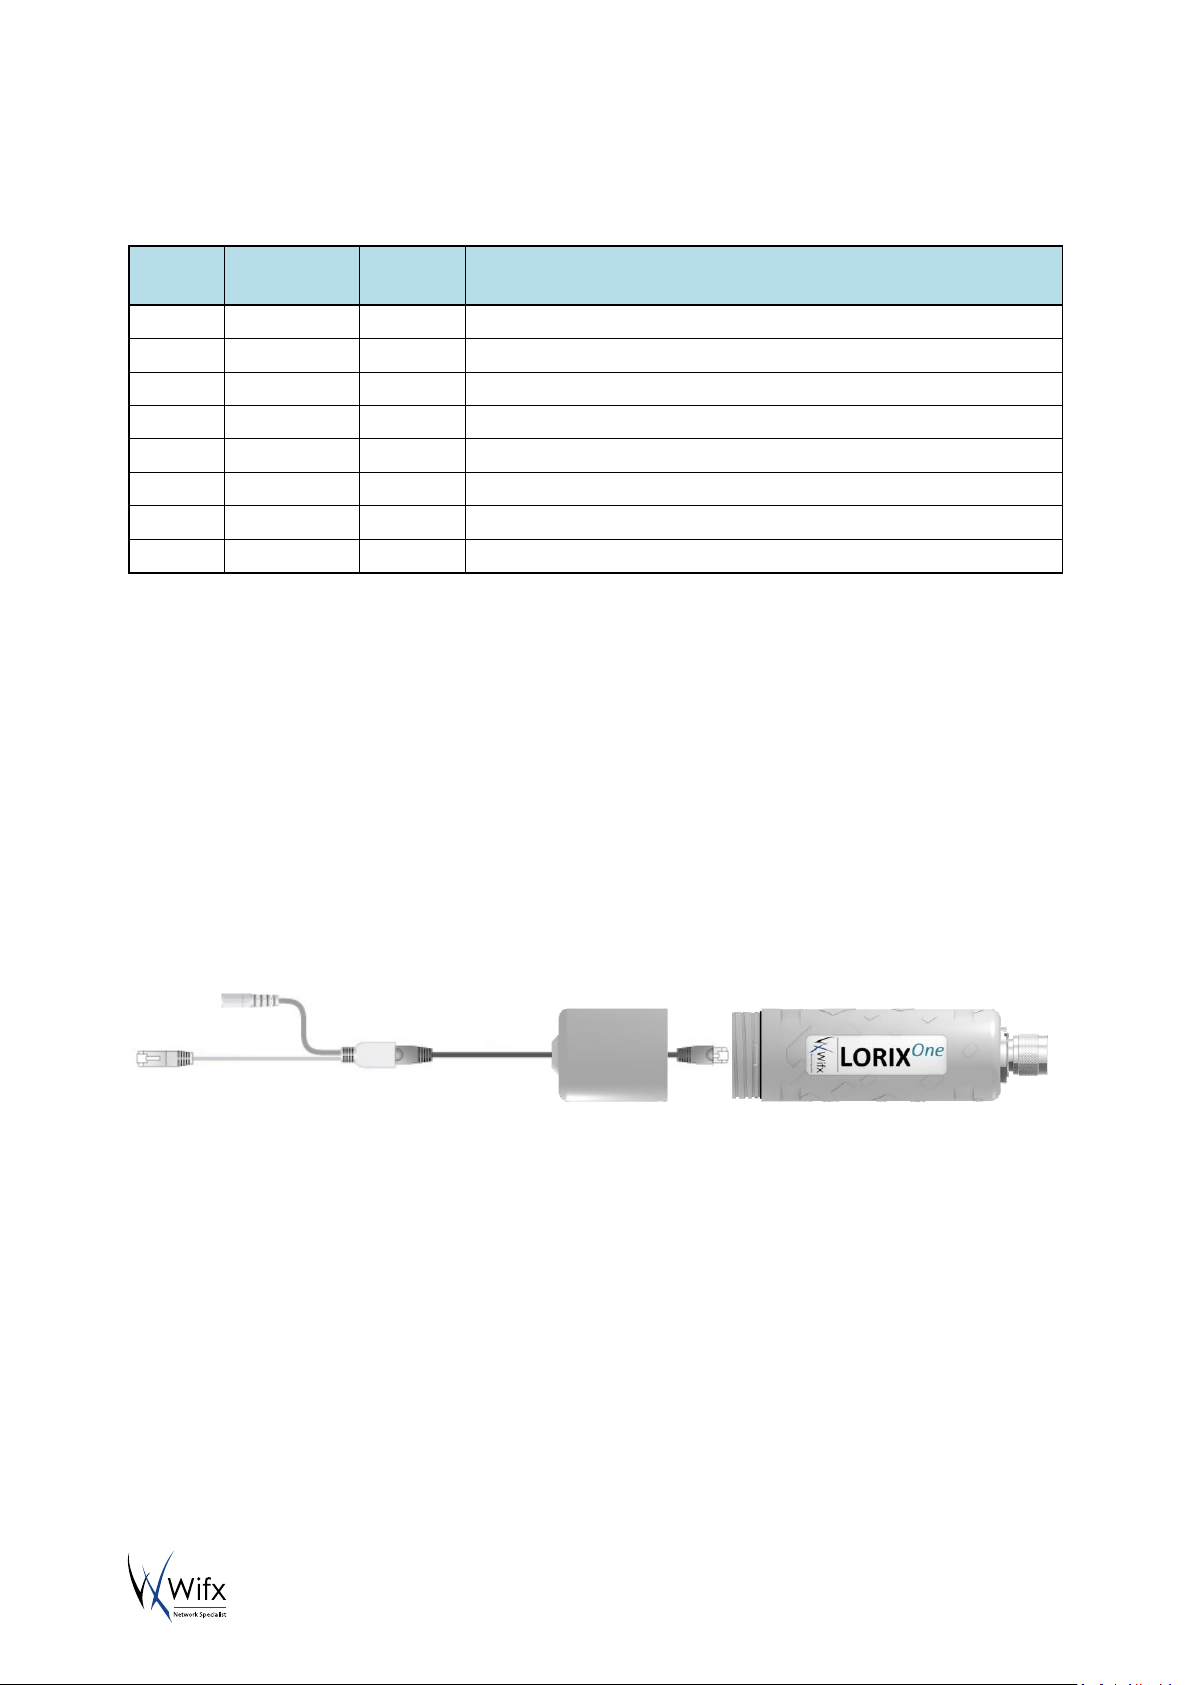
5.1 POWER THROUGH PASSIVE POE
The LORIX One gateway is exclusively powered through passive PoE using the Ethernet connector. The power is
injected through a PoE injector as shown below:
DATA + POWER
DATA
POWER
V
POE1
and V
POE2
(in Table 5) represent both power lines of the gateway. Power must be injected in the power input
connector using the switching power supply provided with the LORIX One only:
Reference HNP12-240L6
Output voltage 24VDC
Output courant 500mA
LORIX One User manual revision 1.4
EN
12
6 ADMINISTRATION TERMINAL ACCESS
The embedded Linux can be accessed either through the USB connector or through SSH with a working Ethernet
connection.
6.1 USB
The gateway has a USB micro-B type connector which provides virtual COM port. Accessing the gateway this way
allows you to debug and configure the software. This is the only way to access the terminal when the network is not
accessible (without SSH access).
USB Connection consideration
Please note that the gateway cannot be powered through the USB port and needs to be powered with the passive
PoE through the Ethernet connector.
The USB connection should exclusively be used for administration/configuration and should not be left connected
during normal use. The IPxx level is also not guaranteed during USB service connector use.
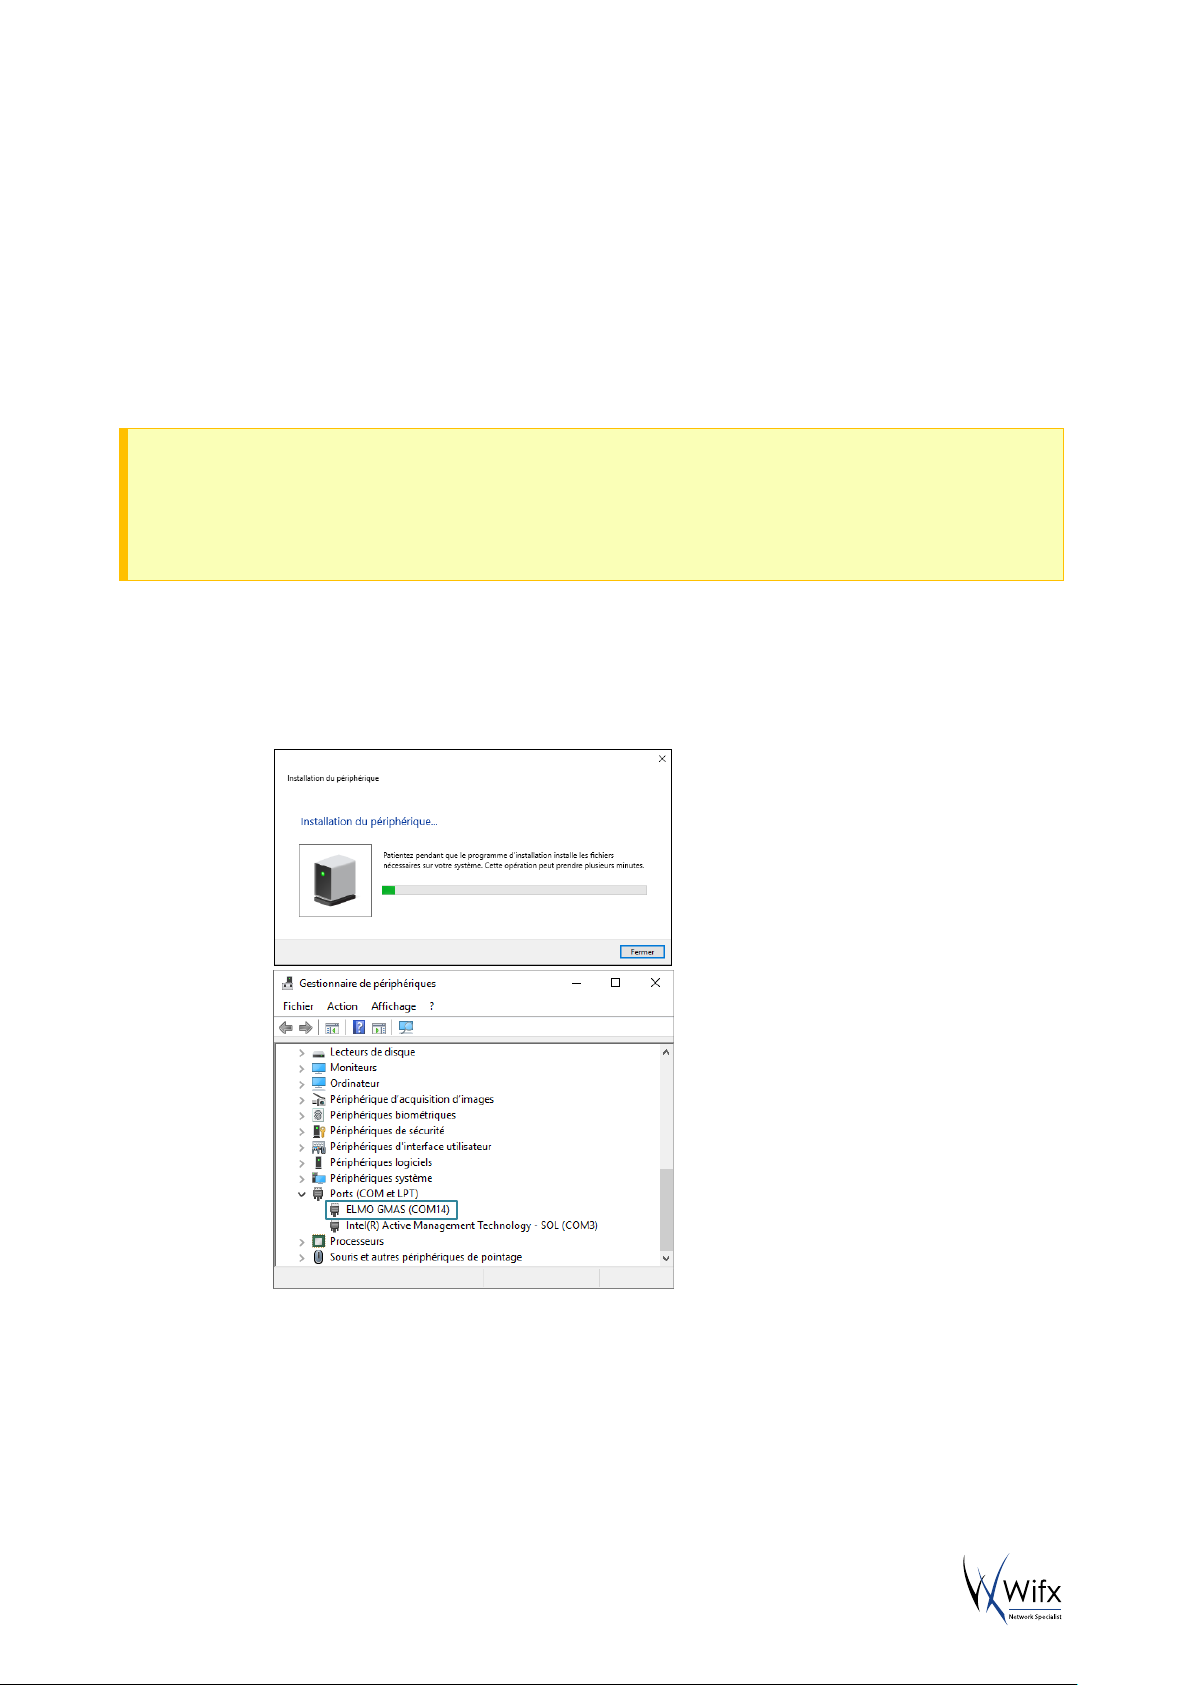
To access the gateway through USB:
1. Power up the gateway with passive PoE through the Ethernet connector
2. Connect a PC to the gateway with a A mini-B cable
3. The virtual COM port is automatically detected by the PC
a. On Windows a new virtual COM port will appear in the device manager under the name ELMO
GMAS (COMxx)
b. On Linux a new virtual COM port will appear in the folder /dev/ttyACMxx
4. A terminal program like PuTTY or minicom can be used with the following parameters:
baudrate 115200
data bits 8
stop bits 1
parity none
flow control none
 Loading...