

WIFO WRG400 User Manual
INTRODUCTION
CONTENTS IN THE BOX EASY STEPS TO GET READY
Thank you for choosing the RemoFinger G - the most convenient and
intuitive way to control apps in the mobile device.
This Quick Start Guide is to give you an overview of the RemoFinger
G and how to get you running with it.
FEATURES
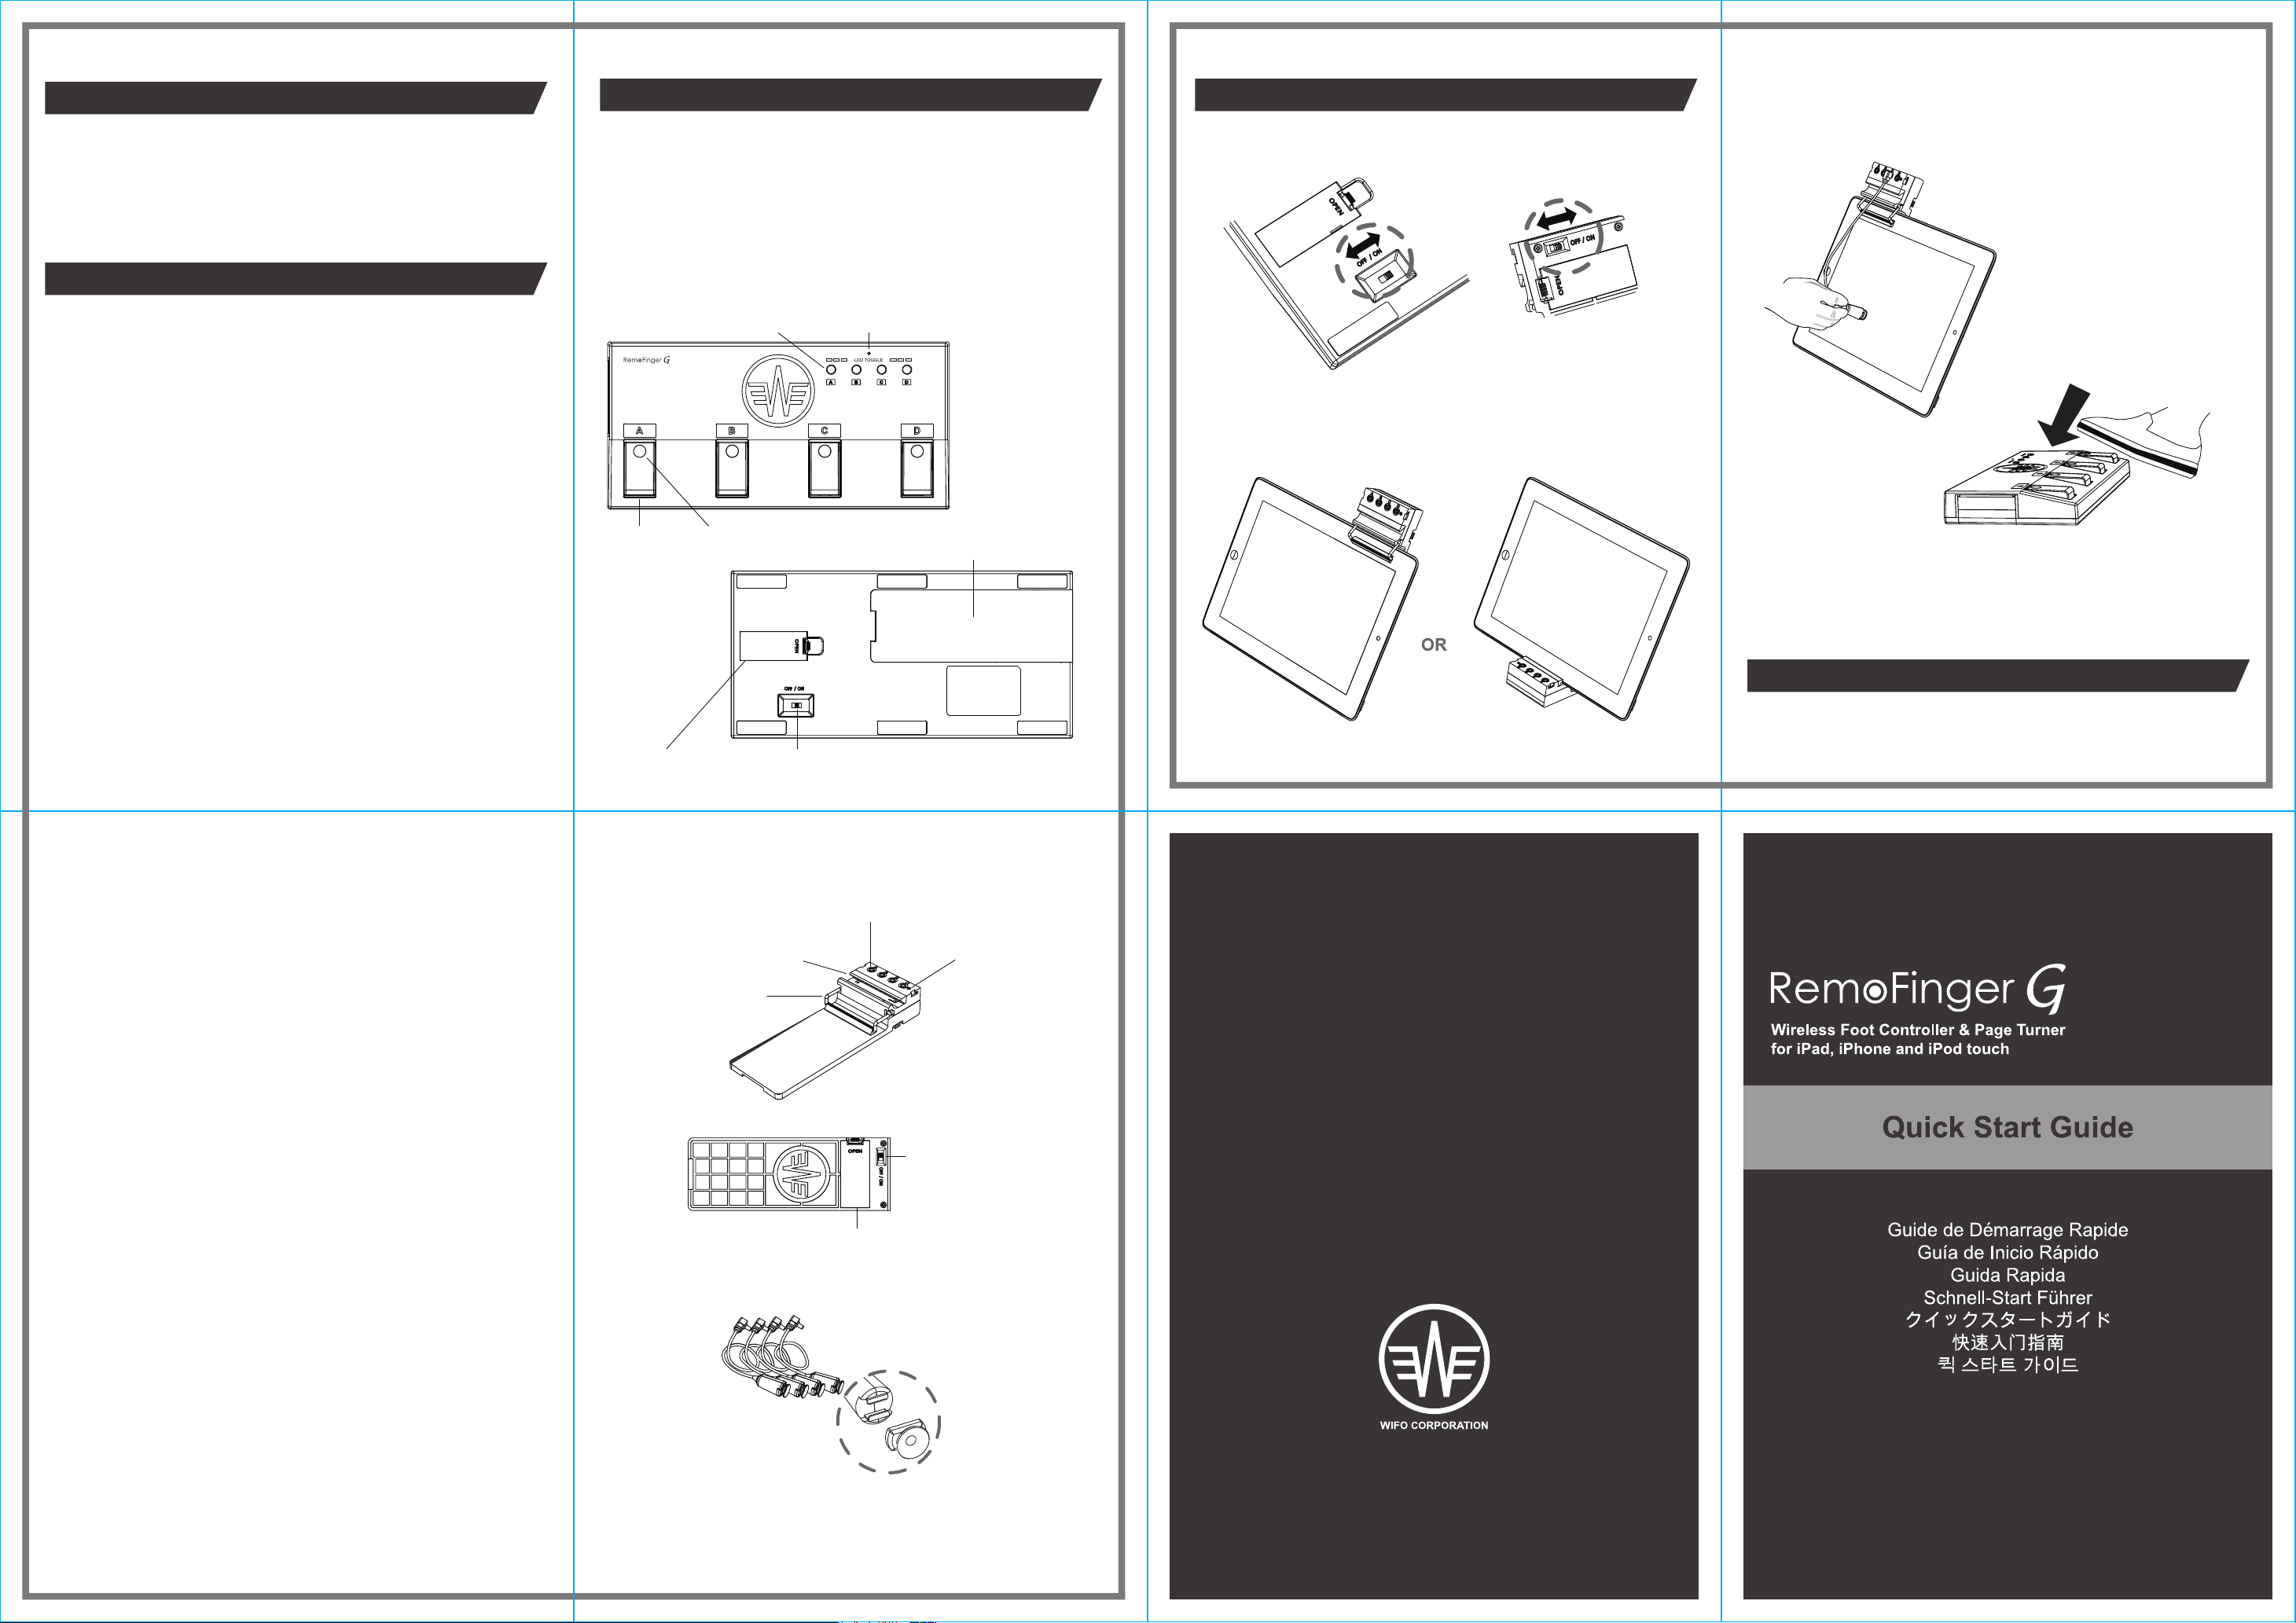
Pedal Board
1. Pedal (A, B, C, D) - Press this pedal to activate the Touch Pointer.
Each Touch Pointer is paired with each Pedal marked with the same
alphabet character.
2. Pedal LED - This LED light is toggled when pressing the Pedal or
the LED Toggle Button. After matching this LED light with the LED of
onscreen stompboxes, this LED can indicate which stompbox is on or
off.
3. LED Toggle Button (A, B, C, D) - Press this button to toggle the
Pedal LED only without activating the Touch Pointer. Each Pedal LED
is paired with the each LED Toggle Button marked with the same
alphabet character. This button is useful when matching the Pedal
LED with the LED of onscreen stompboxes.
4. Status LED - This LED indicates the status of the operation.
Off : The Console is OFF or the batteries are completely exhausted.
On : The Console is ON and operating.
Blinking continuously : The battery power is low. The batteries have to
be replaced.
5. Battery Cover - Remove this cover when inserting or removing the
batteries.
6. Power Switch - Use this switch to power on or off the Pedal Board.
7. Console & Touch Pointer Storage Bay - Store the Console and
the Touch Pointers in this space by combining the Console with the
Pedal Board when carrying the RemoFinger G.
• RemoFinger G
(Pedal Board x 1, Console x 1, Touch Pointer x 4)
• 4 Spare Touch Pointer Tips
• 4 AAA Batteries
• Quick Start Guide
3. LED Toggle Button 4. Status LED
1. Pedal 2. Pedal LED
7. Console & Touch Pointer Storage Bay
5. Battery Cover 6. Power Switch
1. Turn on the Power Switches on both the Console and
the Pedal Board.
2. Fit your mobile device on the Console by the Gripper.
3. Attach the Touch Pointer to the desired point.
"Now, Ready to play"
Pressing the Pedal will activate the Touch Pointer.
Important : Whenever pressing the Pedal, the Pedal LED light
will be toggled. If you need to match the Pedal LED with the LED
of onscreen stompboxes, use the LED Toggle Button.
MORE INFORMATION
Please visit WIFO CORPORATION website (www.wifocorp.com) for
additional information, news, and support of the product.
Console & Touch Pointer
1. Touch Pointer Connect Jack - Connect the Touch Pointer to this
jack.
2. Status LED - This LED indicates the status of the operation.
Off : The Console is OFF or the batteries are completely exhausted.
On : The Console is ON and operating.
Blinking continuously : The battery power is low. The batteries have to
be replaced.
Blinking once : The Pedal is pressed.
3. iPad Holder- The Console can be used as an iPad stand by
mounting the iPad on this holder.
4. Gripper - Grip the mobile device by using this gripper to fit the
mobile device on the Console.
Important : Make sure that the Console is closely located to the
mobile device to control by using either the Gripper or the iPad
Holder. Using neither can cause the failure of operation.
5. Battery Cover - Remove this cover when inserting or removing the
batteries.
6. Power Switch - Use this switch to power on or off the Console.
7. Touch Pointer - Attach the Touch Pointer to the point where you
want to click on the app. It emulates a finger touch on the screen
when the Pedal is pressed.
Important : Make sure that the suction side of Touch Pointer Tip is
clean before using. If the suction force has become weakened due to
dust particles, etc, gently wipe it with the slightly damp cloth. In case
that the suction force is not recoverable due to a permanent damage
like tearing, replace with a spare Touch Pointer Tip.
1. Touch Pointer Connect Jack
3. iPad Holder
4. Gripper
5. Battery Cover
7. Touch Pointer
2. Status LED
6. Power Switch
Specifications
Console
• 4 Touch Pointer connect jacks
• 1 power on/off switch
• Height: 27mm
• Width: 58mm
• Length: 164mm
• Weight: 92g (without batteries)
• Power: 2 x standard AAA battery
Pedal Board
• 4 pedal switches with LED
• 4 LED toggling switches
• 1 power on/off switch
• Height: 32mm
• Width: 135mm
• Length: 278mm
• Weight: 422g (without batteries)
• Power: 2 x standard AAA battery
Touch Pointer
• Cable Length: 400mm
• Weight: 7g
Communication
• ZIGBEE (IEEE Standard 802.15.4 for low-rate WPANS)
Touch Pointer Tip
www.wifocorp.com
Français
Español
Italiano
Deutsche
INTRODUCTION
Merci d'avoir choisi le RemoFinger G - la méthode la plus
pratique et intuitive pour contrôler des applications dans le
dispositif mobile.
Ce Guide de Démarrage Rapide est pour vous offrir un
aperçu du RemoFinger G et son mode d'emploi.
CONTENU
• RemoFinger G
(Plaque de Pédale x 1, Console x 1, Pointeur Tactile x 4)
• 4 Pointes de Pointeur Tactile Rechargeables
• 4 Batteries d'AAA
• Guide de Démarrage Rapide
CARACTÉRISTIQUES
Plaque de Pédale
1. Pédale (A, B, C, D) - Appuyer cette pédale pour faire fonctionner le Pointeur Tactile. Chaque Pointeur Tactile est
appareillé avec chaque Pédale marquée du même alphabet.
2. Pédale LED - Chaque fois que vous appuyez sur la Pédale ou le LED Bouton Bascule, cette lumière LED sera alternée
l'état de marche/arrêt. Lorsque cette lumière de LED est accordée au LED du stompbox sur l'écran, cette LED peut
indiquer quel stompbox est activé ou désactivé.
3. LED Bouton Bascule (A, B, C, D) - Appuyer ce bouton pour faire activer uniquement la Pédale LED, sans faire
fonctionner le Pointeur Tactile. Chaque Pédale LED est appareillée avec chaque LED Bouton Bascule marqué du même
alphabet. Ce bouton est utile pour faire accorder la Pédale LED avec le LED du stompbox sur l'écran.
4. Statut de LED - Ce LED indique le statut de l'opération
Eteint : La Console est étainte ou les batteries sont complétement épuisées.
Allumé : La Console est allumée et en opération.
Clignotant en continu : La puissance de la batterie est faible. Les batteries doivent être changées.
5. Couvercle Batterie - Enlever ce couvercle lors de l'insertion ou du retirage des batteries.
6. Bouton Marche-Arrêt - Utiliser ce bouton pour allumer ou éteindre la Plaque de Pédale.
7. Baie de Stockage de Console et Pointeur Tactile - Quand vous portez le RemoFinger G, faire combiner la Console et
la Plaque de Pédale afin d'avoir un espace pour mettre la Console et le Pointeur Tactile.
Console et Pointeur Tactile
1. Prise Jack de Connexion de Pointeur Tactile - Connecter le Pointeur Tactile à cette Prise Jack
2. Statut de LED - Ce LED indique le statut de l'opération
Eteint : La Console est étainte ou les batteries sont complétement épuisées.
Allumé : La Console est allumée et en opération.
Clignotant en continu : La puissance de la batterie est faible. Les batteries doivent être changées.
Clignotant une fois: La Pédale est appuyée.
3. Support iPad - La Console peut être utilisée comme un stand en montant l'iPad sur ce support.
4. Pince - Fixer le dispositif mobile sur la Console en utilisant cette pince.
Important : Assurer la Console près du dispositif mobile à contrôler, en utilisant uniquement la Pince ou le Support iPad.
Si non, il peut y avoir un échec de l'opération.
5. Couvercle Batterie - Enlever ce couvercle lors de l'insertion ou du retirage des batteries.
6. Bouton Marche-Arrêt - Utiliser ce bouton pour allumer ou éteindre la Console.
7. Pointeur Tactile - Fixer le Pointeur Tactile sur le point où vous voulez cliquer sur l'application. Il émule un toucher par
doigt sur l'écran lorsque la Pédale est appuyée.
Important : Avant d'utilisation, assurer la pointe du Pointeur Tactile propre du côté d'aspiration. Si l'aspiration est faible à
cause des poussières etc., essuyez délicatement avec le chiffon légèrement humide. Dans le cas où l'aspiration ne peut
pas être récupérée provenant d'un dommage permanent telle que la déchirure, remplacer par une nouvelle Pointe du
Pointeur Tactile Rechargeable.
UTILISATION FACILE
1. Allumer chaque Bouton Marche sur la Console et la Plaque de Pédale.
2. Fixer le dispositif mobile sur la Console en utilisant la Pince.
3. Fixer le Pointeur Tactile au point désiré.
"Maintenant, vous êtes prêt à l'utiliser"
Appuyer la Pédale pour faire fonctionner le Pointeur Tactile.
Important : Chaque fois que vous appuyez sur la Pédale, la Pédale LED sera alternée l'état de marche/arrêt. Si vous
avez besoin de faire accorder la Pédale LED avec la LED de stompbox sur l'écran, utilisez le LED Bouton Bascule.
INFORMATION SUPPLEMENTAIRE
Pour des informations supplémentaires, des nouvelles et un soutien au produit, consulter le site internet du WIFO
CORPORATION (www.wifocorp.com).
PRESENTACIÓN
Muchas gracias por seleccionar RemoFinger G, que es el
más conveninete y más intuitivo para controlar la
aplicación de los dispositivos móviles.
Esta Guía de Inicio Rápido describe el resumen y manera
de uso de RemoFinger G.
COMPONENTES
• RemoFinger G
(Tabla de pedales x 1, Consola x 1, Puntero táctil x 4)
• 4 Tips de indicador de contacto preliminar
• 4 baterias AAA
• Guía de Inicio Rápido
NOMBRES Y FUNCIONES
Tabla de pedales
1. Pedal (A, B, C, D) - Aprete el pedal para funcionar el puntero táctil. Cada puntero táctil se empareja con cada pedal
marcado con el mismo carácter del alfabeto.
2. LED de pedal - Cada vez que apreta el pedal o el botón de cambio de modo con LED, cambia el estado de on/off de
las luces de este LED. Si coincide el estado de on/off de este LED con el LED de pedales en la pantalla, se puede saber
si enciende o apaga cualquier pedal.
3. Botón de cambio de modo con LED (A, B, C, D) - Si apreta este botón, sólo se puede encender y apagar las luces de
LED de pedal (pero, el puntero táctil no funciona). Cada LED de pedal se empareja con cada botón de cambio de modo
con LED marcado con el mismo carácter del alfabeto. Este botón es útil para coincidir LED de pedal con el LED de
pedales en la pantalla.
4. LED para indicar estado - Este LED indica el estado de funcionamiento.
Apagar : La consola apaga o las baterías están completamente agotadas.
Encender : La consola enciende y funciona.
Parpadear continuamente : La energía de batería es baja. Reemplace las baterías.
5. Cubierta de batería - Abra esta cubierta cuando pone o saca las baterías.
6. Interruptor de encendido - Use el interruptor para apagar o encender la Tabla de pedales.
7. Almacenamiento de consola y puntero táctil - Guarde la consola y puntero táctil después de combinar la consola con
tabla de pedales cuando lleva RemoFinger G.
Consola y Puntero táctil
1. Conector jack de puntero táctil - Conecte el puntero táctil con este jack.
2. LED para indicar estado - Este LED indica el estado de funcionamiento.
Apagar : La consola apaga o las baterías están completamente agotadas.
Encender : La consola enciende y funciona.
Parpadear continuamente : La energía de batería es baja. Reemplace las baterías.
Parpadear una vez : Presionó el pedal.
3. Sostenedor de iPad - Coloque iPad en este sostendor para utilizar la consola como el soporte de iPad.
4. Pinza - Agarre su dispositivo móvil con la pinza para pegarse la consola al dispositivo.
Nota Debe usar una manera de ambos;pinza o sostenedor de iPad. Y coloque la consola cerca de un dispositivo móvil
que quiere controlar. Si no, puede que no funcione correctamente.
5. Cubierta de batería - Abra esta cubierta cuando pone o saca las baterías.
6. Interruptor de encendido - Use el interruptor para apagar o encender la consola.
7. Puntero táctil - Pegue el puntero táctil en un punto que quiere hacer clic en la aplicación. Si apreta el interruptor de
pedal, el puntero táctil funciona como si tocara la pantalla con los dedos.
Nota Debe limpiar la superficie de adsorción de tip de puntero táctil antes de usarlo. Si el poder de absortivo reduce por
el polvo, limpie suavemente con un paño ligeramente humedecido. En caso de daño permanente como rasgarse, etc.,
sustituya por otro tip preliminar.
FACILIDAD DE USO
1. Encienda los interruptores de encendido de la consola y tabla de pedales respectativamente.
2. Use la pinza para pegarse la consola al dispositivo móvil.
3. Pegue el puntero táctil en un punto que quiere.
"Ahora ya está listo para usar"
Pise el pedal para funcionar el puntero táctil.
Nota Cada vez que apreta el pedal, cambia el estado de on/off de LED de pedal. Si es necesario coincidir el LED de
pedal con el LED de pedal en la pantalla, utilice botón de cambio de modo con LED.
MÁS INFORMACIÓN
Si quiere obtener más información, noticia y saber soporte de producto, visite la página principal de WIFO CORPORATION (www.wifocorp.com).
INTRODUZIONE
Ti ringraziamo per aver scelto RemoFinger G, il modo più
conveniente e intuitivo per controllare le applicazioni sul
tuo dispositivo portatile.
Questa Guida Rapida serve a fornirti una descrizione su
RemoFinger G e a insegnarti come utilizzarlo.
CONTENUTO DELLA SCATOLA
• RemoFinger G
(Pedaliera x 1, Console x 1, Touch Pointer x 4)
• 4 punte di ricambio per i Touch Pointer
• 4 pile AAA
• Guida Rapida
CARACTÉRISTIQUES
Plaque de Pédale
1. Pédale (A, B, C, D) - Appuyer cette pédale pour faire fonctionner le Pointeur Tactile. Chaque Pointeur Tactile est
appareillé avec chaque Pédale marquée du même alphabet.
2. Pédale LED - Chaque fois que vous appuyez sur la Pédale ou le LED Bouton Bascule, cette lumière LED sera alternée
l'état de marche/arrêt. Lorsque cette lumière de LED est accordée au LED du stompbox sur l'écran, cette LED peut
indiquer quel stompbox est activé ou désactivé.
3. LED Bouton Bascule (A, B, C, D) - Appuyer ce bouton pour faire activer uniquement la Pédale LED, sans faire
fonctionner le Pointeur Tactile. Chaque Pédale LED est appareillée avec chaque LED Bouton Bascule marqué du même
alphabet. Ce bouton est utile pour faire accorder la Pédale LED avec le LED du stompbox sur l'écran.
4. Statut de LED - Ce LED indique le statut de l'opération
Eteint : La Console est étainte ou les batteries sont complétement épuisées.
Allumé : La Console est allumée et en opération.
Clignotant en continu : La puissance de la batterie est faible. Les batteries doivent être changées.
5. Couvercle Batterie - Enlever ce couvercle lors de l'insertion ou du retirage des batteries.
6. Bouton Marche-Arrêt - Utiliser ce bouton pour allumer ou éteindre la Plaque de Pédale.
7. Baie de Stockage de Console et Pointeur Tactile - Quand vous portez le RemoFinger G, faire combiner la Console et
la Plaque de Pédale afin d'avoir un espace pour mettre la Console et le Pointeur Tactile.
Console et Pointeur Tactile
1. Prise Jack de Connexion de Pointeur Tactile - Connecter le Pointeur Tactile à cette Prise Jack
2. Statut de LED - Ce LED indique le statut de l'opération
Eteint : La Console est étainte ou les batteries sont complétement épuisées.
Allumé : La Console est allumée et en opération.
Clignotant en continu : La puissance de la batterie est faible. Les batteries doivent être changées.
Clignotant une fois: La Pédale est appuyée.
3. Support iPad - La Console peut être utilisée comme un stand en montant l'iPad sur ce support.
4. Pince - Fixer le dispositif mobile sur la Console en utilisant cette pince.
Important : Assurer la Console près du dispositif mobile à contrôler, en utilisant uniquement la Pince ou le Support iPad.
Si non, il peut y avoir un échec de l'opération.
5. Couvercle Batterie - Enlever ce couvercle lors de l'insertion ou du retirage des batteries.
6. Bouton Marche-Arrêt - Utiliser ce bouton pour allumer ou éteindre la Console.
7. Pointeur Tactile - Fixer le Pointeur Tactile sur le point où vous voulez cliquer sur l'application. Il émule un toucher par
doigt sur l'écran lorsque la Pédale est appuyée.
Important : Avant d'utilisation, assurer la pointe du Pointeur Tactile propre du côté d'aspiration. Si l'aspiration est faible à
cause des poussières etc., essuyez délicatement avec le chiffon légèrement humide. Dans le cas où l'aspiration ne peut
pas être récupérée provenant d'un dommage permanent telle que la déchirure, remplacer par une nouvelle Pointe du
Pointeur Tactile Rechargeable.
UTILISATION FACILE
1. Allumer chaque Bouton Marche sur la Console et la Plaque de Pédale.
2. Fixer le dispositif mobile sur la Console en utilisant la Pince.
3. Fixer le Pointeur Tactile au point désiré.
"Maintenant, vous êtes prêt à l'utiliser"
Appuyer la Pédale pour faire fonctionner le Pointeur Tactile.
Important : Chaque fois que vous appuyez sur la Pédale, la Pédale LED sera alternée l'état de marche/arrêt. Si vous
avez besoin de faire accorder la Pédale LED avec la LED de stompbox sur l'écran, utilisez le LED Bouton Bascule.
ALTRE INFORMAZIONI
Si prega di visitare il sito della WIFO CORPORATION (www.wifocorp.com) per informazioni addizionali, novità e supporto
per il prodotto.
IEinführung
Danke für Auswahl von RemoFinger G-die bequemlichste und intuitivste Methode für die Kontrolle der Apps der
Handyapparate
Dieser Schnell-Start Führer möchte Ihnen gern über
RemoFinger G und dessen Gebrauchsanweisung
informieren.
Inhalte in der Packung
• RemoFinger G
(Das Pedal-Brett x 1, die Konsole x 1, die Antastzeiger x 4)
• Ersatz für die Antastzeiger-Typen 4
• 4 AAA-Batterien
• Schnell-Start Führer
Funktionen
Das Pedal-Brett
1. Das Pedal (A,B,C,D)- Drücken dieses Pedal, funtioniert der Antastzeiger. Der jeweilige Antastzeiger ist mit dem
jeweiligen Pedal paarweise verbunden, das mit demselben Alphabet gekennzeichnet ist.
2. Die Pedal LED - So oft, man das Pedal oder den LED Umschalter-Knopf drückt, wird der Ein- / Aus-Status der LED
gewechselt. Vereint man diesen Ein- /Aus- Status der LED mit der Fußbrett LED auf der Bildfäche, weiss man durch
diese LED, welcher Fußbrett LED Ein- oder ausgeschaltet ist.
3. LED Umschalter Knopf (A,B,C,D)- Drückt diesen Knopf, ändert man nur Ein- oder us- Status des LED Lichtes ohne
Betätigung des Antastzeigers. Die jeweilige Pedal-LED ist mit jeweiligem LED Umschalter Knopf paarweise verbunden,
der mit demselben Alphabet gekennzeichnet ist. Dieser Knopf ist nützlich dafür, dass man die Pedal -LED mit
Fußbrett-LED auf der Bildfläche vereint.
4. Die Statuszeiger LED - Diese LED bezeichnet den Status der Betätigung.
Ausschalten : Die Konsole ist aus oder die Batterien sind leer.
Einschalten : die Konsole ist eingeschaltet und im Gange.
Dauer-Blinzeln : Die Batterien gehen leer. Bitte wechseln Sie Batterien.
5. Der Batterien-Deckel - Bitte öffnen Sie diesen Deckel beim Reintun oder Rausnehmen der Batterien.
6. Der Stromschalter - Man kann mit diesem Schalter den Strom das Pedal-Brett ein- oder ausschalten.
7. Auf bewahrung - Handnimmt man RemoFinger G, bewahren Sie die Konsole und den Antastzeiger mit der Konsole
und dem Pedalbrett verbunden auf.
Console et Pointeur Tactile
1. Prise Jack de Connexion de Pointeur Tactile - Connecter le Pointeur Tactile à cette Prise Jack
2. Statut de LED - Ce LED indique le statut de l'opération
Eteint : La Console est étainte ou les batteries sont complétement épuisées.
Allumé : La Console est allumée et en opération.
Clignotant en continu : La puissance de la batterie est faible. Les batteries doivent être changées.
Clignotant une fois: La Pédale est appuyée.
3. Support iPad - La Console peut être utilisée comme un stand en montant l'iPad sur ce support.
4. Pince - Fixer le dispositif mobile sur la Console en utilisant cette pince.
Important : Assurer la Console près du dispositif mobile à contrôler, en utilisant uniquement la Pince ou le Support iPad.
Si non, il peut y avoir un échec de l'opération.
5. Couvercle Batterie - Enlever ce couvercle lors de l'insertion ou du retirage des batteries.
6. Bouton Marche-Arrêt - Utiliser ce bouton pour allumer ou éteindre la Console.
7. Pointeur Tactile - Fixer le Pointeur Tactile sur le point où vous voulez cliquer sur l'application. Il émule un toucher par
doigt sur l'écran lorsque la Pédale est appuyée.
Important : Avant d'utilisation, assurer la pointe du Pointeur Tactile propre du côté d'aspiration. Si l'aspiration est faible à
cause des poussières etc., essuyez délicatement avec le chiffon légèrement humide. Dans le cas où l'aspiration ne peut
pas être récupérée provenant d'un dommage permanent telle que la déchirure, remplacer par une nouvelle Pointe du
Pointeur Tactile Rechargeable.
Einfache Gebrauchsanweisung
1. Schalten Sie den Stromschalter der Konsole und des Pedalbrettes einzeln ein.
2. Heften Sie die Konsole mit Handygerät durch den Greifer.
3. Heften Sie den Antastzeiger auf den gewünschten Punkt an.
"Es ist bereit, zu benutzen"
Drückt man das Pedal, arbeitet der Antastzeiger.
Wichtig Sooft man das Pedal drückt, ändert sich der Ein-/Aus- Status der Pedal-LED. Wenn man die Pedal LED mit der
Fußbrett-LED vereinen braucht, benutzen Sie den LED Umschalter Knopf.
Hinzufügende Information
Besuchen Sie die WIFO CORPORATION-Website (www.wifocorp.com) für die weitere Information, Nachrichten und
Produkt-Supprot.
日本語
はじめに
モバイルデバイスのアプリを制御する最も便利で直感的
な方法 - RemoFinger Gをお選びいただき、ありがとうご
ざいます。
このクイックスタートガイドでは、RemoFinger Gの概要
と使用方法について説明します。
名称と機能
ペダルボード
1.ペダル (A、B、C、D) - ペダルを押すと、タッチポインタが作動します。各タッチポインタは同じアルファベットの各
ペダルとペアになっています。
2.ペダル LED - ペダルまたはLEDの切替ボタンを押すたびに、 LEDが on/off 状態になります。 LED のon/off 状態を画面
上のストンプボックスLEDとマッチさせると、どのストンプボックスがon またはoff なのかが分かります。
3.LEDの切替ボタン(A、B、C、D) - このボタンを押すと、タッチポインタを作動させずにペダルLEDの on/off 状態だけ
を変えます。各ペダルLEDは同じアルファベットの各LED切替ボタンとペアになっています。このボタンは、ペダルLED
を画面上のストンプボックスLEDとマッチさせるのに便利です。
4.状態表示 LED - 動作状態を表示するLEDです。
オフ :コンソールがオフになっているか、またはバッテリーが消耗しています。
オン :コンソールがオンになっており、動作中です。
継続する点滅 :バッテリーが不足しています。バッテリーを交換してください。
5.バッテリーカバー - バッテリーを出し入れするときは、このカバーを開けてください。
6.電源スイッチ -ペダルボードの電源をオンまたはオフにします。
7.コンソールおよびタッチポインタストレージベイ - RemoFinger Gを携帯する場合、コンソールとペダルボードを組み
合わせて、コンソールとタッチポインタをこのスペースに保管してください。
コンソールおよびタッチポインタ
1.タッチポインタコネクトジャック - タッチポインタをこのジャックに接続してください。
2.状態表示 LED - 動作状態を表示するLEDです。
オフ :コンソールがオフになっているか、またはバッテリーが消耗しています。
オン :コンソールがオンになっており、動作中です。
継続する点滅 :バッテリーが不足しています。バッテリーを交換してください。
一回の点滅 :ペダルが押されました。
3.iPad ホルダー - iPadをホルダーに置くと、コンソールを iPad スタンドとして使用できます。
4.グリッパー - コンソールをモバイルデバイスに付けるためには、グリッパーを利用します。
重要 :必ずグリッパーまたは iPad ホルダーいずれかを使用し、コンソールを制御するモバイルデバイスの近くに配置し
てください。近くに配置しない場合、動作が正常に行われない可能性があります。
5.バッテリーカバー - バッテリーを出し入れするときは、このカバーを開けてください。
6.電源スイッチ -コンソールの電源をオンまたはオフにします。
7.タッチポインタ - アプリでクリックしたいポイントにタッチポインタを固定させます。ペダルスイッチを押すと、タッ
チポインタが指で画面をタッチしているように動作します。
重要 :使用前に必ずタッチポインタチップの吸着面をきれいにしてください。ほこりなどが付着して吸着力が低下したと
きは、軽く濡らした布でさっと拭いてください。テアリングなどの永久的な損傷が原因で吸着力が戻らなくなった場合
は、予備のタッチポインタチップと交換してください。
簡単な使用方法
1.コンソールとペダルボードにある電源スイッチをそれぞれオンにしてください。
2.グリッパーを利用してコンソールをモバイルデバイスに付けてください。
3.タッチポインタを希望するポイントに固定してください。
「これで使用する準備ができました」
ペダルを踏むと、タッチポインタが作動します。
重要 :ペダルを押すたびにペダルLEDの on/off 状態が変わります。ペダルLEDを画面上のストンプボックス LEDと一致さ
せるには、LED切替ボタンを使用してください。
追加情報
より詳細な情報、ニュース、製品サポートについては、 WIFO CORPORATION Webサイト(www.wifocorp.com)をご覧
ください。
構成品
• RemoFinger G
(ペダルボード x 1、コンソール x 1、タッチポインタ x 4)
• 予備用タッチポインタチップ 4個
• 単4乾電池 4本
• クイックスタートガイド
中国
介绍
感谢您选择最方便的控制移动设备软件的直观性方法
——RemoFinger G。
本快速入门指南提供针对RemoFinger G的概要并说明使用
方法。
名称和功能
踏板
1.踏板(A、B、C、D)——按压本踏板,指针就会启动。每个触摸屏指针与标有相同字母的踏板成对连接。
2.踏板LED——每次按压踏板和LED开关按钮,本LED灯的on/off状态就会转换成相反的状态。若使本LED灯的on/off状态和
画面上的stompbox LED状态变得一致,就能通过本LED知道哪个stompbox处于on或off状态。
3.LED开关按钮(A、B、C、D)——按压本按钮,触摸屏指针不会启动,只会改变踏板LED灯的on/off状态。每个踏板
LED与标有相同字母的LED开关按钮成对连接。本按钮在将踏板LED与画面上的stompbox LED变得一致时有用。
4.状态标示LED——本LED显示启动状态。
熄灭:控制台关闭或电池耗尽。
亮起:控制台开启并运行。
持续闪烁:电池电源不足。请替换电池。
5.电池盖——放入或取出电池时,请打开本盖子。
6.电池开关——使用本电源开关打开或关闭踏板的电源。
7.控制台和触摸屏指针Storage Bay——随身携带RemoFinger G时,请将控制台和踏板连接,在本空间保管控制台和触摸
屏指针。
控制台和触摸屏指针
1.触摸屏指针连接插口——请将触摸屏指针与本插口连接。
2.状态标示LED——本LED显示启动状态。
熄灭:控制台关闭或电池耗尽。
亮起:控制台开启并运行。
持续闪烁:电池电源不足。请替换电池。
闪烁一次:踏板被按下。
3.iPad固定器——若将iPad置于本固定器上,控制台就能当作iPad支架使用。
4.夹子——为了将控制台附着于移动设备,使用本夹子夹取移动设备。
重要 : 一定要使用夹子或iPad固定器两种方法中的一种,使控制台靠近欲控制的移动设备。否则,动作有可能无法正常完成
。
5.电池盖——放入或取出电池时,请打开本盖子。
6.电池开关——使用本电源开关打开或关闭控制台的电源。
7.触摸屏指针——将触摸屏指针粘贴于想在软件上点击的点上。按下踏板开关,触摸屏指针就像使用手指触摸画面一样动作
。
重要 : 使用前务必将触摸屏指针头的吸附面清理干净。若因沾上灰尘而使附着力下降,请使用稍微打湿的布轻轻地擦拭。若
因撕裂等永久性损伤导致吸附力无法复原时,请替换备用触摸屏指针头。
简单的使用方法
1.请分别打开控制台和踏板上的电源开关。
2.请使用夹子将控制台附着于移动设备。
3.请将触摸屏指针粘贴于想要的点。
“现在已完成使用准备”
踩踏踏板,触摸屏指针即可启动。
重要 : 每次踩踏踏板时,踏板LED的on/off状态就会改变。若需要使踏板LED与画面上的stompbox变得一致,请使用LED开
关按钮。
附加信息
若想获得更多信息、报道和产品支持,请访问WIFO CORPORATION官方网站(www.wifocorp.com)。
部件
• RemoFinger G
(踏板 x 1、控制台 x 1、触摸屏指针 x 4)
• 备用触摸屏指针头4个
• AAA电池4块
• 快速入门指南
한국어
소개
모바일 디바이스의 앱을 제어하기 위한 가장 편리하고
직관적인 방법 - RemoFinger G를 선택해 주셔서
감사합니다.
이 퀵 스타트 가이드는 리모핑거G에 대한 개요를 제공하고
사용 방법을 설명합니다.
명칭 및 기능
페달 보드
1. 페달 (A, B, C, D) - 이 페달를 누르면 터치 포인터가 작동합니다. 각각의 터치 포인터는 동일한 알파벳 문자가 표시된
각각의 페달과 쌍으로 연결되어 있습니다.
2. 페달 LED - 페달 또는 LED 토글 버튼를 누를 때마다 이 LED 불빛의 on/off 상태가 반대로 바뀝니다. 이 LED 불빛의
on/off 상태를 화면상의 스톰박스 LED와 일치시키면, 이 LED를 통해 어떤 스톰박스가 on 또는 off 인지 알 수 있습니다.
3. LED 토글 버튼 (A, B, C, D) - 이 버튼을 누르면 터치 포인터를 작동시키지 않고 페달 LED 불빛의 on/off 상태만 바뀝니다
. 각각의 페달 LED는 동일한 알파벳 문자가 표시된 각각의 LED 토글 버튼과 쌍으로 연결되어 있습니다. 이 버튼은 페달
LED를 화면상의 스톰박스 LED와 일치시키는데 유용합니다.
7. 콘솔 및 터치 포인터 스토리지 베이 - RemoFinger G를 휴대할 때 콘솔과 페달 보드를 결합하여 콘솔 및 터치포인터를 이
공간에 보관하세요.
콘솔 및 터치 포인터
1. 터치 포인터 커넥트 잭 - 터치 포인터를 이 잭에 연결하세요.
2. 상태 표시 LED - 이 LED는 동작 상태를 표시합니다.
꺼짐 : 콘솔이 꺼져있거나 배터리가 모두 소진되었습니다.
켜짐 : 콘솔이 켜져있으며 동작 중입니다.
계속 깜박거림 : 배터리 전원이 부족합니다. 배터리를 교체해 주세요.
한 번 깜박거림 : 페달이 눌러졌습니다.
3. iPad 홀더 - iPad를 이 홀더에 올리면 콘솔을 iPad 스탠드로 사용할 수 있습니다.
4. 그리퍼 - 콘솔을 모바일 디바이스에 부착하기 위해 이 그리퍼를 이용하여 모바일 디바이스를 집습니다.
중요 : 반드시 그리퍼 또는 iPad 홀더 둘 중 하나의 방법을 사용하여 콘솔을 제어하고자 하는 모바일 디바이스에 가깝게
위치하도록 하세요. 그렇지 않으면 동작이 제대로 되지 않을 수 있습니다.
5. 배터리 커버 - 배터리를 넣거나 뺄 때 이 커버를 열어 주세요.
6. 전원 스위치 - 이 스위치를 이용하여 콘솔의 전원을 켜거나 끕니다.
7. 터치 포인터 - 앱에서 클릭하고 싶은 포인트에 터치 포인터를 부착합니다. 페달을 누르면 터치포인터가 마치 손가락으로
화면을 터치한 것 처럼 동작합니다.
중요: 반드시 사용 전에 터치 포인터 팁의 흡착면은 깨끗하게 하여 주세요. 먼지 등이 묻어 흡착력이 떨어지면, 살짝 적신
천을 이용하여 부드럽게 닦아 주세요. 만약 찢김 같은 영구적인 손상으로 인해 흡착력의 복구가 불가능할 경우에는 예비용
터치포인터 팁으로 교체하세요.
손쉬운 사용 방법
1. 콘솔 및 페달 보드에 있는 전원 스위치를 각각 켜세요.
2. 그리퍼를 이용하여 콘솔을 모바일 디바이스에 부착하세요.
3. 터치포인터를 원하는 포인트에 붙이세요.
"이제 사용할 준비가 되었습니다"
페달을 밟으면 터치포인터가 작동합니다.
중요 : 페달을 누를 때마다 페달 LED의 on/off 상태가 바뀝니다. 만약 페달 LED를 화면상의 스톰박스 LED와 일치시킬
필요가 있을 경우, LED 토글 버튼을 사용하세요.
추가 정보
보다 많은 정보, 뉴스 그리고 제품 지원에 대해서는 ㈜위포코퍼레이션 웹사이트 (www.wifocorp.com) 를 방문하세요.
구성품
• RemoFinger G
(페달 보드 x 1, 콘솔 x 1, 터치 포인터 x 4)
• 예비용 터치 포인터 팁 4개
• AAA 배터리 4개
• 퀵 스타트 가이드
LIMITED WARRANTY
Your RemoFinger G is warranted against defects in materials and
workmanship for a period of ONE (1) YEAR from the date of
original retail purchase ("Warranty Period"). If a defect arises during
the Warranty Period, WIFO CORPORATION, at its option and to
the extent permitted by law will (1) repair the product at no charge
using new parts or parts that are equivalent to new in performance
and reliability, (2) exchange the product with a functionally
equivalent product that is new or equivalent to new in performance
and reliability, or (3) refund the original purchase price. This
warranty excludes damage resulting from abuse, accident,
modifications, defects caused by normal wear and tear or otherwise
due to the normal aging of the product, or other causes that are not
defects in materials and workmanship. WIFO CORPORATION will
not be responsible for the shipping costs associated with the return
of products to WIFO CORPORATION under a warranty claim.
TO THE EXTENT PERMITTED BY APPLICABLE LAW, WIFO
CORPORATION IS NOT LIABLE FOR ANY DIRECT, INDIRECT,
INCIDENTAL OR CONSEQUENTIAL DAMAGES ARISING OUT
OF THE USE OR SERVICE OF THE PRODUCT. THE
WARRANTY AND REMEDIES DESCRIBED ABOVE ARE
EXCLUSIVE AND IN LIEU OF ALL OTHER WARRANTIES,
REMEDIES, AND CONDITIONS, WHETHER ORAL, WRITTEN,
EXPRESS, STATUTORY OR IMPLIED. TO THE EXTENT
PERMITTED BY APPLICABLE LAW WIFO CORPORATION
DISCLAIMS ALL IMPLIED AND STATUTORY WARRANTIES,
INCLUDING, WARRANTIES OF MERCHANTABILITY AND
FITNESS FOR A PARTICULAR PURPOSE. IF IMPLIED
WARRANTIES CANNOT BE DISCLAIMED, THEN SUCH
WARRANTIES ARE LIMITED IN DURATION TO THE DURATION
OF THIS WARRANTY. ANY RECOVERY IS LIMITED TO THE
ORIGINAL PURCHASE PRICE.
No other person is authorized to modify this limited warranty, and
your seller is solely responsible for any other warranties. Some
states or countries do not allow limitations on how long an implied
warranty lasts, or do not allow exclusion or limitation of incidental or
consequential damages, so the above limitations or exclusions may
not apply to you As WIFO CORPORATION has no control over
use, setup, final assembly, modification or misuse of the product,
no liability shall be assumed nor accepted for any resulting damage
or injury. By the act of use, setup or assembly, the user accepts all
resulting liability.
To obtain warranty service, email support@wifocorp.com. Proof of
purchase may be required to verify eligibility.
Supporting Devices
Apple :
iPad 3, 4, Air, Air 2, Pro
iPhone 4s, 5, 5c, 5s, 6, 6s
iPod touch 5, 6
Other Manufactures :
The RemoFinger G works with some of Android devices
with a built-in capacitive touch screen.
Please check the details for the supportable models on
the WIFO CORPORATION website (www.wifocorp.com).
FCC STATEMENT
This equipment has been tested and found to comply with the limits
for a Class B digital device, pursuant to part 15 of the FCC Rules.
These limits are designed to provide reasonable protection against
harmful interference in a residential installation. This equipment
generates, uses and can radiate radio frequency energy and, if not
installed and used in accordance with the instructions, may cause
harmful interference to radio communications. However, there is no
guarantee that interference will not occur in a particular installation.
If this equipment does cause harmful interference to radio or
television reception, which can be determined by turning the
equipment off and on, the user is encouraged to try to correct the
interference by one or more of the following measures:
• Reorient or relocate the receiving antenna.
• Increase the separation between the equipment and receiver.
• Connect the equipment into an outlet on a circuit different from
that to which the receiver is connected.
• Consult the dealer or an experienced radio/TV technician for help.
FCC Radiation Exposure Statement
This equipment complies with FCC RF radiation exposure limits set
forth for an uncontrolled environment. This transmitter must not be
co-located or operating in conjunction with any other antenna or
transmitter. This equipment should be installed and operated with a
minimum distance of 20 centimeters between the radiator and your
body.
This device complies with Part 15 of the FCC Rules. Operation is
subject to the following two conditions: (1) this device may not
cause harmful interference, and (2) this device must accept any
interference received, including interference that may cause
undesired operation.
Caution : Any changes or modifications not expressly approved by
the party responsible for compliance could void the user's authority
to operate the equipment.
Model: RemoFinger G (WRG-400)
FCC ID: 2AGFZ-WRG400
Designed and Made in Korea
by WIFO CORPORATION
Apple is not responsible for the operation of this device or its
compliance with safety and regulatory standards. iPad, iPhone,
iPod touch and GarageBand are trademarks of Apple Computer,
inc. registered in U.S. and other countries.
RemoFinger is a registered trademark of WIFO CORPORATION.
All other product names images or trademarks are the property of
their respective owners, which are in no way associated or affiliated
with WIFO CORPORATION.
 Loading...