

WiFiRanger Elite, Marine2, Sky, Go2 User Manual

WIFIRANGER
CONNECTING MOBILE LIFESTYLES™
USER MANUAL
Written For
7.0 Phantom Firmware
Copyright WiFiRanger 2015©
All Rights Reserved!
943 West Overland Road, Meridian, Idaho • 208-321-5544 • www.wifiranger.com

Table of Contents!
CONTROL PANEL 2
Quick Start
BASICS 3
Bookmark
Scan & Connect to WiFi Signals
Perform Range
WiFi Networks
Private Broadcast
Updating
CONNECTIONS 8
Ethernet WAN
Internal WiFi
Cellular
WFRBoost
WFRControl
USAGE 12
Realtime Utilization
Bandwidth History
Bandwidth Groups
Billing Periods
Device Restrictions
OPTIONS 15
Guest Wireless Network
Social Info
System Preferences
FEEDBACK 18
Network Reviews
Registration
OPTIMIZATIONS 20
Multi-WAN
Profiles
Internet Connectors
Tag s
Slowest Usable Speed
Wireless Radio
Range Options
ADVANCED 29
Fusion
Port Forwarding
DNS
DMZ
Static IP
Private LAN IP Alias
WIFIRANGER HOME 32
WIFIRANGER X 33
WIFIRANGER GO 34
WIFIRANGER GO235
WIFIRANGER SKY 36
WIFIRANGER MOBILE 37
WIFIRANGER MARINE 38
TERMS GLOSSARY 39
WARRANTY 40
30-day Satisfaction Guarantee
1-year Warranty
1-year Functionality Guarantee
5-year Titanium Warranty
Lifetime MobileTi Warranty
WiFiRanger User Manual
1
CONTROL PANEL
The interface used to setup and control a WiFiRanger router. Each WiFiRanger has its own Control
Panel that is embedded within the router and accessed in a web browser of a connected device.
Computers, smartphones, tablets, and other devices with web browsers can be used to setup and
control a WiFiRanger.
By default, advanced features are hidden on the Control Panel. Turn Hide Advanced Features to Off
on the Setup tab to view the full Control Panel. Most users only need the simple mode.
✦
Web Browser Based
✦
Accessible by All Devices
✦
Simple and Clean Design
Quick Start
1) Power WiFiRanger
USE INCLUDED POWER SUPPLY OR FOLLOW INSTALLATION GUIDE
2) Wait a couple minutes
WIFIRANGERS AUTOMATICALLY SEARCH FOR INTERNET AFTER POWERING UP
3) Wirelessly connect a device to NETWORK using PASSWORD
YOU CAN ALSO CONNECT VIA HARDWIRE FOR WIFIRANGERS WITH LAN PORTS
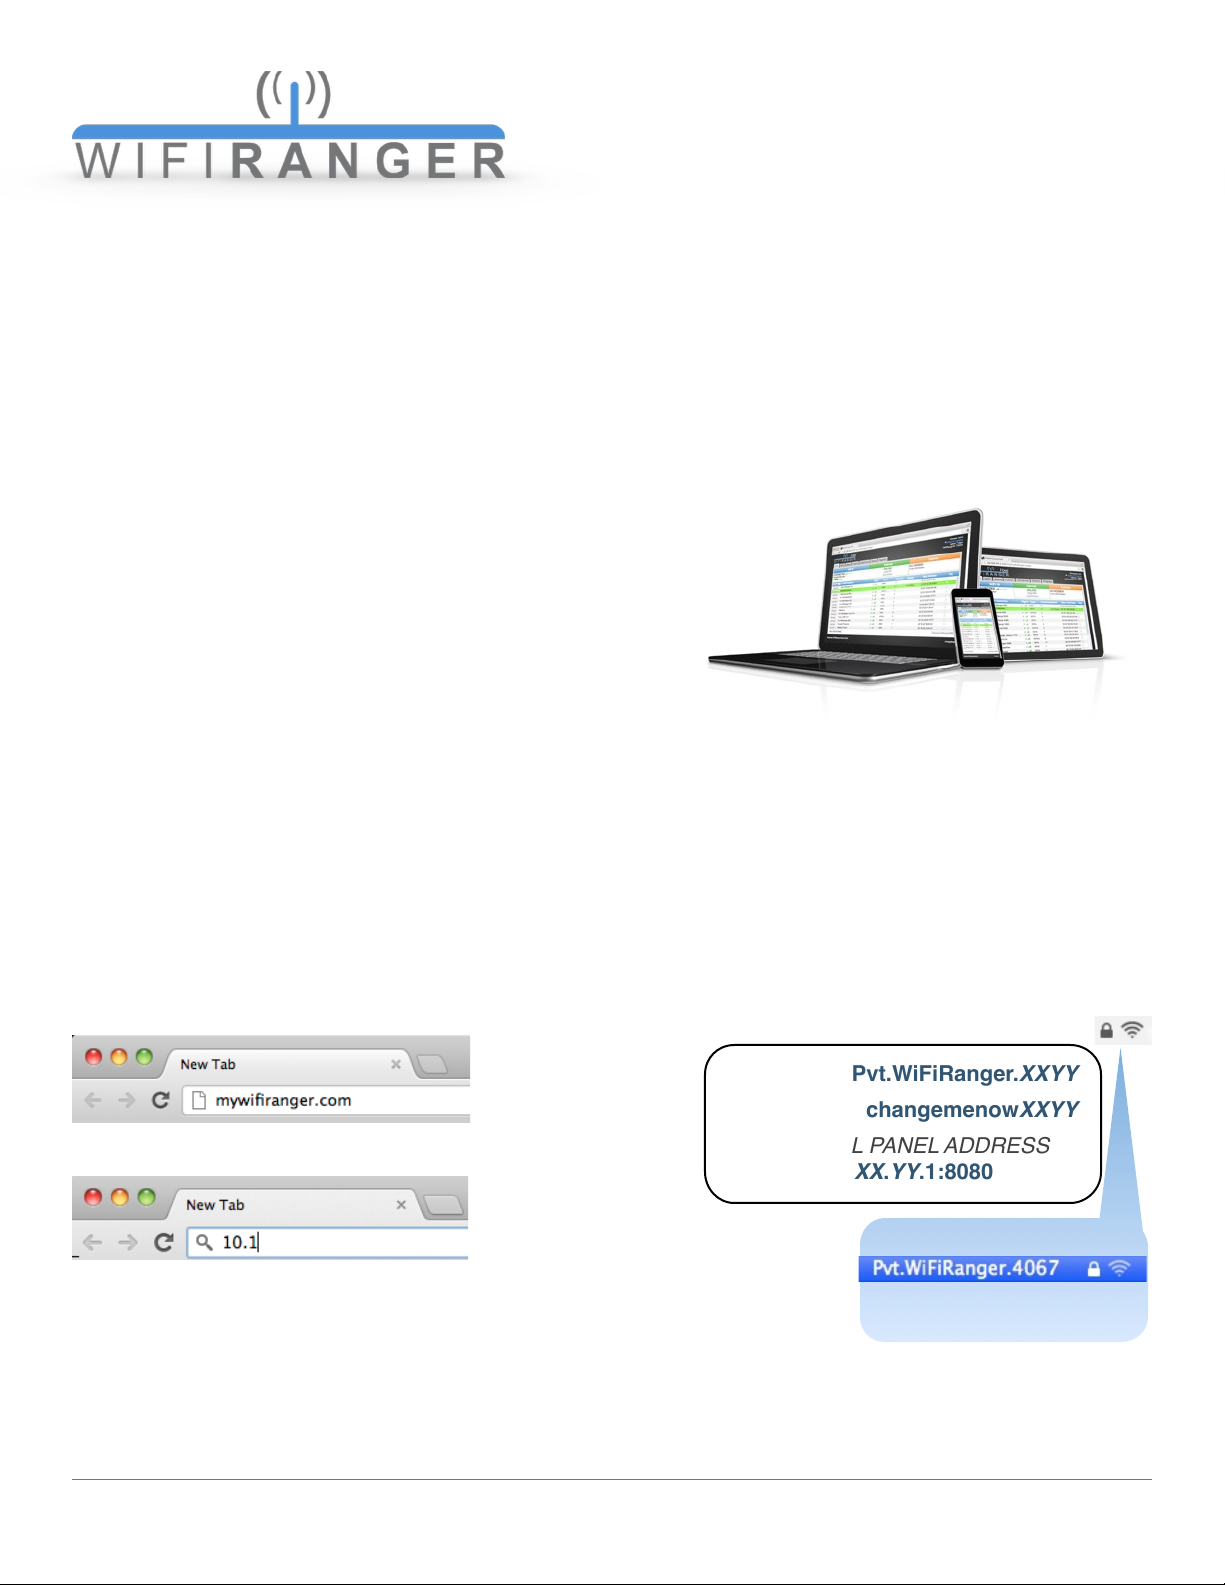
4) Open device’s web browser and go to Control Panel
OPEN INTERNET EXPLORER, CHROME, FIREFOX, SAFARI, ETC.
mywifiranger.com
CONTROL PANEL ADDRESS
5) See if WiFiRanger is online or connect
JOIN A WIFI NETWORK OR CONNECT TO ETHERNET WAN OR CELLULAR IF NOT YET ONLINE!
WiFiRanger User Manual
2
NETWORK Pvt.WiFiRanger.XXYY
PASSWORD changemenowXXYY
CONTROL PANEL ADDRESS
10.1XX.YY.1:8080
FOR EXAMPLE
changemenow4067
10.140.67.1:8080
DETERMINE XX AND YY FROM
NETWORK BROADCAST OF YOUR WFR

BASICS
Bookmark
Upon accessing the Control Panel, it is highly recommended to create a bookmark using the Make
Bookmark link located at the bottom left of the Control Panel. This makes accessing the WiFiRanger
easy in the future while alleviating the need to remember the direct IP address.
Scan & Connect to WiFi Signals
1) Get on Main tab of Control Panel
EVERYTHING NECESSARY IS LOCATED ON THE LEFTHAND SIDE
2) Select desired wireless radio
ONLY WFRBOOST & WFRCONTROL USERS HAVE MULTIPLE CHOICES AS SHOWN (GO2 / MOBILE IN THIS CASE)
3) Click Scan
REFRESHES THE LIST OF WIFI NETWORKS WHICH THE SELECTED RADIO CAN CURRENTLY SEE
4) Click Connect on desired WiFi Network once Scan is complete
YOU WILL BE PROMPTED FOR THE PASSWORD IF THE WIFI NETWORK WAS SECURED USING WEP OR WPA
The Scan button performs a one-time refresh of the wireless signals in range. When moving locations, for instance, the list of WiFi Networks may look like you are still at the old location, but clicking
the Scan button will list what is currently available. Keep in mind that you must first select the desired
model to the left of the Scan button prior to scanning or connecting.
The Connect button simply attempts to connect to the selected WiFi Network. If the signal is secured,
you may be prompted to enter the password of the WiFi Network. The WiFi status will update with the
steps the WiFiRanger is taking during the connection attempt.!
WiFiRanger User Manual
3
Perform Range
REQUIRES HIDE ADVANCED FEATURES OFF ON SETUP TAB
1) Get on Main tab of Control Panel
THE RANGE OPTIONS ARE HIDDEN INITIALLY
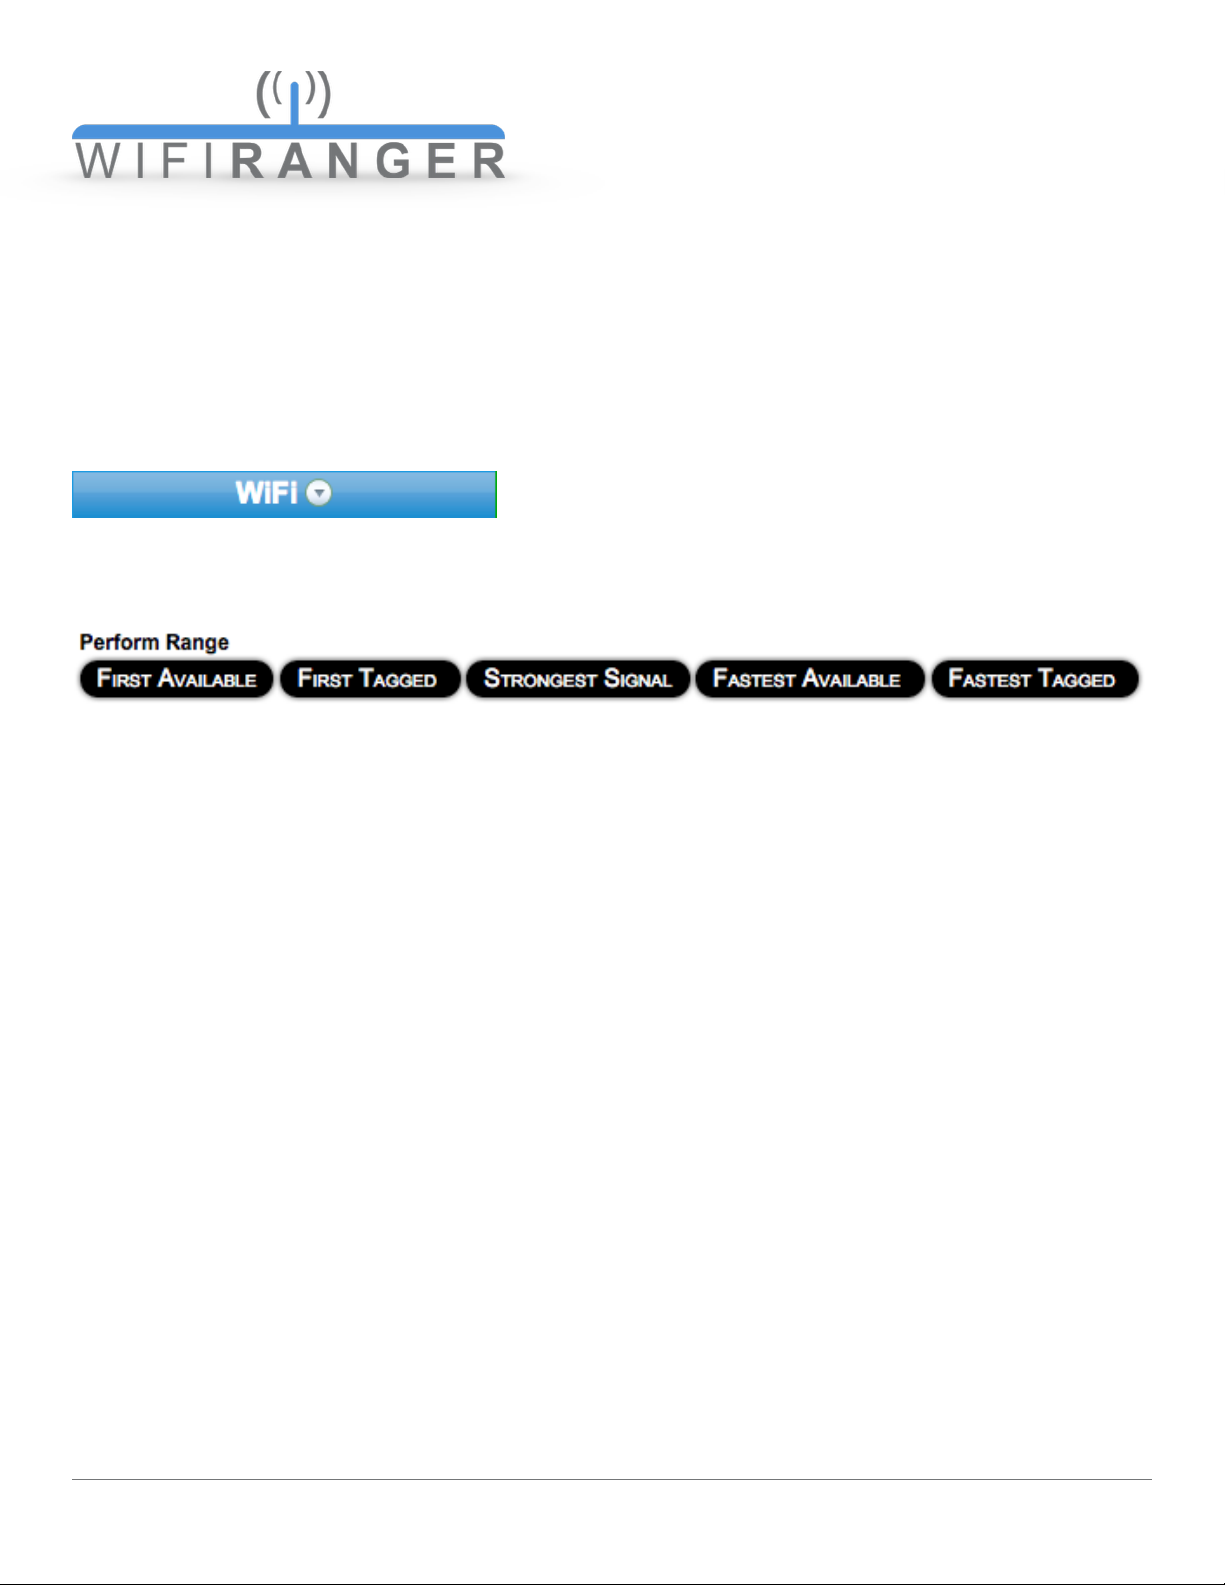
2) Click arrow-button to right of WiFi header
THIS EXPANDS TO SHOW THE RANGE OPTIONS BELOW
3) Click desired Perform Range choice
EACH OPTION IS BASED ON INTELLIGENT PRIORITIZATION TO PROVIDE CONVENIENT CONNECTIVITY
First Available
Tries to establish a connection with the first available WiFi Network that provides an internet connection regardless of its speed, security, or signal quality
First Tagged
Tries to establish a connection with the first available WiFi Network that is tagged as Prefer or Last
Try, sorted by signal quality from best to poorest
Strongest Signal
Tries to establish a connection with an available WiFi Network that provides the strongest wireless
signal quality
Fastest Tagged
Tries to establish a connection with the fastest available WiFi Network that is tagged as Prefer or Last
Try, sorted by internet speed from best to poorest
Fastest Available
Tries to establish a connection with the WiFi Network that has the fastest internet speed available,
regardless of any Prefer tokens
NOTE THAT RANGE OPTIONS WILL ATTEMPT ALL WIFI NETWORKS IN RANGE, BUT NOT ALL SIGNALS ARE
NECESSARILY AVAILABLE. SUCCESS IS BASED ON HAVING AVAILABLE NETWORKS IN RANGE FOR WHICH YOU
HAVE ALREADY STORED THE PASSWORD OR THAT ARE OPEN OR FILTERED.!
WiFiRanger User Manual
4
WiFi Networks
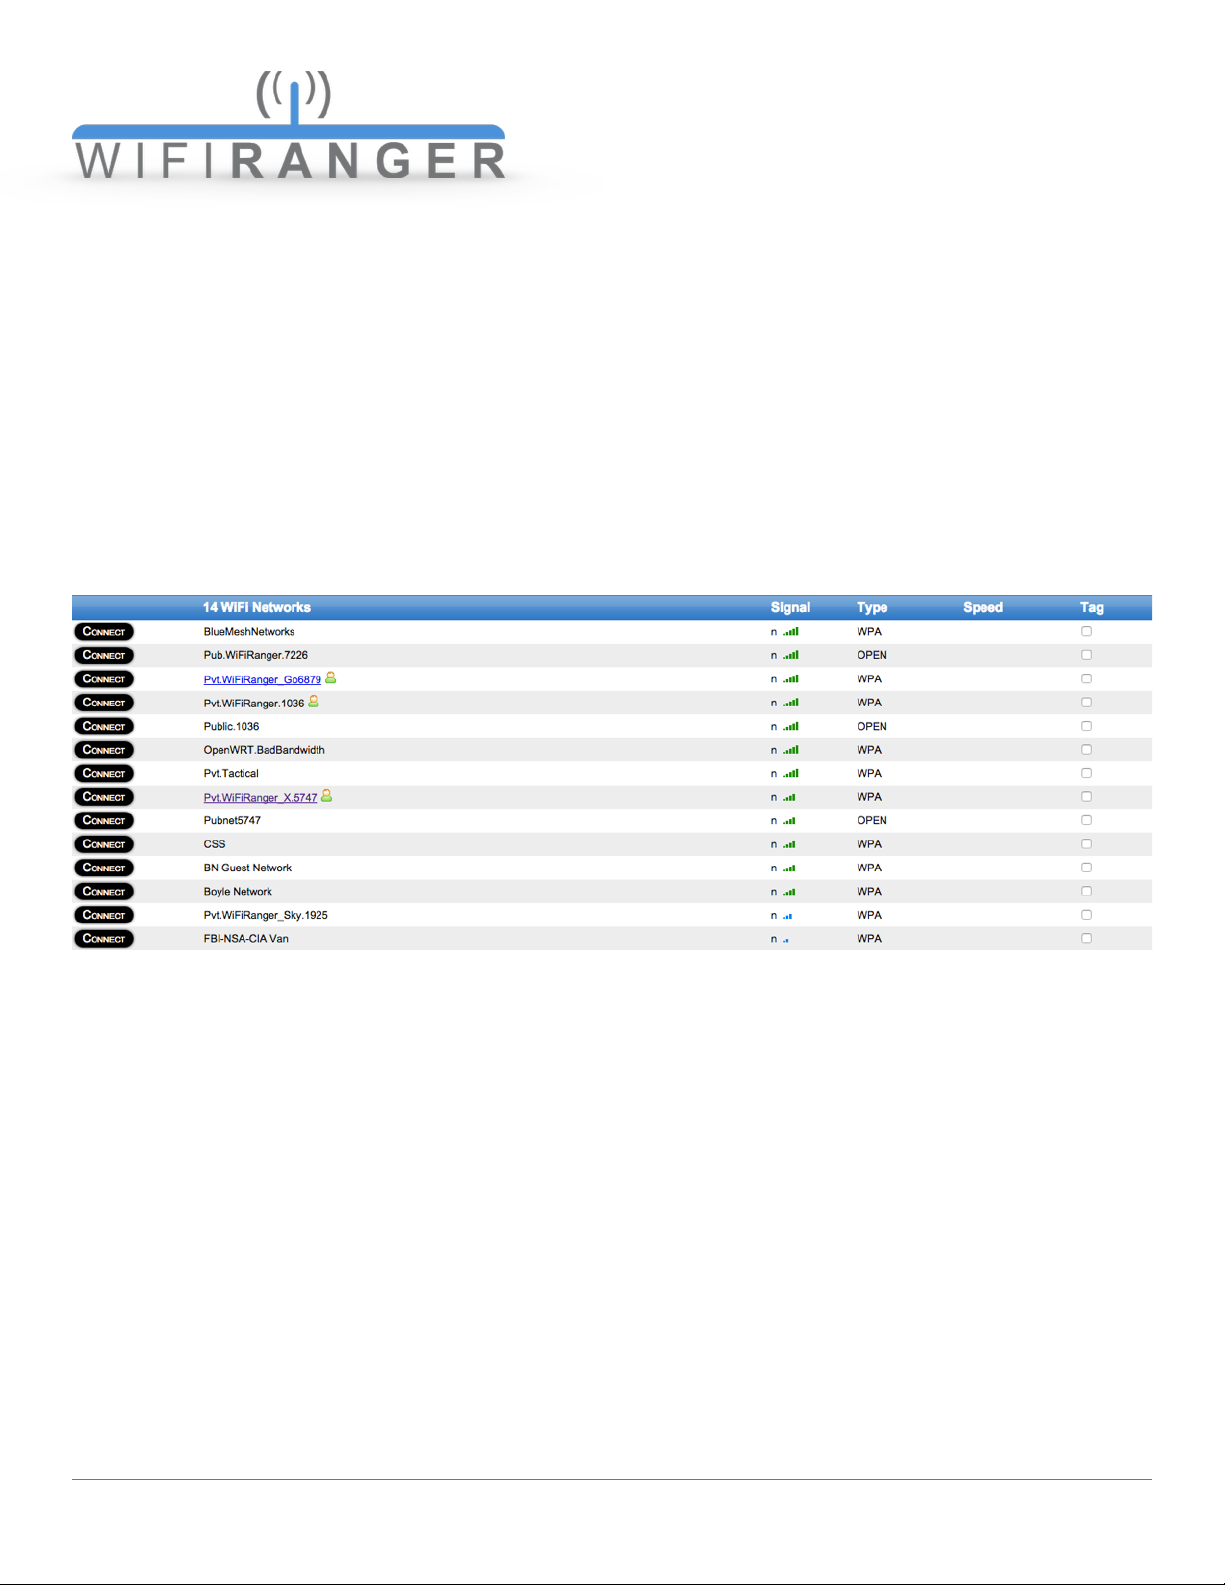
On the Main tab, the list of available WiFi Networks provides useful information and sorting of wireless signals. The number of networks is displayed, as are the signal details. All networks are sorted
top to bottom in order of signal strength (strongest to weakest) from the time of the Scan.
The letter to the left of the signal strength bars denotes the type of network whether 802.11b, g, or n
(oldest and slowest technology to newest and fastest from left to right). The signal bars are color coded to help emphasize their strength (red is weakest and green is strongest).
Speedtest results are also displayed once the network has successfully been connected to and
Speedtested. Creating a network Tag is also possible for each WiFi Network by clicking the Tag
checkbox. A prompt window will appear so that you can select the type of Tag that you would like to
create for this WiFi Network.
Type (encryption)
OPEN
No password required for connecting and common for free public WiFi Hotspots
FILTERED
No password required yet a passcode or terms acceptance on a web page is required
WEP
Password is required for connecting and this is an older and weaker form of security
WPA
Password is required for connecting and this is the latest and strongest form of security!
WiFiRanger User Manual
5

Private Broadcast
On the WiFi tab, customize the WiFiRanger’s private wireless signal.
Broadcast*
In general, it is not recommended to turn the Broadcast to Off. In cases of paired WFRControl
systems, it may be preferable to turn the Broadcast of the Slave to Off, minimizing wireless
noise.
Hidden Network*
Hiding the signal is not recommended. This setting is for limited purposes. Prior to hiding the
signal, take the same precaution listed above for when turning the WiFi Broadcast Off.
Name (SSID)
Personalize your signal by changing the Name. It is recommended to change the Name at the
same time of making a Password change, as your computers and devices may get confused
and have mix-matched passwords stored for the WiFiRanger.
Password (WPA Key)
When setting up the WiFiRanger for the first time, it is highly recommended to change the
Password from the default. Once the new Password is Saved, your device’s connection will
be knocked off, as the WiFiRanger is resetting its broadcast to use the new password. Once
disconnected, reconnect your computer or device to the WiFiRanger and enter the new
Password. It is recommended to personalize the Name along with the Password.
Encryption*
Modify the type of security if some older devices do not support the default WPA2 AES encryption which is the latest and most secure type.
*REQUIRES HIDE ADVANCED FEATURES OFF ON SETUP TAB!
WiFiRanger User Manual
6

Updating
It is highly recommended to keep the WiFiRanger updated and on the current firmware version. This
ensures best performance and highest security possible.
1) Connect WiFiRanger to stable Internet
RELIABLE INTERNET AND POWER IS CRUCIAL FOR MINIMIZING POTENTIAL UPGRADE FAILURE
2) Click Check for Updates on Control Panel
THIS MAY HAVE ALREADY OCCURRED UPON GETTING THE WIFIRANGER ONLINE
3) Click Update Firmware link if available
THE CHECK FOR UPDATES BUTTON WILL ONLY CHANGE TO THE FIRMWARE LINK IF AN UPDATE IS AVAILABLE
4) Follow instructions shown on screen
GENERALLY WAIT FOR THE WIFIRANGER TO COMPLETE THE UPDATE ON ITS OWN AND LEAVE IT POWERED UP
Cautions & Risks
Leaving the WiFiRanger alone for several minutes will allow the update to complete. If the WiFiRanger loses either power or internet during the update process, the router may become inaccessible
and unresponsive. In the unfortunate and infrequent event of an upgrade failure, contact WiFiRanger
support to receive the appropriate troubleshooting and solution.
Upgrading Multiple WiFiRangers
For owners of multiple WiFiRanger routers, we have simplified the update process so that it is all
done automatically if WFRControl is properly setup. Just get on the Control Panel of your Go/Go2
(master) and follow the update procedure as outlined above.!
WiFiRanger User Manual
7

CONNECTIONS
To access the more advanced configuration details of each Internet Connector, ensure that it is Active
and then click the Settings gear icon on the Setup tab.
Ethernet WAN
Use Ethernet WAN for internet via a hardwired connection from a Cable or DSL modem. By default
Ethernet WAN is Active on the Setup tab. This connection type is very simple, as it only requires an
ethernet cable be plugged into the designated Ethernet WAN port of the WiFiRanger.
On the Setup tab, by clicking the gear Settings icon of Ethernet WAN,
the Ethernet Port selection is exposed. Here the port can actually be
changed to the desired one. It is recommended to leave it on the default WAN port, but the option to modify the port designation is available.
A second Ethernet WAN port can be assigned in order to have two
Ethernet WAN internet sources. This allows for improved internet stablity and redundancy. Simply check Ethernet WAN 2 as Active, then expand its Settings to select
which port to assign for the secondary Ethernet WAN.
Toggli ng POE ’s 2 nd Port
For WiFiRanger Mobile, Marine, Sky, or Elite products that are using a POE power supply, it is possible to toggle the secondary ethernet port (labeled LAN) of the adapter to act as either a WAN or LAN
port. Having Ethernet WAN Active allows you to hardwire the WiFiRanger to an internet source as
outlined above. Making Ethernet WAN inactive causes the WiFiRanger to use the secondary port of
the POE as a LAN connection for hardwiring one computer, device, or switch.
Secondary Port as WAN
Check Ethernet WAN as Active on the Setup tab then click Save Changes
Secondary Port as LAN
Uncheck Ethernet WAN making it inactive on the Setup tab then click Save Changes!
WiFiRanger User Manual
8
Internal WiFi
The primary purpose of WiFiRangers has been to connect to the internet through other wireless signals. This is a very unique feature, and is one that was pioneered by the makers of WiFiRanger.
WiFi For WAN is a term used for this functionality, which denotes the WiFiRanger’s ability to use other
WiFi Networks in a similar way to a hardwired WAN connection.
To use Internal WiFi, simply Scan & Connect or setup Auto Connect as desired. Internal WiFi is capable of connecting to any standard wireless signal that provides internet, including Public Hotspots,
Home Networks, Hotel Networks, MiFi Signals, Smartphone Signals, etc.
Cellular
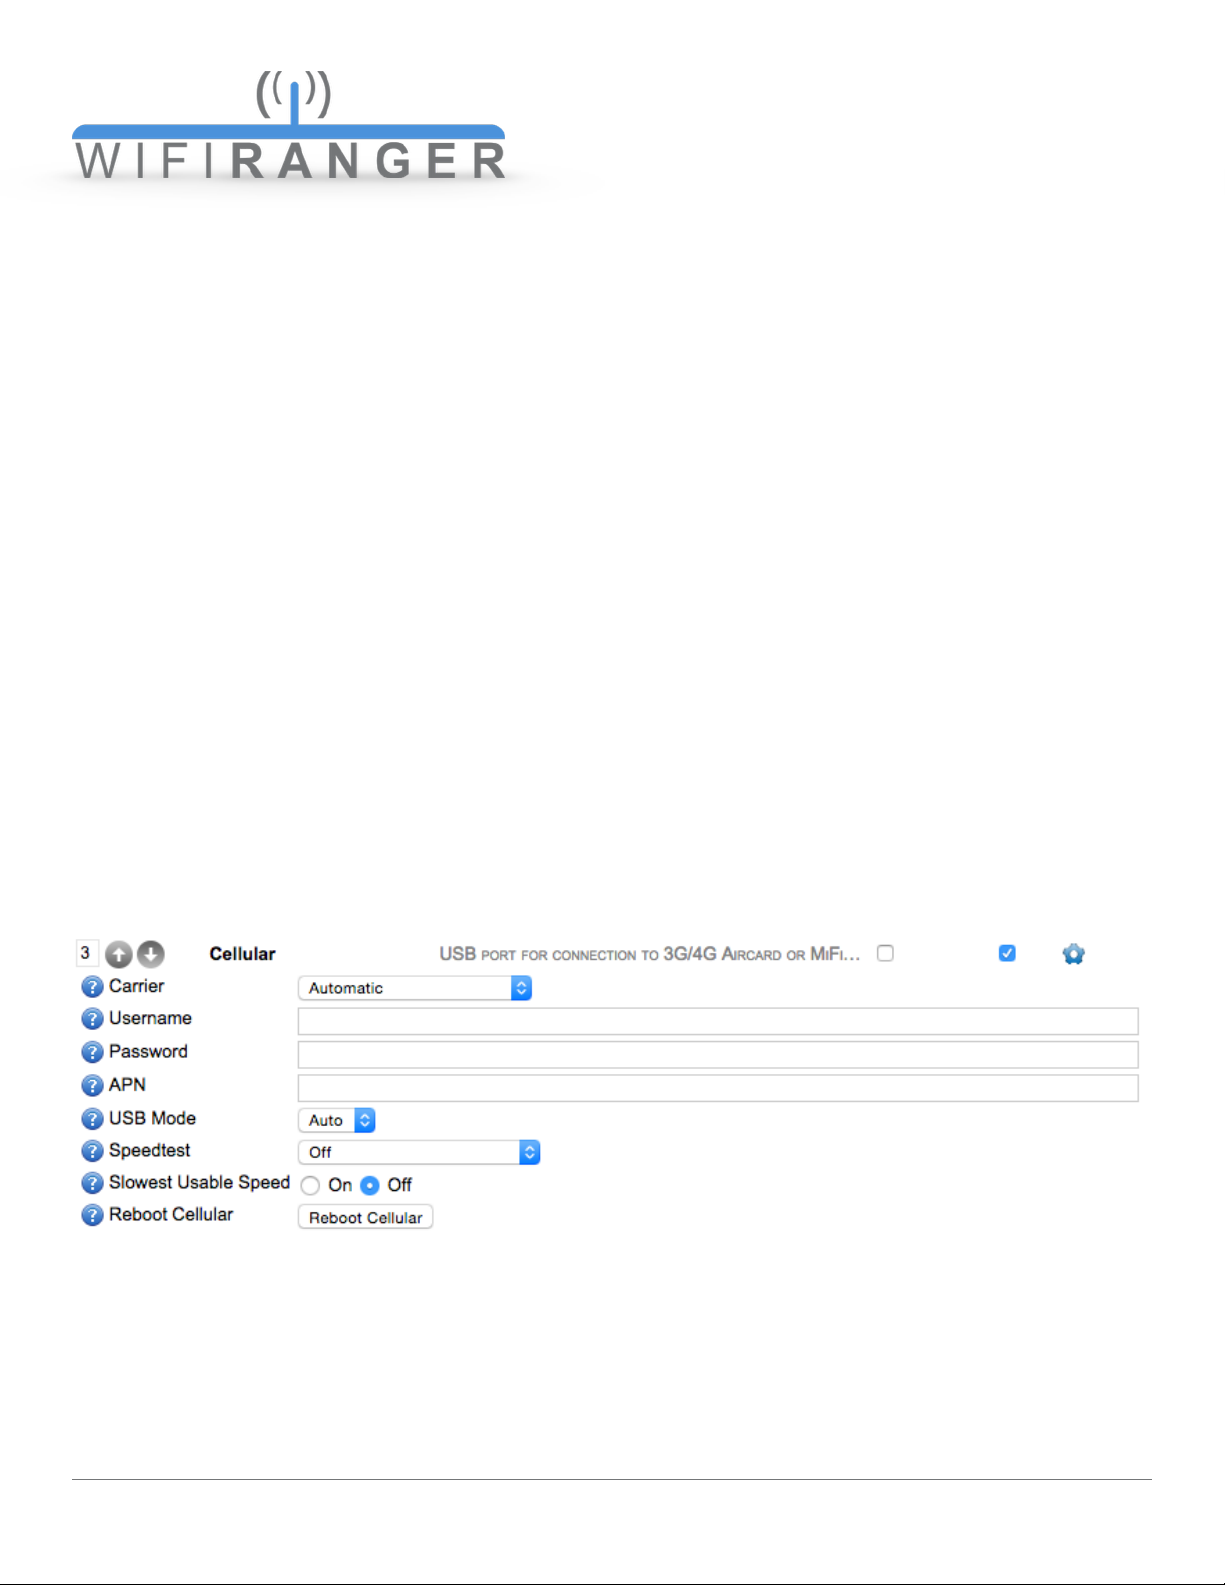
Indoor WiFiRanger routers that are equipped with a USB port which supports plug-n-play use of particular Aircards, Smartphones, and MiFi devices. Ensure that the device is activated and has service
before attempting to use with the WiFiRanger. For a list of supported devices, go to wifiranger.com
In general, no settings need to be changed on the WiFiRanger in order for a supported Aircard or MiFi
device to tether. If unable to connect to a support device after verifying that all of its settings are correct, then contact WiFiRanger support for assistance. Additional settings are available to troubleshoot
Cellular by turning Hide Advanced Features Off on the Setup tab. Now on the Setup tab, click the
gear Settings icon to reveal additional settings. By default, Automatic is selected for Carrier which is
the recommended option. Any supported device should work with Automatic selected.
FOR TETHERING THE NOVATEL 4620L/LE MIFI DEVICE, FOLLOW THE SEPARATE GUIDE AVAILABLE AT WIFIRANGER.COM
WHEN PLUGGING USB AIRCARDS IN, IT IS RECOMMENDED TO USE A USB EXTENSION CABLE BETWEEN THE WIFIRANGER
AND AIRCARD. THIS ENSURES PROPER SEATING OF THE USB CONNECTION, AND ALLOWS THE AIRCARD TO BE PLACED IN
AN OPTIMAL LOCATION FOR CELLULAR RECEPTION.!
WiFiRanger User Manual
9
WFRBoost
NO LONGER SUPPORTED OR RECOMMENDED
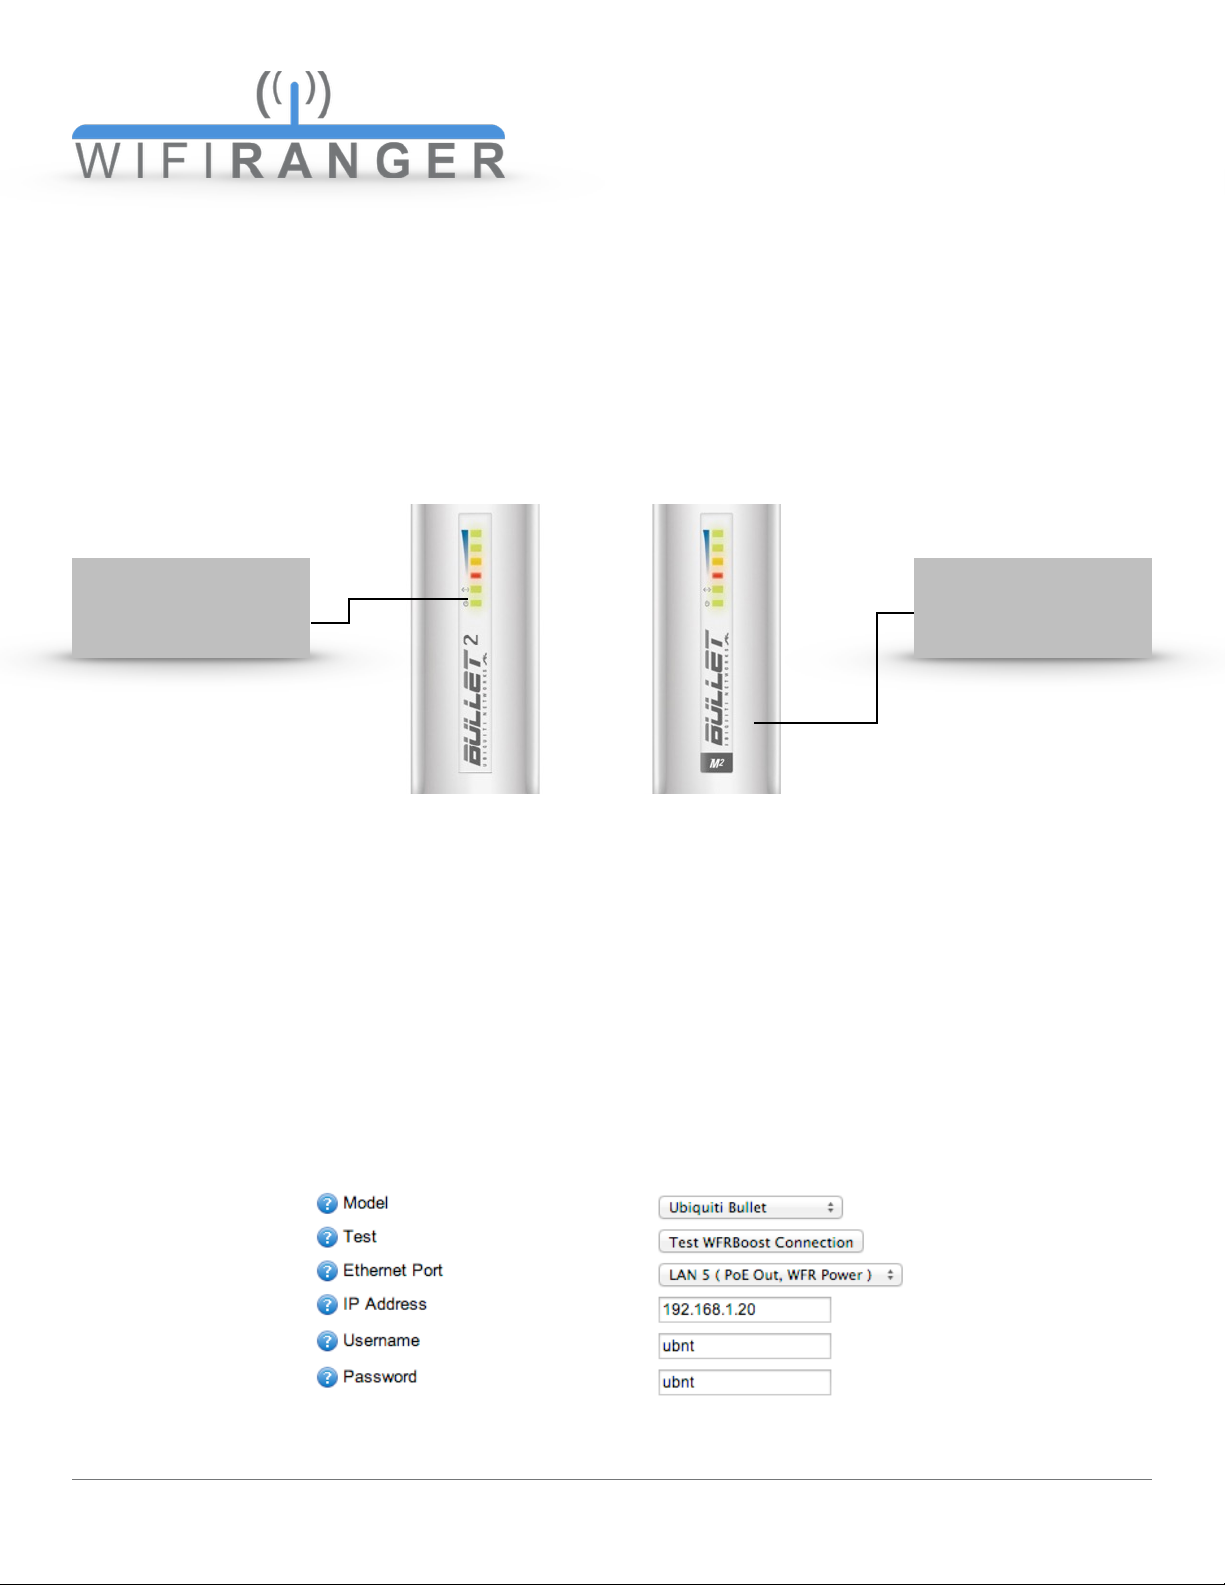
The WFRBoost systems were discontinued in July of 2012. These were the predecessors of the current WiFiRanger Mobile. It is critical to determine which product is in use as the WFRBoost feature
will not work for paired systems which require WFRControl setup instead and vice versa.
To distinguish between a WFRBoost and the similar looking original Mobile (non-Titanium version),
simply look at the hardware.
Activating WFRBoost
1) Check WFRBoost as Active on Setup tab
WFRBOOST MUST BE POWERED UP AND PLUGGED INTO WIFIRANGER
2) Expand settings by clicking gear icon
GENERALLY THE DEFAULT SETTINGS WILL WORK TO CONFIGURE
3) Select WFRBoost Model and verify other settings
RESET THE WFRBOOST TO FACTORY DEFAULTS IF THE PROVIDED SETTINGS FAIL (GUIDE AT WIFIRANGER.COM)
4) Click Save Changes
IF SUCCESSFUL, WFRBOOST WILL BE READY TO USE AND LISTED ON THE MAIN TAB AS AN AVAILABLE MODEL!
WiFiRanger User Manual
10
Mobile
BulletM2
WFRBoost
Bullet2
WFRControl
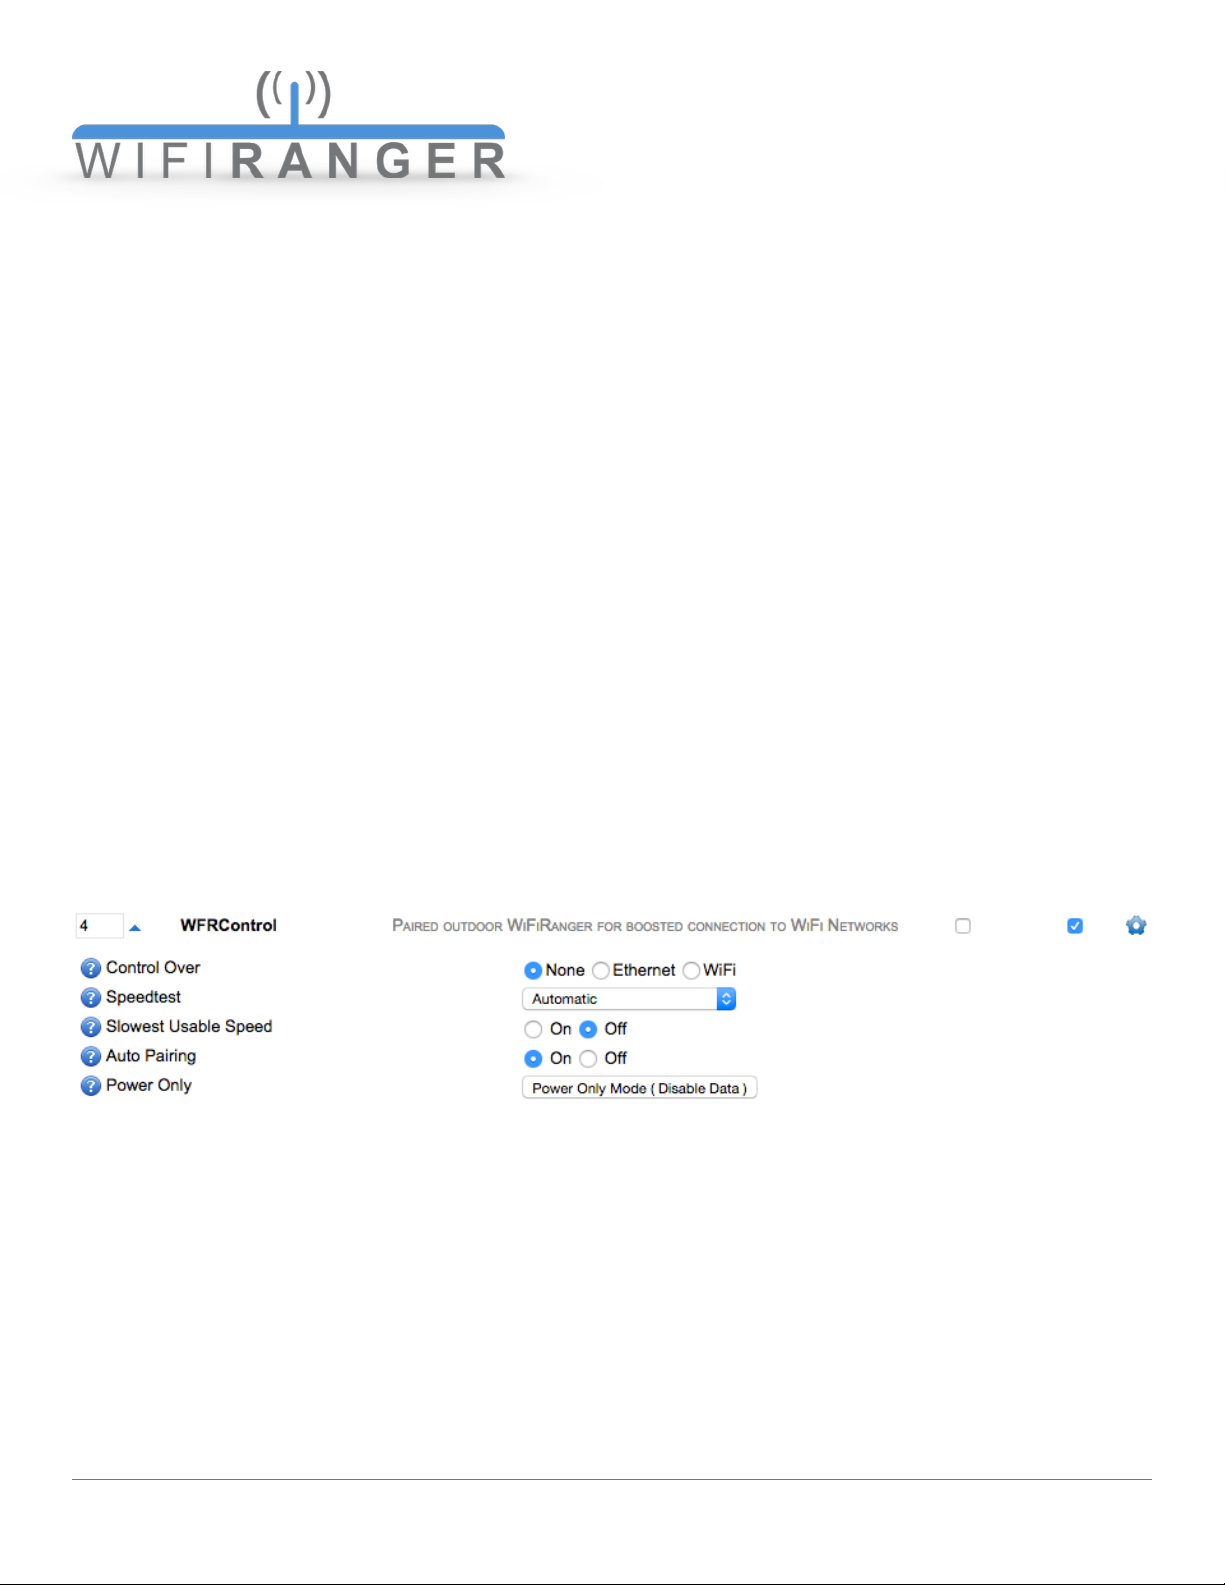
This feature allows a master WiFiRanger to manage and control a secondary WiFiRanger. This is
used in packs that generally include both indoor and outdoor routers. It is preferable to Scan and Join
using the outdoor router which is generally the slave. This can be done conveniently from the master’s Control Panel once WFRControl is properly setup.
WFRControl also unites the private network so that devices connected to either WiFiRanger can
communicate on the same Local Area Network. This ensures that the network is one, even though
two routers are in play. Generally, the master router is used for Control Panel functions while WFRControl is in use.
Initiating WFRControl
1) Check WFRControl as Active on Setup tab
2) Expand settings by clicking gear icon
3) Select appropriate Control Over method
Ethernet
No additional information needed (automatically senses ports)
WiFi
Select client WiFiRanger’s SSID and enter WPA key
4) Click Save Changes
5) Select WFRControl then Scan and Connect on Main tab
Power Only Mode is used only in troubleshooting situations which require the outdoor unit to be powered up by the indoor router, but not to have data interconnectivity. This mode is helpful when encountering trouble pairing WFRControl, allowing direct access to the outdoor unit’s wireless network
and Control Panel so that it can be reset to factory defaults before attempting pairing again.!
WiFiRanger User Manual
11
USAGE
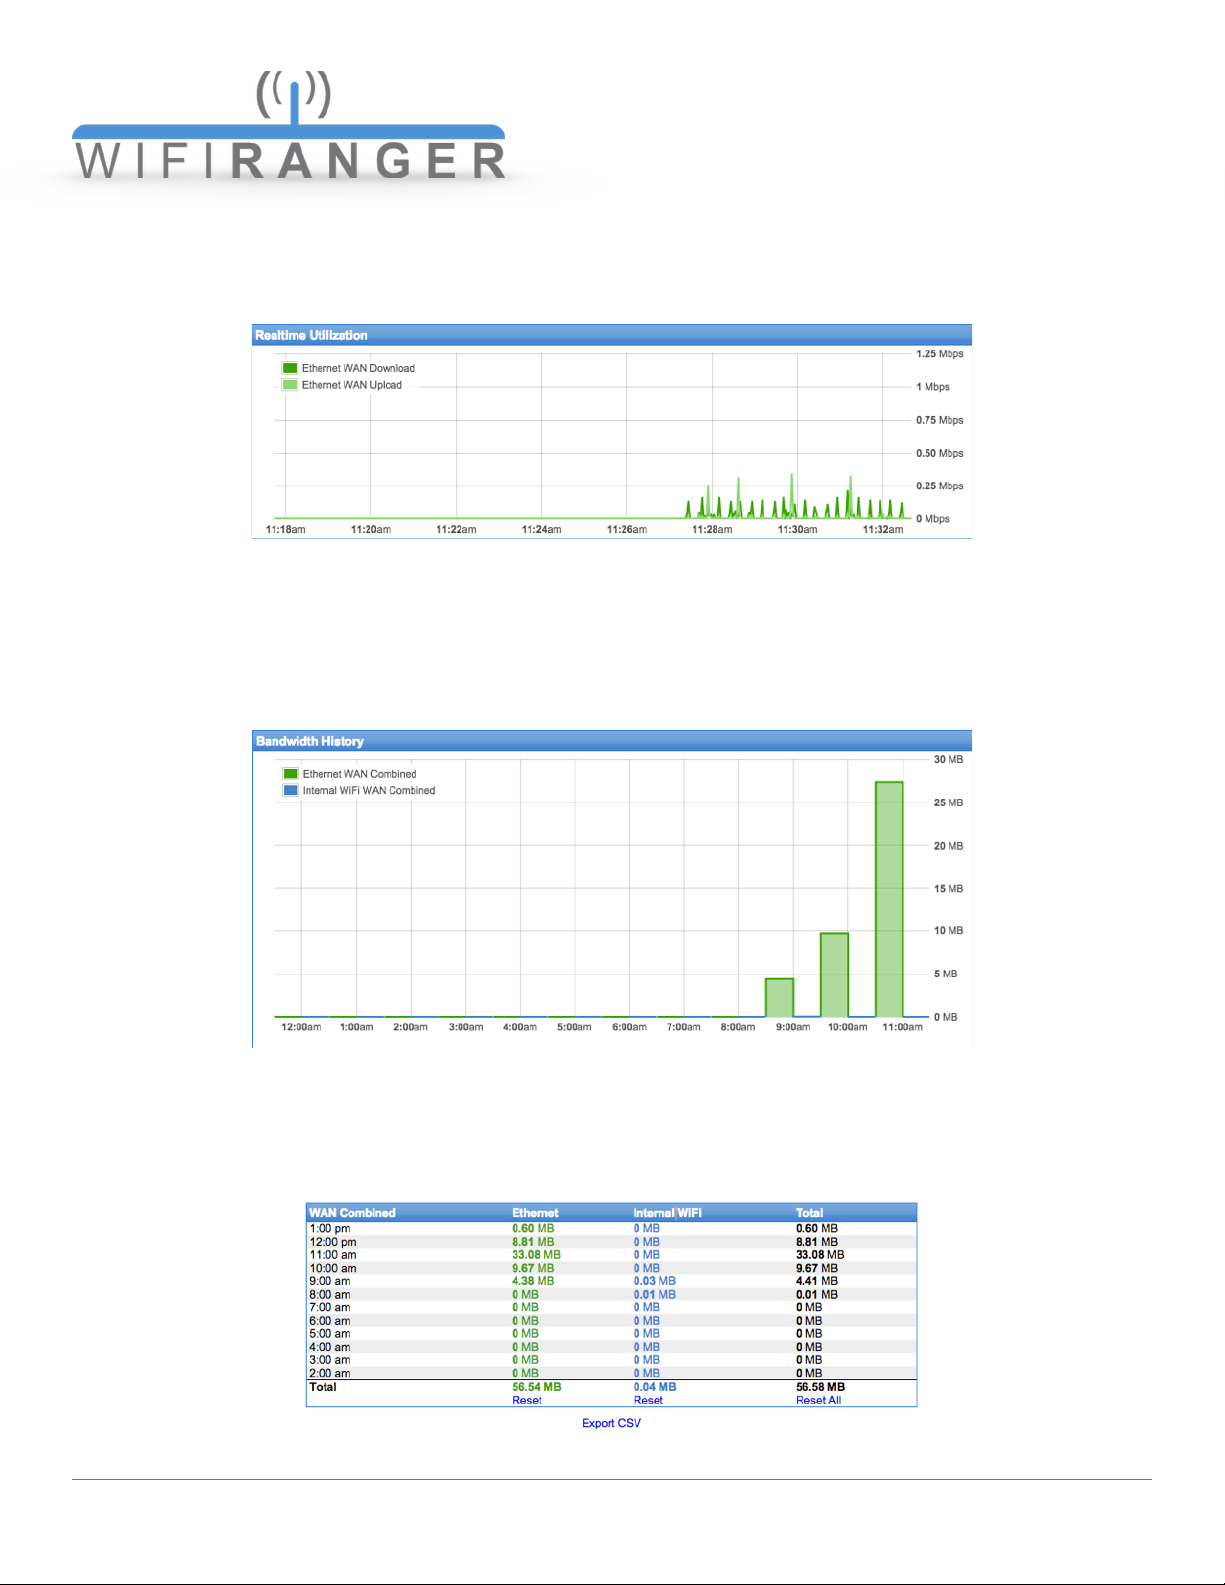
Realtime Utilization
Monitor the past 15 minutes of bandwidth activity on the Usage tab of the Control Panel. Speeds will
be indicated on the graph, and each individual Internet Connector will be color coded with Download
and Upload separated by shade of color.
Bandwidth History
Analyze past consumption of data on the Usage tab of the Control Panel. History is broken out by Internet Connector using color coding. The desired history to display can be changed using various
drop-down options below the graph. A table of usage will display by clicking the Show History button
on the right. This table can also be downloaded as a CSV export.
WiFiRanger User Manual
12
 Loading...