

Page 1

Montageanleitung (Or iginal)
Wieland Electric GmbH
Brennerstraße 10
96052 Bamberg
Phone
Fax
info@wieland
www.wieland-electric.com
HINWEIS
Personal, welches dieses Gerät installiert, programmiert, in Betr ieb nimmt oder wartet,
muss diese Anleitung gelesen und verstanden haben.
WARNUNG
• Das Personal muss gründlich mit allen Warnungen, Hinweisen und Maßnahmen gemäß
• Halten Sie das Gerät von Wasser und Feuer fern!
Spannungsverorgung
FE
GND
VCC
Betriebserde
Masse
24 VDC
Serielle Schni ttstelle: RS485
Pin A
A (- / Y)
Pin B
B (+ / Z)
Ethernet-Schnittstelle: ETH 0 un d ETH 1
Grüne LED
Link-Anzeige
Gelbe LED
Aktivitätsanzeige
Status-LEDs
P
Versorgungsspann ung vorhanden
A
SPS-Status
B
Portal-Status
Adresse: http://192.168.1.10
Benutzername: admin
Passwort: wienet123
W ARNUNG
Schalten Sie die Spann ungsversorgung aus und trennen Sie das Gerät vom N etz.
Spannungsversorgung
Versorgungsspannung
24 VDC (±15%)
Betriebsstrom
<50 mA (ohne I/Os)
weitere Schnitts telle
SD-Kartenschacht (siehe Abb. 2)
microSD-Karte
Anschlüsse
Anschlusstechnik
Schraubklemme 2-/3-pol
Anschlussquerschnitt
0,2…2,5 mm² (AWG 30 – AWG 12)
Abisolierlänge
7 – 8 mm
Allgemeine Daten
Betriebstemperatur
0…55 °C
Lagertemperatur
-20…+60°C
Maße
siehe Maßzeichnun g, Abb. 1
Schutzart
IP20
Störaussendun g
IEC 61000-6-3
Störfestigkeit
IEC 61000-6-2
Prüfzeichen
CE
1 2 3
4
microSD
ETH1 ETH0 Reset
wienet IoT-Gateway Starterkit
IOT SK 115-W 83.041.1000.0
– 14
+49 951 9324-0
+49 951 9324-198
-electric.com
dieser Montageanleitung vertra ut sein.
• Ggf. erforderliche Schutzmaßnahmen und Schutzeinrichtungen müssen den gültigen
Vorschriften entsprechen.
• Beschädigte Produkte dürfen weder installiert noch in Betrieb genommen werden.
• Das Gerät darf nicht geöffnet werden.
• Führen Sie keine Fremdobjekte in das Gerät ein!
1 Funktionsbeschreibung
Das wienet IoT-Gateway komm uniziert mit der wienetCloud via Ether net und der vorhandenen Netzwerkinfrastruktur. Der Kommunikationsmechanismus hat ein geringes Datenaufkommen und lässt sich problemlos in vorhandene Netzwerkinfrastrukturen integrieren.
Das IoT-Gateway ist für die Montage a uf einer geerdeten 35-mm-Hutschiene in trockenen
Räumen vorgesehen.
Die Stromversorgung is t als PELV-Stromkreis (Verbindung zwischen Masse und Betriebserde) auszuführen. Die Stromversorgung muss eine Stromquelle mit begrenzter Energie
nach EN60950-1 Kap. 2.5 sein oder das Ger ät ist mit einer Sicherung 2 A träge abzus ichern.
2 Funktionselemente und Anzeigen
Pinbelegungen und Verbindungen
LEDs
4 Zugriff auf die Web-Oberfläche des IoT-Gateways
Das IoT-Gateway wird über ein Web-Interface via Web-Browser konfiguriert. Rufen Sie folgende Adresse auf und melden Sie sich mit diesen Daten an:
Sie befinden sich jetzt auf der Weboberfläche des IoT-Gateways. Sollte ein Öffnen nicht
möglich sein, dann überprüfen Sie bitte die Proxy-Einstellungen des verwendeten Browsers.
Bitte keinen Proxy wählen!
5 Werkseinstellungen laden (Reset)
1. Trennen Sie das IoT-Gateway von der Span nungsversorgung.
2. Betätigen Sie den Reset-Knopf mit einem spitze n Gegenstand (z. B. Büroklammer) und
halten Sie ihn gedrück t (bis Schritt 5).
3. Schließen Sie das IoT-Gateway wieder an die Spannungsversorgung an.
4. Warten Sie, bis das IoT-Gateway das Zurücksetzten durch zweimaliges kurzes Aufleuchten aller LEDs bestätigt.
5. Lassen Sie den Reset-Knopf los und warten Sie bis das IoT-Gateway wiede r gestartet
hat. Trennen Sie das Gerät währenddessen nicht von der Spannungsversorgung.
6 Demontage (Abb. 4)
Drücken Sie das Gerät nach unten, und kippen Sie es nach oben.
7 Technische Daten
3 Montage
Anbringen auf Trägerschiene (Abb. 3)
1. Kippen Sie das Gerät etwas nach hinten.
2. Haken Sie das Gerät oben auf der Schiene ein.
3. Drücken Sie d as Gerät nach unten und gegen die Schiene, bis es einrastet.
4. Prüfen Sie, ob das Gerät fest auf der Tragschiene sitzt.
Anschluss an Spannungsversorgung
Schließen Sie eine geeignete Spannungsversorgung an das IoT-Gateway an.
Anschluss von Netzwerkgeräten
Schließen Sie Ihre Netzwerkgeräte über Standard-UTP/STP-Kabel mit RJ45 Stec kverbindern
an das IoT-Gateway an.
Doc. # BA001201 – 07/2019 (Rev. A) wienet IOT SK 115-W DE
8 Lieferumfang
• 1 IoT-Gateway GW 115-W
• 1 microSD-Karte
• 1 Montageanleitung
• 1 Steckverbinder 3-polig
• 1 Steckverbinder 2-polig
• 1 Etikett MAC-Adresse
Page 2
Schnellstart-Anleitung (Original)
Wieland Electric GmbH
Brennerstraße 10
96052 Bamberg
Phone
Fax
info@wieland
www.wieland-electric.com
IP-Adresse: 192.168.1.100-250
Netzwerkmaske: 255.255.255.0
Benutzername: admin
Passwort: wienet123
Default:
Benutzername: admin
Passwort: wienet123
Reboot
wienet IoT-Gateway Starterkit
IOT SK 115-W 83.041.1000.0
Schnellstart Anleitung
1 Inbetriebnahme
Damit eine Netzwerkverbindung hergestellt werden kann, muss sich Ihr PC im gleichen
Netzwerk wie das IoT-Gateway befinden.
Variante 1: St andard
1. Verbinden Sie Ihren PC via Ethernetkabel mit dem IoT-Gateway.
2. Stellen Sie die IP-Adresse des Netzwerkadapters am PC manuell ein:
Variante 2: wienet IoT IP-Tool
Laden Sie sich das wienet IoT IP-Tool von https://wie .li/iiotde herunter und installieren Sie
das Tool.
1. Verbinden Sie Ihren PC via Ethernetkabel mit dem IoT-Gateway.
2. Öffnen Sie das Tool.
▷ Ihr Gateway wird nun ange zeigt.
Sie können die IP -Adresse des Gateways direkt im wienet IoT IP-Tool ändern und das Gateway so in Ihr Netzwerk integrieren.
3. Geben Sie die neue IP-Adresse, ggf. die neue Netzwerkmaske und die Gateway IP-
Adresse ein. Klicken Sie auf Configure.
▷ Ihr Gateway hat nach erfolgreicher Konfiguration, die von Ihnen festgelegte IP-Ad-
resse.
4. Klicken Sie auf den HTTP-Button, um die We boberfläche des IoT-Gateways zu öffnen.
– 14
+49 951 9324-0
+49 951 9324-198
-electric.com
b. Projekt anlegen
• Starterkit: Nachdem Sie Ihr Starterkit erhalten haben , kontaktieren Sie bitte unseren
Technischen Support (Tel. +49 (0) 951 9324-995). Dieser wird für Sie ein Projekt auf unserem Testserver anlegen und Ihnen die Zugangsdaten zusenden.
• Gateway: Gehen Sie auf https://www.iot.wiene t.cloud/register und registrieren Sie sich
für das wienetCloud-Por tal. Nach Prüfung Ihrer Angaben wird Ihr Portalz ugang freigeschalten und S ie können sich anmelden.
c. Gatewa y anlegen
1. Um ein Gateway zu ak tivieren, müssen Sie sich im entsprechenden Projekt anmelden,
siehe Schritt 3b.
2. Gehen Sie in der Ansicht Anzeigen zum Reiter Gateway. Wählen Sie hier Gateway a kti-
vieren.
3. Wählen Sie Ihren Gateway-Typ aus und geben Sie die MAC-Adresse des Gateways ein.
4. Füllen Sie folgende Felder aus: Scope, Benut zername und Passwort.
Merken oder notier en Sie sich diese Angaben gut!
5. Um das Gateway zu aktivieren, klicken Sie auf KOSTENPFLICHTIG BESTELLEN UND
AKTIVIEREN. Für die Star terkits fallen hier keine Kosten an , da hier der Cloud-Zugang
auf unserem Testserver für ein Jahr inklusive ist.
2 Benutzerpasswort ändern
Nach erfolgreichem Login auf der Weboberfläche des wienet IoT-Gateways müssen Sie zuerst das Passwort ändern.
Geben Sie hierzu Ihr neues Passwort gemäß den Richtlinien ein und folgen Sie den weiteren
Anweisungen.
3 Kommunikation mit dem wienetCloud Portal
Für eine erfolgreiche Kommunikation mit dem wienetCloud- Portal müssen folgende Schritte
beachtet werden.
a. Internetverbindung mit IoT-Gateway herst ellen
1. Gehen Sie auf die Weboberfläche des IoT-Gateways.
2. Gehen Sie über das Einstellungen-Icon auf E instellungen und dann auf Netzwerk.
Wählen Sie je nach Gateway-Typ Ethernet, WLAN oder Mobilfunk aus.
• Ethernet: Stellen Sie die Ethernet-Schnittstelle auf DH CP ein. Klicken Sie auf OK
und führen Sie einen Neustart durch. Verbinden Sie den entsprechenden Port via
Ethernetkabel mit einem Gateway ins Internet.
• WLAN: Wählen Sie unter Netzwerkeinstellungen DHCP benutzen aus. Klicken Sie
auf den Button Suchen , um nach WLAN zu suchen. Wählen Sie anschließend das
richtige WLAN aus und geben Sie den Verschlüsselungscode ein. Klicken Sie auf OK
und führen Sie einen Neustart durch.
• Mobilfunk: Gehen Sie auf Mobilfunk und wählen Sie Mobilfunk aktivieren aus. Ge-
ben Sie anschließend den SIM-PIN und den APN ein. Klicken Sie auf OK und führen
Sie einen Neustart d urch.
3. Um die die In ternetverbindung zu testen, klicken Sie auf das Dia gnose-Icon und wählen
den Reiter Ping. Geben Sie unter Host folgende IP-Adresse ein: 172.217.16.131
(google.de)
4. Klicken Sie Start.
6. Gehen Sie zurück auf die Weboberfläche des IoT-Gateways.
7. Gehen Sie über das Einstellungen-Icon auf Ei nstellungen und dann auf wienetCloud.
8. Füllen Sie hier folgende Felder aus: Host, Projekt, Scope, Benu tzer und Passwort. Diese
Angaben müssen mit den Angaben aus der wienetCloud übereinstimmen.
9. Klicken Sie auf OK und starten Sie das IoT-Gateway anschließend neu.
Unter Einstellung en > Ereignisprotokoll können Sie den S tatus der Verbindung und mögliche Fehler nachverfolgen.
Nach erfolgreicher Verbindung ist Ihr Gateway im wienetCloud-Portal grün hinterlegt.
Doc. # BA001201 – 07/2019 (Rev. A) wienet IOT SK 115-W DE
Page 3

Installation instruc tions (translation from original)
Wieland Electric GmbH
Brennerstraße 10
96052 Bamberg
Phone
Fax
info@wieland
www.wieland-electric.com
NOTE
Personnel which ins talls, programs, operates or maintains this device must have read and
understood these ins tructions.
WARNING
• The personnel must be thoroughly familiar with all warnings, notes and procedures de-
• Keep away from fire and water!
Power supply
FE
GND
VCC
Functional earth
Ground
24 VDC
Serial interface: RS485
Pin A
A (- / Y)
Pin B
B (+ / Z)
Ethernet interface: ETH 0 and ETH 1
Green LED
Link indication
Yellow LED
Activity indication
Status LEDs
P
Device is powered
A
PLC status
B
Portal status
Address: http://192.168.1.10
User name: admin
Password: wienet123
W ARNING
Switch mains power off and disconnect your system from the supply network.
Power supply
Supply voltage
24 VDC (±15%)
Active current
<50 mA (without I/Os)
Interface
SD card interface (s ee fig. 2)
microSD card
Connectors
Wiring
Screw terminal, 2-/3-pole
Connector cross -section
0.2…2.5 mm² (AWG 30 – AWG 12)
Stripping length
7 – 8mm
General data
Operating temperature
0…+55 °C
Storage temperature
-20…+60 °C
Dimensions
see dimensional drawing, fig. 1
Degree of protection
IP20
EMC emission
IEC 61000-6-3
EMC immunity
IEC 61000-6-2
Compliance
CE
1 2 3
4
microSD
ETH1 ETH0 Reset
wienet IoT-Gateway Starterkit
IOT SK 115-W 83.041.1000.0
scribed in these op erating instructions.
• Where necessary, safety precautions and safety devices must comply with the applicable
regulations.
• Damaged products must neither be in stalled nor put into operation.
• The unit must not be opened.
• Do not insert any objects into the unit!
1 Function description
The wienet IoT gateway comm unicates with the wienetCloud via Ethernet an d the existing
network infrastr ucture. The communication mechanism has a low data vol ume and can be
integrated easily in the e xisting network infrastructure.
The IoT gateway is des igned for an installation on a grounded 35 mm DIN rail in dry rooms.
The power supply of the device must be a grounded circuit PELV (connection between func-
tional earth and gro und). The power supply must b e a limited power source according to
the EN60950-1 chap. 2.5 or must be provide d with an anti-surge fuse of 2 A.
2 Functional elements and indicators
Pin assignments and connections
– 14
+49 951 9324-0
+49 951 9324-198
-electric.com
4 Access to the web interface for the IoT gateway
The IoT gateway is configured via a web interface using a web browser. Open the following
URL in the browser an d enter the login data:
The web interface then opens. If the window does not open, please check the proxy settings
for the browser you are us ing. Please do not use a proxy!
5 Load factory settings (reset)
1. Disconnec t the IoT gateway from the power supply.
2. Press the reset button with a pointed object (e.g. a paper c lip) and keep it pressed (until
step 5).
3. Connect the IoT gateway to the power supply.
4. Wait until the I oT gateway confirms the reset by two short flashes of all LEDs.
5. Release the reset button and wait until the IoT gateway finished the restart. Do not disconnect the device from the power supply during the restart.
6 Removal from DIN rail (fig. 4)
Push down the power supply, and tilt upwards.
7 Technical data
LEDs
8 Scope of supply
• 1 IoT Gateway GW 115-W
3 Installation
Mounting on support rail (see fig. 3)
1. Tilt the unit s lightly backwards.
2. Fit the unit over top hat rail.
3. Push the unit d ownwards and against the rail for lock ing.
4. Check that the unit is locked into position.
Connecting to power
Prepare a suitable pow er source and connect to the IoT gateway.
Connecting to network device via ethernet
Connect your device b y standard UTP/STP cable with RJ45 conn ectors to the IoT gateway.
• 1 microSD card
• 1 installation instructions
• 1 Connector 3-pin
• 1 Connector 2-pin
• 1 Label MAC-ID
Doc. # BA001201 – 07/2019 (Rev. A) wienet IOT SK 115-W EN
Page 4

Quick start guide (tran slation from original)
Wieland Electric GmbH
Brennerstraße 10
96052
Phone
Fax
info@wieland
www.wieland-electric.com
IP address: 192.168.1.100-250
Network mask: 255.255.255.0
Username: admin
Password: wienet123
Default:
Username: admin
Password: wienet123
Reboot
wienet IoT-Gateway Starterkit
IOT SK 115-W 83.041.1000.0
Quick start guide
1 Commissioning
To establish a network connection, your PC must be in the same n etwork as the IoT gateway.
Variant 1 Stand ard:
1. Connect your PC to the IoT gateway via Ethernet cable .
2. Set the IP address of network adapter manually on the PC.
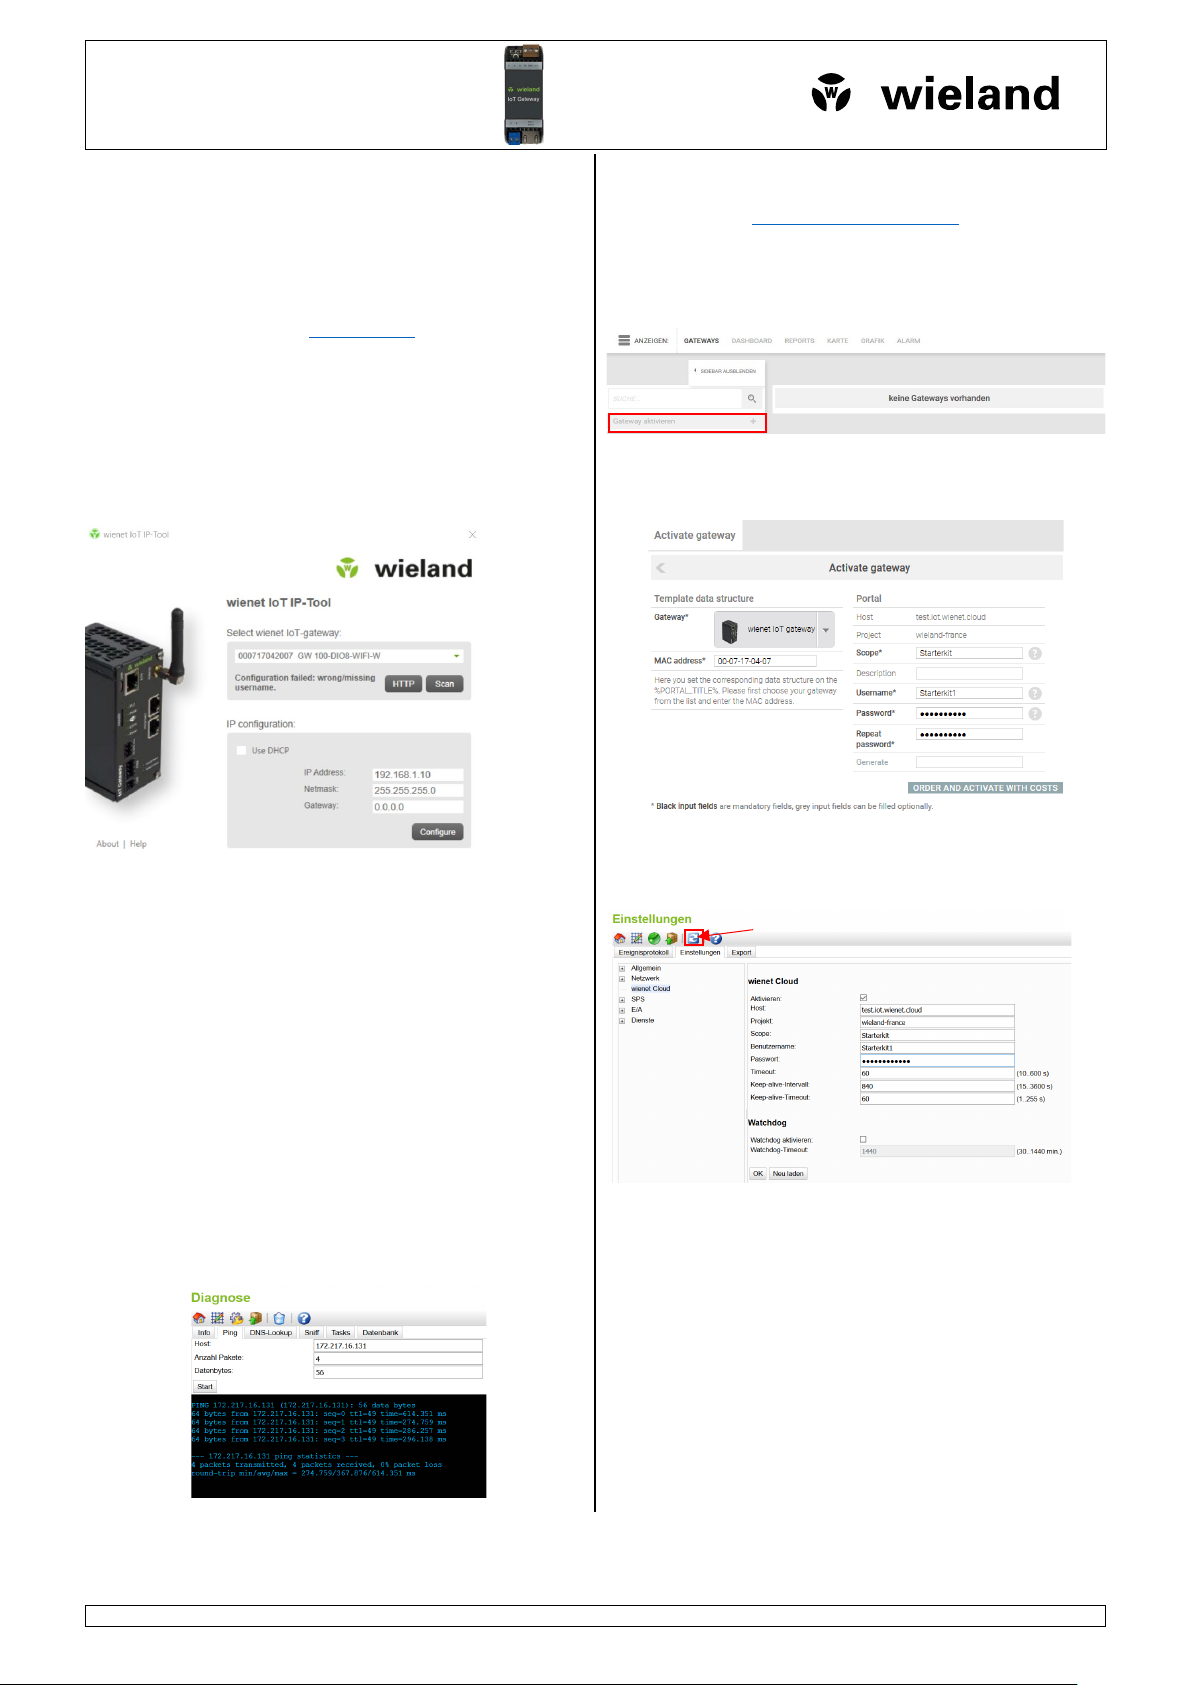
Variant 2: wienet IoT IP-Tool
Download the wienet IoT IP-Tool from http://wie.li/iioten and instal l the tool.
1. Connect your PC to the IoT gateway via Ethernet cable .
2. Open the tool.
▷ Your IoT gateway is now displayed.
You can change the IP address of the gateway directly in the wienet IoT IP-Tool and thus integrate the gateway int o your network.
3. Enter the new IP address and, if necessary, the new network mask and the gateway IP
address. Click on Configure.
▷ After successful configuration, your IoT gateway has the IP address you specified.
4. Click the H TTP button to open the web interface of the IoT gateway.
Bamberg
+49 951 9324-0
+49 951 9324-198
b. Create project
• Starter kit: After you have received your Starter kit, please contact our techn ical support
(Tel. +49 (0) 951 9324-995). They will create a project for you on o ur test server and send
you the access data.
• Gateway: Go to https://www.iot.wienet.cloud/register and register for the wienetCloud
portal. After check ing your data, your portal access will be activated and you can log in.
c. Activat e Gateway
1. To activate an IoT gateway, you must log in to the correspon ding project, see step3b.
2. In the View win dow, go to the Gateway tab. Select Activate Ga teway.
3. Select your IoT gateway type and enter the MAC address of the IoT gatew ay.
4. Fill in the following fields: Scope, Username and Pa ssword.
Remember this inf ormation well or note it!
5. To activate the I oT gateway, click on ORDER AND ACTIVATE WITH COSTS. There are no
costs for the Starter kits, as one year of cloud access to our test s erver is included.
– 14
-electric.com
2 Change user password
After successful login to the web interface of the wienet IoT gateway, you must change the
password first.
Enter your new passw ord according to the guidelines and follow the instructions.
3 Communication with the wienetCloud portal
To communicate successfully with the server, follow the steps below.
a. Connecting to the internet with IoT gateway
1. Go to the web inte rface of the IoT gateway.
2. Go via the Set tings icon to Settings and then to Ne twork. Select according to your IoT
gateway type Ethernet , WLAN or Cellular Modem.
• Ethernet: Set the Ethernet interface to D HCP. Click OK and reboot the system. Con-
nect the correspon ding port to the internet via an Ethernet cable with a gateway.
• WLAN: In the Network Settings, select Use DHCP. To scan for WLAN, click the
Search button. Select the c orrect WLAN and enter the encryption k ey. Click OK and
reboot the gateway.
• Cellular modem: Go to Cellular modem and select Enable cellular modem. Then
enter the SIM PIN and the APN. Click OK and reboot the system.
3. To test the intern et connection, click on the Diagnose icon and select the Ping tab.
Enter the following IP address under Host: 172.217.16.131 (google.de)
4. Click Star t.
6. Go back to the web interface of the IoT Gateway.
7. Go via the Settings ic on to Settings and then to wiene tCloud.
8. Fill in the following fields: Host, Project, Scope , Username and Password. This In for-
mation must match the inf ormation you provided in the wienetCloud .
9. Click OK an d reboot the gateway.
Under Settings >Eve nt log, you can track the status of the con nection and possible errors.
After the successf ul connection, your IoT gateway is highlighted green in the wienetCloud
portal.
Doc. # BA001201 – 07/2019 (Rev. A) wienet IOT SK 115-W EN
 Loading...