

WIDOS Einsteinstr. 5 Phone +49 / 71 52 99 39 - 0
W. Dommer Söhne GmbH D-71254 Ditzingen-Heimerdingen Fax +49 / 71 52 99 39 - 40
info @ widos.de
www.widos.de
Working instructions
Translation
Heating element-butt welding machine
WIDOS 4001
Kunststoff schweißtechnik
Keep for further use !
Headquarters: D-71254 Ditzingen-Heimerdingen Country court Stuttgart HRB 200973 Managing Director: Jürgen Dommer

Identification of product
Model: Workshop machine
Kunststoff schweißtechnik
Type:
Serial number: / year: see type plate
WIDOS 4001
Customer entries
Inventory- No.:
Location:
Order of spare parts and after sales service
Address of manufacturer WIDOS
W. Dommer Söhne GmbH
Einsteinstr. 5
D - 71254 Ditzingen-Heimerdingen
Phone: +49 / 71 52 - 99 39 - 0
Fax: +49 / 71 52 - 99 39 - 40
E-mail: info@widos.de
Address of subsidiary companies
WIDOS
WIDOS GmbH W. Dommer Söhne AG
An der Wiesenmühle 15 St. Gallerstr. 93
D-09224 Grüna / Sachsen CH – 9201 Gossau
Phone: ++49 371 / 8 15 73 - 0 Phone: ++41 71 / 388 89 79
Fax: ++49 371 / 8 15 73 - 20 Fax: ++41 71 / 388 89 73
25.06.12 Working instructions WIDOS 4001 Page 2 of 59

Introduction
Kunststoff schweißtechnik
Purpose of the document
These working instructions give you information about all important questions which refer to
the construction and the safe working of your machine.
Just as we are, you are obliged to engage in these working instructions, as well.
Not only to run your machine economically but also to avoid damages and injuries.
Should questions arise, contact our advisers in the factory or in our subsidiary companies.
We will help you with pleasure.
According to our interest in making our products and working instructions continuously better,
we kindly ask you to inform us about problems and defects which occur in exercise.
Thank you.
Structure of the working instructions
The working instructions are arranged in chapters, which belong to the different using
phases of the machine.
Therefore the searched information can be found easily.
WIDOS 25.06.2012
W. Dommer Söhne GmbH
Einsteinstraße 5
D-71254 Ditzingen-Heimerdingen
All rights reserved.
Reprinting only allowed with permission of the corporation.
Any changes prior to technical innovations.
25.06.12 Working instructions WIDOS 4001 Page 3 of 59

Contens
Kunststoff schweißtechnik
1. DESCRIPTION OF PRODUCT ...................................................................................... 6
1.1. Mounting and purpose-oriented use ..................................................................................6
1.2. Safety measures....................................................................................................................7
1.3. Conformity .............................................................................................................................7
1.4. Marking of product ...............................................................................................................7
1.4.1.
Technical data ................................................................................................................7
1.4.1.1. WIDOS 4001 general data.......................................................................................7
1.4.1.2. Heating element.........................................................................................................8
1.4.1.3. Planer.........................................................................................................................8
1.4.1.4. Hydraulic aggregate...................................................................................................8
1.4.1.5. Basic unit....................................................................................................................8
1.5. Equipment and accessories: ...............................................................................................9
2. SAFETY RULES .......................................................................................................... 10
2.1. Explanation of the different symbols................................................................................10
2.2. Obligations of the owner....................................................................................................11
2.3. Obligations of the worker...................................................................................................11
2.4. Measure of organization.....................................................................................................11
2.5. Information about safety precautions...............................................................................11
2.6. Instructions for the staff.....................................................................................................11
2.7. Dangers while handling the machine................................................................................12
2.8. Gefahren durch die Hydraulik............................................................................................12
2.9. Special dangers...................................................................................................................12
2.9.1.
Danger of stumbling over hydraulic and electric cables...............................................12
2.9.2.
Danger of being burned at the heating element and at the welding point ....................13
2.9.3.
Danger of clothes being grapped by the planer............................................................13
2.9.4.
Danger of crushing by clamping tools and guide rods .................................................13
2.9.5.
Risk of injury by noise...................................................................................................14
2.10. Structural modifications on the machine .........................................................................14
2.11. Warranty and liability..........................................................................................................14
3. DESCRIPTION OF PROCESS .................................................................................... 15
4. OPERATING AND INDICATING ELEMENTS.............................................................. 16
4.1. Elements on the front side.................................................................................................16
4.2. Elements on the right side .................................................................................................17
4.3. Elements on the heating element......................................................................................18
4.4. Wells at the table.................................................................................................................19
5. STARTING AND OPERATING..................................................................................... 20
5.1. Safety indications and Starting .........................................................................................20
5.2. Welding process .................................................................................................................21
5.2.1.
Plane girder for planing only at one side ......................................................................23
25.06.12 Working instructions WIDOS 4001 Page 4 of 59

Contens
Kunststoff schweißtechnik
5.3. Welding logs and tables.....................................................................................................23
5.4. Welding segmented bends ................................................................................................23
5.5. Welding of Cross- and T-pieces ........................................................................................24
6. WELDING LOGS AND TABLES.................................................................................. 26
7. MAINTENANCE AND REPAIR .................................................................................... 31
7.1. Maintenance, Inspection and repair.................................................................................31
7.2. Planer ...................................................................................................................................31
7.3. Checking the level of the hydraulic oil .............................................................................32
7.3.1.
Used hydraulic oil .........................................................................................................32
7.4. Transport .............................................................................................................................32
7.5. Venting the hydraulic cylinders.........................................................................................33
7.6. Clamping elements .............................................................................................................33
7.7. Cleaning of the machine ....................................................................................................33
7.8. Disposal ...............................................................................................................................33
8. WIRING AND HYDRAULIC DIAGRAMS ..................................................................... 34
9. SPARE PARTS LIST ................................................................................................... 37
9.1. Basic machine .....................................................................................................................37
9.2. Clamping tool ......................................................................................................................40
9.3. Planer ...................................................................................................................................42
9.4. Heating element ..................................................................................................................45
9.5. Heating element holder ......................................................................................................47
9.6. Conversion kit for clamping tool.......................................................................................49
9.7. Conversion kit for planer ...................................................................................................51
9.8. Conversion kit for heating element...................................................................................53
9.9. Hydraulic box ......................................................................................................................55
9.10. Plane girder for planing only at one side .........................................................................57
10.
DECLARATION OF CONFORMITY......................................................................... 59
25.06.12 Working instructions WIDOS 4001 Page 5 of 59

WIDOS Einsteinstr. 5 Phone +49 / 71 52 99 39 - 0
W. Dommer Söhne GmbH D-71254 Ditzingen-Heimerdingen Fax +49 / 71 52 99 39 - 40
info @ widos.de
http://www.widos.de
Kunststoff schweißtechnik
1. Description of product
This chapter gives important basic information about the product and its prescribed use.
All technical details of the machine are put together as a general arrangement.
1.1. Mounting and purpose-oriented use
The WIDOS 4001 is a workshop machine and especially designed for the heating element butt
welding of pipes and fittings from Ø = 90 mm - 315 mm (standard diameters are 90 / 110 / 125
/ 140 / 160 / 180 / 200 / 225 / 250 / 280 / 315 mm).
The machine is equipped with an electrohydraulic adjusting device for control and application
of the welding pressure, a planer and a heating element, two transport handles, a basic
clamping device (swivelling on each side up to 15° for the fabrication of segmented bends and
fittings).
For the compensation of diameter tolerances the right-hand clamping tools is axially movable.
Hydraulic unit, planer, heating element and clamping tools can be easily removed for
transporting the machine even into difficulty accessible rooms.
By means of an optional available conversion kit with 2nd cylinder, larger planer and heating
element, even the diameters 355 / 400 and 450 mm can be clamped and welded.
T- and cross pieces up to OD 250 can be welded with an additional special angle clamping
device.
Any other use of this control unit is considered not to be purpose-oriented.
The machine is only to be used in a technically perfect condition, as well as purpose oriented,
safety- and danger-conscious in compliance with the working instructions and the relevant
safety regulations (especially the regulations for the prevention of accidents).
The described plastic welding machine may only be operated, maintained and repaired by
persons who are trained and informed about the dangers.
For personal injuries, material and immaterial damages resulting herefrom, only the user is
responsible!
Also part of the appropriate usage are
•
following all indications of the working instructions and
•
performing the inspection and maintenance works.
25.06.12 Working instructions WIDOS 4001 Page 6 of 59
Description of product Chapter 1
Kunststoff schweißtechnik
1.2. Safety measures
In case of wrong use, wrong operation or wrong maintenance the machine itself or products
being in the surrounding can be damaged or destroyed.
Persons being in the endangered area may be injured.
Therefore these working instructions have to be thouroughly read and the corresponding
safety advices must necessarilly be adhered to.
1.3. Conformity
The machine corresponds in its construction to the valid recommendations of the European
Community as well as to the according European standard specifications.
The development, manufacturing and mounting of the machine were made very carefully.
1.4. Marking of product
The product is marked by a type-plate at the basic machine.
It contains the machine type, the serial number and the year of construction.
1.4.1. Technical data
1.4.1.1. WIDOS 4001 general data
Material: PP; PE 80; PE 100, PVDF
Pipe dimension: Outside-∅ = 90 – 315 mm;
with conversion kit: Outside-∅ = 90 – 450 mm
Total weight (without packing): 285 kg
Fuse protection: 16 A
Power section: 2,5 mm²
Emissions - Noises exceeding 80 dB (A) may occur; during
planing it is obligatory to wear ear protection!
- When using the named plastic materials and
when welding below 260 °C no toxicant damp
arises.
Environmental conditions in the
welding area
- take care for cleanness (no dust at the welding
area)
- if secured by an appropriate measurement that
allowed conditions for welding are indicated, it is
possible to work in any outside temperature
condition as far as the welder is not constrained
in its manual skill.
- avoid humidity, if necessary use a welding tent
- avoid strong sun rays influence
- protect from wind, shut the pipe ends
25.06.12 Working instructions WIDOS 4001 Page 7 of 59

Description of product Chapter 1
1.4.1.2. Heating element
Power: 3,6 kW / 5,4 kW (for conversation kit)
Voltage: 230 V (± 10%) / 400 V (for conversation kit)
Amperage: 16 A (± 10%)
Frequency: 50 Hz
Surface: antisticking coated
Mounted elements: - electronic temperature control
- control lamps
- on/off switch (for conversation kit)
1.4.1.3. Planer
Motor: Monophase universal motor
Power: 1,05 kW / 1,4 kW for conversion kit
Voltage: 230 V (± 10%)
Amperage: 3,8 A / 4,9 A for conversation kit
Frequency: 50 Hz (± 10%)
Gear: Gear ratio: approx. 0,12
Revolutions of planer [1/min] 50 - 70
1.4.1.4. Hydraulic aggregate
Kunststoff schweißtechnik
Power: 300 Watt
Voltage: 230 V (± 10%)
Amperage: 2,7 A
Frequency: 50 Hz
Phase displacement: approx.18°
Hydraulic oil tank: approx. 1 l
Type of protection IP 54
Electric motor and pump:
Engine revolution: 1380 U/min
max. working pump: approx. 250 bar
Working pressure: adjustable up to 250 bar
1.4.1.5. Basic unit
Dimension l x w x h: 1220 x 1000 x 1355 (mm)
Frame material: Constructin steel
Cylinder-∅: 25 mm
Piston rod-∅: 18 mm
max.force (F=P*A) 236 N (at 100 bar)
5,9 kN (at 250 bar)
Moving speed of the piston: approx. 5,6 cm/s
25.06.12 Working instructions WIDOS 4001 Page 8 of 59

Description of product Chapter 1
1.5. Equipment and accessories:
The following tools and accessories are part of the first delivery:
1 Tool bag for 10 parts
1 Socket wrench size 27
1 each Allan key angled size 3 / 6 / 7 / 8
1 each Allan key with T-grip size 4 / 5 / 6
1 Fork wrench size 17 / 19
1 x Plane girder for planing only at one side
1 Screw driver with Torx drive T10
optional different reduction inserts, rollerstands as pipe support, clamping tools
for fabrication of T-pieces
For order numbers and single parts see spare parts list
Kunststoff schweißtechnik
25.06.12 Working instructions WIDOS 4001 Page 9 of 59
WIDOS Einsteinstr. 5 Phone +49 / 71 52 99 39 - 0
W. Dommer Söhne GmbH D-71254 Ditzingen-Heimerdingen Fax +49 / 71 52 99 39 - 40
info @ widos.de
http://www.widos.de
Kunststoff schweißtechnik
2. Safety rules
The basic condition for the safety conscious handling and the fault free operation of this
machine is the knowledge of the basic safety advises and rules.
• These working instructions contain the most important indications for running the machine
according to the safety regulations.
• The safety indications need to be followed by all persons working on the machine.
2.1. Explanation of the different symbols
In the working instructions, the following designations and signs are used for potential
dangers:
This symbol means a possibly danger for the life and the health of persons.
• The disrespect of these indications may have heavy consequences for the
health.
This symbol means a possible dangerous situation.
• The disrespect of these indications may cause slight injuries or damages on
goods.
This symbol means a possible dangerous situation due to hot surfaces.
• The disrespect of these indications may conduct to heavy burns,
respectively to self-ignition or even fire.
This symbol means a possible dangerous situation by moving parts of the
machine
• The disrespect of these indications may cause heavy crushing’s of parts of
the body resp. damages of parts of the machine.
This symbol means a possible risk of injury by noise exceeding 80 dB (A).
• Ear protection is obligatory
This symbol gives important indications for the proper use of the machine.
• The disrespect of these indications may conduct to malfunctions and
damages on the machine or on goods in the surrounding.
Under this symbol you get user tips and particularly useful information.
• It is a help in order to use all the functions on your machine in an optimal
way and helps you to make the job easier.
T he ac c id e nt pr e ve n ti o n m e as u re s a r e v al i d ( U VV ) .
25.06.12 Working instructions WIDOS 4001 Page 10 of 59

Safety rules Chapter 2
Kunststoff schweißtechnik
2.2. Obligations of the owner
The owner is obliged only to let persons work at the machine who
• know about basic safety and accident prevention rules and are instructed in the handling of
the machine, as well as who
• have read and understood the safety chapter of this manual and certify this by their
signature.
The safety-conscious working of the staff has to be checked in regular intervals.
2.3.
Obligations of the worker
All persons who are to work at the machine are obliged before working:
• to follow the basic safety and accident protection rules.
• to have read and understood the safety chapter and the warnings in this manual and to
confirm by their signature that they have well understood them.
• to inform themselves about the functions of the machine before using it.
2.4. Measure of organization
• All equipment required for personal safety is to be provided by the owner.
• All available safety equipment is to be inspected regularly.
2.5.
Information about safety precautions
• The working instructions have to be permanently kept at the place of use of the machine.
They are to be at the operator's disposal at any time and without much effort.
• In addition to the manual, the common valid and the local accident protection rules and
regulations for the environmental protection must be available and followed.
• All safety and danger indications on the machine have to be in a clear readable condition.
• Every time the machine changes hands or is being rent to third persons, the working
instructions are to be sent along with and their importance is to be emphasized.
2.6.
Instructions for the staff
• Only skilled and trained persons are allowed to work at the machine.
• It must be clearly defined who is responsible for transport, mounting and dismounting, and
starting the operation.
• A person who is being trained may only work at the machine under supervision of an
experienced person.
25.06.12 Working instructions WIDOS 4001 Page 11 of 59

Safety rules Chapter 2
Kunststoff schweißtechnik
2.7. Dangers while handling the machine
The machine WIDOS 4001 has been constructed according to the latest standards of the
technology and according to the recognized technical rules.
Although, during the operation dangers for the user or for persons standing close as well
as damages for items may occur.
The machine should only be used
• purpose oriented
• in a perfect technical safety condition
Disturbances which may affect the safety of the machine must be cleared immediately.
Only skilled persons are allowed to work at electrical appliances.
• The electrical equipment of the machine has to be checked regularly. Loose connections
and damaged cables have to be replaced immediately.
• Protect the machine from rain and dropping water.
• According to VDE 0100, operation on building sites is only allowed with a current distributor
with FI-security protective switch.
2.8. Gefahren durch die Hydraulik
System sections which have to be opened in case of repair work have to be
depressurized before starting to repair.
There is a danger of hurting your eyes because of a sudden flow compressed
air resp. squirting hydraulic oil. The hydraulic oil can be hot!
• Damaged hydraulic / pneumatic hoses have to be immediately replaced.
• Before starting to work make a visual examination of the hydraulic / pneumatic lines.
• The hydraulic oil is brackish!
The hydraulic oil is to be handled and disposed of in appropriate manner
2.9. Special dangers
2.9.1. Danger of stumbling over hydraulic and electric cables
Pay attention that nobody has to step over the lines.
Favorably pass the lines in order that the danger is minimized.
Do not squeeze and kink the lines or anything likewise.
Avoid the heating-up of hydraulic lines (rise in pressure!).
25.06.12 Working instructions WIDOS 4001 Page 12 of 59
Safety rules Chapter 2
Kunststoff schweißtechnik
2.9.2. Danger of being burned at the heating element and at the welding
point
You can burn yourself, inflammable materials can be ignited.
• The heating element temperature is heated up to more than 200°C!
• Do not leave the machine with heated heating element unsupervised.
• Do not touch the surfaces of the heating element.
• Take enough safety distance to inflammable materials.
• Do wear safety gloves.
• Switch off the heating element after use.
• No third persons should stay inside the range of the moving area of the heating element.
• Swivel and transport the heating element only at the grip.
2.9.3. Danger of clothes being grapped by the planer
System parts and pressure conducts which need to be opened are to be made
pressureless before any kind of repair.
• There is a danger of injuring the eyes by hydraulic oil squirting out.
• Wear tight-fitting clothes.
• Do not wear rings or jewelry during work.
• wear snood-type cap.
• Do not touch the surfaces of the planer.
• Keep away others from the drilling area.
2.9.4. Danger of crushing by clamping tools and guide rods
Heavy injuries can result from crushing:
• upon opening / closing the clamping tools
• upon driving in and out the heating element and planer
• upon opening / closing the slides
• upon mounting the reducer inserts
• Do not touch in-between clamped pipes
• Do not reach between the clamping rings in case the pipes are still to be clamped and in
case you move the clamping tools
• In case of working inside the machine, the mains plug always has to be switched off and
secured against unauthorized activation.
• During the installation of the reducer inserts use a lifting device, do not reach between
reducer insert and clamping tool
• Don’t hinder moving tables.
25.06.12 Working instructions WIDOS 4001 Page 13 of 59

Safety rules Chapter 2
Kunststoff schweißtechnik
2.9.5. Risk of injury by noise
You may sustain hearing damage; the drilling noise exceeds 80 dB A
considerably.
• Ear protection is obligatory during drilling!
2.10. Structural modifications on the machine
• No modifications, extensions or reconstructions may be made on the machine without
permission of the manufacturer.
• Machine parts which are not in perfect condition have to be replaced immediately.
• Only use original WIDOS spare and wear parts.
• In case of order, always state the machine number!
2.11. Warranty and liability
Basically, our "General Terms of sale and delivery“ are valid.
They are at the owner’s disposal latest at conclusion of the contract.
Warranty and liability rights are excluding injuries of persons and property damages if they
are due to one or several of the following reasons:
• Not using the machine purpose oriented.
• Unsuitable transport, mounting, starting, operating and maintenance of the machine.
• Operating the machine without or with not correctly fixed safety devices.
• Not following the indications of the working instructions.
• Unallowed structural modifications on the machine.
• Unsatisfactory inspection of machine parts which are subject to wearing.
• Unsatisfactory performed repairs.
• In case of catastrophes through action of an external body or actions of God.
25.06.12 Working instructions WIDOS 4001 Page 14 of 59
WIDOS Einsteinstr. 5 Phone +49 / 71 52 99 39 - 0
W. Dommer Söhne GmbH D-71254 Ditzingen-Heimerdingen Fax +49 / 71 52 99 39 - 40
info @ widos.de
http://www.widos.de
Kunststoff schweißtechnik
3. Description of process
B as i ca l l y , t h e i n te r na t io n al a nd na t io n al p r o c e s s g u id e li n es ar e to
b e f ol l o w e d !
At first, the clamping tools are fixed on the machine slide.
For the fabrication of angles and bows, the clamping tools can be turned on both sides.
The plastic pipes are clamped by means of the clamping tools.
If necessary, stabilize the pipes by means of roller stands or pipe supports (for bows, a
supporting angle is existing).
Then the front sides of the pipes are planed parallel by means of the planer and the
misalignment of the pipes is checked.
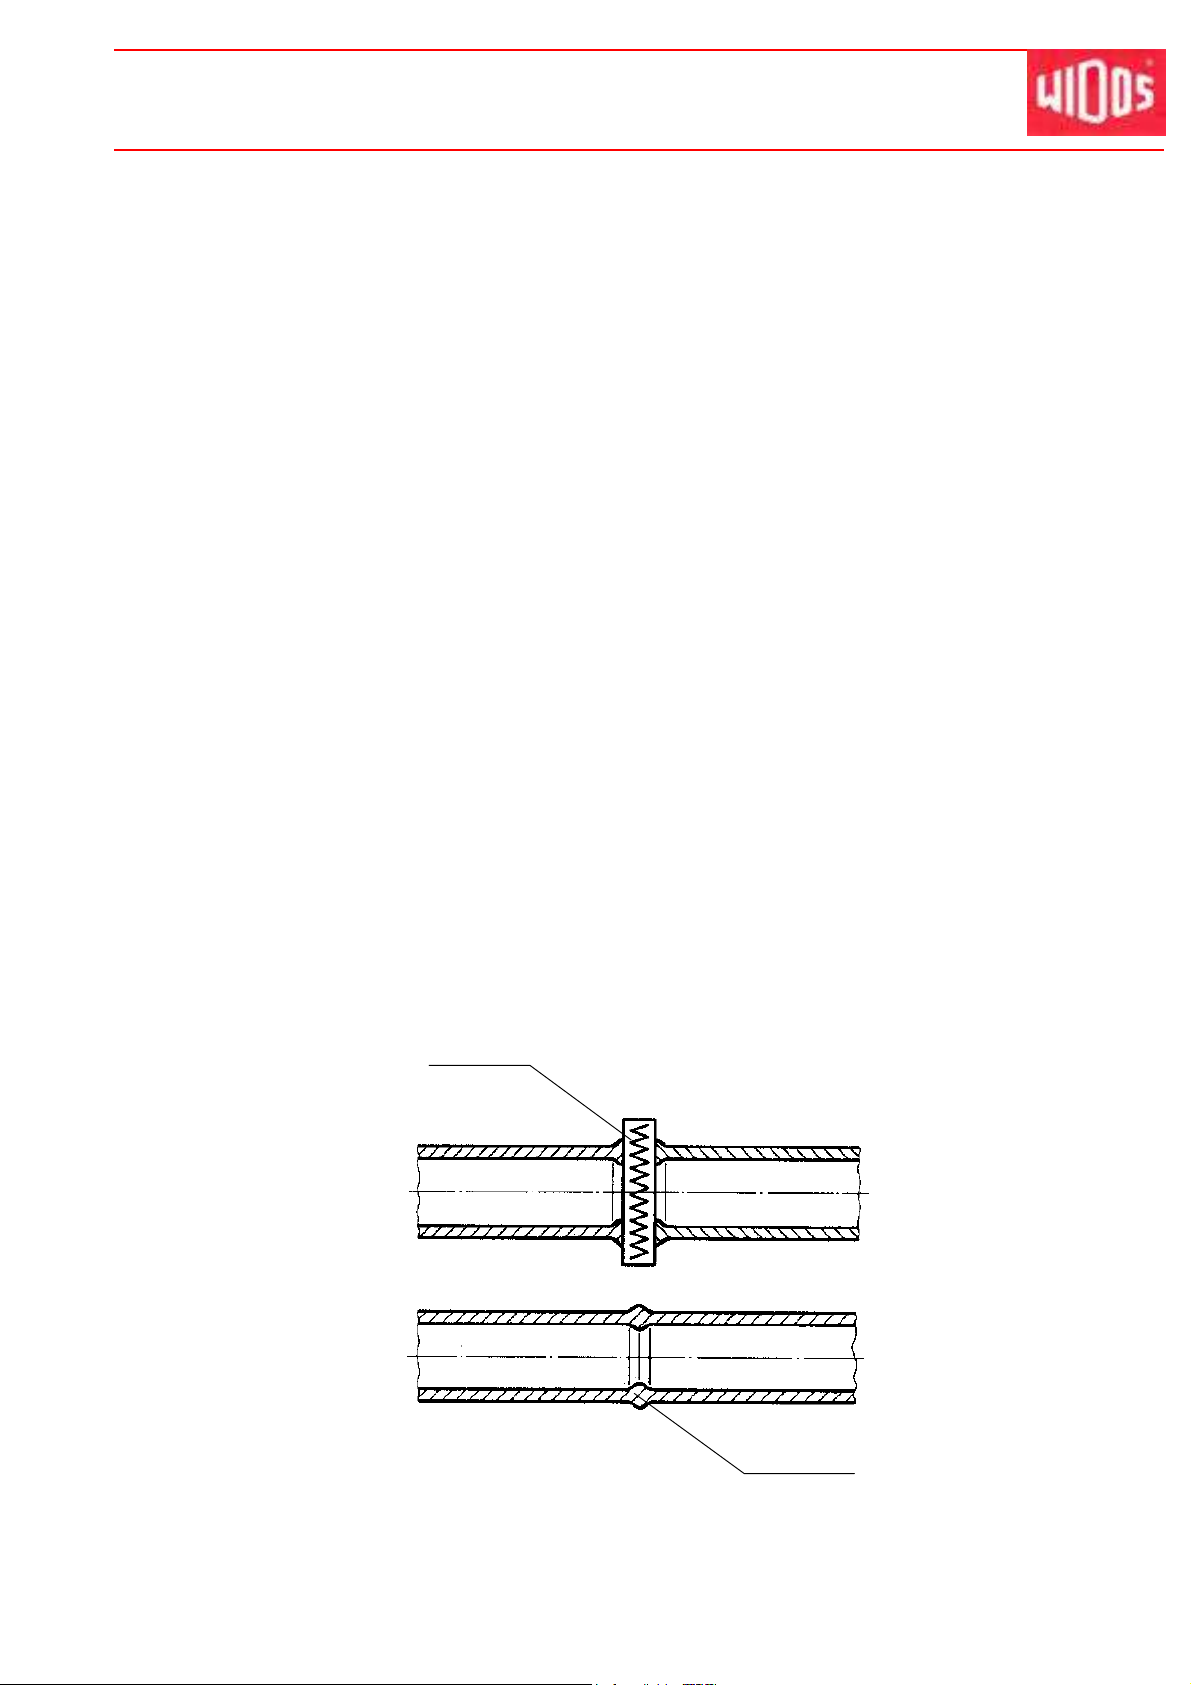
Now the heating element is swivelled in and the pipes are pressed against the heating element
under defined adjusting pressure. This process is called "adjusting".
After the prescribed bead height being reached, pressure is reduced, heat up time begins.
The function of this time is to heat up the pipe ends.
After expiration of the heat up time, the slides are opened, the heating element is swivelled out
quickly and the pipes are closed again hydraulically.
The time gap from the removal of the heating element to joining the pipes is called change
over time.
The pipes are joined under prescribed welding pressure and then cool down under pressure
(cooling time).
The welded joint can be unclamped, the welding process is finished.
Heating element heats
up the pipes up to
welding temperature
Finished welding with
inside and outside bead
25.06.12 Working instructions WIDOS 4001 Page 15 of 59
WIDOS Einsteinstr. 5 Phone +49 / 71 52 99 39 - 0
2
4
5
6
7
3
8
12
W. Dommer Söhne GmbH D-71254 Ditzingen-Heimerdingen Fax +49 / 71 52 99 39 - 40
info @ widos.de
http://www.widos.de
Kunststoff schweißtechnik
4. Operating and indicating elements
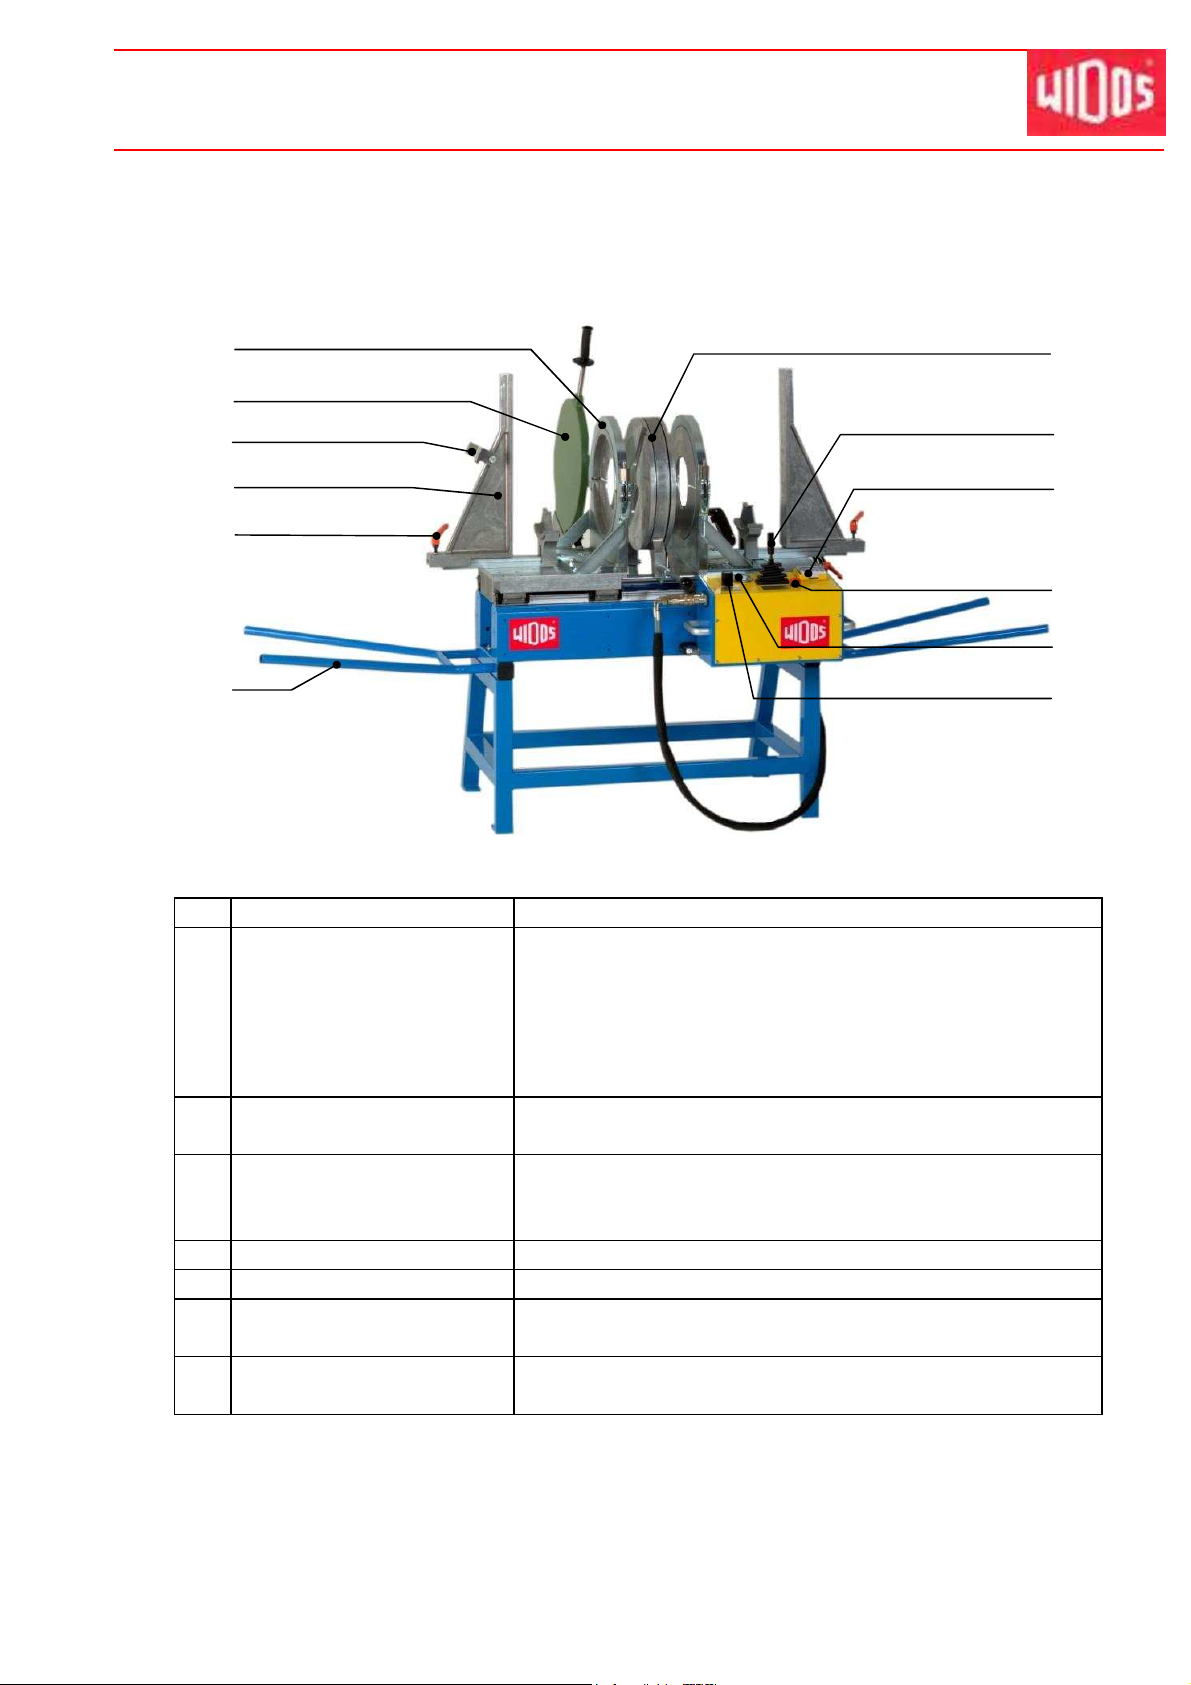
4.1. Elements on the front side
1
No. Denomination Function
1 Clamping tool - swivable up to 15° on both sides.
- Clamping the pipes. By means of the respective
reduction inserts, pipes from OD=90 - 315 mm can be
clamped.
- when using reduction inserts with 22,5° obliquity the
clamping tools need not be turned.
2 Heating element - Bring the pipe up to welding temperature.
- Can be moved sidewards and be swivelled in
3 Pipe support - Clamped pipes can be supported with the corresponding
inserts.
- Bows can be supported on the supporting angles.
4 Supporting angle - Stabilization of bows and angles.
5 Clamping lever - Fixation for supporting angle
6 Carrying handle - Handcarrying the machine
- can be unscrewed if need be.
7 Planer - Planing the pipe ends to be welded.
- Is switched on over the switch at the control desk.
10
11
25.06.12 Working instructions WIDOS 4001 Page 16 of 59
No. Denomination Function
8 Valve lever For opening / closing the slide. There are 4 different
9 Place for stop watch - Place for the delivered stop watch giving a good view
10 Oil dipstick - Oil filler neck / checking the oil level. Oil level must be
11 Manometer - Indication of the hydraulic pressure
12 Setscrew for pressure relief
valve
Operating and indicating elements Chapter 4
positions:
- FORWARDS: slide is closed.
- in the center (without moving): the instantaneous
pressure is held (also by means of the built in pressure
reservoir).
- Pressure release: a possible pressure can be released
without opening the machine. Due to the pressure
reservoir it takes approx. 10 s until the complete
pressure is released.
- BACKWARDS: slide is opened.
on it.
between the two marks.
- Limitation of the hydraulic pressure onto the desired
value. (adjustable from 0 - 250 bar)
4.2. Elements on the right side
Kunststoff schweißtechnik
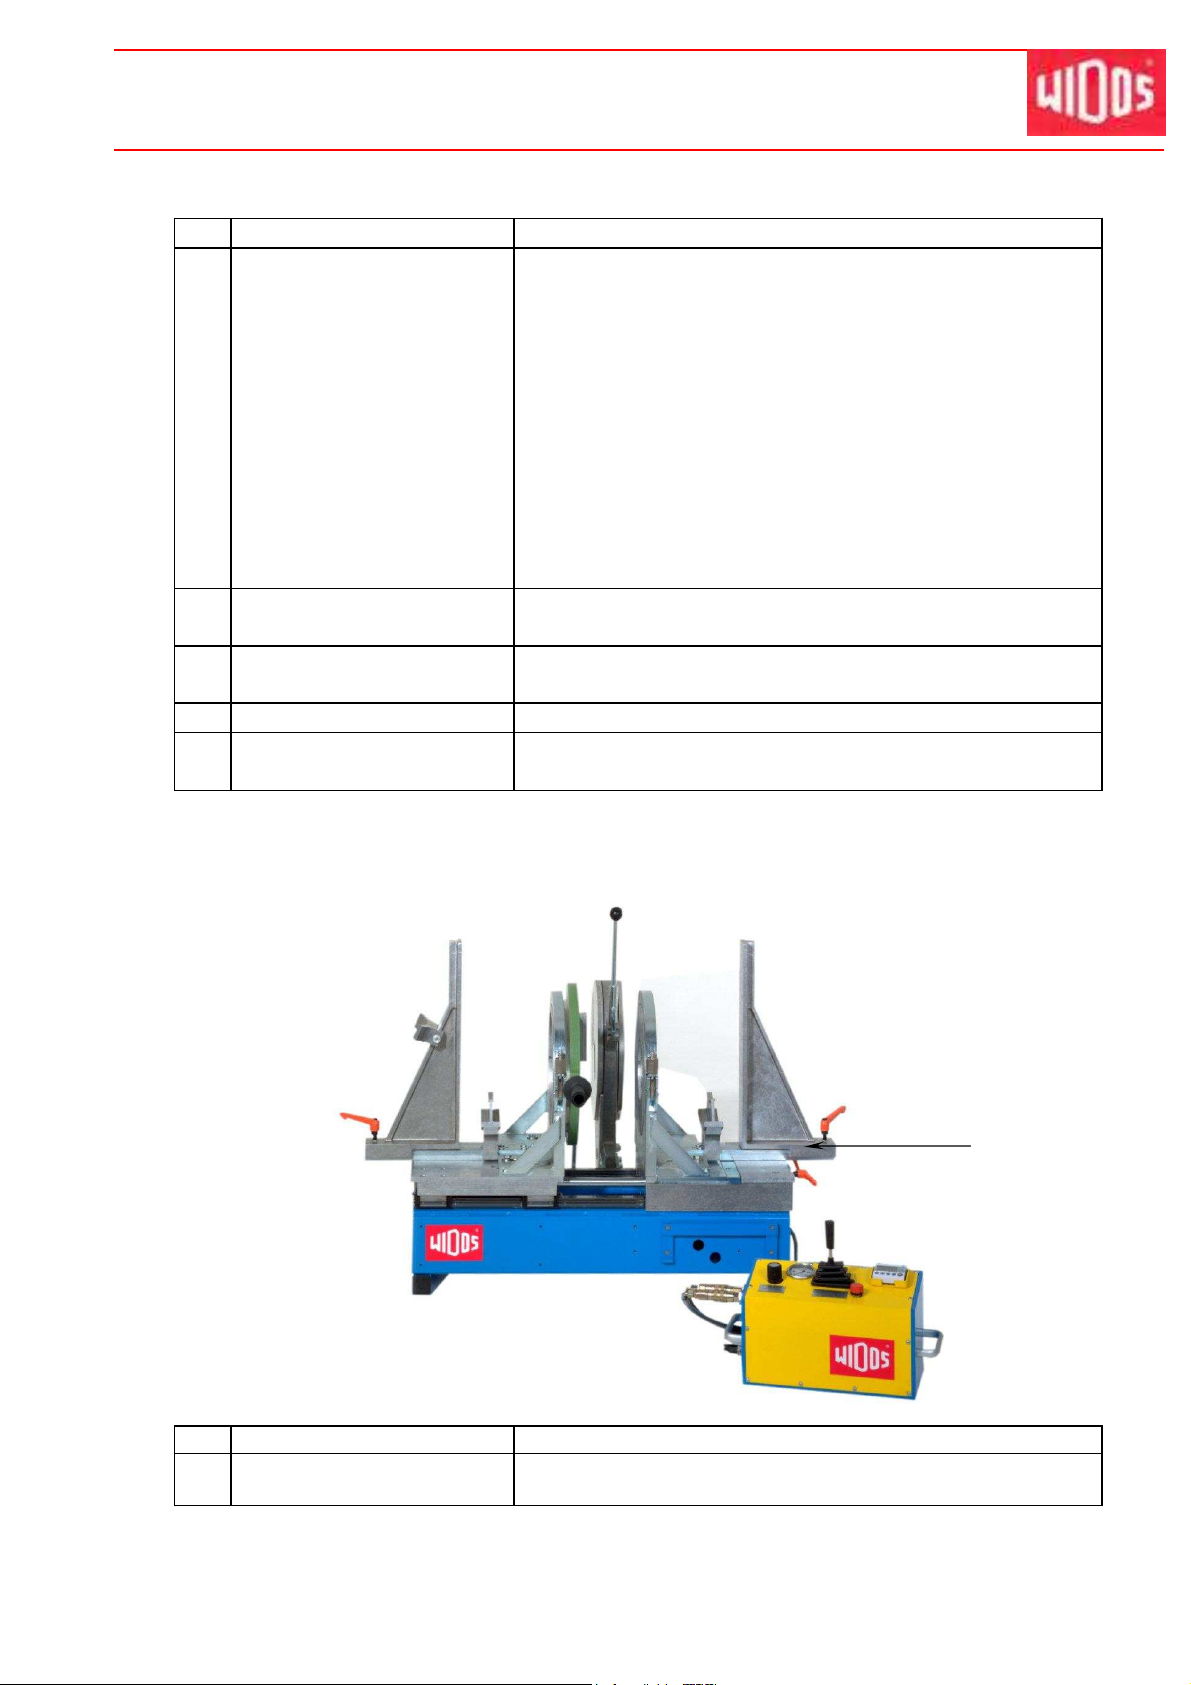
No. Denomination Function
1 Clamping lever - Loosen for moving the right table half, for horizontal
mismatch compensation.
1
25.06.12 Working instructions WIDOS 4001 Page 17 of 59
1
2
3
Operating and indicating elements Chapter 4
4.3. Elements on the heating element
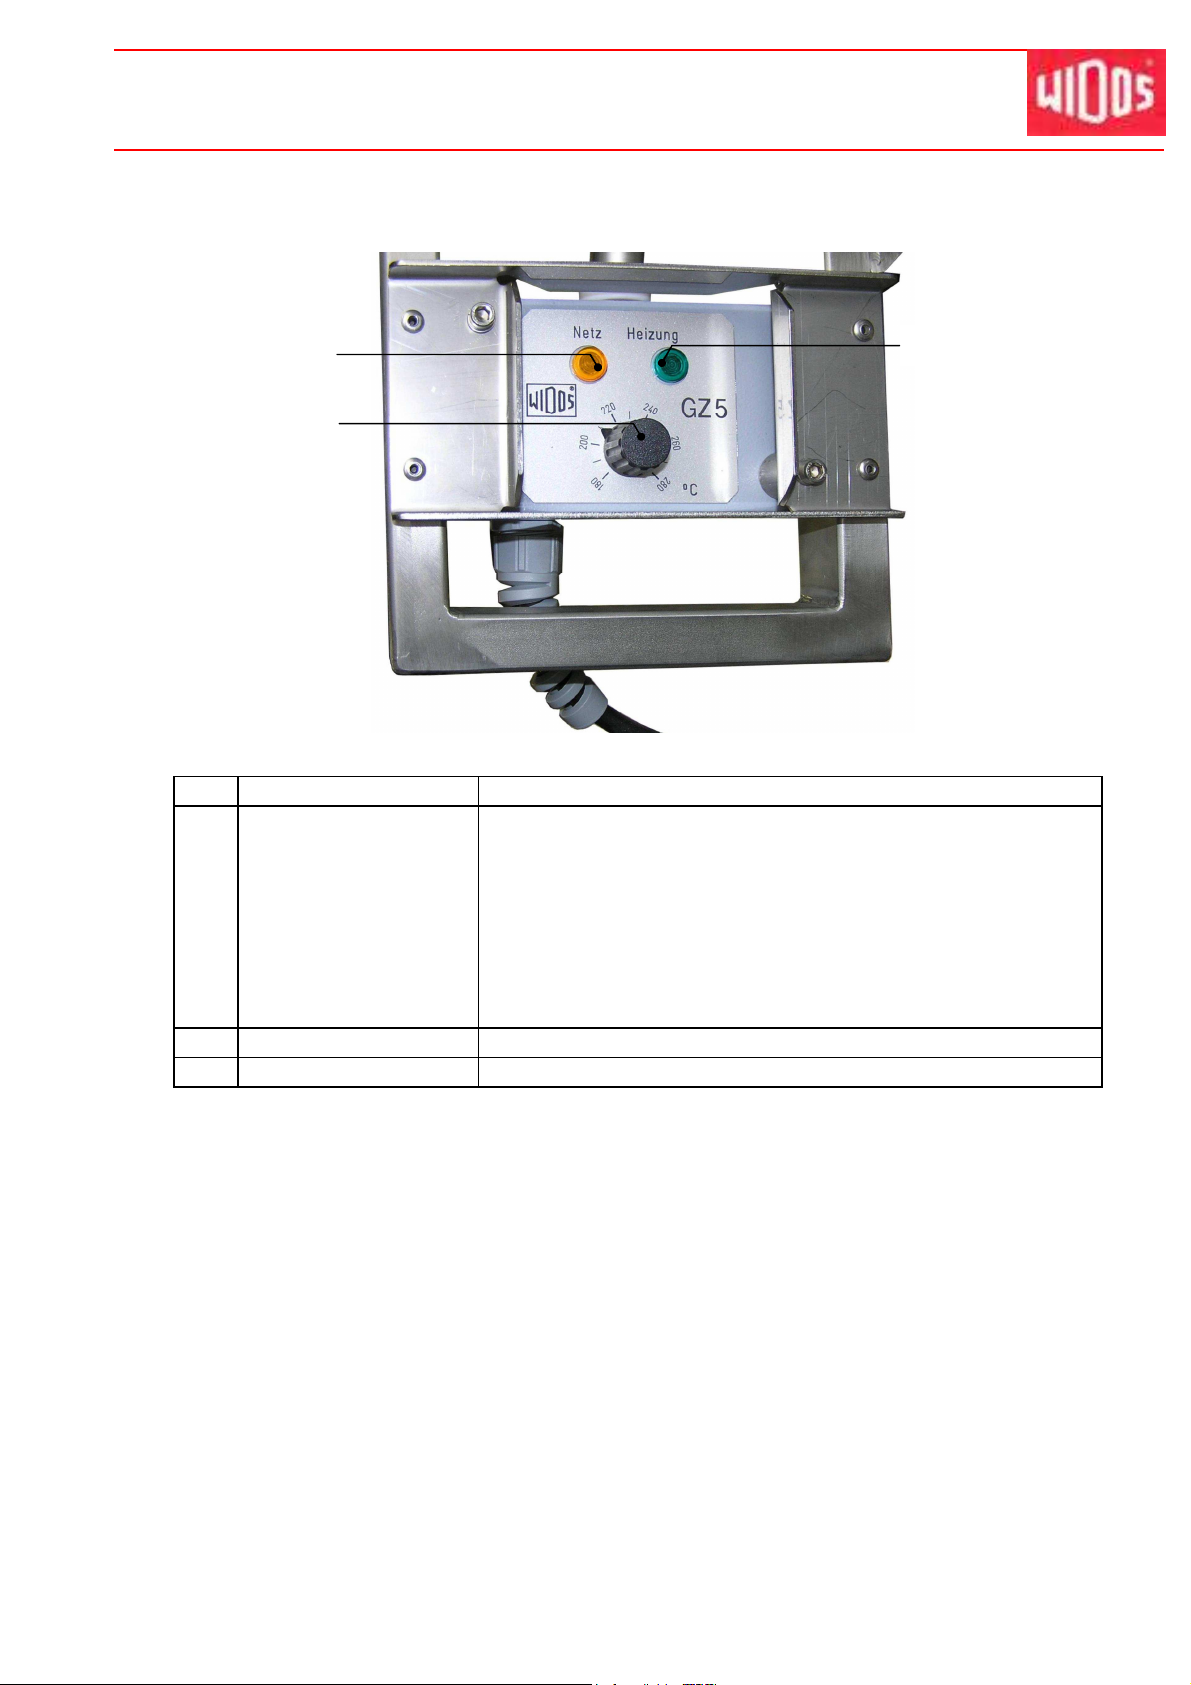
No. Denomination Function
1 Control lamp yellow There are three different states:
- off: the heating element is not being heated up at the
moment or is cooling down.
- blinking: the temperature of the heating element is
maintained by a certain pulse-position ratio.
- on: the heating element is being heated up at the moment.
The desired temperature has not yet been reached.
Kunststoff schweißtechnik
2 Control lamp green - Indication for mains operated
3 Control knob - Temperature control
25.06.12 Working instructions WIDOS 4001 Page 18 of 59
Operating and indicating elements Chapter 4
Kunststoff schweißtechnik
4.4. Wells at the table
The clamping tool is fixed on one side by means of a centering bolt which serves as swivelling
axle if angles have to be adjusted.
The clamping tool can be moved forwards/backwards.
At the slooted hole on the clamping tool, any angles from 0-15° can be adjusted. For the exact
setting of 11,25° and 15°, figure stamps are existing.
M o v i n g d i r e c t i o n
Centering bolt for
clamping tool /
swiveling axle
Fixing for clamping tool
back
Fixing for clamping tool
front
Screws for clamping tool
front / back
Angle marks for
clamping tools front /
back
Fixing for table
25.06.12 Working instructions WIDOS 4001 Page 19 of 59
WIDOS Einsteinstr. 5 Phone +49 / 71 52 99 39 - 0
W. Dommer Söhne GmbH D-71254 Ditzingen-Heimerdingen Fax +49 / 71 52 99 39 - 40
info @ widos.de
http://www.widos.de
Kunststoff schweißtechnik
5. Starting and operating
The indications of this chapter are supposed to instruct you in the operation of the machine
and to lead you during the skilled starting of the machine.
This includes:
• the safe operation of the machine
• using all possibilities
• economic operation of the machine
5.1. Safety indications and Starting
The machine may only be operated by skilled and authorized persons.
A plastic welder exam according to DVS and DVGW can be taken for the
qualification.
• In danger situations for mankind and for the machine, the main power connection has to be
immediately removed.
• In case of power fall, there may still be pressure in the hydraulic system. If required release
pressure.
• At the end of the work and during breaks, the machine has to be switched off.
• Also take care that no unauthorized person have access to the machine.
• Protect the machine from wetness and humidity !
• According to VDE 0100, operation on building sites is only allowed with a current distributor
with FI-security protective switch.
Before starting the hydraulic check the level of the oil in order to avoid
damages on the pump.
If necessary add hydraulic oil of the quality HLPD 32 (Chapter: 7.3, 7.3.1).
The heating element surfaces should be clean, especially non greasy, that’s
why they need to be cleaned shortly before each welding or in case of
dirtiness by means of a fibre-free paper and cleaning agent (e.g. technical
pure alcool) or cleaning cloths which are available at the WIDOS company.
The anti-adhesive coating of the heating element should be undamaged in
the working area
Be sure that all hydraulic and electric connections are connected.
• Take care for the ambient conditions:
• Welding must not be performed at direct sunlight.
• If necessary, use a welding umbrella.
• At an ambient temperature under 5° C take the respective measures:
• if necessary use a welding tent or heat up the pipe ends.
• In addition, take measures against dust.
25.06.12 Working instructions WIDOS 4001 Page 20 of 59

Starting and operating Chapter 5
Kunststoff schweißtechnik
5.2. Welding process
B as i ca l l y , t h e c o r r e sp o nd i ng va l id w el d i ng p r e sc r ip t io n s ( I SO / C EN
/ D V S. . . ) h av e t o b e f o l lo w e d.
• Do wear safety gloves as protection against burning.
• A stop watch is needed for registrating the actual times for heating and cooling.
• A table with the prescribed parameters for the pipe dimensions to be welded has to be
available.
• The surfaces of the heating element should be clean, especially free from grease, and for
that purpose, in case of dirtiness, they have to be cleaned with a fibreless paper and
a cleaning agent.
The anti-adhesive coating of the heating element must be undamaged in the working area.
• Switch on heating element and set the required welding temperature on the rotary type
regulator. If the control light flashes, the nominal temperature has been reached and is held
at a constant level (Chapter4.3).
• Set the desired angle at the clamping tools.
• The left clamping tool can be moved forwards and backwards.
• The angle settings 11,25° and 15° can be read at the figure stamps.
• Screw the clambing tools according to the pipe outside diameter to be welded
• Lay the work pieces into the clamping shells, fasten the clamping screws and align the work
pieces to each other.
• Use the WIDOS rollerstand for the alignment of long pipe ends, for bows use the
supporting angle and pipe supports.
• Close the machine meanwhile reading the travel pressure at the manometer.
• The travel pressure is displayed exactly at that moment when the machine with the
clamped pipe starts moving.
• Then open the machine again in such a way that the planer fits in between.
• Swivel in the planer between the ends of the workpieces and let the planer lock.
• Switch on the planer, close the machine and plane with a pressure that lies between 1 and
15 bar over the travel pressure.
• If necessary, use the plane girder for planing only at one side (if planing to size or if using a
welding neck which means that only a little material may be removed).
• Planing should be carried out until a revolving cutting has been formed on both sides.
• Open the machine again, switch off the planer and swivel back the planer out of the
machine.
• Remove the formed chips without touching the surfaces.
• Close the machine.
25.06.12 Working instructions WIDOS 4001 Page 21 of 59

Starting and operating Chapter 5
Kunststoff schweißtechnik
• Check the misalignment and the gap between the two pipes touching one the other.
According to DVS 2207, the misalignment at the pipe outside should not be higher than
0,1 x pipe wall thickness, the acceptable gap not bigger than 0,5 mm.
The right half of the table can be pushed backwards and forwards for the
misalignmentcheck.
Release both clamping levers at the front side of the table.
• In case of a misalignment compensation, a new planing should be performed.
• Take the adjustment pressure for the pipe dimensions to be welded from the table and add
the travel pressure.
• Set the so defined pressure value at the pressure limitation valve and check by actioning
the valve lever.
• Open the machine again somewhat.
• Take heat up time, max. change over time, cooling down time and bead height for the pipe
dimension to be welded from the welding table (Chapter: 6)
• Swivel in the cleaned heating element, brought onto desired temperature, between the
pipes, if necessary wait until the desired temperature has been reached.
• Drive the machine halfs together schock-free under the set adjusting pressure.
• When the prescribed circular bead height is being reached, reduce the pressure.
• For this purpose put the valve lever into position „pressureless“ until the desired heating
pressure is set (heating pressure = approx. 10% of the adjusting pressure).
• Now the heat up time begins. Press the stop watch and compare the actual time with the
desired time taken out of the table.
• Open the machine after completion of the heating time, pull the heating element out as
quickly as possible and drive the machine together without schock-free.
• The maximum time range for this process is given by the value for the change over time
taken out of the table.
• After completion of the welding pressure up-building, press the stop watch and maintain the
control lever for about 10 s in position „pressure“ so that the hydro tank may be filled.
• If required set the pressure again during cooling (the pressure for cooling is the same like
the set adjusting pressure).
• After completion of the cooling time release pressure, remove the welded parts and open
the machine.
The welding process is finished.
25.06.12 Working instructions WIDOS 4001 Page 22 of 59

Starting and operating Chapter 5
A
Kunststoff schweißtechnik
5.2.1. Plane girder for planing only at one side
If planing is necessary only at one side (e.g. at
use of a fitting) the plane girder for planing (A) is
used.
Center the centering bolt of the girder in the
central drill.
Of the planer and hold tightly the girder during
planing.
5.3. Welding logs and tables
If welding angles, the welding surface of the pipe and thus the necessary pressure changes.
Calculate the necessary pressure as follows:
• Take the prescribed value for adjusting or cooling from the table.
• Multiplicate the pressure value with factor /cos (angle).
This will give the following factors:
Welding 15° (chamfered pipe with 7,5°): 1,01
Welding 22,5° (chamfered pipe with 11,25°): 1,02
Welding 30° (chamfered pipe with 15°): 1,04
Welding 45° (chamfered pipe with 22,5°): 1,08
Welding 60° (chamfered pipe with 30°): 1,15
Welding 90° (chamfered pipe with 45°): 1,41
• Add the motional pressure as usual.
All the other welding parameters remain as usual.
angle
5.4. Welding segmented bends
Calculate the sawing angle to be set (corresponding to the required angle at the clamping
tools or clamping inserts) as follows:
angle of the bend
sawing angle = ---------------------------------------------
number of all welding surfaces
Example 1: bend of 90° 4 segments (6 welding surfaces)
90°
sawing angle = ----- = 15°
6
Example 2: bend of 45° in 3 segments (4 welding surfaces)
45°
sawing angle = ----- = 11,25°
4
25.06.12 Working instructions WIDOS 4001 Page 23 of 59

Starting and operating Chapter 5
Kunststoff schweißtechnik
5.5. Welding of Cross- and T-pieces
The optional available clamping device for angles is screwed on together with the adapter
plate and standard tools.
T - pieces (45°, 60° and 90°) and Cross-pieces up to OD=250 mm can be welded.
25.06.12 Working instructions WIDOS 4001 Page 24 of 59

Starting and operating Chapter 5
Kunststoff schweißtechnik
25.06.12 Working instructions WIDOS 4001 Page 25 of 59

WIDOS Einsteinstr. 5 Phone +49 / 71 52 99 39 - 0
W. Dommer Söhne GmbH D-71254 Ditzingen-Heimerdingen Fax +49 / 71 52 99 39 - 40
info @ widos.de
http://www.widos.de
6. Welding logs and tables
Kunststoff schweißtechnik
25.06.12 Working instructions WIDOS 4001 Page 26 of 59

Welding logs and tables Chapter 6
Kunststoff schweißtechnik
25.06.12 Working instructions WIDOS 4001 Page 27 of 59

Foundation: 2207, 2208 DIN 16932 German association for welding
Use for:
4000 / 4001 / 4002
1 bar on manometer:
23N
PE 80
The value for heating element temperature is between 200° C - 220° C.
The
smaller
the pipe wall the
higher
the temperature.
PE 100
The standard value for heating element temperature is 220° C.
Increase the change-over time and the welding pressure time at PE 100 as fast as possible !
T
pipe
pipe
SDR
bead-up
circular
heat-up
max.
time welding
cool-
diameter
wall
pressure
bead
time
change-
to reach
pressure
down
OD
(s)
[bar]
min.
[s]
over
welding
[bar]
time
[mm]
[mm]
[mm]
time
pressure
[min]
90
90
90
90
90
90
90
90
90
90
110
110
110
110
110
110
110
110
110
110
Additional to the given bead-up force and to the welding force the moving force of the support must be added !
desired
Table for PE
P (N/mm²)
bead-up heat-up
0,15 (PE) time pressure
change- reach full
over welding cool-dow n time
Kunststoff schweißtechnik
time to
pressure in
welding area
temperature
in welding area
time
[s] [s]
2,2 41 4 0,5 22 4 4 4 2
2,8 33 6 0,5 28 4 4 6 3
3,5 26 7 0,5 35 5 5 7 4
4,3 21,0 8 0,5 43 5 5 8 6
5,1 17,6 9 1,0 51 5 5 9 7
5,4 17 10 1,0 54 5 5 10 7
6,7 13,6 12 1,0 67 6 6 12 10
8,2 11 14 1,5 82 6 6 14 11
10,1 9,0 17 1,5 101 7 7 17 14
12,3 7,4 20 2,0 123 8 8 20 16
2,7 41 6 0,5 27 4 4 6 3
3,4 33 8 0,5 34 5 5 8 4
4,2 26 10 0,5 42 5 5 10 6
5,3 21,0 12 1,0 53 5 5 12 7
6,3 17,6 14 1,0 63 6 6 14 9
6,6 17 14 1,0 66 6 6 14 9
8,1 13,6 17 1,5 81 6 6 17 11
10,0 11 21 1,5 100 7 7 21 14
12,3 9,0 25 2,0 123 8 8 25 16
15,1 7,4 30 2,0 151 9 9 30 20
25.06.2012 Working instructions WIDOS 4000 - 4002 Page 28 / 1 of 59

Foundation: 2207, 2208 DIN 16932 German association for welding
Use for:
4000 / 4001 / 4002
1 bar on manometer:
23N
PE 80
The value for heating element temperature is between 200° C - 220° C.
The
smaller
the pipe wall the
higher
the temperature.
PE 100
The standard value for heating element temperature is 220° C.
Increase the change-over time and the welding pressure time at PE 100 as fast as possible !
T
pipe
pipe
SDR
bead-up
circular
heat-up
max.
time welding
cool-
diameter
wall
pressure
bead
time
change-
to reach
pressure
down
OD
(s)
[bar]
min.
[s]
over
welding
[bar]
time
[mm]
[mm]
[mm]
time
pressure
[min]
Additional to the given bead-up force and to the welding force the moving force of the support must be added !
125
125
125
125
125
125
125
125
125
125
140
140
140
140
140
140
140
140
140
140
desired
Table for PE
P (N/mm²)
bead-up heat-up
0,15 (PE) time pressure
change- reach full
over welding cool-dow n time
Kunststoff schweißtechnik
time to
pressure in
welding area
temperature
in welding area
time
[s] [s]
3,1 41 8 0,5 31 4 4 8 4
3,9 33 10 0,5 39 5 5 10 5
4,8 26 12 1,0 48 5 5 12 6
6,0 21,0 15 1,0 60 6 6 15 8
7,1 17,6 18 1,5 71 6 6 18 10
7,4 17 18 1,5 74 6 6 18 10
9,2 13,6 22 1,5 92 7 7 22 13
11,4 11 27 1,5 114 8 8 27 15
14,0 9,0 32 2,0 140 9 9 32 18
17,1 7,4 38 2,0 171 9 10 38 22
3,5 41 10 0,5 35 5 5 10 4
4,3 33 12 0,5 43 5 5 12 6
5,4 26 15 1,0 54 5 5 15 7
6,7 21,0 19 1,0 67 6 6 19 10
8,0 17,6 22 1,5 80 6 6 22 11
8,3 17 23 1,5 83 7 7 23 12
10,3 13,6 28 1,5 103 7 7 28 14
12,7 11 34 2,0 127 8 8 34 17
15,7 9,0 40 2,0 157 9 10 40 20
19,2 7,4 48 2,5 192 10 11 48 24
25.06.2012 Working instructions WIDOS 4000 - 4002 Page 28 / 2 of 59

Foundation: 2207, 2208 DIN 16932 German association for welding
Use for:
4000 / 4001 / 4002
1 bar on manometer:
23N
PE 80
The value for heating element temperature is between 200° C - 220° C.
The
smaller
the pipe wall the
higher
the temperature.
PE 100
The standard value for heating element temperature is 220° C.
Increase the change-over time and the welding pressure time at PE 100 as fast as possible !
T
pipe
pipe
SDR
bead-up
circular
heat-up
max.
time welding
cool-
diameter
wall
pressure
bead
time
change-
to reach
pressure
down
OD
(s)
[bar]
min.
[s]
over
welding
[bar]
time
[mm]
[mm]
[mm]
time
pressure
[min]
Additional to the given bead-up force and to the welding force the moving force of the support must be added !
160
160
160
160
160
160
160
160
160
160
180
180
180
180
180
180
180
180
180
180
desired
Table for PE
P (N/mm²)
bead-up heat-up
0,15 (PE) time pressure
change- reach full
over welding cool-dow n time
Kunststoff schweißtechnik
time to
pressure in
welding area
temperature
in welding area
time
[s] [s]
4,0 41 13 0,5 40 5 5 13 5
4,9 33 16 1,0 49 5 5 16 7
6,2 26 20 1,0 62 6 6 20 9
7,7 21,0 25 1,5 77 6 6 25 11
9,1 17,6 29 1,5 91 7 7 29 13
9,5 17 30 1,5 95 7 7 30 13
11,8 13,6 36 2,0 169 9 10 36 22
14,6 11 44 2,0 146 9 9 44 19
17,9 9,0 53 2,0 179 10 11 53 23
21,9 7,4 62 2,5 219 11 12 62 27
4,4 41 16 0,5 44 5 5 16 6
5,5 33 20 1,0 55 5 5 20 8
6,9 26 25 1,0 69 6 6 25 10
8,6 21,0 31 1,5 86 7 7 31 12
10,2 17,6 36 1,5 102 7 7 36 14
10,7 17 38 1,5 107 7 7 38 14
13,3 13,6 46 2,0 136 8 9 46 18
16,4 11 55 2,0 164 9 10 55 21
20,1 9,0 66 2,5 201 10 11 66 25
24,6 7,4 79 2,5 246 12 13 79 30
25.06.2012 Working instructions WIDOS 4000 - 4002 Page 28 / 3 of 59

Foundation: 2207, 2208 DIN 16932 German association for welding
Use for:
4000 / 4001 / 4002
1 bar on manometer:
23N
PE 80
The value for heating element temperature is between 200° C - 220° C.
The
smaller
the pipe wall the
higher
the temperature.
PE 100
The standard value for heating element temperature is 220° C.
Increase the change-over time and the welding pressure time at PE 100 as fast as possible !
T
pipe
pipe
SDR
bead-up
circular
heat-up
max.
time welding
cool-
diameter
wall
pressure
bead
time
change-
to reach
pressure
down
OD
(s)
[bar]
min.
[s]
over
welding
[bar]
time
[mm]
[mm]
[mm]
time
pressure
[min]
Additional to the given bead-up force and to the welding force the moving force of the support must be added !
200
200
200
200
200
200
200
200
200
200
225
225
225
225
225
225
225
225
225
225
desired
Table for PE
P (N/mm²)
bead-up heat-up
0,15 (PE) time pressure
change- reach full
over welding cool-dow n time
Kunststoff schweißtechnik
time to
pressure in
welding area
temperature
in welding area
time
[s] [s]
4,9 41 20 1,0 49 5 5 20 7
6,2 33 25 1,0 62 6 6 25 9
7,7 26 31 1,5 77 6 6 31 11
9,6 21,0 38 1,5 96 7 7 38 13
11,4 17,6 45 1,5 114 8 8 45 15
11,9 17 46 1,5 119 8 8 46 16
14,7 13,6 56 2,0 147 9 9 56 19
18,2 11 68 2,0 182 10 11 68 23
22,4 9,0 82 2,5 224 11 12 82 28
27,4 7,4 97 3,0 274 13 15 97 34
5,5 41 25 1,0 55 5 5 25 8
6,9 33 31 1,0 69 6 6 31 10
8,6 26 39 1,5 86 7 7 39 12
10,8 21,0 48 1,5 108 8 8 48 15
12,8 17,6 56 2,0 128 8 8 56 17
13,4 17 59 2,0 134 8 9 59 18
16,6 13,6 71 2,0 166 9 10 71 21
20,5 11 86 2,5 205 10 12 86 26
25,2 9,0 104 2,5 252 12 14 104 31
30,8 7,4 123 3,0 308 14 16 123 38
25.06.2012 Working instructions WIDOS 4000 - 4002 Page 28 / 4 of 59

Foundation: 2207, 2208 DIN 16932 German association for welding
Use for:
4000 / 4001 / 4002
1 bar on manometer:
23N
PE 80
The value for heating element temperature is between 200° C - 220° C.
The
smaller
the pipe wall the
higher
the temperature.
PE 100
The standard value for heating element temperature is 220° C.
Increase the change-over time and the welding pressure time at PE 100 as fast as possible !
T
pipe
pipe
SDR
bead-up
circular
heat-up
max.
time welding
cool-
diameter
wall
pressure
bead
time
change-
to reach
pressure
down
OD
(s)
[bar]
min.
[s]
over
welding
[bar]
time
[mm]
[mm]
[mm]
time
pressure
[min]
Additional to the given bead-up force and to the welding force the moving force of the support must be added !
250
250
250
250
250
250
250
250
250
250
280
280
280
280
280
280
280
280
280
280
desired
Table for PE
P (N/mm²)
bead-up heat-up
0,15 (PE) time pressure
change- reach full
over welding cool-dow n time
Kunststoff schweißtechnik
time to
pressure in
welding area
temperature
in welding area
time
[s] [s]
6,2 41 31 1,0 62 6 6 31 9
7,7 33 39 1,5 77 6 6 39 11
9,6 26 48 1,5 96 7 7 48 13
11,9 21,0 59 1,5 119 8 8 59 16
14,2 17,6 69 2,0 142 9 9 69 19
14,8 17 72 2,0 148 9 9 72 19
18,4 13,6 88 2,0 184 10 11 88 23
22,7 11 106 2,5 227 11 13 106 28
27,9 9,0 127 3,0 279 13 15 127 34
34,2 7,4 152 3,0 342 15 18 152 42
6,9 41 39 1,0 69 6 6 39 10
8,6 33 48 1,5 86 7 7 48 12
10,7 26 60 1,5 107 7 7 60 14
13,4 21,0 74 2,0 134 8 9 74 18
15,9 17,6 87 2,0 159 9 10 87 20
16,6 17 90 2,0 166 9 10 90 21
20,6 13,6 110 2,5 206 10 12 110 26
25,4 11 133 2,5 254 12 14 133 31
31,3 9,0 160 3,0 313 14 16 160 38
38,3 7,4 190 3,5 383 16 20 190 47
25.06.2012 Working instructions WIDOS 4000 - 4002 Page 28 / 5 of 59

Foundation: 2207, 2208 DIN 16932 German association for welding
Use for:
4000 / 4001 / 4002
1 bar on manometer:
23N
PE 80
The value for heating element temperature is between 200° C - 220° C.
The
smaller
the pipe wall the
higher
the temperature.
PE 100
The standard value for heating element temperature is 220° C.
Increase the change-over time and the welding pressure time at PE 100 as fast as possible !
T
pipe
pipe
SDR
bead-up
circular
heat-up
max.
time welding
cool-
diameter
wall
pressure
bead
time
change-
to reach
pressure
down
OD
(s)
[bar]
min.
[s]
over
welding
[bar]
time
[mm]
[mm]
[mm]
time
pressure
[min]
Additional to the given bead-up force and to the welding force the moving force of the support must be added !
315
315
315
315
315
315
315
315
315
315
355
355
355
355
355
355
355
355
355
355
desired
Table for PE
P (N/mm²)
bead-up heat-up
0,15 (PE) time pressure
change- reach full
over welding cool-dow n time
Kunststoff schweißtechnik
time to
pressure in
welding area
temperature
in welding area
time
[s] [s]
7,7 41 49 1,5 77 6 6 49 11
9,7 33 61 1,5 97 7 7 61 13
12,1 26 76 2,0 121 8 8 76 16
15,0 21,0 93 2,0 150 9 9 93 19
17,9 17,6 109 2,0 179 10 11 109 23
18,7 17 114 2,0 187 10 11 114 24
23,2 13,6 139 2,5 232 11 13 139 29
28,6 11 168 3,0 286 13 15 168 35
35,2 9,0 202 3,0 352 15
43,1 7,4 241 3,5 431 18
18
22
202 43
241 52
8,7 41 62 1,5 87 7 7 62 12
10,9 33 77 1,5 109 8 8 77 15
13,6 26,0 96 2,0 136 8 9 96 18
16,9 21,0 118 2,0 169 9 10 118 22
20,1 17,6 138 2,5 201 10 11 138 25
21,1 17 145 2,5 211 11 12 145 26
26,1 13,6 176 3,0 261 12 14 176 32
32,2 11,0 213 3,0 322 14 17 213 39
39,7 9,0 257 3,5 397 17 20 257 48
48,5 7,4 305 3,5 485 20
24
305 58
25.06.2012 Working instructions WIDOS 4000 - 4002 Page 28 / 6 of 59

Foundation: 2207, 2208 DIN 16932 German association for welding
Use for:
4000 / 4001 / 4002
1 bar on manometer:
23N
PE 80
The value for heating element temperature is between 200° C - 220° C.
The
smaller
the pipe wall the
higher
the temperature.
PE 100
The standard value for heating element temperature is 220° C.
Increase the change-over time and the welding pressure time at PE 100 as fast as possible !
T
pipe
pipe
SDR
bead-up
circular
heat-up
max.
time welding
cool-
diameter
wall
pressure
bead
time
change-
to reach
pressure
down
OD
(s)
[bar]
min.
[s]
over
welding
[bar]
time
[mm]
[mm]
[mm]
time
pressure
[min]
Additional to the given bead-up force and to the welding force the moving force of the support must be added !
400
400
400
400
400
400
400
400
400
400
450
450
450
450
450
450
450
450
450
450
•
prefabrication under workshop conditions
•
low additional pressure at unclamping
•
no additional pressure during further cooling down
•
load onto the workpieces only after being completely cooled down
•
Join parts with wall thickness
≥15 mm
desired
Table for PE
P (N/mm²)
bead-up heat-up
0,15 (PE) time pressure
change- reach full
over welding cool-dow n time
Kunststoff schweißtechnik
time to
pressure in
welding area
temperature
in welding area
time
[s] [s]
9,8 41 79 1,5 98 7 7 79 13
12,3 33 98 2,0 123 8 8 98 16
15,3 26,0 121 2,0 153 9 9 121 20
19,1 21,0 150 2,5 191 10 11 150 24
22,7 17,6 176 2,5 227 11 13 176 28
23,7 17,0 183 2,5 237 11 13 183 29
29,4 13,6 224 3,0 294 13 16 224 36
36,3 11,0 271 3,0 363 16 19 271 44
44,7 9,0 326 3,5 447 18 23 326 54
54,7 7,4 387 4,0 547 21
27
387 65
11,0 41 99 1,5 110 8 8 99 15
13,8 33 124 2,0 138 9 9 124 18
17,2 26,0 153 2,0 172 9 10 153 22
21,5 21,0 189 2,5 215 11 12 189 27
25,5 17,6 222 2,5 255 12 14 222 31
26,7 17,0 232 3,0 267 12 14 232 33
33,1 13,6 283 3,0 331 15 17 283 40
40,9 11,0 343 3,5 409 17 21 343 49
50,3 9,0 412 4,0 503 20 25 412 60
61,5 7,4 490 4,0 615 23
31
490 71
Remaining under the cool-down time for up to 50% is allowed under the following conditions:
25.06.2012 Working instructions WIDOS 4000 - 4002 Page 28 / 7 of 59

Foundation: 2207, 2208 DIN 16932 German association for welding
Use for:
4000 / 4001 / 4002
1 bar on manometer:
23N
T
pipe
pipe
SDR
bead-up
circular
heat-up
max.
time welding
cool-
diameter
wall
pressure
bead
time
change-
to reach
pressure
down
OD
(s)
[bar]
min.
[s]
over
welding
[bar]
time
[mm]
[mm]
[mm]
time
pressure
[min]
90
90
90
90
90
90
90
110
110
110
110
110
110
110
125
125
125
125
125
125
125
Additional to the given bead-up force and to the welding force the moving force of the support must be added !
The standard value for heating element temperature is 210° C +/- 10° C.
The
smaller
the pipe wall the
higher
the temperature.
desired
Table for PP
P (N/mm²)
bead-up heat-up
0,10 (PP) time pressure
change- reach full
over welding cool-down time
Kunststoff schweißtechnik
time to
pressure in
welding area
temperature
in welding area
time
[s] [s]
2,2 41 3 0,5 94 4 5 3 2
2,8 33 4 0,5 104 4 5 4 3
3,5 26 5 0,5 117 5 6 5 4
5,1 17,6 6 0,5 145 5 6 6 7
8,2 11 10 1,0 192 6 8 10 14
12,3 7,4 14 1,0 249 7 11 14 20
15,0 6 16 1,0 281 8 14 16 24
2,7 41 4 0,5 103 4 5 4 3
3,4 33 5 0,5 115 5 6 5 4
4,2 26 7 0,5 130 5 6 7 6
6,3 17,6 9 0,5 164 6 7 9 10
10,0 11 14 1,0 217 7 9 14 17
15,1 7,4 20 1,0 283 8 14 20 24
18,3 6 23 1,0 322 9 16 23 29
3,1 41 6 0,5 110 4 5 6 4
3,9 33 7 0,5 124 5 6 7 5
4,8 26 8 0,5 140 5 6 8 7
7,1 17,6 12 1,0 176 6 7 12 12
11,4 11 18 1,0 237 7 11 18 19
17,1 7,4 26 1,0 307 8 15 26 27
20,8 6 30 1,5 348 10 18 30 33
25.06.2012 Working instructions WIDOS 4000 - 4002 Page 29 / 1 of 59

Foundation: 2207, 2208 DIN 16932 German association for welding
Use for:
4000 / 4001 / 4002
1 bar on manometer:
23N
T
pipe
pipe
SDR
bead-up
circular
heat-up
max.
time welding
cool-
diameter
wall
pressure
bead
time
change-
to reach
pressure
down
OD
(s)
[bar]
min.
[s]
over
welding
[bar]
time
[mm]
[mm]
[mm]
time
pressure
[min]
Additional to the given bead-up force and to the welding force the moving force of the support must be added !
The standard value for heating element temperature is 210° C +/- 10° C.
The
smaller
the pipe wall the
higher
the temperature.
140
140
140
140
140
140
140
160
160
160
160
160
160
160
180
180
180
180
180
180
180
desired
Table for PP
P (N/mm²)
bead-up heat-up
0,10 (PP) time pressure
change- reach full
over welding cool-down time
Kunststoff schweißtechnik
time to
pressure in
welding area
temperature
in welding area
time
[s] [s]
3,5 41 7 0,5 117 5 6 7 4
4,3 33 8 0,5 131 5 6 8 6
5,4 26 10 0,5 149 5 6 10 8
8,0 17,6 15 1,0 189 6 8 15 14
12,7 11 23 1,0 254 7 12 23 21
19,2 7,4 32 1,5 332 9 17 32 30
23,3 6 38 1,5 373 10 20 38 36
4,0 41 9 0,5 126 5 6 9 5
4,9 33 11 0,5 141 5 6 11 7
6,2 26 14 0,5 162 6 7 14 10
9,1 17,6 19 1,0 204 6 9 19 15
14,6 11 29 1,0 277 8 13 29 24
21,9 7,4 42 1,5 359 10 19 42 34
26,6 6 49 2,0 405 11 23 49 41
4,4 41 11 0,5 133 5 6 11 6
5,5 33 14 0,5 151 5 6 14 8
6,9 26 17 0,5 173 6 7 17 12
10,2 17,6 24 1,0 220 7 10 24 17
16,4 11 37 1,0 298 8 15 37 26
24,6 7,4 53 1,5 386 11 21 53 38
29,0 6 60 2,0 423 12 25 60 44
25.06.2012 Working instructions WIDOS 4000 - 4002 Page 29 / 2 of 59

Foundation: 2207, 2208 DIN 16932 German association for welding
Use for:
4000 / 4001 / 4002
1 bar on manometer:
23N
T
pipe
pipe
SDR
bead-up
circular
heat-up
max.
time welding
cool-
diameter
wall
pressure
bead
time
change-
to reach
pressure
down
OD
(s)
[bar]
min.
[s]
over
welding
[bar]
time
[mm]
[mm]
[mm]
time
pressure
[min]
Additional to the given bead-up force and to the welding force the moving force of the support must be added !
The standard value for heating element temperature is 210° C +/- 10° C.
The
smaller
the pipe wall the
higher
the temperature.
200
200
200
200
200
200
200
225
225
225
225
225
225
225
250
250
250
250
250
250
280
280
280
280
280
280
desired
Table for PP
P (N/mm²)
bead-up heat-up
0,10 (PP) time pressure
change- reach full
over welding cool-down time
Kunststoff schweißtechnik
time to
pressure in
welding area
temperature
in welding area
time
[s] [s]
4,9 41 14 0,5 141 5 6 14 7
6,2 33 17 0,5 162 6 7 17 10
7,7 26 21 1,0 185 6 8 21 13
11,4 17,6 30 1,0 237 7 11 30 19
18,2 11 46 1,0 320 9 16 46 29
27,4 7,4 65 2,0 411 11 23 65 42
33,2 6 76 2,0 456 13 29 76 50
5,5 41 17 0,5 151 5 6 17 8
6,9 33 21 0,5 173 6 7 21 12
8,6 26 26 1,0 197 6 8 26 15
12,8 17,6 38 1,0 255 7 12 38 21
20,5 11 58 1,5 345 9 18 58 32
30,8 7,4 82 2,0 437 12 26 82 47
37,4 6 96 2,5 487 14 32 96 55
6,2 41 21 0,5 162 6 7 21 10
7,7 33 26 1,0 185 6 8 26 13
9,6 26 32 1,0 211 7 9 32 16
14,2 17,6 46 1,0 272 8 13 46 23
22,7 11 71 1,5 367 10 20 71 35
34,2 7,4 101 2,0 463 13 29 101 51
6,9 41 26 0,5 173 6 7 26 12
8,6 33 32 1,0 197 6 8 32 15
10,7 26 40 1,0 227 7 10 40 18
15,9 17,6 58 1,0 292 8 14 58 26
25,4 11 89 1,5 394 11 22 89 39
38,3 7,4 127 2,5 493 14 33 127 57
25.06.2012 Working instructions WIDOS 4000 - 4002 Page 29 / 3 of 59

Foundation: 2207, 2208 DIN 16932 German association for welding
Use for:
4000 / 4001 / 4002
1 bar on manometer:
23N
T
pipe
pipe
SDR
bead-up
circular
heat-up
max.
time welding
cool-
diameter
wall
pressure
bead
time
change-
to reach
pressure
down
OD
(s)
[bar]
min.
[s]
over
welding
[bar]
time
[mm]
[mm]
[mm]
time
pressure
[min]
Additional to the given bead-up force and to the welding force the moving force of the support must be added !
The standard value for heating element temperature is 210° C +/- 10° C.
The
smaller
the pipe wall the
higher
the temperature.
315
315
315
315
315
355
355
355
355
355
400
400
400
400
400
450
450
450
450
450
•
prefabrication under workshop conditions
•
low additional pressure at unclamping
•
no additional pressure during further cooling down
•
load onto the workpieces only after being completely cooled down
•
Join parts with wall thickness
≥15 mm
desired
Table for PP
P (N/mm²)
bead-up heat-up
0,10 (PP) time pressure
change- reach full
over welding cool-down time
Kunststoff schweißtechnik
time to
pressure in
welding area
temperature
in welding area
time
[s] [s]
7,7 41 33 1,0 185 6 8 33 13
9,7 33 41 1,0 213 7 9 41 16
12,1 26 51 1,0 246 7 11 51 20
17,9 17,6 73 1,0 317 9 16 73 28
28,6 11 112 2,0 420 12 24 112 44
8,7 41 42 1,0 199 6 8 42 15
10,9 33 52 1,0 230 7 10 52 18
13,6 26 64 1,0 264 7 12 64 22
20,1 17,6 92 1,5 341 9 18 92 32
32,2 11 142 2,0 448 13 28 142 48
9,8 41 53 1,0 214 7 9 53 16
12,3 33 66 1,0 249 7 11 66 20
15,3 26 81 1,0 221 7 10 81 17
22,7 17,6 117 1,5 367 10 20 117 35
36,3 11 181 2,0 480 14 31 181 54
11,0 41 66 1,0 231 7 10 66 18
13,8 33 83 1,0 267 8 13 83 23
17,2 26 102 1,0 308 8 15 102 27
25,5 17,6 148 1,5 395 11 22 148 39
40,9 11 229 2,5 508 15 35 229 59
Remaining under the cool-down time for up to 50% is allowed under the following conditions:
25.06.2012 Working instructions WIDOS 4000 - 4002 Page 29 / 4 of 59

Table for PVDF
Foundation: 2208, 2207 Part 15 German association for welding
Use for:
4000 / 4001 / 4002
1 bar on manometer:
23N
T
pipe
pipe
bead-up
circular
heat-up
time welding
cool-
diameter
wall
pressure
bead
time
to reach
pressure
down
OD
(s)
[bar]
min.
[s]
welding
[bar]
time
[mm]
[mm]
[mm]
pressure
[min]
90
90
90
110
110
110
125
125
140
140
160
160
180
180
200
200
225
225
250
250
280
280
315
The standard value for heating element temperature is 240° C +/- 8° C.
The
smaller
the pipe wall the
higher
the temperature.
Additional to the given bead-up force and to the welding force the moving force of the support must be added !
change-
over
max.
time
desired
P (N/mm²) change-
bead-up welding cool-down time
0,10 (PVDF) pressure
heat-up over
time
Kunststoff schweißtechnik
time to
reach full
pressure in
welding area
temperature
in welding area
time
[s]
2,8 4 0,5 68 4 4 5,5
4,3 6 0,5 83 4 6 7,0
5,4 7 0,5 94 5 7 8,5
3,4 5 0,5 74 4 5 6,0
5,3 8 0,5 93 5 8 8,5
6,6 10 0,6 106 5 10 10,0
3,9 7 0,5 79 4 7 6,5
6,0 10 0,6 100 5 10 9,0
4,3 8 0,5 83 4 8 7,0
6,7 13 0,6 107 6 13 10,0
4,9 11 0,5 89 5 11 8,0
7,7 17 0,7 117 6 17 11,0
5,5 14 0,5 95 5 14 8,5
8,6 21 0,8 126 6 21 12,5
6,2 17 0,6 102 5 17 9,5
9,6 25 1,0 136 7 25 13,5
6,9 21 0,7 109 6 21 10,5
10,8 32 1,0 148 7 32 15,0
7,7 26 0,7 117 6 26 11,0
11,9 39 1,1 159 8 39 16,5
8,6 32 0,8 126 6 32 12,5
13,4 49 1,2 174 8 49 18,0
9,7 41 1,0 137 7 41 13,5
3
3
3
3
3
4
3
4
3
4
3
4
4
4
4
4
4
4
4
4
4
4
4
[s]
25.06.2012 Working instructions WIDOS 4000 - 4002 Page 30 of 59

WIDOS Einsteinstr. 5 Phone +49 / 71 52 99 39 - 0
W. Dommer Söhne GmbH D-71254 Ditzingen-Heimerdingen Fax +49 / 71 52 99 39 - 40
info @ widos.de
http://www.widos.de
Kunststoff schweißtechnik
7. Maintenance and repair
Goal of the chapter is to:
• keep the nominal condition and the operation capacity of the machine.
• increase the efficiency by avoiding non-planned outage.
• Efficient planning of the maintenance works and the maintenance tools
7.1. Maintenance, Inspection and repair
All maintenance and repair works have to be basically performed with the
machine in off position.
During this the machine has to be secured against unauthorized switching on.
Prescribed maintenance and inspection works should be performed in time. The
DVS gives the advice of inspection works after 1 year.
Should for machines with a specially high usage percentage the testing cycle be
shortened .
The works should be performed at the WIDOS GmbH company or by an
authorized partner.
The linear guides for heating element and planer must be cleaned every week
e.g. with a brush.
Check the linear guide carriages every 3 months and grease them over the
lubricating nipple if necessary. Chips or other impurities in the guides can be the
cause if the heating element or the planer jam or run heavily.
• Clean the piston rods every month with an oily tissue.
• Check the hydraulic connections every month for tightness, tighten again if necessary.
• The operating staff has to be informed before the starting of the maintenance works.
• Check the tightness of loosened screws.
• Check the function of the safety devices after completion of the maintenance works.
Especially insulation, tension resistence and protective cables resistence.
7.2. Planer
• Check the driving chain in the planer from time to time and lubricate it. For that purpose
screw off the housing of the planer.
• Check the cutting ability of the planer, exchange it if necessary (double sided polished
section, max. chip thickness = 0,2 mm!)
25.06.12 Working instructions WIDOS 4001 Page 31 of 59

Maintenance and repair Chapter 7
7.3. Checking the level of the hydraulic oil
• Before each starting of the machine check the oil level of the hydraulic pump in order
to avoid damages.
• Unscrew the red closing screw (with integrate oil dipstick) on the top of the aggregate.
Clean the oil dipstick with a dry cloth and insert it again into the tank, do not screw.
• Remove the oil dipstick again and check the level by means of the two marks (the oil
level must be between the two marks). In case of oil level being beyond the lower mark
refill oil of the quality HLPD 32 (Chapter:7.3.1) .
• The oil level must not surpass the upper mark because otherwise there is the danger
of overflowing in certain situations.
• Oil level check being finished, tighten again firmly the red closing screw.
7.3.1. Used hydraulic oil
Only use oil of the quality HLPD 32.
Properties: anticorrosive, resistant to ageing, contains wearing resistant
agents, high rating and partly water binding.
The hydraulic oil must be disposed of professionnally.
7.4. Transport
Kunststoff schweißtechnik
• Take care that the machine is not exposed to hurts.
• Handle the machine carefully, take especially care for the electro cables.
• Do not tilt the machine too much, in order to prevent oil slick.
• If need be, dismount the planer and the heating element:
For that purpose remove the heating Remove the four screws (S) from the planer
element from the holder (see arrow) and then the planer itself
S
25.06.12 Working instructions WIDOS 4001 Page 32 of 59

Maintenance and repair Chapter 7
Kunststoff schweißtechnik
7.5. Venting the hydraulic cylinders
Necessary: If a new cylinder has been built in.
Condition: A vent hose must exist preventing oil coming out uncontrolled.
Procedure: Open the slides completely, loosen the vent screw for closing at the
cylinder and connect the vent hose.
Close the slides until there is no air in the vent hose. Repeat the same
process at the vent screw for opening.
There are 2 drilled holes at the right table, one of it is in the middle under the horizontal
movable plate.
The cylinder has to be dismounted completely from the movable table on the left side.
Then open completely the cylinder:
Open the rear vent screw (seen from the cylinder) and screw the vent hose to it.
Move backwards and forwards until there is only oil left in the hose and no more air bubbles.
Unscrew the vent hose and tighten again the screw.
Repeat the same process at the frontal screw.
To be sure that the air has left the cylinder completely, you can perform the following the test:
Drive out the cylinder for the half way as soon as both vent screws are tightened again.
Move slowly forwards and backwards the piston rod.
A continuous resistance signifies that there is no more air in the cylinder.
Jerking means there is still left air in the cylinder.
7.6. Clamping elements
• For a long service life clean and grease regularly the treaded spindles and the joint parts
which are used for clamping the pipes.
7.7. Cleaning of the machine
The used materialis and clothes have to be handled and disposed off properly especially
• when cleaning with solvents
• when lubricating with oil and grease
7.8. Disposal
At the end of their life time, the machine and the wear parts have to be disposed
of properly and non-polluting, and in accordance with the national laws of waste
disposal.
25.06.12 Working instructions WIDOS 4001 Page 33 of 59

WIDOS Einsteinstr. 5 Phone +49 / 71 52 99 39 - 0
W. Dommer Söhne GmbH D-71254 Ditzingen-Heimerdingen Fax +49 / 71 52 99 39 - 40
info @ widos.de
http://www.widos.de
8. Wiring and hydraulic diagrams
Kunststoff schweißtechnik
25.06.12 Working instructions WIDOS 4001 Page 34 of 59

Wiring and hydraulic diagrams Chapter 8
Kunststoff schweißtechnik
25.06.12 Working instructions WIDOS 4001 Page 35 of 59

Wiring and hydraulic diagrams Chapter 8
Kunststoff schweißtechnik
25.06.12 Working instructions WIDOS 4001 Page 36 of 59

WIDOS Einsteinstr. 5 Phone +49 / 71 52 99 39 - 0
6
W. Dommer Söhne GmbH D-71254 Ditzingen-Heimerdingen Fax +49 / 71 52 99 39 - 40
info @ widos.de
http://www.widos.de
9. Spare parts list
9.1. Basic machine
1 - 3
4 - 5
13 - 14
15
16 - 17
7
8 - 9
10 - 11
12
18 - 19
20
Kunststoff schweißtechnik
25.06.12 Working instructions WIDOS 4001 Page 37 of 59

Spare parts list Chapter 9
21 - 22
23
24 - 25
26 - 28
40 - 42
43 - 47
48 - 49
Kunststoff schweißtechnik
29 - 30
31
32 - 36
37 - 39
50
25.06.12 Working instructions WIDOS 4001 Page 38 of 59

Spare parts list Chapter 9
WIDOS 4001
Basic unit
Pos. Name Piece Order no.
1 Linear guide with slide 2 L30600TR
2 Pan-head screw M 8x30 DIN 912 16 0912H030
3 Cap for linear guide 16 L30601
4 Rear girder 1 023104
5 Rivet nut M 10 10 N1002
6 Transport grip 2 020123
7 Pan-head screw M 8x55 DIN 912 16 0912H055
8 Frontal girder 1 023102
9 Rivet nut M 10 10 N1002
10 Crossgirder for basic frame 2 024103
11 Protective cap (50x50x4 mm) 4 J0208
12 Basic frame 1 024101
13 Slide 4 L20ELZ
14 Pan-head screw with low head M 6x14 DIN 7984 16 7984F014
15 Linear guide 2 L20700
16 Fitting cap 24 L20501
17 Pan-head screw M 5x16 DIN 912 24 0912E016
18 Stop pin 1 024105
19 Washer M 10 DIN 125 2 0125J
20 Parallel pin M 5x18 DIN 6325 4 6325E018
21 Hydraulic cylinder 1 023115
Seals for cylinder 1 set D023115
22 Pan-head screw M 8x25 DIN 912 3 0912H025
23 Grub screw M 6x10 DIN 913 1 0913F010
24 Shaft (d = 25, l= 275 mm) 1 023120
25 Guide bearing 1 LKH2540
26 Slide, left 1 023105
27 Thread insert M 12 short 2 GEWK-M12
28 Thread insert M 12 5 GEW-M12
29 Pan-head screw M 10x90 DIN 912 2 0912J090
30 Pan-head screw M 10x70 DIN 912 4 0912J070
31 Plate, horizontal movement 1 023108
32 Guide rod 2 023107
33 Pan-head screw M 10x40 DIN 912 2 0912J040
34 Thread insert M 10 4 GEW-M10
35 Counter nut M 10 DIN 985 2 0985J
36 Washer M 10 DIN 125 2 0125J
37 Holder for hydraulic box 1 024118
38 Flat-head screw M6x20 DIN 7991 2 7991F020
39 Flat-head screw M6x16 DIN 7991 2 7991F016
40 Clamping lever (threaded length 30 mm) 2 BM10030
41 Straight pin 8x120 DIN 6325 2 6325H120
42 Washer M 8 DIN 125 2 0125H
43 Angular screw coupling 2 VSWV8LL
44 Washer spring A 35,5x18,3x2 DIN 2093 2 2093R020
45 Distance tube 1 023116
Kunststoff schweißtechnik
25.06.2012 Working instructions WIDOS 4001 Page 39 / 1 of 59

Spare parts list Chapter 9
WIDOS 4001
Basic unit
Pos. Name Piece Order no.
46 Hexagon nut M 14 DIN 934 3 0934N
47 Counter support 1 023117
48 Washer M10 DIN 9021 4 9021J
49 Hexagon head screw M 10x70 DIN 933 4 0933J070
50 Slide, right 1 023106
-- Type plate 1 SCHT4001
Kunststoff schweißtechnik
25.06.2012 Working instructions WIDOS 4001 Page 39 / 2 of 59

Spare parts list Chapter 9
Kunststoff schweißtechnik
9.2. Clamping tool
5 - 6
8 - 9
10
11
12
13
14
15 - 16
17 - 18
1
2
(23)
(24)
3
4
7
19
20
21
22
25.06.12 Working instructions WIDOS 4001 Page 40 of 59

Spare parts list Chapter 9
WIDOS 4001
Clamping tools
Pos. Piece Order no.
1 Center pin 2 020117
2 Supporting angle 2 023712
3 Pipe support 1 Set 0206...*
4 Pipe support 2 023711
5 Clamping lever M 12/30° 2 BM1230
6 Insert nut 2 023713
7 Guide rail 2 023724
8 Pan-head screw M 10x20 DIN 7984 8 7984J020
9 Straight pin 8x20 DIN 6325 4 6325H020
10 Clamping tool, left DO 335 1 S02335L
11 Clamping tool, right DO 335 1 S02335R
12 Thread spindle 2 091108
13 Nut 2 091109
14 Thrust washer 2 023708
15 Lock washer size 7 DIN 6799 2 6799G
16 Rivet for spindle 2 S0205
17 Hexagon screw M 12x35 DIN 933 6 0933L035
18 Thrust washer 6 023707
19 Rivet for joint 2 S0426
20 Knurled screw 1 S0318
21 Support for bow 1 020721
22 Knurled screw 1 S0222
23 Reduction insert, Ø90 - 280 1 Set 0208...*
-- Reduction insert wide, Ø90 - 280 1 Set 0218...*
-- Reduction insert super wide, Ø90 - 280 1 Set 0228...*
24 Pan-head screw for reduction inserts Ø90-280 4 0912F30X
-- Flat-head screw for reduction inserts Ø315 4 7991F20X
-- Allan key SW 27 1 ZRS27
Kunststoff schweißtechnik
25.06.2012 Working instruction WIDOS 4001 Page 41 of 59
* When ordering state dimension !

Spare parts list Chapter 9
Kunststoff schweißtechnik
9.3. Planer
1 - 3
4 - 7
8
9
10
11
12
13 - 15
16
17 - 22
23 - 24
25.06.12 Working instructions WIDOS 4001 Page 42 of 59

Spare parts list Chapter 9
25
32
33
34 - 35
36
Kunststoff schweißtechnik
26
27 - 31
37
38 - 40
25.06.12 Working instructions WIDOS 4001 Page 43 of 59

Spare parts list Chapter 9
WIDOS 4001
Planer
Pos. Name Piece Order no.
1 Flat-head screw M 3x8 DIN 965 12 0965C008
2 Blade 2 MES170
3 Spacer 2 MU170
4 Ball bearing 2 L6003Z
5 Hexagon nut M 16x1,5 DIN 934 1 0934Y
6 Washer M16 DIN 125 4 0125P
7 Bolt 1 210410
8 Driving motor 1050 W, 230 V 1 AMBF16
Connecting cable 1 EK3220
Collector carbon 1 set EKMBF16
Switch for driving motor 1 on request
9 Planer disc, left 1 210403
10 Pan-head screw M 8x35 DIN 912 2 0912H035
11 Planer disc, right 1 210402
12 Pan-head screw M 10x40 DIN 912 2 0912J040
13 Flat-head screw M 3x8 DIN 965 6 0965C008
14 Blade 2 MES072
15 Spacer 2 MU072
16 Fastener for planer 1 023401
17 Ball bearing 1 L6020
18 Chain wheel, small (11 teeth) 1 K38011
19 Chain wheel, large 3/8" (95 teeth) 1 023406
20 Chain 3/8" (143 links) 1 K38143
21 Chain joint 3/8" 1 KSCH38
22 Flat-head screw M 8x12 DIN 7991 4 7991H012
23 Cover 1 023404
24 Pan-head screw M 4x12 DIN 912 4 0912D012
25 Ball button C 40 DIN 319 1 0319C40
26 Handle bar 1 071409
27 Guide bolt 1 023407
28 Bolt 1 023408
29 Stud bolt 1 023409
30 Claw 1 023410
31 Spring 1 023411
32 Pan-head screw M6x20 DIN 912 8 0912F020
33 Mounting plate 1 024405
34 Washer M10 DIN 125 6 0125J
35 Pan-head screw M10x25 DIN 912 2 0912J025
36 Retaining plate whith hole 1 024402
37 Retaining plate whith thread 1 024401
38 Pan-head screw M10x55 DIN 912 4 0912J055
39 Washer M10 DIN 125 4 0125J
40 Bolt for retaining plate 1 024404
Kunststoff schweißtechnik
25.06.2012 Working instructions WIDOS 4001 Page 44 of 59

21
17 - 20
3
14 - 15
Spare parts list Chapter 9
Kunststoff schweißtechnik
9.4. Heating element
5 - 8
1
2
4
10
9
11
12 - 13
16
24
25
26
22
27
23
28
29 - 35
25.06.12 Working instructions WIDOS 4001 Page 45 of 59

Spare parts list Chapter 9
Heating element
WIDOS 4001
Pos. Name Piece Order no.
1 Heating element H 4002, 230 V 1 H4002E
Heating plate new 1 HP4002E
Heating plate in exchange 1 HPT4002E
2 Stud bolt M 12 1 HGEW-M12
3 Grip for heating element 1 H0205
4 Handlebar 1 H0206
5 Sensor PT 1000 1 H09082
6 Holder for sensor 1 023536
7 French head screw M 4x 6 DIN 7985 2 7985D006
8 Toothead lock washer M 4 DIN 6797 1 679D
9 Guard plate for heating element 1 023535
10 Oval-head screw M 3x5 DIN 7985 6 7985C005
11 Cover plate 1 H2116
12 Antikink union joint PG11 1 EV0011
13 Connection cable with plug 1 EK3220
14 Cap for control 1 H2115
15 Housing with cap for control 1 H2114
16 Flat-head screw M 6x12 DIN 7991 8 7991F012
17 Pan-head screw M 5x25 DIN 912 2 0912E025
18 Washer M 5 DIN 125 2 0125E
19 Spring washer M 5 DIN 127 2 0127E
20 PTFE-distance washer 2 H2110
21 Blind rivet 4 7337D010
22 Control lamp yellow 1 H2106
23 Button for thermo regulator with cover cap 1 H2109
24 Frame for heating element 1 on request
25 PTFE-distance washer 1 H2103
26 Control lamp green 1 H2105
27 Screen 1 on request
28 Screen with temperature scale 180-280 1 on request
29 Electronic control GZ 4 without sensor 1 H0928220
30 Triac 1 H09083
31 Sensor PT 1000 1 H09082
32 Teminal lustre, triple 1 EA1001
33 Pan-head screw M 3x12 DIN 912 2 0912C012
34 Knee for terminal lustre 1 H2112
35 Flat-head screw M 4x10 DIN 7991 1 7991D010
Kunststoff schweißtechnik
25.06.2012 Working instructions WIDOS 4001 Page 46 of 59

Spare parts list Chapter 9
Kunststoff schweißtechnik
9.5. Heating element holder
1
2 - 3
4 - 5
6 - 8
9 - 10
11
12
13 - 15
16
25.06.12 Working instructions WIDOS 4001 Page 47 of 59

Spare parts list Chapter 9
Heating element holder
WIDOS 4001
Pos. Name Piece Order no.
1 Retaining plate whith thread 1 024501
2 Roller 4 023503
3 O - ring 4 D18x4
4 Pan-head screw M10x55 DIN 912 4 0912J055
5 Washer M10 DIN 125 6 0125J
6 Pan-head screw M10x70 DIN 912 1 0912J070
7 Washer M10 DIN 9021 1 9021J
8 Hexagon nut M 10 DIN 934 1 0934J
9 Pan-head screw M5x20 DIN 912 1 0912E020
10 Hexagon nut M5 DIN 934 1 0934E
11 Mounting plate 1 024405
12 Pan-head screw M6x20 DIN 912 8 0912F020
13 Bolt for retaining plate 1 024404
14 Pan-head screw M10x25 DIN 912 1 0912J025
15 Washer M10 DIN 9021 1 9021J
16 Retaining plate whith hole 1 024502
Kunststoff schweißtechnik
25.06.2012
Working instructions WIDOS 4001 Page 48 of 59

Spare parts list Chapter 9
Kunststoff schweißtechnik
9.6. Conversion kit for clamping tool
1 - 3
7
4 - 5
8 - 9
6
10 / 11
25.06.12 Working instructions WIDOS 4001 Page 49 of 59

Spare parts list Chapter 9
Conversion kit for clamping tools
WIDOS 4001
Pos. Name Piece Order no.
1 Spindle nut 2 071109
2 Thrust washer 2 023708
3 Thread spindle 2 071108
4 Lock washer size 8 DIN 6799 2 6799H
5 Rivet for spindle 2 S0425
6 Set clamping tools OD 450 1 S04450
7 Rivet for joint 2 S0426
8 Pipe support conversion kit 2 040711
9 Pipe support OD 400 - 315 2 0406...*
10 Hexagon head screw M 12x35 DIN 933 6 0933L035
11 Thrust washer 6 160110
-- Allan key SW 27 1 ZRS27
-- Screw for reduction inserts 4 7984J30X
-- Reduction inserts 2 0708...*
Kunststoff schweißtechnik
* When ordering state dimension !
25.06.2012 Working instructions WIDOS 4001 Page 50 of 59

Spare parts list Chapter 9
Kunststoff schweißtechnik
9.7. Conversion kit for planer
4 - 8
10
11 - 14
15 - 18
19
20 - 21
1
2
3
22 - 24
9
25
26 - 28
29 - 34
35
36
25.06.12 Working instructions WIDOS 4001 Page 51 of 59

Spare parts list Chapter 9
Conversion kit for planer
WIDOS 4001
Pos. Name Piece Order no.
1 Ball button C 40 DIN 319 1 0319C40
2 Handle bar 1 040407
3 Hexagon nut M 16 DIN 934 1 0934P
4 Claw 1 023410
5 Bolt 1 023408
6 Guide bolt 1 023407
7 Stud bolt 1 023409
8 Spring 1 023411
9 Planer disc, right 1 043402
10 Fastener for planer 1 043401
11 Ball bearing 2 L6003Z
12 Hexagon nut M 16x1,5 DIN 934 1 0934Y
13 Disc M 16 DIN 125 4 0125P
14 Bolt 1 210410
15 Driving motor 1040 W, 230 V 1 AMBF23
16 Connection cable 1 EK3220
17 Collector carbon 1 set EKMBF23
18 Switch for driving motor 1 on request
19 Planer disc, left 1 043403
20 Cover 1 043404
21 Pan-head screw M 4x16 DIN 912 4 0912D016
22 Blade 4 MES085
23 Spacer 4 MU085
24 Flat-head screw M 3x8 DIN 965 6 0965C008
25 Pan-head screw M 10x40 DIN 912 4 0912J040
26 Blade 2 MES170
27 Spacer 2 MU170
28 Flat-head screw M 3x8 DIN 965 18 0965C008
29 Ball bearing 1 L61834
30 Chain wheel, small (11 teeth) 1 K38011
31 Chain wheel disc 3/8" (95 teeth) 1 023406
32 Chain 3/8" (151 links) 1 K38151
33 Chain joint 3/8" 1 KSCH38
34 Flat-head screw M 8x20 DIN 7991 4 7991H020
35 Plate 2 043429
36 Pan-head screw M 8x35 DIN 912 2 0912H035
Kunststoff schweißtechnik
25.06.2012 Working instructions WIDOS 4001 Page 52 of 59

23 - 25
18
4 - 5
8 - 10
11
Spare parts list Chapter 9
9.8. Conversion kit for heating element
1
3
6
7
19
20 - 22
Kunststoff schweißtechnik
2
12
13
14 - 15
16
17
26
27
28
25.06.12 Working instructions WIDOS 4001 Page 53 of 59

Spare parts list Chapter 9
Conversion kit for heating element
Kunststoff schweißtechnik
WIDOS 4001
Pos. Name Piece Order no.
1 Heating element holder 1 HU4002E
Heating plate new 1 HPU4002E
Heating plate in exchange 1 HPTU4002E
2 Lifting eye screw M 10 DIN 580 1 0580J
3 Heat sink 1 on request
4 Frame 1 071558
5 Pan-head screw M 8 x 30 DIN 912 2 0912H030
6 Insulating piece 1 071556
7 Cover for heating element holder 1 3555478
8 Drive-in nut 4 05460098
9 Pan-hed screw M 6 x 16 DIN 7984 8 7984F016
10 Spring loxk washer M 6 DIN 127B 8 127F
11 Heating element holder 1 071558
12 Temperature probe PT 1000 1 H09082
13 Insertion nut 1 HGEW-M12
14 Hexagon nut M 12 DIN 439B 1 0439L
15 Guard plate 1 355549
16 Handlebar 1 355544
17 Ball button Ø 40 1 on request
18 Controller G4 with triac 1 H0908230D1
19 Window, tinted 1 H09071
20 Screw connection HKL 1 EVH21201615
21 Rubber cable 5 x 1,5², 3,2 m 1 EL02515
22 Cekon - plug 16A 1 EST0116
23 Distance piece 4 081554
24 Tapped bushing 4 081553
25 Pan-head screw M 6x45 DIN 912 4 0912F045
26 Upper and lower part of housing 1 081551
27 Flat-head screw M 3x8 DIN 7991 2 7991C008
28 PTFE - joining piece 1 211505
25.06.2012 Working instructions WIDOS 4001 Page 54 of 59

Spare parts list Chapter 9
Kunststoff schweißtechnik
9.9. Hydraulic box
2 - 3
13
14 - 15
16
17
19
21
22 - 24
25 - 30
31 - 34
1
20
7 - 9
4
10 - 11
5
12
6
18
25.06.12 Working instructions WIDOS 4001 Page 55 of 59

Spare parts list Chapter 9
WIDOS 4001
Hydraulic box
Pos. Name Piece Order no.
1 Hydraulic box 1 024227
2 French head screw M 3,5x13 DIN 7983 12 7983C013
3 Disc of roses M 3,5 12 ROSM 3.5
4 Cover for hydraulic box 1 024226
5 Pressure gauge (0-250 bar) 1 020204
6 Bellows 1 101035
7 Hook for removable hydraulic unit 2 024119
8 Counter plate for hook 2 0241191
9 Flat-head screw M 6x16 DIN 7991 4 7991F016
10 Fastener for stop-watch 1 023917
11 Flat-head screw M 4x10 DIN 965 3 0965D010
12 Cylinder knob 1 on request
13 Screw coupling for mini measuring tube 1 VSK02
14 Screw connection for WIDOS 4001 2 1010242
15 O-ring 18x1,5 2 D18x15
16 Mini measuring tube 1 V0400140
17 Hydraulic unit 1 023203
18 Accumulator (10 bar) 1 103206
19 Pipe duct size 22 1 EKT22
20 Coupling plug, flat packing 1 VST14
21 Coupling box, flat packing 1 VMU14
22 Bow type handle 2 BG565201
23 Pan-head screw M 6x14 DIN 7984 4 7984F014
24 Washer M 6 DIN 9021 4 9021F
25 Sealing nipple 2 VB306
26 Bow shaped nipple 2 VB386
27 Compressed bushing 4 VP256
28 Hydraulic hose 1,7 m VSCHL61
29 Hydraulic hose 1,9 m VSCHL61
30 Protective hose (28x2 mm) 1,2 m EA08011
31 HKL-screw connection Pg 13/11 1 EVH1311
32 Counter nut (brass) for Pg 13.5 1 EV0213
33 Cable H07RN-F (3x1,5 mm²) 3,0 m EL02315
34 Plug with earthing contact (230 V) 1 EST0702
-- Stop-watch 1 TMZ1000
Kunststoff schweißtechnik
25.06.2012 Working instructions WIDOS 4001 Page 56 of 59

Spare parts list Chapter 9
Kunststoff schweißtechnik
9.10. Plane girder for planing only at one side
3 - 4
1
2
5
6
25.06.12 Working instructions WIDOS 4001 Page 57 of 59

Spare parts list Chapter 9
Plane girder for planing only at one side
WIDOS 4001
Pos. Name Piece Order no.
1 Centering bolt 1 023418
2 Bearing 1 L51103
3 Plane girder for planing only at one side 1 023427
4 Protective cap (25x25x3) 2 J0205
5 Washer M 10 DIN 125 2 0125J
6 Counter nut M 10 DIN 985 1 0985J
Kunststoff schweißtechnik
25.06.2012 Working instructions WIDOS 4001 Page 58 of 59

WIDOS Einsteinstr. 5 Phone +49 / 71 52 99 39 - 0
W. Dommer Söhne GmbH D-71254 Ditzingen-Heimerdingen Fax +49 / 71 52 99 39 - 40
info @ widos.de
http://www.widos.de
10. Declaration of conformity
In the sense of the EC-guideline, EG-MRL 2006/42/EG
Corporation
WIDOS GmbH
Einsteinstr. 5
D-71254 Ditzingen-Heimerdingen
declares in allone responsibility that the product
Plastic welding machine
WIDOS 4001
to which this declaration refers to, is conform with the following norms and norming
documents:
1. DIN EN ISO 12100 – 1 and 2 (substitute for DIN EN 292 Parts 1 and 2)
Safety of machines, basic meanings, general regulations of design
Kunststoff schweißtechnik
2. DIN EN 60204.1
Electrical equipment of industrial machines
3. DIN EN 4413
Safety requirements for fluid power systems and components
4. EN 60555, EN 50082, EN 55014
Electromagnetic compatibility
The technical documentation is completely available.
The working instructions in the language of the user is available.
Ditzingen-Heimerdingen, the 25.06.12
Martin Dommer (Technical director)
25.06.12 Working instructions WIDOS 4001 Page 59 of 59
 Loading...