

Page 1
1
BREADMAKER
INSTRUCTION MANUAL
Model NO: BREADM
Parameter: 220-240V/850W/3.5LB
Read this booklet thoroughly before using and save it for future reference
This product is for household use only.
wido.com
Page 2

Important Safety Instructions:
1. Read this instruction manual thoroughly before using.
2. Before using check that the voltage of wall outlet corresponds to the one shown on the rating plate.
This appliance has been incorporated with a grounded plug. Please ensure the wall outlet in your house
is well earthed.
3. Do not operate any appliance with a damaged cord or plug or after the appliance malfunctions. Return
it to manufacturer or the nearest authorized service agent for replacement or examination.
4. Do not touch the hot surface, after bread baking wear oven gloves to operate.
5. Do not immerse power cord, plug, bread maker into water or other liquid in case of electric shock.
6. Unplug the appliance after using, when not use or before clean the appliance.
7. Do not let power cord hand over the edge of a worktop or run across a hot area.
8. Do not use any other accessory attachments not recommended by manufacturer.
9. Do not let children operate without supervision or instruction.
10. Do not place the appliance on or near heat sources such as gas stove or electric hot plate.
11. Extreme caution must be used when moving an appliance containing hot oil or other hot liquids.
12. Do not touch any moving or spinning parts of the machine when baking.
13. Metal foils or other materials must not be inserted into the bread maker, as this will cause the risk of a
fire or short circuit.
14. Never cover the bread maker with a towel or any other material, heat and steam must be able to
escape freely.
15. Never vigorously tap the baking pan on the top or edge to remove the pan, as this may damage the
pan.
16. Never switch on the appliance without ensuring that the baking pan is securely in place.
17. This appliance is not intended for other use.
18. Do not use outdoors.
19. Save these instructions for future reference
20. The appliance is not intended to be operated by means of an external timer or separate
remote-control system.
21. This appliance is intended to be used in household and similar applications such as: Staff kitchen
areas in shops, offices and other working environments; Farm houses; By clients in hotels, motels and
other residential type environments; Bed and breakfast type environments.
22. This appliance can be used by children aged from 8 years and above and persons with reduced
physical, sensory or mental capabilities or lack of experience and knowledge if they have been given
supervision or instruction concerning use of the appliance in a safe way and understand the hazards
involved. Children must not play with the appliance. Cleaning and user maintenance must not be made by
children.
23. Keep the appliance and its cord out of reach of children less than 8 years.
Page 3
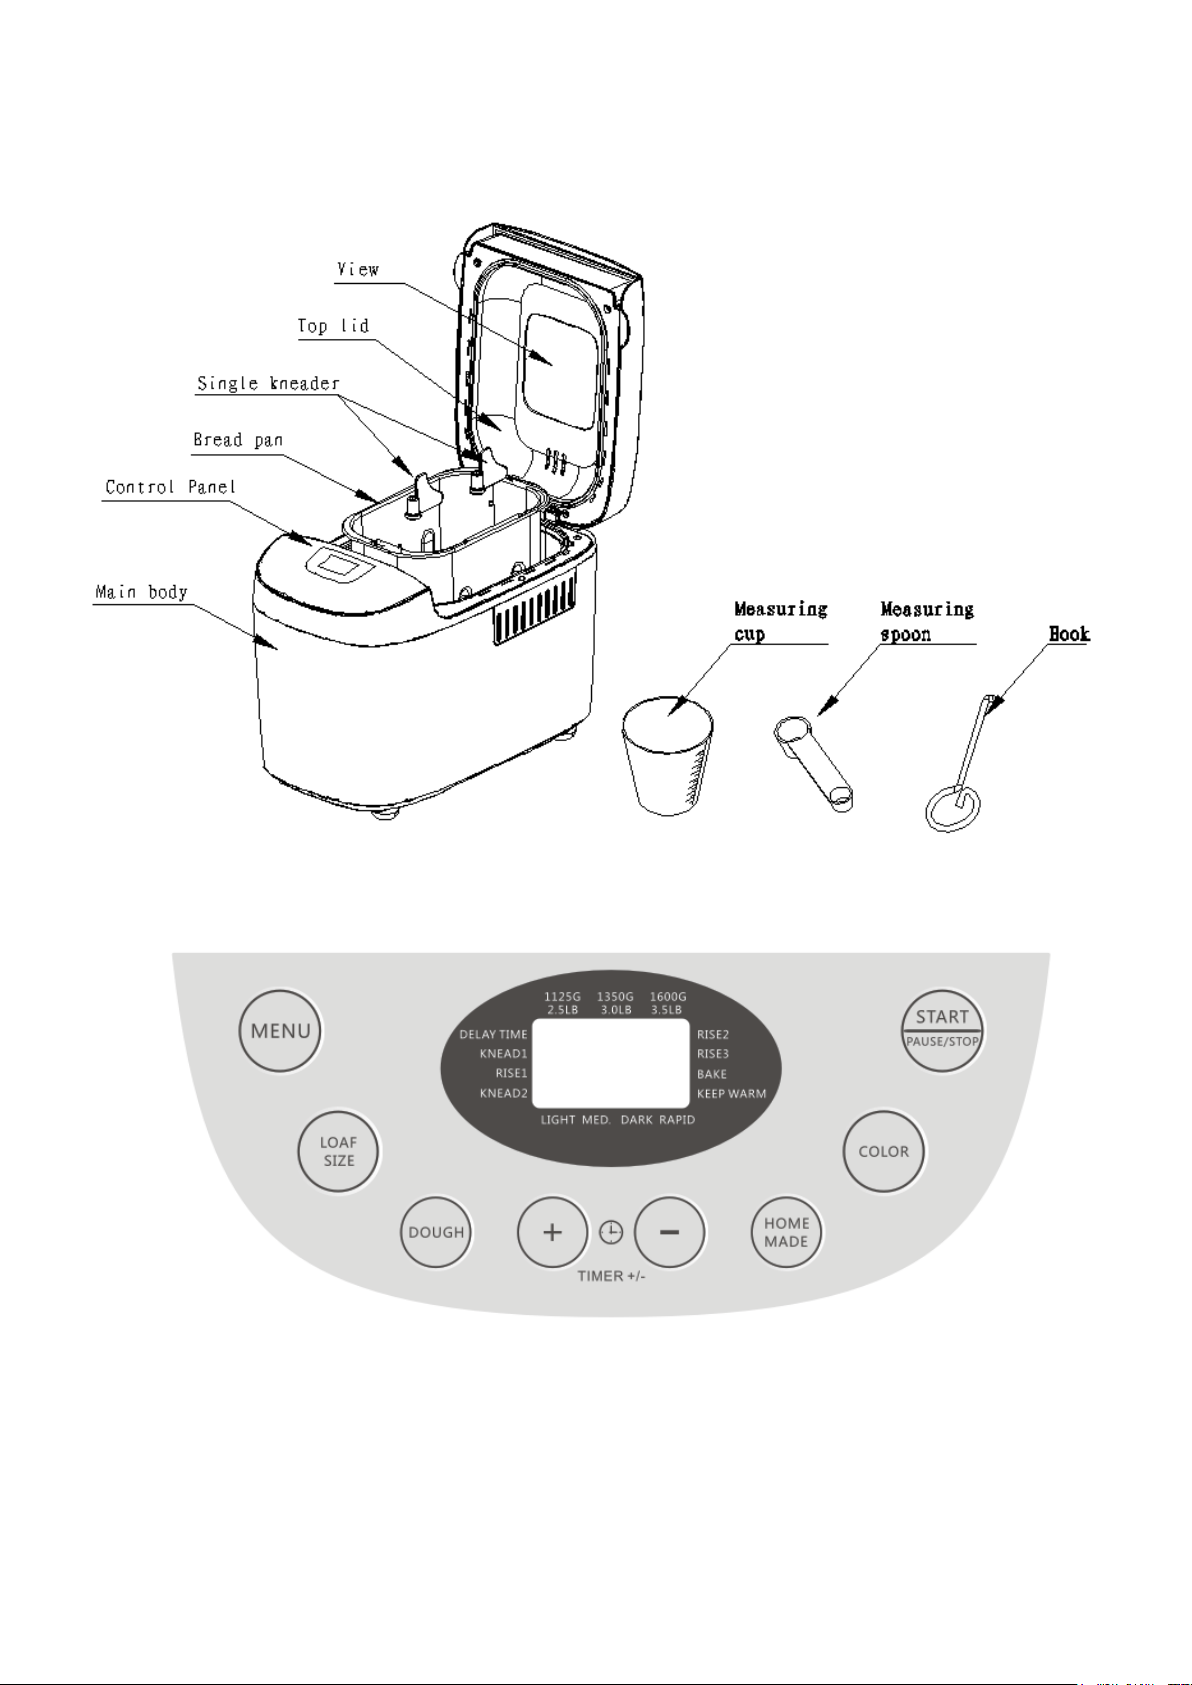
Bread Maker Parts:
Control panel:
After power-up
As soon as the bread maker is plugged into power supply, a beep will be heard and “3:00” will be
displayed. The ‘:’ between the “3” and “00” will not flash constantly. “1” is the default program.
The arrows point to “1500g” and “MEDIUM” as they are default settings.
Page 4

Start/stop
This button is used for starting and stopping the selected baking program.
To start a program, press the START/STOP button once. A short beep will be heard, the indicator
will light up, and the two dots in the time display begin to flash and the program starts. Any other
button is inactivated except the START/STOP button after a program has begun.
To pause the program, press the START/STOP/PAUSE button for approx. 0.5 seconds, then the
program will pause, after 3 minutes of non-operation, the program will continue to work.
To stop the program, press the START/STOP button for approx. 3 seconds, then a beep will be
heard, it means that the program has been switched off. This feature will help to prevent any
unintentional disruption to the operation of program.
Menu
The MENU button is used to set different programs. Each time it is pressed (accompanied by a
short beep) the program will vary. Press the button discontinuously, the 15 menus will be cycled
to show on the LCD display. Select your desired program. The functions of 15 menus will be
explained below.
Program 1: Basic
For white and mixed breads, that mainly consist of wheat flour or rye flour. The bread has a
compact consistency. You can adjust the bread brown by setting the COLOR button.
Program 2: French
For light breads made from fine flour. Normally the bread is fluffy and has a crispy crust. This is
not suitable for baking recipes requiring butter, margarine or milk.
Program 3: Whole Wheat
For breads with heavy varieties of flour that require a longer phase of kneading and rising (for
example, whole wheat flour and rye flour). The bread will be more compact and heavy.
Program 4: Sweet
For breads with additives such as fruit juices, grated coconut, raisins, dry fruits, chocolate or
added sugar. Due to a longer phase of rising the bread will be light and airy.
Program 5: Milk Bread
Kneading, rising and baking, with milk for a sweeter flavour.
Program 6: Gluten free
Kneading, rising and baking gluten free loaves. Normally for: gluten free flour, rice flour, sweet
Page 5

potato flour, corn flour and oat flour.
Program 7: Quick
Kneading, rising and baking loaves in a shorter time than regular bread. Breads baked at this
setting are usually smaller with a denser texture.
Program 8: Cake
Kneading, rising and baking, but risen with soda / baking powder.
Program 9. Knead
Setting the kneading time.
Program 10: Dough
Kneading and rising, but without baking. Remove the dough and used for making bread rolls,
pizza, steamed bread, etc.
Program 11: Mix
Mixing program.
Program 12: Yogurt
Fermentation and making with yoghurt
Program 13: Jam
Boiling jams and marmalades.
Program 14: Bake
For additional baking of breads that are too light or not baked through. In this program there is no
kneading or rising.
Program 15: Homemade
Press the HOMEMADE button to use this setting and cycling.
You can customise how many minutes for each phase of kneading, rising, baking, keeping warm
etc.. The time range of each program is timetabled.
COLOR
Light, medium, or dark crust and quick bread for your selection. When COLOR is pressed, it will
display these 4 modes. Menu 1 to 4 with rapid bread for selection; quick bread without crust color
to choose; direct with “Δ”. Default crust color is Medium, but not available for Rapid bread in
Menu 1 to 4.
WEIGHT
In menu 9,10,11,12,13 you can select the bread weight; there are 3 weight modes to
choose:1125g, 1350g,1600g, When pressed, the WEIGHT button will display 1125g→1350g→
1600g in circle, the default value is 1500g. The weight function only available to Menu 1 to 8.
Page 6

Delay function( TIME+, TIME-)
If you don’t want the bread maker work immediately, you can use the in built delay function. The longest
delay time 15 hours. Firstly, select the menu and color, then press the TIME button to change the time showing
on the LCD screen. Press TIME button once to increase or decrease 10 mins of delay time. Menu
9,11,12,13 without delay function. Hold the TIME button down and the time will increase or decrease
continuously in a cycle. The setting time means including the program time and the delay time. When
press TIME button >1S, time will display quickly. “ ◄ “ will indicate to DELAY TIME.
Example: At 8:30pm, if you would like your bread to be ready in the next morning at 7 o’clock, i.e. in 10 hours
and 30 minutes. Select your menu, color, loaf size then press the “ or ”to add the time until 10:30 appears
on the LCD. Then press the START/STOP button to activate this delay program and the indicator will light up.
You can see the dot flashing and the LCD will count down to show the remaining time. You will get fresh bread
at 7:00 in the morning.
Note: For time delayed baking, do not use any easily perishable ingredients such as eggs, fresh milk, fresh
fruits, fresh onions, etc. as this will spoil the bread.
Delay time shown on LCD = time you want to complete - current time
Keep warm function
Bread can be automatically kept warm for 1 hour after baking. LCD will show 0:00 During keeping warm,
“ ►“ indicates to KEEP WARM until the 60min keep warm time is complete.
ENVIRONMENT
Suggested room temperature should be within the range of 15 ℃ to 34℃ to use the appliance. The
bread fermentation will be affected if the temperature is too high, if it’s too low, this will effect the bread
rising. Based on environment temperature, the bread size may differ.
MEMORY
If the power supply has been interrupted during the course of making bread, the process will continue
automatically within 10-15 minutes, even without pressing START/STOP button. If the interruption time
exceeds 10-15 minutes, the memory cannot be kept, and you must discard the ingredients in the bread
pan and restart the process. If the dough has not entered the rising phase when the power supply breaks
off, you can press the START/STOP directly to continue the program from the beginning.
Page 7

WARNING DISPLAY
”HHH” - This warning means that the temperature inside of the bread pan is too high. Press
START/STOP button (see below figure1) to stop the program, unplug the power cord, open the top lid,
and let the machine cool down completely for 10-20minutes before restarting.
”EE0” - This warning means that the temperature sensor is disconnected. Press START/STOP button
(see below figure2) to stop the program, unplug the power cord. Please check the sensor by the nearest
authorized service agent for examination, repair or electrical /mechanical adjustment.
Figure 1 Figure 2
BEFORE THE FIRST USE
The appliance may emit a little smoke and/or odor when you turn it on for the fist time. In manufacture it is
necessary to lightly grease some parts of the appliance. This is normal .
1.Clean all the parts according to “CLEANING AND MAINTENANCE”.
2.Set the bread maker on bake mode and bake empty for about 10 minutes. Or put 200ML water into the
bread pan to bake for 10 minutes. This action in order to subside the smell of the heating element and
bread pan. Beep will be heard after complete.
3. Unplug then let it cool down and clean all the detached parts again. Make sure the appliance has
sufficient ventilation.
Operation Instructions
1. Place bread pan in the bread maker, press downward. Place kneading paddle on shaft, pushing down
as far as it will go, making sure flat surfaces are lined up.
NOTE: It’s recommended to grease the kneading blade with oil to avoid the dough sticking to the
kneading blade, also this enables the kneading blade to be removed from the baked item easily.
2. Premeasure all ingredients, normally add water or other liquid ingredients firstly, secondly add sugar,
salt and flour, lastly adding yeast. If making the high content wheat flour dough, it’s recommended to
adjust the adding order: yeast and wheat flour firstly, secondly add sugar and salt, lastly add water or
other liquids, in order to get better effect.
NOTE: When adding flour, try to let it cover the water. Make a small indentation on the top of flour with
finger, add yeast into the indentation Make sure that yeast does not come into contact with salt or liquids.
3. Close the lid, then plug in.
4. Press MENU button until your desired program is displayed.
5. Press the CRUST to move the arrow to desired setting: Light, Medium, Dark crust.
6. Press the WEIGHT to move the arrow to desired weight.
7. If desired, set the DELAY TIMER button. Press + and – buttons to increase the cycle time shown on
the LCD display. If you want to make the bread immediately, you can ignore this process.
8. Press START/STOP to work. If setting to crust color and weight, press this button to confirm the setting,
press again to activate the program. “ ►“ indicates to the current working progress, meanwhile the ‘:’ will
start flashing constantly and the time counting down. The program start working.
NOTE: If want to stop the program, press START/STOP button for 3 seconds.
9.For add-ins(fruits,nuts,raisins),the machine will beep 10 times,“ ►“ indicates to ADD. Open the lid and
pour your add-ins. Bread maker will adjust to this.
NOTE: ADD function only appliance to menu’s: quick, sweet, french, whole wheat, Rice, Gluten free.
10.When 0:00 display on LCD, 10 beeps will be heard to indicate the program complete, press
START/STOP for 3 seconds to close the bread maker.
NOTE: If you don’t press START/STOP, the program will start 1 hour keep warm automatically. If want to
stop keep the warm progress, press START/STOP for 3 seconds. The program will not stop until the LCD
shows out the default display.
Page 8

11.Open the lid, wear oven mitts, hold tight the pan handle then lift upward.
NOTE: Extreme caution must be used when operating, the bread pan and the bread will be very hot.
12.Using oven mitts, turn the bread pan upside down (with the bread pan handle folded down) onto a wire
cooling rack or clean surface and gently shake until bread falls out. Use a non-metal spatula to gently
scrape the sides of the bread pan.
NOTE: If kneading blade remains in the bread, gently pry it out using a hook, don’t take it by hand in case
of scalding.
CLEANING AND MAINTENANCE
1. Disconnect the machine from the power outlet and let it cool down before cleaning.
2. To clean bread pan: Wipe inside and outside of pan with damp cloth, do not use any sharp or abrasive
agents, in order to protect the non-stick coating. The bread pan must be dried completely before
installation.
3. If the kneading blade is difficult to remove from the bread pan, add some warm water to dip for 30mins.
then can put out easily. Use a wet rag to clean it.
4. To clean top lid: After use, allow the unit to cool. Use a damp cloth to wipe lid, and interior of viewing
window. Do not use any abrasive cleaners for cleaning as this will degrade the high polish of the surface.
Note: It is suggested to not disassemble the lid for cleaning.
5. Gently wipe the outer surface of housing with a wet cloth then use dry cloth to wipe. Never use petrol or
other liquids. Never immerse the housing into water for cleaning.
6. Before the bread maker is packed for storage, ensure that it has completely cooled down, is clean and
dry, and the lid is closed.
USE EXACT MEASUREMENTS
TIPS: One of the most important steps of making good bread is the proper measurement of ingredients.
Measure each ingredient carefully and add to your bread pan in the order given in the recipe.
It is strongly suggested that use measuring cup or measuring spoon to obtain an accurate amount,
otherwise the bread will be largely altered.
Adding Sequence
Always add ingredients in the order given in the recipe.
FIRST: Liquid ingredients
SECOND: Dry ingredients
LAST: Yeast
The yeast should only be placed on the dry flour and never come in contact with the liquid or salt.
When you use the Delay Timer function for a long time, never add perishable ingredients such as eggs or
milk.
After the flour has completed kneading for first time, a beep will heard and you can put fruit ingredients
into the mixture. If the fruit ingredients are added too early, the flavor will be diminished after being stirred
for a long time.
Liquid Ingredients
Water, fresh milk or other liquids should be measured with measuring cups with clear markings and a
spout. Set the cup on the counter and accurately check the liquid level. When measuring cooking oil or
other ingredients, clean the measuring cup thoroughly without any other ingredients.
Dry measurements
Measure dry ingredients by gently spooning flour, etc, into the measuring cup and then, once filled, level
off with a knife. Never use the measuring cup to scoop your dry ingredients directly from a container as
this could add up to one tablespoon of extra ingredients .Do not tap the bottom of the measuring cup or
Page 9
these ingredients will pack down.
HINT: Before measuring, stir the flour to aerate it. When measuring small amounts of dry ingredients,
such as salt or sugar, use a measuring spoon, making sure it is leveled off.
Accessories Instructions
Measuring cup:
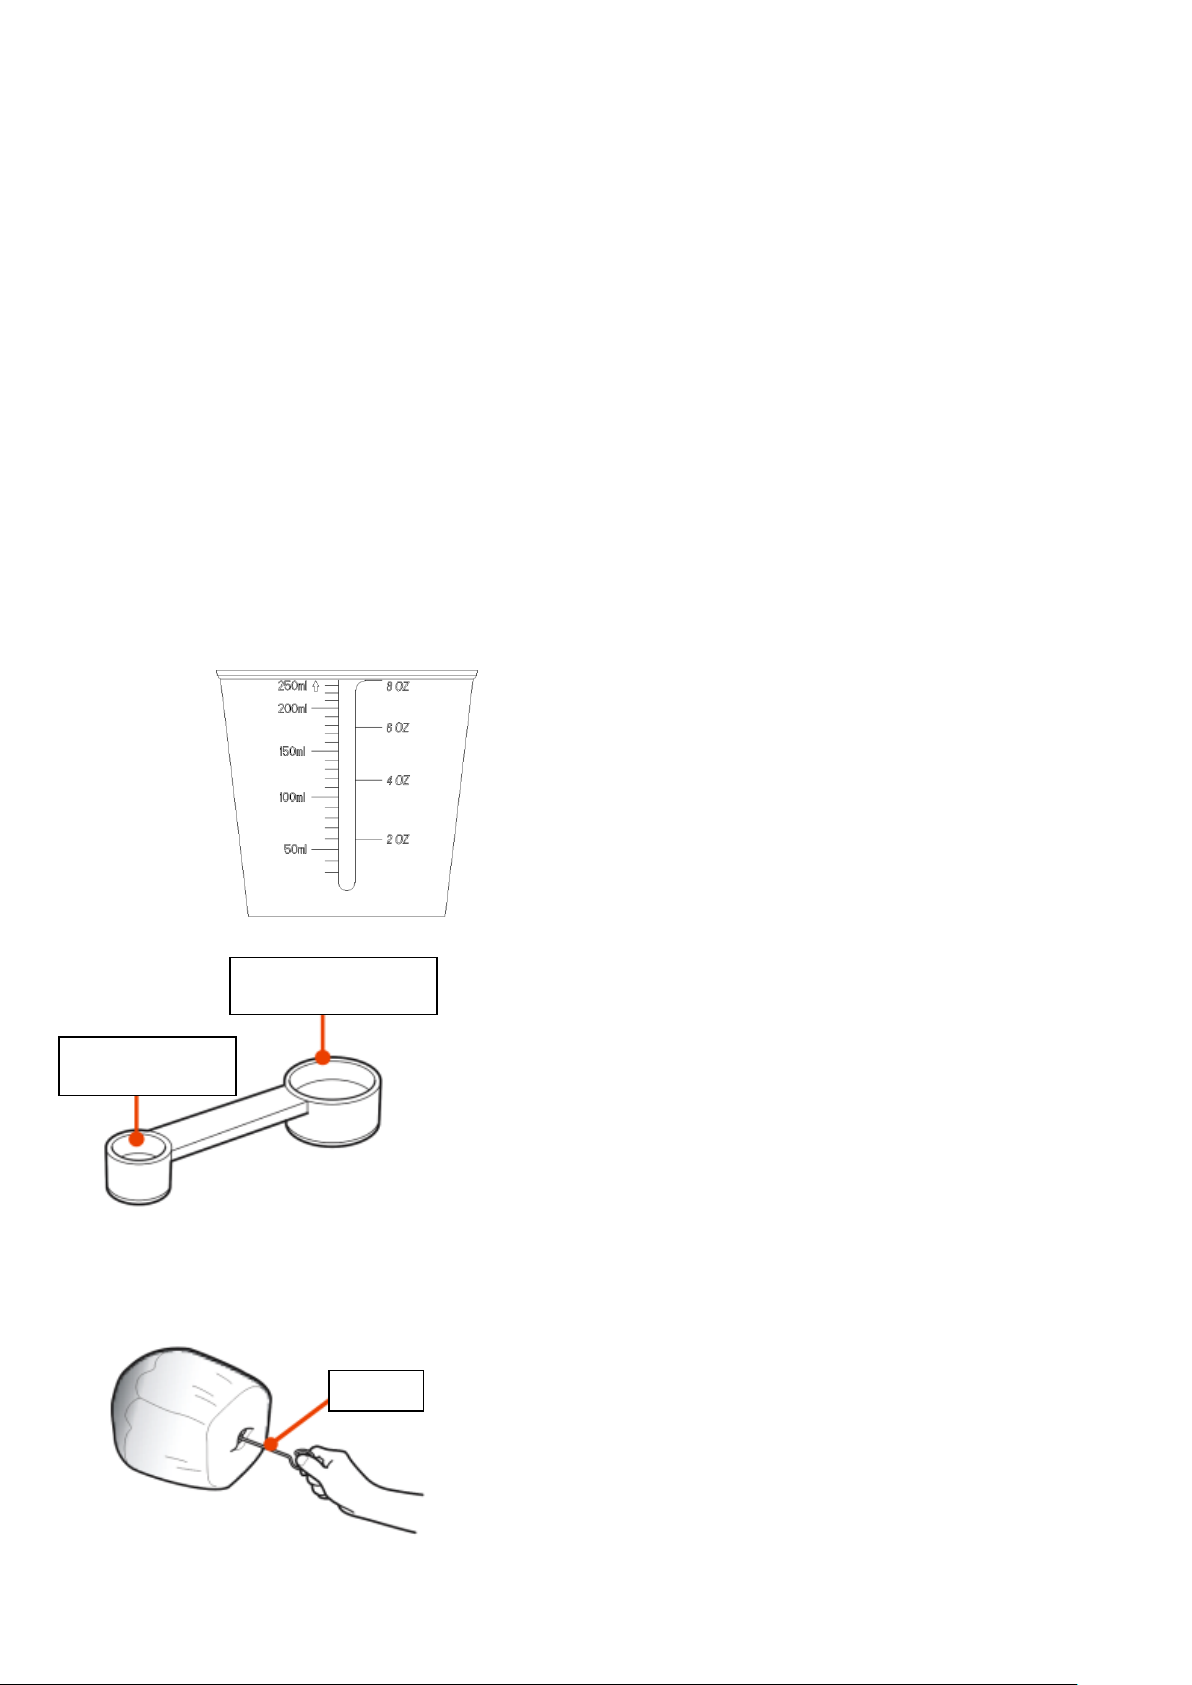
In Recipe, measuring unit “CUP” means full cup, 240ML, Below picture for reference.
1、Measuring the liquid ingredients: When measuring the liquid, the cup should put on the horizontal flat
surface and viewed at eye level (not on an angle) to check the measurement. If adding egg, milk or other
liquids, put into the cup first then add water up to the degree according to recipe. (i.e total liquid amount
is same as the recipe but water is reduced)
2、Measuring the powder ingredients: Measure the powder ingredients into the cup then shake gently
until leveling off to read the measurement. Don’t shake for a long time and too hard, or the powder would
be too compact to over measure.
Measuring spoon: Including tea spoon and table spoon.
Tea spoon (Tsp) use to measure yeast, salt.
Table spoon (Tbsp) use to measure the sugar and oil.
Hook: Use to pull out the knead blade from the bread.
Hook
Sometimes when removing the bread, the kneading blade will stay into the bread, use the hook to pull out the
blade.
Teaspoon (Tsp)
Hook
Tablespoon (Tbsp)
Page 10

TROUBLESHOOTING
The below trouble shooting guide is only for your reference.
If the appliance is damaged, to avoid permanent damage to the machine, please contact our customer services
team or a licensed maintenance expert.
NO.
Problem
Cause
Solution
1
Smoke from
ventilation hole
when baking
Some ingredients stick to the heat
element. Or for the first use, oil has
remained on the surface of heat
element.
Unplug the bread maker and clean the
heat element, but be careful not to
burn yourself. Wash and dry
components before reuse.
2
Bread bottom
crust is too thick
Keeping bread warm and leaving
bread in the bread pan for a long time.
Take bread out soon without keeping it
warm
3
It is very difficult
to take bread out
Kneader sticks tightly to the shaft in
bread pan
After taking bread out, put hot water
into bread pan and immerse kneader
for 10 minutes, then take it out and
clean.
4
Ingredients aren’t
spread evenly
and bake badly
1.Incorrect program used
Select the correct program menu
2. In use, cover opened several times
and the bread is dry, no brown crust
color
Don’t open cover at the last rise
3.Stir resistance is too high, the
kneader almost can’t rotate and stir
adequately
Check kneader hole, then take bread pan
out and operate without load, if not
normal, contact customer services.
5
Displays “HHH”
after pressing
START/STOP
button
The temperature in bread maker is
too high to make bread.
Press START/STOP button and
unplug bread maker, then take bread
pan out and open cover until the bread
maker cools down.
6
Hear the motor
noises but dough
isn’t stirred
Bread pan is fixed improperly or
dough is too large to be stirred
Check whether bread pan is fixed
properly and dough amount is
reduced.
7
Bread size is too
large and
presses against
cover
Too much yeast or flour has been
used. Or too much water and the
environment temperature is too high
Check yeast, flour, water levels, as
well as the environment temperature
and retry.
8
Bread size is too
small or bread
has not risen.
No yeast or the amount of yeast is not
enough, moreover, yeast may have a
poor activity as water temperature is
too high or yeast is mixed together
with salt, or the environment
temperature is lower.
Check the amount and performance of
yeast, increase the environment
temperature.
9
Dough is so large
& overflows the
bread pan
Too much liquid or yeast.
Reduce the amount of liquids/yeast
and improve dough rigidity
10
Bread collapses
in the middle
parts when
baking dough
1.Flour used is not strong enough and
hasn’t risen.
Use bread flour or stronger flour.
2.Yeast rate is too rapid or yeast
temperature is too high
Yeast should be used below room
temperature
3.Excessive water makes dough too
wet and soft.
According to the rate of absorbing
water, adjust water on recipe
11
Bread weight is
very large and
too dense
1.too much flour or short of water
Reduce flour or increase water
2.too many fruit ingredients or too
much whole-wheat flour
Reduce the amount of corresponding
ingredients and increase yeast
12
Middle parts are
hollow after
cutting bread
1. Excessive water/yeast or no salt
Reduce water or yeast and check salt
2.water temperature is too high
Check water temperature
13
Bread surface is
stuck to dry
powder (flour)
1. Too many sticky ingredients in
bread such as butter and
bananas etc.
Do not add so many sticky ingredients
into bread dough.
2.Stirring not adequate when less
water used.
Check water levels & program setting.
Page 11

14
Crust is too thick
and baking color
is too dark when
making cakes or
food with
excessive sugar
Different recipes or ingredients have
great effect on making bread, baking
color will become very dark if too
much sugar used,
If baking color is too dark for the recipe
with excessive sugar, press
START/STOP to interrupt the program
ahead 5-10min of intended finishing
time. Before removing out the bread
you should keep the bread or cake in
bread pan for about 20 minutes with
cover closed.
 Loading...