

Page 1
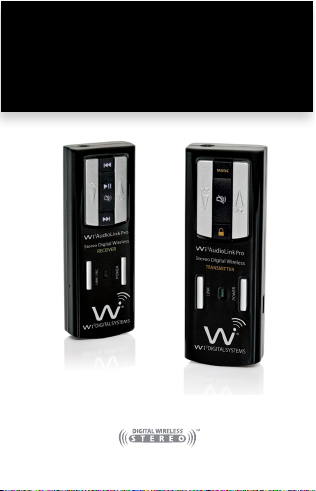
QUICK START USER GUIDE
Wi AudioLink Pro
www.widigitalsystems.com
TM
Page 2
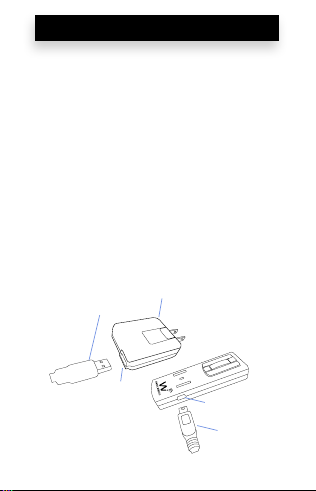
Charging
POWER
LINK
1. Plug the AC Charger into a power socket.
2. Connect the USB Y-Split power cable to
the USB port on the AC Charger.
3. Connect one of the two mini USB connectors
into the transmitter USB port.
4. Connect the second mini USB connector into
the receiver USB port.
5. The Power/Status LED will turn to solid
Red ON.
6. When charging is complete the Red LED
will turn OFF.
7. Remove the charging cable and the AC
Charger and store in the carrying case.
The battery will last 4 to 6 hours of
continuous operation.
USB Connector
AC Charger
USB Port
USB Port
Mini USB
Connector
Page 3
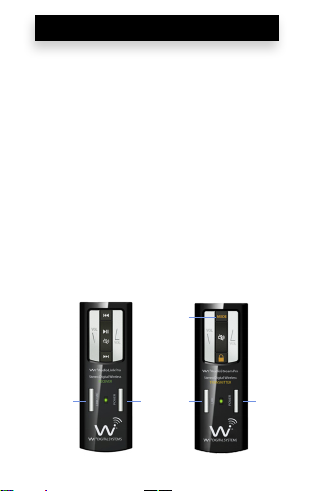
Pairing (Only If Needed)
1. First turn ON the transmitter (Tx) and the
receiver (Rx) units by pressing and
holding the POWER button , on each
of the units for 2 seconds.
2. Press and hold the LINK button on the
transmitter (Tx) for 3 seconds. The Power/
Status LED on the transmitter will start fast
ashing. The transmitter is now in a Pairing
mode and ready to search for the receiver.
3. Press and hold the LINK button on the
receiver (Rx) for 3 seconds. The Power/
Status LED on the receiver will start fast
ashing. The receiver is now in a Pairing
mode and ready to be found by the
transmitter.
4. Once the transmitter links with the receiver
the Power/Status LED on both devices will
turn to solid Green.
(Rx)
r
k
v
p
z
(Tx)
z
v
p
k
Page 4
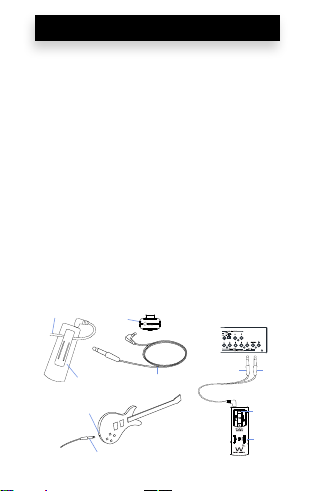
Transmitter Connection
1. Connect the 1/8” stereo male end of the
cable into the “Audio Input” jack on the
transmitter.
2. Route the audio cable beneath the belt clip
as shown to prevent accidental disconnection
of the cable.
3. Connect the 1/4” mono male end of the cable
into the electric guitar. Use the 1/4” stereo
cable for digital piano, keyboard or electronic
drums connection.
4. Power up the transmitter by pressing and
holding the POWER button for 2 seconds.
5.
Please refer to the “Transmitter Button Function Matrix”
section of this Quick Guide for Active Guitars and
Stereo Line-in MODE settings.
6. Attach the transmitter to your belt.
Alternatively the receiver can be
placed next to the musical instrument.
Audio Cable
Audio Input Jack
Belt Clip
1/4” Mono to 1/8” Stereo Cable
Electric Guitar input
1/4” mono male connector
v
r
Musical Instrument
(L/MONO)
(R)
1/4” Y-Split to 1/8”
Stereo Cable
r
(Tx)
k
Page 5
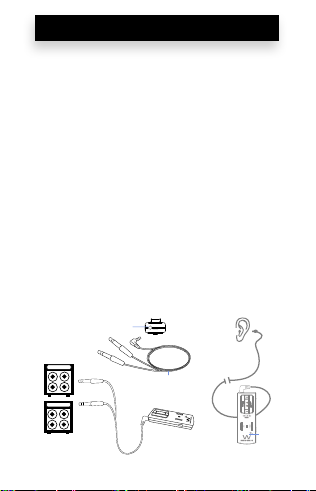
Receiver Connection
PLEASE PROTECT YOUR EARS! Prolonged u se of
headphones or In-Ear personal monitors at high
volumes may affect your hearing capacity or may
result in noise induced hearing loss (NHL).
1. Connect the 1/8” stereo end of the cable into
the “Audio Input” jack on the receiver.
2. Route the audio cable beneath the belt clip
as shown to prevent accidental disconnection
of the cable.
3. Connect the 1/4” male end of the cable to the
inputs of your amplier, powered monitor,
sound system, mixer or foot pedal. Use the
L/MONO and R jacks on your gear when
using the system in stereo.
4. Power up the receiver by pressing and
holding the POWER button for 2 seconds.
5. Attach the receiver to your belt. Alternatively
the receiver can be placed next to the mixer,
amp, foot pedal or stomp box.
Audio Output
Jack
v
1/4” Y-Split to 1/8” Stereo Cable
POWER
LINK
v
(Rx)
Page 6

The Sound of Digital Wireless Innovation
QUICK START USER GUIDE
TM
© 2013 Wi Digital Systems, Inc. All rights reserved. Stylized Wi logo is a
registered trademark of Wi Digital Systems, Inc. in the United States and may
be a registered trademark in other countries. Wi, Digital Wireless Stereo logos
and Wi AudioLink, Wi Sure-Ears, Wi Micro-In-Ear are trademarks of Wi Digital
Systems, Inc. All other trademarks included herein are the property of their
respective owners. US and Foreign Patents Pending.
(Design and specications subject to change without notice).
www.widigitalsystems.com
Page 7
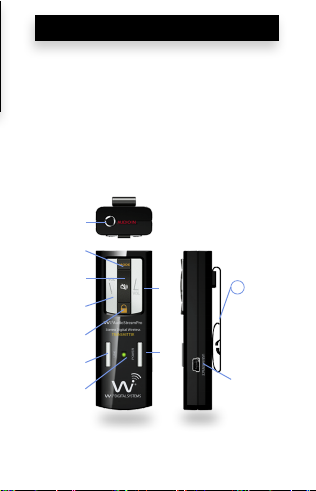
Wi Transmitter
1. Audio IN Jack
2. Power ON/OFF
3. Power/Status LED
4. Volume UP
5. Volume Down
6. Mute
j
r
o
n
q
p
l
7. Link/Pairing
8. Lock
9. Operation Mode
10. USB Audio
Interface &
Charging Port
11. Belt Clip
m
11
k
s
Page 8
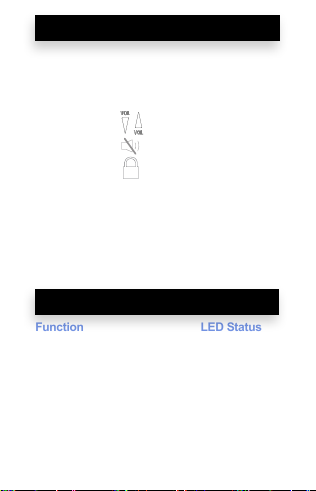
Transmitter Button Function
Function Button Hold LED Status
Power ON/OFF POWER 2 sec Solid Green
Pairing Mode LINK 3 sec Fast Green Flash
Volume UP
Volume Down
Mute ON/OFF
Lock Keypad 2 sec Solid Green Only
Unlock Keypad Click Solid Green & Blue
Flashes
Mono Preamp MODE 2 sec Solid Green & Slow
Blue LED Flashes
Mono Line-In MODE
Blue LED Flashes
Stereo Line-In MODE 2 sec Solid Green & Two
Blue LED Flashes
Click
1.5sec Solid Green & Blue
2 sec Solid Green & Fast
Transmitter LED Indicator
Function LED Status
Searching For Receiver Flashing Green
Linked to Receiver Solid Green
Lock Keypad Solid Green Only
Low Battery Solid Green &
Flashing Red
Charging With Power OFF
Charging With Power ON
Charging Complete Red OFF
l
l
l
l
Solid Red
l
Solid Red & Green
l
l
Page 9
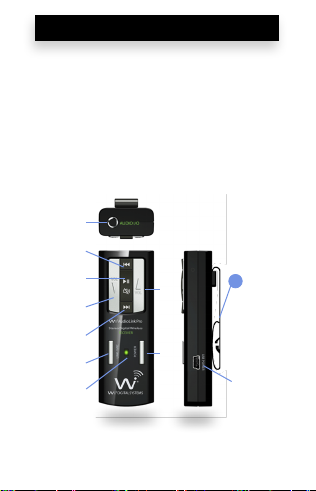
Wi Receiver
1. Audio OUT Jack
2. Power ON/OFF
3. Power/Status LED
4. Volume UP
5. Volume Down
6. Link/MIC
u
|
}
y
{
z
w
*Functions are activated when Transmitter is connected to a USB Port
7. Next Track
8. Previous Track
9. Mute/ Play/Pause
10.USB Charging Port
11. Belt Clip
x
11
v
~
Page 10
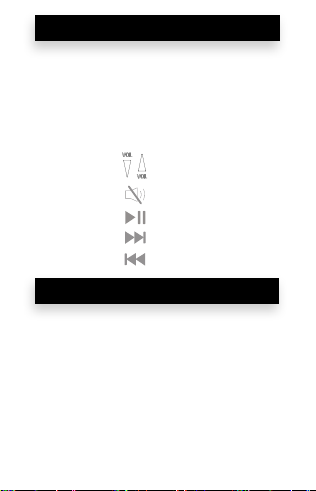
Receiver Button Function
Function Button Hold LED Status
Power ON/OFF POWER 2 sec Solid Green
Pairing Mode
MIC On/Off
/ Solid Green LED
Volume UP Click
Volume Down
Mute ON/OFF 1.5 sec Solid Green & Blue
Play/Pause *
Next Track * Click
Prev Track *
LINK 3 sec Fast Green Flash
MIC Click 2 Blue LED Flashes
Click
Click
Receiver LED Indicator
Function LED Status
Searching For Transmitter Flashing Green
Linked to Transmitter Solid Green
Lock (Activated By Tx) Solid Green
Low Battery Solid Green &
Flashing Red
Charging With Power OFF Solid Red
Charging With Power ON
Charging Complete Red OFF
w
w
w
w
w
Solid Red & Green
w
w
 Loading...