

Page 1
ST
TEREO
DIGIT
AL
WIRELES
TM
USER GUIDE
Page 2

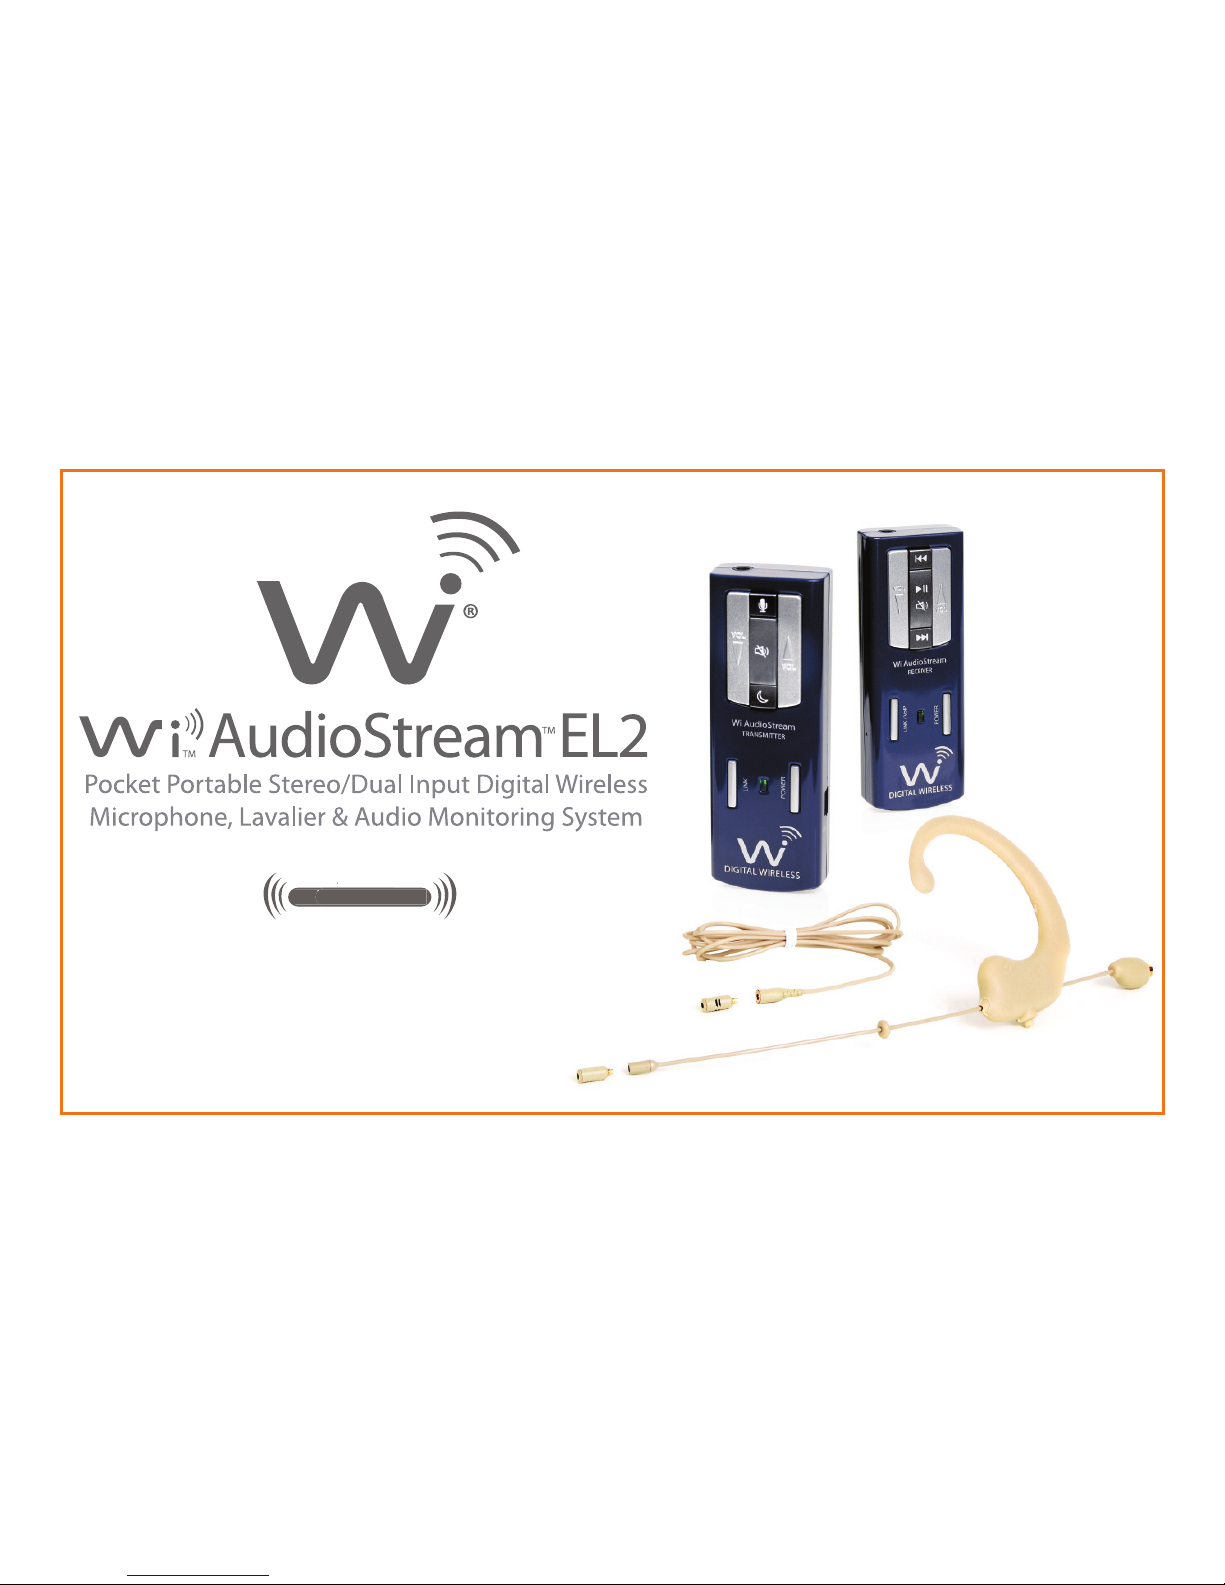
Thank You For Choosing the Wi AudioStream EL2 Pocket Portable Stereo Digital Wireless System.
Congratulations on your purchase of the Wi AudioStream EL2 Pocket Portable Stereo Digital Wireless Microphone,
Lavalier & Audio Monitoring System. Please thoroughly read this User’s Manual for all the feature operation
information necessary to install and operate your new Wi AudioStream EL2 system.
Notice: Product specifi cations and package contents are subject to change without notice.
Package contents may vary according to the different regions.
For additional support, please visit www.widigitalsystems.com
Wi AudioStream EL2
CONGRATULATIONS
Page 3
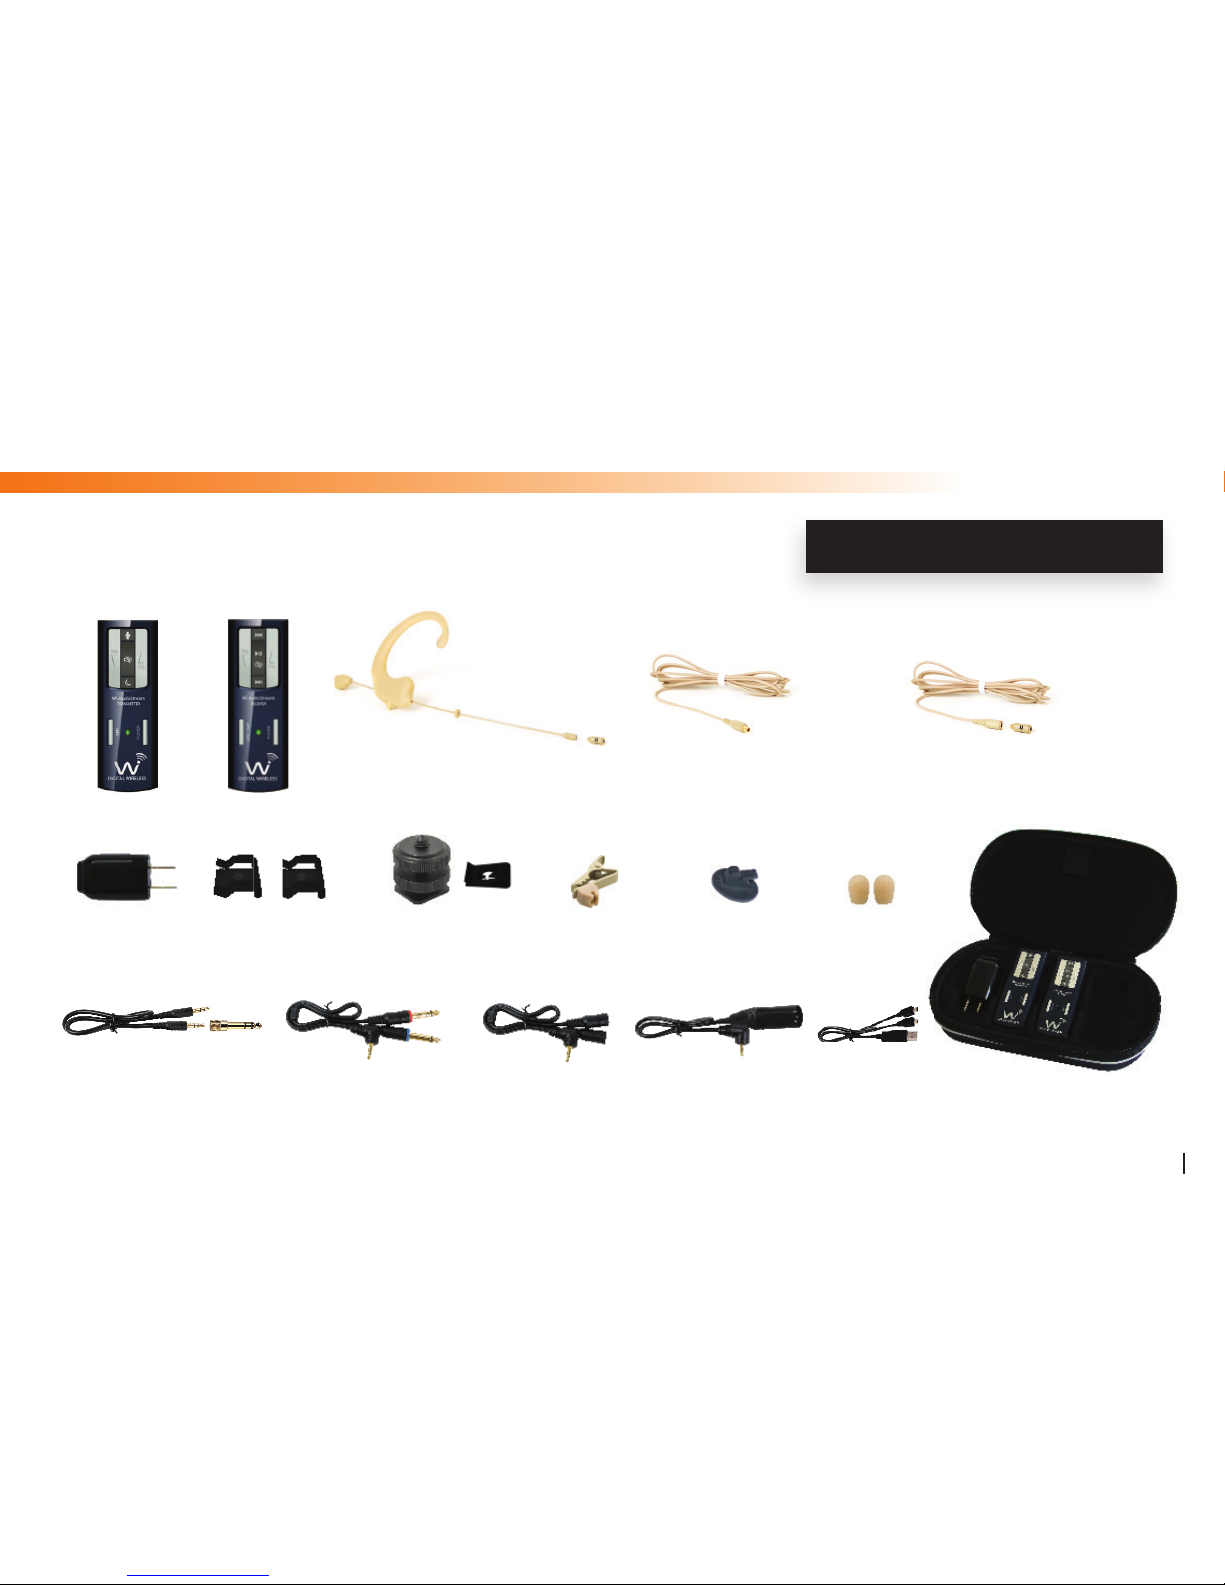
PACKING LIST
Wi AudioStream EL2
3
MIC
Windscreens
Wi Sure-Fit™ Earset with
Wi Simple-Twist Omnidirectional
Detachable Microphone Capsule
Wi Simple-Twist™
Detachable Earset Cable
Wi Sure-Fit™ Lavalier with
Wi Simple-Twist Unidirectional
Detachable Microphone Capsule
Rubber Flat Surface
MIC Clip
Earset/Lavalier
Cable Clip
Wi Transmitter Wi Receiver
XLR to 1/8”
TRS Cable
1/8” to 1/8” TRS Stereo
Cable & 1/4” Adapter
1/4” Stereo Male to 1/8”
Stereo Male Y-split Cable
Hard Shell
Carrying Case
1/4”-20 Camera
Hot Shoe & Clip
Transmitter/Receiver
Mounting Brackets Clip
Universal USB
AC Charger
1/8” Dual Input L/R
to 1/8” Y-split Cable
USB Y-Split
Power Cable
Page 4
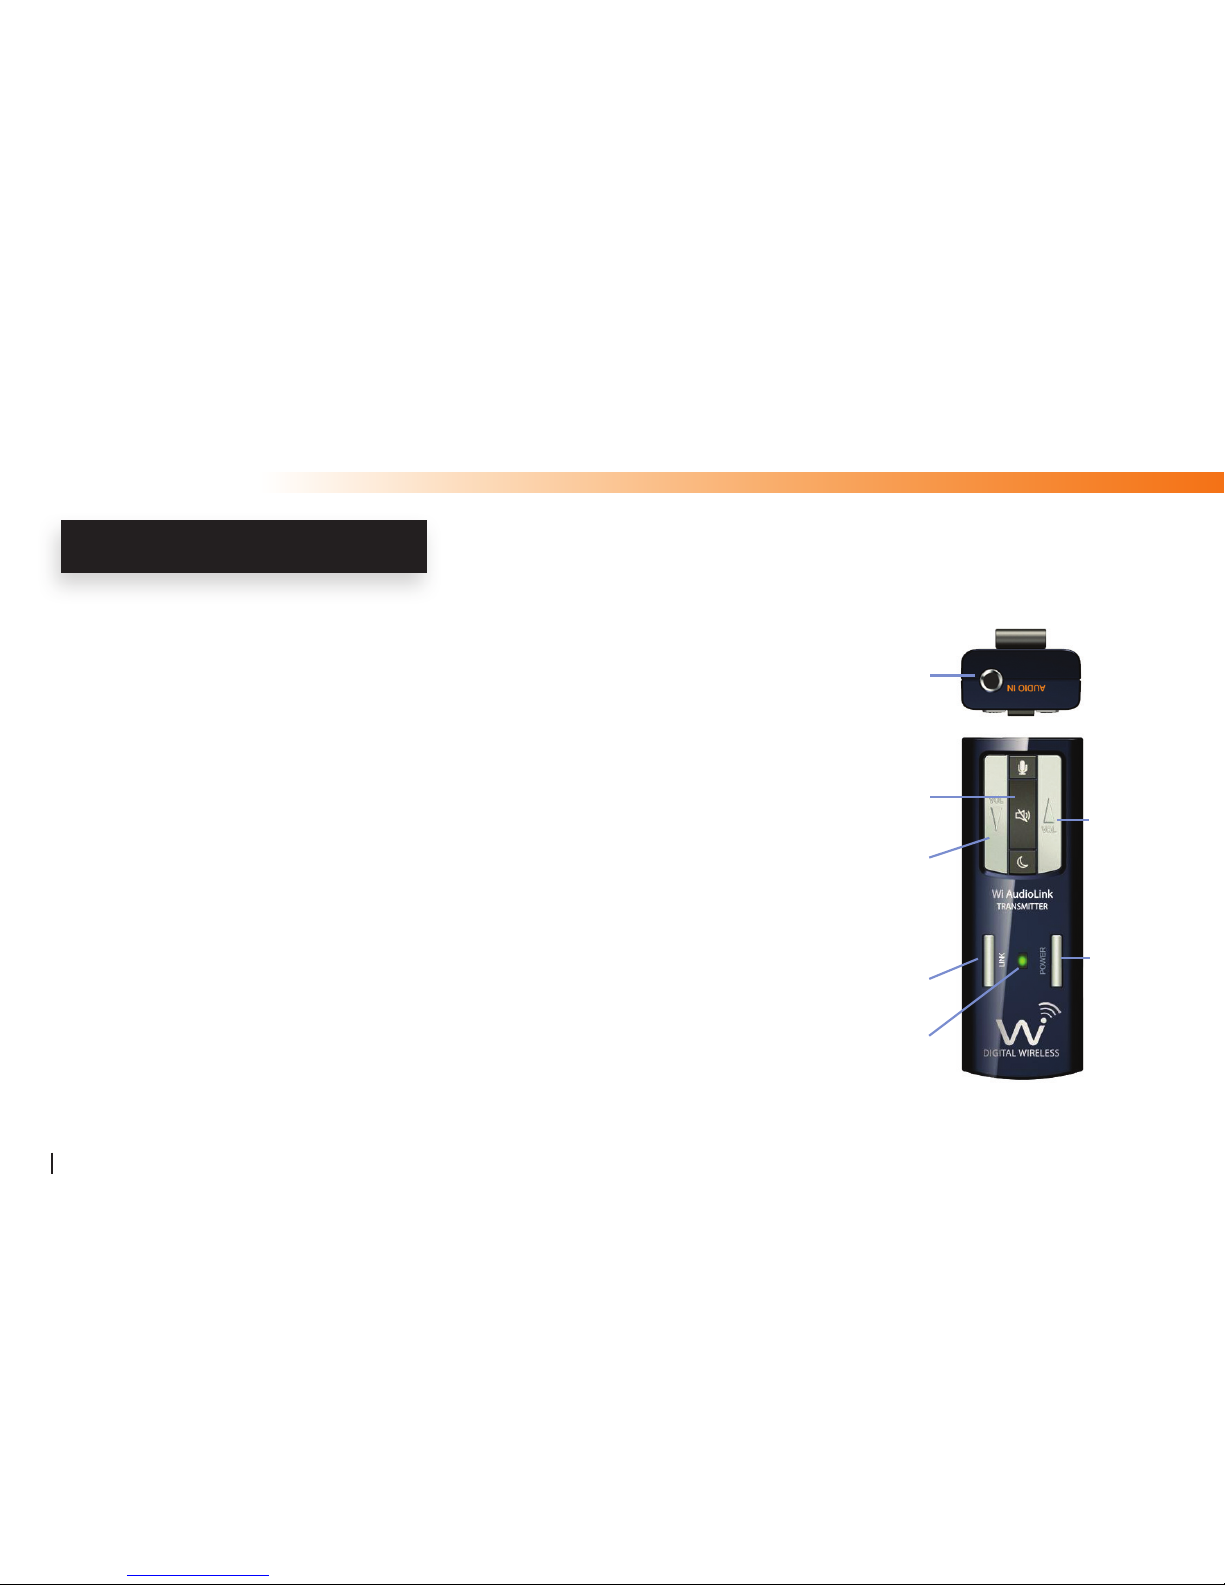
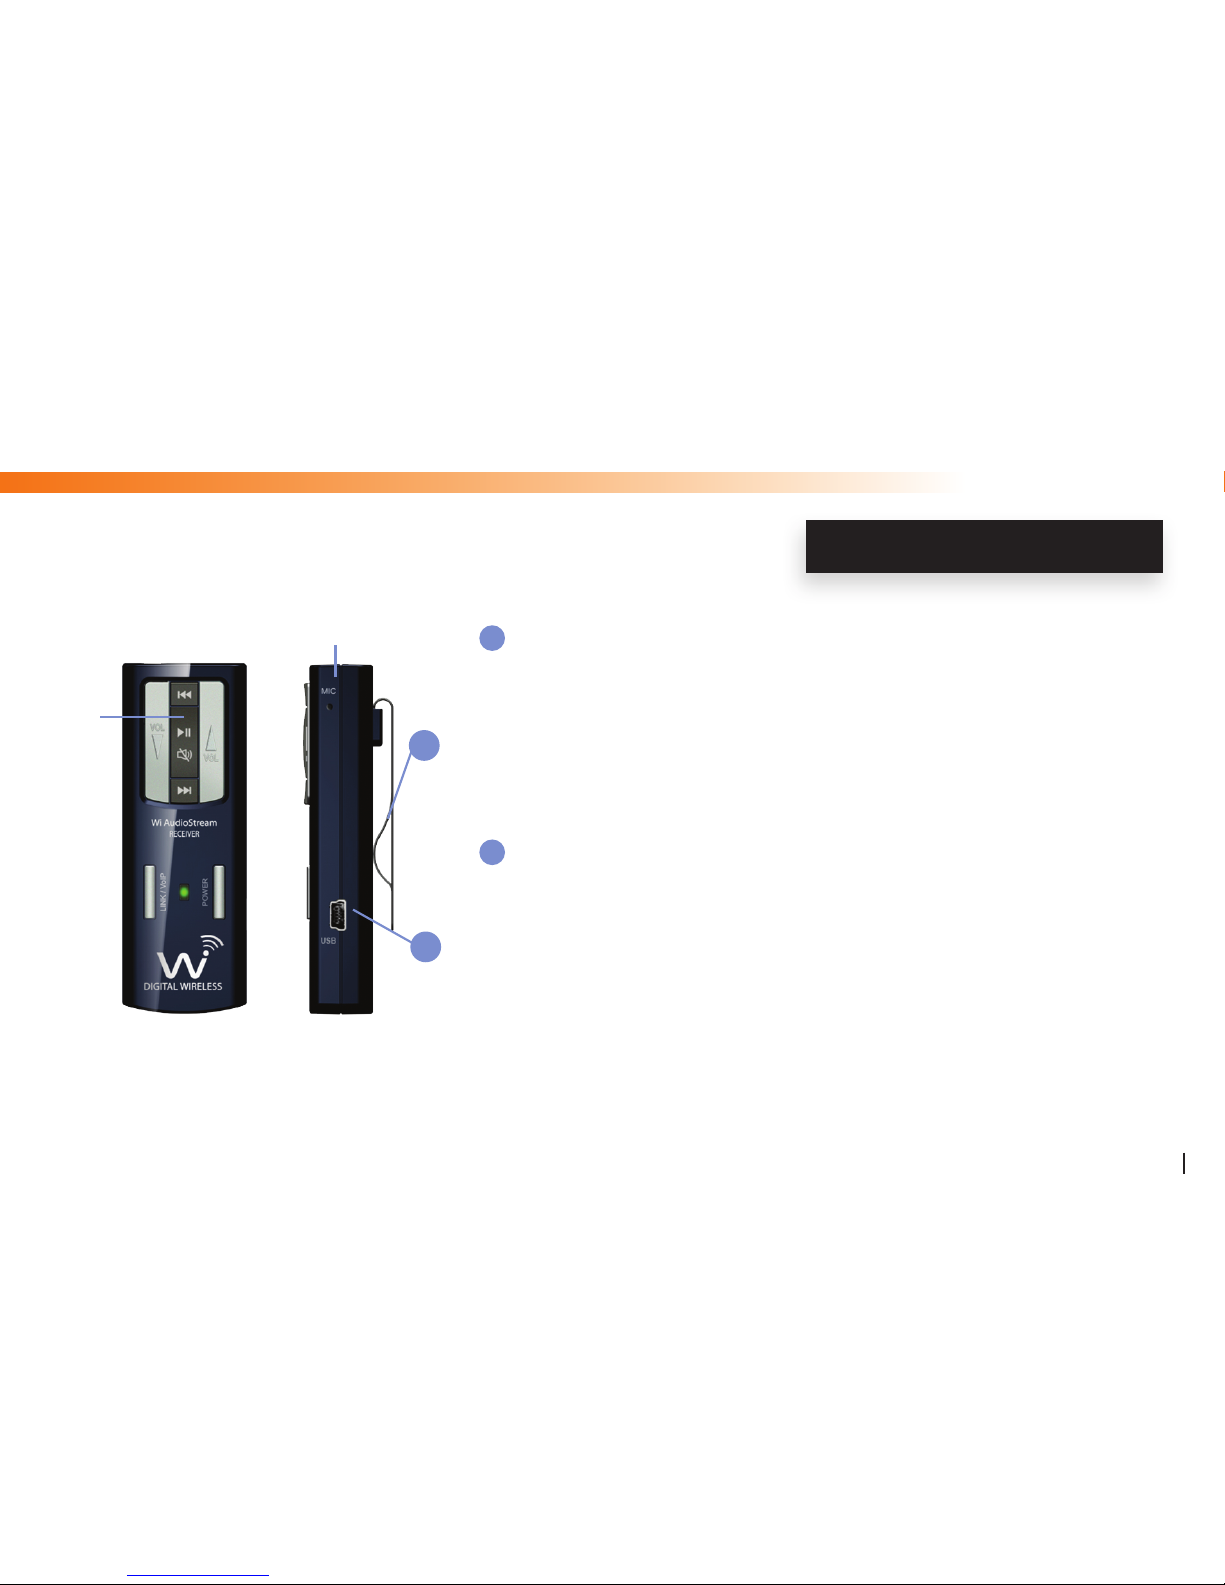
Transmitter Controls and Connections
Audio IN Jack: Provides mono and stereo connection for your
microphone or other sound source.
Power ON/OFF: Press and hold the Power button for 2 seconds
to turn the transmitter ON or OFF.
Power/Status LED: Displays the status of six functions: ON/OFF, Battery
Charging, Low Battery, Pairing, Mute, Operating and
Sleep Modes.
Refer to the “Tx Button Functions” on page (32) for more details
Volume UP: Press once to increase the volume level one step
at a time. Hold to increase continuously.
Volume DOWN: Press once to decrease the volume level one step
at a time. Hold to decrease continuously.
Wi AudioStream EL2
4
TRANSMITTER FEATURES
Page 5

Wi AudioStream EL2
5
Mute: Press and hold for 1.5 seconds to mute or unmute the audio.
Link/Pair: The Link button performs two functions: Pairing and Linking.
Pairing allows the Transmitter to connect to up to eight (8) different receivers
sequentially to create a wireless audio matrix. Press and hold for 3 seconds until
the green LED display fast fl ashes, indicating that it is ready to pair with a
Receiver. Once the Transmitter pairs with the Receiver, the LED on both devices
will turn solid green.
Linking allows the Transmitter to re-route the audio signal sequentially to up to
eight (8) different receivers previously paired with the Transmitter. Press once to
re-route the wireless connection to the next receiver.
TRANSMITTER FEATURES
Page 6

Wi AudioStream EL2
6
Sleep: Press and hold for 2 seconds to put the Transmitter and Receiver into
power save mode (all settings will be preserved). Press once to wake-up
the Transmitter and Receiver. (Sleep function will prolong the Transmitter
battery life by 50% and the Receiver battery life by 35%).
Mode: Press and hold for 2 seconds to select the desired operation indicated
by the following blue LED fl ashing sequence. Continue to hold to cycle
between the three operating modes.
Stereo Mic-in Mode Solid Green LED and Slow Blue LED Flashes
Mono Mic-in Mode Solid Green LED and Fast Blue LED Flashes
(Factory Setting)
Stereo Line-in Mode Solid Green LED and Two Blue LED Flashes
TRANSMITTER FEATURES
Page 7

Wi AudioStream EL2
7
Charging Port: This is a mini USB connection to power
up and charge the internal batteries.
The Transmitter can be charged using the
supplied universal AC charger, via an
instrument or computer USB port, or the
optional AA battery power booster adapter.
Belt Clip: The Transmitter can be attached to belts,
shirts and pants’ pockets. The compact and
lightweight design is easy to wear without
impeding body movement.
TRANSMITTER FEATURES
11
11
Page 8
Wi AudioStream EL2
8
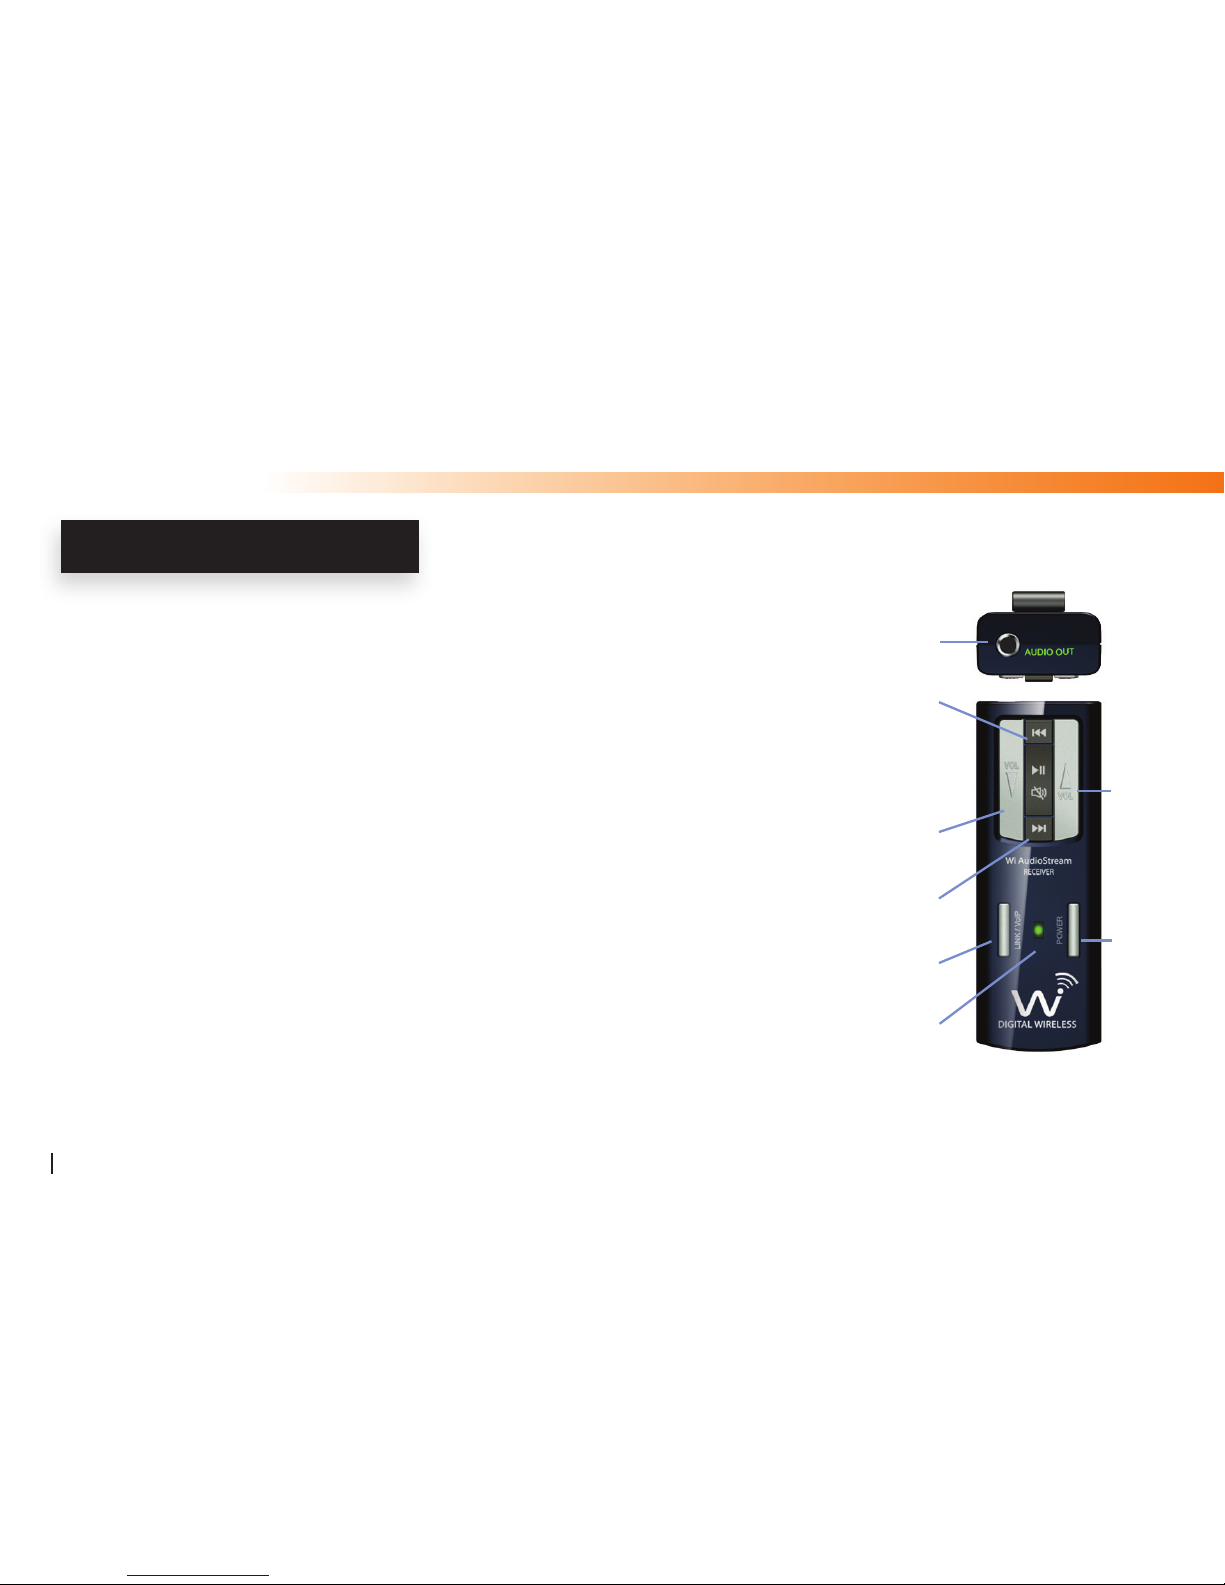
Receiver Controls and Connections
Audio OUT Jack: Stereo connection for professional Sound Systems,
Monitors, Mixers, In-Ear Monitors, Headphones and more...
Power ON/OFF: Press and hold for 2 seconds to turn the receiver
ON or OFF
Power/Status LED: Displays the status of six functions: ON/OFF, Battery
Charging, Low Battery, Pairing, Mute and Sleep mode.
Volume UP: Press once to increase the volume level one step
at a time. Hold to increase continuously.
Volume DOWN: Press once to decrease the volume level one step
at a time. Hold to decrease continuously.
RECEIVER FEATURES
Page 9

Wi AudioStream EL2
9
Link/VoIP: This multifunction button performs the Pairing and VoIP MIC activation.
Pairing allows the Receiver to be discovered by the Transmitter. Press and hold
the Link button for 3 seconds until the green LED display fast fl ashes, indicating
that it is ready to pair with a Transmitter. Once the Transmitter pairs with the
Receiver, the LED on both devices will turn solid green.
VoIP Microphone operations - See item #10
Next Track: The Next Track function button is used with the optional Wi USB Transmitter to
remotely control jumping to the next track for media players or sequencing
software.
Press the Next Track button once to jump to the next audio track.
Previous Track: The Previous Track function button is used with the optional Wi USB Transmitter
to remotely control jumping to the previous track for media players or sequencing
software.
Press the Previous Track button once to go back to the previous audio
track.
RECEIVER FEATURES
Page 10

Wi AudioStream EL2
10
Mute/Pause/Play: Press and hold the Mute/Pause/Play button for 1.5 seconds to mute/un-mute audio.
Press once to pause or play an audio track (when Receiver is used with the optional
Wi USB Transmitter, this function will remotely control the media player or
sequencing software to mute, pause or play the audio track).
VoIP Microphone: Press the LINK / VoIP button (see page 9) once to activate the VoIP Microphone.
The Blue LED on the Receiver will turn ON when the VoIP MIC is activated. (This
microphone is used with the optional Wi USB Transmitter for Voice over
Internet Protocol (VoIP) communications).
Refer to the “Rx Button Functions” on page (34) for more details
RECEIVER FEATURES
Page 11
Wi AudioStream EL2
11
11
12
Charging Port: This is a mini USB connection to power
up and charge the internal batteries.
The Receiver can be charged using the
supplied universal AC charger, via an
instrument or computer USB port, or the
optional AA battery power booster adapter.
Belt Clip: The Receiver can be attached to belts,
shirts and pants’ pockets. The compact and
lightweight design is easy to wear without
impeding body movement.
RECEIVER FEATURES
11
12
Page 12

Wi AudioStream EL2
12
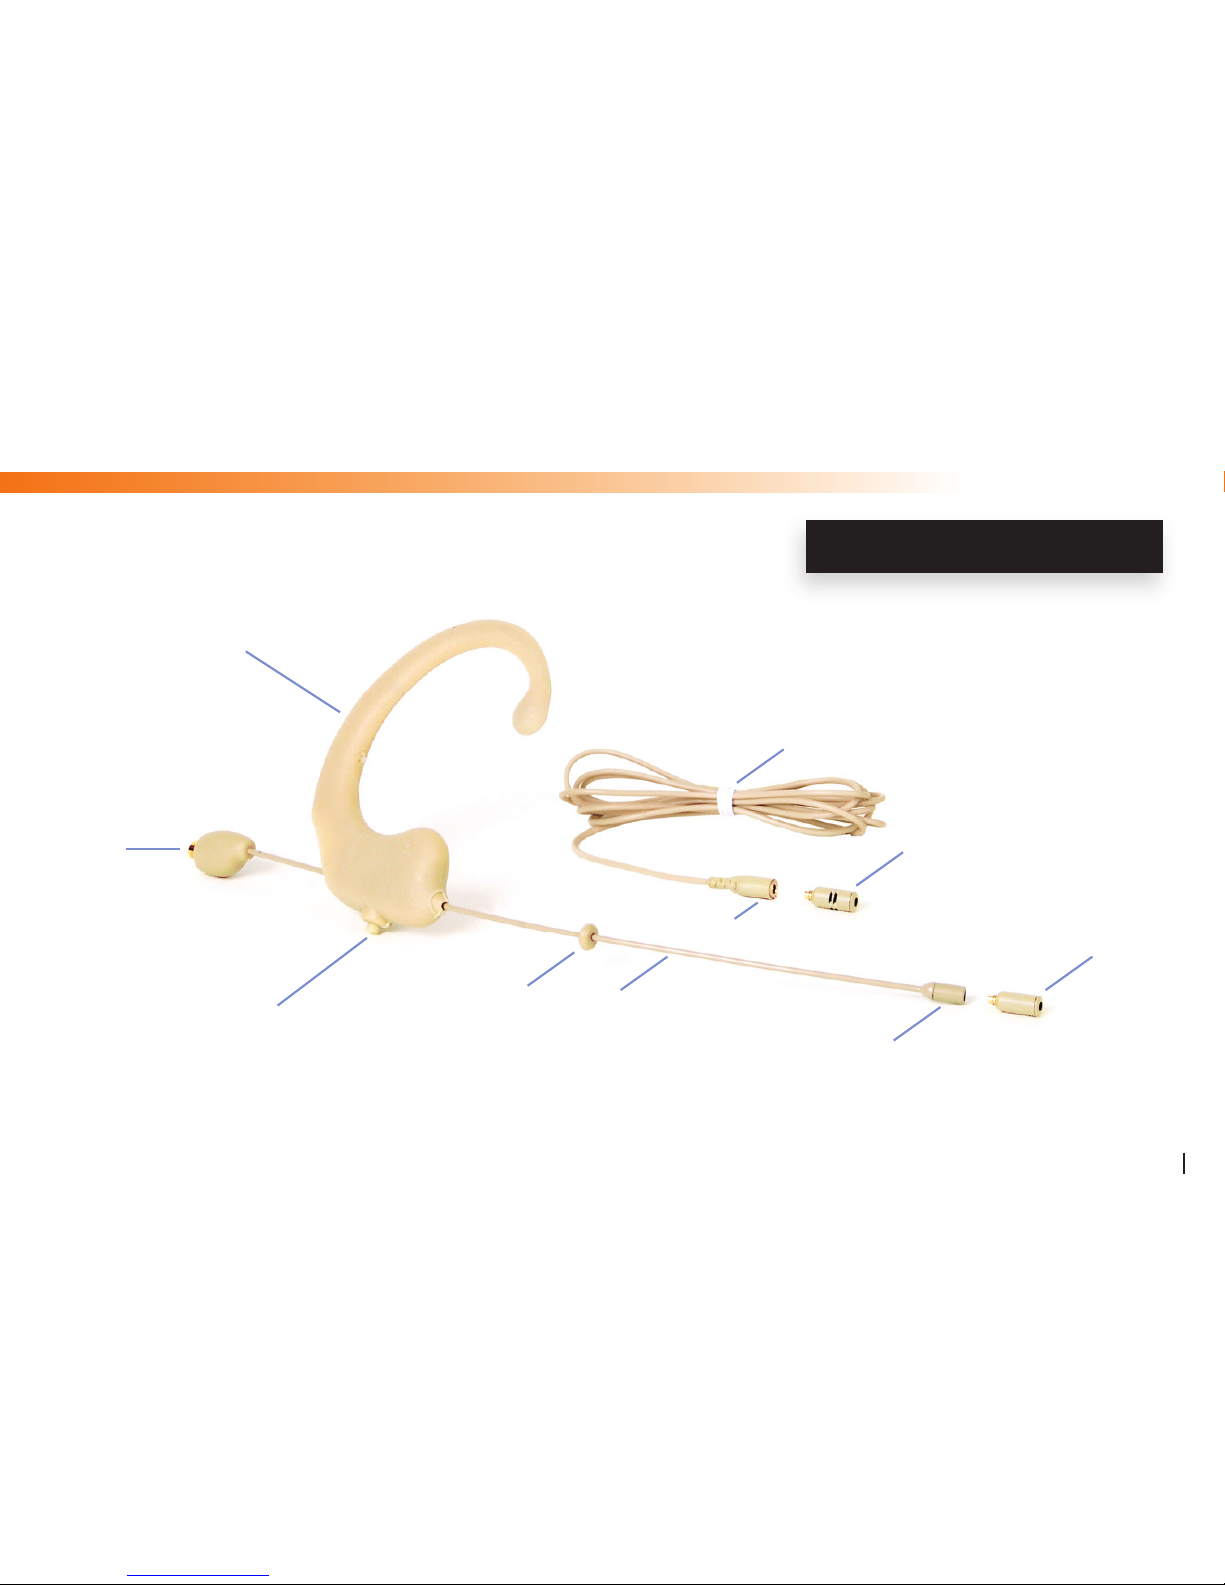
Removable MIC1: Wi Simple-Twist™ omnidirectional removable microphone capsule model JM-ST35O
for ear-worn, lavalier and instrument miking applications.
Removable MIC2: Wi Simple-Twist™ unidirectional removable microphone capsule model JM-ST35U
for ear-worn, lavalier and instrument miking applications.
Earset MIC Port: Simple-Twist removable microphone capsule port
Lavalier MIC Port: Simple-Twist detachable Lavalier cable with removable microphone capsule port
Boom: Sure-Fit bendable boom design
Silicon Spacer: Silicon cheek spacer
Boom Lock: Adjusting the boom length, left and right ear placement boom confi guration and
keeping boom securely in place
Cable Port: Simple-Twist detachable cable port
EL Ear Mount: Sure-Fit advanced ergonomic silicon ear mount model EL
Lavalier MIC Port: Simple-Twist detachable Lavalier cable
EARSET & LAVALIER FEATURES
Page 13
Wi AudioStream EL2
13
EARSET & LAVALIER FEATURES
Page 14

Wi AudioStream EL2
14
Handling The Wi Sure-Fit EL Series
The Wi Sure-Fit™ EL Series is a high-precision instrument and
is designed for durability and fl exibility. The following are
some of the basic precautions to prevent damage to
the Wi Sure-Fit™ EL.
Do not bend the boom over sharp edges such as
the end of your fi ngernail or twist the boom
around a tight radius less than 1/2” diameter.
Use the thumb and index fi nger to do small
bends at multiple points of the boom to get the
desired curvature.
EARSET HANDLING
Page 15
EARSET HANDLING
Wi AudioStream EL2
15
Do not bend and wrap the cables in any way that
creates severe coiling or strain on the cables.
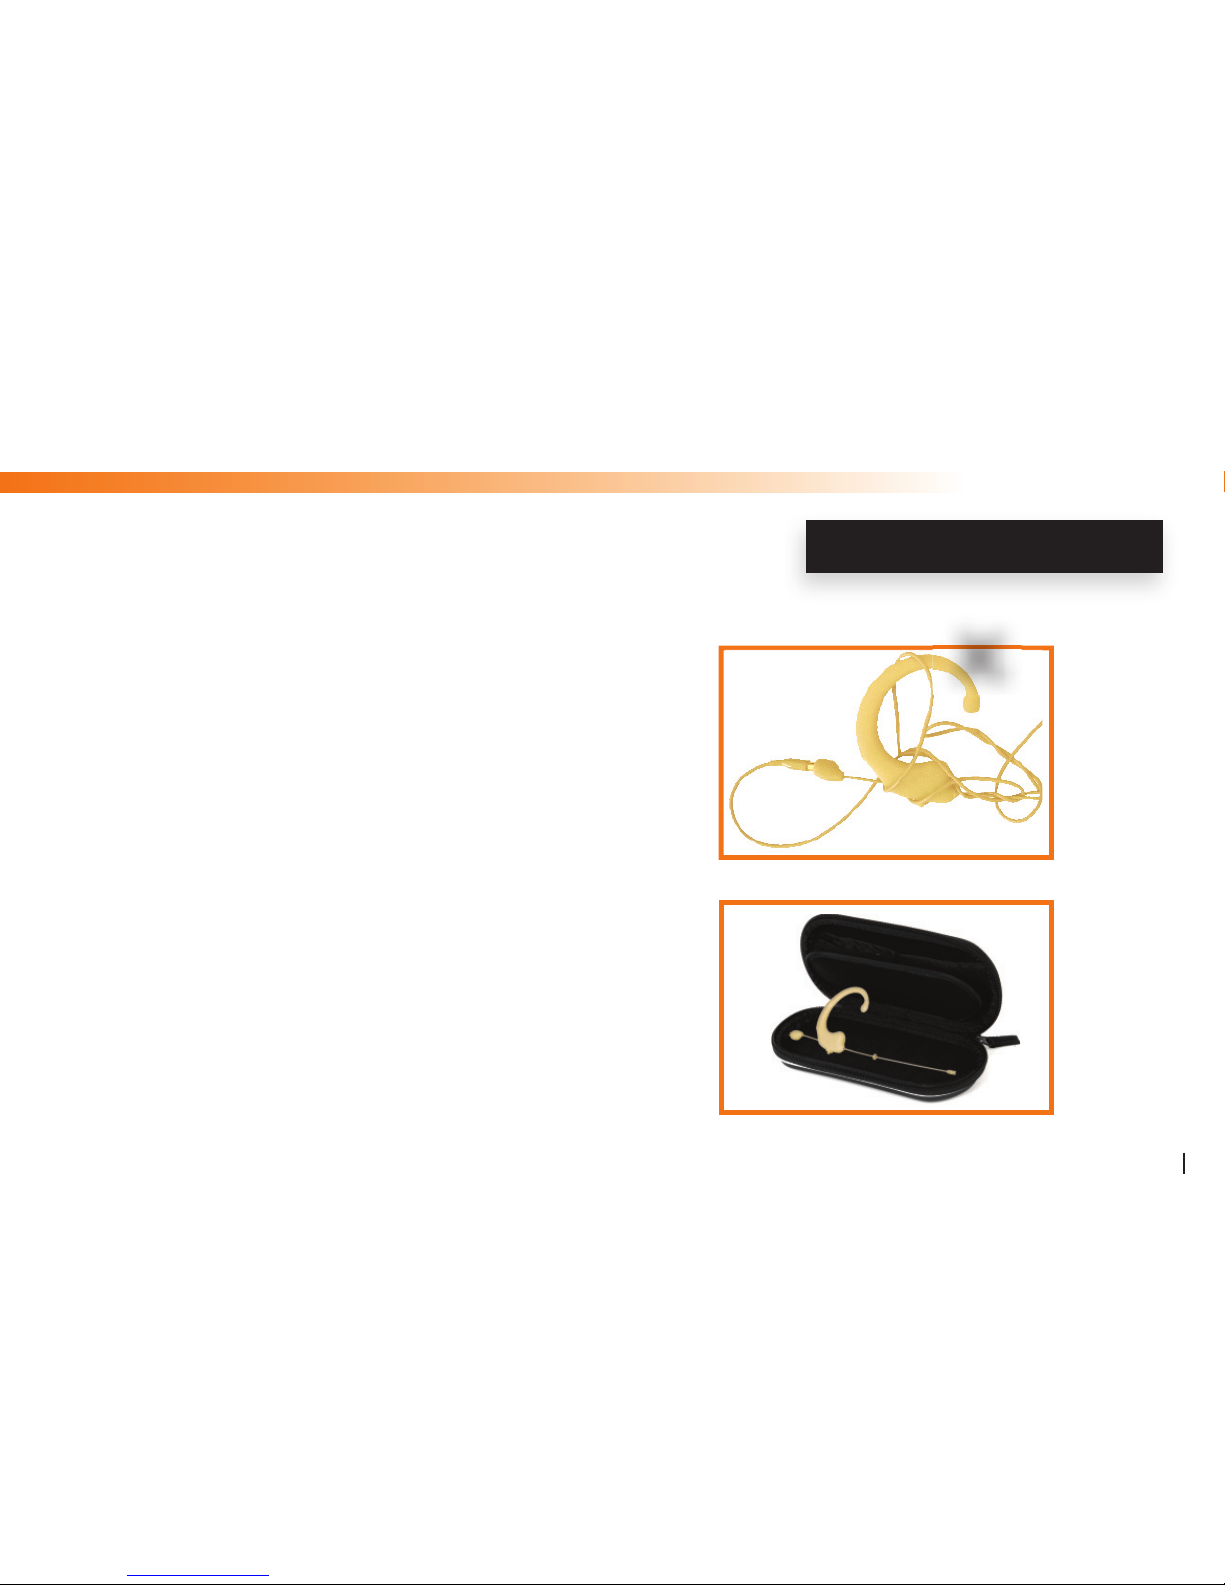
Always detach the earset cable and the removable
adapter when storing the Wi Sure-Fit™ microphone
Page 16

Wi AudioStream EL2
16
Ready, Charge, Go!
Before using your new Wi AudioStream™ EL2 digital wireless system,
you need to fully charge the batteries for approximately 2 hours.
Charging
1. Plug the AC Charger into a power socket.
2. Connect the USB power cable to the USB port on the AC charger.
3. Connect one of the two mini USB connectors to the transmitter
USB port.
4. Connect the second mini USB connector to the receiver USB port.
5. The Power/Status LED will turn to solid Red ON.
6. When charging is complete the Red LED will turn OFF.
7. The battery will last 4 to 6 hours of continuous operation.
POWER
LINK
AC Charger
USB Port
Mini USB
Connector
USB Port
USB Connector
GETTING STARTED
Page 17

GETTING STARTED
Wi AudioStream EL2
17
More Charging Options
The Wi AudioStream™ EL2 power source’s fl exible design boasts an
internal rechargeable battery for 4~6 hours of battery operation. The
optional ON-THE-GO AA battery power adapter provides for 10~13
hours of extended battery operations and the AC power adapter
provides continuous operation, so there’s no need to power down the
Wi AudioStream EL2 for recharging or swapping the AA batteries on
the optional ON-THE-GO battery power booster. The Transmitter and
Receiver can also be powered by USB bus power when connected to
any USB host equipped device for continuous power operation.
Charger
USB
Bus Power
AA Battery
Power Booster
Page 18

Wi AudioStream EL2
18
EARSET SETUP
The Wi Sure-Fit Earset & Lavalier
Delivering unmatched value, comfort, sound
quality and secure fi t, the Wi Sure-Fit™ EL2
Series earset and lavalier microphone delivers
three (3) applications in one versatile microphone
including ear-worn, lavalier and video camera/
instruments miking applications. Jangus Music’s
ultra-small removable MIC capsule mounted
on an ultra-thin, rugged, bendable, adjustable
length and incredibly lightweight boom captures
vocals clearly with excellent rejection of wind and
ambient noise. The Wi Sure-Fit™ EL2 Series is
an excellent choice for pastors, artists, fi tness in-
structors, speaking and singing performers, video
camera miking and hard to MIC instruments.
Page 19

EARSET SETUP
Connecting The Earset Cable
The Wi Sure-Fit™ EL2 Series ultra-low-profi le detachable cable
delivers minimum visibility with maximum durability. Optional adapters
give the Wi Sure-Fit™ EL2 series earset great fl exibility for use with
different pocket wireless systems including AKG™, Shure™, Sony™,
Audio-Technica™ and Sennheiser™.
1. Locate the detachable earset cable and the included
detachable adapter for the Wi AudioStream™ EL2 pocket
portable digital wireless system.
2. Fasten the earset end of the earset cable to the screw
connector located on the silicon ear mount.
Wi AudioStream EL2
19
Page 20

Wi AudioStream EL2
20
EARSET CUSTOM FITTING
Left or Right Ear Placement
The Wi Sure-Fit™ EL Series can easily be converted from right
to left ear wearing preferences with a Simple-Twist™. This un-
matched time saving feature delivers exceptional fl exibility
for venues needing to accommodate multiple users and their
wearing preferences.
1. Press the boom locking switch located on the bottom
of the Silicon ear mount.
2. Rotate the boom 180 degrees to the preferred
ear wearing preference.
3. Release the locking switch when rotation is complete.
No need to rework the bend or reshape the boom again when
switching from left to right ear placement. The boom maintains
its original angle to capture vocals from the near-the-mouth
position, from the opposite side.
Page 21

Wearing the Wi Sure-Fit Earset
The Wi Sure-Fit™ EL Series advanced ergonomic Silicon ear-mount design
delivers an unmatched comfortable fi t in seconds while ensuring secure boom
placement even when the head moves, or when used with glasses or other
head-worn accessories. This ultra-lightweight MIC is incredibly easy to
wear even for an extended time.
1. Pull the “C” shaped Sure-Fit™ silicon ear mount wide open and
clip over the ear
2. Loop the bottom part of the “C” shaped ear mount beneath the earlobe.
3. You should feel the Wi Sure-Fit earset gripping your ear and pressing
out against your earlobe for comfortable secure fi t.
4. The boom is designed to press and curve smoothly around the face.
Adjusting the boom length and curvature are covered in the following section.
Wi AudioStream EL2
21
EARSET CUSTOM FITTING
Page 22

Adjusting the Boom Length
The Wi Sure-Fit™ EL Series boom can easily be adjusted to
the appropriate length and placement with a simple push of a
button to capture the closest near-the-mouth vocals clearly
and consistently. The boom locking mechanism keeps the
boom securely in place to provide good gain and natural
sound that doesn’t change when the head moves.
1. Press the boom locking switch located on the bottom
of the Silicon ear mount.
2. Slide the boom shaft to position the MIC capsule
just behind the corner of your mouth when you are
smiling.
3. Release the locking switch when adjustment is complete.
• Placing the microphone too far forward
can result in breath-related pops.
Wi AudioStream EL2
22
EARSET CUSTOM FITTING
Page 23

Wi AudioStream EL2
23
EARSET CUSTOM FITTING
Adjusting the Boom Curve
The Wi Sure-Fit™ EL Series bendable boom can easily be adjusted
to position the microphone tip as close as possible to the mouth for
best vocal gain and clarity. Adjust the curvature of the boom only
when necessary. If the microphone tip is away from the cheek, this
will result in lower gain and more ambient noise.
1. Using the thumb and the index fi nger, curve the boom with
a sliding motion to form the boom and get the curvature you
require.
• Avoid bending right at the capsule
• Do not bend the boom over sharp edges such as
the end of your fi ngernail
• Do not pinch, twist or kink the boom around a tight
radius less than 1/2” diameter
Page 24

EARSET CUSTOM FITTING
Wi AudioStream EL2
24
Positioning The Microphone Capsule
The Wi Sure-Fit™ EL Series removable microphone capsule is located at the tip of the boom. The key to maximizing
the sound quality is to locate the capsule as close as possible to the mouth without touching the face.
1. Press the boom locking switch located on the bottom
of the Silicon ear mount.
2. Slide the boom shaft to position the MIC capsule
just behind the corner of your mouth when you
are smiling.
3. Release the locking switch when adjustment is complete.
• Placing the microphone too far forward
can result in breath-related pops.
• Use the windscreen outdoors.
Page 25

EARSET CUSTOM FITTING
Wi AudioStream EL2
25
Using The Earset/Lavalier Cable Clip
The Wi Sure-Fit™ EL Series comes with an Earset/
Lavalier cable clip to prevent movement of the cable
from dislodging the earset. The clip is specifi cally
designed to match the diameter of your cable, either
1.4mm or 2mm.
1. Locate the cable clip and gently pull the cable
down into the rubber cable channel opening on
the clip.
2. Attach the clip to the collar and leave enough
slack in the cable such that the head can turn to
both sides without tugging on the clip.
• We recommend leaving the clip attached
to the cable when possible to minimize
repetitive strain on the cable.
Page 26

LAVALIER CUSTOM FITTING
Wi AudioStream EL2
26
Using The Lavalier Option
The Wi Sure-Fit EL Series comes standard with a
detachable lavalier cable for use with the removable MIC
capsule. The ultra-thin lavalier detachable cable easily
accommodates alternative mounting applications such as:
• Ties, Shirts, Jackets and Behind-the-Button Positioning
• In-Hair
• Beneath T-shirts & Blouses using the rubber MIC clip
• Hard to MIC Instruments using the rubber MIC clip
The included Lavalier cable clip and the Instruments MIC
rubber clip can be used to customize the fi t of the lavalier
to be both comfortable and discreet. Ideal for presenters,
reporters, worship leaders and pastors, broadcasters,
interviewers, musicians and many more!
Page 27

REPLACING MIC CAPSULES
Wi AudioStream EL2
27
Replacing the Microphone Capsules
The Wi Simple-Twist™ detachable MIC capsules are designed to be
interchangeable between the earset and the lavalier for minimum
visibility with maximum fl exibility.
1. Remove the MIC capsule from the earset or lavalier MIC port
by unscrewing the MIC capsule counterclockwise.
2. Align the MIC capsule threads in a straight line with earset or
lavalier cable MIC port
3 Fasten the MIC capsule from the earset or lavalier MIC port
by screwing in the MIC capsule clockwise until SNUG! Be certain
not to overtighten.
AVOID ACCIDENTAL CAPSULE THREAD STRIPPING!
• Be certain to align the MIC capsule threads in a straight line
• Be certain not to overtighten.
Page 28

Wi AudioStream EL2
28
PAIRING
Pairing the Wi AudioStream EL2
Before using the Wi AudioStream EL2, you will need to pair the Transmitter with the
Receiver. Pairing will allow a connection between the Transmitter and the Receiver.
1. First turn ON the Transmitter (Tx) and the Receiver (Rx) by pressing and
holding the POWER button , on each of the units for 2 seconds.
2. Press and hold the LINK button on the Transmitter (Tx) for 3 seconds.
The Power/Status green LED on the Transmitter will start fl ashing.
The Transmitter is now in a Pairing mode and ready to search for receivers.
3. Press and hold the LINK button on the Receiver (Rx) for 3 seconds.
The Power/Status green LED on the receiver will fl ash momentarily.
4. Once the Transmitter pairs with Receiver, the Power/Status LED on both
devices will turn to solid green.
5. The Wi AudioStream EL2 Transmitter and Receiver are now ready for use.
(Tx)
(Rx)
Page 29

Always route the audio cable beneath the Tx & Rx
units’ belt clip to prevent accidental disconnection.
Use the
1/8” dual input L/R to 1/8” Y-split cable to connect
the Earset and the Lavalier microphones to the Wi
transmitter at the same time.
Wi AudioStream EL2
29
CONNECTING THE MIC
Single and Dual MIC connection
• For single MIC connection, ensure that the Transmitter is in
Mono Mic-in Mode
and the LED is in fast blue fl ashing mode.
• For dual MIC connection, ensure that the Transmitter is in
Stereo Mic-in Mode
and the LED is in slow blue fl ashing mode
Belt Clip
Audio Cable
Audio Input Jack
Microphone
(Tx)
Receiver Connection
1/4” Y-Split to 1/8”
Stereo Cable or XLR
Mono Cable
Transmitter Connection
Wi AudioStream EL
Receiver (Rx)
Page 30

CAMERA CONNECTION
Wi AudioStream EL2
30
Using The 1/4”-20 Hot Shoe & Clip
The Wi AudioStream EL2 transmitter and receiver are
designed to mount video camera DSLR and
handheld recorders This powerful solution lets you
wirelessly capture superb vocals and amazing
ambient sounds easily and accurately.
1. Locate the 1/4” -20 Hot Shoe fl ash adapter
and the U-Type Speed Nut 1/4” -20 screw
attachment for tripods and bipods.
2. Insert the U-Type Speed Nut 1/4” -20 screw
attachment to the Wi AudioStream EL
receiver belt clip.
3. Fasten the 1/4” -20 Hot Shoe fl ash adapter
mounting screw to the U-Type Speed Nut
1/4” -20 screw attachment.
Page 31

CAMERA CONNECTION
Wi AudioStream EL2
31
Using The Plastic Clip Attachment
The Wi AudioStream EL2 transmitter and receiver
can also mount to video camera, DSLR and
handheld recorders using the quick latch plastic
mounting brackets.
1. Locate the Plastic-Clip attachment for the
Wi Transmitter and Receiver.
2. Insert the Plastic-Clip to the Wi Transmitter
and Receiver belt clip.
3. Remove the protective strip from the adhesive
backed Plastic-Clip.
4. Stick the Transmitter and Receiver to the
desired secure location.
Page 32

CAMERA CONNECTION
Wi AudioStream EL2
32
Connecting the Receiver to The Camera
1. Turn the camera off before installing the Wi
AudioStream receiver to the camera.
2. Loosen the bottom lock ring on the 1/4” -20 Hot Shoe
fl ash adapter camera accessory.
3. Insert/slide the mounting foot of 1/4” -20 Hot Shoe
fl ash adapter into the camera accessory shoe and
tighten the bottom lock ring.
4. Rotate the Wi AudioStream receiver to preferred
direction and tighten the upper lock ring.
Page 33

CAMERA CONNECTION
Wi AudioStream EL2
33
Audio Cable Connection
1. Locate the 1/8” to 1/8” TRS stereo audio cable or
the 1/8” to XLR TRS audio cable.
2. Insert the 1/8” TRS stereo end of the audio cable
into the Wi AudioStream EL receiver audio output
jack.
3. Insert the 1/8” TRS stereo end of the audio cable
into the Camera MIC-IN or Line-In audio input
jack.
4. Use the 1/8” TRS to XLR audio cable id your
camera is equipped with XLR audio input ports.
1/8” to 1/8” Stereo Audio
Cable or XLR Mono Cable
1/8” to XLR Mono Cable
Page 34

Audio Input
Jack
(Tx)
Wi AudioStream EL2
34
IN-EAR MONITORING SETUP
PLEASE READ THIS FIRST
Set the Transmitter to the
Line-in Stereo Mode
(Blue LED double fl ashing)
for operation with earphones. Refer to the back of the transmitter for a
reference listing of the operating modes.
(Tx)
Receiver ConnectionTransmitter Connection
(Rx)
1/4” Y-Split to 1/8” Stereo Cable
Audio Monitoring
Mixing
Console
POWER
LINK/VoIP
Computer
Headphone Jack
Optional 1/8” to 1/8” Cable
(Rx)
Music Listening from Computer
Always route the audio cable beneath the
Tx & Rx units’ belt clip to prevent accidental
disconnection.
Belt Clip
Audio Cable
Page 35

Wi USB Transmitter Connection
Connect the optional plug-and-play Wi USB Transmitter to your laptop
or desktop USB port upon restart. Your system is now ready to use.
No software or drivers required for this installation.
Receiver Connection
Press the LINK/VoIP button once on the Receiver to activate
the internal VoIP microphone. The Blue LED will turn ON.
Speak directly into the VoIP MIC to transmit. Always route
the audio cable beneath the Rx unit’s belt clip to prevent
accidental disconnection.
Built-in MIC
Wi AudioStream EL2
35
VoIP MICROPHONE SETUP
PLEASE PROTECT YOUR EARS! Prolonged use of headphones or
In-Ear personal monitors at high volumes may affect your hearing
capacity or may result in noise induced hearing loss (NHL).
(Rx)
LINK/VoIP Button
Wi USB Transmitter
Model JM-UST01
(Optional)
Page 36

Transmitter (Tx) Button Functions
Function Button Activation Hold Time LED Status
Power ON/OFF POWER Press and Hold 2 sec Solid Green
Pairing Mode LINK Press and Hold 3 sec Fast Green Flashes
Signal Re-routing LINK Click Click
Volume UP/Down Click for Step, Press and hold for Auto Click
Mute ON/OFF Press and Hold 1.5 sec Solid Green and Blue
Sleep / Wake up Press and Hold to Sleep / Click to Wake 2 sec Two Green Flashes
Stereo Mic-in Mode Press and Hold 2 sec Solid Green LED and
Slow Blue LED Flashes
Mono Mic-in Mode Press and Hold 2 sec Solid Green LED and
(Factory Setting) Fast Blue LED Flashes
Stereo Line-in Mode Press and Hold 2 sec Solid Green LED and
Double Blue Flashes
Tx BUTTON FUNCTIONS
Wi AudioStream EL2
36
Page 37

Tx LED INDICATOR CHART
Transmitter (Tx) LED Indicator Chart
Function LED Status
Searching For Receiver Flashing Green
Linked to Receiver Solid Green
Sleep Mode Two Green Flashes
Low Battery Solid Green & Flashing Red
Charging With Power OFF Solid Red
Charging With Power ON Solid Red & Green
Charging Complete Red OFF
Wi AudioStream EL2
37
Page 38

Receiver (Rx) Button Functions
Function Button Activation Hold Time LED Status
Power ON/OFF POWER Press and Hold 2 sec Solid Green
Pairing Mode LINK Press and Hold 3 sec Fast Green Flashes
Voice Over IP MIC LINK/VoIP Click (With Optional USB Tx Dongle) Click Solid Green LED and
Two Blue LED Flashes
Volume UP/Down Click for Step, Press and Hold for Auto Click
Mute ON/OFF Press and Hold 1.5 sec Solid Green & Blue
Play/Pause Click (With Optional USB Tx Dongle) Click
Next Track Click (With Optional USB Tx Dongle) Click
Prev Track Click (With Optional USB Tx Dongle) Click
Rx BUTTON FUNCTIONS
Wi AudioStream EL2
38
Page 39

Rx LED INDICATOR CHART
Receiver (Rx) LED Indicator Chart
Function LED Status
Searching For Transmitter Flashing Green
Linked to Transmitter Solid Green
Sleep Two Green Flashes (Activated by Tx)
Low Battery Solid Green & Flashing Red
Charging With Power OFF Solid Red
Charging With Power ON Solid Red & Green
Charging Complete Red OFF
Wi AudioStream EL2
39
Page 40

Wi AudioStream EL2 Technical Specifi cations
Specifi cations
Transmission Format: 2.4 GHz, 16-bit, 48kHz Digital Wireless
Frequency Response: 15Hz to 20kHz
Frequency Selection: Auto select
S/N Ratio: More than 89 dB (A-weighted) for stereo line-in mode
More than 84 dB (A-weighted) for stereo and mono MIC mode
Distortion: 0.12 % THD
Connectors: 1/8” (3.5mm) TRS Stereo
Max Input Level: 1Vrms
Max Output Level: 700mVrms
Input Impedance: 3.3K ohm
Output Impedance: < 10 ohm
Rechargeable Battery Life: 4~6 hours
Power Input: 5V DC, 500 mA
PRODUCT SPECIFICATIONS
Wi AudioStream EL2
40
Page 41

PRODUCT SPECIFICATIONS
Specifi cations
Battery Power Booster: 10~13 hours (With optional AA battery power booster adapter)
USB Bus Power: Yes
Low Battery Alert: 15 minutes of life left
Power-up Modes: Three (3) power-up modes (Stereo Line-in, Stereo Mic-in, Mono Mic-in)
Antenna: Two internal antennas
Range: Up to 100 ft
(Range may be dependent on line of sight and may vary due to local conditions)
Units operating at the same time: 9
Audio Signal Routing: One (1) transmitter can re-route audio signal to eight (8) different receivers
MAC/PC Compatible: Yes (With Optional Jangus Music USB Transmitter Model JM-UST01)
VoIP Capable: Yes (With Optional Jangus Music USB Transmitter Model JM-UST01)
802.11g/n Network Safe: Yes
Transmitter Weight: 0.068 lbs (1.08 Oz) (30.8g)
Receiver Weight: 0.068 lbs (1.08 Oz) (30.8g)
Dimensions: 1.2” W x 0.6” D x 3.34” H
Mounting Method: Metal belt clip
Wi AudioStream EL2
41
Page 42

PRODUCT SPECIFICATIONS
Wi AudioStream EL2
42
Wi Sure-Fit EL Technical Specifi cations
Mechanical Specifi cations
Ear Mount: Sure-Fit™ Ergonomic Silicon Ear Mount
Ear Placement: Simple-Twist™ Left/Right Ear Placement
Boom Type: Simple-Twist™ Bendable, Adjustable Length Boom with Locking Mechanism
Cable Type: Simple-Twist™ Detachable Cables
Omnidirectional Capsule MIC Specifi cations Model JM-ST35O (If specifi ed by part number)
Frequency Response: 20Hz to 20kHz
Operating Current: Less than 500uA
Operating Voltage: 1.5V - 12V DC
Sensitivity: -45dB+/-3dB/Pascal
Maximum SPL: 140 dB SPL max
Output Impedance: 2KΩ±30%
Capsule Type: Simple-Twist™ Removable 3.5mm Capsule
Element: Back Electret Condenser
Polar Pattern: Omnidirectional
Page 43

PRODUCT SPECIFICATIONS
Wi AudioStream EL2
43
Wi Sure-Fit Lavalier Technical Specifi cations
Unidirectional Capsule MIC Specifi cations Model JM-ST35U (If specifi ed by part number)
Frequency Response: 50Hz to 15kHz
Operating Current: Less than 500uA
Operating Voltage: 1.5V - 10V DC
Sensitivity: -51dB+/-4dB/Pascal
Maximum SPL: 130 dB SPL max
Output Impedance: 1.5KΩ±30%
Capsule Type: Simple-Twist™ Removable 3.5mm Capsule
Element: Back Electret Condenser
Polar Pattern: Cardioid (Unidirectional)
Page 44

FCC NOTICES
Wi AudioStream EL2
44
Regulatory Compliance Information
Compliance Statement
This equipment has been tested and found to comply with the limits for a Class B digital device, pursuant to part 15 of the
FCC Rules. These limits are designed to provide reasonable protection against harmful interference in a residential installation. This equipment generates, uses and can radiate radio frequency energy and, if not installed and used in accordance
with the instructions, may cause harmful interference to radio communications. However, there is no guarantee that interference will not occur in a particular installation. If this equipment does cause harmful interference to radio or television reception, which can be determined by turning the equipment off and on, the user is encouraged to try to correct the interference
by one or more of the following measures: (1) Re-orient or relocate the receiving antenna. (2) Increase the separation
between the equipment and receiver. (3) Connect the equipment into an outlet on a circuit different from that to which the
receiver is connected. (4) Consult the dealer or an experienced radio/ TV technician for help. CAUTION: Any changes or
modifi cations not expressly approved by the grantee of this device could void the user’s authority to operate the equipment.
Page 45

RECYCLING INFORMATION
Wi AudioStream EL2
45
Disposal and Recycling Information
Correct Disposal
This symbol indicates that your product must be disposed of properly according
to the local laws and regulations. When your product reaches its end of life,
contact the retailer where the product was purchased or your local authorities to
learn about recycling options. This product should not be mixed with other commercial waste for disposal.
Page 46

Product Warranty Terms
Wi Digital Systems warrants that the Wi AudioStream EL2 is free from material defects and faulty workmanship for a
period of twelve (12) months from the date of purchase. Wi Digital Systems will repair or replace, at its option, any Product
that breaches this warranty during said period. This warranty does not cover and is void with respect to (1) Products
which have been improperly installed, repaired, modifi ed or altered; (2) Products which have been subject to abuse,
misuse, physical damage, exposure to fi re, water or excessive moisture or dampness; (3) Products on which the serial
number has been removed, altered, or rendered illegible; (4) Products that are operated outside the limits of the technical
specifi cations of the product.
Repair and/or replacement of the Wi Digital Systems product will be performed through Wi Digital Systems Return Material Authorization (RMA) procedure. The customer is required to contact Wi Digital Systems at www.widigitalsystems.com
to obtain the approval and procedure for returning any product under warranty.
IN NO EVENT SHALL Wi DIGITAl SYSTEMS BE LIABLE FOR ANY INCIDENTAL, CONSEQUENTIAL, DIRECT,
INDIRECT, SPECIAL OR PUNITIVE DAMAGES WHICH ARISE IN ANY WAY OUT OF THE MANUFACTURE, SALE OR
USE OF ITS PRODUCTS OR SERVICES. In the event that a court of competent jurisdiction determines that Wi Digital
Systems is in breach of any warranty, the amount of recoverable damages shall be limited to the cost of the replacement
of any Product found to be defective or nonconforming.
PRODUCT WARRANTY
Wi AudioStream EL2
46
Page 47

PRODUCT WARRANTY
Out of Warranty
Should your Wi AudioStream EL2 not function properly after the warranty period has expired, please contact
Wi Digital Systems Customer Care at www.customercare@widigitalsystems.com
Limitations of Liability
Wi Digital Systems expressly assumes no responsibility for any error, omission, interruption, deletion, defect, delay
in operation or transmission, communications failure, theft or destruction or unauthorized access to, or alteration
of, any use of the Wi AudioStream EL2 product. TO THE MAXIMUM EXTENT PERMITTED BY APPLICABLE LAW,
IN NO EVENT SHALL WI DIGITAL SYSTEMS OR ITS SUPPLIERS BE LIABLE FOR ANY SPECIAL, INCIDENTAL,
INDIRECT, PUNITIVE OR CONSEQUENTIAL DAMAGES WHATSOEVER, INCLUDING, BUT NOT LIMITED TO,
DAMAGES FOR: LOSS OF PROFITS OR REVENUES, LOSS OF CONFIDENTIAL OR OTHER INFORMATION ,
BUSINESS INTERRUPTION, PERSONAL INJURY, DEATH, LOSS OF PRIVACY, CORRUPTION OR LOSS OF DATA,
FAILURES TO TRANSMIT OR RECEIVE AUDIO OR ANY OTHER PECUNIARY LOSS WHATSOEVER ARISING OUT
OF OR IN ANY WAY RELATED TO THE USE OF OR INABILITY TO USE THE DEVICE OR THE SUPPORT SERVICES
OR OTHERWISE IN CONNECTION WITH ANY PROVISION OF THIS AGREEMENT, EVEN IF WI DIGITAL SYSTEMS
OR ANY SUPPLIER HAS BEEN ADVISED OF THE POSSIBILITY OF SUCH DAMAGES.
Wi AudioStream EL2
47
Page 48

www.widigitalsystems.com
© 2011 Wi Digital Systems by Jangus Music, Inc. All rights reserved. Wi, Stylized Wi and Jangus Music Logos are
registered trademarks of Jangus Music, Inc. in the United States and may be registered trademark or trademarks
in other countries. Wi AudioStream, Sure-Fit, Simple-Twist and Digital Wireless Stereo logo are trademarks of
Jangus Music, Inc. All other trademarks included herein are the property of their respective owners. US and
Foreign Patents Pending. (Design and speci cations subject to change without notice).
 Loading...