

Wi Digital Systems AUDIOSTREAM Pro AV Owner's Manual

OWNER’S MANUAL
OPERATING INSTRUCTIONS

PACKING LIST 5
SYSTEM CHARGING & PAIRING 6
TRANSMITER MICROPHONE SETUP
RECEIVER SETUP
AUDIO MONITORING 30
2-WAY USB 2.0 WIRELESS AUDIO INTERFACE 32
SMART DEVICE DIRECT MIC CONNECTION 42
WI TRANSMITTER & RECEIVER FEATURES 44
MICROPHONES FEATURES 58
FCC NOTICE & RECYCLING INFO 62
WARRANTY 64
Thank You For Choosing Wi Digital Systems.
Congratulations on your purchase of the Wi AudioStream Pro AV 2.4GHz Smart Pocket Portable Stereo Digital
Wireless Lavalier & Audio Monitoring System with 2-Way Wireless USB 2.0 Audio Interface.
Please thoroughly read this User’s Manual for all the feature operation information necessary
to install and operate your new Wi AudioStream Pro AV system.
Notice: Product specications and package contents are subject to change without notice.
Package contents may vary according to the different regions.
For additional support, please visit www.widigitalsystems.com
CONGRATULATIONS!

PACKING LIST 5
SYSTEM CHARGING & PAIRING 6
TRANSMITER MICROPHONE SETUP
• MONO LAVALIER SETUP 8
• TRANSMITTER PLACEMENT 11
• OPTIONAL STEREO LAVALIER SETUP 12
• OPTIONAL EARSET SETUP 14
• OPTIONAL SHOTGUN SETUP 18
RECEIVER SETUP
• CAMERA CONNECTION 20
• SMARTPHONE CONNECTION 22
• TABLET & SMART DEVICE CONNECTION 26
• SOUND SYSTEM CONNECTION 28
AUDIO MONITORING 30
2-WAY USB 2.0 WIRELESS AUDIO INTERFACE 32
• MAC & PC USB SETUP 34
• iPad, Surface & Tablet PC USB SETUP 38
• AUDIO LISTENING, VoIP & PODCASTING 40
SMART DEVICE DIRECT MIC CONNECTION 42
WI TRANSMITTER & RECEIVER FEATURES 44
MICROPHONES FEATURES 58
FCC NOTICE & RECYCLING INFO 62
WARRANTY 64
TABLE OF CONTENTS
------------------------------------------------------------------------------------------
------------------------------------------------------------------------------------------
------------------------------------------------------------------------------------------
------------------------------------------------------------------------------------------
------------------------------------------------------------------------------------------
------------------------------------------------------------------------------------------
------------------------------------------------------------------------------------------
------------------------------------------------------------------------------------------
------------------------------------------------------------------------------------------
------------------------------------------------------------------------------------------
------------------------------------------------------------------------------------------
------------------------------------------------------------------------------------------
------------------------------------------------------------------------------------------
------------------------------------------------------------------------------------------
------------------------------------------------------------------------------------------
------------------------------------------------------------------------------------------
------------------------------------------------------------------------------------------
------------------------------------------------------------------------------------------
------------------------------------------------------------------------------------------
------------------------------------------------------------------------------------------
------------------------------------------------------------------------------------------

TECHNICAL SUPPORT
Getting Answers!
We want you to get the most from your new Wi AudioStream Pro AV stereo digital wireless audio system!
Simply logon to www.widigitalsystems.com and access the resources available online including
instructional manuals and more.
Our customer service support staff are ready to assist you with any question you may have.
Your Wi AudioStream Pro AV comes with one year of telephone support and service coverage.
There are several ways to contact Wi Digital Systems customer service support.
E-Mail: support@widigitalsystems.com
Website: www.widigitalsystems.com/support
Technical support: (714) 505-4567
1/8” to 1/8” TRS Stereo
Universal USB

PACKING LIST
MIC
Windscreens
Smartphone
Mounting Adapter
1/8” to 1/8” TRS
Smart Device Cable
Single Feed
Cable Clips
Wi Transmitter Wi Receiver
XLR to 1/8”
TRS Cable
1/8” to 1/8” TRS Stereo
Cable & 1/4” Adapter
Hard Shell
Carrying Case
1/4”-20 Camera
Hot Shoe Adapter
Universal USB
AC Charger
USB Y -Split
Power Cable
MIC/Headphone
Adapter
USB
Data Cable
5
Wi SmartMic™ Lavalier with
Omnidirectional Microphone Capsule
1/4”-20
Smartphone Adapter
6
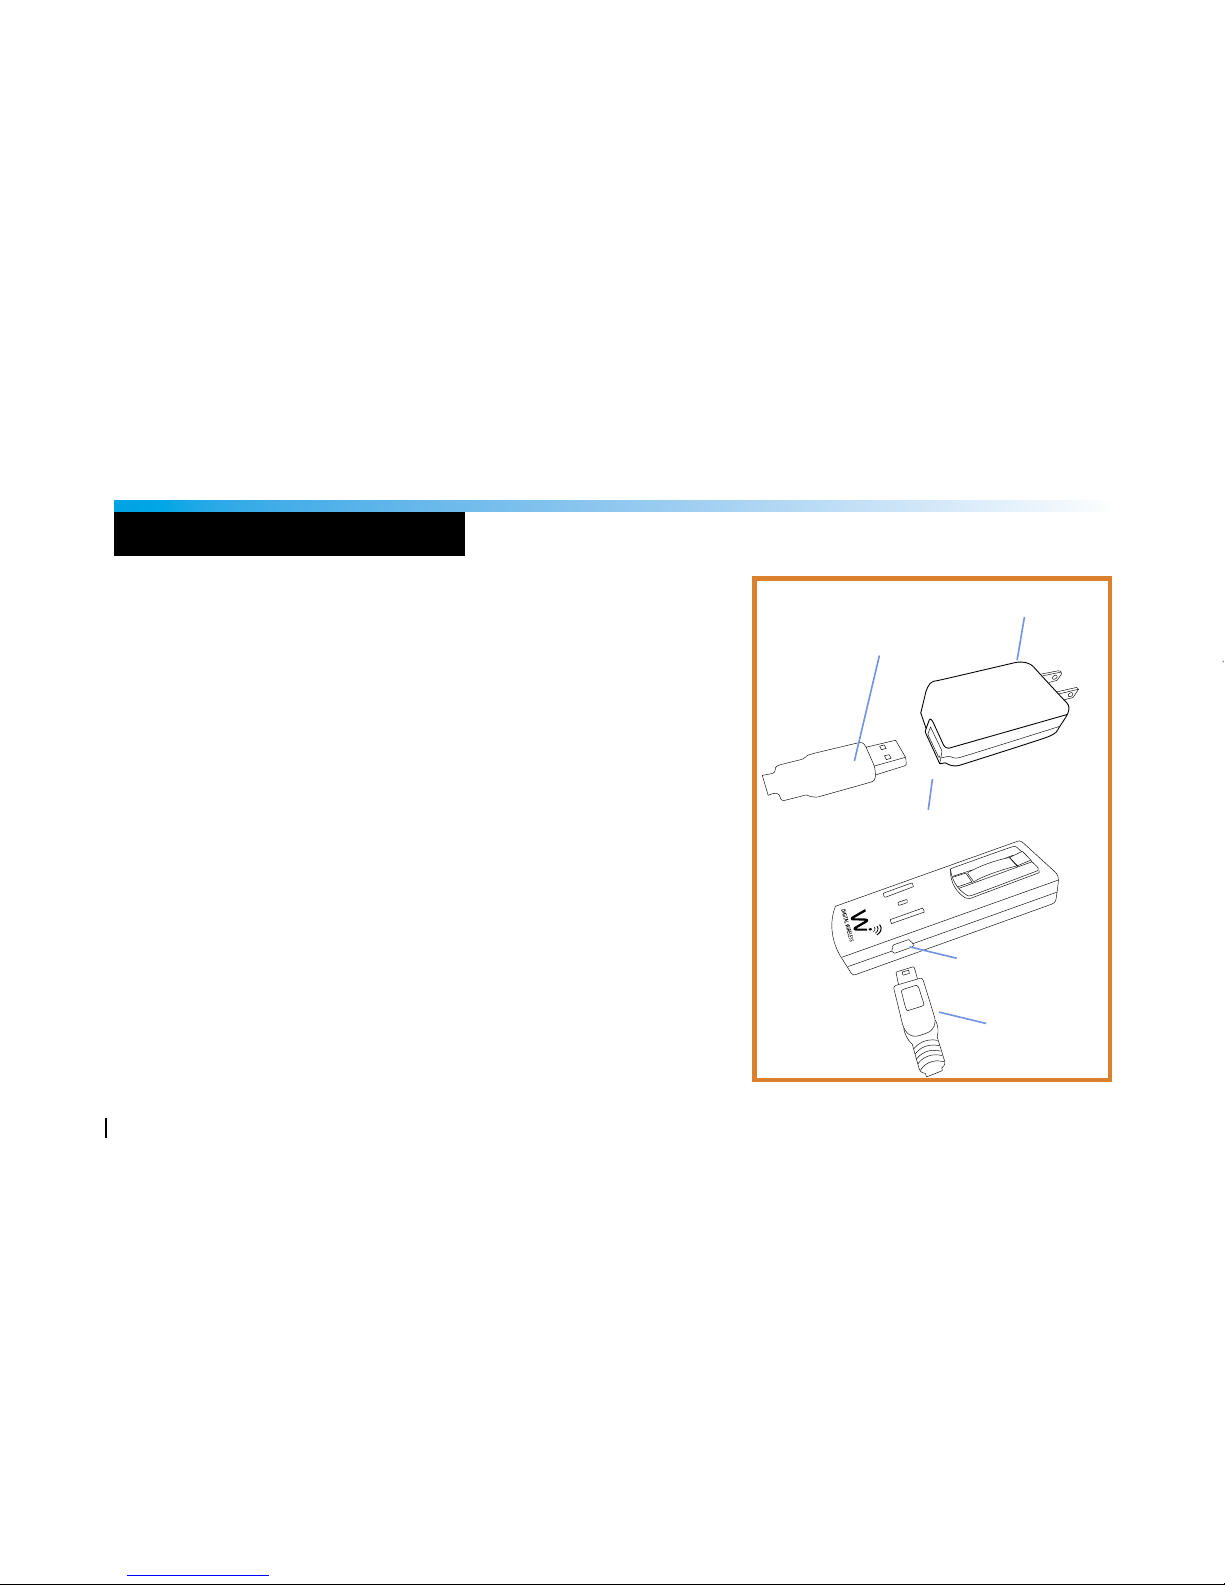
Charging The System
Before using your new Wi AudioStream™ Pro AV digital wireless system,
you need to fully charge the batteries for approximately 2 hours.
1. Plug the AC Charger into a power socket.
2. Connect the USB power cable to the USB port on the AC charger.
3. Connect one of the two mini USB connectors to the Transmitter
USB port.
4. Connect the second mini USB connector to the Receiver USB port.
5. The Power/Status LED will turn to solid Red ON.
6. When charging is complete the Red LED will turn OFF.
The system’s power source’s exible design boasts 4 power options:
• 4~6 hours internal rechargeable battery use.
• 13 hours with USB AA battery adapter (optional accessory).
• Continuous use with AC power adapter.
• Continuous use with USB port bus power.
POWER
LINK
AC Charger
USB Port
Mini USB
Connector
USB Port
USB Connector
CHARGING
Pairing the Wi Transmitter & Receiver
The Wi Transmitter and Receiver are paired at the factory. Perform the
following steps ONLY if you need to reestablish connection between
the Transmitter and the Receiver.
1. First turn ON the Transmitter (Tx) and the Receiver (Rx) by pressing and
holding the POWER button , on each of the units for 2 seconds.
The green LED on Each unit will ash.
2. Press and hold the LINK button on the Transmitter (Tx) for 3 seconds.
The Power/Status green LED on the Transmitter will start ashing faster.
The Transmitter is now in a Pairing mode and ready to search for the Receiver.
3. Press and hold the LINK button on the Receiver (Rx) for 3 seconds.
The Power/Status green LED on the Receiver will ash momentarily.
4. Once the Transmitter links with the Receiver, the Power/Status LED on both
devices will turn to solid green.
5. The Transmitter and Receiver are now ready for use.

7
PAIRING
(Tx)
p
k
z
v
(Rx)
r
Pairing the Wi Transmitter & Receiver
The Wi Transmitter and Receiver are paired at the factory. Perform the
following steps ONLY if you need to reestablish connection between
the Transmitter and the Receiver.
1. First turn ON the Transmitter (Tx) and the Receiver (Rx) by pressing and
holding the POWER button , on each of the units for 2 seconds.
The green LED on Each unit will ash.
2. Press and hold the LINK button on the Transmitter (Tx) for 3 seconds.
The Power/Status green LED on the Transmitter will start ashing faster.
The Transmitter is now in a Pairing mode and ready to search for the Receiver.
3. Press and hold the LINK button on the Receiver (Rx) for 3 seconds.
The Power/Status green LED on the Receiver will ash momentarily.
4. Once the Transmitter links with the Receiver, the Power/Status LED on both
devices will turn to solid green.
5. The Transmitter and Receiver are now ready for use.
p
k
z
v

8
Using The Lavalier Option
The Wi SmartMic Mono Lavalier easily accommodates
alternative mounting applications such as:
• Ties, Shirts, Jackets and Behind-the-Button Positioning
• In-Hair
• Beneath T-shirts & Blouses
• Hard to MIC Instruments
The included Lavalier cable clip can be used to customize
the t of the lavalier to be both comfortable and discreet.
Ideal for lmmaking, news-gathering, presenters,
reporters, worship leaders and pastors, broadcasters,
interviewers, artists, tness instructors, speaking and
singing performers and more!
Wi SmartMic Mono Lavalier Mic
Wi Digital Systems SmartMic high-end
broadcast quality lavalier features an ultrasmall 3.1 mm MIC capsule mounted on an
ultra-thin rugged cable designed to capture
vocals clearly with excellent rejection of
wind and ambient noise.
The crisp, high-quality Wi SmartMic™ Mono
Lavalier microphone provides superb vocals
and sound pick-up from all directions making it an excellent choice for video
camera, camcorders, DSLRs,
smartphones and tablets miking.
Refer to the “Lavalier Specs” on
page (58) for more details.
F
MONO LAVALIER SETUP

9
Using The Lavalier Option
The Wi SmartMic Mono Lavalier easily accommodates
alternative mounting applications such as:
• Ties, Shirts, Jackets and Behind-the-Button Positioning
• In-Hair
• Beneath T-shirts & Blouses
• Hard to MIC Instruments
The included Lavalier cable clip can be used to customize
the t of the lavalier to be both comfortable and discreet.
Ideal for lmmaking, news-gathering, presenters,
reporters, worship leaders and pastors, broadcasters,
interviewers, artists, tness instructors, speaking and
singing performers and more!
MONO LAVALIER SETUP

10
Connecting The Microphone to The Transmitter
Connect the 1/8” TRS end of the microphone cable to
the audio output port of the Wi Transmitter.
For Mono MIC connection, ensure that the
Transmitter is set for
Mono Mic-In Mode
and the LED is in FAST blue ashing mode.
For Stereo MIC or Mono Redundancy MIC connection,
ensure that the Transmitter is set for
Stereo Mic-In Mode
and the LED is in SLOW blue ashing mode.
For Camcorders or DSLRs without microphone noise lter
circuit or limited MIC gain control capability set the Transmitter
to
Stereo Line-In Mode
. The blue LED will reect
TWO FAST ashes.
Refer to the “Tx Button Functions”
on page (50) for more details.
j
r
r
r
j
F
F
F
r
MONO LAVALIER SETUP

11
Transmitter Placement
Designed for singers, performers, broadcasters,
interviewers and active users, the ultra-lightweight,
1.08 oz discreet and unobtrusive Wi Transmitter
can easily be attached to your belt, shirt, or even
placed in your pocket without impeding your
body movement.
For best wireless performance we
recommend mounting the Wi Transmitter
on your belt to the side of your body.
TRANSMITTER PLACEMENT

Using The Stereo Lavalier
The Wi SmartMic SL Stereo Lavalier easily accommo-
dates alternative mounting applications such as:
• Ties, Shirts, Jackets and Behind-the-Button Positioning
• In-Hair
• Beneath T-shirts & Blouses
• Hard to MIC Instruments
The included dual feed and single feed lavalier
cable clips can be used to customize the t to
support discreet stereo or mono redundancy
miking applications with comfort and exibility.
Ideal for lmmaking, news-gathering, presenters,
reporters, worship leaders and pastors, broadcasters,
interviewers, musicians and more!
Wi SmartMic SL Stereo Lavalier
Wi Digital Systems ultra-small 3.1 mm MIC
capsules mounted on an ultra-thin rugged
cable, capture vocals clearly with excellent
rejection of wind and ambient noise.
The Wi SmartMic™ SL Stereo Lavalier is an
excellent choice for pastors, artists, tness
instructors, speaking and singing performers
and video camera miking.
Refer to the “Lavalire Specs” on
page (59) for more details
F
OPTIONAL STEREO LAVALIER
12

Using The Stereo Lavalier
The Wi SmartMic SL Stereo Lavalier easily accommodates alternative mounting applications such as:
• Ties, Shirts, Jackets and Behind-the-Button Positioning
• In-Hair
• Beneath T-shirts & Blouses
• Hard to MIC Instruments
The included dual feed and single feed lavalier
cable clips can be used to customize the t to
support discreet stereo or mono redundancy
miking applications with comfort and exibility.
Ideal for lmmaking, news-gathering, presenters,
reporters, worship leaders and pastors, broadcasters,
interviewers, musicians and more!
OPTIONAL STEREO LAVALIER
13
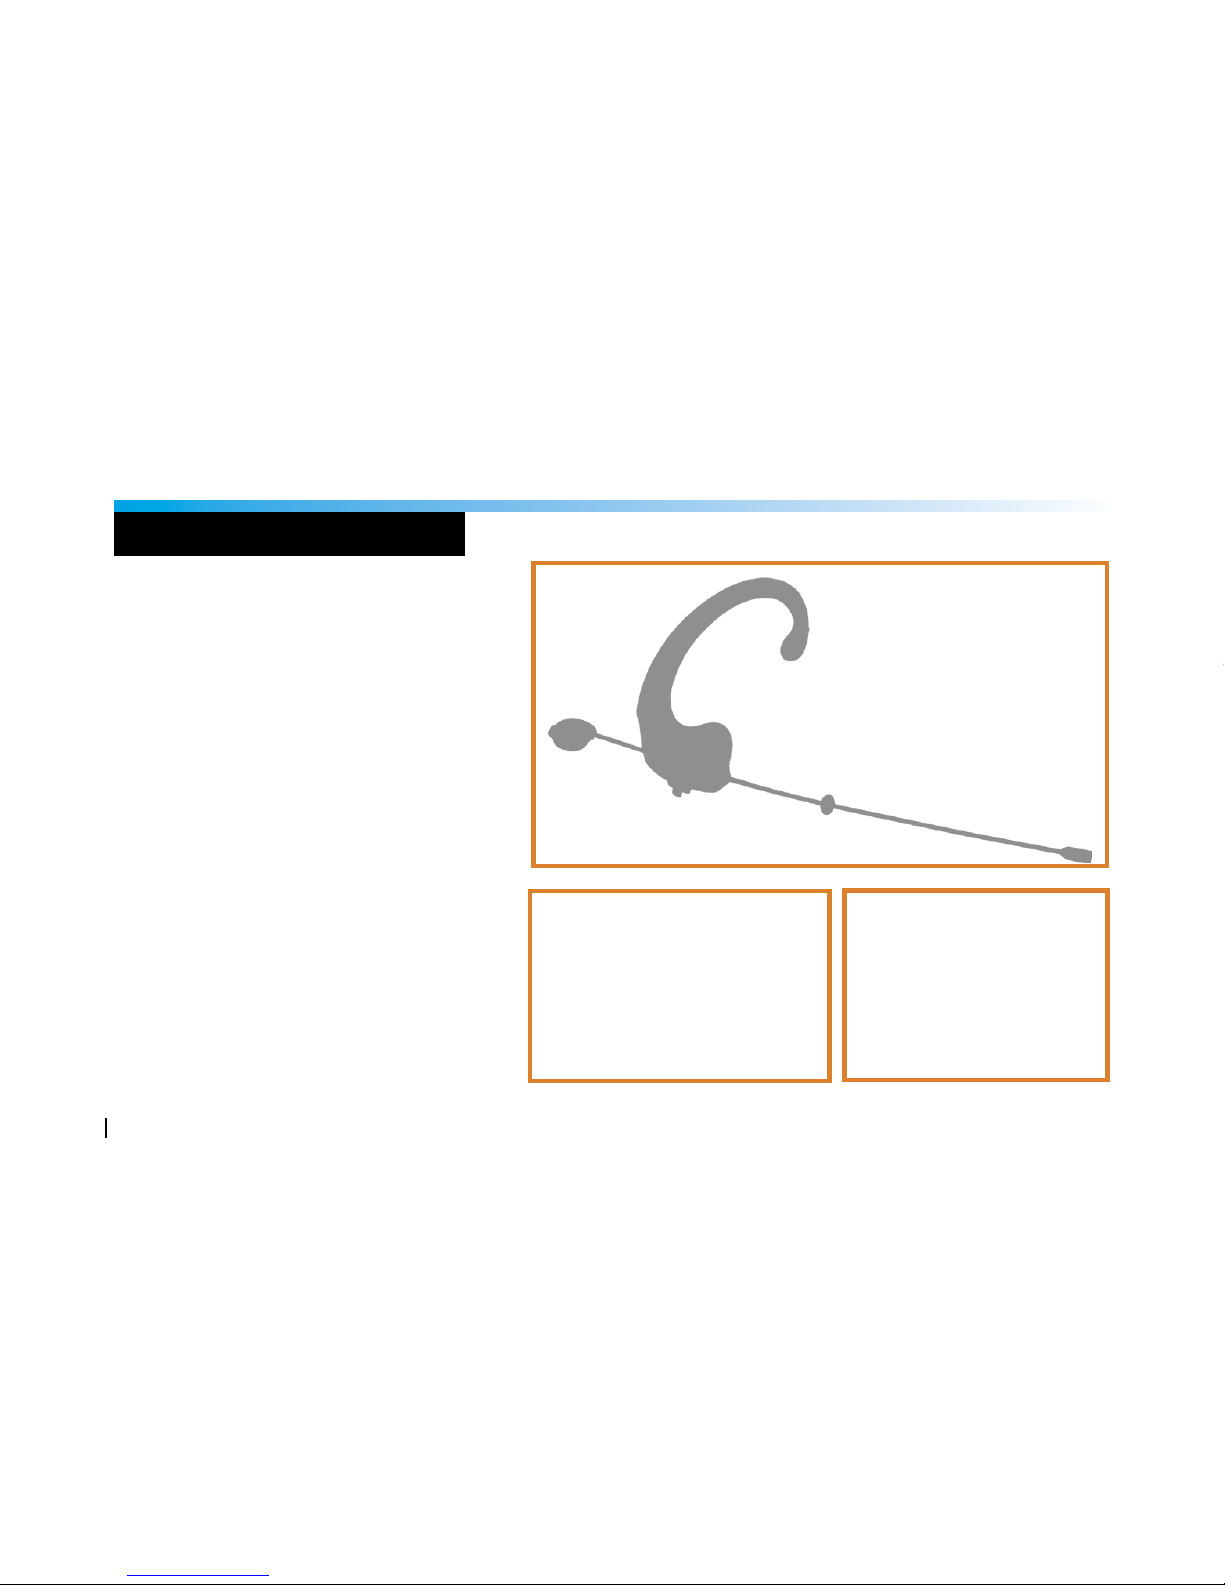
Wearing the Wi SmartMic ES Earset
The Wi SmartMic ES series advanced ergonomic Silicon ear-mount design
delivers an unmatched comfortable t in seconds while ensuring secure boom
placement even when the head moves, or when used with glasses or other
head-worn accessories. This ultra-lightweight MIC is incredibly easy to
wear even for an extended time.
1. Pull the “C” shaped Sure-Sound silicon ear mount wide open and
clip over the ear.
2. Loop the bottom part of the “C” shaped ear mount beneath the earlobe.
3. You should feel the Wi Sure-Sound earset gripping your ear and pressing
out against your earlobe for comfortable secure t.
4. The boom is designed to press and curve smoothly around the face.
Adjusting the boom length and curvature are covered in the following section.
Wi SmartMic ES Earset
Delivering unmatched value, comfort,
sound quality and secure t, the Wi
SmartMic™ ES earset ultra-small MIC
capsule mounted on an ultra-thin,
rugged, bendable, adjustable length
and incredibly lightweight boom
captures vocals clearly with excellent
rejection of wind and ambient noise.
OPTIONAL EARSET SETUP
F
Connecting The Earset Cable
1. Locate the detachable earset cable.
2. Fasten the earset end of the earset cable
to the screw connector located on the
silicon ear mount.
Refer to the “Earset Specs” on
page (60) for more details.
14

Wearing the Wi SmartMic ES Earset
The Wi SmartMic ES series advanced ergonomic Silicon ear-mount design
delivers an unmatched comfortable t in seconds while ensuring secure boom
placement even when the head moves, or when used with glasses or other
head-worn accessories. This ultra-lightweight MIC is incredibly easy to
wear even for an extended time.
1. Pull the “C” shaped Sure-Sound silicon ear mount wide open and
clip over the ear.
2. Loop the bottom part of the “C” shaped ear mount beneath the earlobe.
3. You should feel the Wi Sure-Sound earset gripping your ear and pressing
out against your earlobe for comfortable secure t.
4. The boom is designed to press and curve smoothly around the face.
Adjusting the boom length and curvature are covered in the following section.
OPTIONAL EARSET SETUP
15

OPTIONAL EARSET SETUP
Using The Earset/Lavalier Cable Clip
The Wi SmartMic ES series comes with an Earset/
Lavalier cable clip to prevent movement of the cable
from dislodging the earset. The clip is specically
designed to match the diameter of your cable, either
1.4mm or 2mm.
1. Locate the cable clip and gently pull the cable
down into the rubber cable channel opening on
the clip.
2. Attach the clip to the collar and leave enough
slack in the cable such that the head can turn to
both sides without tugging on the clip.
• We recommend leaving the clip attached
to the cable when possible to minimize
repetitive strain on the cable.
Positioning The Microphone Capsule
The Wi SmartMIc ES series microphone capsule is located
at the tip of the boom. The key to maximizing the sound
quality is to locate the capsule as close as possible to the
mouth without touching the face.
1. Press the boom locking switch located on the bottom
of the Silicon ear mount.
2. Slide the boom shaft to position the MIC capsule
just behind the corner of your mouth when you
are smiling.
3. Release the locking switch when adjustment is complete.
• Placing the microphone too far forward
can result in breath-related pops.
• Use the windscreen outdoors.
5
5
5
5
16

OPTIONAL EARSET SETUP
Using The Earset/Lavalier Cable Clip
The Wi SmartMic ES series comes with an Earset/
Lavalier cable clip to prevent movement of the cable
from dislodging the earset. The clip is specically
designed to match the diameter of your cable, either
1.4mm or 2mm.
1. Locate the cable clip and gently pull the cable
down into the rubber cable channel opening on
the clip.
2. Attach the clip to the collar and leave enough
slack in the cable such that the head can turn to
both sides without tugging on the clip.
• We recommend leaving the clip attached
to the cable when possible to minimize
repetitive strain on the cable.
17

Connecting The Shotgun Mic
Connect the 1/8” TRS end of the WI SmartMic
Shotgun microphone to the audio output port
of the Wi Transmitter
OPTIONAL SHOTGUN SETUP
Wi SmartMic SG Shotgun
Delivering unmatched value, comfort,
sound quality and secure t, the Wi
SmartMic™ SG Shotgun ultra-small unidrectional MIC mounted on an ultra-thin,
rugged,and incredibly lightweight boom
captures vocals clearly with excellent
rejection of wind and ambient noise.
F
Refer to the “Shotgun Specs” on
page (61) for more details.
Transmitter Placement
Designed to be attached to boom poles and tripods stands for perfect wireless clear directional audio shotgun
miking on the go.
18

OPTIONAL SHOTGUN SETUP
Transmitter Placement
Designed to be attached to boom poles and tripods stands for perfect wireless clear directional audio shotgun
miking on the go.
19

Audio Cable Connection
1. Locate the 1/8” to 1/8” TRS stereo audio cable or
the 1/8” to XLR TRS audio cable. Use the 1/8”
TRS to XLR audio cable if your camera is
equipped with XLR audio input ports.
2. Insert the 1/8” TRS stereo end of the audio cable
into the Wi Receiver audio output jack.
3. Insert the 1/8” TRS stereo end or the XLR end of
the audio cable into the Camera MIC-IN or Line-In
audio input jack.
For best audio results we recommend connecting
to the Line-In input if available.
Camera Connection
The Wi Transmitter and Receiver are designed
to mount video camera DSLR and handheld
recorders.
1. Locate the 1/4”-20 Hot Shoe ash adapter
for cameras, tripods and bipods.
2. Fasten the 1/4”-20 Hot Shoe ash adapter
mounting screw to the belt clip 1/4”-20 nut
and tighten the top lock ring.
3. Loosen the bottom lock ring on the 1/4”-20
Hot Shoe ash adapter camera accessory.
4. Insert/slide the mounting foot of 1/4”-20 Hot
Shoe ash adapter into the camera accessory
shoe and tighten the bottom lock ring.
To emulate direct lavalier connection setting for your
camera, change the Transmitter mode setting to Line-in
mode.
5
d
CAMERA CONNECTION
20
F
 Loading...