

Page 1

FORMENTRY FOR MAC 2.3.5
The User’s Manual
Last Updated: February 25, 2014
TM
FormEntry - The User’s Manual 1
Page 2

Widget Press, Inc.
Copyright © 2014 Widget Press, Inc. All rights reserved. Widget Press and the Widget
Press logo are trademarks of Widget Press, Inc. FormEntry is a trademark of Widget
Press, Inc.
Acknowledgements
Portions of this Widget Press Software may utilize the following copyrighted material,
the use of which is hereby acknowledged:
Mac Copyright © 2014 Apple, Inc.
iPhone Copyright © 2014 Apple, Inc.
iPod touch Copyright © 2014 Apple, Inc.
iPad Copyright © 2014 Apple, Inc.
FormEntry - The User’s Manual 2
Page 3

D ATE
C HANGES
2/15/11
Added information about posting to an
internal SSL web server were the iOS device
needs the digital certificate installed.
5/10/11
Updated for latest functionality
10/1/11
Updated for FormEntry 2.1, new controls and
features.
2/15/12
Added FTP Transmittal Plug-In info,
FormEntry FORM (.form) file format into and
PHP Archive Info.
3/20/13
Updated for FormEntry 2.3, new controls and
features.
10/10/13
Updated with new info on Paid Plug-Ins. New
URL Schema.
2/25/14
Updated PHP Archive with additional info.
Misc updates.
FormEntry - The User’s Manual 3
Page 4

CONTENTS
Welcome to FormEntry 12
FormEntry for Mac Features at a Glance 12
Sample Forms 13
Wi-Fi Deployment 13
FormEntry Typical Workflow 14
Send Email Post 15
Send HTML Post 20
Send JSON Post 20
Timer Expiration 20
Location Expiration 20
Controls at a Glance 22
Text Field (⌘1) 22
On-Off Switch (⌘2) 22
Checkmark (⌘3) 22
Text Box (⌘4) 23
Date & Time Picker (⌘5) 23
Countdown 23
Date 23
Date and Time 23
Stopwatch 23
Time 24
Photo Picker (⌘6) 24
Signature (⌘7) 24
Spin Wheel Picker (⌘8) and Spin Wheel Item (⌘9) 24
Location (^0) 25
FormEntry - The User’s Manual 4
Page 5

Hidden (^1) 25
Barcode (^2) 25
Image (^3) 25
Ratings (^4) 25
Web Browser (^5) 26
PIN (^6) 26
Groupings (⌘G) 26
Field-set 26
Drill-Down 26
Icons 26
Form Icons 27
Grouping Icons 27
Section Icons 27
FormEntry Setup 28
Install FormEntry for Mac 28
Install FormEntry Touch 28
Basic Concepts of FormEntry 30
Wi-Fi Syncing 30
FormEntry FORM Format (.FORM) 32
Overview of FormEntry 35
Single User Interface 36
Sections and Groupings 37
Sections 37
Groupings 38
Field-set Grouping 38
FormEntry - The User’s Manual 5
Page 6

Drill-Down Grouping 38
Controls 38
Control Tool Bar Pane 38
Footer Text 39
Val idat ion Rule s 40
Initial Keyboard Type for Input/Date Picker for Input 40
Initial Keyboard type for Input 40
Date Picker for Input 40
Web Services 40
Configuration 41
Native iOS and Custom Controls 42
Text (⌘0) 43
Text Field (⌘1) 43
On-Off Switch (⌘2) 44
Checkmark (⌘3) 45
Text Box (⌘4) 46
Date & Time (⌘5) 47
Photo Picker (⌘6) 47
Signature (⌘7) 49
Spin Wheel Picker (⌘8) 49
Spin Wheel Item (⌘9) 50
Location (^0) 51
Hidden (^1) 52
Barcode (^2) 53
Image (^3) 54
Ratings (^4) 55
Web Browser (^5) 56
PIN Code (^6) 57
FormEntry - The User’s Manual 6
Page 7

Settings 58
General Info 58
Appearance 60
Sending Form 60
Author Info 61
DSV and PDF Settings 62
Overview of Database 65
Setting up your Database 65
Updating Database via a Web Service 68
Set XML Web URL 68
User Initiated POST Request 69
Web XML URL 69
Column Data Types 72
Standard And Custom Data Types 72
Binding Controls to Database 74
Text Field Bindings 75
Bindings Summary 76
Retrieving Same Table Values 76
Key Path Traversing to Parent Table 78
Update Products Table 79
Add new Location Table 79
Key Path Traversing in Rule Builder 81
Key Path Summary 82
Traversing to Grandparent Table 82
Update Location Table 83
Add New Types Table 84
Key Path Traversing in Rule Builder 85
FormEntry - The User’s Manual 7
Page 8

Key Path Summary 86
Spin Wheel Picker Bindings 87
Switch to Spin Wheel Picker Condition 87
Bind Icons and Image Key Paths 89
Image Summary 94
Filtered Spin Wheel Picker 94
Filtered Summary 97
PIN Code Bindings 97
PIN Code Binding Summary 99
Barcode Bindings 100
Add New Column ID 100
Barcode Key Path 102
Barcode Binding Summary 103
Handling Data & Responding 105
Email Transmittal Plug-In 105
File Names 106
HTML and JSON Post Transmittal Plug-Ins 106
Responding to FormEntry Touch 107
Internal SSL digital Certificates 109
Exporting to PHP Archive 109
Printer (AirPrint) Transmittal Plug-In 114
File Transfer Protocol (FTP) Transmittal Plug-In 115
Directory Paths 118
File Names 118
Open In Transmittal Plug-In 118
File Names 119
FormEntry - The User’s Manual 8
Page 9

WebDAV Transmittal Plug-In 119
Directory Paths 121
File Names 122
Save Transmittal Plug-In 122
Keyword and Reserved Parameter IDs 124
Reserved Parameter Descriptions 124
Accessing Parameter IDs 128
Check Form Version 131
Example of using the Check Form Version 133
Using FormEntry URL Scheme 134
Remotely pre-populate a Form with data 134
FormEntry URL Scheme Example 135
Control configuration through URL Scheme 136
Using PDF Technology 138
Laying out the PDF elements 140
Using PDF Alias 141
Rule Builder 143
Rule and Condition Sequence and Rule actions 144
FormEntry Touch Event Bubbling Stack 144
Rules and Conditions Bubbling Stack Flowchart 146
Rule Alert 147
Controls table 147
Execute a Math Expression on a Control 147
FormEntry - The User’s Manual 9
Page 10

Boolean Values for Checkmarks and Switches 148
Set a String Value on a Control 148
Update the Label Name of a Control 148
Update the Image Control or Icons of a Control 148
Example FormEntry Project with Rules 148
Create a New Project 148
Create First Rule To Enable a Text Field 150
Create Second Rule with a Math Expression and Test Math 153
Create a Third Rule with a Math Expression 156
Math Expressions 158
Built-in Operators 159
Considerations 160
The Degree Operator 160
Logical Values 161
Factorial and Logical Not 161
Parentheses and Associativity 161
Operator Associativity 161
Built-in Functions 161
Functions that take > 1 parameter 161
Functions that take 1 parameter: 162
The trigonometric functions: 162
Functions that take no parameters ("constant functions"): 163
Implicit Multiplication 164
Handling Operators 164
Functions and Implicit multiplication 165
Argument-less Functions 165
Tokenizing 165
FormEntry - The User’s Manual 10
Page 11

Numbers 165
Functions 166
Variables 166
Operators 166
Regarding Whitespace 167
Term Grouping 167
Group terms 167
Function term 167
Number term 167
Variable term 168
Operator term 168
Publishing to FormEntry Server 169
Resources for More Learning 173
Onscreen Tooltip Help 173
Web Resources 173
FormEntry - The User’s Manual 11
Page 12
WELCOME TO FORMENTRY
With FormEntry for Mac, impressive forms are just
the beginning. This section provides an overview of
FormEntry features.
FormEntry for Mac is a rapid application
development tool for creating
professional-quality, native, form-based
applications with the power of touchcontrol input.
FormEntry Touch is the app installed
on a device which accepts forms from
FormEntry for Mac and allows users to
complete and send form data.
FormEntry for Mac and FormEntry
Touch work together seamlessly to
develop forms and sync them for use
on a device.
Creating a form for a device is now
simple and straight forward. Drag and
drop controls, add icons, update
parameters, and edit each post setting.
Never has form development for
devices been easier.
FormEntry for Mac
Features at a Glance
The next few pages provide a high level
overview of the key FormEntry features.
The remainder of the manual provides
the details of creating and building a formbased application.
FormEntry - The User’s Manual 12
Page 13
Note 1: When discussing forms, we tend to refer to the following as having the same
meaning: form-based application, FormEntry Touch document, form, form doc, form
and form application. From this point forward these documents are referred as a “form”.
Note 2: From this point forward an iPhone, iPod Touch, iPad, or iOS device are
referred to as a “device”.
S AMPLE F ORMS
Three sample forms are provided in FormEntry for Mac to demonstrate the capabilities
of FormEntry. The samples are Healthcare, Home Inspection, and Restaurant Menu
and are accessible from the FormEntry for Mac menu at File -> Open Projects Window.
W I -FI D EPLOYMENT
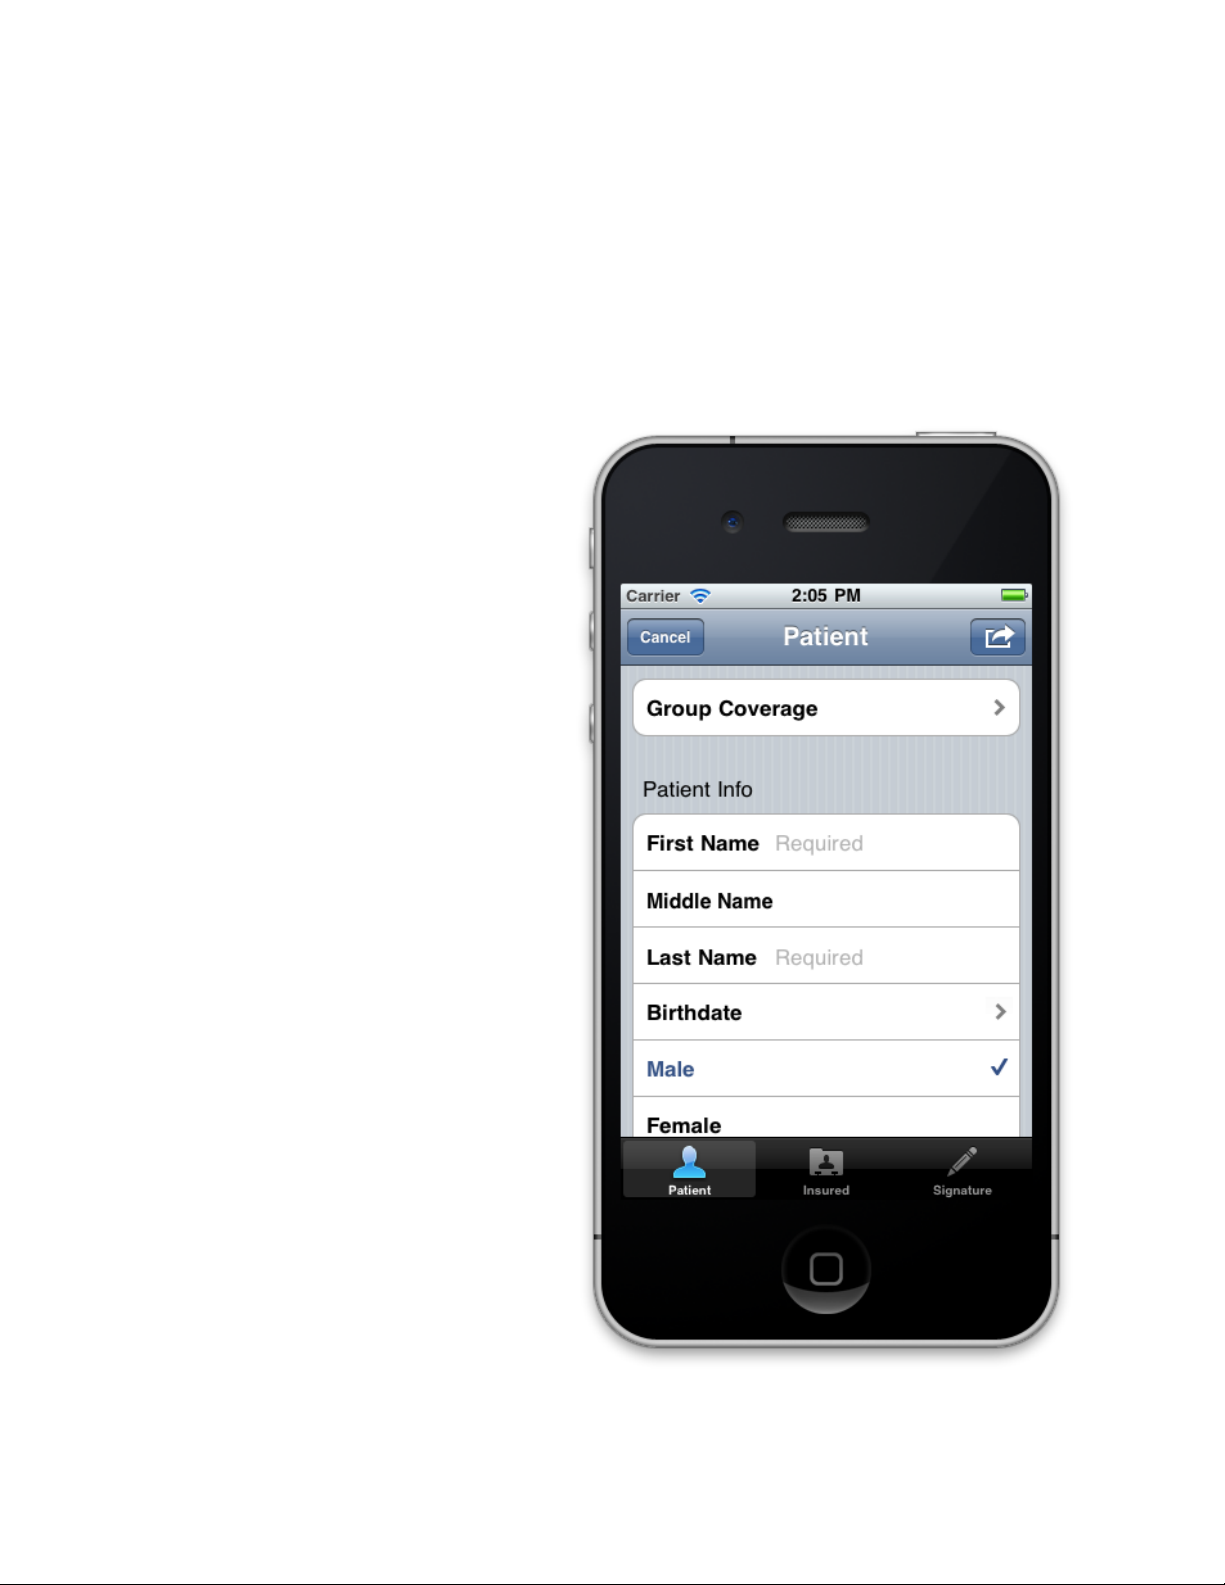
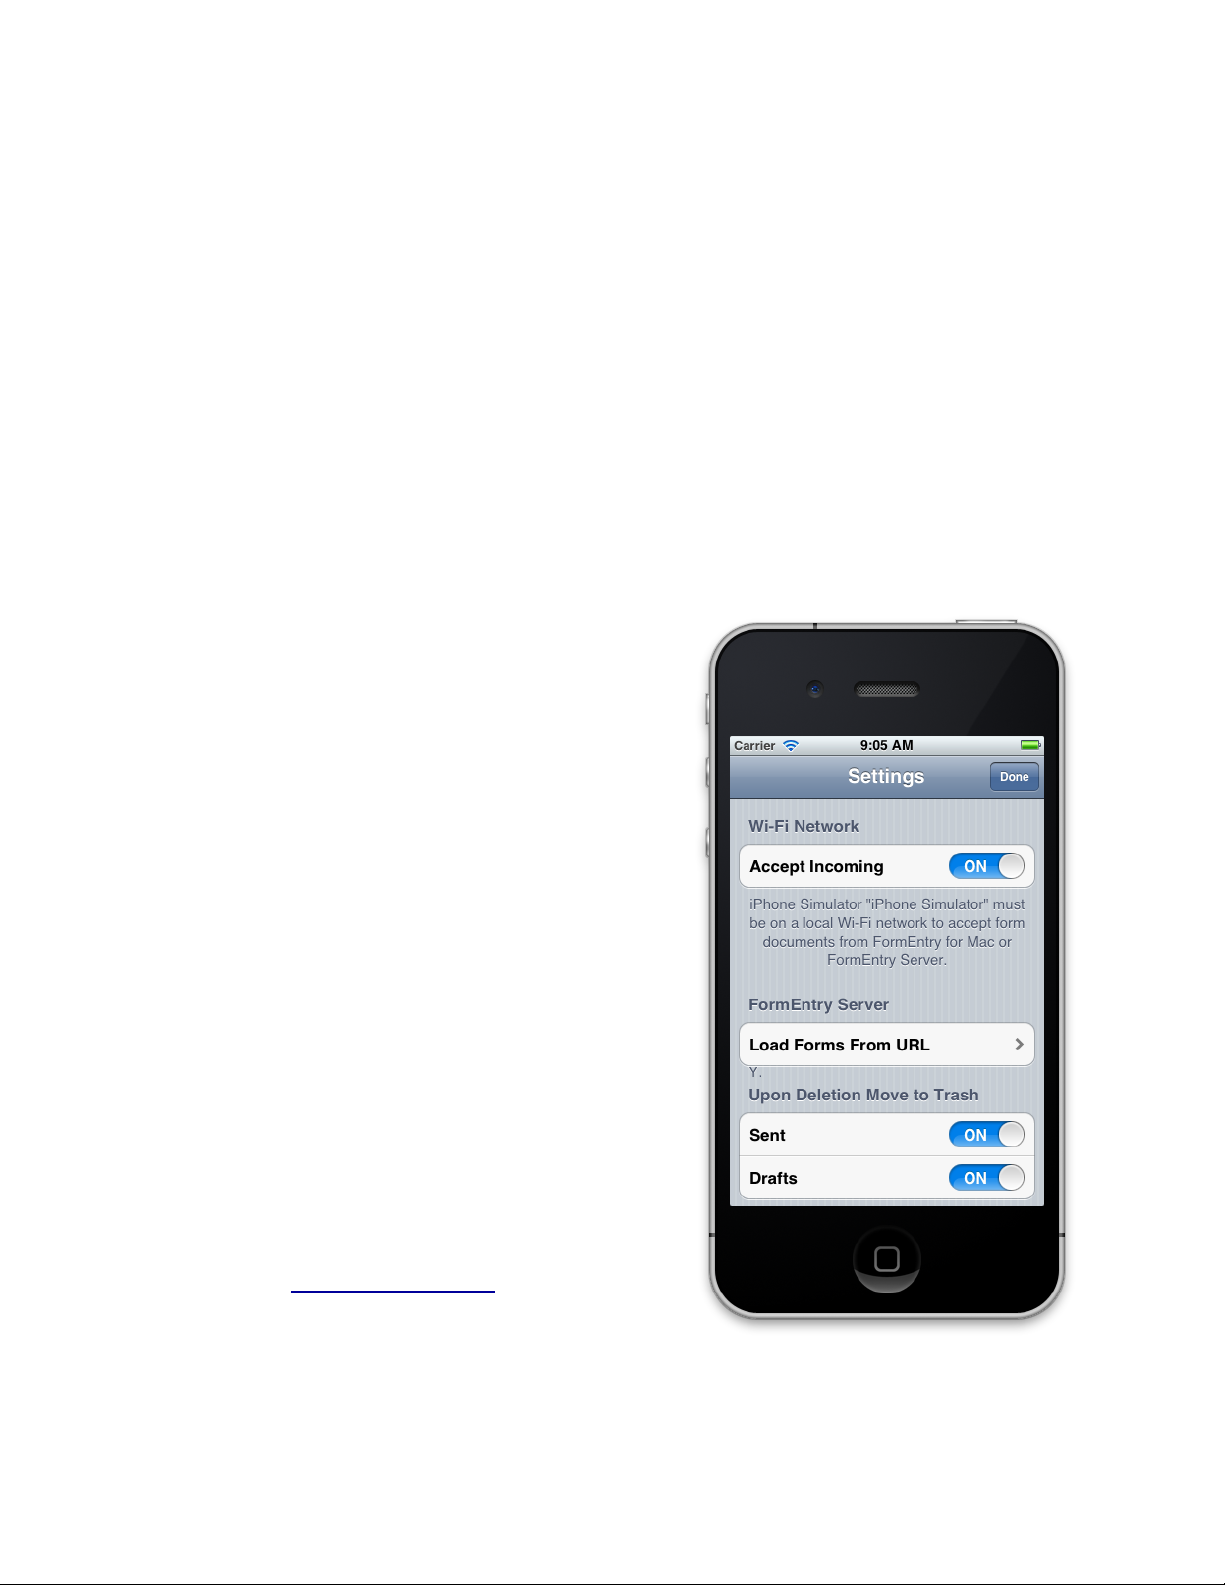
Transferring a form to a device is easy. In fact, no
wires are needed. Simply enable 'Accept
Incoming' in FormEntry Touch under the ‘Settings’
screen and click ‘Sync Devices’ (⌘⏎) from
FormEntry for Mac. The form is sent to any
available device.
Note that both FormEntry Touch and FormEntry
for Mac must be on the same Wi-Fi network to
sync forms. An ad hoc Wi-Fi network can be easily
created to send forms to any available device.
Make sure that Airport, Apple’s wireless
networking interface, is active on the Mac. Then in
the Airport menu, select ‘Create Network...’.
Enter a name for the network in the ‘Name:’ field
and have the device users join the network just
created.
There is also an option to set a form to expire
once a user leaves the original paired Wi-Fi
network. See Location Expiration for details.
FormEntry - The User’s Manual 13
Page 14
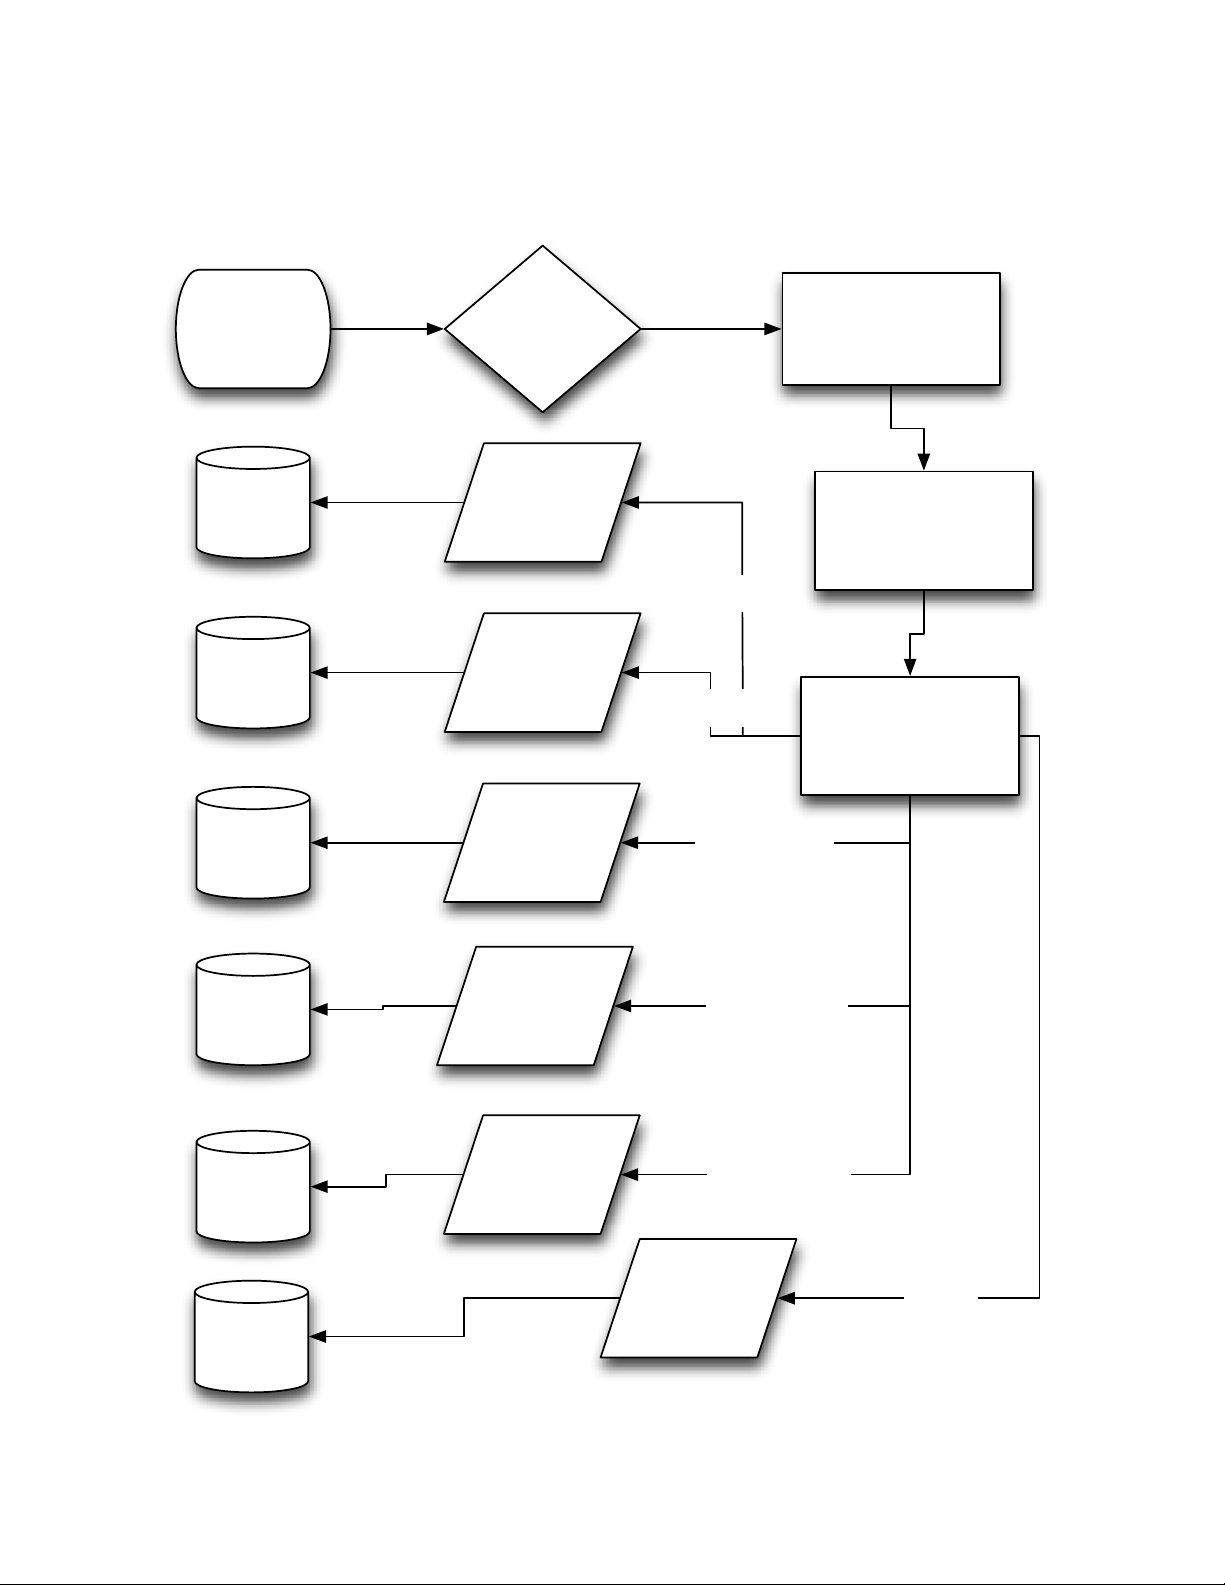
F ORME NTRY T YPICAL W ORKFLOW
Start - Author
designs form
on FormEntry
for Mac
Author decides
how the form will
send data
Author syncs form to iOS
user using FormEntry
Touch
Web Server
iOS user receives and
completes form
iOS user sends
data
Data is
converted to
HTTP web
Post
HTML Form
Web Server
Data is
converted to
HTTP web
Post
JSON Object
Email
Data is
converted to
plain text
email
Plain Email Text
Email
Data is
mapped to
PDF
PDF Attachment
Email
Data is
converted to
DSV file
(.csv)
CSV Attachment
Wireless
Printer
Data is
mapped to
PDF
AirPrint
FormEntry - The User’s Manual 14
Page 15

S END E MAIL P OST
Need the ability to send an email with form data? No problem. Form data is sent to any
email address once the email function is enabled. This capability provides simplicity
and power for the mobile user.
Also, photos can be attached and sent via email from the Photo Library or taken with
the device’s camera.
The FormEntry author can create a default email address, saving users’ time and
trouble. This feature also prevents users from searching and selecting an email
address from a list of contacts, thereby removing any potential error.
When sending an email post, you have the option of sending your data as plain email
text, a PDF file or as a DSV file with a .csv file extension, or if installed, in Microsoft
Excel .xlsx file (The Microsoft Excel Transmit Format is a paid plug-in).
FormEntry - The User’s Manual 15
Page 16
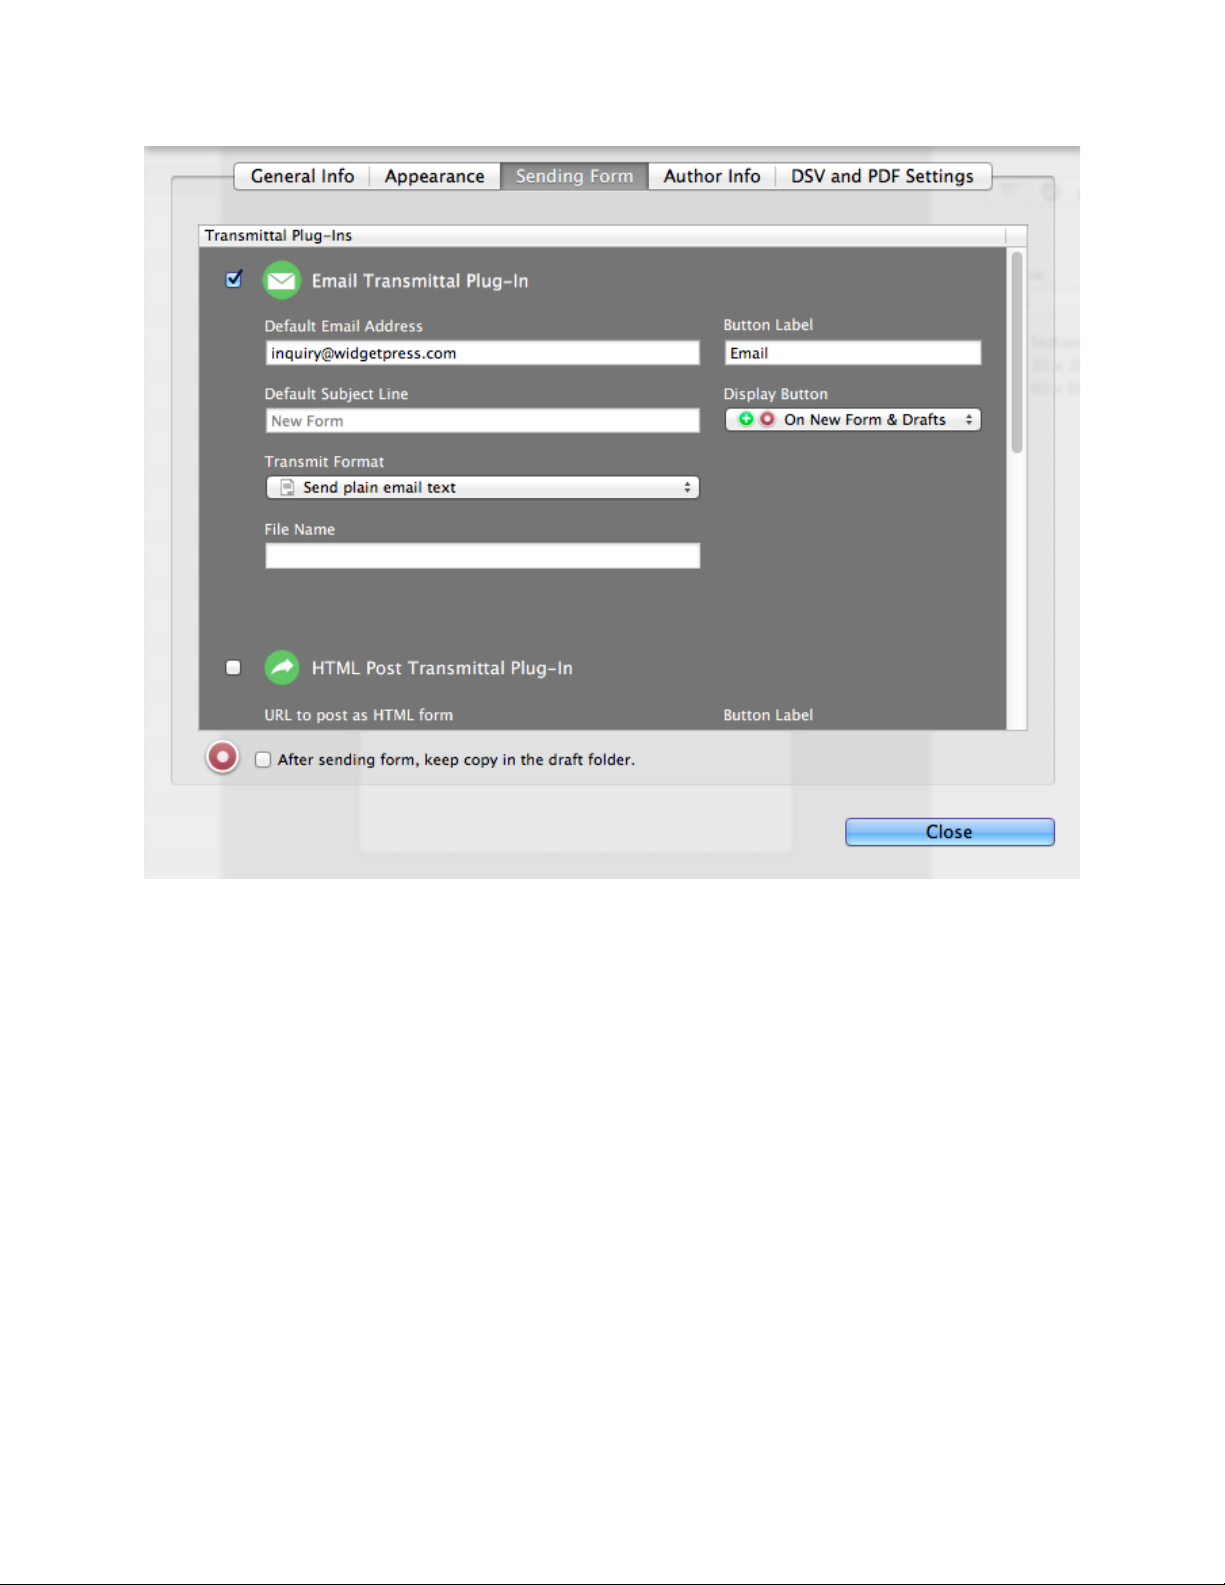
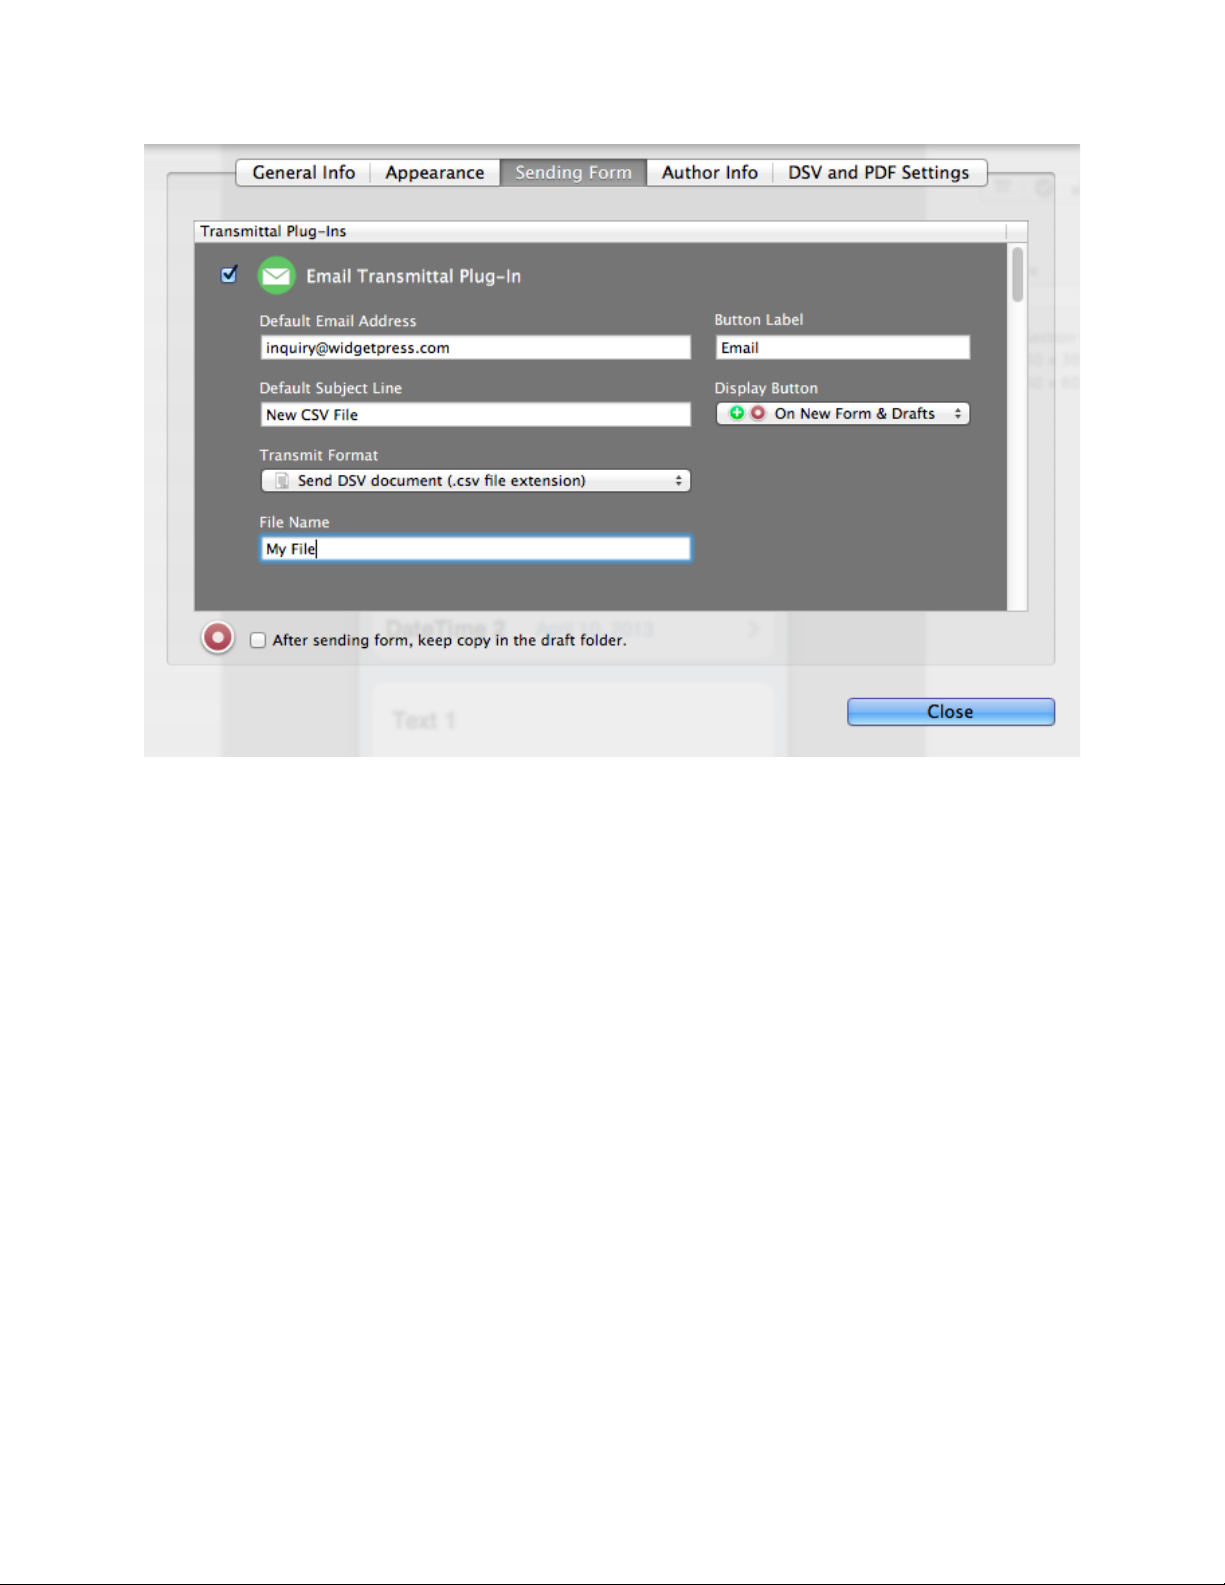
When sending a file attachment from the Email transmittal Plug-In, you will need to
specify a Default Subject Line and File Name.
FormEntry - The User’s Manual 16
Page 17
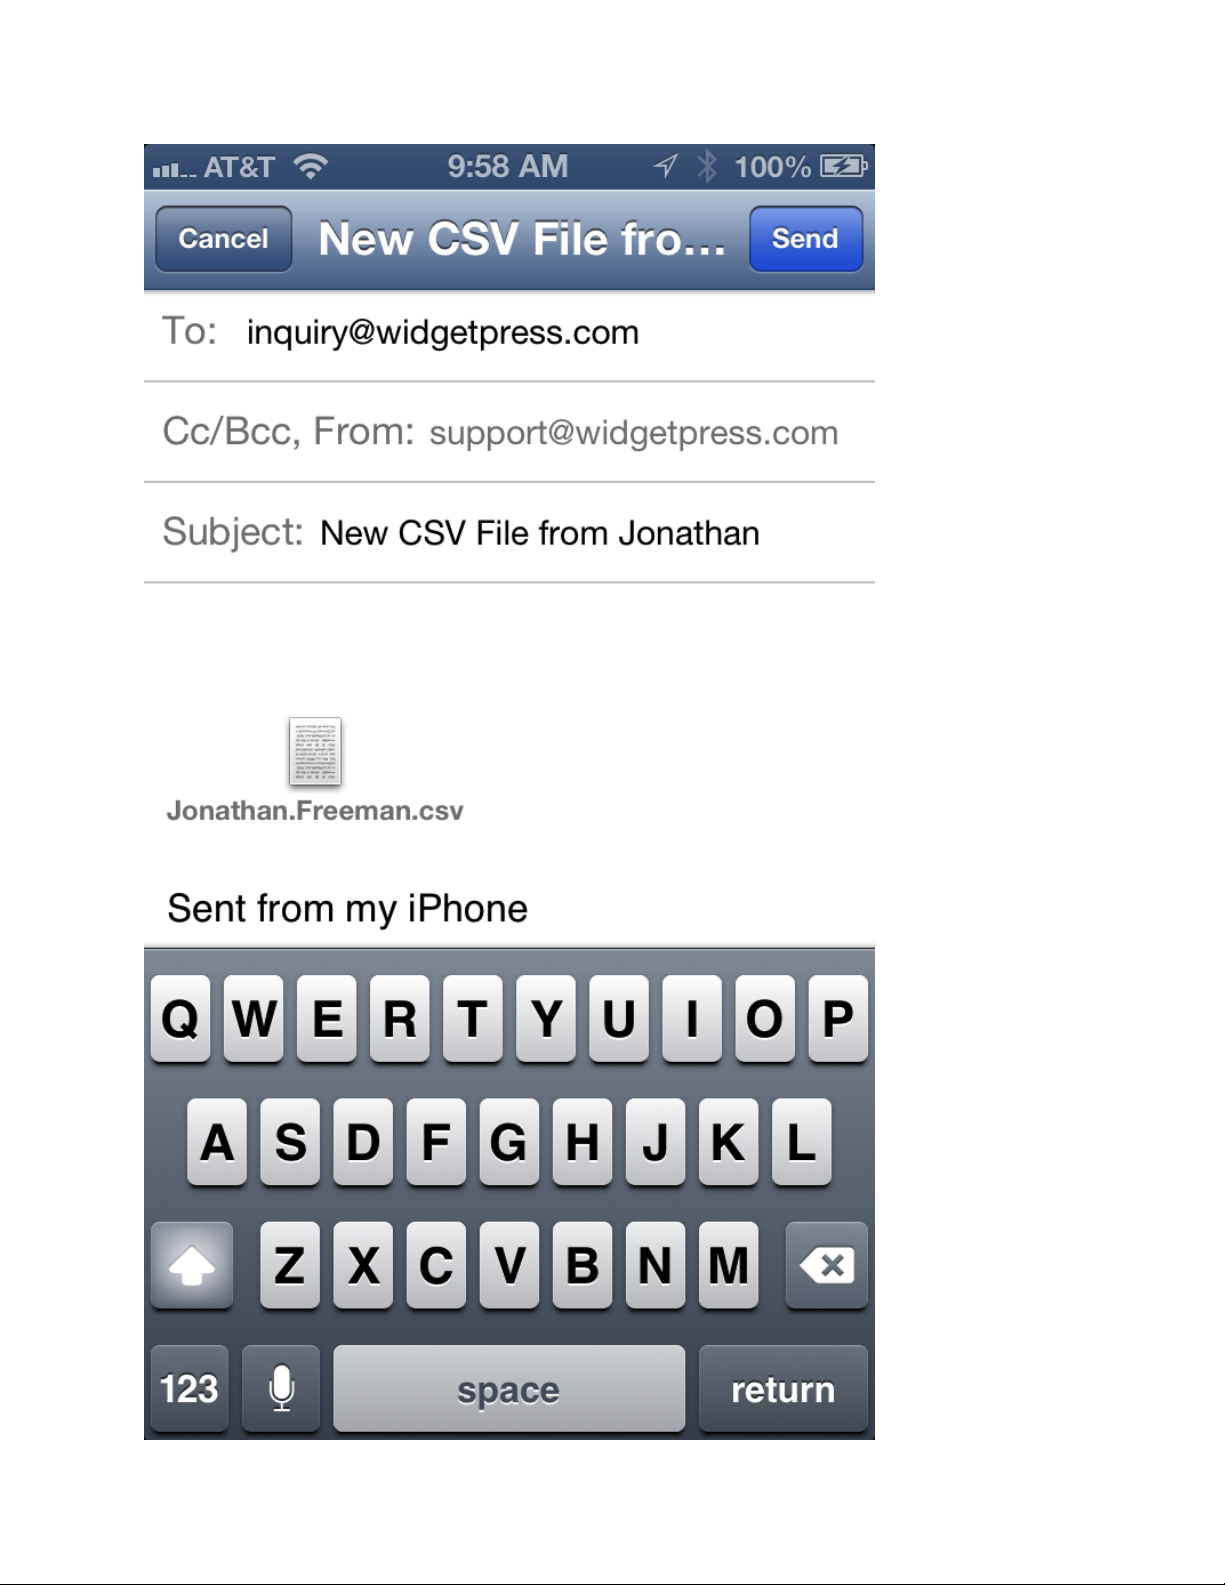
When the user sends the form, the Subject Line and File Name are created and
attached within the Mail app.
You can also create dynamic file names and subject lines based upon form values. This
type of parameter naming convention for file names also applies to the WebDAV, FTP,
Open In Transmittal Plug-Ins.
FormEntry - The User’s Manual 17
Page 18
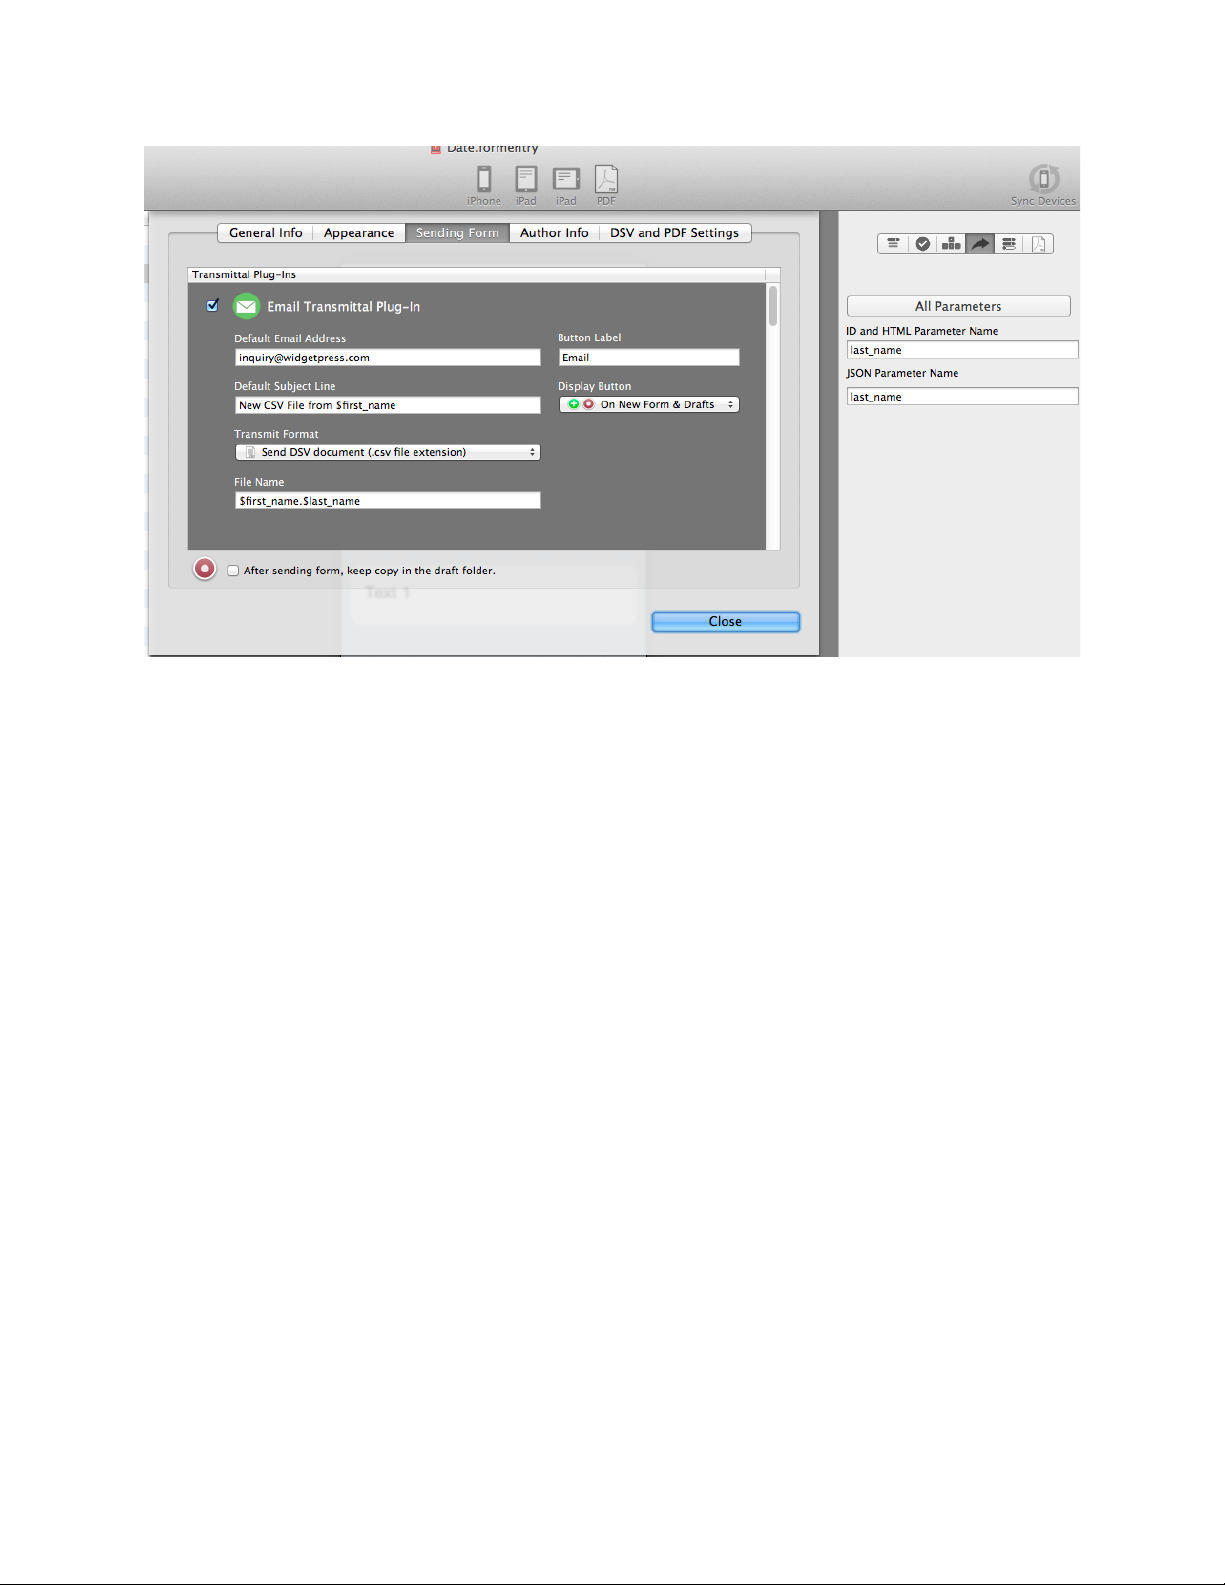
Dynamic file name and dynamic subject lines are used by the Param ID of controls. For
example, if you wanted the values from the form and place them within the subject line
and or have the file name be created based upon the values of a control, you can do
that.
Simply use the Parameter ID of the control using the “$” in front. In the above
screenshot, the “last_name” parameter ID is placed within the creation of the file name:
$first_name.$last_name
Notice you can mix in different parameter IDs together. When the user completes the
form with the first name “Jonathan” and last name of “Freeman”, the file name created
for the CSV file will be:
Jonathan.Freeman.csv
FormEntry - The User’s Manual 18
Page 19
FormEntry - The User’s Manual 19
Page 20

S END HTML P OST
The form can post data to a web site over HTTP as a standard HTML form ‘POST’. All
data is sent from FormEntry Touch using standard web-based technologies.
Each HTML form post uses the ‘POST’ method and is multipart assuring that all the
data including photos are sent correctly.
S END JSON P OST
The form can easily send all user data as JSON (JavaScript Object Notation) over
HTTP.
Each form sent to the web site is a standard HTML form ‘POST’ using the single
parameter: 'json'. If photos are being sent with the form, each photo is transformed to
BASE64. For more about BASE64 encoding, please refer to this Wikipedia article
(http://en.wikipedia.org/wiki/Base64).
Specify the JSON key for a control under the ‘Web Services’ inspector for that control.
T IMER E XPIRATION
Forms can expire with a timer. This feature is perfect for the classroom during exams,
quizzes or lab work. If the timer expiration is enabled, users are not be able to access
the form for input, or view any sent items, drafts, or items in trash boxes.
L OCATION E XPIRATION
A form can be set to expire if the users leave the originally paired Wi-Fi network.This is
an excellent option when sensitive information is entered, reviewed, and sent from a
specific location.
Important: Location expiration only works over a shared Wi-Fi network not an “ad hoc”
computer-to-computer network.
FormEntry - The User’s Manual 20
Page 21
FormEntry - The User’s Manual 21
Page 22
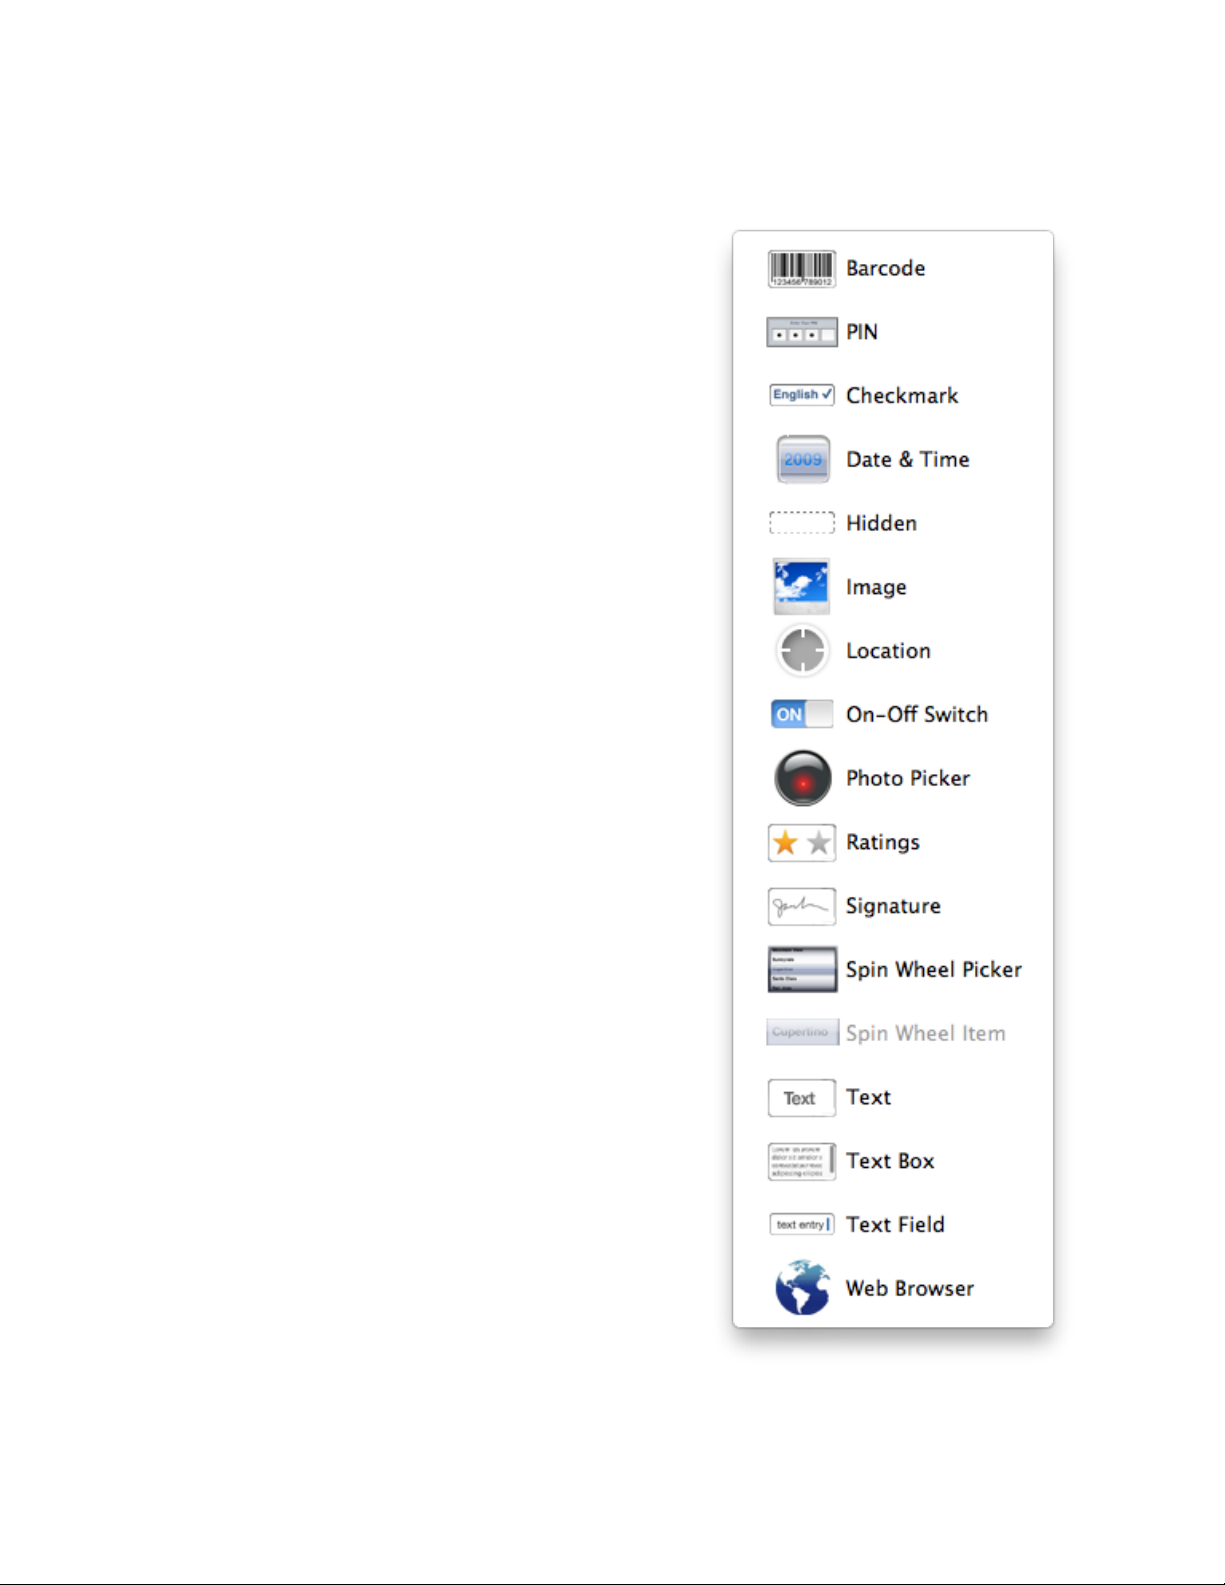
Controls at a Glance
The section provides a high level overview of the
FormEntry for Mac controls used to collect user
data. FormEntry for Mac offers seventeen native iOS
controls and several organization widgets for the
controls. Additionally, each of these controls allows
for the display of a multi-line footer below the control
or group of controls. The footer serves as an
excellent place to add contextual information.
Two of the controls are paid Plug-In controls that can
be purchased in the In-App Purchase Plug-In Store
within FormEntry for Mac.
T EXT F IELD (⌘1)
The Text Field control handles small amounts of
editable text. The default keyboard can be set that
appears when the Text Field has been tapped. The
choices are either the standard keyboard, or the
numeric keyboard which allows faster access to the
number pad.
Text boxes also have the ability to apply validation
rules, such as a ‘Required Field’.
O N -OFF S WITCH (⌘2)
The ubiquitous ‘On-Off Switch’ is a standard control
on the device. Users can touch the switch to enable
or disable this item.
This is a paid plug-in and can be purchased within
the In-App Purchase Plug-In Store within FormEntry
for Mac.
C HECKMARK ( ⌘ 3 )
The Checkmark control allows the user to tap the
control to check or uncheck an item.
FormEntry - The User’s Manual 22
Page 23

FormEntry for Mac also handles grouped information. Just place the checkmarks inside
a grouping and enable the 'Checkmarks as a single select' in the group’s ‘Configuration’
inspector. When enabled, the form allows only one checkbox selection in the grouping.
This is a paid plug-in and can be purchased within the In-App Purchase Plug-In Store
within FormEntry for Mac.
T EXT B OX (⌘4)
The ‘Text Box’ control is designed to handle a larger amount of editable text which can
not fit in a standard ‘Text Field’. Additionally, the ‘Text Box’ allows the user to input text
in a multi-line format.
By default, a ‘Text Box’ does not show a label. However a label name is still required
because the label name is used by the ‘Web Services’ inspector to generate HTML and
JSON parameter names.For instance, the label name ‘Property Condition’ is converted
into the HTML and JSON parameter name ‘property_condition’. The label name for the
‘Text Box’ is set in the ‘Configuration’ inspector in the ‘Label Name’.
To provide a label for the users, place the text box within a grouping and then use the
grouping’s label name.
D ATE & T IME P ICKER (⌘5)
Need to collect different dates and time from users? FormEntry for Mac offers four ‘Date
& Time’ options using the standard “spinner” control:
C OUNTDOWN
Collects hours and minutes.
D ATE
Collects the date in a month, day and year format.
D ATE A ND T IME
Collects the month, day, hour, minutes and AM or PM.
S TOPWATCH
Collects the time from Start to Stop.
FormEntry - The User’s Manual 23
Page 24

T IME
Collects the hours, minutes and AM or PM.
P HOTO P ICKER (⌘6)
The ‘Photo Picker’ adds photos to forms by including photos taken with the device’s
camera or by selecting photos from the device’s Photo Library.
When designing the form, the photo choices are the ‘Kind:’, ‘JPEG Quality:’ or ‘PNG’
and the photo ‘Size’. If JPEG is selected, the image quality can be selected from ‘Low’,
‘Medium’, ‘High’ or ‘Maximum’.
When the users send their forms, the photos are sent in the correct format. For email,
the users' photos are sent as an email attachment. For HTML posting, photos are sent
as a standard web file upload posting. For a JSON object, the photos are transformed
into a BASE64 formatted string.
This is a paid plug-in and can be purchased within the In-App Purchase Plug-In Store
within FormEntry for Mac.
S IGNATURE (⌘7)
The ‘‘Signature’ control allows the capture of a signature within the form. The user's
signature is captured with just a stroke of an index finger. When the users send their
forms, the signature is sent in a PNG format. For email, the users' signatures are sent
as an email attachment. For HTML posting, the signature is sent as a standard web file
upload posting. For sending as a JSON object, the signatures are transformed into a
BASE64 format string.
This control also has a multi-line footer text area which serves as a great place to add
contextual information, such as 'I agree' or 'I authorize'.
This is a paid plug-in and can be purchased within the In-App Purchase Plug-In Store
within FormEntry for Mac.
S PIN W HEEL P ICKER (⌘8) AND S PIN W HEEL I TEM
(⌘9)
The Spin Wheel Picker provides a single
selection of a list of mutually exclusive items. An unlimited number of Spin Wheel Items
can be added to the Spin Wheel Picker. Also, each item can include a 30 x 30 pixel
icon.
FormEntry - The User’s Manual 24
Page 25

This is a paid plug-in and can be purchased within the In-App Purchase Plug-In Store
within FormEntry for Mac.
L OCATION (^0)
With the Location control, you can gather the users GPS coordinates at the latitude and
longitude degrees. You can also have the control to be refreshable, meaning the user
can kept selecting the control to update their coordinates. If you have refreshable
unchecked, the user has only press the location one time to gather their coordinates.
This is a paid plug-in and can be purchased within the In-App Purchase Plug-In Store
within FormEntry for Mac.
H IDDEN (^1)
With the Hidden control you can add field values that are not visible to the user. The
value can be used to set other input values with the Rule Builder.
B ARCODE (^2)
The Barcode control allows your users to scan up to 16 different types of barcodes.
This is a paid plug-in and can be purchased within the In-App Purchase Plug-In Store
within FormEntry for Mac.
I MAGE (^3)
The Image control allows you to place full size images within the forms. It also has the
ability to allow the user to draw upon the image.
This is a paid plug-in and can be purchased within the In-App Purchase Plug-In Store
within FormEntry for Mac.
R ATIN GS (^4)
The Ratings control is a 5 star ratings control that allows the user to rate.
This is a paid plug-in and can be purchased within the In-App Purchase Plug-In Store
within FormEntry for Mac.
FormEntry - The User’s Manual 25
Page 26

W EB B ROWSER (^5)
The Web Browser control allows the user to load a remote web page, specified by a
URL from the form author.
This is a paid plug-in and can be purchased within the In-App Purchase Plug-In Store
within FormEntry for Mac.
PIN (^6)
The PIN Code control allows the form author to lock the entire form or sections of the
form by using a 4 digit PIN number.
This is a paid plug-in and can be purchased within the In-App Purchase Plug-In Store
within FormEntry for Mac.
G ROUPINGS ( ⌘ G )
Groupings organize blocks of form input by breaking up the input into logical sections.
Groupings make the user experience more intuitive and pleasant. There are two types
of Groupings: Field-set and Drill-down.
F IELD- SET
In a Field-set grouping, the input items are grouped together into a section. A Field-set
can have a label name as well as a ‘Navigation Icon’ for the grouping.
D RILL-DOWN
A Drill-down group places the input controls on a secondary view. The label name acts
as a button. Tapping the label causes the grouped controls to be displayed on the next
view.
I CONS
Adding icons to a form helps users identify sections, drill-downs, headers, and forms
quickly and easily. These visual indicators enhance the user experience by enabling
faster control identification, greater visual appeal, faster workflows, and a finer polish to
the forms. All icons are resized to a 30 x 30 pixel height and width, however if you place
a 60 x 60 icon, they will be supported on Retina Display iOS devices. Three types of
icons are:
FormEntry - The User’s Manual 26
Page 27

F ORM I CONS
Adding a 30 x 30 form icon helps the users identify the form on application launch.
These icons support 24-bit color channels.
G ROUPING I CONS
The location of a grouping icon depends on the grouping type. The Field-set grouping
icon is placed to the left of its label. The Drill-down icon is placed to the left of the row.
Both types of icons support 30 x 30 icons and 24-bit color channels.
S ECTION I CONS
The section icons appear in a tab bar at the bottom of the form if there is more than one
section. These icons are referred to as ‘Tabs’ in iOS lingo. Tabs are a common interface
element used in countless iOS applications and help differentiate the sections. These
tabs support 30 x 30 images. The images are transformed into a gray icon in the
unselected state. Upon selection, the icon color changes to a blue highlight.
FormEntry - The User’s Manual 27
Page 28

FORMENTRY SETUP
FormEntry must be installed on both the Mac and the
device platforms to make the development
environment fully operational.
Install FormEntry for Mac
FormEntry for Mac installation is simple. Download FormEntry for Mac from the Mac
App Store.
To add FormEntry for Mac in the Dock, drag the FormEntry for Mac icon from
the‘Applications’ folder to the Dock. This creates a quick access to the FormEntry for
Mac application.
Install FormEntry Touch
Installing FormEntry Touch is straight forward as well. Open the iTunes application,
select the ‘iTunes Store’ and search for ‘FormEntry’. Download the application and sync
the device. It’s that easy!
FormEntry - The User’s Manual 28
Page 29

FormEntry - The User’s Manual 29
Page 30

BASI C CON CE PTS OF
FORMENTRY
The basic concepts needed to create a functioning
form
A Mac with FormEntry for Mac installed and a device with FormEntry Touch installed is
required to create a form. If you want to share your form immediately with an iPhone or
iPad, a Wi-Fi network is required that is shared by both the Mac and the device. If a Wi-
Fi network is not available, an ‘ad hoc’ Wi-Fi, computer-to-computer network can be
created between the Mac and device.
You can also export your FormEntry for Mac project to the FormEntry FORM (.form) file
format. You can then host this file on your website or email it to an iOS user to install
upon their device.
Eventually, you want the data to come off the FormEntry Touch. There are a number of
ways to get the data. Ultimately, the data needs to be sent by user the form after the
user has completed data entry.
FormEntry Touch can send the form data in four ways: via email, HTML Post, JSON
Post or AirPrint. The settings for sending data are provided in the ‘Sending Form’ tab
under ‘Settings’ in FormEntry for Mac.
If FormEntry for Mac is configured to send emails, an accessible email account is
required to receive the users’ information. For both HTML Post and JSON Post, access
to a web site is needed and the ability to process the incoming form data posted by the
users. Typically, processing form data can be achieved using .ASP, PHP, JSP, Ruby,
Python or almost any other web friendly language.
W I -FI S YNCING
Test it frequently during development by syncing
the Mac and device.
Enable ‘Accept Incoming’ by tapping the
‘Settings’ button on the FormEntry Touch screen
and selecting ON.
FormEntry - The User’s Manual 30
Page 31
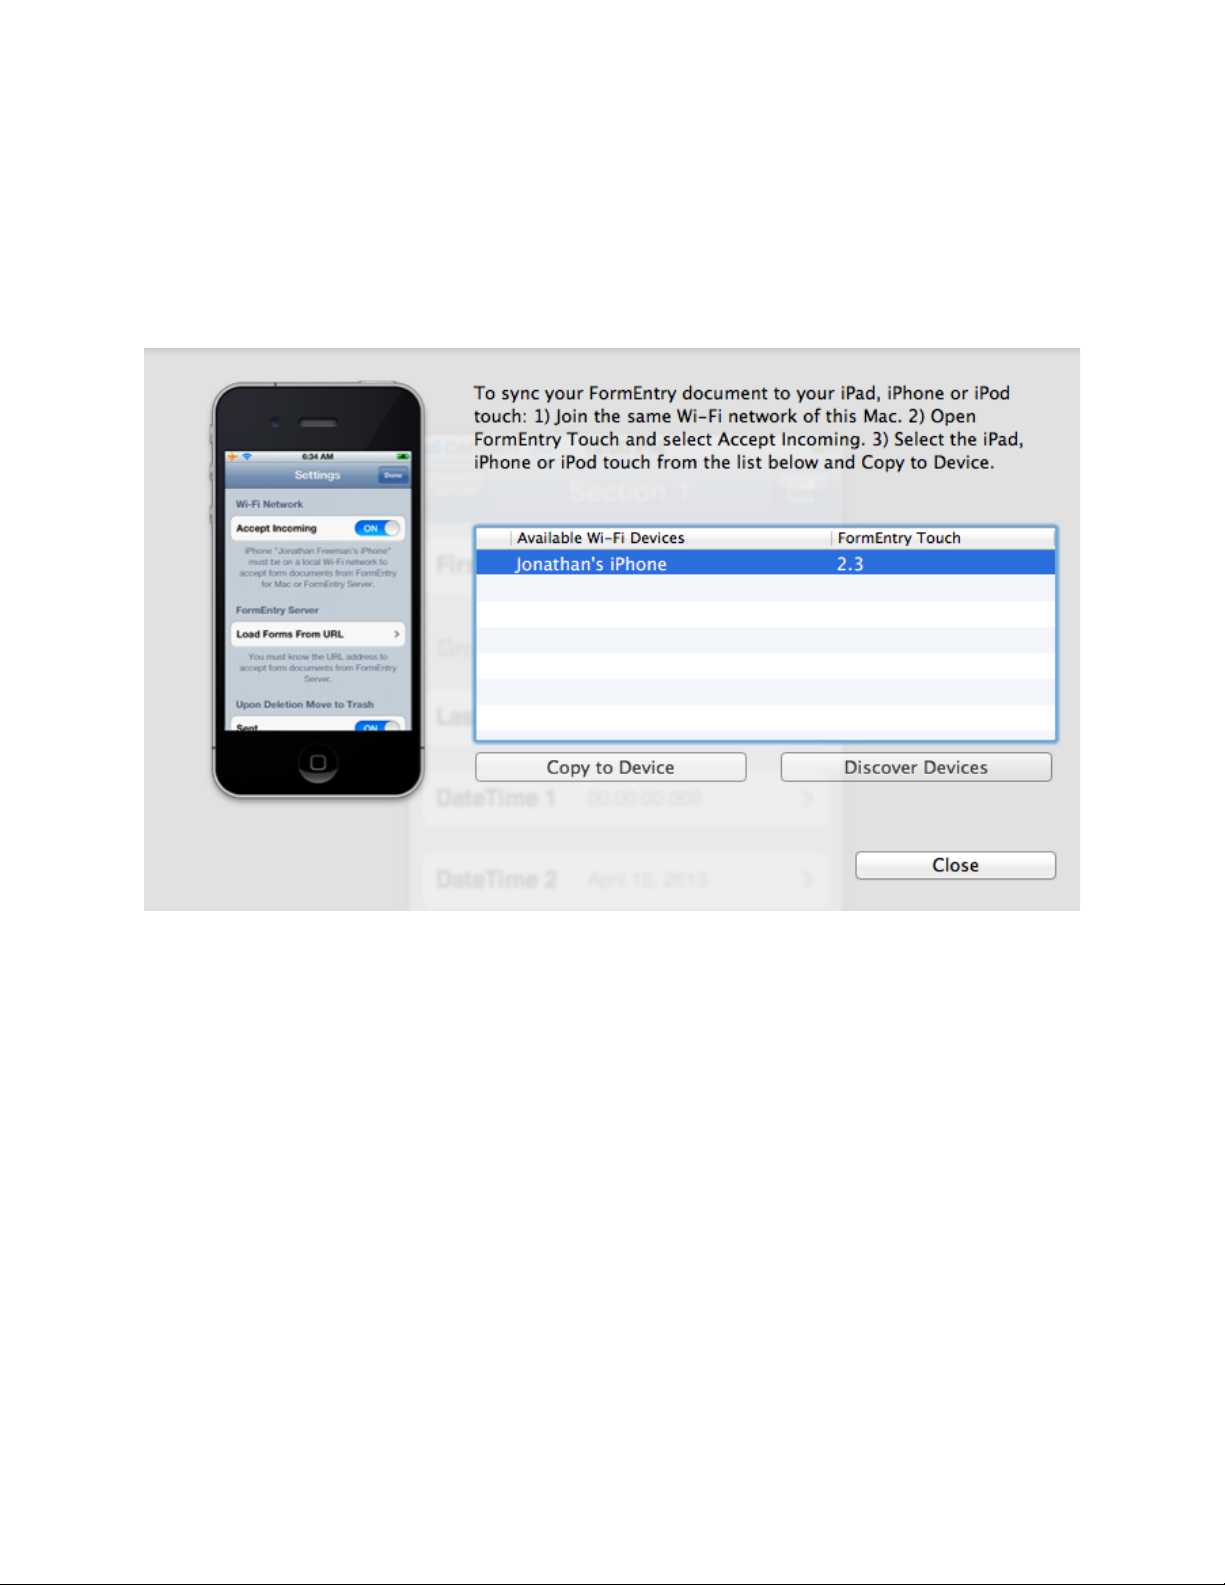
Detect all devices connected to the Wi-FI network in FormEntry for Mac by clicking
‘Sync Devices’ at the top-right of the window.
FormEntry for Mac detects and compares its software version with the versions of
FormEntry Touch the running on the devices and determines if the form can be sent to
each device.
For example, if the users are running a new version of FormEntry Touch and running an
incompatible version of FormEntry for Mac, FormEntry for Mac does not allow the
devices to sync.
After clicking the ‘Sync Devices’ button, choose the applicable devices by selecting
them in the table and click the ‘Copy to Device’ button.
During the process of syncing devices, a green checkmark appears next to the devices
which have successful received the form.
Additionally, the device displays a popup indicating the form has been added to the
device.
FormEntry - The User’s Manual 31
Page 32
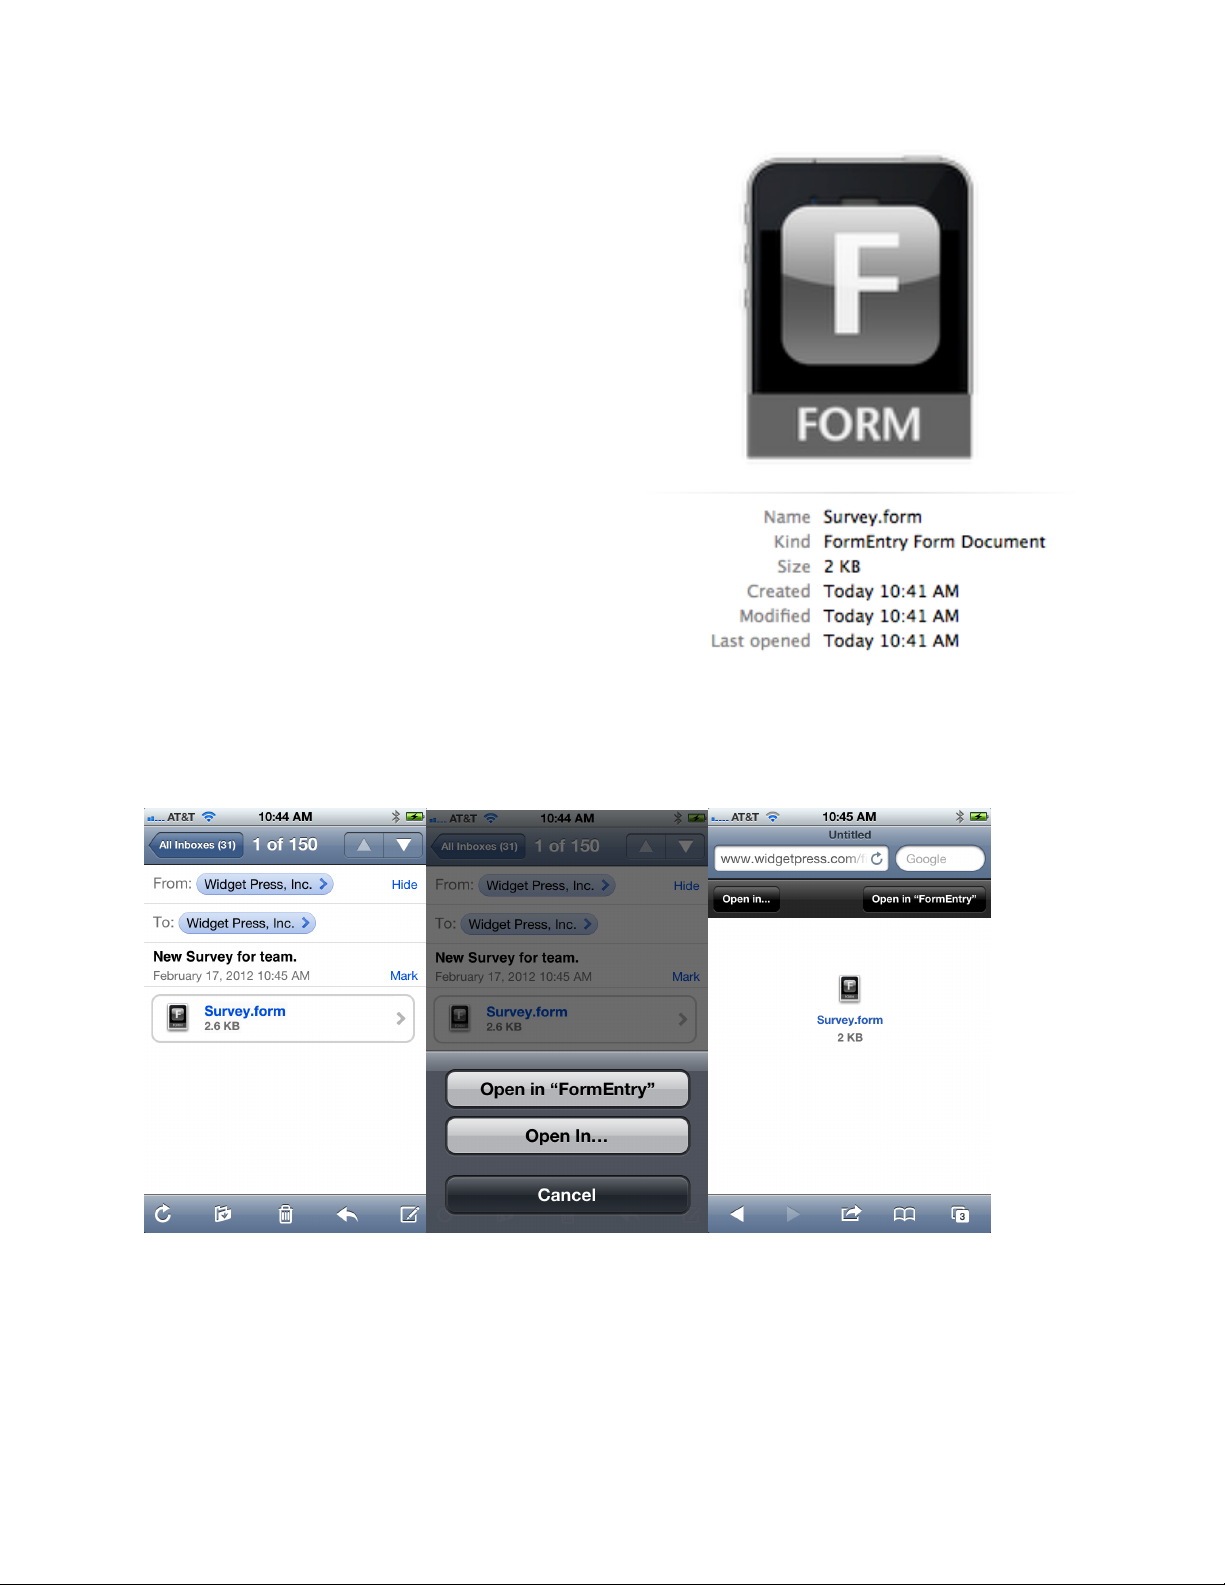
F ORME NTRY FORM
F ORMAT (.FORM)
FormEntry for Mac allows you to export your
project to the .form file format that can be
read by FormEntry Touch. Simple choose
File->Export... -> Export FormEntry FORM
and save to your hard drive.
You can then place this file on your web site
or email the file as an email attachment to an
iPad or iPhone user. Your FormEntry Touch
user can install your form from a link or from
the email attachment by simply touching the
icon and select “Open in FormEntry”.
Your users will need to use Mail app, Mobile
Safari and FormEntry Touch to install
remotely.
You can even take the .form file and sync it via iTunes through the USB cable. Simply
plug in your iOS device into your computer using a USB Cable. Open iTunes on your
computer and navigate to the Apps tab and down to FormEntry. Select FormEntry for
the list of Apps under File Sharing.
FormEntry - The User’s Manual 32
Page 33
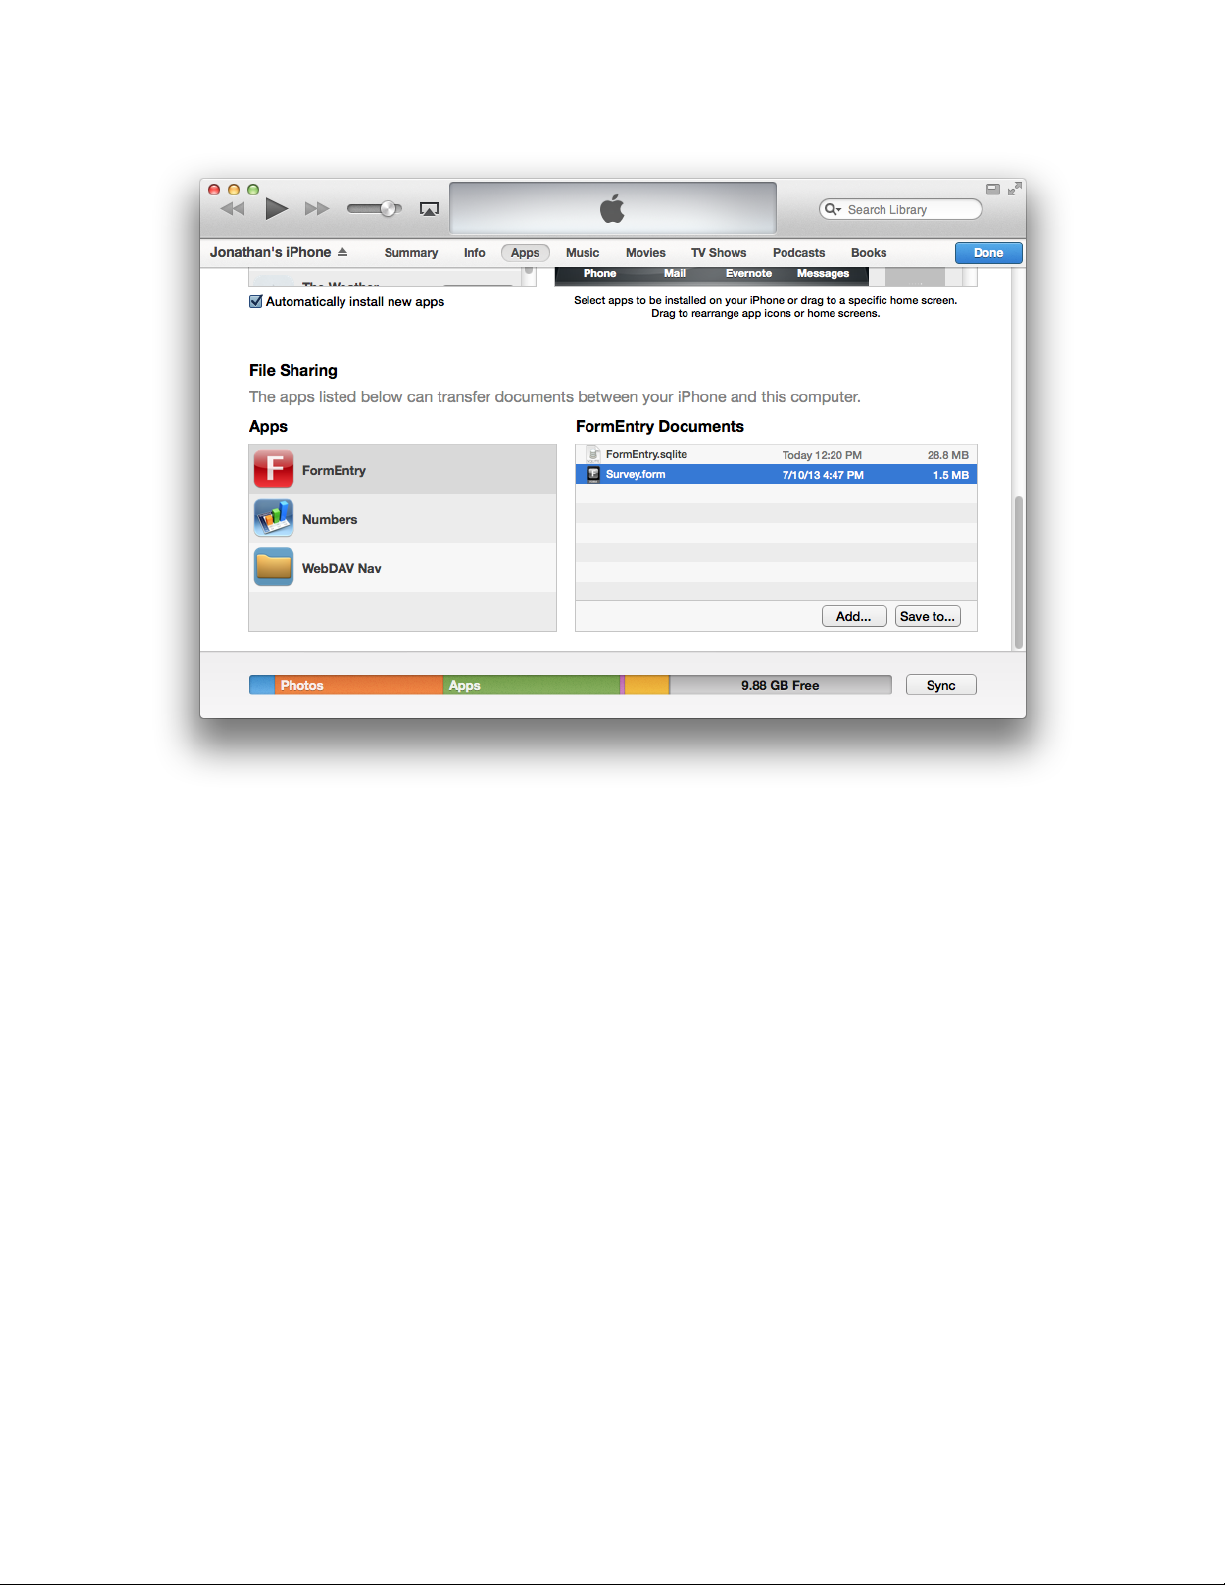
Now select “Add...” button to add your .form file or simply drag and drop the file into the
FormEntry Documents window. Select Sync to move the .form file into FormEntry
Touch.
FormEntry - The User’s Manual 33
Page 34
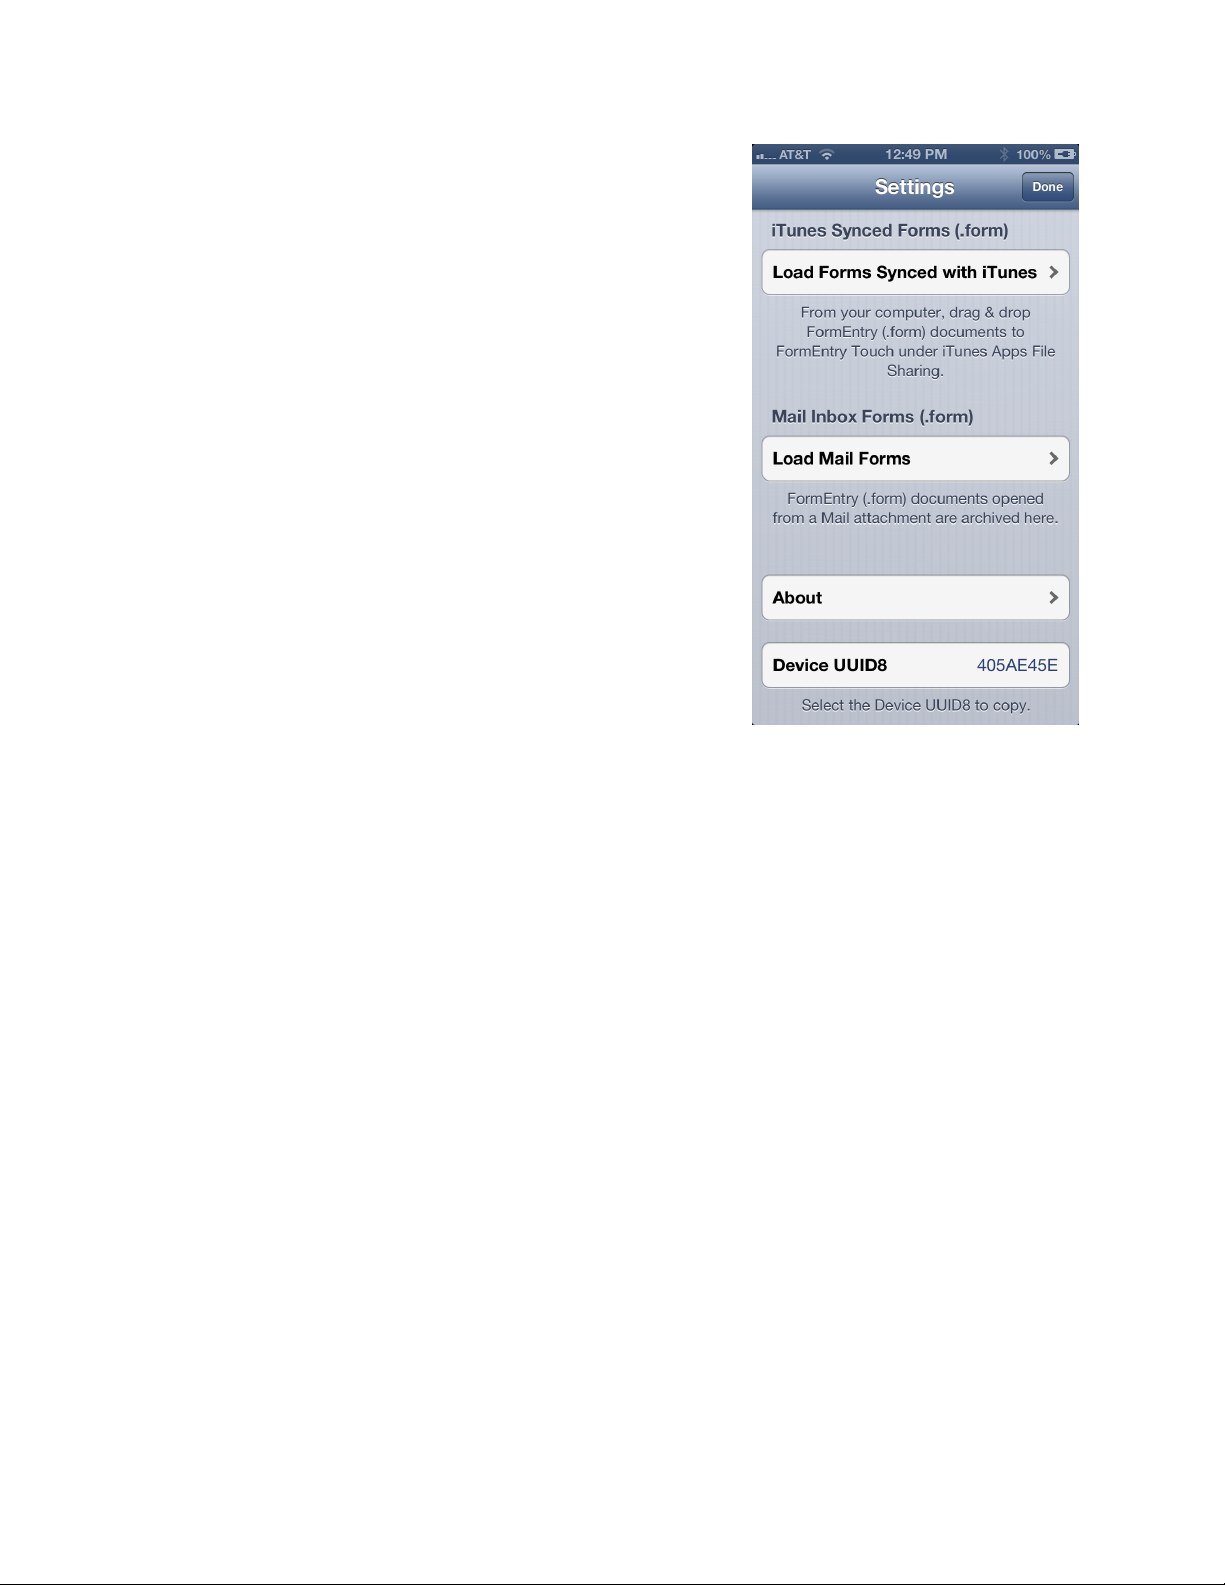
From FormEntry Touch, select the Settings button and
navigate down to iTunes Synced Forms (.form)
section. You will be able to load any .form files that are
contained here.
You can also load an emailed .form attachments here
as well. All .form files that were emailed and opened
by FormEntry Touch are archived in the Mail Inbox
Forms folder and can be loaded again.
FormEntry - The User’s Manual 34
Page 35

OVERVIEW OF FORMENTRY
This section describes the three main areas in the
FormEntry User Interface: the Form Outline, the iOS
Preview and the Control Tool Bar Pane, and their
relationship to Sections, Groupings, or Controls.
This section also provides example snippets for each
control.
FormEntry - The User’s Manual 35
Page 36
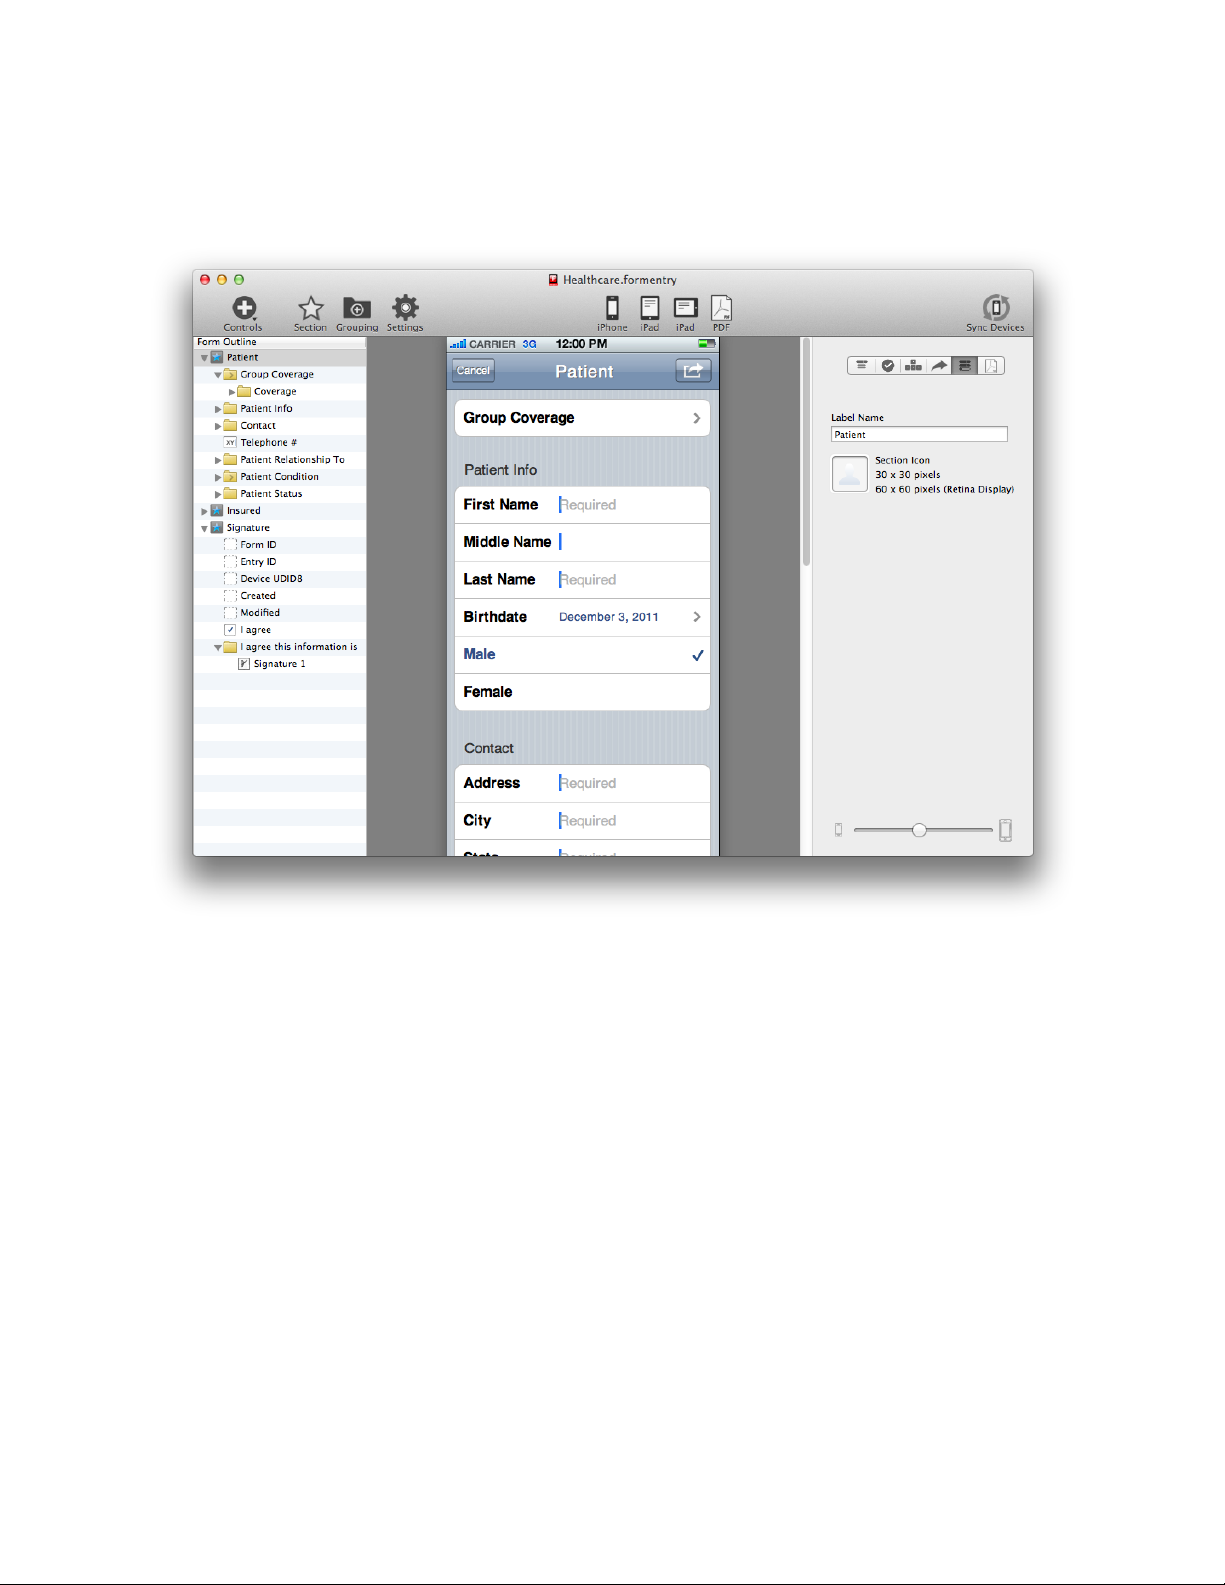
Single User Interface
Note: Refer to the screenshot below during these descriptions.
The left-side section of the FormEntry for Mac window is the ‘Form Outline’. The ‘Form
Outline’ is the hierarchical structure of the controls in the form which allow the addition
or deletion of the controls, sections or groupings. The items in the outline can be
dragged and dropped to rearrange their order.
The ‘iOS Preview’ located in the middle of the window shows the currently selected item
when adding, deleting or rearranging items in the ‘Form Outline’. The iOS Preview’ is
available in three formats selectable from the FormEntry for Mac menu under
View>Switch iOS Preview.
The ‘Control Tool Bar Pane’, located on the right side of the window, displays the details
of the currently selected control, section, or grouping and allows adjustments to the their
applicable properties.
FormEntry - The User’s Manual 36
Page 37
Sections and Groupings
Sections and Groupings are logical dividers within the form. Consider sections and
groupings the ‘branches’ for different ‘leaves’ within the document.
S ECTIONS
Every form must have at least one section. A least a 30 x 30 pixel icon can be added to
each section. However, the icon does not appear if there is only one section in the form.
It is best to use images that are exactly 30 pixels x 30 pixels or 60 x 60 pixels for Retina
Display devices. If the image is smaller or larger than this size, FormEntry for Mac
stretches or shrinks the image accordingly. Simply drag an icon from your desktop unto
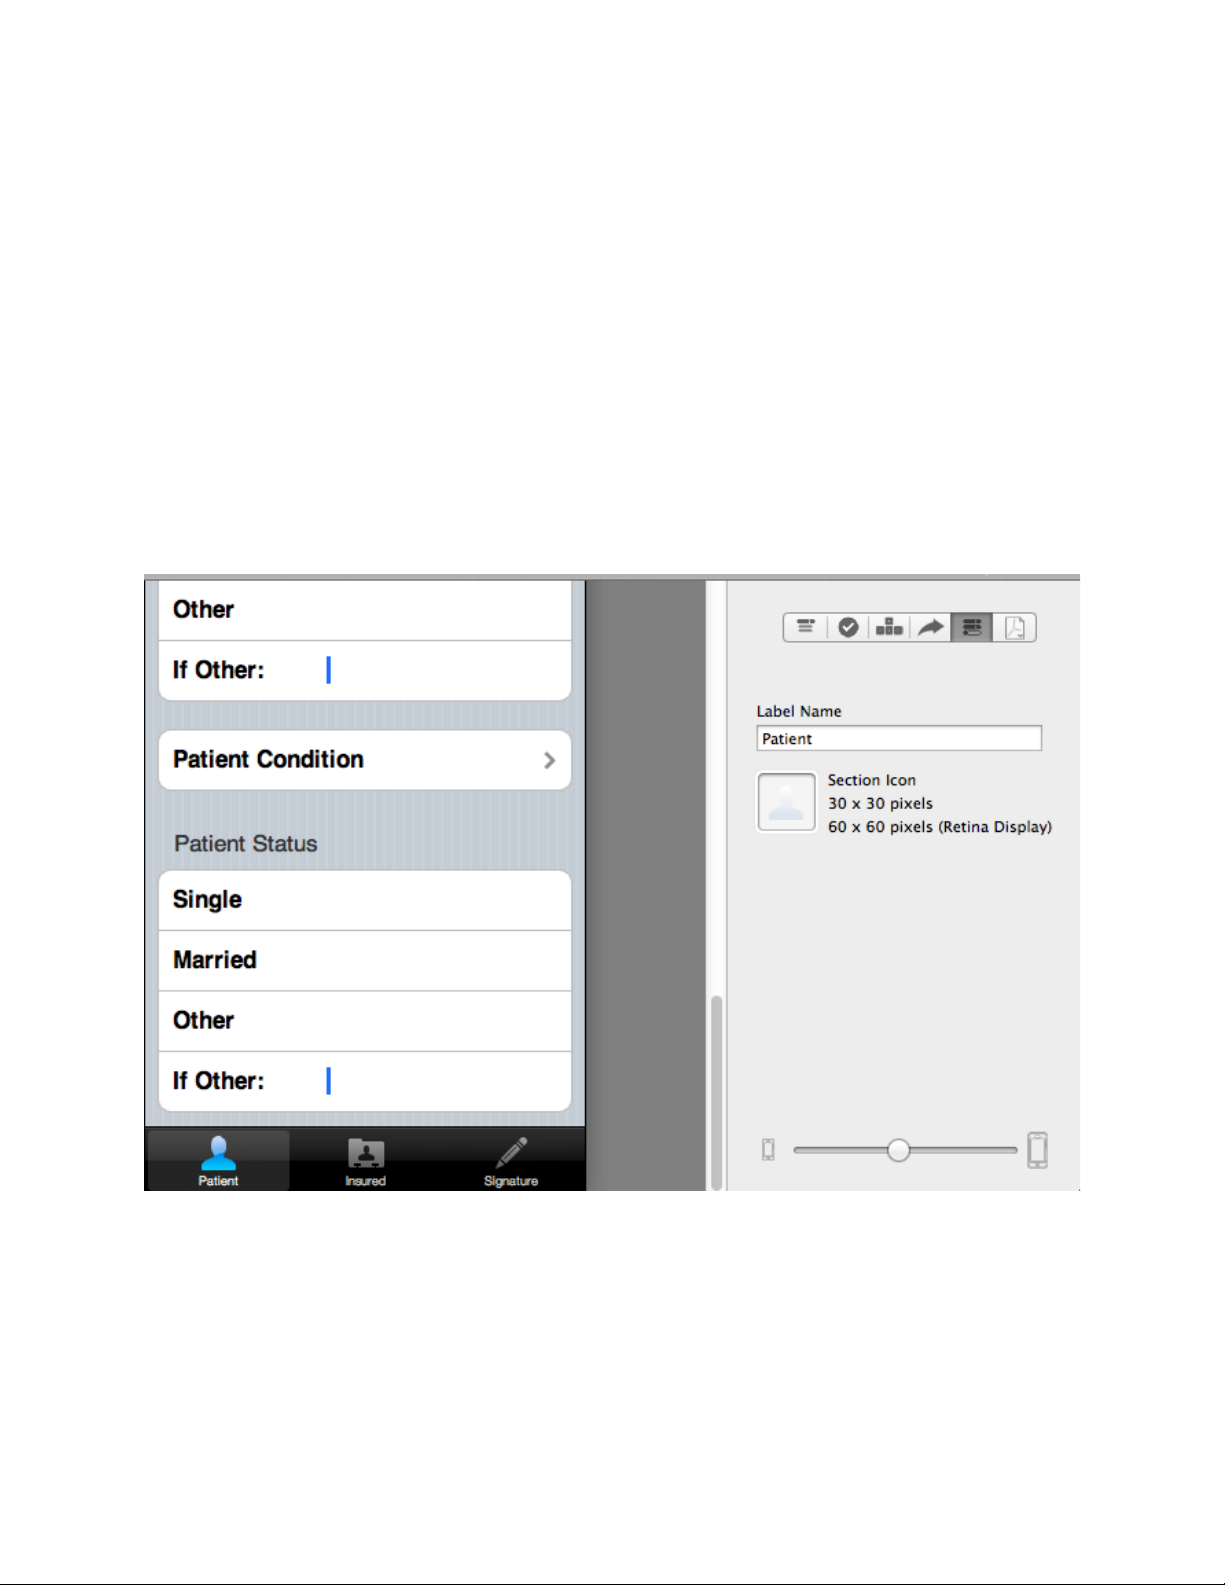
the Section Icon cell and your icon will appear at the bottom as tab bar icons.
A tab bar appears at the bottom of the screen if two or more sections are added. Note
that the images for each section is transformed into gray icons. The icons is illuminated
with a blue highlight when the icons are touched on the device.
FormEntry - The User’s Manual 37
Page 38
G ROUPINGS
Groupings hold a collection of controls and are
either a Field-set grouping or a Drill-down
grouping.
F IELD- SET G ROUPING
A Field-set grouping is the default when adding
a new grouping. Field-set groupings join its
controls together in a standard iOS table view.
The label name for each grouping is used as
the header. A 30 x 30 icon or 60 x 60 pixel icon
can be added to this grouping and appears on
the left side of the label name.
Checkmark controls within the grouping can
optionally be treated as a unified control
allowing only a single selection. Tapping on
one checkmark deselects the other checkmarks. To enable single select for
checkmarks, click the ‘Checkmarks as single select’ checkbox in the ‘Control Tool Bar
Pane’ for the grouping.
D RILL-DOWN G ROUPING
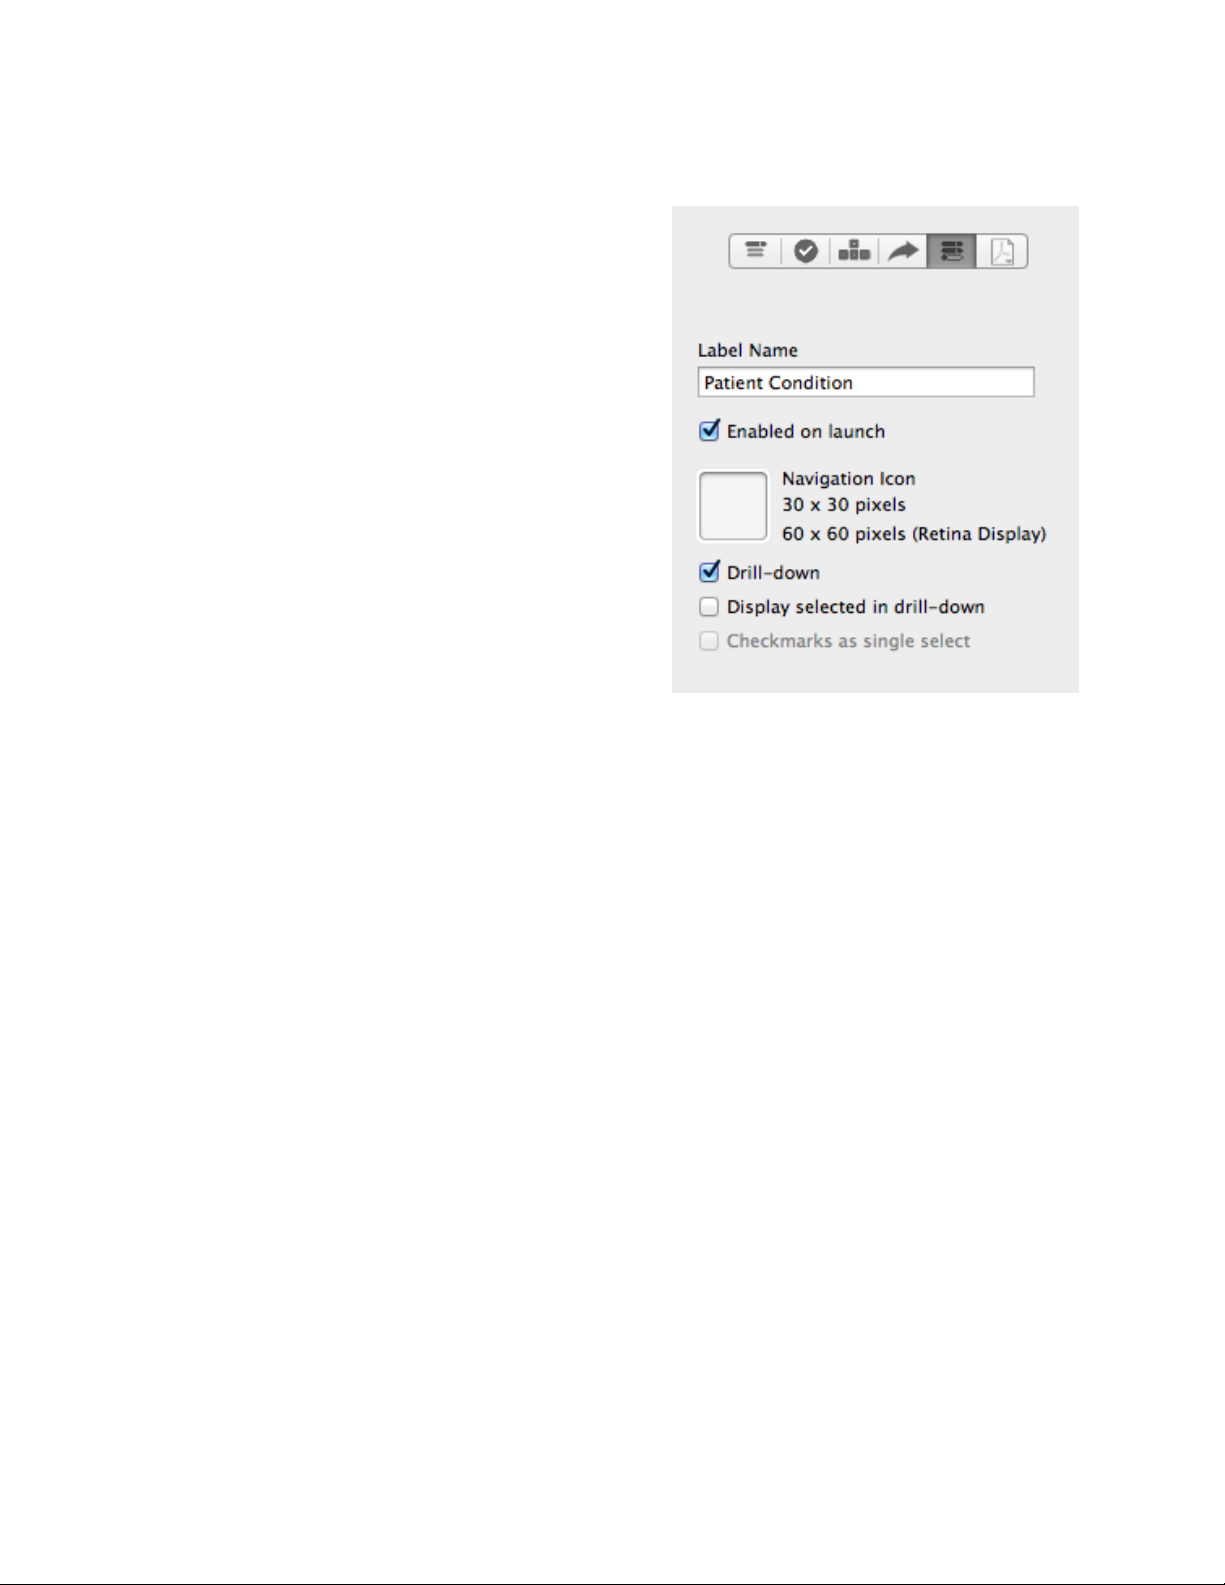
A grouping can appear on another view by changing the grouping type to Drill-down in
the ‘Configuration’’ section of the ‘Control Tool Bar Pane’. Once changed, the Drill-down
grouping displays the label name with an arrow (in the table row) indicating it is a drilldown. The grouping displays on the next view when the user selects the row in the
table.
Controls
Controls are used to enable user interaction with FormEntry Touch. As controls are
added, they are shown in order in the form outline. Also, the type of control is displayed
in the ‘iOS Preview’ as it would on a device. The controls are configured on the right-
side of the FormEntry for Mac. This area is called the Control Tool Bar Pane’.
C ONTROL T OOL B AR P ANE
FormEntry - The User’s Manual 38
Page 39
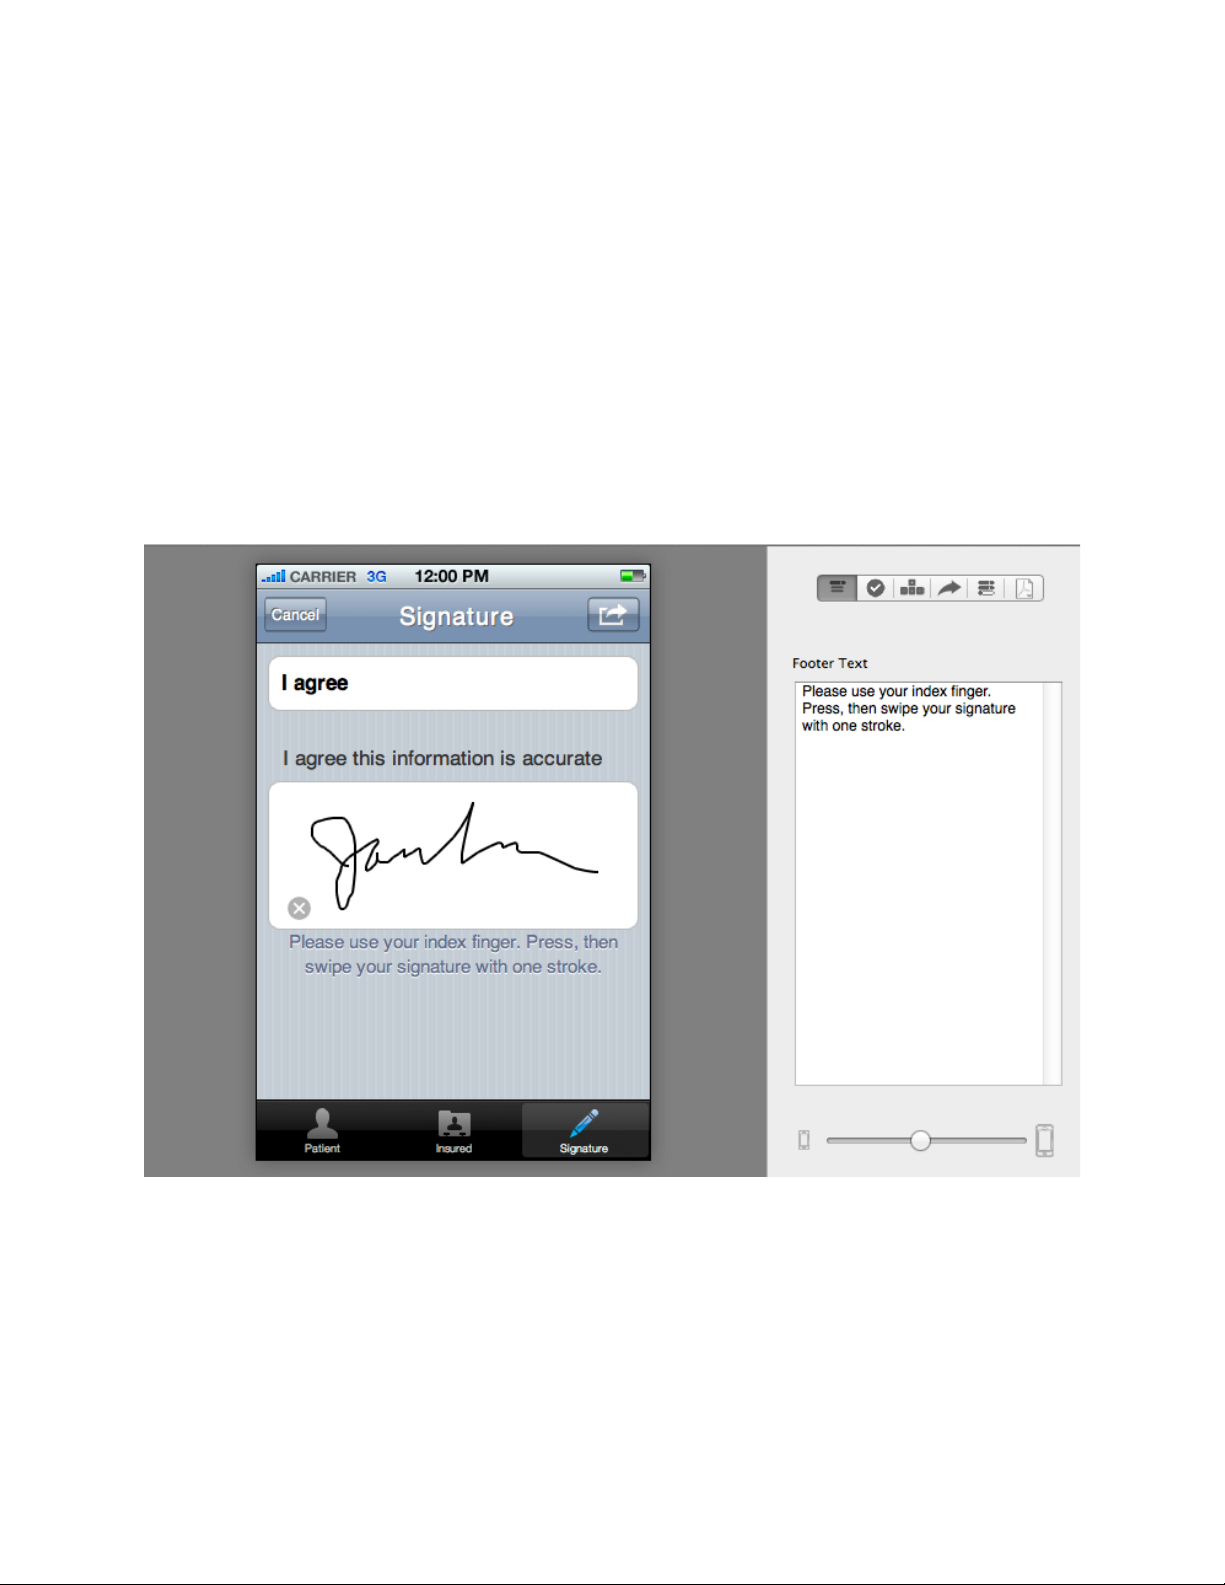
The Control Tool Bar Pane can be thought of in Mac terms as the ‘Inspectors’ for each
control, section or grouping in the form.
The six buttons located at the top of the pane representing these inspectors which are:
Footer Text, Validation Rules, Initial Keyboard Type or Input/Date Picker for Input, Web
Services, Configuration and PDF layout.
F OOTER T EXT
Footer Text allows changes to add ready-only text underneath the bottom of a control.
They can be under most controls and grouping. Enter text in the Footer Text field to be
displayed below a control or group. For controls, no text is displayed if the control is in
a Field-set grouping.
FormEntry - The User’s Manual 39
Page 40
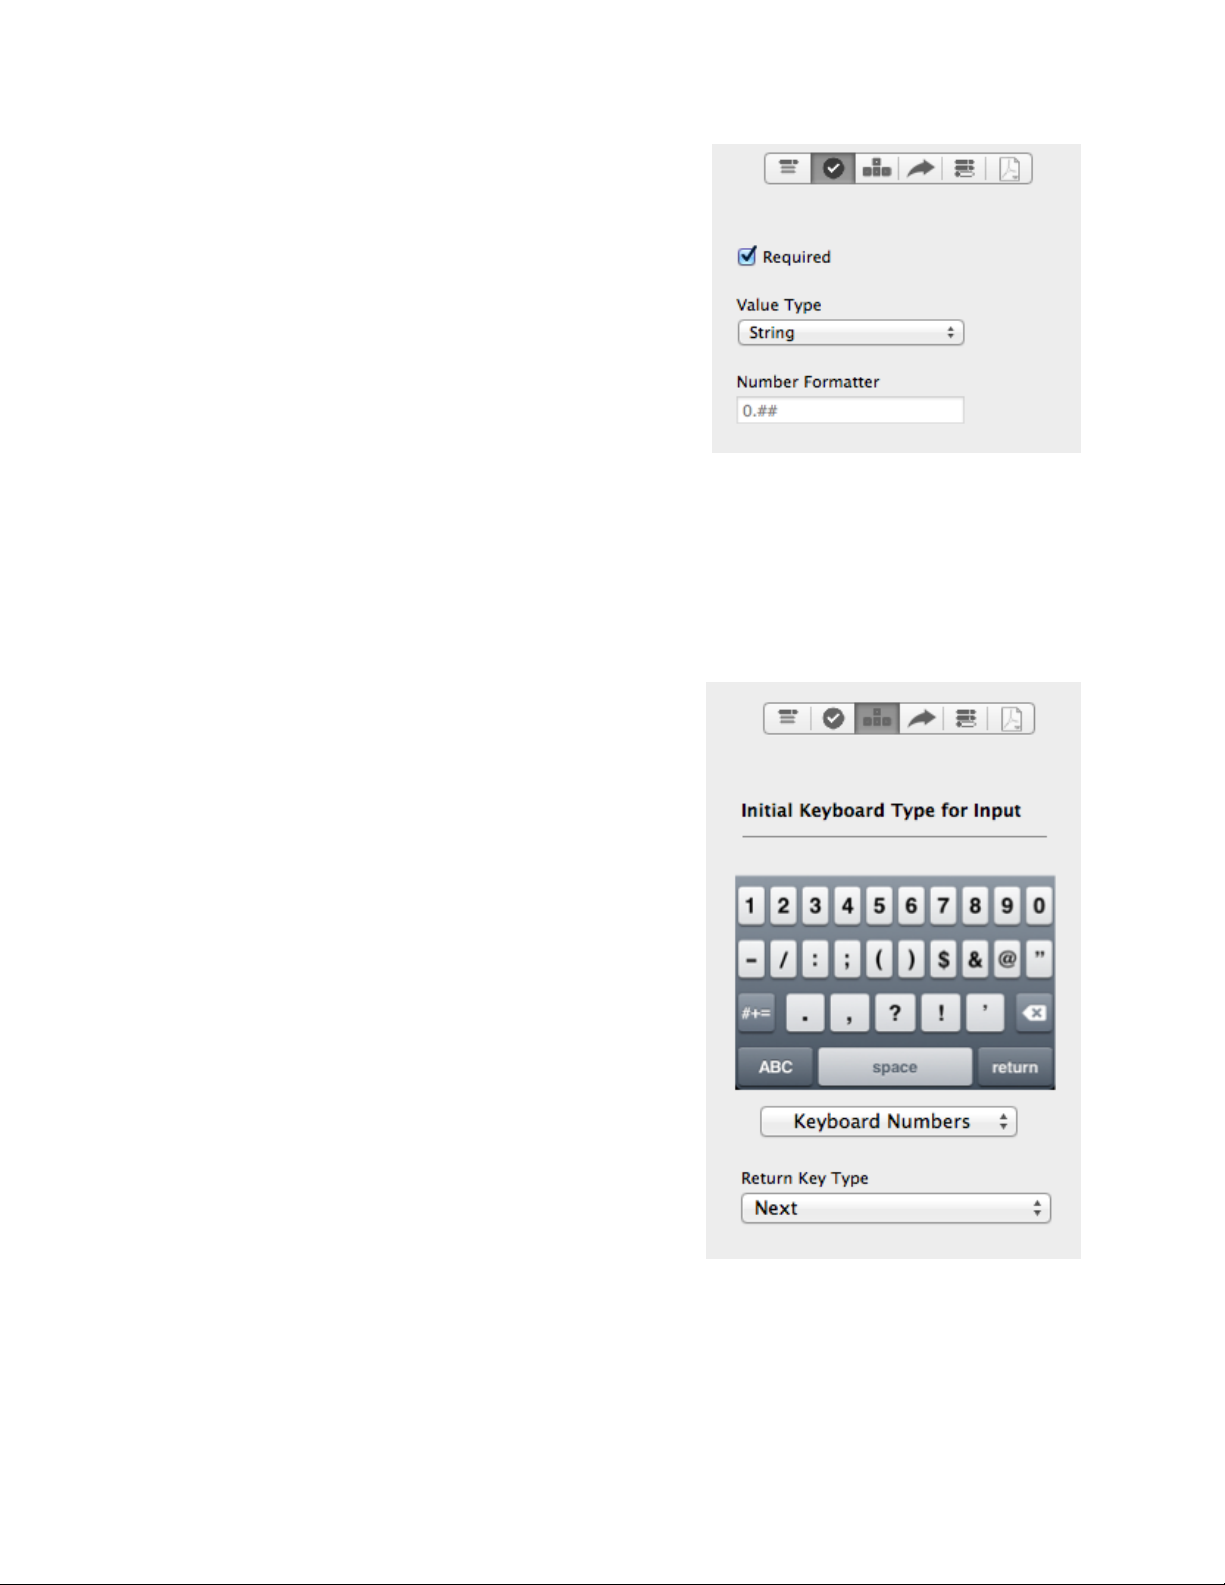
V ALIDATION R ULES
Select ‘Required Field’ in the ‘Control Tool Bar
Pane’ if a text field is a required entry. ‘Not
Applicable’ is displayed for some controls.
If the control is a text input style control, you have
the options of treating this control as Currency,
Integer, Decimal, Percent, Scientific or a String. If
its a decimal or integer, you have the options of
treating the input value with a number formatter. If
you would like to perform any calculations on these
controls from the Rule Builder, you will want to set Value Type to integer or decimal.
I NITIAL K EYBOARD T YPE FOR I NPUT/DATE P ICKER FOR
I NPUT
I NITIAL K EYBOARD TYPE FOR
I NPUT
FormEntry for Mac offers two types of keyboard
types for users: ‘Keyboard Default’ - the default
QWERTY keyboard or ‘Keyboard Numbers’ - a
keyboard with numbers and symbols.
‘Return Key Type’ changes the text on the
keyboard button to allow the user to continue
editing the form after completing information in a
text field. The choices of text are: ‘Done’, ‘Next’,
‘Return’ or ‘Send’.
D ATE P ICKER FOR I NPUT
There are four types of configurable input for a
Date & Time control: ‘Countdown’, ‘Date’, ‘Date &
Time’’, ‘Stopwatch’ and ‘Time’.
W EB S ERVICES
The parameter name for the HTML or JSON object is entered in this field if ‘URL to post
as HTML form’ or ‘URL to post as JSON form’ is enabled in the ‘Settings’ tab.
FormEntry - The User’s Manual 40
Page 41
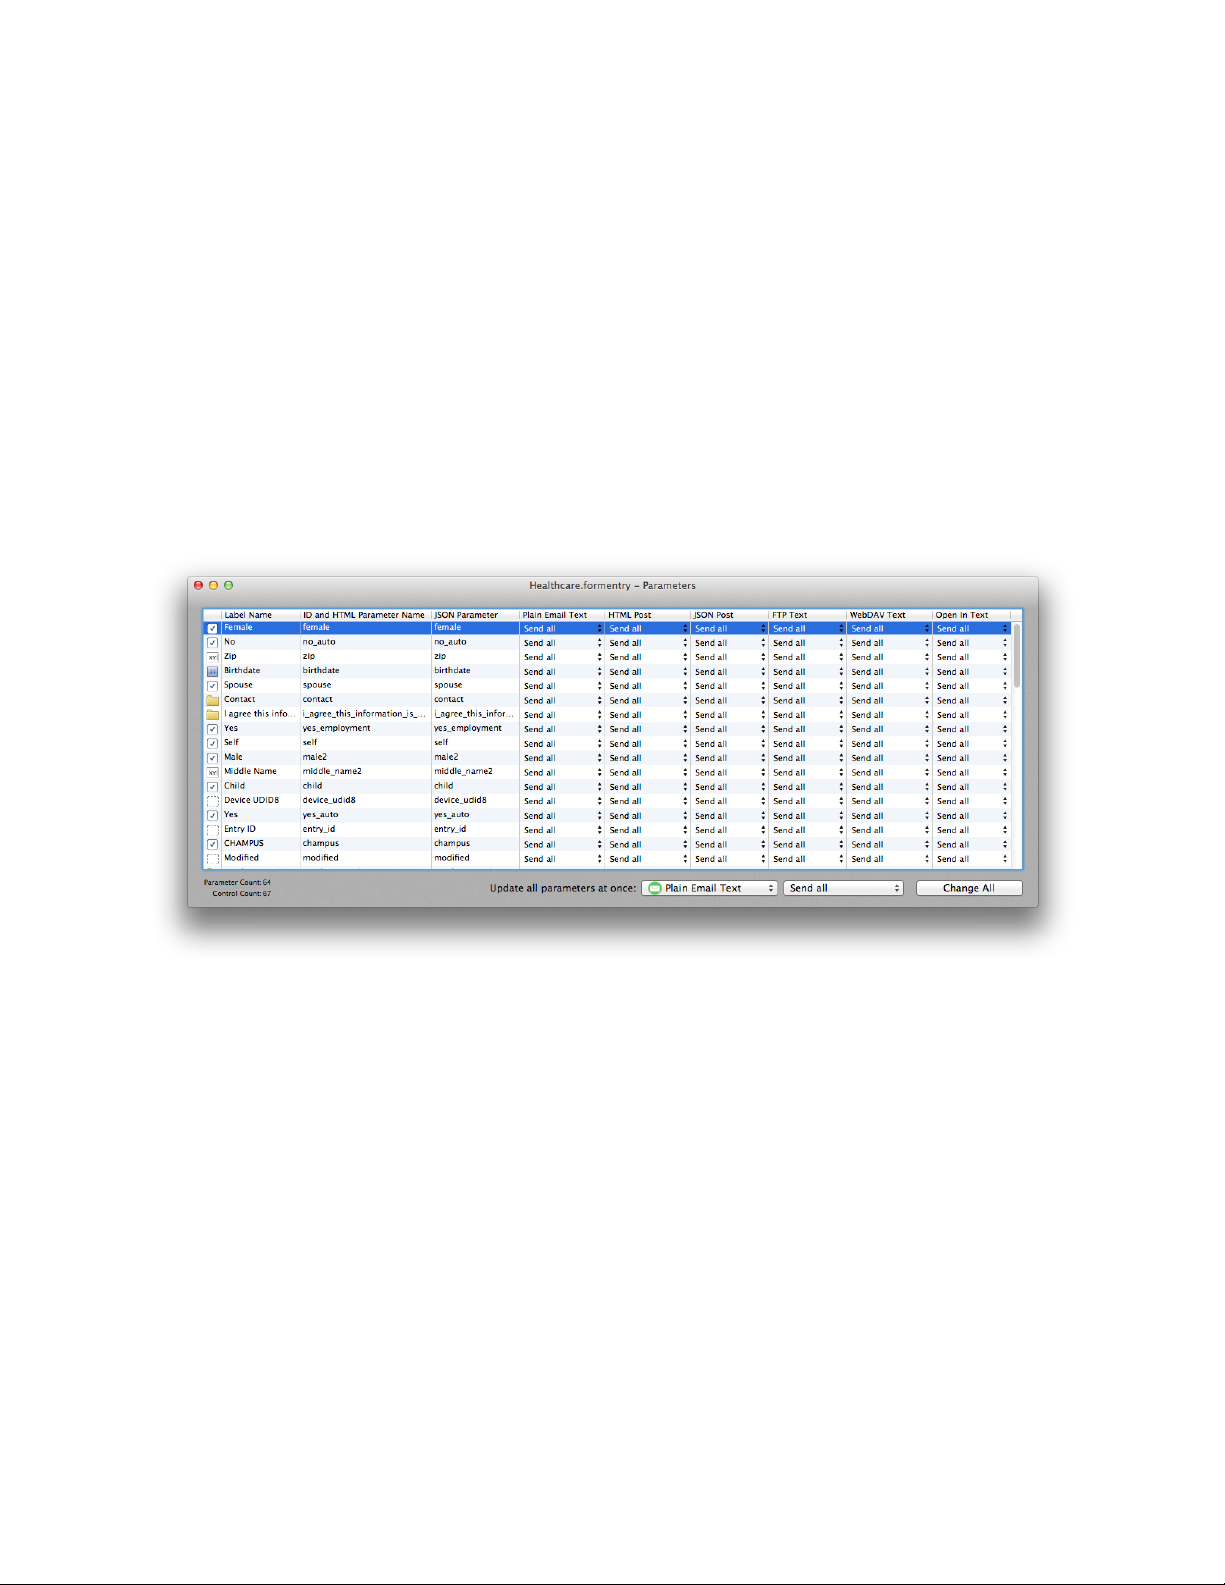
The ‘HTML Parameter Name’ or ‘JSON Parameter Name’ stores the values entered on
the form in FormEntry Touch. The backend developer then parses the form data using
this parameter name and handles the appropriate response back to the users when the
users post the form to the web service.
You can also review all the parameters at once by open the Parameters window. Simply
select View -> Show All Parameters. You have the option of updating the label name,
parameter id, json parameter. You have the option of 'Send all' (send the label every
time, plus any data), 'Unless has data' (send the label and data only when the control
has data), 'Never send' (never send the label and data) for sending Plain Email Text
Email, HTML Post and JSON Post. If you have purchased the FTP, WebDAV and Open
In Transmittal Plug-Ins, you have the option of restricting the text (.txt) file as well.
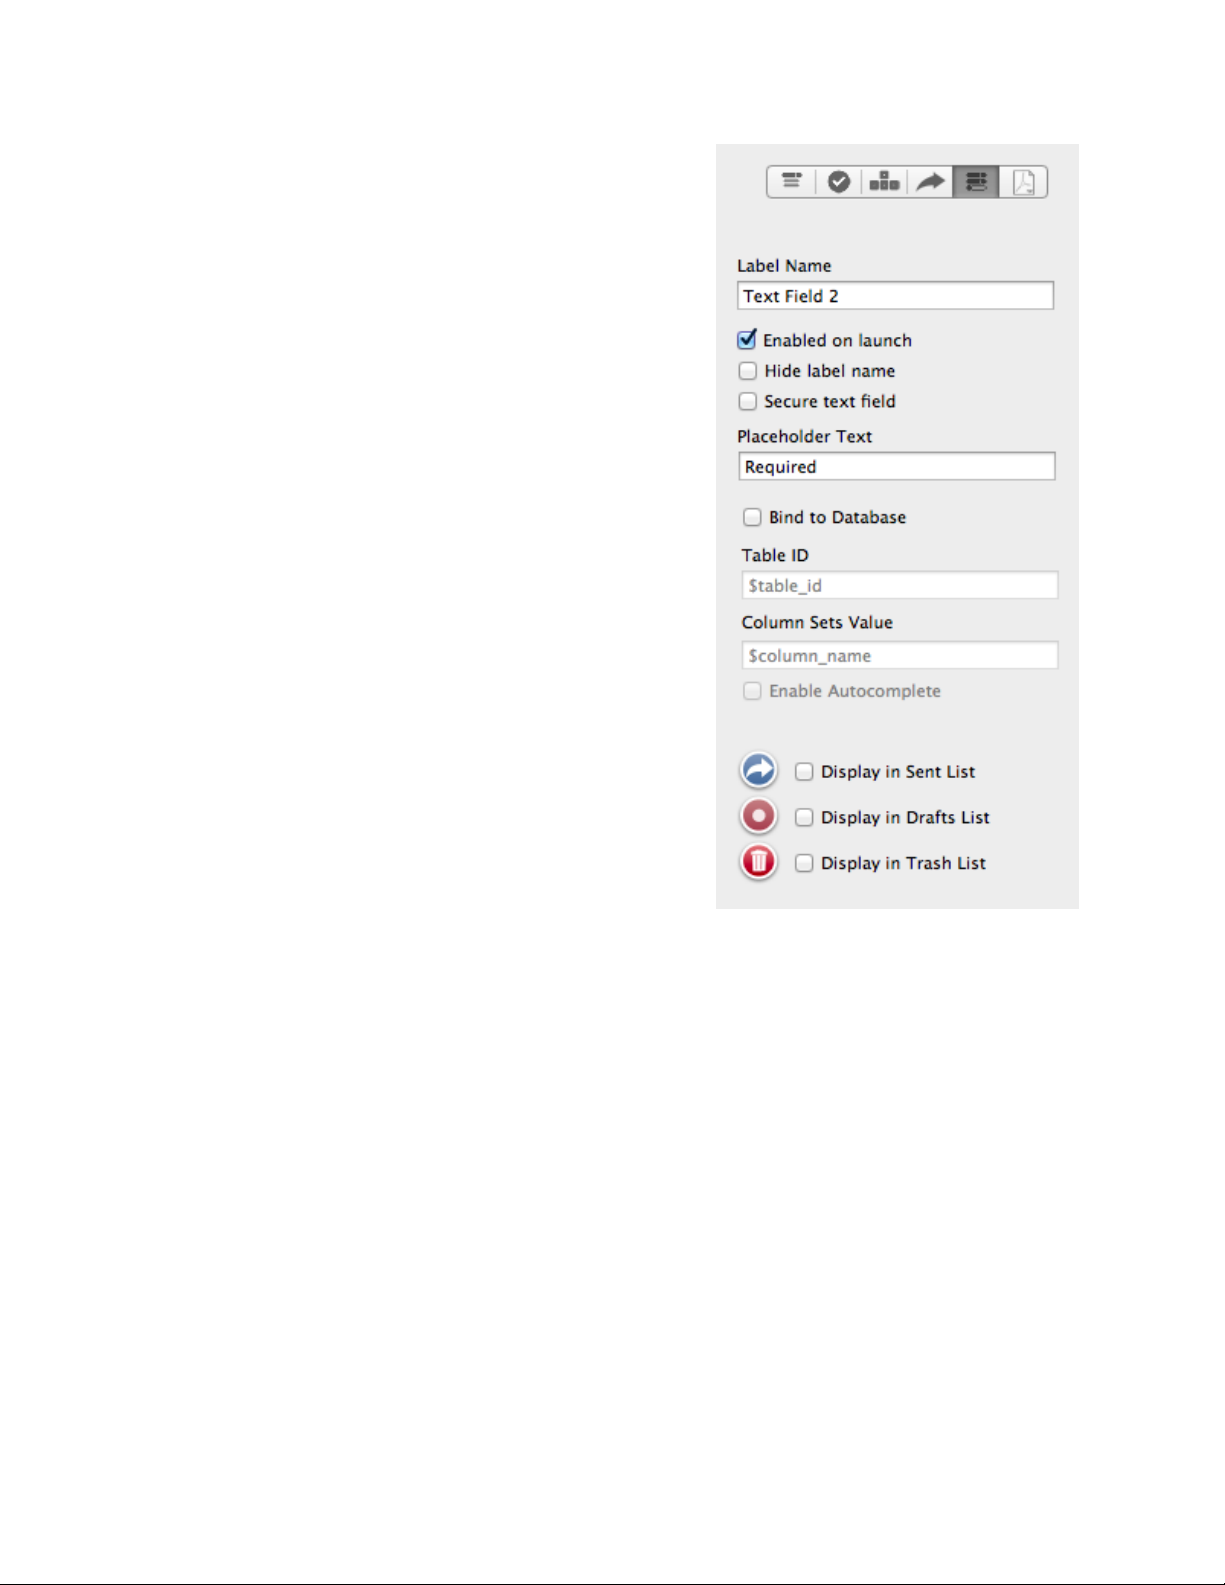
C ONFIGURATION
Configuration holds other parameters for controls, sections and groups, navigation
icons, label names, placeholder text, and enabling drill-downs. Configuration changes
based upon the control selected in the form outline.
FormEntry - The User’s Manual 41
Page 42
N ATIV E IOS AND C USTOM
C ONTROLS
FormEntry for Mac offers native iOS controls: Text
(⌘0) , Text Field (⌘1), On-Off Switch (⌘2),
Checkmarks (⌘3), Text Box (⌘4), Date & Time
(⌘5), Photo Picker (⌘6), Signature (⌘7), Spin
Wheel Picker (⌘8), Spin Wheel Item (⌘9),
Location (^0), Hidden (^1), Barcode (^2), Image
(^3), Ratings (^4), Web Browser (^5) and PIN Code
(^6).
Once the control is added to the Form Outline, you
can access it’s capabilities in the Control Toolbar
Pane. You can place the control in a different place
within the form by dragging and dropping the
control in the Form Outline.
For web services, all controls output their
respective ‘Label Name’, ‘HTML Parameter ID
Name’ or ‘JSON Parameter ID Name’ when the
form is sent by the user to the web service.
Form control values can be saved to different types
of file formats, such as .csv, .xlsx (paid plugin), .pdf and for image controls .png or .jpg files.
For plain text email, the data is formatted in an email with photos, images and
signatures as attachments.
FormEntry - The User’s Manual 42
Page 43
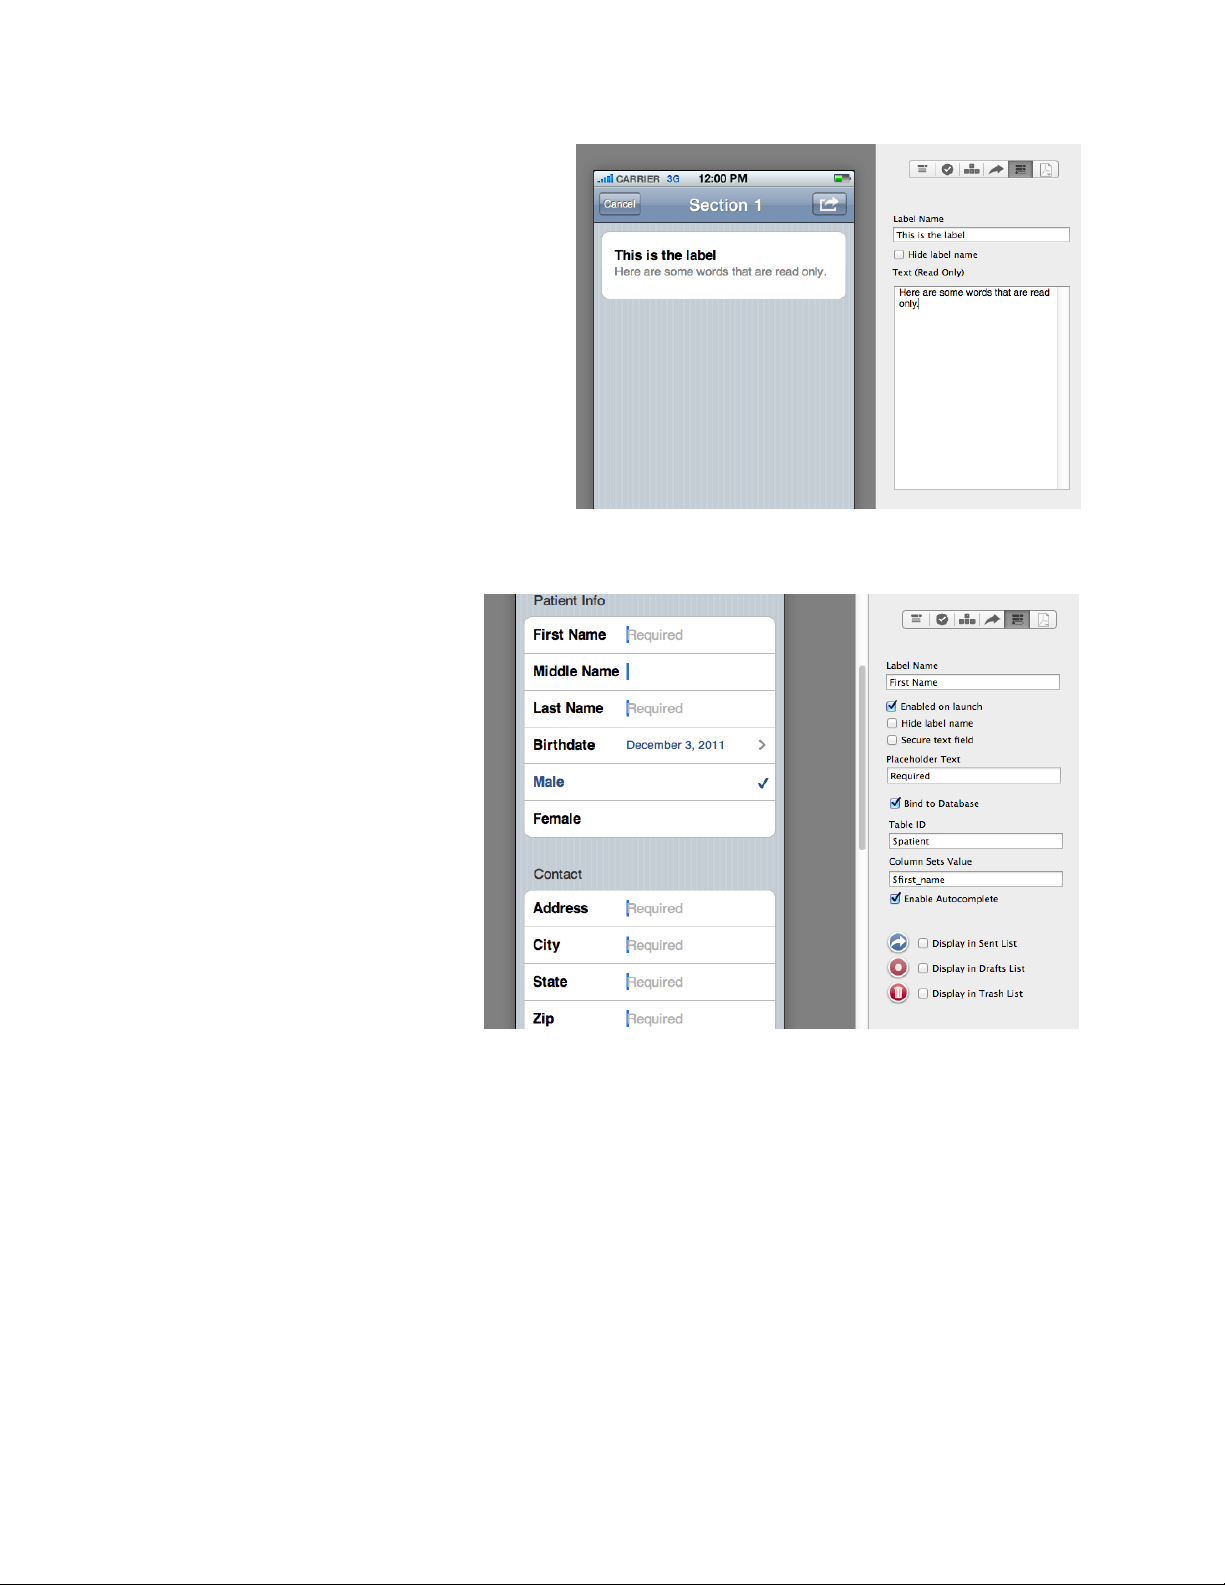
T EXT (⌘0)
The text control allows you to add
read only text, such long paragraphs.
It can also provide you with a label or
or you can hide it.
If you need large blocks of read only
text, the Text Control is the one to
use.
The label for the text field can be
hidden by checking ‘Hide label name’
in the ‘Configuration’ inspector.
T EXT F IELD (⌘1)
The ‘Text Field’ control
handles small amounts of
editable text. It can be
configured with different
default keyboards that
appear when the user taps
the control. Select a standard
‘QWERTY’ keyboard or a
numeric keyboard in the
‘Initial Keyboard Type for
Input’.
The ‘Text Field’ can apply
validating rules if the ‘Required Field’ in the ‘Validation Rules’ is selected in the
inspector.
The label for the text field can be hidden by checking ‘Hide label name’ in the
‘Configuration’ inspector. Another option is to check the ‘Secure text field‘. As the
characters are typed, they are replaced with dots (e.g. a password field).
FormEntry - The User’s Manual 43
Page 44
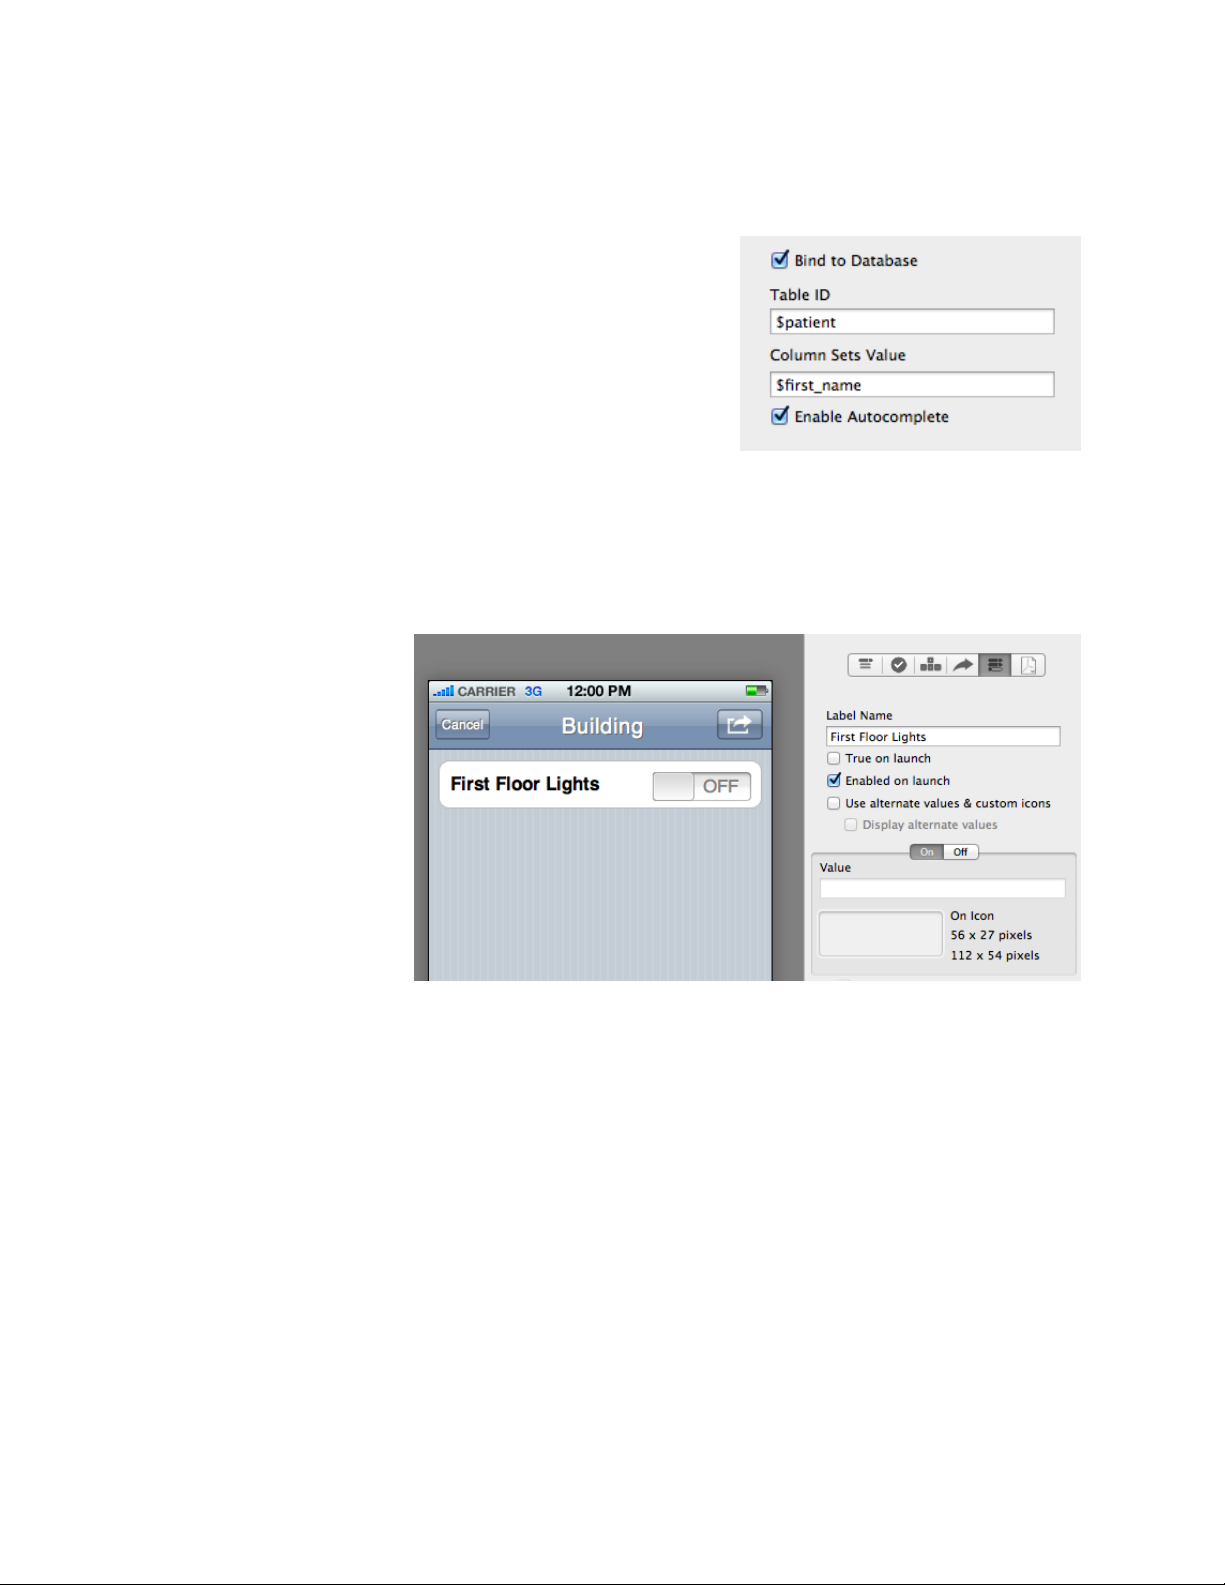
The text field can also be bound to a database table’s column and can be enabled with
autocomplete. Once the user starts typing within the text field, the control will look up
within the database the list of items in bound column.
To bind the database to database table’s column,
select the “Bind to Database” checkmark and place
the Table ID and Column ID within the bound fields
using the “$” as the prefix. For example, this text field
“First Name” is bound with $patient table and
$first_name column.
You will, of course have to have a database table with the Table ID of “patient” and a
Column ID of “first_name”.
O N -OFF
S WITCH (⌘2)
The ‘On-Off Switch’
provides a true/false
toggle in the form. It
can provide a ‘true’ or
‘false’ by sending
either an ‘On’ or ‘Off’
value. The default
state can be set using
the ‘True on launch’
option under ‘Configuration’.
This control also allows you to add custom values and icons. If you would like to add a
Yes or No, or even an Up or Down values, simple enable the “Use alternate values &
custom icons” checkbox. You can add the values and custom icons to the appropriate
tabs.
FormEntry - The User’s Manual 44
Page 45
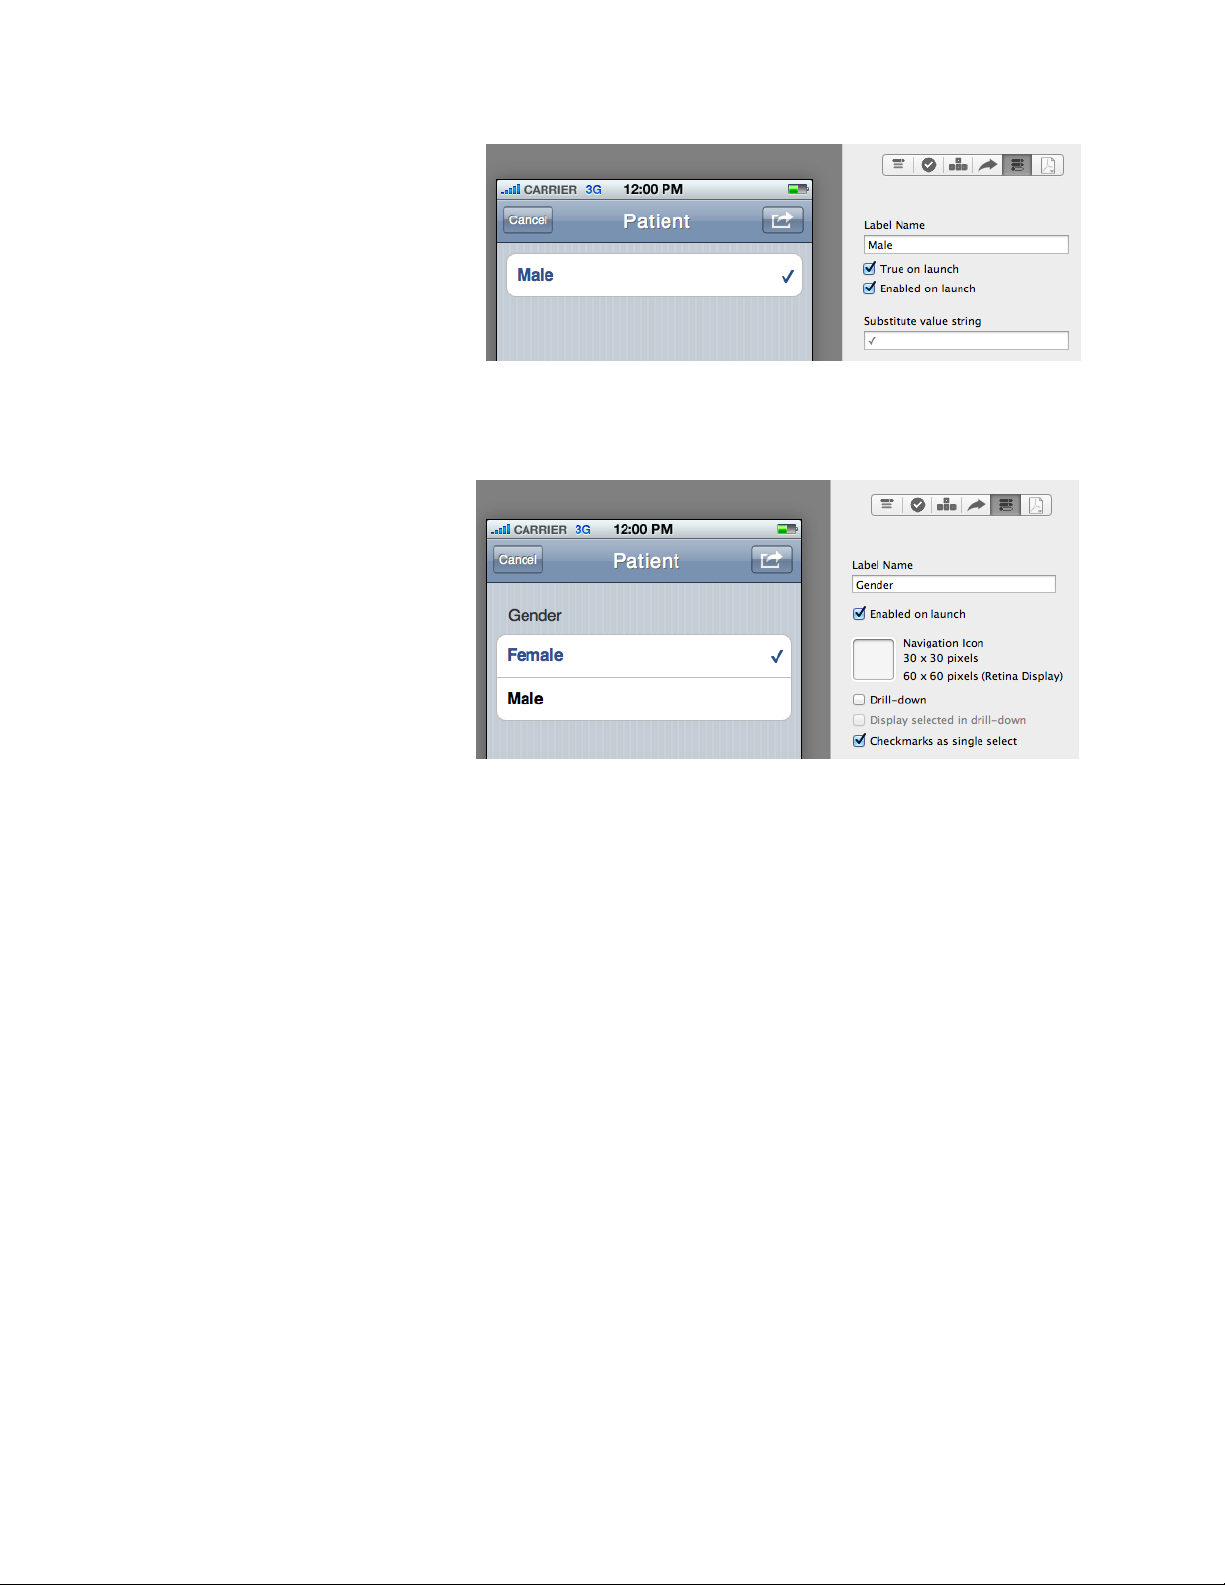
C HECKMARK (⌘3)
Much like an ‘On-Off Switch’,
the ‘Checkmark’ allows the
user to set a true or false
value depending on a
checkmark’s visibility. The
default state can be set using
the ‘True on launch’ option under ‘Configuration’ . If ‘True on launch’ is selected, a
checkmark is visible when the control appears for the first time.
FormEntry for Mac also a
handles grouped information
for checkmarks. Put the
checkmarks inside a
grouping and enable the
'Checkmarks as a single
select' in the group’s
‘Configuration’ inspector.
The form allows only one
checkbox in the grouping to
be selected at a time. This behavior mimics a drop-down menu or radio button.
Checkmarks post back to web services or email the default values as ‘Checked’ if the
control has been enabled. If the checkmark is not enabled, the value is empty.
You can also override the default “Checked” value by substituting a text string or
character, i.e. symbols, checkmarks, X’s, etc. Add the text string or character under
“Substitute value string” at the input field.
FormEntry - The User’s Manual 45
Page 46
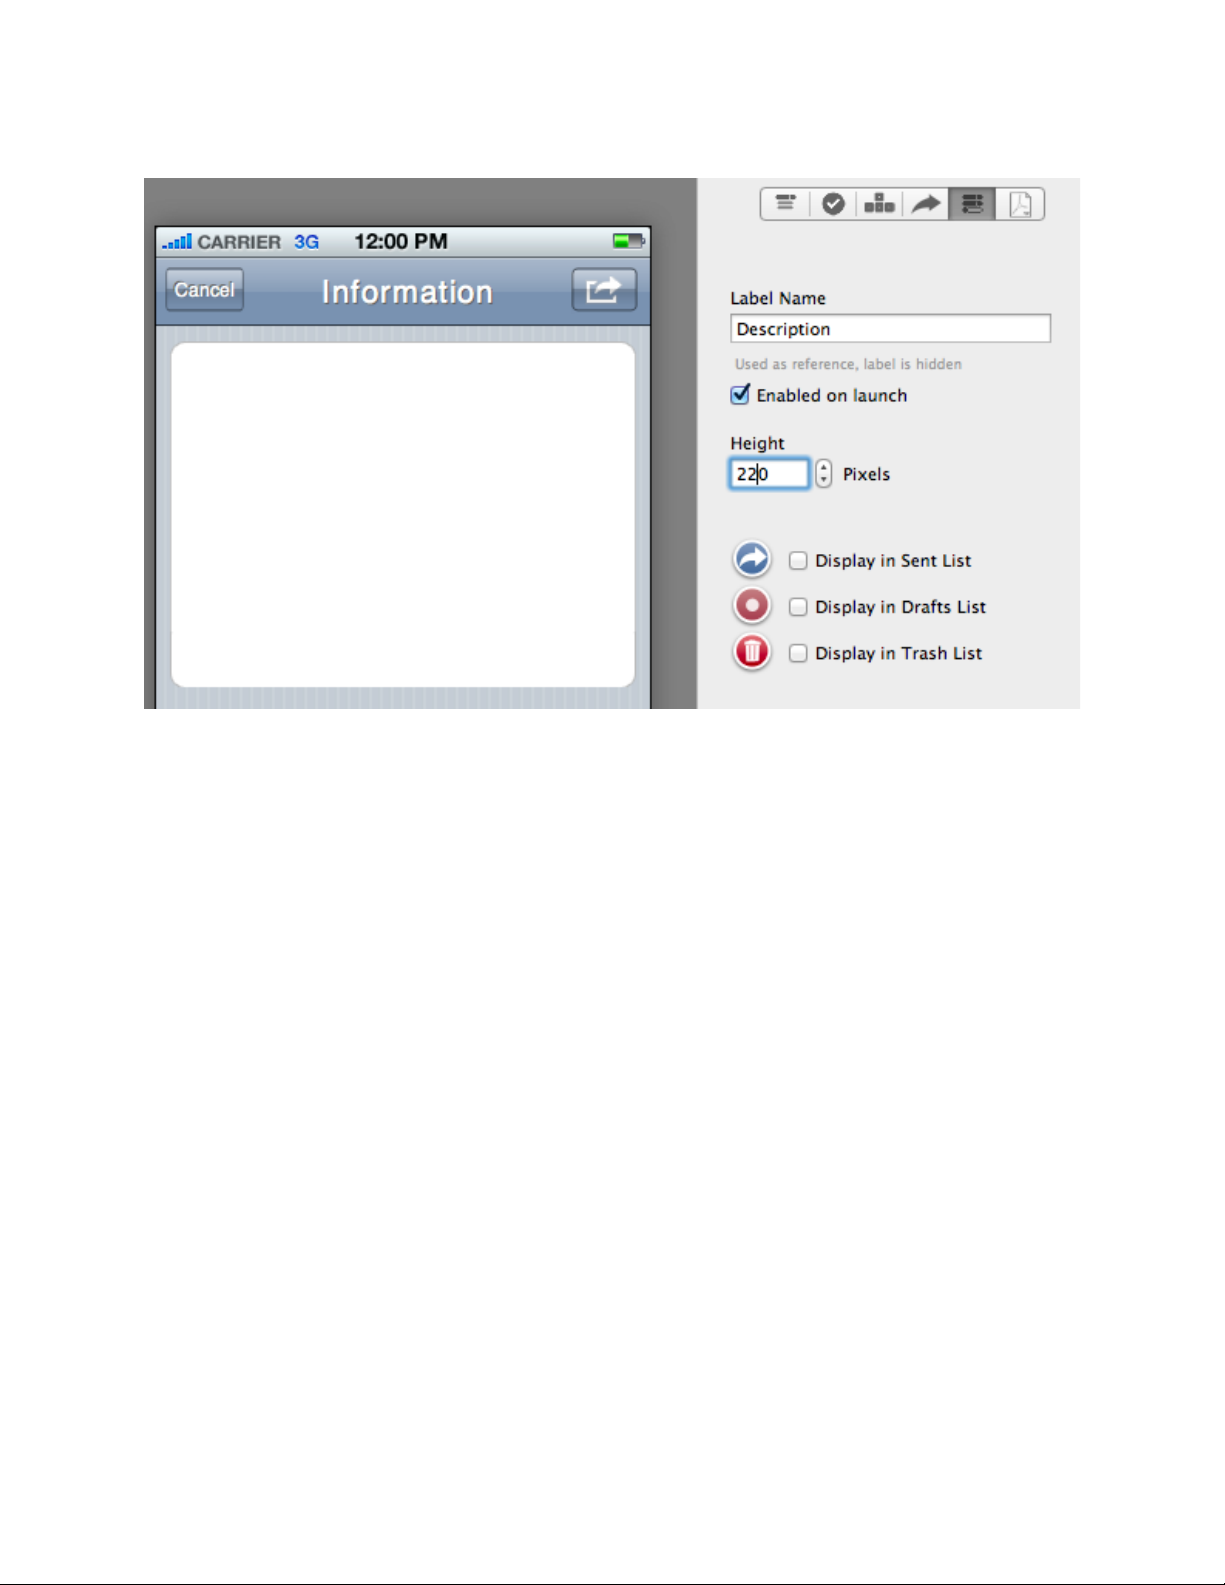
T EXT B OX (⌘4)
The ‘Text Box’ control hold larger amounts of editable text. The text can be added in a
multiline format. By default, the Label name is never displayed. If a label is required for
a text box, place the text box in a grouping. The grouping’s ‘Label Name’ acts as the
‘Text Box’ label.
If you would like have more height for text input, you can adjust the height of the text
box.
FormEntry - The User’s Manual 46
Page 47
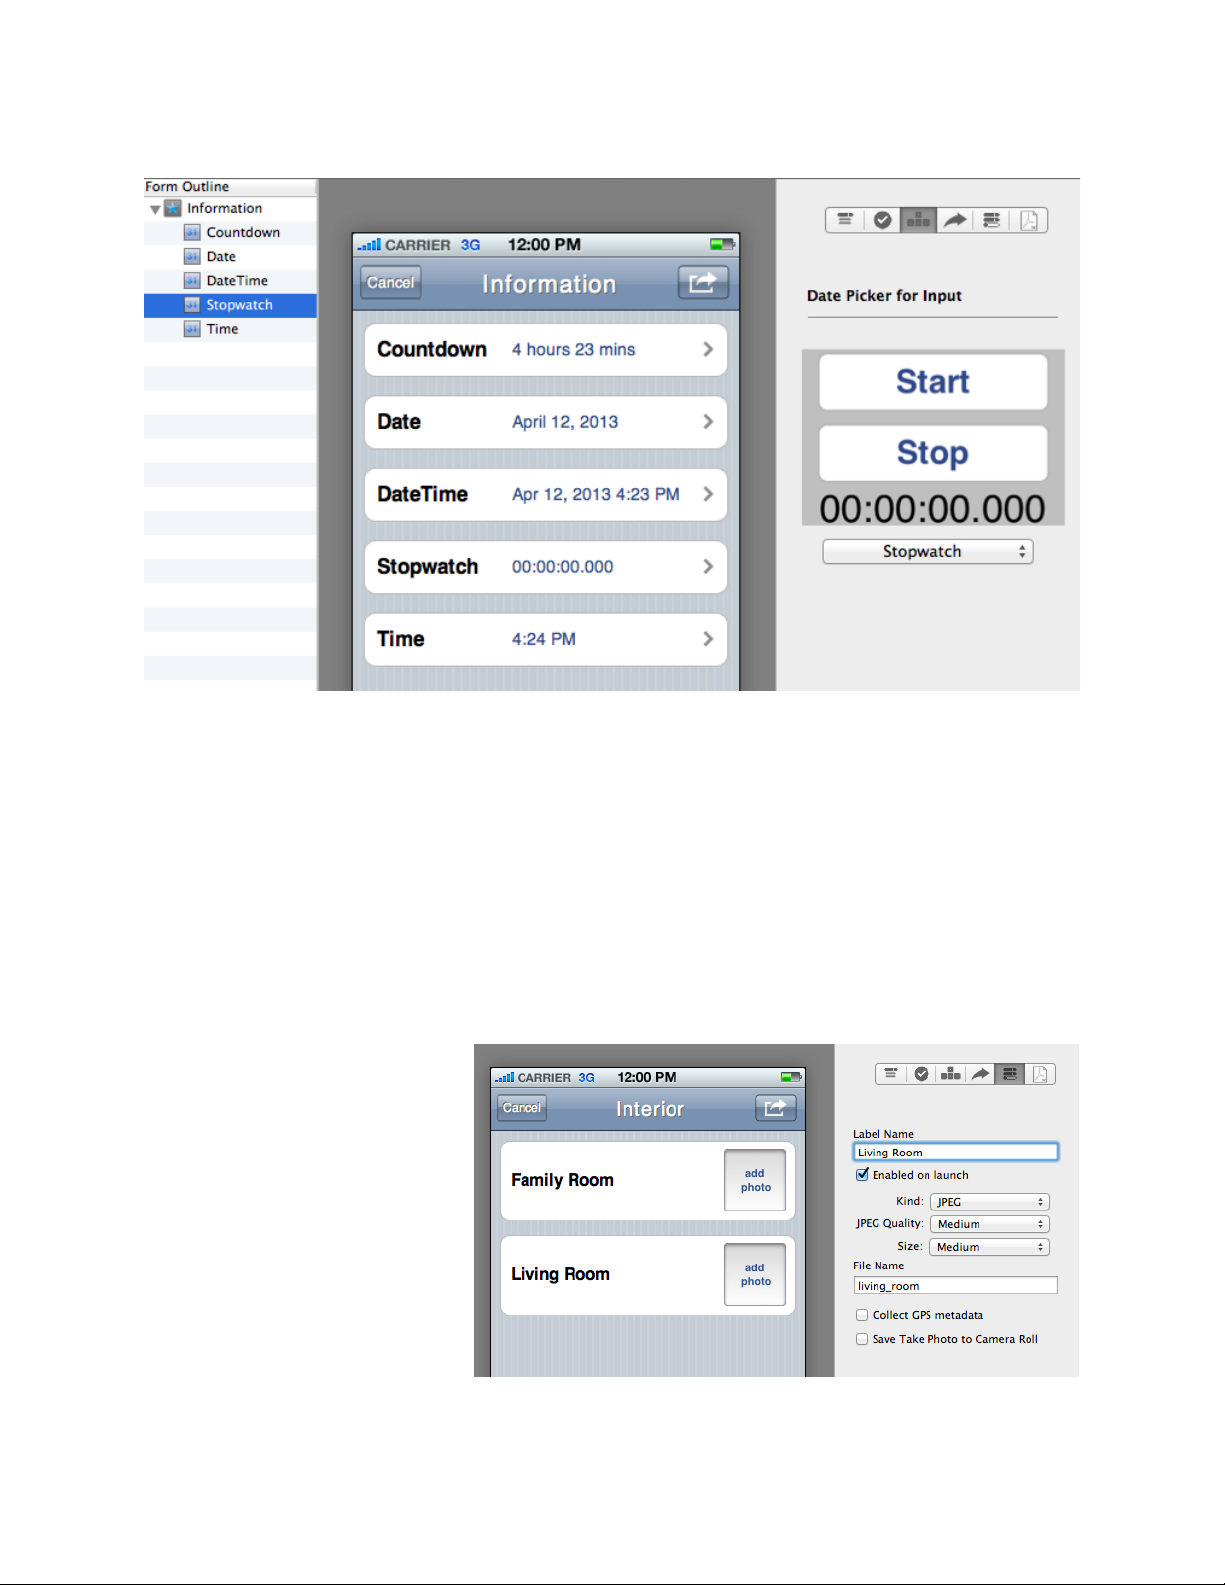
D ATE & T IME (⌘5)
The ‘Date & Time’ control provides four ways to collect date & time information:
‘Countdown’, ‘Date’, ‘Date & Time’, ‘Stopwatch’ and ‘Time’.
Each of the ‘Date and Time’ controls sends information differently. The ‘Countdown’
sends time in hours and minutes; ‘Date’ sends month, day, year; ‘Date & Time’ sends
month, day, year, hours, minutes, and AM or PM; ‘Stopwatch’ allows you to record a
time from the moment the user starts and stops the watch; ‘Time’ sends hours, minutes,
and AM or PM.
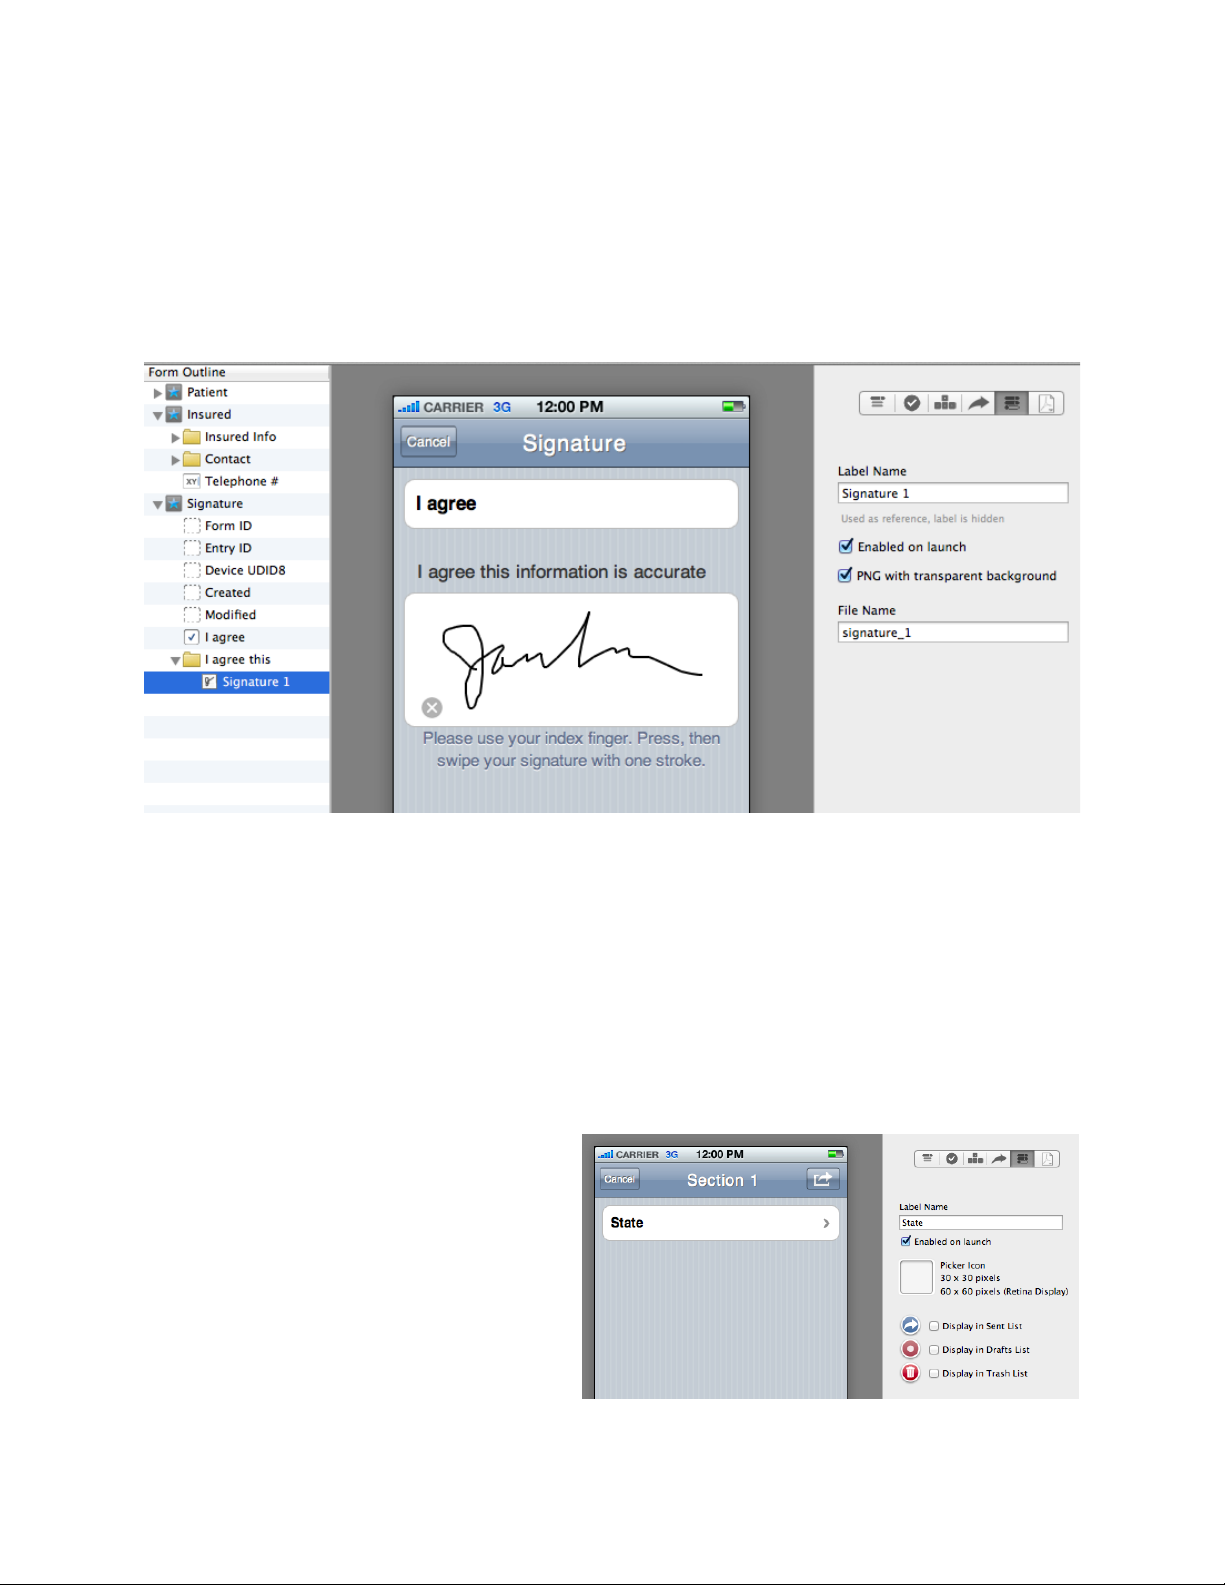
P HOTO P ICKER (⌘6)
The Photo Picker control
allows the user to include
photos from device’s ‘Photo
Library’ application in a form.
If the form is being used on
an iPhone or iPad, the user
has the option of using the
built-in camera to take a
photo.
FormEntry - The User’s Manual 47
Page 48

Users can remove any photos they have added by selecting ‘edit’ on the thumbnail icon
and then selecting ‘Delete Photo’.
Select the type of photo when configuring the photo picker under the ‘Kind:’ pull-down
menu in the ‘Configuration’ section of the ‘Control Tool Bar Pane’. The choices are
‘JPEG’ or ‘PNG’. If JPEG’ is selected the image quality under the ‘JPEG Quality’ pull-
down.
T AKING P HOTOS FROM THE C AMERA
When you select JPEG as an option, you also have the ability to collect GPS metadata,
the latitude and longitude coordinates of where the photo was taken from the camera.
PNG file format does not have this option. Typically you can parse this information or
view it through a photo viewing software.
Also, you as the form author, you can have the photos taken by the user, to be store in
the iOS camera roll. If you do not want the user to have a photos of your form within
their photo album, uncheck the “Save Take Photo to Camera Roll”
P HOTO SIZE
The ‘Size’ option, which determines the size of the file sent to the web service, is
available to either type of file format. Selecting a larger size means a larger the file is
sent to the web service. This has an impact on transmission performance while sending
forms. Note: Form users do not have the option of changing these settings.
H OW P HOTOS ARE SENT
If the form is configured to return form data in an email, the photo selected by the user
is sent as a standard email attachment using the title specified in the ‘File Name’ field.
There is no need to specify a file extension. FormEntry Touch appends the appropriate
extension automatically.
If the form is configured to send form data to the web service in an HTML post, the form
is posted as a standard HTTP ‘Post’ using a multipart form mechanism. The incoming
data must be parsed as a standard form post from a web browser. Specify the ‘HTML
Parameter Name’ for the photo under the ‘Web Services’ tab in the ‘Control Tool Bar
Pane’.
If JSON is being to send form data, the form is posted as a standard HTTP post.
However, any photo is converted to a BASE64 string. Specify the ‘JSON Parameter
Name’ for the photo under the ‘Web Services’ tab in the ‘Control Tool Bar Pane’.
FormEntry - The User’s Manual 48
Page 49
The following snippets demonstrate the values sent from a ‘Photo-Picker’ when posting
back to an email, or a JSON web service. If the form is being sent as a HTML post, a
standard multipart form post is used. Therefore, a snippet example is not shown here.
S IGNATURE (⌘7)
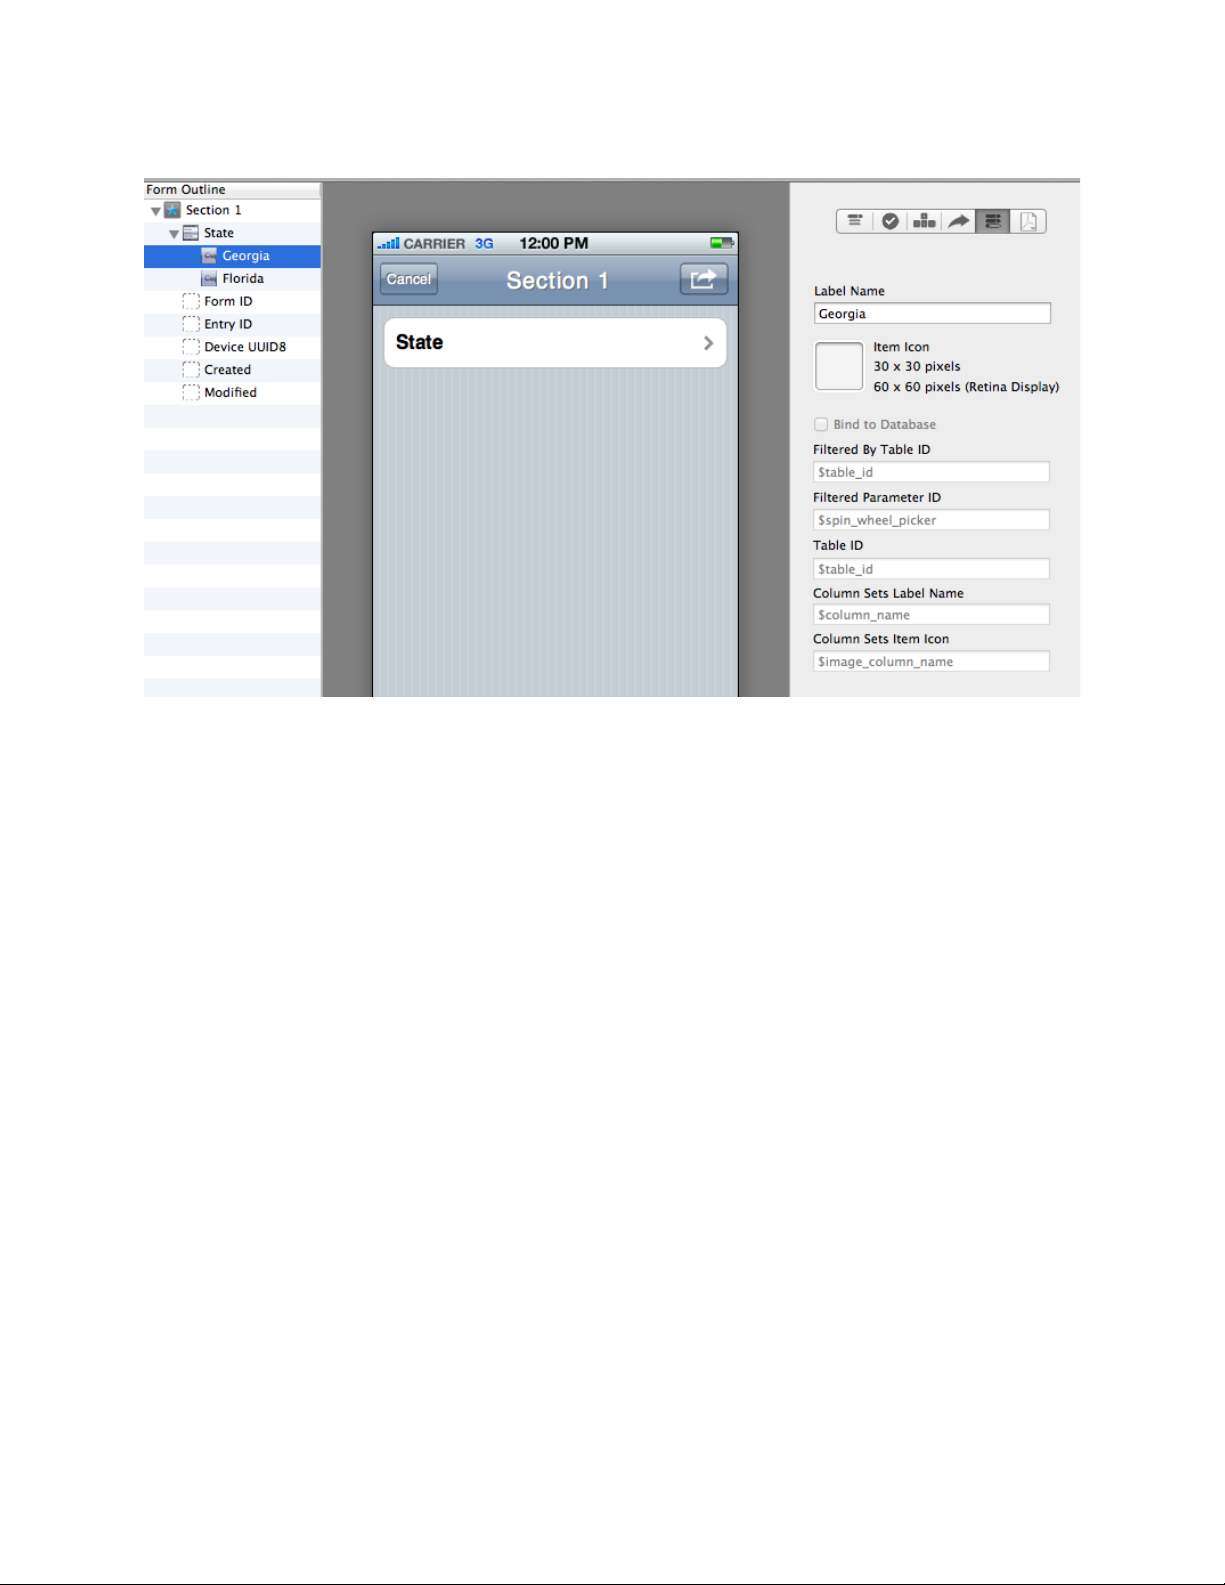
The Signature control allows the user to sign a form by simply drawing their signature
with their finger.
The signature data is stored and sent as a PNG file. The posting of the signature to
URL works the same way as posting a photo from the Photo Picker. For example, when
emailing, the signature is attached as a PNG file or as an image within the PDF
attachment.
S PIN W HEEL P ICKER (⌘8)
The Spin Wheel Picker control allows
the user to select from a list of items.
Each control can hold an unlimited
number of Spin Wheel Items. Once a
user selects the item, the label name
value is set to the Spin Wheel Picker.
FormEntry - The User’s Manual 49
Page 50
S PIN W HEEL I TEM (⌘9)
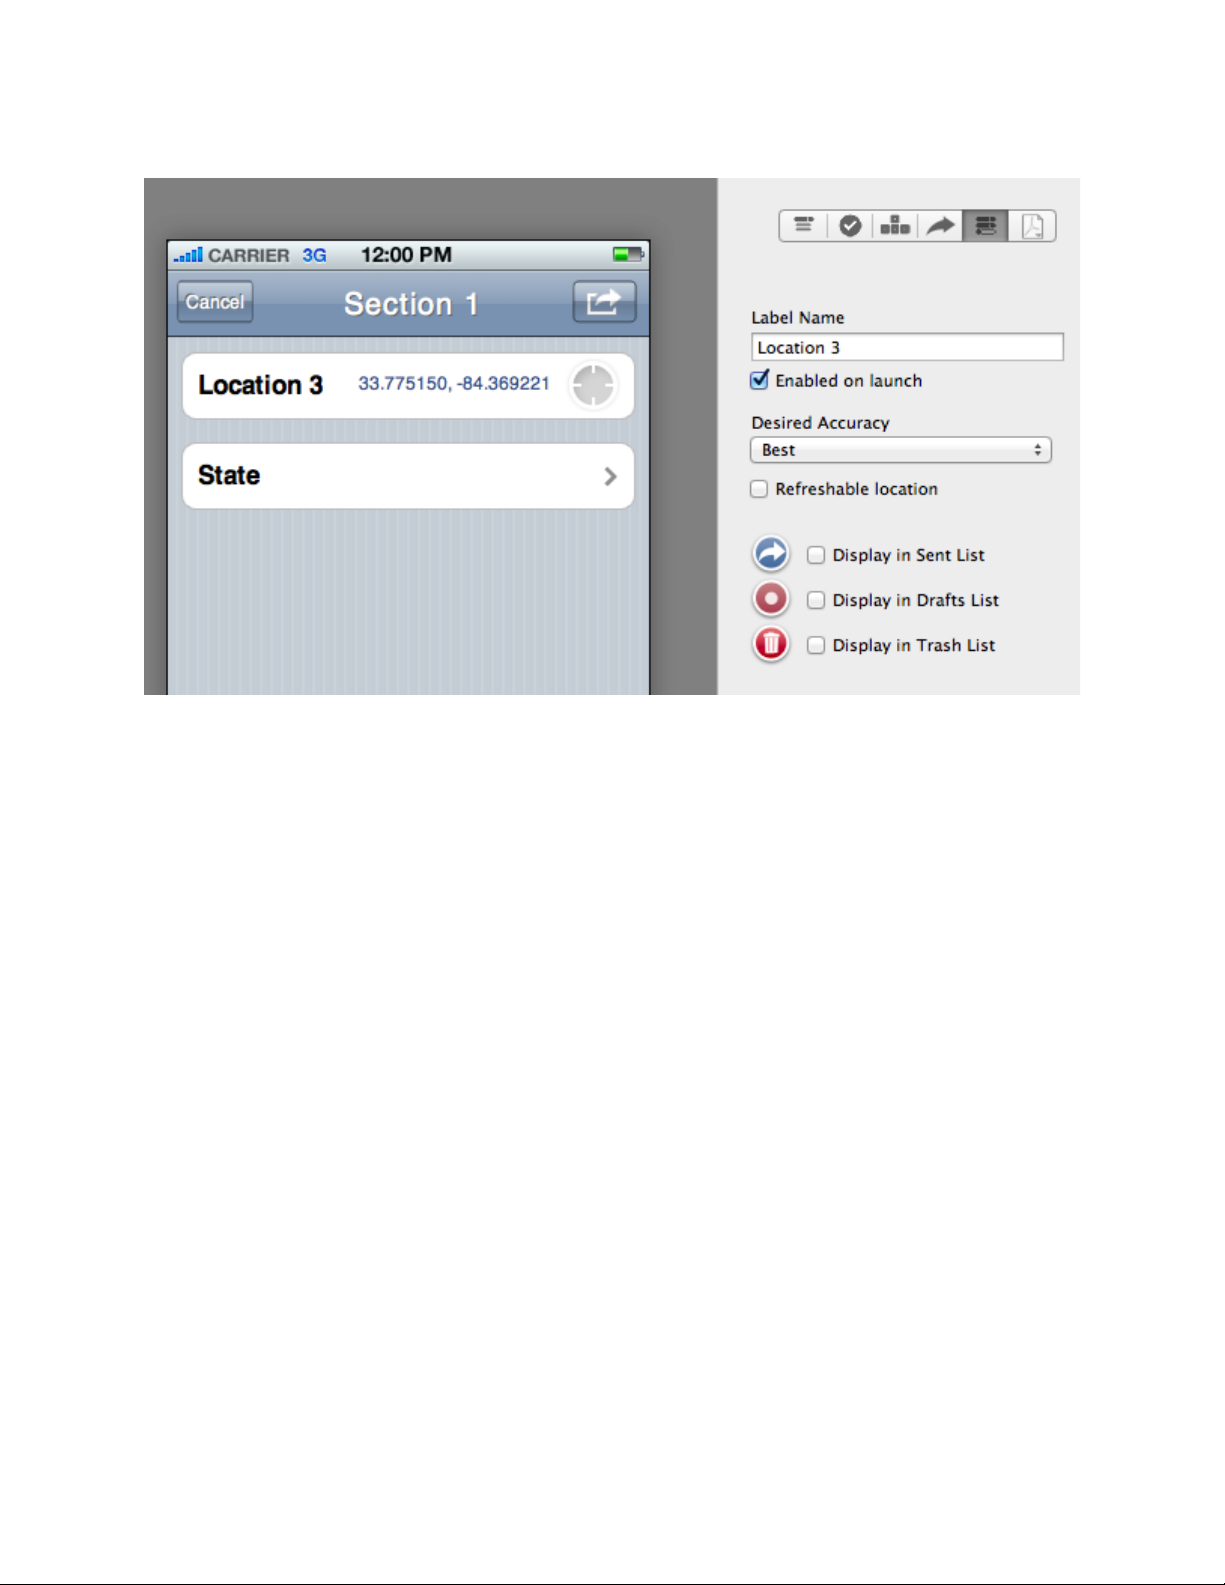
Spin wheel items are controls embedded within the Spin Wheel Picker. These items are
raw text strings that are assigned to the Spin Wheel Picker when the item is selected by
the user. A 30 x 30 or 60 x 60 (Retina Display) pixel icon can also be added for each
item.
The selected value will be set to the parent Spin Wheel Picker. If you want to do any
Rules against the Spin Wheel Item, you will need to use the param id of the parent Spin
Wheel Picker.
The Spin Wheel Item can be bound to the database table’s column. To bind the Spin
Wheel Item to a database table’s column, only 1 Spin Wheel Item is needed. This 1
Spin Wheel Item can then be bound by select “Bind to Database”.
The Table ID of the table to “Table ID” and the Column ID of the bound value to “Column
Sets Label Name”. If you would like to bind the icon of the Spin Wheel Item, you can
bind the “Column Sets Item Icon” to the Column ID of a “image” data type column.
FormEntry - The User’s Manual 50
Page 51
L OCATION (^0)
Location gathers the latitude and longitude coordinates of the user’s device. When the
user select the control, the coordinates are collected.
If you want the user to have the ability to refresh their location, you can select the
Refreshable Location checkbox. If not, have this unchecked, will allow the user to only
select the control once.
For most locations, your desired accuracy should be set to best.
You can also use the Rule Builder to perform calculations or enabled/disable controls
using the Location services. For example, you can enable controls if the user is
standing within 10 meters of a specific GPS location.
FormEntry - The User’s Manual 51
Page 52
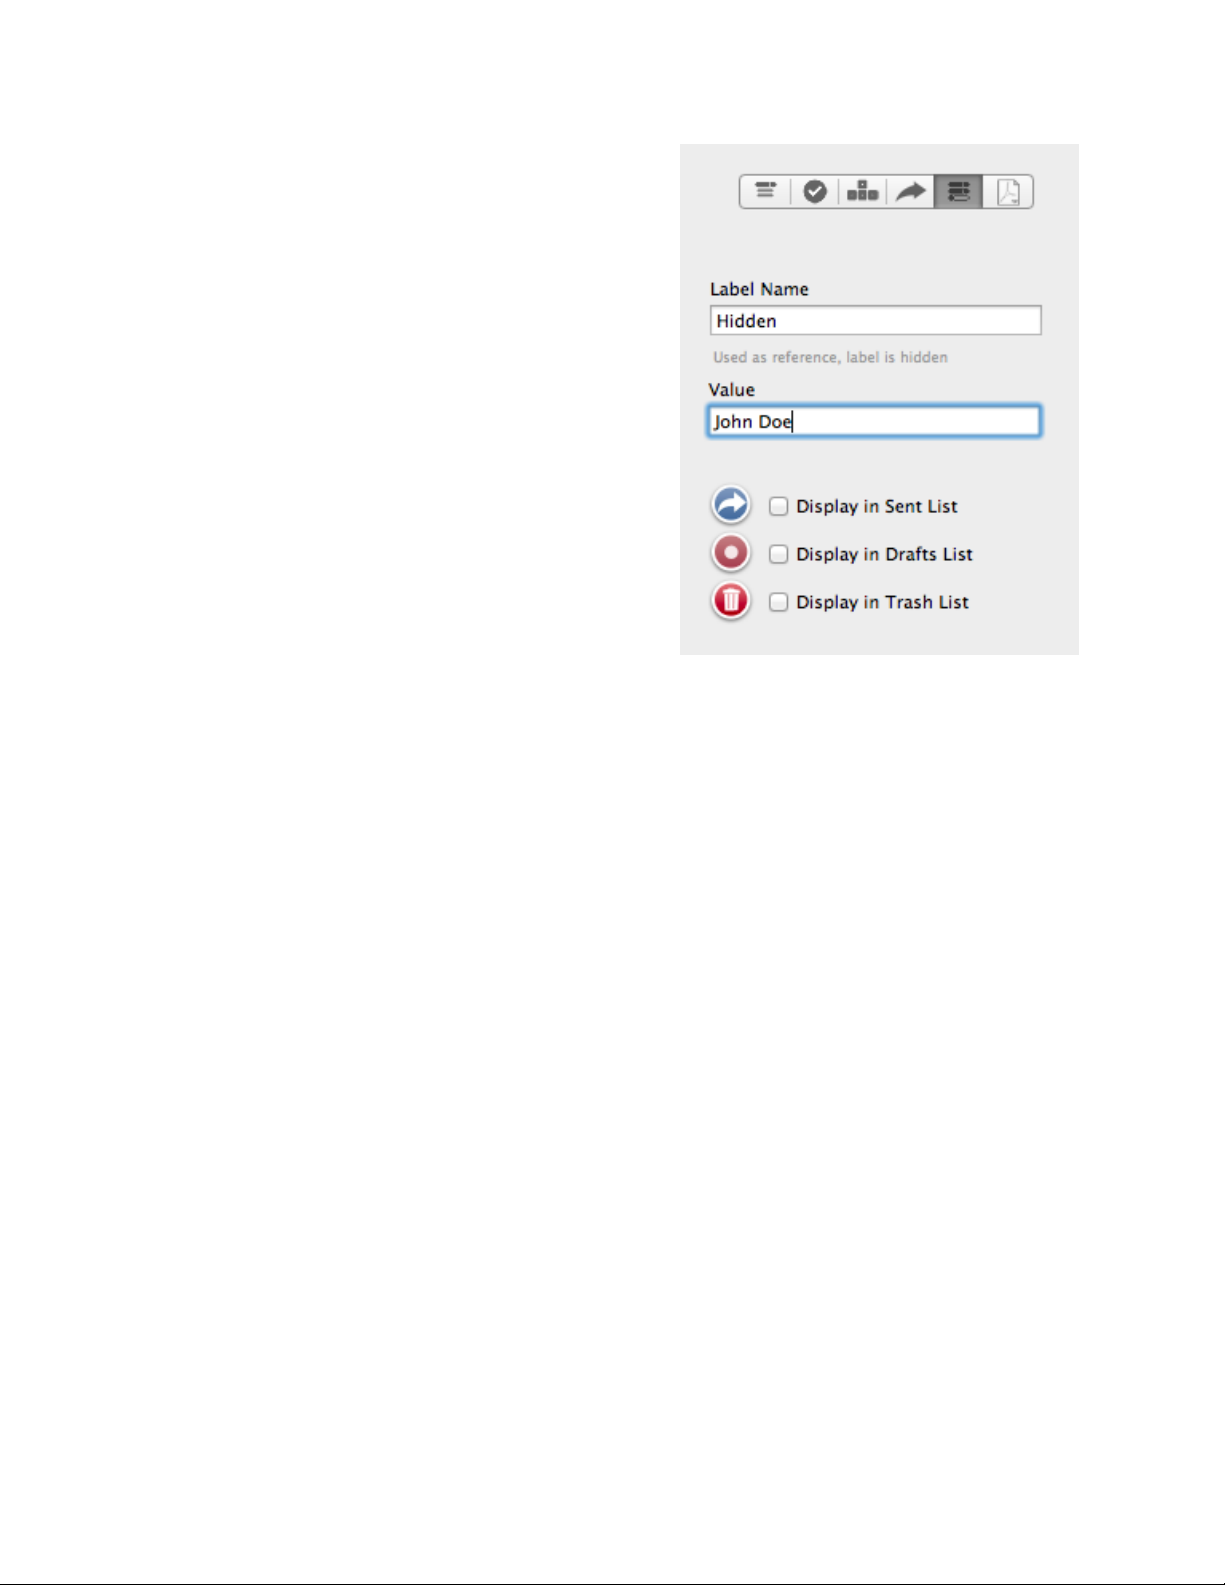
H IDDEN (^1)
Hidden controls are place holders controls that
are invisible to the user. If you like to store
values in hidden fields and have that data be
sent back or to be used in the Rule Builder, this
would be an excellent place to store values.
Note, there are five key parameter values that
are stored by default with FormEntry, “form_id”,
“entry_id”, “device_uuid8”, “created” and
“modified”, which are all hidden fields. These
parameters will become populated with the
device information.
From the Web Service tab, you can disable the
Keyword Parameter Names for the five default
key parameters. By disabling these key
parameters, you basically will turn them into a normal hidden field.
FormEntry - The User’s Manual 52
Page 53
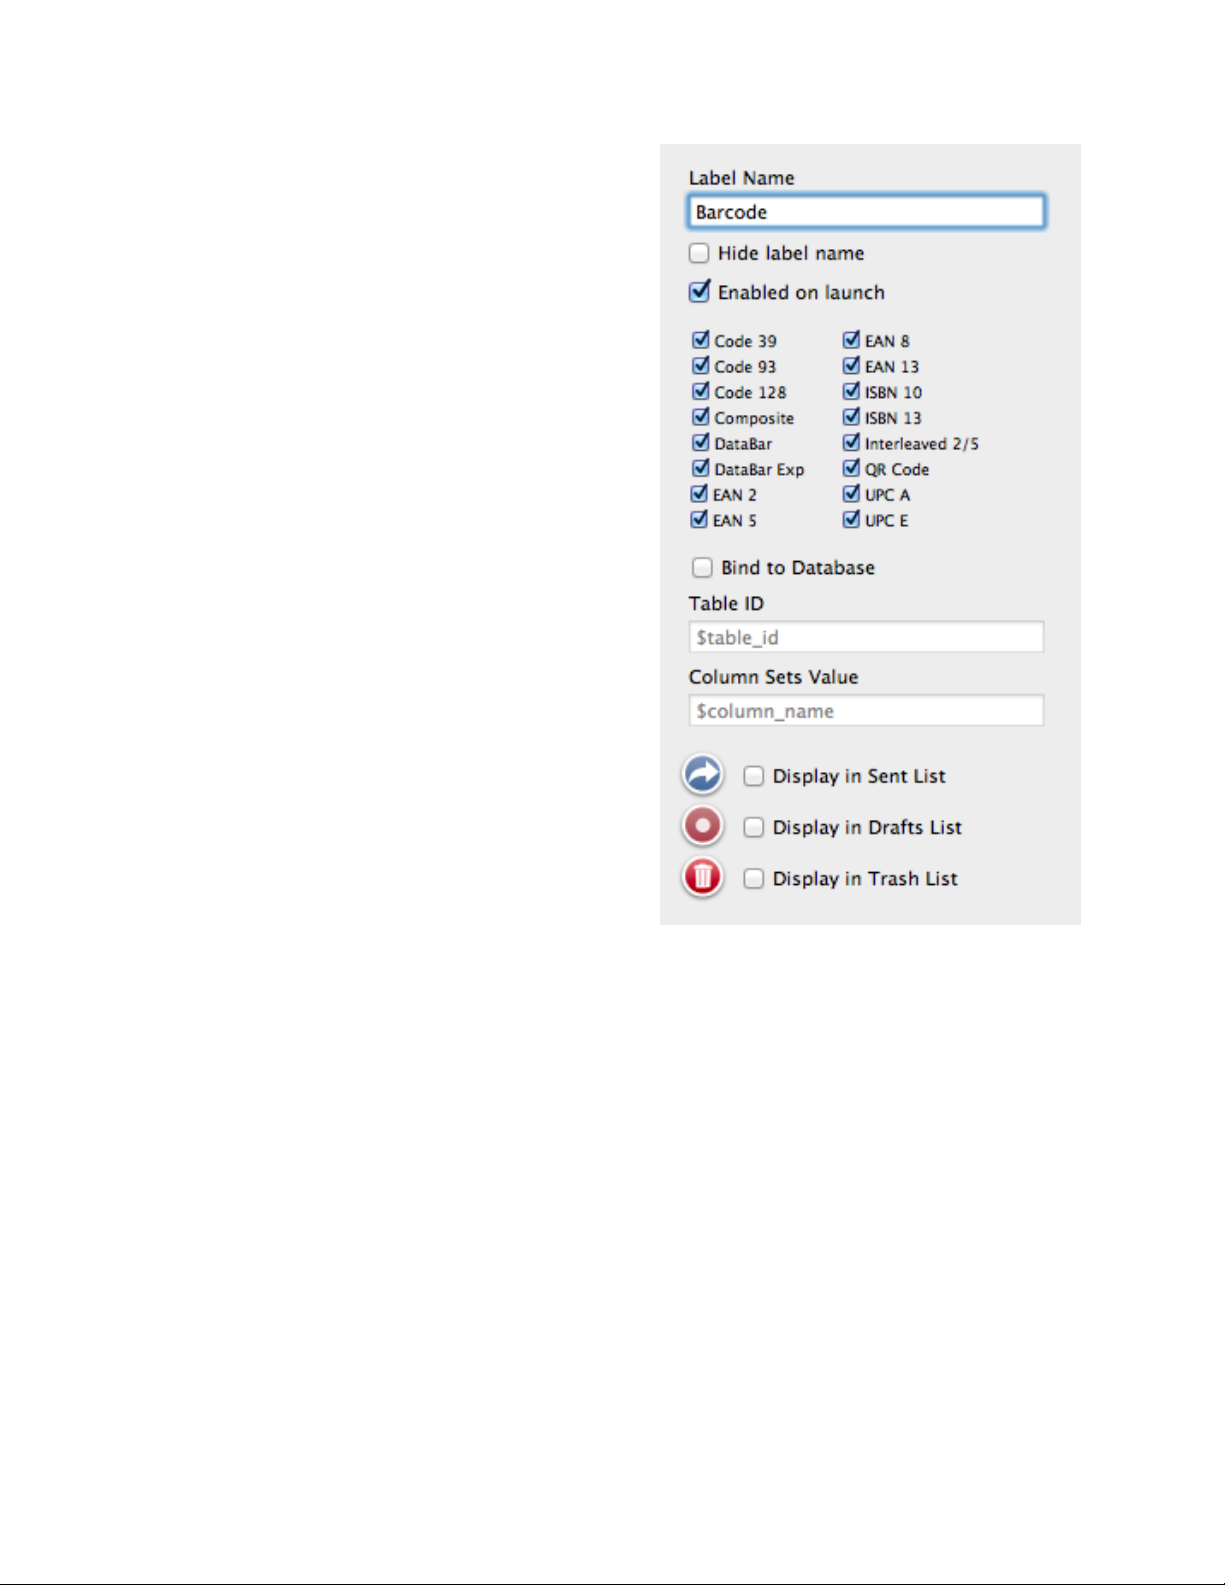
B ARCODE (^2)
Once installed you can add barcode scanning
to your form apps. Using the iOS device’s
camera, you will be able to read the following
barcodes: Code 39, Code 93, Code 128,
Composite, DataBar, DataBar Exp, EAN 2,
EAN 5, EAN 8, EAN 13, ISBN 10, ISBN 13,
Interleaved 2/5, QR Code, UPC A and UPC E.
You can also bind the values of the scanned
barcode to a database table’s column. This is
useful if you would like to perform a look up
on a product and populate additional fields
from the database based upon the scanned
barcode.
FormEntry - The User’s Manual 53
Page 54
I MAGE (^3)
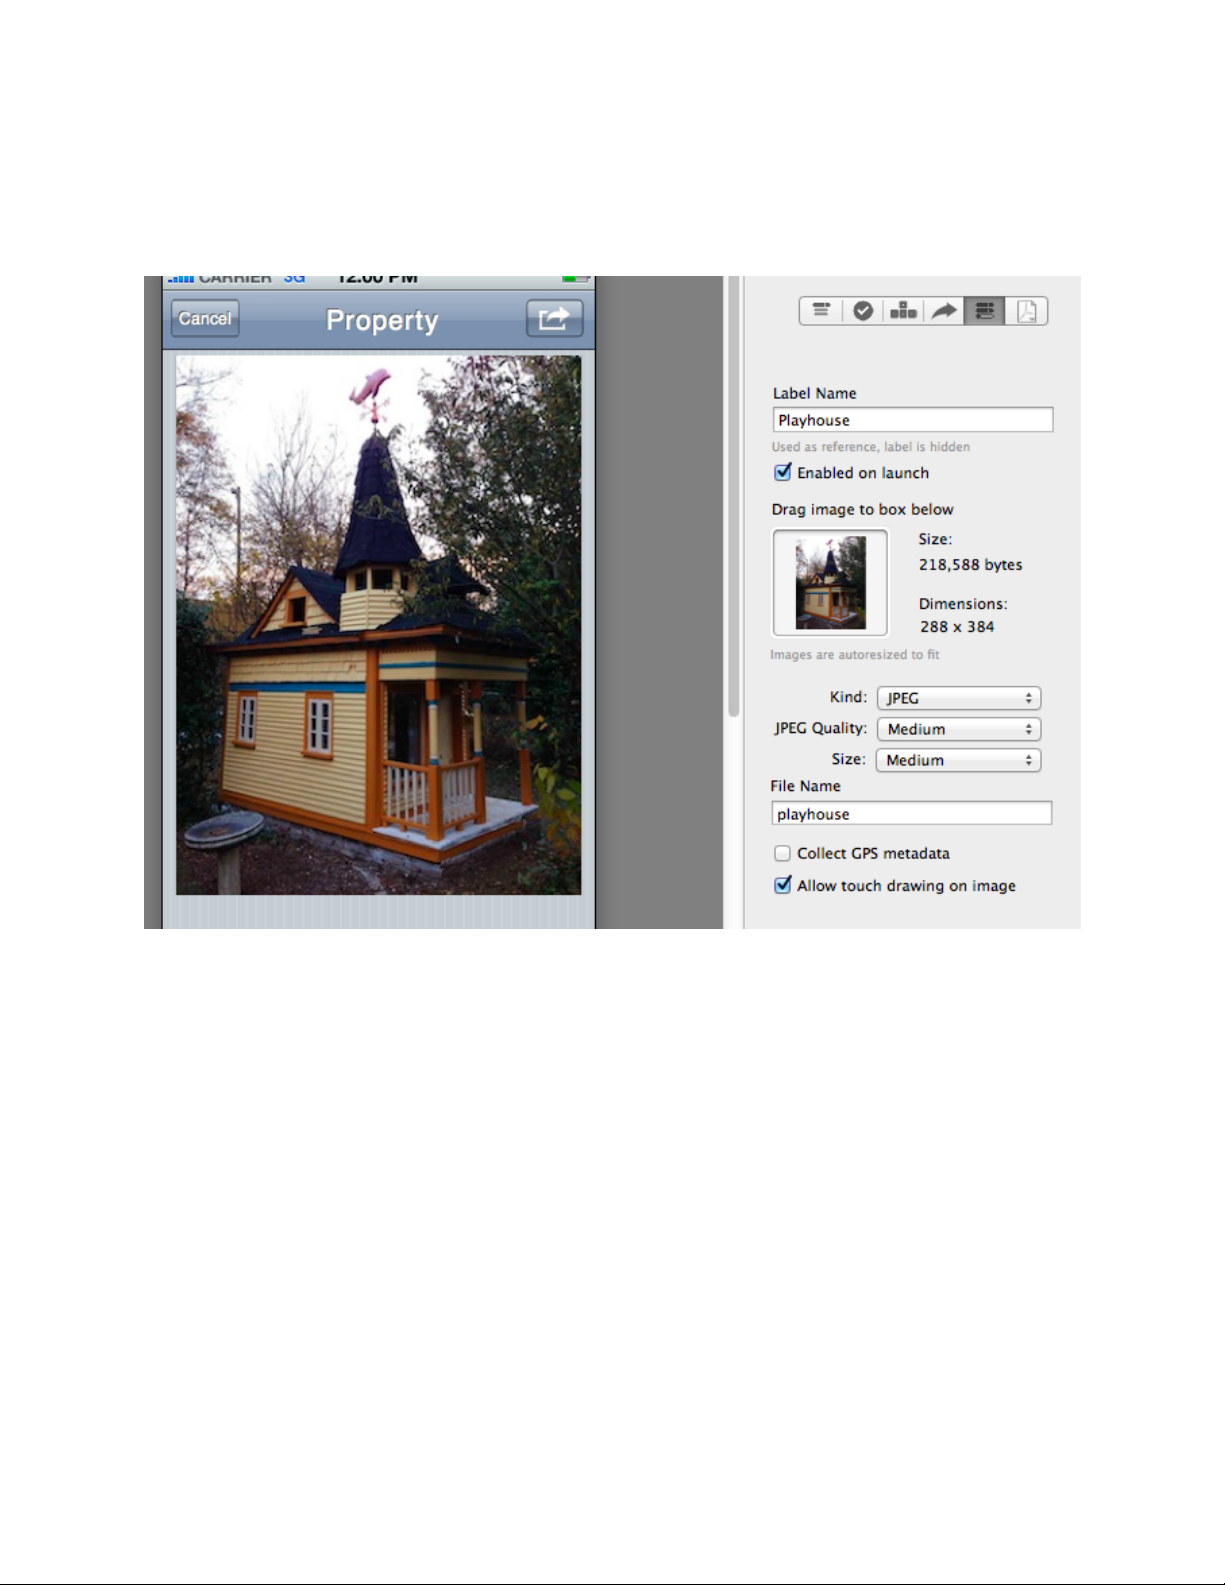
The Image control allows you to place an image within your form app. The image will
auto adjust to a full size image to fit on the width under the iPhone or iPad.
You can drag any JPEG or PNG file into the image well. It is HIGHLY recommended you
use the smallest file size possible. The above image is roughly 218K in file size and is
288 x 384 in resolution. It could be possible to compress this file even further and the
quality would be roughly the same on the iOS devices.
Within the Image control, you have the ability to send the image back to you either as a
JPEG or PNG file. If you choose JPEG, you have further options of compressing the
image when sending it back as well as collecting GPS and any touch drawings.
The Image control allows your users to draw with their finger or stylus on your image.
When the image is sent back, the drawing is mapped to your image.
FormEntry - The User’s Manual 54
Page 55
R ATING S (^4)
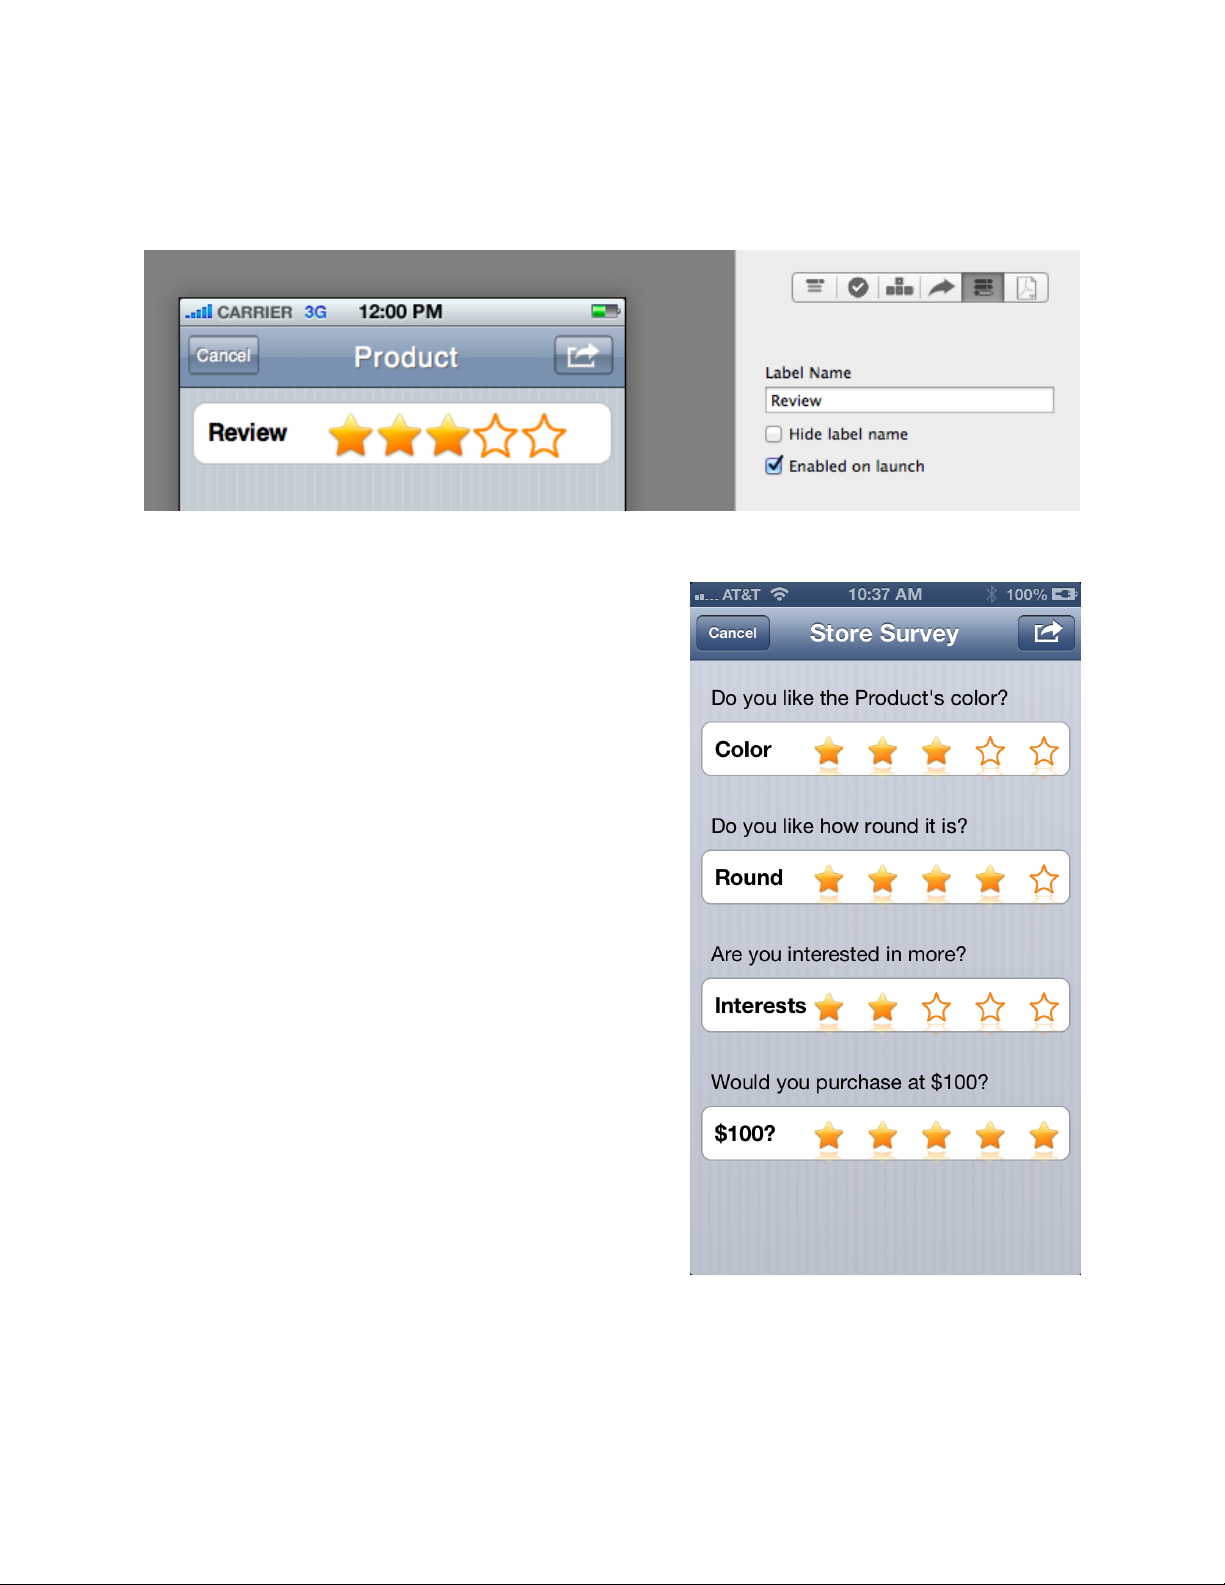
The Ratings control allows your users to rate from 0 to 5 stars on the iOS device. The
iOS user can select a star by simply touching the
star. To select no stars, they can simply touch
the label or to the right of the first star.
The Ratings control is ideal for ad hoc retail
surveys, questionnaires, classroom and reviews.
FormEntry - The User’s Manual 55
Page 56
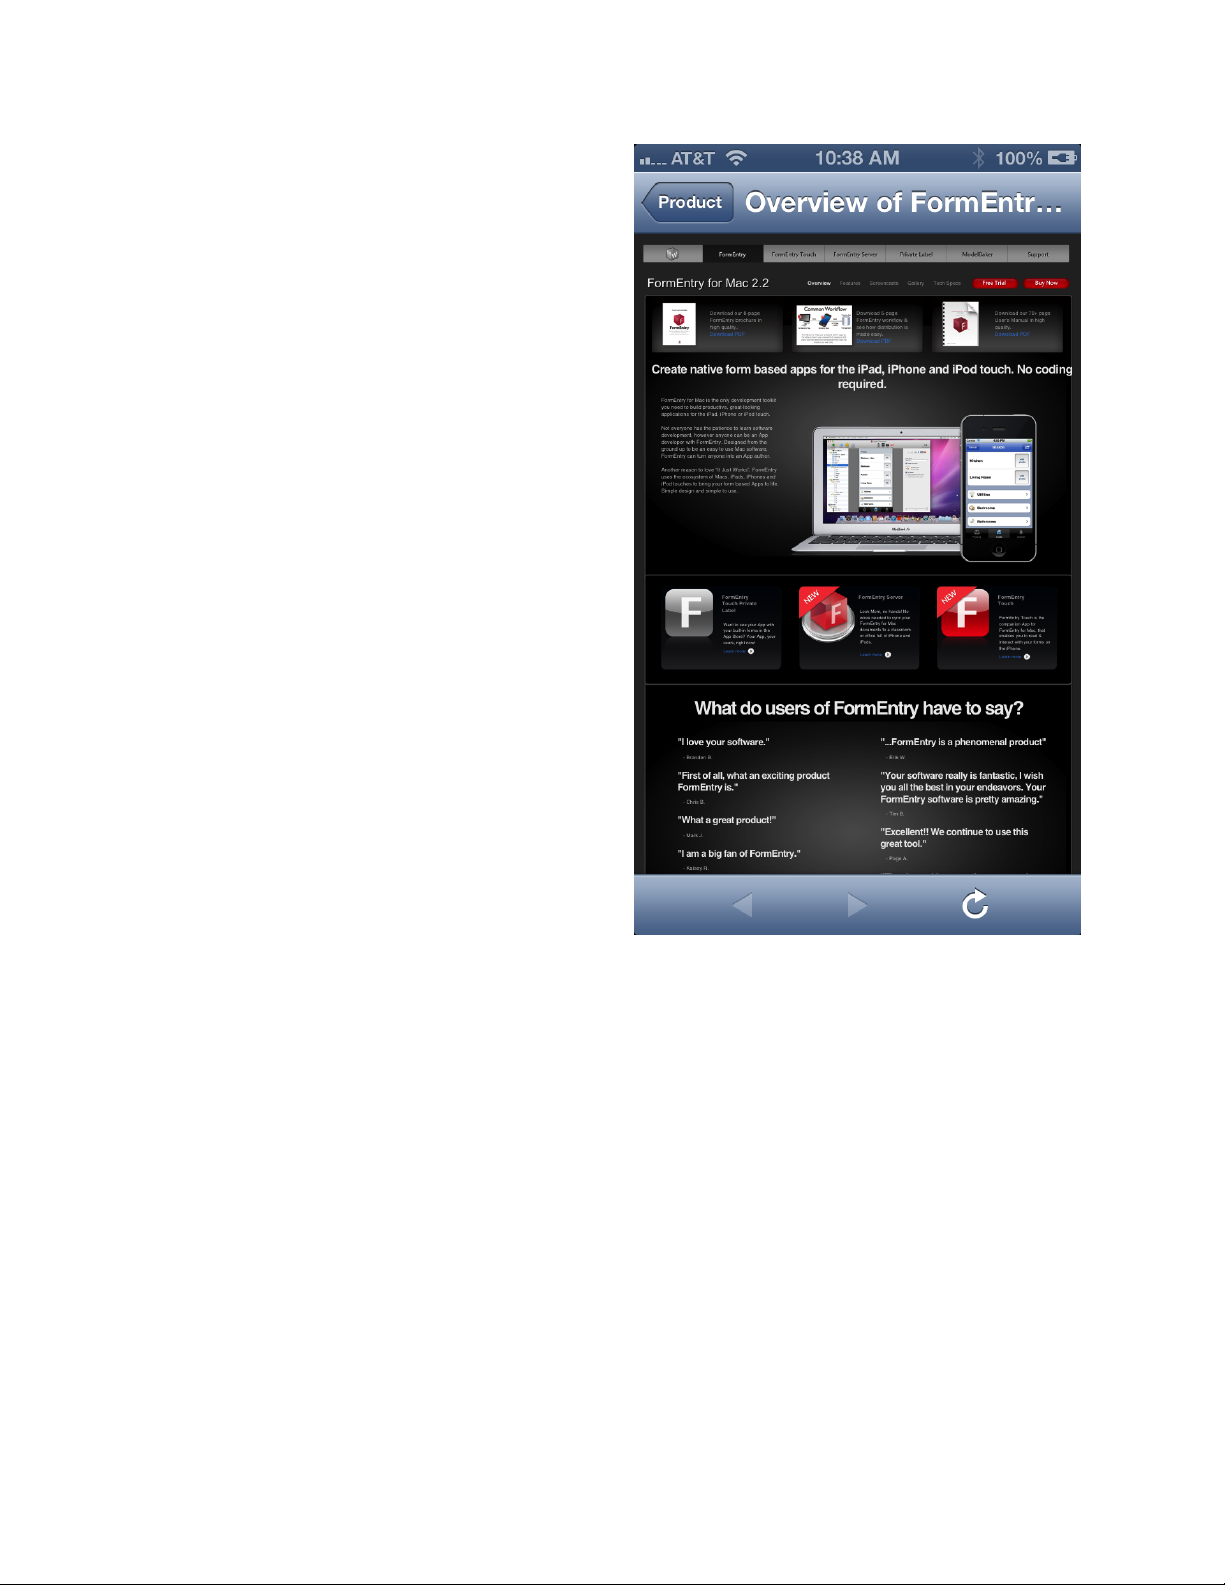
W EB B ROWSER (^5)
The Web Browser control allows you to add
a live web landing page to your form apps.
The end user does not have access to
change the URL, they can only simple
navigate through the URL you have
provided.
An Internet connection (Wi-Fi or Cellular) is
required for the web page to load.
This plug-in embeds the full functionality of
Mobile Safari on the iOS device. The end
user can go back and forward, refresh the
page and navigate back to your form app.
Ideal for learning resources, links to videos,
audio files, PDFs, anything external that
you want your users to gain access to.
FormEntry - The User’s Manual 56
Page 57
PIN C ODE (^6)
The PIN Code control allows you to lock
your forms or different Sections or drilldown groups (Current Screens) with a 4digit PIN code (passcode).
Your users must successful enter the PIN
Code to advance in either loading the form
app or getting access to different areas of
your form app.
You can capture the user’s 4-digit number
when the form is sent by selecting either
“Lock Current Screen Only” or “Lock
Current Screen & Form”. If you have
selected “Lock Form Only”, no value will
be collected however, your form cannot be
accessible without the correct PIN Code.
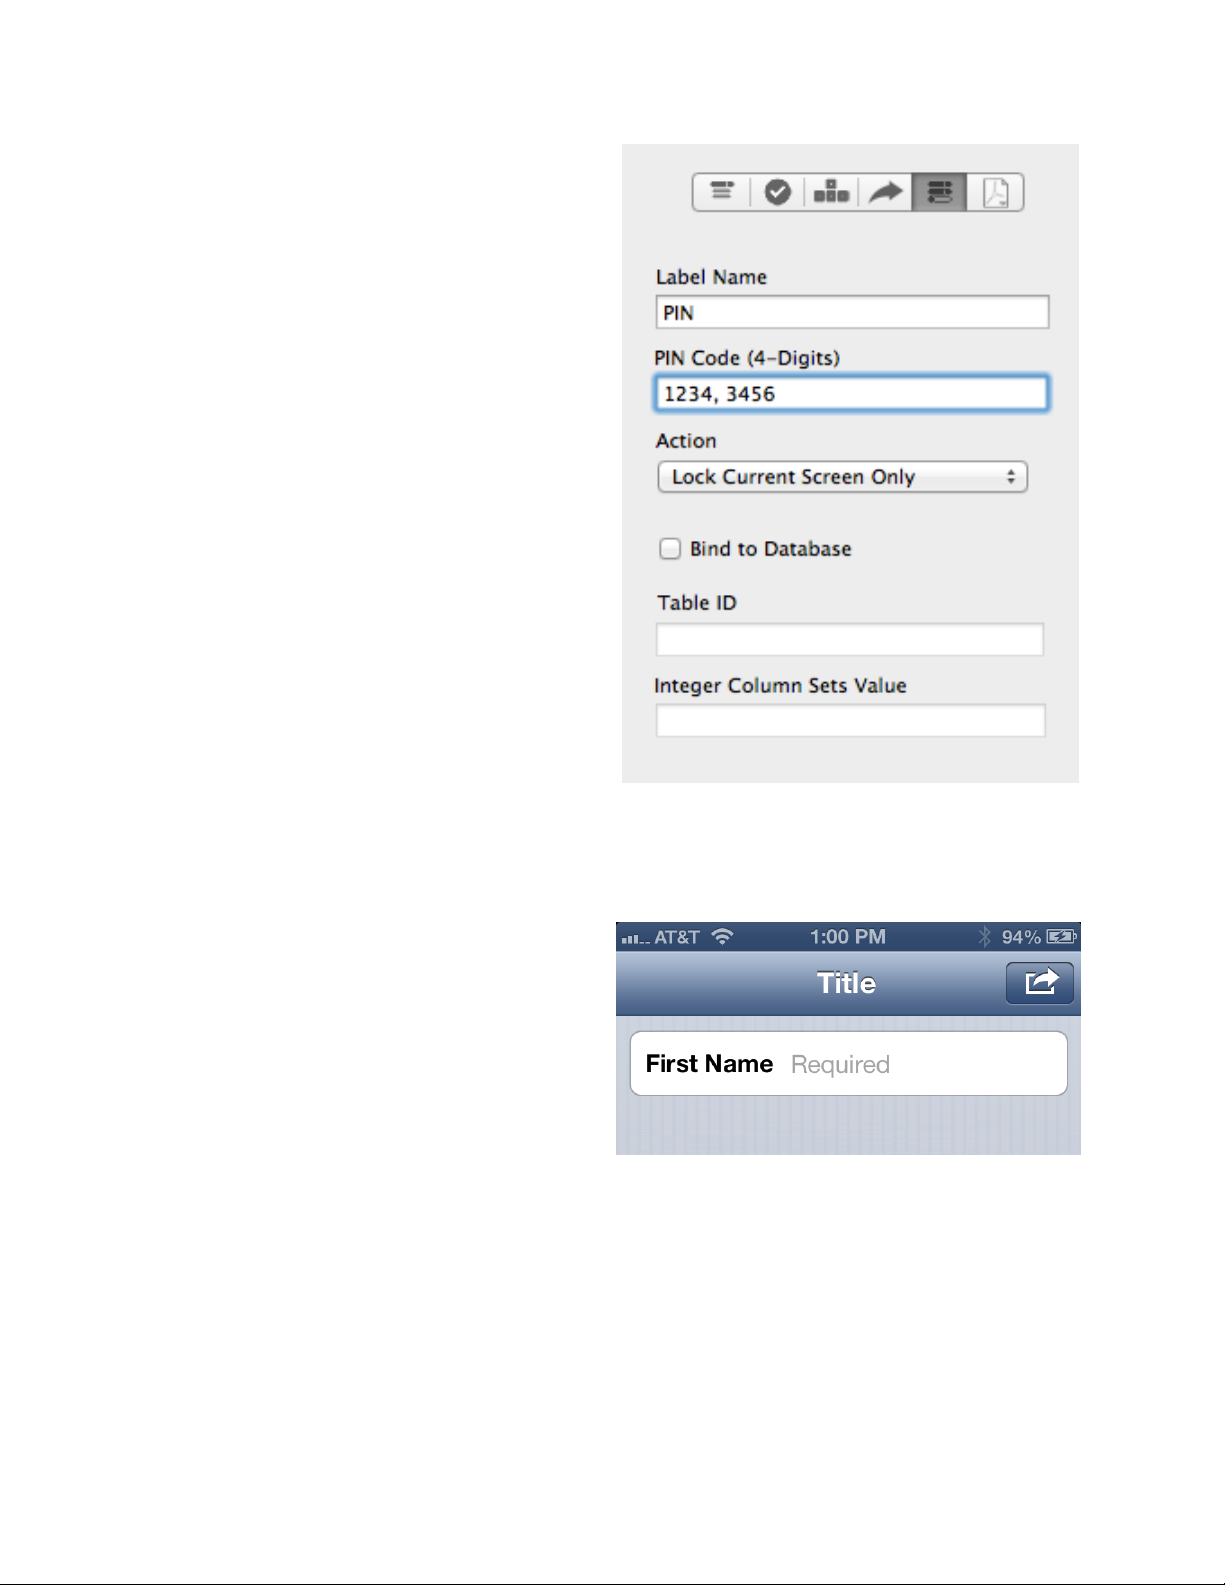
If you want to set multiple PIN Codes, you
can simply add the 4-digit numbers
separated by a comma, i.e. “1234, 3456”.
This control can be bound to a database table’s column.
Important configuration to note, if you had
selected to not show the “Cancel” button
within your form app and choose to use
the “Save” plugin, there would be no way
to get back to the current form screen.
Your form would constantly be in a New
form state. To get around this, the PIN
Code control offers the ability to jump
back to the current form screen by pressing the Title for 5 seconds.
To enable the 5 second PIN Code recognition the Action must be either “Lock Current
Screen & Form”s or “Lock Form Only” selected.
FormEntry - The User’s Manual 57
Page 58
Settings
The Settings sheet offers the ability to configure your project. From here, you can sent
specific information about your project. Configuring your project setting is important part
of how your form app will behave once installed on your user’s iOS devices.
G ENERAL I NFO
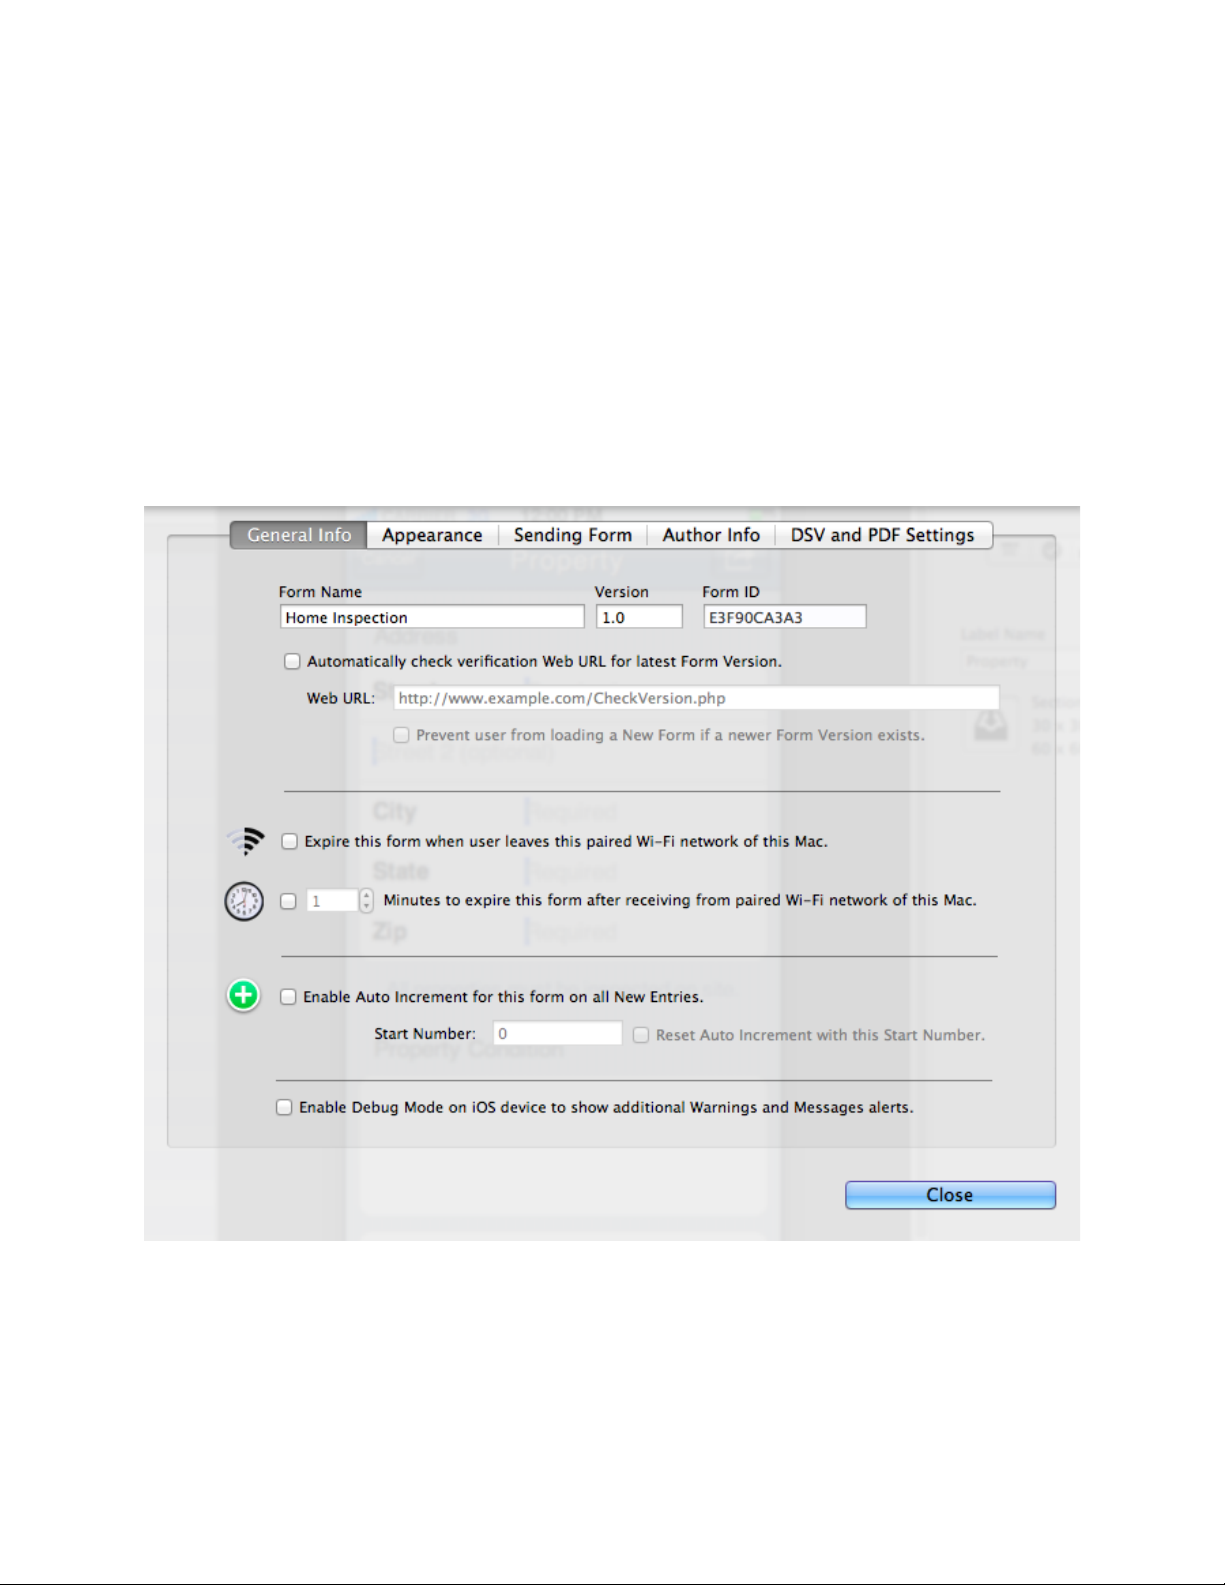
From the General Info tab you can configure the Form Name, Version number as well
read the Form ID provided by FormEntry for Mac. It also provides the option to expire
the form after a time limit when the user leaves the paired Wi-Fi network of the Mac.
You can also configure whether your form app should check a web service for newer
versions, see the Check Form Version section for details.
You can also set an auto increment value for your form app and you can specify the
start number. When the form is delivered for the first time to an iOS device, it will start
FormEntry - The User’s Manual 58
Page 59
with the Start Number. If you deliver an update to your form app, it will not reset the
number on the device, unless you have “Reset Auto Increment with this Start Number”
set.
Lastly, you can also enable a debug
mode on the iOS device as you test
your form app. This is handy when
testing your form app with an attached
database.
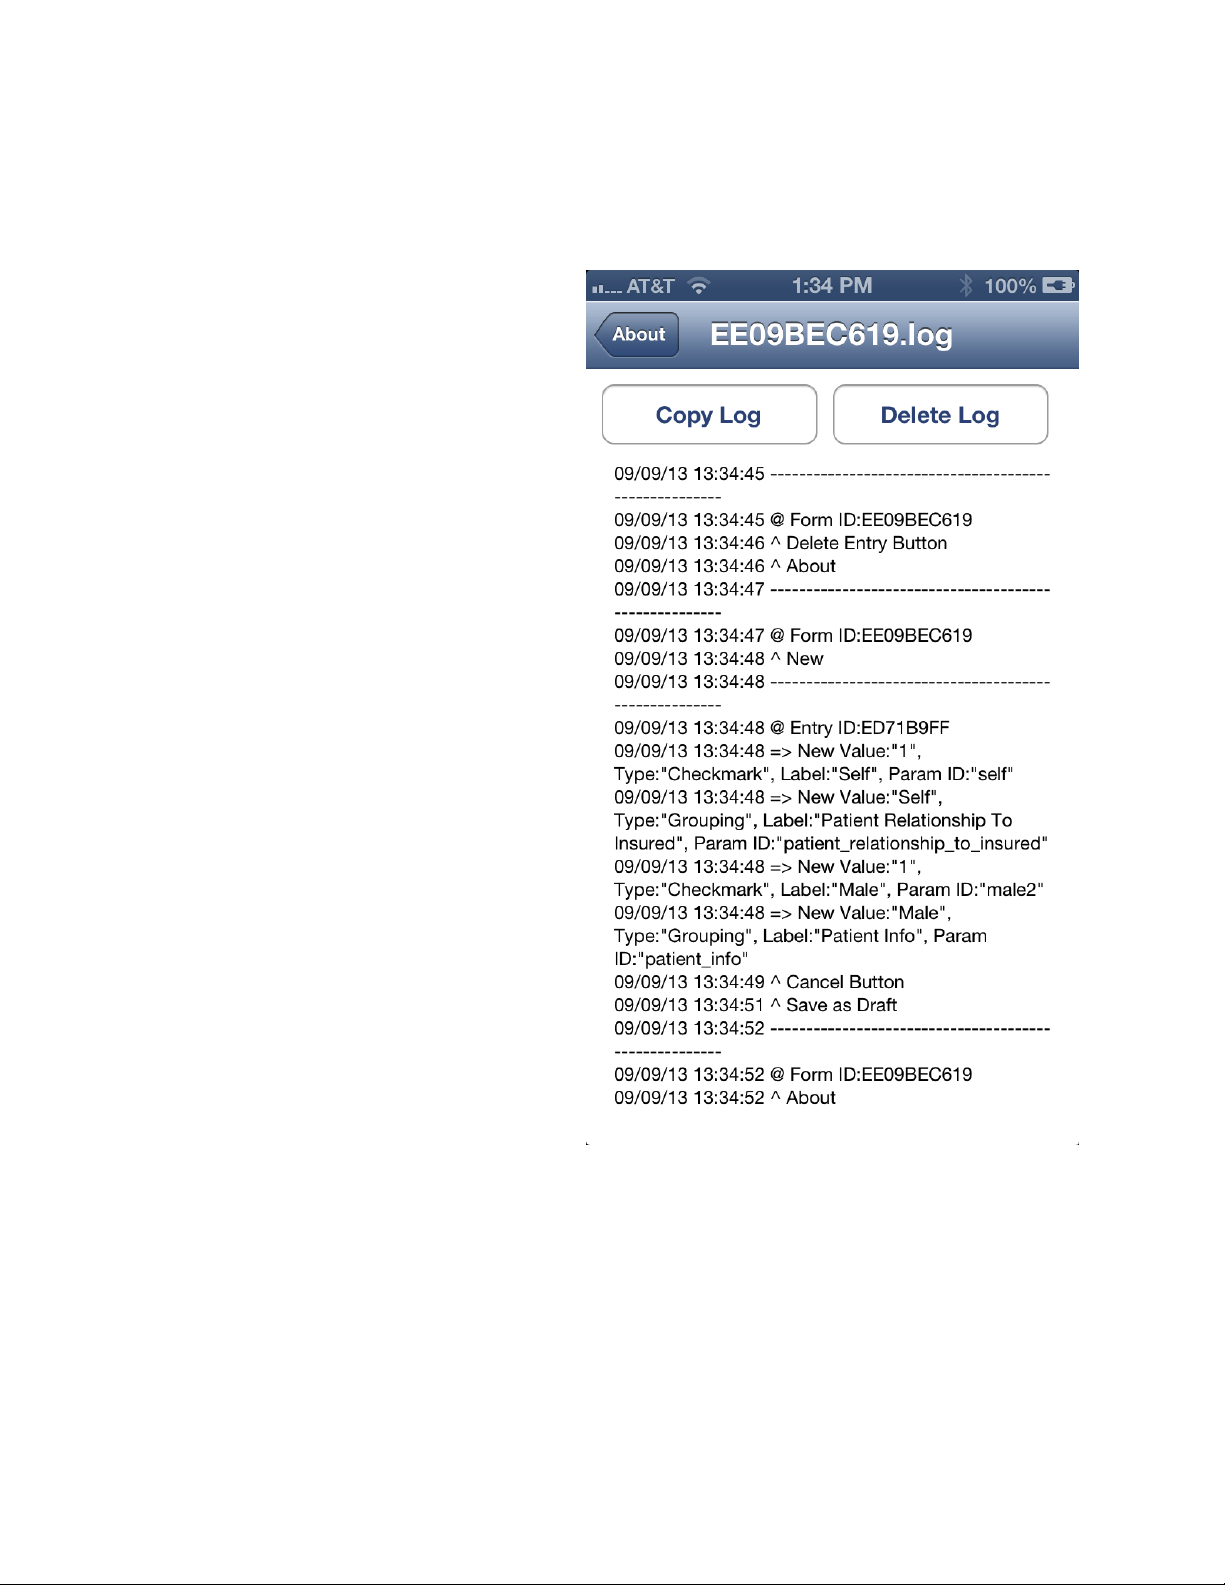
Under your form app if you navigate to
the About screen, you will see Debug
Mode - View Log. This log contains the
history of your form. The information
that is recorded under the log will help
you track down issues that come up
when doing math, rules, posting form
data to websites, etc.
The log file is also accessible under
iTunes if you Sync your iOS device to
your computer. From the Apps tab
under File Sharing, you can save the
form’s logs to your computer to be
opened in a text editor.
FormEntry - The User’s Manual 59
Page 60
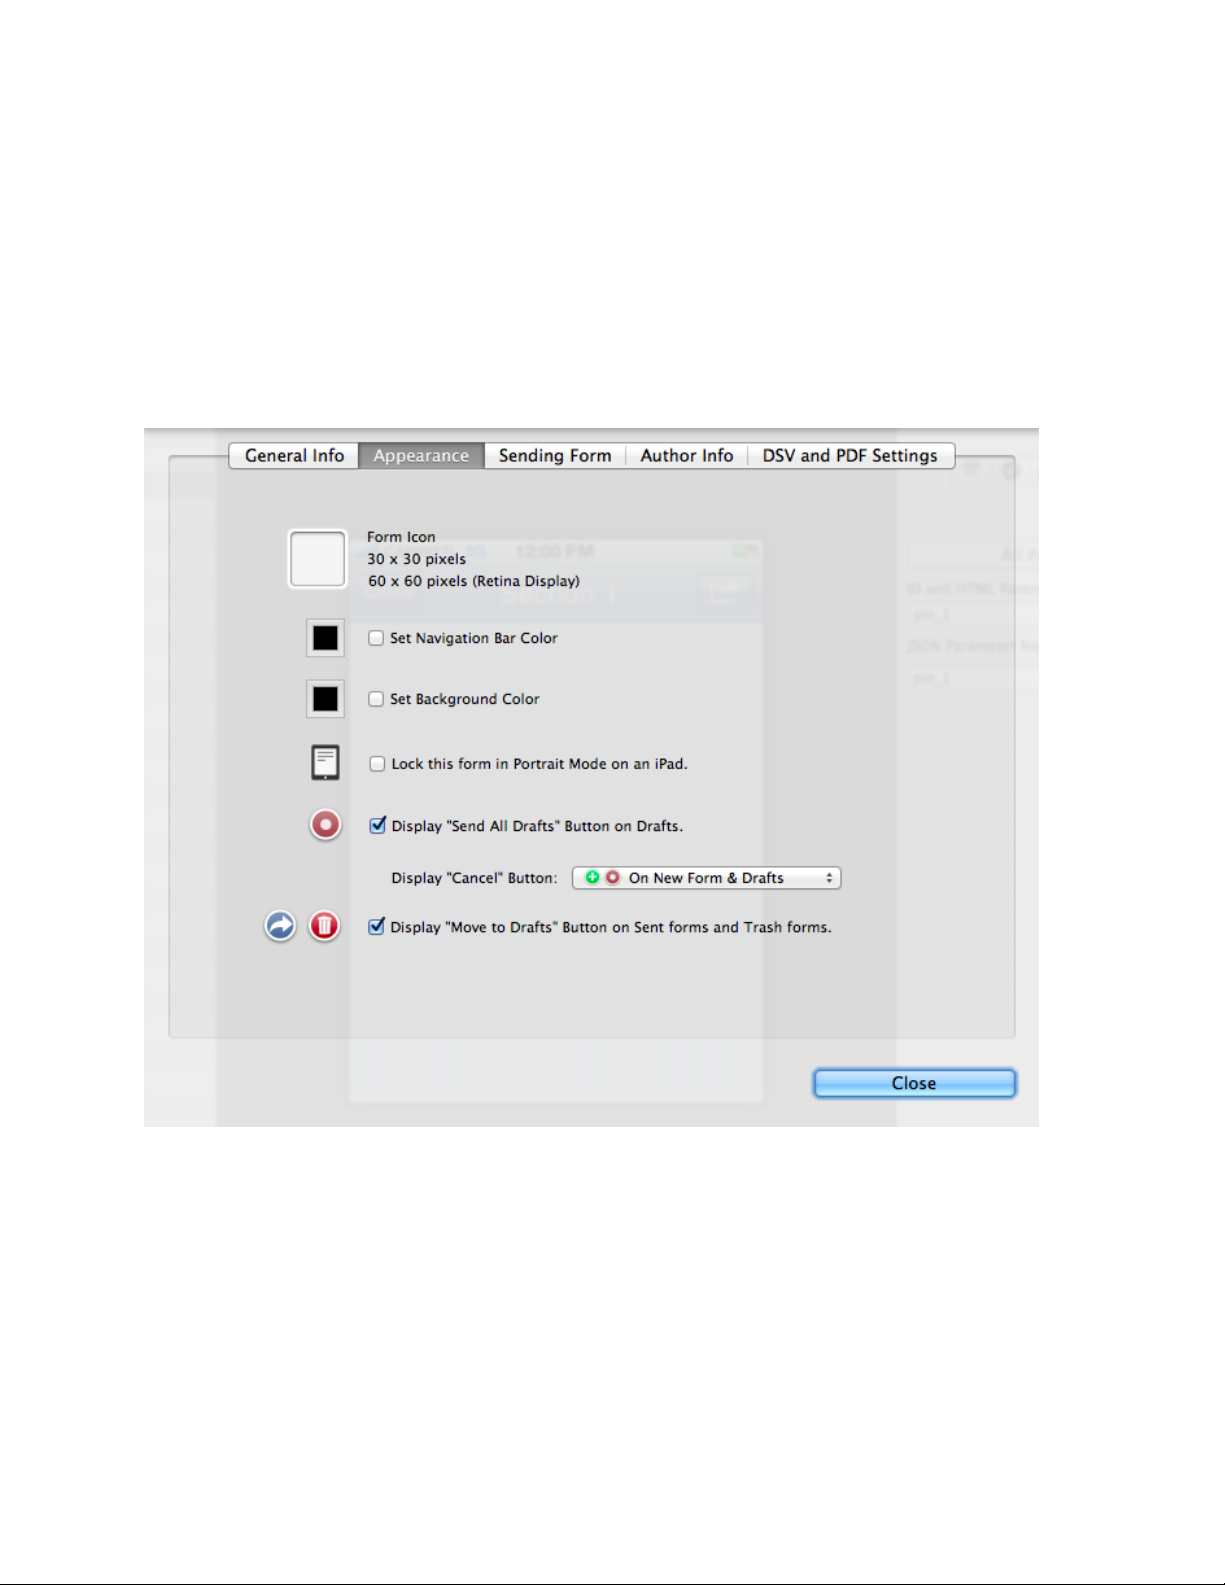
A PPEARANCE
The Appearance tab allows you to configure your Form Icon using a 30 x 30 or 60 x 60
(Retina Display) icons. You can also set the navigation and background colors of your
form app.
On iPads, you can lock your form app in Portrait mode. This is handy if you do not want
your users to have access to Drafts, New, Sent, Trash folder and this mode works great
with the Save and PIN code Plug-ins.
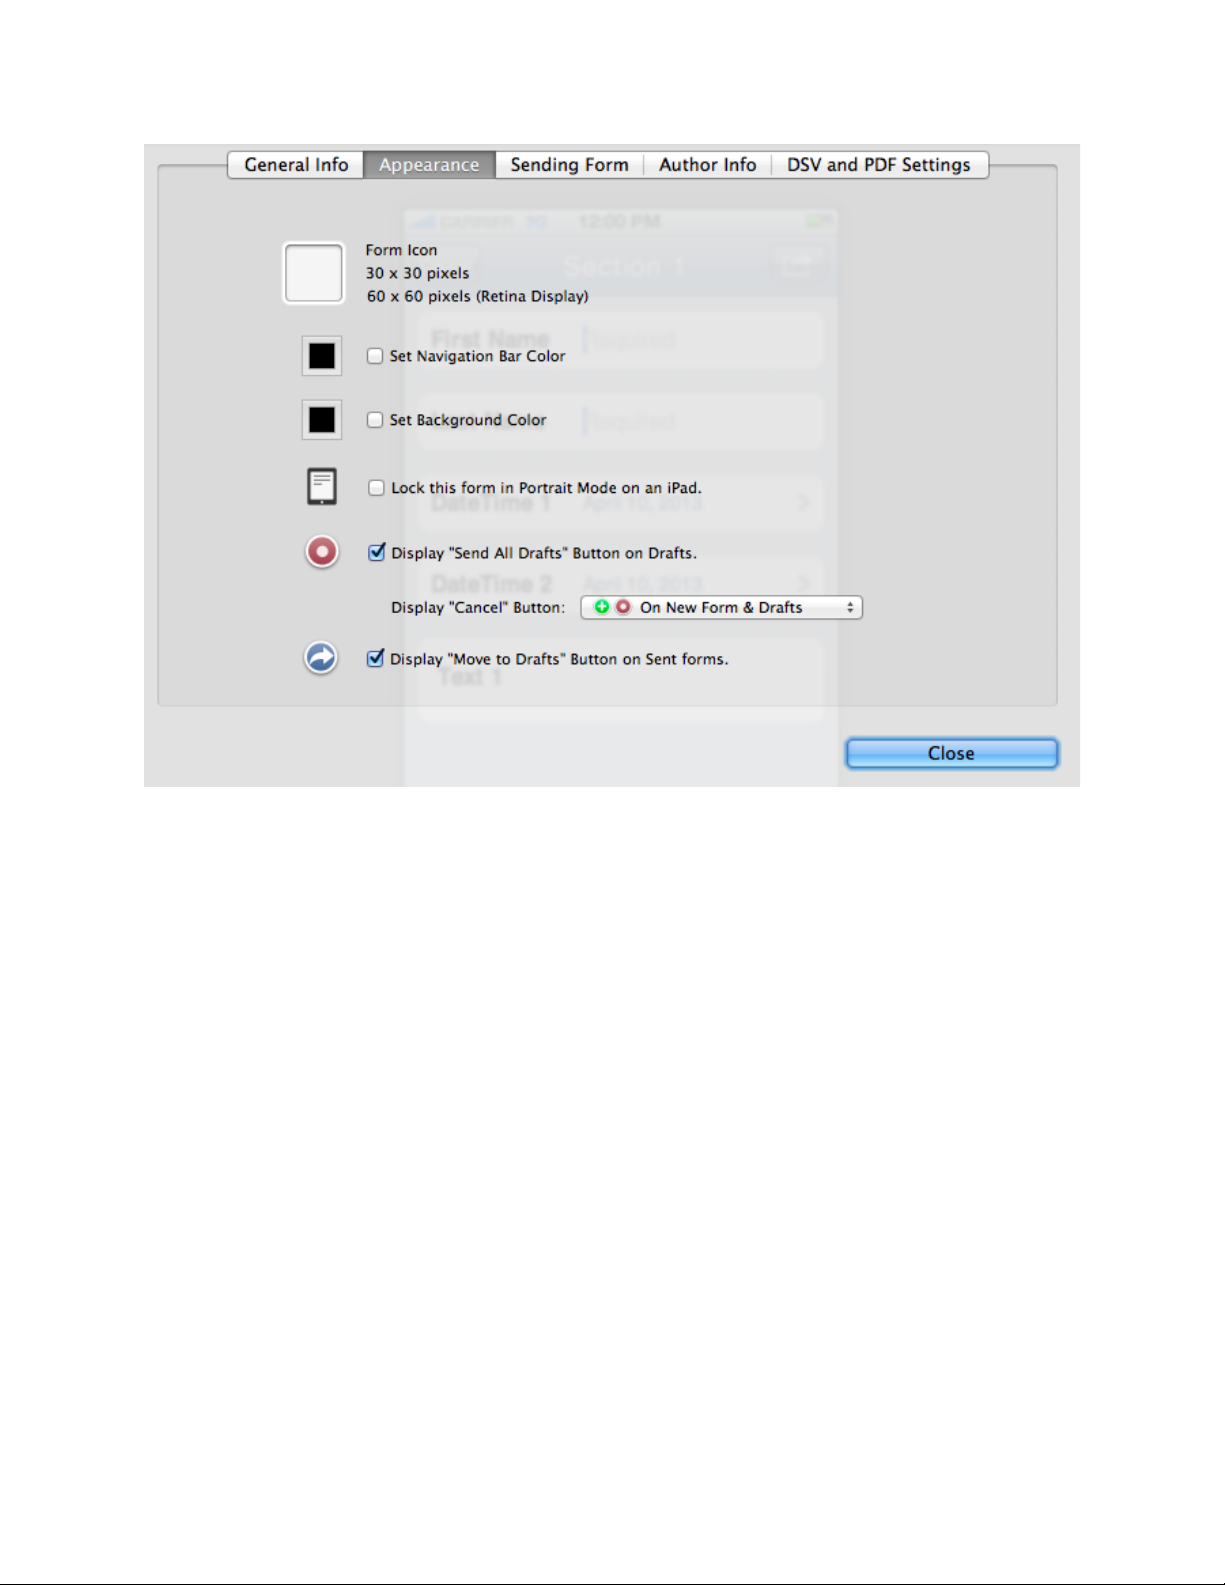
Also, you can decide if you want to have the action buttons displayed on the New Form,
Drafts, Sent and Trash screens.
S ENDING F ORM
Sending the Form data is probably the end goal of collecting the information on your
iOS devices. You want the ability to process, review, perform analytics, collect and store
this information. FormEntry provides eight different methods for sending your data:
FormEntry - The User’s Manual 60
Page 61
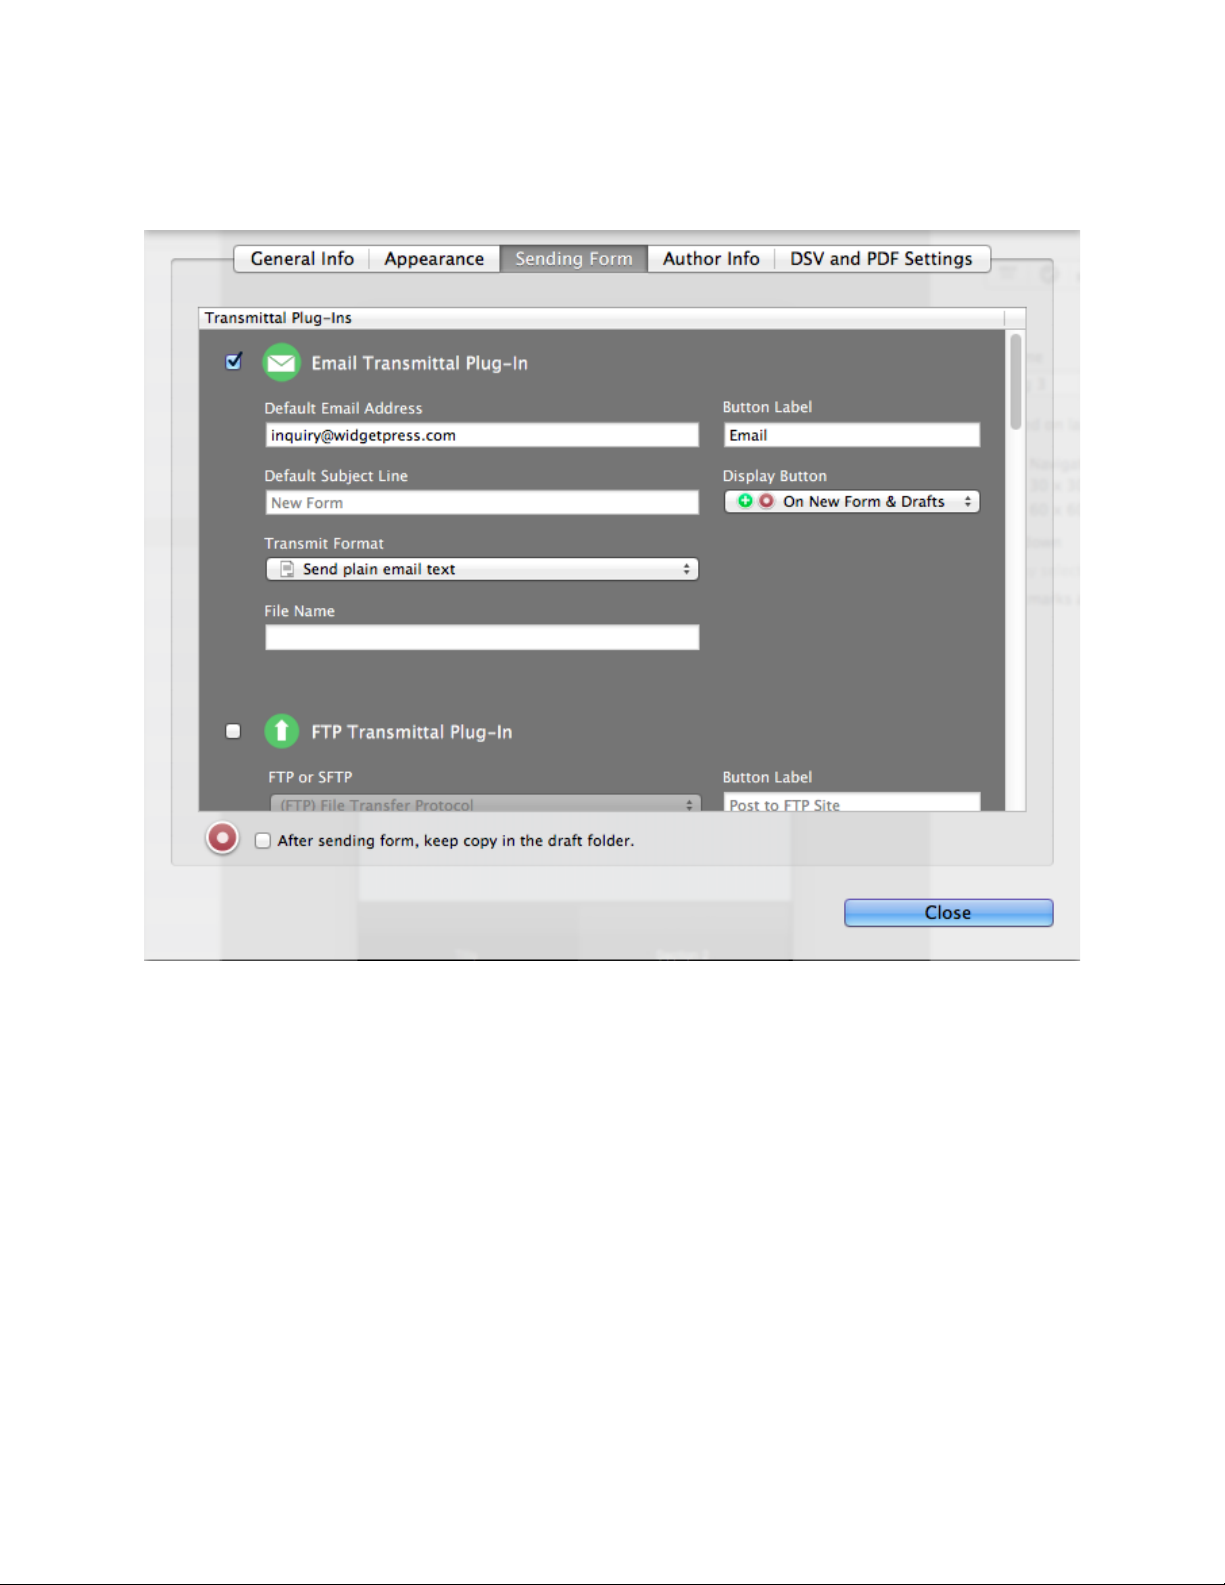
Email, FTP, HTML Post, JSON Post, Open In, Printer, Save and WebDAV Transmittal
Plug-Ins.
A UTHOR I NFO
The form Author Info tab holds the metadata about your form, such as the Author’s first
and last name, email, company information and form description.
This information is used within FormEntry Touch under the about section as well as
provides further information in the Projects Window if placed within the Projects Folder.
FormEntry - The User’s Manual 61
Page 62
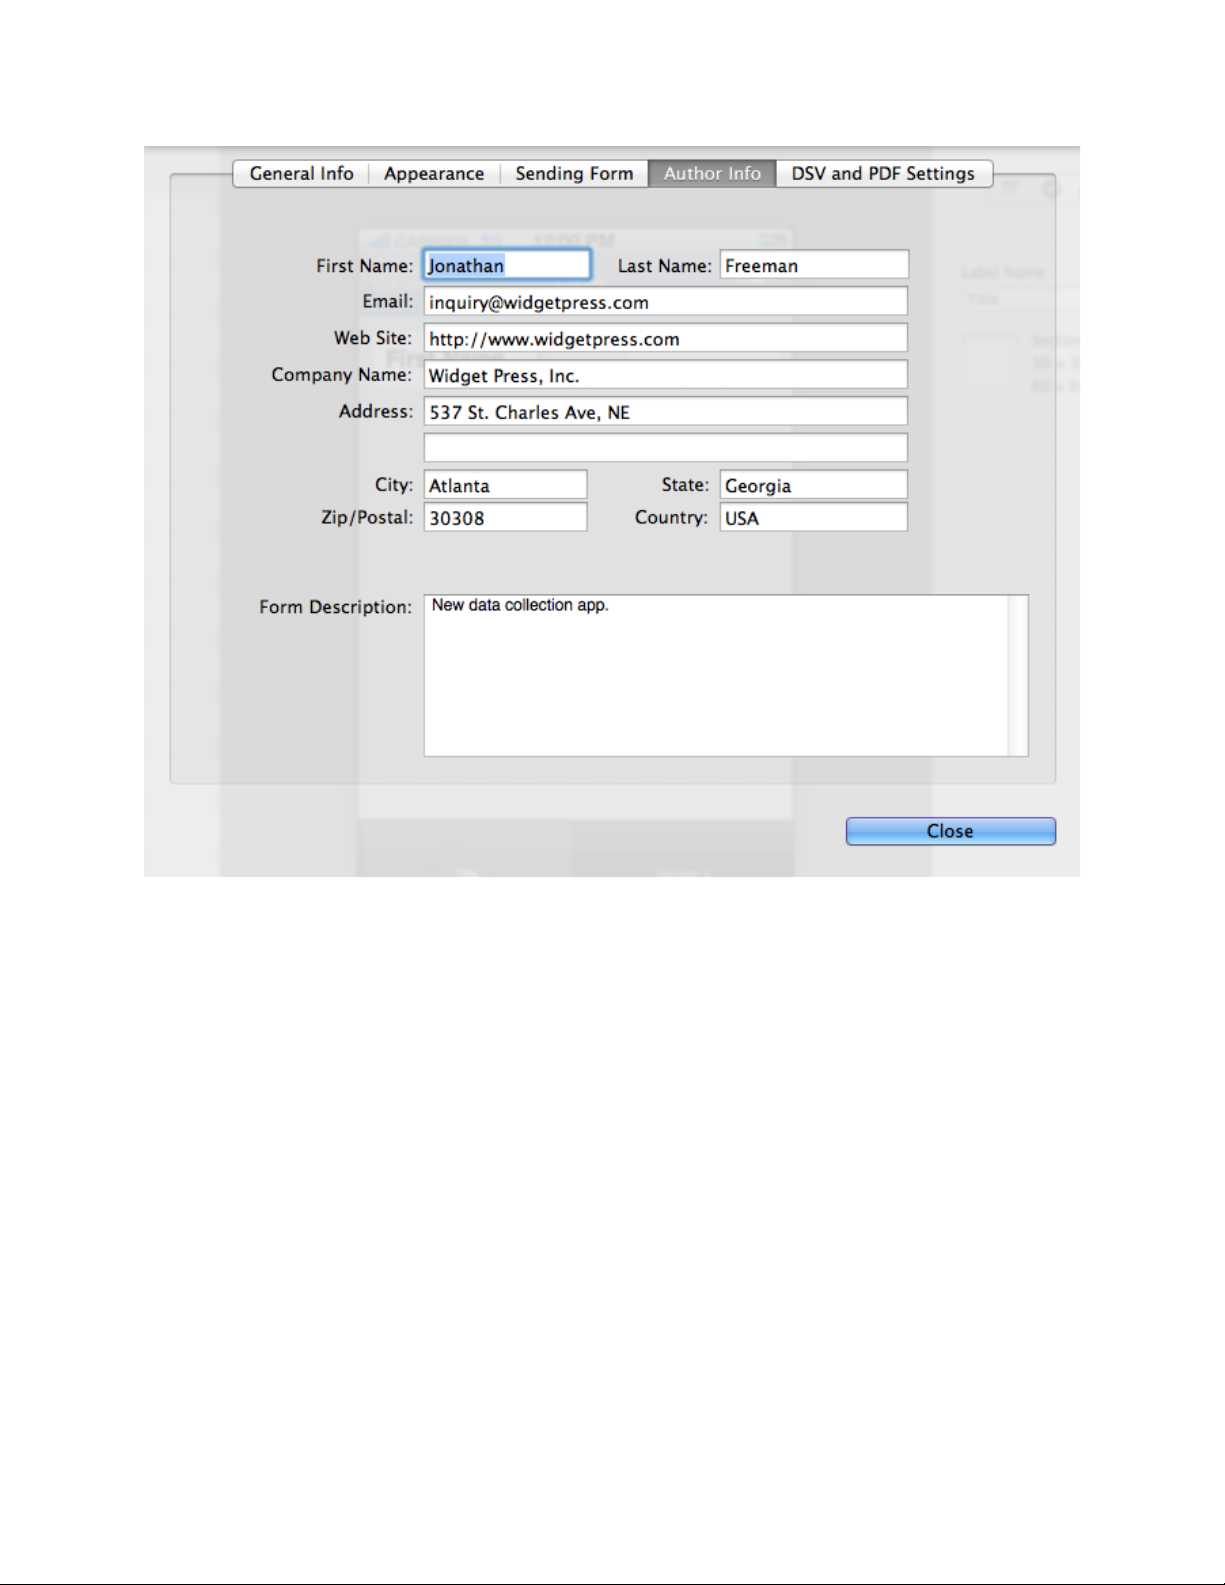
Different parts of the Author Info can be used within your form apps using the reserved
form parameter ids, see the section of Reserved Form Parameter IDs.
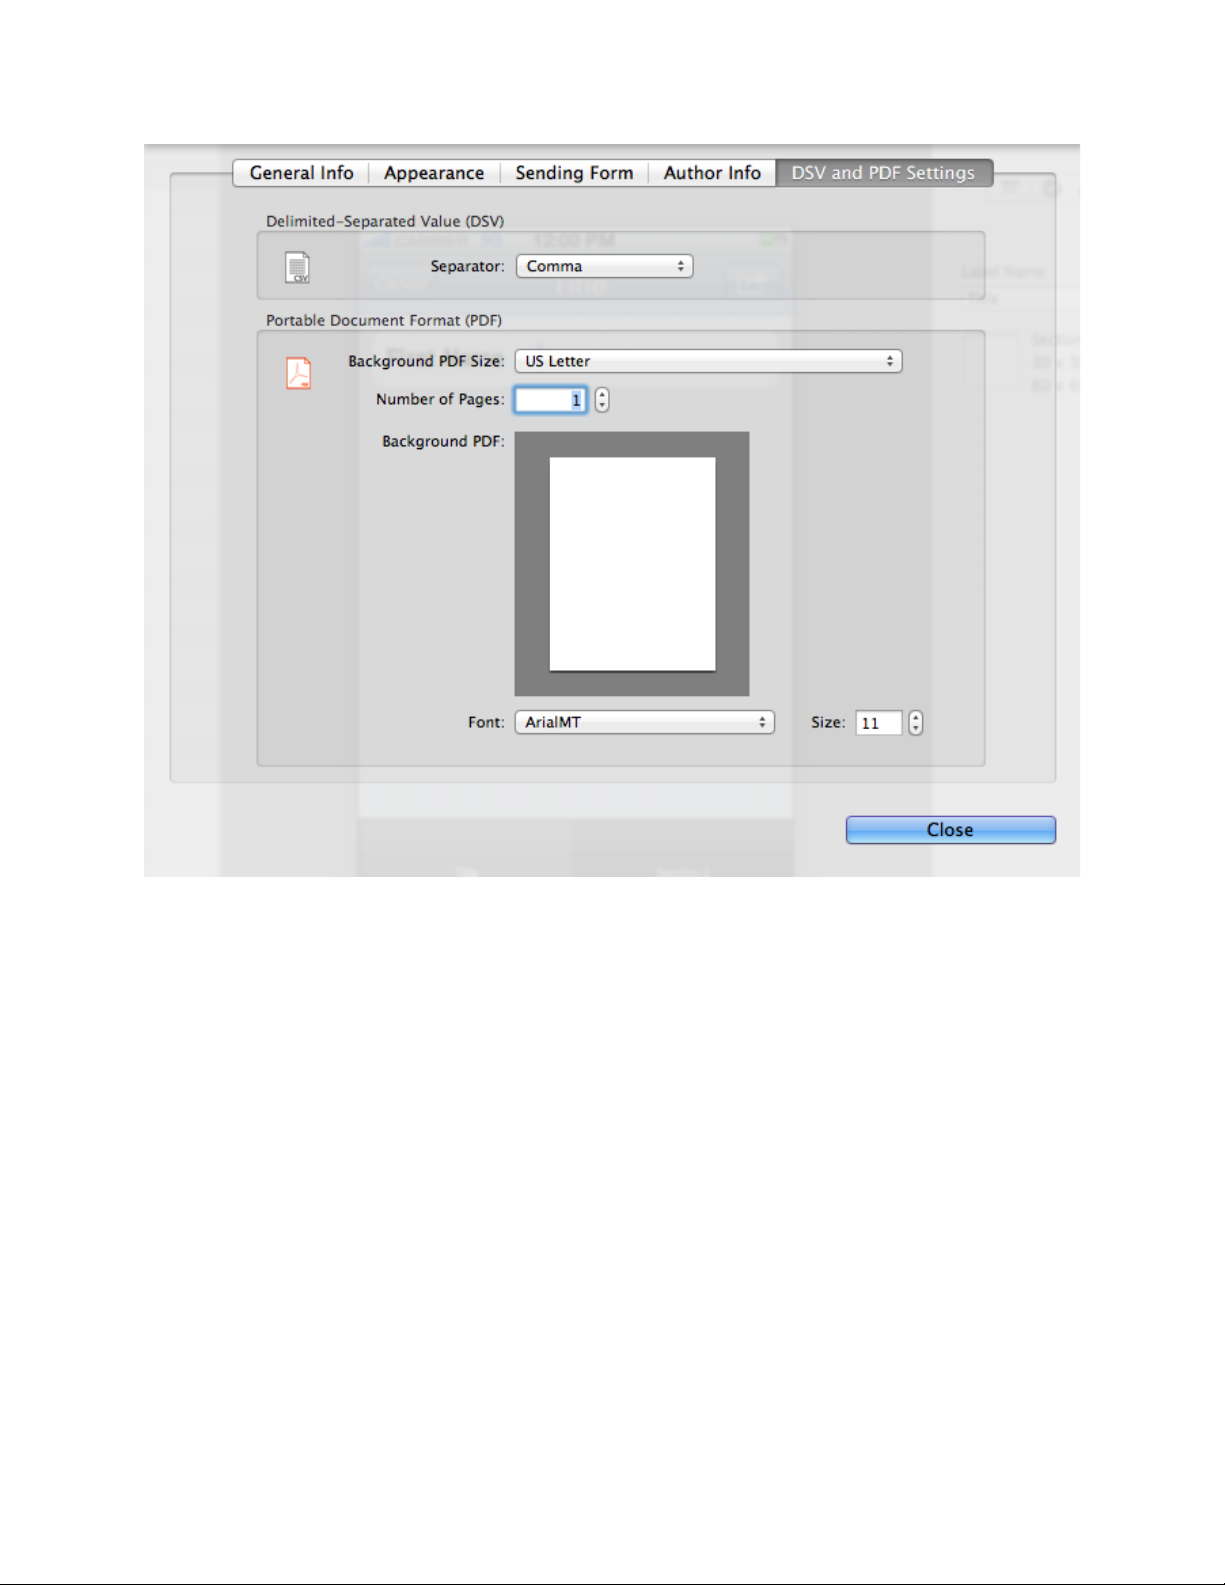
DSV AND PDF S ETTINGS
DSV and PDF Settings tab allows you to configure the .csv and .pdf transmit files.
For Delimited-Separated Value (DSV) files, they will always use the .csv file extension
and you can configure it to separate your values either comma, tab or semicolon.
For Portable Document Format (PDF) files, you can configure the file size, number of
pages, globally change the font and font size at once. If you want to use your own
custom PDF file, you can import that background PDF here. You will need to layout the
values on top of your PDF through the PDF editor.
FormEntry - The User’s Manual 62
Page 63
See Using PDF Technology for further readings on how to layout your values.
FormEntry - The User’s Manual 63
Page 64

FormEntry - The User’s Manual 64
Page 65

OVERVIEW OF DATABASE
This section describes how to add a local RDMS
database to your form app, using key paths for
accessing database values and updating the form’s
local database remotely from a web service.
FormEntry for Mac allows you to add a database to your form app. This custom object
database that can be used in conjunction with the Rule Builder and with bindings to
bindable controls. You can also update this database remotely when the user refreshes
the form’s database.
There are a few limitations to the database that you will need to know before setting up
your database. 1) The database is limited to a Read Only database, we will further
explain what this means later in this chapter. 2) You are limited to 9 different data types
for your columns. These data types are the typical standard data types as well as some
custom types that are designed to work well with FormEntry Touch. 3) You are allowed
only a limited number of columns per data type. 4) You do not have SQL access to the
database, however, you can update the database via a web service.
The overall theme for FormEntry Touch’s database is to think “small”, the smaller the
data sets per table the better. And to think of this database as a cached read-only data.
Remember that once the form is installed within FormEntry Touch, it can fully operate
without an Internet connection. So the database needs to be local and independent of
the Internet.
Once the device is on the Internet, there is the opportunity to update the “cache” local
database via a web service. You can update one table or a combination of multiples
tables at a time, however, you should keep in mind when updating via a web service,
you will be “reinstalling” the entire table(s), it’s not a true update.
Setting up your Database
FormEntry for Mac allows you create a database by setting only one table. Once at
least one table has been created, your database is set. You can add an unlimited
number of tables to your database.
FormEntry - The User’s Manual 65
Page 66
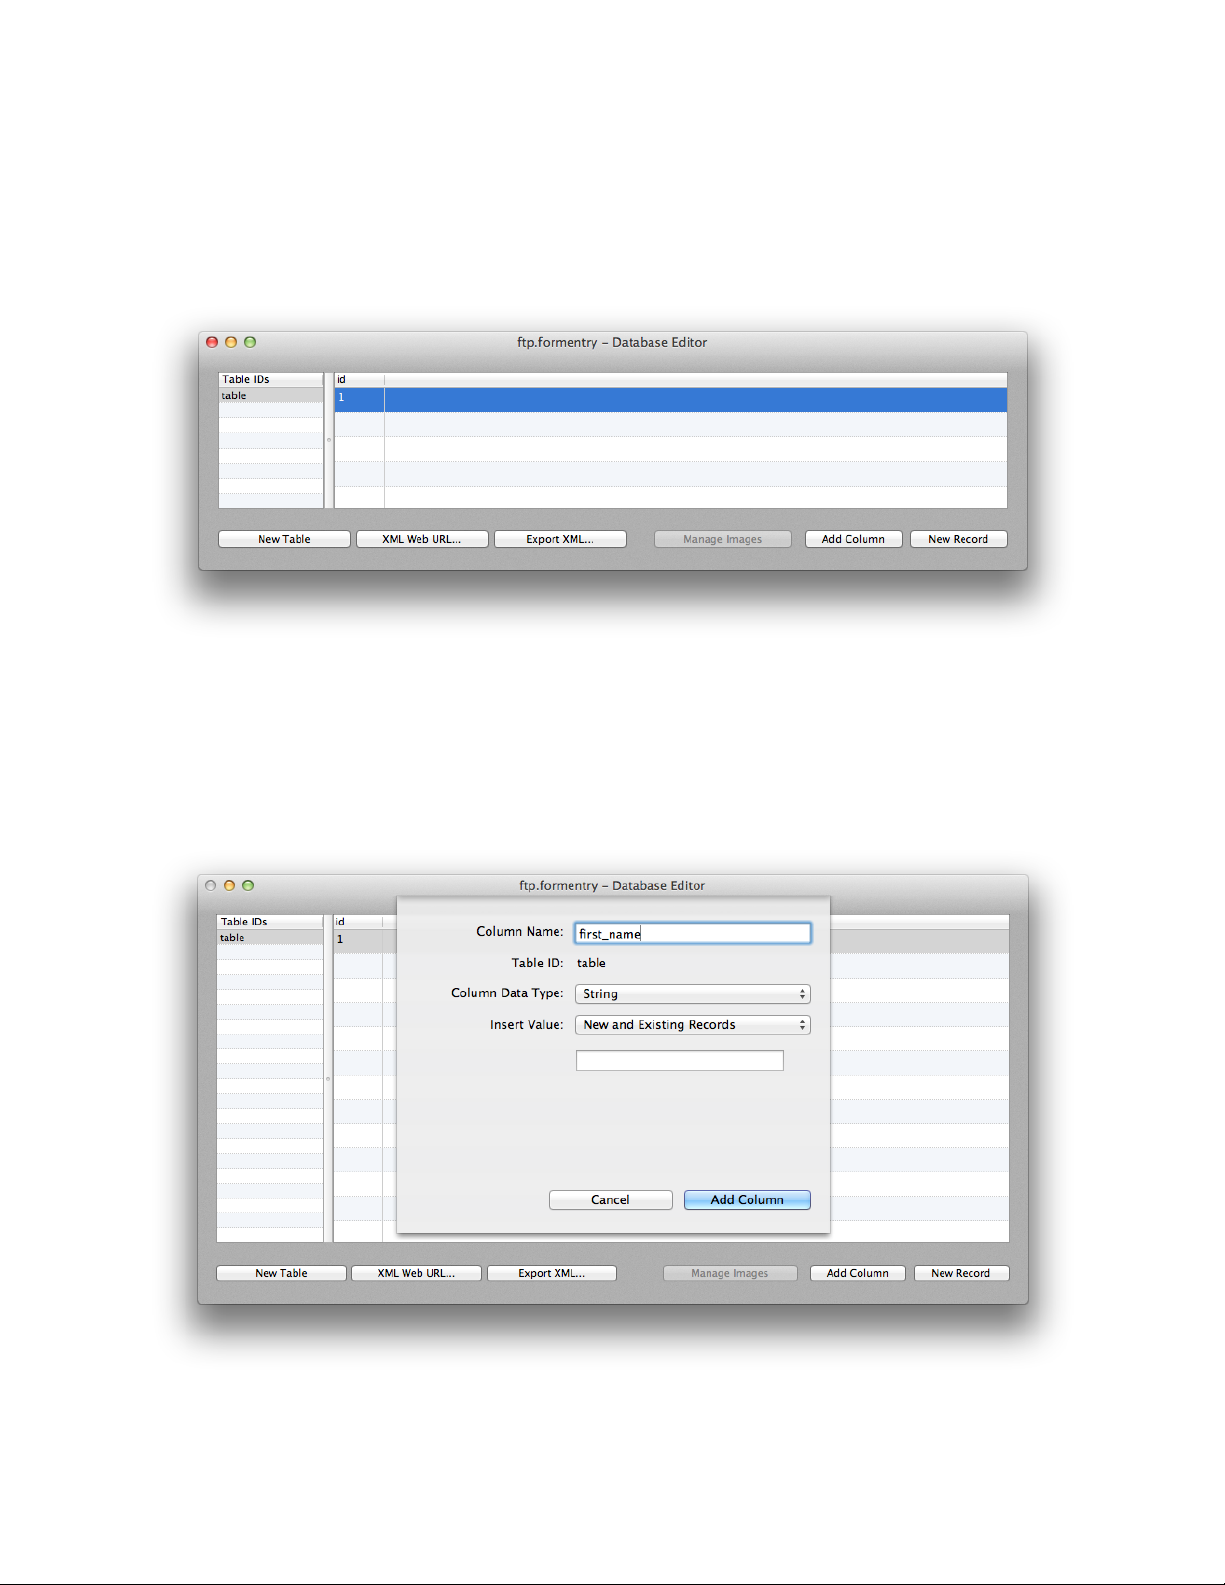
From the Main Menu, select View -> Show Database to bring forward the Database
Editor. Select New Table button to add a new table. Rename the table with a new table
ID if need be by double-clicking on the ‘table’ name within the table row. By default
‘table’ is used and all table IDs must be unique.
Once you add your first table, you will notice the first record has been created with a
record ID of “1” as a default .
To add a new column to your table, select the Add Column button. Choose a Column
Name for your table and select its Column Data Type.
FormEntry - The User’s Manual 66
Page 67
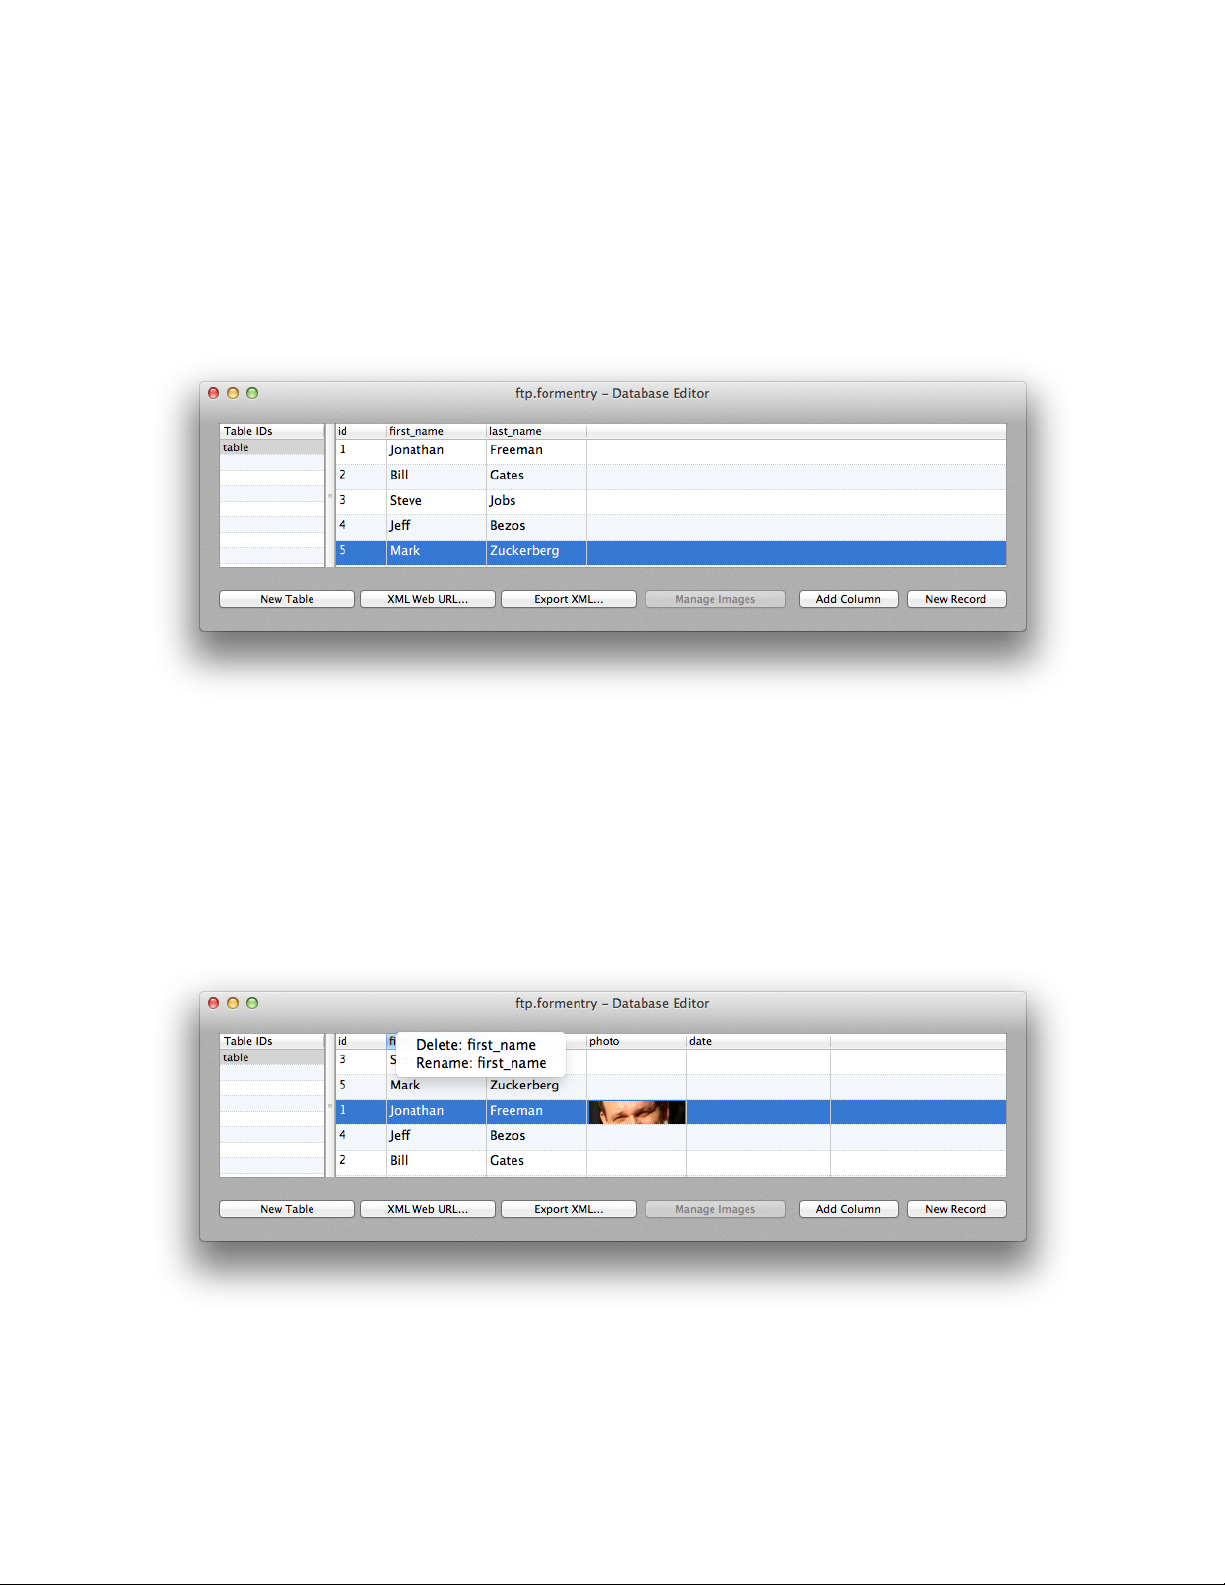
You can also select a default Insert Value when adding New or Existing Records. To add
additional records, you will need to select the New Record button and a new record will
be added to the selected table.
If you had placed a default Insert Value for New Records, that default value will populate
all the records within that column.
To remove a table or record, simple select the row in the table and press the Delete Key
on your keyboard.
To remove or rename a Column, right click on the Column ID and select Delete or
Rename.
FormEntry - The User’s Manual 67
Page 68
U PDATING D ATA BASE V IA A W EB S ERVICE
FormEntry for Mac provides you with the ability to update the database remotely. You
can update all the tables at once or one table at time once the iOS device is on the
Internet. You are responsible for maintaining the web service at your web server or
cloud based account.
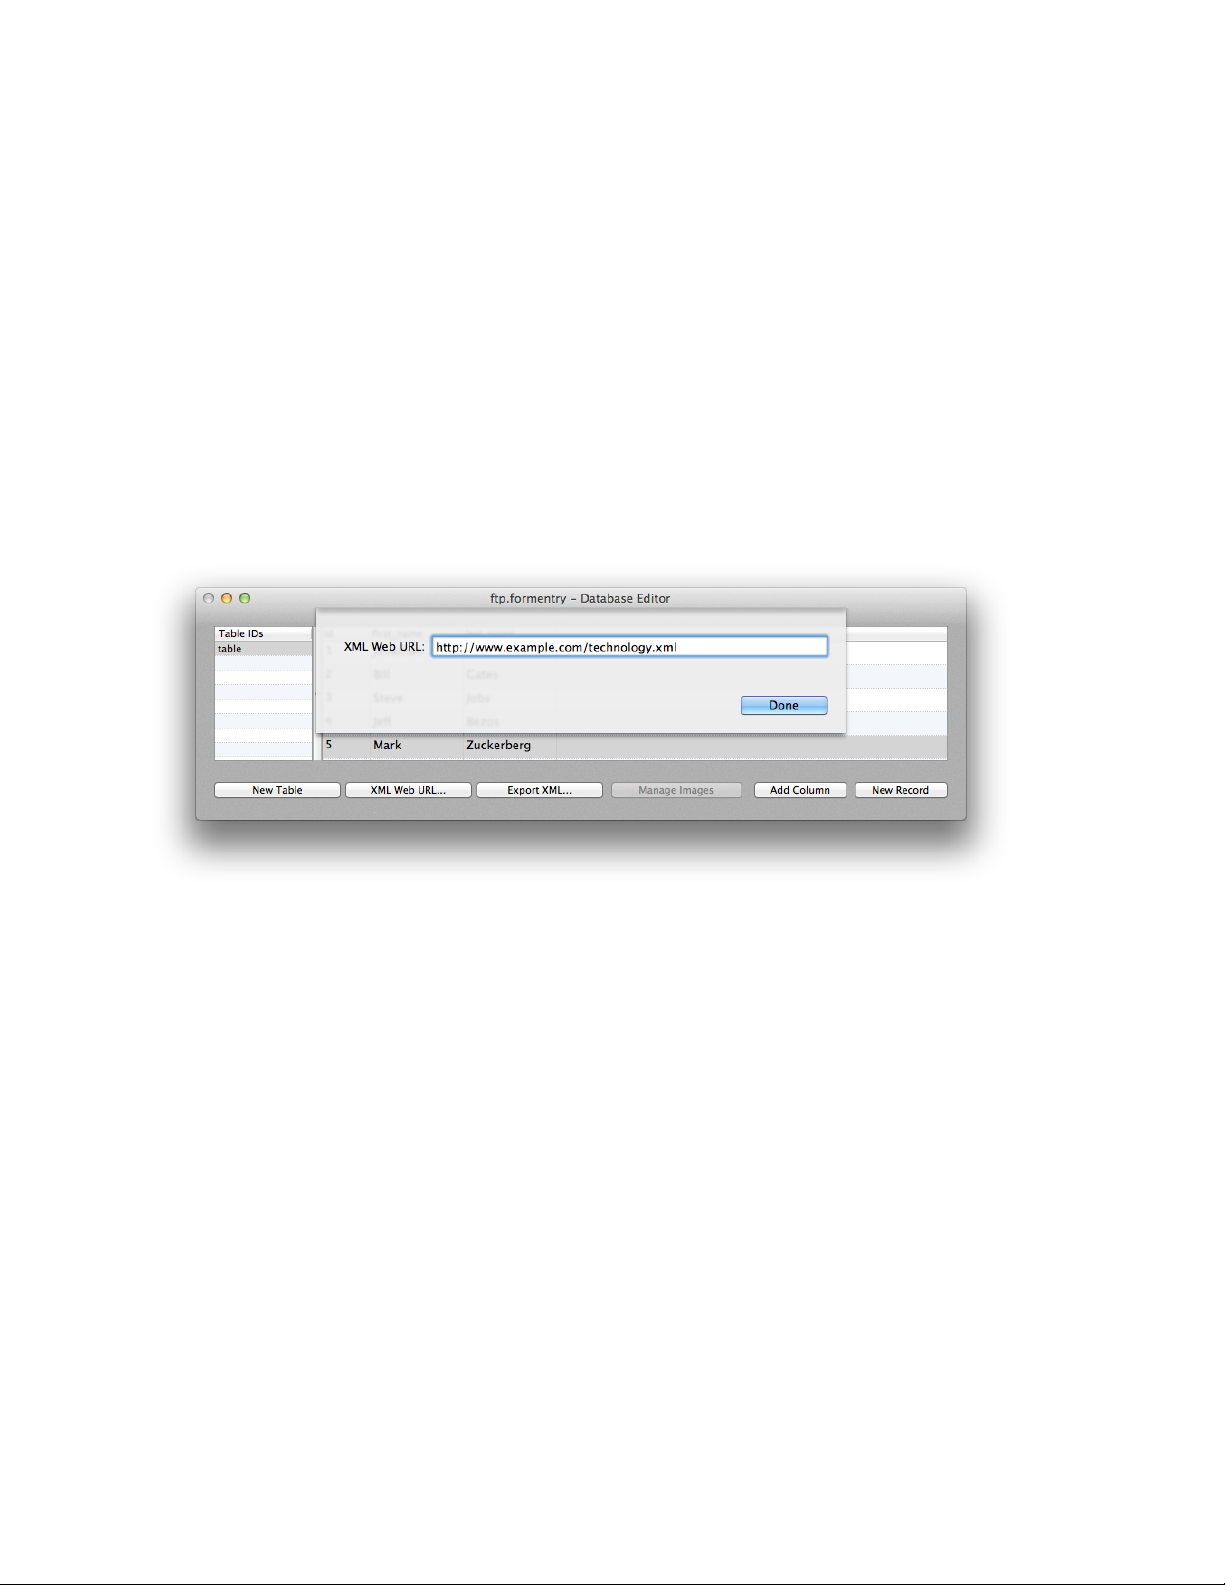
S ET XML W EB URL
To enable the web service, you must provide a valid Web URL by choosing the XML
Web URL button. This fully qualified URL will receive a POST request from the iOS
device, if 1) the device is on the Internet and 2) the iOS user requests the database to
be updated. The iOS user must initiate the request.
FormEntry - The User’s Manual 68
Page 69

U SER I NITIATED POST R EQUEST
When the iOS user is at your form app’s current form screen (New, Sent, Drafts, Trash
and About), they can choose to update the database by pulling down this screen for a
refresh.
If the iOS device is connected to the Internet, FormEntry Touch will post to your URL
with a standard HTTP Post the following parameters to your web service URL,
“device_uuid8”, “form_version”, “form_id”, “table_id[]”, “table_updated[]” and if installed
the “pin_code” (based upon the parameter id of the PIN Code) parameter id.
The “device_uuid8” is based upon the Device UUID8 from the device’s Settings screen
within FormEntry Touch.
The “form_version” is the version of your form, originally assigned from the Version field
on the General Info tab within FormEntry for Mac.
The “form_id” is the unique identifier that is created for your form, found under the
General Info tab within FormEntry for Mac.
The “pin_code” parameter is sent when the user logs into the form using their 4-digit
passcode number. The PIN Code Plug-In must be purchased from within the In-App
Purchase Plug-In Store within FormEntry for Mac. This parameter is upon the parameter
id of the control and might not be the actually named “pin_code”.
The “table_id[]” and “table_updated[]” are parameter arrays which contain a collection of
tables IDs of the database along when last updated date in GMT. Based upon the
posted parameter values, this is useful if want to update a specific table and not deliver
the entire database back to the user.
W EB XML URL
You are responsible for maintaining the web service that your form app points to the
Web XML URL. Your response should always be an XML response. If there are no
tables to update on the iOS device, your should reply back with an XML response of just
the empty database and no tables.
<?xml version="1.0" encoding="UTF-8"?>
<database>
</database>
By looking at the iOS posted ‘table_id[]’ and ‘table_updated[] parameters, you can
decide what table needs to be updated. Your response for updating a table or tables
FormEntry - The User’s Manual 69
Page 70

should be in the following XML format. Note, that each table within your database will
generate a “table” element with an “id” attribute and an “updated” attribute.
The column ids values are placed within the ‘th’ element and the column type is placed
in the ‘type’ attribute of the header. The record values are placed with a unique ‘tr’ row
and are placed with the appropriate ‘td’ element.
<?xml version="1.0" encoding="UTF-8"?>
<database>
!<table id="table" updated="2013-04-30 21:02:51 +0000">
!!<thead>
!!!<tr>
!!!!<th type="id">id</th>
!!!!<th type="string">first_name</th>
!!!!<th type="string">last_name</th>
!!!</tr>
!!</thead>
!!<tbody>
!!!<tr>
!!!!<td>1</td>
!!!!<td>Jonathan</td>
!!!!<td>Freeman</td>
!!!</tr>
!!!<tr>
!!!!<td>2</td>
!!!!<td>Bill</td>
!!!!<td>Gates</td>
!!!</tr>
!!!<tr>
!!!!<td>3</td>
!!!!<td>Steve</td>
!!!!<td>Jobs</td>
!!!</tr>
!!!<tr>
!!!!<td>4</td>
!!!!<td>Jeff</td>
!!!!<td>Bezos</td>
!!!</tr>
!!!<tr>
!!!!<td>5</td>
!!!!<td>Mark</td>
!!!!<td>Zuckerberg</td>
!!!</tr>
FormEntry - The User’s Manual 70
Page 71
!!</tbody>
!</table>
</database>
Notice how similar this format is to standard HTML. The only difference is having the
extra database element. You could simple change the file extension from .xml to .html
and it should render in any modern web browser as standard HTML. This format can be
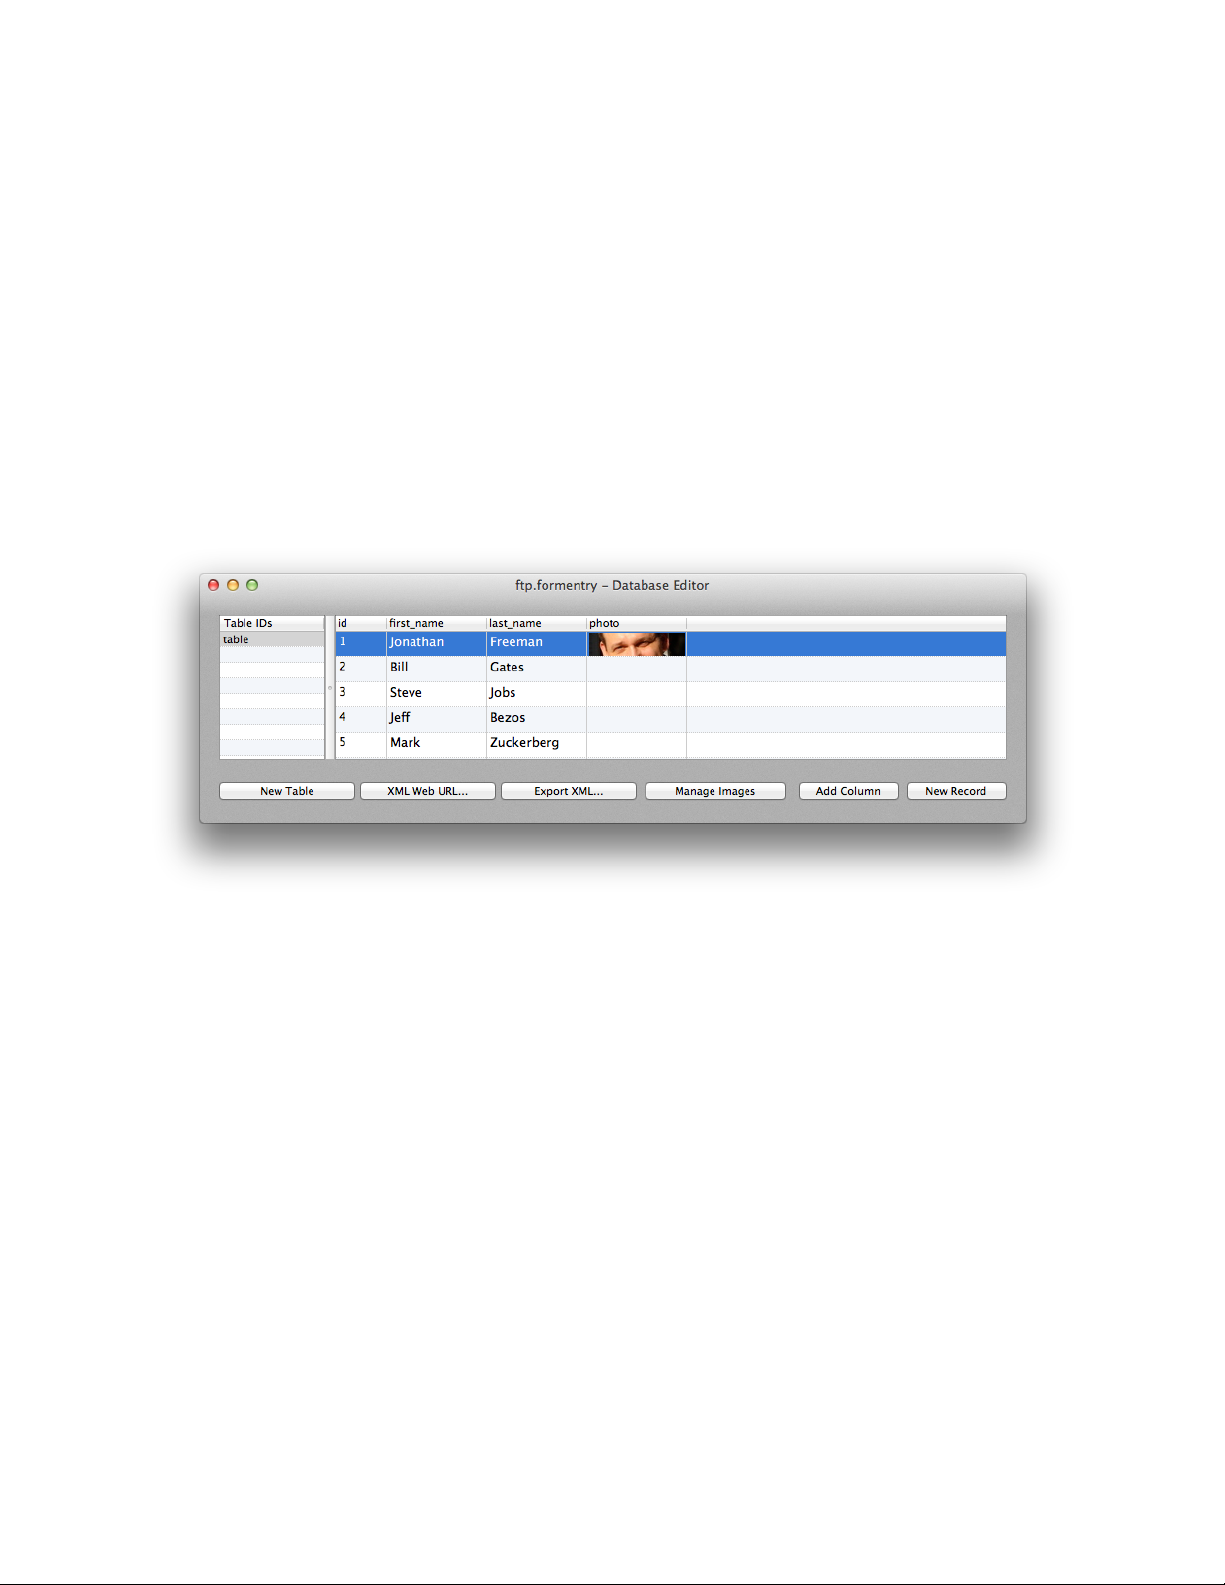
exported from FormEntry for Mac by selecting the ‘Export XML...’ button on the
Database Editor. It will export all the tables from your database into one XML file.
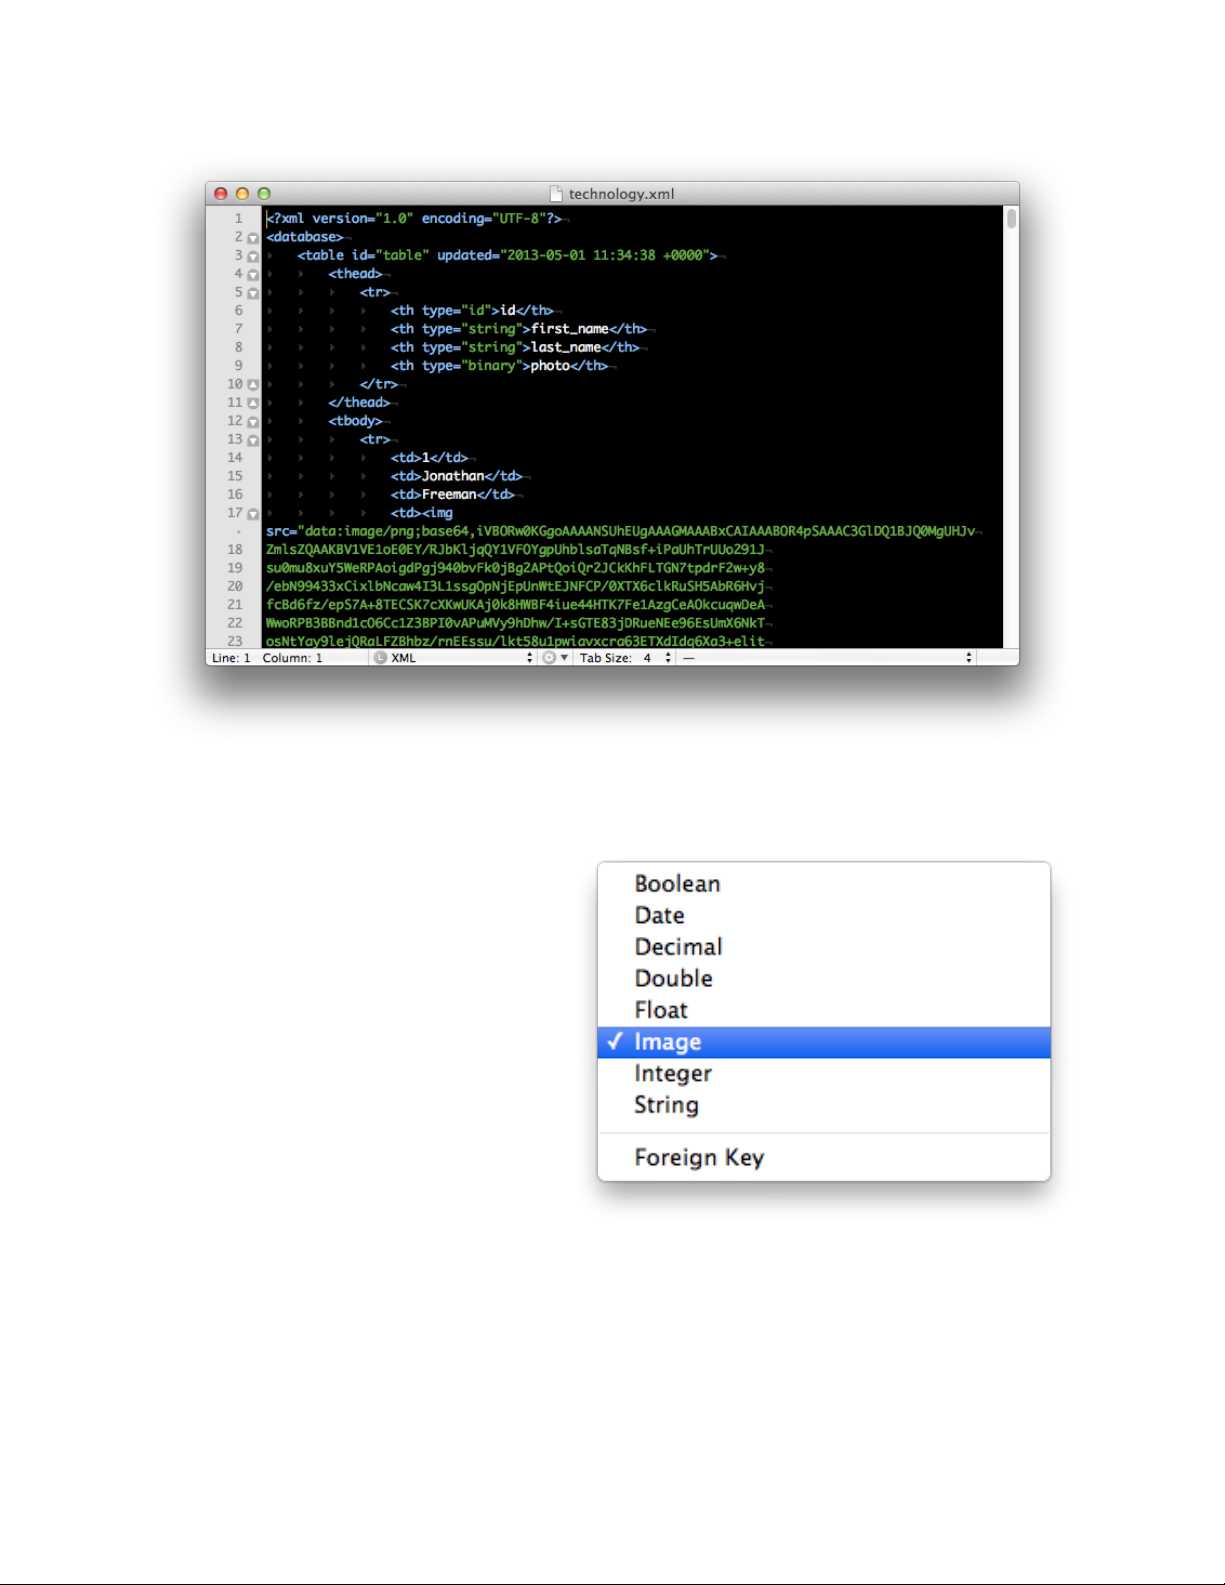
If you add an image column to your table and they will be exported to the ‘img’ element
using inline Base-64 for the ‘src’ attribute.
FormEntry - The User’s Manual 71
Page 72
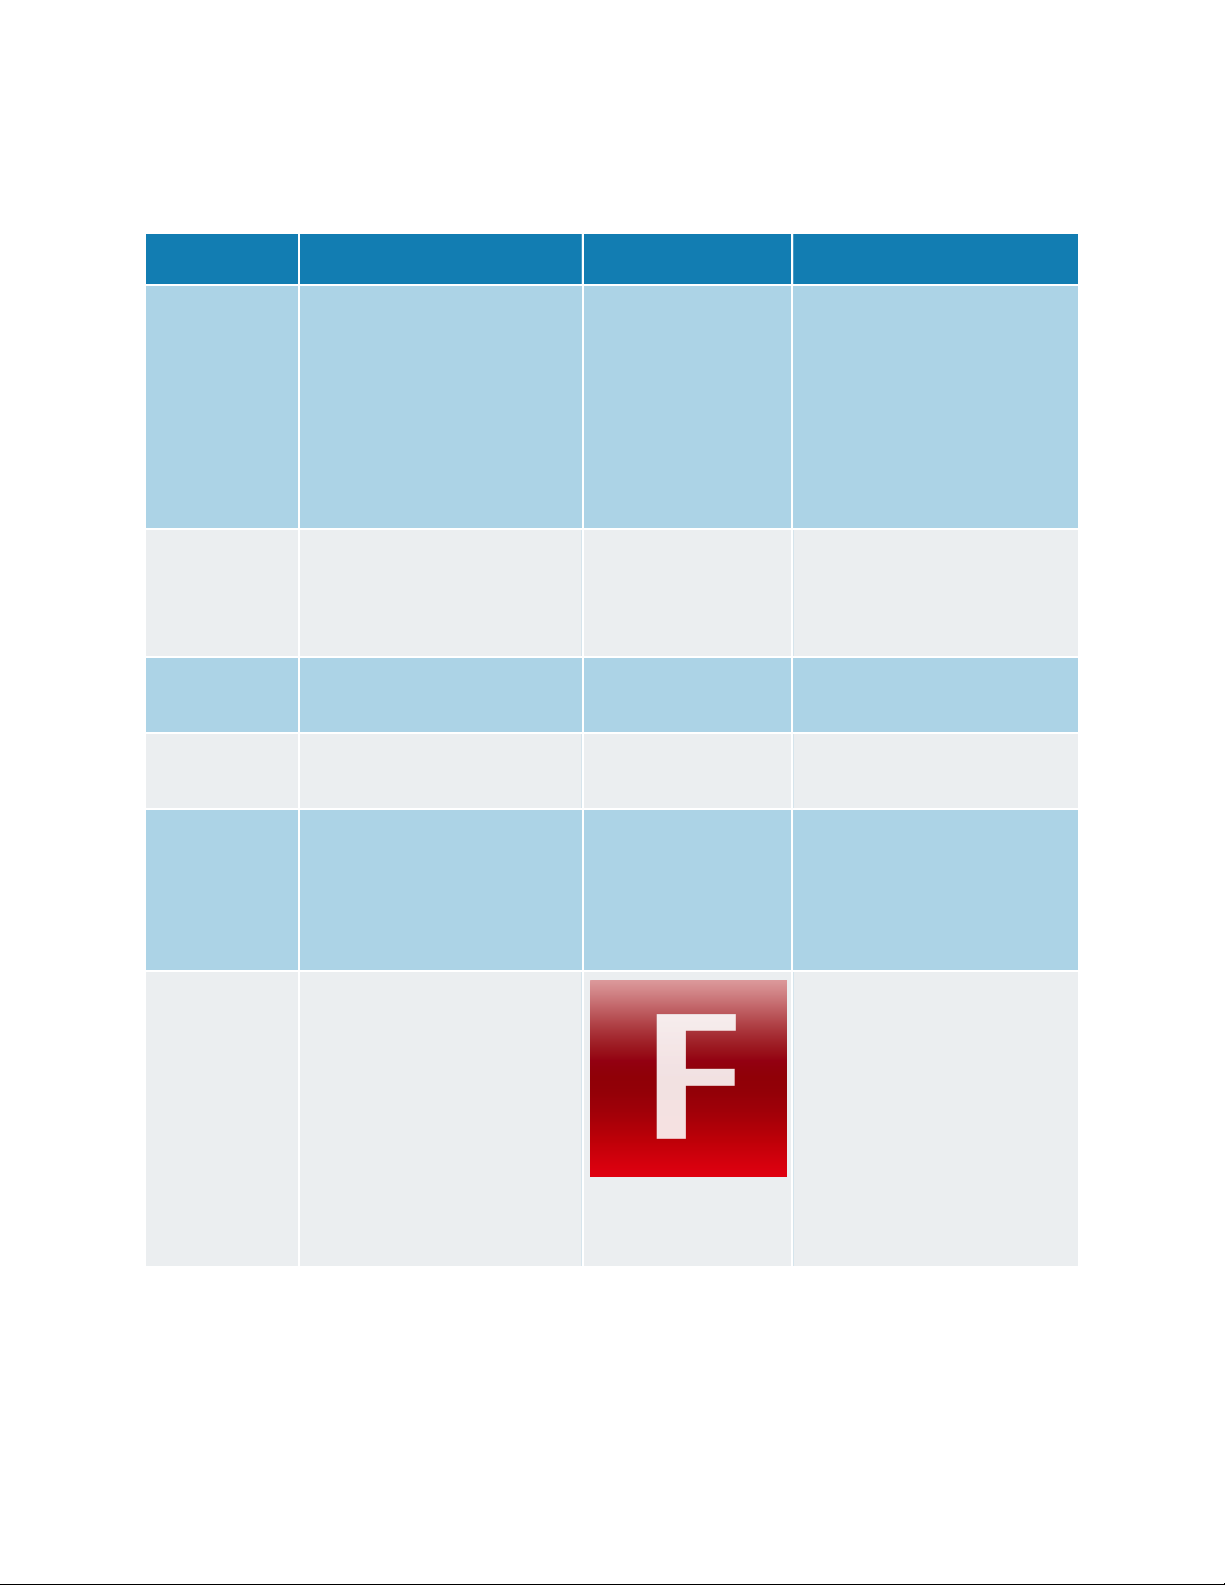
C OLUMN D ATA T YPES
FormEntry for Mac’s Database Editor
allows you to add up to nine different
data types, Boolean, Date, Decimal,
Double, Float, Image, Integer, String
and Foreign Key.
The Image and Foreign Key column
data types are custom types that help
FormEntry Touch query the database
faster, while the rest are standard data
types.
S TANDARD A ND C USTOM D ATA T YPES
The standard data types are really object types that are applied to the object database.
The same applies for custom data types, Image and Foreign Key. However, these
FormEntry - The User’s Manual 72
Page 73
custom types are specific to FormEntry and help in querying the database. The data
T YPE
L IMITS
E XAMPLE
D ESCRIPTION
Boolean
•
Sets either TRUE or
FALSE
•
Limited to 10 columns
per table
TRUE
Boolean values are
values that are either
TRUE or FALSE. You
can use these values to
set Checkmarks and On/
Off Switches from the
Rule Builder.
Date•Sets the date and time
•
Limited to 10 columns
per table
1982-02-12
11:00:00
The Date value must be
in this format: YYYY-MMDD HH:MM:SS
Decimal
•
Limited to 10 columns
per table
1123.19
Holds a decimal value.
Double
•
Limited to 10 columns
per table
17919.9391
Holds a double value.
Float•Holds 7 digits of
precision
•
Limited to 10 columns
per table
179.9999
Holds a float value.
Image
•
It is recommended your
keep images to a small
file size, small
resolution and have
them highly
compressed.
•
Limited to 10 columns
per table
Image values can be
used to populate icons as
well as the Image control
by using the Rule Builder.
types are explained in the table below:
FormEntry - The User’s Manual 73
Page 74

T YPE
L IMITS
E XAMPLE
D ESCRIPTION
Integer
•
Integer values can
have a minimum value
of -2147483648 to
2147483647
•
Limited to 10 columns
per table
432
Holds a integer value and
values have no decimal
places.
String
•
Should be kept small
•
Limited to 20 columns
per table
Jonathan
The String value holds a
wide range of different
character combinations.
Foreign Key
Should always have a
suffix of “_id” in the
column id and the prefix
should always be a table
name.
•
Limited to 10 columns
per table
people_id
Tables that contain
foreign key columns are
always the child table.
The parent table is the
suffix of the foreign key
column name.
“people_id” indicates that
there is a parent table
called “people” in the
database. The row’s
value points to the
parent’s ID value.
Binding Controls to Database
Binding a control to the database, simply means that a control’s value should retrieve
the values from a specific table at a specific Column ID. Once the value is set to the
control’s value, the Record ID “id” of that value is tied or bound to the control. Currently,
only four controls can be bound to the database, however, in combination with the Rule
Builder, you can set the values to most of the controls with values from the database.
The four bindable controls that can be bound to a database are: Text Field, Spin Wheel
Picker Item, Barcode and PIN Code control Plug-Ins.
FormEntry - The User’s Manual 74
Page 75
As we work through the following four bindable controls in this “Binding Controls to
Database”, we will be expanding upon a database example.
T EXT F IELD B INDINGS
Text Field controls can be bound to a table’s column by selecting the configuration tab
from the control tab bar pane.
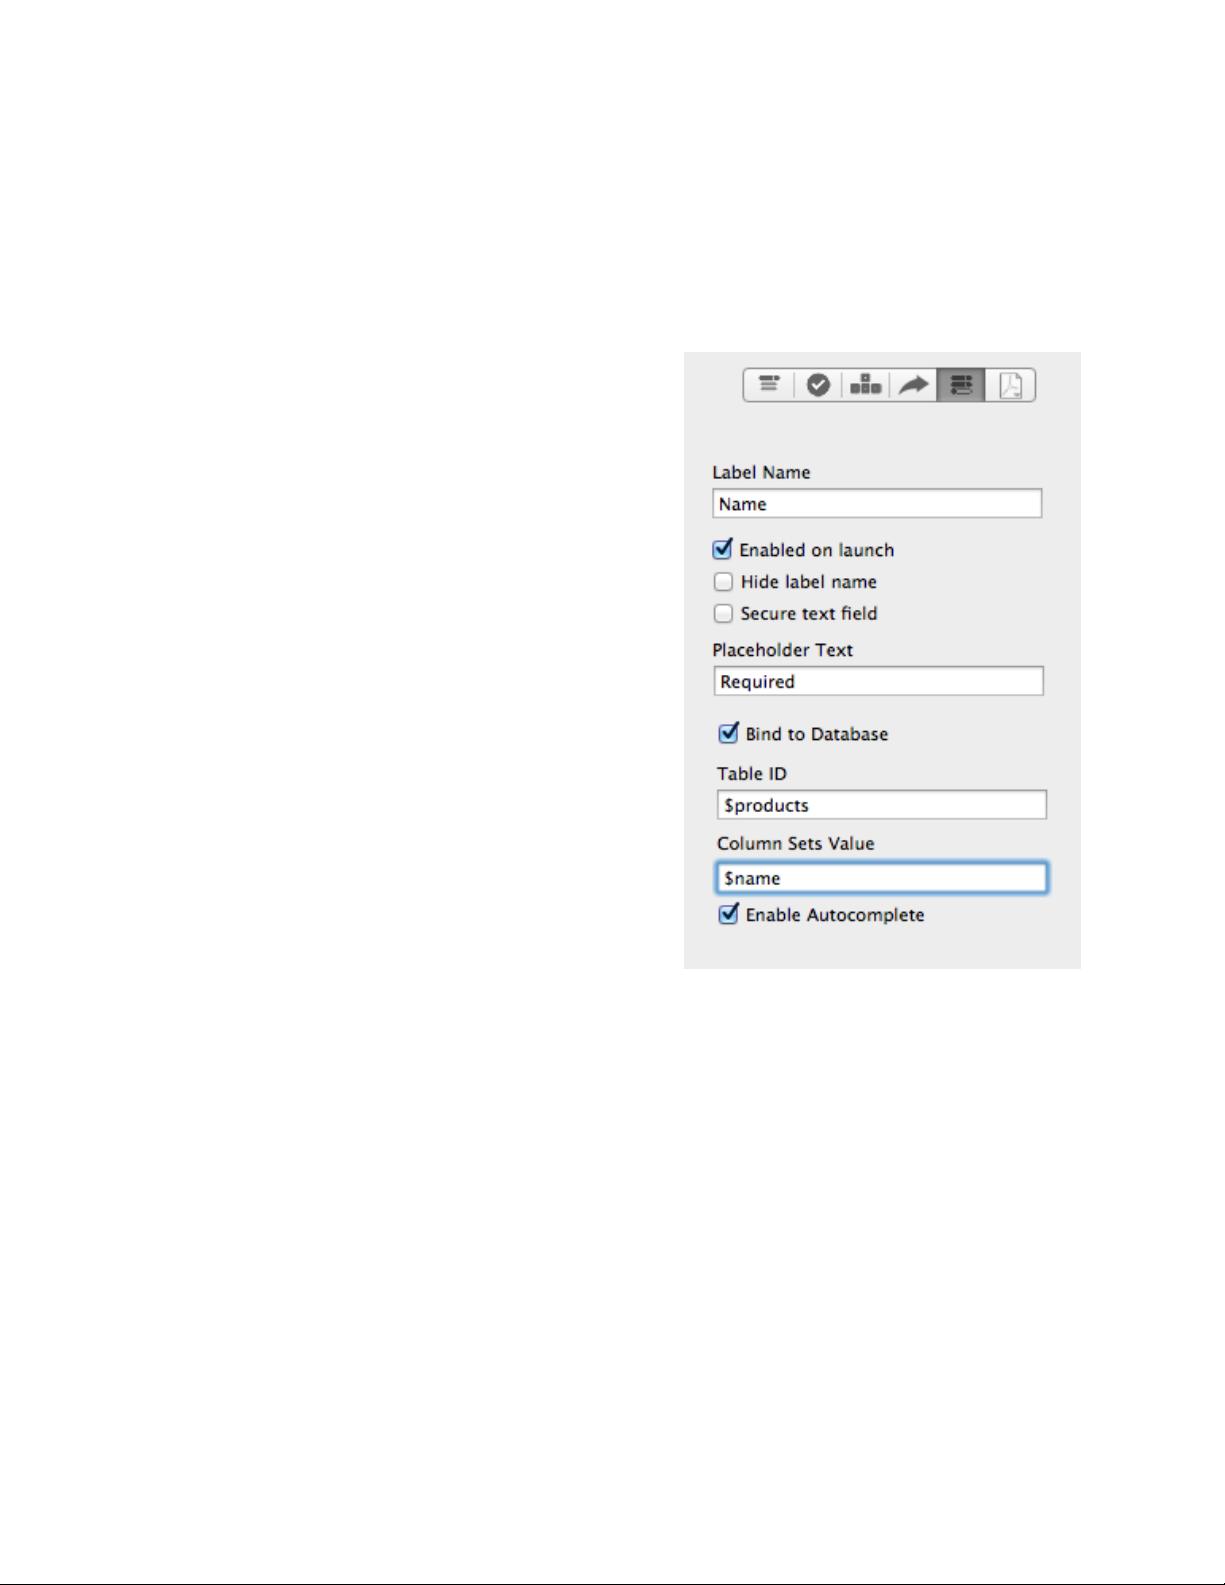
To bind a Text Field control to the database,
select “Bind to Database” checkbox. In the Table
ID, place the Tables ID you want to bind to,
prefixed with the “$” character. For example, if
we are wanting to bind “products” table, you will
need to place “$products” in the Table ID for this
Text Field.
Next, you will need to bind the Column ID that
you want to set the value for the Text Field at
The Column Sets Value input by prefixing “$” to
the Column ID. In this particular image example
to the right, we want to bind the “name” Column
ID, so we set “$name” to the Column Sets Value
input field.
Also, for our example, we want to Enable
Autocomplete checkbox. This will showcase an
autocomplete drop down on the iOS device
when the user starts typing.
From the Database Editor, create a database by adding a new table with the Table ID of
“products”. Add a “New Column” with the Column ID of “name”and a Column Data Type
of “String”. Add six new records with the following names in the image below. Your
window should look something like the following:
FormEntry - The User’s Manual 75
Page 76
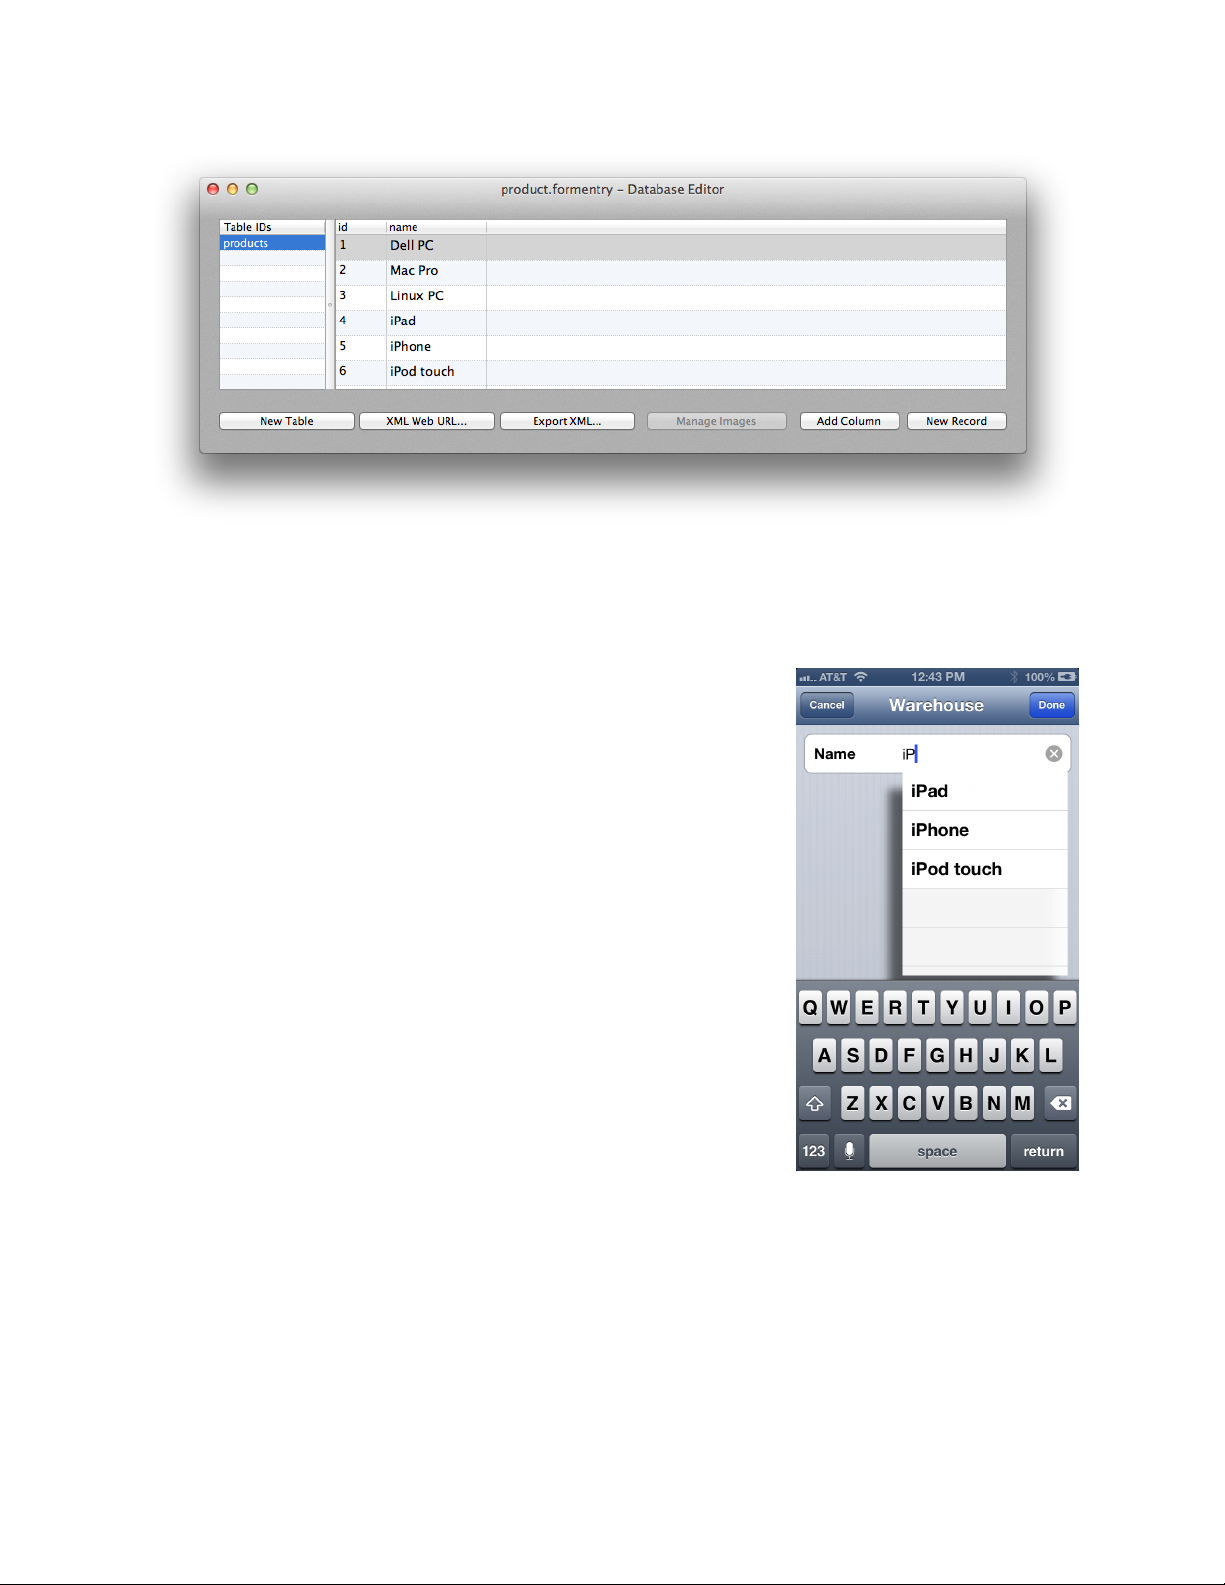
Sync the form to FormEntry Touch and select your form. As you proceed to type in the
Name Text Field, you will see an auto complete drop-down
appear as you type along. You can select the value from
the drop-down list and it will populate the the Text Field on
the iOS device.
B INDINGS S UMMARY
In review, adding a bindable autocomplete Text Field to
your form app is straight forward.
1. Add a Table ID with a Column ID
2. Add Records to your Table
3. Bind your Text Field to the Table ID and Column ID with
prefixes of “$”
4. Enable Autocomplete
R ETRIEVING S AME T ABLE V ALUES
If a control is bound to a database, you can retrieve values from the database based
upon the Record ID of the bound control. This requires the Rule Builder with a passing
condition and an action that sets the value(s) with a key path.
FormEntry - The User’s Manual 76
Page 77
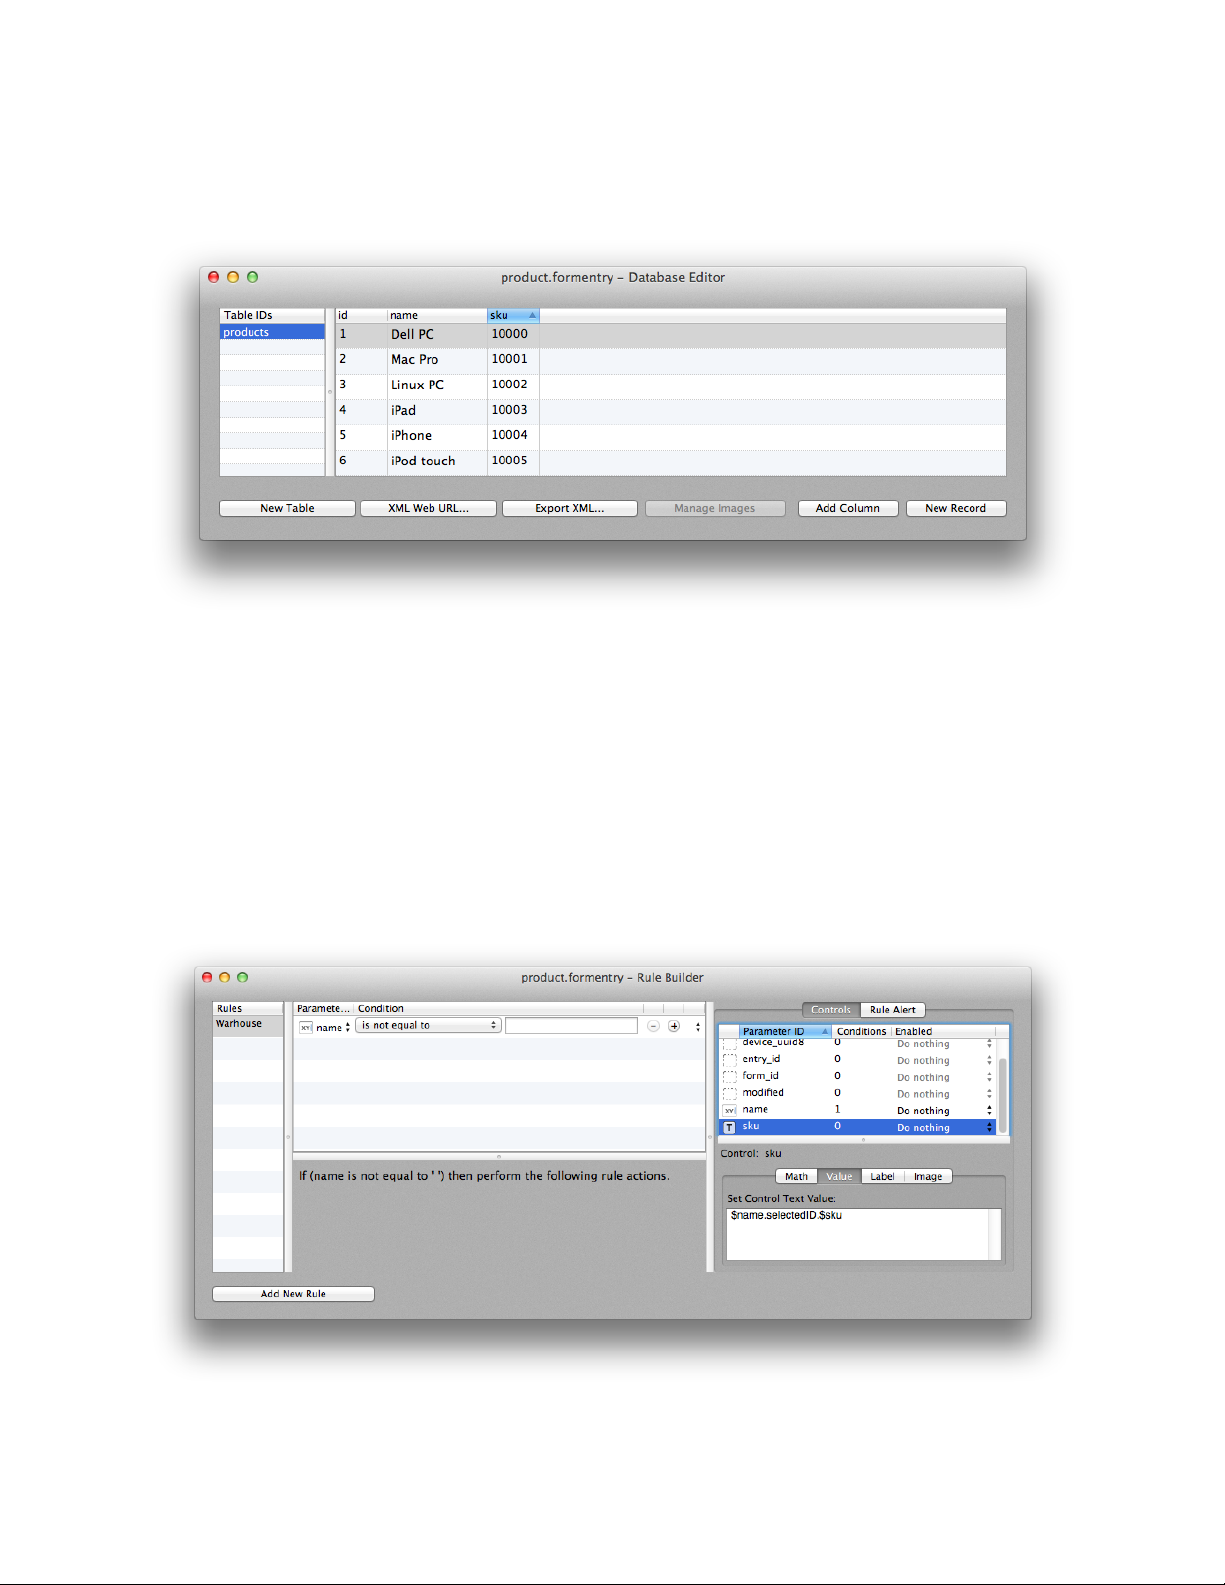
Let’s go ahead an add a new column to our “products’ table with a Column ID of “sku”
with an Column Data Type of “Integer”. The database should something like this:
Now, in the Rule Builder, add a new Rule with a condition of “If (name is not equal to ‘ ‘)
then perform the following rule actions.” Note the blank space, if the name is not equal
to an empty blank space.
Then for the Rule Action, select ‘sku’ in the list of Controls and select the Value tab. Set
the following key path for the Value of ‘sku’.
“$name.selectedID.$sku”
It should look like the following image:
FormEntry - The User’s Manual 77
Page 78
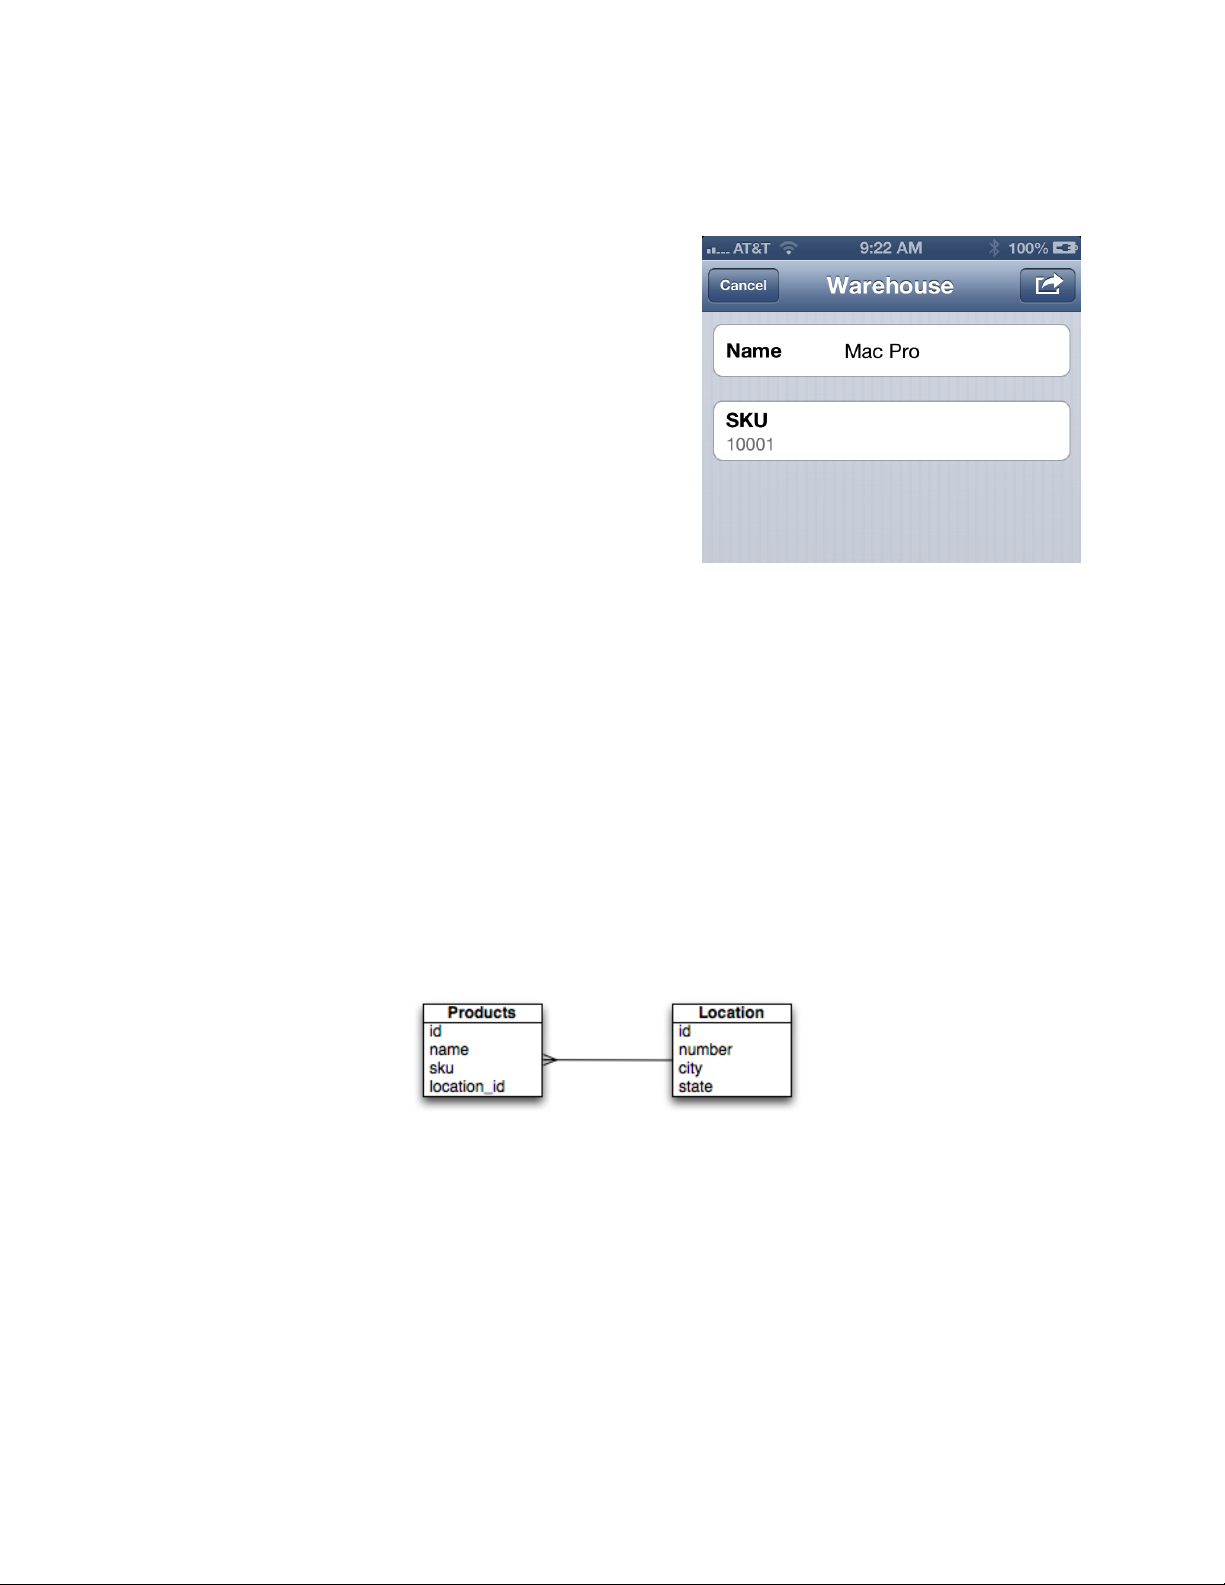
Since both the “name” Column ID and the “sku” Column ID are on the same table
“products”, you simply get the “$name” record (by using the selectedID) and then get
the “$sku” value on the same record.
Sync your form to your device and when you
select the Name text field, you will be able to
select from the autocomplete list on the “name”
Column ID. Once you have selected the name,
the text field will be set with the record “id” of that
record and the Rule Builder will be triggered.
The key path of “$name.selectedID.$sku” will be
executed and the value at “sku” on the selected
“name” record will be populated at the SKU text
control.
K EY P ATH T RAVERSING TO P ARENT T ABLE
One of the important concepts in gathering data from across multiple tables through the
“key path” in combination with the Rule Builder. This allows you to pull data values from
other tables and place them into controls on your form app.
To start using key paths to pull values from across tables you will need at least two
tables and at least one Foreign Key Column ID in the child table. So, let’s expand upon
our database example and add another table. Our data model will be something like the
following entity diagram, a many-to-one or one-to-many relationship:
We want to have two tables, “products” and “location”. In this relationship, the “products”
table is the child for it has only one location, where as the “location” is the parent for at a
given warehouse location, there could can be multiple products in inventory. As such,
our Database Editor should look similar to the following with necessary records for the
location.
FormEntry - The User’s Manual 78
Page 79
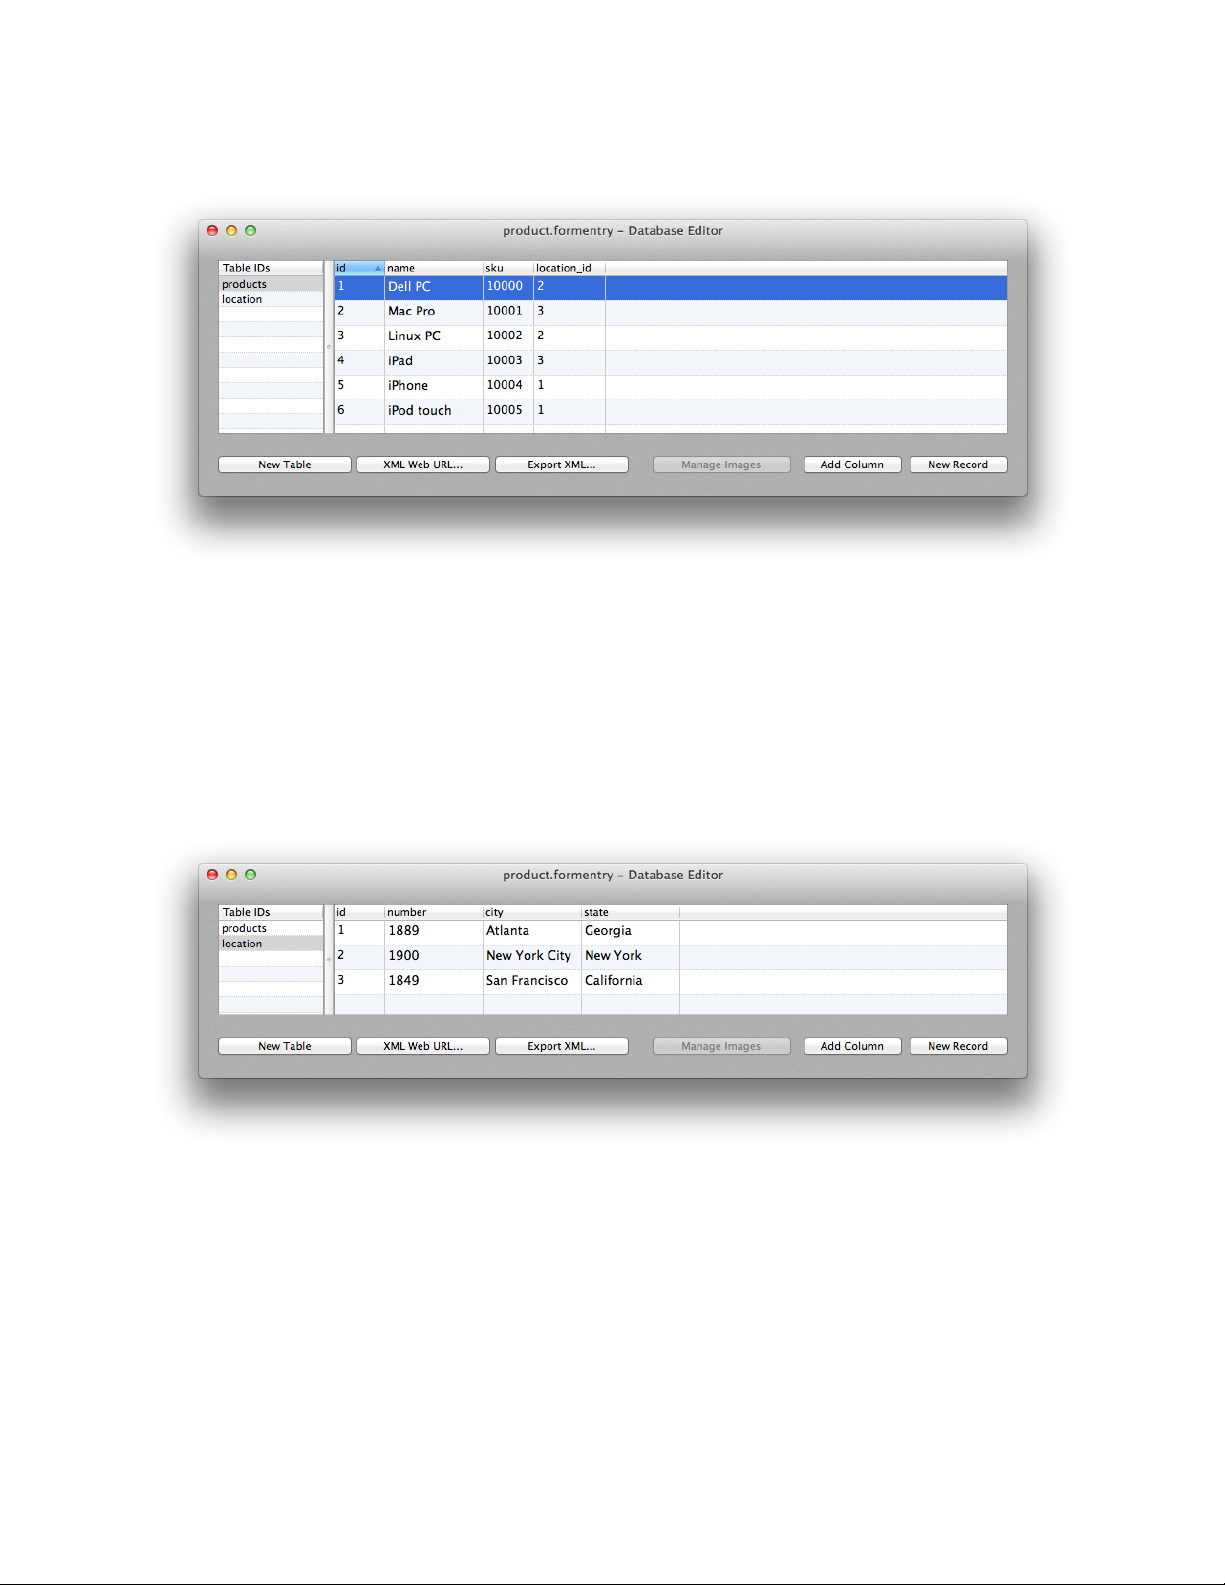
U PDATE P RODUCTS T ABLE
Add the “location_id” Foreign Key column to “products”. Note that “location” prefixed to
“_id” tells FormEntry that this table is the child table to the “location” table. All Foreign
Key Columns are required to have the suffix of “_id”.
A DD NEW L OCATION T ABLE
Create the “location” table and add three String Column IDs to the table as shown
above.
Now add three new Text Controls (Text Controls are Ready Only) and with Labels
“Warehouse Number”, “City” and “State”.
FormEntry - The User’s Manual 79
Page 80
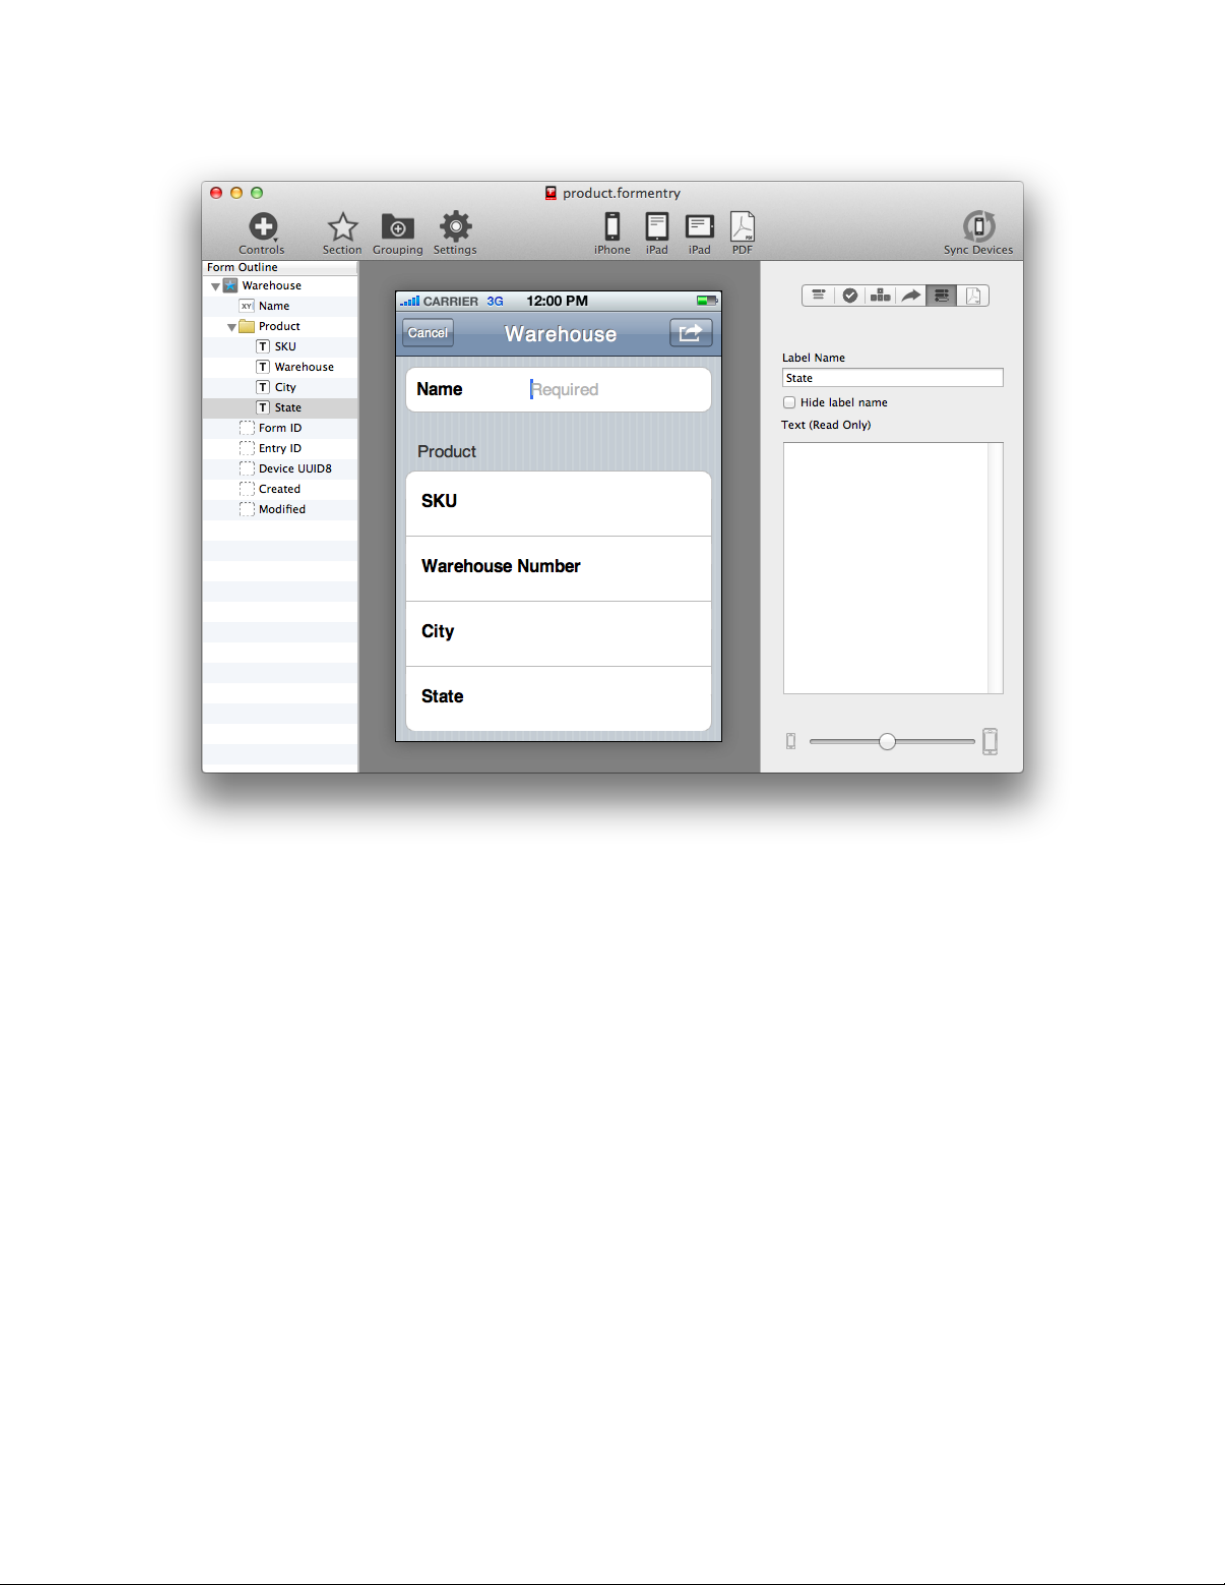
After you have added the Text controls, we need to update the Rule Builder to populate
the Warehouse Number, City and State controls.
FormEntry - The User’s Manual 80
Page 81
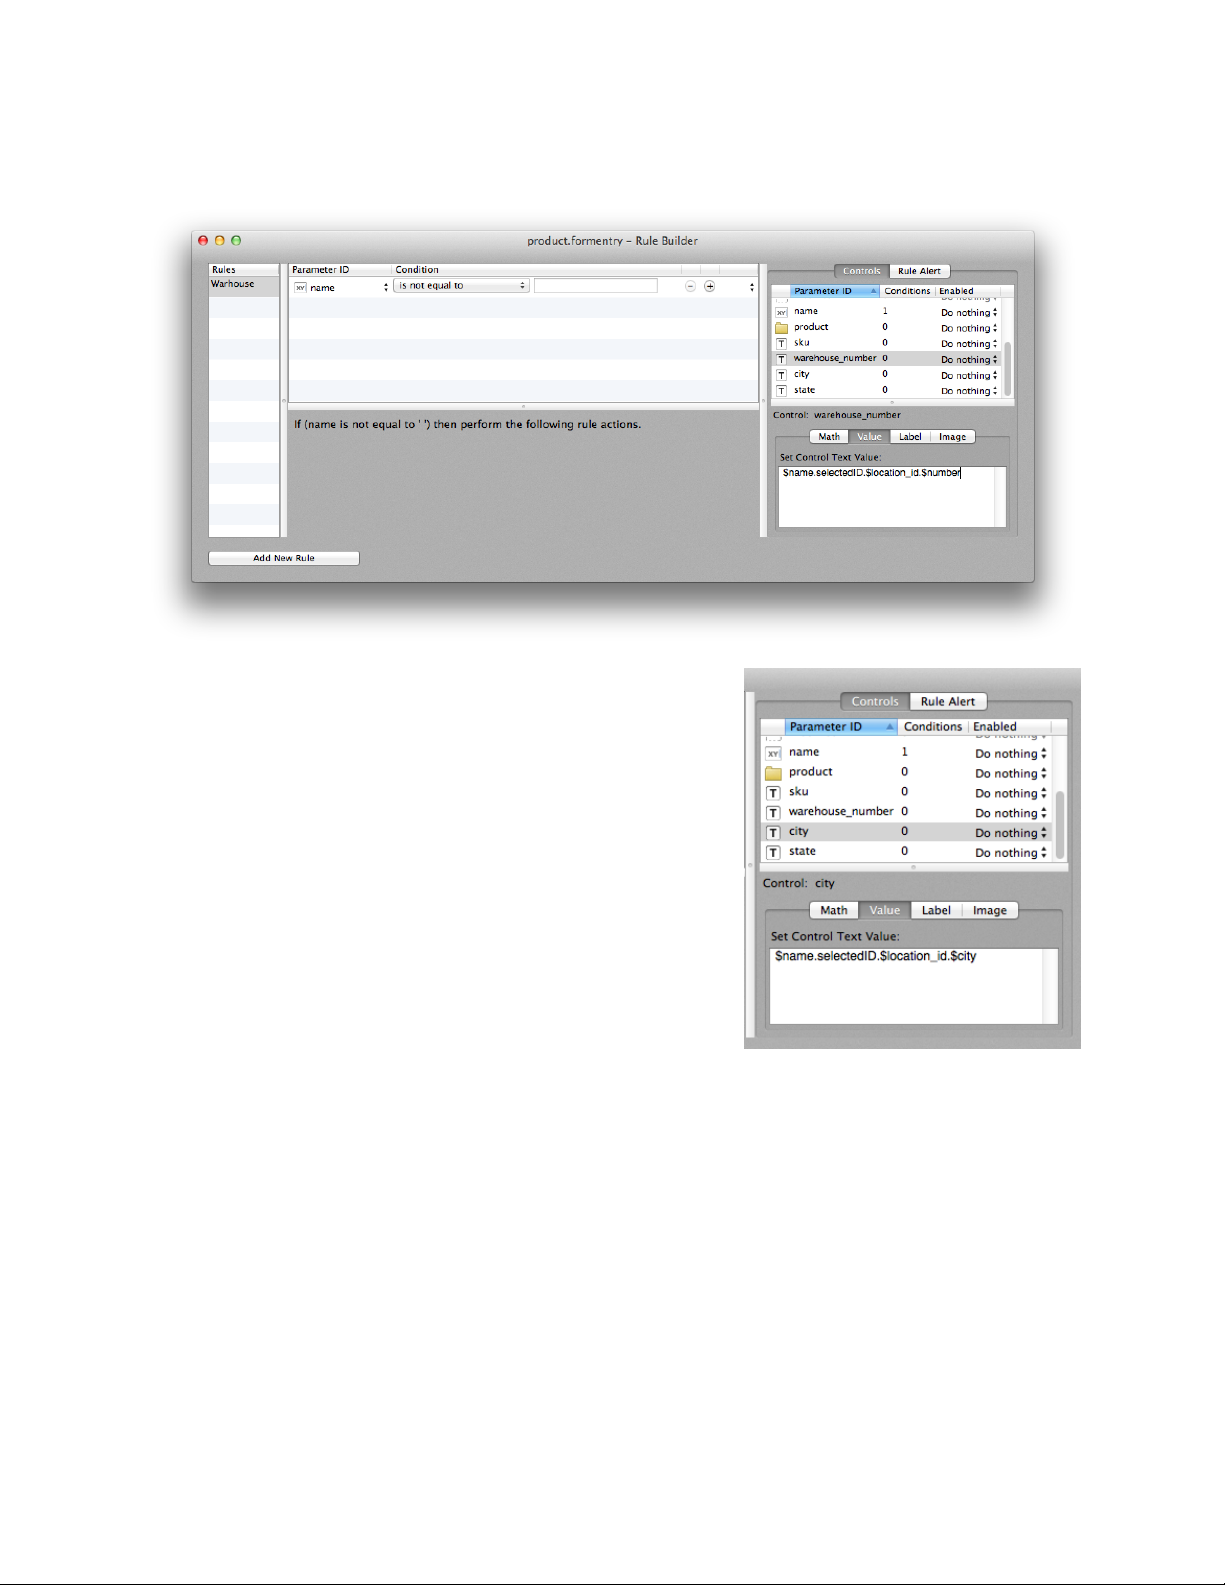
K EY P ATH T RAVERSING IN R ULE B UILDER
The key value path for retrieving across parents
tables is done through the Foreign Key Column ID. In
the above example, to set the “Warehouse Number”
control, we want to use the following key path in the
Rule Builder:
“$name.selectedID.$location_id.$number”
What this means is:
<parameter id>.<record ID>.<parent id>.<column id>
Select the “warehouse_number” in the Rule Builder for this Rule and select the Value
tab. Basically, when the “name” parameter is set (which is bound to the database), we
want to grab the record ID of said “name”, the lookup the Column ID of
“location_id” (FormEntry Touch recognizes the ‘_id’ in the Column ID name) and
FormEntry - The User’s Manual 81
Page 82
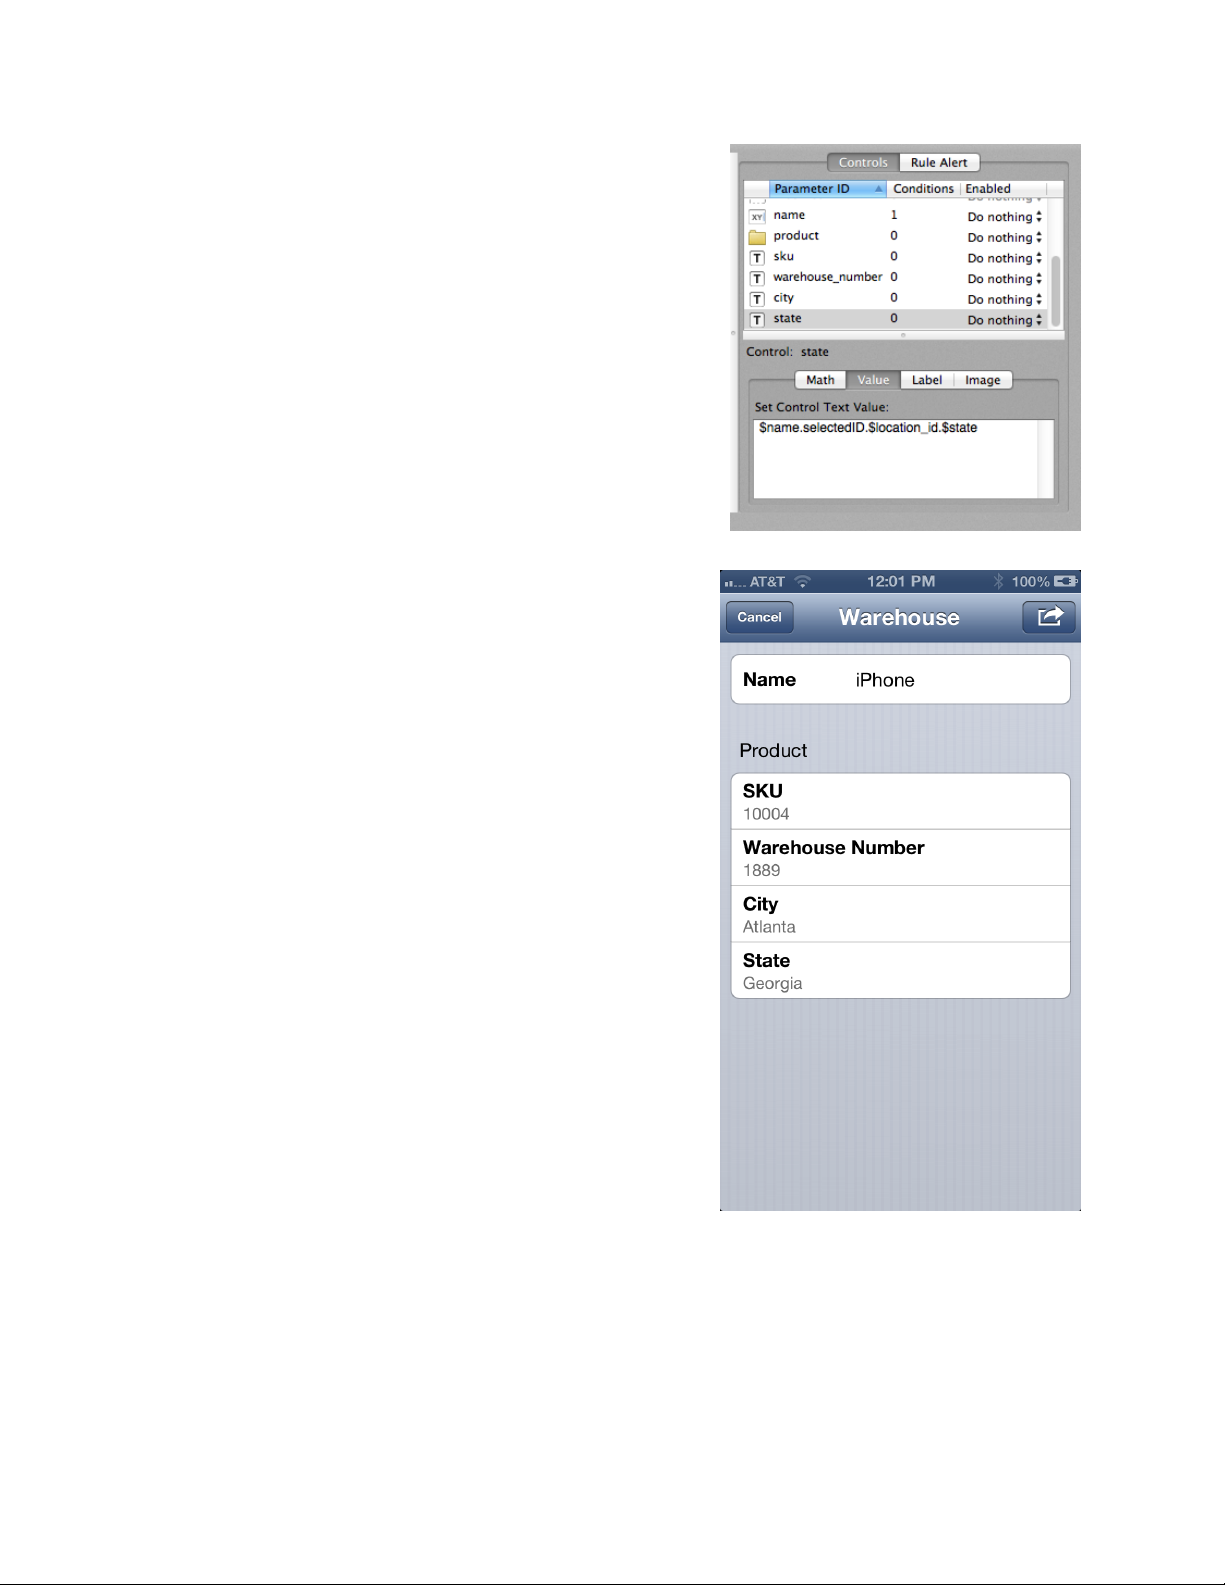
retrieves the “number” Column ID for the “products”
“id” at “number” Column ID.
Same methodology applies for both the “City” and
“State” controls. We select the “city” and “state”
parameter IDs in the Rule Builder and update the
their Values with their key path:
“$name.selectedID.$location_id.$city”
“$name.selectedID.$location_id.$state”
Now update your iOS device with the modified form.
Select a Name from the autocomplete and the SKU
should be populated from the ‘products’ table at the
Column ID of ‘sku’. The Warehouse Number should
be populated with ‘number’ Column ID from the
‘location’ table, while the City and State should be
populated from their respective Column IDs.
Notice if you select a different product from the
autocomplete, the values will looked up and
inserted into the four Text controls.
K EY P ATH S UMMARY
In review, traversing from child to parent tables is
straight forward.
1. Have at least two tables with a child to parent
relationship.
2. The child uses the suffix of “_id” in a Foreign
Key Column Type to the parent.
3. User the Rule Builder for triggering updates and
retrieving database values through key paths.
T RAVERSING TO G RANDPARENT T ABLE
You can expand upon the key path convention even further by traversing from child to
parent to grandparent table and even further. Let’s see an example of how to transverse
to the grandparent table, we will use three tables. Your data model will look like the
FormEntry - The User’s Manual 82
Page 83
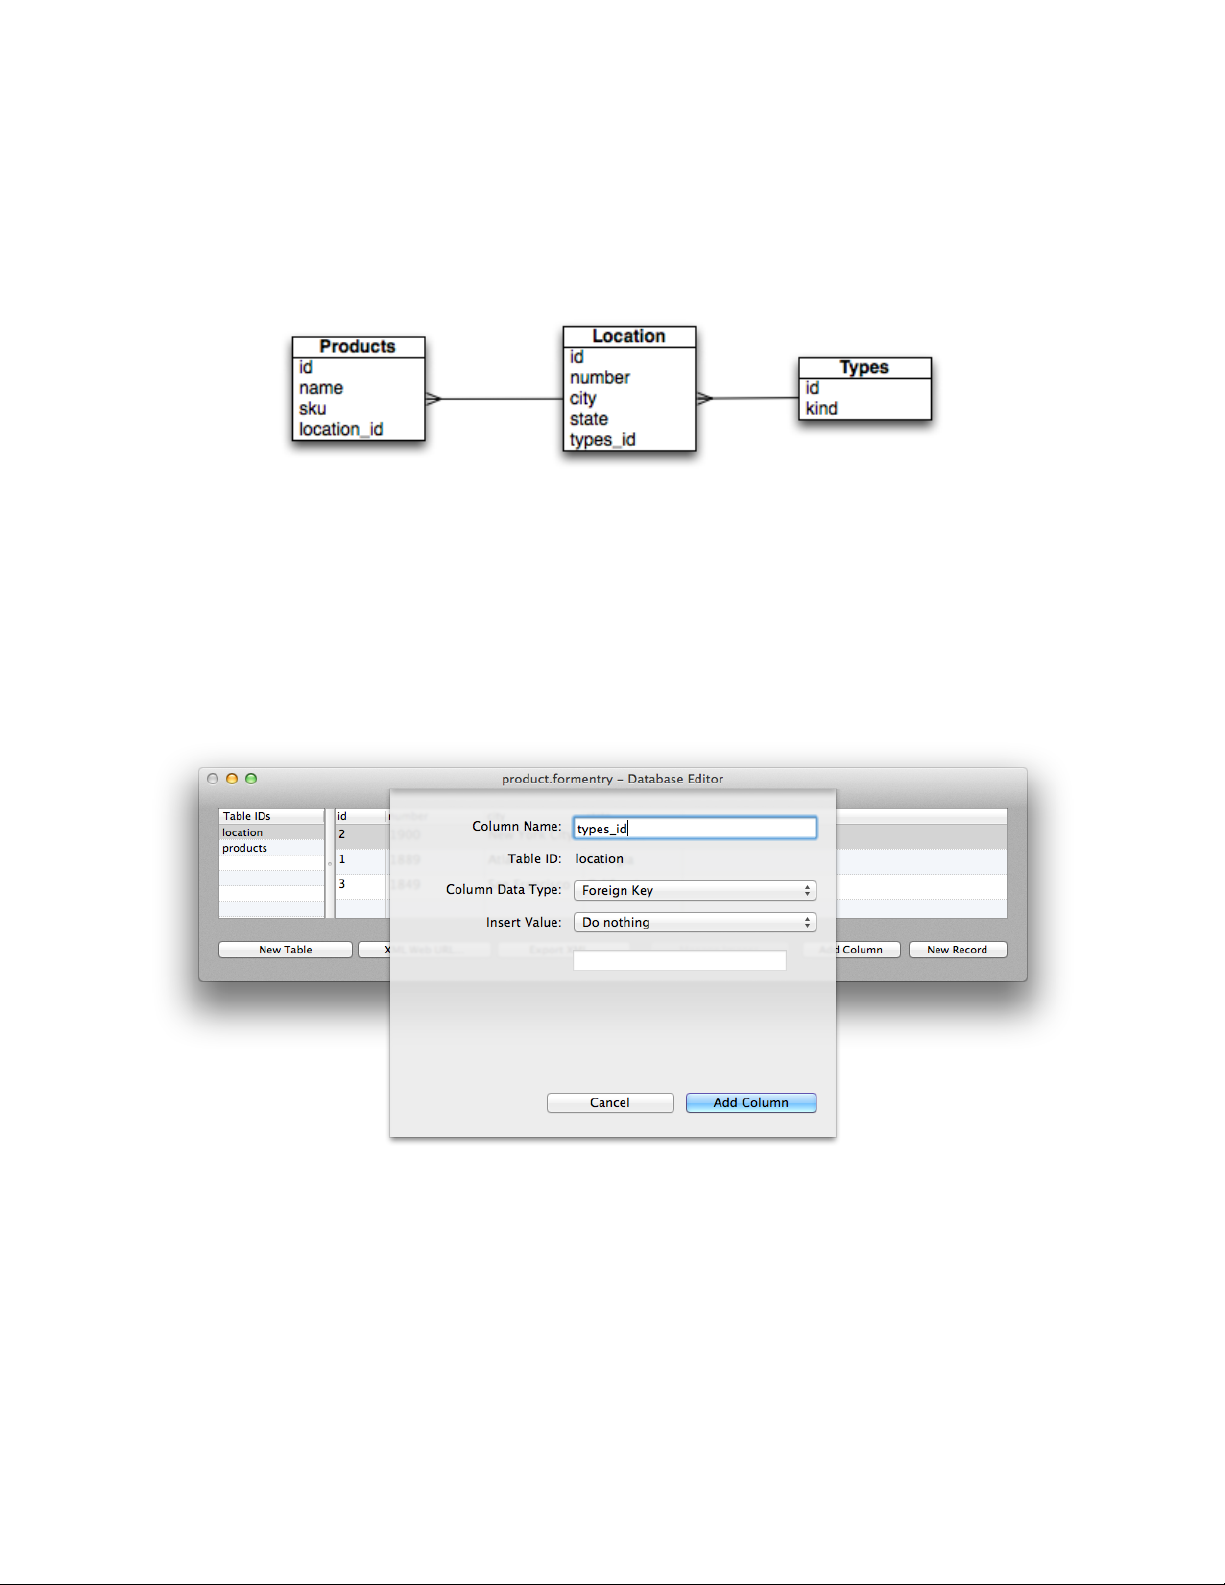
following entity diagram, a many-to-one or one-to-many relationships. We will need a
new table “types” that is the parent of “location” and is related with the “types_id”.
Remember, the child table always contains the Foreign Key Column Data Type.
U PDATE L OCATION T ABLE
Update the ‘location’ table by adding a new Foreign Key Column Type called “types_id”
as in the following:
By using the “types_id”, FormEntry will assume there will be a table called “types” in the
database. Let’s add some values to the “types_id” by adding an either “1” or “2” value
for the foreign key.
FormEntry - The User’s Manual 83
Page 84
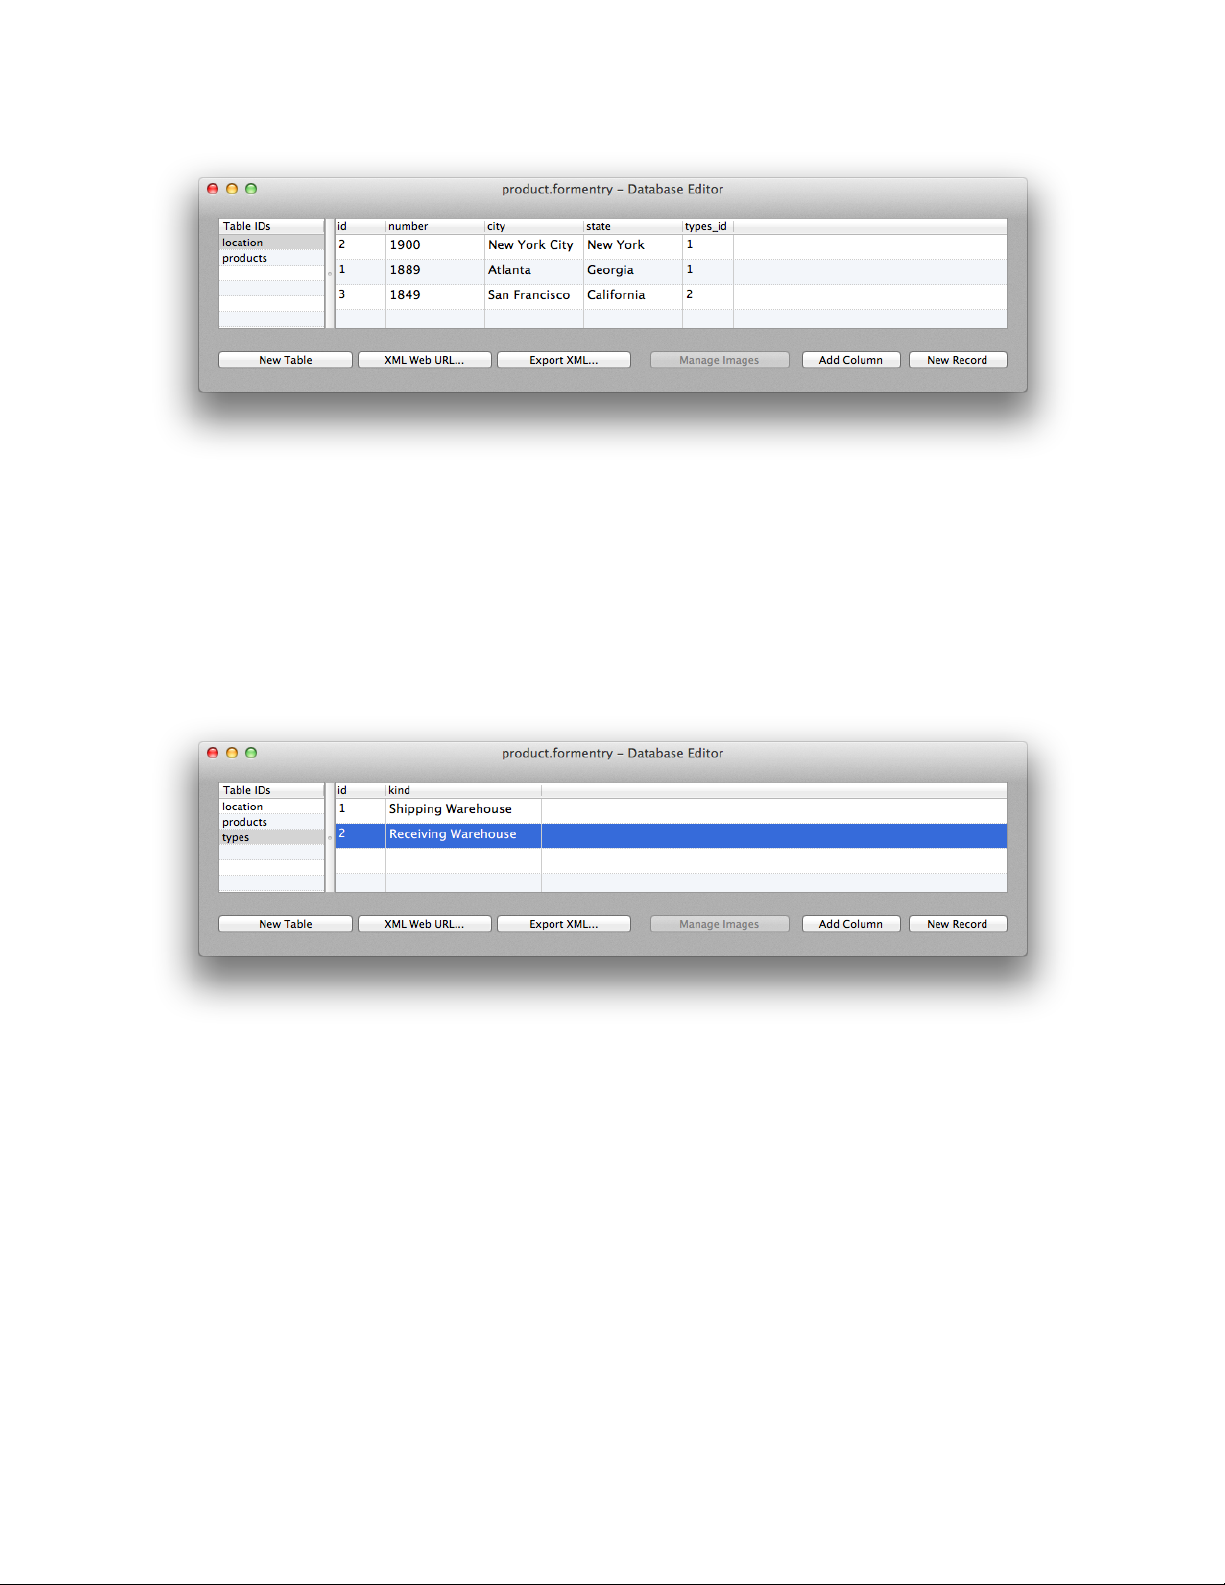
A DD N EW T YPES T ABLE
Now let’s add a new table called “types” where this will hold two record values for
Shipping Warehouse or Receiving Warehouse. Add a new Column ID with the title of
“kind” and set it to a Column Data Type of “String. Your table should look like the
following:
Now let’s add a new Text Control called “Warehouse Type” and rearrange the form
layout to look something like the following:
FormEntry - The User’s Manual 84
Page 85
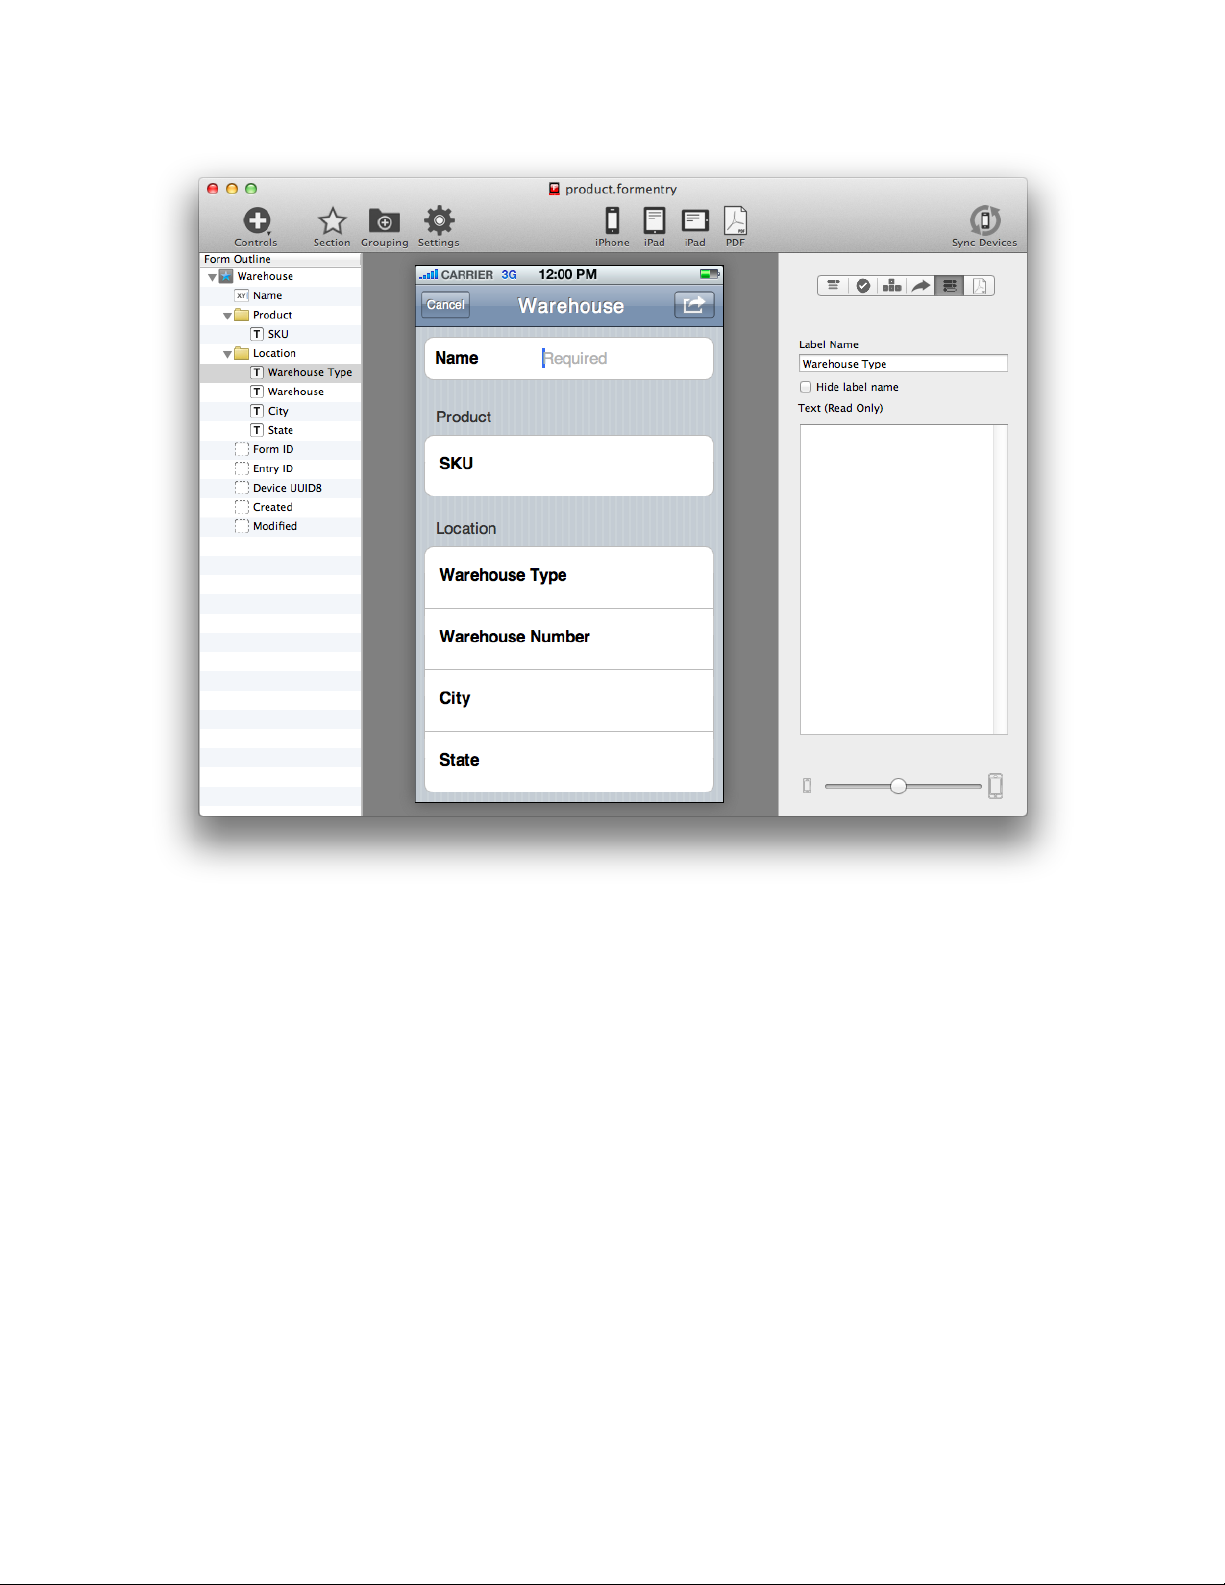
K EY P ATH T RAVERSING IN R ULE B UILDER
From within the Rule Builder, select our previous Rule example and then select the
“warehouse_type” from the Control list. Select the Value tab and add the following key
path in the text box:
$name.selectedID.$location_id.$types_id.$kind
FormEntry - The User’s Manual 85
Page 86
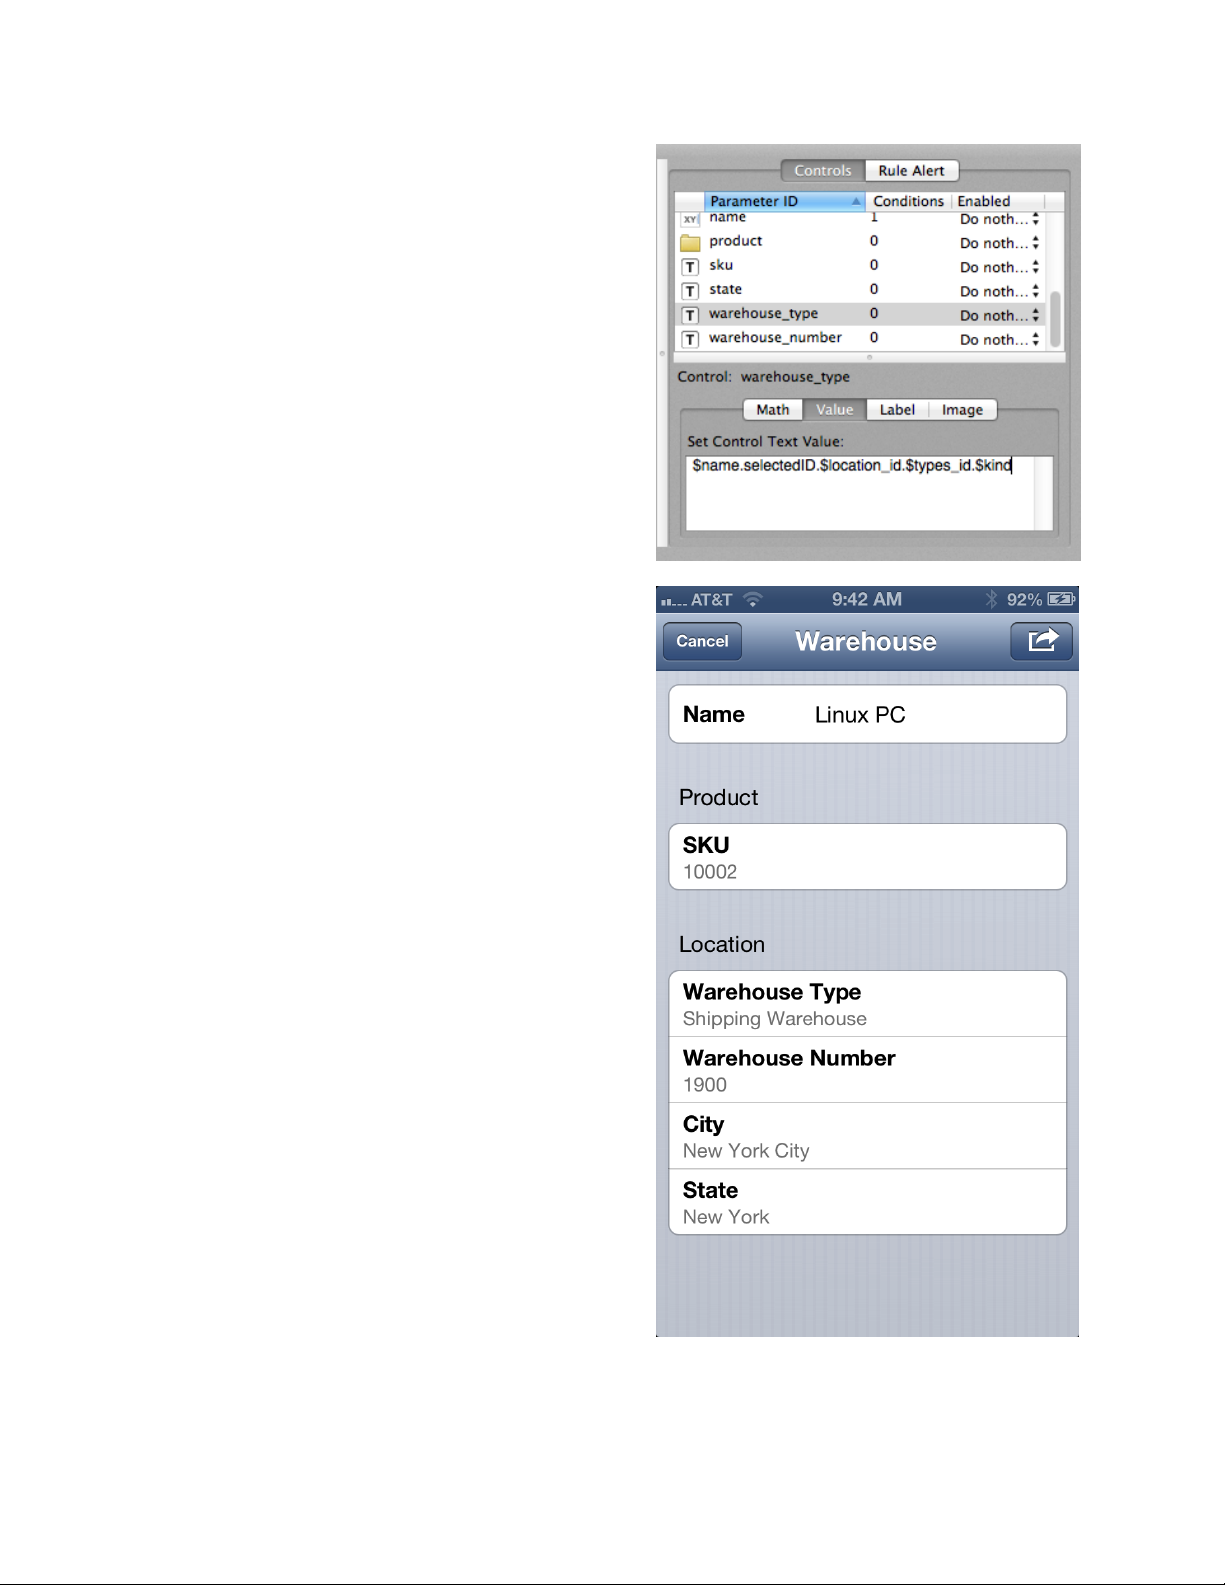
This key path will traverse the 3 tables and
retrieve the value of the related “kind” value
on the “types” table.
Your Rule Builder should look like the
following screenshot to the right.
Now update your iOS device with the new
form and select a Name from the
autocomplete. You will see either “Shipping
Warehouse” or “Receiving Warehouse” in the
Warehouse Type Text Control.
You can repeat this process with child to
parent relationship, and child to grandparent
relationship. It is recommended that when
traversing key paths, you should stay with
traversing one or two tables. If you try to
traverse more tables, be aware of a
performance hit depending on your iOS
device.
K EY P ATH S UMMARY
In review, traversing from child to grandparent
tables is straight forward.
1. Have at least three tables with a child to
parent relationship and parent to
grandparent relationship.
2. The child and parent uses the suffix of
“_id” in Foreign Key Column Types to the
parent and grandparent.
3. User the Rule Builder for triggering
updates and retrieving database values
through key paths.
FormEntry - The User’s Manual 86
Page 87
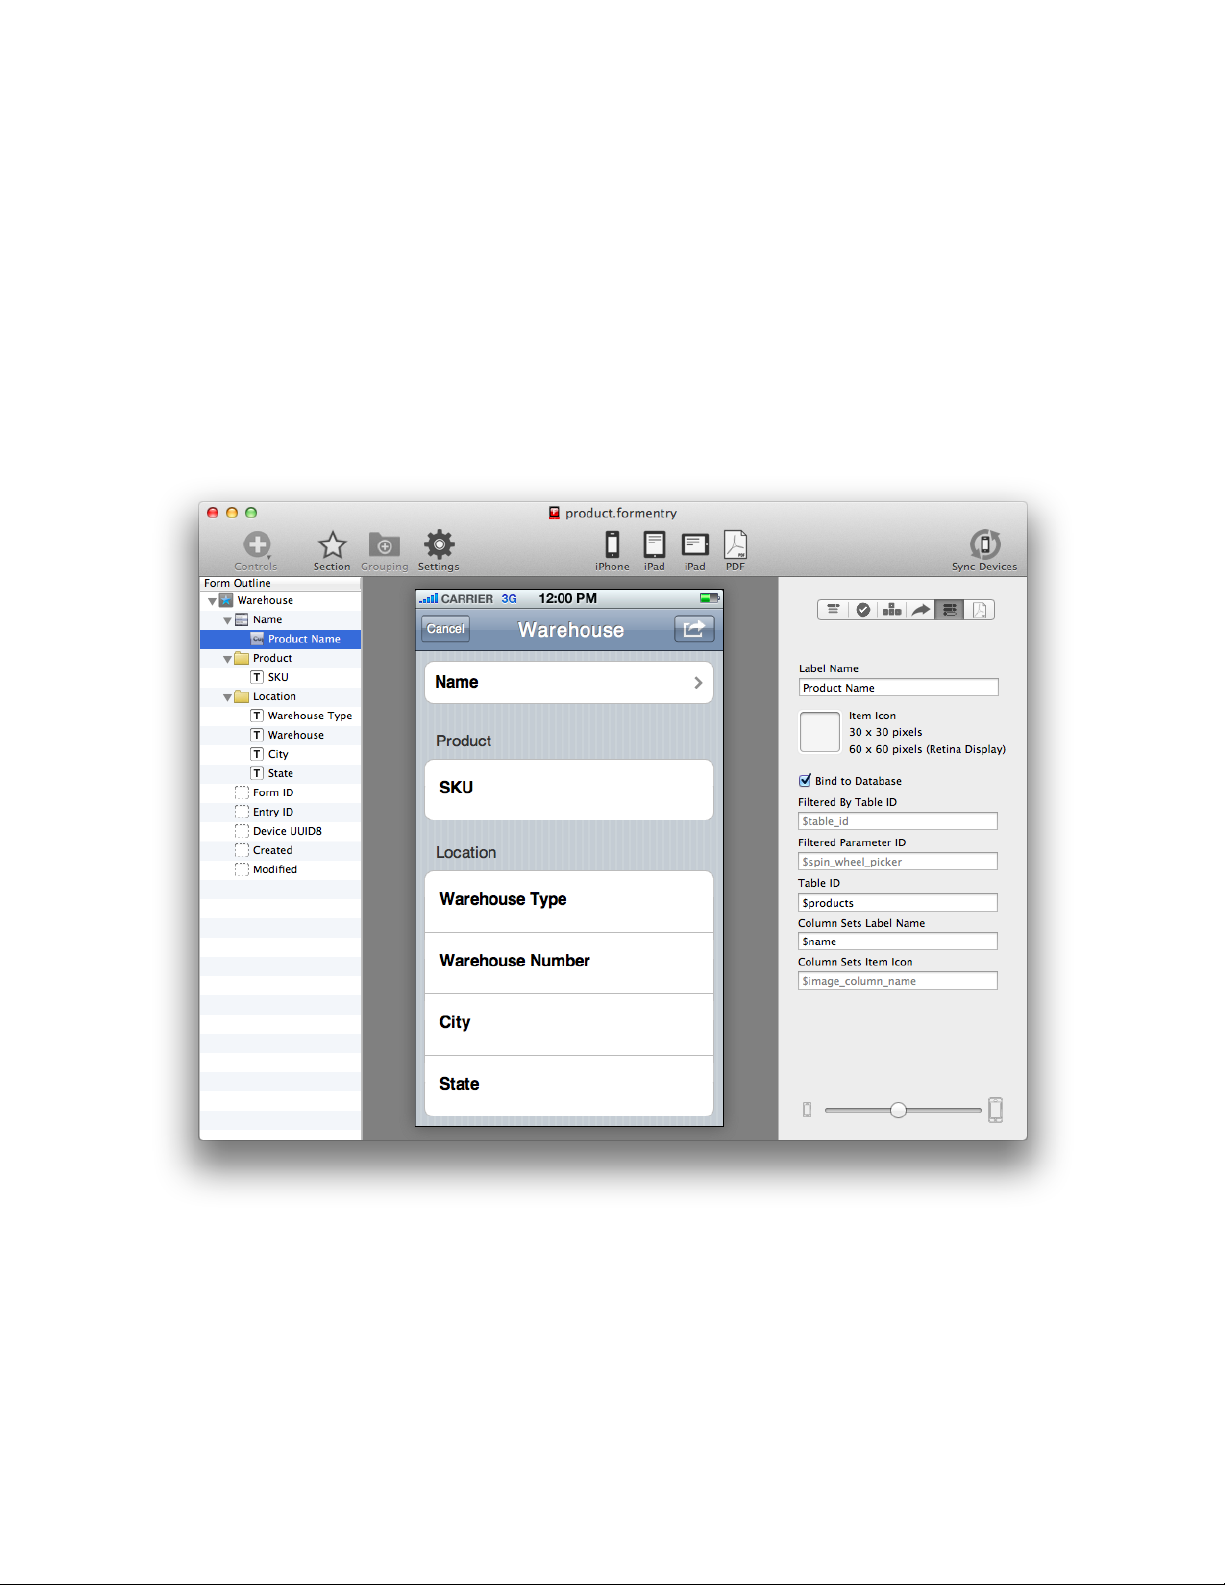
S PIN W HEEL P ICKER B INDINGS
The Spin Wheel Picker Bindings is bound to the database through the Spin Wheel Item.
The control can be bound to a table’s column by selecting the configuration tab from the
control tab bar pane. When binding a Spin Wheel Picker, only one Spin Wheel Item is
required.
In our example, let’s add a new Spin Wheel Picker. Change the Label Name to “Name”.
Now add a Spin Wheel Item and check the Bind to Database checkbox. Now add
“$products” to the Table ID and “$name” to the Column Sets Label Name.
S WITCH TO S PIN W HEEL P ICKER C ONDITION
Now in the Rule Builder window, let’s make sure we select the “name” of the Spin
Wheel Picker and not the “name” for the Text Field.
FormEntry - The User’s Manual 87
Page 88
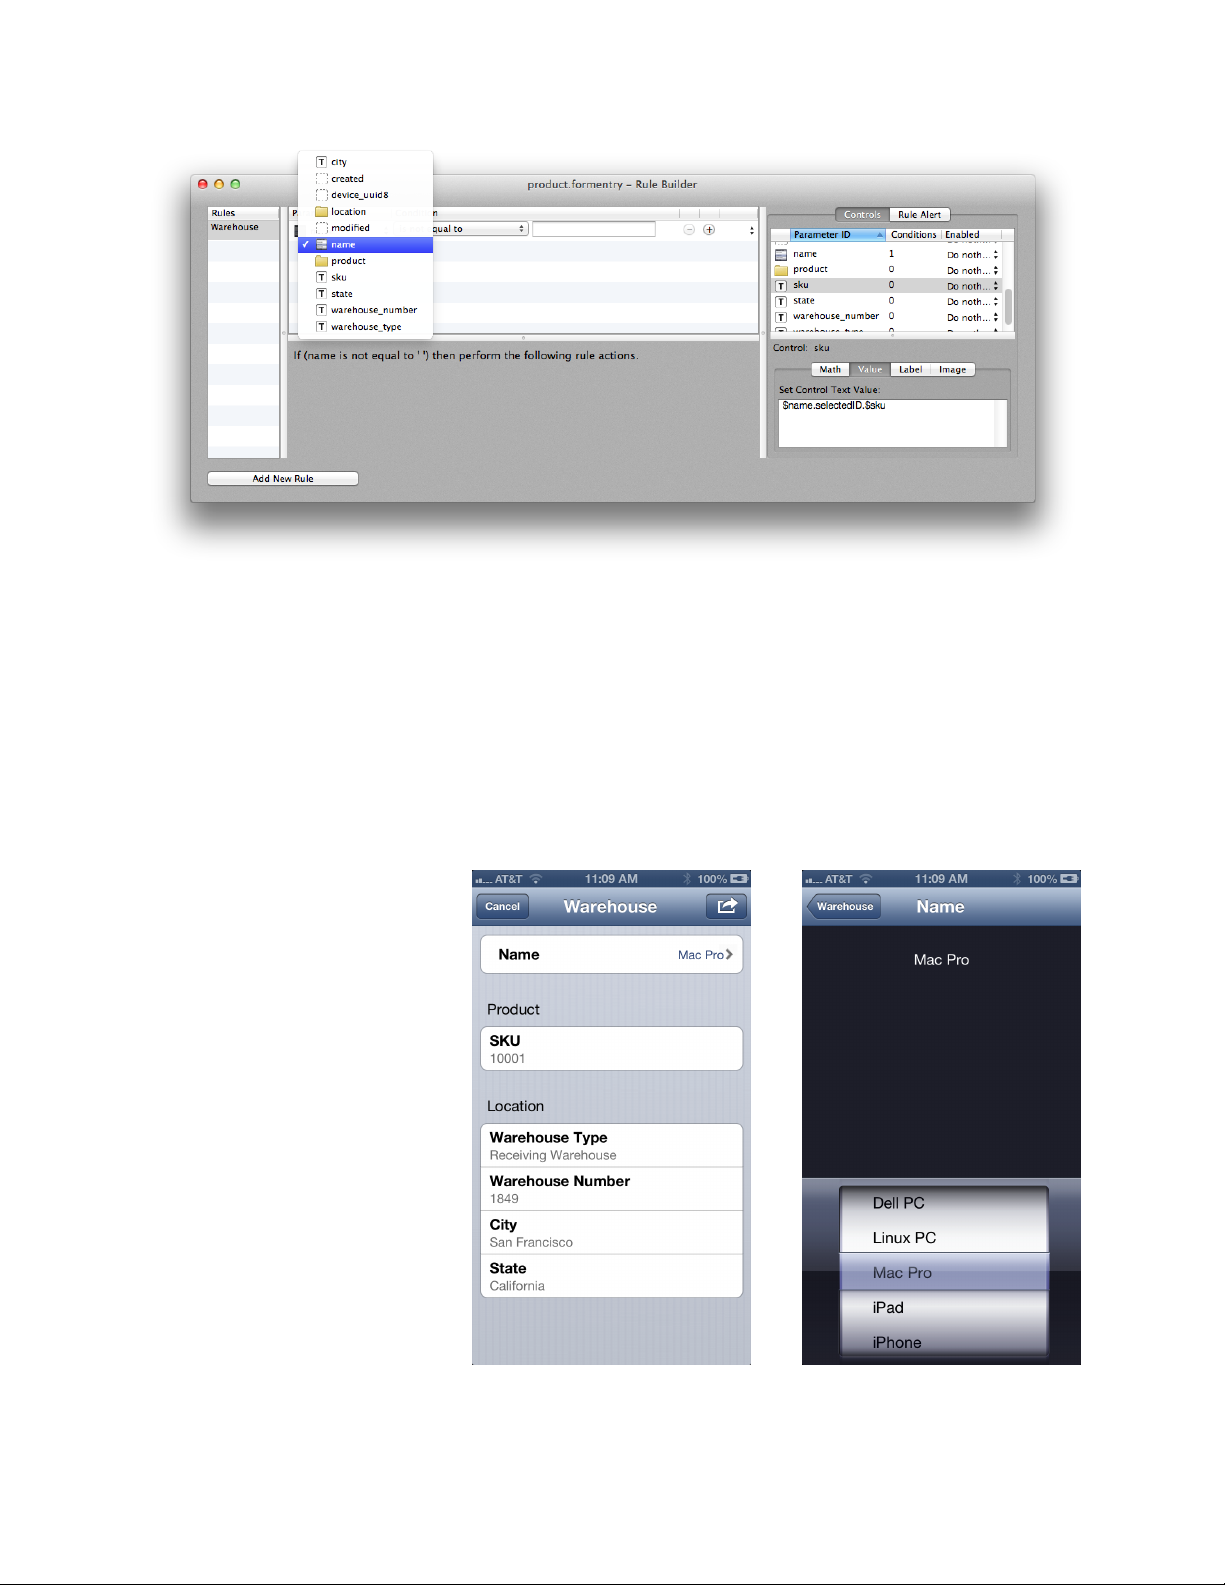
You will need to change the to Spin Wheel Picker “name”, delete the “Name” Text Field
and probably rename the Spin Wheel Picker parameter ID from “name1” to “name”.
Your final Rule Builder window should look like the above screenshot.
None of your rule actions changes, you simply want to switch from using the “Name”
Text Field to the “Name” Spin Wheel Picker.
You want to make sure that your condition is basically the same as before : “If (name is
not equal to ‘ ‘) then perform the following rule actions.” The same as not equal to a
blank space.
Now Sync your form app to
your iOS device. You now
have a Spin Wheel Picker
that is bound to your
database instead of the Text
Field.
Select the Spin Wheel
Picker and you will see the
list of products that Spin
Wheel Item is bound too.
Select an item and press
the Warehouse back button,
your form app loads all the
appropriate values, just like
selecting the Text Field
FormEntry - The User’s Manual 88
Page 89
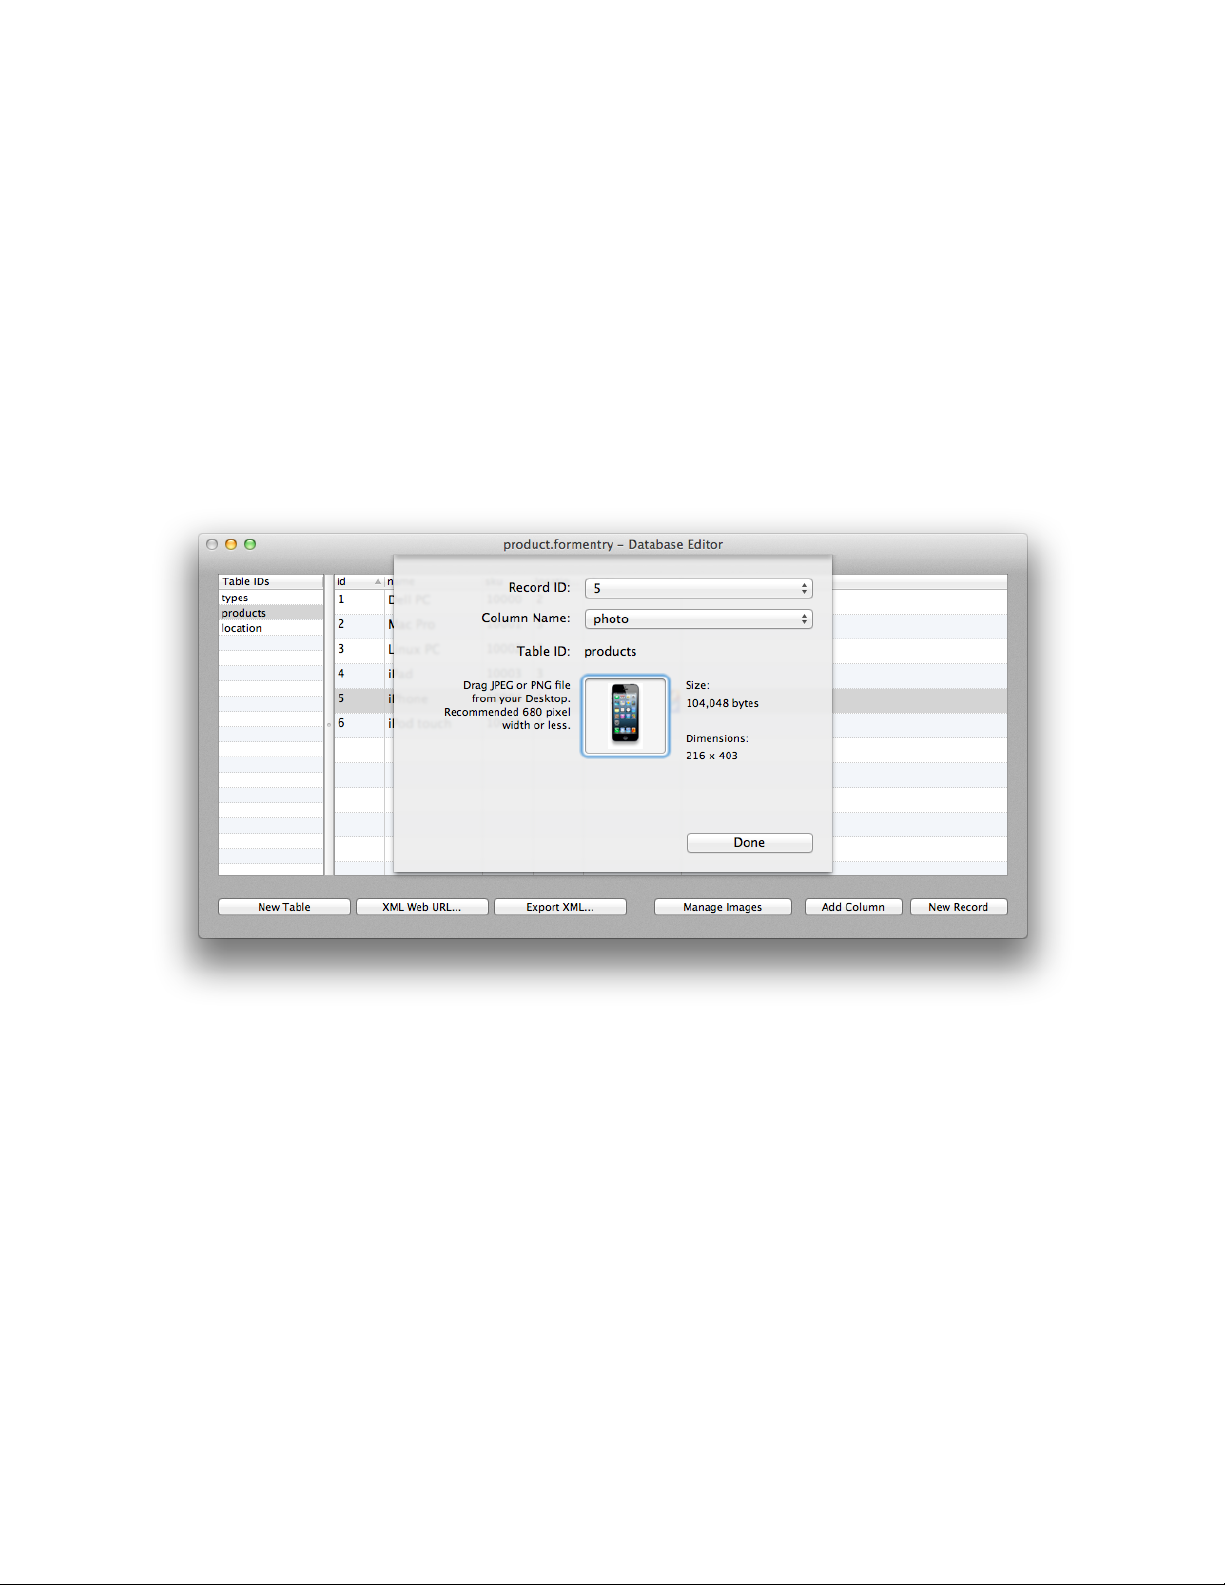
autocomplete.
B IND I CONS AND I MAGE K EY P AT HS
Now we want to populate our Spin Wheel Items, Product grouping and a new Image
control with image values from our database.
We need to gather six images and add them to the Database Editor by adding a new
Column ID of “photo” with a Column Data Type of Image. Once the Image column of
“photo” is added, double click at the cell that of “photo” and the row you are wanting to
add an image. Or you can select “Manage Images” button.
From the drop down sheet, drag an image into the Image Well, and in the above
example, we added an image of the iPhone from the Desktop. Repeat this process for
the remainder of your images.
When adding your images, you want to make sure you use the smallest possible size
images. Think about using smaller resolution at all times.
FormEntry - The User’s Manual 89
Page 90
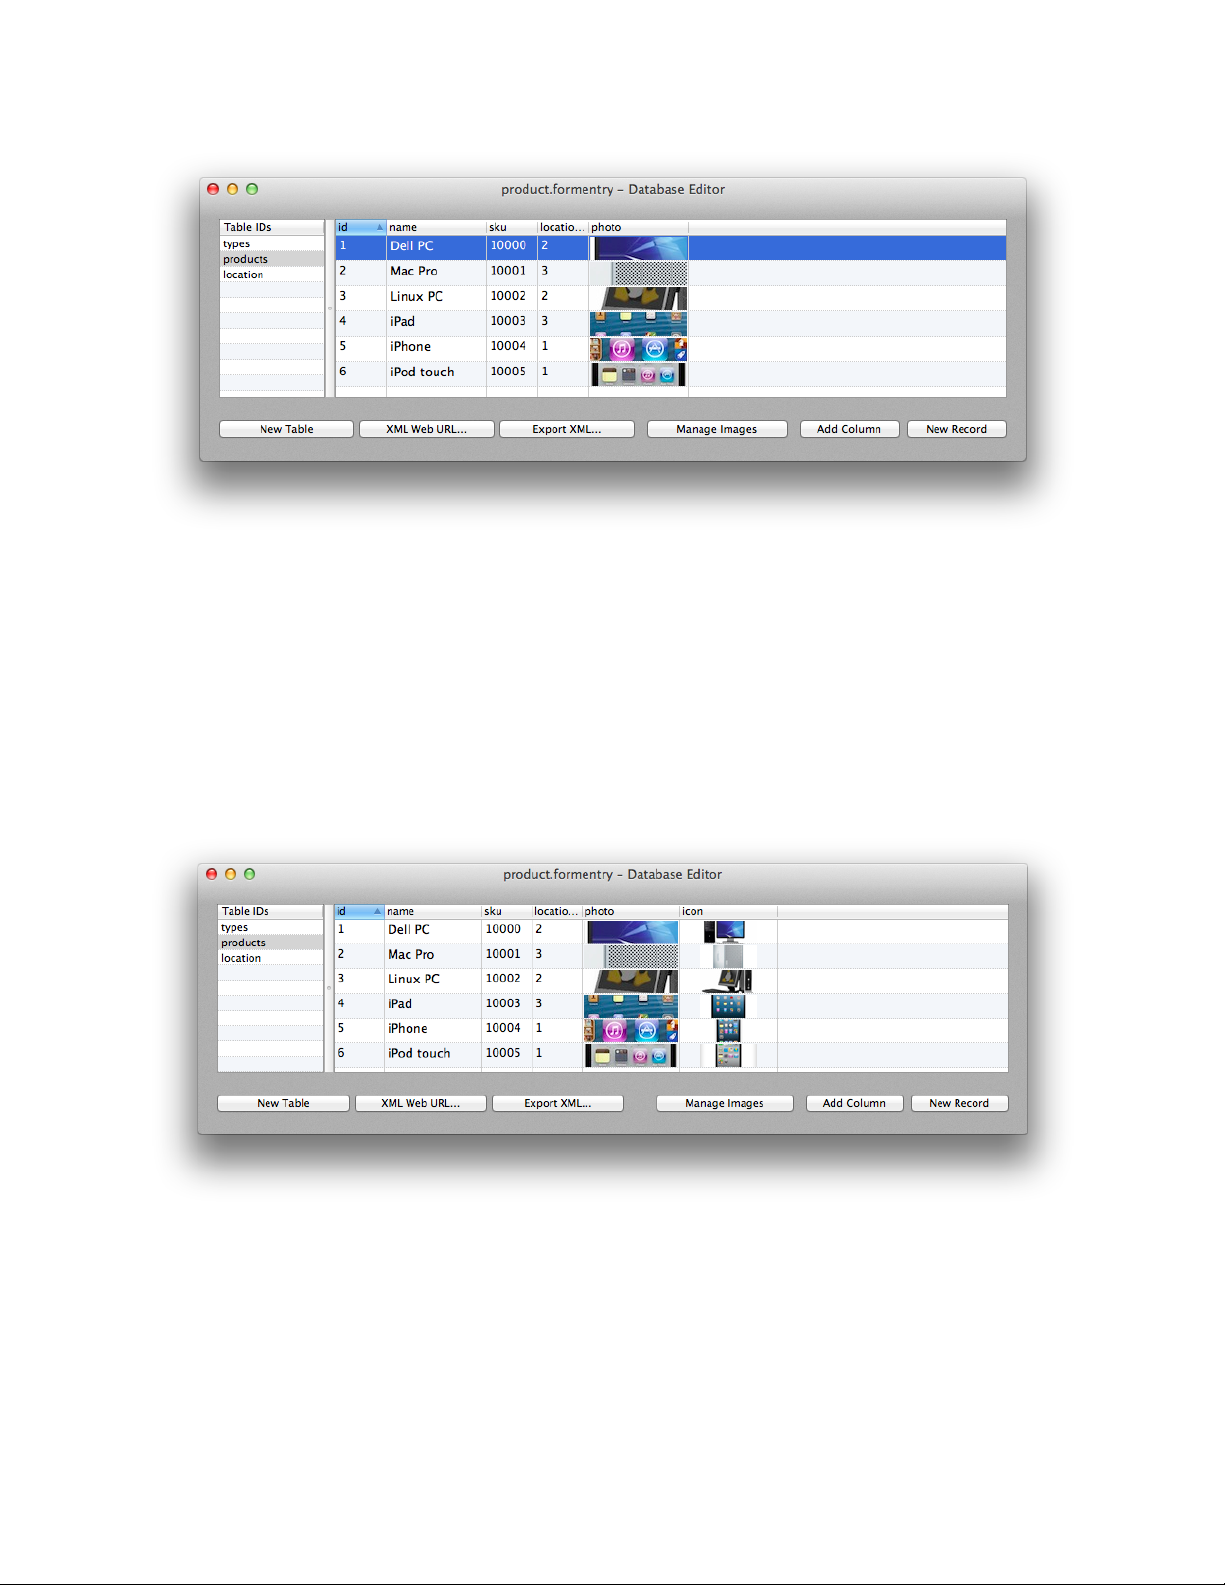
Let’s repeat the process again for the icons. We to use 60 x 60 icons (Retina Display) of
the Spin Wheel Item and Product grouping, so we resized our photos and saved them
as icons.
We need to create another Column ID “icon” with an Image Column Data Type. We are
repeating the same process as the photos and our Database Editor should look like the
following screenshot.
FormEntry - The User’s Manual 90
Page 91
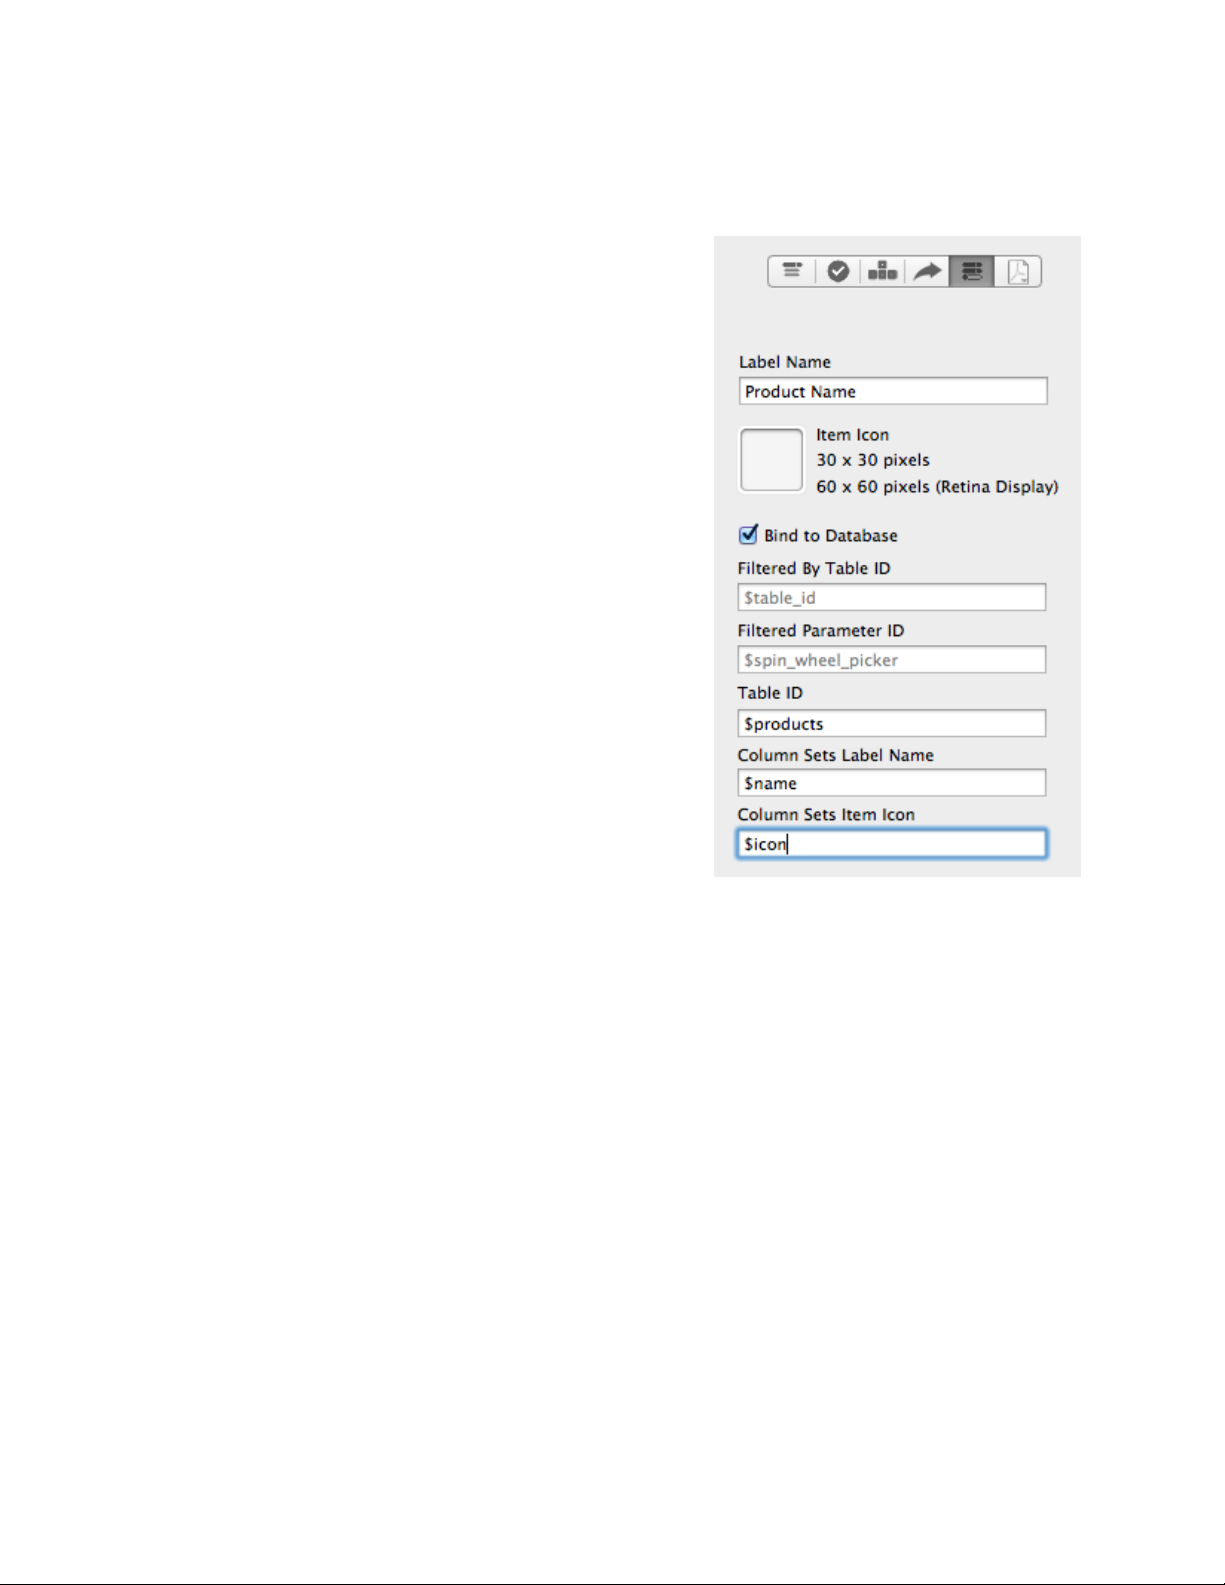
Now, let’s go ahead and bind the Spin Wheel Item’s Icon to our database. Select the
Spin Wheel Item from the Form Outline and add the Column ID of “$icon” to the Column
Sets Item Icon input field.
When we bind the Spin Wheel Item’s Icon to the
Image Column ID, we really want to bind a much
smaller icon and not a full size image.
The images we added in our example for the
‘photo’ column are less than 100K, however they
are under 300 pixels in width. You will need to
determine the best size and performance expense.
Loading photos into icons in your form app can be
done, however it will pay a performance penalty.
Now let’s add an Image Control to our form app,
place the Image Control under the Product
grouping. Do not add any image from the Desktop
to the Image Well.
FormEntry - The User’s Manual 91
Page 92
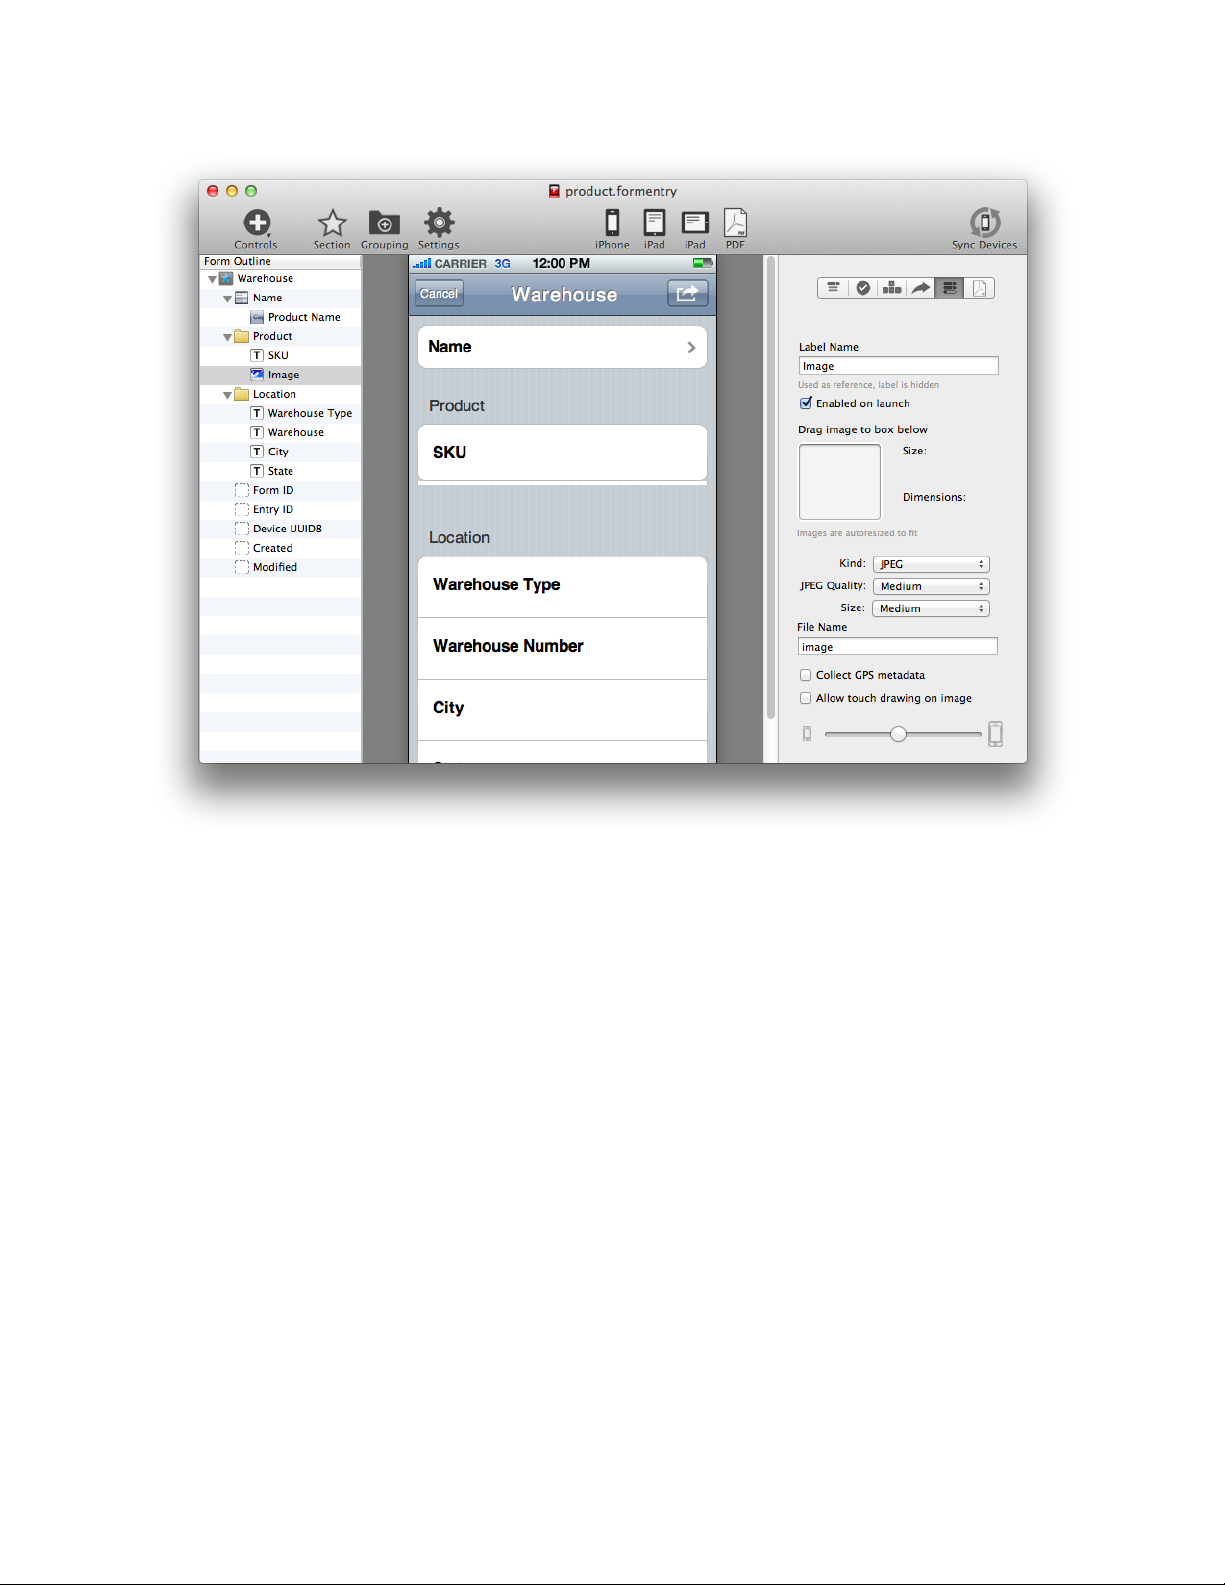
Now, within the Rule Builder window, we want to update the Image control with a full
size photo and the Product grouping with an icon.
Select the “image” parameter id from the Controls tab and select the Image tab. Add
the following Image Key Path to the “image” parameter:
$name.selectedID.$photo
FormEntry - The User’s Manual 92
Page 93
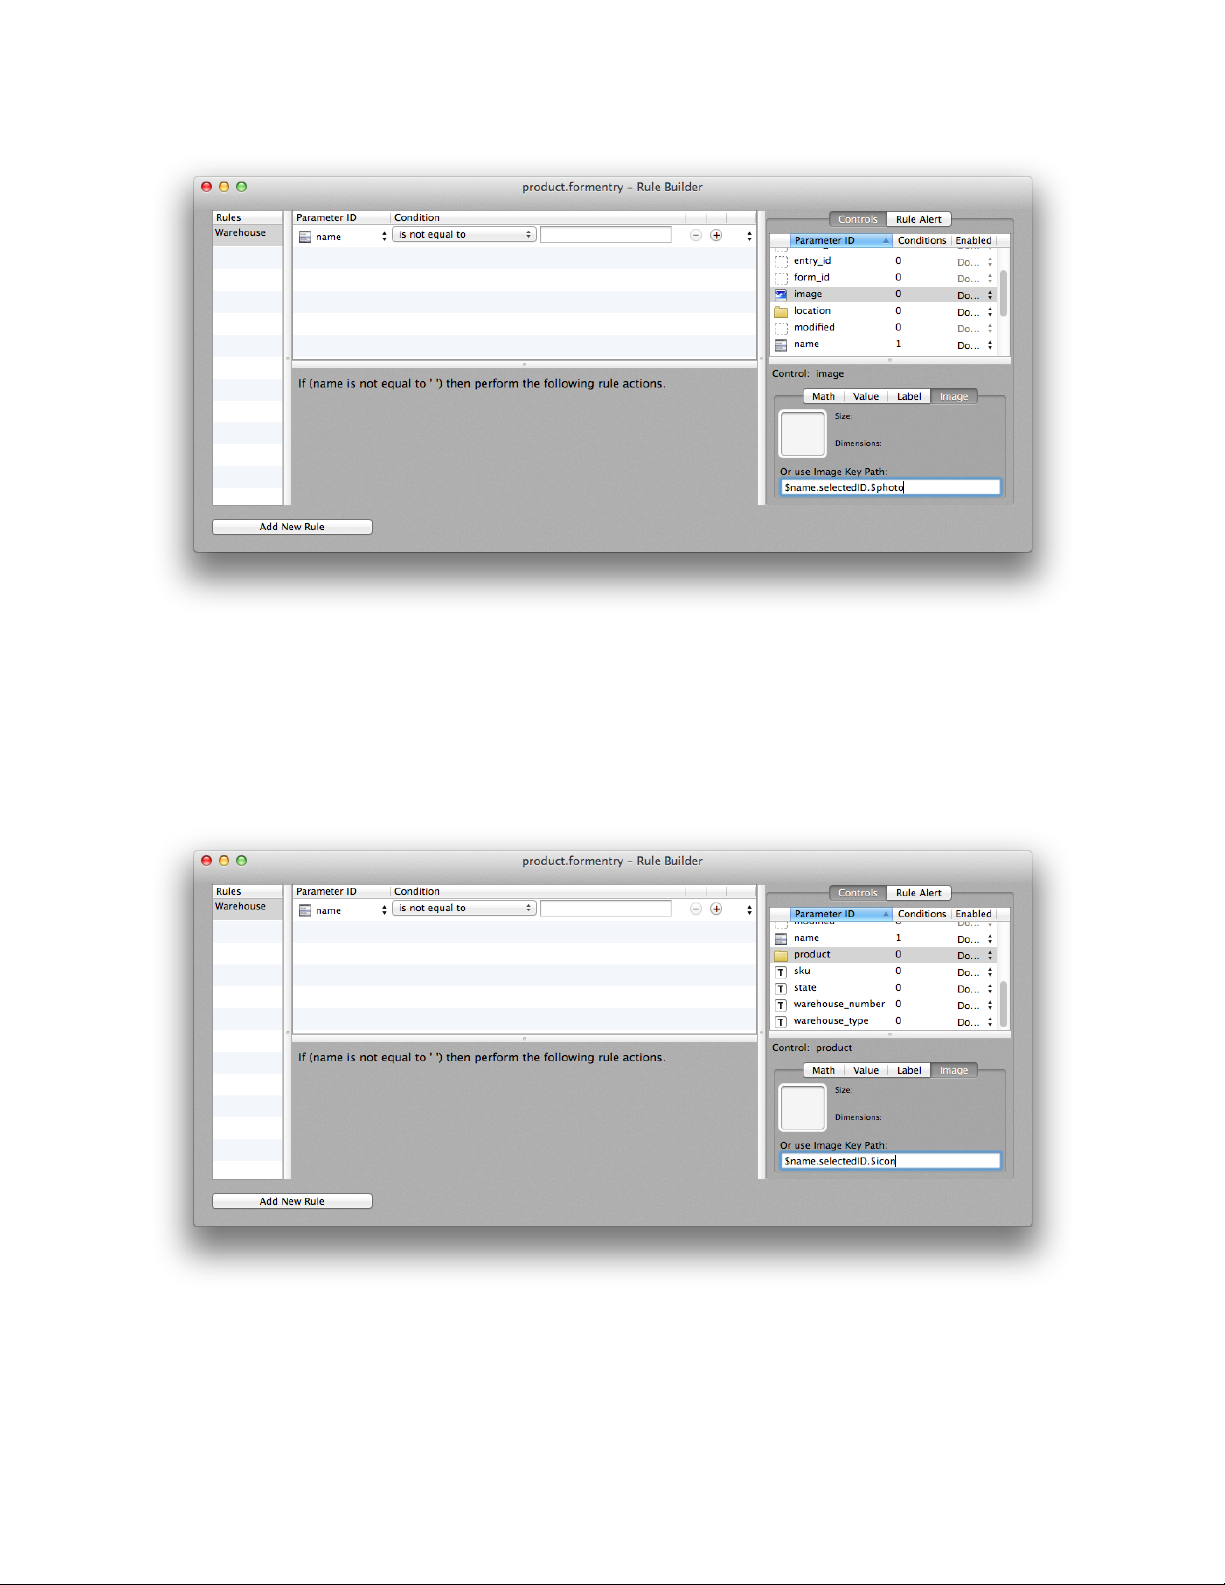
Now select the “product” grouping parameter from the Controls and add the following to
the Image tab Image Key Path:
$name.selectedID.$icon
FormEntry - The User’s Manual 93
Page 94
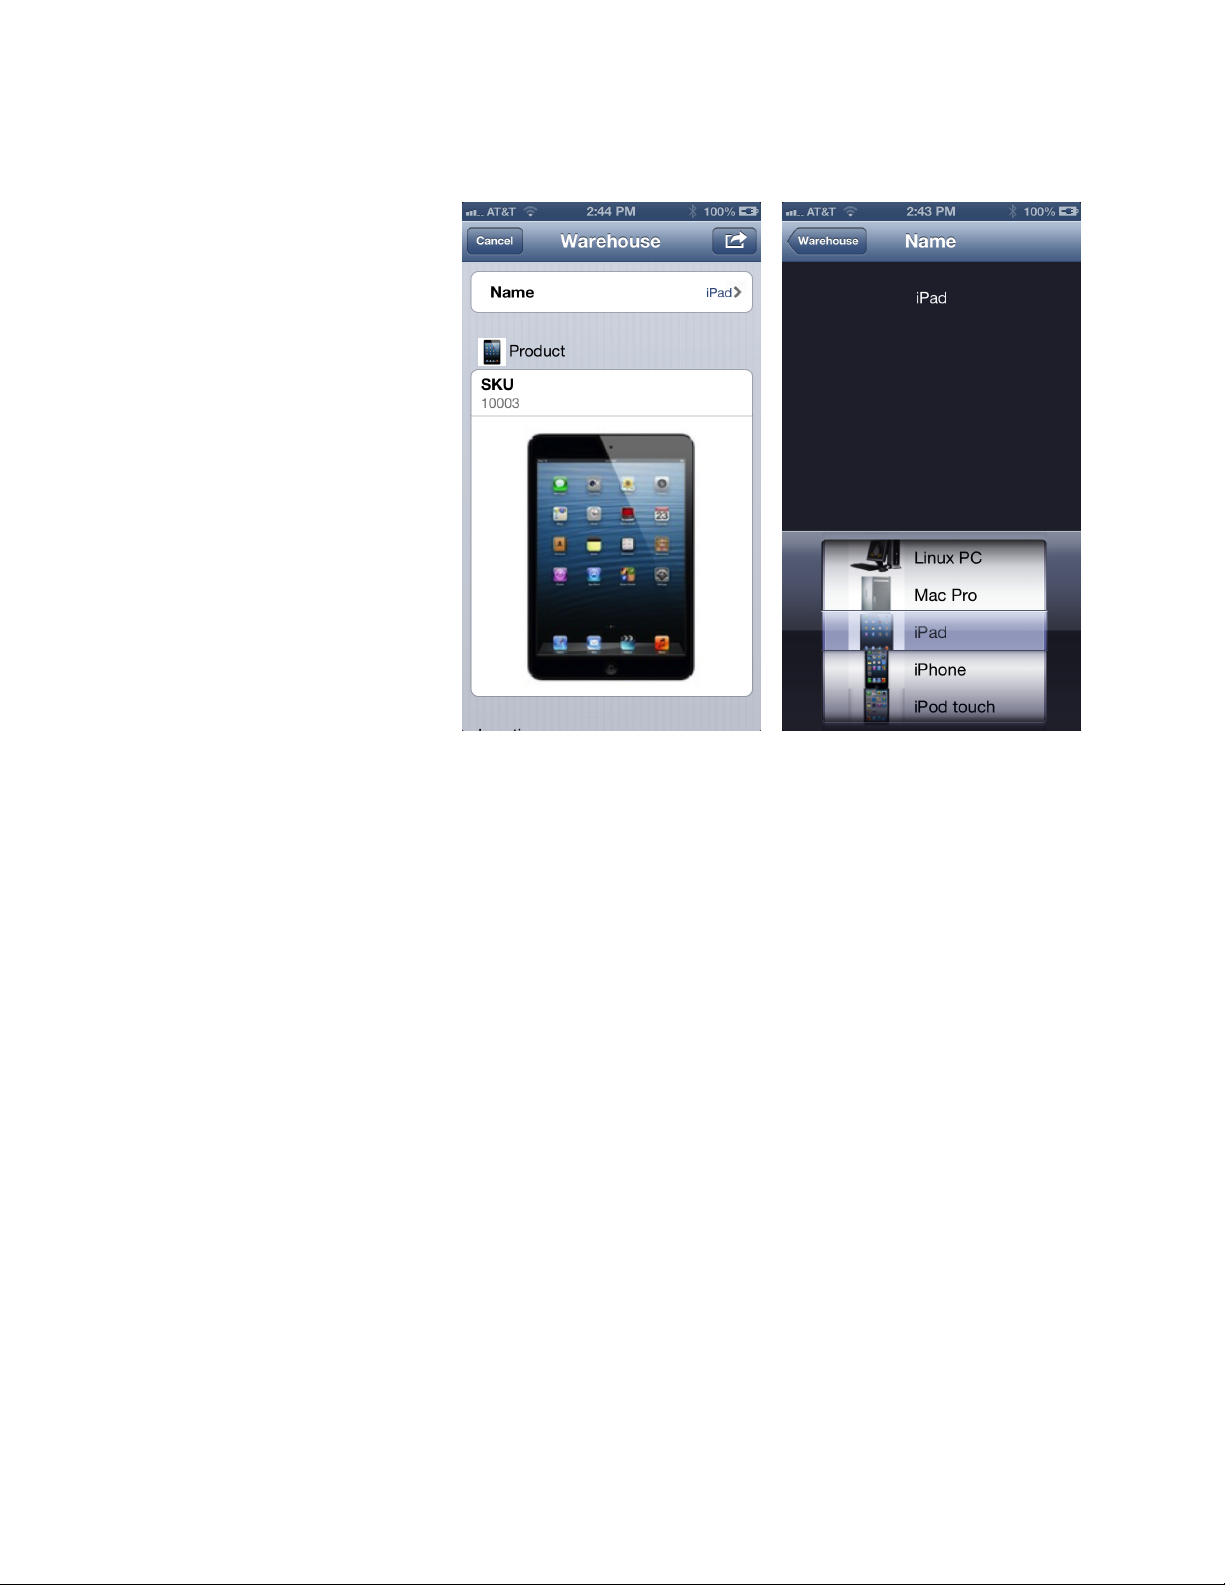
Now sync your form app project to your iOS device. Load a new form and select the
name of one of the
products from the Spin
Wheel Picker.
You will notice that the Spin
Wheel Picker items now
contains the icons next to
their names. Once you
select the item, you will see
the Product grouping has
set the icon from the
database as well as the
Image Control gets set with
the photo from the
database.
I MAGE S UMMARY
In review, retrieving images
from the database is easy.
1. Add an Image Column Data Type to your database and drag the appropriate scaled
images into the Image Well for each record.
2. Bind either the Spin Wheel Item icon or use Image Key Path within the Rule Builder
to set Grouping Icons and Image Controls.
F ILTERED S PIN W HEEL P ICKER
Filtering a Spin Wheel Picker is the same as filtering a child based upon parent. In
following with our example, we only want to show certain products in the Products Spin
Wheel Picker based upon the State from the ‘location’ table.
Let’s add a new Spin Wheel Picker called “In this State” to our form app project. We
also want to add a Spin Wheel Item called “State” and bind it to our ‘location’ database
at the ‘state’ Column ID. Do not forget to add the prefix “$” to our bindings.
FormEntry - The User’s Manual 94
Page 95
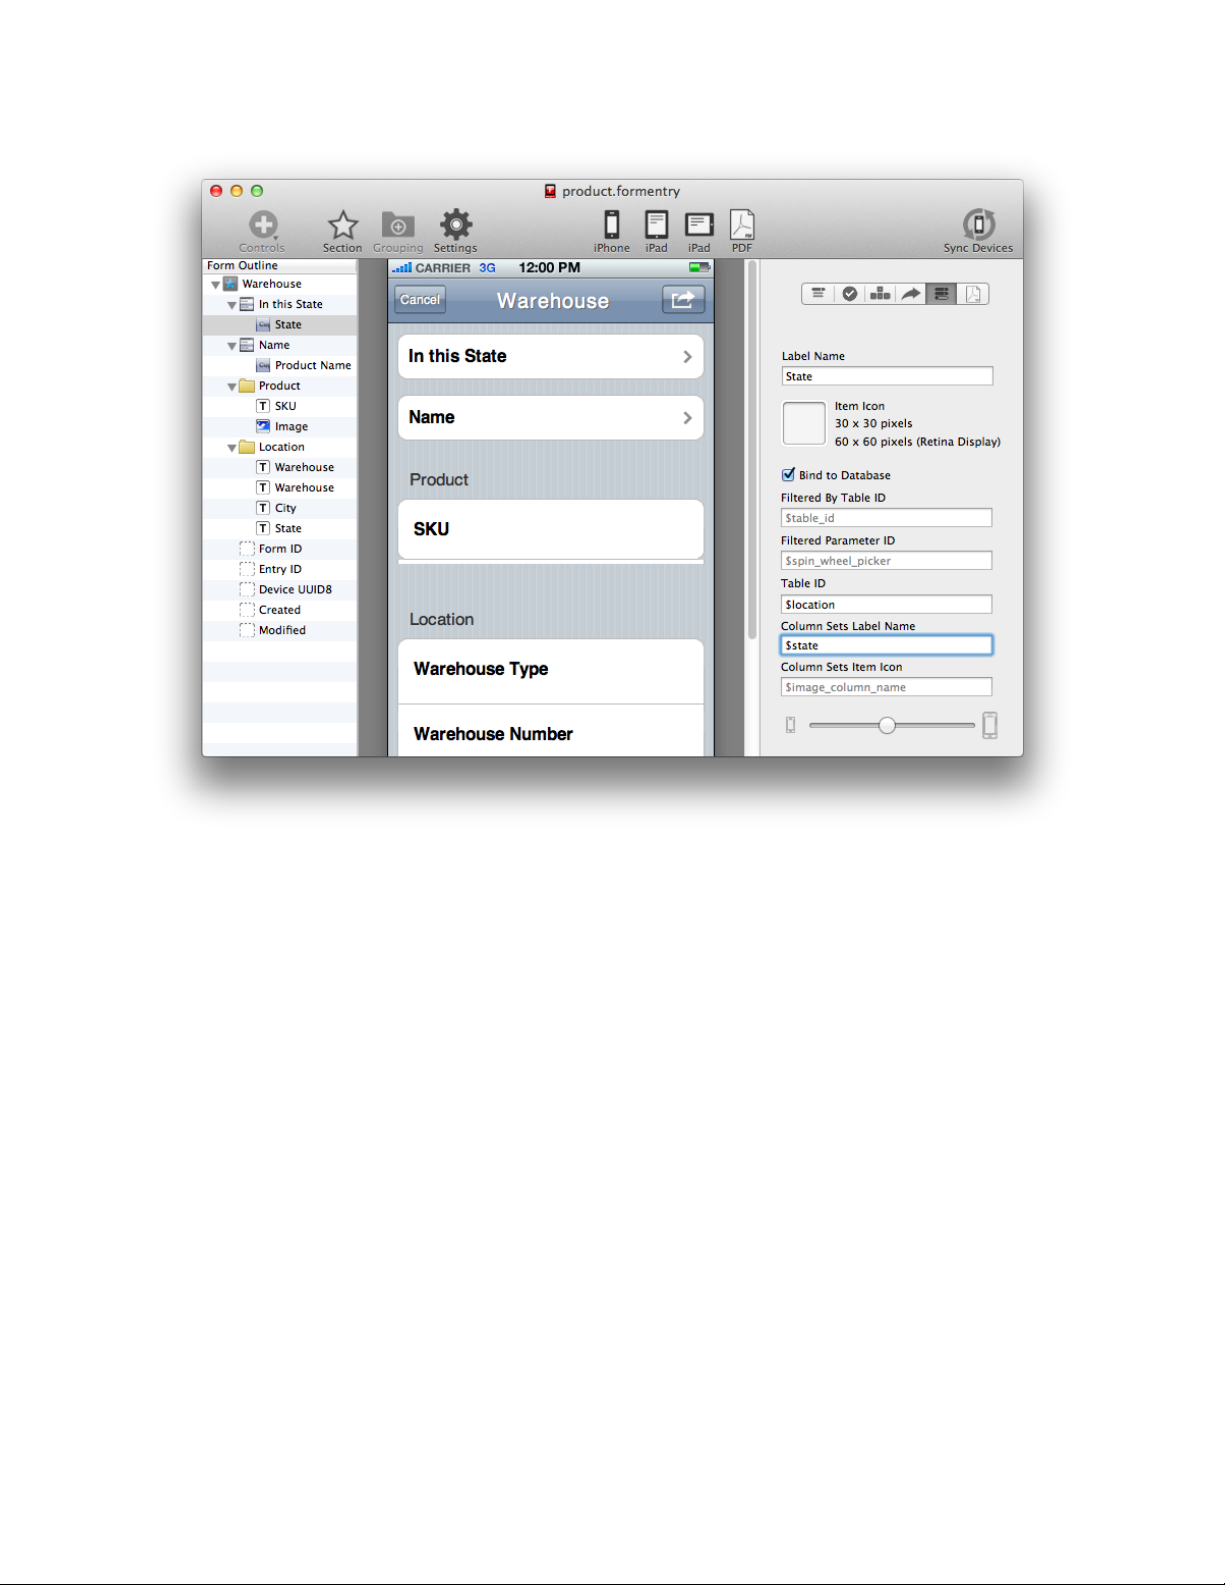
Now that the new “In this State” Spin Wheel Picker is bound to the database through the
Spin Wheel Item, let’s filter our “Name” Spin Wheel Picker. Select “Product Name” and
enter ‘$location’ in the “Filtered By Table ID”. Next enter into “Filtered Parameter ID” the
parameter ID of the control that will filter this Spin Wheel Picker, which is
“$in_this_state”. You form app project should look like the following:
FormEntry - The User’s Manual 95
Page 96
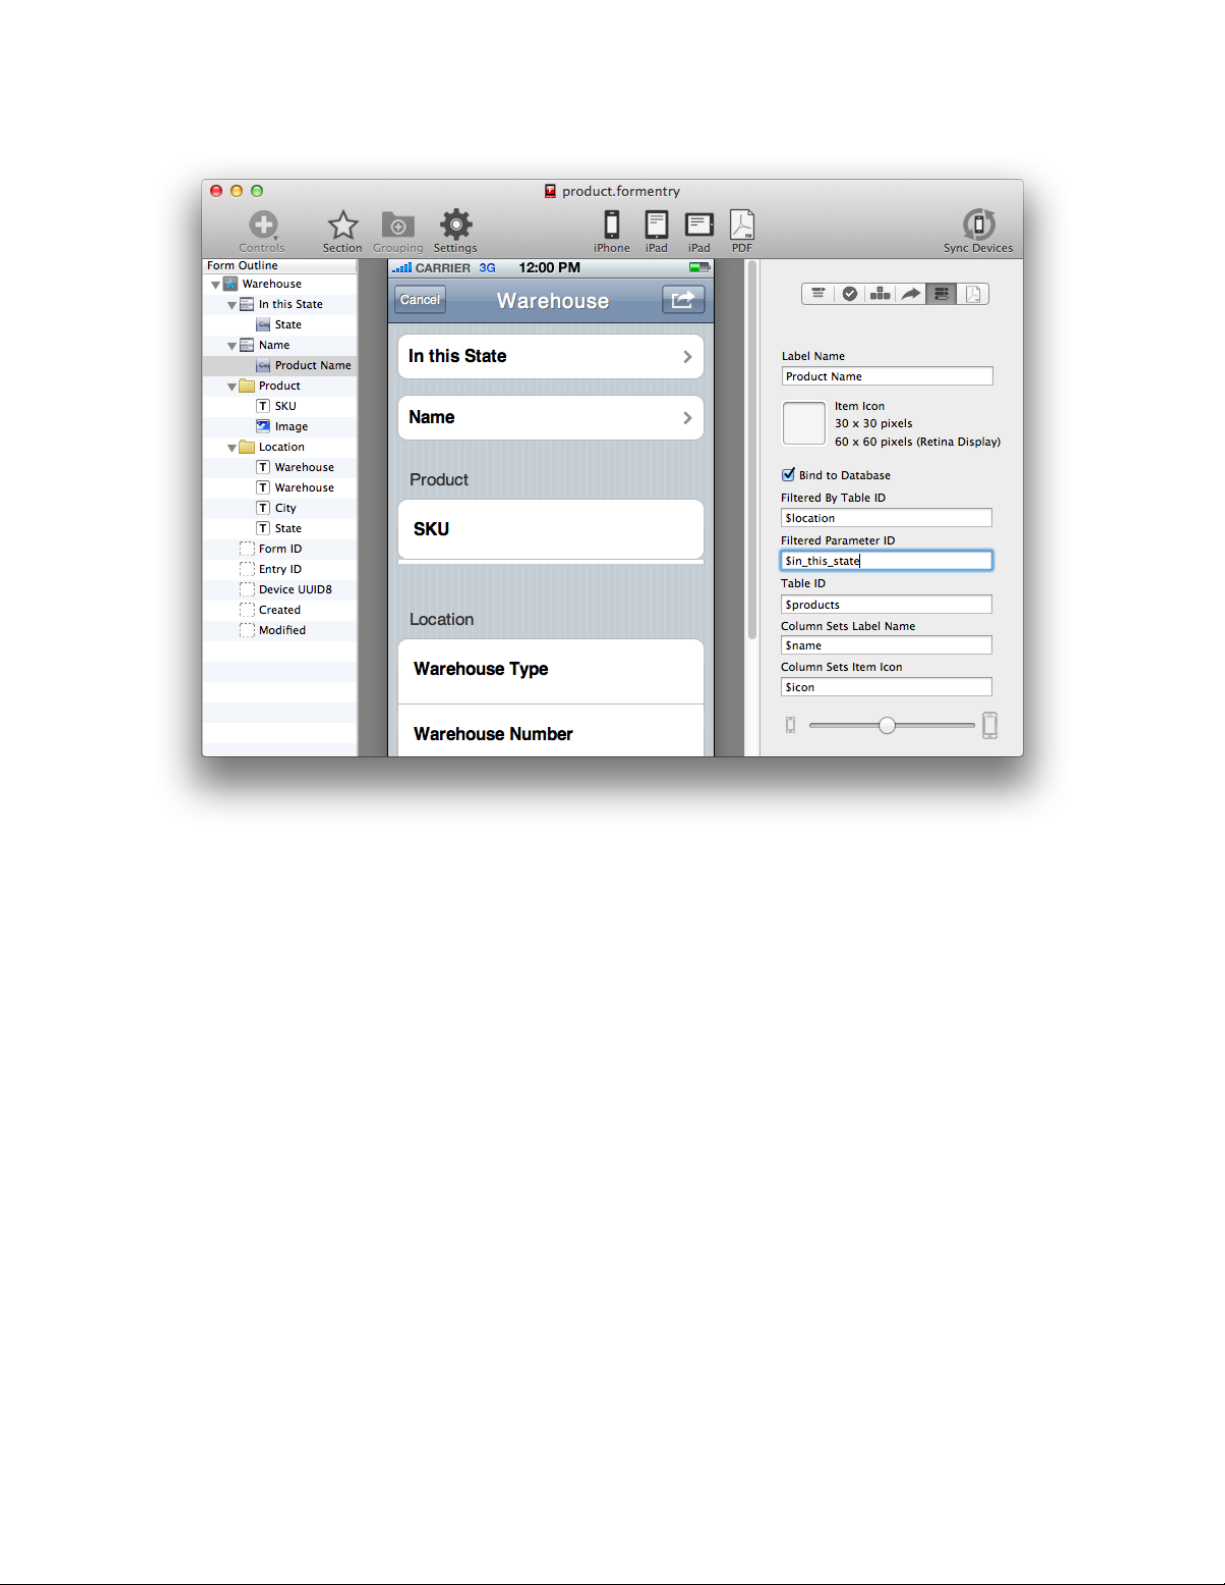
Now sync your form app project to your iOS device. Select the “In this State” Spin
Wheel Picker. You will see the three States, select any state.
Now select the “Name” Spin Whee Picker and you will see that it is filtered by the state.
FormEntry - The User’s Manual 96
Page 97
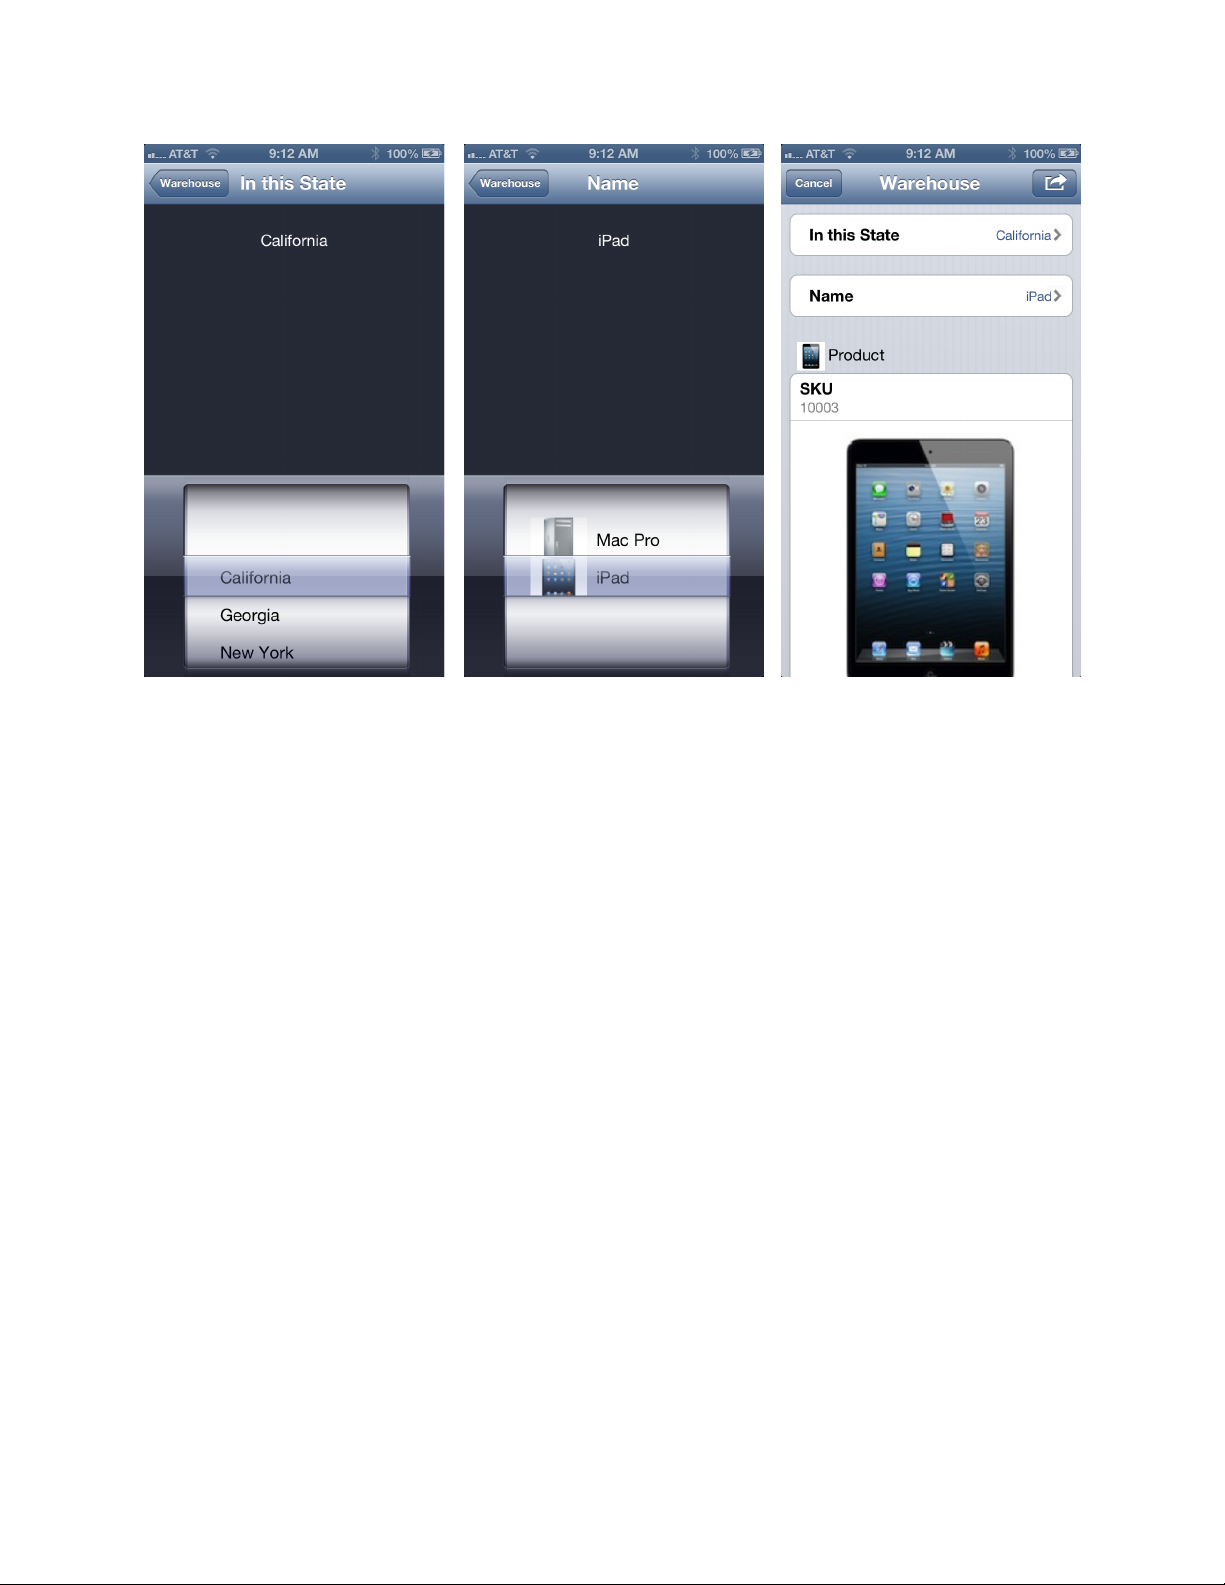
F ILTERED S UMMARY
In review, filtering a Spin Wheel Picker based upon another control is easy.
1. Select the Spin Wheel Picker you want to be filtered. Add the table ID by which you
want to be filtered by.
2. Add the parameter ID of the control you want to be filtered by.
PIN C ODE B INDINGS
The PIN Code allows you to bind the PIN Code to your database. The PIN Code control
requires a 4-digit passcode from your users to gain access to specific screens or the
entire form app itself.
To bind the PIN Code to the database, we will need to create a new table. Let’s add a
new Table ID of ‘users’ to our example database. Now, let’s add a new Column ID called
‘pins’ with the Column Data Type of either ‘String’ or ‘Integer’*. Add a few records and
your Database Editor window should look like the following screenshot.
FormEntry - The User’s Manual 97
Page 98
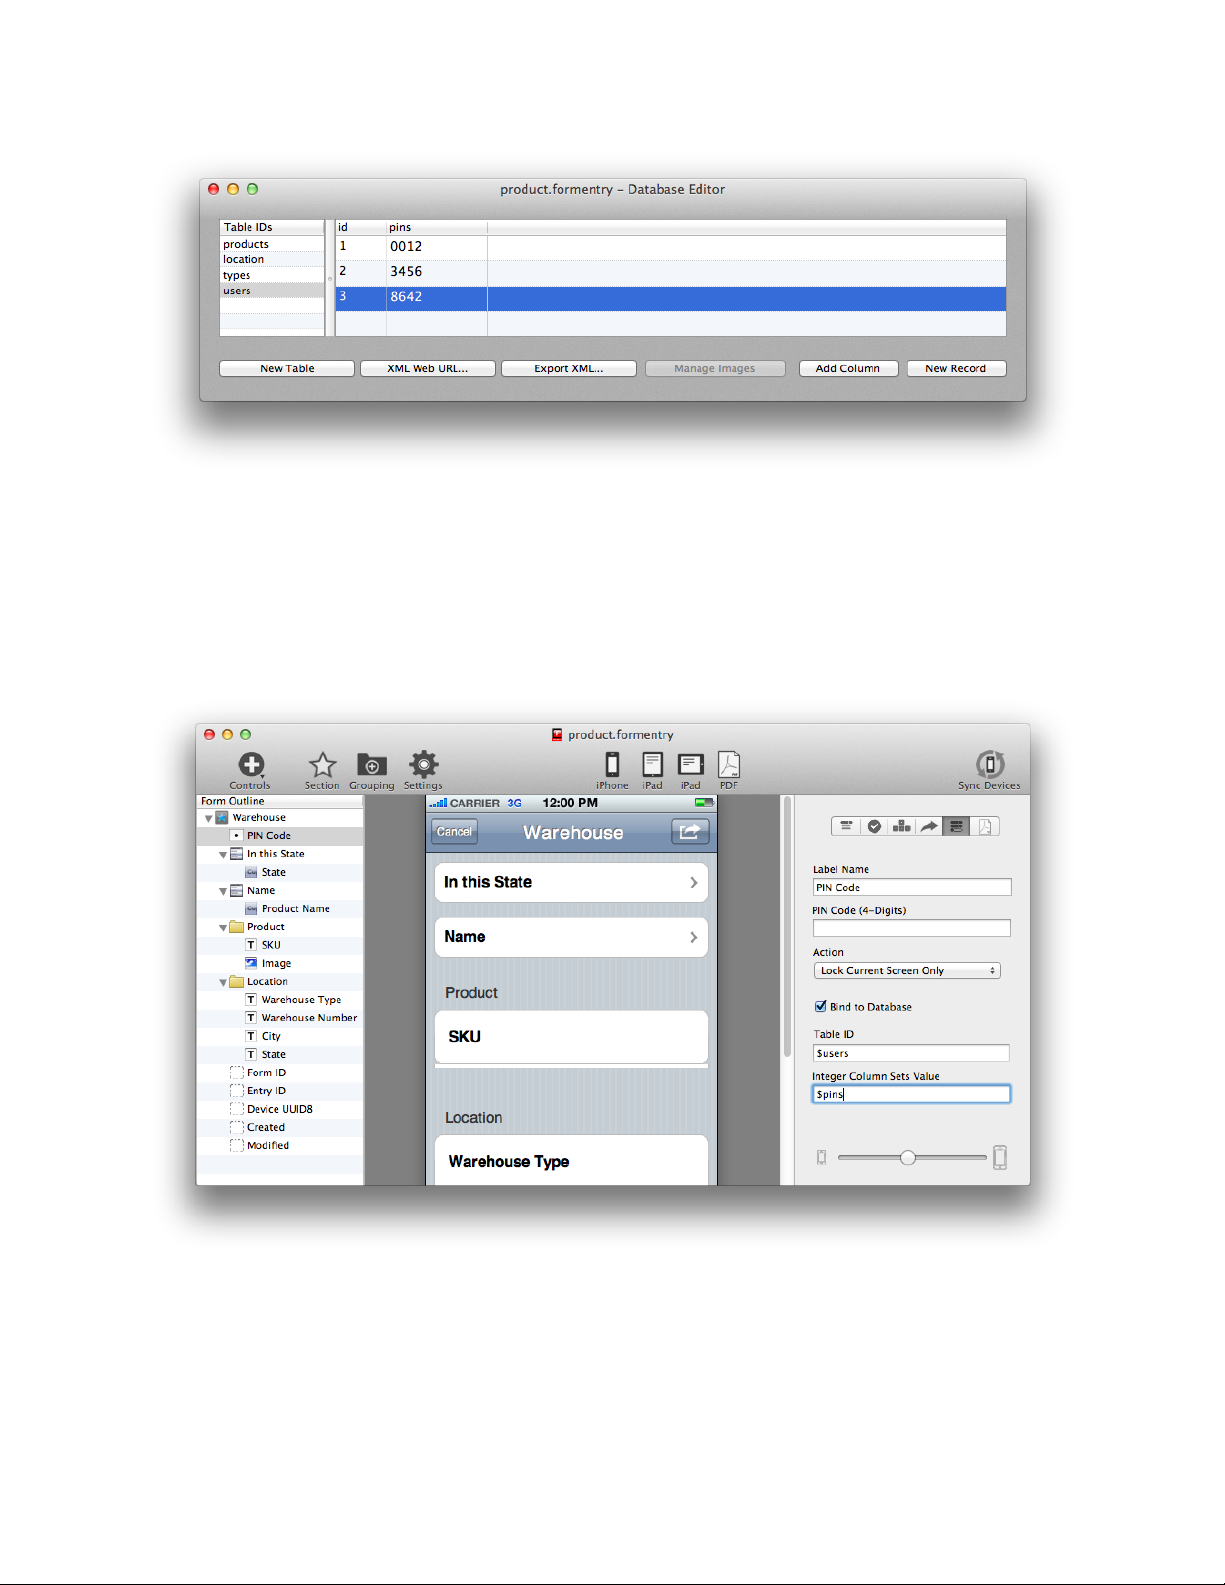
*Note, that if you bind to an ‘Integer’ Column Data Type, you will limited to some PIN
numbers and not the full range. For example, in the above screenshot, ‘0012’ is not an
Integer, there’s no way to add ‘0’s before an true Integer. So, to get around this, your
column must be a ‘String’ type to fully receive the 4-digit range from 0000 to 9999
values.
FormEntry - The User’s Manual 98
Page 99
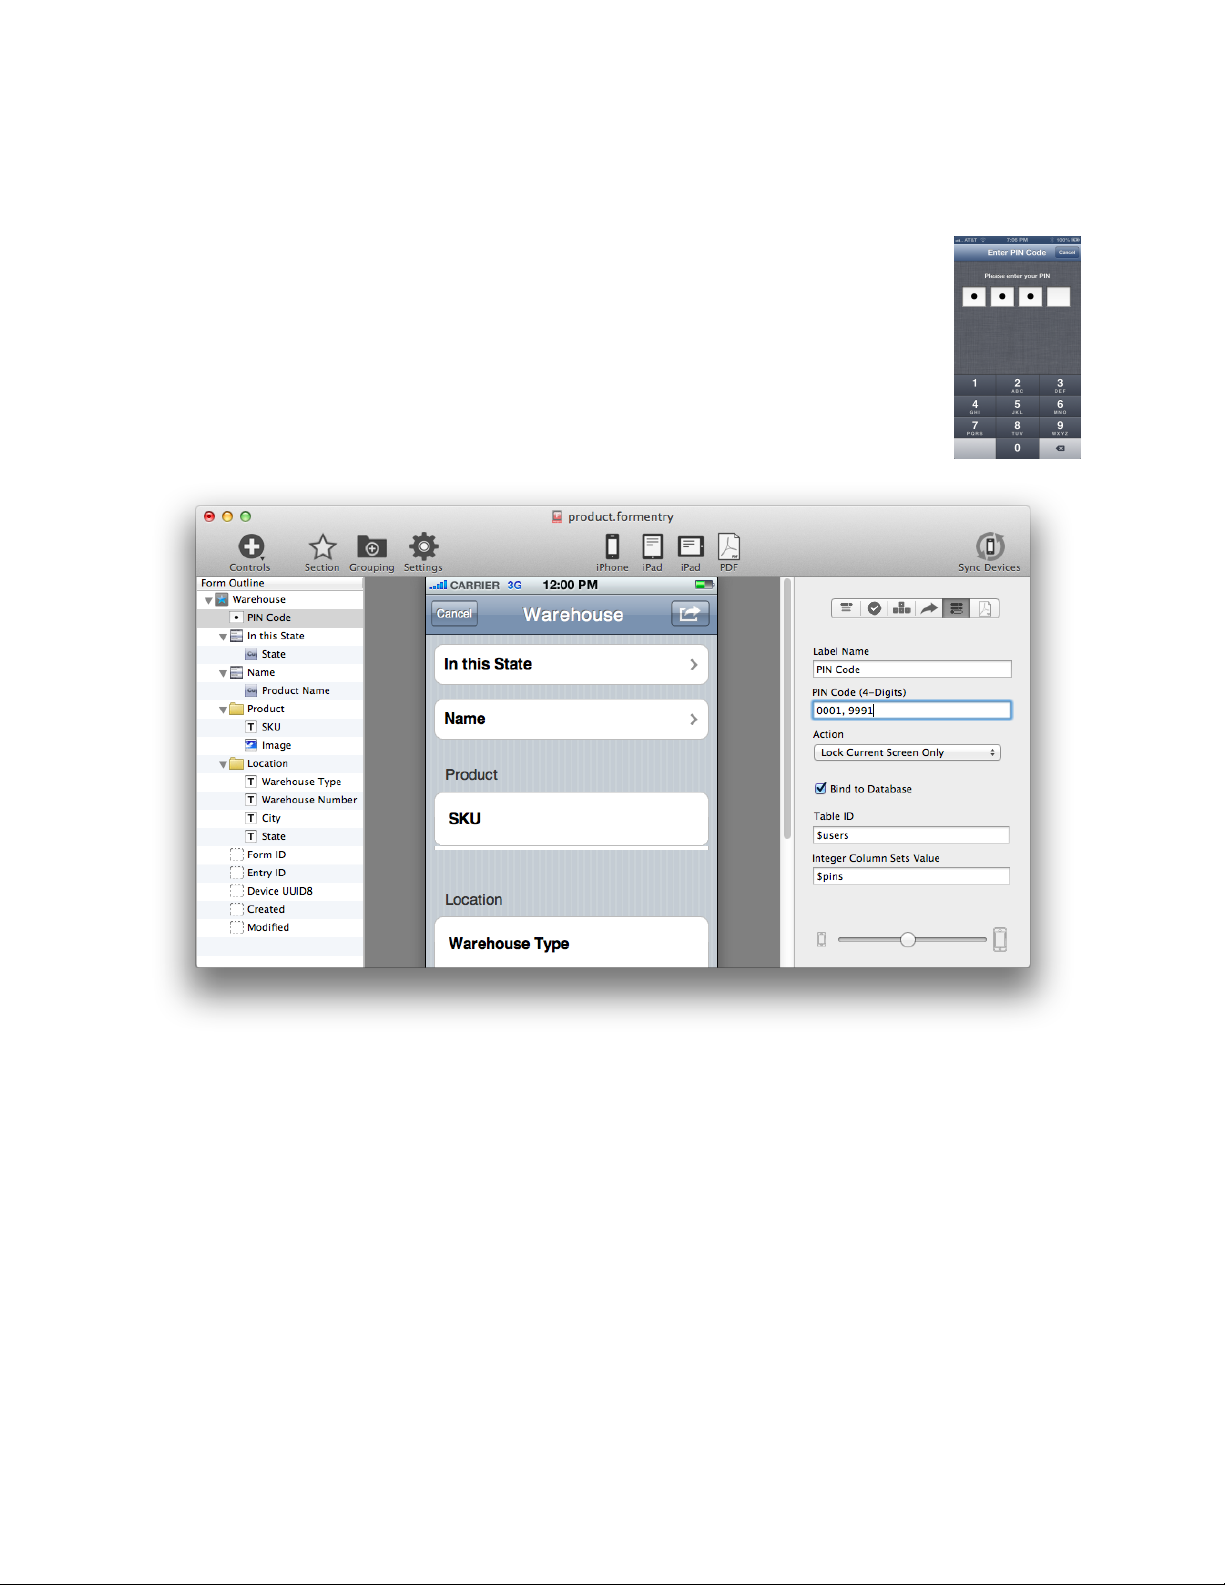
Now, let’s add a new PIN Code control and bind to our newly created table. Bind the
Table ID to ‘users’ and the Column ID of ‘pins’. Your form app project should like the
above screenshot.
Now sync your form app project to your iOS device and you should be
able to log into the first screen based upon the values in the ‘pins’ column.
You can also mix the PIN Code input field with the values in the database.
If we placed additional 4-digit PIN Codes at the PIN Code input field, we
would have a screenshot like the following.
PIN C ODE B INDING S UMMARY
In review, binding the PIN Code to the database to straight forward.
1. Select the PIN Code control in the Form Outline. Add the table and column IDs to
the Table ID and Column Sets Value input fields.
2. Add the Table and Column IDs with records that will be used by the PIN Code
control.
FormEntry - The User’s Manual 99
Page 100
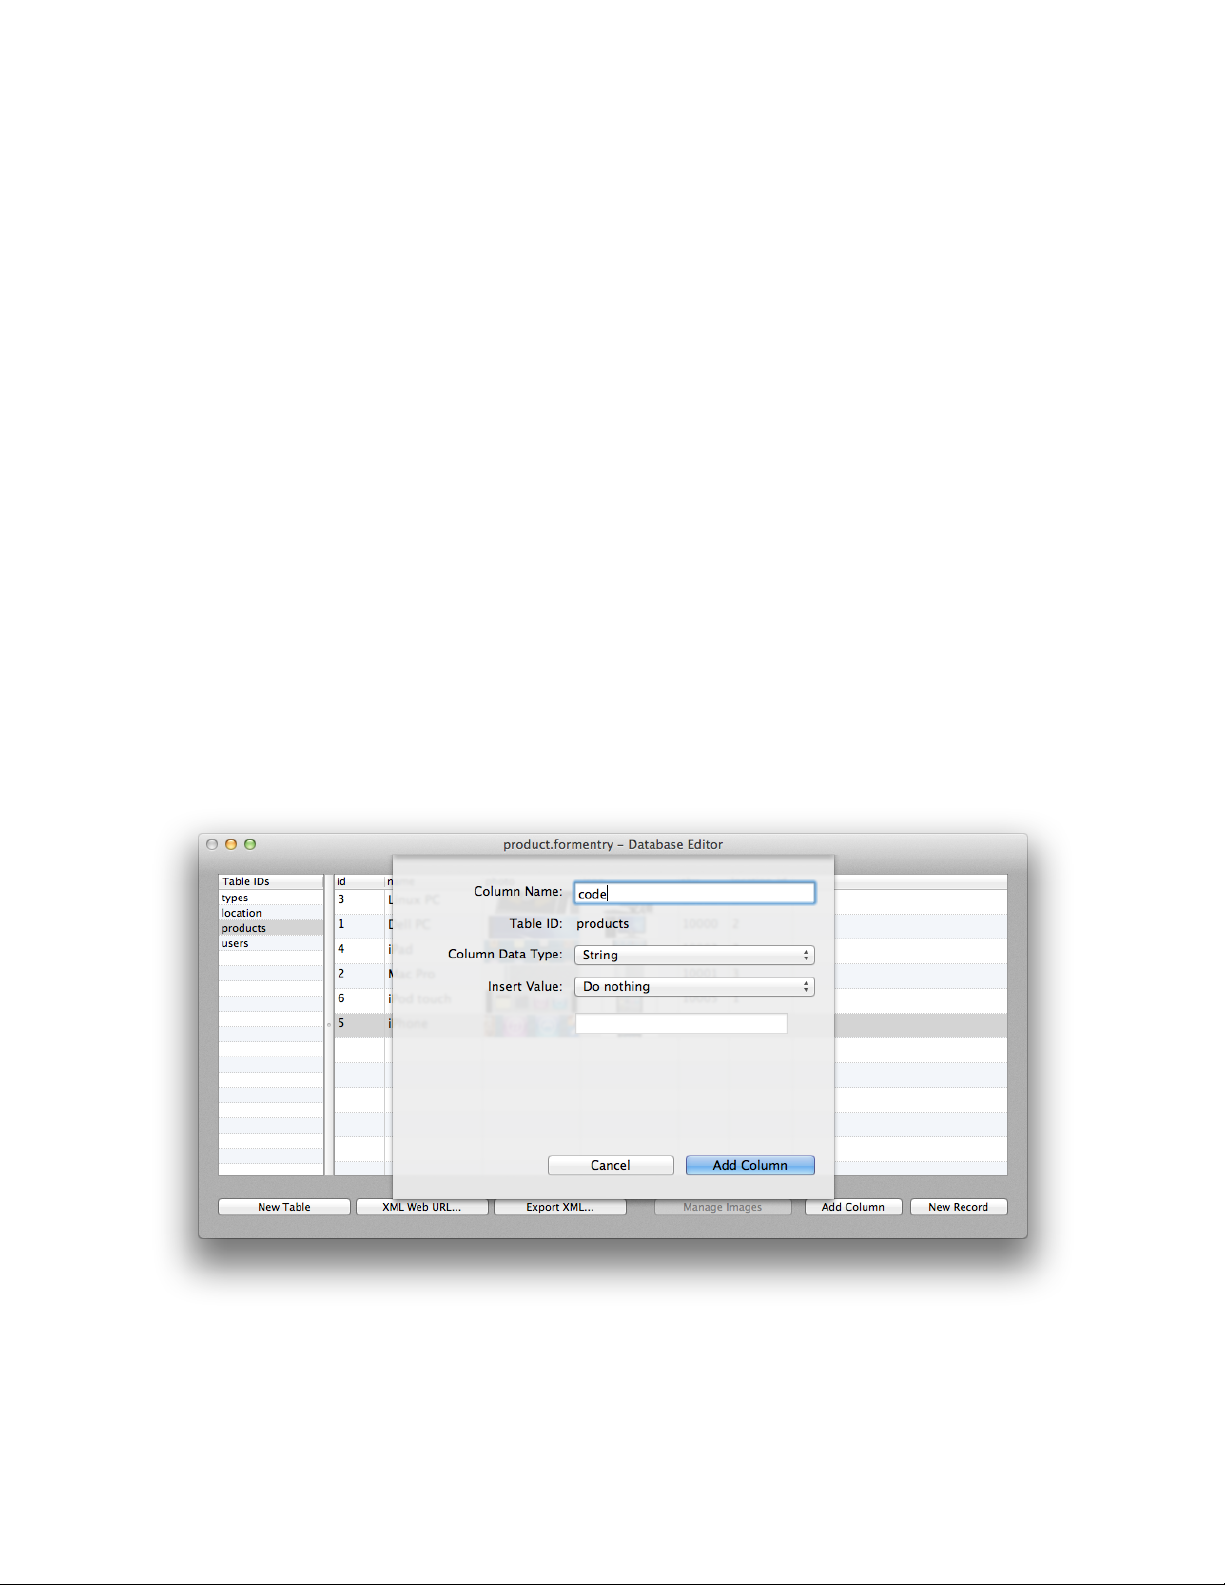
B ARCODE B INDINGS
The Barcode Control Plug-In allows you to bind the Barcode control to your database.
The Barcode Control allows you to scan up to sixteen different types of barcodes. You
will typically bind the Barcode Control to a ‘String’, ‘Double’, ‘Float’ and ‘Integer’ Column
Data Types on your table. Keep in mind, if your barcodes start with ‘0’, you will definitely
want to use a ‘String’ type.
When scanning barcodes, the Barcode value will be set after the camera has identified
the barcode and interpreted the value from the barcode. If the Barcode Control is bound
to the database, the interpreted barcode value is looked up at the bound Table ID and
Column ID. If the interpreted barcode value is in the database, then the Barcode control
is marked with the Record ID from the database.
In combination with the Rule Builder (similar to the Text Field bindings in the above
section), you can perform actions to set other control values.
A DD N EW C OLUMN ID
First, let’s add a new Column ID called ‘code’ to our ‘products’ table and want to make
sure we use ‘String’ as the Column Data Type.
FormEntry - The User’s Manual 100
 Loading...