

Page 1

User’s instructions
Inteo-m
Behind-the-ear
Page 2

2
Page 3

3
The hearing aid, ear-set and accessories shown in these
instructions may not look the same as the ones you
have. We furthermore reserve the right to make any
changes considered necessary.
Hearing aids and their accessories should
not be disposed of with normal household
waste. Please consult your national Widex
distributor for advice on how to dispose of
your hearing aid.
Page 4

4
Contents
Your new hearing aid ..................................6
Ear-set solutions....................................... 7
The hearing aid ........................................8
Right/left identification ................................ 9
The battery...........................................10
Inserting the battery...............................11
Changing the battery..............................13
Turning the hearing aid on and off ....................15
Possible settings .....................................16
Automatic adjustment of loudness....................17
Listening programs...................................18
Switching between the available
listening programs ................................20
Hearing aid with an earmould .........................22
Placement in/on the ear ..............................23
Removal .............................................25
Cleaning .............................................26
The hearing aid....................................27
The microphone openings.........................27
The earmould .....................................28
In case of malfunction ................................30
Page 5

5
Hearing aid with an Instant ear-tip ....................32
Right/left identification ...............................33
Placement on/in the ear ..............................34
Removal .............................................35
Cleaning .............................................36
The hearing aid....................................37
The microphone openings.........................37
The ear-set . . . . . . . . . . . . . . . . . . . . . . . . . . . . . . . . . . . . . . . . 38
Changing the ear-set .................................40
Individualising the ear-set ............................42
The anchor ...........................................43
In case of malfunction ................................49
Hearing aid with a Custom ear-tip .....................52
Right/left identification ...............................53
Placement in/on the ear ..............................54
Removal .............................................55
Cleaning .............................................56
The hearing aid....................................57
The microphone openings.........................57
The ear-set . . . . . . . . . . . . . . . . . . . . . . . . . . . . . . . . . . . . . . . . 58
If the tubing needs to be changed ....................59
In case of malfunction ................................60
Caring for your hearing aid............................62
Good advice ..........................................66
Page 6

6
Your new hearing aid
Thank you for choosing a Widex hearing aid. This is a
hearing aid that allows you to be part of the process of
tailoring the sound to your individual hearing loss and
lifestyle requirements.
We hope you will be pleased with your new Widex
hearing aid.
All illustrations in this booklet
show a right-ear hearing aid.
Unless otherwise stated, the
same principles apply to the
left ear.
Page 7
7
General
Ear-set solutions
Several ear-set solutions are available for your hearing
aid. Below, your hearing care professional can tick off
the type of ear-set tip chosen for you.
Unless otherwise indicated, the information provided
in this booklet applies to all three types of ear-set solution. In addition to the general instructions, please be
sure to read the sections that apply to your specific earset solution.
Earmould Instant ear-tip Custom ear-tip
Page 8
8
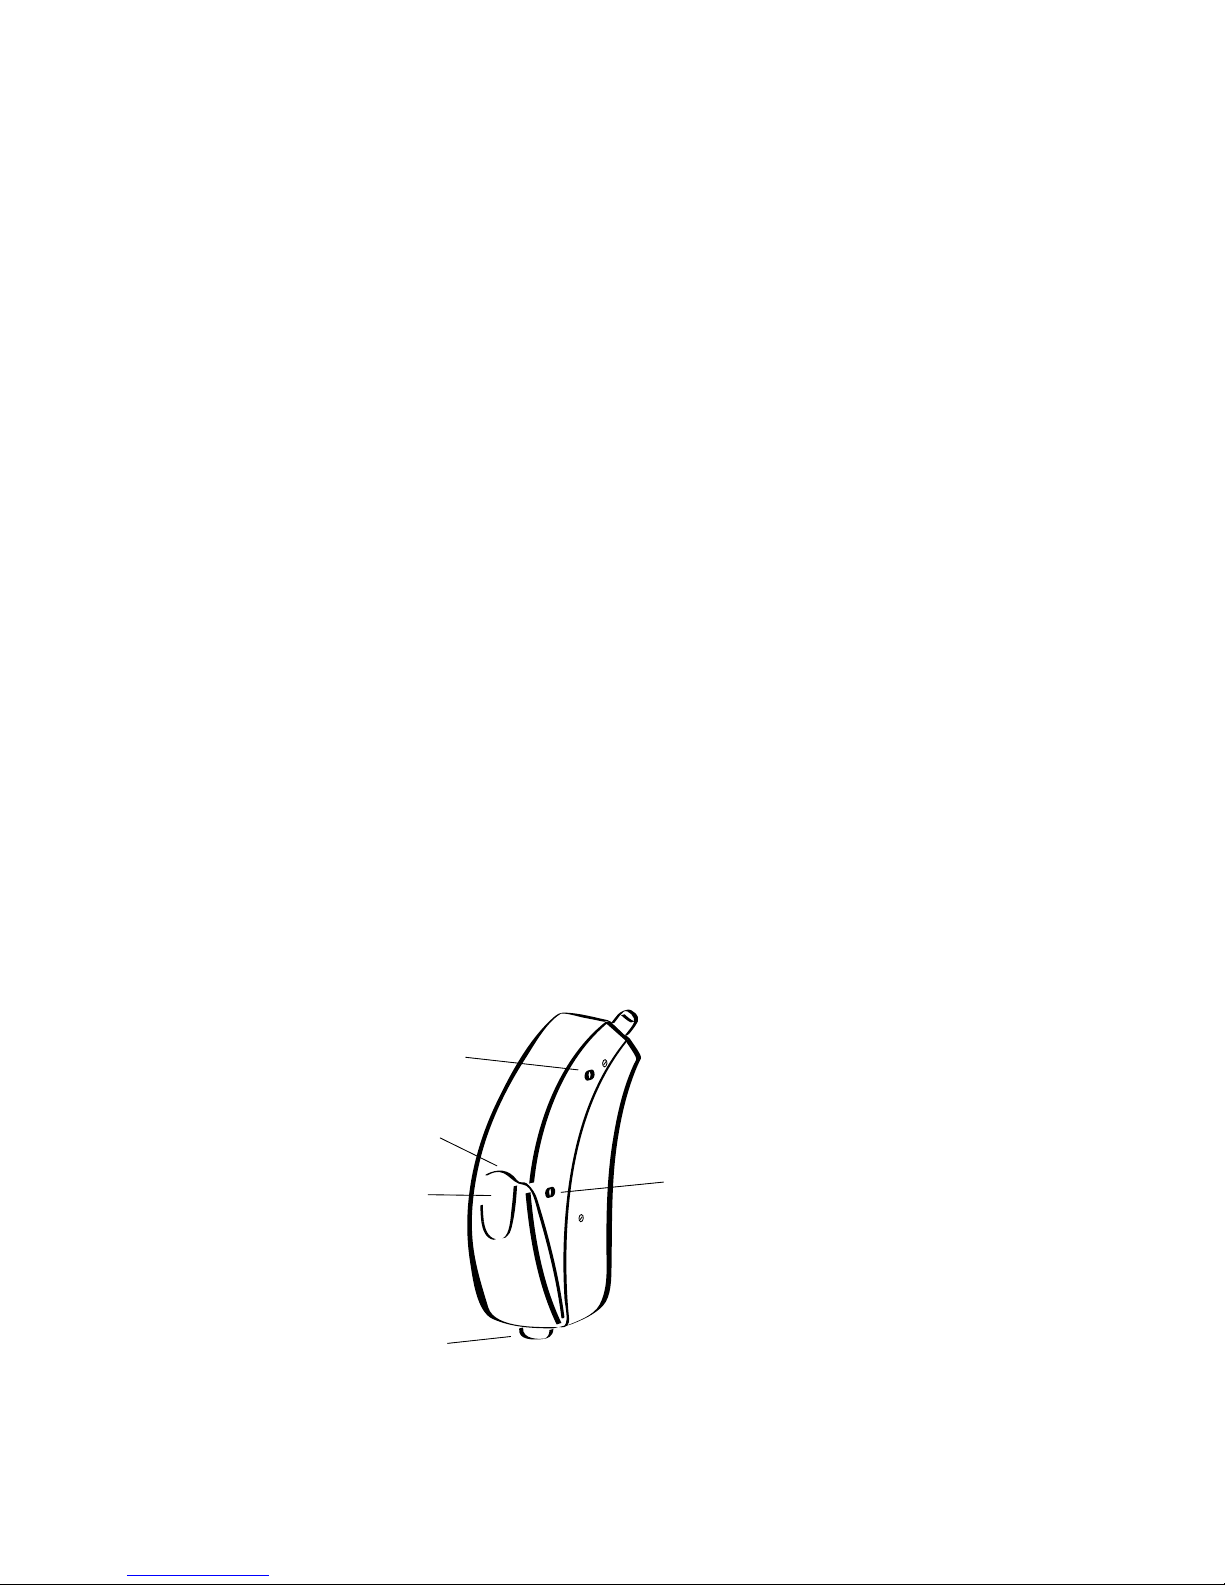
The hearing aid
The illustration below shows the hearing aid without
any of its other parts (for example tubing and tip).
1. Microphone openings, where the sound enters the
hearing aid.
2. Program button is available on some models. It
allows you to choose between different listening
programs. If you have a remote control for your
hearing aid, the hearing aid does not include a
program button.
3. On/off function, which is integrated into the
battery drawer (see page 15).
4. Nail grip on the battery drawer for easy opening.
1.
2.
3.
4.
1.
Page 9

9
General
Right/left identification
If you wear hearing aids on both ears,
your hearing care professional can
put coloured marks on your hearing
aids so you can easily see which is for
the right ear and which is for the left
ear (red mark = right and blue mark =
left).
The arrow shows the position of the
right/left identification mark.
Page 10

10
The battery
The recommended battery type for your hearing aid
is:
Zinc Air battery type 10
To obtain replacement batteries, please consult your
hearing care professional. It is important to take note
of the expiry date and the recommendations regarding
disposal of used batteries on the battery pack. To ensure proper battery function, do not use batteries past
the expiry date. The battery life will depend on a
number of factors, such as the setting of your hearing
aid, how many hours you use it daily and the listening
environments in which you use it.
Page 11

11
General
Inserting the battery
Before inserting a new battery in your
hearing aid, remember to remove the
adhesive tab. Once the tab has been
removed, the battery will start func-
tioning after a few seconds. Do not
use batteries on which there is a sticky residue from the
tab or other unwanted substance.
Use the nail grip to gently swing the
battery drawer outwards. Do not
press the battery drawer beyond the
open position.
Page 12

12
Place the battery in the drawer so that the small plus (+)
sign on the battery is facing in the direction indicated
by the small plus (+) sign printed on the round battery
holder. You can use the provided battery magnet to
steer the battery into place. If the battery drawer does
not close easily, the battery is incorrectly inserted.
Always place the battery in the actual battery
drawer as illustrated and not in the open space
inside the hearing aid.
Page 13

13
General
Changing the battery
If you hear four beep-tones from your hearing aid, it is
an indication that the battery is nearly exhausted. Once
the battery is totally exhausted, the hearing aid will be
completely silent. Exactly how long the hearing aid will
function after the beep-tones varies from one case to
another. We recommend that you always have a spare
battery with you.
For adjustment of the beep-tone level or disabling of
the function, please consult your hearing care professional.
Never leave an exhausted battery in the hearing aid.
Exhausted batteries may leak, which could damage the
hearing aid. When changing batteries, it is a good idea
to hold the hearing aid over a table or a carpet, in case
you drop the hearing aid or battery.
Page 14

14
Your hearing aid may be provided
with a battery drawer without a nail
grip, which means that you need a
tool to open the battery drawer.
This type of drawer can be a good
choice if the hearing aid is worn by
a child. A special tool for opening
the drawer will be included with
this drawer (see the illustration).
Open the battery drawer as illustrated.
Page 15

15
General
Turning the hearing aid on and off
The battery drawer of your hearing
aid also functions as the on/off switch.
The hearing aid is turned on when a
battery is inserted correctly and the
battery drawer is completely closed.
The hearing aid is turned off when
the battery drawer is open.
Please remember to switch the hearing aid off when it is not in use. Remove the battery if the hearing aid
will not be used for several days.
Page 16

16
Possible settings
Your hearing aid can be set to start up in two different
ways: In the standard start-up setting your hearing aid
may whistle slightly while you place it on the ear. An alternative is a setting where the hearing aid actively
suppresses whistling while it is being placed on the ear.
Together with your hearing care professional you can
choose the start-up setting that suits your needs best.
Page 17

17
General
Automatic adjustment of loudness
The hearing aid adjusts loudness automatically in accordance with your sound environment. You do not
have to think about adjusting the volume – it happens
quite automatically.
Important: If the volume in your hearing aid is too loud
or too weak, or if the reproduced sounds are distorted,
or you would like any further information, consult your
hearing care professional.
Page 18

18
Listening programs
Your hearing aid may be provided with several listening programs optimised for different listening situations. Your hearing care professional can help you select the programs that are of use to you. If your needs
change over time, the combination of listening programs can be changed. In these user’s instructions, the
hearing care professional should list the listening programs that are available in your hearing aid (see next
page).
Page 19

19
General
Listening
programs
Description Chosen
program
position:
Master Standard program
Acclimatisation
Acclimatisation program
Music Music program
TV TV program
Comfort Attenuates background
noise
Audibility
Extender
Makes high-frequency
sounds audible
Page 20

20
Switching between the available listening programs
If the hearing aid is provided with a program button,
you can switch between the programs by pressing this
button at the bottom of the hearing aid.
Each time you switch to another program, you will hear
beep-tones. The beeps tell you which program you
have chosen:
Program 1: One brief beep
Program 2: Two brief beeps
Program 3: Three brief beeps
(depending on hearing aid model)
Some hearing aid models may be provided with a remote control. If your
hearing aid has a remote control, please
refer to the user’s instructions for the remote control.
Page 21

21
General
The number of different beeps depends on how many
programs you - together with your hearing care professional - have chosen to have in your hearing aid.
If you – in consultation with your hearing care professional – decide on other combinations of programs later, these can be written on the blank forms found at
the back of these instructions.
Page 22

22
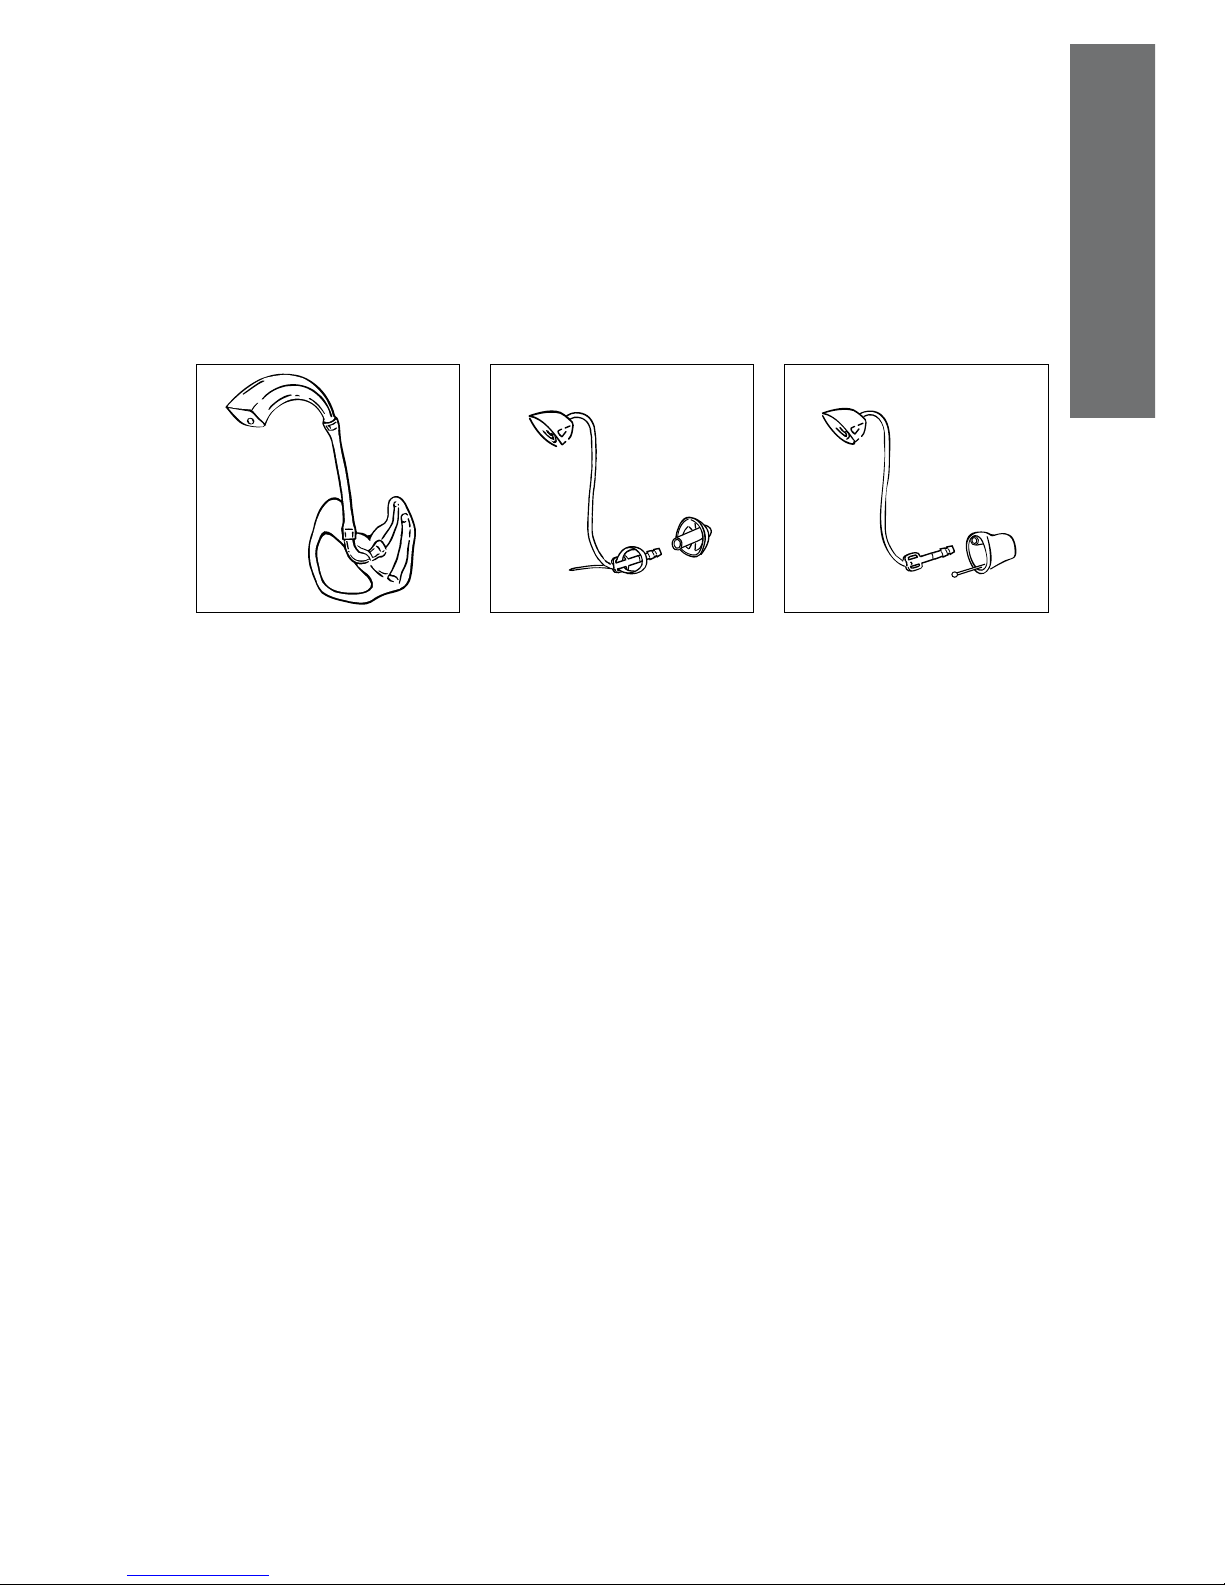
Hearing aid with an earmould
An ear-set consists of three parts:
1. Earhook
2. Tubing
3. Earmould
3a. Sound bore
3b. Vent
1.
2.
3.
3a.
3b.
Page 23

23
Earmould
Placement in/on the ear
First insert the earmould in the ear canal while holding
the lower part of the tubing. It may help to pull the outer ear backwards and upwards with the opposite
hand.
Right ear seen from behind.
Right ear seen from the side. The
arrows show where to hold the earmould and pull the ear.
Page 24

24
Once the earmould has been inserted, place the hearing aid itself behind the ear, so that the hook rests comfortably on the ear, close to your head.
Page 25

25
Earmould
Removal
First remove the hearing aid itself from its position behind the ear. Carefully pull the earmould out of the ear
canal, while holding the lower part of the tubing. If it is
difficult, it may help to try to move the earmould carefully from side to side while pulling it out. It may also
help to pull the outer ear backwards and upwards with
the opposite hand.
The arrow shows where to
hold the tubing.
Page 26

26
Cleaning
The following cleaning accessories are available for
your hearing aid:
1. Wax removing tool
2. Soft cloth
Contact your hearing care professional if you need additional supplies of cleaning accessories.
1.
2.
Page 27

27
Earmould
The hearing aid
Never clean your hearing aid with
water or cleaning solutions. Instead, clean your hearing aid with
the soft cloth (no. 2) after use.
The microphone openings
Use the wax removing tool (no.1)
to clean the microphone openings. Pass the wax removing tool
straight through the openings. If
you feel resistance, withdraw the
tool and try again. Use only the
recommended wax removing
tool.
When the hearing aid is not in use, it is a good idea to
leave the battery drawer open, so as to ventilate the
hearing aid and allow it to dry.
Page 28

28
The earmould
Make sure that the earmould is
clean and free of earwax and
moisture. If it is plugged, clear
the openings with the wax removing tool.
Disconnect the tubing from
the earmould to clean the
sound bore with the wax removing tool.
Disconnect the earmould from
the tubing at least once a week
and wash the earmould thoroughly in lukewarm water. Allow the
earmould to dry overnight. Never
use alcohol or other cleaning solutions to clean your earmould.
Page 29

29
Earmould
If there is still moisture in
the earmould the next
time you want to use the
hearing aid, use a blower
or the like, as illustrated, to
blow it dry.
Please note:
• Replace the tubing if it becomes slack, stiff, yellow or
cracked. For further supplies of tubing, consult your
hearing care professional.
• If the earmould no longer fits your ear, contact your
hearing care professional. The earmould may need
to be changed or adjusted.
Page 30

30
In case of malfunction
If the hearing aid is dead, it could be because:
• The hearing aid is not turned on. Make sure that the
battery drawer is closed.
• The battery is dead or does not work. Insert a new bat-
tery. Make sure the battery is placed correctly.
• The sound bore of the earmould is blocked. Clean the
blocked sound bore.
If the hearing aid volume is not powerful enough, it
could be because:
• The battery is nearly exhausted. Insert a new battery.
• The sound bore of the earmould is blocked. Clean the
blocked sound bore.
• Your ear is blocked by earwax. Contact your ENT doc-
tor/physician.
• Your hearing may have changed. Contact your hear-
ing care professional.
Page 31

31
Earmould
If the hearing aid whistles continuously, it could be
because:
• Your ear is blocked by earwax. Contact your ENT doc-
tor/physician.
• The tubing is broken. Replace the tubing.
• The tubing is yellow and stiff. Replace the tubing.
• The tubing often comes off the hearing aid hook. Re-
place the tubing.
• The hook is cracked. Contact your hearing care profes-
sional.
• The earmould is not correctly placed in your ear canal.
Take the earmould out and reinsert it.
• The earmould fit is too loose. Contact your hearing
care professional.
Page 32

32
Hearing aid with an Instant ear-tip
An ear-set consists of three parts:
1. Hook with tubing
2. Anchor
3. Instant ear-tip
Page 33

33
Instant ear-tip
Right/left identification
The ear-set is available in five different lengths for the
right and left ear, respectively. The individual size is
printed on the ear-set. Red print indicates that it is for
the right ear and blue print that it is for the left ear.
Page 34

34
Placement on/in the ear
First place the hearing aid behind the ear, so that the
hook and tubing rest comfortably on the ear, close to
your head. Then insert the ear-tip in the ear canal while
holding the lower part of the tubing. Lastly, make sure
that the anchor is positioned correctly. It should rest at
the opening of the ear canal and secure the position of
the ear-tip as well as the entire ear-set. Remember to
check at regular intervals that the hearing aid and the
ear-set are positioned correctly.
Page 35

35
Instant ear-tip
We do not recommend wearing the hearing aid without the anchor for the Instant ear-tip solution. If the
hearing aid is not secured with the anchor, there is a
risk of loosing the hearing aid.
Removal
First remove the hearing aid itself
from its position behind the ear.
Carefully pull the ear-tip out of the
ear canal, while holding the lower
part of the tubing.
Page 36

36
Cleaning
The following cleaning accessories are available for
your hearing aid:
1. Wax removing tool
2. Soft cloth
3. Cleaning thread
Contact your hearing care professional if you need additional supplies of cleaning accessories.
1.
2.
3.
Page 37

37
Instant ear-tip
The hearing aid
Never clean your hearing aid with
water or cleaning solutions. Instead, clean your hearing aid with
the soft cloth (no. 2) after use.
The microphone openings
Use the wax removing tool (no.1)
to clean the microphone openings. Pass the wax removing tool
straight through the openings. If
you feel resistance, withdraw the
tool and try again. Use only the
recommended wax removing
tool.
When the hearing aid is not in use, it is a good idea to
leave the battery drawer open, so as to ventilate the
hearing aid and allow it to dry.
Page 38

38
The ear-set
Make sure that the ear-set is clean and free of earwax
and moisture. If the ear-set tubing is plugged, it must
be cleaned. Remove the ear-set from the hearing aid.
Remove the ear-tip from the coupling. Then clean the
tubing with the cleaning thread (no. 3). Never use alcohol or other cleaning solutions to clean the ear-set.
Pull the ear-set off the
hearing aid.
Pull off the ear-tip
Page 39

39
Instant ear-tip
Pass the cleaning thread
through the tubing until
the end of the thread
comes out at the other
end.
Clean the ear-tip under running water.
If necessary, the ear-tip can be washed in lukewarm
water. Remove the ear-tip from the ear-set and wash
the ear-tip thoroughly. Allow it to dry overnight.
Page 40

40
Changing the ear-set
The ear-set should be changed on a regular basis. The
life of an ear-set is individual and depends on a number
of factors, such as how much the hearing aid is used
and the type of earwax produced in the ear.
The ear-set is removed by
pulling it off the hearing
aid. A new hook and tube
can then be snapped into
place. It is very important
to ensure that the tubing
is firmly secured.
Page 41

41
Instant ear-tip
After the new tube has been
secured on the hearing aid,
the ear-tip snaps easily onto
the tubing. It is very impor-
tant to ensure that the ear-tip
is firmly secured.
Before you can use the ear-set, it must be adjusted to
fit your ear exactly. This adjustment can be complicated. Therefore, we recommend that you and your hearing care professional go through the following instructions together and arrange future delivery of new earsets.
Page 42

42
Individualising the ear-set
The ear-set can be adjusted to fit your ear exactly. Your
hearing care professional will choose the correct size
for you the first time. In these user’s instructions, your
hearing care professional can circle the sizes selected
for you (see page 47).
Choice of tubing: The tubing is available in five different lengths for the right and left ear, respectively. It is
important to choose the correct one in order to ensure
a good and comfortable fit. The tubing must not be
uncomfortably short or so long that it is too loose.
Choice of ear-tip: The ear-tip is available in four sizes. It
is important to choose the correct one in order to ensure a good and comfortable fit. The ear-tip must be
positioned comfortably in the ear canal.
Page 43

43
Instant ear-tip
The anchor
To secure the position
of the ear-tip in your
ear canal, we have
made a loose anchor
to be adjusted to your
ear.
The illustrations on the next pages show how to adjust
the anchor for the right ear. Illustrations 1-3 show the
anchor and the ear-tip from the front. Illustrations 4-5
show the anchor and the ear-tip from behind for the
right ear.
Page 44

44
The anchor is supplied separately from the rest of the ear-set
and must be adjusted to fit your
ear.
1: Pull the pointed end of the
anchor through the upper hole
of the coupling located at the
end of the tubing.
2: Continue pulling until the anchor is stopped by the grip at
the end.
Page 45

45
Instant ear-tip
3: Now guide the pointed end of
the anchor through the lower
hole to form a small loop.
4: (This illustration shows the
anchor and ear-tip from behind
for the right ear.) When the loop
is the correct size, any excess
should be cut off, leaving only
the loop.
Page 46

46
5: (This illustration shows the
anchor and ear-tip from behind
for the right ear.) Take great care
to cut off all the excess so that
the end of the anchor loop is
flush with the small hole and
there are no sharp edges. Use the tip of your finger to
check for sharp edges. If part of the anchor sticks out
through the hole, creating an uneven surface, this may
cause ear irritation.
The anchor loop has the correct size when it supports
the position of the ear-tip in the ear canal, and the earset sits securely in and on the ear.
Page 47

47
Instant ear-tip
Circle the sizes selected for your ear-set.
Left ear (blue) Right ear (red)
ear-tip tubing ear-tip tubing
1S 1L 1 1S 1L 1
2S 2L 2 2S 2L 2
3 3
4 4
5 5
Page 48

48
Please note:
• It is important to wipe the ear-set thoroughly with a
soft cloth and keep it clean of wax, etc. Otherwise,
the ear-tip may come off.
• Replace the ear-set if one of the ear-set elements be-
comes slack, stiff, yellow or cracked. For further supplies of new ear-sets, consult your hearing care professional.
• Replace the ear-tip if it no longer fits your ear, for ex-
ample if your ear canal size has changed or the eartip becomes broken.
Page 49

49
Instant ear-tip
In case of malfunction
If the hearing aid is dead, it could be because:
• The hearing aid is not turned on. Make sure that the
battery drawer is closed.
• The battery is dead or does not work. Insert a new bat-
tery. Make sure the battery is placed correctly.
• The sound outlet of the ear-tip is blocked. Clean or re-
place the ear-tip. If necessary, replace the entire earset.
Page 50

50
If the hearing aid volume is not powerful enough, it
could be because:
• The battery is nearly exhausted. Insert a new battery.
• The sound outlet of the ear-tip is blocked. Clean or re-
place the ear-tip. If necessary, replace the entire earset.
• Your ear is blocked by earwax. Contact your ENT doc-
tor/physician.
• Your hearing may have changed. Contact your hear-
ing care professional.
Page 51

51
Instant ear-tip
If the hearing aid whistles continuously, it could be
because:
• Your ear is blocked by earwax. Contact your ENT doc-
tor/physician.
• The tubing is broken. Replace the ear-set.
• The tubing is yellow and stiff. Replace the ear-set.
• The hook is cracked. Replace the ear-set.
• The ear-tip is not correctly placed in your ear canal. Take
the ear-tip out and reinsert it.
Page 52

52
Hearing aid with a Custom ear-tip
An ear-set consists of two parts:
1. Hook with tubing
2. Custom ear-tip with an extraction cord
2.
Page 53

53
Custom ear-tip
Right/left identification
The ear-set is marked with red or blue print. Be sure to
use the ear-set with red print with the right-ear hearing
aid and the ear-set with blue print with the left-ear
hearing aid.
The ear-tip has ”Widex” printed on it.
Red print indicates that it is for the right
ear and blue print that it is for the left
ear.
Page 54

54
Placement in/on the ear
First insert the Custom ear-tip in the ear canal while
holding the lower part of the tubing. It may help to pull
the outer ear backwards and upwards with the opposite hand.
Once the Custom ear-tip has been inserted, place the
hearing aid itself behind the ear, so that the hook and
tubing rest comfortably on the ear, close to your head.
Page 55

55
Custom ear-tip
Removal
First remove the hearing aid itself
from its position behind the ear.
Then, carefully pull the Custom eartip out of the ear canal by means of
the extraction cord. Do not pull the
tubing to remove your hearing aid
or ear-tip.
Page 56

56
Cleaning
The following cleaning accessories are available for
your hearing aid:
1. Wax removing tool
2. Soft cloth
3. Cleaning thread
Contact your hearing care professional if you need additional supplies of cleaning accessories.
1.
2.
3.
Page 57

57
Custom ear-tip
The hearing aid
Never clean your hearing aid with
water or cleaning solutions. In-
stead, clean your hearing aid with
the soft cloth (no. 2) after use.
The microphone openings
Use the wax removing tool (no.1)
to clean the microphone open-
ings. Pass the wax removing tool
straight through the openings. If
you feel resistance, withdraw the
tool and try again. Use only the
recommended wax removing
tool.
When the hearing aid is not in use, it is a good idea to
leave the battery drawer open, so as to ventilate the
hearing aid and allow it to dry.
Page 58

58
The ear-set
Make sure that your ear-set is clean and free of earwax
and moisture. Use a soft cloth to wipe the ear-set at
regular intervals. If the ear-set tubing is plugged, it
must be cleaned. Remove the ear-set from the hearing
aid. Then clean the ear-set with the cleaning thread
(no. 3). Never attempt to disconnect the ear-tip from
the tubing. Never use alcohol or other cleaning solutions to clean the ear-set.
Pull the tubing and hook
off the hearing aid.
Pass the cleaning thread
through the ear-set until
the end of the thread is
visible at the sound outlet
of the Custom ear-tip.
Page 59

59
Custom ear-tip
If the tubing needs to be changed
The process involved in changing the tubing for Custom ear-tip solutions requires experience and the appropriate tools. Therefore we recommend that you
contact your hearing care professional if the tubing
needs replacement. Do not attempt to make any
changes on your own.
Please note:
• If the ear-set tubing becomes slack, stiff, yellow or
cracked, it must be replaced. Please contact your
hearing care professional for help with this. Never attempt to exchange any part of the ear-set yourself.
• If the Custom ear-tip no longer fits your ear, contact
your hearing care professional. The Custom ear-tip
may need to be changed or adjusted.
Page 60

60
In case of malfunction
If the hearing aid is dead, it could be because:
• The hearing aid is not turned on. Make sure that the
battery drawer is closed.
• The battery is dead or does not work. Insert a new bat-
tery. Make sure the battery is placed correctly.
• The sound outlet of the ear-tip is blocked. Clean the ear-
tip and tubing. See page 58 for detailed instructions.
If the hearing aid volume is not powerful enough, it
could be because:
• The battery is nearly exhausted. Insert a new battery.
• The sound outlet of the ear-tip is blocked. Clean the ear-
tip and tubing. See page 58 for detailed instructions.
• Your ear is blocked by earwax. Contact your ENT doc-
tor/physician.
• Your hearing may have changed. Contact your hear-
ing care professional.
Page 61

61
Custom ear-tip
If the hearing aid whistles continuously, it could be
because:
• Your ear is blocked by earwax. Contact your ENT doc-
tor/physician.
• The tubing is broken. Contact your hearing care pro-
fessional to have the tubing replaced.
• The tubing is yellow and stiff. Contact your hearing
care professional to have the tubing replaced.
• The hook is cracked. Contact your hearing care profes-
sional to have the tubing replaced.
• The ear-tip is not correctly placed in your ear canal. Take
the ear-tip out and reinsert it.
• The ear-tip fit is too loose. Contact your hearing care
professional.
Page 62

62
Caring for your hearing aid
With proper care, your hearing aid will give you years
of reliable service. Here are some things you can do to
prolong the life of your hearing aid:
Page 63

63
General
• Switch your hearing aid off when it is not in use.
Should you not use it for several days, take out the
battery to avoid battery leakage.
• Treat your hearing aid as the valuable object it is:
with care. When your hearing aid is not in use, keep it
in its case in a cool, dry location where it cannot be
reached by children or pets.
• When not in use, do not expose your hearing aid to
extreme temperatures or high humidity.
• In environments with high humidity, a Widex drying
kit may be used daily to reduce the amount of moisture inside the hearing aid. See the instructions enclosed with the Widex drying kit.
Page 64

64
• Do not wear your hearing aid in the shower or swim-
ming, or when using a hair dryer, hair spray, or other
sprays.
• Never try to open or repair the hearing aid yourself.
• Do not wear your hearing aid during x-ray, MR scans,
CT scans, short-wave diathermy, or similar radiation
treatments and never place your hearing aid in a microwave oven. These are some of the types of radiation that can damage your hearing aid. Radiation
from, for example, room surveillance equipment,
burglar alarms and cellular telephones is weaker and
will not damage your hearing aid.
• Widex hearing aids are not certified for use in mines
or other areas with explosive gases.
Page 65

65
General
• To maintain the proper shape of the ear-set, be care-
ful not to twist or squeeze it out of shape when your
hearing aid is placed in the case. The below illustration shows two hearing aids with Instant ear-tips.
Page 66

66
Good advice
• The use of hearing aids increases the risk of accumu-
lation of earwax. Contact your physician/ENT doctor
if you suspect that a plug of earwax has accumulated
in your ear. Earwax may not only reduce your own
hearing but also the effect of the hearing aid considerably. It is a good idea to ask your physician to clean
your ears a couple of times a year.
• Please be sure to keep the hearing aid and its parts
and accessories out of the reach of children, who
might place them in their mouths. Also keep batteries out of children’s reach and discard used batteries
carefully. Do not change batteries in front of children
and do not let them see where you keep your supply.
• Never put a battery in your mouth for any reason as
you may risk swallowing it. In case of ingestion, contact your physician immediately.
Page 67

67
General
• The hearing aid is made of modern non-allergenic
materials. Still, in rare cases skin irritation can occur. If
you notice skin irritation in or around your ear or ear
canal, contact your hearing care professional.
• Please be aware that the use of any type of hearing
aid may involve a slightly increased risk of infection
in the ear canal. An infection can arise as a result of
inadequate ventilation of the ear. Therefore, we recommend that you remove the entire hearing aid
from your ear at night to allow the ear canal to be
ventilated. Make sure that you clean and inspect your
hearing aid and all its parts as required. If an infection occurs, you should seek medical attention and
contact your hearing care professional for advice on
how to disinfect the various hearing aid parts. Do not
under any circumstances use alcohol, chlorine or
similar substances to clean your hearing aid and its
parts.
Page 68

68
Listening
programs
Description Chosen
program
position:
Master Standard program
Acclimatisation
Acclimatisation program
Music Music program
TV TV program
Comfort Attenuates background
noise
Audibility
Extender
Makes high-frequency
sounds audible
Page 69

69
General
Listening
programs
Description Chosen
program
position:
Master Standard program
Acclimatisation
Acclimatisation program
Music Music program
TV TV program
Comfort Attenuates background
noise
Audibility
Extender
Makes high-frequency
sounds audible
Page 70

70
Page 71

71
Page 72

¡9 514 0094 001.¤
Printed by HTO / 2007-05
9 514 0095 001 #01
¡#01v¤
 Loading...