

Page 1

USER MANUAL
Ear-sEts for
WidEx BtE hEaring aids
Page 2
Contents
GENERALINFORMATION . . . . . . . . . . . . . . . . . . . . . . . . . . . . . . . . . . . . . . . . . .
Warnings .........................................................
Maintenanceandcare .............................................
Rightleftidentification............................................
INSTANTEAR-TIPSFORRICRITEMODELS ........
Cleaning.........................................................
TheWidexwaxguard ............................................
Changingtheear-tip .............................................
Theanchor ......................................................
Troubleshooting..................................................
2
Page 3
CUSTOMEAR-TIPSANDEARMOULDSFORRICRITE
MODELS.......................................
Cleaning.........................................................
TheWidexwaxguard ............................................
Changingtheear-setparts........................................
Troubleshooting..................................................
3
Page 4
INSTANTANDCUSTOMEAR-TIPSFORBTEMODELS
WITHTHINTUBE ...............................
Cleaning.........................................................
Changingtheear-setparts........................................
Theanchor ......................................................
Troubleshooting..................................................
4 5
Page 5
EARMOULDSFORBTEMODELS
WITHCLASSICTUBE............................
Cleaning.........................................................
Changingtheear-setparts........................................
Troubleshooting..................................................
LISTOFS YMBOLS ..............................................
Your hearing care professional will tick the relevant type
5
Page 6
General information
Warnings
WARNING
• This booklet contains important information and instructions regarding your ear-set, and complements the user instructions for your hearing aid. B e sure to read the chapter “General i nformation” as well a s the
chapter that deals with your specific ear-set solution before you start
using the hearing aid.
• Keep hearing aids and their parts, accessories and batteries out of
reach of children and anyone else who might swallow such items or
otherwise cause injury to themselves.
6
Page 7

WARNING
• Clean and inspect your hearing aid after use to check that it is intact.
If the hearing aid or the ear-set breaks while in the ear canal, contact
your hearing care professional immediately. Do not try to remove the
parts yourself.
• Some hearing aids are capable of producing a sound pressure level
exceeding 132 dB SPL. There may be a risk of damaging your residual hearing. Please follow the recommendations of your hearing care
professional.
7
Page 8
Electrical and electronic equipment (EEE) contains
materials, components and substances that can be
hazardous and present a risk to human health and
the environment when waste electrical and electronic equipment (WEEE) is not handled correctly.
Do not dispose of hearing aids, hearing aid accessories and batteries with ordinary household waste.
Hearing aids, batteries and hearing aid accessories should be
disposed of at sites intended for waste electrical and electronic
equipment, or given to your hearing care professional for safe
disposal. Proper disposal helps to protect human health and the
environment.
8 9
Page 9

Maintenance and care
• When the hearing aid and ear-set are not in use, keep them
in the case in a dry location out of reach of children and pets.
• Do not expose the hearing aid to extreme temperatures or high
humidity. Make sure to dry the hearing aid and ear-set thoroughly if you have been perspiring heavily, for example after
playing sports.
• Do not wear your hearing aid while in the shower or swimming,
or when using a hair dryer, and avoid letting the hearing aid
come into contact with sticky or greasy substances, such as
hair spray or sunscreen.
Right/left identification
An ear-set is provided with an indication of whether it is for the
right ear (red) or for the left ear (blue).
9
Page 10
instant ear-tips for riC/rite
models
10 11
Page 11

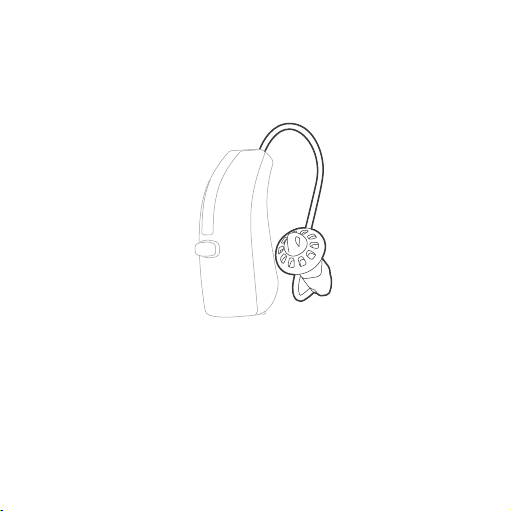
This chapter describes how to clean and handle various instant
ear-tips for Widex RIC/RITE models. The illustrations in this chapter show a hearing aid with an open ear-tip, but the procedure is
identical for the other instant ear-tips.
NOTE
Your ear-set may not look exactly as illustrated in this booklet. We also
reserve the right to make any changes considered necessary.
11
Page 12
Cleaning
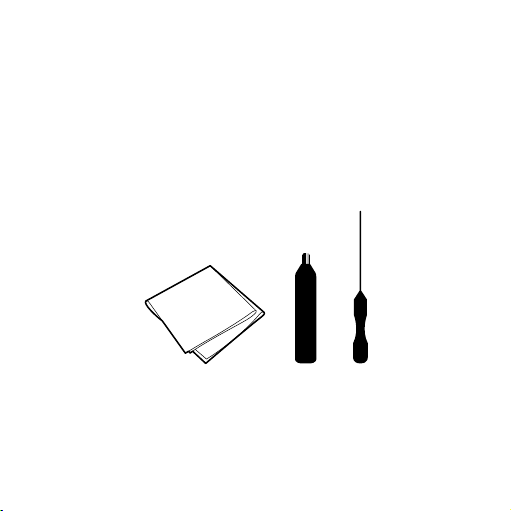
Cleaning accessories
1. Cloth
2. Brush
3. Wax removing tool
3
1 2
Contact your hearing care professional if you need additional
supplies of cleaning accessories.
12 13
Page 13
Make sure that the ear-set is always clean and free of earwax,
moisture and the like. Clean the earwire with the cloth after use.
To keep the ear-tip free of earwax, clean it with the small brush on
a daily basis. It is a good idea to do this every morning, after the
hearing aid has been allowed to dry overnight.
13
Page 14
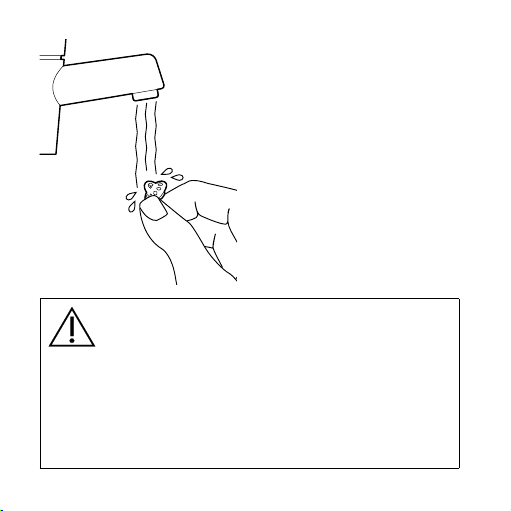
If necessary, the instant eartip can be washed in lukewarm
water, after disconnecting it
from the rest of the ear-set.
Allow it to dry overnight.
WARNING
• Never use alcohol or other cleaning solutions to clean the ear-set, as
this may discolour it.
• Never use water or cleaning solutions to clean the earwire. The
receiver must never come into contact with water, as this may damage the receiver.
14
Page 15
The Widex wax guard
The wax guard helps to protect the hearing aid against earwax.
Always use a Widex wax guard with your hearing aid, otherwise
the warranty for your hearing aid will be void.
The wax guard system consists of the following parts:
1. Holder
2. Removal hook
3. Wax guard
2 3
1
15
Page 16
Check on a regular basis to ensure that your wax guard has not
become blocked with earwax, in the following way:
First remove the ear-tip from the earwire. If wax has accumulated
in the wax guard, change it. Never attempt to clean it.
Changing the wax guard
1. Remove the ear-tip from the earwire.
2. Insert the removal hook into the used wax guard.
16
Page 17
3. Pull the wax guard straight out.
4. Turn the holder around, so that the new wax guard is in
position to be inserted.
Old
New
17
Page 18
5. Insert the new wax guard into the opening of the sound
outlet.
18 19
Page 19
6. Pull the holder straight out. The new wax guard will
automatically detach from the holder. Press the receiver
gently against a flat surface to ensure that the wax guard
remains in place.
7. Push the ear-tip back onto the receiver.
If you have any questions regarding your wax guard, please contact your hearing care professional.
19
Page 20
WARNING
• If the wax guard fits loosely, discard it and insert another. If the wax
guard becomes dislodged while the ear-tip is placed in the ear canal,
please contact your physician. Do not try to remove the wax guard
from your ear canal yourself.
• The wax guard is disposable. Never clean the wax guard or re-insert
a used wax guard into the sound outlet. This could cause the wax
guard to become dislodged in your ear.
• Use only the removal tool described above. The use of other object s
may cause the wax guard to be pushed f urther into the sound outlet
and damage the hearing aid.
20 21
Page 21
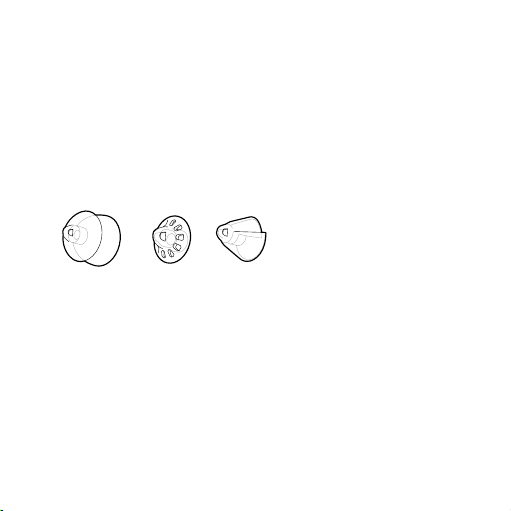
Changing the ear-tip
The ear-tip should be changed as required. For further supplies
of ear-tips, or if its size no longer fits your ear, contact your hearing care professional.
WARNING
Do not attempt to disconnect the earwire from the hearing aid.
21
Page 22

After having removed the old ear-tip, push the new ear-tip onto
the receiver until it reaches the point indicated by the dotted line.
It is very important to ensure that the ear-tip is firmly secured.
When inserting the receiver into the ear-tip, you should feel it
click into place.
22 23
Page 23
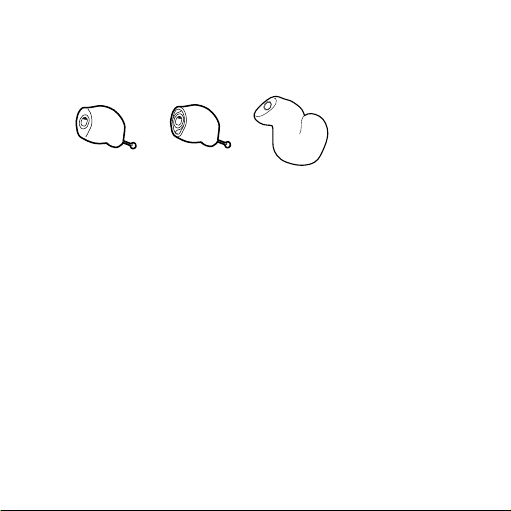
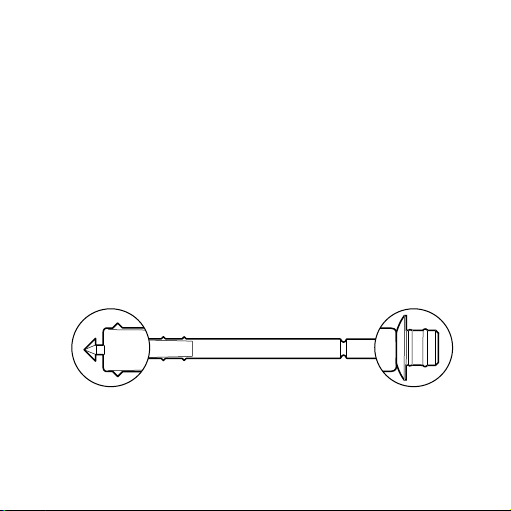
The anchor
If your hearing care professional has provided you with an anchor,
pull the pointed end of the anchor through the hole in the receiver
until the anchor is stopped by the grip at the end. The angled grip
should be pointing towards the hearing aid.
Position the anchor as illustrated.
23
Page 24
Troubleshooting
The following pages contain some advice on what to do if your
hearing aid malfunctions or fails to perform satisfactorily. If the
problems persist, contact your hearing care professional. The
advice relates only to the ear-set. Please also see the user instructions for your hearing aid.
Problem Possible cause Solution
The hearing aid
is completely
silent
The hearing aid
volume is not
powerful enough
The wax guard or eartip is blocked
The earwire is broken Contact your hearing
The wax guard or eartip is blocked
24 25
Change the wax guard
or ear-tip
care professional
Change the wax guard
or ear-tip
Page 25
The hearing aid
whistles continuously
The ear-tip is not correctly placed in your ear
canal
The ear-tip fit is too
loose
The receiver is not adequately secured in the
ear-tip
25
Take the ear-tip out and
reinser t it. If the problem persists, contact
your hearing care professional
Contact your hearing
care professional
Replace the ear-tip. If
the problem persists,
contact your hearing
care professional
Page 26
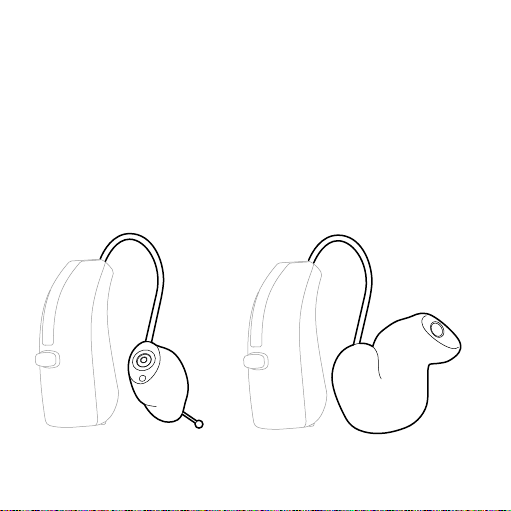
Custom ear-tips and
earmoulds for riC/rite
models
This chapter describes how to clean and handle various custom
ear-tips and earmoulds for Widex RIC/RITE models. The illustrations in this chapter show a hearing aid with an ear-tip, unless
otherwise indicated.
Custom ear-tip Custom earmould
26
Page 27

NOTE
Your ear-set may not look exactly as illustrated in this booklet. We also
reserve the right to make any changes considered necessary.
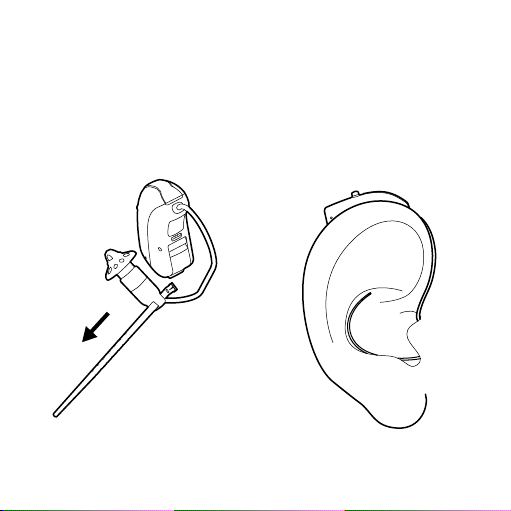
Positioning the hearing aid
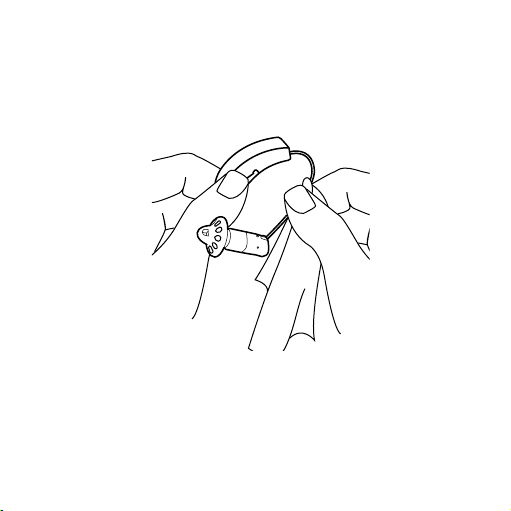
Insert the ear-tip or earmould while holding it with your thumb
and forefinger. The ear-tip or earmould should rest comfortably
in your ear. Place the hearing aid behind the ear so that the earwire rests comfortably on the ear, close to your head.
27
Page 28

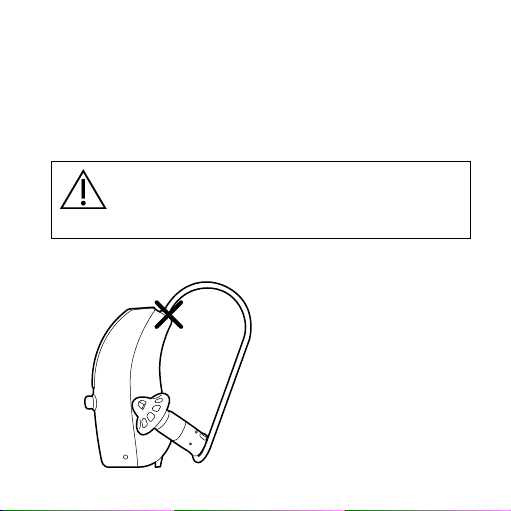
WARNING
• NEVER attempt to disconnect the earwire from the custom ear-tip/
earmould or the hearing aid, as this may damage the earwire. Do not
pull the earwire to remove your hearing aid from your ear.
28 29
Page 29

Cleaning
Cleaning accessories
1. Cloth
2. Brush
3. Wax removing tool
3
1 2
Contact your hearing care professional if you need additional
supplies of cleaning accessories.
29
Page 30

Make sure that the ear-set is always clean and free of earwax,
moisture and the like. Clean the earwire and the ear-tip or earmould with the cloth after use.
30 31
Page 31

If earwax or dirt has collected on the ear-tip, remove any visible earwax from around the sound outlet with the small brush or
cloth. Do NOT attempt to clean the wax guard.
31
Page 32

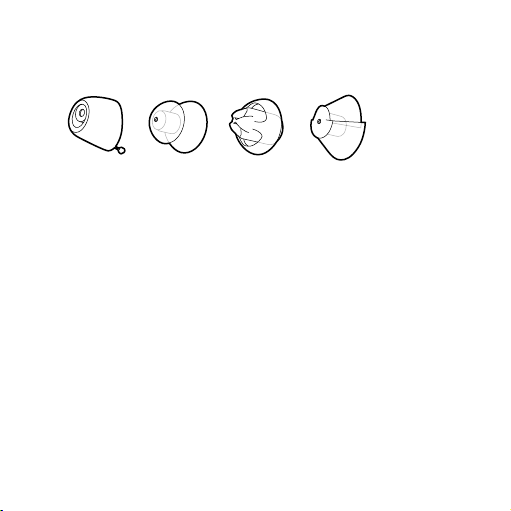
If the sound outlet is blocked, you should change the wax guard.
Your ear-tip or earmould may be provided with a vent. The illustrations below show examples of how to clean the vent, if any, in
different types of ear-tip/earmould:
32
Page 33

WARNING
The ear-set must never come in contact with liquids such as water or
cleaning solutions, as this may damage it.
33
Page 34

The Widex wax guard
The wax guard helps to protect the hearing aid against earwax.
Always use a Widex wax guard with your hearing aid, otherwise
the warranty for your hearing aid will be void.
The wax guard system consists of the following parts:
1. Holder
2. Removal hook
3. Wax guard
2 3
1
34 35
Page 35

Check on a regular basis to ensure that your wax guard has not
become blocked with earwax. If wax has accumulated in the wax
guard, change it. Never attempt to clean it.
WARNING
Do NOT remove the custom ear-tip/earmould from the earwire.
35
Page 36

Changing the wax guard
1. Insert the removal hook into the used wax guard.
2. Pull the wax guard straight out.
36
Page 37

3. Turn the holder around, so that the new wax guard is in
position to be inserted.
Old
New
37
Page 38

4. Insert the new wax guard into the opening of the sound
outlet.
38 39
Page 39

5. Pull the holder straight out. The new wax guard will
automatically detach from the holder. Press the ear-tip
gently against a flat surface to ensure that the wax guard
remains in place. If you have a custom earmould, make sure
the wax guard sits securely inside the sound outlet.
If you have any questions regarding your wax guard, please contact your hearing care professional.
39
Page 40

WARNING
• If the wax guard fits loosely, discard it and insert another. If the wax
guard becomes dislodged while the ear-tip/earmould is placed in
the ear canal, please contact your physician. Do not try to remove
the wax guard from your ear canal yourself.
• The wax guard is disposable. Never clean the wax guard or re-insert
a used wax guard into the sound outlet. This could cause the wax
guard to become dislodged in your ear.
• Use only the removal tool described above. The use of other object s
may cause the wax guard to be pushed f urther into the sound outlet
and damage the hearing aid.
40
Page 41

Changing the ear-set parts
Consult your hearing care professional if any of the ear-set parts
need replacement, or if the ear-tip or earmould no longer fit s your
ear.
41
Page 42

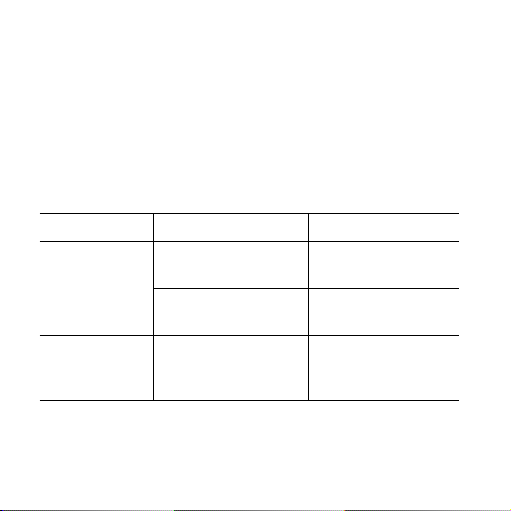
Troubleshooting
The following pages contain some advice on what to do if your
hearing aid malfunctions or fails to perform satisfactorily. If the
problems persist, contact your hearing care professional. The
advice relates only to the ear-set. Please also see the user instructions for your hearing aid.
Problem Possible cause Solution
The hearing aid
is completely
silent
The hearing aid
volume is not
powerful
enough
The wax guard is blocked Change the wax
guard
The earwire is broken Contact your hearing
care professional
The wax guard is blocked Change the wax
guard
42 43
Page 43

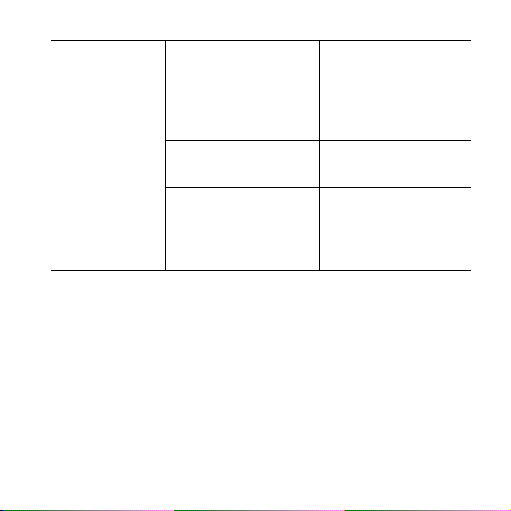
The hearing aid
whistles continuously
The ear-tip/earmould is uncomfort-able to wear
The ear-tip/earmould is
not correctly placed in your
ear canal
The ear-tip/earmould fit is
too loose
Your outer ear or ear canal
is sore
43
Take the ear-tip/earmould out and reinsert it. If the problem persists, contact
your hearing care
professional
Contact your hearing
care professional
Contact your hearing
care professional
Page 44

instant and Custom ear-tips
for Bte models with thin
tuBe
This chapter describes how to clean and handle various ear-tips
for Widex BTE models with thin tube.
Type 1 Type 2
Custom
Instant
NOTE
Your ear-set may not look exactly as illustrated in this booklet. We also
reserve the right to make any changes considered necessary.
44
Page 45

Cleaning
Cleaning accessories
1. Cloth
2. Brush
3. Wax removing tool
4. Cleaning thread
3 4
1 2
Make sure that your ear-set is always clean and free of earwax,
moisture and the like.
45
Page 46

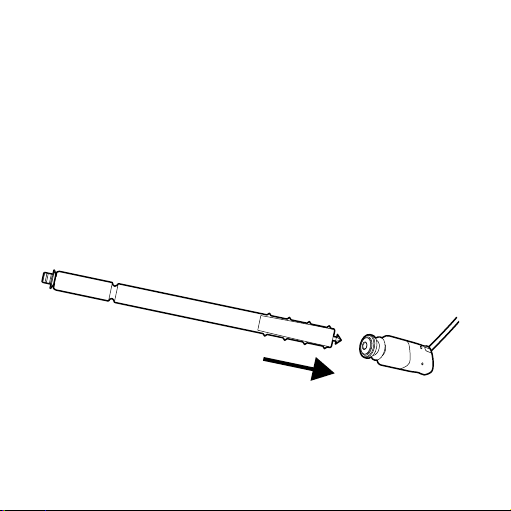
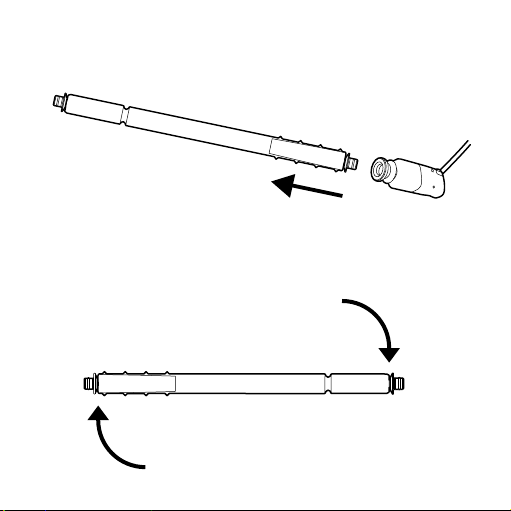
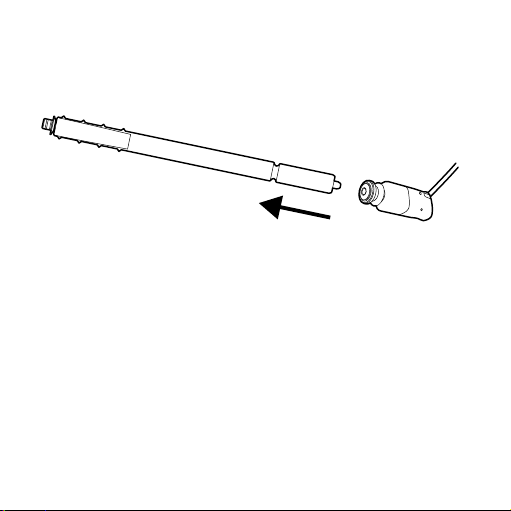
If you have a type 1 tube, grip the hearing aid between your
thumb and index finger. With your other hand, grip the tubing
and pull straight apart as indicated by the arrows. Alternatively, a
small tool is available for removing the tubing. Contact your hearing care professional if you would like more information.
46
Page 47

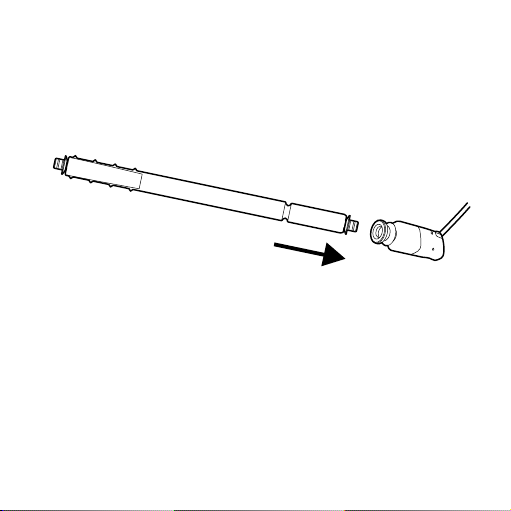
If you have a type 2 tube, lift the ear-set
off the hearing aid in a slanting, backward movement, as shown.
47
Page 48

Type 1 and type 2
Carefully pull the ear-tip off the
tubing.
If you have a custom ear-tip, it
does not have to be removed to
clean the tube.
Pass the cleaning thread through
the tubing. Pull the thread out at
the other end.
48 49
Page 49

If necessary, the ear-tip can be
washed in lukewarm water after
disconnecting it from the rest of
the ear-set. Allow it to dry over-
night.
WARNING
Never use alcohol or other cleaning solutions to clean the ear-set, as
this may discolour it.
49
Page 50

Placing an instant ear-tip on the tube
Gently insert the tubing into the ear-tip until it reaches the end.
It is very important to ensure that the ear-tip is firmly secured.
50
Page 51

Placing a custom ear-tip on the tube
Hold the custom ear-tip as shown and gently press the tubing into
place in the cus tom ear-tip. Use your fingernail to press the tubing
in as far as it will go, so that it is securely fastened.
51
Page 52

Click the ear-set onto the top of the
hearing aid as illustrated.
52 53
Page 53

Changing the ear-set parts
The tube
The tube should be changed as required. For further supplies of
tubes, contact your hearing care professional.
The instant ear-tip
The instant ear-tip should be changed as required. For further
supplies of ear-tips, or if the ear-tip size no longer fits your ear,
contact your hearing care professional.
53
Page 54

The anchor
Type 1 with an instant ear-tip
NOTE
We do not recommend wearing the hearing aid without the anchor with
the open ear-tip or the tulip ear-tip solution. If the hearing aid is not secured by the anchor, it may fall off your ear and become lost. The loose
anchor is not used with the double ear-tip.
Loose anchor
54
Page 55

Firstly, we show how the
anchor can be used without
prior trimming:
Pull the pointed end of the
anchor through the upper hole
on the side of the tubing.
The angled grip should be pointing towards the hearing aid.
Continue pulling until the anchor
is stopped by the grip at the end.
55
Page 56

Your ear-set is now ready for use.
Position it so that it rests comfortably in your ear.
56 57
Page 57

The anchor can also be trimmed
to fit your ear:
Pull the pointed end of the anchor
through the upper hole on the
side of the tubing.
The angled grip should be pointing towards the hearing aid.
Continue pulling until the anchor
is stopped by the grip at the end.
Now turn the ear-set around.
Then guide the pointed end of the
anchor through the lower hole to
form a loop.
57
Page 58

When the loop is the correct size, cut any excess off,
leaving only the loop.
The anchor loop has the
correct size when it supports the position of the
ear-tip in the ear canal, and
the ear-set sits securely in
and on the ear.
58
Page 59

Take great care to cut off all the
excess so that the end of the
anchor loop is flush with the
small hole and there are no sharp
edges. Use the tip of your finger
to check for sharp edges. If part
of the anchor sticks out through
the hole, creating an uneven surface, this may cause irritation of
the ear.
59
Page 60

Type 2 with an instant ear-tip
The integrated anchor is not used
with an instant double ear-tip
solution and should be completely
cut off.
Integrated anchor
For the open ear-tip and tulip ear-tip solutions, the anchor should
be trimmed to form an appropriately sized loop to ensure the
comfortable retention of the ear-tip in the ear canal. There are
several ways of doing this. Please see the following examples. For
further information consult your hearing care professional.
60 61
Page 61

Example 1
Pull the tip of the anchor through the small hole on the side of
the tubing.
When the loop is the correct size,
cut off any exces s with scissors or
the like.
61
Page 62

The anchor loop has the correct size
when it supports the position of the eartip in the ear canal, and the ear-set sits
securely in and on the ear.
62
Page 63

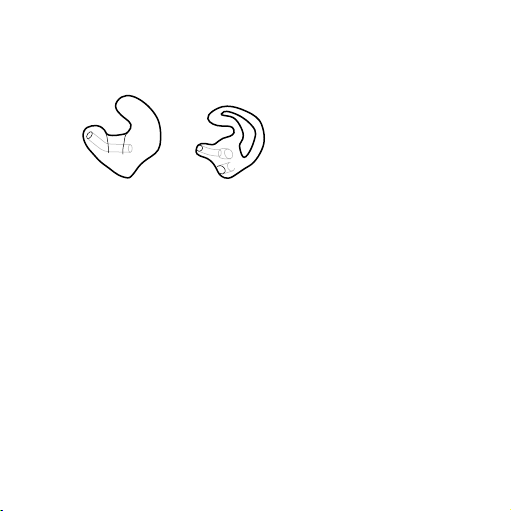
Example 2
Loop the anchor in the direction
indicated by the dotted line and
arrows.
Guide the tip of the anchor through
the small hole on the side of the tubing
as illustrated to form a heart-shaped
loop.
63
Page 64

When the loop is the correct size, turn
the ear-set around and cut off any
excess with scissors or the like.
The anchor loop has the correct size when it supports the position of the ear-tip in the ear canal, and the ear-set sits securely
in and on the ear.
64 65
Page 65

Example 1 and example 2:
Make sure that the end of the anchor loop is flush with the small
hole and there are no sharp edges. Use the tip of your finger to
check for sharp edges.
If part of the anchor sticks out through
the hole, creating an un even surface,
this may cause irritation of the ear.
Type 2 with a custom ear-tip
The integrated anchor is not used
with a custom ear-set solution and
should be com pletely cut off.
65
Page 66

Troubleshooting
The following pages contain some advice on what to do if your
hearing aid malfunctions or fails to perform satisfactorily. If the
problems persist, contact your hearing care professional. The
advice relates only to the ear-set. Please also see the user instructions for your hearing aid.
Problem Possible cause Solution
Instant Custom
The hearing aid
is completely
silent
The sound outlet is
blocked
The tubing is blocked Clean or replace the tubing
Clean or
replace the
ear-tip
66 67
Clean the
ear-tip
Page 67

The hearing aid
volume is not
powerful enough
The sound outlet is
blocked
The tubing is blocked Clean or replace the tubing
Clean or
replace the
ear-tip
Clean the
ear-tip
The hearing aid
whistles continuously
The ear-tip is
uncomfort able
to wear
The ear-tip is not correctly placed in your
ear canal
The tubing is broken Replace the tubing
The ear-tip fit is too
loose
Your outer ear or ear
canal is sore
67
Take the ear-tip out and
reinser t it. If the problem
persists, contact your
hearing care professional
Contact your hearing care
professional
Contact your hearing care
professional
Page 68

earmoulds for Bte models
with ClassiC tuBe
This chapter describes how to clean and handle classic earmoulds
for Widex BTE models.
1. Classic mould
2. Classic tube
3. Earhook
68 69
3
2
1
Page 69

NOTE
Your ear-set may not look exactly as illustrated in this booklet. We also
reserve the right to make any changes considered nec essary.
Positioning the hearing aid
Insert the earmould while holding the lower part of the tubing.
The earmould should rest comfortably in your ear. Place the hearing aid behind the ear, so that the tubing rests comfortably on the
ear, close to your head.
69
Page 70

Cleaning
Cleaning accessories
1. Soft cloth
2. Brush
3. Wax removing tool
1
Contact your hearing care professional if you need additional
supplies of cleaning accessories.
Make sure that your ear-set is always clean and free of earwax
and moisture.
2 3
70 71
Page 71

WARNING
Never use al cohol or other clea ning solutions to cl ean the ear-set as thi s
may discolour it.
Wipe your earmould with a cloth
after use.
If the earmould is provided with a
vent, clean the vent with the wax
removing tool.
71
Page 72

Disconnect the tubing with the earmould from the earhook of the
hearing aid on a regular basis and rinse the tubing and earmould
thoroughly in lukewarm water.
Allow it to dry overnight.
72
Page 73

If there is moisture in the earmould or tubing, use a blower
or similar to blow them dry
before attaching the tubing to
the earhook.
Changing the ear-set parts
If your ear-set tubing breaks, it should be replaced.
For further supplies of tubing, or if the earmould no longer fits
your ear, contact your hearing care professional.
73
Page 74

Troubleshooting
The following pages contain some advice on what to do if your
hearing aid malfunctions or fails to perform satisfactorily. If the
problems persist, contact your hearing care professional. The
advice relates only to the ear-set. Please also see the user instructions for your hearing aid.
Problem Possible cause Solution
The hearing aid
is completely
silent
The hearing aid
volume is not
powerful
enough
The sound outlet is
blocked
The sound outlet is
blocked
74 75
Clean the blocked sound
bore
Clean the blocked sound
bore
Page 75

The hearing aid
whistles continuously
The earmould
is uncomfortable to wear
The tubing is broken Replace the tubing
The tubing is too short Replace the tubing
The earmould is not correctly placed in the ear
canal
The earmould fit is too
loose
The tubing often come s
off the earmould or earhook
The earhook is cracked Contact your hearing
Your outer ear or ear
canal is sore
75
Take it out and re insert it.
If the problem persists,
contact your hearing care
professional
Contact your hearing
care professional
Replace the tubing
care professional
Contact your hearing
care professional
Page 76

list of symBols
Symbol Title/Description
Catalogue number
The product’s catalogue (item) number.
Serial number
The product’s serial number.*
Keep away from sunlight
The product must be protected from light sources and/or
The product must be kept away from heat
Keep dry
The product must be protected from moisture and/or The
product must be kept away from rain
Lower limit of temperature
The lowes t temperature to which t he product can be s afely
exposed.
Symbols commonly used by Widex A/S in medical device labelling
(labels/IFU/etc.)
Symbol Title/Description
Manufacturer
The product is produced by the manufacturer whose name
and address are stated next to the symbol. If appropriate,
the date of manufacture may also be stated.
Date of manufacture
The date when the product was manufactured.
Use-by date
The date after which the product is not to be used.
Batch code
The product’s batch code (lot or batch identification).
76
Page 77

Symbol Title/Description
Catalogue number
The product’s catalogue (item) number.
Serial number
The product’s serial number.*
Keep away from sunlight
The product must be protected from light sources and/or
The product must be kept away from heat
Keep dry
The product must be protected from moisture and/or The
product must be kept away from rain
Lower limit of temperature
The lowes t temperature to which t he product can be s afely
exposed.
77
Page 78

Symbol Title/Description
Upper limit of temperature
The highest temperature to which the product can be
safely exposed.
Temperature limits
The highest and lowest tempe ratures to which the product
can be safely exposed.
Consult instructions for use
The user instructions contain important cautionary information (warnings/precautions) and must be read before
using the product.
Caution/Warning
Text marked with a caution/warning symbol must be read
before using the product.
78
Page 79

Symbol Title/Description
WEEE mark
“Not for general waste”
When the product is to be discarded, it must be sent to a
designated collection point for recycling and recovery.
CE mark
The product is in conformity with the requirements set out
in European CE marking directives.
Alert
The product is identified by R&TTE Directive 1999/5/EC as
an equipment Class 2 product with some restrictions on
use in some CE member states.
C-Tick mark
The product complies with EMC and radio spectrum
regulatory requirements for products supplied to the
Australian or New Zealand market.
79
Page 80

Symbol Title/Description
Interference
Electromagnetic interference may occur in the vicinity of
the product.
*The six- or seven-digit number on the product is the serial number. Serial numbers may not always be preceded by
80 81
Page 81

81
Page 82

82 83
Page 83

83
Page 84

WIDEX A /S Nymoellevej 6, DK-3540 Lynge, Denmark
www.widex.com
Manual no.:
9 514 0278 001 #02
Issue:
2015-05
É[5qr0w7|k;;a;g]
 Loading...