

Page 1

USER INSTRUCTIONS
THE DREAM™ SERIES
D-PA model
RIC
Receiver-in-canal
Page 2

2
YOUR WIDEX HEARING AID
(To be filled out by the hearing care professional)
DREAM440
DREAM330
DREAM220
DREAM110
Programs:
Master Audibility Extender
Music Audibility Extender
TV Audibility Extender
Comfort Audibility Extender
Reverse focus Audibility Extender
Phone Audibility Extender
Zen Audibility Extender
Master + Zen Audibility Extender
Master + Reverse focus Audibility Extender
Master + Phone Audibility Extender
Zen+ Audibility Extender
Date Your hearing care professional
Page 3

CONTENTS
THEHEARINGAID ................................
Acousticindicators..................................
Thebattery ........................................
Insertingthebattery ..............................
Lowbatteryindication ...........................
Turningthehearingaidonandoff ...................
Rightleftidentification.............................
Positioningthehearingaid..........................
Removingthehearingaid...........................
Volumeadjustment ................................
Lostpartneralarm .................................
Programs .........................................
Switchingbetweenthelisteningprograms..........
Zen ...........................................
Usingatelephone..................................
CLEANING......................................
Thehearingaid ....................................
ACCESSORIES...................................
INCASEOFMALFUNCTION .......................
CARINGFORYOURHEARINGAID ..................
WARNINGS.....................................
ADVICE ........................................
Adaptingtoyourhearingaids .......................
REGULATORYINFORMATION ......................
ADDITIONALPROGRAMFORMS ...................
SYMBOLS.......................................
3
Page 4

4
THE HEARING AID
The illustration below shows the hearing aid without
the ear-set. The choice of ear-set solution depends on
your specific needs. Please refer to the separate ear-set
user manual.
1. Microphone openings
2. Battery drawer (on/off function)
3. Nail grip
4. LED & Right/left identification
If you need help to identify the serial number (usually six or seven digits) on the product, please contact your hearing care professional.
Page 5
5
NOTE
In addition to these user instructions, a separate user manual is
provided describing the various ear-set solutions available for
your hearing aid: “Ear-sets for Widex BTE hearing aids”.
WARNING
This booklet and the manual “Ear-sets for Widex BTE hearing aids” contain important information and instructions. Read
these booklets carefully before you start using the hearing aid.
NOTE
Your hearing aid, ear-set and accessories may not look exactly
as illustrated in this booklet. We also reserve the right to make
any changes considered necessary.
Intended use
The hearing aids are intended as air conduction
amplification devices to be used in everyday listening
environments. The hearing aids may be provided with
the Zen program intended to provide a relaxing sound
background (i.e. music/noise source) for adults who
desire to listen to such a background in quiet.
Indications for use
The devices are indicated for individuals with a range of
hearing loss severity from slight (16 dB HL to 25 dB HL)
to moderately severe (85 dB HL) and all hearing loss
configurations.
Page 6

6
They are to be programmed by licensed hearing care
professionals (audiologists, hearing aid specialists, otolaryngologists) who are trained in hearing (re)habilitation.
Description of device
Your hearing aid is used with an ear-set which consists
of an earwire and an ear-tip, in which the receiver is
placed. The hearing aid uses a proprietary wireless
technology, the WidexLink, to enable communication
between the left and the right hearing aids, as well as
between the hearing aids and the DEX accessories.
Your hearing aid may be provided with an optional listening program called Zen. It makes musical tones (and
sometimes a rushing noise) in the background. These
sounds are shaped according to your hearing loss.
Page 7

7
Acoustic indicators
The hearing aid may be set to produce a signal to
indicate the use of certain functions. The signal may
be a spoken message or tones. The signal can also be
deactivated.
Functions Default
settings
Other
settings
Adjusting volume via remote control Tone Off
Confirming RC program key use Clicking
sound
Off
Changing program via remote control Message Tones/of f
Starting up the hearing aid Message Tone/off
Warning about low battery Message 4 tones/off
Warning about lost partner Off Message
Service reminder Off Message
Note: “Warning about lost partner” can only be made available
in DREAM440.
Page 8

8
The battery
We recommend zinc-air batteries. Use a size 10 battery
for the hearing aid.
To obtain replacement batteries, please consult your
hearing care professional. It is important to take note
of the expiry date and the recommendations on the
battery pack regarding disposal of used batteries.
Otherwise there is a risk that the battery life may be
reduced.
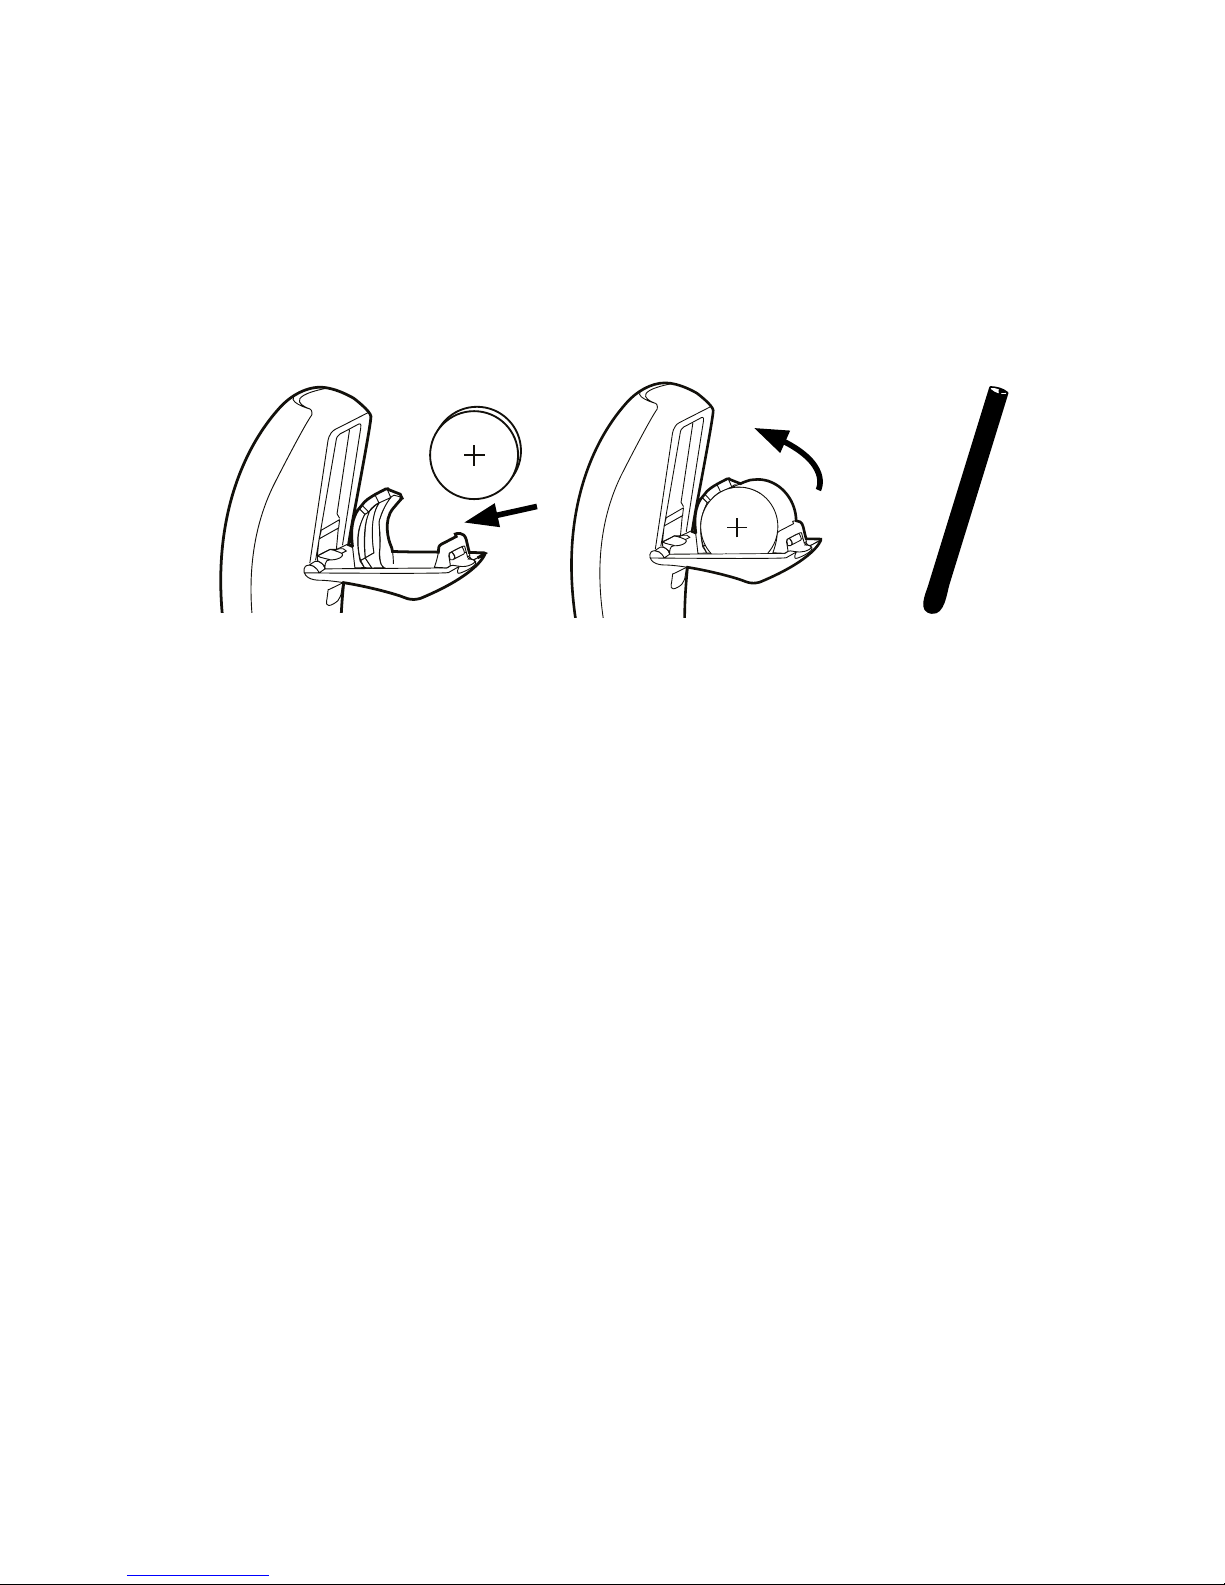
Inserting the battery
Before inserting a new battery into the
hearing aid, remember to remove the adhesive tab. Once the tab has been removed,
the battery will start functioning after a few
seconds.
CAUTION
Do not use batteries if there is a sticky residue from the tab or
other unwanted substance, as this can cause the hearing aid to
malfunction.
Use the nail grip to gently swing the battery drawer open. Do not press the drawer
beyond the open position.
Page 9
9
Place the battery in the drawer as illustrated, so that the
plus (+) sign on the battery is facing towards you when
you hold the hearing aid as shown. You can use the battery magnet provided to steer the battery into place.
If the battery drawer does not close easily, the battery
is incorrectly inserted.
When changing battery, it is a good idea to hold the
hearing aid over a table.
Always place the battery in the actual battery drawer
as illustrated and not in the open space inside the hearing aid.
Page 10

10
Low battery indication
An acoustic indicator will sound when the battery is
nearly exhausted, unless this function has been disabled (see page”Acoustic indicators” on page 7).
We recommend that you always have a spare battery
with you.
WARNING
Never leave an exhausted battery in the hearing aid. Exhausted
batteries may leak, damaging the hearing aid.
WARNING
Your hearing aid may stop functioning, for instance if the battery is exhausted. You should be aware of this possibility, in particular when you are in traffic or are otherwise dependent on
warning signals.
Page 11

11
Turning the hearing aid on and off
The battery drawer of the hearing aid also functions as
the on/off switch.
Close the battery drawer to turn on the
hearing aid. An acoustic indicator will
indicate that the hearing aid has been
switched on unless this function has
been disabled.
Open the battery drawer to turn off the
hearing aid.
NOTE: Another way to verify that the
hearing aid is turned on is to cup it in
your hand. If it is on, it will whistle.
Please remember to turn off the hearing aid when it is
not in use. Remove the battery if the hearing aid will not
be used for several days.
Page 12

12
Right/left identification
If you wear hearing aids on both ears,
the hearing aids can be provided with
coloured marks (red mark = right and
blue mark = left).
The arrow shows the position of the
identification mark.
Page 13
13
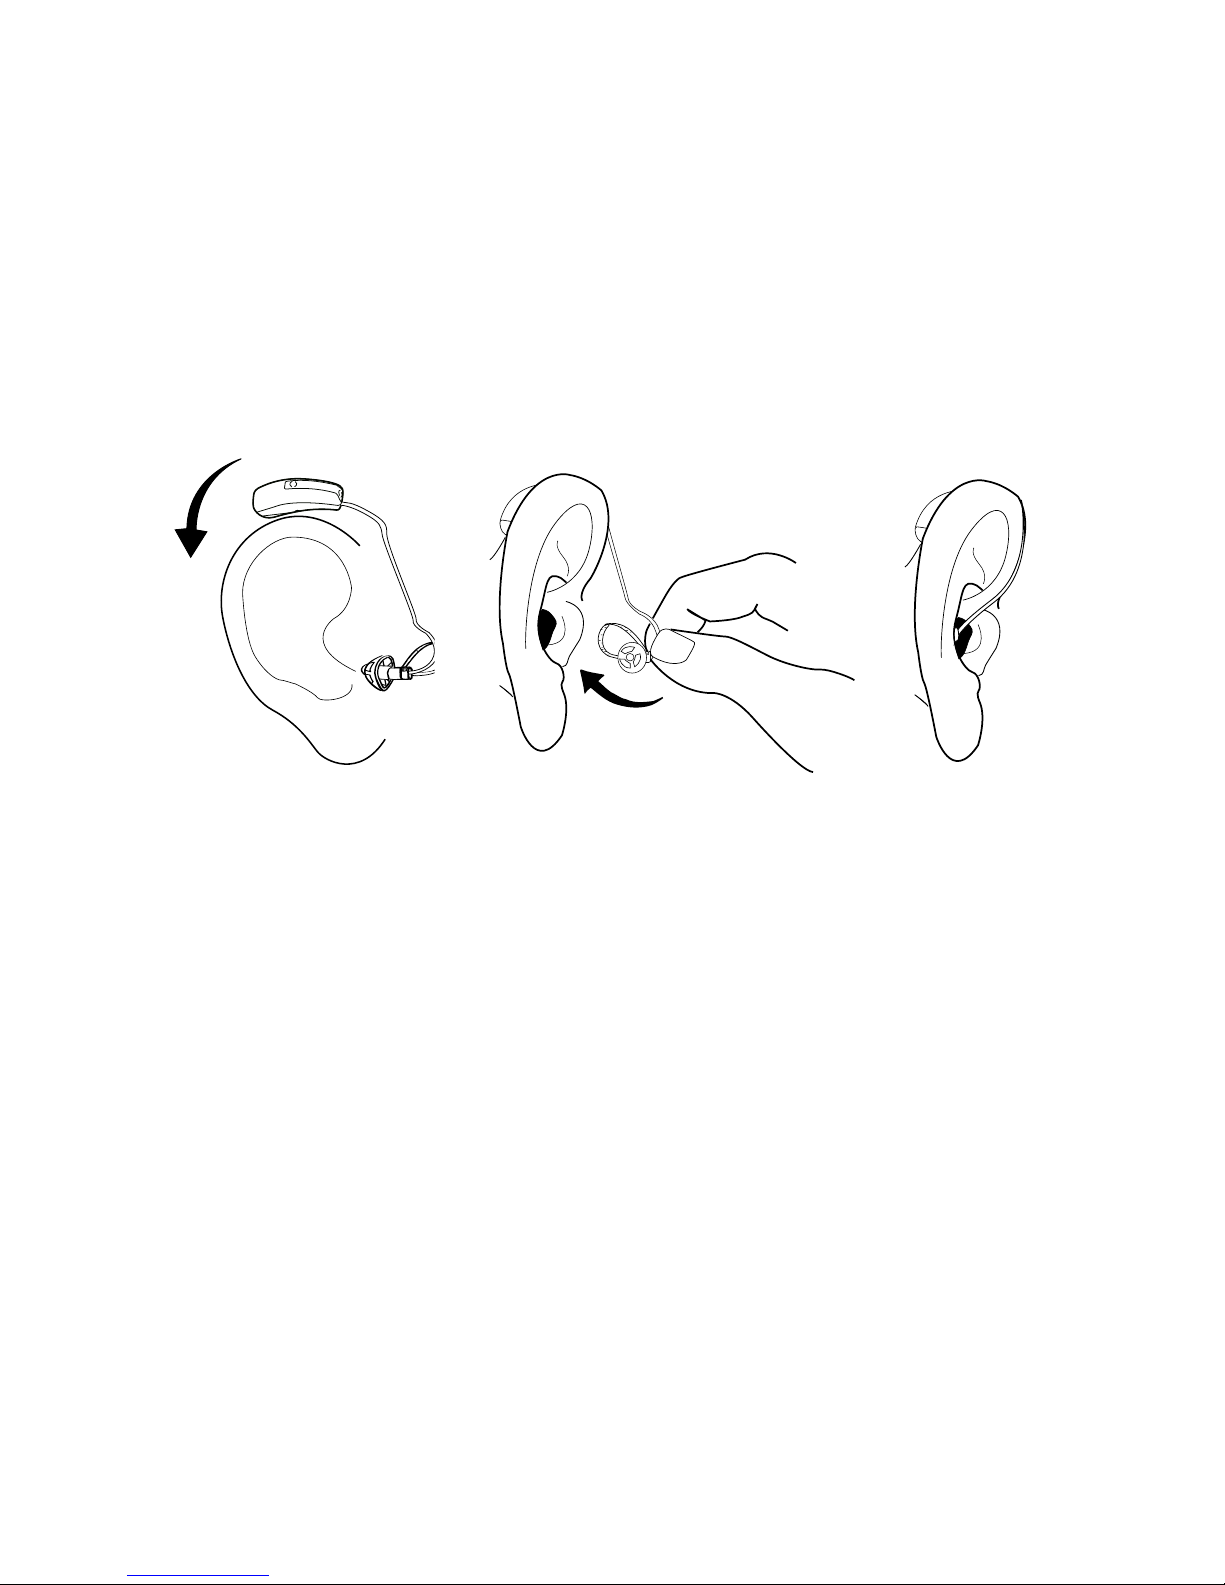
Positioning the hearing aid
Place the hearing aid behind the ear, so that the earwire
rests comfortably on the ear, close to your head.
Insert the ear-tip into the ear canal while holding the
lower part of the earwire.
The illustrations show an open ear-tip. For further information on ear-tip types, anchors and procedures, see
the separate ear-set user manual provided.
If the ear-set does not fit or sit properly, causing discomfort, irritation, redness or the like, contact your
hearing care professional.
Page 14

14
Removing the hearing aid
Remove the hearing aid from its position behind the
ear.
Carefully pull the ear-tip out of the ear canal, while
holding the lower part of the earwire. If the ear-tip is
provided with an extraction cord, take hold of this and
carefully pull the ear-tip out of the ear canal.
Page 15

15
Volume adjustment
The hearing aid volume is adjusted automatically in
accordance with your sound environment.
If you have a remote control, you can also adjust the
volume manually or mute your hearing aid. Any adjustment of the volume setting will be cancelled when your
hearing aid is turned off, or when you change program.
Depending on hearing aid features and setting, any
change you make will affect both hearing aids.
To alter the increments in which the volume is increased
or decreased, consult your hearing care professional.
If you have a remote control, please also refer to the
user instructions for this.
WARNING
If the volume in the hearing aid is generally too loud or too
weak, or the reproduced sounds are distorted, or if you would
like any further information, consult your hearing care professional.
Page 16

16
To mute the hearing aid with a remote control:
Keep pressing the volume down key on the remote
control after the long beep-tone has sounded and until
it stops. Pressing one of the volume keys briefly will
bring back the sound.
NOTE: Your hearing aid can be set to gradually increase
the amplification provided to allow you to acclimatize
yourself to the sound through the hearing aid. Therefore you may notice an increase in level after a period
of time.
Lost partner alarm
(Note: Only applicable if this feature is available and
has been activated by your hearing care professional.)
If one of your hearing aids falls off your ear, and/or the
battery is exhausted, a tone signal and a spoken message will sound two times in the other hearing aid, and
a diode will flash on both hearing aids.
When the lost hearing aid is repositioned, and/or the
battery is exchanged, the diodes stop flashing.
Page 17

17
Programs
By default your hearing aid has one program. However,
with a remote control a number of additional programs,
plus the special Zen program called Zen+ can be made
available.
Please also refer to the user instructions for your remote
control.
Master Standard
Music For listening to music
TV For listening to the TV
Comfort Attenuates background noise
Reverse focus Focus on sounds from behind
Phone For listening to the telephone
Zen Generates different kinds of tones or
noise
Compound
programs
The Master program in one ear and Zen,
Reverse focus or Phone in the other
Zen+ Special Zen program with up to three
different Zen styles
Your hearing aid has a function called the Audibility
Extender. This feature makes high frequency sounds
audible, and can be set to operate for one or more or all
available programs.
Page 18

18
If your needs change over time, the combination of
listening programs can be altered.
Zen program
Your hearing aid may be provided with a unique optional
listening program called Zen. It makes musical tones
(and sometimes a rushing noise) in the background. The
Zen program may be used alone (without amplification)
in quiet when you are not required to hear surrounding
sounds. Or, it may be used with amplification so both
the surrounding sounds and the generated sounds
(fractal tones and noise) are heard together.
CAUTION
Use of the different Zen programs may interfere with hearing
surrounding sounds including speech. The programs should
not be used when hearing such sounds is important. Switch the
hearing aid to a non-Zen program in those situations.
CAUTION
If you perceive decrease in loudness, tolerance of sounds,
speech not as clear, or worsening tinnitus, contact your hearing care professional.
Page 19

19
Benefits
The Zen program may provide a relaxing listening
background for some people. When the Zen program
is used in a tinnitus management program, its wearer
may experience some relief from tinnitus.
Indications for use
The Zen program is intended to provide a relaxing
sound background (i.e., music/noise source) for adults
who desire to listen to such a background in quiet.
It may be used as a sound therapy tool in a tinnitus
treatment program that is prescribed by a hearing care
professional (audiologists, hearing aid specialists, otolaryngologists) who is trained in tinnitus management.
Directions for use
Because of the unique ways in which Zen is programmed
in your hearing aid, please follow the recommendations
of your hearing care professionals as to how to use the
program, when to use the program and/or how long to
use the program.
Page 20

20
Switching between the listening programs
If you have a remote control, you can change programs
with a simple push of the program key. Each time you
change program, an acoustic indicator will sound unless
this function has been disabled.
Program Messageoroneshortbeep
Program Messageortwoshortbeeps
Program Messageorthreeshortbeeps
Program Messageoronelongandoneshortbeep
Program Messageoronelongandtwoshortbeeps
Zen Messageortone
Depending on hearing aid features and setting, any
change you make will affect both hearing aids.
Zen+
This program is accessed via a long press (more than
1 second) on the remote control program key. A short
press then allows you to cycle through the available
Zen styles.
You can exit Zen+ by pressing and holding the program
key for more than 1 second.
Page 21

21
Using a telephone
When using a telephone, we
recommend that you hold the
telephone against your head at
an angle above your ear, rather
than directly against the ear.
If the sound is not optimal, try
moving the telephone earpiece
to a slightly different position.
Page 22

22
CLEANING
The following cleaning accessories are available for the
hearing aid and ear-set*. For cleaning the ear-set, see
the user manual “Ear-sets for Widex BTE hearing aids.”
1. Cloth
2. Long wax removing tool
3. Short wax removing tool
4. Brush
Contact your hearing care professional if you need
additional supplies of cleaning accessories.
* Selection depends on ear-set type.
2.
3. 4.1.
Page 23

23
The hearing aid
Clean the hearing aid after use with
the cloth provided.
If the microphone openings are still
blocked, contact your hearing care
professional.
WARNING
Never use water or cleaning solutions to clean the hearing aid,
as this may cause it to malfunction.
When the hearing aid is not in use,
keep it in a warm, dry place with the
battery drawer open to ventilate the
hearing aid and allow it to dry.
Page 24

24
ACCESSORIES
A variety of assistive listening devices are available for
your hearing aid.
RC-DEX remote control
TV-DEX for listening to TV and audio
M-DEX for mobile phone applications and remote
control
PHONE-DEX for easy landline use*
FM+DEX the FM+DEX is a high-quality streaming device
designed specifically for Widex hearing aids
* Available in some countries only
For help in determining whether you could benefit from
a remote control or other accessories, please consult
your hearing care professional.
Page 25

25
IN CASE OF MALFUNCTION
Problem Potential cause Solution
The hearing
aid is completely silent
The hearing aid is
not turned on
Make sure the battery
drawer is closed
The battery does not
work
Insert a new battery in
the battery drawer
The hearing
aid volume is
not powerful
enough
Your ear is blocked
by earwax
Contact your ENT doctor/physician
Your hearing may
have changed
Contact your hearing
care professional
The hearing
aid whistles
continuously
Your ear is blocked
by earwax
Contact your ENT doctor/physician
Your two
hearing aids
are not working in synchrony
The connection
between the hearing
aids is lost
Turn the hearing aids
off and on again
The hearing
aids do not
respond with
a corresponding change in
volume or
program to
the DEX
a. The DEX is used
beyond the transmission range
b. Strong electro-
magnetic interference in the vicinity
c. The DEX and the
hearing aids are
not matched
a. Move the DEX closer
to the hearing aids
b. Move away from
known source of EM
interference
c. Check with hearing
care professional to
make sure DEX is
matched with the
hearing aids
Page 26

26
Problem Potential cause Solution
You hear
“interrupted”
speech (on
and off) from
the hearing
aids or no
speech
(muted) from
the transmitting ear.
a. The battery in one
of the hearing aids
has expired
b. Strong electro-
magnetic interference in the vicinity
a. Replace battery in
one or both hearing
aids
b. Move away from
known sources of
interference
Note: This information covers only the hearing aid. See
the “Ear-sets for Widex BTE hearing aids” user manual
for information specific to your ear-set.
If the problems persist, contact your hearing care professional for assistance.
Page 27

27
CARING FOR YOUR HEARING AID
The hearing aid is a valuable object and should be
treated with care. Here are some things you can do to
prolong the life of your hearing aid:
CAUTION
• Turn off your hearing aid when it is not in use. Remove the
battery if the hearing aid will not be used for several days.
• When the hearing aid is not in use, keep it in its case in a dry
location out of reach of children and pets.
• Do not expose the hearing aid to extreme temperatures or
high humidity. Make sure to dry the hearing aid thoroughly
after heavy perspiration such as that which may occur during
intense physical activity, e.g. playing sports.
• Avoid dropping your hearing aid – perform cleaning and
battery changes while holding the hearing aid above a soft
surface.
• Do not wear your hearing aid while in the shower or swimming, or when using a hair dryer, perfume, hair and body
sprays or gels such as suntanning lotions or creams.
• In environments with high humidity, a drying kit may be used
daily to reduce the amount of moisture inside the hearing aid.
See the instructions enclosed with the drying kit.
Page 28

28
WARNINGS
WARNING
Hearing aids and batteries can be dangerous if swal lowed or
used improperly. Swallowing or improper use can result in
severe injury or even fatalities. In case of ingestion, contact a
physician immediately.
• Keep hearing aids and their parts, accessories and batteries out
of reach of children and anyone else who might swallow such
items or otherwise cause injury to themselves. Do not change
batteries in front of them and do not let them see where you
keep your battery supply. Discard used batteries carefully.
• Batteries are very small and can easily be mistaken for pills or
the like. Never put a battery or hearing aid in your mouth for
any reason as you may risk swallowing it.
• Clean and inspect your hearing aid after use to check that it is
intact. If the hearing aid or the ear-set breaks while in the ear
canal, contact your hearing care professional immediately. Do
not try to remove the parts yourself.
• Risk of explosion if battery is replaced by an incorrect type
or recharged. Dispose of used batteries according to the
instructions.
• Never allow others to wear your hearing aid, as this could
cause permanent damage to their hear ing.
• When selecting a listening program, please remember that there
are situations in which it is particularly important to be able to
hear the surrounding sounds (e.g. traffic, warning signals).
• The hearing aid is made of modern non-allergenic materials.
Nonetheless, in rare cases skin irritation may occur. If you
notice skin irritation in or around your ear or ear canal, contact
your hearing care professional.
Page 29

29
WARNING
• Please note that when using any type of hearing aid, you must
allow regular ventilation of the ear. If the ear is not adequately
ventilated, there may be a slightly increased risk of infection
or disease in the ear canal. We therefore recommend that you
remove the hearing aid and ear-set from your ear when you
go to bed, to allow the ear canal to be ventilated. If possible,
you should also remove your hearing aid and ear-set during
the day if there are any periods when you do not need them.
Make sure that you clean and inspect your hearing aid and
ear-set as required. If an ear infection or disease occurs, you
should seek medical attention and contact your hearing care
professional for advice on how to disinfect the various hearing aid parts. Do not under any circumstances use alcohol,
chlorine or similar substances for this purpose.
• Regular use of a de-humidifier is recommended to help avoid
malfunction of the hearing aid.
• Do not use Widex hearing aids in mines or other areas with
explosive gases.
• Do not wear your hearing aid during radiation, X-rays, MRIs,
CT or other medical treatments and scans. The emissions
from these procedures as well as from other types of radiation,
such as that in a microwave oven, can damage your hearing
aid and the hearing aid can become very hot. Radiation from,
for example, room surveillance equipment, burglar alarms
and mobile phones is weaker and will not damage the hearing
aid, but may create audible interference.
Page 30

30
WARNING
Interference with active Implants
• In order to show caution, we advise to follow the guidelines
recommended by manufacturers of defibrillators and pacemakers regarding use of mobile phones:
• If you wear an active implantable device keep the Wireless
Hearing Aids and Hearing Aid Accessories such as wireless
remote controls or communicators at least 15 cm away from
the implant.
• If you experience any interference, do not use the hearing aids
and contact the manufacturer of the implant. Please note that
interference can also be caused by power lines, electrostatic
discharge, airport metal detectors etc.
• If you have an active brain implant, please contact the manufacturer of the implant for risk evaluation.
If you have an implantable device, we advise to keep magnets*
at least 15 cm away from the implant. (*= can be specified as
Autophone magnet, hearing instrument case, magnet in a tool,
etc.)
Page 31

31
CAUTION
• Your hearing aid has been tested for interference according
to international standards. Nevertheless, it is possible that
unforeseen interference may occur in the hearing aid due to
electromagnetic radiation from other products such as alarm
systems, room surveillance equipment and mobile phones.
• Although your hearing aid has been designed to comply with
the most stringent international electromagnetic compatibility standards, the possibility cannot be excluded that it may
cause interference with other equipment, such as medical
devices.
• Never try to open or repair the hearing aid yourself.
Page 32

32
ADVICE
NOTE
• The hearing aid will not restore normal hearing and will not
prevent or improve a hearing loss resulting from organic
conditions. However, the hearing aid can help you to make
the best possible use of your remaining hearing ability. You
should also bear in mind that it can take time to get used to a
new hearing aid and new sounds.
• In most cases, using the hearing aid infrequently will not
permit you to gain full benefit from it.
• The use of a hearing aid is only part of hearing habilitation
and may need to be supplemented by auditory training and
instruction in lipreading.
• The use of hearing aids increases the risk of accumulation of
earwax. Contact your physician/ENT doctor if you suspect
that a plug of earwax has accumulated in your ear. Earwax
may not only reduce your own hearing but also the effect
of the hearing aid considerably. It is a good idea to ask your
physician to clean your ears a couple of times a year.
Page 33

33
Adapting to your hearing aids
Congratulations for taking the first steps toward restoring your communication skills with the purchase of
state-of-the-art hearing aids from Widex.
Because many of the sounds you may now hear have
not been fully audible without hearing aids, we urge
you to take a few minutes to perform the following simple activities in the order listed. Do these first in quiet
settings, then try them in noisier surroundings.
Activity 1: First, listen to a friend or relative speak to
you with your eyes closed and your hearing aids off.
Now, put your hearing aids on and continue to listen.
Notice the difference? The purpose of this activity is not
to hear every word, but just to recognize the difference
in amplified speech from a familiar source.
Activity 2: Listen to your friend or relative speak to you
with your hearing aids on, but with your eyes closed.
Now continue to listen with your eyes open. The goal is
to demonstrate how helpful it is to receive information
from your eyes to supplement your ears.
Activity 3: Purchase two copies of today’s newspaper.
Ask a friend or relative to read a story aloud while you
read along with the same story. Alternatively, read it
aloud and listen to your own voice. It is also helpful to
watch captioned TV.
Page 34

34
• We hear in our brain, not in our ears. It will take your
brain some time to fully adapt to the new sounds
you are hearing. It is not unusual, for example, to
hear certain sounds, such as your own footsteps, or
a newspaper rustling, or the refrigerator humming,
that people with normal hearing take for granted and
thus don’t consciously process. Be patient and allow
yourself a few weeks to adapt. Your brain will learn
to ignore them if they are not important. Of course,
if sounds are too loud or uncomfortable for you,
contact your hearing care professional.
• Conversational speech has many redundant cues.
Worrying about a word you may have missed will
likely lead to additional missed words. Focus on
the essence of the conversation. It may help to ask
someone you are comfortable with to subtly alert you
about the overall topic when listening in groups.
• Before going to a restaurant, call ahead and request
a seat away from the kitchen or bar area. Remember
that in noisy places, even normal hearing people may
struggle to hear.
For more activities, training materials, and helpful communication hints please go to www.widex.com.
Page 35

35
REGULATORY INFORMATION
FCC ID: TTY-DPA
IC: 5676B-DPA
Federal Communications Commission Statement
This device complies with part 15 of the FCC Rules. Operation is
subject to the following two conditions:
(1) This device may not cause harmful interference, and
(2) this device must accept any interference received, including
interference that may cause undesired operation.
NOTE:
This equipment has been tested and found to comply with the limits
for a Class B digital device, pursuant to part 15 of the FCC Rules.
These limits are designed to provide reasonable protection against
harmful interference in a residential installation. This equipment
generates, uses and can radiate radio frequency energy and, if not
installed and used in accordance with the instructions, may cause
harmful interference to radio communications. However, there is no
guarantee that interference will not occur in a particular installation.
If this equipment does cause harmful interference to radio or television reception, which can be determined by turning the equipment
off and on, the user is encouraged to try to correct the interference
by one or more of the following measures:
— Reorient or relocate the receiving antenna.
— Increase the separation between the equipment and receiver.
— Connect the equipment into an outlet on a circuit different
from that to which the receiver is connected.
— Consult the dealer or an experienced radio/TV technician for
help.
NOTE:
This equipment complies with FCC radiation exposure limits set
forth for an uncontrolled environment. This transmitter must not be
co-located or operating in conjunction with any other antenna or
transmitter.
Page 36

36
Changes or modifications to the equipment not expressly approved
by Widex could void the user’s authority to operate the equipment.
Industry Canada Statement/Déclaration d’industrie Canada
Under Industry Canada regulations, this radio transmitter may only
operate using an antenna of a type and maximum (or lesser) gain
approved for the transmitter by Industry Canada.
To reduce potential radio interference to other users, the antenna
type and its gain should be so chosen that the equivalent isotropically radiated power (e.i.r.p.) is not more than that necessary for
successful communication.
This device complies with Industry Canada licence-exempt RSS
standard(s). Operation is subject to the following two conditions:
(1) this device may not cause interference, and
(2) this device must accept any interference, including interference
that may cause undesired operation of the device.
Conformément à la réglementation d’Industrie Canada, le présent
émetteur radio peut fonctionner avec une antenne d’un type et
d’un gain maximal (ou inférieur) approuvé pour l’émetteur par
Industrie Canada.
Dans le but de réduire les risques de brouillage radioélectrique à
l’intention des autres utilisateurs, il faut choisir le type d’antenne et
son gain de sorte que la puissance isotrope rayonnée équivalente
(p.i.r.e.) ne dépasse pas l’intensité nécessaire à l’établissement
d’une communication satisfaisante.
Le présent appareil est conforme aux CNR d’Industrie Canada
applicables aux appareils radio exempts de licence. L’exploitation
est autorisée aux deux conditions suivantes :
(1) l’appareil ne doit pas produire de brouillage, et
(2) l’utilisateur de l’appareil doit accepter tout brouillage radioélectrique subi, même si le brouillage est susceptible d’en compromettre le fonctionnement.
Page 37

37
Hereby, Widex A/S declares that this D-PA is in compliance with the essential requirements and other relevant
provisions of Directive 1999/5/EC.
A copy of the Declaration of Conformity can be found
at: http://www.widex.com/doc
Page 38

38
Electrical and electronic equipment (EEE)
contains materials, components and substances that can be hazardous and present
a risk to human health and the environment
when waste electrical and electronic equipment (WEEE) is not handled correctly.
Do not dispose of hearing aids, hearing aid accessories
and batteries with ordinary household waste.
Hearing aids, batteries and hearing aid accessories
should be disposed of at sites intended for waste electrical and electronic equipment, or given to your hearing care professional for safe disposal. Proper disposal
helps to protect human health and the environment.
Page 39

39
ADDITIONAL PROGRAM FORMS
Programs available in your hearing aid:
Program 1:
Program 2:
Program 3:
Program 4:
Program 5:
Special program:
Page 40

40
Programs available in your hearing aid:
Program 1:
Program 2:
Program 3:
Program 4:
Program 5:
Special program:
Page 41

41
Programs available in your hearing aid:
Program 1:
Program 2:
Program 3:
Program 4:
Program 5:
Special program:
Page 42

42
SYMBOLS
SYMBOLS
Symbols commonly used by Widex A/S in medical device
labelling (labels/IFU/etc.)
Symbol Title/Description
Manufacturer
The product is produced by the manufacturer whose
name and address are stated next to the symbol. If appropriate, the date of manufacture may also be stated.
Date of manufacture
The date when the product was manufactured.
Use-by date
The date after which the product is not to be used.
Batch code
The product’s batch code (lot or batch identification).
Catalogue number
The product’s catalogue (item) number.
Serial number
The product’s serial number.*
Keep away from sunlight
The product must be protected from light sources and/or
The product must be kept away from heat
Page 43

43
Symbol Title/Description
Keep dry
The product must be protected from moisture and/or
The product must be kept away from rain
Lower limit of temperature
The lowest temperature to which the product can be
safely exposed.
Upper limit of temperature
The highest temperature to which the product can be
safely exposed.
Temperature limits
The highest and lowest temperatures to which the product can be safely exposed.
Consult instructions for use
The user instructions contain important cautionary information (warnings/precautions) and must be read before
using the product.
Caution/Warning
Text marked with a caution/warning symbol must be
read before using the product.
WEEE mark
“Not for general waste”
When the product is to be discarded, it must be sent to
a designated collection point for recycling and recovery.
Page 44

44
Symbol Title/Description
CE mark
The product is in conformity with the requirements set
out in European CE marking directives.
Alert
The product is identified by R&TTE Directive 1999/5/EC
as an equipment Class 2 product with some restrictions
on use in some CE member states.
C-Tick mark
The product complies with EMC and radio spectrum
regulatory requirements for products supplied to the
Australian or New Zealand market.
Interference
Electromagnetic interference may occur in the vicinity of
the product.
*The six- or seven-digit number on the product is the serial number. Serial numbers may not always be preceded by
Page 45

45
Page 46

46
Page 47

47
Page 48

WIDEX A/S Nymoellevej 6, DK-3540 Lynge, Denmark
www.widex.com
É[5qr0w1|l;;a;k]
Manual no.:
9 514 0219 001 #04
 Loading...